1
Océ User Manual
Océ PRISMAproduction Server
Administration Settings and Tasks
Copyright
Copyright © 2001 - 2008 Océ
All rights reserved, including rights of translation, reprinting, reproduction by copying or
any other method, of this document as a whole or parts thereof. Offenders will be liable
for damages.
All rights, including rights created by patent grant or registration of a utility model or design,
are reserved.
Delivery subject to availability; right of technical modifications reserved.
All hardware and software names used are trademarks of their respective owners.
PRISMA®production and Océ CustomTone® are registered trademarks of Océ.
Adobe®, Acrobat®, Reader® and Distiller® are registered trademarks of Adobe® Systems
Incorporated.
PostScript® 3™ is a registered trademark of Adobe® Systems Incorporated.
Microsoft®, Windows®, Windows XP®, Windows Server 2003® are either registered
trademarks or trademarks of Microsoft® Corporation in the United States and/or other
countries.
Java™ and all Java-based trademarks are trademarks or registered trademarks of Sun® Microsystems, Inc. in the United States and other countries.
SUSE Linux Enterprise® is a registered trademark of Novell®, Inc.
For this product we also offer seminars at our International Training Center in Poing.
Information:
Phone +49 8121 72 3940
Fax +49 8121 72 3950
Océ Printing Systems GmbH
ITC
Postfach 1260
85581 Poing
Germany
Edition: 2008-10
Introduction to the Océ PRISMAproduction Server "Administration Settings and Tasks" Manual
Introduction to the Océ PRISMAproduction Server "Administration Settings and Tasks" Manual
This manual mainly addresses users who install, configure and administrate Océ
PRISMAproduction Server Server. It also covers the configuration of the POD-, APA-,
LCDS-, OLDS- and PCL-Module. In detail the following subjects are described in this
manual:
■
■
■
■
■
■
■
■
■
■
Installation of the Operation System and of Océ PRISMAproduction Server
Overview of the different user roles and permissions which are predefined in Océ
PRISMAproduction Server
Setup and configuration of the different POD-Module components (Unity, DPconnect,
Jobrequirement tool, PCL, TIFF, PPML converters)
Configuration of the LCDS-Module
Configuration of the OLDS-Module
Configuration of the PCL-Module
Description of all configuration interfaces in Océ PRISMAproduction Server
Description of the parameters of the Océ Custom Ticket (OCT)
Description of the different backup solutions for Océ PRISMAproduction Server
Integration of the Océ Document Designer in Océ PRISMAproduction Server
3
Contents
Contents
Chapter 1
Installation.........................................................................................................11
Installation of SUSE Linux: Overview.....................................................12
Installation of SUSE Linux: Preliminary Notes......................................13
Create Server Configuration Media........................................................15
Installation of SUSE Linux Enterprise Server 10 SP2............................18
Update of SUSE Linux Enterprise Server 10..........................................23
Configuration of SuSE Linux Enterprise Server 10...............................32
Security and Services..............................................................................39
Océ PRISMAproduction Server Installation/Deinstallation/Update.....45
Océ PRISMAproduction Server Licenses...............................................49
Change IP Address, Host and Domain Name........................................51
Modify Adaptec Bios Settings for older Tape Drives............................54
Chapter 2
Remote Access to the Océ PRISMAproduction Server 'Explorer'................55
Access with the 'Explorer' Launcher......................................................56
Chapter 3
User IDs and Access Rights.............................................................................61
User IDs and Access Rights.....................................................................62
Chapter 4
POD-Module Operation....................................................................................67
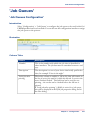
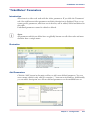
'Print File Manager'..................................................................................68
'Print File Manager' (PFM).................................................................68
'Unity'........................................................................................................75
'Unity': Overview................................................................................75
'Unity': User Resources and Fonts....................................................77
'Unity': Customizing for Specific Applications.................................82
'Unity': Color Separation...................................................................84
Workflow Extended AIMS Concept...................................................91
'Unity': Enhanced Functionality........................................................93
'Unity': Conversion.............................................................................94
'Unity': Troubleshooting....................................................................95
'Unity': Unity Plus (Graphic Arts_Plus).............................................96
'Unity': 'GetTiff-Service' Integration...............................................100
Jobrequirement......................................................................................101
Jobrequirement Functional Module...............................................101
PCL Converter.........................................................................................108
PCL Converter: Concept...................................................................108
4
Contents
PCL Converter: Fonts and Bin Control............................................111
PCL Converter: Saving Resources on Hard Disk............................113
PCL Converter: Operation................................................................119
PCL Converter: Conversion under Océ PRISMAproduction Server.124
PCL Converter: Troubleshooting.....................................................126
TIFF Converter........................................................................................130
TIFF Converter: Concept..................................................................130
TIFF Converter: Operation...............................................................132
TIFF Converter: Troubleshooting....................................................140
PPML Converter......................................................................................143
PPML Converter: Overview..............................................................143
PPML Converter - Workflow............................................................145
'DPconnect'.............................................................................................147
'DPconnect' Functionality................................................................147
'DPconnect' Configuration and Job Submission...........................153
'DPconnect' User Interface - Overview...........................................159
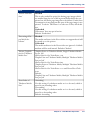
'DPconnect''Job Processing' Tab....................................................160
'DPconnect' Data Processing Mode Tab.........................................164
'DPconnect''Input Job Ticket Translation' Tab..............................172
'DPconnect''Barcode' Tab................................................................174
'DPconnect' Hints for using Ticket Templates...............................177
'DPconnect' Meaning of Job Ticket Template Entries...................178
'DPconnect' Configuration Example...............................................189
'DPconnect' Maintenance Programs...............................................193
'DPconnect' Appendix......................................................................196
Chapter 5
LCDS-Module Operation................................................................................213
LCDS-Module: 'New catalog'................................................................214
LCDS-Module: Organization of Resources...........................................215
LCDS-Module: 'LCDS Resources'..........................................................217
LCDS-Module: Stockset Configuration Tool........................................223
Chapter 6
PCL-Module Operation...................................................................................231
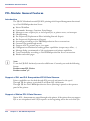
PCL-Module: General Features.............................................................232
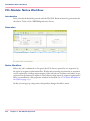
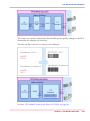
PCL-Module: Native Workflow..............................................................234
PCL Native Workflow in the PJM..........................................................237
PCL-Module: Syntax of the Native PCL Filter.......................................242
PCL-Module: Print Parameters..............................................................245
Chapter 7
Configuration .................................................................................................249
Overview and Usage of the Configuration Interfaces.........................250
Configuration Overview...................................................................250
General Usage of the Configuration Applications.........................256
5
Contents
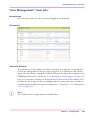
'User Management'................................................................................258
'User Management': Overview........................................................258
'User Management': LDAP Support................................................262
'User Management': 'User'..............................................................264
'User Management': 'User Info'......................................................269
'User Management': 'User Info' for 'operator' and 'applic'..........270
'User Management': 'User Permissions'........................................271
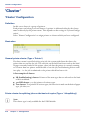
'Cluster'...................................................................................................276
'Cluster' Configuration.....................................................................276
'Logging'.................................................................................................278
'Logging'...........................................................................................278
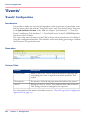
'Events'....................................................................................................280
'Events' Configuration......................................................................280
'System'...................................................................................................281
'System Configuration': Overview..................................................281
'System Configuration': ODS Parameter........................................282
'System Configuration': System and Job Parameter....................284
'System Configuration': eMail Notification....................................286
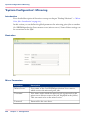
'System Configuration': Mirroring..................................................288
'System Configuration': LDAP Parameter......................................290
'System Configuration': 'Country Preferences'..............................293
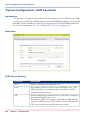
'System Configuration': 'Password'................................................295
'Devices'..................................................................................................298
'Devices' Configuration....................................................................298
'Devices' Configuration (APA / LCDS).............................................300
'Master/Slave'.........................................................................................301
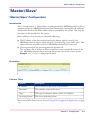
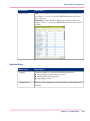
'Master/Slave' Configuration...........................................................301
Message System....................................................................................304
Message System: Overview............................................................304
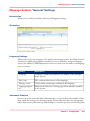
Message System: 'General' Settings..............................................305
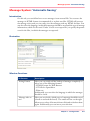
Message System: 'Automatic Saving'............................................307
Message System: 'Automatic Answers'.........................................309
Message System: 'Triggers' (Active Notification Interface)..........311
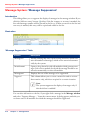
Message System: 'Message Suppression'.....................................312
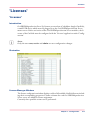
'Licenses'.................................................................................................313
'Licenses'...........................................................................................313
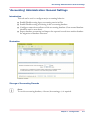
'Accounting'............................................................................................316
'Accounting' Administration: Overview.........................................316
'Accounting' Administration: General Settings.............................317
'Accounting' Administration: 'Database Permissions'..................320
'Accounting' Administration: 'Legacy-Files'...................................321
'Consumables'........................................................................................322
'Consumables' Configuration..........................................................322
'Backup/Restore'.....................................................................................327
6
Contents
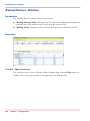
'Backup/Restore': Basic Concept.....................................................327
'Backup/Restore': Window...............................................................330
'Backup/Restore': Convert old Backups..........................................335
'Library paths'.........................................................................................337
'Library path configuration'.............................................................337
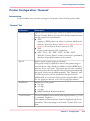
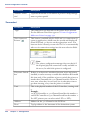
'Printers'..................................................................................................339
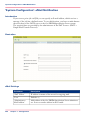
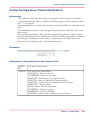
Printer Configuration: Overview.....................................................339
Printer Configuration: Add a new Printer.......................................342
Printer Configuration: 'Job Notification'........................................346
Printer Configuration: 'General'......................................................349
Printer Configuration: 'Print Parameter'.........................................352
Printer Configuration: Printer Drivers/Backends............................355
'IPDS Driver' (AFP2IPDS Backend)..................................................356
'Linedata Printer Driver' (LCDS)......................................................357
PostScript Backends (Xerox 6180, VP2110, VP61xx, OCE31x5, Canon
150, CPS700-900)..............................................................................360
Printer Configuration: Custom specific Infopages and Resources for
Configured Printers..........................................................................362
Printer Configuration: 'Job Queues'...............................................364
Printer Configuration: 'Cluster'........................................................365
Printer Configuration: Toner Stations.............................................366
Printer Configuration: 'Input Devices'.............................................367
Printer Configuration: 'Output Devices'..........................................368
Printer Configuration: 'Printer Notification'...................................369
Printer Configuration: 'Gray Curves'...............................................370
'Job Queues'...........................................................................................375
'Job Queues Configuration'.............................................................375
'FCB'.........................................................................................................378
'FCB' Configuration..........................................................................378
'LCDS Jobs'.............................................................................................379
Overview of LCDS-Module Processes............................................379
LCDS Parameter Configuration: Job Control Files (JCF)..............382
LCDS Parameter Configuration: 'LCDS Jobs' Window.................385
LCDS Parameter Configuration: Description of the JCF Parameters.....................................................................................................387
LCDS Parameter Configuration: Online Configuration.................403
LCDS Parameter Configuration: Special Functions and User
Scripts................................................................................................405
'Paper'......................................................................................................413
'Paper' Configuration Tool...............................................................413
'Ticket Rules'...........................................................................................416
'TicketRules': Introduction...............................................................416
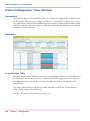
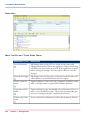
'TicketRules': Main Window............................................................418
'TicketRules': Definition of Rules.....................................................423
7
Contents
'TicketRules': Definition of Conditions, Settings, Messages and Return/Exit.............................................................................................425
'TicketRules': Parameters.................................................................429
'TicketRules': Variables....................................................................430
'TicketRules': Define Foreach Loop.................................................435
'TicketRules': Value Tables..............................................................437
'TicketRules': Save and Log.............................................................439
'TicketRules': Activate for LP, Download and HotDir....................440
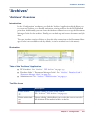
'Archives'.................................................................................................441
'Archives': Overview........................................................................441
'Archives': 'PFL Archives'.................................................................443
'Archives': 'Database Links' / 'Document Manager Cache'...........445
'Archives': 'Administration'.............................................................451
'Archives': Search Function.............................................................453
'Archives': Appendix........................................................................455
'Input Modules'.......................................................................................460
'Input Modules': Overview...............................................................460
'Download'........................................................................................474
'Download': Behavior in Error Situations.......................................484
'HotDir'..............................................................................................488
'HotDir': Behavior in Error Situations.............................................500
HotDirWinClient................................................................................504
'LP'.....................................................................................................508
'LP': Behavior in Error Situations....................................................525
LP Windows Client...........................................................................529
LP Windows Tools............................................................................531
Chapter 8
PJM Command Line.......................................................................................533
PJM Command Line Mode Overview...................................................534
PJM Command Line Parameters..........................................................536
Chapter 9
Océ Custom Ticket..........................................................................................547
Oce Custom Ticket.................................................................................548
Chapter 10
Workflows.......................................................................................................567
Workflow 'Tab Printing'.........................................................................568
3
Workflow UP I Devices..........................................................................571
Workflow 'Color Selection'....................................................................578
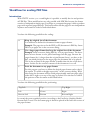
Workflow for scaling PDF files..............................................................581
Workflow Media Assignment to Printers.............................................583
Workflow LCDS......................................................................................586
Chapter 11
8
Contents
Backup Solutions............................................................................................589
Microlite BackupEDGE V2.1...................................................................590
BackupEDGE: Installation and Configuration.................................590
Connectivity to Océ PRISMAproduction Server............................592
Océ PRISMAproduction Server Backup (Additional Software)..........596
Océ PRISMAproduction Server Backup: Tasks and Components.596
Océ PRISMAproduction Server Backup: Installation and Workflows..................................................................................................599
Océ PRISMAproduction Server Backup: Command Line Client....603
Océ PRISMAproduction Server Backup: Glossary.........................623
Mirror Print Jobs....................................................................................625
Mirror Print Jobs: Introduction........................................................625
Mirror Print Jobs: Prerequisites and Functionality........................627
Mirror Print Jobs: Workflow............................................................629
Chapter 12
Océ Document Designer Integration in Océ PRISMAproduction Server...633
Océ Document Designer for Océ PRISMAproduction Server.............634
9
Contents
10
Chapter 1
Installation
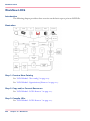
Installation of SUSE Linux: Overview
Installation of SUSE Linux: Overview
Introduction
The following chapters describe the installation of the operation system SUSE Linux
Enterprise Server 10 SP2, which is the basis for Océ PRISMAproduction Server Server
V4.0.
Installation Chapters
■
■
■
■
■
■
12
‘Installation of SUSE Linux: Preliminary Notes’ on page 13
‘Create Server Configuration Media’ on page 15
‘Installation of SUSE Linux Enterprise Server 10 SP2’ on page 18
‘Update of SUSE Linux Enterprise Server 10’ on page 23
‘Configuration of SuSE Linux Enterprise Server 10’ on page 32
‘Security and Services’ on page 39
Chapter 1 - Installation
Installation of SUSE Linux: Preliminary Notes
Installation of SUSE Linux: Preliminary Notes
Introduction
This chapter describes the prerequisites for the installation of the Linux operating system.
Attention:
BEFORE!!! installation of Océ PRISMAproduction Server V 4.0 or higher it is definitely
required to reinstall the print server operating System with SuSE Linux Enterprise Server
10 SP2 "Unattended Installation". Otherwise the Océ PRISMAproduction Server software
cannot be installed.
Installation Package for Linux
The installation package for LINUX contains the official DVD from Novell SUSE and
a Server-Configuration-CD, which contains the configuration floppies or files for all
recommended Fujitsu Siemens Servers (see ‘Create Server Configuration Media’ on page
15).
Alternatively to the installation DVD there are also 4 installation CDs attached.
Note:
The installation DVD and the installation CDs can only be used alternatively and not
in parallel for the same installation!
Hardware Requirements
■
■
A minimum of 1 GB MB RAM is required for installing and running Océ
PRISMAproduction Server in an productive environment. If the value is below this
limit, an error message is displayed.
The use of hard disks of at least 36 GB is required.
See the "Release Notes" for detauled requirements.
Enhanced Documentation
For details about making boot -, modules - and configuration floppies for the LINUX
system see file OCE-installation-readme.txt (English language) or OCE-installationliesmich.txt (German language) on the Server-Configuration-Floppy CD.
There are also Quick Guides (README for English language, LIESMICH for German
language) located on SUSE Linux Enterprise Server 10.
Chapter 1 - Installation
13
Installation of SUSE Linux: Preliminary Notes
Installation on non Océ certified Servers
On the Server-Configuration-Floppy CD you find images of Server-Configuration floppies
of the type "Generic". These images can be selected by the type of hard disk controller,
which is built into the system (please see installation readme files on the CD for further
details). For the installation of Linux itself please refer to the description below.
Cold Standby Rack (High Availability)
Installing or upgrading a Cold Standby Rack (2 identical servers with Common Hard
Disk Extension) requires additional configuration and hardware setup in order to realize
a working Master/Backup configuration.
A separate "Cold Standby Rack" CD with additional documentation for network setup
and UPS (Uninterrupted Power Supply) support is available at the Océ Software Support
department.
Note:
Please contact the Océ Software Support (Poing) before installation!
Points to consider BEFORE Installation
■
■
■
■
■
14
The unattended installation assumes that all servers are preconfigured according to
the Océ guidelines for customer use.
All servers with Mylex or LsiLogic Raid Controller MUST have at least two logical
disk drives configured. Otherwise the installation fails for a missing disk drive.
The size of the root file system (/) is 8GB, so the use of hard disks of at least 36 GB
is required. This ensures to have enough space left (min. 8 GB) for installing and
running Océ PRISMAproduction Server on the (/u) file system.
Ensure to have Legacy USB Support disabled in the BIOS settings of the server. This
will prevent the system from booting the License Dongle – it will fail, and the server
stops booting at all.
It is NOT allowed to have any USB storage devices connected to the server at installation time except the USB stick used for unattended installation.
Chapter 1 - Installation
Create Server Configuration Media
Create Server Configuration Media
Introduction
The Océ specific configuration will be made by a configuration file contained on a 3,5
inch floppy disk (both internal or USB floppies) or any USB stick.
The Server-Configuration-Floppy can be created on any PC running Linux or Windows.
Attention:
Installing the server using this configuration floppy will ERASE ALL DATA ON ALL
HARD DISKS!
Available Server Configuration Files
The names of the directories on the CD are created by using a prefix and a suffix.
The prefix is the exact type of the server and the second names the configuration of the
hard disks.
The Server Config Floppy Images are available for the following server hard disk configurations:
The suffix describes the used hard disk controller:
■
■
■
■
■
■
■
suffix: -1xscsi
One single SCSI hard disk is required (min 36GB).
suffix: -2xscsi
First hard disk for swap and root partition (min 18GB). Second hard disk for u-file
system (min 18GB).
suffix: -mylexraid (Mylex Raidcontroller)
First logical disk for swap and root partition. Second logical disk for u-file system.
suffix: -1xlsiraidraid (LsiLogic Raidcontroller)
First and only logical disk for all, swap, root and u partition. Root partition is 50GB
in size!!!!
suffix: -2xlsiraidraid (LsiLogic Raidcontroller)
First logical disk for swap and root partition. Second logical disk for u-filesystem.
suffix: -ide
Single IDE hard disk configured as Primary Master ist required (min 36GB).
suffix: -hpraid (HP Smart Array Controller)
First logical disk for swap and root partition Second logical disk for u-filesystem.
The generic types of the Floppy disk images are for installation of servers running Océ
PRISMAproduction Server 4.x, which are not officially supported by Océ. The suffix
describes the used hard disk controller in the same way as for the FSC servers. When using
Chapter 1 - Installation
15
Create Server Configuration Media
a floppy created for the wrong hard disk controller, the installation will fail with a message
of unsufficient hard disk space!
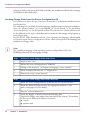
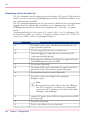
Creating Floppy Disks from the Server-Configuration CD
First you have to detect the type of server to be installed. The hardware installed must be
certified by Océ.
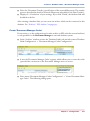
The disk images are available for multi-language installation and are located in subdirectories “de” for the German, “en” for the English, “nl” for the Dutch, “it” for the Italian,
“fr” for the French, “es” for the Spanish version. These directories contain subdirectories
for the different server types, which themselves contain the disk images and programs to
create floppy disks.
See also the file ’SLES-Installation-xxx.txt’ (’xxx’ represents the language, either English
or German) on the Server Configuration CD for a short description of the handling and
installation of floppy disks.
Note:
The installation language of the operating system is independent of the Océ
PRISMAproduction Server language settings.
#
Step
Actions to create floppy disks under Linux
1
Login as user ’root’.
2
Mount the Server-Configuration-CD-ROM.
3
Change to the directory '/<CD path:>/<language>/<server model>'.
4
Insert an empty disk into the 3,5" floppy drive.
5
Execute the script "create-linux.sh".
Step
Actions to create floppy disks under Windows
1
Insert the Server-Configuration-CD-ROM into the CD-ROM drive.
2
From the Windows Explorer select the appropriate folder in '\<CD
path:>\<language>\<server model>'.
3
Execute "create-windows.bat".
4
Verify the floppy, it should contain the following files:
(Mount the floppy using msdos filesystem and list the content. The number
of files can be different in different versions!!)
■ version
■ autoinst.xml
#
16
Chapter 1 - Installation
Create Server Configuration Media
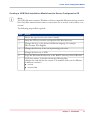
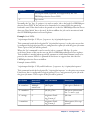
Creating a USB Stick Installation Media from the Server-Configuration CD
Note:
The USB stick must contain a Windows or Linux compatible filesystem and can contain
files. Only files named autoinst.xml or version must not be stored, as they will be overwritten!
The following steps will be required:
#
Step
Action
1
Detect the type of server you want to install.
2
Insert the CD in your drive and open the CD-Root directory.
3
Change directory to the desired installation language (for example:
DE=German, EN=English).
4
Change the directory to the one representing your server.
5
Change the directory to USB.
6
Copy the files from the directory to the ROOT directory of the USB stick.
7
Verify the content, it should contain the following files:
(Mount the stick and list the content. The number of files can be different
in different versions!)
■ version
■ autoinst.xml
Chapter 1 - Installation
17
Installation of SUSE Linux Enterprise Server 10 SP2
Installation of SUSE Linux Enterprise Server 10 SP2
Introduction
For preparing the installation and for the installation procedure the original DVD "SUSE
Linux Enterprise Server 10 SP2" and the configuration floppy (or the USB stick) for this
particiular server model will be required.
Note:
All preparation of hard disks regarding the partitions, as needed in SUSE Linux Enterprise
Server 10 SP1, are NOT needed anymore in SUSE Linux Enterprise Server 10 SP2.
Caution:
Installation of LINUX will definitely ERASE ALL DATA on the server!
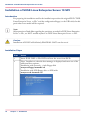
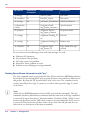
Installation Steps
#
18
Step
Action
1
Insert SUSE SLES 10 SP2 DVD and boot the server from DVD.
2
Select 'Installation' when the boot manager is displayed and enter one of the
additional boot options:
Installation with internal 3,5 inch floppy disk:
autoyast=floppy instmode=cd
Installation with USB floppy drive or USB stick:
autoyast=usb instmode=cd
Chapter 1 - Installation
Installation of SUSE Linux Enterprise Server 10 SP2
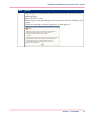
Step
Action
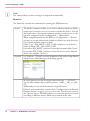
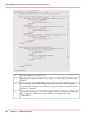
3
Depending on the installation method insert either the USB stick or the installation floppy.
Press <Return> to start.
When using certain hard disk types the system may detect by mistake a raid
system.
If this error message (see below) appears, you may ignore it.
Chapter 1 - Installation
19
Installation of SUSE Linux Enterprise Server 10 SP2
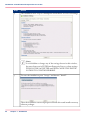
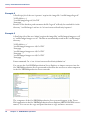
Step
Action
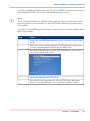
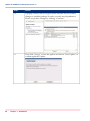
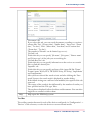
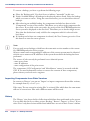
4
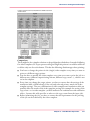
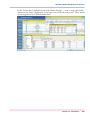
The installation now stops at a breakpoint which allows to review all settings.
Note:
It is forbidden to change any of the settings shown in this window,
because of an error in SUSE Linux Enterprise Server 10 these settings
WILL NOT BE ACCEPTED and WILL CAUSE THE INSTALLATION TO CONTAIN ERRORS!
5
To start the installation press "Accept" and button "Install".
Then the installation starts and prepares all hard drives and installs necessary
software packages.
20
Chapter 1 - Installation
Installation of SUSE Linux Enterprise Server 10 SP2
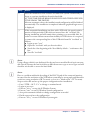
Step
Action
6
After the installation of the software is finished the system automatically reboots to continue installation from the hard disk.
AT THIS TIME PLEASE REMOVE ANY DVD AND THE FLOPPY/USB
STICK FROM THE DRIVES.
After an automatic reboot, the installation and configuration will be finished
automatically. The installation is completed when the graphical login screen
is displayed.
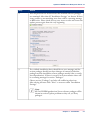
7
If the unattended installation was done with a USB stick, the partition information of this particular USB stick was inserted into the '/etc/fstab' file
during installation and will remain there pointing to an accessible disk. In
order to recreate full auto mount functionality for USB devices it is required
to remove the corresponding line of this USB stick from file '/etc/fstab' as
follows:
■ Login as user “root”
■ Open file '/etc/fstab' with you favorite editor
■ Search for a line beginning with '/dev/disk/by-id/usb....' and remove this
line
■ Save file '/etc/fstab'
Note:
Using a floppy which is not dedicated for the used server model will end up in an unusable system, because the low-level-drivers differ from server type to server type and will
therefore not be able to access the hard disks!
Note:
Due to a problem within the decoding of the DCC Signal of the connected monitor,
in some cases the resolution of the X-Window system may be wrong and could therefore
result in a wrong resolution (CRT screens) or even in a "black screen" (TFT screens).
Steps to solve this and set up the proper configuration after installation:
1. Press "CTRL - ALT - F2" to change to terminal mode
2. Login as user root
3. Execute "init 3" to stop the X-Window System
4. Execute "sax2" to start X-Window System configuration
5. Accept the automatic default or change configuration as needed
6. Finish setup and save the configuration
7. Execute "init 5" to start X-Window System again
Chapter 1 - Installation
21
Installation of SUSE Linux Enterprise Server 10 SP2
Default Network Settings
The unattended installation of LINUX configures the server with the following default
values, which have to be changed BEFORE connecting the server to the network:
■
■
Hostname: lx001234.ops.de
First network card: 192.168.10.50 / 255.255.255.0
To change these default settings, please refer to ‘Configuration of SuSE Linux Enterprise
Server 10’ on page 32 for details of how to configure the system properly.
22
Chapter 1 - Installation
Update of SUSE Linux Enterprise Server 10
Update of SUSE Linux Enterprise Server 10
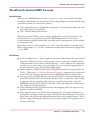
Introduction
The following chapter describes how to patch SUSE Linux or to update the operating
system to a higher service pack level.
Update of SUSE Linux Enterprise Server 10 with Océ Patch DVD
The patch DVD contains all available and well tested patches for the Linux operating
system SLES10, released by Novell. The focus of the tests are the packages installed with
an unattended installation and used in an Océ PRISMAproduction Server environment.
All packages which are released by Novell are contained, but not tested. Packages causing
errors in Océ PRISMAproduction Server will not be available for installation on the
DVD. It is recommended always to use the latest available patches.
Note:
ONLY install patch DVD for Service Pack 1 on Service Pack 1 installations, for Service
Pack 2 installations ONLY use the patch DVD for Service Pack 2 (and so on).
Note:
To install additional software packages on the Océ PRISMAproduction Server server
the YaST software installer will ALWAYS choose the latest version of the software
package. As the latest version is located on either the latest Patch DVD or on the installation DVD it is DEFINITELY REQUIRED to have at LEAST the original installation
DVD AND the latest Patch DVD available.
Note:
It is ABSOLUTELY REQUIRED to update the system always after any change of installed system packages. Océ PRISMAproduction Server Software may fail if you miss
the update at this time!
Note:
The installation of SUSE Linux Enterprise Server Service Pack 2 patches may need more
than one installation run to be finished. The second and following runs have to be
started manually as the tray icon shows. You should repeat this until the tray icon shows
green (only optional updates remaining – which you should not install – ) or shows a
globe which means, that all updates are installed.
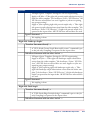
Installing SLES10 Patches from DVD
Chapter 1 - Installation
23
Update of SUSE Linux Enterprise Server 10
#
Step
Action
1
Insert the SLES 10 SP'X' DVD into the drive (X must be replaced by the
respective installed Service Pack Level).
Cancel any automatic action from the operating system!
2
Open YaST / Software / Patch CD Update.
3
Press "Next" to load all available updates. YaST automatically detects which
updates are installed on the system and which need to be installed, so there
is NO manual interaction needed to select updates. All security and recommended (bugfix) updates are selected automatically for ALL installed software
packages.
4
Press "Accept" to start the update.
5
On update of certain packages YaST will prompt an additional message for
explicit installation (for example system libraries, kernel) which must be
"accepted".
Note:
Some packages must be installed exclusively. In those cases only the
exclusive patches will be installed. Please repeat the update process
in order to install all other patches.
Note:
It is ONLY allowed to use the official Océ Patch DVDs to update
the system. If any other – even the official Novell update is used –
the mechanism of filtering patches will NOT work any more.
6
After the complete finish of the update a reboot of the system is required to
take all updates into effect.
Update of SUSE Linux Enterprise Server 10 to a Higher Service Pack Level
Novell releases Service Pack Versions of SUSE Linux Enterprise Server 10 on a regular
schedule. These Service Packs contain all bug fixes and corrections found before the release
of the corresponding Service Pack. Novell also decided to have all Service Pack levels to
be seen as different versions of SuSE Linux Enterprise Server. This means that patches
made for Service Pack version 1 WILL NOT install on Service Pack 2 version and vice
versa. As for this issue after the release of a new Service Pack all bugfixes will be released
for the latest and also the previous version of the Service Pack level. But the support of
the previous Service Pack level will terminate after some time, so that all users of SUSE
Linux Enterprise Server will have to update their systems to the latest Service Pack level.
24
Chapter 1 - Installation
Update of SUSE Linux Enterprise Server 10
In order to simplify installation issues the Service Pack DVD is also the latest version of
a full installation DVD to be used for full installation from scratch.
Note:
There is NO possibility for an UNDO of this upgrade. If there is an absolute need to
have the previous version installed, it is necessary to fully install the previous version
from scratch!
To update an Océ PRISMAproduction Server to the latest Service Pack level please follow
these steps carefully:
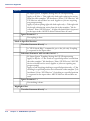
#
Step
Action
1
Prepare the Océ PRISMAproduction Server system for a reboot of the
system.
2
Reboot the server and insert the latest SUSE Linux Enterprise Server
10 Service Pack Installation DVD into the DVD drive.
3
Boot from DVD and choose menu item “Installation”, do not enter
any options and boot the server.
4
Choose the language and click “Next”.
5
Accept the License Agreement for Novell SUSE Linux Enterprise
Server 10 selecting check box “Yes” and click on button “Next”.
Chapter 1 - Installation
25
Update of SUSE Linux Enterprise Server 10
Step
Action
6
After scanning and analyzing the computer for all installed hardware
and installed operating systems select Installation Mode “Update” and
click “Next”.
7
Now a list of installed operating systems is shown, and there must be
a single item “SUSE Linux Enterprise Server 10” which is highlighted
automatically, click “Next” to continue.
Note:
If there are mount points specified in the '/etc/fstab' file which
are NOT accessible (for example a removable storage device)
an error message window occurs. Please ensure that there is
no problem with the server and the missing storage device is
not necessary.
If there is no problem, please press button “continue” to continue with the update.
If there is ANY problem here, choose “cancel”, cancel the
whole update process and fix the problem within '/etc/fstab'
file first and then restart the update.
26
Chapter 1 - Installation
Update of SUSE Linux Enterprise Server 10
Step
Action
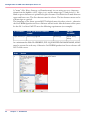
8
Now all partitions are mounted and the installed software packages
are examined. After that all “Installation Settings” are shown. If there
is any conflict or not matching issue there will be a warning message
in RED color. Please check for any error issues to solve and restart the
update process again from the very beginning.
9
For a default installation there should be no error message and the
section packages should just show changes of removal of obsolete
packages and the installation of new packages needed (also to satisfy
new dependencies). If there is an error in section software there will
be a warning message for section “Packages”.
Choose section “Packages” and solve all conflicting selections.
After solving all issues click “Next” to return to main “Installation
Settings”.
Note:
All Océ PRISMAproduction Server software packages will be
shown in section Update problems as they are 3rd Party
packages!
Chapter 1 - Installation
27
Update of SUSE Linux Enterprise Server 10
28
Step
Action
10
A popup window will now appear which informs about automatic
changes to installed packages in order to satisfy new dependencies.
Please accept these changes by clicking “Continue”.
11
Now click “Accept” to start the update and choose “Start Update” to
confirm again the Update.
Chapter 1 - Installation
Update of SUSE Linux Enterprise Server 10
Step
Action
12
Now all installed SUSE Linux Enterprise Server packages will be updated to the latest Service Pack Level. The update will run completely
automatically and reboot the server again to boot into the new kernel
and environment.
Chapter 1 - Installation
29
Update of SUSE Linux Enterprise Server 10
30
Step
Action
13
After the reboot, the system will automatically boot into the installation
system to continue the installation process.
At the next manual interaction point the window “Test Internet
Connection” will be displayed. Choose selection “No, Skip This Test”
and click “Next” to continue (if choosing to do this test, the server will
try to connect to the Internet and to reach Novell websites. If the DIRECT connect is not possible it will take about two minutes to timeout
and to continue.
14
Now the installation process “writes the system configuration” and
after that the “Release Notes” of the new Service Pack Level of the
operating system are shown. Please click “Next” to continue.
Chapter 1 - Installation
Update of SUSE Linux Enterprise Server 10
Step
Action
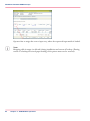
15
Last, the “Installation Completed” window is shown. Please disable
the check box “Clone This System for Autoyast” and click “Finish” to
boot into the upgraded system.
Note:
If additional software is installed by the customer this behavior can be different to what
is described in this document, and can require additional actions to upgrade customer
software as well. But it is NOT possible to have any information or documentation here
for any of these issues.
Chapter 1 - Installation
31
Configuration of SuSE Linux Enterprise Server 10
Configuration of SuSE Linux Enterprise Server 10
Introduction
The following chapter explains basic configuration settings for the Linux system like the
configuration of the network and the setting of date and time.
Attention:
If the files for the network configuration are not edited properly services may NOT start
and the system will NOT work properly!
Attention:
All configuration items regarding the system MUST be done using YaST control center
when possible.
Attention:
After the configuration of the network a reboot of the server is definitely required!
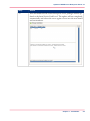
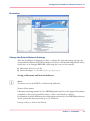
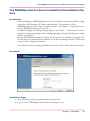
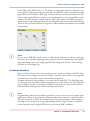
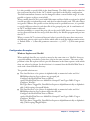
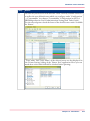
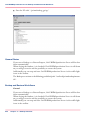
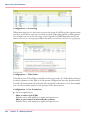
Note:
The SuSE Linux Enterprise Server Administration and Configuration Guide is automatically installed for extended documentation of the system. To access it, please open item
"SuSE-Help" / "SuSE- Hilfe" in the start menu. Then choose ’SLES Admin Guide’:
32
Chapter 1 - Installation
Configuration of SuSE Linux Enterprise Server 10
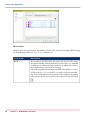
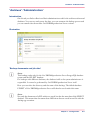
Illustration
Change the Default Network Settings
After the installation is finished, you have to change the network settings, because the
unattended installation of LINUX configures the server with the following default values,
which have to be changed BEFORE connecting the server to the network.
■
■
Hostname: lx001234.ops.de
Network adapter 1: 192.168.10.50 / 255.255.255.0
Setting of Hostname and Network Addresses
Note:
You must not use the DHCP to add network addresses!
Syntax of host names:
Like many operating systems do, Océ PRISMAproduction Server also supports hostnames
compliant to the syntax specified in rfc952, rfc810 and rfc608 (see below).
In expansion to the rfc definitions the string length restriction for Océ PRISMAproduction
Server systems has been increased up to 32 characters.
Excerpt of rfc952, rfc810 and rfc608:
Chapter 1 - Installation
33
Configuration of SuSE Linux Enterprise Server 10
A "name" (Net, Host, Gateway, or Domain name) is a text string up to 24 characters
drawn from the alphabet (A-Z), digits (0-9), and the minus sign (-) and period (.). No
blank or space characters are permitted as part of a name. No distinction is made between
upper and lower case. The first character must be a letter. The last character must not be
a minus sign or a period.
The hostname of the Linux system MUST definitely meet the above criteria - otherwise
the Océ PRISMAproduction Server Software will not work. Also the format of the syntax
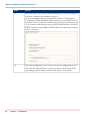
for the file '/etc/hosts' MUST meet the following requirements (see example):
#
IP-ADDRESS
FULL QUALIFIED DOMAINNAME
ALIAS
[MORE
ALIASES]
192.168.10.50
lx001234.ops.de
lx001234
alias2 alias3
alias4
As a minimum the fields IP-ADDRESS, FULL QUALIFIED DOMAINNAME, ALIAS
must be present for each entry. Otherwise Océ PRISMAproduction Server software will
NOT work correct.
#
34
Step
Action
1
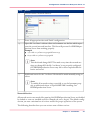
Login as root and open YaST Control Center.
Chapter 1 - Installation
Configuration of SuSE Linux Enterprise Server 10
Step
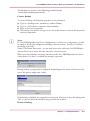
Action
2
Choose section ’Network Devices’.
3
Enter all appropriate data and ’finish’ configuration.
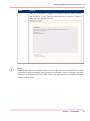
4
Open file '/etc/hosts' with an editor and comment out the line which represents the second network interface. This line will prevent Océ PRISMAproduction Server from working properly.
Example
■ 192.168.10.50 lx001234.ops.de lx001234
■ #192.168.20.50 lx001234.ops.de
Note:
This check and change MUST be made every time the network settings are changed! If the file '/etc/hosts' is not properly configured,
Océ PRISMAproduction Server may fail or show unpredictable behavior and errors!
5
Additional entries for the '/etc/hosts' file should be made manually using an
editor.
Note:
To enable all network settings, especially to set the hostname properly an additional reboot is required BEFORE installing Océ
PRISMAproduction Server.
Network Services
All network services not needed for running Océ PRISMAproduction Server are disabled
by default or even not installed at all (for example rsh, rexec, rlogin). The default configuration just runs a minimal set of services needed for proper operation of the system.
The following describes how you can activate some of these services.
Chapter 1 - Installation
35
Configuration of SuSE Linux Enterprise Server 10
Configuring the Default ftp Server "pure-ftpd" for root Access
This configuration is NOT included within YaST and have to be done by an editor.
Configuration file is
■
■
■
First edit the file '/etc/pure-ftp/pure-ftpd.conf' and set the value MinUID 100 to 0:
# Minimum UID for an authenticated user to login.
MinUID 100 -> change to 0
Then edit the file '/etc/ftpusers':
comment the entry "root" by the "#" sign
'Postfix'
'postgres'
'# root'
'sapdb'
Finally reboot the server
Remote Access with ssh
For remote access to the server use the ssh protocol (128 bit encrypted connection). This
service is enabled as default.
Configuring the Samba Server
The Samba Server can be configured using the SuSE configuration tool YaST. The only
exception is to add "Samba only user" to the system. This must be done using the command "smbpasswd". Please see the "SuSE Admin Guide" for further details.
Enable telnet and rsh Services
This services will be configured in the xinet.d configuration (YaST -> 'Network Services'
-> 'Network Services (inetd)' )
To get root access to telnet, add allowed terminal devices to '/etc/securetty', one per line.
Telnet terminals are pts/1, pts/2 a.s.o.
Open a Program with root Privileges in KDE Environment
Use 'kdesu <program>'.
Modifying Other Settings After Installation
Keyboard:
#
36
Step
Action
1
Login as root.
Chapter 1 - Installation
Configuration of SuSE Linux Enterprise Server 10
Step
Action
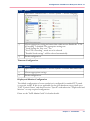
2
Open YaST Control Center -> section 'System' -> section 'Language'.
3
Choose appropriate setting and ensure that within section Details the "UTF8 Encoding" is disabled! The appropriate settings are:
"Local Settings for User root": Yes
"Use UTF 8 encoding": needs not to be selected
"Detailed Local settings": will be selected automatically
4
Finish configuration.
Timezone Configuration:
#
Step
Action
1
Open YaST Control Center -> section 'System' -> section ’Date and Time'.
2
Choose appropriate settings.
3
Finish configuration.
Display and Monitor Configuration
The default configuration of screen resolution is configured for standard TFT panels
(1024x768, 60Hz). If this is not applicable for the given hardware setup, please open
"YaST Control Center" and choose section "System" with subsection "Graphiccard and
Monitor" to setup required configuration.
Please see the "SuSE Admin Guide" for further details.
Chapter 1 - Installation
37
Configuration of SuSE Linux Enterprise Server 10
Adding Computers to an Océ PRISMAproduction Server Cluster
After a successful installation of the system, you can add other servers to build up a cluster.
To do this use the ’Master/Slave’ application in the ’Configuration’ menu of the Océ
PRISMAproduction Server 'Explorer'.
Before adding a server you have to check the following:
■
■
■
The IP address of the first network card is the address, which is used by Océ
PRISMAproduction Server (check this with '/etc/sysconfig/network/ifcfg-eth-id-<macaddress>'). This address must be accessible in the Océ PRISMAproduction Server
network.
Job acceptation and job processing must be switched off.
The 'etc/hosts' file of all servers (Master and Slaves) must contain all servers of the
Océ PRISMAproduction Server network. Please take care for the correct syntax:
Example: '160.120.20.111 charly.ops.de charly'
Note:
With SuSE Linux the Printer Spooler System "CUPS" is installed as a system requirement.
The complete system is unconfigured and the service is disabled by default. Configuring
or using the "CUPS" Printing software WILL DAMAGE AN INSTALLED Océ
PRISMAproduction Server installation which may remain unusable! Therefore it is
strictly FORBIDDEN to configure or use "CUPS".
38
Chapter 1 - Installation
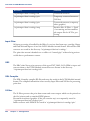
Security and Services
Security and Services
Introduction
The Linux for Océ PRISMAproduction Server security concept has changed to be much
more secure = restricted.
The following services are not enabled anymore as default:
■
■
Samba Server (DO a FULL Configuration before enabling!)
By default root access to the server is disabled using the FTP protocol. After installing
Océ PRISMAproduction Server, the Océ PRISMAproduction Server users and any
additional users created are able to access the server using ftp.
Note:
The write access is restricted to those directories, for which the user is granted write access
by the file system.
The following services are not installed anymore Apache Webserver (MUST NOT BE
INSTALLED!):
■
■
■
RSH server
RLOGIN server
REXEC server
These services can be manually installed using YaST configuration tool, section "Software",
subsection "Install/Remove Software" if absolutely needed. It is not recommended to use
any of these services for security reasons!
To enable the services use YaST section "Network Services" subsection "Network Services
(xinetd)".
To see, which ports are opened, please login as root and enter one of the following commands:
'netstat -anp | grep LISTEN'
'lsof -i | grep LISTEN'
See also: ‘Configuration of SuSE Linux Enterprise Server 10’ on page 32
Note:
The inetd daemon is enabled by default after installing Océ PRISMAproduction Server.
Disabling the xinetd daemon is forbidden, as it is a basic service required to run Océ
PRISMAproduction Server or newer.
Chapter 1 - Installation
39
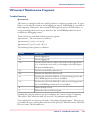
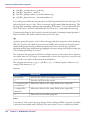
Security and Services
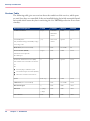
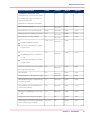
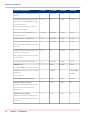
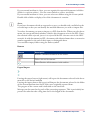
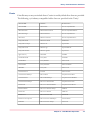
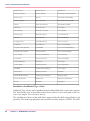
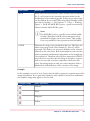
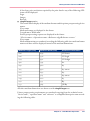
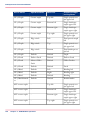
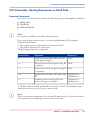
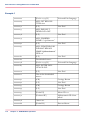
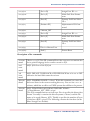
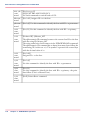
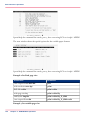
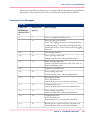
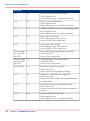
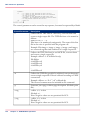
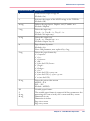
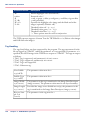
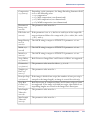
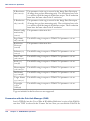
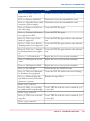
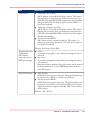
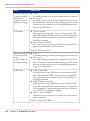
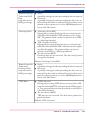
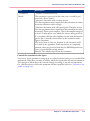
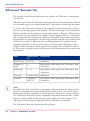
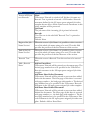
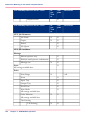
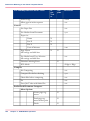
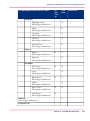
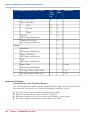
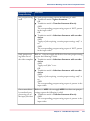
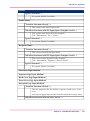
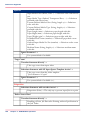
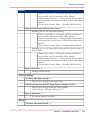
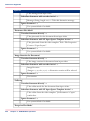
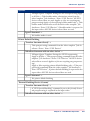
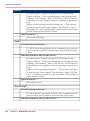
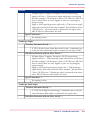
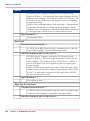
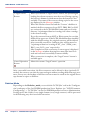
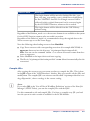
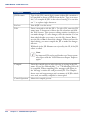
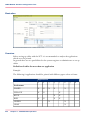
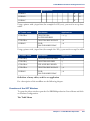
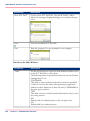
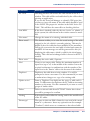
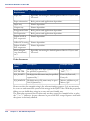
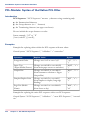
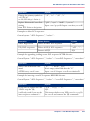
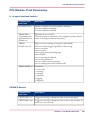
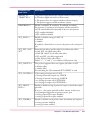
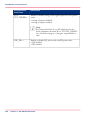
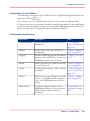
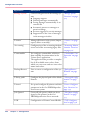
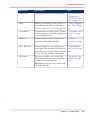
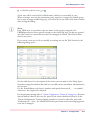
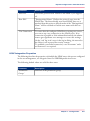
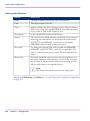
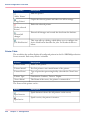
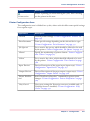
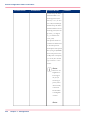
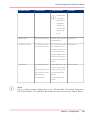
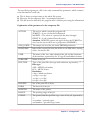
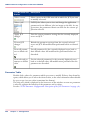
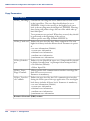
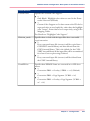
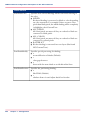
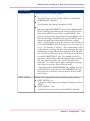
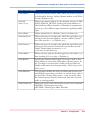
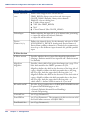
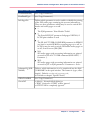
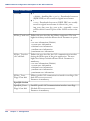
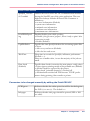
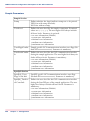
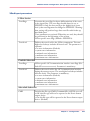
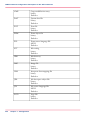
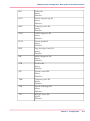
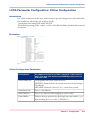
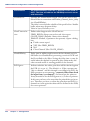
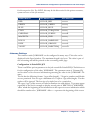
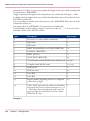
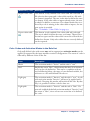
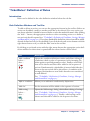
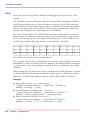
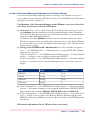
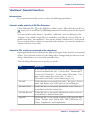
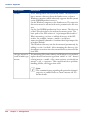
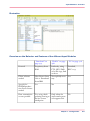
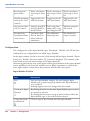
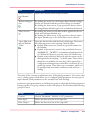
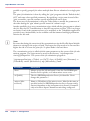
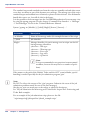
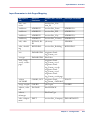
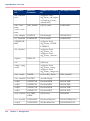
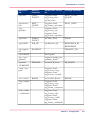
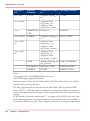
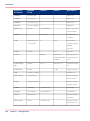
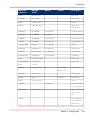
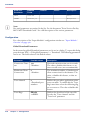
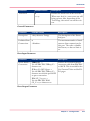
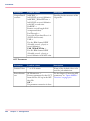
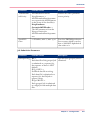
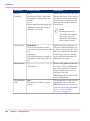
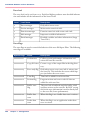
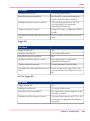
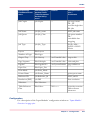
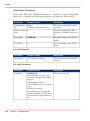
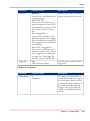
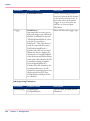
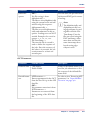
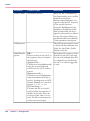
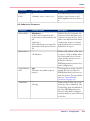
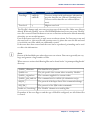
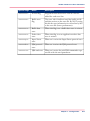
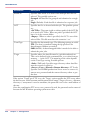
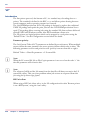
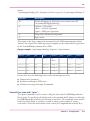
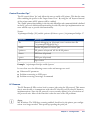
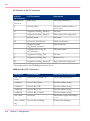
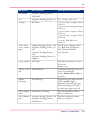
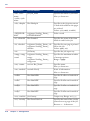
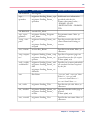
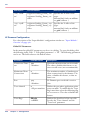
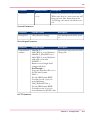
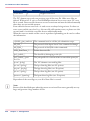
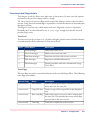
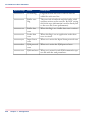
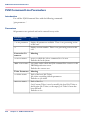
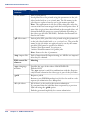
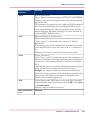
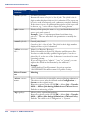
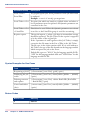
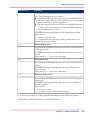
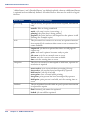
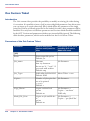
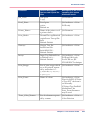
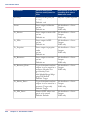
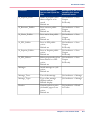
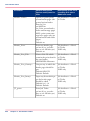
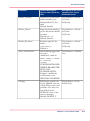
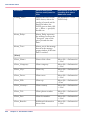
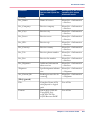
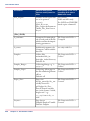
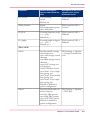
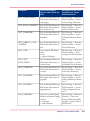
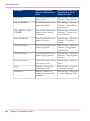
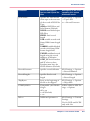
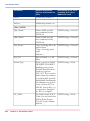
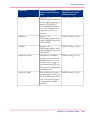
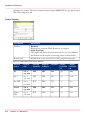
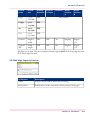
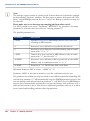
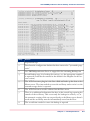
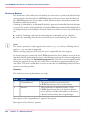
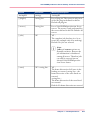
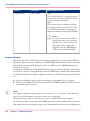
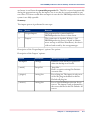
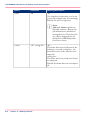
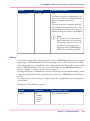
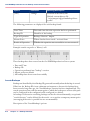
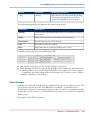
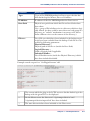
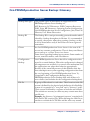
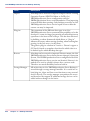
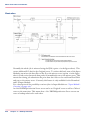
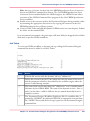
Services Table
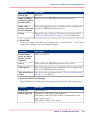
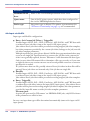
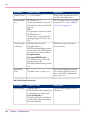
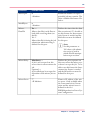
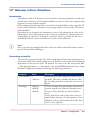
The following table gives an overview about the condition of the services, which ports
are used, how they are controlled, if they are installed during the initial unattended installation and which status they have concerning the Océ PRISMAproduction Server functionality:
#
Service Description
Port#
Control
Status
Default
CodeMeter WebAdmin
22350
Code Meter
needed
started
optional
NI
YaST
not available
NI
no port
YaST
needed
started
21
YaST
optional
started
8080, 1099
PP internal
needed
started
YaST
not available
started
Web Admin
software
Cold StandbyServer
3052
Only installed if running a Cold Standby configu-
USV control
software
ration using a USV
HTTP Server (must not be installed!)
Internet Daemon (INETD)
OP: Basic IP service dispatcher
PP: ODS, Spool
Internet File Transfer Protocol server (FTP)
OP: Common service to share files over the Internet
PP:
■
Run Unity Rip at a Windows system
■
File transfer via ftp into a hot folder (HotDir)
■
DPconnect with Xerox Client Software
JBOSS
LDAP Server (must not be installed!)
Mail Transfer Agent
25
YaST
usable
closed
NFS Server
955(udp)
YaST
usable
closed
YaST
usable
closed
958(tcp)
OP: X-Windows
40
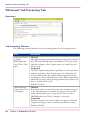
Chapter 1 - Installation
6000
Security and Services
Service Description
Port#
Control
Status
Default
OpenSSH Secure Shell Daemon (SSH)
22
YaST
usable
started
needed
started
needed
started
needed
started
needed
started
needed
-
needed
started
needed
started
needed
started
OP: Provides access to a remote system. It replaces
(not installed) telnet, rlogin, rexec and rsh with
encrypted communications.
PP: Run Xerox or small printers with PS-LPR
PP: Account Server (accserv)
1203
PP: Communicator execution deamon (exed)
flexible
PP: Explorer Server Control during start and stop
1208
PP: Internal spool access service (libspld)
651
PP:
32768 - 65536
■
Java RMI (established connection)
■
Access for java clients (Explorer, Launcher)
PP internal
PP internal
PP internal
PP internal
PP internal
to Explorer server
PP:
■
1206
PP internal
Java RMI Registry (listener to initialize connection)
■
Access for java clients (Explorer, Launcher)
to Explorer server
PP: Java Server interface Access for non java clients
1207
PP internal
(for example PJM commandline)
PP: LCDS (SCT)
1500
PP: MessageWindow <-> message daemon (msgs)
1209
PP internal
needed
started
PP: Online Help Server Port is opened while using
1210
PP internal
needed
started
1200
PP internal
needed
started
1201
PP internal
needed
started
PP: Receive line printer data send via lpr (lpd)
515
PP
optional
closed
PP: Receiving jobs send via download (downloadd)
1025-65536
PP
optional
closed
PP internal
the online help window
PP: Order Distribution System ODS: Internal
communication (odsnetm)
PP: PJM Server (pjmdm) Explorer server, Spool
<-> ODS
Only the configured ports are opened.
Chapter 1 - Installation
41
Security and Services
Service Description
Port#
Control
Status
Default
PP: ResMng GUI <-> Communicator (Resource
1555
PP internal
needed
started
161-162
PP
needed
started
6201-6216
PP internal
optional
closed
PP: Spool-Daemon <-> ODS (splsocd)
1300
PP internal
needed
started
PP: Web Server (HTTP) Access for java clients
80
PP internal
needed
started
8000
PP
optional
closed
5433
PP internal
needed
started
YaST
needed
started
-
YaST
-
not configured
Remote Administration (VNC-Server)
5901
YaST
usable
closed
Remote Execution server (Rexec)
512
YaST
usable
NI
513
YaST
usable
NI
Manager)
PP: Simple Network Management Protocol (snmp) Interface for read/write PRISMA configuration and job parameters
Planned to become closeable via configuration
PP: Oce post script driver
PP: sna2tcp <-> li in id-mode (LU6.2) - not
available at the moment
(Explorer, Launcher) to Explorer server for loading
java classes
PP: Mirror daemon is needed to be able to receive
Data files on the mirror server.
Only running when Interconnectivity License exists on the server.
PP: Postgres database for Print File Library
PRISMA_Server
PP: General PRISMA startup. Please do not alter
Proxy Server (configure a Proxy Server for KDE
applications)
Not a local service
OP: Remote execution facilities with authentication based on user names and passwords.
PP: Not used
Remote Login server (Rlogin)
OP: Remote login facility with authentication
based on privileged numbers from trusted hosts.
PP: Not used
42
Chapter 1 - Installation
Security and Services
Service Description
Port#
Control
Status
Default
Remote Shell server (Rshell)
514
YaST
usable
NI
111
YaST
needed
started
Samba (Windows File Server smbd)
137 138 139
YaST
optional
not started
OP: SMB server for network services to SMB
445
3173
Command Line
optional
NI
23
YaST
usable
NI
TFTP Service
YaST
not available
NI
WOL (Wake On Lan)
YaST
usable
not configured
OP: remote execution facilities with authentication
based on privileged numbers from trusted hosts.
PP: Print File Manager PFM (PP V3.00 only)
Some specific "DocuTech" features
RPC portmapper
OP: Convert RPC program numbers into DARPA
protocol port numbers. Used by networking clients
like NFS or NIS
clients including MS Windows, OS/2, Linux
PP: Audit/NT -RIP
ServerView RAID Manager
Only available if hardware RAID controller is installed in the server
Telnet Protocol Server
OP: The DARPA telnet interactive communication protocol
PP: Not used
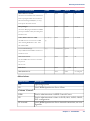
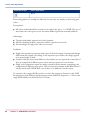
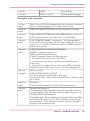
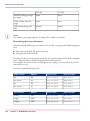
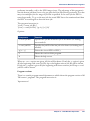
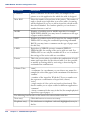
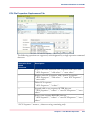
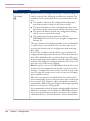
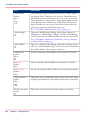
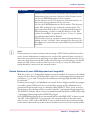
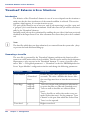
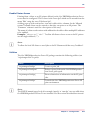
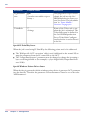
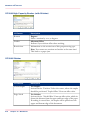
Abbreviations:
#
Abbreviation
Description
OP:
Operating System
PP:
Océ PRISMAproduction Server Client
Column 'Control':
KDE:
Service administration via KDE Control Center
PP:
Service administration is done via POD, APA, LCDS, OLDS,
PCL configuration
PP internal:
Océ PRISMAproduction Server internal connection, not configurable
Chapter 1 - Installation
43
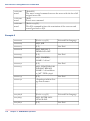
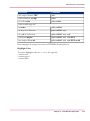
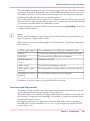
Security and Services
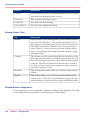
Abbreviation
Description
Column 'Status':
needed:
Service is needed for basic functions and can not be closed
not available:
Must not be used
optional:
Service used for specific Océ PRISMAproduction Server features
only
usable:
Can be used if required, it must be installed, configured and/or
started
Column 'Default' describes the Status after installation (OS and PP):
44
NI
Not installed per unattended installation
closed:
Closed service
configured:
already configured service
not configured:
no configuration is done during installation
not started:
service in inactive
started:
service is running
Chapter 1 - Installation
Océ PRISMAproduction Server Installation/Deinstallation/Update
Océ PRISMAproduction Server Installation/Deinstallation/Update
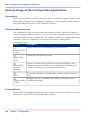
Introduction
Before installing Océ PRISMAproduction Server, the Linux server has to be fully configured (above all: Hostname, IP address and network). The installation of Océ
PRISMAproduction Server has to be done with the "install.prisma" script delivered on
the Océ PRISMAproduction Server CD.
Installation changes (including "Package update" and "Undo ...") will cause loss of configuration settings (depending on the exchanged packages). So please backup your configuration settings first!
During the installation/update procedure, the licenses are not checked or changed. New
licenses have to be entered after installation via the license manager window. The licenses
are part of the configuration backup.
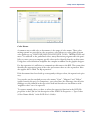
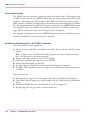
The information shown during installation is intuitive. Please follow these instructions.
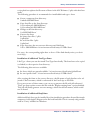
Illustration
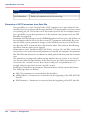
Installation Steps
1. Stop all printing, converting and transmission processes.
2. Log out of Océ PRISMAproduction Server and login as root.
Chapter 1 - Installation
45
Océ PRISMAproduction Server Installation/Deinstallation/Update
3. Save the Océ PRISMAproduction Server configuration using the 'Backup/Restore' application under 'Configuration' in the Océ PRISMAproduction Server 'Explorer' (see
‘'Backup/Restore': Window’ on page 330).
Close the 'Explorer' window when backup is finished.
Note:
Perform this action only if want to keep the configuration of the currently installed version.
Note:
All servers of the Océ PRISMAproduction Server cluster have to be up and running as
the backup is automatically done for the whole cluster. If a Windows computer running
the UnityRIP is part of the cluster, you have to shut it down and disconnect it before
backup creation.
4. Installation/Update/Undo/Uninstallation
Installation from the Océ PRISMAproduction Server release DVD:
■ Insert the Océ PRISMAproduction Server DVD. The DVD is mounted automatically.
■ Change to the DVD directory (which is located at path '/media/<DISK-ID>').
■ Execute './install.prisma'.
■ Select "Installation" from the menu.
■ After the installation is finished, execute "cd /" (otherwise the umount command will
not work).
■ Unmount the DVD with 'umount /media/<DISK-ID>' (if the auto-open feature of
the DVD is disabled, all disks will be mounted anyway but there will be no notification.
But the path '/media/<DISK-ID>' will be created in any case).
Installation from hard disk:
■ Copy all files provided to an empty directory.
■ Execute 'cd <directory>'.
■ Execute 'install.prisma'.
■ Select "Installation" from the installation dialog.
Installation of AddOn packages
■ Change to the DVD directory.
■ Execute 'install.prisma'.
■ Select "Installation of AddOn packages " from the menu.
■ Select the desired packages in the list of available AddOn packages.
Update
■ Execute 'install.prisma'.
■ In the installation dialog, the version which is actually installed and the source for the
update installation are displayed below the title line.
46
Chapter 1 - Installation
Océ PRISMAproduction Server Installation/Deinstallation/Update
■
Select "Update" to open a new screen and choose one of the following possibilities:
Update new packages:
Only new packages or higher versions will be installed.
Update all packages:
All available packages will be exchanged, including older/identical versions.
Note:
Update is not possible between V3 and V4.
Undo (rollback of latest Océ PRISMAproduction Server Update)
■ Execute 'install.prisma'.
■ Select "Undo" from menu.
Uninstallation:
■ Execute 'install.prisma'.
■ Select "Uninstallation" from the installation dialog.
5. Define the Océ PRISMAproduction Server cluster
Note:
Only necessary if the Océ PRISMAproduction Server cluster consists of more than one
server.
Enter the Océ PRISMAproduction Server slave server IP addresses In the 'Master/Slave'
application under 'Configuration' in the Océ PRISMAproduction Server 'Explorer' (see
‘'Master/Slave' Configuration’ on page 301).
6. Import Océ PRISMAproduction Server licenses
■ Connect the CodeMeter license dongle to the system.
■ Open the 'Licenses' application under 'Configuration' in the Océ PRISMAproduction
Server 'Explorer' (see also ‘'Licenses'’ on page 313).
■ Assign each available license to the server(s) by double clicking the respective cell in
the server column and selecting the number of licenses from the drop down list.
7. Restore Océ PRISMAproduction Server configuration using the 'Backup/Restore' application under 'Configuration' in the Océ PRISMAproduction Server 'Explorer' (see
‘'Backup/Restore': Window’ on page 330).
Note:
Only necessary if you want to use the configuration of a previous installed version.
Note:
Restore only works, if the same number of servers are defined inside the cluster and at
least the same number of valid licenses are configured.
Chapter 1 - Installation
47
Océ PRISMAproduction Server Installation/Deinstallation/Update
Note:
Session files (contain stored sessions, suffix .psn in the directory '/u/prismapro/data/shared/') are not part of the 'Backup/Restore' component. They have to be saved
manually.
48
Chapter 1 - Installation
Océ PRISMAproduction Server Licenses
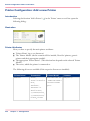
Océ PRISMAproduction Server Licenses
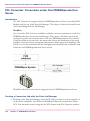
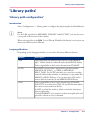
Introduction
Océ PRISMAproduction Server V4.0 licenses are stored in a CodeMeter dongle (CmStick)
, a small USB device which must be plugged-in at the Océ PRISMAproduction Server
master server.
The license dongle is not used during Océ PRISMAproduction Server installation.
Therefore almost all Océ PRISMAproduction Server packages will be installed but must
be activated by importing the licenses immediately after the installation process.
After installation use the license manager within the Océ PRISMAproduction Server
'Explorer' to install all licenses from the dongle. Login as user root, service or admin and
select the menu item 'Configuration' -> 'Licenses' in the 'Explorer' window. If a new license is added, the product will be available after logout and relogin. You can also import
all licenses for all slave computers in the cluster on the master. Before you do so you have
to configure all slaves on the master.
Exceptions for separate software CD's including additional license:
■
■
Third party backup software Microlite BackupEDGE
Océ Document Designer Advanced
Océ License Manager
Before the licenses of the Océ PRISMAproduction Server modules can be activated, the
CmStick has to be configured unsing the configuration application "Licenses" in the Océ
PRISMAproduction Server 'Explorer'.
See: ‘'Licenses'’ on page 313
License or Dongle Update
The system detects a dongle update or exchange. In case all assigned licenses are fitting
to the new dongle context, the configuration is automatically updated. Otherwise a new
configuration must be created by using the menu entry 'Edit' -> ' Reconfiguration' in
the License configuration application.
The CodeMeter software is installed as a part of the Océ PRISMAproduction Server installation.
To update or add new licenses you have to perform the following steps:
Chapter 1 - Installation
49
Océ PRISMAproduction Server Licenses
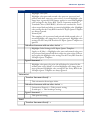
#
50
Step
Action
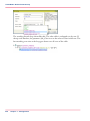
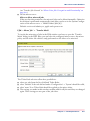
1
In the main KDE menu go to 'System' and open the 'CodeMeter Control
Center'.
2
Select the tab 'Licensing'.
3
Click on the button 'Execute Update'. With this option you can add new
licenses or update the existing licenses content.
4
Select the update file (with the same or similar file name) and click 'Open'.
5
Exit the CodeMeter Control Center ('File'-> ' Quit')
6
Open the Océ PRISMAproduction Server 'Explorer' and then 'Configuration'
-> 'Licenses'.
7
Perform the license assignment as described in ‘'Licenses'’ on page 313.
After this action you can work with Océ PRISMAproduction Server.
Chapter 1 - Installation
Change IP Address, Host and Domain Name
Change IP Address, Host and Domain Name
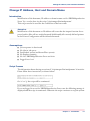
Introduction
Modification of the hostname, IP-address or domain name on Océ PRISMAproduction
Server V4.0 can be done via the script '/u/prismapro/bin/modpcname'.
This script can also be used for the verification of the host name.
Attention:
Modification of the hostname or IP-address will cause that the import function for exported archive files will not work afterwards! Additionally all currently defined printers
in the Printer Configuration will be deleted afterwards.
Assumptions:
■
■
■
■
■
■
Job acceptance is deactivated
No jobs in job queue
Stand-alone system (no Master/Slave system)
No Explorer running
No Océ PRISMAproduction Server activities
Logged in as 'root'
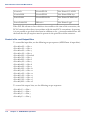
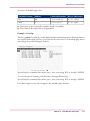
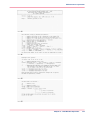
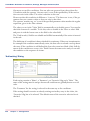
Script Process
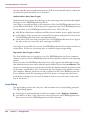
The information shown during execution of '/u/prismapro/bin/modpcname' is intuitive.
Please follow these instructions, as shown below:
On 'n' or 'q' the script will be terminated.
If you are logged in as an Océ PRISMAproduction Server user the following message is
displayed and the script is terminated. Otherwise the script continues to stop the system:
Chapter 1 - Installation
51
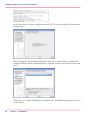
Change IP Address, Host and Domain Name
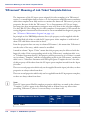
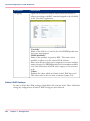
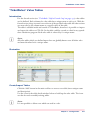
At this time the Suse Linux configuration tool YAST is started with the ’Network cards
configuration’:
After selecting the 'Network Setup Method' click 'Next' and the ’Edit’ to modify the
settings of the IP address and hostname (in a separate window) for the selected network
card:
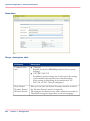
Click ’Next’ to confirm and finish your modifications. The following messages are issued
on the screen:
52
Chapter 1 - Installation
Change IP Address, Host and Domain Name
Note:
After the reboot the new settings become valid. Remember that all modifications affect
the local server only. You have to modify the '/etc/hosts' and if required '/etc/hosts.allow'
individually on all other servers, which will be connected to this Océ PRISMAproduction
Server server.
Chapter 1 - Installation
53
Modify Adaptec Bios Settings for older Tape Drives
Modify Adaptec Bios Settings for older Tape Drives
Introduction
For older tape devices changes needs to be made in the Adaptec host adapter BIOS. These
are devices which have a 50 pin instead of a 68 pin (wide) SCSI connector. Examples:
Most M4 Data cartridges and tape drives, QIC tape drives up to 1.2 or 8 GB. The new
QIC tape drives with 50 or 100 GB have a wide SCSI connector and do NOT need any
changes.
Steps
Reboot system.
When SCSI adapter is seen press Ctrl-A.
Select 'SCSI device configuration'.
For all SCSI id's where older tape devices are connected repeat step 5 and 6.
Set 'Max. Sync Transfer Rate (MB/s)' to 10 MB/s, or when 'Initiate wide Negotiation'
is NO then to 5MB/s.
6. Set 'Initiate wide Negotiation' to NO ('Max. Sync Transfer Rate’ now changes from 10
to 5 MB/s).
7. Save and leave Adaptec bios settings menu and reboot system.
1.
2.
3.
4.
5.
54
Chapter 1 - Installation
Chapter 2
Remote Access to the Océ
PRISMAproduction Server
'Explorer'
Access with the 'Explorer' Launcher
Access with the 'Explorer' Launcher
Introduction
Océ PRISMAproduction Server 'Explorer' is the main application for accessing and
controlling Océ PRISMAproduction Server. The 'Explorer' itself is a framework under
which the actual Océ PRISMAproduction Server applications run. The 'Explorer' and
its applications are implemented in Java and therefore are platform independent.
To keep things simple the term Océ PRISMAproduction Server 'Explorer' will be used
for the combination of the 'Explorer' framework and the applications throughout this
chapter. If some issues regard exclusively either the framework or a specific application
this will be addressed explicitly.
The Océ PRISMAproduction Server concept is highly client-server based where the 'Explorer' is a thin client. It doesn't need any permissions on the client side (except when
local files or resources should be included in a job).
So the Océ PRISMAproduction Server concept itself encourages using the 'Explorer' in
a distributed environment and accessing Océ PRISMAproduction Server from desktop
computers.
You can access the Océ PRISMAproduction Server 'Explorer' from outside a server cluster
via the 'Explorer' Launcher.
With the Launcher, the local file system is accessible, applications can be started by the
'Explorer'.
For example when clicking on a PDF file, Acrobat is invoked automatically. Also the
system language can be modified.
The following two chapters explain how to install and use this functionality.
Note:
In Océ PRISMAproduction Server V4 the former Java Web Start functionality has
been replaced by the Launcher application.
You can still use Java Web Start for some modules but it's not supported anymore.
Highlights
■
■
56
You can use the complete functional range of the Océ PRISMAproduction Server
'Explorer' from each desktop computer. That means the Océ PRISMAproduction
Server system can be configured, jobs can be submitted and controlled.
The java application is downloaded from the Océ PRISMAproduction Server server
to your desktop computer where it is cached. Once cached it can be started quickly.
Chapter 2 - Remote Access to the Océ PRISMAproduction Server 'Explorer'
Access with the 'Explorer' Launcher
■
There is no Java Web Start specific know how needed. A web browser is used to establish "initial communication". From then on the Océ PRISMAproduction Server 'Explorer' can be accessed like a local application by a desktop.
As from the user perspective the Launcher runs under the hood (only a small splash screen
during loading reminds you of the Launcher), one gets the impression of running the
'Explorer' inside the native Océ PRISMAproduction Server environment. The user feels
"closer to the system", with all the advantages and disadvantages if you are working on
the system level: you can do more but you also have to know more.
Océ PRISMAproduction Server and Launcher
Most of the benefits when using the Launcher to run the Océ PRISMAproduction Server
'Explorer' have been listed above. Nevertheless there are a few Océ PRISMAproduction
Server 'Explorer' specific issues worth mentioning:
■
■
The Launcher guarantees that Océ PRISMAproduction Server Explorers from different
Océ PRISMAproduction Server systems can run on the same desktop computer. The
Océ PRISMAproduction Server systems may also differ in their release levels. The
Java context for the 'Explorer' is defined in the launch protocol file JNLP on the Océ
PRISMAproduction Server server. Even 'Explorer' versions needing different JRE's
can run on the same PC as the Launcher automatically picks the right JRE (assuming
it has been installed).
A Web browser is used for starting the 'Explorer', but there is no risk of incompatibilities in the Java Runtime Environments of the browsers. Even browsers which do not
support Java at all or have Java support disabled can be used.
Launch the 'Explorer'
The Océ PRISMAproduction Server server must be registered in the 'hosts' file of your
desktop computer (for Windows: '\WINNT\system32\drivers\etc\hosts'). In addition it
is presumed that JRE/JDK greater or equals 1.5 is installed on your system.
The Launcher gets a connection error if the host name of the Océ PRISMAproduction
Server server contains a '_' (underline). See host name syntax description in ‘Configuration
of SuSE Linux Enterprise Server 10’ on page 32.
The 'Explorer' Launcher can be downloaded from each Océ PRISMAproduction Server
master server. A Launcher download page is offered. Type in the following URL:
'http://<master>/explorer/launcher.jsp ' and the following screen appears:
Chapter 2 - Remote Access to the Océ PRISMAproduction Server 'Explorer'
57
Access with the 'Explorer' Launcher
The Océ PRISMAproduction Server master can be addressed either by name or by IP
address. The type of addressing is of importance because the Launcher downloaded is
explictely linked to that address. If the address has changed, the Launcher must be
downloaded again (for example if the current Launcher has been downloaded via IP address
and the IP address of the server has changed, respectively via name and the name has
changed).
The Launcher is offered in the Web Page in two variants:
■
■
As an executable for the MS WINDOWS platform.
As a JAR archive for all operating systems.
Advantage of the "Executable" version:
■
■
The Océ PRISMAproduction Server 'Explorer' Icon is associated with the executable.
The Java Runtime System is automatically located.
The JAR version is a pure Java archive and therefore platform independent. On the SuSE
LINUX and MS Windows platform JAR files are automatically associated with the Java
Runtime via the file extension mechanism (in case a Java Runtime has been installed). If
the download is targeted to the desktop the 'Explorer' can started afterwards by just
(double) clicking on the icon.
Note:
The proposed file name for the Launcher is "Océ PRISMAproduction Server (<master>).<jar|exe>". It could be renamed in the save dialog or later on, but the extension
must be kept.
58
Chapter 2 - Remote Access to the Océ PRISMAproduction Server 'Explorer'
Access with the 'Explorer' Launcher
Configuration
The Launcher must always be downloaded from the appropriate Océ PRISMAproduction
Server master as it is configured automatically on the server dependent on the current
client connection. It should never be copied directly among client hosts.
The configuration becomes part of the JAR respectively EXE file and is not applicable to
modifications on the client site. If any configuration parameters change (at the moment
just the host name or IP address) the current version or the Launcher must be deleted
and a new one must be downloaded.
Note:
When a Launcher is deleted, its Cache is also to be deleted. About where the cache is
located see chapter ’Caching’ below.
Miscellanous
Caching
The Océ PRISMAproduction Server Launcher also uses a caching mechanism to speed
up the loading process. The application is downloaded once, cached, and later on only
newer versions are downloaded again. The cache is located in the users home directory
under
' .prisma/launcher-cache/http$§§<master>§explorer§explorer.jnlp'
When the Launcher is downloaded again because the <master> address has changed, the
subdirectory 'http$§§<old-master>§explorer§explorer.jnlp' should be deleted.
Compatibility Issues
As the Océ PRISMAproduction Server Launcher is installed locally there is a compatibility issue when the server environment changes.
To avoid user inconvenience the following policy will be pursued: the interface between
client and server will be kept downward compatible; that means if the user doesn't need
any upcoming extensions he can stay with the current version.
A new version must only be downloaded in case of a necessary bugfix, a name / IP address
change or when requesting a new feature.
Chapter 2 - Remote Access to the Océ PRISMAproduction Server 'Explorer'
59
Access with the 'Explorer' Launcher
60
Chapter 2 - Remote Access to the Océ PRISMAproduction Server 'Explorer'
Chapter 3
User IDs and Access
Rights
User IDs and Access Rights
User IDs and Access Rights
Introduction
With Océ PRISMAproduction Server you can configure a very flexible access concept
which allows to provide users with different roles and permissions. The basic intention
is to configure the access concept in such a way that is meets most of the requirements
of the daily routine.
For example a user task could be to monitor and operate the system but not to unintentionally modify anything. Another task could be to administrate and to configure the
system. The latter user has to be provided with much more permissions to fulfill his tasks
than the first one.
Therefore it is possible to create different users in Océ PRISMAproduction Server. Every
user logs on to the system with his user name (and password).
Users can have different permissions. The administrator provides users with permissions
by assigning a permission group. A permission group is a collection of charactaristic attributes of a specific user role and permissions which can be activated and deactivated.
Permission groups can be configured individually (see ‘'User Management': 'User Permissions'’ on page 271).
Predefined Users and Permission Groups
To be able to work with the system after a new installation, four basic users are predefined.
Predefined basic permission groups of the same name are assigned to these users. Neither
basic user nor basic permission group can be deleted or modified. If a user logs in with a
basic user name or belongs to a basic permission group, he consequently always works
with the same permissions.
The following users and permission groups are predefined in the system. The basic users
are configured in such a way that the rights of the user operator are most restricted. The
users applic and admin have more rights whereas the user service has all permissions.
#
62
Basic User
Basic Permission Group
Description
operator
Operator
Printer Operator
Chapter 3 - User IDs and Access Rights
has only permissions to monitor
and operate the print process:
■ access to the configuration
components is restricted
■ cannot access the LINUX
operating system
User IDs and Access Rights
Basic User
Basic Permission Group
Description
applic
Applic
Application
Engineer
additional permissions compared
to user operator:
■ extended access to the configuration components
admin
Admin
System Administrator
additional permissions compared
to user applic:
■ access to almost all Océ
PRISMAproduction Server
components as well as access
to the operating system
service
Service
Service Engineer
additional permissions compared
to user admin:
■ access to all Océ
PRISMAproduction Server
components and diagnostic
tools
To realize a more flexible user concept, the administrator can create additional users as
well as additional permission groups, which are provided with different permissions.
Individually Defined Users and Permission Groups
The individually adjustable user management in Océ PRISMAproduction Server is realized
on the basis of the basic permission groups. Thus the creation of a new permission group
is only possible by copying an existing group. The copy of a permission group is renamed
and it's editable permissions can now be activated or deactivated.
User Roles
The table above shows that the basic user groups have a set of rights, which ensure that
the typical tasks of the group can be performed. This set of rights can be called the user
role.
The method of copying permission groups ensures that every user defined permission
group is derived from a basic permission group. The default group, from which the current
permission group is derived, describes the user role. By copying a permission group, the
set of rights which describes the user role is transferred to the copied group. Because user
roles are derived from the default permission groups, these user roles exist: operator,
applic, admin or service.
Chapter 3 - User IDs and Access Rights
63
User IDs and Access Rights
Permissions
Basically you can modify the permissions of a user defined permission group freely without
taking care of the origin of the permission group. Certain permissions though, which are
typical for a user role, for example that the operator has only restricted access to the Océ
PRISMAproduction Server configuration, cannot be modified.
Examples for sections within which you can activate or deactivate single permissions independent of the corresponding user role:
■
■
■
■
■
■
■
■
Access jobs of other users
Job viewer job modification settings
Accounting server / message server settings
Explorer settings
Print Job Manager settings (for example "Production" or "Expert" mode, for example
working only with predefined print jobs or modifying and saving ticket settings)
Printer status viewer settings
Media assignment settings
Explorer session settings
See ‘'User Management': 'User Permissions'’ on page 271 for a detailed description of the
switchable permissions. The 'User Permissions' application also indicates which permissions
of which default user are active or inactive.
Examples for Permissions and Attributes connected to User Roles
Note:
These permissions and attributes cannot be modified.
User role operator
has all permissions to monitor and operate thew system:
■
■
■
■
■
■
■
display all messages
shut down the system
import print data from a 9 track tape or a 18/36 track cartridge
activate/deactivate Host Download
change the own password
very restricted access to the configuration applications, very few modifications possible
execute shell scripts and programs, which have been stored in a "userscript" directory
by the service engineer
User role applic
64
Chapter 3 - User IDs and Access Rights
User IDs and Access Rights
■
■
advanced access to the configuration applications
manage print resources via the user interface
User role admin
■
■
■
full access to all configuration applications (Licenses, Backup/Restore, Printer Configuration)
modify all settings of the operating system
work with diagnostic tools like "analyze"
User role service
■
work with additional tools, create and delete user scripts
Chapter 3 - User IDs and Access Rights
65
User IDs and Access Rights
66
Chapter 3 - User IDs and Access Rights
Chapter 4
POD-Module Operation
'Print File Manager' (PFM)
'Print File Manager'
'Print File Manager' (PFM)
Introduction
The 'Print File Manager' (PFM) is the component of the Océ PRISMAproduction
Server server system that you use to store printer data in either native or print-ready format.
You can store this data in the Print File Library or in a permanent archive. Currently,
the Océ PRISMAproduction Server server system supports only the PFL for file storage.
By keeping data, you can save time because the files do not need to be reprocessed if you
want to reprint them, and you have an absolute guarantee that the document will look
exactly like the original.
The PFM has three main functions: it records data, manages data and transfers data to
and from other media. At present, the PFM can manage only IOCA data, so it is available
only for the POD-Module for I mode printers.
■
■
■
Recording data: This element of the PFM works with the Print Job Manager (PJM).
You, as the user, have no direct contact with this element. If you activate the 'Store'
option together with either the 'In PFL' or 'As Preprint' option while defining the job
ticket, the PFM will copy the data to the Print File Library in accordance with your
setting once the data has been composed.
Managing data: You can make configuration settings via a GUI to determine how
documents will be managed in the PFL.
Transferring data: You can transfer data from PFLs to devices (tapes or other computers) that you select via the GUI, and import data from these devices into a PFL.
The PJM manages the reprinting of files from the Print File Library. With the help of
integrated PFM functions, it can display the contents of the PFL and therefore present
documents to be reprinted directly on its user interface (PFL data folder in the file selection
box).
The Default Print File Library is held on the ODS master, and is under the control of
the Océ PRISMAproduction Server file management system.
It is possible to keep several PFLs on any servers in the ODS network.
All PFLs can be configured as public or private repositories. You make this setting within
the Océ PRISMAproduction Server 'Explorer' under ’Configuration’ -> 'Archives' (see
‘'Archives': Overview’ on page 441). You can also determine whether the PFLs are each to
be separate entities that can be addressed individually, or whether they are to be dependent
and operate in mirror mode.
The size of the PFLs is limited only by the disk space available on the server concerned.
So there is no need to reconfigure the PFL in the event of an overflow.
68
Chapter 4 - POD-Module Operation
'Print File Manager' (PFM)
Illustration
Print File Manager Window
All administrative and transfer functions are executed via the PFM window which you
start by clicking 'Print File Manager' in the Explorer tree view. You need administrator
access rights to use these functions.
There are also functions for creating folders and for renaming and deleting files.
The main window has functions for exporting documents from a PFL to an external
medium (a tape or another computer system) and for importing them back into a PFL.
There are also various functions for manipulating documents (deleting and renaming
them, for example).
Since saving documents for reprinting will soon fill up a PFL ("Who knows, we might
need it again, soon!"), it is important to have an option to export files to an external
storage medium. This is particularly important given that a PFL is usually on the Océ
PRISMAproduction Server print servers.
Note:
Documents that have been exported to an external medium remain in a PFL as links
(marked as a file name followed by '@'), so it is possible to display the complete contents
of a PFL without going via the external storage medium The origin of the exported
documents is always also recorded on the external medium. Documents can only be
imported back into their original location. It is also possible to delete or rename exported
files without first placing them back in a PFL.
Chapter 4 - POD-Module Operation
69
'Print File Manager' (PFM)
Note:
The exported data can then no longer be imported automatically.
Menu Bar
The menu bar contains the commands for running the PFM functions.
#
'Media'
The Media command enables you to choose which medium (as default
output tape1 and tape2 are set) you want to transfer the data to. You can
also export data to an external computer system, provided access to this
system is configured under ’Configuration’ -> ’Master/Slave’.
When configuring media for the PFM via ’Configuration’ -> 'Devices'
you have to use special keywords, which are offered in a drop down list,
if you double click the respective field:
Under ’Type’: PFL_HOST or PFL_TAPE (computer or tape device)
Under ’Format’: PFL_TAR or PFL_CPIO
If you select PFL_HOST, you have to insert the hostname under ’Server’.
If you select PFL_TAPE, you have to insert the device under ’Physical
device’ (for example: '/dev/st0').
'Options'
Use ’Options’ -> ’Search’ to search documents in the archive using defined
search criteria. The following search dialog appears:
As search pattern you can use regular expressions like .*, *,[A-Za-z]*, ...
You can also combine these criteria by terms: _AND_, _OR_ or _ANOT_.
Additionally you can search documents of specified users.
If there is an external archive connected (see "Configuration of an External
Database System" on page 339), you can use the ’Search extern’ entry in
the ’Options’ menu. The dialog allows you to narrow down your search
according to different aspects, which are presented on five tabs:
70
Chapter 4 - POD-Module Operation
'Print File Manager' (PFM)
'Document' tab
If you select this tab, you can search documents according to certain attributes like 'Size' (’Greater than’, ’Smaller than’), 'Last access' (’From
date’, ’To date’), 'Hits' (’More than’, ’Less than’) and 'Creation date'
(’From date’, ’To date’).
The number of 'Results' can be limited (up to 200).
'Job Info' tab
Under this tab you can specify 'Job name', 'Job queue', 'Printer name'
and 'Printer type' of the jobs you are searching for.
'Job Info Receiver' tab
Under this tab you can specify information on the receiver as a search
filter to find the desired jobs.
'Inputfile' tab
Under this tab you can specify attributes of the input file like 'Name',
'Format' (none, IOCA, PCL, TIFF, PDF-Unity, PS-Unity), 'ImpScheme'
and 'ImpSetname'.
After you have selected the search criteria and after clicking the 'Start
search' button, the search result is displayed in another dialog.
If the default settings on a tab have been modified, the caption of the tab
turns red.
The output of the results is also influenced by the number of results you
have specified and the ’File type’ filter.
The results are displayed in lists of archives and documents. You can select
single files to rename or delete them.
'Help'
Help opens the PFM help system.
Tool Bar
The toolbar contains buttons for each of the devices configured via ’Configuration’ ->
'Devices'. Click a button, to select the device as current external media.
Chapter 4 - POD-Module Operation
71
'Print File Manager' (PFM)
Status Bar
The bottom section of the PFM window is a status bar used to display status information.
When you make an entry in a field or select a device by clicking a toolbar button, the
result of the action is shown here.
Control Panel
The main section of the window is a panel in which the left side shows the contents of
the local PFL, the center shows the copy/transfer functions and the right side shows the
contents of the desired/required external medium.
Documents in archive
The left section of the control panel consists of a standard file selection box and additional
control elements. The file selection box displays the following elements retrieved from
the local PC:
- A folder list that displays all the PFL's in the ODS network
- A document list that displays all the cached documents in the selected PFL
- A filter determining which documents are displayed.
You can select the documents you wish to export from the document list. If you move
the mouse cursor on a linked document, a popup window will display the medium the
document was exported to. You can select several files at once. To do this, select one file,
then keep the left mouse button pressed and drag the pointer to the end of the set you
want to select. Any links that you should happen to select are ignored. The window
contains control buttons for deleting or renaming selected files. The listed documents
are referenced by their names (job tickets). If the list contains several documents with the
same name, each of the identical names is numbered.
Exported documents
The right section of the control panel also consists of a standard file selection box and
additional control elements. This file selection box displays the following elements retrieved
from the external medium:
- A folder list that displays all archives on the external medium (only 1 tape device).
- A folder list that displays all documents in the selected archive.
- A filter determining which documents are displayed.
72
Chapter 4 - POD-Module Operation
'Print File Manager' (PFM)
If your external medium is a host, you can organize the exported documents in folders
(folder is a cpio/tar archive ). Use the create symbol to create a new folder.
If your external medium is a host, you can create new folders using the Create symbol.
Double-click a folder to display a list of the documents it contains.
Note:
If you have documents which are exported to a tape, you should stick a real label on the
recorded tape so that you can identify the medium whenever you wish to import files.
You select documents you want to import to a PFL from the list. When you select documents, the system will check whether a link for this document exists in the PFL. If not,
the selection will be rejected, just as it is rejected if the PFL does not exist in the ODS
network. As with documents in a PFL, documents with identical names have a consecutive
number appended to the end of their names to distinguish them.
You can delete empty folders using the Delete symbol.
Buttons
#
Button
Description
Rename a marked document in the archive.
Delete selected documents.
Select/Deselect all documents in the archive.
Export/Import
Pressing the export button (right arrow) will export the documents selected in the document list to the desired medium
Pressing the import button (left arrow) will import the documents selected in the folder
of the external medium into the PFL they were originally exported from.
The progress of the current task is indicated on the status bar:
Messages on the status bar log each of the processing sequences. This is particularly important for tasks that take a long time due to the length of the documents.
Chapter 4 - POD-Module Operation
73
'Print File Manager' (PFM)
Example
When creating a list of the contents of a tape, the system will first create the table and
then read the label information. There will be no visible changes on the screen in the
period between the output of the list and the evaluation of the label file.
After an export or import operation, the system always updates the document lists: the
link symbols are appended to or removed from the selected file names.
Transferring Documents to a PFL
You transfer documents to the PFL via the Print Job Manager (PJM). Therefore you select
the Store dialog in the Job Attributes section and select a predefined archive under 'In
PFL' or 'As Preprint'.
Format of External Media
External media are physical devices used for storing data (such as PCs, tape drives and
CD recording systems). PFM currently supports only PCs and tapes. The origin of exported documents is always recorded on the external medium. Documents can only be
imported back into their original folder.
#
Component
Function
Tapes
Documents are archived on tapes in the form of cpio or tar
archives. The origin information is contained in the directory
structure within the archive file. Important: Tape cpio/tar
archives cannot be extended. The rule is: one tape = one archive.
Hosts
Documents are archived on external host systems as cpio or tar
archive in a predefined directory structure:
'/u/prismapro/archive/<host>/<folder>'
- '<host>': The name of the server to which the archive belongs
- '<folder>': The name of the external archive
- '<typ>': The archive type, cpio or tar
Note:
Extension of existing host archives is not supported in
the current PFM version.
A folder can be reused or deleted, when all its documents have been reimported.
Devices
74
For more information refer to Devices.
Chapter 4 - POD-Module Operation
'Unity': Overview
'Unity'
'Unity': Overview
Introduction
This chapter describes what the POD-Module 'Unity' software product does and the
purposes for which it can be used.
Definition
'Unity' is a converter for PostScript and PDF documents (PDF: Portable Document
Format). It converts the print data into AFPDS using IOCA’s (Image Object Content
Architecture). It runs as an integrated service under SUSE Linux and acts as a RIP (Raster
Image Processor). The program is controlled by the POD-Module. As an add-on for the
POD-Module, the 'Unity' makes it possible to relocate the task of converting print languages – which usually requires a lot of computing power – to a separate computer.
'Unity' is controlled in the POD-Module by way of the Print Job Manager. The Print
Job Manager (PJM) interface is where you select your print file and begin the conversion.
If the source format of your print file is PostScript 2, PostScript 3 or PDF, the UnityRIP
Module can convert the data into IOCA format, which the printer can interpret.
This chapter helps you prepare for productive operation with the 'Unity'. It defines the
requirements and describes the preliminary steps you have to perform before beginning
work.
UnityRIP Server
Requirements for using the 'Unity'
The conversion requires the following hardware and software:
■
■
■
■
Operating system: SuSE Linux Enterprise Server 10
Processor: Pentium IV processor or higher
RAM: Minimum 1 GB RAM per instance. Recommended 2 GB
Hard disk: At least 2 GB free disc space
Deliverables
The product package consists of the following components:
■
■
■
PostScript 3 Converter
PDF Converter fully capable of PDF 1.6
136 standard fonts (Adobe)
Chapter 4 - POD-Module Operation
75
'Unity': Overview
Optional:
■
■
8 Chinese fonts
12 Kanji fonts
Note:
To use the optional fonts (Kanji version) you need a separate license on the computer
system on which you are running the 'Unity'.
Installation
The 'Unity' is part of the installation package on the Océ PRISMAproduction Server
DVD (see chapter "Océ PRISMAproduction Server Installation/Deinstallation/Update"
in the Océ PRISMAproduction Server Administration Settings and Tasks Guide).
Licensing
The license for the 'Unity' is one of the POD-Module licenses which are managed on
the Océ PRISMAproduction Server Master. For this reason, the license for the 'Unity'
is automatically available when the 'Unity' is configured together with the POD-Module.
However, if you add the license from the dongle for the 'Unity' to an existing system,
you have to update the entries on the Océ PRISMAproduction Server Master using the
'Licenses' application of the Océ PRISMAproduction Server 'Explorer' (see ‘'Licenses'’ on
page 313).
Note:
The 'Unity' will run for a transitional period if the dongle or the dongle license is no
longer valid. In this case, an error message with the code [ -11 / n ] appears every time
the program is started. A positive value for the secondary error code indicates the number
of days without a valid license; a negative value indicates a license violation.
76
Chapter 4 - POD-Module Operation
'Unity': User Resources and Fonts
'Unity': User Resources and Fonts
Introduction
The default directory which is searched for resources is the installation directory
'u/prismapro/lib/unity'. But this directory is not accessible for the normal user for the
installation of resources.
For this reason two additional directories will be searched for resources. Resources in the
directory 'u/cust/resources/local/unity/global' are available for all users. In contrast to
these resources the resources in the directory 'u/cust/resources/local/unity/<USER>' are
only available for the user who is currently logged in. The user directory will be searched
first and then the global directory. This results in the following order when searching resources from within the PostScript code:
First:' /u/prismapro/lib/unity'
Second: '/u/cust/resources/local/unity/<USER>'
Third: '/u/cust/resources/local/unity/global'
If different resource files are stored in the USER directory and in the global directory
under the same name, the file from the USER directory is used.
You have to possibly create further subdirectories in this directory:
■
■
Fonts:' /u/cust/resources/local/unity/<USER>/fonts'
Resources: '/u/cust/resources/local/unity/<USER>/Resource'
Attention:
Directories and file names are case sensitive. This is especially critical if you are importing
files from other systems, for example Windows!
Example 1
A PostScript job of the user ’operator’ requires the image file ’logo.tif’:
'%!PS-Adobe-3.0 '
'(logo.tif) GetTiff '
'showpage'
Therefore the file ’logo.tif’ has to be stored in the directory' /u/cust/resources/local/unity/operator' to finish the conversion without errors.
Chapter 4 - POD-Module Operation
77
'Unity': User Resources and Fonts
Example 2
A PostScript job of the user ’operator’ requires the image file '/var/lib/images/logo.tif':
'%!PS-Adobe-3.0'
'(/var/lib/images/logo.tif) GetTiff '
'showpage'
Because of the absolute path statement the file ’logo.tif’ will only be searched for in the
directory '/var/lib/images' and not in '/u/cust/resources/local/unity/operator'.
Example 3
A PostScript job of the user ’admin’ requires the image files 'var/lib/images/image0001.tif'
to 'var/lib/images/image1000.tif'. The files are automatically stored in the '/var/lib/images'
directory.
'%!PS-Adobe-3.0 '
'(var/lib/images/image0001.tif) GetTiff '
'showpage '
'(var/lib/images/image0002.tif) GetTiff '
'showpage ... '
'(var/lib/images/image1000.tif) GetTiff '
'showpage'
Linux command: 'ln -s /var /u/cust/resources/local/unity/admin/var'
You can use the Océ PRISMAproduction Server Explorer to import resources into the
Océ PRISMAproduction Server system and to distribute the resources to other computers
in the Océ PRISMAproduction Server network:
The computers of the Océ PRISMAproduction Server network appear in the 'Server
Files' application in the Océ PRISMAproduction Server Explorer ($RESOURCES@<servername>). You can use the copy and paste function to copy and move resources.
78
Chapter 4 - POD-Module Operation
'Unity': User Resources and Fonts
Fonts
Print files may or may not include fonts. Courier is used by default if no fonts are provided.
The following 136 industry-compatible Adobe fonts are provided in the 'Unity':
#
AdobeSansMM
GENEVA
MonaLisa-Recut
AdobeSerifMM
GillSans-Bold
NewCenturySchlbk-Bold
AlbertusMT-Italic
GillSans-BoldCondensed
NewCenturySchlbk-BoldItalic
AlbertusMT-Light
GillSans-BoldItalic
NewCenturySchlbk-Italic
AlbertusMT
GillSans-Condensed
NewCenturySchlbk-Roman
AntiqueOlive-Bold
GillSans-ExtraBold
NEWYORK
AntiqueOlive-Compact
GillSans-Italic
Optima-Bold
AntiqueOlive-Italic
GillSans-Light
Optima-BoldItalic
AntiqueOlive-Roman
GillSans-LightItalic
Optima-Italic
Apple-Chancery
GILLSANS
OPTIMA
Arial-BoldItalicMT
Goudy-Bold
OXFORD
Arial-BoldMT
Goudy-BoldItalic
Palatino-Bold
Arial-ItalicMT
Goudy-ExtraBold
Palatino-BoldItalic
ARIALMT
Goudy-Italic
Palatino-Italic
AvantGarde-Book
GOUDY
Palatino-Roman
AvantGarde-BookOblique
Helvetica-Bold
StempelGaramond-Bold
AvantGarde-Demi
Helvetica-BoldOblique
StempelGaramond-BoldItalic
AvantGarde-DemiOblique
Helvetica-Condensed-Bold
StempelGaramond-Italic
Bodoni-Bold
Helvetica-Condensed-BoldObl
StempelGaramond-Roman
Bodoni-BoldItalic
Helvetica-Condensed-Oblique
SYMBOL
Bodoni-Italic
Helvetica-Condensed
TEKTON
Bodoni-Poster
Helvetica-Narrow-Bold
Times-Bold
Bodoni-PosterCompressed
Helvetica-Narrow-BoldOblique
Times-BoldItalic
BODONI
Helvetica-Narrow-Oblique
Times-Italic
Chapter 4 - POD-Module Operation
79
'Unity': User Resources and Fonts
Bookman-Demi
Helvetica-Narrow
Times-Roman
Bookman-DemiItalic
Helvetica-Oblique
TimesNewRomanPS-BoldItalicMT
Bookman-Light
Helvetica
TimesNewRomanPS-BoldMT
Bookman-LightItalic
HoeflerText-Black
TimesNewRomanPS-ItalicMT
CARTA
HoeflerText-BlackItalic
TimesNewRomanPSMT
CHICAGO
HoeflerText-Italic
Univers-Bold
Clarendon-Bold
HoeflerText-Ornaments
Univers-BoldExt
Clarendon-Light
HoeflerText-Regular
Univers-BoldExtObl
Clarendon
JoannaMT-Bold
Univers-BoldOblique
CooperBlack-Italic
JoannaMT-BoldItalic
Univers-Condensed
CooperBlack
JoannaMT-Italic
Univers-CondensedBold
Copperplate-ThirtyThreeBC
JOANNAMT
Univers-CondensedBoldOblique
Copperplate-ThirtyTwoBC
LetterGothic-Bold
Univers-CondensedOblique
Coronet-Regular
LetterGothic-BoldSlanted
Univers-Extended
Courier-Bold
LetterGothic-Slanted
Univers-ExtendedObl
Courier-BoldOblique
LetterGothic
Univers-Light
Courier-Oblique
LubalinGraph-Book
Univers-LightOblique
COURIER
LubalinGraph-BookOblique
Univers-Oblique
Eurostile-Bold
LubalinGraph-Demi
UNIVERS
Eurostile-BoldExtendedTwo
LubalinGraph-DemiOblique
Wingdings-Regular
Eurostile-ExtendedTwo
MARIGOLD
ZapfChancery-MediumItalic
Eurostile
MONACO
ZapfDingbats
Installation of additional Type 1 fonts
Additional Type 1 fonts can be installed on the local hard disk of the conversion computer.
The font files must be in the folder named ’fonts’ relative to the search path of the converter (see chapter ’User resources’ above).
The installation of fonts on the hard disk is supported by the shell scripts pfb2font and
pfa2font. The shell script pfb2font converts fonts in binary format to ASCII. The shell
80
Chapter 4 - POD-Module Operation
'Unity': User Resources and Fonts
script pfa2font replaces the file name of fonts in the ASCII format (*.pfa) with their font
name.
The following procedure is recommended to install additional type 1 fonts:
■
■
■
■
■
Create a temporary font directory:
'# mkdir $HOME/fonts'
Copy font files to the font directory:
'# cp testfont.pfb $HOME/fonts'
'# cp testfont.pfa $HOME/fonts'
Change to the font directory:
'# cd $HOME/fonts'
Convert the fonts:
for binary font files (*.pfb):
'# pfb2font'
for ascii font files (*pfa):
'# pfa2font'
Copy fonts into the user resource directory and link fonts
'# ln -s $HOME/fonts /u/cust/resources/local/unity/<USER>/fonts'
For step 5 the corresponding rights have to be set. If the link already exists, you don't
need step 5.
Installation of additional TrueType Fonts
Like Type 1 fonts you can also install TrueType fonts locally. The fonts have to be copied
(or linked) to the respective font directory.
The following directories are available:
■
■
for fonts, which are general available: '/u/cust/resources/local/unity/global/fonts'
for user specific fonts: '/u/cust/resources/local/unity/<USER>/fonts'
After copying the fonts to the correct directory, the file name of each font has to be adjusted to the font name, which is referenced in the PostScript or PDF file.
If you are not sure of these names, you can try to generate the file with all referenced
TrueType fonts an then convert the file with the "Replace missing fonts" option disabled.
This job will finally generate an error message, which lists all font names, which could
not be found.
Installation of additional Kanji fonts
Additional Kanji fonts can be installed by a font installation procedure from a Macintosh
computer via the AppleTalk protocol to the local hard disk. This is currently only possible
with an 'Unity' installed on Windows.
Chapter 4 - POD-Module Operation
81
'Unity': Customizing for Specific Applications
'Unity': Customizing for Specific Applications
Notes on Running Fanfold Printers
The page length is entered on fanfold printers in increments of 1/6". Consider that the
page length set on the printer must always be at least as large as the output size of the file,
since otherwise PEMs (Print Error Marks) will be printed.
Example: The page length on the printer is 11 4/6" (= 29.63 cm), but the file output
size is A4 (= 29.7 cm). This means PEMs will be printed. You can prevent PEMs from
being printed by setting the size in the output file to the value set for the paper format
on the printer (paper format variable with page length 11 4/6").
Control Input Tray Switching via PS file with 'setpagedevice' operator
The ’setpagedevice’ command has been introduced with PostScript Level 2 and is currently
the standard for input tray switching by specifying certain media attributes.
Example:
'<<'
'/PageSize [ 595 841 ] '
'/MediaType (Standard)'
'/MediaColor (Pink)'
'/MediaWeight 100'
'>> setpagedevice'
Supported attributes are:
PageSize (array of two real or integer numbers)
MediaType (case sensitive string)
MediaColor (case sensitive string)
MediaWeight (real or integer number)
To use this feature you have to select 'Use medias from document' in the PJM under
'Media' in the file properties.
82
Chapter 4 - POD-Module Operation
'Unity': Customizing for Specific Applications
Every different media will be assigned internally to a specific tray. This tray assignment
can be changed later on when the job is to be printed.
Control Tray Switching via PS file with 'setpapertray' operator
The ’setpapertray’ command has been used for inputtray switching in PostScript Level
1 but has been replaced with the ’setpagedevice’ command since PostScript Level 2 and
should not be used anymore.
Internally the 'setpapertray' command will be mapped to a 'setpagedevice' command using
the default pagesize as /PageSize and /MediaType as tray identifier.
Example for changing to the second input tray:
The old command:
'statusdict begin 2 setpapertray end'
is replaced by:
'<< /PageSize [ 595 841 ] /MediaType (tray2) >> setpagedevice'
Here up to 9 trays are supported.
To use this feature you have to select 'Use medias from document' on the 'Media' tab in
the PJM File Properties window for POD files.
The effective tray assignment can still be changed later on when the job is to be printed.
See also ‘Workflow Extended AIMS Concept’ on page 91.
Chapter 4 - POD-Module Operation
83
'Unity': Color Separation
'Unity': Color Separation
Introduction
Basically color spaces are separated due to the way of their usage. Conventional printing
methods (i.e. Offset) mainly use CMYK (Cyan, Magenta, Yellow, Kontrast/Black), CMY
and La*b*. RGB (Red, Green, Blue) color space is most suitable for display with electronic
devices (i.e. TV, Computer displays, beamers, ...).
Note:
RGB = additive dithering: R,G and B result in white when overlaid. CMYK = subtractive dithering: C, M, Y and K result in black when overprinted. Each printing color
therefore substrates part of the light reflectance until the paper white disappears.
Nowadays print data are mainly created digitally. This implies a particular problem. The
data are displayed on the screen for modification using the RGB method. But for printing
you need colors on the CMYK basis. Therefore the data have to be transformed from
one color scheme to the other. If for example the data are stored and handed on in the
PDF format, they are usually optimized for display on the screen and the colors used are
described using the RGB color scheme. Black for example is composed of the color
components R=0, G=0 and B=0, White results from the values R=255, G=255 and B=255.
CMYK Black on the other hand consists of intensity values C=0%, M=0%, Y=0% and
K=100% (K=Kontrast).
A conversion from RGB colors to CMYK colors has the effect, that e.g. RGB Black is
represented by the values C=75%, M=68%, Y =67% and K=90% in the CMYK color
scheme, not as exexpectedspected in C=0, M=0, Y=0 and K=100%. Furthermore the
conversion is not lossless. You can only correct this loss if you use elaborate color management and rendering tools.
In many cases knowledge on the correct use of color spaces is missing. This leads to the
fact that many different data have to be processed in the workflow of a print site or a
service provider. These data often have to be adjusted and modified for special applications.
This is especially true for color separation of documents to Custom Tone or Black.
Functionality of Color Separation with UnityRIP
Every page of the document is ripped line by line (line=scanline; hight=1 output pixel;
width=width of page). Thus every pixel is checked for its color value. Depending on the
options settings data streams for the single colors are created. As options you define parameters, which control the selection of colors by the RIP.
Layout of PS and PDF Documents to enable Color Separation
Only the most important and common settings are discussed below.
84
Chapter 4 - POD-Module Operation
'Unity': Color Separation
Pure colors
The easiest selection is posible with pure colors, because the color component, which
should be separated in a document, can be uniquely assigned a primary color value.
Therefore a direct extraction is possible:
#
Color mode
Description
RGB
Allows the selection of Red, Green or Blue.
CMY(K)
Allows the selection of Cyan, Magenta or Yellow.
sRGB
With sRBG (standardized RGB) the RIP converts the colors
using a special color rendering profile, which creates a single
numeric value for the color impression simulated by the
RGB scheme. Then the separation algorithm is applied to
the scanlines.
Prerequisites:
■
■
■
To ensure a safe and simple color separation the usage of documents (PS and PDF)
containing colors in different color spaces should be avoided.
Applies to colored logos, images and fonts: use only one component for all elements
for creation and display of the color information to be extracted (the color to be
printed is not relevant in this case). It is only important that all elements are of the
same color tone and color type.
You should know the color to be separated. To find out a desired color you have to
use third party products like Enfocus PitStop.
Advantages:
■
■
■
Easy handling, because color information can be identified and separated uniquely.
Easy creation of the raw data, because you always work in the same color space.
Low error rate and few error runs.
The separation of pure colors can be selected in the POD file properties in the PJM (see
the description of the POD File Properties -> 'Standard Colors' in the POD User's Guide).
Chapter 4 - POD-Module Operation
85
'Unity': Color Separation
Mixed colors
Mixed colors are used in many documents. Such a color can be for example RGB orange
of the following values: R=255, G=230, and B=150.
#
86
Color mode
Description
RGB +/- x
If you want to use this color for separation and you also want
to separate similar colored pixels next to this color, it is advisable
to indicate an additional range of values, in which the colors to
be considered for separation are located.
The following illustration shows an RGB color scheme, a selected dot at R=255, G=230 and B=150 and a circle around this
dot. This circle indicates the position of the neighboring similar
color values, which are located in the tolerance zone indicated:
Chapter 4 - POD-Module Operation
'Unity': Color Separation
Color mode
Description
sRGB
sRGB colors are treated as pure colors, because only one channel
(R, G, or B) exists for the internal conversion based on the
standardized color rendering profile. In this case no color range
can be defined. If you create PDFs using Adobe Distiller, make
sure that in ’Settings’ -> ’Job Options’ -> ’Color’ -> Working
Spaces’ -> ’RGB’ the sRGB IEC61966-2.1 profil is not selected.
Choose instead: Adobe RGB (1998).
Note:
The sRGB IEC61966-2.1 profile is set as default profile
in Adobe Distiller for RGB color work spaces and is
optimized for display on various screens. This profile
is not very suitible for color separation with UntityRIP.
CMYK
Selection of a range is not provided in this case. Therefore the
whole color range of the color channel (C, M or Y) will be
separated. This leads to an output of all shades of the selected
channel on the color form. Bear in mind that in some cases the
yellow separation contains more information as for example the
cyan separation. Therefore only if all four separations (CMYK)
are printed one over the other, the image is complete. A separation on its own only contains components relevant for this
color. Separating images in only two colors therefore leads to
falsifications and alienations of the contents of the image.
Example
In this example you can see very clearly, that the yellow separation contains most of the
image information. If you print this separation with a darker CustomTone and Black,
the complete image may appear to be too dark.
#
Example image
Color separation
Default
Cyan
Magenta
Yellow
Chapter 4 - POD-Module Operation
87
'Unity': Color Separation
Example image
Color separation
Black
Fonts and graphics are usually not affected, because they are mainly created using pure
colors.
Prerequisites:
■
All colors needed should be created in one single color space, i.e. CMYK. The use of
more than one color space in one document makes separation extremely difficult.
Advantages:
■
■
■
Targeted and simple separation of color channels.
All color shadings within a separation will be reproduced correctly.
No knowledge of single color values is necessary.
Problems:
■
■
■
Single color separations represent only a part of the entire image. Consequently images
differ from the original. According to the separation you choose, the image appears
to be more bright or dark.
Graphics (like pie charts with different color shades) are not separated as intended, if
they are composed of different pure colors and are separated to one of these.
Single color separations cannot be clearly created from documents containing color
components in different color spaces. This is because for example an RGB Red doesn't
exactly match with CMYK Red, even if there is no difference on the screen.
To separate color ranges (RGB) you have to select the respective function in the POD
file properties in the PJM (see the description of the POD File Properties -> 'Select color
range (RGB-Mode)' in the POD User's Guide).
88
Chapter 4 - POD-Module Operation
'Unity': Color Separation
Color Names
A common way to add color to documents, is the usage of color names. These color
mixing systems are provided as color sequences, color palettes or color guides. Known
color guides are e.g. PANTONE, HKS, FOCOLTONE, TOYO, TRUEMATCH and
more... In addition to the predefined colors, many illustration programs offer the possibility to create you own company specific colors and to identify them by an alias name.
Using these color definitions simplifies the complete workflow for the graphic designer.
For the separation it is sufficient to communicate this name to the RIP. The system then
identifies the appropriate parts of the color and extracts these as color separation. Here
also applies the so called "In-Rip separation".
If the documents have been built up consequently with spot colors, the separation is quite
easy.
You can also use the standard process color names "Cyan", "Magenta" and "Yellow"
(spelled exactly this way). In comparison , spot colors have the advantage, that all color
shadings are only defined in the spot color itself and therefore no interferences with
’neighbor colors’ are to be expected.
To separate named colors you have to select the respective function in the POD file
properties in the PJM (see the description of the POD File Properties -> 'Spot Colors
(Color Names Mode)' in the POD User's Guide).
Chapter 4 - POD-Module Operation
89
'Unity': Color Separation
90
Chapter 4 - POD-Module Operation
Workflow Extended AIMS Concept
Workflow Extended AIMS Concept
Introduction
With the Océ PRISMAproduction Server version 3.02.18 a new extended ’Attribute
based Input Media Selection’ is introduced. This concept helps to overcome the following
restrictions with the Océ VarioPrint printers:
■
■
Color and mediatypes are predefined on the printer. Custom defined names for color
and media types are not possible.
Tab / Ordered Material restrictions.
With this extended AIMS concept, settings, which before you had to perform on the
printer itself, are now performed on the Océ PRISMAproduction Server server.
Printer hardware related functions like clustering and tab printing must also be defined
on the printer itself.
With this concept, it is also possible to run "pure" input bin number oriented printers
like Océ Pagestream 75/55 or "only" medianame oriented printers like the Océ Pagestream
156 via IPDS.
Workflow
■
■
■
■
■
In the 'Configuration' -> 'Paper' application you may define the media types with all
respective attributes. You can enter any paper color you want (for example sky blue
or blossom white). If you click on ’Media Settings ...’ in the 'Printer Pool' application
(tool bar icon or menu entry) you can configure a printer specific mapping table for
the selected printer using the predefined paper names.
Media attributes, defined in PostScript or DigiPath documents are preserved by the
'Unity' / 'DPconnect' / Professional Document Composer and preserved / incorporated
in the AFP data, which are spooled in the Océ PRISMAproduction Server spool.
During printing, the IPDS backend scans the APF data for required media and compares the required media with the media already loaded on the printer. This loading
is represented by the mapping table, you have created for the printer on the Océ
PRISMAproduction Server system. This table is obviously empty after installation or
new definition of a logical printer.
If the backend finds the required material in this mapping table, the respective tray
number is invoked via IPDS.
If the required paper is not found in the mapping table, the required attributes are
displayed in a message window (see below), the operator loads the paper in one of the
input bins of the printer and defines/documents this in this message window. This is
done by simply choosing the input bin for the required paper. No retyping of the attributes is necessary.
Chapter 4 - POD-Module Operation
91
Workflow Extended AIMS Concept
Operator has to assign the correct input tray, where the requested input media is loaded.
Note:
Mapping table is empty (or deleted) during installation and restore of backup. (During
restore of a backup the actual paper-loading of the printer must not be restored).
92
Chapter 4 - POD-Module Operation
'Unity': Enhanced Functionality
'Unity': Enhanced Functionality
Since all relevant information concerning input media and finishing requirements are
concealed within the PostScript data stream, the 'Unity' has been enhanced to translate
PostScript finishing commands into corresponding AFPDS commands.
The UP3I extension to AFPDS (MFC) has been chosen to function as a common interface
to the adjacent backend modules (IPDS-, ps- and xrx-backend).
If this functionality is used, the subsequent use of the Professional Document Composer
may discard all added information by the 'Unity'.
In general the 'Unity' generates portrait afpds pages no matter whether the input media
selection specifies landscape or portrait. The 'Unity' is not a cropping tool though it may
sometimes work if you specify a smaller page size than the original PS/PDF document
requires. The origin of the page is the lower left corner.
Chapter 4 - POD-Module Operation
93
'Unity': Conversion
'Unity': Conversion
Workflow
You control the workflow and define conversion parameters via the Océ PRISMAproduction Server Print Job Manager. This creates a job ticket on the basis of the settings you
specify and sends the ticket to the Océ PRISMAproduction Server Master. The master
then directs the distribution of the work packages, sends instructions to programs and
monitors all the stages in job handling. This is done in a way that maximizes the data
throughput and distributes the workload evenly across the ODS network.
Creating a conversion job with the Print Job Manager
Using the folder icon, select a PostScript or PDF file and add it to the list of files. Select
the file you have just added to the list, then select PS-Unity or PDF-Unity in the Format
list box. the 'Unity' then performs the conversion. Once the conversion is complete,
continue as you would for any other format (see description of the Print Job Manager).
Creating PostScript and PDF print files
The Océ PRISMAproduction Server DVD also contains the installation files for the
Adobeps5 PostScript driver and the product specific PPD (PostScript Printer Definition)
files. This driver and these PPDs should be used exclusively for creating PostScript and
PDF files. This is the only way to guarantee that only those function calls are generated
which can be processed by the 'Unity' Software.
94
Chapter 4 - POD-Module Operation
'Unity': Troubleshooting
'Unity': Troubleshooting
If the conversion job is not completed properly, you must find out the reason why and
correct the problem.
To identify problems, you will need to know a little more about how the Océ
PRISMAproduction Server master and the 'Unity' work together:
The ODS master sends the file to be converted, plus the job ticket, to the 'Unity'. The
'Unity' reports the status of the job back to the Océ PRISMAproduction Server master
at regular intervals (for example it might notify the Océ PRISMAproduction Server
master that the job is "in progress"). When the conversion is completed without any errors,
it sends back the converted file. In the event of an error, the 'Unity' reports the status
"completed with errors" plus a return code indicating the type of problem.
The 'Unity' also keeps two files of its own in the installation folder to log the progress of
conversions.
Chapter 4 - POD-Module Operation
95
'Unity': Unity Plus (Graphic Arts_Plus)
'Unity': Unity Plus (Graphic Arts_Plus)
Introduction
"Multilevel Gray" represents a new method, developed by Océ, to significantly enhance
the print quality especially with images. As indicated by the name, this technique uses
grayscales, which can have different shades in one pixel. This leads to a smoother and
more homogeneous printout of the images. In contrast to the usual RIP method, the
images are not anymore converted to a simple black and white raster (2 bit color depth).
You need the image information with a color depth of 8 bit per color channel.
In a standard prepress RIP process this would lead to a amount of data, which cannot be
sent to the printer with the required performance. Therefore the raster process is moved
directly into the printer. On the one hand side transfer time is saved, on the other hand
the decompression of the data in the controller is not necessary anymore. The ripped
output data are transferred to the IO modules immediately.
The basic element of the workflow is providing the print data in a "composite" (not
rastered) format. Therefore object containers are used, which allow to transport any
contents. In this special case, the contents are PDF pages, which are sent to the printer,
embedded in such a container.
Requirements
The following components are needed to enable the "Graphic Arts" workflow:
■
■
■
Graphic Arts_Plus license
Océ PRISMAproduction Server
One ObjectContainer license per printer
PDF Workflow
Note:
During this process the incoming PDF file is neither checked nor any preflights are
done. Such tasks should be performed before submission of the PDF file to the Océ
PRISMAproduction Server system.
Working with ObjectContainers assumes that only one document page is used per container. Therefore multipage PDF files have to be separated into single pages, which are
then sequentially supplied with an ObjectContainer frame and sent to the printer.
Procedure
96
Chapter 4 - POD-Module Operation
'Unity': Unity Plus (Graphic Arts_Plus)
In the PJM select ’PDF-Unity+’ or ’PS-Unity+’ as input data format to adjust the converter options. When generating the print job, the PDF file will be separated into single
page PDFs in the first place. Each page is then packed into an ObjectContainer. From
these containers an AFP data stream is created. Afterwards you can apply different operations to this AFP file (for example with the PDC). The printer has a RIP integrated,
which extracts single PDF pages from the incoming AFPs and converts them into bitmaps.
These are then processed directly in the printer without further manipulation (for example
compression).
Note:
If you convert PDF files which contain so called forms (references to always equal page
contents), the total of the single pages may require much more memory than the original.
Also embedding fonts in the single page PDF file enlarges the file size. The resulting
AFP files are accordingly big.
PostScript Workflow
Many of the PostScript data on the market are not created according to the DSC rules
(Document Structuring Convention by Adobe). Therefore these data are not page independant and can therefore not be used in ObjectContainers.
A simple solution for this problem is to convert the PS into PDF. The following steps
are the same as for the PDF workflow described above. This means, the PostScript data
are ’normalized’ via the conversion into PDF and are then processed with the known
PDF workflow which generates AFP with ObjectContainers.
Note:
Programming with PostScript makes it possible to create a vast variety of complex print
applications. Many of the resulting advantages and features cannot be realized anymore
after the conversion to PDF. For example proprietary print parameters like stapling or
stitching are not interpreted. Loop programming and the usage of forms or similar resources may also lead to large PDF files (see note for the PDF workflow).
Chapter 4 - POD-Module Operation
97
'Unity': Unity Plus (Graphic Arts_Plus)
The PDF workflow needs an additional conversion of PostScript into PDF. All further
steps are the same as for the PDF worklflow:
[48]
GraphicArts Workflow Limitations
The main advantage of the GraphicArts workflow is that the native PDL (PDF) will be
kept until the RIP process at the chosen printer begins. By that the print quality can be
optimized and specific printer features can be used like deciding at the time of print
whether you want the output to be in black and white or in highlight color.
Possible increase in file size
To be able to use the same POD components like the Professional Document Composer
and make use of multiple RIP instances in the printer, it is necessary to create independent
single page objects out of an PS/PDF datastream or file. By doing this, all resources like
fonts or forms, which all or multiple pages share among each other, have to be added to
every single page object. Therefore the resulting ‘normalized’ AFPDS data may become
a multiple of the size of the original input file. This effect can also be seen if you use the
“extract pages to single pages” feature with Acrobat Professional.
Pages may not print
During the conversion process of creating independent PDF objects for every printable
page the contents of the source file itself is not checked. Some errors show up only during
the ripping process even if the file can be viewed without a problem. The reason for this
is that a viewer is much less restrictive than a RIP respectively a printer. Therefore it may
happen that problems can only be seen during the printing process.
Only viewable with TrueProof
To view the printfile before actually printing it, TrueProof is required together with a license to enable the GraphicArts feature of ripping PS/PDF objects.
Use of PDF security features
98
Chapter 4 - POD-Module Operation
'Unity': Unity Plus (Graphic Arts_Plus)
As part of the GA workflow the incoming PDF files will be split up into single page PDF
sections. Therefore the PDF files must not have the security feature enabled that prohibits
the modification and/or print of the document.
Chapter 4 - POD-Module Operation
99
'Unity': 'GetTiff-Service' Integration
'Unity': 'GetTiff-Service' Integration
Definition
If a valid license has been installed on the system, the 'GetTiff-Service' extension can be
enabled in the 'Unity' tab of the file properties dialog of the PJM.
Without the GetTiff option enabled, the referenced TIFF file will be read and rasterized
during the rip process. Because images cannot be cached in the 'Unity', even the same
image being called several times within the PostScript source file has to be read and
rastered new. Typically this functionality is used in conjunction with PostScript forms
using a defined set of TIFF images as forms and being used multiple times within a document.
With the 'GetTiff-Service' option enabled, the macro will record every call for every TIFF
image into a separate file, together with position and scaling information and inhibit the
further processing in the 'Unity'. Thus a AFPDS document is generated that misses the
contents of those TIFF files.
In a second step the reference file is read and the TIFF files will be converted into IOCA
resources within a new AFPDS file. Next this file will be merged with the AFPDS file
previously generated by the 'Unity'. This is done together with include commands at
those places in the file being captured in the reference file list. This will minimize the
rendering efforts of the 'Unity' and optimize the resulting AFPDS file by reusing common
TIFF objects as resources .
Requirements
"GTS" has the following requirements:
■
■
Unity_RIPR 4.0 license
Unity_GTS_Extension 4.0 license
To use this feature, the PostScript source file has to use a GetTiff macro with a file name
as input parameter to the macro. For example: (StandardLetter.tif) GetTiff.
100
Chapter 4 - POD-Module Operation
Jobrequirement Functional Module
Jobrequirement
Jobrequirement Functional Module
Introduction
The jobrequirement functional module has been designed to better meet requests coming
from printroom environments, in particular to enable a printroom manager to route jobs
to suitable printers.
Definition
The basic task of the jobrequirement module is to scan a POD print job for its requirements, which have do be fulfilled by the printer this job will be printed on. Therefore
jobrequirement may be integrated as an additional Océ PRISMAproduction Server
workflow step in the usual Océ PRISMAproduction Server workflow. The location of
this workflow step is immediately before the print step.
When a job has been scanned, the respective job entry in the All Jobs view in the Océ
PRISMAproduction Server Explorer obtains an info icon ( ) indicating that additional
information for this job is available. A double click on this job opens a popup window
showing detailed information regarding requirements for the destination printer.
Jobrequirement does not affect print job data and print results in any way.
Using jobrequirement
The jobrequirement function can be used either via an LP input queue (see ‘'LP'’ on page
508), via the Vario PJM application and via the PJM itself (menu 'Job' -> 'Determine
Requirements').
Integrating the additional jobrequirement workflow step into the workflow of a job is
accomplished by a suitable job ticket. If jobs are received with an LP input queue, the
associated job ticket template has to be prepared respectively.
The jobrequirement installation package provides two additional job ticket templates
which are put in place when installing Océ PRISMAproduction Server:
■
■
.JOBREQUIREMENT.TIC
JOBREQUIREMENT.TIC
Both ticket templates are prepared in order to invoke the jobrequirement step with a parameter set (see ’Controlling jobrequirement information output’ on page 61) suitable
for most of the use cases. The first one cannot be changed, it works just as a factory default.
The second one is identical to the first one and may be changed according to your own
Chapter 4 - POD-Module Operation
101
Jobrequirement Functional Module
needs. You may use the PJM to do all the changes necessary for your task. You find the
templates in the usual symbolic $JOBINPUT_TICKETS folder.
When setting up an LP input queue you may assign one of the ticket templates in
$JOBINPUT_TICKETS to an LP input queue by selecting the appropriate one with
the combo box in the ’Selected Profile’ line.
The JOBREQUIREMENT.TIC template may be used for LP input queues submitting
jobs by pjm as well as by startdpconnect.
Detailed workflow of Job Routing using the jobrequirement function:
■
■
■
■
■
■
Océ PRISMAproduction Server processes print jobs as usual, but does not specify a
physical destination printer.
The jobrequirement function detects the requirements of the job, which are necessary
to decide, which of the attached destination printers are able to print this job. After
this the print job is held in the Océ PRISMAproduction Server spool.
The detected job requirements are now visible for the operator or printroom manager.
The printroom manager selects the job in the 'All Jobs' view and accepts the job requirements. Due to his knowledge of the capabilities of the attached destination
printers, he selects the suitable physical printer.
The printroom manager changes the print job properties in order to set the physical
destination printer.
The destination printer, which has been specified before, has to be activated earlier,
so the print job now automatically continues and is printed.
Océ PRISMAproduction Server does not allow to start a print job without having specified
a destination printer. So in cases like this, where the concrete destination printer becomes
known only while processing the job, you have to specify the name of a virtual printer,
which acts as a placeholder.
The job ticket templates .JOBREQUIREMENT.TIC and JOBREQUIREMENT.TIC
shipped with the jobrequirement installation package include such a placeholder printer
name: This name is "SelectPrinter". So you have to establish a virtual printer with this
name in your Océ PRISMAproduction Server system. This printer has no physical representation. This printer must not be activated. If it is activated, the printroom manager
has no possibility to reroute the job to another real destination printer, because the system
would immediately try to print the job on the virtual printer - which would fail.
In order to avoid the possibility of activating this printer by mistake it is recommended
to use the printer pool filter mechanism to eliminate this printer from the printer pool
view.
Print Resolution
The Océ PRISMAproduction Server printer configuration requires specification of the
printer resolution. So specifying a destination printer for a print job implicitly specifies
also the resolution of the resulting print data. The Océ PRISMAproduction Server system
102
Chapter 4 - POD-Module Operation
Jobrequirement Functional Module
instructs the required data stream converter (PostScript-, PDF- or PCL-RIP) to apply
the resolution of the destination printer while ripping.
If there are printers attached to the Océ PRISMAproduction Server system with different
print resolutions and you want them to be used in conjunction with jobrequirement, you
have to establish different virtual printers configured with different print resolutions.
Doing so enables you to let the RIP generate the print data in the correct resolution by
selecting the virtual printer with the appropriate print resolution.
Printers with multi resolution capabilities (MRM) will lead to print data ripped for 600
dpi.
DPconnect specific
DPconnect does its own check for printer postprocessing requirements. If the selected
destination printer for DPconnect jobs does not meet these printer postprocessing requirements, then DPconnect will omit these requirements or will stop the print job - according
to the DPconnect settings.
In order to make all DPconnect jobs pass the workflow and take advantage of jobrequirement, the virtual destination printer "SelectPrinter" has to be set up in such a way that
it covers all possibly occurring printer postprocessing requirements. In fact this should
be a superset of the postprocessing capabilities of all real destination printers attached to
your Océ PRISMAproduction Server system.
Manual Ticket Parameter Setup
Upgrading a normal job ticket with a jobrequirement step requires the following:
■
■
■
■
■
■
Open the job ticket file with an ASCII editor. The folder where you find it is
'/u/prismapro/cfg/jobinput/ticket'
Add a new ticket section named jobrequirement. This has to be done in a separate
line, the section name has to be enclosed with [].
'[jobrequirement]'
After the section line insert the line:
' _Service=jobrequirement'
Put all the jobrequirement parameters after the service line and set their values as you
need them.
Search for the [job] section and insert somewhere in the job section the line:
'Pre_Print_Steps=jobrequirement'
Close and save the job ticket file.
Controlling jobrequirement information output
The job ticket section [jobrequirement] contains a set of parameters which control both
the amount of information and for some information also its appearance in the popup
window. Parameters are (Default values are bold):
Chapter 4 - POD-Module Operation
103
Jobrequirement Functional Module
■
■
■
■
■
■
■
■
■
■
■
■
■
■
■
104
outputInJobView=yes/no
Show all job requirement information in the All Jobs view.
outputInMessageView=yes/no
Show all job requirement information as an information message in the Messages
window.
showMediaRequirements=yes/no
If the following input media attributes are requested, they will be displayed:
Medium color name
Medium type name
Medium set size
Medium format
Medium weight
Medium predrilled hole count
showUP3IMediaNames=yes/no
If a UP3I coded medium name is requested, this name will be displayed.
showAFPMediaNames=yes/no
If an AFP coded medium name is requested, this name will be displayed.
showContainerType=yes/no
Shows the type of page content (e.g. image, PDF-container,...).
showTrays=yes/no
If an output tray is requested AND there is no printer postprocessing request, the
output tray number will be displayed.
showPPPRequirements=yes/no
If the following printer postprocessing details are requested, they will be displayed:
Device name
Operation name
Reference edge / Reference corner
showHighlightColorRequirements=yes/no
If the print data of a job requires any other than the default color (in AFP terms) all
of these colors will be displayed in a list.
routing=yes/no
Not implemented.
showTonerRequirements=yes/no
If a specific toner is requested, its corresponding color ID will be displayed.
showInterposerRequirements=yes/no
If some input media has to be drawn out of an interposer tray, this request will be
displayed.
showBarcode=yes/no
If a job prints barcode, a list of used barcode types will be displayed.
showProposal=yes/no
Not implemented.
showResolution=yes/no
Chapter 4 - POD-Module Operation
Jobrequirement Functional Module
■
A list of any print resolutions required by the print data for any of the following AFPitems will be displayed:
Pages
Images
Barcode
simpleOutput=yes/no
This switch affects display of the medium formats and the printer postprocessing device
names.
If set to no:
Medium formats are displayed in the fomat:
'Length mm x Width mm'.
Printer postprocessing requests are displayed in the fomat:
'<Device name> <Operation name> <Reference edge/Reference corner>'
If set to yes:
Medium dimensions are translated according the following table into medium format
names and these will be displayed instead of the medium dimensions:
#
Medium Length [mm]
Medium Width [mm]
Medium Format Name
216
279
US Letter
216
356
US Legal
279
432
US Ledger
420
594
A2
297
420
A3
305
430
A3 uncut
210
297
A4
215
305
A4 uncut
149
210
A5
250
353
B4
157
364
JIS B4
All other medium dimensions are shown as with simpleOutput=no.
Printer postprocessing requirements are translated outgoing from the technical terms
"device name", "operation name" and "reference" to a simplified descriptive name according the following table:
Chapter 4 - POD-Module Operation
105
Jobrequirement Functional Module
#
106
Device Name
Operation Name
Reference
Simplified Postprocessing Name
UP3I Staple
Corner staple
Top left
Single portrait staple upper left
UP3I Staple
Corner staple
Bottom left
Single landscape
staple upper left
UP3I Staple
Corner staple
Bottom right
Single landscape
staple upper right
UP3I Staple
Corner staple
Top right
Single portrait staple upper right
UP3I Staple
Edge stitch
Left
Dual portrait staple
left
UP3I Staple
Edge stitch
Top
Single portrait staple upper left
UP3I Staple
Edge stitch
Bottom
Dual landscape staple left
UP3I Staple
Default
Default
Staple
UP3I Stack
Deliver Stack
Default
Deliver Stack
UP3I Stack
Altern. Offset
Stack
Default
Offset Stacker
UP3I Stack
Default
Default
Stack
UP3I Bind
Default
Left
Binding left
UP3I Bind
Default
Right
Binding right
UP3I Bind
Default
Default
Binding
UP3I Bookletmaker
Default
Default
Bookletmaker
AFP corner staple
-
Top left
Single portrait staple upper left
AFP corner staple
-
Bottom left
Single landscape
staple upper left
AFP corner staple
-
Bottom right
Single landscape
staple upper right
AFP corner staple
-
Top right
Single portrait staple upper right
Chapter 4 - POD-Module Operation
Jobrequirement Functional Module
Device Name
Operation Name
Reference
Simplified Postprocessing Name
AFP edge stitch
-
Left
Dual portrait staple
left
AFP edge stitch
-
Top
Single portrait staple upper left
AFP edge stitch
-
Bottom
Dual landscape staple left
AFP corner staple
-
Default
Staple
All other printer postprocessing requirements are shown with simpleOutput=no.
Chapter 4 - POD-Module Operation
107
PCL Converter: Concept
PCL Converter
PCL Converter: Concept
Introduction
This chapter provides general information about the PCL Converter software product.
It explains what purpose the PCL Converter serves, introduces the requisite components
and describes the workflow.
Definition
As well as controlling printers directly, the PCL Print Control Language (PCL) by Hewlett
Packard can be used to describe entire print pages containing both text and vector
graphics.
Many of today's desktop publishing programs generate print files in PCL format. The
PCL Converter enables users of such programs to convert their PCL documents into the
AFPDS command language. The files can then manipulated using other Océ tools, such
as the Professional Document Composer, enabling them to be output as finished publications on Océ printing systems, or be converted to TIFF format for archiving or other
purposes.
The PCL Converter supports the PCL 6 (PCL5e, including HP-GL/2, PCL XL, PJL)
and PCL 5c.
PCL commands are compact escape sequences embedded in the data stream of a print
job, an approach which reduces both the volume of data and the command-decoding
overhead.
The PCL Converter converts PCL commands into a compressed, full-page image, compliant with the CCITT T.6 Group 4 Coding Standard (G4 MMR) and implements it
into the appropriate command language, taking into account the layout (page) size settings.
PJL commands (Print Job Language) in the data stream are interpreted only if they relate
to the PCL data stream. If not, they are ignored.
Ways of Using the PCL Converter
Under Océ PRISMAproduction Server, the PCL Converter converts PCL files into AFPDS
format. Files are composed at 300 dpi for printing with the PCL-Module, and at 600
dpi for the POD-Module. Océ PRISMAproduction Server features a user-friendly menu
interface for working with the PCL Converter. The workflow is fully automated. It is
integrated into Océ PRISMAproduction Server by way of the Print Job Manager.
Integrating the PCL Converter into Océ PRISMAproduction Server makes the following
procedures possible:
108
Chapter 4 - POD-Module Operation
PCL Converter: Concept
■
■
■
Combining the conversion and print job into a one-step process.
Linking the conversion seamlessly to the print output.
Making the conversion service accessible to all Océ PRISMAproduction Server users.
If there is a heavy conversion workload, or if the production process has to meet specific
requirements, the PCL Converter should be run on a separate computer (RIP server)
upstream from the print server.
This procedure is recommended:
■
■
For applications that print the same documents repeatedly with no changes in content.
It is possible to eliminate redundant conversion by separating the conversion work
from the job of printing the documents.
A further reason is the computing power that conversion requires. If printing is slowed
due to the print servers conversion workload, you should perform the conversion as
a process completely separated from printing.
The conversion can be carried out at a different time and/or in a different place. For
example, conversions can be carried out at night, when the print server does not have
to handle the same workload; or you can convert files on a PC other than the print
server.
After conversion, files are available to users in the format required for further processing
(for example for printing or archiving).
As well as this integrated approach, the PCL Converter can also run as a stand-alone
process.
Stand-Alone Conversion
The PCL Converter can be used separately from Océ PRISMAproduction Server. This
provides more flexibility for custom solutions with the software.
A PCL conversion statement (command line) is provided with the PCL Converter for
stand-alone processing. This enables you to activate conversion automatically via your
own programs or shell scripts.
Integration of a dedicated conversion PC into the production workflow has to take place
on-site, so no facilities can be included in the product package. It is up to you to decide
how the conversion process can best be integrated to suit your needs. We have included
a few suggestions in this manual, but these are not part of the products functionality as
shipped.
Prerequisites for PCL Conversion
PCL conversion requires the following hardware and software:
Chapter 4 - POD-Module Operation
109
PCL Converter: Concept
#
Operating system:
SUSE Linux Enterprise Server 10
Processor:
Intel Pentium (recommended > 2 GHz CPU performance)
RAM:
Recommended > 1 GB RAM for 300 dpi and > 2 GB RAM
for 600 dpi resolution
Product components
The product package consists of the following components:
■
■
■
110
PCL Converter
Shell scripts for generating the required output formats
Internal Fonts
Chapter 4 - POD-Module Operation
PCL Converter: Fonts and Bin Control
PCL Converter: Fonts and Bin Control
Fonts
PCL files may or may not include fonts. The system works with internal PCL fonts if
none are included in the files. The following 53 industry standard-compatible fonts are
provided in the PCL Converter.
#
CG Times
LetterGothic It
Helvetica Ob
CG Times It
Albertus Md
Helvetica Bd
CG Times Bd
Albertus Xb
Helvetica Bd Ob
CG Times BdIt
Clarendon CdBd
Helvetica Nr
Univers MD
Coronet
Helvetica Nr Ob
Univers MdIt
Marigold
Helvetica Nr Bd
Univers Bd
Arial
Helvetica Nr Bd Ob
Univers BdIt
Arial It
NwCentSchlbk Rmn
Univers CdMd
Arial Bd
NwCentSchlbk It
Univers CdMdIt
Arial Bd It
NwCentSchlbk Bd
Unviers CdBd
Times New
NwCentSchlbk Bd It
Univers CdBdIt
Times New It
Palatino Rmn
AntiqOlive
Times New Bd
Palatino It
AntiqOlive It
Times New Bd It
Palatino Bd
AntiqOlive Bd
Symbol
Palatino Bd It
CG Omega
Wingdings
SymbolPS
CG Omega It
ITCAvantGard BK
Times Rmn
CG Omega Bd
ITCAvantGard BK Ob
Times It
CG Omega BdIt
ITCAvantGard Db
Times Bd It
Garamond Antiqua
ITCAvantGard Db Ob
ZapfChancery Md It
Garamond Krsv
ITCBookman Lt
ZapfDingbats
Garamond Hlb
ITCBookman Lt It
Kanji Mincho
Garamond KrsvHlb
ITCBookman Db
Kanji Gothic
Courier
ITCBookman DB It
Line Printer Roman 8
Courier Bd
CourierPS
Line Printer PC-8
Chapter 4 - POD-Module Operation
111
PCL Converter: Fonts and Bin Control
Courier It
CourierPS Ob
Line Printer PC-8 D/N
Courier BdIt
CourierPS Bd
Line Printer IBM 850
LetterGothic
CourierPS Bd Ob
Line Printer ECMA Latin
1
LetterGothic Bd
Helvetica
Line Printer Legal
If the PCL file references fonts which are inaccessible at the time of the conversion, the
PCL Converter selects fonts in accordance with the usual PCL conventions. At present,
it is not possible to pre-load other fonts in addition to the 53 internal standard fonts. All
the fonts that the job requires must be present in the print file as inline resources.
Control of In- and Output Bins
To control the input bins, use the following escape sequences (AFPDS max. 8 input bins):
<Esc>&l20H ---> Bin 1
<Esc>&l21H ---> Bin 2
<Esc>&l22H ---> Bin 3
<Esc>&l23H ---> Bin 4
<Esc>&l24H ---> External
<Esc>&l25H ---> Bin 5
<Esc>&l26H ---> Bin 6
<Esc>&l27H ---> Bin 7
<Esc>&l28H ---> Bin 8
<Esc>&l29H ---> Bin 9
<Esc>&l30H ---> Bin 10
<Esc>&l31H ---> Bin 11
<Esc>&l32H ---> Bin 12
<Esc>&l33H ---> Bin 13
<Esc>&l34H ---> Bin 14
<Esc>&l35H ---> Bin 15
<Esc>&l36H ---> Bin 16
To control the output bins, use the following escape sequences:
<Esc>&l1G ---> Bin 1
<Esc>&l2G ---> Bin 2
<Esc>&l3G ---> Bin 3
<Esc>&l4G ---> Bin 4
112
Chapter 4 - POD-Module Operation
PCL Converter: Saving Resources on Hard Disk
PCL Converter: Saving Resources on Hard Disk
Required Commands
You can save resources (Fonts, Macros, Overlays) by using the following PJL commands:
■
■
■
DISKLOCK
FSMKDIR
FSDOWNLOAD
Note:
Fonts must be available in the ’Mass Storage Format’.
If you want to load a saved resource, you need the alphanumeric ID command:
<ESC>&n#W¤filename
# : This symbol represents the number of characters after W
¤ : This symbol represents the control byte.
The following operations are supported:
#
Control-Byte
Operation
Directory*)
01
Combines the actual font ID with font
of the given string ID
\fonts
02
Selects the font with the given String ID
as primary
\fonts
03
Selects the font with the given string ID
as secondary
\fonts
04
Applies the actual Macro ID to the string
ID
\pcl\macros or
\pclxl\macros
05
Combines the actual macro ID with
macro of the given string ID
\pcl\macros or
\pclxl\macros
*) The directories are strictly predefined and cannot be chosen. The filename, under
which the resources are stored, can be chosen at will.
Note:
There is no resource management. If a resource file already exists, it will be overwritten!
The resposibility for managing resources is only to the user!
Chapter 4 - POD-Module Operation
113
PCL Converter: Saving Resources on Hard Disk
Example 1
#
114
00000000
[Esc%-12345X]
00000009
@PJL SET RESOLUTION=600
00000032
[LF]
00000033
@PJL DEFAULT
DISKLOCK=OFF
00000058
[LF]
00000059
@PJL FSMKDIR
NAME="0:\pcl\macros"
00000092
[LF]
00000093
@PJL FSDOWNLOAD
FORMAT:BINARY
NAME="0:\pcl\macros\macro.res"
SIZE=16
00000161
[LF]
00000162
Downloaded macro
00000178
[Esc%-12345X]
00000187
@PJL ENTER LANGUAGE=PCL
00000210
[LF]
00000211
This is the downloaded
macro :
00000241
[CR]
Carriage Return
00000242
[LF]
Line Feed
00000243
[CR]
Carriage Return
00000244
[LF]
Line Feed
00000245
[Esc&f1Y]
Macro ID <1>
00000250
[Esc&n10W]
Alphanumeric ID Command
00000256
¤macro.res
00000266
[Esc&f2X]
Chapter 4 - POD-Module Operation
Universal Exit Language
Line Feed
Line Feed
Line Feed
Line Feed
Universal Exit Language
Line Feed
Execute Macro
PCL Converter: Saving Resources on Hard Disk
00000271
[EscE]
Printer Reset
00000273
[Esc%-12345X]
Universal Exit Language
Description of the Commands
#
1st command
[Esc%-12345X] This PJL command forces the converter to terminate
the active printer language and to tranfer control to PJL.
2nd command
@PJL SET RESOLUTION=600 Sets the resolution to 600dpi.
3rd command
@PJL DEFAULT DISKLOCK=OFF DISKLOCK has to be set to
OFF, because otherwise you cannot write on the hard disk.
4th command
@PJL FSMKDIR NAME="0:\pcl\macros" Use this command to
create the directory \pcl\macros in the actual working directory. You
can use 0 or 1 as volume, which has no effect on UNIX systems but
still has to be present.
5th command
@PJL FSDOWNLOAD FORMAT:BINARY
NAME="0:\pcl\macros\macro.res"
SIZE=16<LF>Downloaded macro
This PJL command contains the following steps:
1. The format of the data to be saved is binary
2. It sets the directory name (0:\pcl\macros) and the file name
(\macro.res)
3. It specifies the number of bytes of the macro SIZE=16) Finally
follows the macro itself (in this case the text "Downloaded macro").
6th, 7th
command
[Esc%-12345X]
@PJL ENTER LANGUAGE=PCL
Use this command to switch back to PCL again.
After the print data: "This is the downloaded macro:", the macro will
be executed.
8th command
[Esc&f1Y]
The macro ID command sets the ID of the actual macro to 1.
9th command
[Esc&n10W]¤macro.res
The alphanumeric ID command assignes the string ID "macro.res"
to the actual macro ID. You have to use the same string name as in
the FSDOWNLOAD command.
The alphanumeric ID command has to know how many bytes follow
after the last W (in this case 10). The ¤ symbol here represents the
decimal value 05. This control byte indicates, that the string ID is
assigned to the actual macro ID.
Chapter 4 - POD-Module Operation
115
PCL Converter: Saving Resources on Hard Disk
10th command
[Esc&f2X]
The macro control command executes the macro with the last of all
assigned macro ID.
11th command
[EscE]
Printer reset command
12th command
[Esc%-12345X]
This PJL command initiates the termination of the converter and
control goes back to PJL.
Example 2
#
00000000
[Esc%-12345X]
00000009
@PJL JOB
00000017
[LF]
00000018
@PJL DEFAULT
DISKLOCK=OFF
00000043
[LF]
00000044
@PJL FSMKDIR
NAME="0:\fonts"
00000072
[LF]
00000073
@PJL FSDOWNLOAD
FORMAT:BINARY
NAME="0:\fonts\Matura_MT" SIZE=36496
00000139
[LF]
00000140
<Fontdaten im Mass Storage Font Format>
Universal Exit Language
Line Feed
Line Feed
Line Feed
Line Feed
...
...
...
116
00036638
[Esc%-12345X]
00036647
@PJL ENTER LANGUAGE=PCL
00036670
[LF]
Chapter 4 - POD-Module Operation
Universal Exit Language
Line Feed
PCL Converter: Saving Resources on Hard Disk
00036701
[Esc*c1D]
Assign Font ID <1>
00036706
[Esc*c5F]
Make Soft-Font Permanent
00036711
[Esc(1X]
Primary Soft Font Select
ID 1
00036715
[Esc&n10W]
Alphanumeric ID Command
00036721
¤ Matura_MT
00036731
[Esc*c1D]
Assign Font ID <1>
00036736
[Esc*c5F]
Make Soft-Font Permanent
00036741
[Esc(1X]
Primary Soft Font Select
ID 1
00036745
This is a Matura Font
00036769
[EscE]
Printer Reset
Description of the commands
#
1st command
[Esc%-12345X] This PJL command forces the converter to terminate the
active printer language and to tranfer control to PJL.
2nd
command
@PJL JOB Start of the PJL Job
3rd
command
@PJL DEFAULT DISKLOCK=OFF DISKLOCK has to be set to OFF
otherwise the hard disk cannot be written.
4th command
@PJL FSMKDIR NAME="0:\fonts" With this command you create the
directorx \fonts in the current working directory. You can use 0 or 1 as
volume, which has no effect on UNIX systems but still has to be present.
5th command
@PJL FSDOWNLOAD FORMAT:BINARY NAME=
"0:\fonts\Matura_MT" SIZE=36496
This PJL-command initiates several steps. First it specifies the binary data
format. Secondly it contains the directoryname (0:\fonts\) and the file
name to be saved (Matura_MT). Thirdly it specifies the number of bytes
of this font (SIZE=36496). The following contains the font data (in the
Mass Storage Font Format).
Chapter 4 - POD-Module Operation
117
PCL Converter: Saving Resources on Hard Disk
118
6th, 7th
command
[Esc%-12345X]
@PJL ENTER LANGUAGE=PCL
Use both commands to switch back to PCL.
8th command
[Esc*c1D] Assignes ID 1 to the font.
9th command
[Esc*c5F] Use this command to identify the font with ID 1 as permanent.
10th
command
[Esc(1X] Use this command to identify the font with ID 1 as primary.
11th
command
[Esc&n10W] §¤Matura_MT
The alphanumeric ID command connects the current font ID to the font
with the string ID ,Matura_MT
The string name has to be the same as in the FSDOWNLOAD command.
The alphanumeric ID command has to know how many bytes follow the
terminating W (in this case 10). The symbol ¤ represents the control byte
with the decimal value of 01.
12th
command
[Esc*c1D]
Assignes ID 1 to the font.
13th
command
[Esc*c5F]
Use this command to identify the font with ID 1 as permanent.
14th
command
[Esc(1X]
Use this command to identify the font with ID 1 as primary.. the print
data follow (This is a Matura Font).
15th
command
[EscE] Printer Reset command.
Chapter 4 - POD-Module Operation
PCL Converter: Operation
PCL Converter: Operation
Introduction
This chapter explains how to operate the PCL Converter. It explains how to control the
program and outlines measures for correcting possible problems.
Customizing for Océ PRISMAproduction Server
All necessary customizing is carried out during the installation of the Océ PRISMAproduction Server system.
Notes on Running Fanfold Printers
The page length (”pagelength” parameter) on fanfold printers is entered in increments
of 1/6”. Consider that the page length must always be at least as large as the output size
generated in the PCL file, since otherwise PEMs (Print Error Marks) will be printed.
Example: 11 4/6" = 29.63 cm, but length A4 = 29.7 cm
Stand-Alone Conversion in Command Line Mode
Selecting the Control Procedure
When the PCL Converter is run as a separate process, the conversion job is submitted
via a custom-defined statement. A number of these statements are available to choose
from. The required statement is either selected by the user or integrated into a customdefined shell script. This customizing is performed by the system administrator using
operating system utilities. You can display a list of the available conversion statements by
entering the command ‘pcl’. The following summary is shown on the screen:
General help for command line mode
From this list, locate the shell script you need by combining the output data format with
the resolution.
Example: you want to convert a PCL file for a 600 dpi printer into AFPDS format. As
indicated by the following table, you should use the shell script pcla6.
Chapter 4 - POD-Module Operation
119
PCL Converter: Operation
#
600 dpi
300 dpi
AFPDS (full-page image
per page)
pcla6
pcla3
TIFF (n files with one
page)
pclt6
pclt3
TIFF (multi image tiff
file)
pclmt6
pclmt3
Note:
You cannot create page segments in output files, which are divided.
Determining the Correct Parameters
After locating the shell script you want to use, you have to prepare the following parameters:
■
■
The name of the PCL file to be converted
The page size of the PCL file
The page size for conversion must match the size specified when the PCL file was generated – otherwise there could be misregistration in the printout.
For example, if a driver centers an A4 page on an A3 page, you must select A3 for the
conversion, not A4.
Overview of predefined page sizes:
#
DIN Formats
Abbrev.
Size in mm
Size in inches
A4
D4
210.0 x 297.0
8.27 x 11.7
A4 uncut
A4
215.0 x 305.0
8.46 x 12.0
A3
D3
297.0 x 420.0
11.7 x 16.5
A3 uncut
A3
305.0 x 430.0
12.0 x 16.9
US Formats
Abbrev.
Size in mm
Size in Inches
Letter
LET
215.9 x 279.4
8.5 x 11.0
Legal
LEG
215.9 x 355.6
8.5 x 14.0
Ledger
LED
279.4 x 431.8
11.0 x 17.0
#
120
Chapter 4 - POD-Module Operation
PCL Converter: Operation
Overview of variable page sizes:
#
Variable Formats
Abbrev.
Size in X Direction
Size in Y Direction
cm
M
0 < x < 138.71
0 < y < 138.71
inch
I
0 < x < 54.61
0 < y < 54.61
■
■
The layout of the output file (simplex, duplex or tumble)
The name of the output file to be generated
Example 1 for help::
The entry pcla6, for example, would display further information about which parameters
are required and which options you can use for the conversion. The first help page shows
the settings for predefined paper formats.
Special help for command line mode, part 1, here converting PCL to 600dpi / AFPDS
To view the special options, press the Enter (Carriage Return) key:
Special help for command line mode, part 2, here converting PCL to 600dpi / AFPDS
Press Enter again to view the settings for the variable paper formats:
Chapter 4 - POD-Module Operation
121
PCL Converter: Operation
Special help for command line mode, part 3, here converting PCL to 600dpi / AFPDS
The next window shows the special options for the variable paper formats:
Special help for command line mode, part 4, here converting PCL to 600dpi / AFPDS
Example 2 for fixed page size:
#
Conversion
Command
into output format AFPDS
pcla
with resolution 600 dpi
pcla6
PCL file t1.bin
pcla6 t1.bin
with page size A4
pcla6 t1.bin D4
and layout simplex
pcla6 t1.bin D4_P_SIM
into output file t1.af6
pcla6 t1.bin D4_P_SIM t1.af6
Example 3 for variable page size:
122
Chapter 4 - POD-Module Operation
PCL Converter: Operation
#
Convesion
Command
into output format TIFF
pclt
with resolution 300 dpi
pclt3
PCL file t2.bin
pclt3 t2.bin
with variable page size:
in inches
pclt3 t2.bin I
of 10.3 in X-direction
pclt3 t2.bin I 10.3
of 13.8 in Y-direction
pclt3 t2.bin I 10.3 13.8
and layout duplex
pclt3 t2.bin I 10.3 13.8 DUP
into output file t2.af6
pclt3 t2.bin I 10.3 13.8 DUP t2.af6
Error messages are output on screen via STDERR (Standard Error).
Highlight Color
To extract highlight color use 1, 2 or 3 for <special>.
1 extracts red
2 extracts green
3 extracts blue
Chapter 4 - POD-Module Operation
123
PCL Converter: Conversion under Océ PRISMAproduction Server
PCL Converter: Conversion under Océ PRISMAproduction
Server
Introduction
The PCL Converter is integrated into Océ PRISMAproduction Server (currently PODModule only) by way of the Print Job Manager. This subject is dealt with in detail in the
section describing the Print Job Manager.
Workflow
You control the PCL Converter workflow and define conversion parameters via the Océ
PRISMAproduction Server Print Job Manager. This creates a job ticket based on the
settings you specify and sends the ticket to the Océ PRISMAproduction Server master.
Using the details in the job ticket, the master then directs the distribution of the work
packages, sends instructions to programs and monitors all the stages in job handling. This
is done in a way that maximizes the data throughput and distributes the workload evenly
within the Océ PRISMAproduction Server system.
Workflow when PCL conversion is integrated into Océ PRISMAproduction Server
Creating a Conversion Job with the Print Job Manager
1. Working in the Print Job Manager, select the PCL file you want to convert and place it
in the job list (called the 'List of Files & Workflow Definition') with the data format
PCL. You can make certain settings for the PCL format in the File Properties window.
124
Chapter 4 - POD-Module Operation
PCL Converter: Conversion under Océ PRISMAproduction Server
2. In this window select the print format in the 'Paper size' box on the 'Media' tab:
- A4
- A4_uncut
- A3
- A3_uncut
- Letter
- Legal
- Ledger
- Variable
Make sure to choose the format in which the pages of the PCL file were generated.
3. The resolution is set automatically by the Print Job Manager.
4. Choose the printing mode in the Page Layout box:
- Simplex
- Duplex
- Tumble
The PCL Converter can compose files for output on one or both sides of the paper. With
output on both sides, you can choose whether the finished document is to be set out like
a book (pages are turned to the left) or like a wall calendar (pages are turned over the
short edge).
5. You can use the collect function to chain multiple PCL files for processing together.
Consider that a PCL reset (ESC E) is executed before and after each file.
Note:
A further point to consider: When you place a series of PCL files in the List of Files and
indicate that you want these files to be chained, the chaining is performed following the
conversion. Each file in the list is treated as a completely separate entity, and a number
of PCL Converters can work on the list at the same time. However, conversion using
more than one PCL Converter can change the order in which the files are sequenced.
If you want to keep your files in a particular order, you must create a chained file yourself
before performing the conversion.
Chapter 4 - POD-Module Operation
125
PCL Converter: Troubleshooting
PCL Converter: Troubleshooting
Introduction
The PCL language is defined such that users essentially have the responsibility for preventing errors, and there are always alternative courses of action available, defined as part
of the language. Consequently, it is at present up to the user to ensure that, for example,
all the required resources are embedded correctly in the data stream.
Error messages that can occur on IO processors or due to incorrect parameters:
Messages in Stand-Alone Conversion
The Converter error messages are output on STDERR in accordance with the conventions
described in the table below.
Messages in Conversion Integrated into Océ PRISMAproduction Server
All processes on the Océ PRISMAproduction Server system run under the control of the
Order Distribution System (ODS). This also goes for the output of error messages. ODS
always uses the error code 203 for converter errors. Messages are displayed in the ODS
Control window.
The Océ PRISMAproduction Server messages and logs only tell you that a conversion
was begun, and whether it was completed, aborted abnormally due to an error, or canceled
by an Océ PRISMAproduction Server Cancel command. ODS is always specified as the
module reporting the error.
Known and acceptable differences between the PCL Converter and the HP Reference
Priner (LaserJet)
■
■
If a Universal Exit Language (<Esc>%-12345X) command appears within a PCL file,
all resources (softfonts, macros, overlays ...) are deleted and are not available anymore
after a UEL command! Reason: the externally purchased sources do not allow ’ state
preservation’.
Resources (softfonts, macros, overlays ...) are not permanently kept in the memory.
Therefore the resources cannot be accessed anymore after a restart of the PCL converter.
Reason: The PCL converter is restarted for every conversion. Unlike an HP printer it
does not work in an infinite loop. Therefore the converter does not know permanent
resources from a former conversion anymore.
Known and acceptable differences between the PCL Converter and PCL Emulation
■
126
Highlight color cannot be accessed like it is possible with the PCL emulation. For this
full color would be necessary as described in the HP "Technical Reference Manual".
Use HP color drivers (we recommend HP Color LaserJet 4500) to create color files.
Chapter 4 - POD-Module Operation
PCL Converter: Troubleshooting
Reason: the externally purchased sources comply with the manuals mentionened above
and expect escape sequences for color conversion described in theses manuals
Converter Error Messages
#
Error No.
Under Océ
PRISMAproduction Server
Stand-alone
process
Error message
0
0
Process completed without errors
-
01
Error opening protocol file.
Note: The logging function is only intended for
troubleshooting. It must be switched off during
normal operation. Action: Switch off the logging
function.
102
02
Not enough memory
124
06
Error opening output file
Action: System error, inform administrator
125
07
Error opening input file
Action: Verify that input file exists. If it does, inform the administrator.
126
Expired or invalid license
104
08
Error reading input file
Action: System error, inform administrator
128
09
Wrong page layout
Note: Internal error
Action: Report error to systems consultant
131
12
Command line error
Action: Check and correct the command line.
105
13
Error writing output file
Action: System error, inform administrator
132
14
Compression error
Note: Internal error
Action: Report error to systems consultant
134
16
Resolution not supported Note: Internal error
Action: Report error to systems consultant
Chapter 4 - POD-Module Operation
127
PCL Converter: Troubleshooting
Error No.
128
135
17
Front end error with return code = 0
Note: Internal error
Action: Report error to systems consultant
136
18
Page size exceeds limitations
Note: Internal error
Action: Report error to systems consultant
137
19
AFPDS and TIFF datastream only MMR possible
Note: Internal error
Action: Report error to systems consultant
138
20
Input trays out of range
Note: Wrong input tray selected.
Action: Select correct input tray.
139
21
Output trays out of range
Note: Wrong output tray selected.
Action: Select correct output tray.
These settings
are rejected at
the GUI
22
Page width greater page length not possible
Note: User error.
Action: Correct input file.
These settings
are rejected at
the GUI
24
Variable format x- or y-value equal 0
Note: User error.
Action: Correct input file.
Not possible
26
Input file is equal to output file
Note: User error.
Action: Correct call parameter settings.
146
28
Compression algorithm not supported
Note: User error.
Action: Generate PCL file with permitted compression algorithm
147
29
Resolution 600 dpi not allowed (low end)
Note: User error.
Action: Generate a PCL file with a permitted resolution
154
36
Cannot open file resource file
Note: Internal error
Action: Report error to systems consultant
Chapter 4 - POD-Module Operation
PCL Converter: Troubleshooting
Error No.
155
37
Error writing file resource file
Note: Internal error
Action: Report error to systems consultant
156
38
Invalid access on resource file
Note: Internal error
Action: Report error to systems consultant
157
39
PJT parameter not complete
Note: Internal error
Action: Report error to systems consultant
200
Output trays not possible in AFPDS
201
Resolution frontend/backend not equal
202
Possible font substitution (font characteristics)
203
Missing resource(s) [font ID]
204
Missing resource(s) [symbol set ID]
205
Missing resource(s) [macro ID]
Chapter 4 - POD-Module Operation
129
TIFF Converter: Concept
TIFF Converter
TIFF Converter: Concept
Introduction
This chapter gives general information on the TIFF Converter software product. It describes the tasks performed by the converter and outlines ways it can be used.
There is also a survey of necessary components and an outline of the working procedure.
Definition
Many of today's desktop publishing programs output their print files in TIFF format.
With the TIFF Converter, you can convert your TIFF documents into the AFPDS or
PCL command languages of printing systems. The files can then be output as finished
publications, ready for distribution.
Ways of using the TIFF Converter
Dedicated Conversion Server
To provide more scope for individual solutions with the TIFF Converter, the software
can also be run on a dedicated system, completely separate from the print server. In this
type of installation, the TIFF Converter can be started by command line entry. You can:
■
■
Shift the conversion workload from the print server to a different PC.
Activate the conversion automatically via your own programs or shell scripts.
This approach is recommended:
■
■
For applications that always print the same documents without changes to the contents.
Since conversion is a separate process, you only have to repeat it when the contents
or form of the document change.
If printing is slowed due to the print server’s conversion workload, you should conduct
the conversion as a completely separate process from printing. The conversion can be
carried out at a different time and/or in a different place. For example, conversions
can be carried out at night, when the server does not have to handle the same workload;
or you can convert files on a PC other than the print server.
Both these approaches will help restore output on the printing system to rated speed.
After conversion, files are available to users in the format required for further processing
(for example for printing and archiving).
130
Chapter 4 - POD-Module Operation
TIFF Converter: Concept
Note:
To use the TIFF Converter on a separate system, you need a high performance PC with
hardware and software that complies with the minimum requirements given in folowing
chapter.
Note:
Integration of a dedicated conversion PC into the production workflow has to take place
on-site, so no facilities can be included in the TIFF Converter product package. It is up
to you to decide how the conversion can best be integrated to suit your needs. We have
included a few suggestions in this manual, but these are not part of the product’s functionality as shipped. They are merely intended to give you some ideas and help for implementing your own solution.
Prerequisites for TIFF Conversion
TIFF conversion requires the following hardware and software:
#
Operating system:
SUSE Linux Enterprise Server 10 and higher
Processor:
Intel Pentium (recommended > 2 GHz CPU performance)
RAM:
Recommended > 1 GB RAM for 300 dpi and > 2 GB RAM for 600
dpi resolution
Chapter 4 - POD-Module Operation
131
TIFF Converter: Operation
TIFF Converter: Operation
Introduction
This chapter explains how to operate the TIFF Converter. It describes the program
functions and outlines measures for correcting possible problems.
Stand-Alone Conversion in Command Line Mode
If the TIFF Converter is run as a separate process, the conversion job is submitted via a
user-specific statement. A number of these statements are available to choose from. The
required statement is either selected by the user or integrated into a user-specific shell
script. This customizing is performed by the system administrator using operating system
tools.
Description of Control Parameters
If the TIFF Converter is called without parameters (tiffconv), the following help text is
displayed:
132
Chapter 4 - POD-Module Operation
TIFF Converter: Operation
Chapter 4 - POD-Module Operation
133
TIFF Converter: Operation
The control parameters can be entered in any sequence, but must be separated by a blank.
#
134
Control Parameter
Description
-s
Collects all the TIFF files in a directory, converts them and
creates a single output file. The TIFF files have to be named as
follows:
name.ext ext = 1 ... n.
Files have to be numbered contiguously. The name of the first
file in the series is specified with the program call.
Example: Files image.1, image.2, image.3, image.4 and image.5
are converted together and combined in a single output file.
-l
Collects the TIFF files listed in an ASCII file, converts them
and creates a single output file.
Example: tiffconv -l -X A filelist list.afp
File filelist:
/u/tiff/File1.tif
/u/tiff/File2.tif
/u/tiff/File3.tif
:
/u/tiff/Filex.tif
-w
Collects the TIFF files specified by wildcard, converts them and
creates a single output file. Files are collected according to UNIX
conventions.
Example: tiffconv -w -X A "*.tif" wildcard.afp
The inverted commas must be included in the command.
-p
Generates just a page, without page description. (Default: print
file).
-x arg
x offset (+/-) in dots
(Default: 0).
Note: Negative values are not permitted for PCL.
-y arg
y offset (+/-) in dots
(Default: 0).
Note: Negative values are not permitted for PCL
Chapter 4 - POD-Module Operation
TIFF Converter: Operation
Control Parameter
Description
-n
Turns screen output of tags off.
(Default: On).
-a
Activates the output of the ASCII strings in the TIFF file.
(Default: Off).
-m arg
Defines the page layout. Duplex: -m d, Tumble: -m t.
(Default: Simplex).
-i arg
Selects the input tray.
Tray A: -i 0, Tray B: -i 1, Tray C: -i 2.
(Default: No input tray).
-o arg
Selects the output tray.
Tray B: -o 1, Sample tray: -o 2.
(Default: Output tray A).
-u
Paper format A4 uncut.
(Default: A4).
Note: Old parameter, now replaced by -f arg.
-f arg
Selects the paper format A4 :
-f 0 A4uncut :
-f 1 A3 :
-f 2 A3uncut :
-f 3 B4 :
-f 4 (not for PCL) Letter :
-f 5 Legal :
-f 6 Ledger :
-f 7 A5 :
-f 8 (not for PCL) 19x24 cm :
-f 9 (not for PCL) 13.97x21.59 cm :
-f 10 (not for PCL)
-X arg
Selects the printer data stream
AFPDS : -X A
PCL : -X P
(Default : AFPDS)
-M
-I
-A arg
-B arg
Variable paper format:
The variable paper format is composed of three parameters: the
measuring unit (cm or inch), the x extent and the y extent.
Dimension in cm
Dimension in inches
Page size x extent
Page size y extent
Chapter 4 - POD-Module Operation
135
TIFF Converter: Operation
Control Parameter
Description
-H
<color>
-K
-U <R>
-W <G>
-Y <B>
Enables highlight color (Default:off) *
Extracted color *
1=red, 2=green, 3=blue, 4=red/green, 5=red/blue, 6=green blue
7=red/green/blue
Separates the highlight color image and the black and withe
images (optional) (Default: off).
Threshold value red * (0 - 255)
Threshold value green * (0 - 255)
Threshold value blue * (0 - 255)
* = These options must be used in conjunction.
The TIFF converter supports Custom Tone for TIFF files Rev. 6.0 (Palette-color images
and RGB full color images).
Tag Handling
The tags listed below are those supported by the program. The tags encountered in the
file are logged in STDOUT (when the parameter -n is not specified). If parameter -a is
specified, the ASCII strings in the TIFF file are output to STDOUT. The tags are output
as follows:
!! TAG: Tag is supported, and parameter(s) is (are) correct.
!? TAG: Tag is supported, parameter(s) not correct.
?! TAG: Tag is not supported.
?? TAG: Unknown tag.
#
136
New Subfile
254(0xFE)
The parameter value must be 0.
Subfile Type
255 (0xFF)
The parameter value must be 0.
Image Width
256 (0x100)
The parameter in the tag is transferred to the Image Data Descriptor
(image x extent). The parameter value must be on a byte boundary.
Image Length
257 (0x101)
Provided the image is not divided into strips, the parameter in the
tag is transferred to the Image Data Descriptor (image y extent).
Bits per Sample 258
(0x102)
The parameter in the tag must be 1.
Chapter 4 - POD-Module Operation
TIFF Converter: Operation
Compression
259 (0x103)
Depending on the parameter, the Image Encoding Parameter field
is set to the following value:
1 = no compression
2 = G3 MH compression (one-dimensional)
3 = G3 MR compression (two-dimensional)
4 = G4 MMR compression (two-dimensional)
Photometric
Interp. 262
(0x106)
The parameter value must be 0.
Fill Order 266
(0x10a)
If the parameter is set to 2, the bits in each byte of the output file
swap positions as follows: bit 0 swaps with 7, bit 1 with 6, bit 2 with
5, bit 3 with 4.
Image Descriptor 270
(0x10e)
The ASCII string is output to STDOUT if parameter -a is set.
Maske 271
(0x10f)
The ASCII string is output to STDOUT if parameter -a is set.
Model 272
(0x110)
The ASCII string is output to STDOUT if parameter -a is set.
Strip Offsets
273 (0x111)
Both ‘Pointer to Image Data’ and ‘Pointer to Offsets’ are supported.
Orientation
274 (0x112)
The parameter value must be either 1, 3, 6 or 8.
Samples per
Pixel 277
(0x115)
The parameter value must be 1.
Rows per Strip
278 (0x116)
If the image is divided into strips (the number of rows per strip is
unequal to the image length), an image is created for each strip.
Strip Byte
Counts 279
(0x117)
Both ‘Bytecount of compressed Data’ and ‘Pointer to Byte Counts’
are supported. If the image is divided into strips, data fields of corresponding lengths are created in the Image Data Descriptor.
Min Sample
Value 280
(0x118)
The parameter value must be 0.
Max Sample
Value 281
(0x119)
The parameter value must be 1.
Chapter 4 - POD-Module Operation
137
TIFF Converter: Operation
X-Resolution
282 (0x11a)
The parameter in the tag is entered in the Image Data Descriptor
(X image dots per base measuring unit). The resolutions have to be
300 and 600 dpi if the image is divided into stripes. The X resolution
must have the same value as the Y resolution.
Y-Resolution
283 (0x11b)
The parameter in the tag is entered in the Image Data Descriptor
(Y image dots per base measuring unit). The resolutions have to be
300 and 600 dpi if the image is divided into stripes. The Y resolution
must have the same value as the X resolution.
Planar Configuration 284
(0x11c)
The parameter value must be 1.
Page Name
285 (0x11d)
The ASCII string is output to STDOUT if parameter -a is set.
Resolution
Unit 296
(0x128)
The parameter value must be 2.
Software 305
(0x131)
The ASCII string is output to STDOUT if parameter -a is set.
Date Time
306 (0x132)
The ASCII string is output to STDOUT if parameter -a is set.
Artist 315
(0x13b)
The ASCII string is output to STDOUT if parameter -a is set.
Hostcomputer
316 (0x13c)
The ASCII string is output to STDOUT if parameter -a is set.
Ink Names
333 (0x14d)
The ASCII string is output to STDOUT if parameter -a is set.
Target Printer
337 (0x151)
The ASCII string is output to STDOUT if parameter -a is set.
Copyright
33432
(0x8298)
The ASCII string is output to STDOUT if parameter -a is set.
Tags not included in the list above are not supported.
Conversion with the Print Job Manager (PJM)
Load a TIFF file into the 'List of Files & Workflow Definition' section of the PJM. Be
sure that 'TIFF' is selected in the 'Format' list box. Now you can click the 'Edit File Pa-
138
Chapter 4 - POD-Module Operation
TIFF Converter: Operation
rameter' button and make your settings to collect several TIFF files in one file, to make
composer settings, to define medias or to separate colors.
Chapter 4 - POD-Module Operation
139
TIFF Converter: Troubleshooting
TIFF Converter: Troubleshooting
TIFF Converter Error Messages
If the TIFF Converter is run as a separate process, the converter error messages are output
to STDERR in English.
#
Error
Action
Error 01: Cannot open output
file
Verify that the requested file exists.
Error 02: Cannot open input file
Verify that the requested file exists.
Error 03: Memory allocation
failed
System error; consult your system administrator.
Error 04: Reading input file
Report the error to your system consultant.
Error 05: Resolution X != Y
Create TIFF file with the correct resolution (300
or 600 dpi).
Error 07: No TIFF file
140
Error 08: Wrong page layout
Call the converter with the correct layout (-m d
or -m t).
Error 09: Wrong intray
Call the converter with the correct input tray.
Error 10: Internal inconsistency
Internal error. Report the error to your system
consultant.
Error 11: Wrong outtray
Check and correct the command line entry.
Error 12: Data stream not supported
Check and correct the command line entry.
Error 13: Wrong parameter in
command line
Check and correct the command line entry.
Error 14: Image scanline data
not at byte boundary
Note: Applies only to LIP controller. The error
cannot occur with the SRA controller.
Error 15: Compression algorithm not supported
Create a TIFF file with the correct compression
algorithm.
Error 16: Writing output file
Report the error to your system consultant.
Error 17: No valid license for
TIFF Converter
Obtain a license.
Error 18: No output file in the
command line
Check and correct the command line entry.
Chapter 4 - POD-Module Operation
TIFF Converter: Troubleshooting
Error
Action
Error 19: Variable format not
supported in PCL
Variable format possible in AFPDS only.
Error 20: Measure undefined
Check and correct the command line entry.
Error 21: Input file has no valid
extension (option sample)
Check and correct the command line entry.
Error 22: Pointer to TAGs outside valid range
Create the TIFF file again.
Error 23: Orientation Parameter
not supported in PCL
Create the TIFF file again.
Error 24: TAG 0x140 Color
Map not supported
Create the TIFF file again without color information.
Error 25: TAG 0x102 Bits Per
Sample parameter not supported
Create the TIFF file again without color information.
Error 26: TAG 0x115 Samples
Per Pixel parameter not supported
Create the TIFF file again without color information.
Error 27 - 30: Internal error
Report the error to your system consultant.
Error 31: Child process not executed
Report the error to your system consultant.
Error 32: Child process failed
Report the error to your system consultant.
Error 33: No such file
Check whether the ASCII file exists.
Error 34: TAG 0x106 Photometric Parameter not supported
Create the TIFF file without the inverted image.
Error 35: Name of input file
specified incorrectly with collect
function (-s option)
Rename the input file(s).
Errors 41-43: reserved
Error 44: Only 300 or 600dpi
are permitted for striped images
Create TIFF file with the correct resolution (300
or 600 dpi).
Errors 45-49: reserved
Error 50: TAG’s not in ascending order
Create TIFF file with the correct resolution (300
or 600 dpi).
Errors 45-49: reserved
Chapter 4 - POD-Module Operation
141
TIFF Converter: Troubleshooting
Error
Action
Error 50: TAG’s not in ascending order
Create TIFF file with the correct order.
Errors 51-53: reserved
Error 54: Resolution TAG
0x11A or 0x11B missing
142
Chapter 4 - POD-Module Operation
Create TIFF file with correct TAG’s.
PPML Converter: Overview
PPML Converter
PPML Converter: Overview
Introduction
This converter enables you to print PPML files via the Océ PRISMAproduction Server
POD-Module. PPML (Personalized Print Markup Language) is based on XML and is
used for printing personalized data.
Requirements
You need a license for the Océ PRISMAproduction Server POD-Module and additionally
a license for the PPML converter:
PPML2AFPconvert 4.0
For the printer a CPSI license is required.
The following Hard- and Software versions are required:
■
■
■
■
Océ PRISMAproduction Server Server V4.0 or higher
Suse Linux SLES10 or higher
SPS with PS Version 3.8.2c or higher
Printer from bundle 5 Functional Code and CPSI - RIP V3.04.02 or higher
Installation and Deinstallation
The PPML-Module is installed with the Océ PRISMAproduction Server CD with licenses
for the Océ PRISMAproduction Server POD-Module and the PPML-Module.
Installation is described in chapter "Océ PRISMAproduction Server Installation/Deinstallation/Update" in the Océ PRISMAproduction Server Administration Settings and Tasks
Guide.
A demo application is installed on installation into the $DEMO directory.
You can check if the installation was successful by printing this demo application.
Deinstallation is performed via the install.prisma script: deinstallation of a component
of Océ PRISMAproduction Server.
Chapter 4 - POD-Module Operation
143
PPML Converter: Overview
Basic Functionality
The PPML converter represents a program, which runs under Linux. The program reads
a PPML file and converts it to AFPDS, which then can be printed on Océ printers with
bundle 5 - functional code. Additionally to the PPML file a DTD (description of the
XML structure of PPML) is needed and also all external resources belonging to the PPML
file. The program analyzes the PPML file and converts the layout to AFPDS while keeping
the original structure. The PPML objects will be converted to one PDF container per
page. These containers are then rastered and printed by the printer.
The program is integrated into the Océ PRISMAproduction Server workflow an can be
used after installation, if the correct license is installed.
Benefits and Restrictions of the PPML Converter
The basic benefits of the program are:
■
■
■
■
■
■
All Océ printers with SRA3 controller and bundle 5 functional code (CPSI) are supported.
Note: To have access to all functions of the program, the connected printers must
have a CPSI license for the functional code.
Support of PPML version 2.2 with UTF-8 coding.
Conversion of PPML files and resources to AFPDS.
Setting Simplex/Duplex via the GUI.
Setting of X2up via the GUI of the Professional Document Composer.
PS, PDF, TIFF and JPEG objects are supported (Conformance Subset Graphics Art
of PPML)
The restrictions are:
■
■
■
■
144
Multilevel is not supported. Color support depends on the abilities of the printer.
Only PPML files are supported, which comply with the Graphics Arts Conformance
Level.
PPML and AFPDS files up to a maximum of 2 GB are supported.
By mapping color on gray scales, contrasts maybe lost.
Chapter 4 - POD-Module Operation
PPML Converter - Workflow
PPML Converter - Workflow
Introduction
Prerequisites:
■
■
■
■
■
Proper installation of Océ PRISMAproduction Server (+POD-Module) V4.0 or
higher.
Proper import of licenses.
All external resources for the PPML application must be located in the subdirectory
’ppml’ of the application.
The PPML application should be located in the same directory but can also be stored
in any other directory.
The related DTD file must be located in the directory '/u/prismapro/lib/ppml'. Per
default the files ’ppml102.dtd’ and ppml 220 dtd is copied in this directory during
installation.
Conversion and Printing
1. Open the PJM with a POD ticket and set the correct format (PPML):
2. Add the PPML file to be printed to the ’List of Files’.
3. Open the ’File Properties’ by clicking the respective icon: .
Chapter 4 - POD-Module Operation
145
PPML Converter - Workflow
4. A window with two dialogs is opened:
5. In the ’PPML Options’ dialog first set the correct resource path. Basically there are two
possibilities to store the resources for the PPML converter:
■ If the resources are located on the computer, on which the converter is running, these
resources can be stored in a normal Linux path. You then have to select this local path
in the file selection box.
■ If the resources are located on another computer of the Océ PRISMAproduction
Server network, on which the converter is not running, a virtual directory $RESOURCE_PPML is provided. This directory is a link to '/u/prismapro/data/ppml'.
In this directory you have to create a subdirectory, in which all necessary resources
must be copied. This subdirectory has to be selected as ’Resource Path’. Per default a
subdirectory ’demo’ is already existing.
Additionally you can define the layout to be printed in this dialog.
'Do not optimize PDF Elements': When converting PPML data, PDF pages are created
which are packed in the corresponding containers of the AFPDS data stream. During the
PDF creation for example some parts can be compressed. This may lead to a smaller
amount of data, but decreases performance during conversion. Per default the optimization
is performed, but can be switched off if this box is activated.
6. Use the ’Compose’ dialog to call the Professional Document Composer to create impositioning sets for certain postprocessing devices (see the user guide for the Professional
Document Composer). This dialog also allows you to combine the PPML file with a
predefined impsitioning scheme.
7. Click the ’Execute’ button to convert and print the file on the selected target printer.
146
Chapter 4 - POD-Module Operation
'DPconnect' Functionality
'DPconnect'
'DPconnect' Functionality
Introduction
'DPconnect' enables you to print jobs, which have been sent from a Xerox print job
submitter to an Océ Océ PRISMAproduction Server system with the POD-Module.
'DPconnect' can be installed as a license dependent option for the POD-Module.
'DPconnect' allows you to replace the following Xerox printer types:
■
■
■
■
■
■
Xerox DocuTech 61xx
Xerox DocuTech 1xx HighLight Color
Xerox DocuTech 135
Xerox DocuPrint 4635 NPS
Xerox DocuPrint 48xx NPS
Xerox Nuvera
'DPconnect' emulates the interface between a Xerox print job submitter and the Xerox
print server. Therefore the known Xerox workflow is not changed. Via 'DPconnect' Xerox
print jobs will be received, converted, transferred to the Océ PRISMAproduction Server
ODS process chain and executed. At this point the print job is a normal Océ
PRISMAproduction Server print job. No operator interventions are required.
Additionally 'DPconnect' is able to print jobs, which have been created by standard LP
clients. These jobs may or may not have a Xerox job ticket. Also jobs created by Windows
printer drivers and by LP programs belong to this type.
'DPconnect' Functions
'DPconnect' supports the ASCII-ticket format and the XPIF-ticket format.
The following Xerox print submitter software can be used with Océ 'DPconnect'. The
above mentioned printer types can be used with this software:
■
DigiPath (V1.2, V2.0, V2.1, V3.0, V4.0), FreeFlow (Makeready V2.0, V3.0, V4.0,
V5.0)
- DSM (Document Scan and Makeready):
Production printing of RDO data
Printing of RDO data via printer drivers (see below)
- QuickPrint:
Production printing of RDO data
Chapter 4 - POD-Module Operation
147
'DPconnect' Functionality
PostScript
PDF
PCL
ASCII
Tiff
148
■
Xerox Printer Drivers for Windows
The following types of drivers are supported:
- PostScript driver
- PCL driver
Xerox job ticket generation may be switched on or off.
With print jobs for the DocuPrint 48xx NPS hightlight color substitution actions are
not available.
■
Xerox XDS
XDS Plus is not supported. The following data types are supported for each printer
model:
- Printer default
- PostScript
- PDF
- PCL
- ASCII
- TIFF
■
Xerox FreeFlow Print Manager
The following data types are supported for each printer model:
- Printer default
- PostScript
- PDF
- PCL
- ASCII
- TIFF
■
Print jobs from standard LP clients
DPconnect accepts print jobs submitted by a standard lp-client such as the Windowsor LINUX-lpr. Also Window printer drivers using the lp protocol are accepted. The
following data types (with or without Xerox-job-ticket) are supported:
- Printer default
- PostScript
- PDF
- PCL
- ASCII
Chapter 4 - POD-Module Operation
'DPconnect' Functionality
- TIFF
- AFP (IOCA)
PostScript- and PCL-data may be enriched with PJL-commands, however, PJL-commands other than PDL-language-settings, will be ignored. If no explicit PDL-languagesetting exists, 'DPconnect' determines the type of the print data by searching for
characteristic byte sequences
■
Customer developed print job submitter software with:
- File types: PostScript, PDF, PCL, ASCII, TIFF, AFP (IOCA)
- Xerox-ASCII- or XPIF-job ticket or without job ticket
- Using LP-protocol or Océ PRISMAproduction Server Hotdir
Note:
It is recommended to use the above mentioned Xerox printer types! These are the most
capable ones because they offer the widest range of job features. Of course you can use
other Xerox printer types. But Xerox job tickets for these printer types may not be suitable
for all desired job features.
■
Print jobs with other Xerox job ticket types
'DPconnect' accepts jobs with almost any kind of Xerox job ticket which complies
with the Xerox Job Ticket Programming Guide. This is to cover a wider range of Xerox
print jobs. However some rarely appearing job ticket statements are not implemented.
These statements will be shown in a message in the Océ PRISMAproduction Server
message box. To handle these cases, 'DPconnect' may be set up in a way either to interrupt job processing and ask the operator how to proceed or to ignore the unimplemented statements.
'DPconnect' supports jobs, which store the job ticket apart fom the print data in a
separate file. (This is for instance also the case with print jobs for the Xerox DocuTech
135). Thus print data can stored (in advance) anywhere on an Océ PRISMAproduction
Server print server. Then you only have to send the job tickets from a local server or
from any remote client to the Océ PRISMAproduction Server print server via the LP
protocol. These job tickets contain links to the stored print data. You can print the
same data in different ways using different job tickets. The print data can be stored
on local discs, on removable storage devices or on mounted network devices. Furthermore you can control via the job ticket if the print data should be deleted after printing
or not.
The following Xerox job ticket commands are used for this function:
ASCII-Jobticket:
'XRXsourceFile <full qualified Unix file path>' and
'XRXdeleteSource True | False | Dir'
XPIF-Jobticket:
'<xpif-operation-attributes>'
Chapter 4 - POD-Module Operation
149
'DPconnect' Functionality
'<document-uri syntax="uri"> full qualified Unix file path </document-uri>'
'</xpif-operation-attributes>'
See also the Xerox documentation on job ticket programming.
■
Receiving Print Jobs via HotDir
Job input via HotDir is possible in almost the same way as via LP input. Xerox jobt
tickets are supported.
Be aware that all Xerox job submitter programs mentioned above use the LP protocol
and therefore they are not suitable to feed an Océ PRISMAproduction Server HotDir.
So HotDir input may be used with custom designed print job submitter software,
even if it takes advantage of Xerox Job tickets.
■
Highlight Color
The above mentioned print job generators may produce highlight color- or full colorjobs: If highlight color- or full color-PostScript-jobs are to be printed on a highlight
color Océ printer color separation has to be activated for the Unity-RIP explicitly.
Because the quality of color-separation depends on the print data the setting of the
color-separation parameters has to be done manually in the job ticket template of the
receiving LP input queue.
The following information of the Xerox job tickets is supported by Océ 'DPconnect':
■ Number of copies and sorting (sheets or stacks)
■ Print all job types (Standard, Signature, Booklet, 2-up, ...)
■ Print page ranges
■ Print simplex, duplex, duplex (tumble), can be modified within page ranges
■ Page numbering (also with page ranges), header and footer, text boxes
■ Definition of not printable margins
■ Scaling of page images
■ Image shift, can be modified within page range
■ Rotation of images, can be modified within page ranges
■ Beginning of a chapter (any pages can be forced to be front pages)
■ Multioverlay of images on one page
■ Input media for the document.
Choose size, color, drilling, paper type, order count, weight and medium name
■ Exception pages and selection of the input media (size, color, drilling, paper type, order
count, weight and medium name) for these pages
■ Insertion of cover and separator pages and selection of input media (size, color, drilling,
paper type, order count, weight and medium name) for these pages
■ Insertion of slip sheets and selection of input media (size, color, drilling, paper type,
order count, weight and medium name) for these sheets
■ All postprocessing options, depending on the postprocessing devices available for the
Océ printer
150
Chapter 4 - POD-Module Operation
'DPconnect' Functionality
■
■
■
■
■
■
■
■
■
■
■
■
■
Paper postprocessing devices, which have an impact on the right edge of the paper.
This is achieved by a 180° rotation of the print image on the page (as it is done with
the Xerox DocuTech 6180) and using postprocessing devices, which have an impact
on the left paper edge.
Stapling on a defined position
Definition of font name and font size for ASCII print jobs
Definition of the orientation (Portrait/Landscape) for ASCII print jobs
Accounting, sender name, receiver name
Direct insert
Highlight color, taken from page image data, not from job ticket
Halftone screen setting
Job message, Job start message
Job name, Document name
Printing of ordered media (for example tabulator sheets)
LP-Input-Queue name. Redirection of the job to the indicated queue on the print
server and processing according to the assigned ticket template.
Support of job tickets for re-prints of print files which are already stored on the servers.
To match specific user requirements, translation rules, which control the transformation
of the input job ticket to the Océ PRISMAproduction Server job ticket, can be modified
using the 'DPconnect' translation table. You can use the 'DPconnect'-user interface in
the Océ PRISMAproduction Server 'Explorer' to set up or modify the appropriate parameters.
This GUI will be available on all servers of the Océ PRISMAproduction Server network
as soon as a 'DPconnect' license is installed and activated at least on one of these servers.
The 'DPconnect' converter however only runs on servers which actually process an activated 'DPconnect' license (Master).
'DPconnect' consists of a main module ('DPconnect') and a service module ('DPconnect'
service). Both modules write a start- and finishing message which will be displayed in the
Message window.
There is a combo box on the 'DPconnect' configuration user interface named 'Sort Order
of Tabulator Media Sets:'. This is only valid for VarioPrint 51xx compatible printers and
has to be set according to the sort order of an tabulator input media set actually loaded
into the printer. According to this the page sequence of the whole job will be reverted by
the Océ PRISMAproduction Server workflow if necessary.
For a description of the user interface see ‘'DPconnect' User Interface - Overview’ on page
159
Chapter 4 - POD-Module Operation
151
'DPconnect' Functionality
Installation Requirements
'DPconnect' can be licensed as an optional module belonging to the POD language
module. The following components are required for the installation of 'DPconnect':
■
■
■
■
Océ PRISMAproduction Server POD-Module V4.0
'Professional Document Composer' V4.0
'Unity' or 'Unity+' (Graphic Arts Plus Workflow) V4.0
PCL converter (only, if you want to print PCL data) V4.0
The installation procedure is only performed on an Océ PRISMAproduction Server
master. It creates all required directories and files on the system.
After installation you have to configure the system.
152
Chapter 4 - POD-Module Operation
'DPconnect' Configuration and Job Submission
'DPconnect' Configuration and Job Submission
Configuration on the Océ PRISMAproduction Server Server
Insert the IP-address and name of the computer with the Xerox print job submitter in
the file' /etc/hosts'.
Before you can use 'DPconnect', set up the following configuration using the Océ
PRISMAproduction Server 'Explorer':
■
■
■
Define at least one printer with at least one input bin and one output bin ('Configuration' -> 'Printers').
Define at least one job queue ('Configuration' -> 'Job Queues'). 3 queues are predefined
when Océ PRISMAproduction Server is shipped.
Define at least one LP printer queue ('Configuration' -> 'Input Modules'). In this dialog box set up the following parameters:
#
Parameter
Description
Selected Profile
Select one ticket template name from the combo box. These
ticket templates can be found in the symbolic directory
$JOBINPUT_TICKETS. The installation provides the following ticket template:
DPCONNECT.TIC
default, no printer post processing
Ticket templates in this directory, which have a leading dot
before the name are read-only. You can create your own customized ticket from these tickets. To do this, you have to copy
the template and save it without a leading dot in the same directory. You can use the PJM for the creation of new or the modification of existing tickets. A modifiable copy of .DPCONNECT.TIC is provided as DPCONNECT.TIC when installing
the system (see ‘'DPconnect' Hints for using Ticket Templates’ on
page 177 and ‘'DPconnect' Meaning of Job Ticket Template Entries’
on page 178).
Program name for
job submission
Set this parameter to 'startdpconnect'.
Chapter 4 - POD-Module Operation
153
'DPconnect' Configuration and Job Submission
Parameter
Description
hosts.lpd
The computer with the Xerox print job submitter has to be allowed to send print jobs to the Océ PRISMAproduction Server
server. Do this by choosing the menu item 'Edit' -> 'Edit
hosts.lpd' (on the 'Input Modules' tab in the Océ
PRISMAproduction Server 'Explorer'). In the pop up dialog
press the 'Add' button and in the column "Allowed systems"
add the name of the DigiPath workstation.
Now 'DPconnect' is able to translate Xerox job tickets to Océ PRISMAproduction
Server job tickets.
Configuration on the server with the Xerox print job submitter:
Insert IP address and name of the Océ PRISMAproduction Server server which is to receive
DigiPath jobs in the file '<Windows-installpath>\system32\drivers\etc\hosts'. The different
kinds of Xerox print job submitters have to be configured in the following way:
■
DigiPath / FreeFlow Makeready
On the Xerox-DigiPath-Workstation set up at least one symbolic printer with the
following properties:
#
Parameter
Description
Print Server
Name of the Océ PRISMAproduction Server Server. Insert the
name only and not the IP-address!
Print Queue
One of the LP printer queues previously defined on the Océ
PRISMAproduction Server server.
Printer type
Any printer type is allowed. The printer types mentioned in
‘'DPconnect' Functionality’ on page 147 are recommended.
Server type
Any server type is allowed.
Print manager
Any print manager is allowed. Standard production printing
path is recommended.
Network type
TCP/IP
■
154
Xerox-Printer Driver for Windows
The installation of Xerox printer drivers on a Windows systems has the following
properties:
Chapter 4 - POD-Module Operation
'DPconnect' Configuration and Job Submission
#
Parameter
Description
Printer port
LPR port
Name or address
of the host, which
provides LPD
Name of the Océ PRISMAproduction Server server.
Name of the
printer connected
to this computer
One of the LP printer queues, which have been configured before in Océ PRISMAproduction Server.
Printer
Any printer type is allowed. The printer types mentioned in
‘'DPconnect' Functionality’ on page 147 are recommended.
■
Xerox XDS
In the main window click the button ’Connections...’ and click ’Add...’ in the ’Printer
connections’ dialog to add a new symbolic printer.
#
Parameter
Description
Connection between the Xerox
printer and the
computer
LPR over TCP/IP
Server
Name of the Océ PRISMAproduction Server server.
Vitual printer
One of the LP printer queues, which have been configured before in Océ PRISMAproduction Server.
Type of the Xerox
server
Any of the server types mentioned in ‘'DPconnect' Functionality’
on page 147 are allowed.
■
Xerox FreeFlow Print Manager
Open FreeFlow Print Manager printer registration and do the following settings:
#
Parameter
Description
Printer type
Other Printer
Printer protocol
LPR printer with ASCII ticket profile or
LPR printer with XPIF ticket profile (recommended, is the
most capable one) or
LPR printer without ticket profile.
Chapter 4 - POD-Module Operation
155
'DPconnect' Configuration and Job Submission
Parameter
Description
Hostname/IP-Address
Name of the Océ PRISMAproduction Server server.
Queue name
One of the LP printer queues, which have been configured before in Océ PRISMAproduction Server.
Device type
Any printer type is allowed. The printer types mentioned in
‘'DPconnect' Functionality’ on page 147 are recommended.
Job Input via HotDir
Input type and HotDir configuration:
■
■
■
Data + Océ Custom Job Ticket (+ Triggerfile)
Possible Input: ASCII-, PCL-, PDF-, PostScript-, AFP (IOCA)- and TIFF-data with
or without Xerox job ticket (same as for input via LP-input queue).
Jobs without Xerox job ticket will be processed according assigned job ticket template,
but ticket parameters provided by the custom job ticket (belongs to the job) override
job ticket template parameters.
Multiple input files per print job are allowed. All file data types mentioned above may
occur in one single job. Specification for a converter for job files in the custom job
ticket is not generally required, because 'DPconnect' itself determines file data types.
Only in cases where DPconnect fails to determine a file type correctly or if you want
to explicitly choose one certain converter out of several possible converters a converter
specification is needed.
If a job has more than one file, possibly existent Xerox job tickets in these files will be
ignored. Xerox job tickets are honored only if the job has one single file.
DataFile
Possible Input: ASCII-, PCL-, PDF-, PostScript-, AFP (IOCA)- and TIFF-data with
or without Xerox job ticket (same as for input via LP-input queue).
Jobs without Xerox job ticket will be processed according assigned job ticket template.
Data + Triggerfile
Possible Input: ASCII-, PCL-, PDF-, PostScript-, AFP (IOCA)- and TIFF-data with
or without Xerox job ticket (same as for input via LP-input queue). Jobs without Xerox
job ticket will be processed according assigned job ticket template, but ticket parameters
provided by input file name override job ticket template parameters.
File name parts
As print jobs processed by 'DPconnect' are PRISMA+POD jobs, only POD relevant
ticket parameters are effective here.
In every case input data type will be determined automatically (same as for input via LPinput queue).
156
Chapter 4 - POD-Module Operation
'DPconnect' Configuration and Job Submission
Processing:
■
■
■
Default Job Ticket
Choose one of the selectable job ticket templates.
PrgJobSubmission
Select "startdpconnect".
ExtractParameters
Choose "Off"
Job Submission from Xerox Environment
DigiPath / FreeFlow Makeready
After logging in on a DigiPath / FreeFlow Makeready workstation, the user will be asked
for an ftp account, if he sends a job for the first time. This account has been set up on
the Océ PRISMAproduction Server master to receive data from DigiPath / FreeFlow
Makeready via ftp.
■
■
User Id = xdt
Password = xdt
If you want to print on an Océ PRISMAproduction Server system, you have to select the
corresponding symbolic printer on the DigiPath / FreeFlow Makeready workstation.
After this, you are able to send print jobs like a DigiPath / FreeFlow Makeready user does
it.
DigiPath / FreeFlow Makeready consist of the program ’Document Scan and Makeready’
(DSM) and QuickPrint. 'DPconnect' processes all jobs which have been generated by
one of these programs. With DSM you can use either production printing or printing
via printer drivers.
Xerox Printer Driver for Windows
With Xerox printer drivers you can send print jobs with Xerox features from all Windows
applications.
Xerox XDS
Use XDS to create print jobs with Xerox features from any PostScript, PDF, PCL, ASCII,
and TIFF files and send them for printing.
Xerox FreeFlow Print Manager
Use Xerox FreeFlow Print Manager to create jobs with Xerox features from any PostScript,
PDF, PCL, ASCII and TIFF files and send them for printing.
Chapter 4 - POD-Module Operation
157
'DPconnect' Configuration and Job Submission
Standard LP Client
You can use an LP Client to send print jobs without Xerox features. After receiving a
Xerox-print job on an Océ PRISMAproduction Server system, it will be shown in the
Océ PRISMAproduction Server 'Explorer' under 'All Jobs'.
158
Chapter 4 - POD-Module Operation
'DPconnect' User Interface - Overview
'DPconnect' User Interface - Overview
Introduction
The user interface of 'DPconnect' is integrated in the Océ PRISMAproduction Server
'Explorer' under 'Configuration'. The 'DPconnect' UI consists of three tabs for the job
processing, the input ticket translation and the barcode functions. Before printing jobs
via 'DPconnect', a target printer has to be selected.
Toolbar and Menu ’Parameter’ Functions
#
Icon
Description
'Apply changes'
Save the values in the window to the database.
'Discard changes'
The values in the window are overwritten by the values stored
in the database.
'Apply default setting for selected printer'
The translation table parameters of the selected printer are set
to their default values and are stored in the database.
'Apply default setting for all printers'
The translation table parameters of all printers are set to their
default values and are stored in the database.
The user interface consists of the following tabs:
■
■
■
■
'Job Processing' Tab (see ‘'DPconnect''Job Processing' Tab’ on page 160)
'Data Processing Mode' Tab (see ‘'DPconnect' Data Processing Mode Tab’ on page 164)
'Input Job Ticket Translation' Tab (see ‘'DPconnect''Input Job Ticket Translation' Tab’
on page 172
'Barcode' Tab (see ‘'DPconnect''Barcode' Tab’ on page 174
Chapter 4 - POD-Module Operation
159
'DPconnect''Job Processing' Tab
'DPconnect''Job Processing' Tab
Illustration
'Job Processing' Window
The following controls influence the way incoming print jobs are being processed:
#
160
Item
Description
'Input Job Ticket
overrides
PRISMAproduction-Ticket-Template'
Checked
The impositioning requested from the incoming job overrides
the PDC-impsitioning which is probably set in the job ticket
template assigned to the LP input queue over which the job
was received.
Unchecked
The PDC-impsitioning which is probably set in the job ticket
template assigned to the LP input queue over which the job
was received overrides the impositioning requested from the
incoming job. If you explicitly want to use a PDC-impsitioning
which fits to a paper post processing attached to the printer you
have to set this switch to off.
Default: Checked
'Allow Identical
Copies from Ticket-Template'
Checked
If identical copies are required in the ticket template assigned
to the LP input queue over which the job was received, this
mode will be printed even if 'Input Job Ticket overrides
PRISMAproduction-Ticket-Template' is activated.
Unchecked
Indentical copies in the ticket template are ignored. All other
Composer settings are also overwritten by the Xerox ticket
Default: Checked
Chapter 4 - POD-Module Operation
'DPconnect''Job Processing' Tab
Item
Description
'Extend Printable
Area'
Checked
This is only needed for print jobs having page images which
are smaller than the size of the input medium which they are
printed on, AND the page image has to be shifted. Under these
circumstances it may happen that part of the page image is not
printed. To advise 'DPconnect' to take care of this, check this
box.
Unchecked
'DPconnect' does no special action.
Default: Unchecked
'Processing of Input Media Attributes'
Checked
The media attributes in the Xerox ticket are supported and will
be passed on to the printer.
Unchecked
The media attributes in the Xerox ticket are ignored. A default
medium will be used instead. Default: Checked
'Printer Capabilities for Tabulator
Media Sets:'
'Simplex Print on Tabulator Media, Single Tabulator Media
Set per Job'
Choose this for Océ VarioPrint 51xx
'Duplex Print on Tabulator Media, Multiple Tabulator Media
Sets per Job'
Choose this for Océ VarioPrint 6xxx
'Simplex Print on Tabulator Media, Multiple Tabulator Media
Sets per Job'
Choose this for Océ VarioPrint 2110 and Xerox DocuTech
61xx
Default:
'Duplex Print on Tabulator Media, Multiple Tabulator Media
Sets per Job'
'Sort Order of
Tabulator Media
Sets:'
'Ascending'
Use this setting if a tabulator media set is to be used, which is
sorted in an ascending order.
'Descending'
Use this setting if a tabulator media set is to be used, which is
sorted in a descending order.
Default: Ascending
Chapter 4 - POD-Module Operation
161
'DPconnect''Job Processing' Tab
162
Item
Description
'Ask at Job Problems'
Checked
The job will be halted and the operator may watch the job inconsistencies in a message dialog started from the job view.
Possible job problems are:
■ Collisions between cover pages and separator pages.
■ Collisions between cover pages and chapter starts.
■ Job requires tabulator media to be printed in duplex or
tumble mode.
■ Job requires a media weight below 40 g/qm² or over 200
g/qm².
■ Job requires a specific printer postprocessing device connected to a specific printer output tray, but the device is not
connected to that output tray.
■ Job requires a specific printer postprocessing device, but the
device is not connected to the target printer.
■ Several different print media, which are ordered in a different
way, are requested.
■ The PDC impositioning schema contains contradictive
media requests for the whole document and/or for parts of
the document.
■ A job ticket command was found which is not supported.
■ A print job requests being processed over an LP-InputQueue, which does not exist.
The operator now is asked for the way he wants to proceed.
There are two choices:
■ Press "Start" in order to let 'DPconnect' eliminate the
problems and continue the job.
Chapter 4 - POD-Module Operation
'DPconnect''Job Processing' Tab
Item
Description
Elimination of the problems means respectively:
■ Separator pages are ignored when colliding with cover pages.
■ Chapter starts are ignored when colliding with cover pages.
■ Tabulator media is being printed in simplex mode.
■ The media weight requirement is set to 40 g/m2 respective
200 g/m2.
■ The job is redirected to the output tray, which the required
postprocessing is connected to.
■ The required printer postprocessing is being ignored for this
job.
■ The ordered material, which has been requested first, will
be used as well for all other requests for ordered material.
■ Only the first request for print material, which is valid for
the whole document, is considered.
■ The job ticket command is ignored.
■ The print job is processed according to the ticket template,
which belongs to the receiving LP-Input-Queue.
Unchecked
No message is generated for the job view ('All Jobs'). 'DPconnect' eliminates the problems automatically and continues the
job.
Default: Unchecked
Note:
If a job problem occurs, always a message is generated for the message window.
Chapter 4 - POD-Module Operation
163
'DPconnect' Data Processing Mode Tab
'DPconnect' Data Processing Mode Tab
Introduction
The data processing mode describes the way how the different types of print data are to
be converted.
164
Chapter 4 - POD-Module Operation
'DPconnect' Data Processing Mode Tab
Illustration
Data Processing Window
#
Item
Description
'Search Order for
Identifying required Print Data
Converter:'
Chapter 4 - POD-Module Operation
165
'DPconnect' Data Processing Mode Tab
Item
Description
Choose search order for identifying the required print data
converter. The required converter can be obtained from the
following information sources:
■ Océ Custom Ticket, which is generated for each job when
it was received via the 'LP' or 'HotDir' channel.
■ Ticket template, which is assigned to the receiving 'LP' or
'HotDir' channel.
■ Rules shown below.
The following choises for this combo box describe in which
order the above mentioned information sources are searched:
■ 'Custom Ticket -- Ticket Template -- Rules shown below'
First search the custom ticket for a converter setting.
If there is none, search the ticket template for a converter
setting.
If there is none, take te rules shown below.
■ 'Custom Ticket -- Rules shown below'
First search the custom ticket for a converter setting.
If there is none, take the rules shown below.
■ 'Ticket Template -- Rules shown below'
First search the ticket template for a converter setting.
If there is none, take the rules shown below.
■ 'Rules shown below'
Take the rules shown below.
Default: 'Custom Ticket -- Rules shown below'
Note:
Application of the rules shown below requires that
'DPconnect' can properly determine type of the received
print data.
166
Chapter 4 - POD-Module Operation
'DPconnect' Data Processing Mode Tab
Item
Description
'ASCII-Data:'
■
■
■
'PostScript (Unity-RIP)'
ASCII data are converted to PostScript code by 'DPconnect'.
During job processing they are afterwards converted into
AFP code with embedded TIFF containers by the UnityRIP.
The generated data can then be printed via an IPDS or a
PostScript backend.
'PostScript (Graphic Arts Plus)'
ASCII data are converted to PostScript code by 'DPconnect'.
During job processing they are afterwards converted into
AFP code with embedded PDF containers by the Graphic
Arts Plus Normalizer.
'Do not convert (RAW)'
ASCII data are not converted either by 'DPconnect' or
during job processing afterwards. The data can be printed
via a generic backend.
Default: PostScript (Unity-RIP).
'Remove Input Job
Ticket from
ASCII-Data'
(only relevant for
RAW processing)
■
'AFP-IOCA-Data:'
■
■
■
Active:
A possibly existing Xerox job ticket preceeding the data is
removed.
Not active:
A possibly existing Xerox job ticket preceeding the data is
not removed.
Raw data (with or without Xerox job ticket) can be printed
on Xerox printers or via Océ PRISMAproduction Server
with 'DPconnect'.
'AFP (IOCA)'
AFP-IOCA data are not converted. The generated data can
be printed via an IPDS or a PostScript backend.
'Do not convert (RAW)'
AFP-IOCA data are not converted. The generated data can
be printed via an IPDS or a PostScript backend. The generated data cannot be imposed with the PDC or be stored as
AFP overlays.
Default: 'AFP (IOCA)'.
Chapter 4 - POD-Module Operation
167
'DPconnect' Data Processing Mode Tab
Item
Description
'Remove Input Job
Ticket from AFPIOCA-Data'
(only relevant for
RAW processing)
■
'PCL-Data:'
■
■
■
Active:
A possibly existing job ticket preceeding the data is removed.
Not active:
A possibly existing job ticket preceeding the data is not removed. Raw data (with or without Xerox job ticket) can be
printed on Xerox printers or via Océ PRISMAproduction
Server with 'DPconnect'.
'PCL-Converter'
During job processing PCL data are converted into AFP
code with embedded TIFF containers by the PCL-Converter.
The generated data can then be printed via an IPDS or a
PostScript backend.
'Do not convert (RAW)'
PCL data are not converted. The data can be printed via a
generic backend.Default: PCL-Converter.
Default: 'PCL-Converter'.
'Remove Input Job
Ticket from PCLData'
(only relevant for
RAW processing)
■
'PDF-Data:'
■
■
■
■
Active:
A possibly existing job ticket preceeding the data is removed.
Not active:
A possibly existing job ticket preceeding the data is not removed. Raw data (with or without Xerox job ticket) can be
printed on Xerox printers or via Océ PRISMAproduction
Server with 'DPconnect'.
'PDF (Unity-RIP)'
During job processing PDF data are converted into AFP
code with embedded TIFF containers by the Unity-RIP.
The generated data can then be printed via an IPDS or a
PostScript backend.
'PDF (Graphic Arts Plus)'
During job processing PDF data are converted into AFP
code with embedded PDF containers by the Graphic Arts
Plus Normalizer. The generated data can then be printed
via an IPDS or a PostScript backend.
'Do not convert (RAW)'
PDF data are not converted. The data can be printed via a
generic backend.
Default: 'PDF (Unity-RIP)'.
168
Chapter 4 - POD-Module Operation
'DPconnect' Data Processing Mode Tab
Item
Description
'Remove Input Job
Ticket from PDFData'
(only relevant for
RAW processing)
■
'PostScript-Data:'
■
■
■
■
Active:
A possibly existing job ticket preceeding the data is removed.
Not active:
A possibly existing job ticket preceeding the data is not removed. Raw data (with or without Xerox job ticket) can be
printed on Xerox printers or via Océ PRISMAproduction
Server with 'DPconnect'.
'PostScript (Unity-RIP)'
During job processing PostScript data are converted into
AFP code with embedded TIFF containers by the UnityRIP. The generated data can then be printed via an IPDS
or a PostScript backend.
'PDF (Graphic Arts Plus)'
During job processing PostScript data are converted into
AFP code with embedded PDF containers by the Graphic
Arts Plus Normalizer. The generated data can then be
printed via an IPDS or a PostScript backend.
'Do not convert (RAW)'
PostScript data are not converted. The data can be printed
via a generic backend.
Default: 'PostScript (Unity-RIP)'.
'Remove Input Job
Ticket from
PostScript-Data'
(only relevant for
RAW processing)
■
'TIFF-Data:'
■
■
■
Active:
A possibly existing job ticket preceeding the data is removed.
Not active:
A possibly existing job ticket preceeding the data is not removed. Raw data (with or without Xerox job ticket) can be
printed on Xerox printers or via Océ PRISMAproduction
Server with 'DPconnect'.
'TIFF-Converter'
During job processing TIFF data are converted into AFP
code with embedded TIFF containers by the TIFF-Converter. The generated data can then be printed via an IPDS or
a PostScript backend.
'Do not convert (RAW)'
TIFF data are not converted. The data can be printed via a
generic backend.
Default: 'TIFF-Converter'.
Chapter 4 - POD-Module Operation
169
'DPconnect' Data Processing Mode Tab
Item
Description
'Remove Input Job
Ticket from TIFFData'
(only relevant for
RAW processing)
■
■
Active:
A possibly existing job ticket preceeding the data is removed.
Not active:
A possibly existing job ticket preceeding the data is not removed. Raw data (with or without Xerox job ticket) can be
printed on Xerox printers or via Océ PRISMAproduction
Server with 'DPconnect'.
When to use which Information Source?
■
■
■
170
'Rules shown below'
If the ’Rules shown below’ are used to identify the desired converter, this implies that
'DPconnect' is able to determine the data type correctly. If this is not possible, another
source (custom ticket, ticket template) has to be used. If custom ticket or ticket template
do not provide sufficient information, the ’Rules shown below’ are the recommended
information source.
'Océ Custom Ticket'
The job-specific custom tickets, which are generated by the Input Modules ('HotDir'
and 'LP') usually do not indicate a converter which is to be used. Only if the job
generator sends an OCT file (custom ticket) with the print data to a HotDir, possibly
a converter statement exisits - the job generator may add this statement, but not necessarily.
The custom ticket can only provide converter statements on 'HotDir' reception. These
make sense, if the data types change from job to job and the data type recognition of
'DPconnect' doesn’t work properly.
Furthermore this method allows you to select a defined converter out of a number of
possibilities (for example Graphic Arts Plus Normalizer instead of Unity-RIP foor
PostScript data).
'Ticket Templates'
Ticket templates usually contain a converter statement. But in cases when jobs with
different data types have to be processed, this statement is not useful, because the
converter statement of the ticket template is often incorrect.
The converter statement in ticket templates is useful if the data type doesn’t change,
if jobs are to be received also via LP protocol and if the data type recognition of 'DPconnect' doesn’t work properly.
Furthermore this method allows you to select a defined converter out of a number of
possibilities (for example Graphic Arts Plus Normalizer instead of Unity-RIP foor
PostScript data).
Chapter 4 - POD-Module Operation
'DPconnect' Data Processing Mode Tab
Jobs Consist of Multiple Print Files
Via 'HotDir' jobs with multiple print files can be received. In this case, the followng restrictions exist:
■
■
The RAW processing of jobs which contain multiple files with preceeding job ticket
is not allowed, because these job tickets may contradict eachother.
The RAW processing of jobs which contain multiple files of different data types is
not allowed, because the subsequent processing of such mixed data is not reasonable.
PostScript Jobs with External Files
The RAW processing of PostScript jobs with external files is not allowed, because the
further transport of all files which belong to the job is not possible with the Océ
PRISMAproduction Server backend.
Chapter 4 - POD-Module Operation
171
'DPconnect''Input Job Ticket Translation' Tab
'DPconnect''Input Job Ticket Translation' Tab
Illustration
Controls for the translation table
#
172
Item
Description
'Configuration for
Printer:'
Select the printer or the cluster, for which the translation rules
in this dialog should be valid. Printer groups <Any xxx dpi
Printer> are also presented in the list.
'Jobticket Statement:'
Define, for which input jobticket statement a translation mode
should be created using the control elements on the right side
of this window. The control elements shown depend on the
selected statement, that is they depend on the number and kind
of the available parameters. Controls which are not available
for a statement are not visible.
Chapter 4 - POD-Module Operation
'DPconnect''Input Job Ticket Translation' Tab
Item
Description
'Translation
Mode:'
'Translate Statement directly'
The statement is processed in the same way it would be processed on a Xerox printer.
'Substitute Statement with an other Action'
The data (argument values) required for this statement are taken
from this translation table settings.
'Substitute Statement with LP Input Queue Template Action'
The data (argument values) required for this statement are taken
from an LP input queue template. This is the template assigned
to that LP input queue over which the jobs are being received.
It is recommended that this template uses the same destination
printer that is actually selected here in the translation table.
'Ignore Statement'
The action done in this case depends on the statement itself
(see table in the appendix): Some statements are completely
omitted, others are processed with the Océ PRISMAproduction
Server system default settings instead.
Default: The defaults depend on the statements.
Controls for translation rules input
You can set up the parameters using up to two selection boxes and up to seven edit fields
underneath. Only those controls are visible, which are required for the selected statement.
The descriptive labels above the controls change according to the selected statement:
For a full description of all ticket statments and their possible values see ‘'DPconnect' Appendix’ on page 196
Chapter 4 - POD-Module Operation
173
'DPconnect''Barcode' Tab
'DPconnect''Barcode' Tab
The barcode controls shown below have been added to the 'DPconnect' configuration
user interface:
'DPconnect' prints the job name of the incoming print job or a free defined text as barcode
on a document page or on an added blank sheet - either before or behind the document.
To activate this 'DPconnect' barcode a new complete barcode statement has to be put
into the used LP input queue ticket template. The barcode settings can be found in the
PJM user interface in the Composer window under 'Marks -> Barcode'. All barcode parameters have to be specified here (for example: position, height, width, etc.). 'DPconnect'
will recognize this barcode statement and then it will replace the barcode string (which
functions here as a place holder) with that string obtained from the source selected with
the barcode controls. So 'DPconnect' has to distinguish between "normal" barcode
statements which have to be processed as they are and this special 'DPconnect'-placeholder-barcode statement for which the barcode string has to be modified. In order to
let 'DPconnect' recognize this special 'DPconnect'-barcode statement it has to meet some
requirements:
#
Item
Required Value
Description
Barcode type
Code 39
mandatory
Number of
fields
11
place holder, will be replaced by 'DPconnect' with
actual data
Field range
1 - 11
place holder, will be replaced by 'DPconnect' with
actual data
Data type
constant string
mandatory
Content
+DPCONNECT+
place holder, will be replaced by 'DPconnect' with
actual data
Note:
Remember that if any of the above requirements is absent this barcode statement will
become a normal barcode statement and will be printed in every case (with the place
holder string if present) regardless of the settings of the 'DPconnect' barcode controls.
The 'DPconnect'-Barcode of course is completely independent from any other "normal"
barcode statement defined in the LP input queue assigned job ticket template. So a
'DPconnect'-Barcode may be combined with any other barcode statement.
The 'DPconnect'-Barcode controls function as follows:
174
Chapter 4 - POD-Module Operation
'DPconnect''Barcode' Tab
#
Item
Description
'Source of DPconnect-Barcode:'
None
'DPconnect'-Barcode is switched off. Neither job name nor
Barcode Text is printed as barcode. A 'DPconnect'-Barcode
statement defined in the LP input queue assigned job ticket
template has no effect. All the other barcode statements in this
ticket template will be processed.
Job Name
The job name of the incoming job is printed as barcode.
Barcode
Text The text in the edit field "Barcode Text" is printed as
barcode.
Default: None
'Begin of the Job
Name Section:'
When the source is Job Name it is possible to select a section
out of the whole job name string to be used. This edit field
specifies the position of the first character of the section.
'End of the Job
Name Section:'
When the source is Job Name it is possible to select a section
out of the whole job name string to be used. This edit field
specifies the position of the last character of the section.
'Barcode Text:'
When the source is Barcode Text this text has to be entered
here.
'Add a Barcode
Sheet:'
Add no Extra Sheet
'DPconnect'-Barcode will be printed on a document page. The
desired page number has to be specified in the 'DPconnect'Barcode-statement in the LP input queue assigned job ticket
template.
Add Extra Sheet Before Document
'DPconnect'-Barcode will be printed on an extra sheet added
before the document. The front page of this sheet is accessed
with page number 1, the back page with number 2. The desired
page number has to be specified in the 'DPconnect'-Barcodestatement in the LP input queue assigned job ticket template.
Add Extra Sheet Behind Document
'DPconnect'-Barcode will be printed on an extra sheet added
behind the document. The front page of this sheet is accessed
with page number n-1, the back page with number n. The desired page number has to be specified in the 'DPconnect'-Barcode-statement in the LP input queue assigned job ticket template. Default: Add no Extra Sheet
Chapter 4 - POD-Module Operation
175
'DPconnect''Barcode' Tab
Note:
When using an added barcode sheet the resulting page numbering range for barcode
positioning - which is from 1 to n - extends over all - the original document pages, any
inserted blank pages or blank sheets and the added barcode sheets.
Note:
Barcode type code 39 is being used. Allowed characters are: A-Z, 0-9, the following
characters inside the double quotes "-.$/+%" and the blank character. The Barcode Text
edit field restricts input to this character set. For the incoming job name lower case
characters are converted to upper case, all other forbidden characters are substituted by
a period.
176
Chapter 4 - POD-Module Operation
'DPconnect' Hints for using Ticket Templates
'DPconnect' Hints for using Ticket Templates
For those statements which provide an alternative action this action either is described
by a translation table entry or by a ticket template entry. So a complete set of alternative
actions consists of two parts, one from the translation table settings and one from the LP
input queue assigned ticket template settings.
Please pay attention to this:
■
■
Each printer which is defined in Océ PRISMAproduction Server should be assigned
one translation table.
Each LP input queue which is defined in Océ PRISMAproduction Server should be
assigned one Océ PRISMAproduction Server job ticket template.
The destination printer for a print job is specified by the printer name entry in the ticktet
template of that LP input queue which receives the print job. For 'DPconnect' jobs this
printer name entry also specifies the translation table to be used with this job. And finally
this translation table says which entries in the specified ticket template are to be used for
alternative action.
So the best way to handle with 'DPconnect' translation tables and LP input queue ticket
templates is the following one:
Let 'DPconnect' create one translation table for each printer in Océ PRISMAproduction
Server. (This is done by 'DPconnect' automatically and can not be inhibited.) Define
one LP input queue for each printer in Océ PRISMAproduction Server and assign a
ticket template to it which holds as destination printer name the name of that printer
which it belongs to. For each printer do the appropriate adjustments both to the translation
table and the ticket template so that they suit to the printer and to its printer post processing. For example the printer attached postprocessing machine requires a specific PDC
impositioning and a specific UP³I setting, both has to be set up in a ticket template. After
doing this each printer is accessible through his LP input queue and jobs printed through
this input queue on each of these printers are printed in a way that represents the printers
capabilities and the attached printer post processing capabilities.
In order to take advantage of these different Océ PRISMAproduction Server print paths
from within Xerox DigiPath you should act as follows: For each Océ PRISMAproduction
Server print path (LP input queue, ticket template, printer, postprocessing) you are going
to use with DigiPath define a logical printer (in terms of Xerox DigiPath), that is, the
destination of each of these logical printers is one of the LP input queues on the Océ
PRISMAproduction Server print server (see ‘'LP'’ on page 508). Now you are able to print
all DigiPath documents with that kind of job processing and printer postprocessing you
want - just by choosing the right DigiPath logical printer.
Chapter 4 - POD-Module Operation
177
'DPconnect' Meaning of Job Ticket Template Entries
'DPconnect' Meaning of Job Ticket Template Entries
The importance of the LP input queue assigned job ticket templates is in 'DPconnect'
version 1.02 much higher than in version 1.00. In conjunction with DPconnect translation
tables these templates now fully work as a container for almost all 'DPconnect' print job
properties. Because of this the 'DPconnect' V1.00 Startparameter GUI is not longer
necessary since these startparameter settings are now to be done in the job ticket template.
Use the PJM-GUI for editing the job ticket templates. Startparameter GUI controls for
setting diagnostic functions have been moved to a new command line diagnostic program
(see ‘'DPconnect' Maintenance Programs’ on page 193).
In principle an Océ PRISMAproduction Server job property can be supplied with the
Xerox DigiPath job ticket or with the LP input queue ticket template or with both of
them. The table below shows this in detail.
Some few properties have an entry in column 'DPconnect', this means that 'DPconnect'
sets the value of the entry, which cannot be modified.
A mark in column "Input -Ticket" means that this property may be delivered with the
Input job ticket. If the corresponding switch in the 'DPconnect' translation table is set
to "Translate Statement directly" this property will be processed as it is. If there is a mark
too in column "Template" and the corresponding switch in the 'DPconnect' translation
table is set to "Substitute Statement with LP Input Queue Template-Action" the value
of this property will be taken from the LP input queue template instead from the Input
job ticket.
There are several properties which only can be supplied from the input job ticket, so these
properties are always taken from there.
There are several properties which only can be supplied from the LP input queue-template,
so these are always taken from there.
Note:
Those LP input queue/HotDir template properties which have no mark in the column
"Template" or don't appear in the following table at all don't have any effect when
processing 'DPconnect' jobs so it's not necessary to set them at all.
#
Océ PRISMAproduction Server Ticket
Menu Ticket
178
Chapter 4 - POD-Module Operation
InputTicket
Template
'DPconnect'
'DPconnect' Meaning of Job Ticket Template Entries
Océ PRISMAproduction Server Ticket
InputTicket
Template
New
'DPconnect'
= POD-Ticket
Menu Job
Transfer Mode
All settings available here
X
Information
User
Name
X
X
Company
X
City
X
Street
X
Zip Code
X
Country
X
Country
X
Tel.
X
Fax
X
Add.Info
X
Receiver
Name
X
X
Company
X
City
X
Street
X
Zip Code
X
Country
X
Tel.
X
Fax
X
Add.Info
X
Shipment
Account
X
X
Chapter 4 - POD-Module Operation
179
'DPconnect' Meaning of Job Ticket Template Entries
Océ PRISMAproduction Server Ticket
InputTicket
Shipment Info
Template
'DPconnect'
X
#
Océ PRISMAproduction Server Ticket
InputTicket
Template
Job Name
X
X
Copies
X
X
'DPconnect'
GUI: Job Parameter
Printer
X
Job Queue
X
GUI: Job Attributes
Message
Inform operator only
X
Hold job until operator confirmation
X
Message text
X
Store
All settings available here
X
X
Print
Print Range
X
= all
Form
X
Input Tray
X
Output Tray
X
Proof Print
X
Print Mode
All settings available here
X
Color Selection
All settings available here
X
X
X
X
Tab Printing
Tab Printing
180
Chapter 4 - POD-Module Operation
'DPconnect' Meaning of Job Ticket Template Entries
Océ PRISMAproduction Server Ticket
InputTicket
Tab Set
Template
'DPconnect'
X
Explicit
= no
Positions
X
= none
Resource
= none
From Print Data
= yes
From Print Data using Size
of Tab Pages
= no
UP3I Devices
All settings available here
Header/Trailer
All settings available here
X
Events
Start Job Events
All settings available here
X
Start Print Events
All settings available here
X
Notification
All settings available here
X
Custom Settings
Nr. 1
X
Nr. 2 - 20
X
#
Océ PRISMAproduction Server Ticket
InputTicket
Template
'DPconnect'
List of Files
Format
X
Collect
Collect Mode
= no
Chapter 4 - POD-Module Operation
181
'DPconnect' Meaning of Job Ticket Template Entries
Océ PRISMAproduction Server Ticket
InputTicket
Template
'DPconnect'
Index Range
= none
Allow gaps in index sequence
= no
Use Paper Size
= no
Use Medias from Document
= yes
Convert
Paper size
Name
X
Size X
X
Size Y
X
Unit of Measure
Page Layout
All settings available here
= cm
X
X
Use Media based Tray Selection
All settings available here
Substitute missing Fonts
= no
X
PCL-Mode
= Edge to Edge
Compose
No Composing
= no
Compose files before chaining
= yes
Chain files before composing
= no
Set
= no
Store Job Ticket with linked Set
= no
Professional Document Composer
Menu Options
182
Create page segments
X
Load page segments before print
X
Stitch
X
Chapter 4 - POD-Module Operation
'DPconnect' Meaning of Job Ticket Template Entries
Océ PRISMAproduction Server Ticket
InputTicket
Template
'DPconnect'
Integrate
Highlight Color
All settings available here
X
Merge
All settings available here
X
Cropping
All settings available here
X
Overlays
All settings available here
X
Variable Data
All settings available here
X
Impose
Impose
All settings available here
X
Signature
All settings available here
X
X
Assemble
Positioning
All settings available here
X
Creep
All settings available here
Blank Sheets
All settings available here
X
X
Marks
All settings available here
X
X
Input Trays
All settings available here
X
Print Range
All settings available here
X
Halftone
All settings available here
X
X
X
Custom Tone
Chapter 4 - POD-Module Operation
183
'DPconnect' Meaning of Job Ticket Template Entries
Océ PRISMAproduction Server Ticket
InputTicket
Template
X
X
Red
X
X
Green
X
X
Blue
X
X
No Custom Tone
'DPconnect'
Spot Color Filter
Options
All settings available here
X
Primary Color Filter
All settings available here
X
Workflow
All settings available here
X
Image Generation
All settings available here
X
Scale
All settings available here
X
Unity
Input Trays
All settings available here
= none
Use Paper Name as RIP Color
= no
Use Paper Name as RIP Type
= no
Important Settings:
Automatic Start of the TrueProof Browser
The TrueProof Browser will be opened automatically, showing a list of ’printed’ jobs on
the connected TrueProof server, if all of the following conditions are true:
■
■
■
■
184
The 'DPconnect' service module has finished successfully.
Destination printer has the printer model "TrueProof".
Destination printer is none of the <Any xxx dpi Printer> printer group.
The ticket template job attributes request the action "Print".
Chapter 4 - POD-Module Operation
'DPconnect' Meaning of Job Ticket Template Entries
Using Printer Clusters
In the "Job Parameter / Printer"-dialog you may also select a printer cluster. In this case
'DPconnect' takes required printer properties from the first printer in this cluster. In the
printer list of the 'DPconnect' translation table you can also see printer cluster, which
allows you to define translation rules also for these clusters.
Presentation of Job Problems
Problems with a job are either the result of contradictions in the input job ticket, or of
requirements in the input job ticket, which cannot be fulfilled by the currebt Océ
PRISMAproduction Server system. 'DPconnect' provides automatic procedures to solve
both types of problems (see ’Job Processing Tab’).
Job problems can be discovered either during the 'DPconnect' start step or during the
'DPconnect' service step. In both cases the job is interrupted.
In the job list the job is marked with <Icon>. Double click on it to read the associated
message for details on the problem. If the job has been interrupted by the 'DPconnect'
start step, you can continue it with the rerspective button in the message box. If the job
has been interrupted by the DPconnect service step, you must click the ’Continue’ button
in the tool bar.
In the message boxes you are asked to confirm the solution for the problem, which 'DPconnect' proposes automatically. This avoids unexspected results in the output.
The original job messages are issued together with the 'DPconnect' problem messages.
If the job is processed to the end, the 'DPconnect' messages are deleted and only the
original job messages remain in the message window.
Setting of Printer Input and Output Trays
The effective setting of the printer input trays and output trays depends on the settings
in the PJM GUI ’Job Attributes’ / ’Print’ / ’Input Tray’, ’Output Tray’ and the settings
in a potential PDC impositioning scheme:
■
■
Setting of Printer Input and Output Trays The effective setting of the printer input
trays and output trays depends on the settings in the PJM GUI ’Job Attributes’ /
’Print’ / ’Input Tray’, ’Output Tray’ and the settings in a potential PDC impositioning
scheme:
Using a PDC impositioning scheme: Input and output tray control is always disabled.
If input tray selection is set to "Default" the effective input- and output tray selection
is taken from the PDC impositioning scheme. If input tray selection is not set to
"Default" the effective input- and output tray selection is as selected here.
Using UP³I Devices
Each UP³I device is connected to a specific output tray of the printer. This connection
has to be configured in the printer configuration. To do this open the "Printers" node in
the Océ PRISMAproduction Server Explorer tree. Select the appropriate printer and open
the "Output Devices" tab. Here set the correct number of output trays and specify their
Chapter 4 - POD-Module Operation
185
'DPconnect' Meaning of Job Ticket Template Entries
physical numbers. Double click the type column of that output tray the UP³I device is
connected to. Then select the required device out of the shown list.
To put this device into a template in order to make it a job processing property open the
appropriate job ticket template with the PJM GUI and then open the "Job Attributes /
Print"-dialog. Here select that output tray to which the UP³I device is connected to. By
doing this the "UP³I Devices"-button becomes active. Clicking on this button opens a
configuration dialog appropriate to the attached UP³I device. You may do here some
device specific settings.
Generally in a 'DPconnect' environment there are two sources for Up³I postprocessing
requests:
■
■
Input job ticket
Job ticket template.
The available 'DPconnect' translation rules for all printer postprocessing requests are the
same:
■ Translate Statement directly
■ Substitute Statement with an other Action:
- Apply to all Jobs
- Apply to Jobs requiring <certain postprocessing> only
■ Ignore Statement
Because there are interdependencies between translation rules for different postprocessing
requests, the determination of the resulting printer postprocessing is based on the rules
shown in the following table:
186
Chapter 4 - POD-Module Operation
'DPconnect' Meaning of Job Ticket Template Entries
#
Resulting Printer
Postprocessing
Condition
No postprocessing
at all
For each postprocessing request the following is valid:
■ Translation mode is Ignore Statement.
OR
■ Translation mode is Translate Statement directly.
AND
The corresponding postprocessing request is NOT present
in the input ticket.
OR
■ Translation mode is Substitute Statement with an other
Action.
AND
"Apply to Jobs requiring <certain postprocessing> only" is
set.
AND
The corresponding postprocessing request is NOT present
in the input ticket.
Only postprocessing taken out of
the ticket template
Rule no. 1 does not apply AND for at least one postprocessing
request the following is valid:
■ Translation mode is Substitute Statement with an other
Action.
AND
"Apply to all Jobs" is set.
OR
■ Translation mode is Substitute Statement with an other
Action.
AND
"Apply to Jobs requiring <certain postprocessing> only" is
set.
AND
The corresponding postprocessing request is present in the
input ticket.
One or more direct- Rules no. 1 AND 2 do not apply AND for at least one postproly translated post- cessing request the following is valid:
■ Translation mode is Translate Statement directly.
processing out of
the input job ticket
AND
The corresponding postprocessing request is present in the
input ticket.
Chapter 4 - POD-Module Operation
187
'DPconnect' Meaning of Job Ticket Template Entries
Note:
If there are two postprocessing requests, one being translated directly, one being substituted by a ticket template action, the directly translated request is being ignored and
only the substituted request becomes effective.
There is a check made to find out whether the resulting postprocessing does match the
UP³I postprocessing settings of the selected output tray of the destination printer. This
ensures that only those UP³I postprocessing requests, which are really available, become
effective. If the check fails a job problem message is attached to the job and the operator
will be asked how to proceed.
Using PDC Stitch command
There is a non UP³I stitch command which may be put into a LP input queue ticket
template. This stitch command may be used for simple stitch devices which do not understand UP³I commands. On the logical level in Océ PRISMAproduction Server this
command may be combined with any other UP³I postprocessing settings in the ticket
template. The customer has to decide if doing so fits the requirements of his postprocessing
devices. This command is invoked in the PJM-GUI by clicking the "Edit Compose Options"-button. A new dialog window named "Properties for new files" opens. Select here
the "Compose"-tab, then select the "Compose file before Chaining"-radio button, uncheck
the "Store job ticket with linked set"-check box and then press the right most button to
open the "Professional Document Composer"-window. Open the "Options"-menu and
check the "Stitch"-check box.
The PDC-stitch command becomes effective under the same conditions as all the other
UP³I commands in the ticket template are effective. That is, if the translation rules for
one of the postprocessing requests in the input ticket require to take a UP³I postprocessing
out of the ticket template, the PDC stitch command - if available in the ticket template
- will be performed too.
Using PDC Impositioning Schemes
If you have defined a PDC impositioning scheme in the job ticket template that is assigned
to that LP input queue which is receiving the print jobs, this impositioning scheme may
contradict the impositioning required by the incoming job. The decision on which impositioning overrides the other one is made in the 'DPconnect' configuration GUI with the
check box "Input Job Ticket overrides Océ PRISMAproduction Server Ticket". In case
the PDC impositioning scheme should take effect this check box has to be switched off.
If the incoming job impositioning should take effect this check box has to be switched
on.
188
Chapter 4 - POD-Module Operation
'DPconnect' Configuration Example
'DPconnect' Configuration Example
Introduction
If configuring LP input queues, printers, printer-postprocessing combinations in Océ
PRISMAproduction Server as well as defining logical printers on the DigiPath, you have
to take care of some assignment rules. These help to avoid operating errors and cause a
simplification of workflows. The following figure shows an example on how to achieve
a reasonable assignment: It shows three different printers (1, 2, 3) on which print jobs
from DigiPath can be printed in five different alternatives.
General
The LP input queues serve as input channels for the DigiPath print jobs. Every input
queue is dedicated an own ticket template. This template contains information on how
the print jobs received via this queue should be printed (for example booklet-print).
Printers are the receivers of the print jobs. Each printer is assigned a 'DPconnect' translation table. This table contains information on how the input job requirements should be
represented in Océ PRISMAproduction Server. In this example the translation rules are
left at their default settings (direct translation) and have therefore no further importance.
The example also contains general information on the processing mode of incoming jobs
(for example the input tray selection mode).
LP input queue and 'DPconnect' translation table represent a pair which together represents the complete set of print processing rules.
As you can see from this example, the number of ticket templates does not necessarily
have to be the same as the number of 'DPconnect' translation tables. Only one assigned
translation table can be effective for a specified printer, however more than one ticket
template can be effective for this printer (in the example printer 1 is driven by translation
table 1 and ticket template 1 or ticket template 2). To see which translation table is used
together with which ticket template(s) for a specified printer, you have to display the assigned translation table by selecting the respective printer on the 'DPconnect' UI. Additionally you have to find the ticket template, which contains as name of the target printer
the name of this printer.
Example
The example shows the following situation:
■ Printer 1 is a continuous feed printer, which should print in two different ways: it
should either drive paper post processing PPP 1 or PPP 2. Both PPPs need different
impositioning schemes.
■ Printer 2 is a cut sheet printer, which is driven in 1-up mode. The input bins are selected by media attributes. 10 copies are to be printed of every job - independent of
the copycount set in the input ticket.
Chapter 4 - POD-Module Operation
189
'DPconnect' Configuration Example
■
Printer 3 also is a cut sheet printer. It’s input bins are selected by bin numbers. Documents are to be printed in 2-up mode or booklet mode, thus different impositioning
schemes are required.
To easily select these print functions from DigiPath you have to do the following:
■ It is supposed that printer 1, 2, and 3 and the PPP 1 and 2 are installed and configured.
DPconnect translation tables 1, 2, and 3 are set up automatically with practical default
values.
■ 'DPconnect' translation tables 1, 2, and 3 have to be modified to match the requirements of the example. In translation table 2 the translation mode for the copy count
has to be modified from ’Translate Statement directly’ to ’Substitute Statement with
LP Input Queue Template Action’. Thus the copy count 10 in ticket template 3 will
be effective.
■ Queue Template Action’. Thus the copy count 10 in ticket template 3 will be effective.
You have to set up ticket templates 1, 2, 3, 4 and 5 and to modify them according to
the requirements of the example (Templates 1, 2, 4, and 5 need a PDC impositioning
scheme, copy count in template 3 has to be 10). Take care that the correct target
printer is indicated in every template. The tempate names should reflect the function
of the tickets.
■ Set up LP input queues 1, 2, 3, 4 and 5. These queues necessarily have to start the
program ’startdpconnect’. Assign the corresponding ticket templates to these queues.
The queue names should reflect their function.
■ Set up the five logical printers in DigiPath. Each of these logical printers represents a
defined print function in Océ PRISMAproduction Server. Therefore you have to
connect the printers with the LP input queues of the Océ PRISMAproduction Server
system.
190
Chapter 4 - POD-Module Operation
'DPconnect' Configuration Example
Comparison
There might be also a simpler solution to the problem described above: Instead of defining
five ticket templates, LP input queues and logical DigiPath printers it would be sufficient
to define only one for each element. This has the following disadvantages when printing:
■
■
■
■
You have to change the printer in the (single) ticket template every time you want to
print on a different target printer.
You also have to modify the ticket template every time you want to print the job in a
different way (different impositioning scheme, different copy count ...), which is not
set in the template.
Every time you change the target printer, you have to ensure that the settings of the
translation table, which belongs to the currently selected printer, match the ticket
template settings. The new combination of ticket template and translation table can
possibly affect the results of the ticket template settings (for example the setting of the
copy count =10 in ticket template 3 will be ineffective in combination with translation
table 1, because this table specifies to take over the copy count from the input job).
Before submitting the job, you have to ensure that all requirements for the printing
of the job can be achieved by the ticket template.
Chapter 4 - POD-Module Operation
191
'DPconnect' Configuration Example
For this reason it is highly recommended to set up the system according to the example
above, if you have a complex printing system and if you are printing jobs in different
ways.
192
Chapter 4 - POD-Module Operation
'DPconnect' Maintenance Programs
'DPconnect' Maintenance Programs
Trouble Shooting
dpconnectset
'DPconnect' is equipped with trace and log features to analyze program errors. It is possible to set the trace level and to switch logging on and off. Additionally it is possible to
hold temporary 'DPconnect' data instead of deleting them and to tell 'DPconnect' to
accept incoming jobs but not to put them into the Océ PRISMAproduction Server
workflow for debugging reasons.
These actions are controlled with the console program:
'dpconnectset'. The invocation is as follows:
'dpconnectset [-l y|n] [-t 0|1|2|3|4]'
'dpconnectset [-k y|n] [-s y|n] [-h] [-v]'
The meaning of the options is as follows:
#
Option
Description
-l y
Switch logging on.
-l n
Switch logging off.
-t n
Sets the trace level to n, where n has to be in the range from 0
to 4. 0 means no trace at all, 4 is the highest level which gives
the most detailed report.
-k y
Switches the hold data function on.
-k n
Switches the hold data function off.
-s y
Switches the call of the PJM on, so jobs are being put into the
Océ PRISMAproduction Server workflow.
-s n
Switches the call of the PJM off, so jobs are not being put into
the Océ PRISMAproduction Server workflow.
-h
Shows the help screen.
-v
Shows the version of this program.
Invoking the program without any option displays the current settings. Temporary
'DPconnect' data, which are held, are stored in '/u/prismapro/tmp/dpconnect',
Trace and log file are written to the path '/u/prismapro/diag/dpconnect'. There are up
to six different trace- and log files written for each print job. Each file has the ODS-jobID in its name. The file names are:
Chapter 4 - POD-Module Operation
193
'DPconnect' Maintenance Programs
■
■
■
■
<job-ID>_startdpconnect_<pid>.log
<job-ID>_dpconnect_<pid>.trc
<job-ID>_pjmdpconnect_<internal number>.log
<job-ID>_dpconnectserv_<internal number>.trc
Trace and protocol files and temorary data are deleted periodically by the dels-script. The
deletion period is set to 7 days. There is one more log file named administration.log. This
file logs while installing, updating and uninstalling 'DPconnect'. It is not deleted by dels.
After 'DPconnect' has been uninstalled the file is moved to' /tmp/administration.log'.
Temporary data kept by the -k switch is stored in the path 'u/prismapro/tmp/dpconnect'.
Data stored here also will be deleted with a period of 7 days.
spj
spj (show print job) may be used to show the page and sheet properties of the resulting
AFP file of a print job which is processed successfully and is staying in the spool queue.
Additionally postprocessing commands and barcode data is shown. spj is good for
checking whether page impositioning, highlight color processing, barcode processing and
UP3I command settings are correct.
The output of this program is ASCII text which is written to the stdout device. Because
the output lines are very long it is recommended to direct the output into a text file and
view it with a text editor with horizontal scroll abilities.
The program invocation is: 'spj -n <job ID> [-s] [-c <column separator character>] [-e
<empty field character>] [-v]'
Options:
#
Option
Description
-n <job ID>
Specifies the job ID (no leading zeros needed).
-s
Puts the job ID into the output.
-c <column separator character>
Alternative character for empty fields in the output file.
-e <empty files
character>
Alternative character for empty fields in the output file.
-v
Shows the version of this program.
jview
jview may be used to show the page images of the resulting AFP file of a print job which
is processed successfully and is staying in the spool queue. jview is a shell script which
194
Chapter 4 - POD-Module Operation
'DPconnect' Maintenance Programs
performes internally a call to the PDV image viewer. The advantage of this program is
that the shown jobs don't have to be put into the Print File Library previously. You also
may view multiple jobs if a range of job IDs is specified. So for each job the PDV is
started repeatedly. To go to the next job the actual PDV has to be terminated and then
the PDV is started again to show the next job.
The program invocation is:
'jview [-s <start job ID>]'
'jview [-e <end job ID>] [-p 2|3] [-v] [-h]'
Options:
#
Component
Function
-s <start job ID>
Specifies the job ID of the first job to be shown (no leading
zeros needed).
-e <end job ID>
Specifies the job ID of the last job to be shown (no leading zeros
needed).
-p [2 | 3]
Selects the viewer:PDV or PDV3.
-v
Shows the version of this program.
-h
Shows the help screen.
When no -s or -e option was given, all jobs will be shown. If only the -s option is given
all jobs beginning with <start job ID> up to the highest existent job ID will be shown.
If only the -e option is given all jobs beginning with lowest existent job ID up to <end
job ID> will be shown.
Program versions
There is a console program named dpconnectver which shows the program version of all
'DPconnect' programs. The program invocation is:
'dpconnectver'
Chapter 4 - POD-Module Operation
195
'DPconnect' Appendix
'DPconnect' Appendix
Translation Rules for Input Job Ticket Statements
#
General pattern:
Input Job Ticket Statement
'Translation Mode:'
Alternative Arguments (Range of values) -> Effect
#
Options:
'Job Name'
'Translate Statement directly' ->
Take job name from input ticket.
'Substitute Statement with LP Input Queue Template Action' ->
Take job name from the ticket template "Job Parameter / Job
Name".
'Ignore Statement' ->
Use system default if available.
'Document Name'
'Translate Statement directly' ->
Take document name from input ticket
'Substitute Statement with an other Action' ->
Document Name (String, length 100) -> Take this alternative document name.
'Ignore Statement' ->
Discard document name.
'Accounting'
'Translate Statement directly' ->
Take account string from input ticket.
'Substitute Statement with LP Input Queue Template Action' ->
Take account string from the ticket template.
"Job / Information / Shipment / Account".
196
Chapter 4 - POD-Module Operation
'DPconnect' Appendix
Options:
'Ignore Statement' ->
Use system default if available.
'Sender Name'
'Translate Statement directly' ->
Take sender name from input ticket.
'Substitute Statement with LP Input Queue Template Action' ->
Take sender name from the ticket template .
"Job / Information / User / Name".
'Ignore Statement' ->
Use system default if available.
'Recipient Name'
'Translate Statement directly' ->
Take receiver name from input ticket.
'Substitute Statement with LP Input Queue Template Action' ->
Take receiver name from the ticket template .
"Job / Information / Shipment / Rceiver Name".
'Ignore Statement' ->
Use system default if available.
'Document Input Medium'
'Separator Page Input Medium'
'Back Cover Page Input Medium'
'Front Cover Page Input Medium'
'Exception Page Input Medium'
'Translate Statement directly' ->
Take the properties for the default-, separator, back cover-, front
coverand exeption-pages input media of the document from input ticket.
'Substitute Statement with an other Action' ->
Chapter 4 - POD-Module Operation
197
'DPconnect' Appendix
Options:
Input Media Color (White, Pink ...) -> Substitute color with selected
one.
Input Media Type (Stadard, Transparent Sheet, ...) -> Substitute
prefinish with selected one.
Custom Defined Media Color (String, length 30) -> Substitute
color with this.
Custom Defined Media Type (String, length 30) -> Substitute
prefinish with this.
Paper Length (mm) -> Substitute paper length with this.
Paper Hight (mm) -> Substitute paper height with this.
Paper Weight (g/m²) -> Substitute paper weight with this.
Predrilled Hole Count (number) -> Substitute paper hole count
with this.
Ordered Input Media Set Size (number) -> Substitute order count
with this.
Medium Name (String, length 30) -> Substitute medium name
with this.
'Ignore Statement' ->
Use system default if available.
'Copy Count'
'Translate Statement directly' ->
Take copy count from input ticket
'Substitute Statement with LP Input Queue Template Action' ->
Take copy count from the ticket template
"Job Parameters / Copies"
'Ignore Statement' ->
Use system default if available (=1).
Disposition
'Substitute Statement with an other Action' ->
Disposition (Print) -> The only way to process input Jobs is to print
'Delete Source Data'
'Translate Statement directly' ->
Handling of Print Job Data after Printing without Specification in
the Job Ticket
198
Chapter 4 - POD-Module Operation
'DPconnect' Appendix
Options:
(Delete Source File) -> If the print job data are linked to
one main file, only the main file will be deleted.
(Delete Source Directory) -> If the print job data are linked
to one main file, the directory with the linked data will be
deleted.
(Do not delete Source Data) -> Nothing will be deleted.
'Substitute Statement with an other Action' ->
Handling of Print Job Data after Printing:
(Delete Source File) -> If the print job data are linked to
one main file, only the main file will be deleted.
(Delete Source Directory) -> If the print job data are linked
to one main file, the directory with the linked data will be
deleted.
(Do not delete Source Data) -> Nothing will be deleted.
Handling of Print Job Data after Printing without Specification in
the Job Ticket
(Delete Source File) -> If the print job data are linked to
one main file, only the main file will be deleted.
(Delete Source Directory) -> If the print job data are linked
to one main file, the directory with the linked data will be
deleted.
(Do not delete Source Data) -> Nothing will be deleted
'Ignore Statement' ->
Nothing will be deleted.
'Job Start Message'
'Translate Statement directly' ->
Take job start message from input ticket.
'Substitute Statement with LP Input Queue Template Action' ->
Take job start message from the ticket template
"Job Attributes / Message / Message Text"
'Ignore Statement' ->
Use system default if available.
'Message'
'Translate Statement directly' ->
Chapter 4 - POD-Module Operation
199
'DPconnect' Appendix
Options:
Take message from input ticket.
'Substitute Statement with an other Action' ->
Message (String, length 100) -> Take this alternative message
'Ignore Statement' ->
Use system default if available
'Document Plex Mode'
'Translate Statement directly' ->
Take plex mode for the document from input ticket
'Substitute Statement with LP Input Queue Template Action' ->
Take plex mode from the ticket template "Edit / File Properties /
Convert / Paper Layout".
'Ignore Statement' ->
Use system default if available.
'Image Rotation for Document'
'Translate Statement directly' ->
Take image rotation for document from input ticket.
'Substitute Statement with an other Action' ->
Image Rotation
(Integer: 0, 90, 180, 270) -> Alternative rotation will be selected.
'Ignore Statement' ->
No rotation.
'Collating'
'Translate Statement directly' ->
Take collate mode for the document from input ticket.
'Substitute Statement with LP Input Queue Template Action' ->
Take collate from the ticket template "Job Parameter / Copies"
combo box.
'Ignore Statement' ->
Use system default if available.
'Exception Plex Mode'
200
Chapter 4 - POD-Module Operation
'DPconnect' Appendix
Options:
'Translate Statement directly' ->
Take the exception plex mode from input ticket.
'Substitute Statement with an other Action' ->
PlexMode (Simplex, Duplex, Duplex/Tumble) -> All exception plex
pages are printed in this mode.
'Ignore Statement' ->
All pages are printed like in "Document Plex Mode".
'Exception X-Image Shift'
'Exception Y-Image Shift'
'Translate Statement directly' ->
Take page numbers and shift from input ticke
'Substitute Statement with an other Action' ->
Pages where shift is to be applied (Even Page Numbers, Odd Page
Numbers, All Page Numbers) -> This alternative pages are to be
shifted.
Image Shift in X (Y)-Direction (value [mm]) -> Use this shift value
'Ignore Statement' ->
No shift is done.
'Image Rotation on Exception Pages'
'Translate Statement directly' ->
Take image rotation from input ticket
'Substitute Statement with an other Action' ->
Image Rotation (Integer: 0, 90, 180, 270) -> Alternative rotation
will be selected
'Ignore Statement' ->
No rotation.
'LP Input Queue Name'
'Translate Statement directly' ->
Chapter 4 - POD-Module Operation
201
'DPconnect' Appendix
Options:
Redirection to another LP Input Queue, indicated in the job ticket
on the print server.
The job will be processed acoording to the ticket template assigned
to this queue.
'Substitute Statement with an other Action' ->
LP-Input-Queue Name (String) -> The job will be redirected to the
queue indicated in the edit field ’LP-Input-Queue-Name’.
'Ignore Statement' ->
No redirection to another Input-Queue.
'Slipsheeting'
'Translate Statement directly' ->
A slip sheet is added after the job. If no slip sheet material has been
defined, the default media will be used.
'Substitute Statement with an other Action' ->
Interposing of Slipsheets (After every print job) -> A slip sheet is
added after every job. If no slip sheet material has been defined, the
default media will be used.
'Ignore Statement' ->
No slip sheets are processed.
'Slipsheet Input Medium'
'Translate Statement directly' ->
Take the properties for the slip sheets from input ticket.
'Substitute Statement with an other Action' ->
202
Chapter 4 - POD-Module Operation
'DPconnect' Appendix
Options:
Input Media Color (White, Pink ...) -> Substitute color with selected
one.
Input Media Type (Stadard, Transparent Sheet, ...) -> Substitute
prefinish with selected one.
Custom Defined Media Color (String, length 30) -> Substitute
color with this.
Custom Defined Media Type (String, length 30) -> Substitute
prefinish with this.
Paper Length (mm) -> Substitute paper length with this. Paper
Hight (mm) -> Substitute paper height with this.
Paper Weight (g/m²) -> Substitute paper weight with this. Predrilled
Hole Count (number) -> Substitute paper hole count with this.
Ordered Input Media Set Size (number) -> Substitute order count
with this.
Medium Name (String, length 30) -> Substitute medium name
with this.
'Ignore Statement' ->
No slip sheets are processed.
'Document Image X-Shift Front Side'
'Document Image X-Shift Back Side'
'Document Image Y-Shift Front Side'
'Document Image Y-Shift Back Side'
'Translate Statement directly' ->
Take shift for the document from input ticket.
'Substitute Statement with an other Action' ->
Front (Back) Page Image Shift in X (Y)-Direction (value [mm]) >Use this shift value.
'Ignore Statement' ->
No shift is done
'Binding'
'Translate Statement directly' ->
A "UP³I-Bind-Default"-command is added to the job only if binding
is requested in the input ticket.
'Substitute Statement with an other Action' ->
Chapter 4 - POD-Module Operation
203
'DPconnect' Appendix
Options:
LP Input Queue Template Settings for UP³I Postprosessing
Apply to all Jobs -> Take binding substitution action from the
ticket template "Job Attributes / Print / UP³I Devices" All UP³I
devices selected here are used. Applies to jobs not requiring any
postprocessing!
Apply to Jobs requiring binding only -> Take binding substitution
action from the ticket template "Job Attributes / Print / UP³I Devices", if binding is requested in the input ticket. All UP³I devices
selected here are used
'Ignore Statement' ->
No Binding is done.
'Right Side Binding'
'Translate Statement directly' ->
A "UP³I-Bind-Default"-command is put to the job only if binding
is requested in the input ticket. All sheet images are rotated by 180°.
'Substitute Statement with an other Action' ->
LP Input Queue Template Settings for UP³I Postprosessing
Apply to all Jobs -> Take right side binding substitution action from
the ticket tem plate "Job Attributes / Print / UP³I Devices". All
UP³I devices selected here are used. Applies to jobs not requiring
any postprocessing!
Apply to Jobs requiring right side binding only -> Take right side
binding substitution action from the ticket template "Job Attributes
/ Print / UP³I Devices", if right side binding is requested in the input
ticket. All UP³I devices selected here are used.
'Ignore Statement' ->
No right side binding is done
'Bookletmaker'
'Translate Statement directly' ->
A "UP³I-Bookletmaker-Booklet"-command is put to the job only
if binding is requested in the input ticket.
'Substitute Statement with an other Action' ->
204
Chapter 4 - POD-Module Operation
'DPconnect' Appendix
Options:
LP Input Queue Template Settings for UP³I Postprosessing Apply
to all Jobs -> Take booklet maker substitution action from the
ticket template "Job Attributes / Print / UP³I Devices" All UP³I
devices selected here are used. Applies to jobs not requiring any
postprocessing! Apply to Jobs requiring booklet maker only -> Take
booklet maker substitution action from the ticket template "Job
Attributes / Print / UP³I Devices", if booklet maker is requested in
the input ticket. All UP³I devices selected here are used.
'Ignore Statement' ->
No booklet maker is used
Printer Default Finishing
'Translate Statement directly' ->
Take postprocessing commands from the ticket template "Job Attributes / Print / Print / UP³I Devices"
'Substitute Statement with an other Action' ->
LP Input Queue Template Settings for UP³I Postprosessing
Apply to all Jobs -> Take postprocessing commands from the ticket
template "Job Attributes / Print / UP³I Devices" All UP³I devices
selected here are used. Applies to jobs not requiring any postprocessing!
Apply to Jobs requiring printer default finishing only -> Take postprocessing commands from the ticket template "Job Attributes /
Print / UP³I Devices", if printer default finishing is requested in the
input ticket. All UP³I devices selected here are used.
'Ignore Statement' ->
No printer default finishing
'External Finishing Device (Custom)'
'Translate Statement directly' ->
A "UP³I-Special Handling"-command is put to the job only if external postprocessing is requested in the input ticket.
'Substitute Statement with an other Action' ->
Chapter 4 - POD-Module Operation
205
'DPconnect' Appendix
Options:
LP Input Queue Template Settings for UP³I Postprosessing
Apply to all Jobs -> Take external postprocessing from the ticket
template "Job Attributes / Print / UP³I Devices" All UP³I devices
selected here are used. Applies to jobs not requiring any postprocessing!
Apply to Jobs requiring external finishing only -> Take external
postprocessing from the ticket template "Job Attributes / Print /
UP³I Devices", if external finishing is requested in the input ticket.
All UP³I devices selected here are used.
'Ignore Statement' ->
No external finishing
'Stacker'
'Translate Statement directly' ->
A "UP³I-Stack-AlternateOffset Stack"-command is put to the job
only if customer specific postprocessing is requested in the input
ticket.
'Substitute Statement with an other Action' LP Input Queue Template Settings for UP³I Postprosessing
Apply to all Jobs -> Take stacker substitution action from the ticket
template "Job Attributes / Print / UP³I Devices" All UP³I devices
selected here are used. Applies to jobs not requiring any postprocessing!
Apply to Jobs requiring stacking only -> Take stacker substitution
action from the ticket template "Job Attributes / Print / UP³I Devices", if stacking is request ed in the input ticket. All UP³I devices
selected here are used
'Ignore Statement' ->
No stacker is used
'Portrait Staple'
'Translate Statement directly' ->
A "UP³I-Stitch-Corner Staple-Top left corner"-command is put to
the job only if portrait staple is requested in the input ticket.
'Substitute Statement with an other Action' ->
206
Chapter 4 - POD-Module Operation
'DPconnect' Appendix
Options:
LP Input Queue Template Settings for UP³I Postprosessing
Apply to all Jobs -> Take portrait staple substitution action from
the ticket template "Job Attributes / Print / UP³I Devices" All UP³I
devices selected here are used. Applies to jobs not requiring any
postprocessing!
Apply to Jobs requiring portrait staple only -> Take portrait staple
substitution action from the ticket template "Job Attributes / Print
/ UP³I Devices", if portrait staple is requested in the input ticket.
All UP³I devices selected here are used.
'Ignore Statement' ->
No stapling is done.
'Landscape Staple'
'Translate Statement directly' ->
A "UP³I-Stitch-Corner Staple-Bottom left corner"-command is put
to the job only if landscape staple is requested in the input ticket.
'Substitute Statement with an other Action' ->
LP Input Queue Template Settings for UP³I Postprosessing
Apply to all Jobs -> Take landscape staple substitution action from
the ticket template "Job Attributes / Print / UP³I Devices" All UP³I
devices selected here are used. Applies to jobs not requiring any
postprocessing!
Apply to Jobs requiring landscape staple only -> Take landscape
staple substitu tion action from the ticket template "Job Attributes
/ Print / UP³I Devices", if landscape staple is requested in the input
ticket. All UP³I devices selected here are used.
'Ignore Statement' ->
No stapling is done.
'Landscape Dual Staple'
'Translate Statement directly' ->
A "UP³I-Stitch-Edge Stitch-left edge"-command is put to the job
only if landscape dual staple is requested in the input ticket.
'Substitute Statement with an other Action' ->
Chapter 4 - POD-Module Operation
207
'DPconnect' Appendix
Options:
LP Input Queue Template Settings for UP³I Postprosessing
Apply to all Jobs -> Take landscape dual staple substitution action
from the ticket template "Job Attributes / Print / UP³I Devices" All
UP³I devices selected here are used. Applies to jobs not requiring
any postprocessing!
Apply to Jobs requiring landscape dual staple only -> Take landscape
dual staple substitution action from the ticket template "Job Attributes / Print / UP³I Devices", if landscape dual staple is requested
in the input ticket. All UP³I devices selected here are used.
'Ignore Statement' ->
No stapling is done.
'Dual Staple'
'Translate Statement directly' ->
A "UP³I-Stitch-Edge Stitch-left edge"-command is put to the job
only if dual stapling is requested in the input ticket.
'Substitute Statement with an other Action' ->
LP Input Queue Template Settings for UP³I Postprosessing
Apply to all Jobs -> Take dual staple substitution action from the
ticket template "Job Attributes / Print / UP³I Devices" All UP³I
devices selected here are used. Applies to jobs not requiring any
postprocessing!
Apply to Jobs requiring dual staple only -> Take dual staple substitution action from the ticket template "Job Attributes / Print / UP³I
Devices", if dual staple is requested in the input ticket. All UP³I
devices selected here are used.
'Ignore Statement' ->
No stapling is done.
'Right Side Portrait Staple'
'Translate Statement directly' ->
A "UP³I-Stitch-Corner Staple-Bottom left corner"-command is put
to the job only if stapling is requested in the input ticket.
'Substitute Statement with an other Action' ->
208
Chapter 4 - POD-Module Operation
'DPconnect' Appendix
Options:
LP Input Queue Template Settings for UP³I Postprosessing
Apply to all Jobs -> Take right side portrait staple substitution action
from the ticket template "Job Attributes / Print / UP³I Devices" All
UP³I devices selected here are used. Applies to jobs not requiring
any postprocessing!
Apply to Jobs requiring right side portrait staple only -> Take right
side portrait staple substitution action from the ticket template "Job
Attributes / Print / UP³I Devices", if right side portrait staple is requested in the input ticket. All UP³I devices selected here are used.
'Ignore Statement' ->
No stapling is done.
'Right Side Landscape Staple'
'Translate Statement directly' ->
A "UP³I-Stitch-Corner Staple-Bottom left corner"-command is put
to the job only if stapling is requested in the input ticket.
'Substitute Statement with an other Action' ->
LP Input Queue Template Settings for UP³I Postprosessing
Apply to all Jobs -> Take right side landscape staple substitution
action from the ticket template "Job Attributes / Print / UP³I Devices" All UP³I devices selected here are used. Applies to jobs not
requiring any postprocessing!
Apply to Jobs requiring right side landscape staple only -> Take
right side landscape staple substitution action from the ticket template "Job Attributes / Print / UP³I Devices", if right side landscape
staple is requested in the input ticket. All UP³I devices selected here
are used.
'Ignore Statement' ->
No stapling is done.
'Right Side Dual Staple'
'Translate Statement directly' ->
A "UP³I-Stitch-Edge Stitch-left edge"-command is put to the job
only if stapling is requested in the input ticket.
'Substitute Statement with an other Action' ->
Chapter 4 - POD-Module Operation
209
'DPconnect' Appendix
Options:
LP Input Queue Template Settings for UP³I Postprosessing
Apply to all Jobs -> Take right side dual staple substitution action
from the ticket template "Job Attributes / Print / UP³I Devices" All
UP³I devices selected here are used. Applies to jobs not requiring
any postprocessing!
Apply to Jobs requiring right side dual staple only -> Take right side
dual staple substitution action from the ticket template "Job Attributes / Print / UP³I Devices", if right side dual staple is requested
in the input ticket. All UP³I devices selected here are used
'Ignore Statement' ->
No stapling is done.
'Stitch at Specified Position'
'Translate Statement directly' ->
A "UP³I-Stitch-Edge"-command is put to the job only if stapling
is requested in the input ticket.
'Substitute Statement with an other Action' ->
LP Input Queue Template Settings for UP³I Postprosessing
Apply to all Jobs -> Take ’Stitch at a specified position’ action from
the ticket template "Job Attributes / Print / UP³I Devices" All UP³I
devices selected here are used. Applies to jobs not requiring any
postprocessing!
Apply to Jobs requiring stitching at a specified position only -> Take
stitching at a specified position action from the ticket template "Job
Attributes / Print / UP³I Devices", if stitching at a specified position
is requested in the input ticket. All UP³I devices selected here are
used.
'Ignore Statement' ->
No stitching is done.
'Highlight Color'
'Translate Statement directly' ->
210
Chapter 4 - POD-Module Operation
'DPconnect' Appendix
Options:
Highlight color jobs:
Highlight color parts and normal color parts are processed and
printed with their respective print colors. A second highlight color
image layer is generated. DPconnect applies its own fixed highlight
color settings for the Unity RIP. That is: Separation method is
'Standard Colors (CMY/RGB)', all colors are searched for. So all
colors except black and white are treated as highlight color. Highlight
color settings for the Unity RIP from the LP Input Queue Template
are allways ignored.
Normal jobs:
The complete job is processed and printed whith normal color. A
second highlight color image layer is not generated. Highlight color
settings for the Unity RIP from the LP Input Queue Template are
ignored.
'Substitute Statement with an other Action' ->
Highlight Color Settings in LP Input Queue Template:
(Apply to all Jobs) -> Highlight color parts and normal color parts
are processed and printed with their respective print colors. DPconnect applies the highlight color settings for the Unity RIP from the
LP Input Queue Template.
'Ignore Statement' ->
Highlight color parts of a print job will always be printed in the
normal print color (black). A second highlight color image layer is
never generated. Highlight color settings for the Unity RIP in the
LP Input Queue Template are always ignored.
'Orientation'
'Translate Statement directly' ->
Take orientation from input ticket.
'Substitute Statement with an other Action' ->
Orientation (Portrait) -> Take portrait setting.
(Landscape) -> Take landscape setting..
'Ignore Statement' ->
Take portrait setting.
'Fonts'
'Translate Statement directly' ->
Chapter 4 - POD-Module Operation
211
'DPconnect' Appendix
Options:
Take font name and size from the input ticket..
'Substitute Statement with an other Action' ->
Font Name: (Selection of default font for PostScript Level 1 and 2)
-> Take alternative font name.
Font Size [points] (IInteger from 4 to 1000) -> Take alternative
font size.
'Ignore Statement' ->
Courier, grade 10 will be selected.
'Chapter Start'
'Translate Statement directly' ->
Take chapter starts from the input ticket..
'Ignore Statement' ->
No chapter starts.
'Halftone Quality'
'Translate Statement directly' ->
Select source of the Halftone Quality Specification for all page elements:
(Halftone Line Frequency for Graphics)
(Halftone Line Frequency for Images)
(Halftone Line Frequency for Text)
'Substitute Statement with LP Input Queue Template Action' ->
Take lpi setting from Job Ticket Template
'Ignore Statement' ->
Take default setting of the UnityRIP
212
Chapter 4 - POD-Module Operation
Chapter 5
LCDS-Module Operation
LCDS-Module: 'New catalog'
LCDS-Module: 'New catalog'
Introduction
The necessary print resources for printing LCDS data are be stored and organized in
different customer catalogs.
To create a new customer catalog:
Illustration
1. In the Océ PRISMAproduction Server Explorer open the 'Server Files' application and
go to the LCDS or the GCI file system.
2. Select ’File’ -> ’New directory’ or click the 'Create new directory' icon to open the 'New
catalog' dialog box:
3. Under 'New catalog name:' enter a name. The length of the field is restricted to 32 bytes.
Click ’OK’ to confirm the action.
Result
When setting up a new catalog, the sub catalogs 'rds' and 'xpar' are created automatically.
See also: ‘LCDS-Module: Organization of Resources’ on page 215.
214
Chapter 5 - LCDS-Module Operation
LCDS-Module: Organization of Resources
LCDS-Module: Organization of Resources
Introduction
JSLs in Unix ASCII text format and AFP resources (especially resources already created
by XRC process of other LCDS systems), may be put into the respective sub catalogs
“jsl” and “rds” of the target catalog.
For this purpose, the Océ PRISMAproduction Server 'Explorer''Server Files' application
with service or admin rights may be used. With this file manager, (recommended is the
use of the GCI file system of the respective server), JSLs and converted AFP resources
within “rds” may be copied from one catalog/subcat into another catalog or from the local
server file system to a catalog/subcat.
Copy Resources
1. Transport (for example using ftp) the files to a local “source” directory (for example to
'/u/admin').
Note:
In case of ftp transfer of text files from DOS/Windows system, please use ascii transfer
mode. In case of transfer of binaries/print resources, please use “bin” transfer mode.
2. In this local directory (or for example in the “jsl” or “rds” subcat of the source catalog),
mark/select the files (left mouse button) which you want to copy.
Note:
Please note, that the files may be sorted using alphabetic names, size, date and type (for
JSLs). This may help marking the files.
You can access the local file directory tree, opening the GCI file view of the respective
server, where the local files are located, and clicking the 'Change to parent directory' icon
to access the Linux root directory (/).
3. Press the 'Copy selected files to clipboard' icon in the upper right corner.
4. Change with the GCI file system (resource manager) to the target catalog. Change to the
“jsl” or “rds” sub catalog.
Note:
If the respective subcat is not created yet, please use the 'Create new directory' icon to
create a sub cat and select the respective subcat type for example “jsl”.
5. Press the 'Paste files from clipboard' icon to copy the files of the clip board into the actual
sub cat.
Chapter 5 - LCDS-Module Operation
215
LCDS-Module: Organization of Resources
Note:
Please note, that the file manager will issue an overwrite warning, if the files (JSL or AFP
resource) is already present. In this case it is recommended to skip / chancel the copy
process in order to avoid for example the overwriting of already changed JSLs.
216
Chapter 5 - LCDS-Module Operation
LCDS-Module: 'LCDS Resources'
LCDS-Module: 'LCDS Resources'
Introduction
This application allows you to copy and/or convert Xerox resources from a Xerox formatted
input media or from hard disk to the correct directories in the LCDS-Module. It also
gives you the possibility to edit JSLs.
After the copy process the resources are converted (if selected) to the AFP format and are
stored on the harddrive in the directory ('/u/prismapro/data/cat/<catalog>/fnt(img,lgo,frm'), where <catalog> is the current catalog.
Note:
If you select 'Format' -> 'Resources' in the 'List of Files & Workflow Definition' section
of the 'Print Job Manager' (LCDS-Ticket), you can also copy/convert resources with
the PJM!
Attention:
This program is not available to the user "operator"!
Illustration
Resource Types
The LCDS-Module accepts the following resource types:
Chapter 5 - LCDS-Module Operation
217
LCDS-Module: 'LCDS Resources'
#
Resource Type
Description
CMD
Command files (*.CMD) are transferred into the system from
an input media. After this they only serve for information purposes. They will not be converted or processed in any way.
FNT
Fonts (*.FNT) are transferred from input media and converted
to Océ PRISMAproduction Server fonts. Kanji fonts will be
rejected.
LGO
Logos (*.LGO) are transferred from input media and converted
to Océ PRISMAproduction Server page segments. Multi color
logos will be accepted.
FRM
Forms (*.FRM) are transferred from input media and converted
to Océ PRISMAproduction Server overlays. Color substitution
lists (I-lists) will be processed in GRAPHIC and LOGO statements ('...INK inkref1, [inkref2] [...];')
IMG
Images (*.IMG) are transferred from input media and converted
to Océ PRISMAproduction Server page segments. Multi color
images will be accepted.
JSL
JSL’s (*.JSL) are transferred from input media and converted
to Océ PRISMAproduction Server internal formats. They have
to be compiled in order to use them for data conversion.
Note:
Other types of resources are ignored.
Resources can be loaded onto the server from the following media:
■
■
■
■
9 track tape
IBM Cartridge (3480, 3490)
3,5“ disk (1,2 MB format)
Hard disk
'Copy/Convert' Workflow
Before you can start copying, you must perform the following steps in the Resources
section of the 'LCDS Resources' application:
218
Chapter 5 - LCDS-Module Operation
LCDS-Module: 'LCDS Resources'
#
UI Element
Description
'Input device:'
Select an available input medium from a list (Tape, Hard Disk,
Cartridge or 3 1/2’’ Floppy).
If the device Harddisk is chosen, files with extension “.JSL”
are checked for the existence of line feed characters in the first
400 bytes. If there are such characters, the file is assumed to be
in ASCII-text mode. Then it is automatically moved into the
“jsl” subcatalog of the selected catalog. Files without extensions
but with AFP resource prefixes like “O1”, “IX” or “C0” are assumed to be AFP resources and are automatically moved to the
“rds” subcatalog.
Please note, that the file names are also automatically changed
to the upper case, which is the default of both subcatalogs.
Please note, that there is no overwrite protection.
'Resource name:'
Lists all resources on the selected medium. Xerox file name and
file type. Wildcards are allowed (* = all files, A*.FNT = all fonts,
which start with character ’A’).
'Copy'
Check this box if you only want to copy the resources on your
system.
'Convert'
Check this box also to ensure that the resources are converted
after copying.
Chapter 5 - LCDS-Module Operation
219
LCDS-Module: 'LCDS Resources'
UI Element
Description
'Copy/Convert'
Button
When you click the 'Copy/Convert' button, the system begins
loading the relevant resources onto the server. During copying,
the button is dimmed, which means that the function is not
available. The names of the resources being copied to the server
are displayed in the Messages window.
When the files have been read and the 'Convert' checkbox is
marked, the Xerox resources of type FNT, FRM, IMG or LGO
are converted to the LCDS-Module format and saved in the
directory '/u/prismapro/data/cat/<catalog>/rds' where <catalog>
is the current catalog.
If you ftp resources from an MVS or Elixir system, be sure that
all files are in upper case. If the LCDS-Module has been installed
with the default settings, the original resources will be deleted
after successful conversion. Otherwise they will be moved to
'/u/prismapro/data/cat/<catalog>/FNT_conv' ('FRM_conv,
IMG_conv, LGO_conv' respectively).
After completion of the conversion, a status report is displayed
in the Messages window showing how many files have been
read and converted successfully or unsuccessfully.
When conversion is complete, the 'Copy/Convert' button is
available again.
Cancel Operation
Button
Aborts the current 'Copy/Convert' operation.
After a successful conversion, the Xerox resources can be deleted or kept (optional). If
needed, the resources can then be converted again without reading them from tape once
more. In any case, the backups of all Xerox resources must be saved in the original Xerox
tape format on tapes or diskettes.
Deletion Mode
Depending on the Deletion_mode you set with the 'LCDS Jobs' tool in the 'Configuration' workspace of the Océ PRISMAproduction Server Explorer (see "LCDS Parameter
Configuration" -> "LCDS Jobs" in the Océ PRISMAproduction Server Administration
Settings and Tasks Guide), every single element (every single resource) will be processed
in the following way after successful conversion:
220
Chapter 5 - LCDS-Module Operation
LCDS-Module: 'LCDS Resources'
#
Deletion Mode
Description
0
The single element will be moved to backup files (fnt_conv,
frm_conv, img_conv and lgo_conv), which serve as input library
for the CONVERT function. So all single resources will be
collected in their original format and can be converted again
by the CONVERT function, whenever this is needed.
1
The single element will be deleted from the COPY library
without saving.
Regardless of the Deletion_mode 0 or 1 the resource element is not available on the system
for the COPY function anymore after successful conversion.
Regardless of the Deletion_mode it is recommended to keep the original data on the
Xerox resource tape or on the Xerox floppy.
Note the following when loading resources from Harddisk:
■
■
■
Copy Xerox resources with corresponding extensions (for example ABC.FRM) in
uppercase characters into the directory '/u/prismapro/data/resimport/lcds'.
Note: You can use the command 'chfnm –u' to convert all resource names from lowercase to uppercase.
Select Harddisk as the input device and start copying.
The files in '/u/prismapro/data/resimport/lcds' are not deleted automatically after the
conversion!
Compile JSLs
After copying the resources on your system you have to compile the JSLs. This is done
in the JSL section of the 'LCDS Resources' window. Here you can also edit the JSLs and
modify them. The compiled JSL's are written to one file called '/u/prismapro/data/cat/<catalog>/ldparm.dat', where <catalog> is the current catalog.
Note:
If you select JSL in the 'List of Files & Workflow Definition' section of the Print Job
Manager' (LCDS-Ticket), you can also compile JSLs with the PJM!
Use this command to edit and compile JSLs. You have to compile every JSL you load
into the system in order to make it available for the LCDS-Module.
Chapter 5 - LCDS-Module Operation
221
LCDS-Module: 'LCDS Resources'
#
UI Element
Description
JSL file name
Type in the JSL ( max 6 digits) name without file extension to
be compiled or choose a JSL file from the list. Type in an asterisk (*) to compile all JSLs in the selected catalog. You can also
use ’?’ to replace single characters.
List box
Lists all JSL’s on the server.
'Edit'
Starts a notepad to edit the JSL’s. To edit a JSL, enter the JSL
name (max. 6 characters) without the file extension and click
the 'Edit' button. This opens an editing window in which you
can make changes. To save changes, close the window. You are
then asked whether you want to save the file. Answer Yes to
save the file, or No to discard the changes. When you have finished editing, you must compile the JSL to make the changes
effective.
Wildcards in the JSL filename are rejected by the UI, if the JSL
editor is called.
Note:
An imported JSL can be used further on a Xerox system
after export with the 'LCDS Resources Export' Explorer
applet.
222
'Compile'
Starts the compile process after selecting or typing in the JSL
name. (If you use wildcards like ’*’ or ’?’ all matching JSLs will
be compiled. When compiling JSLs, messages will appear in
the ’Message’ window for each processed JSL. The compiler
shows start and stop messages and a summary of all JSLs which
were read, successfully compiled or interrupted.
'Cancel Operation'
Aborts the compile process.
Chapter 5 - LCDS-Module Operation
LCDS-Module: Stockset Configuration Tool
LCDS-Module: Stockset Configuration Tool
Introduction
This tool allows you to define the status of paper loading of the printer. In detail you
define in which input bin the various sorts of paper (stocknames) should be loaded for
the different applications. Therefore the SCT links stocknames to input bins (or input
bin combinations) and saves this configuration to SCT tables. When printing an LCDS
application you have to activate the matching SCT table.
A change of the arrangement of paper loading during an LCDS conversion process initiates
an operator message defining how to load the paper into the printer (form message/Otext).
The process works as follows: while converting an LCDS application the system checks
if the stocknames used by a STOCKS command are defined in the active SCT table. If
this is the case the table names will be reported by a form message or by Otext to the
operator. If the active table does not match the requirements, the system searches for a
matching table in the SCT.DAT file. If there is exactly one matching table, it will be set
active automatically after issuing a warning. If there are more than one matching tables,
a list of these tables appeares for the operator to choose from. In case the system cannot
find any matching table, a list of the required stocknames is issued for the operator to
create a new table with the respective settings.
The SCT table which is used by the x-filter during the conversion process is locked automatically by the system so it cannot be modified by the operator. This is done because
the name of the SCT table is used as FORM ID/form message or in the Otext allowing
the operator to view the requirements of paper loading of every job before it is printed.
The FORM ID gives information on the start configuration. An Otext message will be
displayed if the status of paperloading is changed during print process (by DJDE or JSL).
Note:
SCT configuration is only used if the tray selection of the PJM is set to 'by the stockset
configuration'.
Chapter 5 - LCDS-Module Operation
223
LCDS-Module: Stockset Configuration Tool
Illustration
Overview
Before setting up tables with the SCT it is recommended to analyze the applications
which are to be printed.
In general there are two possibilities for the systems engineer or administrator to set up
tables:
Definition of tables for more than one application
Example:
The following 8 applications should be printed with different paper colors or forms:
#
Applications
1
2
3
4
WHITE
X
X
X
X
YELLOW
X
X
5
6
Stocknames
X
BLUE
RED
GREEN
GRAY
224
Chapter 5 - LCDS-Module Operation
X
X
X
X
X
X
X
X
X
X
7
8
LCDS-Module: Stockset Configuration Tool
Applications
FORMA
X
X
FORMB
X
X
FORMC
X
Using a printer with 4 input bins (for example Océ VP5000), you need to set up three
tables:
#
SCT table name
Stockname
Applications
COLOR01
WHITE/YELLOW/BLUE/RED
1245
COLOR02
WHITE/GREEN/GRAY
36
FORMX
FORMA/FORMB/FORMC
78
Using a printer with 3 input bins (for example Océ PS75), you need to set up five tables:
#
SCT table name
Stockname
Applications
COLOR04
WHITE/YELLOW/RED
12
COLOR05
WHITE/BLUE/RED
4
COLOR06
YELLOW/BLUE/RED
5
COLOR02
WHITE/GREEN/GRAY
36
FORMX
FORMA/FORMB/FORMC
78
Definition of many tables, each for one application
For a description of the workflow see the following chapter.
Functions of the SCT Window
To open the editor window open the Océ PRISMAproduction Server Menu and click
on Stockset Configuration.
The ’Table’ Menu
Chapter 5 - LCDS-Module Operation
225
LCDS-Module: Stockset Configuration Tool
#
Menu Entry
Description
‘New SCT.DAT’
Creates a new SCT.DAT file. The old SCT.DAT will be
deleted. A warning is displayed asking you to confirm the operation.
‘Save’
Saves the modified SCT.DAT file.
‘Exit’
Exits the program. You are prompted to save changes.
Buttons on the Main Window
#
226
UI Element
Description
’Table’
Use the arrow button to open a list with all defined tables stored
in the SCT.DAT file to select from.
The following tables are predefined when you start the Stockset
Configuration Tool:
STANDARD
This table is always locked and therefore cannot be modified
or deleted. Activate this table when printing an application
without stockset definition to show the entry STANDARD in
the print queue window.
TEST
This table cannot be locked and should therefore only be used
for testing reasons.
FF1
Default table for fanfold printers (only one input bin).
CS1
Default table for cutsheet printers.
Chapter 5 - LCDS-Module Operation
LCDS-Module: Stockset Configuration Tool
UI Element
Description
’ACTIVE’
Checking this box will activate the table shown in the SCT
window. This table will be used and locked by the x-filter when
printing an application.
If you use the Print Job Manager to submit LCDS print jobs
you have to insert the name of the table which should be used
in the LCDS ‘File properties’ window in the field ‘Active SCTable’. This will have the same effect as checking this box.
’LOCKED’
If this box is checked (either by the user ‘service’ or ‘admin' or
by the system) the table shown in the window cannot be modified.
‘New name’
Changes the name of an existing, unlocked table.
‘Show actual’
This button enables you to view the actual settings of the table
assigned to the job, which is currently printing. This may be
helpful if the active table has been modified in the meantime.
During job conversion the used table is locked and cannot be
modified. A form message text will be generated for this job
displaying the table name, which is valid for the initial paperloading. This valid and unchanged table is shown in the SCT
window.
‘Show active’
Displays the active table, if present.
‘New’
Creates a new empty table. Define the maximum number of
input bins (up to 16) in the middle of the window. Insert the
required stocknames in combination with the number of the
input bins in the ‘Entries’ table at the bottom of the window.
‘Duplicate’
Duplicates the table shown in the window. You will be
prompted to insert a new name. Use this command if you want
to make minor changes to a copy of an existing table.
‘Update active’
Same as ‘Duplicate’ but duplicates the active (!) table and it’s
name. To differentiate the duplicates the SCT adds an increasing
number to this name. Use this command if you want to create
groups of similar tables.
'Delete‘
Deletes a selected table from SCT.DAT. Before this is done
you will be prompted to confirm.
'Catalog'
In this selection box define the catalog used for the modification
of the SC-tables.
'Printertype'
The space in this text field is limited to one word with a maximum of 14 characters. Insert any optional term (for example
"Cutsheet") which serves as a comment to the selected table.
Chapter 5 - LCDS-Module Operation
227
LCDS-Module: Stockset Configuration Tool
UI Element
Description
‘Comment’
Insert a comment for the entire table, for example on the
printer or on the application for which the table is designed.
‘Max. BIN’
Select the number of input bins of the printer. The number is
used to check active input bins in an active table. A warning
will be displayed if you try to add an input bin, which exeeds
the selected number. For cutsheet printers you can choose a
number between 1 and 16.
‘MAIN’
Number of stockbin used as MAIN input bin, for example
DJDE FEED=MAIN (you may insert a comment on the type
of paper used for this bin).
‘AUX’
Number of stockbin used as AUX input bin, for example DJDE
FEED=AUX or using the conditional processing command
RAUX (you may insert a comment on the type of paper used
for this bin).
‘FEED’
Equivalent to XEROX operator command FEED. If
FEED=MAIN, the settings of the active table are used. For
FEED=AUX or <n> only the stockbin AUX or <n> is used and
the settings of the active table are overridden.
'Entries'
This is the section where you define the combination of stocknames and input bins for the selected table. It is also possible
to modify an existing table by activating or deactivating the
stockname/bin combinations.
Column Titles
‘name’
= stockname. As a stockname you can choose any name (for
example the color of the paper) with a maximum of 6 characters.
‘number’
= number of the input bin. With the VP5000 a number can
also represent a combination of input bins (cluster).
‘active’
= single entries of a list can be activated or deactivated. This
feature enables you to adjust a table for different applications.
‘comment’
= insert a comment for the entry in the list (for example physical
input bins, type of paper, ...).
The following buttons refer to the entries of a selected table in the list.
228
‘New entry’
Click this button to create a new entry.
‘Duplicate entry’
Use this button to duplicate a selected (highlighted) entry in
the list.
Chapter 5 - LCDS-Module Operation
LCDS-Module: Stockset Configuration Tool
UI Element
Description
‘Delete entry‘
Deletes a selected (highlighted) entry in the list. Before this is
done you will be prompted to confirm.
Status bar
This bar at the bottom of the editor window indicates the status
of the SCT. For instance you will be informed, if the SCT.DAT
has been changed and needs to be saved. Activating a table will
automatically save the configuration.
Note:
The term ‘Form’ is used with the LCDS-Module in the sense of general settings for
cutsheet inbin configuration defined in a SC-table. The form message window is generated if the stockset is defined in the start JDE or JDL. If the stockset is changed using
DJDE the conversion process automatically inserts OTEXT WAIT messages showing
the name of the SC-table.
Note:
It is recommended to avoid positioning forward or backward after interrupting the print
job (in the 'All Jobs' window), if the print data you want to skip contain OTEXT messages generated by the stockset handling. These messages will be processed in any case
leading to an improper reloading of paper.
Chapter 5 - LCDS-Module Operation
229
LCDS-Module: Stockset Configuration Tool
230
Chapter 5 - LCDS-Module Operation
Chapter 6
PCL-Module Operation
PCL-Module: General Features
PCL-Module: General Features
Introduction
The PJL/PCL Backend extends PJL/PCL printing with Output Management functionality of Océ PRISMAproduction Server:
■
■
■
■
■
■
■
■
■
■
■
■
■
Native Workflow
Commands: Interrupt, Continue, Print Ranges
Messages at start of print job, at end of print job, at printer errors, on interrupts
Checkpointing
Esc Sequence(s) Replacement Filter including Barcode (Input)
Esc Sequence(s) Replacement (Output)
Accounting according to Océ PRISMAproduction Server conventions
CustomTone (passthrough mode)
Support of PCL5 printers up to 1000 ppm
Configuration of backend according printer capabilities (output trays, offset, ...)
Message dialog on missmatch of job requirements and printer capabilities
Trace functionality according to Océ PRISMAproduction Server conventions
Header and trailer pages
Note:
To use the PJL/PCL backend you need a valid license. Currently you need the following
license:
Product name PJL_Driver
Product version 4.0
Support of PJL and PJL Encapsulated PCL5 Data Streams
Printer capabilities are checked through PJL protocol and passed to the spool.
Through PJL the printer is switched to and from PCL datastream.
Through PJL the Océ PRISMAproduction Server Jobstring is passed to the operator
panel of the printer.
Support of Native PCL 5 Data Streams
Native PCL 5 datastreams are passed through to the printer, if the printer does not support
PJL or are encapsulated with a PJL sequence at the beginning and at the end of the job.
232
Chapter 6 - PCL-Module Operation
PCL-Module: General Features
Supported Printers
The PJL/PCL Backend supports printers up to 1000 ppm connected via TCP/IP. Functional code 6 or higher is required. To provide the Output Management System with the
required information the printer must support the PJL commands defined in Print Job
Language Technical Reference Manual (Hewlett-Packard Company). Supported printers
are:
■
■
■
■
■
■
■
■
■
■
■
■
■
■
■
■
VarioStream 9220
VarioStream 9210
VarioStream 7650
VarioStream 7650
VarioStream 7550
VarioStream 7450
VarioStream 7400
VarioStream 7300
VarioStream 7200
VarioStream 6100
VarioPrint 5160
VarioPrint 5115
VarioPrint 3090
Generic_Cutsheet
Generic_Single
Generic_CTWIN
Restrictions
■
■
■
■
■
MSG pages are not supported.
Absolute and relative positioning is not supported.
The NPRO functionality is not supported.
Tuning sets are not used.
The backend does not connect to the Océ PRISMAproduction Server database. It
does not make entries in it or use any information from it.
Chapter 6 - PCL-Module Operation
233
PCL-Module: Native Workflow
PCL-Module: Native Workflow
Introduction
Print jobs which should be printed with the PJL/PCL Backend must be generated with
the Native Ticket of Océ PRISMAproduction Server:
Illustration
Native Workflow
Before the job is submitted to the spool, the PCL data are parsed for esc sequences by
the input esc sequence replacement filter. Within this processing step barcode esc sequences
can be replaced by a bitmap representation of the barcode esc sequences and other escape
sequences can be removed or replaced. The behavior of the input esc sequence replacement
filter is controlled by a file properties window in the PJM (see ‘PCL Native Workflow in
the PJM’ on page 237).
In this processing step only printer independent changes should be made.
234
Chapter 6 - PCL-Module Operation
PCL-Module: Native Workflow
The output esc sequence replacement filter handles printer specific changes to the PCL
datastream (for example tray selection).
The barcode filter converts esc sequences into bitmaps:
See also: ‘PCL-Module: Syntax of the Native PCL Filter’ on page 242
Chapter 6 - PCL-Module Operation
235
PCL-Module: Native Workflow
Supported and Unsupported Spool Job Commands
The Backend supports the following spool job commands (in the Océ PRISMAproduction
Server 'All Jobs' application):
■
■
Continue
Restart
The Backend does not support the following spool job commands:
■
■
■
■
Halt
Reposition: absolute and relative reposition cannot be used. Instead use the page range
to reposition.
Interrupt: Don’t use the spool interrupt command with PJL Backend. Due to possible
buffering of many jobs in the printer, for which the error recovery is made in the
printer, the behavior of this command would be ambiguous in several situation and
the delay between entering the command and the reaction on it might be very long.
To interrupt a printing job use the cancel job button in the printer control panel. After
this the print job is interrupted and the printer is deactivated. To continue printing
activate the printer again.
Print Ranges: For partial job printing only one page range (from ... to) is supported.
Additional Information for the Separator Pages
You can use the ’Personal Information’ dialog in the PJM to add detailed information
on the reciever to the separator pages. Therefore select the 'Job' menu in the PJM and
click on 'Information ...'
236
Chapter 6 - PCL-Module Operation
PCL Native Workflow in the PJM
PCL Native Workflow in the PJM
Introduction
The properties dialog for the PCL workflow provides the ability to modify PCL data to
correct problems caused by older applications or PCL data designed for different printers.
The properties window for PCL files can also be used to send PCL fonts and macros with
PCL data stream, if they are not available in the printers, and to replace PCL escape sequences. These steps are performed depending on the job settings, defined by the PJM
in the job ticket. The enriched and changed PCL data stream is then spooled in the system.
Attention:
In V3.10.06, the configuration file '/u/prismapro/lib/pcl_filter/config.txt' had to be
edited on a command line basis and the user was able to set PCL replacement commands
only on the system level. With version V4.00, the user is now able to define the PCL replacement commands with the job-specific PJM-GUI. In V4.00 the PCL file properties
dialog replaces the configuration file. The 'config.txt' file is not used anymore.
For the definition of the special PCL Filter commands "-PJL" / "-DFF" and complex
UP3I replacement commands, please use the second PCL Filter based in the PJL driver.
This filter uses the configuration file '/u/prismapro/cfg/backend_filter/config_out.txt'.
This configuration file has explicit inline description in the file and is used globally for
all PJL drivers on this server. In the future this file will also be replaced by a properties
window in the PJM.
PCL Replacement
PCL commands provide access to the printer's PCL control structure. The PCL structure
controls all features of the printer. PCL printer commands (other than single-character
control codes) are also referred to as escape sequences.
PCL replacement is a possibility to change PCL printer commands (or escape sequences).
This function allows to control the features of one particular printer or to change PCL
applications device-independent.
Some PCL applications are so complex that it is necessary to use a set of different PCL
replacements to adjust them to special printers. So the best way for PCL replacement is
the possibility of universal changing in PCL data stream, which allows covering its diverse
modifications. The most useful PCL replacements are summarized in the following table:
#
Examples for PCL
Replacement
Usual Dependencies
Simplex/Duplex
print
Printer-dependent.
Chapter 6 - PCL-Module Operation
237
PCL Native Workflow in the PJM
Examples for PCL
Replacement
Usual Dependencies
Paper size
Especially interesting for fanfold printers like for VS9000 and
VS10000.
Paper orientation
Both, printer and application dependent.
Input tray
Printer-dependent.
Output tray
Printer-dependent.
Foreground Color
Both, printer and application dependent.
Job Separation
Both, printer and application dependent.
Delete all UP3I
PCL sequences
Printer-dependent.
Offset PCL setting
Printer-dependent.
Delete all offset
PCL sequences
Printer-dependent.
Move margins
(top, horizontal,
etc.)
Especially interesting for fanfold printers like for VS9000 and
VS10000.
Ticket Parameters
#
Paramater
[files]
Description
Example (string)
PJL_ESC_
PCLFILTER
Multiply input PCL filter commands may
be specified, separated by ';'
"*vS","2"="3";
"&lZ","*"-
PJL_FONTS
Multiply font file names may be specified,
separated by ';'
Font1.sfs;Font2.sfs;
Font3.sfs
PJL_MACROS
Multiply macro file names may be specified, separated by ';'
Macro1.pcl;Macro2.pcl;
Macro3.pcl
Please note that the example string is for reference/analyze purpose. It is not necessary
for a user to understand the syntax of the strings in the PJM Ticket. With the properties
dialog you can build these stings in an easy and user friendly way.
The semicolon separated lists of values may not have spaces for example before or after
the ";" or "=" character. A space character as part of the PCL escape sequence itself with
the quotes is obviously allowed.
238
Chapter 6 - PCL-Module Operation
PCL Native Workflow in the PJM
PCL File Properties: Replacement Tab
The following operations are supported, each designated by a single operation command
character:
#
Operation Command
Charecter
Description
=
Replace the value within the PCL sequence with a new value.
"<PCL Sequence>", "<old value>" = "<new value>"
~
Replace entire PCL sequence with a new PCL sequence.
"<PCL Sequence>", "<old value>" ~ "<new PCL Sequence>",
"<new value>"
-
Delete PCL sequence.
"<PCL Sequence>", "<value>" -
>
Append (add) a new sequence AFTER this one.
"<PCL Sequence>", "<value>" > "<new PCL Sequence>", "<new
value>"
<
Insert a new sequence BEFORE this one.
"<PCL Sequence>", "<value>" < "<new PCL Sequence>", "<new
value>"
"<PCL Sequence>" means a 3 character string containing only:
Chapter 6 - PCL-Module Operation
239
PCL Native Workflow in the PJM
■
■
■
The Parameterized character.
The Group character (or a ' ' character).
The Terminating character (use upper case letters).
For example: "(sT" or "*vS".
In order to define one replacement rule, you may follow these steps. For example:
#
Step
Action
1
Add a new rule clicking the "+" icon in the tool bar.
2
Choose an 'Operation', for example "Replace Sequence".
3
Choose the 'Old Sequence' you want to replace.
4
Choose the 'New Sequence' you want to use.
The other operations work respectively. Unused fields are grayed out. For example for
the operation 'Delete' the fields 'New Sequence' and 'New value' cannot be used. You
may define several replacement rules. Each line of this table represents one rule.
Note:
You need a certain PCL knowhow to use this feature. On purpose, there is no checking
for the range of parameters/values, because the PCL code of the input file may not be
within the specification and therefore a parameter check may not be useful.
The GUI allows full flexibility so far choice of sequences and values are concerned. This
requires -- on the other hand --a certain PCL expertise of the user of this GUI. You may
choose escape sequences via an easy-to-use list of predefined sequences on the left hand
side or alternatively via the 3 character string on the right hand side, which allows flexible
definition of PCL escape sequences via their 3 character representation.
PCL File Properties: Fonts and Macros Tabs
With these tabs, PCL fonts and macros can be defined. These resources will then be
embedded in the beginning of the respective PCL data file.
These PCL fonts and PCL Macros, which fit to the respective application/files, must be
provided by the user in the "$RESOURCES-SHARED" library, (usually
'/u/prismapro/resources/shared', which is a link to '/u/cust/resources/shared'.).
It is recommended to use the 'Server Files' application, to create PCL and application
related subdirectories. These subdirectories under the "$RESOURCES-SHARED" library
240
Chapter 6 - PCL-Module Operation
PCL Native Workflow in the PJM
allow to distinguish for example AFP and PCL resources or PCL resources dedicated for
specific PCL Applications/Files.
If the 'Server Files' application is used, the resources are automatically shared with the
other server of the Océ PRISMAproduction Server cluster. If these resources are copied
manually, please copy the resources to all servers.
Chapter 6 - PCL-Module Operation
241
PCL-Module: Syntax of the Native PCL Filter
PCL-Module: Syntax of the Native PCL Filter
Introduction
PCL Sequences: "<PCL Sequence>" means a 3 character string containing only:
■
■
■
the Parameterized character
the Group character (or a ' ' character)
the Terminating character (use upper case letters)
Do not include the escape character or value.
Syntax example : "(sT" or " E"
[<esc>(s16602T], [<esc>E],
Examples
Examples for replacing values within the PCL sequence with new values:
General syntax: "<PCL Sequence>", "<oldvalue>" = "<newvalue>"
#
Operation
Replace Value
Syntax
Foreground Color
Change <esc>*v2S to <esc>*v3S
"*vS" , "2" =
"3"
Input Tray
(Paper (Media) Source)
Change <esc>&l2H to <esc>&l7H
(from main paper source to autoselect)
"&lH" , "2" =
"7"
Output Bin
Change <esc>&l0G to <esc>&l1G
(from automatoc selection to Upper
Output Bin)
"&lG" , "0" =
"1"
Simplex/Duplex Print
Change <esc>&l0S to <esc>&l1S
(from simplex to duplex, long-edge
binding)
"&lS" , "0" =
"1"
Page Size (Media
Name)
Change <esc>&2A to <esc>&l26A
(from Letter to A4)
"&lA" , "2" =
"26"
Examples for replacing the entire PCL sequence with a new PCL sequence:
General Syntax: "<PCL Sequence>", "<oldvalue>" ~ "<new PCL Sequence>", "<newvalue>"
242
Chapter 6 - PCL-Module Operation
PCL-Module: Syntax of the Native PCL Filter
#
Operation
Syntax
Change the primary symbol set
10U (PC-8)
to 0N (ISO 8859/1 Latin 1):
"( U" , "10" ~ "( N" , "0"
Replace Horizontal Cursor Positioning
from PCL Units to decipoints:
"*pX" , "+300" ~ "&aH" , "+720.01"
Input: <esc>*p+300X Output: <esc>&a+720.01H
Examples to delete PCL sequences:
General syntax: "<PCL Sequence>", "<value>" #
Operation
Delete Action
Syntax
Offset Registration
Delete all offset PCL sequences
"&lZ" , "*" -
UP3I PCL sequences
Delete all UP3I PCL sequences
"*uW" , "*" -
Remove all PJL
-PJL
Example for appending (adding) a new PCL sequence AFTER this one:
General Syntax: "<PCL Sequence>", "<value>" > "<new PCL Sequence>", "<newvalue>"
#
Operation
Syntax
Add a Unit of Measure command
AFTER every <esc>E reset:
" E" , "" > "&uD" , "600"
Note: empty value field after the " E"
Input: <esc>E Output: <esc>E<esc>&u600D
Example for inserting a new PCL sequence BEFORE this one:
General Syntax: "<PCL Sequence>", "<value>" < "<new PCL Sequence>", "<newvalue>"
#
Operation
Syntax
If you want to replace the UEL
*AND* strip the PJL,
it will only work if you use the
insert sequence command ’<’
"% X", "-12345" < " E", ""
-PJL
This insertes before every UEL(<esc>%-12345X)
the <esc>E and removes the PJL commands
Chapter 6 - PCL-Module Operation
243
PCL-Module: Syntax of the Native PCL Filter
Special Case:
Instead of a "<new PCL sequence>" , "<new value>", the replacement can be a string
starting with 'X', and containing text or hexadecimal bytes, each starting with "\x" and
having exactly 2 hex digits, for example: "\x1B"; up to 255 bytes.
This string may NOT be used as a search string on the left side of an operation character.
For example, to replace job separation <esc>&l1T with the complex UP3i command for
a UP3i stacker:
"&lT", "1"
~"X\x1B*u15W\x00\x01\x00\x0D\x03\x00\x08\x00\x01\xFF\x00\x00\x00\x00\x00"
244
Chapter 6 - PCL-Module Operation
PCL-Module: Print Parameters
PCL-Module: Print Parameters
LI (=Logical Interface Section)
#
Parameter=Default Value
Description
DUMMYDEV=0
Enable or disable the internal printer simulator.
0 Printer simulator disabled
1 Printer simulator enabled
TRACEFILE=
'/u/prismapro/diag/printers/<Printername>.trc'
Filename of the trace file.
The name must be unique for each configured printer (Printer
name is the logical name of the printer).
TRACEFLAGS=0x012F
Flags to turn on tracing of categories individually.
Errors are always logged regardless of this setting.
0x0001 network
0x0002 printer
0x0004 page description language
0x0008 spool
0x0010 parsing of readback
0x0020 job parameters
0x0040 verbose printer messages
0x0100 dump printer data stream to file
TRACELEVEL=0
Tracelevel:
0 errors only
1 warnings
2 messages
3 questions
4 logging
5 diagnosis
PDSINFO Section
#
Parameter=Default Value
Description
CKPTPAGE=10
Trigger for writing a checkpoint after at most nnn pages.
CKPTTIME=1000
Trigger for writing a checkpoint after at most nnn seconds. In
units of 1/1000 seconds.
Chapter 6 - PCL-Module Operation
245
PCL-Module: Print Parameters
Parameter=Default Value
Description
DSFORMAT=0,0,7,0,0
Selects printing of HDR,SEP,TXT,MSG, TRL pages.
HDR
■ 0 disables printing of Header pages
■ 1 enables printing of Header pages
SEP
■ 0 disables printing of Separator pages
■ 1 enables printing of Separator pages
TXT
■ must be 7
MSG
■ must be 0
TRL
■ 0 disables printing of Trailer pages
■ 1 enables printing of Trailer pages
JOBCNTRL=-1
Specifies job processing at the end of job:
1 do not accept every end of job, only for the last job in the
queue
(-> higher printing performance)
-1 accept every end of job
PJL Section
#
246
Parameter=Default Value
Description
CSE=1
The printer has/does not have the so called "cut sheet emulation".
This feature is unique to OPS printers and will be disabled automatically
if the printer query states that it is not present in the printer.
0 Printer does not have "cut sheet emulation"
1 Printer has "cut sheet emulation" (OPS printers only)
DUMMY_LIMITED=0
Enable or disable limited dummy job.
If limited dummy job is enabled, then the limited dummy job
will be sent to the printer.
0 limited dummy job disabled
1 limited dummy job enabled
Chapter 6 - PCL-Module Operation
PCL-Module: Print Parameters
Parameter=Default Value
Description
MEDIA_ATTRIBUTES=0
The printer supports/does not support media attributes inquiry
in Windows Application Driver data stream.
0 The printer does not support media attributes inquiry
1 The printer supports media attributes inquiry
READBACK=1
Enable or disable PJL readback. If readback is enabled,
the presence of certain printer features will be queried for
via PJL and disabled automatically if they are not present.
0 PJL readback disabled
1 PJL readback enabled
SET_ESCE=1
Enable or disable setting of <ESC>E
0 disabled
1 enabled
If enabled, a Printer Reset is sent to the printer after each print
job.
SET_EXT_OFFSET
Extended job offset specifies which job offsets take effect:
0 Only PCL job offset takes effect
1 Both PJL and PCL job offset take effect
2 PJL and PCL job offset suppressed
3 Only PJL job offset takes effect
Values "1", "2" and "3" are valid for OPS printers only.
SET_OFFSET=1
The printer supports/does not support job offset via PJL
0 disables offset
1 enables offset
For switching the PJL command SET OFFSET is used.
SET_OUTBIN=0
0 No setting of output tray via PJL
1 Setting of internal output tray UPPER
2 Setting of internal output tray LOWER
101 Setting of output tray EXTERNAL
102 Setting of output tray EXTERNAL2
SET_PRINTFILE=0
Enable or disable setting of print file output to check the output
print file.
If set to 1, the output print file will be written in directory:
'/u/prismapro/diag/printers/<printer name>.prn'
0 setting of print file output disabled
1 setting of print file output enabled
SET_TIMER=0
Enable or disable setting of the timer for dummy job inquires.
0 setting of timer disabled
1 setting of timer enabled
Chapter 6 - PCL-Module Operation
247
PCL-Module: Print Parameters
Parameter=Default Value
Description
STATUS_TIMED=1
Enable or disable setting of the regular inquire for the printer
status.
0 setting of inquire disabled
1 setting of inquire enabled
Note:
For Functional Code V3.05.XX and lower: In the
Printer Parameter Section PJL set "STATUS_TIMED"
on 0. Default setting on 1 may give unpredictable results.
USE_PJL=1
248
Enable or disable PJL job control and PJL printer info
0 PJL disabled
1 PJL enabled
Chapter 6 - PCL-Module Operation
Chapter 7
Configuration
Configuration Overview
Overview and Usage of the Configuration
Interfaces
Configuration Overview
Introduction
The configuration interfaces are used to configure an Océ PRISMAproduction Server
system. This entails defining which computers are to belong to the network, and which
printers, job classes, etc. are to be made available for users to choose from.
You also use the configuration interfaces to define, manage and modify resources and
permit resource sharing, and to make general system settings.
The configuration data is stored in the central database on the master. This data is available
to all the computers in the network. You can edit the configuration data on the master
via any of the servers in the system.
The users admin and service are authorized to edit configuration data; the users applic
and operator can only access the data for viewing.
Click '&Add Workspace' -> 'Configuration' in the Océ PRISMAproduction Server 'Explorer'View menu. All configuration applications appear one below the other and can be
launched with a single cllick of the mouse. If you click with the right mouse button in
the list, you can sort the entries alphabetically.
Note:
The manual presents the descriptions of the configuration interfaces in the order of the
list shown below. The list is not sorted alphabetically.
Note:
See also: ‘General Usage of the Configuration Applications’ on page 256.
Definition
By default no application is launched if you open the 'Configuration' entry in the 'Explorer'. If you click with the right mouse button into the application list, a context menu is
displayed with the following entries:
■
■
250
'Sort alphabetically': If you enable this check box, the applications in the list will be
sorted alphabetically.
'Restore selection on reopening': If you activate this check box, the selected application
will be reopened every time the 'Configuration' workspace is opened again.
Chapter 7 - Configuration
Configuration Overview
The following items can be configured and will be described in the subsequent chapters:
Chapter 7 - Configuration
251
Configuration Overview
Illustration
252
Chapter 7 - Configuration
Configuration Overview
Configuration Context Menu
The following menu appears if you click the list of configuration applications with the
right mouse button:
If you activate the 'Sort alphabetically' entry, you can sort the list alphabetically.
If 'Restore selection on reopening' is marked, the application which you have used before
is reopened automatically every time you start the Océ PRISMAproduction Server 'Explorer' or reopen the 'Configuration' session within the 'Explorer'.
Configuration Applications
#
Application
Description
See...
'User Management'
Central administration of users and user
permissions
‘'User Management': Overview’ on
page 258
'Cluster'
Create cluster of the type 'Printer' or
'Jobsplitting'
‘'Cluster' Configuration’ on page 276
'Logging'
Enable or disable logging for the different
processes (also called 'servers') in the Océ
PRISMAproduction Server system.
‘'Logging'’ on page
278
'Events'
Define special events, which control the
start of a print job.
‘'Events' Configuration’ on page 280
'System'
Configure basic system-, ODS-, and job
parameters
‘'System Configuration': Overview’ on
page 281
'Devices'
Define devices (tapes, floppies, network
devices ...) and link them to computers
of the Océ PRISMAproduction Server
system.
‘'Devices' Configuration’ on page 298
'Master/Slave'
Set up all computers within an Océ
PRISMAproduction Server system and
define if they are Master, Slave or
PrintSlave.
‘'Master/Slave' Configuration’ on page
301
Chapter 7 - Configuration
253
Configuration Overview
254
Application
Description
See...
Message System
Central configuration of the message system:
■ Language support
■ Deleting messages automatically
■ Saving messages automatically to an
external file
■ Automatic answers to messages to
question dialogs
■ Actions triggered by certain messages
■ Suppression of the view of messages
in the messages window
‘Message System:
Overview’ on page
304
'Licenses'
Manage all licenses in the system (import,
export, delete or modify).
‘'Licenses'’ on page
313
'Accounting'
Configuration of the accounting database
access and of the accounting legacy files.
‘'Accounting' Administration: Overview’
on page 316
'Consumables'
Pre configure consumables, which are
then available for maintenance in the
'Printer Pool' application.
The application also provides a complete
list of all available toner colors, from
which you can create and save own color
names and values.
‘'Consumables' Configuration’ on page
322
'Backup/Restore'
Save or restore a configuration of the system.
‘'Backup/Restore':
Window’ on page
330
'Library paths'
Configure the physical path of the default
libraries.
‘'Library path configuration'’ on page
337
'Printers'
Set up and configure all printers and their
parameters in the Océ PRISMAproduction Server system.
‘Printer Configuration: Overview’ on
page 339
'Job Queues'
Create all job queues, which can be assigned to the printers in the Océ
PRISMAproduction Server network.
‘'Job Queues Configuration'’ on page
375
'FCB'
Configuration of Forms Control Buffer.
‘'FCB' Configuration’ on page 378
Chapter 7 - Configuration
Configuration Overview
Application
Description
See...
'LCDS Jobs'
Configuration tool for LCDS printing.
‘LCDS Parameter
Configuration:
'LCDS Jobs' Window’ on page 385
'Paper'
Define special media which you like to
use in the system. (See also ‘Workflow
Media Assignment to Printers’ on page 583)
‘'Paper' Configuration Tool’ on page
413
'Ticket Rules'
Use this feature to change ticket parameters depending on other ticket parameters
at job submission time.
‘'TicketRules': Introduction’ on page
416
'Archives'
Create, modify or mirror archives for
print data of the POD-Module.
‘'Archives':
Overview’ on page
441
'Input Modules'
In these dialogs you can configure the
input queues for automatic job generation
when data are received via input channels
(LP-In, LP-Out, HotDir, Download).
‘'Input Modules':
Overview’ on page
460
'DPconnect'
DPconnect enables you to print jobs,
which have been sent from a DigiPath
workstation, on an Océ Océ
PRISMAproduction Server system with
the POD-Module.
‘'DPconnect' Functionality’ on page
147
Chapter 7 - Configuration
255
General Usage of the Configuration Applications
General Usage of the Configuration Applications
Introduction
Because of the database concept, some icons and control elements appear with the same
functionality in many of the configuration applications. This chapter explains these elements and will be referred to in the subsequent chapters.
Editing configuration data
The configuration data is stored in the form of database tables. Each table consists of
rows and columns. When you select a row, you can edit its contents provided its value
is not derived from values in other fields. To modify a column entry, double click it with
the mouse. There is a standard set of functions and icons for editing tables:
Configuration Icons#
Icon
Description
Inserts a new row or item following the selected one.
Add new Row
/ Item
Deletes the selected row or item.
Delete Row /
Item
Reload /Discard all
Changes
Save
Duplicate Row
/ Item
Shows the actual status of the data stored in the database. Any
changes that you have made via the interface are discarded if you
do not save them prior to executing this function.
Saves to the database any changes that you have made via the interface.
Duplicates a row or an item in the database. The entry can be
modified afterwards.
Context Menus
If you click with the right mouse button on a column title a context menu opens with
functions to sort the list or to hide and display colums.
256
Chapter 7 - Configuration
General Usage of the Configuration Applications
If you click with the right mouse button in the list a context menu opens with commands
to insert or delete rows.
Predefined Entries in Tables
If a column must contain a predefined entry, a double click on the column displays a list
of the entries you can pick.
Chapter 7 - Configuration
257
'User Management': Overview
'User Management'
'User Management': Overview
Introduction
Basic information on users and permissions can be found in ‘User IDs and Access Rights’
on page 62.
Generally all applications have to log on to Océ PRISMAproduction Server to get access
to the functions of the server applications like the 'Explorer' server or License server. This
takes effect either within the system for the connection between master and slave or (even
more) for a connection from outside the system, for example via a Windows workstation
with the 'Explorer' Launcher.
Basically a user can log on to Océ PRISMAproduction Server from every server within
an Océ PRISMAproduction Server cluster or from every workstation which is connected
via LAN.
A user logs on with user name and password. The login data can be verified either by Océ
PRISMAproduction Server or by LDAP. Océ PRISMAproduction Server supports different
user types by means of different login and authorization mechanisms:
■
■
■
258
External Users (Option: Authorization='External')
This user mainly works on an external workstation. Access to Océ PRISMAproduction
Server is probably only one of his tasks. This user does not need a user name on the
Linux server. User name and password are always requested in the log in dialog. The
user account is saved within Océ PRISMAproduction Server and is checked by Océ
PRISMAproduction Server on every user log on.
LDAP User (Option: Authorization='Ldap'
In contrast to the "External User", the log in data are kept on the LDAP server and
authorization is performed via LDAP.
After a successfull authorization, LDAP users are assigned to the 'Permission Groups'
which has been defined in 'System Configuration'-> ‘'System Configuration': LDAP
Parameter’ on page 290. If other 'Permission Groups' should be assigned to particular
LDAP users, this has to specified in the user management.
See also: ‘'User Management': LDAP Support’ on page 262
User with Account on the Master Server (Option: Authorization='auto')
Since Océ PRISMAproduction Server is installed on a Linux server, the Linux user
name can also be used for the Océ PRISMAproduction Server login. If the user logs
in from a terminal within the Océ PRISMAproduction Server cluster using the Linux
user name, he does not have to indicate an Océ PRISMAproduction Server user name
and password. The login to Océ PRISMAproduction Server is performed automatically.
Chapter 7 - Configuration
'User Management': Overview
Océ PRISMAproduction Server considers this user as trustwothy, because his data
have already been checked by Linux.
Note:
The functionality of the Linux desktop depends on the user role of the Linux user name
'Permission Groups' and Default User
In order to provide permissions for users within Océ PRISMAproduction Server, these
users are assigned to 'Permission Groups'. A 'Permission Group' contains a specific user
role and a set of editable permissions. New 'Permission Groups' can be created and assigned
to users in the user management.
See ‘'User Management': 'User Permissions'’ on page 271
Océ PRISMAproduction Server users admin, service, applic and operator are preconfigured as basic users. Predefined permissions groups with the same names are assigned
to these users.
Note:
These basic users and basic 'Permission Groups' cannot be modified or deleted (‘User
IDs and Access Rights’ on page 62.
Login with Authorization=Auto
Basically the user of an Océ PRISMAproduction Server system should be able to work
under the same conditions in every environment (Master, Slave or from a LAN-connected
workstation), this means with the same windows and with the same functionality.
To get access to Océ PRISMAproduction Server, a login, which requires a valid access
permission, is always performed.
The difference is, whether the login on the Linux system is performed on a dedicated
Océ PRISMAproduction Server server (Master or Slave) or from outside (from a workstation), where Océ PRISMAproduction Server is only one application among others.
The user of the Océ PRISMAproduction Server server, who is already able to work with
the Linux system after logging in, has also the authorization to work with Océ
PRISMAproduction Server without an extra login dialog, this means, the login procedure
to Océ PRISMAproduction Server is performed automatically (Authorization=Auto).
On the contrary the access to Océ PRISMAproduction Server must not be automatically
allowed when logging on to the operating system of the workstation via the network.
The Océ PRISMAproduction Server system administrator is able to define if the user is
allowed to login to Océ PRISMAproduction Server automatically or not, when creating
Chapter 7 - Configuration
259
'User Management': Overview
the user with the option Authorization=Auto. If the account should only be used in the
network, the option should be set to 'External'.
Authorization=Auto (Auto Login)
Authorization=Auto means, that the logon to the operating system automatically implies
the logon to Océ PRISMAproduction Server.
Auto-login is generally possible on all computers of the Océ PRISMAproduction Server
system (Master and Slave), if the Linux user is registered in the Océ PRISMAproduction
Server data base as Océ PRISMAproduction Server user. This is the case
■
■
■
with all four default users on Master and Slave servers (admin, service, applic, operator),
on the Master if the account was created with the option Authorization=Auto in the
Océ PRISMAproduction Server user administration,
on the Slave if the user name created for the Océ PRISMAproduction Server login is
the same as the one created for the Linux login (via KDE).
Auto-login is not possible if you access Océ PRISMAproduction Server from outside (via
workstation). In this case you always have to confirm a separate login dialog.
Important: Auto Login on Slaves
The four default users are created on every Océ PRISMAproduction Server computer
(master or slave) in the Océ PRISMAproduction Server database and also in the operating
system.
Please note that Océ PRISMAproduction Server only supports the additional creation
and administration of user names with the option Authorization=Auto on a Master! This
means a new auto login user name is only created in the database and the operation system
of the master (and nowhere else). This means also that changes of the default accounts
(for example a different password) are only performed in the Océ PRISMAproduction
Server database and in the operating system of the master. Consequently you have to
perform these changes on every slave by hand in order to access the slaves in the same
way as the master.
Login Dialog
The login dialog requires the entry of a valid username and a corresponding password.
The login dialog appears
■
■
260
if the logon is performed from outside (for example via the 'Explorer' Launcher)
on a Master or Slave, if the Linux user is not registered as Océ PRISMAproduction
Server user in the Océ PRISMAproduction Server data base.
Chapter 7 - Configuration
'User Management': Overview
User Interfaces
The following user interfaces can be used to administrate users and 'Permission Groups':
'System Configuration' -> 'User'(‘'User Management': 'User'’ on page 264)
Create and modify users and establish membership to a group of permissions.
'System Configuration' -> 'User Permissions'(‘'User Management': 'User Permissions'’
on page 271
Create new groups of permissions by copying existing groups and switching permissions
on or off.
'System Configuration' -> 'User Info'(‘'User Management': 'User Info'’ on page 269)
Modify user specific data: Name, Mail, ... Language of the Océ PRISMAproduction
Server 'Explorer' user interface (not of the operating system).
If a user has no permissions to create users and groups, the entries 'User' and 'User Permissions' do not exist. Only the 'User Info' application always exists. Minor modifications
(for example changing the language for a user) are possible here. The 'User' and 'User
Permissions' applications can be opened with write permission only once. The user, who
is the first to open the respective application, is granted write permission. All others only
get read permission.
Chapter 7 - Configuration
261
'User Management': LDAP Support
'User Management': LDAP Support
Introduction
Océ PRISMAproduction Server supports the authorization via LDAP (Lightweight Directory Access Protocol). This has some advantages, for example:
■
■
Security mechanisms of LDAP can be used (for examle deterioration of passwords)
Enables the user to work with the same login data on different platforms.
The general data of the user and above all the essential login data (user name and password)
are kept only in the LDAP data pool. On the user login, Océ PRISMAproduction Server
tries to find the user name in the in the Océ PRISMAproduction Server data base. If the
user cannot be authorized in this way, Océ PRISMAproduction Server tries the login via
the LDAP server. If LDAP has authorized the user, he is allowed to access Océ
PRISMAproduction Server.
Test Connection to the LDAP Server
In order to authorize via LDAP, Océ PRISMAproduction Server needs information to
connect to the LDAP server. These connection parameters must be supplied in the 'System
Configuration'. To ensure a correct connection to the LDAP server, the Océ
PRISMAproduction Server administrator can establish a test connection with his data.
At this point the administrator receives significant error messages why the connection or
the authorization fails. For security reasons, on a normal login only a general error message
is issued, if the login fails.
To test the connection (and only for this reason), the administrator has to provide a valid
LDAP user name with password. If Océ PRISMAproduction Server reports a successful
connection, the administrator can assume, that other LDAP users, who can be found in
the same LDAP structure and who have a password, are also able to log on to the system.
The essential data of an LDAP user - user name and password as well as other user data
- are not stored and updated in Océ PRISMAproduction Server. These data are only
displayed in Océ PRISMAproduction Server.
If there are no entries in the Océ PRISMAproduction Server user management done for
the LDAP user, he works with the default permission group for LDAP users, which can
be edited in 'System Configuration' -> 'LDAP Parameter' -> 'LDAP Integration Properties'.
In order to grant an LDAP user specific permissions, this user has to be added to the Océ
PRISMAproduction Server user administration. Therefore this user is added with the
property "Authorization=Ldap". This option means that only Océ PRISMAproduction
Server-specific data are stored in Océ PRISMAproduction Server (e.g. permission group
and language setting). The general data (for example address, phone number) and above
262
Chapter 7 - Configuration
'User Management': LDAP Support
all the login details user name and password are managed in LDAP. The user name, which
has to be defined in the Océ PRISMAproduction Server user administration, is only used
to assign the Océ PRISMAproduction Server-specific permissions to the correct LDAP
user.
Mapping LDAP Attributes to Océ PRISMAproduction Server Fields
Every LDAP data pool which is used for user administration usually contains a number
of predefined attributes (according RFCs 2798/2256). These attributes mainly conform
to the fields in the Océ PRISMAproduction Server user administration. The attributes
of the RFC are assigned to the matching Océ PRISMAproduction Server fields per default.
If the LDAP scheme of the customer differs from the default, it is possible to assign not
matching attribute names. This can be done with the Mapping function in 'System
Configuration' -> 'LDAP Parameter'.
If you call the mapping function, a connection to the LDAP server is established. This
is only possible if a valid user name and password is provided. Therefore the mapping
function uses the test user name and the test password to set up the connection an to request the data. The data of the 'test user' are then displayed. The modification of the
LDAP values is of course valid for all LDAP users.
Océ PRISMAproduction Server uses the detected LDAP values only to display the user
data of the user, who is currently logged in, in the User Info window. A modification of
the user data can only be performed by the LDAP administrator.
Chapter 7 - Configuration
263
'User Management': 'User'
'User Management': 'User'
Introduction
Use this application to create and administrate Océ PRISMAproduction Server users.
The table lists the basic data of a user and allows you to make modifications concerning
permission group, authorization, 'Language' and the 'Country Prefs'. If you create a new
user or if you want to modify all user data, a separate dialog is opened.
Note:
Only users in the user roles 'admin' or 'service' are allowed to create new users or to
modify existing users.
Illustration
Columns
#
264
Column name
Description
'Username'
Name of the user which is used for Océ PRISMAproduction
Server login.
'First Name' ...
'Last Name'
Personal information on the user, max. 64 characters.
'Permission Group'
Double clicking on this column allows you to assign a 'Permission Group' to the selected user.
Chapter 7 - Configuration
'User Management': 'User'
Column name
Description
'Authorization'
You can modify this setting for existing user names with the
'Authorization' mode 'External' or 'Auto'.
You can select three different modes:
■ 'External':
For external users, who use Océ PRISMAproduction Server
only occasionally. All user data are managed within Océ
PRISMAproduction Server.
■ 'Auto'
Indicates that an automatic login on the Océ PRISMAproduction Server master is performed for this user.
All user data are managed within Océ PRISMAproduction
Server and within the operation system. If you activate the
auto-login, a system user of the same name will be created.
If you deselect this option, the system user will be deleted
on the master.
■ 'Ldap'
The user has an LDAP account. The general user data are
kept on the LDAP server. Additional Océ PRISMAproduction Server-specific settings have been made for this user in
Océ PRISMAproduction Server. Otherwise this user won't
appear here. See ‘'User Management': LDAP Support’ on page
262
'Language'
You can modify this setting also for basic users.
Here you set the Océ PRISMAproduction Server user language
for this specific user. The Océ PRISMAproduction Server System with all its applications is started in this language.
If the user language is set to 'System', the current Océ
PRISMAproduction Server system language will be used as Océ
PRISMAproduction Server user language. This Océ
PRISMAproduction Server system language is set under 'Configuration' -> 'System'.
Chapter 7 - Configuration
265
'User Management': 'User'
Column name
Description
'Country Prefs'
You can modify this setting directly in this table or via the
context menu (see below).
Using this setting, you can force the system to preset certain
default settings in connection to the selected country. For example the presentation of the date in the 'All Jobs' list or the default
measure unit in 'Configuration' -> 'Paper'.
■ '(Default)'
If this option is selected, the global settings which have been
defined in 'Configuration' -> 'System' are also valid for this
user. See ‘'System Configuration': 'Country Preferences'’ on
page 293
■ 'CA'/'DE'/'GB'/'US'
Predefined country settings can be selected or the settings
can be modified by opening the 'Specific Country Settings'
dialog (click the button [...]):
Here you can select a 'Date Format', a 'Number Format' and
a 'Measure System'(metric or imperial) for many countries.
The examples are adjusted to the values which are currently set.
The default settings are dependent on the user language.
If the settings in this dialog do not match with 'US', 'DE','CA'
or 'GB', Mixed is displayed.
If you right click the mouse in the table, a context menu is opened with the following
options:
New User
To create a new user or to modify an existing user:
■
■
266
select from the menu 'User' -> 'New user' or 'Edit user'
or select 'New user' or 'Edit user' from the context menu
Chapter 7 - Configuration
'User Management': 'User'
■
or click the tool bar icons:
or .
A new user will be created with a default name, which you can modify at once.
When creating a new user the permission group ’operator’ is assigned as default group.
If you want to assign a different group, you can do this in the table of the basic window
after closing the dialog.
Note:
If an LDAP user is created here, the user name is only used to assign the Océ
PRISMAproduction Server-specific settings to the real LDAP user. In this case general
user data cannot be entered because these are managed in LDAP. The fieds for these
data are not active.
If you create a new user (or if you modify an existing user via the 'Edit' function), the
following dialog opens:
See the table above for a description of the entries you can make in this dialog. Apart
from the settings described in this table you can add contact and address information for
the new user.
For the E-mail address only letters, numbers and special characters @ _ . - (at symbol,
underscore, dot, hyphen) are allowed.
For the password settings refer to ‘'System Configuration': 'Password'’ on page 295. Be aware
that the default values in this view are preset by the values which have been set in the
'System Configuration'. Password Aging parameters cannot be edited for users with
'Authorization' = 'Auto'. For LDAP users neither passwords nor Password Aging parameters can be changed.
Chapter 7 - Configuration
267
'User Management': 'User'
Edit User
You modify users using the same dialog as described above. The only difference is that
you cannot modify the user name field.
To edit a user
■
■
select from the menu User -> Edit or
select Edit from the context menu.
Edit Selected Users
Via multi selection the administrator is able to perform the following modifications for
more than one user at the same time:
■
■
User with 'Authorization' = 'Auto': Change password.
User with 'Authorization' = 'External': Modify password and password aging parameters.
Copy User
You can copy the currently selected user in the table to create a new user. All settings
apart from user name and password are copied in this case. The user name is automatically
created and can be modified immediately.
To copy a user
■
■
■
select from the menu User -> Copy or
select Copy from the context menu or
click on the toolbar icon:
For an explanation of the other toolbar icons see the following reference: ‘General Usage
of the Configuration Applications’ on page 256
Delete User
Note:
If a user with 'Authorization' = 'Auto' is deleted the home-directory for this user on the
linux server ('u/ppuser/<user>') is NOT deleted.
268
Chapter 7 - Configuration
'User Management': 'User Info'
'User Management': 'User Info'
Introduction
Here the data for the user, who is currently logged in, are displayed.
Illustration
User Info Window
The information in this window can also be viewed by users who have no permissions
for the user management. If the user, who is logged in, is an LDAP user, this window
displays the data which is managed by LDAP - as long as the data can be assigned to Océ
PRISMAproduction Server fields (see ‘'User Management': LDAP Support’ on page 262).
Every user can make or modify the settings for his or her account in this window. This
includes also the settings for the user language and the country preferences, which can
be different from the global settings in 'Configuration' -> 'System' (see ‘'User Management':
'User'’ on page 264).
Note:
The 'Authorization' settings cannot be modified here.
Chapter 7 - Configuration
269
'User Management': 'User Info' for 'operator' and 'applic'
'User Management': 'User Info' for 'operator' and 'applic'
Introduction
Here the data for the user, who is currently logged in, are displayed.
Illustration
User Info Window
The information in this window can also be viewed by users who have no permissions
for the user management. If the user, who is logged in, is an LDAP user, this window
displays the data which is managed by LDAP - as long as the data can be assigned to Océ
PRISMAproduction Server fields.
Every user can make or modify the settings for his or her account in this window. This
includes also the settings for the user language and the country preferences, which can
be different from the global settings in 'Configuration' -> 'System'.
Note:
The 'Authorization' settings cannot be modiefied here.
270
Chapter 7 - Configuration
'User Management': 'User Permissions'
'User Management': 'User Permissions'
Introduction
This tab displays, which permissions are available for the 'Permission Group' marked.
The name and the permissions of the four basic 'Permission Groups'operator, applic,
admin and service cannot be modified.
To built an individual set of 'User Permissions', you have to create a new 'Permission
Group' by copying an existing group ( ).
You can immediately modify the default name created. Single permissions for the group
can be switched on and off.
Note:
Copying the 'Permission Group' copies also the characteristic attributes of the user role
in the new 'Permission Group' which you cannot modify later (‘User IDs and Access
Rights’ on page 62).
Permissions can be viewed in a tree structure, which groups the entries according to their
meaning (the permission either refer to the Jobs Viewer, the PJM, the Messages System
and so on). You can also switch to a simple list view using the tabs at the bottom of the
window:
Attention:
The name and the permissions of the four basic 'Permission Groups'operator, applic,
service and admin cannot be modified.
Chapter 7 - Configuration
271
'User Management': 'User Permissions'
Illustration
Columns
#
Column
Description
'Permission
Groups'
Names of the 'Permission Groups' available. (The permissions
can only be modified for user defined groups. If one of the basic
'Permission Groups' is marked, the permissions cannot be
channged.)
'Permissions'
Displays the status of the permissions for the permission group
selected. You can switch between a list and a tree view.
In the list view the values can be set to yes (allowed) or no (not
allowed).
In the tree view you can accordingly check the boxes for the
permissions which should be allowed for the group selected.
Editable Permissions
'Accounting server settings'
■
'Configure accounting'
'Explorer session settings'
272
Chapter 7 - Configuration
'User Management': 'User Permissions'
■
■
■
'Allow to create/change sessions'
Note: Without this permission the user cannot create new or open existing sessions.
The user is not allowed to create new workspaces in the navigation bar. It is also not
possible to add applications to existing workspaces. The respective functions are not
available in this case. However the user is still able to move available workspaces into
the application area and to combine them.
'Allow to rearrange workspaces'
Note: Without this permission the user cannot move workspaces from the navigation
bar into the application area and vice versa. The distribution and size of the applications
within a workspace can always be modified (for example: PJM smaller, Job List bigger).
'Default session'
Note: A default session will be opened if there is no workspace saved for this user on
this computer or if the user has none of the session permissions described below. See
also chapter "Create and Save User Defined Workspaces and Sessions" in the Océ
PRISMAproduction Server User's Guides.
'General Explorer settings'
■
■
'Allow modification of explorer settings'
Note: With this permission the user is allowed e.g. to open the dialog under File ->
Preferences.
'Allow to write to $HOME library'
Note: Removing this permission should prevent overloading the home directories
from outside. Too much data in theses directories could have a serious impact on the
system perfomance.
General Job Viewer settings
■
■
■
'View jobs of other users'
'Control jobs of other users'
'Delete jobs of other users'
'Job modifications'
■
■
■
■
■
■
'Release mirrored jobs'
'Delete mirrored jobs'
'Pass control of mirrored jobs to mirror'
Note: The permissions to handle mirrored jobs are only visible if a valid Interconnectivity license is installed.
'Reprint jobs'
'Modify user defined filter'
'Confirmation for reprintable jobs'
no: the reprint has not to be confirmed.
simple: a dialog is issued to confirm the reprint job.
Chapter 7 - Configuration
273
'User Management': 'User Permissions'
■
■
■
■
■
■
■
■
■
■
■
■
with message: a dialog is issued with the necessity to type in a message (for example
the reason for the reprint). The text is shown in the message details window.
'Modify form not constrained by filter'
If this permission is disabled, only the forms which are present in a filtered job list
can be modified in the job properties dialog.
'Modify job queue not constrained by filter'
See above.
'Modify printer not constrained by filter'
See above.
'Modify printer in jobs of other users'
'Modify copies in jobs of other users'
'Modify job queue in jobs of other users'
'Modify form in jobs of other users'
'Modify print range in jobs of other users'
'Modify priority in jobs of other users'
'Modify file copies in jobs of other users'
'Modify Form Definition in jobs of other users'
'Modify Page Definition in jobs of other users'
Note:
According to the settings you make here, the corresponding fields in the 'Job Properties'
dialog in the 'All Jobs' window are enabled/disabled.
Example: If the "Modify print range in jobs of other users" permission is set to "no",
the "Print range" field in the dialog is not editable.
'Media assignments settings'
■
■
'Allow to create and modify papers'
'Allow to create and modify forms'
'Message server settings'
■
■
■
'Configure message system'
'Reply open message requests'
Note: The user is allowed to confirm open message requests like the mount form
message.
'Delete messages'
'Print Job Manager settings'
■
■
■
274
'PJM Expert Mode'
'PJM Preparation Mode'
'PJM Production Mode'
Chapter 7 - Configuration
'User Management': 'User Permissions'
■
■
'Allow to set priority on Job Ticket'
Note: the priority of a job can only be set directly in a Job Ticket (not in the PJM
window). Nonetheless the PJM leaves the parameter untouched, i.e. if such a job is
submitted by the PJM, the priority is considered. If a user tries to submit a Job Ticket
containing the priority parameter and does not have this right granted, an error is reported - and no job is submitted.
'Allow to mirror jobs'
Note: The permissions to handle mirrored jobs are only visible if a valid Interconnectivity license is installed.
'Printer Status Viewer settings'
■
■
■
■
■
■
■
■
■
■
'Reset printer'
'Allow to change check for Form-Name'
'Allow to change check for DPI'
'Allow to change check for Printer-Name'
'Allow to change check for Job-Queue'
'Allow to change check for Colors'
'Allow to change check for Data-Type'
'Allow to change Autostart setting'
'Allow to change check Message-Receiver'
'Claim printer: allow to select other user name'
Chapter 7 - Configuration
275
'Cluster' Configuration
'Cluster'
'Cluster' Configuration
Definition
In this case a cluster is a group of printers.
Each printer can belong to several clusters. A printer is addressed either by the cluster
name or directly by the printer name. This depends on the settings in 'System Configuration'.
Select 'Printer Configuration' to assign printers to clusters which you have configured.
Illustration
General printer cluster (Type = 'Printer')
If a cluster name is specified with a print job, the system picks from the cluster the
printer that can execute the job. The selection can be based on factors such as the kind
of paper currently loaded in the printer, what job class the printer is currently running,
etc. If more than one printer would be able to run the job, load balancing factors come
into play – i.e. the job is submitted to the printer which has least to do.
A few examples of clusters
■
■
■
LB (load balancing) clusters: Printers of the same type that are selected on the basis
of their workload.
300 DPI clusters: 300 dpi printers of various types
Test clusters: Test printers of various types; the selection is made on the basis of paper
type, job class, etc.
Printer cluster for splitting jobs on the basis of copies (Type = 'Jobsplitting')
Note:
This cluster type is only available for the POD-Module.
276
Chapter 7 - Configuration
'Cluster' Configuration
The printout of a job, which contains several job copies can be distributed over more
than one printer using the cluster function. To do this, you have to define a cluster of
the 'Jobsplitting' type to which you assign at least two printers. In the PJM select the
cluster name as 'Printer' in the 'Job Parameter' section. The number of jobs created with
an own job ID equals the number of printers in the cluster. The jobs will be printed together. If a printer fails, another printer will take over the job. A complete overview on
the workflow you find in chapter "Jobsplitting per Job Copies" in the Océ PRISMAproduction Server User's Guides.
To configure printer cluster select 'Cluster Configuration'.
Column Titles
#
Column
Description
'Cluster_Name'
Enter the name you want to assign to the cluster. The name
can contain up to 20 characters. No blanks are allowed. You
have to convert cluster names with blanks if you update from
an older version than 3.02.19. Jobs which use ’old’ cluster names
must be reassigned: ’Edit properties’ in the Job List.
'Cluster Type'
Select the cluster type.
'Jobsplitting' is only possible with the POD-Module.
For an explanation of the menus and tool bar see: ‘General Usage of the Configuration
Applications’ on page 256
Chapter 7 - Configuration
277
'Logging'
'Logging'
'Logging'
Introduction
On this tab you can set up a trace level for every java server application.
Only marked entries in this list are added to the log file.
The log file itself is located in: '/u/prismapro/diag/explorerserver/explorerserver.log'.
After every restart of the system (Reboot/Reset), a new log file will be created and the old
one will be saved
Illustration
Column Titles
#
278
Column
Description
'Server Name'
Name of the java server.
'Debug'
Log entries of the type debug. Use only for diagnostic reasons.
'Trace'
Log entries of the type trace, logging program sequences.
'Info'
Log entries of the type info, such as connected and disconnected
messages.
'Warning'
Log entries of the type warning.
Chapter 7 - Configuration
'Logging'
Column
Description
'Error'
Log entries of the type error, such as error messages.
If you click the 'Debug', 'Trace' or 'Info' column with the right mouse button, a context
menu opens, which allows you to enable or disable the trace, debug and info protocol
levels either for all servers or only for the marked cells. Marked cells can also be inverted.
Example for a Log File
26.07.2004 08:07:36 | TRACE | DataServer.27 getNextEvent() returned event:
LOG_PROFILE,changed
26.07.2004 08:07:36 | INFO | ExplorerServer Log profile has changed. Update LogWriter.
26.07.2004 08:07:36 | TRACE | ConfigurationServer.233 postEvent(): event added:
DB.LOG_GROUPS,table_changed
26.07.2004 08:07:36 | TRACE | ConfigurationServer.233 getAllEvents() returned 1
events
26.07.2004 08:07:39 | INFO | DeviceFileSystemServer.209 client disconnected.
26.07.2004 08:07:39 | INFO | pfl.server.210 client disconnected. 26.07.2002 08:07:45
INFO ConfigurationServer.233 client disconnected.
For a description of the menu and toolbar icons see: ‘General Usage of the Configuration
Applications’ on page 256
Chapter 7 - Configuration
279
'Events' Configuration
'Events'
'Events' Configuration
Introduction
It is possible to make the start of a job dependent on the occurrence of a particular event.
Job execution is directed with the "Start Job Events" and "Start Print Events" functions
in the Job Attributes Section of the PJM (see chapter "Job Attributes" -> "Start Job
Events" and chapter "Job Attributes" -> "Start Print Events" in the Océ PRISMAproduction Server User's Guides.
The events that users can choose in the PJM to direct job execution have to be defined
using this configuration interface. This interface is also used during processing to confirm
the occurrence of a particular event.
Illustration
Column Titles
#
Column
Description
'Events Name'
Name of the event. This is used in the PJM for directing and
controlling the events. A typical event name would be “roll
loaded”.
'Description'
For instance “roll with red paper must be loaded on the printer”.
'Active'
Setting an event to “active” state indicates that it has occurred.
This setting can also be changed by the operator.
For a description of the menu and toolbar icons see: ‘General Usage of the Configuration
Applications’ on page 256.
280
Chapter 7 - Configuration
'System Configuration': Overview
'System'
'System Configuration': Overview
Introduction
This application allows you to make global settings for the entire Océ PRISMAproduction
Server system. In detail you can set up parameters on seven different tabs:
■
■
■
■
■
■
■
'ODS Parameter' (Order Distribution System = Océ PRISMAproduction Server network)
See: ‘'System Configuration': ODS Parameter’ on page 282
'System and Job Parameter'
See: ‘'System Configuration': System and Job Parameter’ on page 284
'eMail Notification'
See: ‘'System Configuration': eMail Notification’ on page 286
'Mirroring'
See:‘'System Configuration': Mirroring’ on page 288
'LDAP Parameter'
See: ‘'System Configuration': LDAP Parameter’ on page 290
'Country Preferences'
See: ‘'System Configuration': 'Country Preferences'’ on page 293
'Password'
See: ‘'System Configuration': 'Password'’ on page 295
’System parameter’ menu and toolbar see: ‘General Usage of the Configuration Applications’
on page 256
Chapter 7 - Configuration
281
'System Configuration': ODS Parameter
'System Configuration': ODS Parameter
Introduction
These parameters control the handling of print jobs, the disk usage and the ODS trace
level throughout the Océ PRISMAproduction Server system
Illustration
ODS Parameter
#
282
Parameter
Description
'Max. Number of
Jobs'
You can define the maximum number of jobs that can be active
simultaneously in the ODS. The default is 0 jobs (no upper
limit). Without indicating an upper limit the number of possible
active jobs is limited by the setting of the minimum free disk
space on the system.
'Hold Finished
Jobs [h]'
Use this field to specify how many hours you wish successfully
completed jobs to be kept in the job list. The data files belonging
to finished jobs are deleted following this time so as to save
space.
If you enter 0, finished jobs are kept due to system requirements
for 70 seconds.
Jobs with errors are treated differently: these are kept on the
system until they are actually removed.
Default: 12h
Chapter 7 - Configuration
'System Configuration': ODS Parameter
Parameter
Description
'Hold Finished
Mirror Jobs [h]'
Number of hours, which have to pass after deleting the original
jobs, before the mirrored jobs will be deleted from the mirror
server. If you enter 0 h, the mirrored jobs are deleted at the
same time as the original jobs.
Default: 12h
'Hold Locked Jobs
[h]'
Number of hours, after which locked jobs will be deleted from
the server.
If you enter 0 h, the locked jobs are not deleted at all.
'Hold Log Files
[d]'
Use this field to specify how many days the ODS log files
('/u/prismapro/diag/') are to be kept.
If you enter 0 d, the log files are not deleted at all.
The default setting is 2 days.
'Min. Free
Diskspace [%]'
Enter the minimum amount of disk space in percent of the
planned disk space in MB to be kept free on the ODS server
for the '/u/' and ’/root/’ file system. This value applies to all
servers of the Océ PRISMAproduction Server network. If you
enter the value '0', the free disk space will not be monitored.
In the event that the free space on both file systems falls below
the threshold value you have indicated, ODS will not accept
any further jobs on the respective server until there is more space
again or the lock is released manually.
Default and recommendation: 15%
'Threshold value
Free Diskspace
[%]'
If the available diskspace reaches the value set for the minimal
free diskspace (see above), the threshold controls, when jobs
will be accepted again by the system.
Example: Min. free diskspace is 15%, threshold is 3% -> ODS
will accept jobs again, if the free diskspace is 18%.
Setting a threshold value avoids switching the job acceptance
permanently on and off, if the diskspace oscillates around the
value set for the min. free diskspace.
Default: 3%
'ODS Protocol
Level'
You can define a protocol level for the ODS system. For normal
operation select level 1 from a range of 1-5. Default value is
level 1 (lowest protocol level).
Chapter 7 - Configuration
283
'System Configuration': System and Job Parameter
'System Configuration': System and Job Parameter
Illustration
'System Parameter'
#
284
Parameter
Description
'Language'
The language of the Océ PRISMAproduction Server system.
The setting you make here applies to all the computers in this
Océ PRISMAproduction Server network. The Océ
PRISMAproduction Server system language is used if the user
language (see ‘'User Management': 'User'’ on page 264) is set to
'System'. Further it is used for internal information and system
messages. Default setting is 'English'.
Chapter 7 - Configuration
'System Configuration': System and Job Parameter
Parameter
Description
'Trusted hosts
[TCP/IP]'
Computers which are not part of the Océ PRISMAproduction
Server network but which need to access a computer in the
network have to be registered as trusted hosts. For instance,
computers which access a remote Océ PRISMAproduction
Server network via the PJM command line or Océ
PRISMAproduction Server file server each have to be registered
in this way.
Trusted hosts do not need to be defined in the server table as
Océ PRISMAproduction Server servers in the ODS network.
Format: IP addresses for example: 160.111.13.27. Click the
'Add' button to open a dialog which allows you to enter an IP
address in the correct format.
You can also use a wildcard after the second dot as termination,
for example: 160.111.*,
160.111.1*,160.111.14.*,160.111.14.2*.
This allows an easier access to many computers in a domain.
This is especially useful for the Windows Printer Driver.
Use the 'Update' button to modify a marked IP address. With
'Remove' the marked address is deleted from the list.
'Job Parameter'
#
Parameter
Description
'Operator Intervention'
When you check 'Operator Intervention', jobs that are submitted in the PJM require operator acknowledgment. They are set
to 'interrupted' and processing has to be initiated manually.
Default: not active
'Run Job on One
Host'
When you check this option, the system will attempt to execute
the entire job on a single print server. Of course, this is only
possible if the services required for the job can all be accessed
on the server concerned. For instance, if the job files have to be
converted but the converter is installed on a different server,
the conversion step will have to be executed on the other server.
Default: not active
'Access Each Printer of a Cluster'
When you are using printer clusters, you normally just pick the
cluster name for selecting a printer, and the system decides
which physical printer will print the job.
Default: not active
Chapter 7 - Configuration
285
'System Configuration': eMail Notification
'System Configuration': eMail Notification
Introduction
If you create a print job via PJM you can specify an E-mail address, which receives a
message, if the job has a defined status. To use this function, you have to make known
the access data of the SMTP server to the Océ PRISMAproduction Server system.
The required data are provided by the administrator of the SMTP server. (SMTP =
Simple Mail Transfer Protocol)
Illustration
eMail Settings
#
286
Parameter
Description
'SMTP Host'
IP address or name of the server for outgoing mail.
'Port'
Default: 25
'Administrator
Mail Address'
Mail address of the Océ PRISMAproduction Server administrator. Serves as sender address in the E-mails.
Chapter 7 - Configuration
'System Configuration': eMail Notification
Parameter
Description
'Username and
Password'
If the SMTP server requires an authentication, you have to activate this option.
'Username'
User name of the SMTP server.
'Password'
Password for the SMTP server.
Chapter 7 - Configuration
287
'System Configuration': Mirroring
'System Configuration': Mirroring
Introduction
For a detailed description of the mirror concept see chapter "Backup Solutions" -> ‘Mirror
Print Jobs: Introduction’ on page 625.
In this section you can define the global parameters for mirroring print jobs on another
Océ PRISMAproduction Server master server (mirror server). Some of these settings can
be overwritten in the PJM.
Illustration
Mirror Parameters
#
288
Parameter
Description
'Mirror Server'
Sever name of the Océ PRISMAproduction Server master,
which receives the mirrored print jobs.
'Username'
User name under which the mirrored job is generated on the
mirror server (future owner of the job, displayed in the joblist).
This user must exist on the mirror server.
'Password'
Password for the user above.
Chapter 7 - Configuration
'System Configuration': Mirroring
Parameter
Description
'Mirroring Policy'
'Mandatory':
If this option is selected, the system only creates the job if mirroring was successful. In other words, the job is created on both
systems or it is not created at all.
'Optional':
In this case the system tries to mirror the job, but if this is not
successful, the job will be submitted on the original server anyway. You can also set the mirror policy in the PJM (menu 'Job'
-> 'Transfer Mode'). The PJM policy always overrides the setting
in the 'System Configuration' window. If you set the policy in
the PJM to ’Default’, the setting in ’Configuration’ -> ’System’
becomes valid.
'Ticketrule'
Select a Ticket Rule, which has been configured to modify the
ticket of the mirrored job so that this job can be submitted on
the mirror server. You can set this parameter here and/or in the
PJM -> 'Transfer Mode'. The Ticket Rule, which is set in the
'System Configuration', is only applied if the Ticket Rule setting
in the PJM is set to "Default".
Chapter 7 - Configuration
289
'System Configuration': LDAP Parameter
'System Configuration': LDAP Parameter
Introduction
On this tab you configure the parameters for the connection to the LDAP server. Additionally you can define the default values for the Océ PRISMAproduction Server specific
handling of those LDAP users, who are not registered in the Océ PRISMAproduction
Server user management (see ‘'User Management': Overview’ on page 258).
Illustration
LDAP Server Settings
#
290
Parameter
Description
'Host:'
Name or IP address of the LDAP server.
'Port':
Port number, which is used to access the LDAP server. (The
LDAP specification recomments port 389 and for the SSL
communication port 636.)
'SSL'
Indicates whether the communication via the above configured
port should be SSL based or not.
Note that an LDAP server supports SSL and non-SSL communication on different ports. If you address an non-SSL port with
SSL, an error will occur and the other way round.
Chapter 7 - Configuration
'System Configuration': LDAP Parameter
Parameter
Description
'Protocol:'
The LDAP protocol used. LDAP v2 and LDAP v3 are supported.
'Base DN:'
"Distinguished Name". Defines the point of entry into the
LDAP data. The hierarchically structured LDAP data tree is
searched from this point on. All sub-nodes of the "Distinguished
Name" will be searched to find the user names with their attributes
'Test Connection'
To ensure that the configured LDAP server settings are correct,
you can set up a test connection to the LDAP server. If no
connection is possible or if the auhtentification fails, the administrator gets significant error messages to correct the settings.
On the 'real' log in of a user via the log in dialog, the reason for
the failure is not reported for security reasons.
To establish a successful connection, a test'Username:' and a
test'Password:' are required.
LDAP Integration Properties
The following describes the properties, with which the LDAP users, who are not configured
in the user management, are integrated into Océ PRISMAproduction Server .
The following default values are valid for these users:
#
Parameter
Description
'Permission
Group:'
Selection of the permission group
Chapter 7 - Configuration
291
'System Configuration': LDAP Parameter
Parameter
Description
'Mapping'
Opens an information window which shows the LDAP attributes according to the RFC standard assigned to the Océfields
in the 'User Info' application.
'User Info'
Name of the field as it is used in the Océ PRISMAproduction
Serveruser management
'LDAP-Attributes'
Name of the attribute as given by RFC. This name can be
modifies to adjust it to the current LDAP scheme.
Please note that no values can be assigned to incorrect attribute
names, because Océ PRISMAproduction Servermakes no difference if the field exists in LDAP and is empty or if it exists not
at all.
'Values'
Displays the values which are found in the LDAP data pool.
The values refer to the user who is indicated under Test.
Delete LDAP Settings
In order to delete the LDAP settings, simply delete the contents of the 'Host:' field. After
saving the configuration, all other LDAP settings are also removed.
292
Chapter 7 - Configuration
'System Configuration': 'Country Preferences'
'System Configuration': 'Country Preferences'
Introduction
Here the gobal (systemwide) settings for the country preferences are performed. These
settings can be modified for each user in the user administration (see ‘'User Management':
'User'’ on page 264).
Note:
The 'Country Preferences' can only be modified by users whose account is based on the
'admin' and 'service' permission groups.
Chapter 7 - Configuration
293
'System Configuration': 'Country Preferences'
Illustration
Stage - description table
#
UI-Element
Description
'Country Preference'
■
■
'Date Format'
'Number Format'
'Measure System'
294
Chapter 7 - Configuration
'(Default)'
depends on the Océ PRISMAproduction Server system
language
'CA'/'DE'/'GB'/'US'
Predefined country settings can be selected or the settings
can be modified by selection boxes described below.
If the settings in this dialog do not match with 'US',
'DE','CA' or 'GB', 'Mixed' is displayed.
Here you can select the format for many countries as well as
the 'Measure System' (metric or imperial).
The examples are adjusted to the values which are currently set.
The default settings are dependent on the user language.
'System Configuration': 'Password'
'System Configuration': 'Password'
Introduction
To increase security, certain requirements can be defined for passwords. These requirements refer to the expiration (Password Aging) and to the complexity of passwords.
'Password Aging'
If you use the Password Aging parameters, a periodic change of the password can be enforced. The starting point is always the date of the last change of the password. From this
point on a number of days can be defined for which the password is valid. After this period of time the password expires.
A period of time can be defined before the password expires in which the user is informed
that the password will soon not be valid anymore.
After the password has expired, another period of time can be defined in which the user
is still allowed to log on but has to change the password immediately.
Aging parameters can only be set up for the 'Authorization''External' (see ‘'User Management': 'User'’ on page 264). Aging parameters for 'Authorization''Auto' are set under
LINUX and for 'Ldap' under LDAP.
Here in 'Configuration' -> 'System' -> 'Password' the aging parameters are set globally
and are valid for all 'External' users.
In the 'User Management' it is possible to modify the settings for individual users.
'Password Complexity'
Use these parameters to define the required length of a password and the characters of
which it must consist.
Complexity parameters are defined globally via 'Configuration' -> 'System' -> 'Password'
for all users with 'Authorization''Auto' or 'External'.
Permissions
Users of the 'Permission Groups' 'applic' and 'operator' can only access to the 'User Info'
application (see ‘'User Management': 'User Info'’ on page 269). This means, these users can
only edit their own user data and their own password. The password has to conform to
the rules of complexity. It can only be changed if it is changed outside of the minimal
period of validity. The aging parameters are visible but cannot be modified.
Users of the 'Permission Groups' 'admin' and 'service' have full permissions to modify
the passwords of all users at any time in the 'User' dialog (see ‘'User Management': 'User'’
on page 264). If passwords do not comply with the rules of complexity, a warning is displayed in the 'User Management' which can be ignored. If a password is changed in the
login dialog it has always to conform to the rules of complexity.
Chapter 7 - Configuration
295
'System Configuration': 'Password'
Illustration
'Password Aging'
Some parameters depend on each other. To avoid contradictive values, the values are
adjusted automatically.
#
296
Selection Box
Description
'Days before password expiration to
issue warning'
The user will get a warning a certain number of days before the
password expires. Select the number of days.
The user can decide whether he wants to change the password
immediately or firstly continues to work.
Default is a blank (no warning will be displayed).
'Days after password expires with
usable login'
Select the number of days during which the user has still the
possibility to log on. In this period of time the user also has to
create a new password to be admitted to the system.
Default is a blank (no login is possible after the password has
expired).
'Maximum number of days for the
same password'
Maximium number of days for which the password is valid.
After this period of time the password expires.
Default is a blank (the password never expires).
Chapter 7 - Configuration
'System Configuration': 'Password'
Selection Box
Description
'Minimum number
of days for the
same password'
Minimum number of days a password is valid. During this period of time, the password cannot be changed (protect from an
immediate rechange of the password).
Default is a blank (the new password can be changed immediately).
'Expiration date'
Date when the password expires in any case. The day indicated
here is the first day from which on no login to the system is
possible anymore. This is a superior indication which can be
used for instance for a limited access of a user.
The entry is not used to enforce a periodic change of passwords.
The 'Days after password expires with usable login' setting has
no effect if the user login has expired after reaching the expiration date.
Default is a blank (access never expires).
'Password Complexity'
The higher the complexity of a password is, the more security is provided.
The password should have a reasonable length and should contain as many different
characters as possible.
#
Selection Box
Description
'Min. length of
password'
The longer the password, the greater the security is.
Default is a blank (no minimal length is required).
'Min. number of
numeric characters'
Minimal number of special characters (', /, ...) a password must
contain
Default is a blank (no special characters are required).
'Min. number of
special characters'
Minimal number of numeric characters a password must contain
Default is a blank (no numeric characters are required).
Chapter 7 - Configuration
297
'Devices' Configuration
'Devices'
'Devices' Configuration
Introduction
The configuration interface provides functions for configuring devices (tape drives, floppy
drives, network connections and the like) – which means making them known to Océ
PRISMAproduction Server. Once a device has been registered with Océ PRISMAproduction Server, it is shown in the Directory Viewer.
Illustration
Columns
#
Columns
Description
'Device'
Device namen in the system.
'Type'
Device type, e.g. TAPE, PFL_HOST, PFL_TAPE.
'Format'
Language module dependent data format (resources or print
data).
'Physical Devices'
The physical name of the device, as used by the operating system, for example '/dev/rst0-'
'Server Name'
The computer to which the device is connected. Double clicking
opens a list of all computer names in the system.
Configuring Media for the 'Print File Manager'
When configuring media for the 'Print File Manager' via ’Configuration’ -> 'Devices'
you have to use special keywords:
298
Chapter 7 - Configuration
'Devices' Configuration
#
Columns
Text
'Type'
PFL_HOST or PFL_TAPE (computer or tape device)
'Format'
PFL_TAR or PFL_CPIO
If you select PFL_TAPE, you have to insert the device under ’Physical device’ (for example
'/dev/st0').
Chapter 7 - Configuration
299
'Devices' Configuration (APA / LCDS)
'Devices' Configuration (APA / LCDS)
Introduction
The configuration interface provides functions for configuring devices (tape drives, floppy
drives, network connections and the like) – which means making them known to Océ
PRISMAproduction Server. Once a device has been registered with Océ PRISMAproduction Server, it is shown in the Directory Viewer.
Illustration
Columns
#
300
Columns
Description
'Device'
Device namen in the system.
'Type'
Device type, for example TAPE.
'Format'
Language module dependent data format (resources or print
data).
'Physical Devices'
The physical name of the device, as used by the operating system, for example '/dev/rst0-'
'Server Name'
The computer to which the device is connected. Double clicking
opens a list of all computer names in the system.
Chapter 7 - Configuration
'Master/Slave' Configuration
'Master/Slave'
'Master/Slave' Configuration
Introduction
Select ’Configuration’ -> 'Master/Slave' to configure the Océ PRISMAproduction Server
computers in an Océ PRISMAproduction Server network by entering their IP addresses.
All the other details in the Master/Slave table are provided by the system. The entry for
the master is also provided by the system.
Before adding a server you have to check the following:
■
■
The IP address of the first network card is the address, which is used by Océ
PRISMAproduction Server (check this with '/sbin/ifconfig', entry under eth0). This
address must be accessible in the Océ PRISMAproduction Server network.
Job acceptation and job processing must be switched off.
The 'etc/hosts' file of all servers (Master and Slaves) must contain all servers of the
Océ PRISMAproduction Server network. Please take care for the correct syntax:
Example: 160.120.20.111 charly.ops.de charly
Illustration
Column Titles
#
Columns
Description
'IP Address'
The IP address of the server. If you want to
'Hostname'
The symbolic name of the server
'Type'
The type of computer: master, client or PrintSlave
'Operating System'
The server operating system.
Menu and tool bar functions see ‘General Usage of the Configuration Applications’ on page
256
Chapter 7 - Configuration
301
'Master/Slave' Configuration
Add a Server
Before adding a server you have to check the following:
■
The IP address of the first network card is the address, which is used by Océ
PRISMAproduction Server
(check this with '/etc/sysconfig/network/ifcfg-eth-id-<mac-address>'). This address
must be accessible in the Océ PRISMAproduction Server network.
■
Job acceptation and job processing must be switched off (see chapter "Servers" in the
Océ PRISMAproduction Server User's Guides)
The 'etc/hosts' file of all servers (Master and Slaves) must contain all servers of the
Océ PRISMAproduction Server network. Please take care for the correct syntax: Example: '160.120.20.111 charly.ops.de charly'
■
To add a server click the tool bar icon or right click on the table. Select ’Insert’ in the
context menu. The following dialog is displayed:
#
302
UI Element
Description
'IP Address'
IP address of the computer which should be added.
Chapter 7 - Configuration
'Master/Slave' Configuration
UI Element
Description
'Server Type'
Slave: Server which is either used as Printserver or as RIP server,
see chapter "Servers" in the Océ PRISMAproduction Server
User's Guides.
PrintSlave: Server which is only used to drive printers, see
chapter "Servers" in the Océ PRISMAproduction Server User's
Guides.
Options Menu
#
Menu entry
Description
'Logfiles'
Generate logfiles to control the following processes:
■ Activating and deactivating the host,
■ adding and removing a host,
■ stopping processes.
'Components'
Returns a list displaying version and status of all components
(RPMs):
Chapter 7 - Configuration
303
Message System: Overview
Message System
Message System: Overview
Introduction
This configuration application allows you to administrate and configure the message
server. You can modify the following items:
■
■
■
■
■
■
Language support
Deleting messages automatically
Saving messages automatically to an external file
Automatic answers to messages to question dialogs
Actions triggered by certain messages
Suppression of the view of messages in the messages window
Message System Tabs
#
304
'General'
'Automatic
Saving'
'Automatic
Answers'
'Triggers'
'Message
Suppression'
See ‘Message
System: 'General' Settings’ on
page 305
See ‘Message
System: 'Automatic Saving'’
on page 307
See ‘Message
System: 'Automatic Answers'’
on page 309
See ‘Message
System: 'Triggers' (Active
Notification Interface)’ on
page 311
See ‘Message
System: 'Message Suppression'’ on page
312
Chapter 7 - Configuration
Message System: 'General' Settings
Message System: 'General' Settings
Introduction
Allows you to modify automatic deletion and language settings.
Illustration
Language Settings
Allows you to select the language to be used for the message system. By default both directories for english and german are enabled. If you are definitely using one language
only for the whole Océ PRISMAproduction Server system, you can deselect one language
to save resources.
#
Column
Description
'Language'
Languages which are available for the display of the messages
in the system.
'ISO-Code'
ISO conform abbreviation of the language.
'Message count'
Total number of messages available in this language.
'Language supported'
Mark the checkbox for each language which should be available
in the system.
Automatic Deletion
If you want to automatically delete older messages, you can indicate the number of days,
after which the messages are deleted from the system. After this time, the old messages
will be deleted on system start up. Additionally you can also specify a certain daily point
Chapter 7 - Configuration
305
Message System: 'General' Settings
in time, when this deletion should be performed (preferably a time, when you are not
busy with the system).
306
Chapter 7 - Configuration
Message System: 'Automatic Saving'
Message System: 'Automatic Saving'
Introduction
On this tab you can define how to save messages in an external file. You can save the
messages in HTML format (recommended) or as plain text files. HTML will preserve
the message colors and you can easily view the messages with any HTML browser. You
can also select the language, in which the messages should be saved and the type of message
information, which is to be saved. Under ’Create a new export file’ you specify the parameters for the files, in which the messages are exported:
Illustration
Window Functions
#
UI Element
Description
'Saving Format'
Here you can switch off the backup of messages completely or
select one of the following formats:
- HTML-Format for Web-Browser
- CSV-file for Spreadsheet
- Plain text
Additionally you can select the language in which the messages
should be saved.
'Message infos to
save'
Here you can decide, which parts of a message should be saved
(check or uncheck the boxes). The small tool bar on the right
allows you to select all items with one click and to deselect them
again. Additionally you can invert your selection.
Chapter 7 - Configuration
307
Message System: 'Automatic Saving'
308
UI Element
Description
'Create a new export-file'
'In saving directory:'
Insert the path to the directory, where the messages should be
stored.
'When at least X messages are written:'
The maximum number of messages after which a new file is
written, normally 10000 or 20000.
'When at least X minutes are gone:'
Additionally you can set a time value, after which a new message
file is written.
'And always after the day change'
This is a default setting which cannot be changed.
Chapter 7 - Configuration
Message System: 'Automatic Answers'
Message System: 'Automatic Answers'
Introduction
Here you can collect messages with questions in a list, which should be answered automatically by the system.
If you click the button, either, if the list is empty, the first valid message number will
be entered in the list or, if there are entries in the list, the marked entry will be copied
and added to the list. Now you can edit the following columns.
Illustration
'Automatic Answers' Table
#
Column
Description
'Message-Id'
Double clicking this entry opens a drop down list, which contains all numbers of messages, which can be answered automatically by the system.
'Modulename'
Opens a drop down list with all modules which generate messages. Select the a module for which the message should be answered automatically or select all modules.
'Questiontext'
Displays the text of the question delivered by the message.
'Answer'
From a drop down list select the answer, the system is to provide
automatically.
'Active'
This column allows you to create a master list and to activate
those entries only, which are required in a certain situation.
Note:
The system generates automatic answers only if this
check box is enabled!
Chapter 7 - Configuration
309
Message System: 'Automatic Answers'
You can also use the question dialog itself to add entries to the list. If a question, which
can be answered automatically, pops up, you can check the 'Next time reply automatically'
box at the bottom of the dialog. You can also select a defined module or all modules:
310
Chapter 7 - Configuration
Message System: 'Triggers' (Active Notification Interface)
Message System: 'Triggers' (Active Notification Interface)
Introduction
Here you can specify programs/scripts, which will be executed, if a certain message is
generated by the system. For example you can configure the system to create traces if a
certain error occurs. This function is similar to the Active Notification Interface in the
Printer Configuration. Consequently the executable programs/scripts have to be located
in the '/u/prismapro/bin/ani' directory.
Illustration
'Triggers' Table
#
Column
Description
'Message-Id'
Select the message from the list, which should invoke a specified
program/script.
'Modulename'
Opens a drop down list with all modules which generate messages. Select or enter an appropriate module or select all modules.
This restricts the trigger to the messages that come from the
selected modules.
'Messagetext'
Displays the text of the message.
'Trigger Command'
Opens a list with all available programs/scripts in the
'/u/prismapro/bin/ani' directory. Select the program to be executed, if the message is generated.
'Active'
Switch the program execution on or off.
Chapter 7 - Configuration
311
Message System: 'Message Suppression'
Message System: 'Message Suppression'
Introduction
This dialog allows you to suppress the display of messages in the message window.If you
click the ’Add new entry’ button: , either, if the list is empty or no entry is marked, the
first valid message number will be entered in the list or, if there are entries in the list and
one entry is marked, this entry will be copied and added to the list.
Illustration
'Message Suppression' Table
#
Column
Description
'Message-Id'
Double clicking this entry opens a drop down list, which contains all numbers of messages, which can be answered automatically by the system.
'Modulename'
Opens a drop down list with all modules which generate messages. Select the a module for which the message should be answered automatically or select all modules.
'Messagetext'
Displays the text of the message to be suppressed.
'Suppress'
This column allows you to create a master list and to activate
those entries only, which are required in a certain situation.
Note:
The system suppresses the display of messages only if
this check box is enabled!
You can also add entries to the list, if you right click a message in the Message window
and select 'Suppress Message ...' from the context menu. A dialog appears and asks you
to choose one or all modules for which the messages should be suppressed.
312
Chapter 7 - Configuration
'Licenses'
'Licenses'
'Licenses'
Introduction
Océ PRISMAproduction Server V4 licenses are stored on a CodeMeter dongle (CmStick),
a small USB device which must be plugged in at the Océ PRISMAproduction Server
master server. Before activation of the Océ PRISMAproduction Server modules, the licenses of the CmStick must be configured with the 'Licenses' application under 'Configuration'.
Note:
Only the users root, service and admin can save configuration changes.
Illustration
License Manager Window
The license configuration window displays a table of all available CmStick licenses including their corresponding properties. Further columns for each Océ PRISMAproduction
Server server are added for license assignment.
Currently three possible actions can be performed:
Chapter 7 - Configuration
313
'Licenses'
#
Tool Bar / Menu
Description
'Edit' -> 'Apply'
All license modifications will be stored in the database and the
corresponding Océ PRISMAproduction Server modules will
be activated.
'Edit' -> 'Discard'
'Edit' -> 'Reconfiguration'
Discards license changes and displays the currently stored configuration of the database.
Deletes existing license assignment of the database and initializes
the database by rereading the licenses from the CmStick. Result
is, that no license is assigned to an Océ PRISMAproduction
Server server.
The Licenses table provides the following columns:
#
Column Title
Description
'State'
License is ok.
'License Name'
Consists of the product and the version.
'Activation Date'
Displays the date of the activation of the “Emergency” dongle.
'Expiration Date'
Displays the expiration date of the licenses – no entry means,
the license has no expiration date.
'Available Instances'
Displays the number of free licenses, which are not yet assigned
to servers. The count is deminished by the number of instances
you assign to the servers. It the count is '0' all instances are assigned the server(s).
'Product Code'
Describes the internal product number.
Server Name
Shows the number of activated licenses for this server. For each
new server which is added to the Océ PRISMAproduction
Server cluster an additional column will be inserted with the
server’s hostname as title.
License Information
Double click a license entry to open a license information window:
314
Chapter 7 - Configuration
'Licenses'
Apart from the information already given in the license table the following is displayed
in this window:
#
UI Entry
Description
'Activation Date'
Displays the date of the activation of the “Emergency” dongle.
'Product Code'
Describes the internal product number.
Assignment of Licenses with the 'Licenses' Application
License assignment to an Océ PRISMAproduction Server server can be done by doubleclicking the corresponding cell of the server column (last column of the table) and license
row. In a drop down list, the number of assignable licenses will be displayed - mostly you
can change the number from “0” to “1”.
Meaning of the Numbers
#
0
Means that this license is not assigned to the server.
1
Means that this license is assigned to the server.
>1
means the amount of instances which are assigned to the server
Chapter 7 - Configuration
315
'Accounting' Administration: Overview
'Accounting'
'Accounting' Administration: Overview
Introduction
The account server is a daemon-process running once in an Océ PRISMAproduction
Server Explorer-server network. It collects the accounting data sent by the different
modules and writes the accounting entries into a database and also into the legacy files.
It can also delete accounting entries (and files) after a configurable time (number of days).
All accounting information based on legacy files is kept in the directory
'/u/prismapro/account/'. This directory name cannot be changed.
Accounting Configuration Window
The Océ PRISMAproduction Server Explorer offers an accounting administration window
in the Configuration part of the Explorer. This window consists of three tabs:
#
316
'General'
'Database Permissions'
'Legacy-Files'
General configuration settings
See ‘'Accounting' Administration: General Settings’
on page 317.
PostgreSQL database access
See ‘'Accounting' Administration: 'Database Permissions'’ on page 320.
Legacy Files administration
See ‘'Accounting' Administration: 'Legacy-Files'’ on
page 321.
Chapter 7 - Configuration
'Accounting' Administration: General Settings
'Accounting' Administration: General Settings
Introduction
This tab can be used to configure major accounting behavior:
■
■
■
■
Enable/Disable storing legacy accounting entries in files.
Enable/Disable storing accounting in the accounting database.
Configure connection attributes of the accounting database (if an external database
should be used to store data).
Export database accounting and import the exported records into another database
for migration of database structures.
Illustration
Storage of Accounting Records
Note:
To use the accounting database, a license (Accounting 4.0) is required.
Chapter 7 - Configuration
317
'Accounting' Administration: General Settings
#
Column
Description
'Active'
Activates/Deactivates the storage of the accounting records either
as legacy files or in a 'PostgreSQL' database.
For 'PostgreSQL' you can select the normal version 1 or the
enhanced version 2 which also stores for example color information.
Note:
Two active databases may have an inpact on the system
performance.
'Status'
Reflects the status of the database: 'Ok', 'closed' or 'connected'.
'Database'
Type of the database.
Default: Files and 'PostgreSQL'
'Name'
Name of the database (can be modified).
Default: PPACC and PPACC_V2
'Version'
Version of the 'PostgreSQL'.
Default: 'Version 1' and 'Version 2'.
'Host'
Hostname, where the database runs on.
'Port'
Port number to access the database server (can be modified).
Default: 5433
'Owner'
User name, which has permission to access the database (accadmin is the preconfigured internal default user, which cannot be
modified.
Default: accadmin
'Password'
User-Passwords
Export / Import of Database Accounting
The export and import feature is the way to migrate accounting database content from
an older database version to a newer one. So export should be done before installation of
a new Océ PRISMAproduction Server version containing a new database structure version.
Note:
Before export it is recommended to condense the database to the necessary records by
executing in database maintenance the action "Clean up Accounting-database (vacuum)".
This will afterwards reduce time to parse the imported records into the database.
318
Chapter 7 - Configuration
'Accounting' Administration: General Settings
To export the database content use the export button ( ). You will be asked for a file
name to store the original accounting records that were sent to the accounting server together with their time stamp.
To import accounting records with time stamp use the import button ( ). The import
is done like normal sending accounting records to the accounting server, so parsing the
records may take a longer while. This task is to be done once after installation and activation of a new database structure.
'Delete accounting records automatically'
Here you can define the number of days after which the old and completed accounting
entries will be deleted automatically at system startup. Additionally you define here a
daily deletion time.
Files: old files are simply deleted
Database: entries, which are referenced by entries from other tables are not deleted.
"Unfinished" entries (TIME_OUT is still NULL) are not deleted.
Note:
The "delete" button in the tool bar ( ) can be used to call the cleanup procedure immediately.
'PRISMAproduction Job-Id Pool'
Restriction setting for creating new Océ PRISMAproduction Server job ids. This feature
can be used to exchange jobs between primary servers without job id conflicts, as long as
the job id range is limited to the range 1-99999999.
Chapter 7 - Configuration
319
'Accounting' Administration: 'Database Permissions'
'Accounting' Administration: 'Database Permissions'
Introduction
The configuration of the PostgreSQL database only allows access to internal user "accadmin". This user is the owner of the database and he has full access to it.
On this tab, additional users can be created with read-only access to the database in order
to allow accounting analyzing tools to read information from the database.
Illustration
Permissions Table
The table on this tab contains adjustments required in the postgres configuration file:
'/u/prismapro/data/postgres/database/pg_hba.conf'
All entries in this file, which are related to the accounting database, are always automatically adjusted with the configuration settings in this table.
More information is available in the postgres administration documents.
Note:
These users get only a "read" access to the database!
If a user with the same name is defined for multiple ip-adresses, the same password is
synchronized for that user automatically for all rows.
Write access to the database is possible only with the command "ppacc -a".
320
Chapter 7 - Configuration
'Accounting' Administration: 'Legacy-Files'
'Accounting' Administration: 'Legacy-Files'
Introduction
The 'Legacy-Files' tab can be used to manage the old accounting files, which are created
in the '/u/prismapro/account/ 'directory on the master server.
Illustration
The following actions are possible with the legacy accounting files:
■
■
Delete ( ) stored accounting legacy files (deletion is restricted to the users "admin"
and "service").
Export ( ) all selected legacy accounting files into a single output file. This output
file can be stored on windows clients running the Launcher interface too.
Chapter 7 - Configuration
321
'Consumables' Configuration
'Consumables'
'Consumables' Configuration
Introduction
The 'Consumables' configuration application is used to pre-configure the consumables
with unique names and a description. After you have saved the entries, the names of the
consumables can be selected in the 'Printer Maintenance' dialog in the 'Printer Pool'
window (see chapter "Printer Pool" -> "Maintenance Report" in the Océ PRISMAproduction Server User's Guides).
The 'Consumables' are organized in different tables (Toner, Developer, Brush, Corotron,
Strip, Filter, Blade, 'Other') which are accessible via tabs within the application. Some
'Consumables' are already preconfigured in these tables.
The 'Toner' table also provides a complete list of all color toners which are available from
Océ.
322
Chapter 7 - Configuration
'Consumables' Configuration
Illustration
Toner Table
Use this table to select the toners you use on your Océ PRISMAproduction Server system.
You can also use this table to define your own toner colors or to add user defined color
names to Océ System Toners:
First you have to select a toner entry in the 'Toner' table. The 'Color' column shows a
sample view of the toner color.
Now you can copy the entry with the "Copy" button ( ) and modify the color name for
the toner.
To define a new toner color, click the "Add" button ( ) or select 'Add New Entry' from
the context menu. A new line is inserted in the table. All columns of the toner table (see
description below) are editable for this new entry.
For the already existing 'Océ System Toners' you can add a user defined color name to
the existing 'Color Name' via a dialog box:
To open this box, you have to mark the entry which should be modified an then click
the modify button in the tool bar ( ) or select 'Color Names...' from the context menu
Chapter 7 - Configuration
323
'Consumables' Configuration
(right mouse button) or from the 'File' menu. The dialog also opens if you double click
the column 'Color Name' of the selected entry.
For 'Océ System Toners' you are not allowed to change the RGB values or the description.
If you still want to modify the color value, you first have to copy the respective entry ( ).
Assign Toner Colors to Printer
You can use the 'Toner Station' tab in the 'Printer Configuration' to assign Océ Toners
and/or user defined toners to printers (see ‘Printer Configuration: Toner Stations’ on page
366).
Toner Table Columns
#
324
Column
Description
'Toner'
Internal toner number.
'Description'
The description 'Océ System Toner' cannot be edited.
If you create a new toner, you can edit a description here.
'Color Names'
The predefined color name of an 'Océ System Toner' connot
be modified, but you can add other names if you wish (see
above).
For user defined colors the entire field is editable.
Chapter 7 - Configuration
'Consumables' Configuration
Column
Description
'Color'
This column shows a sample view of the selected toner color.
Red-Green-Blue values are shown as tool tip. The setting is
used by the Professional Document Composer to display the
color.
With user defined toners you can click the 'Select Color' button
( ) to open a dialog, which helps you to enter the correct values
for your color. Clicking ’OK’ transfers the values to the column.
The same dialog opens if you select 'Color Selection ...' from
the contex menu or if you double click on the color.
If you try to edit the color of an 'Océ System Toner' an error
message is displayed which informs you that you are not allowed
to do so.
'Available for
Maintenance'
Mark the check box if the entry should be available in the
'Printer Pool''Printer Maintenance' dialog.
See chapter "Printer Pool" -> "Maintenance Report" in the Océ
PRISMAproduction Server User's Guides.
Note:
For a complete Workflow for the definition of colors in a print job see ‘Workflow 'Color
Selection'’ on page 578.
Consumables Tables
You can define your consumables in these tables. For each printer these consumables can
be selected in the 'Printer Pool''Printer Maintenance' dialog.
Additionally you find in this table predefined entries for all available Océ toners with
their name and description. These entries can only be selected but cannot be modified.
Chapter 7 - Configuration
325
'Consumables' Configuration
#
326
Column
Description
Developer, Brush,
Corotron, Strip,
Filter, Blade, 'Other'
Name of the consumable.
After clicking the 'Add' button ( ), a new entry will be added
to the table. The first column header contains the consumable
name.
'Description'
Add an additional description here.
'Available for
Maintenance'
If you check this box, the operator is able to select this consumable in the 'Printer Maintenance' dialog in the 'Printer Pool'
application to report its replacement or the refilling to the accounting. If the box is deselected, the 'Consumable name' field
in this window is switched into the editable mode, which allows
the operator to enter consumable name for the selected type by
himself.
Chapter 7 - Configuration
'Backup/Restore': Basic Concept
'Backup/Restore'
'Backup/Restore': Basic Concept
Introduction
With the 'Configuration' -> 'Backup/Restore' function you can save the configuration
of the system and restore it later. It can be useful to generate a backup of the current
configuration before an update installation and to restore it after the installation. This
function is available for users 'service' and 'admin' only. A message confirms the end of
a successful saving or restoring procedure. In case the saving or restoring procedure was
not successful, enhanced diagnostic information on the failure is given. This helps the
user to efficiently analyze the cause of the failure.
All Océ PRISMAproduction Server servers of a cluster have to be up and running in order
to save or restore the Océ PRISMAproduction Server configuration. To restore a previous
saved configuration the system configuration has to be identical. This means: same
number of slave systems, same IP addresses.
If the current system configuration differs from the backup configuration, the restore
feature cannot be executed. This is illustrated in the list of available backups by a grayedout backup icon.
Note:
Every time a restore of the Océ PRISMAproduction Server configuration was performed,
a ’Reset Océ PRISMAproduction Server ’ is necessary to initialize Océ PRISMAproduction Server with the restored configuration. This reset is automatically done on all servers.
A status window is opened to see the progress of the reset. The 'Explorer' will be closed
and reconnected automatically.
Details of the backup can be viewed using the backup viewer. To load a backup into the
viewer, select the backup from the list of available backups and choose the option 'View'.
After a successful saving procedure, the new created backup will automatically be loaded
into the backup viewer.
Note:
It is not possible to cancel a saving or restoring procedure. The user must wait until the
saving or restoring procedure finishes.
Note:
Session files (contain stored sessions, suffix.psn) and are not part of the Backup/Restore
component. They have to be saved manually.
Chapter 7 - Configuration
327
'Backup/Restore': Basic Concept
Definition
The 'Backup/Restore' component of Océ PRISMAproduction Server is in fact a framework
enabling all other Océ PRISMAproduction Server components to backup or restore their
configuration. The figure below illustrates this concept. As can be seen in this figure, the
'Backup/Restore' framework delegates the backup/restore action to so-called plug-ins like
the Database component, the 'Explorer' component, the Ticket Rules component, etc.
The storage of the data which each component is backing up or is restoring, is managed
by the 'Backup/Restore' framework.
Illustration
Backup Data
As mentioned before, the 'Backup/Restore' framework delegates the backup or restore
action to each plugged-in component. This means that each component is responsible
for backing up and restoring it’s own configuration data. Even more, each component is
also responsible to support backwards compatibility between it’s backup data. Therefore
it is not possible to modify the data (add or remove files/directories) which is being backed
up or restored.
Backup Phases
The 'Backup/Restore' framework sends out several so-called triggers to each plugged-in
component. This gives the particular component the possibility to react accordingly.
Below a summary is given of all triggers which are executed when a configuration backup
is being requested.
■
■
328
Cancel (Backup Initialization Phase)
Notifies a plugged-in component that a configuration backup will be started. The
component must stop its processes, which influence the configuration backup process,
immediately. For example, the ODS will cancel any running job. The canceled ODS
jobs must be reactivated again by the user after the backup has finished.
Preupdate (Backup Phase)
Chapter 7 - Configuration
'Backup/Restore': Basic Concept
■
Notifies a plugged-in component that it can start making a backup of its configuration
data.
Uncancel (Backup Finalizing Phase)
Notifies a plugged-in component that the backup has been finished. The component
can now start to operate normally again.
Note:
If one or more plugged-in components fail in backing up their configuration data, a diagnostic dialog is displayed after the backup has finished in order to analyze the cause
of the failure. In this case NO backup will be created! (an incomplete backup makes no
sense...)
Restore Phases
Just like the backup action, a restore action also causes certain triggers to be executed on
all plugged-in components. Below a summary is given of all triggers that are executed
when a restore is being requested.
■
■
■
Cancel (Restore Initialization Phase)
Notifies a plugged-in component that a configuration restore will be started. The
component must stop its processes, that will influence the restore process, immediately.
For example, the ODS will cancel any running job. The canceled ODS jobs must be
reactivated again by the user after the restore has finished.
Postupdate (Restore Phase)
Notifies a plugged-in component that it can start restoring its configuration data which
is part of the selected backup.
Uncancel (Restore Finalizing Phase)
Notifies a plugged-in component that the configuration restore has been finished.
The component can now start to operate normally again.
Note:
If one or more plugged-in components fail in restoring their configuration data, a diagnostic dialog is displayed after the restore has finished in order to analyze the cause of
the failure. In this case the failed component(s) can contain incomplete or inconsistent
configuration data. It is up to the user to configure the failed components by hand or
to restore another configuration backup.
For detailed information on how to work with the application see ‘'Backup/Restore':
Window’ on page 330
Chapter 7 - Configuration
329
'Backup/Restore': Window
'Backup/Restore': Window
Introduction
The 'Backup/Restore' window consists of two parts:
■
■
a Backup Selection Table, which gives an overview of all configuration backups. An
icon indicates, if the backups can be restored on the system or not.
a Backup Viewer. Backups can be viewed by loading them in the selection table.
Illustration
Tool Bar / Menu Functions
You can load, create, restore, refresh or delete backups using either the Edit menu, the
toolbar icons or the pop up menu if you right-click on a backup entry.
330
Chapter 7 - Configuration
'Backup/Restore': Window
#
Icon
Description
'View the selected
backup.'
Before the details of a configuration backup can be shown, it
is necessary to load the configuration backup.
The loading process takes a little while and cannot be canceled.
A warning dialog will be displayed when the user tries to cancel
the load process. During the loading process a progress dialog
is displayed indicating the status of the loading process.
To load a configuration backup, you have to select it in the
backup selection table and to start the load action in the Edit
menu, the pop up menu, the icon bar or by double clicking on
the table selection. The backup selection table shows for each
configuration backup the information described under "Backup
selection table columns" in the next table.
When a configuration backup is loaded, the lower part of the
'Backup/Restore' GUI will show a tabbed pane with the views
mentioned above. In one of the following tables the several
views of a configuration backup will be described in detail.
'Start a new backup.'
(for admin and service users only)
Starts a new configuration backup. After a confirmation dialog,
you will be asked to provide a short description of the backup.
This description cannot be empty.
When all necessary information is provided, the configuration
backup creation process will begin. A progress dialog is shown
during the backup process, indicating the status of the process.
The configuration backup process cannot be canceled. A
warning dialog will be displayed when the user tries to cancel
the backup process.
Should a backup fail, a diagnostic dialog is shown.This diagnostic dialog provides the user a way to analyze the cause of the
backup creation failure.
Chapter 7 - Configuration
331
'Backup/Restore': Window
Icon
Description
'Restore the selected backup.'
Restores a selected configuration backup. A system backup can
only be restored if the following conditions are satisfied. The
condition check is performed in the order as described in the
list:
■ The number of hosts in the configuration backup must
match the number of hosts in the current system.
■ The hosts IP addresses of the configuration backup must
match those of the current system, and the other way around.
■ The master IP address of both, the configuration backup
and the current system must match.
■ The configuration backup must be a valid Océ
PRISMAproduction Server V3.xx or higher configuration
backup. See
The type of a slave in the backup (whether it is a standard slave
or a print slave) is also checked. The user must take care of
restoring the backup only in a configuration with matching
slave types.
If one of the conditions described here are not satisfied, the
configuration backup cannot be restored. The restore functionality will be disabled in this case (the backup icon will be gray).
In case not all components could be restored, a diagnostic dialog
is shown. This diagnostic dialog provides the user a way to analyze the cause of the restore problem.
Note: Except for a severe Océ PRISMAproduction Server core
system error (for example that the database server is not functioning), a configuration restore always succeeds. It is up to the
user to accept the system restore or not in case not all components could be restored.
When the restore process has finished the the system will be
reset automatically. A reset is alwas necessary after a backup has
been restored. The 'Explorer' will be closed and reconnected
automatically. While exiting the 'Explorer' all messages regarding
the loss of connection can be ignored.
It's recommended to check if (maybe unintentionally) functions,
which have an impact on the whole Océ PRISMAproduction
Server system have been activated by the restore, for example
'eMail Notification', 'Job Notification', 'Printer Notification',
...
332
Chapter 7 - Configuration
'Backup/Restore': Window
Icon
Description
'Delete'
To delete a configuration backup, simply select a configuration
backup from the backup selection table and click on the delete
button. After confirming a dialog, the configuration backup
will be deleted.
Note:
There is no way to undo a delete!
'Refresh the backup selection table'
This functionality simply rereads the available backups from
the system. Note that any loaded configuration backup (displayed in the backup views area) must be loaded again after the
refresh has finished. As described under "Restoring a backup",
the state of a configuration backup is depending on the current
system configuration. Therefore the backup selection table needs
to be updated whenever the system configuration changes (for
example a slave is being added to or removed from the system).
In this case the user is being informed about the refresh which
will be performed.
Backup Selection Table Columns
#
Column
Description
'State'
Indicates by an icon, if the configuration backup can be restored
on the current system or not:
= successful backup, which can be restored
= backup with problems.
= incompatible backup.
= successful restore
= restore with problems
See "Restoring a Backup" for more details about the conditions
for restoring. In case the configuration backup cannot be restored on the current system, a tooltip text will provide the user
with possible causes.
'Name'
The name is created automatically when you start the backup.
It consists of the Océ PRISMAproduction Server version and
a serial number after the dot.
'Description'
Short description of this backup version. You create this description on the start of a new backup.
Chapter 7 - Configuration
333
'Backup/Restore': Window
Column
Description
'Version'
Version number of the Océ PRISMAproduction Server release
from which the backup has been created.
'Created at'
Date and time of backup creation.
'Created by'
User who created the backup.
'Last restored at'
Last restored configuration backup
Backup Viewer Tabs
#
Tab
Description
'History'
Shows a history of the backup and its restores which you have
selected in the table above. This window also informs you, if
the components of a backup have been saved or restored successfully. Each component is marked with an icon indicating its
status. If there is a status message associated with the component, you can display the message by double-clicking or rightclicking the item.
'Content'
The content view of a system backup shows a selected set of the
most important files which are included in the backup. For each
file a short description is given in order to illustrate the meaning
of the file. The file-icon illustrates if the file can be viewed or
not. The viewing is done using a simple text viewer, therefore
some files cannot be viewed.
'Database'
Shows the database tables which are contained in the selected
backup.
'Details'
This view provides a 1 to 1 overview on the contents of the
backup archive. This tab is only available for users of the type
admin and service. Some files can be viewed in ASCII text mode.
Backup/Restore diagnostics
In case a backup or restore should fail, a diagnostics dialog will be displayed. This diagnostics dialog offers the possibility to analyze the cause of the failure.
334
Chapter 7 - Configuration
'Backup/Restore': Convert old Backups
'Backup/Restore': Convert old Backups
Introduction
System backups of an Océ PRISMAproduction Server V3.00.07 system first need to be
converted into Océ PRISMAproduction Server V3.02.20 backups. In order to do so,
execute the script '/u/prismapro/bin/convertBackups' from the command line immediately
after the installation of Version 3.02.20. The script checks the system for old system
backups and converts them accordingly.
The Océ PRISMAproduction Server Explorer 'Backup/Restore' application reports the
3.00 Backups as "not restorable". After having saved these converted backups they can
be used in Océ PRISMAproduction Server V4.00 without further conversion.
Conversion Process
The convertBackups script performs 2 functions:
■
■
Syntax: 'ConvertBackups -check'
Checks all backups found on the system (for example the contents of path
'/u/.prismapro.bak'). A list is displayed where the state of each backup is specified:
'up to date' or
'damaged' or
'not convertible' or
'convertible'.
Of interest are the convertible backups. Damaged backups should be deleted manually
by the 'Backup/Restore' application. Non convertible are some early 3.02 Backups
which haven't been stored with double byte code encoding yet.
Syntax: 'ConvertBackups [-noreset] '
Converts all backups stated as convertible to 3.xx. If you rerun the check after the
conversion these backups will be displayed as up to date.
Note:
It's very important that Océ PRISMAproduction Server is reset after the conversion.
The '-noreset' parameter is supported for internal use only. There is no reason of preventing the automatic reset in the customer environment.
For security reasons the backup directory '/u/.prismapro.bak' should be saved before
running the conversion. It's recommended to pack it by: 'tar -cvf backups.tar
/u/.prismapro.bak' and copy the file into a different file system (not /u). In case of an
emergency the backup directory could be restored by: 'tar -xvf backups.tar'.
To use the backups of the Océ PRISMAproduction Server V3.02.20 in Océ
PRISMAproduction Server V4.00 or higher save the backups in a tar archive as described
above and restore the archive on the new system.
Chapter 7 - Configuration
335
'Backup/Restore': Convert old Backups
After all the backups of interest have been converted the saved tar file can be deleted.
336
Chapter 7 - Configuration
'Library path configuration'
'Library paths'
'Library path configuration'
Introduction
Select 'Configuration' -> 'Library paths' to configure the physical paths of default libraries.
Note:
For the PJM type libraries $HEADER, $TARGET and $OUTPUT you can also enter
a new path at the bottom of the window.
When selecting files in the PJM 'List of Files & Workflow Definition' section you can
choose the files from these libraries.
Language Modules
Depending on the language module you can select files from different libraries:
#
Module
Description
APA
Select files from the different input devices (CARTRIDGE,
QIC, TAPE) which are collected under the $DEVICE library.
Select original files in their native format from $TARGET.
LCDS
For LCDS resources select input devices presented under
$DEVICE (XFLOPPY_35, XRES_CARTRIDGE,
XRES_TAPE). For LCDS print data you can select cartridge,
channel (additionally channel1 to channel4) or tape under the
$XDATA_DEVICE library. You can also select JSLs and resources directly from the jsl and $XRESOURCE library.
POD
Select original files in their native format from $TARGET.
$OUTPUT saves files in the TIFF, PS and PDF format which
have been reconverted from IOCA.
In $PFL you find the archives, which contain the final print
jobs and print files.
Under $PRPRINTS you can select archives with print jobs and
print files, which are not yet finished.
Chapter 7 - Configuration
337
'Library path configuration'
Library paths Window
#
Column
Description
'Name'
The logical name of the library (also virtual paths).
'Path'
The physical path of the file.
'Type'
Indicate whether the library belongs to the Composer, Printer,
PJM or web client. The type INTERNAL means that the library
is not visible as node in the 'Explorer' tree.
'Description'
A more detailed description of the library.
'Servers'
The servers on which the libraries are located. If you use data
mirroring, the same library can be located on several servers.
$OUTPUT and $TARGET can only be on the master.
$HEADER can be located on any print server.
'New path'
To change the physical path (only possible for $HEADER,
$TARGET and $OUTPUT), enter the new path here. The
path is created if it does not yet exist. The new path must be
empty.
'Move data'
You must check this option to move the existing library to a
new path. Otherwise a new library is created in the new path –
the new library will be used for all future processing and the
old one will remain at its original location.
Note:
The library can only be moved to an empty path.
'Library paths'File menu and toolbar see: ‘General Usage of the Configuration Applications’
on page 256
338
Chapter 7 - Configuration
Printer Configuration: Overview
'Printers'
Printer Configuration: Overview
Introduction
The Printer Configuration Manager is used to configure all printers in the Océ
PRISMAproduction Server network. The application consists of the 'Printer' menu and
a tool bar, which give you access to identical functions. The window is divided into two
main parts: The upper half displays a table with all configured printers (Printer Table).
The lower half gives you access to up to nine different tabs on which you perform all
steps to fully configure a printer (Printer Configuration Area).
Note:
All buttons which are grayed out (dimmed) and are not mouse or key sensitive cannot
be activated, either because the user has no right of access or because the function concerned cannot be executed at this point.
Attention:
Only the users root, service and admin can save configuration changes.
The 'Printer' Menu and Toolbar
All functions in this menu are also accessible via the tool bar icons of the Printer Configuration Manager.
#
Menu entry
Description
'Start print daemon
on Host'
Enables the Océ PRISMAproduction Server spool in case it has
been disabled before. The small arrow button allows you to select any computer in the network, on which the spool should
be enabled.
'Stop print daemon
on Host'
Disables the Océ PRISMAproduction Server spool. The small
arrow button allows you to select any computer in the network,
on which the spool should be disabled.
'Save'
Saves the configuration. If a printer was modified, which is
currently active, the user is asked to stop the printer first.
Chapter 7 - Configuration
339
Printer Configuration: Overview
Menu entry
Description
Add new printer.
'Add a Printer'
Copies the selected printer and takes over all its settings.
'Copy Printer'
Delete the selected printer.
'Delete selected
Printer'
Discards all changes and rereads the data from the database.
'Discard all
changes'
'Job Notification'
This icon calls up a dialog, which allows you to configure the
Active Notification Interface for jobs. For further details see
below.
Printer Table
The area below the toolbar displays all configured printers in the Océ PRISMAproduction
Server network. Each entry shows 6 columns:
#
Column
Description
'Printer Name'
Name of the printer.
'Printer Model'
For Océ printers: exact model name of the printer.
'Printer Driver'
Type of print data processing facility (described in 'New Printer').
'Printer Type'
Continuous. Cutsheet, Twin or Triplex.
'Server Name'
The Name of the server, the printer is connected to.
The Status of the printer can be:
#
Status
Description
Spool daemon is down (for all printers on the server)
Spool inactive
Spool is active, the printer is inactive.
Spool active
340
Chapter 7 - Configuration
Printer Configuration: Overview
Status
Description
Printer active
Printer is printing (or at least waiting for a job). Don't reconfigure the printer in this state.
Printer Configuration Area
The configuration area is divided into 9 tabs, where each tab offers some special settings
for a separate topic.
#
Application
Description
'General'
General printer settings: ‘Printer Configuration: 'General'’ on
page 349
'Print Parameter'
Some special settings depending on the selected device type:
‘Printer Configuration: 'Print Parameter'’ on page 352
'Job Queues'
Set or restrict the queues, which should be allowed to be used
by the printer: ‘Printer Configuration: 'Job Queues'’ on page 364
'Cluster'
Specify the membership of printer clusters: ‘Printer Configuration: 'Cluster'’ on page 365
'Colors'
Set or restrict the colors, which should be allowed to be used
by the printer: ‘Printer Configuration: Toner Stations’ on page
366
'Input Devices'
Devices Description of the paper input (input trays): ‘Printer
Configuration: 'Input Devices'’ on page 367
'Output Devices'
Devices Description of the paper output (output trays): ‘Printer
Configuration: 'Output Devices'’ on page 368
'Printer Notification'
Active Notification Interface" command for printer status
changes: ‘Printer Configuration: 'Printer Notification'’ on page
369
'Gray Curves'
Gray curve settings for Postscript converter (available only, if
UnityRip license is installed): ‘Printer Configuration: 'Gray
Curves'’ on page 370
Chapter 7 - Configuration
341
Printer Configuration: Add a new Printer
Printer Configuration: Add a new Printer
Introduction
Selecting the function 'Add a Printer' ( ) in the 'Printer' menu or tool bar opens the
following dialog:
Illustration
Printer Attributes
Here you have to specify the main printer attributes:
■
■
■
■
'Printer Name' (up to 20 characters).
The 'Printer Model' (the list contains all Océ models, Non Océ printers, generic
printers and their appropriate symbol).
The appropriate 'Printer Driver'. (The selection here depends on the selected 'Printer
Model').
The server, which the printer is connected to.
The following drivers are available (if the respective licenses are installed):
#
'Printer Driver'
'Connection'
'Printer Model'
Licenses
'IPDS Driver'
'Network'
Sends all kind of AFP-, Line
IPDS_Driver 4.0
'Network' ' for ATwin' ' for
- and Mixed data in IPDS to
CTwin'
Océ and Non-Océ IPDS
,
/
,
'SCSI-Interface'
printers.
,
'SCSI-Interface' ' for
ATwin' ' for CTwin'
/
,
'/370-Channel (intercom)'
,
'/370-Channel (intercom)' '
for ATwin' ' for CTwin'
/
342
Chapter 7 - Configuration
Printer Configuration: Add a new Printer
'Printer Driver'
'Connection'
'Printer Model'
'Postscript Driver'
'Network with LP-Protocol'
PS_Driver 4.0 (for Océ
'Network with Socket+Port'
printers)
,
Licenses
DocuTech_Driver 4.0 (for
Xerox Docutech printers)
Digimaster_Driver 4.0 (for
Digimaster/Canon printers)
Chapter 7 - Configuration
343
Printer Configuration: Add a new Printer
'Printer Driver'
'Connection'
'Printer Model'
Sends Postscript and "POD"IOCA based AFP to Océ
PostScript printers (VarioPrint 2090, 21xx, 31xx, 61xx,
62xx, CPS700 and CPS900).
Sends Postscript and "POD"IOCA based AFP to non-Océ
PostScript printers (for example Canon_150, Digimaster_9110 and Xerox Docutech_6180)
The input data will be converted from the IOCA format
to the PostScript format.
PostScript files can be printed
directly using the PJM-RAW
format. The printer answers
as AFP printer. Consequently
you can only select this data
type in 'General' -> 'Data
Format'
Note:
Please note, that
DigiMaster has
Ticket support
only (no job
monitoring via
printer). This is
the functionality
of the former
DocuTech Driver and DigiMaster Driver.
Note:
344
Chapter 7 - Configuration
Licenses
Printer Configuration: Add a new Printer
'Printer Driver'
'Connection'
'Printer Model'
Licenses
For VP6000 also
fully composed
MO:DCA data
(APA/LCDS)
and PDF-Container based AFP
(POD) are supported.
'PJL/PCL Driver'
'Network with LP-Protocol'
PJL/PCL5 printers, especially
PJL_Driver 4.0
VHV PCLprinters
'Linedata Printer Driver'
'/370-Channel (intercom)'
Prints line data in the LCDS
'Network with Socket+Port'
line coded data stream on a
,
LCDS_Driver 4.0
DocuPrint without data conversion. Can also be used to
print general IBM3211 based
line data on line data printers,
which use the /370 IBM3211
protocol.
'Generic Driver'
'Network with FTP-Proto-
Sends all kind of data to other
col',
systems or printers via differ-
'Network with LP-Protocol',
ent protocols: lp or ftp. Re-
'Network with Socket+Port',
places former ftp- and lp-
EXE-Subbackend,
Backend.
'Centronics (LPT)'
No data conversion is per-
No license required
formed.
Note:
Up to 32 printers can be configured per server. The selectable 'Connection' depends on
the 'Printer Model'. The table lists the maximum connection for each 'Printer Driver'.
Chapter 7 - Configuration
345
Printer Configuration: 'Job Notification'
Printer Configuration: 'Job Notification'
Introduction
Job Notification is an open interface in the Océ PRISMAproduction Server Spool, which
can be used to either integrate Océ PRISMAproduction Server into customer environments
where monitoring tools are in use, or for example notify users via E-mail after their job
has been printed.
Océ PRISMAproduction Server supports two types of notification:
■
■
Notification on any printer status changes: ‘Printer Configuration: 'Printer Notification'’
on page 369
Notification on any job status changes of a print-job.
(It's currently not available for ODS preprocessing jobs!)
Internally, Océ PRISMAproduction Server executes some user configurable programs/scripts on the appropriate status changes by supplying a filename a parameter to
the executed utility. This file contains all additional information about the job or the
printer.
Both types of notification are configured in the Printer Configuration Manager:
■
■
Job ANI: one global configurable program.
Printer ANI: configurable for each printer separately.
Job Active Notification Interface
Clicking the toolbar button ( ) or the entry in the printer menu opens a dialog, allowing
you to configure the job ani utility:
The command is specified globally for all print jobs.
The command is executed always only on the master server.
In the text field of the dialog the customer is able to specify his own programs or shellscripts, which are executed each time when one of the following conditions occur:
■
■
■
346
A new job has been submitted
The status of a queued job has been changed (Ready to print -> Printing -> Locked)
A job is deleted from the queue
Chapter 7 - Configuration
Printer Configuration: 'Job Notification'
The specified program gets a file as the only command line parameter, which contains
some information on the job:
■
■
■
This is always a unique name in the whole file system.
Directory for the temporary files: '/u/prismapro/data/ani/...'
This file must be deleted by the program after it finishes processing the information.
Explanation of the parameters in the temporary file:
#
ACTION
The action, which caused the program call:
SUBMIT = A new job has been submitted
MODIFY = The status of a queued job has been changed
DELETE = A job is deleted from the queue
Attention: MODIFY request can appear before the SUBMIT action, but the status will be set to preparation (PREPARE).
ODS_JOBID
The unique job id of the job inside PRISMAproduction.
FILEINDEX
Index of the current file in the list of files in one PJM ticket, starting
with 1 for the first file.
USER
The name of the user, who submitted the job and the hostname
of the machine, separated by the ‘@’ sign (E-mail address format).
JOBNAME
Name of the job.
FILETYPE
Type of the print file: data type and resolution, separated by "/"
Data type:
APF = AFPDS or Linedata
PCL = HP-PCL data
Resolution:
0 dpi = default resolution
240 dpi = 240 dpi
300 dpi = 300 dpi
600 dpi = 600 dpi
FILESIZE
Size of the print file in bytes.
FORM
The form id of the job.
PRINTER
The name of the printer.
RANGE
The printing range of the job.
COPIES
The printed and the specified copy count of the job, separated by
’/’:
1st number = printed copies.
2nd number = specified copy count.
Chapter 7 - Configuration
347
Printer Configuration: 'Job Notification'
348
PAGECOUNT
The printed and the specified page count of the job separated by
’/’:
1st number = printed pages.
2nd number = specified pages.
The count of 0 pages means, that there was no page count specified
with the job.
JOBQUEUE
The print queue (number) of the print job.
JOBSTATUS
The status of the print job:
PREPARE = Preparing
READY = Ready to print
PRINTING = Printing
OUTPUTCONTROL = Output control
FINISHED = Finished
ERROR = Error
INTERRUPT = Interrupted
LOCKED = Locked after printing
HOLD = Locked manually
DELETED = Deleted
Chapter 7 - Configuration
Printer Configuration: 'General'
Printer Configuration: 'General'
Introduction
In this window enter the basic settings for the printer selected in the printer table.
'General' Tab
#
UI Element
Description
'Data Format'
Specification of the data type, which is accepted by the printer.
For the 'Generic Driver' you can select all data formats because
no data conversion is performed:
■ 'AFP'
Applies to IPDS printers as well as to printers which work
with the 'Postscript Driver' and Postscript Driver (non-océ
printers), because these drivers convert to AFP.
■ 'PCL'
Printer works with the PCL emulation.
■ 'AFP', 'PCL', 'PS', 'PDF', 'TIFF', 'LCDS', 'LDT'
With the 'Generic Driver' no data conversion is performed,
therefore all possible formats can be printed.
'Speed'
Printer speed in ppm (pages per minute)
The speed setting is required to check if the printer usage is
covered the the class, which is available via Océ PRISMAproduction Server 4.0 license. The printer speed is also requested
from the printer directly and this value overwrites automatically
the speed, which was specified manually. The "Dummy" and
TrueProof printers are not checked for the speed license.
Additionally you can select if the speed setting should be valid
for 'A4-pages per minute' or for 'Letter-pages per minute'.
'Resolution'
Resolution of the printer
■ 240 dpi
■ 300 dpi
■ 600 dpi
■ MRM (Multiple Resolution Mode)
'Toner Stations'
Count of installed toner stations in the logical printer, e.g. Twin
= 2 stations, Triplex=3, ...
The symbol of selected printer model is displayed only for information. The same image is used in the "Printer Pool" window.
Chapter 7 - Configuration
349
Printer Configuration: 'General'
UI Element
Description
'SNMP Connection'
'Optional: hostname or IP-address of printer's snmp management or printer panels'
'Connection'
#
UI Element
Description
'Type'
The connection type depends on the printer driver selected:
For the different connection types see ‘Printer Configuration:
Add a new Printer’ on page 342
'Scan connected
Printers' ( )
This button is enabled only for SCSI and 370 connections. It
opens an application, which scans the system and displays all
found SCSI and 370 devices on the appropriate server. If at
least one device is found, you can select 'Set 1st' to automatically
take over its connection settings into the next selection fields.
Note:
The printer configuration manager does not check, if
the required physical connection is really available on
the server, for which the printer is configured.
350
'Electronic Switchbox'
If there is an electronic switchbox between server and printer
installed, it can be necessary to enable this checkbox. But enable
this item only, if the switchbox rejects to switch the printer to
another host. Internally the 370-Channel board(s) will set in
reset state, when they are not used, but it takes more time to
get them running, every time the printer is enabled.
'Unit '
This is the physical number of the I/O interface, starting with
0.
Example:
1st SCSI Controller or 370-Channel board has the number 0.
2nd SCSI Controller or 370-Channel board has the number 1.
For LPT printers you can select units LPT1 to LPT3.
'Address '
Address on the 370 Channel or the SCSI bus.
'Host'
Tcp/ip-address or the hostname of the destination system.
Chapter 7 - Configuration
Printer Configuration: 'General'
UI Element
Description
'Port'
The tcp/ip port number, which is expected by the receiving
system.
'Remote Queue'
The name of the printqueue on the destination system.
'Directory'
The directory on the destination system, where the data has to
be transferred.
'User'
The username, which should be used for user ftp login.
'Password'
The password, which should be used for ftp login.
Chapter 7 - Configuration
351
Printer Configuration: 'Print Parameter'
Printer Configuration: 'Print Parameter'
Introduction
Depending on the backend type of the selected printer (AFP, PS, PCL ...) this section
allows you to modify various sets of print parameters. Thus you can adjust the performance
of the printers, set up dummy printers and so on. Details on the print parameters and
backends are explained in the Océ PRISMAproduction Server Technical Reference Guide.
For AFP printers you can select predefined tuning sets, which allow you to easily modify
the print parameters for example to enable traces or to drive non Océ printers.
Caution:
Modifying the print parameters might have a decisive impact on the overall performance
of the system.
Illustration
Available Drivers/Backends
At the moment the following Backends/Drivers are available:
■
■
■
■
■
352
'IPDS Driver' (see ‘Printer Configuration: Printer Drivers/Backends’ on page 355, the
Print Parameters are desctibed in detail in the Océ PRISMAproduction Server Administrators Guide.
Postscript Driver (see ‘Printer Configuration: Printer Drivers/Backends’ on page 355).
'PJL/PCL Driver' (see ‘PCL-Module: General Features’ on page 232).
'Linedata Printer Driver' (see ‘Printer Configuration: Printer Drivers/Backends’ on page
355).
'Generic Driver' (see ‘Printer Configuration: Printer Drivers/Backends’ on page 355).
Chapter 7 - Configuration
Printer Configuration: 'Print Parameter'
For the possible combinations of printer drivers and connections see ‘Printer Configuration:
Add a new Printer’ on page 342.
Setting up Print Parameters
Each time the printer is started in the 'Printer Pool' window, all these parameters are
stored in '/u/prismapro/cfg/printers/<Printer name>/backend.ini'. <Printer name> means
the name of the logical printer in the 'Printer Pool' Window.
#
UI Element
Description
Section
The section can be selected in the combobox on the right side
of the toolbar.
Search
The 'search' text field offers a possibility for finding a certain
row quickly.
Key-Value list
To modify a value, double click on it's entry in the Key-Value
list. Values marked with 'Internal use only' cannot be changed.
Default
The area next to the Key-Value list displays the default value
and a short description for the selected keyword. Click this icon
to reset all values to their defaults.
Description
Apart from the description on the screen, the parameters are
explained in the Océ PRISMAproduction Server Administrators
Guide.
Tuning Sets
Click this button to enable predefined tuning sets, which allow you to easily modify the
print parameters of AFP/Linedata printers e.g. to enable traces or to drive non Océ
printers.
For details see also Océ PRISMAproduction Server Technical Reference Manual, chapter
’Print Parameter’ -> 'Available Tuning Sets'.
At the moment the following tuning sets are available:
■
■
■
■
■
Enable all Job Infopages
Disable all traces
Activate media name mismatch (MMT) message
Disable all Job Infopages
Non Oce Printers (Host) and APA controller adjustment (240 DPI)
Chapter 7 - Configuration
353
Printer Configuration: 'Print Parameter'
■
■
■
■
■
■
■
■
■
Enable full traces
Enable SCSI interface
Deactivate MMT adjustment
Enable all File Infopages
Non Oce Printers (300 DPI e.g. LCDS --> XEROX)
Non Oce Printers (600 DPI / MRM e.g. --> IBM)
Disable all File Infopages
Activate media attribute mismatch (MMT) message
Disable SCSI interface
Example for enabling full traces for IPDS printers
[TRACE]
TRACEFILE_LIMIT = 1900000
TRACEFLAGS=0xFFFFFFFF
354
Chapter 7 - Configuration
Printer Configuration: Printer Drivers/Backends
Printer Configuration: Printer Drivers/Backends
Introduction
There is a variety of printer drivers and backends available in Océ PRISMAproduction
Server, which allow you to drive a wide range of printers.
For the possible combinations of printer drivers and connections see ‘Printer Configuration:
Add a new Printer’ on page 342.
Note:
Some of the drivers/backends need an extra license to work with them.
Note:
For details concerning the print parameters see Océ PRISMAproduction Server Technical
Reference Guide, chapter 'Print Parameter'.
Available Drivers/Backends
■
■
■
‘'IPDS Driver' (AFP2IPDS Backend)’ on page 356
‘'Linedata Printer Driver' (LCDS)’ on page 357
‘PostScript Backends (Xerox 6180, VP2110, VP61xx, OCE31x5, Canon 150, CPS700900)’ on page 360
Chapter 7 - Configuration
355
'IPDS Driver' (AFP2IPDS Backend)
'IPDS Driver' (AFP2IPDS Backend)
Introduction
The AFP2IPDS backend, also called SPS (Smart Print Subsystem), receives data in line
data or structured field format. It composes data for printing according to the parameters
defined for the job. (Parameter description see ...). This backend is especially designed
to support the enhanced functionality of the Océ high volume printers, which is partially
outside the scope of "standard" IPDS.
The basic functions of the backend are:
■
■
■
■
■
Together with print resources data is converted to the printer-specific IPDS format.
Print resources can be embedded in print data; if not, they are retrieved from one or
more external resource libraries. (Resource handling see ...)
The backend also determines the alignment of the print pages on the physical medium:
depending on how parameters are set, two consecutive or identical pages can be
printed side by side, for instance, and printing can be on either one or both sides of
the medium. If specified in the print parameters, the backend also inserts information
pages (header, separator, message and trailer pages).
The backend reacts directly and efficiently to problems that occur during execution
of print jobs.
It detects and distinguishes device, data and user errors and reports them.
Note:
For details concerning the print parameters see Océ PRISMAproduction Server Technical
Reference Guide, chapter 'Print Parameter'.
AFP2IPDS Output Backend and Océ PRISMAproduction Server Server
The mission of the AFP2IPDS backend in the server context is to enable the implementation of an AFP2IPDS capable output management system.
The AFP2IPDS backend is running under the control of the Océ PRISMAproduction
Server Output Distribution System (ODS). It is fully integrated in the Océ
PRISMAproduction Server Server workflow. Océ proprietary interfaces are used to allocate
the jobs and access the print data which is stored in the Océ PRISMAproduction Server
spool. Different types of printer attachments are supported (SCSI, TCP/IP, /370 channel).
Multiple instances of the AFP2IPDS backend may be running in parallel. The number
of them is only restricted by the resource limitations of the system.
356
Chapter 7 - Configuration
'Linedata Printer Driver' (LCDS)
'Linedata Printer Driver' (LCDS)
Introduction
The license LCDS_Driver 4.0 is required to use this driver. With this package you can
receive LCDS line data jobs (typically from an IBM host via TCP/IP download) and pass
them through to a Xerox DocuPrint (via TCP/IP or /370 channel).
Note:
For details concerning the print parameters see Océ PRISMAproduction Server Technical
Reference Guide, chapter 'Print Parameter'.
Functionality
The functionality is similar to IBM's "Job Entry System":
■
■
■
■
insert an FCB record,
prepend 2 header and append 2 trailer banner pages,
convert any type of carriage controls (ANSI, IBM3211, NONE) into IBM3211,
drive the physical printer.
(No ifilter, xfilter, AFP, IPDS is involved in this.)
Printer Configuration
Open ’Configuration’ -> ’Printer’ and create a new printer with the ’Xrx LCDS Driver’.
When you choose ’DocuPrint’ as the printer name, you will have the advantage to run
the demo-job (see below) and MVS-download-jobs without any modification of a jobticket.
After clicking ’Save’, the ’Data Format’ XEROX LCDS will be predefined in the general
printer settings.
Complete the configuration by setting the /370 channel parameters:
■
■
’/370 channel unit’ must match the hardware equipment of your Linux server
’/370 address’ must match the /370 address of your Xerox destination printer
or by setting the TCP/IP parameters, respectively:
■
■
’IP-Address’ must match the IP-address of your Xerox destination printer
’Port’ must match the port number where your Xerox printer listens
Like in most other printer types the Print parameter "DUMMYDEV" is supported:
Chapter 7 - Configuration
357
'Linedata Printer Driver' (LCDS)
■
■
DUMMYDEV 0 = sends output to the physical printer
DUMMYDEV 1 = discards output, which may be useful for testing
FCB configuration
You can configure this item with an own applet, which you select from the Explorer tree.
Testing with the Demo-Job
After having configured an LCDS-Printer and before receiving MVS-Download jobs, we
recommend to print the demo job. This demo job contains 4 pages of EBCDIC-coded
data with ANSI carriage controls. The jesfilter will add an FCB ("FCB1"), add 2 header
banner pages, convert ANSI to IBM3211 carriage controls, and add 2 trailer banner pages
before submitting the job to the spool:
■
■
■
■
Open the PJM with an LCDS job ticket. Open the job ticket '/u/prismapro/demo/jes/jesdemo.TIC'.
Under ’Printer’ select the LCDS printer you created before in the printer configuration.
Activate ’Print’ and ’Header/Trailer’ in the ’Job Attributes’ section of the PJM.
Finally submit the job with the ’Submit’ button.
Job-Queue
LCDS_Driver-Jobs appear in the Job-List with ’Type’=’LCDS". This assures that the
spool will direct LCDS-jobs to an LCDS-printer, and not to an AFP-printer. Other jobs
usually appear here with ’Type’=’AFP’ (including ordinary standard LCDS-jobs converted
by the xfilter).
Restrictions:
■
■
■
■
358
Page number (see column "Pages" in the job list) is not known exactly. This is because
Océ PRISMAproduction Server cannot know the page structure, as the break-down
of the job into pages would require JSL-information (VFU, PDE, ...) which is available
on the Xerox-destination-printer only. Therefore a simple-minded page-counting has
been implemented: Each advance across channel-1 is counted as one page.
Printing page ranges (see column "Print range") is not supported (same reason as
above).
Check-pointing is supported, but the only check point is at job begin (same reason as
above).
Accounting records are written. But the accounted page-numbers have the same restriction as mentioned above.
Chapter 7 - Configuration
'Linedata Printer Driver' (LCDS)
Printers configured as "XEROX LCDS Printers" appear in the printer pool. You can
operate (activate, deactivate, reset, interrupt, assign to job classes) them in the usual way.
Successful operation of LCDS jobs will produce messages in the messages window.
Download Configuration
■
■
■
Open the "Download Configuration" and create a new Download port.
Enter the port number which matches the TCP/IP-printer in MVS.
Click ’OK’. Then you have to change the following setting:
- Set "DefaultTicket" to ".LCDS_Driver.TIC" (note the leading dot)
This job ticket sets the job type to "LCDS", switches banner generation on and selects
the printer "DocuPrint".
Without these settings the JES-filter will probably complain because of nonsense record
lengths.
Restriction:
■
LCDS-Driver tickets are not yet fully supported by the PJM-GUI. Currently the GUI
doesn't enforce selecting a printer of type "LCDS Driver", and it displays many parameters (like JDE/JDL, LCDS-preprocessing) although these are meaningless in the
LCDS-Driver.
Do not save the template ticket '/u/prismapro/cfg/jobinput/ticket/.LCDS_Driver.TIC'
with the PJM-GUI. If you want to edit such a ticket, you should better use a text editor.
On MVS-host side you will need:
■
■
a properly configured TCP/IP-printer (with the IP-Address of your Linux-server and
port number of your download daemon)
some print-jobs (with ANSI, IBM3211, or without carriage controls)
Chapter 7 - Configuration
359
PostScript Backends (Xerox 6180, VP2110, VP61xx, OCE31x5, Canon 150, CPS700-900)
PostScript Backends (Xerox 6180, VP2110, VP61xx, OCE31x5,
Canon 150, CPS700-900)
Introduction
The purpose of the PostScript Backends is as follows:
■
■
■
■
Printing of a given PostScript file.
Conversion of a POD file into PostScript. Number or media based tray selection will
be translated to PostScript accordingly.
Accounting records will be written for the media transferred.
Some backends (VP2110, Xerox 6180, CPS900) are able to monitor the print process.
The printers can be driven by two input data streams:
■
■
By PostScript prepared for the printers: These files have to be spooled in using the so
called PJM RAW format.
By POD-AFP. In this case the backend converts the POD-AFP into PostScript. All
parameters of the Professional Document Composer are preserved and transferred to
PostScript.
Note:
For details concerning the print parameters see Océ PRISMAproduction Server Technical
Reference Guide, chapter 'Print Parameter'.
Configuration of the Backends
The backend is ready-to-print after setting up the IP-address of the printer and the name
of remote queue on the ’General’ tab in the ’Printer-Configuration’.
■
■
■
360
Océ PostScript printer (not CPS):
Here the queue will not be analyzed. By default LP is set as queue.
Xerox DocuTech:
The queue will be analyzed. You have to define a new print queue on the Xerox DocuTech or you have to set an existing queue and to activate this queu on the printer.
The insert the name of this queue in the general backend parameters. Otherwise the
printing will be aborted with an LP error.
CPSxxx:
The queue will be analyzed. Each queue has its own properties. By default the queues
"print" and "hold" exist. They almost correspond to the settings of the so called
mailbox.
Chapter 7 - Configuration
PostScript Backends (Xerox 6180, VP2110, VP61xx, OCE31x5, Canon 150, CPS700-900)
Queue print: A job which is sent to this queue will be printed immediately. In this
case ’printed’ means that the job has been ripped and sent to the CPS by the EFI
controller. The EFI controller then reports, that the job has been printed.
Queue hold: In this case the job remains in the EFI controller and has to be activated
separately.
Note:
For details concerning the print parameters see Océ PRISMAproduction Server Technical
Reference Guide.
Chapter 7 - Configuration
361
Printer Configuration: Custom specific Infopages and Resources for Configured Printers
Printer Configuration: Custom specific Infopages and Resources for Configured Printers
Introduction
The systems creates automatically new runtime printer directories, which contain printer
specific files, for example resources for infopages. This is done when a new printer is
configured AND always on startup of the system. During this procedure, the content of
old printer runtime directories is deleted, if they exist.
The runtime printer directories are build and filled in 5 steps:
1. Every configured printer leads to a sub-directory in '/u/prismapro/cfg/printers/' where the
2.
3.
4.
5.
name of the subdirectory is the name of the printer.
Exception: Names, starting with a dot "." are not valid printer names and are not printer directories.
The content of a template directory in '/u/prismapro/cfg/printers/.system/XXX.YYY' is copied
into the created directory.
The same procedure is repeated for the directory 'u/prismapro/cfg/printers/.custom/XXX.YYY',
but only if it exists.
At last the contents of the directory '/u/prismapro/cfg/printers/.custom/ PRTNAME' is copied
into the new printer directory too (only if the directory exists).
At last the content of the directory '/u/prismapro/cfg/printers/PRTNAME' is also copied into
the new printer directory (this directory always exists). This directory is useful for the customer
to store infopages-resources for special printers.
Description of XXX , YYY and PRTNAME
"XXX" is the internal name of the general backend type, for example "afp" for AFP2IPDSBackend:
#
XXX
Backend
afp
IPDS-Backend
gen
Generic Backend
ops
PostScript Backend
pjl
PJL/PCL Backend
xdp
LCDS Backend (Linedata Printer Driver)
xdt
LCDS Backend (Linedata Printer Driver)
"YYY" represents the supported resolutions:
362
Chapter 7 - Configuration
Printer Configuration: Custom specific Infopages and Resources for Configured Printers
#
YYY
Resolution
144
144 dpi
240
240 dpi
300
300 dpi
600
600 dpi and MRM-Printer
"PRTNAME" has to be the name of the created printer.
Chapter 7 - Configuration
363
Printer Configuration: 'Job Queues'
Printer Configuration: 'Job Queues'
Introduction
A printer can print jobs from different job queues. All job queues are configured with
the 'Job Queues Configuration' tool (see: ‘'Job Queues Configuration'’ on page 375
On this tab the administrator has to specify, which of the configured job queues 1-999
should be allowed to be used by the printer. In further processing, the operator will be
able to select only the allowed queues for the printer in the 'Printer Pool' window.
Illustration
'Job Queues' Tab
The list shows all available job queues in the system. To allow or forbid the usage of a
certain queue for the displayed printer, the checkbox in the first column has to be
(de)selected.
Use the tool bar icons to select: or deselect: all entries in the list.
If the check box 'Auto Selection' is activated, all entries in the list will be selected automatically.
If you click the icon: a window is opened which allows you to add or to configure job
queues. The functions in this window are the same as described in: ‘'Job Queues Configuration'’ on page 375.
364
Chapter 7 - Configuration
Printer Configuration: 'Cluster'
Printer Configuration: 'Cluster'
Introduction
The system offers a possibility to build printer cluster, which consist of more than one
logical printer. The same logical printer can also be a member of more than one cluster.
Clusters are configured with the ‘'Cluster' Configuration’ on page 276 tool. They appear
as "virtual" printers in Océ PRISMAproduction Server environment.
On this tab the administrator assigns selected printers to one cluster or more than one
cluster.
Illustration
The list shows all available printer clusters configured in the system. The clusters can be
defined in the Océ PRISMAproduction Server Explorer under ’Configuration’ -> 'Cluster'.
To add or remove the membership of the current printer to a cluster, the checkbox in
the first column has to be (de)selected.
Note:
There is no check, if the printers in a cluster are compatible with each other. The administrator is responsible for building reasonable clusters. The PJM addresses a cluster like
a single logical printer. Most of the attributes of the first logical printer in the cluster
will be used for the whole cluster (= virtual printer)
Chapter 7 - Configuration
365
Printer Configuration: Toner Stations
Printer Configuration: Toner Stations
Introduction
If a printer is able to print multicolor jobs, it's required to configure the available toners
for the printer. The toners are configured with the ‘'Consumables' Configuration’ on page
322 application. In this tab the administrator has to specify, which of the available printer
colors are usable for the current printer. This does not mean, that all of the toner stations
are built in at the same time.
Illustration
Toner Stations Table
The table shows all user defined toners in the system including all toner colors which can
be delivered at the moment by Océ. To allow or forbid the usage of a certain color for
the displayed printer, the check box in the ’Available for Printer’ column has to be
(un)checked.
The toner colors which are checked are then selectable in the PJM 'Job Attributes' ->
'Print' dialog under 'Color Selection'.
See also: ‘Workflow 'Color Selection'’ on page 578.
366
Chapter 7 - Configuration
Printer Configuration: 'Input Devices'
Printer Configuration: 'Input Devices'
Introduction
On this tab the name and number of input devices is configured for current printer.
Devicecs can be added or deleted.
Illustration
Note:
Even a continuous feed printer has at least one "input tray" for continuous feed paper.
Chapter 7 - Configuration
367
Printer Configuration: 'Output Devices'
Printer Configuration: 'Output Devices'
Introduction
On this tab the number of output trays is configured for current printer.
From a list you can select the type of postprocessing device you want to use with the
output tray.
Illustration
Note:
Even a continuous feed printer has at least one "output tray" for continuous feed paper.
368
Chapter 7 - Configuration
Printer Configuration: 'Printer Notification'
Printer Configuration: 'Printer Notification'
Introduction
This combobox offers only files (scripts or programs), which are stored in the path
'/u/prismapro/bin/ani/' and it's subdirectories. All programs, which names start with an
dot ("."), are ignored.
The command must be specified for each printer separately. Different commands can be
used.
The command is executed at every change of the printer status and always only on the
master server.
The specified program gets a file as the fist command line parameter, which contains
some information on the job. This file must be deleted by the program after it finished
processing the information. This is always a unique name in the whole file system.
Directory for the temporary files:'/u/prismapro/data/ani/...'
Illustration
Explanation of the parameters in the temporary file:
#
PRINTER
The name of the printer.
STATUS
The new status of the printer:
INACTIVE = Printer is inactive.
NOTREADY = Printer is not ready.
MESSAGE = Printer waits on an operator reply.
HALTED = Printer is Halted after job interruption.
WAITING = Printer waits on a multihost network printer.
PRINTING = Printer prints.
IDLE = Printer waits for a print job.
STARTING = Printer is starting.
DRAINING = Printer is draining.
LICENSE = Printer waits on a free print speed license.
Chapter 7 - Configuration
369
Printer Configuration: 'Gray Curves'
Printer Configuration: 'Gray Curves'
Introduction
Note:
This function is only visible/usable if a valid Unity_RIPR license is installed.
Definition
This function was originally designed for conventional printing processes and basically
helps to optimize physically different printing units for a consistent print image. This
applies basically also to digital printers. The same datastream may have different results
on different digital printers. These differences are especially apparent with gradients and
raster images containing different gray or color gradients.
Therefore the printer transfer curve has been implemented to enhance the result oft the
RIP process for every printer individually.
If you are converting and printing PS or PDF files, you can modify the gray curves using
the slide buttons on this tab. This enables printer-specific corrections to be made to the
gray values. If this parameter is not set, grays that are adapted to the Océ printing systems
are used instead of the default grays of the UnityRIP.
It is possible to make corrections to gray values which are read from a file. The correction
file contains 21 values, with one value per line. Values can be between 0 and 100000.
The value 100000 corresponds to a PostScript gray of 1.0, i.e. an intensity of 100% (the
lightest value). The 21 values begin with a substitute for 0% gray and end with the 21st
value for 100% gray. In a file of 21 values, the increment between the gray values on each
line is 5%.
When printing digitally these variations in the printer hardware do not have such a big
effect. However you can use this function to modify documents with problematic
brightness and/or contrast in the images.
370
Chapter 7 - Configuration
Printer Configuration: 'Gray Curves'
Illustration
Use of the Function
The sliders of the dialog (see above) represent a mathematical curve, which leads in its
default position almost linear from the bottom left corner to the top right corner of the
window. This results in a linear - therefore even - conversion of the input gray values to
the output unit. The drawing below illustrates the connections between in- and output.
The axis (left) represents the gray shades the output unit (in this case the printer) is capable
of. The horizontal axis (bottom) represents the gray shades of the input unit (here PS or
PDF).
The transfer curve now behaves like a axis of reflection, with which from the gray values
of the bottom axis the values of the left axis are calculated. If the course of the curve gets
more flat, the range and the position of the gray values of the left axis will be shifted
down. This has the effect that in the output data stream not the whole spectrum of possible gray values is supported and the resulting images will be darker with less contrast.
Shifting the whole curve up results in an evenly brighter image, shifting the whole curve
down darkens the image. To specifically change critical areas of an image like dark shadows
and bright lights, it is sufficient to move the dots of the respective areas. To avoid rough
Chapter 7 - Configuration
371
Printer Configuration: 'Gray Curves'
changes and gaps in the gradient, the curve is usually shaped as an ’S’ or a bow with
smooth transitions.
Examples:
#
High contrast: The difference between bright and dark are very distinct.
#
Low contrast: The difference between bright and dark are not so distinct, the image
seems to be a bit ’flat’.
#
Brighter in the middle.
372
Chapter 7 - Configuration
Printer Configuration: 'Gray Curves'
#
Darker in the middle.
#
Such a curve turns every positive pattern into a negative.
#
The ’normal’ image: The gray shades are converted 1:1.
If you are converting and printing PS or PDF files, you can modify the gray curves using
the slide buttons on this tab. This enables printer-specific corrections to be made to the
gray values. If this parameter is not set, grays that are adapted to the Océ printing systems
are used instead of the default grays of the UnityRIP.
It is possible to make corrections to gray values which are read from a file. The correction
file contains 21 values, with one value per line. Values can be between 0 and 100000.
The value 100000 corresponds to a PostScript gray of 1.0, i.e. an intensity of 100% (the
lightest value). The 21 values begin with a substitute for 0% gray and end with the 21st
value for 100% gray. In a file of 21 values, the increment between the gray values on each
line is 5%.
Click this button: to save your settings on this master in the Océ PRISMAproduction
Server database. This allows you to apply these settings to other printers by selecting the
Chapter 7 - Configuration
373
Printer Configuration: 'Gray Curves'
respective entry from drop down list next to the icons. You are asked to enter a name for
the greyscale setting before it is saved.
To delete the settings again, click the delete button: . If you select ’Default’, you can
always reload the default settings.
It is up to the proficiency and the experience of the user, to find matching values for his
task. Sometimes several tests have to be performed, to achieve acceptable results.
Note:
This procedure can only be applied to documents with a color depth of more than 1 bit
(images and graphics with more than one gray shade). Because UnityRIP transforms the
gray values based on the list of values you have created, you can use this function only
with this converter. TIFFs (or bitmaps) which have been created by the DocSetter and
have been saved as PDF, are simulating gray shades already with a raster. They only have
a color depth of 1 bit (black and white). Such documents cannot be changed anymore
using the transfer curve, because the gray shades have already been transformed to raster
dots.
374
Chapter 7 - Configuration
'Job Queues Configuration'
'Job Queues'
'Job Queues Configuration'
Introduction
Select ’Configuration’ -> 'Job Queues' to configure the job queues to be used in this Océ
PRISMAproduction Server network. You can also use this configuration interface to assign
the job queues to the printers.
Illustration
Column Titles
#
Column
Description
'Number'
This is the number with which the job class is identified in
other interfaces. The job class must be a number between 1 and
999.
'Description'
The description is a text of your choice that briefly profiles the
class, for example “Print in the night”.
'Lock jobs after
printing'
When this column is enabled, a job in this class will remain in
the list of active jobs until it is explicitly deleted. It receives the
status 'finished-locked'. This function can be used for testprinting – the results can be checked before the full run is
printed.
If 'Lock jobs after printing' (=Hold) is active for a job queue,
this will be displayed in the PJM job properties dialog and in
the filter dialog.
Chapter 7 - Configuration
375
'Job Queues Configuration'
'Jobqueue' Menu and Tool Bar
#
376
Menu Entry / Icon
Description
'Add new Queue'
Adds a new job queue to the list. The default queue name will
be ’Job Queue (serial number)’. Modify name and description
by double clicking the corresponding fields.
If you click the small arrow next to this icon, a pop up menu
appears with the following options:
'New Queue':
See above.
'Insert Queue Areas ...':
Opens a dialog where you can specify a range of job queues to
be added to the list. Ranges between 1 and 999 are possible.
You can also define a description for the queues to be added.
If you define #, ## or ###, these characters will be replaced by
numbers (for example #=7, ##=07 and ###=007).
'Map MVS Queues ...':
Opens a dialog where you can map queues, which have been
defined on an MVS host system. 'Base-Number:' Default is
100, i.e. the first number of the MVS queue inserted is 100.
The base number range is from 01-950. You can also define a
description for the queues to be added. ’MVS #’ is the recommendation. In this case ’#’ is replaced with the MVS names AZ and 0-9.
Example: ’MVS #’ generates ’MVS A’, ’MVS B’, ...’MVS Z’,
’MVS 1’, ...’MVS 9’
'Add Copy of a
Queue'
Adds a copy of the marked queue entry..
'Save Queue Configuration'
Saves the current configuration in the database.
'Delete Entries'
Either delete the selected queue or all queues from the list.
'Add Queues to
Printers'
Opens a dialog where you can assign the selected queue(s) to
the printers configured in the system.
'Import Queues'
Opens a file selection dialog to import saved job queues. You
can select to export from the V2.x or V3.x format.
Chapter 7 - Configuration
'Job Queues Configuration'
Menu Entry / Icon
Description
'Export Queues'
Opens a file selection dialog to export the current job queues
list. You can select to export in the V2.xx or V3.xx format.
'Reload configuration'
Reloads the actual status of the data stored in the database. Any
changes that you have made via the interface are discarded if
you do not save them prior to executing this function.
Chapter 7 - Configuration
377
'FCB' Configuration
'FCB'
'FCB' Configuration
Forms Control Buffer
In the configuration list you can open the FCB (Forms Control Buffers) configuration
applet. With this applet you can view and edit the FCB files installed in the
'/u/prismapro/cfg/fcb/' directory. You can create FCB's, delete FCB's, change their
channel assignments, or change their number of lines.
Per installation these FCB's are identical in name and contents to the standard FCB's
defined by IBM. So you will probably never edit these FCB's.
Note:
After installation it is a good idea to transfer all the system FCB files from the IBM host
(stored in 'SYS1.IMAGELIB') to the Océ PRISMAproduction Server master (directory
'/u/prismapro/cfg/fcb/').
Restrictions:
■
■
378
Editing FCB files on slave servers is not supported.
Viewing/editing the horizontal shift defined in the FCB is not supported.
Chapter 7 - Configuration
Overview of LCDS-Module Processes
'LCDS Jobs'
Overview of LCDS-Module Processes
Introduction
The LCDS-Module includes a set of programs running under LINUX as different processes to convert and prepare original XEROX applications and resources for printing on
Océ printers and on standard IPDS printers.
The processes can be concatenated, resulting in a process chain of one or more process
sections.
The LCDS-Module has a fixed directory structure. This is shown below:
Note:
<catalog> is the name of the active customer catalog. The default is DEFAULT.
Process Overview
#
Directory
Contents
/u/prismapro/bin
Modules (e.g. xfilter, xdl, ...)
/u/prismapro/bin
Catest, spool
/u/prismapro/cfg/lcds
Configuration files
/u/prismapro/lib/uimng/jcf
Job control files
/u/prismapro/data/cat/<catalog>/frm
Input forms (Xerox format)
/u/prismapro/data/cat/<catalog>/frm_conv
Converted forms
/u/prismapro/data/cat/<catalog>/fnt
Input fonts (Xerox format)
/u/prismapro/data/cat/<catalog>/fnt_conv
Converted fonts
/u/prismapro/data/cat/<catalog>/img
Input images (Xerox format)
/u/prismapro/data/cat/<catalog>/img_conv
Converted images
/u/prismapro/data/cat/<catalog>/lgo
Input logos (Xerox format)
/u/prismapro/data/cat/<catalog>/lgo_conv
Converted logos
/u/prismapro/data/<catalog>/jsl
Input JSL (ASCII format)
/u/prismapro/data/<catalog>/xrx
Input data set (I - Filter)
Chapter 7 - Configuration
379
Overview of LCDS-Module Processes
Directory
Contents
/u/prismapro/data/<catalog>/rds
Converted resources
/u/prismapro/data/<catalog>/priv
Temporary converted resources
(X-Filter)
/u/prismapro/data/<catalog>/priv
Converted resources (temporary
inline graphics)
/u/prismapro/data/<catalog>/tmp
Interface files: X-Filter -> Spool
+ Accounting and intermediate
pds output files for NTO1 processing.
Input Filter
All input processing is handled by the Ifilter. It receives data from tape, cartridge, floppy
and hard disk and imports it into the LCDS-Module internal format. All read data and
resources are stored in the directory '/u/prismapro/data/cat/<catalog>'.
The print data stream is handed over to xfilter via "named pipe" without being written
to disk due to performance reasons.
XRC
The XRC takes Xerox print resources of the types FNT, IMG, LGO, FRM as input and
converts them to the LCDS-Module internal resource format in the directory
'/u/prismapro/data/cat/<catalog>/rds'.
XDL Compiler
The XDL Compiler compiles JSL files and stores the results in the LCDS-Module internal
format. The compiled information is later used by Input Filter and X-Filter for processing
print data.
X-Filter
The X-Filter processes the print data stream and creates output which can be printed on
the Océ printers and on standard IPDS printers.
Document interleaved graphics (if the job contains any) are temporarily stored in
'/u/prismapro/data/cat/<catalog>/priv'.
Inline resources with PURGE are stored in 'u/prismapro/data/cat/<catalog>/priv'.
380
Chapter 7 - Configuration
Overview of LCDS-Module Processes
Spool Job
This module generates the print job entry in the OPS PRISMA spool. It accepts input
from the X-Filter and from the Sample.
Sample
The Sample is a utility to create sample printouts of resources such as fonts, images, logos
or forms.
Chapter 7 - Configuration
381
LCDS Parameter Configuration: Job Control Files (JCF)
LCDS Parameter Configuration: Job Control Files (JCF)
Introduction
Each data type of the LCDS PJM ticket and each LCDS Explorer application has variable
parameter fields, which are filled in by the user. In the background a JCF (Job Control
File) belongs to each window. These JCFs are located in the directory
'/u/prismapro/lib/uimng/jcf'. When a process is started (for example 'Copy'), all selected
parameters, like Input Device or filename, are written in a temporary Copy.JCF, which
is handed over to the appropriate program(s) (for example 'Ifilter' and 'XRC') for further
processing. After these processes have been ended, this temporary Copy.JCF is deleted,
but the original is still existing.
In the following table you can see the combination of an application, data type or window
and the JCF.
JCF Overview
#
Applet / Action
JCF Name
LCDS Resouces and PJM Format Resource / Copy
Copy.JCF
PJM Format JSL / Compile
Compile.JCF
PJM Format Resource / Convert
Copy.JCF
LCDS Resources / all actions
LCDSResources.JCF
PJM Format LCDS Data / PrintLCDS
PrintLCDS.JCF
PJM Format Sample / Sample
Sample.JCF
LCDS Resources Import
XResImport.JCF
LCDS Resources Export
XResExport.JCF
Note:
Some of JCFs can be edited by the UI (see ‘LCDS Parameter Configuration: 'LCDS Jobs'
Window’ on page 385), others not. In most of the cases it is not necessary to change these
parameters.
For a description of the parameters see ‘LCDS Parameter Configuration: Description of
the JCF Parameters’ on page 387.
382
Chapter 7 - Configuration
LCDS Parameter Configuration: Job Control Files (JCF)
Layout of the Job Control File
The Job Control File (JCF) contains all job-specific parameters. It is created by the print
service. When the job is started, it’s name is transferred to the appropriate programs as a
parameter. The information is read by all processes involved.
The file is divided into sections, each destined for a specific process. These sections are
marked by the lines 'Begin-<id>' and 'End-<id>'. When the file is generated, the name
and the section description are communicated to each process: for example, the input
filter is started with 'ifilter jobfile01 I-Filter'. Thus, the process identifies its section in
the file 'jobfile01' by looking for the line 'Begin-I-Filter' (for example).
The sequence of the sections is arbitrary, as they are selected according to keywords and
not according to the sequence. In addition to the header section, each process has to have
its own section.
Keywords and parameters are case-sensitive, for example the name 'Subcat' is NOT
identical with 'SUBCAT' or 'SubCat' or similar combinations.
At the moment, a legible text file is used as the Job Control File. It can therefore be
edited with standard editors. In the event that a different file format is used in future, the
necessary tools for working on this new format will be supplied.
Note:
Only the system administrator should be allowed to edit the JCF (for example to set
trace levels). Parameters changed incorrectly can cause critical system problems!
A JCF has the following general layout
#
Header information (delimited by Begin-Header / End-Header) which contains
global, process-wide assignments.
Section information (delimited by Begin-<section> / End-<section>) which consists
of the following three parts:
1.
General assignments, specific for the defined process. This part is
optional.
2.
ComInfo information (delimited by Begin-ComInfo / End-ComInfo) which defines the communication-interface and serves as constancy verification in the LCDS-Module.
3.
One or more subsections (delimited by Begin-<subsection> / End<subsection>) which define the sub-process task and the control
data for this sub-process.
Chapter 7 - Configuration
383
LCDS Parameter Configuration: Job Control Files (JCF)
Sections of the Job Control File
Header
The header section is mandatory for each Job Control File. It contains parameters of
general validity as well as the setup of the process chain (i.e. names and sequences of the
dynamic processes). The information in the header can be read by all processes.
Input Filter
■
■
■
■
ComInfo: This section contains information on each process for the internal GCI
communication interface and is mandatory for each process. The only parameters
which may be changed control the ”GCI-user-trace”, i.e. the communication interface
trace.
Device: This section contains information on the data source of the input filter which,
as a single process, reads directly from a device (tape drive, floppy drive, ...). All other
processes obtain their input data via the GCI (see also ‘LCDS –Module Online Configuration’).
Subcatinfo: In this section, you define all subcat types used by the input filter, together
with the maximum number of members that may be open at one time. In version 3.0,
this number is always 1. The subcat types JOB and XPAR always have to be stated,
the others only if required. If resources are converted (without type definitions), for
example, FNT, LGO, IMG and FRM have to be stated. No parameters may be
changed in this section.
Action: The action section contains parameters for a specific action of the input filter.
A Job Control File may contain several action sections. The actions are processed sequentially by the input filter.
Resource Converter (XRC)
Sample
SpoolJob
XDL Compiler
X-Filter
384
Chapter 7 - Configuration
LCDS Parameter Configuration: 'LCDS Jobs' Window
LCDS Parameter Configuration: 'LCDS Jobs' Window
Introduction
You can use 'LCDS Jobs' to configure all the application-dependent parameters of the
JCFs for the LCDS-Module much more easily than with a simple editor (for a detailed
description of JCF see the chapter before). Parameters which have to be modified by
editing the JCF manually are also described in this chapter.
Open the 'LCDS Jobs' application by clicking ‘Configuration’ and selecting 'LCDS Jobs'
in the Océ PRISMAproduction Server tree view.
Note:
All buttons or commands which are grayed out (dimmed) and are not mouse or key
sensitive cannot be activated, either because the user has no right of access or because
the function concerned cannot be executed at this point.
Illustration
The 'LCDS Jobs' Table
The functions of all tool bar icons are also accessible via the 'Parameters' menu.
Chapter 7 - Configuration
385
LCDS Parameter Configuration: 'LCDS Jobs' Window
#
Tool Bar Icons and
Entries
Description
'Select a server'
Select a server in the ODS network on which the JCF you want
to modify is located.
'Select a job'
'LCDS Jobs' allows you to view and change the application
parameters for six different jobs (see image on the left). At any
given time, the parameters shown are those for the current application selected.
'Apply JCF
changes'
Save the current parameter settings for the currently displayed
server and JCF.
'Discard JCF
changes'
Reloads the parameter settings from the currently selected
server and JCF. All modifications performed before are discarded.
'Reset all parameters to default values'
Sets all parameters for the currently displayed server back to
their default values. All modifications performed before are
discarded.
'Reset selected parameter to default
value'
Sets the selected parameter for the currently displayed server
back to its default value. All modifications performed for this
parameter are discarded.
Parameter Table
Double click a value of a parameter which you want to modify. Either a drop down list
opens, which allows you to select the desired value, or the value column becomes editable
for you to type in a new value (sometimes hex format).
The help text, which is displayed in the lower area of the window as soon as a parameter
is selected, explains the function of the parameter and its values.
See also: ‘LCDS Parameter Configuration: Description of the JCF Parameters’ on page 387.
386
Chapter 7 - Configuration
LCDS Parameter Configuration: Description of the JCF Parameters
LCDS Parameter Configuration: Description of the JCF Parameters
Introduction
The following tables describe the JCF parameters for the different LCDS Jobs.
See also: ‘LCDS Parameter Configuration: 'LCDS Jobs' Window’ on page 385.
Compile Parameters
#
XDL Compiler Section
CaseMode
Specifies, whether the XDL allows lower case characters in the
JSL.
STD lower case is not allowed (Default).
LOWER lower case is allowed
LineMode
Specifies the number of columns per line.
STD up to 72 columns (Default).
LONG up to 256 columns
Mode
For use with the STOCKSET, FEED and STOCKS commands
in the OUTPUT statement, as well as the FEED and STOCKS
DJDE.
XEROX/FanFold: Accepts and ignores all syntactically correct
FEED and STOCKS(ET) statements, FEED=AUX and Conditional Processing RAUX and RFEED, but uses input tray 1
(for example: fanfold input media) only.
LCDS/CutSheet: Accepts and processes FEED and
STOCKS(ET) statement (Default).
TraceFlags/
Com-Info
Contains the trace flags for better differentiation of the traces
in the compile process. Compile specific GCI communication
interface trace flags.
(Default=FF00000000000000). Parameter is mandatory.
TraceLevel/
Com-Info
Defines the trace level for the GCI communication interface
during the compile application. The next higher level always
includes all lower levels. Parameter is mandatory.
0 no trace information (Default)
1 system trace information
2 minimal trace information
3 medium trace information
4 maximum trace information
Chapter 7 - Configuration
387
LCDS Parameter Configuration: Description of the JCF Parameters
Copy Parameters
#
I-Filter Section
I-Filter_TraceFlags
Contains the trace flags for better differentiation of the traces
in the input filter. The trace flags should always be set to
FFFFFFF8. Only for data tracing at the highest level (trace
level 4) the trace flags must be changed to FFFFFFFF. Warning:
data tracing will produce huge data trace files which take up
hard disk space!
Trace parameters are optional. When they are used, they should
be positioned at the beginning of the section.
I-Filter specific trace flags (Default=FFFFFFF8)
I-Filter_TraceLevel
Defines the trace level for the I-Filter component. The next
higher level always includes all lower levels. Parameter is optional.
0 no trace information (Default)
1 system trace information
2 minimal trace information
3 medium trace information
4 maximum trace information
I-Filter_DeleteInput
Defines, for the Hard Disk input case, if imported files should
be deleted (usually from '/u/prismapro/data/resimport/lcds').
0 No Deletion (Default)
1 Delete Input File.
I-Filter_TraceFlags/ ComInfo
I-Filter specific GCI communication interface trace flags (Default=FF00000000000000).
Parameter is mandatory.
I-Filter_TraceLevel/ ComInfo
Defines the trace level for the GCI communication interface
during the I-Filter part of the copy application. The next higher
level always includes all lower levels. Parameter is mandatory.
0 no trace information (Default)
1 system trace information
2 minimal trace information
3 medium trace information
4 maximum trace information
Resource Converter (XRC) section
388
Chapter 7 - Configuration
LCDS Parameter Configuration: Description of the JCF Parameters
I-Filter Section
CustomTone
Specifies the Custom color support:
■ 0
Only Black / Highlight color values are used in the Datastream / Resouces (Default)
■ 1
Custom Color Support on. In data stream color ID's for he
requested color are used explicitly, rather than the highlight
color "brown". Printer has to be set respectively, using Color
Mapping Tables.
For Details see "Highlight Color Support".
Deletion_mode
Specifies how to deal with the input files after a successful
copy/conversion.
■ 0
Every converted input file (resource) will be copied into a
CONVERT-internal library and then deleted from the
COPY-internal library. This is the default. In the CONVERT-internal library all the input-files will be accumulated
for a later Convert-processing if desired.
■ 1
Every converted input file (resource) will be deleted from
the COPY-internal library
FrmAFPOut
Specifies how XEROX forms are converted in to AFP documents:
■ 0
Conversion FRM -> Overlay (*:FRM -> o1*) (Default)
■ 1
Conversion FRM -> Page Segment (*:FRM -> ix*)
■ 2
Conversion FRM -> Overlay + Page Segment (*:FRM ->
o1* + ix*)
Chapter 7 - Configuration
389
LCDS Parameter Configuration: Description of the JCF Parameters
I-Filter Section
390
FrmShadeColor
Specifies how colored shadings will be converted referring to
the color:
■ MIXED
Bicolored shading is converted to black or color depending
on color saturation. For example if there are more color
pixels than black pixels, the whole shading will be completely
in highlight color/CustomTone.
■ ALL_BLACK
All toned pixels, no matter if they are colored or black are
converted to black pixels.
■ ALL_COLOR
All toned pixels, no matter if they are colored or black are
converted to colored pixels.
■ RASTER ICT
■ Bicolor shading is converted into two layers (black and
HC/CustomTone).
FrmShadeModify
Specifies special processing for shading:
■ 0
no modification of shades (Default)
■ 1
close gaps between
■ 2
boxes with the same shade to avoid thin white lines
FrmShadePosition
Specifies the positioning shading:
■ 0
like FRM. (Default)
■ 1
absolute from 0/0 and adjust shade box borders
Chapter 7 - Configuration
LCDS Parameter Configuration: Description of the JCF Parameters
I-Filter Section
FrmShadeType
Specifies the type of shading applied:
■ 0
Xerox-like shades (coarse shades). Shades are taken from
FORMS$.FNT (Default)
■ 1
Special shades (fine shades) designed by OPS
■ 6
Ink color shades (RASTERICT). For bi-color shadings INKFONT Shading (representing ink catalogs) will be used as
fonts in the MCF structure of the created AFP file. This
option is interesting for applications having highlight color
and color shadings, which should be printed on HC-printer
with good=small registration abilities (like fpr example
VP92..). If this option is used, the respective Fonts (named
[T1|C0|X0][II|IB|IC]<hex-value-up-to-64><hex-value-upto-64> , for example “T1B2A13”) are automatically loaded
in the respective catalog. The hex values represent the color
and black percentages. IB Fonts are used in the ALL_BLACK
case, IC fonts are used in the ALL_COLOR case and II fonts
are used for RASTERICT case. For example font II0853
represents a font used for a mixed shading of approximately
8% color and 83% black. You can also use these fonts
manually . To use this option, please uncompress (gunzip)
and extract (tar xvf) the fonts collected in file
'/u/prismapro/data/cat/STANDARD/ink_shading_fonts.tgz'
in the rds subcat of this directory STANDARD and copy
the used fonts or all fonts in the rds subcat of the actually
used catalog.
Offset ScndRot
Specifies the maximum number of fonts for each rotation:
■ OFFS_SECND_64:
64 Fonts for each rotation (for exmaple for printing on Xerox
"IPDS").
■ OFFS_SECND_128:
128 Fonts for each rotation (standard IPDS). (Default)
Chapter 7 - Configuration
391
LCDS Parameter Configuration: Description of the JCF Parameters
I-Filter Section
Trc_level/XRC
Defines the trace level for the convert component. Permitted
values are 0, 1, 2, 3, 4. The next higher level always includes
all lower levels. Parameter is optional.
0 no trace information (Default)
1 system trace information
2 minimal trace information
3 medium trace information
4 maximum trace information
XRC_TraceFlags/
ComInfo
Convert specific GCI communication interface trace flags
(Default=FF00000000000000). Parameter is mandatory.
XRC_TraceLevel/
ComInfo
Defines the trace level for the GCI communication interface
during the convert application. The next higher level always
includes all lower levels. Parameter is mandatory.
0 no trace information (Default)
1 system trace information
2 minimal trace information
3 medium trace information
4 maximum trace information
PrintLCDS Parameters
#
I-Filter Traces Section
I-Filter_TraceFlags
(see ’Copy’ parameters)
I-Filter_TraceLevel
(see ’Copy’ parameters)
I-Filter_TraceFlags/ Com-Info
(see ’Copy’ parameters)
I-Filter_TraceLevel/ Com-Info
(see ’Copy’ parameters)
I-Filter Action Section (these two parameters are only processed if you print from
hard disk and if Host=BARRPC)
SkipBytes
To change the length of introducer change the ‘SkipBytes’ in
the ‘Harddisc’ part of the PrintLCDS.JCF (Default=0)
ByteOrder
The byte order of RECLEN can be changed here. (Default=BigEndian; may be LittleEndian)
I-Filter Device Section
392
Chapter 7 - Configuration
LCDS Parameter Configuration: Description of the JCF Parameters
I-Filter Traces Section
ChanAddress
Defines the channel address under which the printer emulator
is addressed by the host. Online Channel address in 0xFF Hex
Format (Default=0x3E)
ChanAddress1/2/3/4
Defines the channel address for the channel1 selection in PJM
LCDS $XDATA_DEVICE. Analogously ChanAddress2 to
ChanAddress4 address channel2 to channel4 for parameterisation of up to five different input channels for possible parallel
input
DeviceName
Online channel device. (Default= /dev/i370/chan0/cua)
ChanStartTime
Defines the time (in seconds) after which the input filter stops
waiting for the first data block in a session. Online Channel
start time must be >= 20 (Default=300)
ChanTimeout
Defines the time (in seconds) after which the input filter stops
waiting for data from the channel after the last data arrived.
Online Channel time-out must be >= 20
0=No time out (Default=60)
ChanChkPos
Defines the byte position for the length byte and enables /370
data checking if set to a value > (Default=0)
ChanBufSize
Specifies the channel buffer length. This can be used to slow
down I-Filter in connection with Online_Channel_device_delay. The delay is executed after a buffer of the specified size.
Smaller buffer mean more frequent delays. Value in bytes, Default=32000
ChanDEDelay
This parameter defines the delay in milliseconds between the
end of I-Filter processing a received ccw and the device end set
by the I-Filter. Setting a delay time > 0 may be useful, when
the channel operates in daisy chain mode and other network
traffic is running parallel.
ChanCondCode
Defines the status of the channel after channel close command.
ONLINE= Channel goes not ready.
OFFLINE= Channel goes offline (Default)
Chapter 7 - Configuration
393
LCDS Parameter Configuration: Description of the JCF Parameters
I-Filter Traces Section
ChanTimeoutAction
Defines what happens after ChanTimeout:
SEND_REND: Always sent end record: close report
CLOSE_CHAN (Default): Always close channel
DIALOG: Opens a dialog box:
■ ‘Finish current report’
■ ‘YES’ (like SEND_REND)
■ ‘NO’
■ ‘Close Channel’ (like CLOSE_CHAN)
DeleteInput
Defines whether the input file is to be deleted after processing.
0= input file will not be deleted (Default)
1= input file will be deleted
DeviceName1/2/3/4
Defines the channel device for the channel1 selection in PJM
LCDS $XDATA_DEVICE. Analogously DeviceName2 to
DeviceName4 address channel2 to channel4 for parameterisation of up to five different input channels for possible parallel
input
X-Filter Section
394
X-Filter section
Specifies whether the xrx input files should be deleted after
printing 0 Deletion mode for xrx input file off 1 Deletion mode
on (Default)
AlignScan
AlignDot
Specifies a basic shift of the print-data/images on a page. This
basic shift modifies the SHIFT-parameter in JSL.
AlignScan defines the shift in the direction of the long side of
a page, AlignDot defines the shift perpendicular to the long
side of a page, both for pages where the long side £ 14‘‘
AlignScan defines the shift in the direction of the short side of
a page, AlignDot defines the shift perpendicular to the short
side of a page, both for pages where the long side > 14‘‘
<shift-value>::= defines a shift in units of 1/300 inch
BFormNumOff
Specifies, if page numbers due to DJDE/JDE NUMBER should
be printed on BFORM pages or not.
0 Printed (Default=Normal Xerox Handling)
1 Switch Off printing.
CustomTone
(see ‘Copy Parameters’)
FrmAFPOut
(see ‘Copy Parameters’. The parameters in this section are valid
for Xerox inline resources via DJDE FILE)
FrmShadeColor
(see ‘Copy Parameters’)
Chapter 7 - Configuration
LCDS Parameter Configuration: Description of the JCF Parameters
I-Filter Traces Section
FrmShadeModify
(see ‘Copy Parameters’)
FrmShadeType
(see ‘Copy Parameters’)
InfoPagesFix
Defines which parameter is used to enable or disable the printing
of the SPS trailer page containing the account information.
There are three parameters which may be used to switch SPS
header and trailer pages on or off:
■ 1
The PJM parameter ‘Print Header/Trailer’
■ 2
The PrintLCDS.JCF parameter Infopages=YES/NO, if
LCDS print window is used
■ 3
The JSL ACCT USER=NONE/BIN parameter (in XEROX
case used to switch XEROX accounting page on or off, in
LCDS it may be used to switch SPS header/trailer pages on
or off, if used in start JDL/JDE)
■ NO:
SPS trailer pages with accounting information are printed
as stated in JSL ACCT USER command (DEFAULT) ?
Parameter 3.
■ YES:
SPS trailer pages with accounting information are printed
as stated in JCF or PJM parameter ? Parameters 1 and 2.
JobnameCfg (JOBNAME)
Defines, which information is to be transferred into the field
‘JOBNAME’ in the spool window. The format is: {type, offset,
length;}. Default=1,0,6;2,0,6;3,0,10;4,0,16;
(for details see chapter ‘Specific Notes’)
OffsetSecndRod
(see ‘Copy Parameters’)
OtextOff
0 default = Normal default behavior.
1 WAIT Option for OTEXT will be ignored
2 OTEXT will be completely ignored.
Chapter 7 - Configuration
395
LCDS Parameter Configuration: Description of the JCF Parameters
I-Filter Traces Section
SaveXRX
■
■
0
= default = handling-like-v3.02/4 = Downloaded resources
(DJDE FILE) are not stored in original xerox format.
1
= new = Downloaded resources (DJDE FILE) are actually
stored in original xerox format in subcat’s fnt_conv,
img_conv, frm_conv, lgo_conv, to be – eventually – reconverted with the convert option of the LCDS resource window.
XFilter_TraceLevel
Defines the trace level for the XFilter component. The next
higher level always includes all lower levels. Parameter is optional.
0 no trace information (Default)
1 system trace information
2 minimal trace information
3 medium trace information
4 maximum trace information
XFilter_TraceLevel/ Com-Info
Defines the trace level for the GCI communication interface
during the XFilter part of the print application. The next
higher level always includes all lower levels. Parameter is
mandatory.
0 no trace information (Default)
1 system trace information
2 minimal trace information
3 medium trace information
4 maximum trace information
XFilter_TraceFlags/ Com-Info
XFilter specific GCI communication interface trace flags. (Default=FF00000000000000).
Parameter is mandatory.
SpoolJob Section
SpoolJob_TraceFlags/ Com-Info
396
Chapter 7 - Configuration
StartSPS specific GCI communication interface trace flags.
(Default=FF00000000000000).
Parameter is mandatory.
LCDS Parameter Configuration: Description of the JCF Parameters
I-Filter Traces Section
SpoolJob_TraceLevel/ ComInfo
Defines the trace level for the GCI communication interface
during the StartSPS part of the print application. The next
higher level always includes all lower levels. Parameter is
mandatory.
0 no trace information (Default)
1 system trace information
2 minimal trace information
3 medium trace information
4 maximum trace information
PrintWhileSpooling
Enables/disables print while spooling
0 Disable, jobs get status ‘prepare’, status ’ready to print’ after
conversion is ready.
1 Enable (Default).
UpdFileDelete
Specifies the time SpoolJob deletes the accounting update files.
0 Never
1 After every read access (Default).
2 After the last read access.
WaitTime
Sleep time in seconds for SpoolJob, influences performance
(Default = 5).
Please use a smaller value, in case the majority of the jobs are
small.
Data check
(Pdschck)
Specifies data checks (overwrites the same printer config value)
1 Printer ignores printing outside of the printable area (Default).
0 All data checks are reported by the printer.
2 Data check "printable characters" switched off.
3 All datachecks switched off. Will increase TCP/IP performance during printing /data transfer to printer.
Parameters to be changed manually by editing the PrintLCDS.JCF
#
FCB Ignore
Indicates whether the online print data will be checked against
the FCB (0) or not (1). The default is 0.
Infopages
Indicates whether info pages should be printed (YES or NO
are valid).
Chapter 7 - Configuration
397
LCDS Parameter Configuration: Description of the JCF Parameters
Sample Parameters
#
Sample Section
Stamp
Defines whether the data/time/host stamps are to be printed.
YES Print with stamp (Default).
NO Print without stamp.
TraceLevel
Defines the trace level for the sample component. Permitted
values are 0, 1, 2, 3, 4. The next higher level always includes
all lower levels. Parameter is optional.
0 no trace information (Default)
1 system trace information
2 minimal trace information
3 medium trace information
4 maximum trace information
TraceFlags/ComInfo
Sample specific GCI communication interface trace flags (Default=FF00000000000000). Parameter is mandatory.
TraceLevel/ComInfo
Defines the trace level for the GCI communication interface
during the sample application. The next higher level always includes all lower levels. Parameter is mandatory.
0 no trace information (Default)
1 system trace information
2 minimal trace information
3 medium trace information
4 maximum trace information
Spooljob Section
398
SpoolJob_TraceFlags/ Com-Info
StartSPS specific GCI communication interface trace flags.
(Default=FF00000000000000). Parameter is mandatory.
SpoolJob_TraceLevel/ Com-Info
Defines the trace level for the GCI communication interface
during the StartSPS part of the sample application. The next
higher level always includes all lower levels. Parameter is
mandatory.
0 no trace information (Default)
1 system trace information
2 minimal trace information
3 medium trace information
4 maximum trace information
Chapter 7 - Configuration
LCDS Parameter Configuration: Description of the JCF Parameters
XResExport parameters
#
I-Filter Section
TraceFlags
Contains the trace flags for better differentiation of the traces
in the input filter. The trace flags should always be set to
FFFFFFF8. Only for data tracing at the highest level (trace
level 4) the trace flags must be changed to FFFFFFFF. Warning:
data tracing will produce huge data trace files which take up
hard disk space!
Trace parameters are optional. When they are used, they should
be positioned at the beginning of the section.
I-Filter specific trace flags (Default= FFFFFFF8).
TraceLevel
Defines the trace level for the I-Filter component. The next
higher level always includes all lower levels. The parameter is
optional.
0 no trace information (Default)
1 system trace information
2 minimal trace information
3 medium trace information
4 maximum trace information
ComInfo Subsection
TraceFlags
I-Filter specific GCI communication interface trace flags (Default=FF00000000000000). Parameter is mandatory.
TraceLevel
Defines the trace level for the GCI communication interface
during the resource export. The next higher level always includes
all lower levels. The parameter is mandatory.
0 no trace information (Default)
1 system trace information
2 minimal trace information
3 medium trace information
4 maximum trace information
SubcatInfo Subsection
CMD
Switches the file type CMD (Command file) (ASCII) on or off.
0 Off: this file type will not be exported to the Xerox format
output device.
1 On: this file type will be exported to the Xerox format output
device. (Default)
Chapter 7 - Configuration
399
LCDS Parameter Configuration: Description of the JCF Parameters
400
CME
Copy modification entry
binary
Default 1
DAT
System data file
binary
Default 0
FNT
Font file
binary
Default 1
FRM
Form object file
binary
Default 1
FSL
Form source language file
ASCII
Default 1
ICT
Ink catalog
binary
Default 1
IDR
Ink directory
binary
Default 1
IMG
Image file
binary
Default 1
IPM
Interpress font mapping file
binary
Default 0
JDL
Job descriptor object file
binary
Default 1
JSL
Job source language file
ASCII
Default 1
LGO
Logo file
binary
Default 1
Chapter 7 - Configuration
LCDS Parameter Configuration: Description of the JCF Parameters
LIB
Utility file
binary
Default 1
LOG
System integrity log file
binary
Default 0
MSC
Temporary user file
binary
Default 1
OSD
OSDS diagnostic file
binary
Default 0
PCH
System patch file
binary
Default 0
PDE
Page descriptor entry file
binary
Default 1
SAF
SAFES diagnostic file
binary
Default 0
STK
Stockset file
binary
Default 1
SYS
System control file
binary
Default 0
TMP
Temporary user file
binary
Default 1
TSK
System task image file
binary
Default 0
TST
RTEXT object file
ASCII
Default 1
Chapter 7 - Configuration
401
LCDS Parameter Configuration: Description of the JCF Parameters
Note:
These parameters are optional. Other file types may be included into XresExport.JCF.
XResImport parameters are identical to XResExport parameters.
402
Chapter 7 - Configuration
LCDS Parameter Configuration: Online Configuration
LCDS Parameter Configuration: Online Configuration
Introduction
For online connection to the host, some customer-specific changes have to be made after
the installation. All changes are made in the file:
'/u/prismapro/lib/uimng/jcf/PrintLCDS.JCF'
The following settings in the ‘online’ section of this file should be checked and corrected
if required:
Illustration
Online Configuration Parameters
#
ChanAddress
An address between 0 and 255 (= decimal) in Hex (0x00 to
0xFF). The Host will address the PRISMAproduction server
with this value.
ChanCondCode
Corresponds with ChanTimeoutAction.
ONLINE: channel will not be closed, host receives the message
‘Not Ready’.
OFFLINE: Channel is closed. CC=3 on the host system.
ChanStartTime
Zero (= run infinite)
ChanTimeout
Zero (= no time-out after stopping to receive data)
ChanChkPos
Defines the byte position for the length byte and enables /370
data checking if set to a value > (Default=0)
Chapter 7 - Configuration
403
LCDS Parameter Configuration: Online Configuration
404
ChanAddress
An address between 0 and 255 (= decimal) in Hex (0x00 to
0xFF). The Host will address the PRISMAproduction server
with this value.
ChanBufSize
Specifies the channel buffer length. This can be used to slow
down I-Filter in connection with Online_Channel_device_delay
(see ChanDEDelay).
The delay is executed after a buffer of the specified size. Smaller
buffer mean more frequent delays.
Value in bytes, Default=32000
ChanTimeoutAction
Defines what happens after ChanTimeout:
SEND_REND: Always sent end record: close report
CLOSE_CHAN (Default): Always close channel
DIALOG (Default, if parameter not present): Opens a dialog
box:
■ ‘Finish current report’
■ ‘YES’ (like SEND_REND)
■ ‘NO’
■ ‘Close Channel’ (like CLOSE_CHAN)
ChanDEDelay
Delay time in milliseconds between the last channel end of a
full buffer (see ChanBufSize) processing a received CCW and
the DeviceEnd set by ifilter. Setting the delay time >0 may be
useful when the channel is opened in daisy-chain mode and
other network traffic is running parallel on the channel.
FCB Ignore
Indicates whether the online print data will be checked against
the FCB (0) or not (1). The default is 0. If the customer uses
"skip to channel" and this channel is not definied in FCB, the
ifilter generates an errormessage "30000063 ifilter Data check
for input from /370-channel." and interrupts the printout.
It may be useful to set the FCB Ignore to (1) to force a printout.
In this case you have to be aware that the printed data are incorrect. Therefore you have to adjust the print data and FCB (i.e.
channels set in the print data must also be defined in the FCB)
for correct printout."
Chapter 7 - Configuration
LCDS Parameter Configuration: Special Functions and User Scripts
LCDS Parameter Configuration: Special Functions and User
Scripts
Introduction
This chapter describes some special user settings and user scripts for the LCDS-Module.
Changing the Default Paper Size
You can start the program ‘setpapersize’ in a Linux command line window after logging
in as root:
'setdefpaper': shows the default paper size on the server.
'setdefpaper a4': sets default paper size to A4.
The default paper size can be changed to legal, letter, ledger, B4 or A3. The default paper
size applies to all customer catalogs.
To initialize the standard formats, PCC and code tables you can start the program 'initlcds'
in a UNIX window after logging in as root:
'initlcds' initializes standards in all catalogs on the server.
The standards apply to all customer catalogs, if no customer catalog is given. The catalog
parameter restricts this setting to one catalog:
'initlcds' DEFAULT sets standards in the DEFAULT catalog only.
For compatibility reasons the script 'setpapersize' is left as a combination of 'setdefpaper'
and 'initlcds' with the same parameters:
setpapersize <paper size> [<catalog>].
This script is started with every installation of the LCDS module.
Suppressing Information Pages
If you are printing jobs with numerous reports, it is possible to suppress the printing of
Océ PRISMAproduction Server information (header, separator and trailer) pages in order
to save paper. Message pages are not suppressible. Every new report starts on a new sheet
(You may get up to three blank pages if you print duplex and two-up). To suppress the
printing of information pages, deactivate the ‘Print Header/Trailerpage’ button in the
PJM.
Chapter 7 - Configuration
405
LCDS Parameter Configuration: Special Functions and User Scripts
Verifying the Version Numbers
A script 'Icdsver' is included in the package. This gives the version numbers of the crucial
modules (for example xdl, xfilter, XRC...). This service tool can be started from the
command line.
A script ’prismaver’ is included on the CD under tools_linux. This gives the version
numbers of all rpm packages and selected modules like with the release notes. This service
tool can be started from the command line.
Implementation of Bicolor Shadings in LCDS
The following table defines the determination of the colors of a shading (up to version
3.04 the color was defined depending on the ratio of color/black: if there was more color
than black, only color was printed and the other way round):
Black=0, Color=0 -> Black
Black=0, Color>0 -> Color
Black>0, Color=0 -> Black
Black>0, Color>0 ->
Bicolor shadings are printed on top of each other (Black and Color). To print the two
layers, the XRC converter switch has to be set to RASTERICT (see Copy Parameters
in ‘LCDS Parameter Configuration: Description of the JCF Parameters’ on page 387).
Highlight Color Support
Highlight color support is based on the alternate color concept. In this case “BLACK”
and “K100” (and related gray shadings like K32 within the XRC) are converted into AFP
Black color = 0x08, all other colors into AFP Brown = Alternate Color = 0x10. This option
is used for the CustomTone=0 switches for PrintLCDS.JCF (Data and inline resources
via xfilter/rfilter) and Copy.JCF (external resources via XRC).
For the CustomTone=1, the main idea of the documentation still applies. Only the Xerox
color names (see table below) are converted in respective AFP OCA Colors names, all
other colors (except BLACK/K100 = AFP Black) into AFP Yellow = 0x06. Yellow was
chosen to be able, to distinguish this from the normal HC case.
Using Color mapping tables (CMT), the color names/hex codes can be mapped to certain
highlight color stations numbers, defined on/by the printer or gray values, etc. Using
CMT’s all CustomTone toner stations can be addressed. These CMT tables may be activated on the physical printer itself (imported via Floppy or USB-stick), configured in the
logical SPS printer of PRISMAproduction (PDS settings Parameter PDSCOLMAP) or
configured via PJM using the SPS printer pds parameter PDSCOLMAP as key and
<CMT-Name> as value in the Job Attributes “Custom Setting” Tab). The CMT <CMTName> must be present in one of the directories of the Resource Library path, defined
406
Chapter 7 - Configuration
LCDS Parameter Configuration: Special Functions and User Scripts
for the respective Job. For LCDS, this may be the directories for the printer resources,
system resource or the job resource.
#
XEROX Names
AFP Names (OCA)
AFP Hex Code
RED
COLOR_RED
0x0002
GREEN
COLOR_GREEN
0x0004
BLUE
COLOR_BLUE
0x0001
CYAN
COLOR_TURQCYAN
0x0005
CARDINAL
COLOR_PURPLE
0x000B
MAGENTA
COLOR_PINK
0x0003
ROYAL
COLOR_DARKBLUE
0x0009
RUBY
COLOR_ORANGE
0x000A
VIOLET
COLOR_DARKTURQ
0x000D
Jobname Settings
The contents under ‘JOBNAME’ can be configured in many ways. This value can be
displayed in the Spool window. The maximum length is 64 bytes. The value is part of
the accounting and will be printed on the accounting trailer page.
Configuration in PrintLCDS.JCF
There is an Xfilter options parameter in the job control file PrintLCDS.JCF which serves
for the configuration of the value ‘JOBNAME’. The parameter name is 'JobnameCfg'
and its value is a list of source information generating the value in the ‘JOBNAME’ column.
The list has the following format: '{type,offset,length;}...' Negative numbers and blanks
are not permitted. You can type a maximum of 11 triplets: 'type,offset,length;. 'Further
triplets will be ignored. The last sign of a triplet has to be a semicolon.
The types ('type') of the sources are coded as numbers (see table below). Types may appear
repeatedly in the list for example to display several parts of HRPTNA in ‘JOBNAME’.
'offset' marks the beginning of the information in the respective source information which
should be transferred to ‘JOBNAME’. offset = 0 represents the beginning of the source
Chapter 7 - Configuration
407
LCDS Parameter Configuration: Special Functions and User Scripts
information. If 'offset' is greater as or equals the length of the source field, nothing will
be transferred to ‘JOBNAME’.
'length' represents the length of the information to be transferred. If 'length' + 'offset'
are higher than the length of the source field, the information up to the end of the source
field will be transferred.
It is not possible to transfer more than 64 byte to the ‘JOBNAME’ field, the rest of the
information will be cut.
The single values in ‘JOBNAME’ are separated by one blank each.
Trailing blanks in the resulting string are truncated, so that no "..." is to be seen in the
Jobname column of the All Jobs window.
#
type
Description
Max length
0
No source, no values will be transferred.
--
1
JDE-name
6
2
JDL-name
6
3
HRPTNA (BANNER or RSTACK HRPTNA)
16
4
HJOBNO (BANNER)
6
5
DEPT (ACCT)
31
6
ACCTINFO (RSTACK)
64
7
Tape file name or hard disk file name without path
65 (64)
8
Complete hard disk file name
255 (64)
9
PJM Job ID
6
10
PJM job name
64
11
Start-JDE
6
12
Start-JDL
6
13
Report number beginning with 0000, displayed
with at least 4 digits
10
14
VSN. “VSN” represents the volume serial number
of a tape VOL record ( 6 bytes from byte no. 5-10
). This value does obviously only make sense for
tape/cartridge jobs with VOL record as volume
definition of a tape.
6
Example 1:
408
Chapter 7 - Configuration
LCDS Parameter Configuration: Special Functions and User Scripts
Begin-Xfilter
...
Begin-Options
...
JobnameCfg 1,0,6;2,0,6;3,4,20;6,0,66;
...
End-Options
...
End-Xfilter
These settings transfer the following values to the ‘JOBNAME’ field:
JDE name from the beginning with length 6,
one blank as separator,
JDL name from the beginning with length 6,
one blank as separator,
the contents of HRPTNA form position 5 with length 12 (end of HRPTNA),
one blank as separator,
the contents of ACCTINFO from the beginning with length 37 (end of JOBNAME=64
Byte),
for example the result will be, if HRPTNA has the value 'HOST-REPORT-NAME'
and ACCTINFO the value for example 'ACCTINFO901023456789012345768901234567890123456789012345678901234':
DFLT___DFAULT_-REPORT-NAME_ACCTINFO901023456789012345768901234567 (In this example blanks are represented by
underscores).
(In this example blanks are represented by underscores).
Example 2
'JOBNAME 1,0,6;3,4,8;0,0,32;2,0,6;'
These settings transfer the following values to the ‘JOBNAME’ field:
JDE name from the beginning with length 6,
one blank as separator,
the contents of HRPTNA form position 5 with length 8.
Nothing else will be transferred because the type o ends the list
for example the result will be,
if HRPTNA has the value 'HOST REPORT NAME':
DFLT____REPORT_
(In this example blanks are represented by underscores, the trailing blank is truncated).
Chapter 7 - Configuration
409
LCDS Parameter Configuration: Special Functions and User Scripts
Multiple Process Chains
The use of parallel LCDS Process chains is supported in V3.10. Two typical use cases
may be given here to explain the usage and advantages.
■
■
Use Océ IPDS twin fanfold system print-while-spooling both in the twin configuration
(one process chain supported in V3.0X) and 2 parallel process chains in a "two-single"
configuration.
Process (Copy, Compile, and Print (sequentially)) production data on a production
catalog.
Parallel a new test catalog may be created and resources may be copied and converted,
JSLs may be edited and compiled and test print done. This test actions may be performed parallel to print process on production catalog without interfering with each
other.
For details concerning the use of this function for multiple process chains, please see also
the following chapters:
■
■
‘LCDS Parameter Configuration: Description of the JCF Parameters’ on page 387 (for
example Keyword DeviceName1/2/3).
"Server Files" (Device) in the Océ PRISMAproduction Server User's Guides.
User Script "Drain_Channel"
Usecase : If the LCDS /370 input via channel has an infinite channel time out, a stop of
the process chain job in the spool/ods queue may result in unwanted data loss. To stop
all infinity channels for example during an operator change due to shift changes or at the
end of the day, a userscript “Drain_channel” is provided. Executing this script will change
the handling of all running ifilters and these processes will now use the finite channel
time out value defined with the parameter “ChannelStopTime”. The recommended
“ChannelTimeoutAction” should be “Close_channel”.
The user script is provided for the user “service”. If it should be available for other users,
service personal can copy this script in the general or user specific folder.
User Script „reset_LCDS“
In case of LCDS procedures (XRC, xdl, ifilter, xfilter) being in a hang situation of running
in an “endless loop”, these processes may be stopped/killed via the delete option in the
ODS job queue or the cancel button of the LCDS resource window. In case this is not
possible for some reason, a user script is provided in order to stop the individual executables
or delete internal files (for example lock files), which may be responsible for this hang
situation. If you call this script (user scripts -> service), a Linux consol window is opened,
410
Chapter 7 - Configuration
LCDS Parameter Configuration: Special Functions and User Scripts
displaying a list of the actual running processes (using unix “ps” process status command
and displaying the unix process ID) and files. With “y”, you have the possibility to kill
these processes (for each type of executable individually) / delete these files. This script
– like other reset commands as well – should be called with special care.
LCDS Online Jobs via TCP-IP Download
PRISMAproduction LCDS module is compatible with a Xerox printer. In the Online
case, the Xerox default value and use case (for example via MVS Jes) is the PCCTYPE=IBM3211. It is strongly recommended to use IBM3211 (machine code) PCC’s
as input for the LCDS converter module.
For the use case of download via TCP/IP (for example PRISMArouter), there may be
MVS files with ANSI PCC’s (or no PCC’s). In order to import these files (for example
also several MVS-Steps, which result in several file sections in the Océ PRISMAproduction
Server download module) in a “Jes/370DocuPrint”-like manner, the Download import
script “.LCDS_DL_input” is provided. This example script should help to simulate the
“Jes/370” process. It is located in '/u/prismapro/cfg/jobinput/bin'.
It should be copied to a customer version and customized using/changing the parameters,
to be found in the head of the script. Here the functionality is also defined. The script
uses functions of the LCDS driver Passthrough package. After an update installation, it
is recommended to compare the customized script with the newly released example,
provided in a new release (enhancements).
Each parameter serves a certain functionality:
Merge: Merge several files section to one file section to emulate the constant data stream
of a /370 channel, with no file boundary in between MVS steps. In normal use cases, it
is recommended to use this function.
PCC: Normalize the PCC’s ( IBM3211, ANSI, no PCC) to IBM3211, using the PCC
type information, provided by the MVS system and passed via router and download input.
In normal use cases, it is recommended to use this function.
Header / Trailer / FCB: This functionality includes header, trailer and FCB’s. The FCB’s
must be present in the System ( like LCDS driver ) for example using the FCB configuration. The header / trailer uses the same LCDS driver templates in
'/u/prismapro/cfg/banner/[start|end]'.txt.
LCDS-Collect Utility
The LCDS collect tool may be called via ’LCDS’ -> ’collect’ from the main Océ
PRISMAproduction Server menu. It can be used for resource handling and error handling
is supplied. It is available for the user ”service”.
Chapter 7 - Configuration
411
LCDS Parameter Configuration: Special Functions and User Scripts
In case of an error, the error should be reproduced and the service department must be
provided with the necessary resources and material. In order to get the most important
material, the collect tool may be started and run parallel to a Print Job, which has this
error. It collects parameter files and all resources needed to reproduce the print in the
headquarter for analyzing purpose. The result is a compressed file '/u/prismapro/collect.tgz'. This file may be sent to the service department. For further questions contact
the service department as well.
Choose the Collect tool and start the collection with option ”c” and follow the listed
procedure:
■
■
■
■
Choose “b” to begin.
Start one or more applications in only one customer catalog.
Wait for end of print including SPS (dummy printer is possible).
Note: It is important that you print the applications because otherwise not enough
information will be ‘collected’.
Stop collect tool with “e”, choose the catalog to collect and store the final file named
/u/spool/collect.tgz and press ’Enter’ to exit.
In any case original XEROX resources, print files and printouts should be supplied as
well.
412
Chapter 7 - Configuration
'Paper' Configuration Tool
'Paper'
'Paper' Configuration Tool
Introduction
You can use this dialog to define paper types which are available throughout the whole
system. You need paper types:
■
■
■
for the use in DPconnect,
as input parameters for conversion. Most of the default paper types are already predefined in the 'Standard Paper' table. They are also offered in the ’Convert’ dialog in
the PJM. For the conversion only the size of the paper is relevant,
to describe the contents of the input trays. You can use the ’User defined Paper’ table
to define any paper with specific attributes.
Use the 'Form' table to define forms which can be assigned to a job under the PJM dialog
'Job Attributes' -> 'Print'. The form names also appear in the job lists.
The 'Tab' table displays all available tabsets together with their description. These tabs
are available in the 'Tab Printing' dialog of the PJM (POD only). You have to select the
tabset which corresponds to the tabset inserted into the printer.
With the tabs 'Standard Paper' and 'User defined Paper' you can chose between the units
'mm' and 'inch'
You can switch between four tabs to show or modify the different tables:
Chapter 7 - Configuration
413
'Paper' Configuration Tool
Illustration
Description of the tabs:
#
Tab
Description
'User defined Paper'
Select this entry to set up user defined medias and to specify
various media attributes (see table below).
User defined papers can be assigned to printer input trays using
the 'Media Settings' dialog in the 'Printer Pool' application
'Standard Paper'
Paper types which are most commonly used, are already predefined and are shown in the table, if you select this entry. These
papers are only defined by size.
Standard papers can be assigned to printer input trays using the
'Media Settings' dialog in the 'Printer Pool' application (see
chapter "Printer Pool" -> "Tool Bar and Menu Functions" in
the Océ PRISMAproduction Server User's Guides).
'Form'
Select this entry to define forms, which are assigned to a job via
the PJM 'Job Attributes' -> 'Print' dialog.
'Tab'
All available tabs are described in this table. These tabs are
provided fpr tab printing in the PJM. You have to select the
type, which has the same number, size and sorting as the tabs
inserted.
If you select 'User defined Paper' you can define the following parameters for each paper:
#
414
Column
Description
'Paper Name'
Freeform name to identify the paper. Choose some standard
names from a list box if you click into the name field. Maximum
length: 40 characters.
'Weight'
Paper weight. Integer values from 40g/m² to 200g/m².
Chapter 7 - Configuration
'Paper' Configuration Tool
Column
Description
'Color'
Any color of the paper. Some colors are offered in a list box.
'Transparent' switches ’Type’ to transparent film. Max. length
of the field: 40 characters.
For every color in the combo box a defined hex code will be
inserted in the data stream. For other colors, which you insert
manually, a special hex code for ’Custom Color’ is inserted.
Additionally you can use so called color prefixes: clear, light or
dark, where clear can be combined with light or dark.
Example: Possible combinations of the color red: red, clear red,
light red, dark red, clear light red, clear dark red.
'Type'
'Standard'
'Transparentfilm'
'Precuttabulator'
'Preprinted'
'X Size'
Width of the paper in mm or inch.
'Y Size'
Height of the paper in mm or inch.
'Order Count'
Quantity of proposition of sorted printed sheets, between min.
0 and max. 100.
'Drilling'
In case of drilled paper insert max. 4 holes. DPconnect needs
the setting ’Drilling=3’.
If you select 'Form' you can define the following parameters for each form:
#
Column
Description
'Form Name'
Freeform name, max. 8 characters.
'Form Description'
Description of the form, max. 255 characters.
Chapter 7 - Configuration
415
'TicketRules': Introduction
'Ticket Rules'
'TicketRules': Introduction
Introduction
This feature offers a wide range of functions to cover almost any possible request for
adapting jobs to the customer environment by changing parameters inside the job ticket.
Generally 'TicketRules' manipulate parameters of job tickets, which have been created
automatically and therefore need some adjustments. These jobs are submitted to the Océ
PRISMAproduction Server system via the input modules Download, LP or HotDirectory.
Consequently the ticket rules have to be applied to the jobs in the configuration of the
input queues.
Ticket rules can also be applied to mirrored jobs. This is sometimes important to modify
the tickets of mirrored jobs so that these jobs can be submitted on the mirror server (which
has a different configuration as the original server).
To avoid undesired changes of a ticket, a rule must be explicitly requested for a job. Only
one rule can be requested for a job. To execute more rules on one job, the rules have to
be defined as sub-rules and the sub-rules have to be actions of another rule ("super-rule").
This rule can then be requested.
If a job is submitted via PJM, then the PJM server merges the required default job ticket
and the Océ custom ticket to a new ticket and calls the execution function in the Ticket
Rules server with a reference to the job ticket. The requested rule is applied to the ticket,
the control is given back to the PJM and the job is submitted with the changed ticket
parameters.
Definitions
The following definitions are prerequsite to understand the purpose and function of the
Océ PRISMAproduction Server 'TicketRules'
Job Ticket - Definition
The job ticket contains the job parameters. The list of parameters is divided into named
sections. The section [files] can occur multiple times, the other sections are unique. Inside
a section unique names for each parameter exist as so called keys. For each key a specific
value can be assigned.
Example:
In the section [files] a key File_Copies exists. The assigned value is an integer value
defining the number of copies of the file that shall be printed.
416
Chapter 7 - Configuration
'TicketRules': Introduction
'TicketRules' - Definition
With the 'TicketRules' application a sequence of actions depending on specific conditions
of the ticket of incoming jobs can be defined. The definition of this sequence is similar
to a program definition, like a shell script. The sequence of actions form a rule. On how
to define rules see ‘'TicketRules': Definition of Rules’ on page 423.
Condition, Variable and Value - Definition
A condition or variable checks the actual value of a ticket parameter at the time it is executed. This can be a value modified before by another action of 'Ticket Rules' execution.
This behavior is similar to the behavior of a script execution.
A condition compares the value of a key against a defined value via operators like ’equal’,
’greater’, ’contains’, etc. If the condition is true, the underlying actions will be performed.
Instead of a "reverse" condition also an "else" can be used.
A value used in the 'Ticket Rules' can be a constant value or a variable which depends
on other values. The definition of a variable is done globally and is evaluated at the time
the variable is used in a rule. Each variable must have a unique name. The variables are
referred by this name.
General Workflow
1. Definition of the ticket rules in the ’Configuration’ -> 'TicketRules' application (see below)
2. Configuration of the input modules. Here a configured ticket rule can be applied to the
jobs, which enter the system via an input channel.
3. Configuration for mirror jobs: a specific ticket rule can be applied in the 'System Configuration' or in the PJM -> Menu ’Job’ -> ’Transfer Mode’. Apart from ’Default’, the PJM
setting always overrides the setting in the 'System Configuration'.
Chapter 7 - Configuration
417
'TicketRules': Main Window
'TicketRules': Main Window
Introduction
The 'TicketRules' application window is divided into two parts: The upper part lists the
respective elements which can be used in the rules. The lower part contains a detailed
definition dialog where you can define the properties of rules, variables and value tables.
In the upper part the 'TicketRules' main window provides four different tabs:
■
■
■
■
418
Rule List
Displays the rule list which you use to add/delete, activate/deactivate/change to SubRule
and to edit rules.
The entries in the colums 'Activation' (= the rule is active or inactive or is a SubRule),
'Name' (= unique name of the rule) and 'Description' (= user defined short description
of the rule) are defined by the user in the Add/Edit rule dialog. To edit a rule (modify
name and description), select the rule and click the entry in all columns except the
'Activation' column with the right mouse button or click the 'Edit' icon ( ) in the
tool bar. The 'Activation' column can be used to activate or deactivate a rule or to
change a rule to a SubRule, if this is allowed (see below).
The lower part of the window repesents in this case the Rule Definition Window,
where you combine the different parts to create a well formed rule.
See: ‘'TicketRules': Definition of Rules’ on page 423
Parameter List
All actions, which are defined in a ticket rule, work with the ticket parameters. The
parameters list displays all known ticket parameters together with their descriptions.
You can add, delete or modify new or customer specific parameters in this list. All
parameters defined here can be selected in the rule definition dialogs.
The parameter list has no separate detailed window.
See: ‘'TicketRules': Parameters’ on page 429
Variables List
The list shows all variables which have been defined in TicketRules. Here you can
define new variables which refer to a parameter or another variable and which may
alter the value found in the current ticket for the referred parameter in different ways
(alteration types calculation, replacement and so on). Variables receive their value in
the moment they are used in a rule, that means, they cannot be used to store previous
values (of a parameter). For this case you can define new parameters.
In the lower part of the window you can edit the alteration code, if an alteration type
is used for the selected variable.
See: ‘'TicketRules': Variables’ on page 430
Value Table List
Value tables can be defined for the so called foreach action. Each column of a value
table has a unique name to refer to it. With the foreach action a loop is started over
each row of the specified value table. All other actions can now refer by the column
Chapter 7 - Configuration
'TicketRules': Main Window
name to a specific value of the table. The table is editable inside and outside of Ticket
Rules, therefore it is possible to import and export the table as a CSV-file. So the table
could be created or edited in any spreadsheet calculation program. Each value table
is referred by it's unique name.
The lower part of the window displays the selected value table and provides controls
to modify the table.
See: ‘'TicketRules': Value Tables’ on page 437.
Attention:
All elements of a TicketRule are globally known over all rules and therefore must have
an unique name!
Note:
Changes do not become valid until the 'Save' button is pressed.
Note:
The 'Used in Rules' entry cannot be edited. The name of the rule is added automatically
as soon as the element is inserted in the action sequence of a rule.
Chapter 7 - Configuration
419
'TicketRules': Main Window
Illustration
Main Tool Bar and ’Ticket Rules’ Menu
#
420
Menu Entry / Icon
Description
Save all elements
All changes done in the GUI are saved and become valid.
Changes done in the GUI are not applied to tickets of incoming
jobs before the save button is pressed. If the application is closed
before saving the changes, the user will be asked to save the
changes.
Discard all changes
All changes since the last save are discarded and the rules and
other elements are reloaded from the server again.
Create a new element
Opens a dialog to create a new rule, parameter, variable or value
table. A unique name is required for all these elements!
Copy selected element
Opens a dialog to copy and modify selected elements. First you
have to enter a different name. The system automativally proposes the existing name plus a numbered extension.
Delete selected element
You are asked for confirmation, before the element is deleted.
Chapter 7 - Configuration
'TicketRules': Main Window
Menu Entry / Icon
Description
Import value table
This button is only enabled if the value table tab is selected. A
file selection box opens and a value table stored in a file with
csv-format is imported. The user is also asked to define the exact
csv-format. If the value table to import already exists, the user
is asked if it shall be overwritten. If a column header that is referred by a rule is missing in the value table to import, the import action is canceled.
See: ‘'TicketRules': Value Tables’ on page 437
Export value table
This button is only enabled if the value table tab is selected.
The user is asked to define the exact csv-format. Then a file selection box opens and the value table is stored in a file with the
defined csv-format. Only value tables that are correctly defined
can be exported.
Color Codes and Activation Modes in the Rule List
Only well defined rules with status true and an appropriate activation modus can be
applied if requested by the input module or mirror configuration. The status of a rule is
reflected by different colors in the list:
#
Color
Description
Black
The activation mode is "Active" and the rule is "true".
Red
Implies the status "false", which means that there is an inconsistency in the rule definition. This can be a condition with no
action following below, the usage of a not defined variable, the
reference to a not well defined sub-rule etc.
Light gray
The activation mode is "Inactive" and the rule is "true". A rule
with activation modus "Inactive" will never be applied and is
ignored. Choosing this modus will switch off the rule. By that
way it is possible to define a rule for later use.
Light pink
The activation mode is "Inactive" and the rule is "false". If a
new rule is added the default activation modus is "Inactive" and
the status is "false", since at least one action has to be defined
for a rule.
Chapter 7 - Configuration
421
'TicketRules': Main Window
Color
Description
Italic black
The activation mode is "Sub-Rule" and the sub-rule is "true".
A rule with activation modus "Sub-Rule" can only be used by
other rules and can not be requested itself. A sub-rule itself can
not refer to other sub-rules. Therefore a sub-rule is only applied
if it is referred by another rule which is "Active". Since a subrule may be referenced by different rules with different activation
modes and the reference may also depend on conditions, it is
not possible to define a general activation mode ("Active" or
"Inactive") for a sub-rule.
Italic red
The activation mode is "Sub-Rule" and the sub-rule is "false".
Right Mouse Button in the Lists
If you mark an entry in the lists and click it with the right mouse button, the effect is the
same as clicking the 'Edit' button in the tool bar: the Edit dialog of the selected element
opens.
The only exception is the 'Activation' column in the rule list: If you click on a marked
entry (multiple selection is also possible) a context menu appears where you can quickly
activate or deactivate rules or where you can transform a rule into a subRule:
The change is only done for rules which allow the change. For example you cannot change
an active rule (superRule) - which refers to a subRule - into a subRule.
422
Chapter 7 - Configuration
'TicketRules': Definition of Rules
'TicketRules': Definition of Rules
Introduction
Rules can be defined in the rules definition window below the rule list.
Rule Definition Window and Tool Bar
To add or delete an action, you can use the appropriate button in the tool bar. Before an
action can be added, a node or another action has to be selected. For every action you
can choose whether it should be inserted before or after the marked element. After clicking
the ’Add ...’ button, the appropriate window to select an existing action or to define a
new action in detail is opened (see ‘'TicketRules': Definition of Conditions, Settings, Messages
and Return/Exit’ on page 425). If you have finished the definition, this action will be added.
Already defined actions can be modified if you click the selected action element with the
right mouse button or if you click the Edit icon in the tool bar.
By clicking on a selected action with the right mouse button the appropriate action definition window for this action is opened and the selected action can be edited.
#
Icon
Description
'Add condition'
before ...
after ...
Opens the condition definition window and allows editing of
conditions (check a value of a parameter in the incoming job
ticket against a specified parameter value). Finally a valid condition can be chosen and this will be added to the sequence of
actions. Simultaneously a placeholder is inserted which has the
focus so the next action can be placed here. A condition with
an empty block makes no sense and is therefore not considered
as well defined.
See: ‘'TicketRules': Definition of Conditions, Settings, Messages
and Return/Exit’ on page 425.
'Add or-condition
...'
Allows you to add more conditions by disjunction.
'Add else'
An else statement will be added to the sequence of actions.
'Add setting'
before ...
after ...
Opens the ’Add settings' dialog’ which allows editing of settings
(see ‘'TicketRules': Definition of Conditions, Settings, Messages
and Return/Exit’ on page 425). Finally a valid setting can be
chosen and this will be added to the sequence of actions.
Chapter 7 - Configuration
423
'TicketRules': Definition of Rules
424
Icon
Description
'Add foreach'
before ...
after ...
This new action type is intended for the use of Value Tables.
An existing Value Table has to be selected. Simultaneously a
placeholder is inserted which has the focus so the next action
can be placed here. A loop with an empty block makes no sense
and is therefore not considered as well defined. The foreach
loop will walk over every row of the selected value table and
process the actions in its block for every row.
See: ‘'TicketRules': Define Foreach Loop’ on page 435.
'Add message'
Opens the ’Add Messages Dialog’ which allows editing of
messages (see ’Add Messages Dialog’). Finally a valid message
can be chosen and this will be added to the sequence of actions.
See: ‘'TicketRules': Definition of Conditions, Settings, Messages
and Return/Exit’ on page 425
'Add subRule'
Opens the ’Add Sub-rules Dialog’ which allows editing of subrules (see ’Add Subrule Dialog’). A sub-rule can be chosen and
this will be added to the sequence of actions.
'Add Return'
before ...
after ...
A return statement will be added to the sequence of actions.
Add exit
before ...
after ...
An exit statement will be added to the sequence of actions.
Add exit job
before ...
after ...
An exit job statement will be added to the sequence of actions.
'Add comment'
before ...
after ...
This action type is intended for better clarity of the rules. With
enough clear comments a rule will be much easier to maintain.
'Delete tree entry
action'
Deletes the selected action from the sequence of actions.
Chapter 7 - Configuration
'TicketRules': Definition of Conditions, Settings, Messages and Return/Exit
'TicketRules': Definition of Conditions, Settings, Messages
and Return/Exit
Introduction
There are dialogs to add a condition, a setting, a foreach action, a message, a subRule, a
return/exit command or a comment to a rule. All these dialogs contain a list of previously
defined actions and offer the functionality to use existing, create new or to copy elements.
The genaral procedure to define these actions is as follows:
■
■
■
■
■
Click the appropriate ’Add before’ or 'Add after' button of the desired action in the
rule definition tool bar to open the corresponding action definition window.
If you click ’Use existing’ in the action definition window, the selected action will be
added to the sequence of actions at the selected position.
Click the 'Copy' button to copy and modify an existing element.
Click the 'Add new' button to open the definition windows for conditions and settings.
Click the ’Cancel’ button to close the action definition window without changes.
General features and conventions
Errors in any field (for example if the name inserted is not unique) turn the text in this
field into red and a short description of the error can be seen in the tool tip.
'Add condition' Dialog
Each condition contains a 'Name', a 'Parameter', an 'Operator' and a 'Value'. The name
of the condition must be unique because all conditions are globally known over all rules.
The 'Parameter' for the condition can be selected from a drop down list. This ensures,
that no misspelling occurs. Variables can also be used as parameters. The user defined
variables can be selected at the end of the drop down list. Parameters are marked in blue
color, variables in green.
Chapter 7 - Configuration
425
'TicketRules': Definition of Conditions, Settings, Messages and Return/Exit
Operators are used for conditions. You can select an operator from a drop down list.
A condition with the operator 'does not exist' is true if the specified key of the section
does not exist in the ticket. The value is obsolete in this case.
Please note that this condition is different to 'is not set'. The latter one is true, if the parameter does not contain a value or does not exist in the ticket.
The operator 'matches reg. ex.' is true if the specified parameter value matches the regular
expression, given in the value column.
The value you set in the 'Value' field is automatically set in double quotes. You can also
check the content of a variable. To do this, select a variable in the 'Paste to value' field
and paste it with the button next to the field to the value field.
The 'Used in rule(s)' field is not editable and is filled automatically if the action is inserted
in the rule.
The definition of a condition is always checked for consistency. If there are inconsistencies,
for example if the condition name already exists, the font color is red and a tool tip shows
the cause. If the condition is well defined the font color turns into black. Only if all elements of the condition are correct, the 'Finish' button becomes active and you can add
the condition to the sequence of actions.
'Add setting' Dialog
Each setting contains a 'Name', a 'Parameter', an 'Overwrite' flag and a 'Value'. The
name of the setting must be unique because all conditions are globally known over all
rules.
The 'Parameter' for the setting is selected in the same way as for conditions.
If the setting should overwrite an already existing section/key entry in the ticket, the
'Overwrite' flag has to be selected. The default status of the overwrite selection box is
checked.
426
Chapter 7 - Configuration
'TicketRules': Definition of Conditions, Settings, Messages and Return/Exit
A value can also refer to a variable (see ‘'TicketRules': Variables’ on page 430). For example
it would be possible to check if the printer_name is part of the job_name. Use the 'Paste
to value' list box to select an existing variable and to paste it into the 'Value' field.
A value may also be set to '[delete]', which means that the whole key entry will be deleted
in the ticket, which is not the same as to set an entry to '' (empty). The '[delete]' must
not be typed in, but can be selected from the combo box.
The definition of a setting is always checked for consistency. If there are inconsistencies,
for example if the setting's name already exists, the font color is red and a tool tip shows
the cause. If the setting is well defined the font color turns into black. Only if all elements
of the setting are correct, the 'Finish' button becomes active and you can add the setting
to the sequence of actions.
'Add message' Dialog
The Ticket Rules application offers the possibility to generate a message, when the rules
are applied to the ticket. 5 different messages with totally free text are offered. They differ
only in the message type: Log, Error, Warning, Info and User-Action. To create a message,
you first have to enter a unique Name and then select the appropriate Message Id. The
corrensponding Message Type is then inserted automatically. These two text fields are
connected to each other. So selecting a specific message type will automatically select the
appropriate messageID and vice versa.
Then you have to type in at least a Short Text and a Long Text to get a valid message.
You can also use parameters and variables in the message text. For example it would be
possible to display the job name in the message. To do this use the 'Paste to text' field.
Here you can select a parameter or variable and paste it into the other text fields at the
cursor position. The different parts of the message text string (user defined text and
pasted elements) are separated by a '+'.
The definition of a message is always checked for consistency. If there are inconsistencies,
for example if the message name already exists, the font color is red and a tool tip shows
the cause. If the message is well defined the font color turns into black. Only if all elements
Chapter 7 - Configuration
427
'TicketRules': Definition of Conditions, Settings, Messages and Return/Exit
of the message are correct, the 'Finish' button becomes active and you can add the message
to the sequence of actions.
'Add rule' Dialog
This table shows all rules, which are subRules. This means the activation modus is subRule.
Depending on the status of the subRule, the font color is red or black. SubRules are always
part of a superRule.
Apart from superRules you can change any rule to a subRule in the rules list (see ‘'TicketRules': Main Window’ on page 418.
Add Return/Exit
Adding other action entries will not open a definition window.
Other entries are:
#
428
Action
Description
Return
Stop rule execution here, but continue rule execution in superRule, if this is a subRule.
Exit
Stop execution of this rule and of the possibly existing superRule.
Exit job
Like exit, but also stop job execution in the PJM. This can be
useful to check if a job can be printed with the given environment at a print site. When a job is not submitted due to reaching 'Exit job' in ticket rule execution, a message is generated
automatically by the ticketrule server.
Chapter 7 - Configuration
'TicketRules': Parameters
'TicketRules': Parameters
Introduction
All actions in a ticket rule work with the ticket parameters. If you click the 'Parameters'
tab a list with known ticket parameters and their descriptions is displayed. New or customer specific parameters, which are not in this list, can be added, edited and deleted in
this table.
Predefined parameters cannot be edited or deleted.
Note:
All parameters which you define here are globally known over all ticket rules and must
therefore have a unique name.
Illustration
Add Parameters
Click the 'Add' button in the main tool bar to add a user defined parameter. You can
enter a name, which is only valid if it contains a '.' between section and key. Additionally
you can add a description text. All user defined parameters can be modified later on.
Chapter 7 - Configuration
429
'TicketRules': Variables
'TicketRules': Variables
Introduction
If you click on the 'Variables' tab, a list with all variables, which have been defined before
is displayed. Use the icons in the main tool bar to add, copy, modify and delete variables.
If the variables are designed to alter existing values in job tickets, the Alteration Type can
be configured in detail in the lower half of this window.
Note:
All variables which you define here are globally known over all ticket rules and must
therefore have a unique name.
430
Chapter 7 - Configuration
'TicketRules': Variables
Illustration
Add Variable
Click the 'Add' button to create a new variable.
#
UI-Element
Description
'Name'
Enter a unique name because all TicketRules can reference the
variable.
Chapter 7 - Configuration
431
'TicketRules': Variables
UI-Element
Description
'Parameter'
Variables can refer to a parameter or another variable (which
has been defined before). The variables can be used in the actions like parameters.
Here you can select all known job ticket parameters as well as
variables which have been defined before.
'Alteration Type'
The alteration types 'Calculation', 'Field', 'Replacement' and
'RegEx Replacement' can be selected (see below).
If you select 'No' the variable is not altered.
Alteration Types
The alteration types alter the value found in the current ticket for the referred parameter
in different ways.
'Calculation'
If you select alteration type calculation, a definition dialog appears in the lower part of
the window (see screenshot of the variables list).
This function can be applied to integer and float values only. If the selected parameter
contains a string value, then this calculation is not executed.
The contents of the variable is modified by executing the defined calculation. This calculation is defined by the:
■
■
calculation operator
(select "+", "-", "*" or "/" from the drop down menu)
and the calculation value.
The 'Example' and 'becomes' fields show how a given value is changed by the current
calculation definition. These fields are directly adapted to the definition if this is changed.
It's also possible to type in an example value and to see how it is changed by the current
definition.
If you press the ’Ok’ button, the syntax is checked for correctness and the calculation
definition is inserted in the selected cell.
Examples:
■
■
432
Increment an integer value by 10:
+10 (This means: Operator: '+'; Value: 10)
Example: "32' -> "42"
Multiply a float value:
Chapter 7 - Configuration
'TicketRules': Variables
*2.15 (This means: Operator: '*'; Value: 2.15)
Example: "3.1' -> "6.665"
'Replacement'
If you select alteration type replacement, a definition dialog appears in the lower part of
the window.
The contents of the variable is modified by exchanging the string defined in 'Find' with
the string defined in Replace: . 'Occurrences' defines how many occurrences of the string
are replaced. 'Occurrences' can be set to any positive number or to all. An empty replace
string is allowed also.
The Find and Replace can be done case sensitive or case insensitive. By default the check
box is selected and the replacement is done case sensitive.
The 'Example' and 'becomes' text fields show how a given text is changed by the current
'Replacement' definition. These text fields are directly adapted to the definition if this is
changed. It's also possible to type in an example text and to see how it is changed by the
current definition.
When pressing the ’Ok’ button, the syntax is checked for correctness and the 'Replacement'
definition is inserted in the selected cell. The 'Find' and the Replace: character strings
are enclosed in quotes (’), separated by a blank and followed by a blank, followed by the
number of 'Occurrences' (or all), followed by another blank and an indicator for case
sensitive (cs) or case insensitive (ci) use.
Examples:
■
■
Replace case sensitive all occurrences of '-special-' with '-':
'-special-' '-' all cs (This means: Find: '-special-'; Replace: '-'; Occurrences: all, case
sensitive)
Example:
"super-special-extra-job" -> "super-extra-job"
Delete the first three occurrences of 'new' in a string:
'new' '' 3 ci (This means: Find: 'new'; Replace: ''; Occurrences: 3, case insensitive)
Example:
"a New very new fine new total new job' -> "a very fine total new job"
'RegEx Replacement'
This function is similar to the 'Replacement' alteration type described above. The difference is that the search string is regarded as regular expression. This gives you the possibility to impose any complex filter criteria for the search.
Chapter 7 - Configuration
433
'TicketRules': Variables
'Field'
If you select alteration type field, a definition dialog appears in the lower part of the
window.
The 'Delimiter' character divides the value of a key into fields, excluding the delimiter
itself. If the delimiter is not set, then each character becomes a field. If the value starts
with the delimiter the first field is empty and the second field starts after the first delimiter.
If there is no other character between two delimiters the generated field is empty, but
counted. The 'Delimiter' has a maximum size of one character.
The entries 'From Field' and 'To Field' define the range of fields which are extracted
from the value. The fields are numbered in increasing order from left to right starting
with 1 and in decreasing order from right to left starting with -1. This is illustrated in
the following example with empty delimiter (each character is one field):
#
1
2
3
4
5
6
7
8
9
10
T
e
s
t
s
t
r
i
n
g
-10
-9
-8
-7
-6
-5
-4
-3
-2
-1
The delimiter is placed between each selected field.
The 'Example' and 'becomes' text fields show how a given text is changed by the current
field definition. These text fields are directly adapted to the definition if this is changed.
It's also possible to type in an example text and to see how it is changed by the current
definition.
When pressing the ’Ok’ button, the syntax is checked and the field definition is inserted
in the selected field. The delimiter is enclosed in single quotes (’), followed by a blank,
followed by the field range definition with the syntax [<From Field>:<To Field>].
Examples:
■
■
■
434
Extract the characters 5 to 10 from a string:
'' [5:10] (This means: Delimiter: ' '; From Field: 5; To Field: 10)
Example: "Teststring" -> "string"
Cut off all characters including the '_' character:
'_' [2:-1] (This means: Delimiter: '_'; From Field: 2; To Field: -1)
Example: "Global_Company_Name" -> "Company_Name"
Extract all characters between the first two '/':
'/' [2:2] (This means: Delimiter: '/'; From Field: 2; To Field: 2)
Examples: "/etc/hosts" -> '"etc" or "etc/hosts/test"' -> "hosts"
Chapter 7 - Configuration
'TicketRules': Define Foreach Loop
'TicketRules': Define Foreach Loop
Introduction
The following example explains the usage of the 'foreach' action type with value tables.
Example
First a condition has to be added which refers to a value table row:
Then for example a setting can be added that changes a parameter value using a value
out of the value table:
The next picture also shows the use of colors and the pasting of strings to a value: When
you click into the value field you can select a Parameter, Variable or Value table row in
the 'Paste to value' combo box and then paste it to the value at the cursor position. This
is also described in the Description part at the right side when the cursor is in the value
field:
Chapter 7 - Configuration
435
'TicketRules': Define Foreach Loop
The resulting foreach loop shows like this: The value table is evaluated row by row. If
the zip code matches, the parameter Job_Class is set to the value of Class in this row. The
last matching row wins as the loop goes down over all rows of the table.
436
Chapter 7 - Configuration
'TicketRules': Value Tables
'TicketRules': Value Tables
Introduction
For the foreach action (see ‘'TicketRules': Define Foreach Loop’ on page 435) value tables
can be defined. Each column of a value table has a unique name to refer to it. With the
foreach action a loop is started over each row of the specified value table. All other actions
can now refer by the column name to a specific value of the table.
The table is editable inside and outside of TicketRules, therefore it is possible to import
and export the table as a CSV-file. So the table could be created or edited in any spreadsheet calculation program. Each value table is referred by it's unique name.
Note:
All value tables which you define/import here are globally known over all ticket rules
and must therefore have a unique name.
Illustration
Create/Import Tables
Click the 'Add' button in the main tool bar to create a new table (insert unique name
and description).
Use the icons in the table details window below to build up the value table. The icons
can also be used to modify existing tables.
Note:
It is not possible to delete rows which are used in a rule.
Chapter 7 - Configuration
437
'TicketRules': Value Tables
Click the 'Import' button ( ) in the main tool bar to import a value table. If the value
table with this name already exists, the system checks whether the table is used. In this
case at least the column names used in rules must be present in the value table to be imported. In every case the table will only be imported if it is well defined, especially unique
names must be used for every row title.
438
Chapter 7 - Configuration
'TicketRules': Save and Log
'TicketRules': Save and Log
Save, Backup and Restore
If you click the ’Save’ button or if the application is closed and the question to save the
changes is confirmed with ’Yes’, the ticket rules are saved as xml-file in the directory
'/u/prismapro/cfg/ticketRules'. The rules are restored from this file, when the application
is opened again.
The list of known sections and keys is saved in the file '/u/prismapro/lib/ticketRules/ticketParameter.dat'. This file is updated, when changes have been approved in the list of
known sections and keys.
The value tables are stored in the '/u/prismapro/cfg/ticketRules' directory.
The ticket rules, value tables and the ticketParameter.dat file are exported as a part of the
database export during prismadiag.
The ticket rules, value tables and the ticketParameter.dat file are saved and restored in a
’Backup/Restore’.
If Océ PRISMAproduction Server is updated, the ticket rules and the list of known parameters are restored. If the default list of known parameters has been changed between
the old and the new version, the ticketParameter.dat file is updated accordingly.
Logs and Traces
When a rule is applied to a job ticket, a section named 'ticketRulesHistory' is added at
the end of the ticket. This section contains a list of all parameters which were changed
by the rule, but with the value before the rule was applied. The syntax of the parameters
is:
'section.key = value '
For example: 'job.jobname = old_name'
For sections which can occur multiple times, also the number of the specified section is
defined:
'files[10].File_Copies = 3'
Traces are written into the files explorer.<Linux login_name>.out and explorer.<Linux
login_name>.err in '/u/prismapro/diag/explorer' and in explorerserver.log and explorerserver.err in '/u/prismapro/diag/explorerserver'.
Chapter 7 - Configuration
439
'TicketRules': Activate for LP, Download and HotDir
'TicketRules': Activate for LP, Download and HotDir
Introduction
Please choose as program for the job submission: ’TicketRules’ for the desired port,
printer or directory in the Download, LP or HotDirectory Configuration Window.
Examples for the usage for jobs transmitted via download to Océ PRISMAproduction Server:
■
■
■
Depending on the MVS jobs class, a specific Formdef should be selected for the job.
Depending on the FORMS parameter a specific Océ PRISMAproduction Server
printer should be selected in the job ticket.
Depending on the BUILDING and ROOM parameter specific Océ PRISMAproduction Server printers and Job queues are selected.
The description for the valid sections, parameters and values you find in ‘Oce Custom
Ticket’ on page 548.
440
Chapter 7 - Configuration
'Archives': Overview
'Archives'
'Archives': Overview
Introduction
In the ’Configuration’ workspace you find the 'Archives' application which allows you
to create new archives or to modify and mirror existing archives for the POD-Module
print data. Additionally you can create the database connection or set up the Document
Manager Cache for the archives. Finally you can back up and restore document and job
data.
The user interface consists of three or four tabs (the connection to the Document Manager Cache is not available as tab by default, it can be switched on via the menu):
Illustration
Tabs of the 'Archives' Application
■
■
■
'PFL Archives'. See ‘'Archives': 'PFL Archives'’ on page 443
'Database Links' / 'Document Manager Cache'. See ‘'Archives': 'Database Links' /
'Document Manager Cache'’ on page 445
'Administration'. See ‘'Archives': 'Administration'’ on page 451
Tool Bar Icons
#
Icon
Description
Create archive
Opens a dialog to create a new archive.
See ‘'Archives': 'PFL Archives'’ on page 443.
Delete archive/mirror
Opens a dialog, which allows you to select the correct server for
the deletion of the marked archive in the list.
Chapter 7 - Configuration
441
'Archives': Overview
442
Icon
Description
Mirror archives
Allows you to mirror the selected archive on a different server.
Select a server in the dialog box and click ’OK’.
Reload data from
server
Shows the actual status of the data stored in the database. Any
changes that you have made via the interface are discarded if
you do not save them prior to executing this function.
Chapter 7 - Configuration
'Archives': 'PFL Archives'
'Archives': 'PFL Archives'
Introduction
The 'PFL Archives' list displays all archives which are configured on the servers of the
POD system.
List of archives
The 'Archives' list displays all archives which are configured on the servers of the POD
system.
#
Column title
Description
Name
Name of the archive. The name must start with a character.
Only numbers and characters are allowed.
Type
Final cache
Print jobs that are ready and that can be reprinted anytime are
stored in the final cache. These jobs can no longer be modified,
however. Files stored under the same name are not overwritten
and are assigned with an internal number.
Preprint cache
Stores data, which have to be saved for further processing, for
example converted IOCA files which are not yet imposed. The
Preprint Cache is also used to prepare a job. You should use
this function if you want to test several PDC settings for one
print job.
To do this, you should create a job ticket for which you have
not yet made Composer settings. The system will then run the
files of the print job through the corresponding converters and
store them on the server. After this is done, you can load these
print jobs, edit them with the Composer and view them with
the PDV, if you wish. You can repeat this process until you are
pleased with the results. If you store modified files under the
same name, the old files are overwritten. The advantage of this
mechanism is that there is no need to repeatedly convert the
files of the print job.
Description
More detailed description of the archive.
Server
Displays the server, on which the archive is located.
Chapter 7 - Configuration
443
'Archives': 'PFL Archives'
Column title
Description
Database links
Displays the database type the local archive is connected to.
Except for the preprint archives all archive are connected to a
database. The default connection is to the PostgreSQL database,
which ships with the Océ PRISMAproduction Server software
(DEFAULT).
Ready
Indicates that the archive is stored correctly and ready to use.
This might take a while if you mirror archives of many
megabytes. You can only use archives in the PJM, which have
the status 'Ready'.
Create a PFL Archive
Click the 'Add' button ( ) or select menu ’PFL Configuration’ -> ’Create library’ to
create a new PFL archive:
■
■
444
In the followin dialog enter a 'Name' for the new archive (only alphanumeric characters
are allowed).
Select as archive 'Type' ’Final cache’ or ’Preprint cache’. This selection depends on
the type of data you want to save (see description above).
After entering a more detailed 'Description' of the archive, you can select the 'Server'
from a list (if the POD system consists of more than one server).
Under 'Database Link' you can select the default database link (DEFAULT=Postgres)
or a name of another connection, which has to be configured before on the ’Database
links’ tab (see ‘'Archives': 'Database Links' / 'Document Manager Cache'’ on page 445).
Archives of the ’Preprint cache’ type cannot be linked to a database. The selection is
the deactivated.
If you click ’OK’ the archive is physically created on the selected server. The changes
are saved in the database. A message informs you about the successful creation of the
archive.
Chapter 7 - Configuration
'Archives': 'Database Links' / 'Document Manager Cache'
'Archives': 'Database Links' / 'Document Manager Cache'
Introduction
From version 3.10 all archives are always linked to a database.
The documents of the PFL archives are kept in the file system while the meta data of
these documents are saved in an external database.
Meta data of the documents are additional information like the last access of the document,
the access frequency of the document, the input files from which the document has been
created and many more job ticket details.
In the PJM file selection these meta data enable you to search for specific properties of
documents and to find them accordingly (see ‘'Archives': Search Function’ on page 453).
From this version of the Océ PRISMAproduction Server POD-Module you can only
create PFL archives which are connected to a database.
Documents of externally connected PFL archives are always exported to this external
archive. This means that the document data are always kept together with the meta data
on one server.
The connection to a Document Manager database on a Windows server is a special case:
only in this case a cache can be created and only in this case the document data are stored
directly in the database. If the physical disk space of the PFL archive is running short,
some documents will be deleted according to a specified threshold and method. Documents
stored on an external archive are not affected by this procedure! In this way the PFL
archive can be regarded as a cache. If you need again documents, which have been deleted
from the PFL archive, they will automatically be retrieved from the external archive.
Note:
To ensure, that the algorithm for deletion of documents in the PFL archive works
properly, you should assign an own partition to the externally connected archive for example for '/u/prismapro/data/archive/Default'. The threshold which controls the deletion
of documents always relates to the disk space of the whole partition.
Configuration
There are two dialogs in Océ PRISMAproduction Server, which allow the configuration
of this feature:
Chapter 7 - Configuration
445
'Archives': 'Database Links' / 'Document Manager Cache'
#
Dialog
Description
'PFL Database
Link Wizard'
Configuration of a connection to the database.
Set the user name, password and IP address of the server, on
which the external archive is located. By default the PostgreSQL
database, which comes with Océ PRISMAproduction Server,
is connected (see ‘'Archives': Appendix’ on page 455). You can
use the administration application described below only with
this database. Still it is possible to connect other types of
databases (see ‘'Archives': Appendix’ on page 455).
'Create Document
Manager Cache'
This dialog creates the link between PFL archive and the Document Manager database.
Set the PFL archive. Configure also the threshold for the beginning of deletion, the amount of data to be deleted and the
deletion method. From version 3.10 the configuration of the
cache archive (as PFL.cache for external archives) is provided
for the Document Manager as external database system only
(see ‘'Archives': 'Database Links' / 'Document Manager Cache'’
on page 445).
Create 'Database Links'
Before you can connect a PFL archive to another database as the default database, you
have to create a database link in the system an save this link under a specified name:
In the 'Archives' window first activate the ’Database links’ tab or click on
configuration wizard. The wizard guides you through the following steps:
■
■
■
446
to start the
Enter a 'Name' for the link
Selection of the 'Database System': Postgres, MySQL, DB2, Firebird, MS SQL, Oracle,
SAP_DB or Document Manager (Postgres=Default). Enter the 'Port' number for the
connection and the 'Server or IP', which holds the database. If you select the Document
Manager, no port value is preset.
Enter the 'Database User' (select a login account of an Océ PRISMAproduction
Server user from the list) and a 'Database Password' (at least six characters). The name
of the selected user must be identical with the user created on the external server.
Chapter 7 - Configuration
'Archives': 'Database Links' / 'Document Manager Cache'
■
■
Select the 'Document Transfer' (specification of the network filesystem). The transfer
types are described in detail in ’Network Filesystems selectable for the Data Transfer’.
Display of a 'Conclusion' of your settings. If you click ’Finish’, the database link will
be added to the list.
After creating a database link, you can create an archive, which can be connected to this
database. See ‘'Archives': 'PFL Archives'’ on page 443.
Create 'Document Manager Cache'
From version 3.10 the configuration of a cache archive (as PFL cache for external archives)
is only possible for the Document Manager as external database system.
■
In the 'Archives' window activate the 'Database Links' tab and select menu 'Database
Links Configuration' -> 'Document Manager Cache Configuration':
■
A new tab 'Document Manager Cache' appears, which allows you to create the cache
(provided the connection to the Document Manager server is active):
■
Select menu 'Document Manager Cache Configuration' -> 'Create Document Manager Cache'. The following dialog opens:
Chapter 7 - Configuration
447
'Archives': 'Database Links' / 'Document Manager Cache'
#
448
Ui Element
Description
'Name'
Free form name of the Document Manager cache. Only use
alphanumeric characters.
'PFL Archive'
Select the desired PFL archive (for example ’PflArch01’).
'Cache Threshold
[MB]'
Value from which the deletion of documents in the PFL is
started. This value must not exceed ’Maximal available size on
partition'.
'Maximal available
size on partition:'
Size of the partition, on which the PFL archive is located.
'Current used size
on partition:'
Currently used size of the partition, on which the PFL archive
is located.
'Cache Cleanup
[%]'
Percentage value between 0 and 100. It defines how many percent of the data in the PFL archive are to be deleted if the
threshold has been exceeded.
A document which is deleted from the PFL has the size -1. This
means this document is not stored locally anymore, but only
on the external server.
'Cache Cleanup
Method'
Opens a list of available methods:
- Date: Deletion depends on the date. Oldest documents first.
- Size: Deletion depends on the size. Smallest documents first.
- Match: Deletion depends on a pattern. Wildcards like * or ?
are allowed. All documents which match the pattern are deleted.
- NonMatch: Same as above, but all documents which do not
match the pattern are deleted.
'Database Link'
Select the external archive, which should be connected to the
PFL archive selected above.
Chapter 7 - Configuration
'Archives': 'Database Links' / 'Document Manager Cache'
Create a Document Manager Database on an External Server
A version of the Document Manager must be running on the Windows 2000/2003
server, where the external archive should be created (see ’Océ PRISMAarchive Document
Manager’ User Guide, chapter 11).
Configuration of the Document Manager on the Windows 2000 (2003) Server for
the correct Connection to the Print File Library
■
■
Create user: For a correct connection to the Print File Library you have to create a
user pfladmin after the installation of the Document Manager (under Windows).
This user must have the same password, which has been used to set up the database
connection under PRISMAproduction.
If a different user than pfladmin has been set for the database connection, under
Windows an account for a user of the same name has to be created. Under Windows
this user should be part of the "DocMa Document Managers" and "DocMa System
Administrators" groups.
Settings in the PRISMAarchive Administration: Use the tool under ’Programs’ ->
’Oce’ -> ’Oce PRISMAarchive’ -> ’Administration’ to create the PFLEXT database
under this user account:
Under ’Console Root’ -> ’Oce PRISMAarchive Administration’ -> ’Storage Administration’ -> ’Archives’ create an archive with the name PFLEXT.
Under ’Console Root’ -> ’Oce PRISMAarchive Administration’ -> ’Document Administration’ -> ’Attributes Pool’ set up the following attributes with name, type and
length:
#
Name
Type
Length
PflName
String
256
PflPath
String
256
PflSearch
String
1024
PflVersion
Integer
-
■
■
Under ’Console Root’ -> ’Oce PRISMAarchive Administration’ -> ’Document Administration’ -> ’Document Templates’ create a template with the name PFLDOCUMENT
which contains the attributes PflName, PflPath, PflVersion and PflSearch.
Under ’Console Root’ -> ’Oce PRISMAarchive Administration’ -> ’Document Interfaces’ -> ’Profile’ create a profile in the Business Domain Defaullt with the name
PFLEXT and the owner pfladmin (or the user ID created under Océ PRISMAproduction Server).
IIS=Internet Information Service (Winows Server 2000/2003)
Chapter 7 - Configuration
449
'Archives': 'Database Links' / 'Document Manager Cache'
Start the tool with ’Start’ -> ’Administrative Tools’ -> ’Internet Information Services (IIS)
Manager’ and allow under ’Internet Information Services’ -> ’Local Computers’-> ’Web
Service Extension’ the following settings:
■
■
■
■
450
All unknown CGI Extensions
All unknown ISAPI Extensions
Active Server Pages
Server-Side Includes (SSI)
Chapter 7 - Configuration
'Archives': 'Administration'
'Archives': 'Administration'
Introduction
On this tab you find a collection of basic administration tools for the archives and external
databases. You can save and restore the data, you can automate the backup process and
you can transfer data from older Océ PRISMAproduction Server versions.
Illustration
'Backup documents and job data'
Note:
This backup works only for the Océ PRISMAproduction Server PostgreSQL database
system and the PFLEXT database.
For backups with different databases, the database itself or the system administrator is
responsible. It cannot be performed by Océ PRISMAproduction Server itself.
Here you can select the directory and the name of the backup. The default database
PFLEXT of Océ PRISMAproduction Server will then be saved under this name:
Note:
Not only the documents of a PFL archive are saved, but also the meta data of the PFLEXT
database. This means that document data AND meta data are saved in one file with the
.backup.tgz extension.
Chapter 7 - Configuration
451
'Archives': 'Administration'
'Restore documents and job data'
' Restore Filename': The backup ’filename’ is restored in the Océ PRISMAproduction
Server PostgreSQL database system.
'Import documents of previous PRISMAPro versions'
Indicate the directory, which contains the documents of the older program versions. Then
enter the PFL archive, which should receive these documents.
The documents are copied from the directory into the PFL archive. Then the meta data
will be analyzed and written to the database.
'Automated backup of documents and job data'
This dialog allows you to automatically backup the document and job data daily, weekly
or monthly from a defined point in time. The backup is written into the given directory
under a given filename. If you select 'with date stamp', the current date will be added to
the filename.
Additionally an e-mail can be sent automatically to a certain receiver as soon a backup is
started. The respective mail server has to be configured under System in the configuration
workspace.
The settings can be summarized in the 'List of tasks'. This list can contain several tasks.
If you click ’Apply’, the tasks are accepted by the system.
452
Chapter 7 - Configuration
'Archives': Search Function
'Archives': Search Function
Introduction
If you search the local file system, you have the following possibilities:
Search Locally with the PJM File Selection
Click 'Add input File' ( ) in the PJM ’List of Files’ section. Then click the search icon
( ). Now you can search the Océ PRISMAproduction Server file system for the required
files.
You can search for a file 'Name (*,? possible):' (wildcards * and ? are allowed) or for
'Content:' (text, which is in the file, you search for) or for files of a certain 'File size:' ot
modification date ('Last modified:'). You can also include 'Subdirectories' in the search.
If you search in archives, which are connected with a database, you can select much more
criteria to find the correct files:
Search in PFL archives connected with a database
Open again the file selection dialog in the PJM and navigate under ’Look in’ to an external
archive. If you click the search icon, the dialog will be enlarged and provides now a sub
dialog, which allows you to search the external archive.
This sub dialog offers four tabs to specify you search:
#
Tab
Description
'Document'
If you select this tab, you can search for documents according
to certain attributes like 'Size' ('Greater than', 'Smaller than'),
'Last access' (’From date’, ’To date’), Hits (’More than’, ’Less
than’) and Creation date ('From date', 'To date').
The number of 'Results' cab be limited (up to 200).
'Job Info'
Under this tab you can specify 'Job name', 'Job queue', 'Printer
name' and 'Printer type' of the jobs you are searching for.
'Job Info Client'
Under this tab you can specify information on the client as a
search filter to find the desired jobs.
'Job Info Receiver'
Under this tab you can specify information on the receiver as
a search filter to find the desired jobs.
'Inputfile'
Under this tab you can specify attributes of the input file like
'Name', 'Format' (none, IOCA, PCL, TIFF, PDF-Unity, PSUnity), 'ImpScheme' and 'ImpSetname'
Chapter 7 - Configuration
453
'Archives': Search Function
. After you have selected the search criteria and after clicking the search button, the search
result is displayed in the upper part of the window.
If the default settings on a tab have been modified, the caption of the tab turns red.
The output of the results is also influenced by the number of results you have specified
and the ’File type’ filter.
454
Chapter 7 - Configuration
'Archives': Appendix
'Archives': Appendix
Network File Systems Selectable for the Data Transfer
#
File System
Description
Local
File transfer as in previous Océ PRISMAproduction Server
versions (Océ PRISMAproduction Server data transfer with
master-slave configuration).
NFS
Network File System. The administrator has to mount a directory from the NFS server on the Océ PRISMAproduction
Server server.
On the NFS server: The file '/etc/exports' must contain the
path, server and access rights of the server which accesses the
NFS server.
Example: '/usr/data/archiv 192.168.0.7'(rw, root_squash)
On the Océ PRISMAproduction Server server: You have to
indicate the directory of the PFL archive as mount point. The
default path of the PFL archive is: '/u/prismapro/data/archive'.
When mounting, you have to add the directory of the PFL
archive, for example: 'mount -t nfs jupiter:/data
/u/prismapro/data/archive/Default'
The NFS directory can also be mounted permanently by adding
it to the '/etc/fstab'. After mounting the directory, the documents are written into the external directory instead of the local
PFL.
Chapter 7 - Configuration
455
'Archives': Appendix
File System
Description
SMBFS
Server Message Block File System like Samba. The administrator
has to mount a directory form the Samba server or from a
Windows computer (which inherently supports this file system)
on the PRISMAproduction server.
On the Windows computer or the Samba server: The respective
directories must be released with write permission for the user
root.
On the Océ PRISMAproduction Server master: The directory
of the PFL archive has to be indicated as mount point. The
basic path of the PFL archives is '/u/prismapro/data/archive/'.
When mounting, you have to add the directory of the PFL
archive, for example: 'mount -t smbfs -o rw,lfs,username=root,fmask=0,dmask=0 //windows/data//u/prismapro/data/archive/Default'
The Windows directory can also be mounted permanently by
adding it to the '/etc/fstab'. After mounting the directory, the
documents are written into the external directory instead of the
local PFL.
cifs type mount instead of smbfs type
mount
For mounting file systems (shares) on Windows 2000 and later
replace the used connection type form “smbfs” to “cifs”. Instead
of using mount –t smbfs –o lfs<, more options> you should use
mount –t cifs –o <options>. This connection has no problem
handling all files, also bigger than 2GB.
Note:
The command syntax regarding all options has changed
respective to smbfs! Please see ‘man 8 mount.cifs’ for
further details.
456
Chapter 7 - Configuration
'Archives': Appendix
File System
Description
NCPFS
Netware Core Protocol File System like Novell Netware. The
administrator has to mount a directory of the Netware server
on the Océ PRISMAproduction Server master.
On the Netware server: The respective directories must be released with write permission for the user root.
On the Océ PRISMAproduction Server master: The directory
of the PFL archive has to be indicated as mount point. The
basic path of the PFL archives is '/u/prismapro/data/archive/'.
When mounting, you have to add the directory of the PFL
archive, for example: 'ncpmount -S server -U root -V volume
/u/prismapro/data/archive/Default'
The Netware directory can also be mounted permanently by
adding it to the '/etc/fstab'. After mounting the directory, the
documents are written into the external directory instead of the
local PFL.
Note:
Unfortunately you cannot automate the mounting of NFS, Samba and Netware directories, because administrator permissions are required for password input, creation of
directories on external servers, adjusting access rights and other system activities. If you
select one of the three network file systems when creating an external archive, you should
mount the PFL archive on the external server as soon as you create the PFL archive
which should be connected to the external archive.
Default Database System PRISMAproduction PostgreSQL
With the version 4.0 a PostgreSQL database system is installed. In contrast to the default
settings, the base directory of PostgreSQL is located in '/u/prismapro/data/postgres/base'
and as port 5433 is used. Thus previous installations of PostgreSQL databases will not
be disturbed.
Database users ’postgres’ and ’pfladmin’ are created. In the configuration files the postgres
user will be granted full local access to the database system and the pfladmin user is
granted local and external access to a database called PFLEXT. Every access, action or
transaction on this database will be recorded in the file '/u/prismapro/diag/postgres/log'.
The PFLEXT database will be created on installation and initialized with the SQL script
'/u/prismapro/data/postgres/share/PFLEXT.postgres'.
In Océ PRISMAproduction Server an external archive called DEFAULT is always created.
The PFL archive DEFAULT is connected to the external archive of the same name.
After a restart, a PFL archive DEFAULT exists, which contains the documents locally
on the master whereas the meta data of these documents are stored in the external archive.
Chapter 7 - Configuration
457
'Archives': Appendix
Configuration of an External Database System
JDBC Driver
The access from Océ PRISMAproduction Server over Java and SQL statements to an
external database system is performed via JDBC drivers. Basically it’s not important which
system is connected. Still it is required copy the JDBC driver of the respective database
system into the Explorer directory /u/prismapro/lib/explorer/codebase and to perform a
’Reset Océ PRISMAproduction Server’.
For all database systems offered in the Océ PRISMAproduction Server configuration dialog JDBC drivers are provided, depending on the platforms and versions. You have to
copy them into the above mentioned directory before you can use them.
User
The configuration of users with access permissions and other system settings is different
for every database system. To make a database user selectable, you have to create a new
user in Océ PRISMAproduction Server. The external password, which is required in the
dialog, is only valid for the external database and has no effect within Océ PRISMAproduction Server itself. A database user pfladmin is created by default.
Design of the PFLEXT Database
It is very important that you create a database on the external database system with the
exact name: PFLEXT. This database must have exactly the tables, fields and initializations
as the SQL script for PostgreSQL below.
The SQL script '/u/prismapro/data/postgres/share/PFLEXT.postgres' creates the required
tables and fields for the PFLTEXT database. This script does not work for other database
types, for example because other databases use different names for data types.
Nevertheless this script should be a hint, how the PFLTEXT database can be used on
other systems, after some modifications.
Create table PFLDOCUMENT
Create table PFLINFILE
Create table PFLROOT
Create table PFLMAXID
Create index entries for fast database access
Initialization, set start values for PFLMAXID
'INSERT INTO PFLMAXID VALUES ('0','0');'
Hints for the data types used in PostgreSQL
458
Chapter 7 - Configuration
'Archives': Appendix
#
TEXT
Variable length character string without limitation
SMALLINT
Integer, 2 bytes
INT
Integer, 4 bytes
BIGINT
Integer, 8 bytes
Chapter 7 - Configuration
459
'Input Modules': Overview
'Input Modules'
'Input Modules': Overview
Introduction
The Input Modules 'Download', 'HotDir' and 'LP' receive print jobs for the Océ
PRISMAproduction Server print server. These jobs are processed, enhanced with server
specific job information and spooled. The print jobs can be provided with information
in order to control the print job.
Note:
The terms ’Input Modules’ and ’Input Channels’ are identical.
The 'Input Status' view shows the print jobs when they are being received, when they are
submitted successfully or when an error occurred.
See chapter 'Input Status" in the Océ PRISMAproduction Server User's Guides.
460
Chapter 7 - Configuration
'Input Modules': Overview
Illustration
Overview on the Behavior and Features of the different Input Modules
#
‘'Download'’ on
page 474
‘'HotDir'’ on page
488
‘'LP'’ on page 508
Protocol
Proprietary from
IBM
Indirectly, using
FTP, NFS, SMB
or by file copy, link
or move
Standard,
RFC1179
Client software
needed
Host Router from
Océ or Download
from IBM
Not explicitly necessary
Yes
Special Océ
PRISMAproduction Server license
needed
Yes
No
No
Data transmission
re-start possible
Yes, using check
pointing starting at
the last correct
checkpoint
Only when the
used transfer protocol supports this
No
Chapter 7 - Configuration
461
'Input Modules': Overview
Receiving compressed data
Partly, decompression script is needed
Partly, decompression script is needed
Partly, decompression script is needed
Data file parameter
extraction (= OCT
control)
Supported for the
AFP data format
Supported for the
AFP data format
Supported for the
AFP data format
Océ custom ticket
(OCT) control
Limited, using JCL
and User Exits on
the MVS host
Full, using field
names and / or by
providing an OCT
Limited, using the
LP control
Job mirroring
(needs Interconnectivity license)
Can mirror data
files on the fly or
mirror with job
submission
Job submission
mirroring only
Job submission
script is needed
Configuration
The configuration of the Input Module types 'Download', 'HotDir' and 'LP' has been
combined in one configuration view called 'Input Modules'
In the upper window section an overview of the already defined input channels ('Download' ports, 'HotDir' directories and/or 'LP' printers) is displayed. The columns of the
lower window show the main settings of the input channel(s).
After having selected one entry in the upper window the parameters of this input channel
can be modified in the lower left window section. When a parameter is selected, the
lower right window section shows the parameter defaults and a description.
Input Modules Tool Bar
#
462
Icon
Description
Save
Save the Input Module changes. For each changed Input
Module type a question pops up whether this Input Module is
to be restarted.
Nothing happens when no changes have been made.
'Create new Input
Channel'
By clicking the main icon the same Input Module type is created
as currently is selected.
By clicking the down arrow a pop up menu is shown where the
Input Module type to be created can be selected.
'Copy selected Input-Channel'
Create a copy of the currently selected input channel.
Chapter 7 - Configuration
'Input Modules': Overview
Icon
Description
'Delete selected Input-Channel'
Delete the currently selected input channel.
'Reload configuration'
By clicking the main icon, all changed Input Module configurations are discarded and the previous settings are reloaded.
By clicking the down arrow, a pop up menu is shown, where
the changed Input Module types to be re-loaded can be selected.
'Filter Services'
By clicking the main icon the filter will be applied for the currently selected Input Module type.
By clicking the down arrow, a pop up menu is shown, where
the Input Module type to be used as filter can be selected.
'Open PJM with
selected Default
Ticket'
Open the default ticket with the Print Job Manager. Please note
the following points, when opening a default ticket:
■ Default tickets must not contain any print file names but
file defaults!
■ Default tickets must be stored in the predefined directory
($JOBINPUT_TICKETS = u/prismapro/cfg/jobinput/ticket). Within this directory you can create one subdirectory.
■ Default tickets which are delivered with the system can be
distinguished by the leading ’.’ in the file name. These tickets
should not be modified, because they will be ignored by a
configuration backup/restore and will be overwritten, if you
update the system. These files serve as examples, which can
be modified and saved under a different name without a
leading ’.’.
The menu ’Edit’ contains an additional entry: 'Edit global parameters'. If you select this
entry, a dialog opens, which allows you to configure global parameters for each type of
input channel. Such parameters are for example trace level and flags.
In the lower part the parameters are divided into groups to show which of these parameters
belong together. The group column is used for this purpose. For Download the following
groups are used:
#
Group
Description
General
General 'Download', 'HotDir' or 'LP' parameters.
Data Input
Define the data structure of the input file.
Data Output
Define the data structure of the output file.
Chapter 7 - Configuration
463
'Input Modules': Overview
Group
Description
OCT
Define the job Control parameters.
Job Submission
Define job submission and job mirroring.
Extraction of OCT Parameters from Data File
One possibility to set Océ Custom Ticket (OCT) parameter is to write them into the
data file and to extract them with the input modules. This feature offers you more control
over printing the job. This works even if the transfer protocol (LP for example) doesn't
give a possibility to pass these parameters. At the moment only parameters in the AFP
data files are supported.
If multiple data files belong to one Océ PRISMAproduction Server job, each of these can
have parameters which can set the file section OCT parameters individually. Be aware
that not all file section parameters changes can be handled correctly in a multi file job.
For the other OCT sections the first value found is taken. The values in the following
data file(s) from the same job are ignored.
All parameters in the 'Specification PPS Job Ticket', sections 'job' and 'files' can be used,
but you have to be aware, that not all parameters are suitable. An example is the parameter
files.File=Filename because it is not known in which path the file is located after transmission.
The parameters are integrated without testing whether they are correct or not. In this
case the user takes the responsibility. It the section is not specified, the parameter(s) are
written into the 'userinfo' section. If you want to add your own parameter(s), it is
strongly advised to put these into the 'userinfo' section.
Each Input Channel has the parameter 'ExtractParameter' which controls this feature.
The following values are allowed:
■
■
■
464
Off = No parameters are extracted from the data file(s)
AFPParameters = Parameters are extracted from the beginning of the AFP NO’OP's
data file.
PCLParameters = Parameters are extracted from the beginning of the PCL data file.
Chapter 7 - Configuration
'Input Modules': Overview
Default Job Ticket
The Default Ticket can be used to specify general Océ PRISMAproduction Server settings
for an input channel. These tickets do not contain a file section ([file]). Instead, a file
defaults section ([filedefaults]) exist.
The parameters defined in the file defaults section are used to specify defaults for all the
data file(s) belonging to the job. These defaults are used unless they are overwritten by
another parameter source.
The Default Tickets can be found in '/u/prismapro/cfg/jobinput/ticket'. Sub directories
are allowed. Blanks are allowed in default ticket names, but it is suggested not to use
blanks, these are difficult to handle in Job Submission scripts.
The delivered example Default Ticket names start with a '.' (dot). These tickets will be
overwritten each time the RPM, which provides these tickets is installed. Even if a configuration backup has been performed, these ’dot tickets’ are NOT saved. It is therefore
strongly recommended to rename the tickets, if they are modified and the to omit the
leading dot.
To edit or create the Default Ticket, the PJM icon can be used in the Input Modules
tool bar.
The Job Submission Script
Note:
Prefer to use the Ticket Rules application if it can replace the current Job Submission
functionality. The use of the Job Submission script is slow and increases the risk of
loosing a job if this script is not programmed properly.
Note:
Switch traces on to see how the input module calls the job submission script and to see
the contents of the generated Oce Custom Ticket. For details see the chapter 'Generating
a trace file'.
The print data files are received ('Download', 'LP') or detected ('HotDir') by the Input
modules. As soon as the file is received correctly, the print job is submitted into the Océ
PRISMAproduction Server spooler. An exception is the Download 'print while spooling'
feature, where a print job is submitted before the complete data file is received. It is also
Chapter 7 - Configuration
465
'Input Modules': Overview
possible to specify grouped jobs where multiple data files are submitted as a single print
job.
The print job submission is done by calling the 'pjm' program with the 'Default ticket',
OCT and some other specified parameters. By specifying a script name instead of the
'pjm' executable, a special customer specific modification can be done.
The better way of customization is using the Ticket Rules to modify the parameters of
the ticket during the 'pjm' submit process instead of a submit script.
Another possibility is to use a customization script, which calls the pjm program to submit
the job, after the OCT modification or data file conversions are done. This is no longer
neccessary if only ticket parameters have to be modified, as the TicketRules application
provides a sure, maintainable, in the workflow well-documented and high performant
solution for this task.
Note:
Be aware that during the execution of the customization script the HotDir Input Module
daemon is waiting for the script to finish. The longer the script needs to be executed the
higher the risk is to loose the print job. So please make it fast and short.
The customization script is called with the same parameters as the syntax of the job submission program. The scripts must be saved in the directory '/u/prismaproduction/cfg/jobinput/bin'. The syntax of the job submission program is:
'/u/prismapro/bin/pjm -t [Ticket] -oct [OCT] -force -id [JobId] -user [Username] -tr
[TicketRule] -mirror [MirrorServer] -mp [MirrorPolicy] -mnd'
#
466
Parameter
Description
-force
Always accept the job and spool it into the Océ PRISMAproduction Server spooler, even when minor errors occur.
-id [JobId]
The Océ PRISMAproduction Server job identifier. Don’t
change this parameter !
-mirror [MirrorServer]
Name or IP-Address of the mirror server. Must be the same as
specified in the Océ PRISMAproduction Server System configuration (dependent on the interconnectivity license). Parameter
only exists when Input Channel has mirroring configured.
Chapter 7 - Configuration
'Input Modules': Overview
Parameter
Description
-mnd
Input Modules has mirrored the job data files already. The following PJM call will only exchange the job Ticket and activate
the job with the correct status on both servers. This Parameter
is dependent on the interconnectivity license. This Parameter
only exists when it is configured for this Input Channel.
WARNING: Don’t mirror the job data file with the Input
Modules when the job submission script changes the data files.
This causes problems when the job has to be printed on the
mirror server!
-mp [MirrorPolicy]
Defines the error handling when the mirror server is not available. Parameter is dependent on the interconnectivity license.
Parameter only exists when Input Channel has mirroring configured. "Mandatory": When job mirroring fails the job also
fails on this Server "Optional": Job continues on this server
even when the mirroring fails
-oct [OCT]
Name and path of the Océ Custom Ticket (OCT or job ticket).
Any value in this ticket overrides the values in the default ticket.
-t [Ticket]
Name and path of the default ticket. Must be in a (sub-) directory of '/u/prismapro/cfg/jobinput/ticket/'
-tr [TicketRule]
Name of the ticket rule to be used when this job is submitted.
This Parameter only exists when it is configured for this Input
Channel.
-user [Username]
Name of the Input module name. This value must be a valid
Océ PRISMAproduction Server system user. Using another
value than specified below will cause problems. This parameter
must have one of the following values:
Download daemon -> Download
HotDir daemon -> HotDir
LP daemon -> LP
If no errors occur and the job is accepted by the Océ PRISMAproduction Server system,
this script should have the return code '0'. In all other cases the return code may be everything except the value '0'. This will then cause the Input Module to encounter that an
error has occurred and write an error message.
Note:
Be aware that incorrect implementation of this customization script can cause a loss of
data files/jobs get lost.
Chapter 7 - Configuration
467
'Input Modules': Overview
The standard output and standard error from the script are normally read and when errors
occur they are shown as part of the daemon error message. The message size of the script
standard output and standard error is limited, so please use this with care. Not all daemons
handle this correct yet, but will do this in the future.
It is also possible to write messages into the Océ PRISMAproduction Server message view
by using the ppmsg program. See also chapter 'Command Line Interface' -> 'Messages'
-> 'Send Messages' section in the Technical Reference Manual.
Syntax: 'ppmsg -m [Module] -j [Jobid] [MsgId] [Insert1] [Insert2] …'
#
Parameter
Description
-m Module
Name of the message sender (for example the name of the script)
-j Jobid
Job identifier
MsgId
Message identifier, for static message text in scripts use the following message identifiers:
98000000 - Info type
98000001 - Warning type
98000002 - Error type
98000003 - Log entry
98000004 – Question
Note:
It is not recommended to use questions in an automated
workflow, because this may lead to a number of problems).
If the names or the path of the Default Ticket and the OCT contain blanks, special
handling is needed especially for the job submission program 'pjm'.
Note:
Do NOT re-direct the output of the 'pjm' program. Otherwise the cause of the job
submission problem cannot be seen in the user messages!
Also do not write too much text to the stdout or stderr file descriptors.
See 'LP Job Submission for Mirroring and Ticket Rules' chapter for LP mirroring and
Ticket Rule examples.
For an example of the job submission script please see the file:
' /u/prismapro/cfg/jobinput/bin/.jobsub_example.script'
468
Chapter 7 - Configuration
'Input Modules': Overview
Input Parameter to Info Pages Mapping
#
IBM Option
(LP)
MVS/JCl
Parameter
-oac, -oaccount
(HotDir) OCT Parameter
Info Page Parameter
receiver.Acc_Custom_Id
-oaddress1
ADDRESS
receiver.Rec_Street
ADDRESS1²
-oaddress2
ADDRESS
receiver.Rec_ZIP
ADDRESS2²
-oaddress3
ADDRESS
receiver.Rec_City
ADDRESS3²
-oaddress4
ADDRESS
receiver.Rec_Country
ADDRESS4²
-obi, -obin
INTRAY, IBIN
job.intray
PDSIBIN
-obu, -obuilding
BUILDING
receiver.Rec_Building
BUILDING²
-occ
DCB=RECFM
originator.Sending_Param_-occ
-occtype
DCB=RECFM
files.Pdscc
-ocd, -ocdp,
-ocod, -ocodepage¹
originator.Sending_Param_-occd
originator.Sending_Param_-occdp
originator.Sending_Param_-ocod
originator.Sending_Param_-occdepage
-ochars
-OCHARS
CHARS, UCS
originator.Sending_Param_-OCHARS
FONTS
-ocop, -ocopies
COPIES
job.Copies
COPIES
-odatac, -odatack
DATACK
files.PDSDCK
-odatat, odatatype
-ode, -odepartment
files.DataType
DEPT
receiver.Rec_Company
DEPARTMENT²
Chapter 7 - Configuration
469
'Input Modules': Overview
IBM Option
(LP)
MVS/JCl
Parameter
-odi, -odistribution¹
Info Page Parameter
originator.Sending_Param_-odi originator.Sending_Param_odistribution
-odo, -odocname,
-ojobn, -ojobname
JOB_NAME
job.Job_name
JOBNAME²
-odu, -oduplex
DUPLEX
files.Pdsduplx
PDSDUPLX²
-of, -oformdef
FORMDEF
files.Formdef
FORMDEF²
-OFILEFORMAT
originator.Sending_Param_-OFILEFORMAT
-oh, -oheader¹
originator.Sending_Param_-oh
originator.Sending_Param_-oheader
-oipdest
470
(HotDir) OCT Parameter
DEST=IP
-oin
job.Intray
-omsgc, -omsgcount¹
originator.Sending_Param_-omsgc
originator.Sending_Param_-omsgcount
-ona, -oname
NAME
receiver.Rec_Name
-ono, -onodeid
NOTIFY
userinfo.Notify
-ooffxb
OFFSETXB
files.PdsOffXB
PDSOFFXB²
-ooffxf
OFFSETXF
files.PdsOffXF
PDSOFFXF²
-ooffyb
OFFSETYB
files.PdsOffYB
PDSOFFYB²
-ooffyf
OFFSETYF
files.PdsOffYF
PDSOFFYF²
-oou, -ooutbin
OUTBIN,
OBIN
job.Outtray
PDSOBIN
-oov, -ooverlay
OVERLAYF
files.FrontSideOvls
FRONTSIDEOVLS
-oovlyb
OVERLAYB
files.BackSideOvls
BACKSIDEOVLS
Chapter 7 - Configuration
REC_NAME²
'Input Modules': Overview
IBM Option
(LP)
MVS/JCl
Parameter
(HotDir) OCT Parameter
Info Page Parameter
-opa class
CLASS
SYSOUT
originator.Sending_Param_class
job.Job_Class
HOST_CLASS²
QUEUE
-opa destination
DEST /
QUEUE
originator.Sending_Param_-optr-queue
HOST_DEST²
-opa, opassthru
originator.Sending_Param_-opa
originator.Sending_Param_-opassthru
-opa forms
FORMS
SYSOUT
job.Print_Form
FORM
-opa Job ID
JOB_ID
job.Reference_Id
REFERENCE_ID
REFERENID²
-opa segmentid
SEGMENT
SEGMENT_ID²
-OPAGEDEF
files.Pagedef
-opr, -oprogrammer
originator.Sending_Programmer_Name
-oprmode
-OPRMODE
PRMODE
-oresp, -orespath¹
-oro, -oroom
userinfo.PR_Mode
PR_MODE²
originator.Sending_Param_-oresp
originator.Sending_Param_-orespath
ROOM
receiver.Rec_Room
ROOM²
-osep, -oseparator¹
originator.Sending_Param_-osep
originator.Sending_Param_-oseparator
-osfo, -orchfo
, -orchfontlib¹
originator.Sending_Param_-osfo
originator.Sending_Param_-orchfo
originator.Sending_Param_-orchfontlib
Chapter 7 - Configuration
471
'Input Modules': Overview
IBM Option
(LP)
MVS/JCl
Parameter
(HotDir) OCT Parameter
Info Page Parameter
-oti, -otitle
TITLE
originator.Sending_Title
TITLE²
-otr, -otrailer¹
originator.Sending_Param_-otr
originator.Sending_Param_-otrailer
-otrc
DCB=OPTCD=J
TRC
files.Pdstrc
PDSTRC
-ous, -ouserid
USERID
originator.Sending_User
HOST_USER²
-oxo, -oxoffset¹
originator.Sending_Param_-oxo
originator.Sending_Param_-oxoffset
-oyo, -oyoffset¹
originator.Sending_Param_-oyo
originator.Sending_Param_-oyoffset
PORT
originator.Receiving_Input_Channel
PORT_NUMBER²
PRTQUEUE
job.Printer_Name
DESTINATION²
RESFMT
Job.DPI
RESOLUTION²
Notes:
¹ Not supported by Océ PRISMAproduction Server.
² LCDS Info pages supported parameter.
See the document "Print Services Facility MVS: MVS Download Guide" for a full description of the various parameters.
The Info pages keywords are only valid for the AFP Driver (SPS V4) and the IPDS
Driver (SPS V5). With these keywords defined in an Info page template the parameter
values will be printed on the info page. Other backends have their own keywords documented.
LCDS Module: Parameters marked with "²" are supported by LCDS in the sense, that
the Download parameter are passed through to the spooljob in order to be available to
be printed on SPS banner pages. These supported parameters are the general parameters
472
Chapter 7 - Configuration
'Input Modules': Overview
like ADDRESS etc.. Naturally the APA special parameters like FormDef / PageDef are
not supported, because they are not used by the LCDS module.
Hint for REFERENCE_ID / REFERENID. For LCDS REFERENCE_ID has always
been the reference from the print spool job to the ODS_ID of the converter job, which
has produced the print job(s). To be able to print the MVS Job_ID on SPS banner page,
please use the LCDS only parameter REFERENID.
Chapter 7 - Configuration
473
'Download'
'Download'
Introduction
The 'Download' Input Module (license dependent) makes it possible to receive print jobs
from the MVS Host using the TCP/IP network. To send the data on the MVS Host the
software product Océ PRISMAproduction Server Host Router from Océ Printing
Systems GmbH or the software product PSF MVS Download from IBM can be used.
The simplest use case is to send a single data file as job to the Océ PRISMAproduction
Server server. The 'Download' header is used to extract parameters for the OCT (See
’Parameter to OCT Conversion’ for details) and to submit the job to the spool. Additionally it is possible to extract parameters from an AFP print data file and to use these to
modify the OCT.
It is also possible to send grouped jobs (a job contains multiple data files). These can then
be submitted as one job or each print data file separate as one job. For details see the
'Download' configuration.
General
Parameter Priority
The Océ Custom Ticket (OCT) parameters are defined by several sources. When multiple
sources define the same parameter the source priority defines which value is taken. The
following parameter sources and priorities exist (priority increases from left to right):
Default Ticket -> Data file parameter -> Download header parameter
With the Download configuration parameter 'TicketParameterPriority' the priority of
the AFP No'op and the Download header parameters can be changed.
Unknown or Customer Specific Parameters
Unknown or customer specific parameters can be added using the AFP No'ops (see
chapter 'Extracting AFP parameters') or by using the Download-User Exit. The syntax
of the parameter must be as follows:
SECTION.PARAMETER=VALUE
where 'SECTION' is defined as the OCT section, the 'PARAMETER' as the parameter
in this section and the 'VALUE' the value this parameter should be set to.
The character '=' is not allowed as part of the value.
See MVS manuals for more information about Download-user Exits.
Compressed/encrypted data stream
When on the MVS system the Océ PRISMAproduction Server Host Router (from now
on called Router) product is used it is possible to send compressed data to the Océ
474
Chapter 7 - Configuration
'Download'
PRISMAproduction Server server. For this setup a special configuration for the MVS as
well as the Download daemon is needed. Also some restrictions exist at the moment,
which are listed below. Please refer to the Router manual for the settings needed on the
MVS system.
The following download configuration settings must be set to the specified values:
#
Download configuration parameter
Value
JobSequencing
NO
OutputDataStructure
NoRDW
PrgJobSubmission
.download_unzip.script
Restrictions:
At the moment restrictions exist when receiving compressed download data. In future
releases most of these restrictions will disappear.
Currently the following restrictions exist:
■
■
■
■
■
No mixed data (AFP and linedata in the same data file) is supported.
The AFPparameters, the special parameters in the first AFP No'op, can not be read
by the download daemon.
The AFPTrim feature cannot be used so that the download daemon removes trailing
bytes after the AFP record.
No Job grouping and Job sequencing is supported.
It is not possible to generate output with the IBM RDW.
LCDS Data
When a LCDS data stream is received the Parameter 'OutputDataStructure' should be
set to the value 'PassThrough'. The tickets starting with '.LCDS_' are example default
tickets (DefaultTicket) for this data stream. See the LCDS documentation for more details.
Parameter to OCT Conversion
The following table shows the MVS JCL and Download header to Océ Custom Ticket
(OCT) parameter conversion:
MVS-Download Parameter Mapping Table
#
MVS/JCLParameter
PRISMA
Ticket
Default
ADDRESS1
receiver.Rec_Street
-
Values
Description
Address1-text
Chapter 7 - Configuration
475
'Download'
MVS/JCLParameter
PRISMA
Ticket
Default
Values
Description
ADDRESS2
receiver.Rec_ZIP
-
Address2-text
ADDRESS3
receiver.Rec_City
-
Address3-text
ADDRESS4
receiver.Rec_Country
-
Address4-text
BUILDING
receiver.Rec_Building
-
building-text
CHARS / UCS
files.Fonts
use Printer Default
Chars – up to 4 Font
names for Linedata
CKPTSEC
-
No Checkpoints
Seconds between
checkpoints
CLASS
userinfo.Host_Class
A
1 char
=> job.Job_Class
Host Job Class =>
switchable mapping in
PRISMAJob_Queue
COPIES
job.Copies
1
1-255
copy-count
DATACK
-
BLOCK
{BLOCK | UN-
Reporting of print-po-
BLOCK | BLKCHAR
sitioning and character
| BLKPOS}
errors
YES | NO => 1 | 0
table-reference-charac-
DCB=OPTCD=J /
files.Pdstrc
NO => 0
TRC
ters
DCB=RECFM
files.Pdscc
-
DEPT
receiver.Rec_Company
-
department-text
DEST / QUEUE
userinfo.Host_Dest
-
printer-pass-through –
{A | M}
carriage-control-type
Destination Name
DEST=IP
userinfo.Host_Dest=IP
-
printer-pass-through –
IP address or Name
DUPLEX
files.Pdsduplx
use Formdef value
sides and plex
FORMDEF
files.Formdef=F1
use System Default
form-definition
FORMS
job.Print_Form
printer-pass-through –
Form Name
INTRAY / IBIN
job.Intray
use Formdef value
printer-pass-through –
Paper Tray ID (1-255)
476
Chapter 7 - Configuration
'Download'
MVS/JCLParameter
PRISMA
Ticket
Default
Values
Description
JOB_ID
job.Reference_Id
-
MVS-Job ID
JOB_NAME
job.Job_name
-
MVS Job Name
NAME
receiver.Rec_Name
-
name-text
NOTIFY
userinfo.Host_Notify
-
user IDs whom
Download notify
OFFSETXB
files.PdsOffXB
use Formdef value
x-image-shift back side
OFFSETXF
files.PdsOffXF
use Formdef value
x-image-shift front side
OFFSETYB
files.PdsOffYB
use Formdef value
y-image-shift back side
OFFSETYF
files.PdsOffYF
use Formdef value
y-image-shift front side
OUTBIN / OBIN
job.Outtray
use Formdef value
OVERLAYB
files.BackSideOvls
use Formdef value
overlay back side
OVERLAYF
files.FrontSideOvls
use Formdef value
overlay front side
PAGEDEF / FCB
files.Pagedef=P1
use System Default
page-definition
PORT
userinfo.Port_Number
-
Download Port
PR / PROGRAMER-
userinfo.Program-
NAME
mer_Name
PRMODE
userinfo.PR_Mode
2
output-bin
programmer-text
JES
{ SOSI1 | SOSI2 |
shift-out-shift-in
SOSI3 | aaaaaa }
PRTQUEUE
job.Printer_Name
RESFMT
job.DPI
ROOM
receiver.Rec_Room
SEGMENT
-
-
print queue name
{P240|P300}
font-resolution
room-text
no segmentation
Not transmitted – page
count to segment data
SEGMENTID
userinfo.Segment_Id
-
number to indicate the
position of the segment
SYSOUT
-
printer-pass-through –
alternative param for
Class and Form
Chapter 7 - Configuration
477
'Download'
MVS/JCLParameter
PRISMA
Ticket
Default
TITLE
userinfo.Title
-
USERID
infoinfo.Host_User
Values
Description
title-text
MVS-Job Creator
Note:
Not used parameters are omitted in the list. See the document "Print Services Facility
MVS: MVS Download Guide" for a full description of the various parameters.
Configuration
For a description of the 'Input Modules' configuration window see ‘'Input Modules':
Overview’ on page 460.
Global Download Parameters
In the menu bar global Download parameters can be set in a dialog. To open this dialog
press the items ’Edit' -> 'Edit global parameters' -> 'Download'. The following parameters
can be set. The bold values are the default values.
#
478
Parameter
Possible values
Description
Connection Timeout
300
<Number>
Network connection time out in seconds.
The value 0 disables this feature, so no
time out will occur (not recommended).
Maximum Client
Connections
0
<Number>
The maximum number of simultaneous
client connections for the daemon. The
value 0 disables this feature, so that no
limit is set.
Trace channel
0
<Download port
number>
Defines the port where application socket
traces are made. To enable this the ‘Trace
flags’ must have at least the following flag
set 0x00000200. The value 0 disables this
feature.
Trace flags
ffff00f8
<0ffffffff>
Defines the detail level of the trace file.
See also the ’Trace channel’ and the
’Trace level’ parameter.
Chapter 7 - Configuration
'Download'
Parameter
Possible values
Description
Trace level
0
<1-4>
Defines the detail level in the trace file.
When trace level is 0 error traces are still
being written. Also, dependent of the
Trace Flags, data traces can still be written.
General Parameters
#
Parameter
Possible values
Description
Description
<Any character String>
The description of the Download port.
PortMaxClient
Connections
0
<Number>
The maximum number of simultaneous client connections for
this port. The value 0 disables
this feature, so that no limit is
set.
Data Input Parameter
#
Parameter
Possible values
Description
EbcdicHeader
Conversion
SEB243V1 ->
Use the EBCDIC SEB243V1
character set.
SEB243V1+IfsToSpace ->
Use the EBCDIC SEB243V1
character set with the special IFS
to space conversion.
IBM-CP_V10500 ->
Use the EBCDIC IBM
CP_V10500 character set
Defines the Download header
conversion table from EBCDIC
to ASCII. This is needed for the
Océ Custom Ticket and the INFO pages.
Data Output Parameter
Chapter 7 - Configuration
479
'Download'
#
Parameter
Possible values
Description
OutputDataStructure
AddCRLF ->
Add CRLF as record delimiter.
AddCRLF_WithAFPTrim ->
Add CRLF as record delimiter
with AFP record trim.
NoRDW ->
Remove record length field
(compressed data).
PassThrough ->
Leave the input data file as it is
(LCDS data stream).
VAR ->
Use the IBM format RDW
(Variable record, 4 byte) as
record delimiter.
VAR_WithAFPTrim ->
Use the IBM format RDW
(Variable record, 4 byte) as
record delimiter with AFP trim.
Specifies the data structure of the
output file.
Parameter
Possible values
Description
DefaultTicket
“” or <File name>
Name of the default ticket to be
used for job submission.
ExtractParameters
AFPParameters ->
Extracts parameters for the OCT
from the first No'op in the AFP
data file.
Off ->
No parameter extraction is done.
See also chapter ‘Extracting AFP
parameters’ in ‘'Input Modules':
Overview’ on page 460.
OCT Parameters
#
480
Chapter 7 - Configuration
'Download'
Parameter
Possible values
Description
TicketParameterPriority
MVSHeaderOverwrites
NoopParameter ->
MVS/Download header parameters overwrite the AFPParameter
in the Noop of the data file(s).
NoopParameter
OverwritesMVSHeader ->
The AFPparameters from the
Noop overwrite the
MVS/Download header parameters.
Defines the ticket parameter
source priority.
StartMVSClass
0 <Number, min. 0, max. 950>
First Océ PRISMAproduction
Server queue which is used as
base to add MVS alphabetical
class value to it.
Job Submission Parameters
#
Parameter
Possible values
Description
JobSequencing
No ->
Each data file of the grouped job
is submitted as a separate job,
the sequence of these is NOT
defined.
SEQ_ONLY ->
Serialized data file receiving.
Each data file is submitted as a
separate job, the file/job sequence is kept.
SEQ+GROUP ->
Each grouped job is submitted
as a single job with multiple data
files.
Specifies how grouped jobs are
submitted.
Chapter 7 - Configuration
481
'Download'
Parameter
Possible values
Description
MirrorDataFile
Yes ->
Mirror data file(s) with Download while receiving them (on
the fly).
No ->
Mirror data file(s) during the job
submission when mirroring is
defined for this port.
Defines the time when the data
files are mirrored. To be able to
use this feature the Interconnectivity license is needed and the
MirrorServer must be defined
for this port.
Note:
Set this parameter to
‘No’ when a job submission script is used in
which data file manipulation steps are done.
482
MirrorPolicy
Mandatory ->
A job is not accepted on this
server when it can not mirror the
job.
Optional ->
A job will always be accepted independent of the mirror job status.
Defines the job acceptance on
this server when the mirror server doesn’t accept the job. To be
able to use this feature the Interconnectivity license is needed
and the MirrorServer must be
defined for this port.
MirrorServer
“”
<IP Address>
Name or IP address of the mirror server. Only available when
the ‘Interconnectivity’ license
exists and the mirror server is
defined in the Océ
PRISMAproduction Server System Configuration
PrgJobSubmission
pjm
<Another executable script or
binary >
This program or script is used to
submit the job into the Océ
PRISMAproduction Server system. See section ‘The job submission’ in ‘'Input Modules':
Overview’ on page 460.
Chapter 7 - Configuration
'Download'
Parameter
Possible values
Description
TicketRule
“”
<String>
Name of the Ticket rule to use
when the job is submitted. The
Ticket Rule must be defined in
the Océ PRISMAproduction
Server Ticket Rule Configuration first before it can be selected
in the list.
Chapter 7 - Configuration
483
'Download': Behavior in Error Situations
'Download': Behavior in Error Situations
Introduction
The behavior of the 'Download' daemon in case of an error depends on the situation to
make sure that the least interference of the normal workflow is achieved. This section
explains, what happens, if a certain situation occurs.
The port will be closed in case of an error, only if job sequencing is used for a port and
a 'grouped' job is send from the mainframe. In all other cases the job will be saved internally by the 'Download' daemon.
Internally saved jobs can be re-submitted by enabling the port (after it has been previously
disabled) in the Input Status View. Also a daemon reset causes these jobs to be re-submitted.
Note:
The data files which have not been submitted, are removed from the system after 3 days
to prevent the hard disk from filling up.
Generating a trace file
The trace file is generated by the 'Download' daemon and shows the function call sequences as well as main values of used variables. This file can be used by the development
department to solve an error in the 'Download' daemon. To create a trace file, select
menu ’Edit' -> 'Edit global parameters' -> 'Download' in the Océ PRISMAproduction
Server 'Input Modules' configuration window and change the following parameters:
#
484
Parameter
Value
Description
Trace channel
0
<Download
Port>
Defines the port where application socket traces
are made. The value 0 disables this feature. Also
the trace flags must have at least the 0x00000200
flag set.
Trace flags
0xfff1cf9
0xfff1cfb
0xfff1efb
Traces are written with performance information;
no print data files are collected (Standard trace).
Traces as well as data files are collected (Data
trace).
Traces, data files as well as data socket traces are
made (Socket data trace). Set the parameter 'Trace
Channel' to the port from which the Socket Data
Trace is to be captured.
Trace level
4
Highest trace level
Chapter 7 - Configuration
'Download': Behavior in Error Situations
The 'Download' daemon saves only one previous copy of the trace file. Older trace files
are deleted. With each 'Download' reset or Océ PRISMAproduction Server reset a new
'Download' trace file is created. Data trace files however are not overwritten and must
be deleted manually when they are not needed anymore.
Even if the lowest trace level 0 is used, errors are always written. So if an error occurs and
the trace level is 0, this trace file still contains traces, so please also save this file and send
it in with the trace files which are additionally created.
If the traces have been created and the error can be reproduced, prismadiag can be used
to collect the information.
Note:
Beware of the hard disk space when data traces are written. Data traces generally are very
large and generate a large number of files.
When traces are written the following files can be found in the '/u/prismapro/diag/download' directory:
#
<JobId>_pjm_cmd.out
The command used to call the job submission script.
All_ISS_*
The protocol of the Input Status View command exchange.
All_PJM_*
The protocol of the PJM socket commands.
Download_DataTrace_*
Socket data trace file
dnld_<jobid>_*
The data file(s) belonging to the job.
dnld_<jobid>_<port
no>.oct
The job specific Oce custom ticket to control the print job.
download.err*, download.log*
The 'Download' daemon error and log files.
Dependent of the trace flags set, not all of these files is created.
Trace Level and Flags details
This chapter is only useful for users who want to know more details. In most cases the
options described in the previous chapter will be sufficient.
'Download' has a trace level and trace flags which control the behavior on how the trace
file is written. Using theses levels and flags, it is possible to control the amount of data
and when the data is written.
The flags are used bit wise, which means each trace flag mode can be set separately.
Normally the TraceLevel should be set to 3 or 4 to get enough trace details, this will
produce large traces.
Chapter 7 - Configuration
485
'Download': Behavior in Error Situations
Trace level
The trace level can be set from 0 to 4. Each level higher produces more detailed information and includes all the information of the lower levels:
#
Level
Level Name
Description
0
Error messages
Only when errors occur.
1
Section messages
Main section enter/exit info.
2
Function messages
Function enter/exit with return code info
3
Info messages
Important variables/information
4
Detail messages
Detailed variables and other information (Large
Trace File !)
Trace Flags
The trace flags are used to control the behavior of the trace file/Input-Filter. The following
trace flags are available:
#
486
Special Flags
Name
Description
0x00000001
Performance
Collects special performance information and
writes this into the trace file.
0x00000002
Copy I/O data
Creates a copy of the output files in the diag directory.
0x00000004
Error only flag
Only when errors occur trace info is written into
the trace file. This includes also traces which happen just before the error occurs.
0x00000008
Time flag
Time info is added for each trace line.
0x00000010
Section flag
Program section and source code id./class are
added for each trace line.
0x00000020
Buffer trace
flag
The trace info is buffered until the buffer is full
and then written to the trace file. By NOT setting
this bit the trace information is written line by line
to the trace file (lower performance).
0x00000100
Buffer data
trace
When this flag is set a buffer data trace is written.
0x00000200
Socket data
trace
When this flag is set an application socket data
trace is written.
Chapter 7 - Configuration
'Download': Behavior in Error Situations
Special Flags
Name
Description
0x00000400
Input Status
trace
When set it writes the Input Status protocol trace
0x00000800
PJM protocol
trace
When set it writes the PJM protocol trace
0x00001000
PJM cmd trace
When set it writes for each PJM command a separate file with the used parameters.
Chapter 7 - Configuration
487
'HotDir'
'HotDir'
Introduction
The 'HotDir' Input Module makes it possible to submit print files automatically into
the Océ PRISMAproduction Server print system. Special directories are monitored if
there are new data files and checked if these data files are complete (transmission is finished).
The data can be transferred via the network using FTP. Also mounted directories are
supported such as NFS and SMB. When the data file is already on the Océ
PRISMAproduction Server server they can be copied, linked or moved to these Hot Directories.
For Microsoft Windows the add-on tool ’HotDirWinClient' can be used to submit the
job using ftp or a mounted network drive. See the 'HotDirWinClient’ chapter for more
details (see ‘HotDirWinClient’ on page 504). For this tool only limited support exists.
Operation
The data files can be provided in four different ways. Each of these ways allows a different
amount of Ticket / print job control.
Here is an overview of the possible variations and the effects they have (the corresponding
parameter names are written in parentheses):
Data file
#
File Effects
Single data file job
Yes
Multiple data files job
No
Data file(s) must be specified
No
Multiple data files sequence control
-
Ticket or print job control
Using fieldnames (Field1-Field8)
Incomplete data file submission can occur
when
Process crashes or Network mounts are
used
OCT
#
File Effects
Single data file job
488
Chapter 7 - Configuration
Yes
'HotDir'
File Effects
Multiple data files job
Yes, using subdirectories
Data file(s) must be specified
No. In OCT, only when a special sequence of the data files is needed
Multiple data files sequence control
- By specifying sequence in OCT or
- By activating a sort algorithm
(DataFileSortSequence)
Ticket or print job control
Using OCT and / or fieldnames (Field1Field8)
Incomplete data file submission can occur
when
Process crashes or Network mounts are
used
Trigger file
#
File Effects
Single data file job
Yes
Multiple data files job
Yes, using subdirectories
Data file(s) must be specified
No
Multiple data files sequence control
By activating the sort algorithms
(DataFileSortSequence)
Ticket or print job control
Using fieldnames (Field1-Field8)
Incomplete data file submission can occur
when
None, as long as the trigger file is only
written when previous steps were successful
OCT & Trigger file
#
File Effects
Single data file job
Yes
Multiple data files job
Yes, using subdirectories
Data file(s) must be specified
No, only when a special sequence of the
data files is needed
Multiple data files sequence control
- By specifying sequence in OCT or - By
activating a sort algorithm (DataFileSortSequence)
Chapter 7 - Configuration
489
'HotDir'
File Effects
Ticket or print job control
Using OCT and / or fieldnames (Field1Field8)
Incomplete data file submission can occur
when
None, as long as the trigger file is only
written when previous steps were successful
The best way to submit the data file(s) into the Océ PRISMAproduction Server system
is to use trigger files. This prevents the submission of incomplete data files caused by
crashing programs or failing networks. It also reduces the 'HotDir' overhead because no
check is needed to see if a file is still being transferred.
If the Ticket or print job control is also required, the OCT and Trigger file combination
can be used.
The disadvantage of the trigger file is that an additional file needs to be created after the
(data) file or OCT has been written successfully. This can be done by a script, on Microsoft
Windows using a batch file, or by using the 'HotDirWinClient'. For more details on the
last option see section 'A Windows file submission tool for HotDir'.
The directories which the 'HotDir' daemon monitors are named as defined in the HotDir
configuration and located as subdirectories of the path '/u/hotdir/'.
If you want to group multiple data files to a single print job, you can use either an OCT
only or a trigger file or you can use both. With each of these possibilities, the data files
belonging to a print job must be located in a sub-directory and the OCT and/or Trigger
file must have the same name as this sub-directory plus the used file name extension for
each.
Example for a job with multiple data files using an OCT:
■
■
■
■
Directory: 12345
Data file1: 12345/file1
Data file2: 12345/file2
OCT: 12345.oct
An Océ Custom Ticket (OCT) may contain only the needed print job parameters. The
file name entries are only necessary if a special data file sequence is needed (which cannot
be achieved with an alphabetical or numerical sort algorithm) or if for each data file different parameters are necessary (in the file section). It is not allowed to specify only a few,
but not all data files belonging to this job.
Note:
Be aware that the path specified in the OCT for the data files is ignored. The data file
name is used together with the sub-directory name as is described above.
490
Chapter 7 - Configuration
'HotDir'
It is also possible to specify fields in the data filename. The field is then used as value for
the section and keyword in the OCT which is specified in the HotDir configuration.
The field termination character can be changed to allow a more flexible usage. It is also
possible to ignore or skip a certain field.
When a multi-data-file job is used with field names and these fields are assigned to global
(not file specific) section and keyword, only the first value found is read. The other values
are ignored. When a file specific section and keyword is specified however, it is possible
to specify different values for each data file of the grouped print job. A combination of
an OCT and field names is allowed.
Another possibility to control the print job can be used if AFP data are sent. Parameters
can be extracted from the first noop of the data file by the HotDir program and put into
the OCT.
When a certain OCT section and keyword value is provided by more than one source
the following priority rule is used to define which value is used (the highest number wins):
1) Default ticket -> 2) Data file parameter extraction -> 3) OCT -> 4) File name parameters
Configuration Examples
Windows Explorer and 'HotDir'
When multiple data files are copied or moved at the same time to a 'HotDir' directory
a special handling is needed to print these jobs in the same sequence. The cause of the
problem is that the explorer doesn't pass the filenames in the same sequence with which
these are selected or shown. In the solutions it is assumed that the HotDirWinClient is
used with a shared HotDir directory.
The possible solutions are:
■
■
The data files have to be printer in alphabetically or numerical order and Océ
PRISMAproduction Server shows one grouped job.
Configure the HotDirWinClient as follows:
<path>/HotDirWinClient.exe MultiFile=Grouped TransType=SMB <Target>
Configure 'HotDir':
FileType=Data+TriggerFile, DataFileSortSequence=AlphaNumerically or Alphabetically, JobGrouping=GroupedFileJobs
The data files have to be printer in alphabetically or numerical order and Océ
PRISMAproduction Server shows single data file jobs.
Configure the HotDirWinClient as follows:
<path>/HotDirWinClient.exe MultiFile=Grouped TransType=SMB <Target>
Configure 'HotDir':
FileType=Data+TriggerFile, DataFileSortSequence=AlphaNumerically or Alphabetically, JobGrouping=SingleFileJobs
Chapter 7 - Configuration
491
'HotDir'
Parameter to OCT Conversion
Each of the input modules has its own internal variable names which are mapped to
Ticket section keywords. The following table describes the mapping of these variable
names.
#
492
Hot Directory
FieldName Parameters
Océ PRISMAproduction Server
Ticket Parameter
Section & Keyword
Default
Parameter Description /
Comments
Carriage Control
Char
files.Pdscc
-
carriage control
character type
Catalog
job.Catalog
File Copies
files.File_Copies
Form
job.Print_Form
form name
Format
files.Format
file type defining
the process service
to be called
Formdef
files.Formdef=F1
use System Default
form definition
Input Tray
job.Intray
use Formdef value
paper tray ID (1255)
JDE Name
files.JDE_Name
LCDS start command:
Job Description
Entry
JDL Name
files.JDL_Name
LCDS start command:
Job Definition
Language
Chapter 7 - Configuration
Customer catalog,
e. g. for LCDS
1
file copy count.
DL, LP:
used for jobs consisting of
multiple files (job
grouping)
'HotDir'
Hot Directory
FieldName Parameters
Océ PRISMAproduction Server
Ticket Parameter
Section & Keyword
Default
Parameter Description /
Comments
Job Copies
job.Copies
1
job copy count.
DL, LP:
used for single data
file jobs
Job Name
job.Job_name
-
MVS job name
Job Queue
job.Job_Class
-
job queue number.
DL:
switchable class
mapping
Job Type
job.Job_Type
Layout
files.Layout
Number of Pages
files.Pages
Output Tray
job.Outtray
use Formdef value
output-bin
Page Sequence
files.Pdsduplx
use Formdef value
sides and plex
Pagedef
files.Pagedef=P1
use System Default
page-definition
Paper Size
files.Paper_Size
Print Mode
job.Print_Mode
Printer Name
job.Printer_Name
-
print queue name
Reference ID
job.Reference_Id
-
MVS job ID
Resolution [DPI]
job.DPI
Substitute
files.Substitute
Table Reference
Char
files.Pdstrc
POD | APA |
LCDS | OLDS |
Native
font-resolution
NO => 0
print data contains
table reference
characters
Configuration
For a description of the 'Input Modules' configuration window see ‘'Input Modules':
Overview’ on page 460.
Chapter 7 - Configuration
493
'HotDir'
Global HotDir Parameters
In the menu ’Edit’ select 'Edit global parameters' -> 'HotDir' to open a dialog, which
allows you to configure the following parameters. Bold values are default values:
#
Parameter
Possible values
Description
Scanning Interval
5000
<Number, minimum 1000>
Directory scan interval in milliseconds.
Delete if older
than
0
(Not used) Delete files older
than days. Disabled when set to
0.
Trace flags
0xffff00f8
See ’Generating a trace file’ for
details.
Trace level
0
See ’Generating a trace file’ for
details.
General Parameters
#
Parameter
Possible values
Description
Description
<Any character String>
The description of the Hot Directory.
File Input Parameters
#
494
Parameter
Possible values
Description
ScanType
AutoDetect ->
Automatically uses the correct
directory scan type of the following two:
NormalDirectoryScan ->
Scans the directory in a normal
way.
FastDirectoryscan ->
Scans directories by using the
directory file time, doesn’t work
for mounted or exported directories.
Directory scan type.
Chapter 7 - Configuration
'HotDir'
Parameter
Possible values
Description
FileType
DataFile ->
A data file is to be submitted as
a single print job.
Data+OCTFile ->
One or more (sub-directory!)
data files together with an OCT
are submitted as a print job. The
OCT must be sent as the last
file.
Data+TriggerFile ->
One or more (sub-directory!)
data files together with a trigger
file are submitted as a single job.
The trigger file must be created
as the last file.
Data+OCT+TriggerFile ->
One or more (sub-directory!)
data files together with an OCT
and a trigger file are submitted
as a print job. The trigger file
must be created as the last file.
Defines what kind of job information is provided for the job.
TriggerExt
.trg
<Any character String>
The file name extension of the
trigger file.
File Ready Parameters
#
Parameter
Possible values
Description
FileSizeDelay
5
<Number>
The delay in seconds which is
waited after the file doesn’t grow
in size anymore, before the file
is marked as being complete. Is
used only when the keyword
Trigger is set to the value AutoDetect or FileSizeExtendedCheck.
Chapter 7 - Configuration
495
'HotDir'
Parameter
Possible values
Description
ProcScanType
CheckAllProcesses
Checks all running processes if
they have opened the file (found
in the monitored directory). Is
used only when the keyword
Trigger is set to the value AutoDetect or ProcessOpenFileCheck.
Trigger
AutoDetect ->
Automatically uses the correct
File ready trigger type. When the
HotDir is mounted it uses the
’FileSizeExtendedCheck’ otherwise the ’ProcessOpenFileCheck’. This value doesn’t
work for exported directories.
FileSizeExtendedCheck ->
Checks if the file size increases.
When this doesn’t happen for
the amount of seconds defined
with the keyword FileSizeDelay
(and some other checks) the file
is marked as being complete.
ProcessOpenFileCheck ->
Checks if the file (found in the
monitored directory) is still
opened by a running process. See
the keyword ProcScanType
which defines which processes
are checked.
Select the File ready trigger type.
Job Sequencing Parameters
#
496
Parameter
Possible values
Description
JobGrouping
SingleFileJobs
GroupedFileJobs
Specifies how grouped jobs are
submitted.
Chapter 7 - Configuration
'HotDir'
Parameter
Possible values
Description
JobSortSequence
Off ->
No file sorting is done.
Alphabetically ->
The files are sorted alphabetically
using the system locale and submitted using this sequence.
Alphanumerically ->
The files are sorted alphanumerically and submitted in this sequence. Leading zeros are NOT
needed. Example of a sorted sequence: 1, 2, 10, 12, 100.
FileTimeStamp ->
The time the file is created is
used to define the sequence of
the jobs. Since the accuracy of
this value is in seconds, the job
creation must be at least one
second apart.
Uses the (last) file specified with
the keyword FileType for eventual sorting.
Parameter
Possible values
Description
DefaultTicket
<File name>
Field1-Field8
Name of the default ticket to be
used for job submission or Use
the content of the defined filename field.
ExtractParameters
AFPParameters ->
Extracts parameters for the OCT
from the first No'op in the AFP
data file.
Off ->
No parameter extraction is done.
PCLParameters ->
Parameters are extracted from
the beginning of the PCL data
file.
See also section ‘Extracting AFP
parameters’ in ‘'Input Modules':
Overview’ on page 460.
Note:
The Alphabetically and
Alphanumerically sorting algorithyms are used
together with the FileTimeStamp. First the
files are sorted using the
FileTimeStamp, when
more than one has the
same timestamp the selected sorting algorithym is used.
OCT Parameters
#
Chapter 7 - Configuration
497
'HotDir'
498
Parameter
Possible values
Description
Field1-Field8
<Section.Keyword>
Better use the TicketRules for
this functionality, here it will be
disabled in the future.
Defines which field value is assigned to which OCT keyword
in the specified section.
Using the FieldSeparator the
filename is divided into fields.
Each of these fields can be assigned to a keyword in a defined
section. For using a field to set
the default ticket see the DefaultTicket parameter description.
FieldSeparator
‘.’
The field separator which is used
to divide the data filename into
fields. See also Field1-Field8.
Default is the dot.
DataFileSortSequence
Off ->
Files are written in the OCT in
the sequence they are found in
the directory.
Alphabetically ->
The files are sorted alphabetically
using the system locale and
written into the OCT in this sequence.
Alphanumerically ->
The files are sorted alphanumerically and submitted in this sequence. Leading zeros are NOT
needed. Example of a sorted sequence: 1, 2, 10, 12, 100.
FileTimeStamp ->
The time the file is created is
used to define the sequence of
the files in the jobs. Since the
accuracy of this value is in seconds, the file creation must be
at least one second apart.
Determines the sequence of the
data files in the job. Used only
for jobs with multiple data files,
if no data files are specified in
the OCT or when a trigger file
is used.
Chapter 7 - Configuration
'HotDir'
Parameter
Possible values
Description
StartMVSClass
0
<Number, min. 0, max. 950>
First PRISMAproduction queue
which is used as base to add
MVS alphabetical class value to
it.
Job Submission Parameters
#
Parameter
Possible values
Description
MirrorPolicy
Mandatory ->
A job is not accepted on this
server when it can not mirror the
job.
Optional ->
A job will always be accepted independent of the mirror job status.
Defines the job acceptance on
this server when the mirror server doesn’t accept the job. To be
able to use this feature the Interconnectivity license is needed
and the MirrorServer must be
defined for this port.
MirrorServer
“”
<IP Address>
Name or IP address of the mirror server. Only available when
the ‘Interconnectivity’ license
exists and the mirror server is
defined in the Océ
PRISMAproduction Server System Configuration
PrgJobSubmission
pjm
<Another executable script or
binary >
This program or script is used to
submit the job into the Océ
PRISMAproduction Server system. See section ‘The job submission’ in ‘'Input Modules':
Overview’ on page 460.
TicketRule
“”
<String>
Name of the Ticket rule to use
when the job is submitted. The
Ticket Rule must be defined in
the Océ PRISMAproduction
Server Ticket Rule Configuration first before it can be selected
in the list.
Chapter 7 - Configuration
499
'HotDir': Behavior in Error Situations
'HotDir': Behavior in Error Situations
Introduction
Dependent on the situation, the behavior of the 'HotDir' daemon in error situations is
to make sure that the least interference of the normal workflow is achieved. This section
explains what happens when a certain situation appears.
The default ticket is not found
The default ticket is specified in the 'HotDir' configuration file. In this case all print jobs
will have the same problem, therefore this 'HotDir' directory will be closed. A message
appears that the Default Ticket is not found.
The default ticket is specified as part of the data file name (field names). In this case the
problem is print job specific, therefore this print job is moved into the 'HotDir' error
directory (see section 'Re-submission of error jobs' for more details) and a message is
displayed.
No Job identifier is provided by the Océ PRISMAproduction Server system
In this case the 'HotDir' daemon waits until it gets a correct Job identifier.
Job Submission problems occur
When after a few retries the jobs still could not be submitted, 'HotDir' directory is closed
and a message is displayed. Normal print job processing for the other directories continues.
Job submission problems when a blank exists in filename or path
If a customization script is used to check that the job submission call parameter has the
correct syntax "$@". See section 'The Job Submission Script' in ‘'Input Modules': Overview’
on page 460 for details.
Re-submission of error jobs
To re-submit error jobs, solve the problem and enable the HotDir directory in the Input
Status View. Also a HotDir reset can be used to re-submit these jobs.
Generating a trace file
The trace file is generated by the 'HotDir' daemon and shows the function call sequences
as well as main values from variables which are used. This file can be used by the development department to solve an error in the 'HotDir' daemon. To create a trace file, select
’Edit' -> 'Edit global parameters' -> 'HotDir' in the Océ PRISMAproduction Server 'Input
Modules' configuration window and change the following parameters:
500
Chapter 7 - Configuration
'HotDir': Behavior in Error Situations
#
Parameter
Value
Description
Trace flags
0xfff1cf9
0xfff1cfb
Traces are written with performance information;
no print data files are collected (Standard trace).
Traces as well as data files are collected (Data
trace).
Trace level
4
Highest trace level
The 'HotDir' daemon only saves one previous copy of the trace file. Older trace files are
deleted. With each 'HotDir' reset or Océ PRISMAproduction Server reset a new 'HotDir'
trace file is created. Data files however are not overwritten and must be deleted manually
when they are not needed anymore.
Even if the lowest trace level 0 is used, errors are always written. So if an error occurs and
the trace level is 0, this trace file still contains traces, so please also save this file and send
it in with the trace files which are additionally created.
If the traces have been created and the error can be reproduced, prismadiag can be used
to collect the information.
Note:
Beware of the hard disk space when data traces are written. Data traces generally are very
large and generate a large number of files.
When traces are written the following files can be found in the '/u/prismapro/diag/hotdir'
directory:
#
<JobId>_<filename>
The data file to be printed
<JobId>.oct
The job specific Oce custom ticket created by 'HotDir'.
<JobId>_original.oct
The customer supplied Oce custom ticket.
<JobId>_pjm_cmd.out
The command used to call the job submission script.
All_ISS_*
The protocol of the Input Status View command exchange.
All_PJM_*
The protocol of the PJM socket commands.
hotdir.err*, hotdir.log*
The 'HotDir' daemon error and log files.
Dependent of the trace flags set and the type of HotDir configured, not all of these files
is created.
Chapter 7 - Configuration
501
'HotDir': Behavior in Error Situations
Trace Level and Flags details
This chapter is only useful for users who want to know more details. In most cases the
options described in the previous chapter will be sufficient.
'HotDir' has a trace level and trace flags which control the behavior on how the trace file
is written. Using theses levels and flags, it is possible to control the amount of data and
when the data is written.
The flags are used bit wise, which means each trace flag mode can be set separately.
Normally the TraceLevel should be set to 3 or 4 to get enough trace details, this will
produce large traces.
Trace level
The trace level can be set from 0 to 4. Each level higher produces more detailed information and includes all the information of the lower levels:
#
Level
Level Name
Description
0
Error messages
Only when errors occur.
1
Section messages
Main section enter/exit info.
2
Function messages
Function enter/exit with return code info
3
Info messages
Important variables/information
4
Detail messages
Detailed variables and other information (Large
Trace File !)
Trace Flags
The trace flags are used to control the behavior of the trace file/Input-Filter. The following
trace flags are available:
#
502
Special Flags
Name
Description
0x00000001
Performance
Collects special performance information and
writes this into the trace file.
0x00000002
Copy I/O data
Creates a copy of the output files in the diag directory.
0x00000004
Error only flag
Only when errors occur trace info is written into
the trace file. This includes also traces which happen just before the error occurs.
0x00000008
Time flag
Time info is added for each trace line.
Chapter 7 - Configuration
'HotDir': Behavior in Error Situations
Special Flags
Name
Description
0x00000010
Section flag
Program section and source code id./class are
added for each trace line.
0x00000020
Buffer trace
flag
The trace info is buffered until the buffer is full
and then written to the trace file. By NOT setting
this bit the trace information is written line by line
to the trace file (lower performance).
0x00000100
Buffer data
trace
When this flag is set a buffer data trace is written.
0x00000200
Socket data
trace
When this flag is set an application socket data
trace is written.
0x00000400
Input Status
trace
When set it writes the Input Status protocol trace
0x00000800
PJM protocol
trace
When set it writes the PJM protocol trace
0x00001000
PJM cmd trace
When set it writes for each PJM command a separate file with the used parameters.
Chapter 7 - Configuration
503
HotDirWinClient
HotDirWinClient
Introduction
The 'HotDirWinClient' is a Windows file submission tool.
To better integrate the MS Windows Operating System with the Océ PRISMAproduction
Server print server, the 'SendTo' menu item of the Windows Explorer can be used. This
menu pops up if you select one or more files in the Windows Explorer and click them
with the right mouse button. The 'Send To' menu has a sub-menu.
By extending the sub-menu with entries, which allows the user to transfer data to the
Océ PRISMAproduction Server HotDir directory, it is very easy to submit print jobs.
Behind this sub-menu entry is a shortcut, which calls the program 'HotDirWinClient'
which takes care of interpreting the specified parameters and transferring the specified
file names to the Océ PRISMAproduction Server HotDir directory.
See also the HotDir description in ‘'HotDir'’ on page 488.
Overview
The 'HotDirWinClient' program can be used in a batch file/script file, or as a post process
from a data converter/data generation program. If the Windows Explorer is used to submit
the data files to the Océ PRISMAproduction Server server, the Explorer 'SendTo' menu
item can be configured.
The 'SendTo' directory is located under 'Documents and Settings\<User name>' on the
partition where the windows operating system is installed. There is also the directory 'All
Users', which is for used for configuration entries for all users. If the 'SendTo' directory
does not exist, you have to create it. Create a link to the HotDirWindowsClient in this
directory. Open the link with the right mouse button and click on ’Properties’. On the
’Shortcut’ tab the path and name of the HotDirWinClient.exe in the ’Target’ text field
should be extended with the needed options. The 'Start in' value should be set to the directory where the HotDirWindowsClient program is located.
Example configuration of the 'SendTo' shortcut:
■
■
■
504
Tab 'General': Océ HotDir (Mount) DataOnly
Tab 'Shortcut', Keyword 'Target':"C:\Program Files\Oce\inputmodules\exe\HotDirWinClient.exe" MultiFile=Grouped TransType=SMB N:\tmp\hdtest01
Tab 'Shortcut', 'Keyword 'Start in': "C:\Program Files\Oce\inputmodules\exe"
Chapter 7 - Configuration
HotDirWinClient
Features of the 'HotDirWinClient' Program
■
■
■
■
The data can be transferred using the ftp protocol instead of shared/mapped folders.
This reduces network overload (less shared/mapped folders) and load on the Océ
PRISMAproduction Server server.
You can specify an OCT, which is automatically sent after the data is copied/transferred.
When multiple files are selected and JobSequencing is set to 'grouped', a subdirectory
is created where the selected data files are copied/transferred to.
If JobSequencing is set to 'FileTime', the needed one-second delay is automatically
put between each transferred data file.
The jobs are always generated using a trigger file, which is created after each job when
the copy process/data transfer was successful. A small trace file is written every time the
'HotDirWinClient' is used.
Usage
The syntax of the 'HotDirWinClient' command is as follows:
'HotDirWinClient.exe [Sequence=...] [MultiFile=...][OCT=...] [TransType=FTP|SMB]
[<Target>] <Data-files>'
The items in square brackets ([]) are optional, the items in <> must be specified.
#
Parameters
Description
Sequence
Specifies how single and multiple data files are handled. Be
aware that the sequence, in which the data files are selected, is
not the same sequence as the files are provided as parameter for
the 'HotDirWinClient'. The following options are valid:
FileTime: A delay of one second is put between each
copied/transferred data file. This makes it possible for the
HotDir daemon to use the data file time to submit the jobs in
the correct sequence. See HotDir configuration for other solutions of this sequencing problem.
None (Default): No special data file handling is done by the
HotDir windows client. HotDir can be configured to sort the
files the alphabetically or alphanumerically.
Chapter 7 - Configuration
505
HotDirWinClient
Parameters
Description
MultiFile
Specifies what needs to be done when multiple data files are
selected. The possible options are:
Grouped: All data files are grouped and submitted as a single
job.
Single (Default): Each data file is submitted as a separate job.
OCT
Specifies the Oct to be used with this job. The possible options
are:
<OCT file>: The name (with or without path) of the OCT file
to be used=<OCT-file>. When no path is provided the OCT
has to be in the current folder.
<Empty>: When no value is specified, the OCT is one of the
selected files. This file must have the extension '.oct'.
TransType
Specifies the data transfer type. The following options are valid:
FTP: The data is transferred using the ftp protocol. No
shared/mapped folders are needed.
SMB (default): A shared/mapped folder is needed to be able to
submit the print jobs.
Target
Specifies where the data file must be copied/transferred too.
This can be defined in the command line, or as value from parameters … in the OCT. The meaning of the value depends
on the TransType setting. Possible options:
<Path>: SMB only: Specifies target directory where data files
must be created or copied to.
<Server>,<User>,<Passwd>:<Remote directory>: FTP only:
Specifies Océ PRISMAproduction Server server to connect to,
remote user, password and the remote directory where to put
the data.
If the option 'TransType=FTP' is set, the 'Target' option specifies the FTP server where
the data are sent. If the username and the password are empty (Target=<Server>,,:<Remote
directory>) 'anonymous' is used as username, the password is set to the e-mail address of
the user.
Once the combination FTP server, user, password is used, the password can be removed
because the MS Windows operating system stores this.
506
Chapter 7 - Configuration
HotDirWinClient
Configuration
The receiving HotDir directory must be configured with the option 'FileType= Data+TriggerFile' if no Océ Custom Ticket (OCT) is sent with the data or with the option 'FileType= Data+Oct+TriggerFile' if an OCT is sent with the data.
First copy the HotDirWinClient.exe program from the Océ PRISMAproduction Server
software CD in the directory '\tools_win\HotDir to the directory C:\Program
Files\Oce\inputmodules\exe'. Then create a new short-cut of the 'HotDirWinClient'
program and put it in the directory 'C:\Documents and Settings\<user>\SendTo'. The
'<user>' part must be replaced with the user(s) who use this feature. In the shortcut tab
the target must be set to the 'HotDirWinClient' path and the needed options. The selected
file names are added to this command line when the menu item is executed.
When the HotDir server is configured and running on the Océ PRISMAproduction
Server server, it should be possible to send print jobs.
Chapter 7 - Configuration
507
'LP'
'LP'
Introduction
The line printer protocol, also known as LP, is a standard way of sending data to a
printer. The standard is defined in the RFC 1179 and allows printer sharing between
several computer and/or operating systems in a network.
The Océ PRISMAproduction Server LP package is designed to replace the traditional
UNIX LP package and spools the print jobs into the Océ PRISMAproduction Server
spool. This package allows creating jobs using the standard LP client software delivered
with all UNIX and Windows systems. Also MVS mainframe clients exist.
The LP printers are logical printers which can be mapped to a real printer using the
'Default Ticket'. See the Configuration section below for details.
Parameter priority
The Océ Custom Ticket (OCT) parameters are defined by several sources. When multiple
sources define the same parameter the source priority defines which value is taken. The
following parameter sources and priorities exist (priority increases from left to right):
Default Ticket -> Data file parameter -> LP control file
Note:
When the LP control file Job or File Copies parameter is not set or has the value '1' the
data file parameter will overwrite this.
Note:
The reference Job Id and the Job name from the data file will always overwrite the LP
control file values. This can cause problems when job actions are requested from this
job using the lp clients (lpq, lprm).
HP Unix client
When using a HP Unix client select, in the LP configuration the value 'Remote printer
is on a BSD system', using the 'sam' utility.
508
Chapter 7 - Configuration
'LP'
Enable Printer Access
Printing from a client to an LP printer defined on the Océ PRISMAproduction Server
server must be configured. This is done in the 'hosts.lpd' which can be started from the
menu 'Edit' using the entry 'Edit hosts.lpd'.
A dialog pops up with a menu bar, icon and a table with 2 columns. In the 'Allowed
systems' column clients can be entered so that they can print to an LP printer. The
'Comment' column is used for a description of the entry.
The name of a client can be written with wildcards to be able to allow multiple IP addresses
to be enabled.
Examples: '160.120.10.*', '160.*'. To allow all clients to have access to the LP printer
use the single wildcard ('*').
Note:
To allow the local LP clients to send jobs to the LP Daemon add the entry 'localhost'!
Utilities
The Océ PRISMAproduction Server LP package contains the following utilities (use
'/u/prismapro/bin' as path):
#
Utility
Description
'/u/prismapro/bin/lpr'
Creates a print job.
'/u/prismapro/bin/lprm'
Deletes a print job from the Océ PRISMAproduction Server print spool.
'/u/prismapro/bin/lpq'
Shows a limited set of information on the LP print
jobs.
'/u/prismapro/bin/lpc'
Controls the Océ PRISMAproduction Server LP
print environment
Note:
The LINUX manual pages for lp (for example 'man lp' or 'man lpr') are not valid when
Océ PRISMAproduction Server is not installed. Use the sections described here instead.
Chapter 7 - Configuration
509
'LP'
Submitting a Print Job with”lpr”
The 'lpr' command is used to submit a print job using the 'LP' protocol. The job can be
send to a (local or remote) Océ PRISMAproduction Server LP-daemon (LPD) or to another inplementation of a LPD.
The 'lpr' command implements the 'LP' protocol as it is defined, if the receiving daemon
supports all of these options that is dependent on it's implementation. The Océ
PRISMAproduction Server LPD does not implement the '-I' and the '-w' options.
Syntax :
'/u/prismapro/bin/lpr [-# <job copies>] [-C <class>] [-D] [-i <n>] [-J <jobname>] [-K
file copies] [-m <mail>] [-o <option>] -P <printer> [@<host>:<port>] [-T <Title>] [-U
<user>] [-w <width>] <file(s)> /u/prismapro/bin/lpr -V'
#
Operator
Description
-#
Set number of job copies: each file is printed before the next
copy is printed (Optional)
-C
Set class string (Optional, max. 300 characters)
-D
Switch debugging on (Optional, trace is written into file
'/u/prismapro/diag/lp/lpr.log')
-i
Ident output by n characters (Optional, not supported by the
Océ PRISMAproduction Server LPD)
-J
Set job name (Optional)
-K
Set number of file copies: the number of copies of one file are
printed first before the next file is printed (Optional)
-m
Send notification mail to <mail> (Optional)
-o
Set options, can be use multiple times (Optional)
Example: -oOpt=1
Note:
Be aware that keywords as listed in the table ’IBM specific OCT conversion’ (see below) are automatically
converted as OCT parameter as described in this table
(Example: -obu=building2).
510
-P
<printer> LP printer <host> LPD host (Optional) <port> LPD
port (Optional)
-T
Set job title (Optional)
-U
Set user, only allowed for root (Optional)
Chapter 7 - Configuration
'LP'
Operator
Description
-w
Set output width (Optional, not supported by the Océ
PRISMAproduction Server LPD)
-V
Lpr version
Normally the 'lpr' (lpr -P <printer>) is used to send a job to the local Océ PRISMAproduction Server LPD. If the job has to be forwarded to a remote LPD the generic lp
backend is used. If the data needs to be passed as it is the Océ PRISMAproduction Server
data type 'Raw Mode' has to be used. In this workflow the job can be monitored with
the Océ PRISMAproduction Server Explorer.
Example (local LPD):
'/u/prismapro/bin/lpr -P PS700 -J report22 -#3 /u/printjobs/report22'
This command sends the local print file '/u/printjobs/report22' to the print server that
is configured for logical printer PS700, and generates a print job with the given job name.
Three copies of the job will be printed.
When the 'lpr' command is used to send a job to a remote LPD (lpr -P <printer>@<host>)none of this can be seen on the Océ PRISMAproduction Server explorer.
This workflow is needed when special LP parameters (other than filename) need to be
passed to the remote LPD. It is planned in the future to support here also the Océ
PRISMAproduction Server workflow.
Example (remote LPD):
'/u/prismapro/bin/lpr -P PS700@PrintServer -J report22 -#3 /u/printjobs/report22'
This command sends the local print file '/u/printjobs/report22' to the print server name
PrintServer that is configured for logical printer PS700, and generates a print job with
the given job name. Three copies of the job will be printed.
#
Lpr Option
Internal LP
Parameter
OCT Parameter
Description
-# <number>
Multiple
entries or #
job.Copies
Job copies (Default 1)
-C <number>
C
job.Job_Class
Job queue (when number > 0 and < 999)
-C <string>
C
originator.Sending_Param_C
Job class
-i <number>
I
originator.Sending_Param_I
Ident spaces (Not supported)
Chapter 7 - Configuration
511
'LP'
Lpr Option
Internal LP
Parameter
OCT Parameter
Description
-J <string>
J
job.Job_name
Job name
-K <number>
K
files.File_Copies
File copies
-m <string>
M
job.Active_Notification
(Mail) notification
-o <keyword>=
<value>
Originator.Sending_Param_O<nnnn>
Special options
-P <printer>
originator. Receiving_Input_Channel
LP printer name
-T <string>
T
originator.Sending_Title
Job title
-U <string>
P
originator.Sending_User
Remote user
-w <number>
W
originator.Sending_Param_W
Page width (Not supported)
In case of an error the following return codes and messages are used:
■
■
■
■
■
Unknown LP parameter
LP parameter value problem
LP socket connection problem
Internal LP client problem occured
Problem occurred during executing command
Getting Spool Queue Information with”lpq”
The 'lpq' command is used to get job details of the LP jobs in the Océ PRISMAproduction
Server spool. By specifiying the LP printer name all jobs are seen which are submitted to
this printer. By using the 'all' keyword all LP jobs can be seen. The command can be
used for local LP printers (lpq -P <printer>) as well as remote printers (lpq -P <printer>@<host>)
Note:
(when the Océ PRISMAproduction Server LPD processed the command): The 'lpq'
command only shows Jobs which are submitted from the same node as the 'lpq' command
is executed. Be aware that when a 'Network Address Translation Table' (NAT) is used
between the lp-clients and the LPD all the computer systems behind the NAT are seen
as one node! This means that all these nodes can see each other LP jobs and also can
delete these (see description of the lprm command).
512
Chapter 7 - Configuration
'LP'
Syntax:
' /u/prismapro/bin/lpq [-D] -P<printer> [@<host>:<port>] [-l] /u/prismapro/bin/lpq -V'
#
Operator
Description
-D
Switch debugging on (Optional, trace is written into file
'/u/prismapro/diag/lp/lprm.log')
-P
<printer> = LP printer
<host> = LP host (Optional)
<port> = LPD port (Optional)
-l
Long status information (Optional)
-V
Lpq version
The output of the 'lpq' command is determined by the LPD implementation which
'answers' the request. The following output examples are the output which is generated
by the Océ PRISMAproduction Server LPD.
Output example: '/u/prismapro/bin/lpq -P lptest01' (short format):
#
Hostname
Owner
R.Id
JobId
Job Name
Copies
Status
Size Files
nn752257.o
root
705
68325527
SIT-
1
wait 680K
/fat_i/bugs_d
RBT600
nn752257.o
root
708
68325528
600dpi_wit
1
wait 952
/etc/hosts
nn752257.o
root
709
68325529
600dpi_wit
1
wait 952
/etc/hosts
nn752257.o
root
710
68325530
600dpi_wit
1
wait 952
/etc/hosts
In case of an error the following return codes and messages are used:
■
■
■
Unknown LP parameter
Problem connecting to LPD server
Problem occurring executing LP command
Cancel Print Jobs with ”lprm”
The 'lprm' command is used to cancel a LP print job in the Océ PRISMAproduction
Server spool. To specify the job which needs to be canceled the LP printer as well as the
Océ PRISMAproduction Server job Id must be specified. The command can be used for
local LP printers (lprm -P <printer>) as well as remote printers (lprm -P <printer>@<host>). Since the functionality of the cancel job is implemented in the LPD, it
Chapter 7 - Configuration
513
'LP'
depends on this implementation if the command works properly or not. The 'lprm'
command only creates a valid LP request and waits for a return code.
Note:
(when the Océ PRISMAproduction Server LPD processed the command): The 'lprm'
command only can cancel Jobs which are submitted from the same node as where the
'lprm' command is executed. Be aware that when a 'Network Address Translation Table'
(NAT) is used between the lp-clients and the LPD all the computer systems behind the
NAT are seen as one node! This means that all these nodes can see each other LP jobs
and also can delete these.
Syntax:
' /u/prismapro/bin/lprm [-D] -P<printer>[@<host>:<port>][-U<user>] <JobId>
/u/prismapro/bin/lprm -V'
#
Operator
Description
-D
Switch debugging on (Optional, trace is written into file
'/u/prismapro/diag/lp/lprm.log')
-P
<printer> = LP printer
<host> = LP host (Optional)
<port> = LPD port (Optional)
-U
Specify user, root only (Optional)
<JobId>
Océ PRISMAproduction Server Job Id to be deleted
-V
Lprm version
Example: '/u/prismapro/bin/lprm -P lptest01 00000001'
In case of an error the following return codes and messages are used:
■
■
■
514
Unknown LP parameter
LP socket (connection) problem occurred
Problem occurring executing LP command
Chapter 7 - Configuration
'LP'
Control Function”lpc”
The LP control client 'lpc' only allows the user to enable a LP printer. This has the same
effect enabling the printer in the 'Input Status View'. By using the 'all' keyword instead
of the printer name all LP printers will be enabled.
The 'enable' printer functionality is also the only official lpc sub-command which is defined
in the LP protocol. Additional functionality provided by other lpc implementations use
none official ways to provide this functionality.
Syntax:
'u/prismapro/bin/lpc [-D] enable <printer>[@<host>:<port>] /u/prismapro/bin/lpc -V'
#
Operator
Description
-D
Switch debugging on (Optional, trace is written into file
'/u/prismapro/diag/lp/lpc.log')
enable
Enable LP printer to receive jobs
<printer>
LP printer or keyword 'all' for all LP printer
<host>
LPD host (Optional)
<port>
LPD port (Optional)
-V
Lpc version
Example: '/u/prismapro/bin/lpc enable lptest01'
In case of an error the following return codes and messages are used:
■
■
■
Unknown LP parameter
Problem connecting to LPD server
Problem occurring executing LP command
LP Daemon
The LP Daemon (LPD) receives local or remote jobs using the LP protocol. This means
that it must be able to communicate with other LP clients as well as other LP daemon
implementations. Since the LP protocol is not accurately defined, a lot of variations of
the protocol exist. Most of the time this is also the cause of the LP problems.
Note:
MS Windows: The 'LPR byte counting enabled' check box by the printer port configuration is no longer needed. This speeds up spooling the print job.
Chapter 7 - Configuration
515
'LP'
LP Protocol to OCT Conversion
#
Internal
LP-Parameter
OCT Parameter
Description
Multiple entries or #
job.Copies
Job copies (Default 1)
C
job.Job_Class
Job queue (when number > 0
and < 999)
C¹
originator.Sending_Param_C
Job class
I¹
originator.Sending_Param_I
Ident spaces (Not supported)
J
job.Job_name
Job name
M
job.Active_Notification
(Mail) notification
¹
Originator.Sending_Param_O<nnnn>
Special options
originator.Receiving_Input_Channel
LP printer name
T
originator.Sending_Title
Job title
P
originator.Sending_User
Remote user
W¹
originator.Sending_Param_W
Page width (Not supported)
¹ Not supported by Océ PRISMAproduction Server
IBM Specific OCT Conversion
#
516
IBM Option
OCT Parameter
Description and limitations
-oac, -oaccount
receiver.Acc_Custom_Id
Accounting information
-oaddress1
receiver.Rec_Street
Specifies address string
-oaddress2
receiver.Rec_ZIP
Specifies address string
-oaddress3
receiver.Rec_City
Specifies address string
-oaddress4
receiver.Rec_Country
Specifies address string
-obi, -obin
job.intray
Determines output bin. Range
1-255
-obu, -obuilding
receiver.Rec_Building
Name of the building
Chapter 7 - Configuration
'LP'
IBM Option
OCT Parameter
Description and limitations
-OCHARS¹
originator.Sending_Param_OCHARS
-occ
originator.Sending_Param_-occ
See ‘-occtype’ and ‘-otrc’
-occtype
files.Pdscc
‘-occ=yes’ and ‘–occtype=a’ then
‘Pdscc=1’
‘-occ=yes’ and ‘–occtype=m’ then
‘Pdscc=2’
‘-occ=yes’ and ‘–occtype=o’ then
‘Pdscc=4’
‘-occ=yes’ and ‘–occtype=x’ then
‘Pdscc=8’
‘-occ=no’ then Pdscc=16,
Pdstrc=0
-ocd, -ocdp,
-ocod, -ocodepage¹
originator.Sending_Param_-occd
originator.Sending_Param_-occdp
originator.Sending_Param_ocod
originator.Sending_Param_-occdepage
ASCII input codepage values:
437, 850, 860 (Portuguese) ,
863 (French Canadian),
865 (Nordic)
-ocop, -ocopies
job.Copies
Specifies the number of copies
of the job.
Range 1-255
-odatac, -odatack
files.PDSDCK
Determines what type of errors
create error messages.
Values: block, blkchar, blkpos,
unblock
-odatat, odatatype
files.DataType
Specifies the type of data stream.
Values: as(cii), af(pds),
db(csascii), d(itroff), gif, jpeg,
l(ine), mo(dcap), pc(l), pdf,
p(o)s(tscript), ppml, sap, tiff
-ode, -odepartment
receiver.Rec_Company
Specifies department name.
Max. 90 characters
-odi, -odistribution¹
originator.Sending_Param_-odi
originator.Sending_Param_odistribution
Specifies distribution name.
Max. 90 characters
Chapter 7 - Configuration
517
'LP'
518
IBM Option
OCT Parameter
Description and limitations
-odo, -odocname,
-ojobn, -ojobname
job.Job_name
Specifies document or job name.
Max. 90 characters
-odu, -oduplex
files.Pdsduplx
Specifies is the job prints on one
or both sides and how the pages
are ordered.
Values: y(es), n(o), t(umble)
-OFILEFORMAT
originator.Sending_Param_OFILEFORMAT
Value: record
-of, -oformdef
files.Formdef
Specifies the name of the form
which is used for the job.
-oh, -oheader¹
originator.Sending_Param_-oh
originator.Sending_Param_oheader
Specifies if a start page is printed
before the job.
Values: y(es), n(o)
-oin
job.Intray
Specifies the job input tray
-omsgc, -omsgcount¹
originator.Sending_Param_omsgc
originator.Sending_Param_omsgcount
Specifies the maximum number
of messages printer.
Range: 0-9999
-ona, -oname
receiver.Rec_Name
Specifies name.
Max. 90 characters
-ono, -onodeid
userinfo.Notify
Node id information.
Max. 20 characters
-ooffxb
files.PdsOffXB
Specifies X-offset on backside of
page
-ooffxf
files.PdsOffXF
Specifies X-offset on frontside of
page
-ooffyb
files.PdsOffYB
Specifies Y-offset on backside of
page
-ooffyf
files.PdsOffYF
Specifies Y-offset on frontside of
page
-oou, -ooutbin
job.Outtray
Output tray, Range: 1-65535
-oov, -ooverlay
files.FrontSideOvls
Specifies the name of the overlay
printed on every page of the job.
Between 1 – 8 characters.
Chapter 7 - Configuration
'LP'
IBM Option
OCT Parameter
Description and limitations
-OPAGEDEF
files.Pagedef
-opa, opassthru
originator.Sending_Param_-opa
originator.Sending_Param_opassthru
-OPRMODE
userinfo.PR_Mode
-opr, -oprogrammer
originator.Sending_Programmer_Name
Programmer name. Max. 40
characters
-oresp, -orespath¹
originator.Sending_Param_-oresp
originator.Sending_Param_orespath
Specifies search order for Advanced Function Printing resources.
-oro, -oroom
receiver.Rec_Room
Specifies room name. Max. 90
characters
-osep, -oseparator¹
originator.Sending_Param_-osep
originator.Sending_Param_-oseparator
Specifies if separator pages are
printed between the job copies.
Values: y(es), n(o)
-osfo, -orchfo,
-orchfontlib¹
originator.Sending_Param_-osfo
originator.Sending_Param_-orchfo
originator.Sending_Param_-orchfontlib
Specifies one or more path which
are searched for fonts required
by the job.
-otrc
files.Pdstrc
‘-occ=yes’ and ‘–otrc=yes’ then
Pdstrc=1 ‘-occ=yes’ and
‘–otrc=no’ then Pdstrc=0 ‘occ=no’ then Pdstrc = 0
-oti, -otitle
originator.Sending_Title
Specifies the job title. Max. 90
characters
-otr, -otrailer¹
originator.Sending_Param_-otr
originator.Sending_Param_otrailer
Specifies whether trailer page is
printed.
Values: y(es), n(o)
-ous, -ouserid
originator.Sending_User
Specifies the user name. Max. 20
characters
Additional user information
provided with the job.
Name=value,name=value,…
-FORMS, -CLASS,
-DESTINATION. –SEGMENTID
Chapter 7 - Configuration
519
'LP'
IBM Option
OCT Parameter
Description and limitations
-oxo, -oxoffset¹
originator.Sending_Param_-oxo
originator.Sending_Param_-oxoffset
Specifies the X offset of the
pages.
nnn.nnn[i|m] i-inch, m–millimeter, pels (without .)
-oyo, -oyoffset¹
originator.Sending_Param_-oyo
originator.Sending_Param_-oyoffset
Specifies the Y offset of the
pages.
nnn.nnn[i|m] i-inch, m–millimeter, pels (without .)
LP Daemon Configuration
For a description of the 'Input Modules' configuration window see ‘'Input Modules':
Overview’ on page 460.
Global LP Parameters
In the menu bar global LP parameters can be set in a dialog. To open this dialog click
the following items: ’Edit' -> 'Edit global parameters' -> 'LP'. The following parameters
can be set. The bold values are the default values.
#
520
Parameter
Possible values
Description
Connection Timeout
300
<Number>
Network connection time out in seconds.
The value 0 disables this feature, so no
time out will occur (not recommended).
Maximum Client
Connections
0
<Number>
The maximum number of simultaneous
client connections for the daemon. The
value 0 disables this feature, so that no
limit is set.
Port
515
<Number>
LP Daemon port on which it receives
jobs.
Trace channel
0
<LP port number>
Defines the port where application socket
traces are made. To enable this the ‘Trace
flags’ must have at least the following flag
set 0x00000200. The value 0 disables this
feature.
Trace flags
ffff00f8
<0ffffffff>
Defines the detail level of the trace file.
See also the ’Trace channel’ and the
’Trace level’ parameter.
Chapter 7 - Configuration
'LP'
Parameter
Possible values
Description
Trace level
0
<1-4>
Defines the detail level in the trace file.
When trace level is 0 error traces are still
being written. Also, dependent of the
Trace Flags, data traces can still be written.
General Parameters
#
Parameter
Possible values
Description
Description
<Any character String>
The description of the LP printer.
Data Output Parameter
#
Parameter
Possible values
Description
OutputDataStructure
AddCRLF ->
Add CRLF as record delimiter.
AddCRLF_WithAFPTrim ->
Add CRLF as record delimiter
with AFP record trim.
NoRDW ->
Remove record length field
(compressed data).
PassThrough ->
Leave the input data file as it is
(LCDS data stream).
VAR ->
Use the IBM format RDW
(Variable record, 4 byte) as
record delimiter.
VAR_WithAFPTrim ->
Use the IBM format RDW
(Variable record, 4 byte) as
record delimiter with AFP trim.
Specifies the data structure of the
output file.
OCT Parameters
Chapter 7 - Configuration
521
'LP'
#
Parameter
Possible values
Description
DefaultTicket
“” or <File name>
Name of the default ticket to be
used for job submission.
ExtractParameters
AFPParameters ->
Extracts parameters for the OCT
from the first No'op in the AFP
data file.
Off ->
No parameter extraction is done.
PCLParameters ->
Parameters are extracted from
the beginning of the PCL data
file.
See also chapter ‘Extracting AFP
parameters’ in ‘'Input Modules':
Overview’ on page 460.
TicketParameterPriority
MVSHeaderOverwrites
NoopParameter ->
MVS/Download header parameters overwrite the AFPParameter
in the Noop of the data file(s).
NoopParameter
OverwritesMVSHeader ->
The AFPparameters from the
Noop overwrite the
MVS/Download header parameters.
Defines the ticket parameter
source priority.
StartMVSClass
0
<Number, min. 0, max. 950>
First Océ PRISMAproduction
Server queue which is used as
base to add MVS alphabetical
class value to it.
Job Submission Parameters
#
522
Parameter
Possible values
Description
JobGrouping
SingleFileJobs ->
Each data file of the grouped job
is submitted as a separate job.
GroupedFileJobs ->
Each grouped job is submitted
as one single job with multiple
data files (default).
Specifies how grouped jobs are
submitted.
Chapter 7 - Configuration
'LP'
Parameter
Possible values
Description
MaxCopies
0
<Number>
Maximum number of copies a
printable job may contain. The
value 0 disables this feature. Default 0.
MaxKBytes
0
<Number>
MirrorDataFile
Yes ->
Mirror data file(s) with Download while receiving them (on
the fly).
No ->
Mirror data file(s) during the job
submission when mirroring is
defined for this port.
Defines the time when the data
files are mirrored. To be able to
use this feature the Interconnectivity license is needed and the
MirrorServer must be defined
for this port.
Note:
Set this parameter to
‘No’ when a job submission script is used in
which data file manipulation steps are done.
MirrorPolicy
Mandatory ->
A job is not accepted on this
server when it can not mirror the
job.
Optional ->
A job will always be accepted independent of the mirror job status.
Defines the job acceptance on
this server when the mirror server doesn’t accept the job. To be
able to use this feature the Interconnectivity license is needed
and the MirrorServer must be
defined for this port.
MirrorServer
“”
<IP Address>
Name or IP address of the mirror server. Only available when
the ‘Interconnectivity’ license
exists and the mirror server is
defined in the Océ
PRISMAproduction Server System Configuration
Chapter 7 - Configuration
523
'LP'
Parameter
Possible values
Description
PrgJobSubmission
pjm
<Another executable script or
binary >
This program or script is used to
submit the job into the Océ
PRISMAproduction Server system. See section ‘The job submission’ in ‘'Input Modules':
Overview’ on page 460.
TicketRule
“”
<String>
Name of the Ticket rule to use
when the job is submitted. The
Ticket Rule must be defined in
the Océ PRISMAproduction
Server Ticket Rule Configuration first before it can be selected
in the list.
Special IP PrintWay Issues
When the job is send using IP PrintWay the following points need to be addressed:
■
■
The 'IBM specific OCT conversion' table is used (additional to the normal LP) to
map the parameters from the LP control file to the OCT.
The 'OutputDataStructure' parameter must be changed to change the incoming 2
byte record length fields to (for example) a 4 byte length field (OutputDataStructure=VAR).
Special Windows Printer Driver Issues
When the data is generated with the windows printer driver it generates OCT parameter
into the data file. Therefore the parameter 'ExtractParameters' must be set to the value
'AFPParameters'.
524
Chapter 7 - Configuration
'LP': Behavior in Error Situations
'LP': Behavior in Error Situations
Introduction
The behavior of the 'LP' daemon in error situations is situation dependent to make sure
that the least interference of the normal workflow is achieved. This section explains what
happens if a certain situation appears.
If the configured default ticket can not be found on the hard disk no jobs using this 'LP'
printer can be submitted. Therefore a user message will be created and the 'LP' printer
will be disabled.
If problems occur during the job submission, retries of job submission are done in the
following four cases: before the next job for this port is submitted, when the printer is
enabled again or when the 'LP' daemon is restarted. Then it is possible for the user to
manually modify the system and make sure the job can be submitted.
Note:
After 3 days the not submitted data files of the jobs will be removed from the system to
prevent the hard disk of filling up.
Generating a trace file
The trace file is generated by the 'LP' daemon and shows the function call sequences as
well as main values from variables which are used. This file can be used by the development
department to solve an error in the 'LP' daemon. To create a trace file, select menu ’Edit'
-> 'Edit global parameters' -> 'Download' in the Océ PRISMAproduction Server 'Input
Modules' configuration window and change the following parameters:
#
Parameter
Value
Description
Trace channel
0
<LP Port>
Defines the port where application socket traces
are made. The value 0 disables this feature. Also
the trace flags must have at least the 0x00000200
flag set.
Trace flags
0xfff1cf9
0xfff1cfb
0xfff1efb
Traces are written with performance information;
no print data files are collected (Standard trace).
Traces as well as data files are collected (Data
trace).
Traces, data files as well as data socket traces are
made (Socket data trace). Set the parameter 'Trace
Channel' to the port from which the Socket Data
Trace is to be captured.
Chapter 7 - Configuration
525
'LP': Behavior in Error Situations
Parameter
Value
Description
Trace level
4
Highest trace level
The 'LP' daemon saves only one previous copy of the trace file. Older trace files are
deleted. With each 'LP' reset or Océ PRISMAproduction Server reset a new 'LP' trace
file is created. Data trace files however are not overwritten and must be deleted manually
when they are not needed anymore.
Even when the lowest trace level 0 is used errors are always being written. So when an
error occurs and the trace level is 0, this trace file still contains traces, so please save this
too and send it in with the trace files that are additionally made.
When the traces are made and the error is reproduced prismadiag can be used to collect
the information.
#
<JobId>_pjm_cmd.out
The command used to call the job submission script.
All_ISS_*
The protocol of the Input Status View command exchange.
All_PJM_*
The protocol of the PJM socket commands.
LPD_DataTrace_*
Socket data trace file.
lpd_<jobid>_*
The data file(s) belonging to the job.
lpd_<jobid>_<port
no>.oct
The job specific Oce custom ticket to control the print job.
lp.err*, lp.log*
The 'LP' daemon error and log files.
lpc.err*, lpc.log*
The lpc client log files (use -D option).
lpq.err*, lpq.log*
The lpq client log files (use -D option).
lpr.err*, lpr.log*
The lpr client log files (use -D option).
lprm.err*, lprm.log*
The lprm client log files (use -D option).
Dependent of the trace flags set, not all of these files is created.
Note:
Beware of the hard disk space when data traces are written. Data traces generally are very
large and generate a large number of files.
526
Chapter 7 - Configuration
'LP': Behavior in Error Situations
Trace Level and Flags details
This chapter is only for those users who want to know more. In most cases the options
described in the previous chapter will be enough.
'LP' has a trace level and trace flags which control the behavior on how the trace file is
written. Using theses levels and flags it is possible to control the amount of data and when
the data is written.
The flags are used bit wise, which means each trace flag mode can be set separately.
Normally the TraceLevel should be set to 3 or 4 to get enough trace details, this will
produce large traces.
Trace level
The trace level can be set from 0 to 4. Each level higher produces more detailed information and includes all the information of the lower levels:
#
Level
Level Name
Description
0
Error messages
Only when errors occur.
1
Section messages
Main section enter/exit info.
2
Function messages
Function enter/exit with return code info
3
Info messages
Important variables/information
4
Detail messages
Detailed variables and other information (Large
Trace File !)
Trace Flags
The trace flags are used to control the behavior of the trace file/Input-Filter. The following
trace flags are available:
#
Special Flags
Name
Description
0x00000001
Performance
Collects special performance information and
writes this into the trace file.
0x00000002
Copy I/O data
Creates a copy of the output files in the diag directory.
0x00000004
Error only flag
Only when errors occur trace info is written into
the trace file. This includes also traces which happen just before the error occurs.
0x00000008
Time flag
Time info is added for each trace line.
Chapter 7 - Configuration
527
'LP': Behavior in Error Situations
528
Special Flags
Name
Description
0x00000010
Section flag
Program section and source code id./class are
added for each trace line.
0x00000020
Buffer trace
flag
The trace info is buffered until the buffer is full
and then written to the trace file. By NOT setting
this bit the trace information is written line by line
to the trace file (lower performance).
0x00000100
Buffer data
trace
When this flag is set a buffer data trace is written.
0x00000200
Socket data
trace
When this flag is set an application socket data
trace is written.
0x00000400
Input Status
trace
When set it writes the Input Status protocol trace
0x00000800
PJM protocol
trace
When set it writes the PJM protocol trace
0x00001000
PJM cmd trace
When set it writes for each PJM command a separate file with the used parameters.
Chapter 7 - Configuration
LP Windows Client
LP Windows Client
Introduction
The LP Windows client can be used in two different ways: The first is to use the command
line command 'lpr', the other is to configure an lpr printer.
To be able to use the 'lpr' command line command no configuration is needed to send
an LP job to your Océ PRISMAproduction Server server.
Syntax: 'lpr -S <Server> -P <Queue> -<Data-file>'
#
Server
Name or IP-address of the Océ PRISMAproduction Server server.
Queue
Name of the logical printer queue configured on the Océ
PRISMAproduction Server server.
Data-file
Name of the data file to be printed.
The option '-o l' (a lowercase 'L') can be used for defining binary transmission when binary (postscript, etc.) files are sent.
Note:
No data conversion is done before the data is sent. Make sure the file has the correct
format before the data is sent, or that the receiving server can convert the data when this
is needed.
If the correct licenses are available and the logical LP printer is configured properly, data
conversion (PostScript, PDF, Linedata, …) can be done by Océ PRISMAproduction
Server. The RAW windows format however cannot be converted. The other way is to
create an lpr printer and configure this printer to send the data to the Océ PRISMAproduction Server server LP queue. The data output format can be one of the following
output formats:
■
■
■
AFP (free driver available, an extended version with more features can be bought)
PCL (free driver available, an extended version with more features can be bought)
Postscript
Configuration of an LPR Printer under Windows XP
1. Select 'Start' and then 'Printers and Faxes'.
2. Double click the 'Add Printer' icon to start the 'Add Printer Wizard'. Click 'Next'.
3. In the following window select 'Local Printer' and click 'Next'.
Chapter 7 - Configuration
529
LP Windows Client
4. In the 'Select a Printer Port' window activate 'Create a new port' and select 'Standard
TCP/IP port' from the drop down list. Click 'Next'.
5. The 'Add Standard TCP/IP Printer Port Wizard' is started. Click 'Next' and then fill in
the Océ PRISMAproduction Server hostname or IP address as 'Printer Name or IP Address', the 'Portname' is added automatically. Click the 'Next' button.
6. In the next window select 'Custom' and click 'Settings...'.
7. In the configuration window activate 'LPR' as 'Protocol'. Fill in the 'LPR Settings Queue
Name' with the Océ PRISMAproduction Server logical LP queue name and click the
'OK' button.
8. You return to the previous wizard window. Click 'Next' and the 'Finish' to complete the
wizard.
9. After the port is configured you can select the appropriate printer driver (AFP, PCL,
postscript etc.) and follow the instructions of the 'Add Printer Wizard' to finish the configuration.
530
Chapter 7 - Configuration
LP Windows Tools
LP Windows Tools
Introduction
On the Océ PRISMAproduction Server software CD in the directory \tools_win\LP some
small LP tools are available. The following tools are supplied:
■
■
Starting lpq from the menu
Starting lpr from the 'send to' menu
Please give us a response how these tools are accepted. If the response is positive, we will
extend these kind of features in the future.
Starting lpq from the menu
To start the lpq command from the menu two small files are needed. The first is a batch
file which shows a command line window, starts the lpq command and waits until the
user clicks a button to close the window. The used path should be:
'C:\Program Files\Oce\inputmodules\exe'.
The second file is a shortcut which calls the lpq batch program and can be for example
put in the Windows directories, which contain the start menu entries:
'C:\Documents and Settings\<user>\Start Menu\Programs\Océ\LP\lpq'
<user> must be replaced by the user using this tool.
#
Server
Name or IP-Address of the Océ PRISMAproduction Server server.
Queue
Name a configured LP queue on the Océ PRISMAproduction
Server server.
The listing displayed is the listing of all the print jobs which are received by the LP protocol. At the moment no distinction is made via which logical LP queue the print job
has entered the Océ PRISMAproduction Server system. This behavior will change however in a future release, so that only the jobs from the specified logical sprinter can be
seen.
Starting lpr from the 'SendTo' menu
To start the lpr command and send data files to the Océ PRISMAproduction Server
server two small files are needed. The first file is called LprWinClient.exe, and is an executable which checks the parameters, writes a small trace file and then submits each se-
Chapter 7 - Configuration
531
LP Windows Tools
lected data file as a single print job to the Océ PRISMAproduction Server server. This
program can also be used separately in a batch file. The used path should be
'C:\Program Files\Oce\inputmodules\exe'.
The second file is a shortcut which calls the LprWinClient.exe and must be put into the
Windows directories where the 'send to' menu entries are located:
' C:\Documents and Settings\<user>\SendTo '
<user> must be replaced by the name of the user who is using this tool.
Frequently asked questions
■
■
■
■
Always use the prismaproduction path '/u/prismapro/bin/' when using the LP clients
lpr, lpc, lpq and lprm.
Editing files on a Dos or Windows system can result in files with a special character
"Ctrl-Z" at the end. This may result in unpredictable problems! Therefore it is recommended to use the configuration tools.
The LINUX system in general is case sensitive. This has to be considered for all entries
into configuration or script files.
HP UNIX client: During LP configuration with the "sam" utility: Please select "Remote
printer is on a BSD system".
Transfer of LPD jobs from a Windows OS:
During transfer of many small jobs via LP from a windows system, the transfer process
may slow down. It seems that the communication hangs or slows down but jobs are still
transferring data.
The cause for this is that the Windows NT/ Windows 2000 OS only use 11 TCP ports.
When more than 11 connections are needed it waits until the first port is available again.
This can take up to 3 minutes.
There is a description from microsoft which shows how to edit the registry to fix this
problem:
http://support.microsoft.com/default.aspx?scid=kb;EN-US;179156
532
Chapter 7 - Configuration
Chapter 8
PJM Command Line
PJM Command Line Mode Overview
PJM Command Line Mode Overview
Introduction
Besides the graphical user interface, the Print Job Manager also provides a commandbased interface, which can be called on all systems that have the PJM GUI Client installed.
The PJM command line can also be installed separately.
The executable version of the command line is supported on LINUX ('/usr/bin/pjm')
and Windows (spjm.exe in folder CD/tools_win). The executable is small and fast on
the client, as the Océ PRISMAproduction Server socket interface is used and most of the
work is done on the server.
The Windows user has to install the Windows command line version on the windows
system by hand.
The description for the command line is valid for all incarnations.
PJM Command Line Features
The PJM command line enables you to execute print jobs by entering a command string.
Also a few maintenance functions can be performed especially regarding Print File Libraries. In general some form of a Job Ticket is defined and merged with other command
line options. This results in a submission ticket which is transferred to the Océ
PRISMAproduction Server system along with the print data (as far as necessary). The
resulting ticket controls the print process on the server site.
In particular you can:
■
■
■
■
■
■
■
■
■
■
534
Specify a Océ PRISMAproduction Server system on which the print job should run.
Define either a local or reprint Job Ticket as basis for a print job - optional along with
a custom ticket OCT for modifications of the original ticket
Specify a job class, printer, the job name, copy count and form
Specify a page definition and form definition for APA jobs
Select a composer set to impose chained files
Replace local files and/or files from a Print File Library in the list of files already defined
in the original ticket
Delete documents in a Print File Libraries and Resource Libraries
Display the status of a job or a list of jobs
Cancel a job or a list of jobs
Request a jobid and use it in a subsequent job submission
Chapter 8 - PJM Command Line
PJM Command Line Mode Overview
All options regarding Print File Libraries are applicable to Océ PRISMAproduction
Server systems with the language module POD only. Same applies to the composer set
name.
The option regarding page and form definition is applicable to Océ PRISMAproduction
Server systems with the language module APA only.
Chapter 8 - PJM Command Line
535
PJM Command Line Parameters
PJM Command Line Parameters
Introduction
You call the PJM Command Line with the following command:
'pjm parameter...'
Parameters
All parameters are optional and can be entered in any order.
#
536
Information Parameters
Meaning
-? or no parameter
display all parameters available. There is no processing action
in this case.
-v
display version number. There is no processing action in this
case.
Connection Parameters
Meaning
-s <server-name>
server to which the job or command is to be sent
Default: the local system
-user <user-name>
user name under which the PJM command line connects to the
PRISMAproduction server
Default: the current user
Ticket Parameters
Meaning
-t <ticket-name>
Path of the local Job Ticket
Job ticket containing default parameters.
Default: no job ticket
-oct <oct-name>
Path of the Oct
Océ Custom Ticket is used to modify the local Job Ticket or
the Reprint Job Ticket (or the empty Job Ticket if none has
been defined).
Default: no oct
Chapter 8 - PJM Command Line
PJM Command Line Parameters
Information Parameters
Meaning
-r <reprint-name>
Logical path of reprint ticket/data.
The reprint job must be specified as follows ($ can be replaced
by @, as the use of the $ character is restricted in some operating
systems):
'[/$PFL/]Archive/User/Document' for private or
'[/$PFL/]Archive/User#Document' for public jobs.
Default: no reprint
-tr <ticketrule>
Name of the ticket rule, which is applied to the executed job
ticket.
This function is not implemented in the PJM user interface.
Default: no ticket rule
Print Parameters
Meaning
-jn <job-name>
Name of the job. Default: ‘tmp’ if no job name has been defined
in the local ticket or custom ticket. The job name in the custom
ticket overlays the job name in the local/reprint ticket.
-jc <job-queue>
Number of the jobqueue.
Default: 1
-nc <copy-count>
Number of jobcopies
Default: 1
-prt <printername>
Name of the target printer or clustername.
The printer also determines the resolution at which the job will
be printed. Instead of a configured printername or clustername
you can also insert the keyword <Any printer> or <Any nnn
dpi printer> (nnn stands for the resolution).
Default: the first printer available.
-form <form>
PRISMA form name which will be displayed to operator before
printing starts.
Default: STD, i.e. no form message is displayed
-pdef <page-definition>
PRISMA Page Definition
If more than one file is defined in the list of files, the page definition is set for each of the according print steps.
-fdef <form-definition>
PRISMA Form Definition
If more than one file is defined in the list of files, the form definition is set for each of the according print steps.
-title <title>
Specifies a title for System Header Pages.
File Parameters
Meaning
Chapter 8 - PJM Command Line
537
PJM Command Line Parameters
538
Information Parameters
Meaning
-f <file-name>…
Path of print files(s)
Local print files to be printed using the parameters in the job
ticket loaded with -t or -r or/and -oct. The file names in the
job ticket are replaced one by one by the names specified.
Note: The replacement in the list of files takes place after the
custom ticket has been merged with the local/reprint ticket. If
more files are given here than defined in the merged ticket, additional default file entries are created (defaults according to
the ticket type APA/LCDS/POD). Default: the filenames defined in the ticket
-pfl <file-name>…
Path of pfl(s) PFL print files to be printed using the parameters
in the job ticket loaded with -t or -r or/and -oct. The print file
names in the job ticket are replaced one by one by the names
specified. Files must be specified as follows:
'Archive/User/Document' for private or
'Archive/User#Document' for public jobs.
Note: Same as for the -f parameter.
-imp <impos-file>
Path of imposition file Impositioning set. All files are imposed
after they are chained.
PJM control Parameters
Meaning
-type <language
module>
Specifies the type of the ticket: APA|LCDS|POD
Default: POD
The -type option is useful in combination with the -f option
only because otherwise the ticket type is part of the job ticket.
-getid
Request a job id
Returns a new PRISMAproduction job id to be used in a subsequent job submission (see -id option).
-id <job-ident>
Job id that is to be used in the current submission.
It is assumed that the jobid has been requested by a previous
PJM call using the -getid option.
Default: generated implicitly for current submission
Chapter 8 - PJM Command Line
PJM Command Line Parameters
Information Parameters
Meaning
-quiet
Run in quiet mode
Do not display formatted messages on STDOUT and STDERR.
Display a code instead and optional a list of parameters depending on the code.
This parameter is supposed to be set when the PJM Command
Line is used in shell scripts. Error handling should be much
easier when dealing with codes and parameters instead of formatted (language dependent) messages. See more detailed description below. Default: verbose
-wait
Wait until the job is ready to print
PJM command line does not return any values until the job is
"ready to print" or is aborted with an error or is deleted.
Returncode:
If the waiting state of the command line is finished because the
job is aborted with an error, the return code is 12 otherwise it
is 0.
Default: do not wait, return after job has been accepted
-force
Accept job anyway
If you "force" a job it is submitted anyway. The job appears in
the list of jobs despite of missing important options. From there
you have to set the missing options for each job via the PJM
GUI.
Normally also the error situation, which prevented the job from
being accepted in the normal way has to be corrected.
Example: An output tray has been referenced, which is not
defined for the given printer. If the job must be printed on the
given printer, the referenced tray must be defined for this
printer before resubmitting the job.
-link
Creates links on the ODS master to the print files if possible.
You can find the respective parameter under PJM -> Menu Job
-> Transfer Mode
Default: Copy print data to the server.
Job control Parameters
Meaning
Chapter 8 - PJM Command Line
539
PJM Command Line Parameters
540
Information Parameters
Meaning
-status <job-id>…
Get basic job status
Returns the status of a job / a list of jobs. The jobid is the 8digit number displayed when a job is submitted. The status can
be: wait, work, interrupted, error, unknown, canceled, finished.
If the status is error, an additional description of the error will
be shown, e.g. "error: tiffconv Input file wrong format".
-prio <num>
Priority of the print job. num = 1-255 (no blank character between -prio and <num>!)
Example: "pjm -f /u/prismapro/demo/ioca/demo.ioca prio100". The user must have the permission to modify the
priority.
-cancel <job-id>…
Cancel job(s) listed
Cancels a job / a list of jobs. The jobid is the 8-digit number
displayed when a job is submitted.
-rdelete <resourceid>…
Name(s) of Reprint/ Resource
Delete documents in Print File Libraries and Resource files.
You have to add the fully qualified logical path. $ can be replaced by @, as the use of the $ character is restricted in some
operating systems.
If you are logged in as "admin", '"root" or "system" you can
replace the userid in the filename by the wildcard *.
Example:
'/$PFL/Archive/User/Document' for private reprints
'/@OVERLAYS/User#Document' for public overlays
Mirror Parameters
Meaning
-mirror <servername>
Server, on which the job should be mirrored during submission.
The mirror server must be defined under Configuration ->
System on the original server.
Respective option on the GUI: PJM -> Menu Job -> Transfer
Mode -> Mirror Jobs during Submissionand Mirror Server.
Default: no mirroring of jobs
-mp <policy>
Mirror policy: optional/mandatory
Respective option on the GUI: PJM -> Menu Job -> Transfer
Mode -> Mirror Jobs during Submission and Mirror Policy.
Default: The value set in ’Configurtion’ -> ’System’.
Chapter 8 - PJM Command Line
PJM Command Line Parameters
Information Parameters
Meaning
-mnd
Mirror no data
The data must exist on the mirror server to print the job.
Respective option on the GUI: This parameter connot be set
via the GUI.
Default: Transfer of ticket and data.
-mtr <ticket rule>
Ticket Rule which is executed on the mirror server: <ticket rule>
| none.
’none’ means that no ticket rule is executed on the mirror server.
If a ticket rule is set via the tr-parameter, the ticket rule set here
is executed on the mirror server additionally to the ticket rule
executed on the original server.
Respective option on the GUI: PJM -> Menu Job -> Transfer
Mode -> Mirror Jobs during Submission and Ticket Rule.
Default: The value set in ’Configurtion’ -> ’System’.
-muser <username>
User who starts the job on the mirror server.
Respective option on the GUI: Configuration -> System ->
Mirroring -> User Name.
Default: The value set in Configurtion -> System.
-mpw <password>
Password for the user set under "muser".
Respective option on the GUI: Configuration -> System ->
Mirroring -> Password.
Default: The value set in Configuration -> System.
Usage of Ticket, Print and File parameter groups:
These parameter groups may be used exclusively or combined (where they supplement
each other). The idea behind is to allow to print either without a Job Ticket or with a
Job Ticket/Oct and replacing parameters in the ticket.
#
Parameter Group
Description
No local Ticket
For simple print jobs. Normally only the "file parameter" would
be used here, maybe with setting a job name and printer by
"print parameters".
Example: -jn simple -nc 2 -f test.afp
Local Ticket only
For fully prepared print jobs. All parameters are defined in the
Job Ticket.
Chapter 8 - PJM Command Line
541
PJM Command Line Parameters
Parameter Group
Description
Local Ticket +
Print/Files:
For prepared print jobs. A few parameters in the job ticket must
be updated.
Example: -t test.tic -f test.afp -prt myprinter
Local Ticket + Oct
For print jobs which are based on a default ticket and where a
lot of parameters must be updated. All dynamic parameters are
contained in the Oct.
Local Ticket + Oct
+ Print/Files
Should not be used. Either the dynamic parameters are written
in an Oct or the Print/Files group is used for overwriting.
Reprint request
The special request -r, where a job kept in intermediate storage
should be reprinted. The Job Ticket for the reprint is supposed
to be the ticket of the original job.
If the -f parameter is used together with a Job Ticket, it simply
overwrites the file name in the List of Files in the Job Ticket.
The file type in the ticket remains valid. If it is used without a
Job Ticket, the type of the file depends on the language module
which interprets the job on the server.
Default file types are "IOCA" for the language module POD,
"AFP" for the language module APA and "LCDS Data" for the
language module LCDS.
Syntax Examples for Use Cases
#
Task
Command
Requesting a job id
[-s Servername] [-user User] -getid [-quiet]
Displaying the job
status
[-s Servername] [-user User] -status JobId1 [JobId2 … JobIdN]
[-quiet]
Deleting resources
and reprints
[-s Servername] [-user User] -rdelete ResOrPfl1 [ResOrPfl2
…ResOrPflN] [-quiet]
Cancel and delete
job(s)
[-s server name] [-user User] -cancel JobId1 [JobId2 … JobIdN]
[-quiet]
Return Codes
#
542
Return-code
Meaning
0
Success
Chapter 8 - PJM Command Line
PJM Command Line Parameters
Return-code
Meaning
All information is written to STDOUT.
Job Submission
■ Message for each file transferred to the ODS Master and a
final success message. The job identification is automatically
included as each message starts with ”Job <job identification>: …”.
■ Quiet mode: The ODS job identification.
Job Id request
■ Message containing the ODS job identification returned.
■ Quiet mode: The ODS job identification
Status
■ Status of job(s) is written.
for detailed information of <job status> see table below.
■ Quiet mode: <job identification> -> <job status>
Resource delete
■ No information is written.
■ Quiet mode: No information
Cancel
■ Information that job(s) has(have) been canceled is written.
■ Quiet mode: No information
1
Invalid command line option
Is set when an invalid option is found in the command line call.
Parameter parsing stops on the erroneous option.
STDERR: Message indicating the erroneous option
Quiet mode: 0 -> <invalid option>
3
No connection error
Is set when no connection to the PRISMAproduction server
specified by –s option could be established.
STDERR: Message describing the connection problem
Quiet mode: 1:-> <server name> -> <server error message>
5
Ticket handling error
Chapter 8 - PJM Command Line
543
PJM Command Line Parameters
Return-code
Meaning
Is set when the tickets given in the -t or -r and/or -oct cannot
be found/opened.
STDERR: Message describing the open problem
Quiet mode:
1 -> <local ticket open error message>
2 -> <reprint ticket open error message>
3 -> <custom ticket open error message>
10
File transfer error
Is set when one of the files in the list of files cannot be transferred. Transfer process stops with the file in error, files already
transferred to the server are deleted on the server.
STDERR: Message describing the file transfer problem
Quiet mode: 1 -> <file name> -> <error message>
11
Negative Ticket check
Is set when the combination of the local or reprint and custom
ticket with the command line options results in an invalid
ticket. All errors found are listed. Note that there are errors
which are so basically that no further analysis can be done (for
example an invalid printer, as most of the checks are printer
related). Analysis stops with such an error.
STDERR: List of messages describing the problems, one message
per problem
Quiet mode:
<code1> <error text 1>
:
:
<codeN> <error text N>
12
544
Job submission error
Chapter 8 - PJM Command Line
PJM Command Line Parameters
Return-code
Meaning
Is set when the PRISMAproduction server doesn’t accept the
job. This can happen for two reasons:
■ A problem in the negotiation process between the PJM client
and server which files are to be transferred (not the transfer
itself, would raise a ‘File Transfer Error’)
■ The job cannot be passed to ODS for execution Returncode
12 is also set if the waiting status of the of the PJM command
line is terminated by an error.
STDERR: Message describing the job submission problem
Quiet mode:
1 -> <server error message>
2 -> <termination error message> (only possible if the -wait
option has been specified)
13
Status display error
Is set when the PRISMAproduction server can’t return the status
of the given job(s).
STDERR: Message describing why the status has not been returned
Quiet mode: 1 -> <server error message>
14
Job cancel error
Is set when the PRISMAproduction server can’t cancel the given
job(s).
STDERR: Message describing why the job(s) has(have) not
been canceled
Quiet mode: 1 -> <server error message>
15
Resource delete error
Is set when the PRISMAproduction server can’t delete the given
resource(s).
STDERR: Message describing why the resource(s) has(have)
not been deleted
Quiet mode:
1 -> <resource name>
2 -> <resource name> <server error message>
<Job Status> is composed of more detailed information in the following format:
'<Main Status> <Detailed Status> [<Additional Status>] '
Chapter 8 - PJM Command Line
545
PJM Command Line Parameters
'<Main Status>' and '<Detailed Status>' are defined explicitly, whereas <Additional Status>
is optional and not definitely defined. <Detailed Status> must not be used for a logical
decision.
#
Main Status
Detailed Status (Meaning)
processing
The job is busy, no operator intervention required, information
only
transfer: files are being transferred
work: a job step is active (converting,…)
printing: the print data is being printed
prepintr: the print has been interrupted but the printer is still
printing (for example copies)
wait
The job waits for a resource or an event, no operator intervention required. Job continues when event occurs or resource becomes available
outputctrl: job has been printed but there are still pages in
output tray
print: wait until a printer becomes ready to print
job event: wait for an external event to occur
service: wait for a service to become available
time: wait for starting time to occur
exception
The job is in an error or interrupted or hold state, operator intervention is required
error-service: error occurred when processing job step
intr-service: job step has been interrupted by operator
hold-service: job step is in hold
error-print: error occurred while printing
intr-print: print process has been interrupted by operator
hold-print: print process is on hold, wait for starting time to
occur
finished
The job is finished but still visible in spool, operator intervention
is required for reprint
final: finished, job cannot be reprinted
locked: job can still be reprinted
546
Chapter 8 - PJM Command Line
Chapter 9
Océ Custom Ticket
Oce Custom Ticket
Oce Custom Ticket
Introduction
The Océ custom ticket provides the possibility to modify an existing job ticket during
it’s execution. It is possible to insert a [job] section with global parameters. Into this section
you can insert up to 9998 subsections [files] which define the parameter of the single
print files. If there are already print files in the loaded job ticket, their parameters will be
modified. You only have to add those parameters and sections which should be modified
by the OCT. Sections and parameters which are not inserted will be ignored. The following
table describes parameters, which can be modified via the Océ Custom Ticket:
Parameters of the Océ Custom Ticket
#
Parameter
General Description
Options and Syntax Default
Description of the corresponding GUI option
Additional notes
[job]
548
Print=
Print output file yes/no
Default: yes
Job_name=
Jobname
max. 64 characters
do not use '#', '/' and '.' if
you work with archives
Default: tmp
Job Parameter
Job_Type=
POD/APA/LCDS/OLDS
Default: POD
Menu Ticket -> new
Copies=
Number of jobcopies that
are to be printed
1-32767
Default: 1
Job Parameter
Copy_Sheets=
Copies on sheet level
yes/no
Default: no
Job Parameter ->
Copies.....'on sheets'
POD only
Multi_File_Print
Copies on job and file level
yes/no
Default: no
Job Parameter ->
Copies.....'per Job+Files'
Chapter 9 - Océ Custom Ticket
Oce Custom Ticket
Parameter
General Description
Options and Syntax Default
Description of the corresponding GUI option
Additional notes
Job_Class=
Job queue
1-999
Job Parameter
Proof_Print=
Proof print
yes/no
Default: no
Job Attributes -> Print
POD only
Printer_Name=
Name of the printer or of
a printer cluster
Job Parameter
Print_Mode=
Normal/Two up/Identical
copies/Invers Two up/Default
Default: Default
Job Attributes -> Print
Outtray=
Output Tray Default/Printer Default/A/B/C/D/...
Default: Default
Job Attributes -> Print
Intray=
Input Tray Default/Printer Default/1/2/3...
Default: Default
Job Attributes -> Print
POD and APA only
For LCDS use JSL
STOCKS/SCT technique
Print_Range=
List of print ranges which
are to be printed, separated by semicolons i.e. 5;10;60-80; 1:5-10; 2:1;...
1-3:10-;5-:1-
Job Attributes -> Print
Print_Form=
Name of a form
Job Attributes -> Print
Note for LCDS: If 'PrinterTyp=SCT' the form is
set internally.
If 'PrinterTyp=FanFold/
MediaName’ the
Print_Form-Parameter
may be used.
Toner_Color_Names=
List of colornames separated by comma
Job Attributes -> Print ->
Color Selection
Chapter 9 - Océ Custom Ticket
549
Oce Custom Ticket
550
Parameter
General Description
Options and Syntax Default
Description of the corresponding GUI option
Additional notes
Priority=
Priority of the print job
1 - 255
Default: 128
All Jobs -> Job Properties
Store=
Store output in libraries
yes/no
Default: no
Job Attributes -> Store
Output
POD only
St_Native=
Store output as native file
yes/no
Default: no
Job Attributes -> Store
Output
POD only
St_PFL=
Store output in PFL
yes/no
Default: no
Job Attributes -> Store
Output
POD only
St_Preprint=
Store output in preprint
cache
yes/no
Default: no
Job Attributes -> Store
Output
POD only
St_Resource=
Store output as resource
yes/no
Default: no
Job Attributes -> Store
Output
POD only
St_Resource_Dest=
Type of destination where
output is to be stored as a
resource: Header/Target/Overlay/Variable/Marks/Merge/Mapping/Tiff/Ps/Pdf
Default: Target
Job Attributes -> Store
Output
POD only
St_Native_Dest=
Type of destination where
output is to be stored as a
resource: Target only
Default: Target
Job Attributes -> Store
Output
POD only
St_PFL_Dest=
Name of PFL where output is to be stored
Default: Default
Job Attributes -> Store
Output
POD only
Chapter 9 - Océ Custom Ticket
Oce Custom Ticket
Parameter
General Description
Options and Syntax Default
Description of the corresponding GUI option
Additional notes
St_Preprint_Dest=
Name of preprint cache
where output is to be
stored
Default: no
Job Attributes -> Store
Output
POD only
St_Resource_Public=
Store resource public
yes/no
Default: no
Job Attributes -> Store
Output
POD only
St_Native_Public=
Store native data public
yes/no
Default: no
Job Attributes -> Store
Output
POD only
St_PFL_Public=
Store in PFL public
yes/no
Default: no
Job Attributes -> Store
Output
POD only
St_Preprint_Public=
Store as Preprint public
yes/no
Default: no
Job Attributes -> Store
Output
POD only
St_PFL_Delete=
Delete preprint after it has
been released to a PFL
yes/no
Default: no
Job Attributes -> Store
Output
POD only
Message=
Attach message to a job
yes/no
Default: no
Message_Text=
Text of the message
Job Attributes -> Message
Message_Type=
Type of the message
display/confirm
Default: display
Job Attributes -> Message
Header=
General option to print
job header pages or not
yes/no
Default: no
Job Attributes -> Header/Trailer
Chapter 9 - Océ Custom Ticket
551
Oce Custom Ticket
552
Parameter
General Description
Options and Syntax Default
Description of the corresponding GUI option
Additional notes
Header/Trailer=
Option to print special
system header pages (the
general option header
must be yes):
yes/MSG/no
yes: Print system header,
trailer and message pages
MSG: print system message/error pages only (no
system header and trailer
pages)
Default: no
Job Attributes -> Header/Trailer
Header_User=
Print user header page
yes/no (if yes, you also
have to set: Header=yes)
Default: no
Job Attributes -> Header/Trailer
POD only
Header_User_File=
Name of the file which
contains the print data for
the user header.
/$HEADER/<filename>
Job Attributes -> Header/Trailer
POD only
Header_User_Outtray=
Output tray in which the
header pages should be
put
Default/A/B/C/D
Default: Default
Job Attributes -> Header/Trailer
POD only
Header_User_Intray=
Input tray from which paper for header pages
should be taken
Default/1/2/.../8
Default: Default
Job Attributes -> Header/Trailer
POD only
JT_print=
Print Job Ticket
yes/no (if yes, you also
have to set: Header=yes)
Default: no
Job Attributes -> Header/Trailer
POD only
Chapter 9 - Océ Custom Ticket
Oce Custom Ticket
Parameter
General Description
Options and Syntax Default
Description of the corresponding GUI option
Additional notes
Header_Outtray=
Output tray in which the
header should be put
Default/A/B/C/D, Formdef
Default: Default
Job Attributes -> Header/Trailer
POD only
Header_Intray=
Input tray from which paper for the header should
be taken
Default/1/2/.../8
Default: Default
Job Attributes -> Header/Trailer
POD only
Header_Rotation=
Rotation angle for the
header
0/90/180/270
Default: 0
Job Attributes -> Header/Trailer
POD only
Active_Notification=
mail notifying triggered by
job states
.mailNotify <mail address> <status-1> <status2> < status-n>
<status>:
START|PRINTING|FINISHED|ERROR|INTERRUPT|CANCELED|DELETED
Example: .mailNotify
[email protected]
PRINTING FINISHED
Job Attributes -> Notification
Catalog=
Defines the custom catalog for XEROX and converted AFP resources and
printfiles. Use only catalogs defined in the
LCDS/GCI view of the
resource manager
Default: DEFAULT
Job Attributes -> Print
LCDS Only
Chapter 9 - Océ Custom Ticket
553
Oce Custom Ticket
Parameter
General Description
Options and Syntax Default
Description of the corresponding GUI option
Additional notes
Catalog_Host=
Defines the server of the
ODS cluster, where the
catalog is located and defined and where the
LCDS process chain (ifilter -> xfilter -> spooljob)
should run.
Job Attributes -> Print
LCDS Only
Alarm_Delay=
Alarm_Delay represents
the minutes between the
"Accepted" time of the
print job and the time
limit.
Alarm_Text=
Alarm_text is the message
shown in the message
popup window, if the time
limit is reached.
[client]
554
Client_Name=
Name of the client
Menu Job -> Information
-> User
Client_Company=
Client company
Menu Job -> Information
-> User
Client_City=
Client city
Menu Job -> Information
-> User
Client_Street=
Client street
Menu Job -> Information
-> User
Client_ZIP=
Client zip
Menu Job -> Information
->User
Client_Country=
Client country
Menu Job -> Information
-> User
Client_Tel=
Client phone number
Menu Job -> Information
-> User
Client_Fax=
Client fax number
Menu Job -> Information
-> User
Client_Branch=
Additional information
about client
Menu Job -> Information
-> User
Chapter 9 - Océ Custom Ticket
Oce Custom Ticket
Parameter
General Description
Options and Syntax Default
Description of the corresponding GUI option
Additional notes
Rec_Name=
Name of receiver
Menu Job -> Information
-> Receiver
Rec_Company=
Receiver company
Menu Job -> Information
-> Receiver
Rec_City=
Receiver city
Menu Job -> Information
-> Receiver
Rec_Street=
Receiver street
Menu Job -> Information
-> Receiver
Rec_ZIP=
Receiver zip
Menu Job -> Information
-> Receiver
Rec_Country=
Receiver country
Menu Job -> Information
-> Receiver
Rec_Tel=
Receiver phone number
Menu Job -> Information
-> Receiver
Rec_Fax=
Receiver fax number
Menu Job -> Information
-> Receiver
Rec_Shipment=
Additional information
about receiver
Menu Job -> Information
-> Receiver
Shipment=
Specific shipment information
Menu Job -> Information
-> Shipment
Acc_Custom_Id=
Booking account for Accounting
Menu Job -> Information
-> Shipment
File=
Complete Name of file
with physical or logical
path
List of Files
Format=
IOCA/PCL/TIFF/PSUnity/PDF-Unity/AFP/LCDS Data/JSL/Resource/RAW
List of Files
[receiver]
[files] (general)
Chapter 9 - Océ Custom Ticket
555
Oce Custom Ticket
Parameter
General Description
Options and Syntax Default
Description of the corresponding GUI option
Additional notes
File_Copies=
Number of file copies that
are to be printed
1-32767
Note: If you set
File_Copies the Parameter
'Multi_File_Print' has to
be yes.
List of Files
POD and APA only
For LCDS use JSL/DJDE
based copies command
ft_setname=
Composer-Setname physical or local path of the file
which contains the impositioning parameters
File Properties POD ->
Compose
ft_extra=
Additional parameter for
Composer -vdfile variabledata-file
use only with Oct
Sample=
Collect files
no/masked/left_index/right_index/directory
Default: no
File Properties POD ->
Collect
Sample_Range=
Collecting-Range e.g "14;6;9-13"
File Properties POD ->
Collect
Sample_Gaps=
Collecting: allow gaps in
the file numbering scheme
off/on
Default: off
File Properties POD ->
Collect
Paper_Size=
Paper size
A4/A4_uncut/A3/A3_uncut/B4/Letter/Legal/Ledger/A5/ Format1/Format2/variable
size in the format "width,
height unit" e.g..
15.5,24.8 cm or 8.5,11
inch
File Properties POD ->
Convert
Layout=
Page layout
Simplex/Duplex/Tumble
Default: Simplex
File Properties POD ->
Convert
[files] (POD)
556
Chapter 9 - Océ Custom Ticket
Oce Custom Ticket
Parameter
General Description
Options and Syntax Default
Description of the corresponding GUI option
Additional notes
Fix_Screen=
User screening
on/off
Default: on
File Properties POD ->
Halftone
Media_Names=
Papers
List of papernames separated by semicolons
File Properties POD ->
Convert
PS_LPI=
Screening frequency in lpi
0.1 .. 999.9
Default: 85.0
File Properties POD ->
Halftone
PS_Angle=
Screening angle in degrees
0.0 .. 360.0
Default: 45.0
File Properties POD ->
Halftone
Pdscc=
Specifies default carriage
control character:
0x01 ASA carriage control
character
0x02 IBM carriage control
character
0x04 OCÉ carriage control character
0x08 LCDS data stream
0x10 None - Force single
line spacing (16)
0x20 None - Force double
line spacing (32)
0x40 None - Force triple
line spacing (64)
Default: as defined in
printer configuration
APA Settings -> Options
-> Carriage Control Character
Pdstrc=
Specifies default table reference character:
0x00 No TRC present
0x01 IBM TRC present
0x02 OCÉ TRC present
Default: as defined in
printer configuration
APA Settings -> Options
-> TRC-Byte
[files] (APA)
Chapter 9 - Océ Custom Ticket
557
Oce Custom Ticket
558
Parameter
General Description
Options and Syntax Default
Description of the corresponding GUI option
Additional notes
Pdsduplx=
Specifies default Simplex/duplex information:
-1 use information from
FORMDEF
0 Simplex
1 Normal duplex
2 Tumble duplex
3 Rsimplex
4 Rnormal duplex
5 Rtumble duplex
6 Zigzag normal
7 Zigzag tumble
9 Rzigzag normal
10 Rzigzag tumble
Default: as defined in
printer configuration
APA Settings -> Options
-> Page Sequence
Pdsx2up
2up in AFPDS
APA Settings -> Resources
Formdef=
Form Definition Default:
F10101
APA Settings -> Resources
-> Form Definitions
Pagedef=
Page Definition
Default: P1STD3
APA Settings -> Resources
-> Page Definitions
Fonts=
List of the default fonts, if
no other fonts are specified.
APA Settings -> Resources
-> Preloaded Fonts
SPSLib=
List of individual resource
paths.
APA Settings -> Resource
Libraries -> Common Libraries
AFP_PageCount=
enables/disables count of
pages, only if pages are not
specified
yes/no
Default: no
APA Settings -> Options
-> No of Pages: “Detect”
EXT_CODED_FONT=
List of individual Resource
File Name Extensions of
coded fonts.
APA Settings -> Resource
File Extension -> Coded
Font Suffixes
Chapter 9 - Océ Custom Ticket
Oce Custom Ticket
Parameter
General Description
Options and Syntax Default
Description of the corresponding GUI option
Additional notes
EXT_CODE_PAGE=
List of individual Resource
File Name Extensions of
code pages.
APA Settings -> Resource
File Extension -> entries
of Code Page Extension
EXT_FONT_CHARSET=
List of individual Resource
File Name Extensions of
font character sets..
APA Settings -> Resource
File Extension -> entries
of Font Character Set
EXT_FORMDEF=
List of individual Resource
File Name Extensions of
formdefs
APA Settings -> Resource
File Extension -> entries
of Form Definition Extension
EXT_OBJECT_CONTAINER=
List of individual Resource
File Name Extensions of
xxx
APA Settings -> Resource
File Extension -> entries
of xxx Extension
EXT_OFF=
use or ignore File Extensions
0: use
1: ignore (Default)
APA Settings -> Resource
File Extension -> select
use/ignore File Extensions
EXT_OUTLINE_FONT=
List of individual Resource
File Name Extensions of
outline fonts
APA Settings -> Resource
File Extension -> entries
of Outline Font Extension
EXT_OVERLAY=
List of individual Resource
File Name Extensions of
overlays
APA Settings -> Resource
File Extension -> entries
of Overlay Extension
EXT_PAGEDEF=
List of individual Resource
File Name Extensions of
pagedefs
APA Settings -> Resource
File Extension -> entries
of Page Definition Extension
EXT_PAGESEG=
List of individual Resource
File Name Extensions of
pagesegments
APA Settings -> Resource
File Extension -> entries
of Page Segment Extension
LIB_COMBINE=
overwrite or add defined
Libraries in Printer Configuration
0: overwrite
1: add (Default)
APA Settings -> Resource
Libraries -> select use
Printer Definitions additionally or ignore Printer
Definitions
Chapter 9 - Océ Custom Ticket
559
Oce Custom Ticket
560
Parameter
General Description
Options and Syntax Default
Description of the corresponding GUI option
Additional notes
LIB_FONT=
List of individual resource
paths of fonts.
APA Settings -> Resource
Libraries -> Font Libraries
LIB_FORMDEF=
List of individual resource
paths of formdefs.
APA Settings -> Resource
Libraries -> Form Definition Libraries
LIB_OBJECT_CONTAINER=
List of individual resource
paths of object libraries
containers.
APA Settings -> Resource
Libraries -> Object Container Libraries
LIB_OVERLAY=
List of individual resource
paths of overlays.
APA Settings -> Resource
Libraries -> Overlay Libraries
LIB_PAGEDEF=
List of individual resource
paths of pagedefs.
APA Settings -> Resource
Libraries -> Page Definition Libraries
LIB_PAGESEG=
List of individual resource
paths of pagesegments.
APA Settings -> Resource
Libraries -> Page Segment
Libraries
Resource_Server=
Defines the name or IP of
the resource server
APA Settings -> Resource
Server
Pages=
Number of print pages
(for Display only)
APA Settings -> Options
-> Number of Pages
Pdscolmap=
Defines a default colormap resource (usually
not used).
APA Settings -> Resources
-> Color Mapping Table
Chapter 9 - Océ Custom Ticket
Oce Custom Ticket
Parameter
General Description
Options and Syntax Default
Description of the corresponding GUI option
Additional notes
JDE-Name=
specifies the label format
of the tape or the structure
of the record of HD-Files
Tape:
ANSI01 ANSI Host and
Label format (Default)
NONE none labeled tapes
HD-Files:
FIXED fixed record
length
VAR variable records with
binary IBM format length
field
VARBLK variable blocked
records with binary IBM
format length field
UNDEF undefined record
length using the record
delimiter as delimiter
ATXT_LF both Linedata
and SF where at least
Linedata must have the
CRLF delimiter (Default)
APA Settings -> Options
-> Tape Label
or -> Record Structure
RecordConstant=
specifies record delimiter
APA Settings -> Options
-> Record delimiter
RecordLength=
specifies fixed record
length
APA Settings -> Options
-> Record length
SkipBytes=
bytes at the beginning of
the file to be skipped
APA Settings -> Options
-> Skip offset
COMP38MO=
Compatible 3800 Media
Origin
off or on
0: off (Default)
1: on
will be added to APA Settings -> Options
Info1=
Additional parameter 1
APA Settings -> Custom
Settings
Use for POD and LCDS
only with Oct
Chapter 9 - Océ Custom Ticket
561
Oce Custom Ticket
Parameter
General Description
Options and Syntax Default
Info2=
Additional parameter 2
...
...
Info20=
Additional parameter 20
Description of the corresponding GUI option
Additional notes
[files] (LCDS)
562
JDL_Name=
Name of JDL used for
start command of this
LCDS job
LCDS Setting -> General
JDE_Name=
Name of JDE used for
start command of this
LCDS job
LCDS Setting -> General
File_From=
Tape / Cartridge File to be
printed from
(Tape / Cartridge input
only)
Default: 1
LCDS Setting -> General
File_To=
File to Default: 0 (= All
Files)
LCDS Setting -> General
PrinterTyp=
Printer type from LCDS
JSL/DJDE STOCKSET
handling point of view
Fanfold: Fanfold Printer:
Stockset is ignored
SCT: SCT Tool is used to
define input bin numbers
in resulting AFP print file
MediaName: Medianames
(Stocknames) are used directly (without SCT) in
AFP file. Not for PS55/75
or equivalent. Designed
for PS 158 or higher
LCDS Setting -> Feed
SC_Table=
SC-Table: Name of SCT
Table to be activated with
PJM Call (for PrinterTyp=SCT only). Blanks
must be ”_”
LCDS Setting -> Feed
Chapter 9 - Océ Custom Ticket
Oce Custom Ticket
Parameter
General Description
Options and Syntax Default
Description of the corresponding GUI option
Additional notes
FeedMode=
MAIN or 1-16 :
XEROX-like Parameter to
use the input bin as specified by STOCKSET /
SCT (MAIN=Default) or
to use the defined bin as
input bin (e.g. for test
purpose)
LCDS Setting -> Feed
MainBin=
Integer 1-16
Defines the number of the
special XEROX input bin
called MAIN.
LCDS Setting -> Feed
AuxBin=
Integer 1-16
Defines the number of the
special XEROX input bin
called AUX.
LCDS Setting -> Feed
AuxForm_Front=
Definition of FORM /
Overlay to be used in the
FEED=AUX case, to be
loaded on front pages, to
be printed from AUX tray.
This option is designed for
fanfold printers
LCDS Setting -> Feed
AuxForm_Back=
Like AuxForm_Front for
the back page of a sheet to
be printed from the AUX
tray. Likewise this option
is designed for fanfold
printers.
LCDS Setting -> Feed
Chapter 9 - Océ Custom Ticket
563
Oce Custom Ticket
564
Parameter
General Description
Options and Syntax Default
Description of the corresponding GUI option
Additional notes
PpActive=
PpHost=
PpPCCColumn=
PpPCCTrans=
PpPCCType=
PpCode=
PpRStructure=
PpRConstant=
PpRAdjust=
PpRLTHFLD=
PpRLength=
PpROffset=
PpRPostamble=
PpRPreamble=
PpBAdjust=
PpBLTHFLD=
PpBLength=
PpBOffset=
PpBPostamble=
PpBPreamble=
These are LCDS Preprocess parameters (Pp...).
These parameters, basically speaking, overwrite the
respective JDL / JDE parameters of Volume
HOST,CODE and LINE
statement for the LCDS
converter and the inputfilter related parameter of
the Record (PpR...) and
Block (PpB...) statements.
These parameters depend
on each other. Please use
the PJM LCDS GUI to
define and test certain
PJM tickets and use these
parameters, which fit to
each other, for creation of
OCT tickets.
PpActive=YES / NO
switches the LCDS preprocess option on or off (Default: off)
LCDS Setting -> Preprocessing
ProcessCCbytes=
This option overwrites the
ifilter related preprocess
parameters (PpR..., and
PpB) and uses any combination of ASCII control
characters (0A, 0C, 0D) as
delimiter: ASCIIskipCC
Additionally this option
converts these CC in
IBM3211 PCC: ASCIIconvCC.
Default is to use neither of
these modes.
LCDS Setting -> Preprocessing
Chapter 9 - Océ Custom Ticket
Oce Custom Ticket
Note:
The description of the parameters is more detailed in the description of the PJM user
interface.
Example for an Océ Custom Ticket
[job]
Store=yes
St_Native=yes
St_Native_Dest=Target
Message=yes
Message_Text=This is an example job
Message_Type=dislpay
[files]
File=/u/test/deckblatt.ps
Format=PS
ft_setname=/u/test/deckblatt.imp
[files]
File=/u/test/list.ps
Format=PS
ft_setname=/u/test/twouplist.imp
ft_extra=-vdfile/$COMPOSER/kunder.var
Chapter 9 - Océ Custom Ticket
565
Oce Custom Ticket
566
Chapter 9 - Océ Custom Ticket
Chapter 10
Workflows
Workflow 'Tab Printing'
Workflow 'Tab Printing'
Introduction
With tab printing you have to specify a tabset. You have to select a tabset, which corresponds to the size, number and sorting of the tab sheets inserted. The name of the tabset
describes also its properties.
■
■
Example 1: A4Tab03E1n: 'A4 Tabs with 3 Sheets Single Flag (1-n)'
Example 2: LetTab07W1n: 'Letter Tabs with 7 Sheets Waterfall (1-n)'
Tab printing is supported in two modes:
Printing without resource file:
The document contains all information to insert tabs on the correct positions. There are
two possibilities:
■
■
Information on the position of the tab pages is available in the document. Setting
'From Print Data'.
The tab pages are available in the data stream and are identified by their size. Setting
'From Print Data using Size of Tab Pages'.
Printing with resource file (setting 'Explicit'):
There is no information on tabs in the document to be printed.
A resource file containing tab pages must be available in addition to the print file. This
resource file has been created using a special tool and has been saved as 'Resource' of the
type 'Tab Resource' in the PJM 'Store' options. Under 'Positions' you indicate, before
which document pages a tab page has to be inserted.
568
Chapter 10 - Workflows
Workflow 'Tab Printing'
Illustration
#
UI Element
Description
'Tab Printing'
Has to be activated to make the settings for tab printing.
'Tab Set'
The required tab set is set here.
'Explicit'
The positions of the tab pages are indicated explicitly. The tab
pages are expected in a resource file.
'Positions': Indicate the pages of the input document, before
which a tab page should be inserted. The input document is
the document, which does not yet contain tab pages.
Rules for entering the position:
■ The single positions are separated by a semicolon.
■ Values must be in ascending order.
■ With duplex/tumble documents you have to take care that
the position always refers to a front page (you cannot insert
tab sheets before back pages).
■ The positions can be described by the following expressions
(’n’ is the last page of the input document):
integer n
n - integer
n / integer
n / integer - integer
n / integer + integer
n+1
'Resource': Indicate a resource file, which contains only tab
pages.
'From Print Data'
The positions of the tab pages are already part of the data stream
of the print data (makes only sense with a DPconnect file).
Chapter 10 - Workflows
569
Workflow 'Tab Printing'
570
UI Element
Description
'From Print Data
using Size of Tab
Pages'
The data stream contains pages, which can be identified as tab
pages by their size. This method can only be used with special
DocSetter documents.
Chapter 10 - Workflows
3
Workflow UP I Devices
3
Workflow UP I Devices
Introduction
The UP3I parameters are processed by the Professional Document Composer, which adds
the information to the data stream.
The connection of UP3I devices is realized via a special output tray. This output tray is
created in 'Configuration' -> 'Printers' -> 'Output Devices'. In the "Type" column select
the UP3I device from a list.
Illustration
3
Configuration of UP I Devices
If you select the tray with the UP3I devices as 'Output Tray', the button 'UP3I Devices'
becomes active in the PJM 'Job Attributes' -> 'Print' dialog.
Select 'Job Attributes' -> 'Print' -> 'UP3I Devices' to enter parameter for these devices.
Every device configured in 'Configuration' -> 'Printers' -> 'Output Devices' is represented
by a tab. The parameters offered refer to the device on the active tab only. You can decide
for example in case of a stitcher, which corner of the paper is to be stitched or in case of
an cutter you define the line for the cut.
If the output tray is changed, the PJM checks if the UP3I parameters fit to the new tray.
If they don't fit, the PJM offers to remove the parameters.
The following UP3I devices can be configured:
Chapter 10 - Workflows
571
3
Workflow UP I Devices
Duplo Booklet Maker
#
UI Element
Description
Stitcher
Use Stitcher:
■ Activate Stitcher.
'Without': no rotation; 'With': Rotate by 90 degrees. The rotation works only for formats like A4, letter and similar formats.
Axis Offset
Distance from the outer edge to the inner edge. For recommended values see table below.
Staple Positions
The staples will always be positioned centric. You can influence
the distance of the staples by entering values in these fields.
Folder
Axis Offset
Distance from the outer edge to the inner edge. For recommended values see table below.
Trimmer
Use Trimmer
Activate trimmer. The trimmer cuts the booklet along the open
edge to avoid creeping of the pages. ’Trim Offset’: Distance
from the outer edge to the inner edge. For recommended values
see table below.
Restrictions
Information on the restrictions of this postprocessing type.
Recommend Settings for Duplo Bookletmaker:
572
Chapter 10 - Workflows
3
Workflow UP I Devices
#
Format
name
Format
size
Printing
direction
Position
in Duplo
Rotation
Stitch
Axis
Offset
Fold
Axis
Offset
Staple
Position
A
Staple
Position
B
Trim
Offset
A4
210 x
297
mm
LEF
SEF
Yes
148,5
148,5
52
157
147
A4 +
215 x
305
mm
LEF
SEF
Yes
152,5
152,5
54
162
149
A4
SEF
297 x
210
mm
SEF
SEF
No
148,5
148,5
52
157
147
Letter
216 x
279
mm
LEF
SEF
Yes
139,7
139,7
54
162
138
Letter
SEF
279 x
216
mm
SEF
SEF
No
139,7
139,7
54
162
138
Legal
356 x
216
mm
SEF
SEF
No
177,8
177,8
54
162
176
Ledger 432 x
279
mm
SEF
SEF
No
216
216
70
210
214
A3
420 x
297
mm
SEF
SEF
No
210
210
75
225
208
A3 +
430 x
305
mm
SEF
SEF
No
215
215
76
228
210
General
length
x
width
LEF
SEF
Yes
width/2
width/2
length/4
length
* 3/4
width/2
-2
mm
General
SEF
width
x
length
SEF
SEF
No
width/2
width/3
length/4
length
* 3/4
width/2
-2
mm
Chapter 10 - Workflows
573
3
Workflow UP I Devices
All values are in mm. The most common formats appear bold. LEF=Long edge forward.
SEF=Short edge forward.
Duplo Stitcher
#
UI Element
Description
Stitcher
Rotation:
Without: no rotation; With: Rotate by 90 degrees.
Stitch Positions:
The staples will always be positioned centric. You can influence
the distance of the staples by entering values in these fields.
Restrictions
Information on the restrictions of this postprocessing type.
Recommended Settings for Duplo Stitcher#
574
Format
name
Format
size
Printing
direction
Position
in Duplo
Rotation
Stitch
Position
A
Stitch
Position
B
A4
210 x
297 mm
LEF
LEF
No
75
225
A4 +
215 x
305 mm
LEF
SEF
No
76
228
A4 SEF
297 x
210 mm
SEF
LEF
Yes
75
225
Letter
216 x
279 mm
LEF
LEF
No
70
210
Letter
SEF
279 x
216 mm
SEF
LEF
Yes
70
210
Chapter 10 - Workflows
3
Workflow UP I Devices
Format
name
Format
size
Printing
direction
Position
in Duplo
Rotation
Stitch
Position
A
Stitch
Position
B
Legal
356 x
216 mm
SEF
Ledger
432 x
279 mm
SEF
A3
420 x
297 mm
SEF
A3 +
430 x
305 mm
SEF
General
length x
width
LEF
SEF
Yes
length/4
length *
3/4
General
SEF
width x
length
SEF
SEF
No
length/4
length *
3/4
Not passible
All values are in mm. The most common formats appear bold. LEF=Long edge forward.
SEF=Short edge forward.
VP 5000 High Capacity Stacker
#
UI Element
Description
Offset
Indicate if you wish an offset when stacking.
Restrictions
Information on the restrictions of this postprocessing type.
Chapter 10 - Workflows
575
3
Workflow UP I Devices
VP 5000 High Capacity Stacker (with Stitcher)
#
UI Elemen
Description
Rotator
Degrees:
Select a rotation by 0 or 90 degrees.
Stacker
Alternate Offset:
Indicate if you wish an offset when stacking.
Restrictions
Information on the restrictions of this postprocessing type.
Note: You cannot use rotation and stacker at the same time!
This leads to a paper jam.
VP 5000 Stitcher
#
576
UI Element
Description
Corner Staple
Use Stapler:
Activate device. ’Position’: Select the corner, where the staples
should be positioned. ’Staple Offset’: Enter an offset value.
Edge Stitch
Use Stitcher:
Activate device. ’Stitch Offset’: Enter an offset value, which indicates the distance from the upper and lower edge of the paper.
If nothing is entered here, the staples will be placed near the
upper and bottom edge of the document.
Chapter 10 - Workflows
3
Workflow UP I Devices
UI Element
Description
Stacker
Offset:
Indicate if you wish an offset when stacking. Stacker means here
the internal stacker of the stitcher.
Restrictions
Information on the restrictions of this postprocessing type.
The UP3I values will be added to the ticket parameters.
Chapter 10 - Workflows
577
Workflow 'Color Selection'
Workflow 'Color Selection'
Introduction
You can define the colors in the PJM to ensure, that the print job submitted is printed
with the correct colors.
Select Colors in the PJM
You can define the colors for the print job in the PJM dialog 'Job Attributes' -> 'Print'.
The number of possible settings corresponds to the number of toner stations installed in
the selected printer. You can configure this number in ’Configuration’ -> 'Printers' ->
'General'. The toner colors selectable in the PJM -> 'Job Attributes' -> 'Print' dialog can
be provided with the following procedure:
Steps to configure the Printer Colors
#
578
Step
Action
1
In the 'Explorer' open 'Configuration' -> 'Printers' -> 'Toner Stations':
Chapter 10 - Workflows
Workflow 'Color Selection'
Step
Action
2
On this tab you find a list with all toner colors currently available from Océ
as well as the user defined toners which you configure under 'Configuration'
-> 'Consumables' (see chapter 'Consumables' Configuration in the Océ
PRISMAproduction Server Administration Settings and Tasks Guide).
For the selected printer check the boxes of the desired toners under 'Available
for Printer'.
'Toner name' and 'Color names' of the selected toners are also displayed in
the 'Printer Settings' dialog of the 'Printer Pool' application. Here you can
mark those colors which should be checked before printing:
Chapter 10 - Workflows
579
Workflow 'Color Selection'
Step
Action
3
In the PJM in 'Job Attributes' -> 'Print' dialog you can now select the toner
color for the respective toner station of the active printer in the 'Color Selection' section:
'Color Selection': The color allocations configured in 'Configuration' ->
'Printers' -> 'Toner Stations' are offered here. The number of list boxes shown
depends on the toner stations installed in the selected printer.
If you submit this print job, the color names also appear in the "Color" column of the 'All Jobs' application:
580
Chapter 10 - Workflows
Workflow for scaling PDF files
Workflow for scaling PDF files
Introduction
With UNITY version 3.00.12 and higher it is possible to modify the size and position
of PDF files. These modifications are only possible with PDF files because the format
consists of independent single pages. PostScript as a computer language is able to produce
pages with repeated program loops. This has the effect that the pages are not independent
anymore and cannot be scaled as individual sheets.
You have the following possibilities for scaling:
#
a
Keep the original size of the document:
It is sufficient to define the document format as paper format.
Example: The page size set for the PDF (or PS) document is DIN A4. Insert
DIN A4 as paper size in the converter dialog.
b
Use a larger paper format but keep the original size of the document:
Example: In the converter dialog DIN A3 is set as paper format. The document in letter format is to be placed unchanged on this page. Because the
target format (A3) is larger than the original format (letter), you have to define, on which position on the target page the document has to be placed.
This is also required if the paper format is smaller than the size of the document. In this case the oversize contents of the documents is cut off.
c
Scale the document to any paper format:
For this purpose you have to define the desired paper format and to check
the option "Fit width or height respectively" in the converter dialog. With
this setting the document will be scaled proportionally until one paper edge
either left or right or on top of the page is reached. You also have to define
the position of the document as described below.
You have the following possibilities for positioning:
#
Top Left
Top
Top Right
Left
Center
Right
Bottom Left
Bottom
Bottom Right
In case a) the preset standard position (according to the PostScript Graphics Model:
Bottom Left) is used. The document page is therefore placed in the lower left corner of
the paper format.
Chapter 10 - Workflows
581
Workflow for scaling PDF files
In case b) you can select any position.
In case c) you can select several positions. Depending on whether you scale fitting to paper
width or paper height, you have three different methods to position the pages:
Scale to paper width:
- top of paper
- center of paper
- bottom of paper
Scale to paper height:
- left paper edge
- center of paper
- right paper edge
Note:
High magnification or diminishment of the contents of the document may lead to a
loss of quality of the images, because these are mostly optimized for a 1:1 reproduction.
582
Chapter 10 - Workflows
Workflow Media Assignment to Printers
Workflow Media Assignment to Printers
Introduction
The following steps must be performed to make use of the Attribute based Input Media
Selection (AIMS) features of a supporting printer model:
Steps
1. Set messages flags:
It is advisable to activate a monitoring mechanism when working with media attributes.
This mechanism will issue messages in case of a mismatch of the paper types defined in
Océ PRISMAproduction Server and provided by the printer. Therefore you can select a
special tuning set "Activate media attribute mismatch (MMT) message" on the Print
Parameter tab in 'Configuration' -> 'Printers'.
2. Create paper types:
Under 'Configuration' -> 'Paper' define the papers you wish to use on your production
system by entering a name and the intended media attributes. The paper names defined
here will be assigned to input bins later on. It is necessary that the names and attributes
match those entries defined on the target printers. Otherwise no match on media attributes
will be possible. The following attributes characterize a paper
#
Paper Name
Freeform text, but must be unique.
Weight
As indicated on the package
Color
See table below.
Type
See table below.
Size
Width (X Size), Height (Y Size)
Order Count
Reserved for future functions
Drilling
Reserved for future functions
Available colors:
#
white
black
gray
Chapter 10 - Workflows
583
Workflow Media Assignment to Printers
red
yellow
green
blue
turquoise
violet
orange
brown
gold
silver
noColor
pink
buff
ivory
goldenrod
mustard
Available Media Types:
#
Standard
Transparentfilm
Precuttabulator
Preprinted
3. Configuring Input Trays:
In 'Configuration' -> 'Printers'select the 'Input Devices' tab and define for every Cutsheet
printer as many input trays as the number of different medias you intend to use in your
workflow.
4. Assigning media types to input trays:
584
Chapter 10 - Workflows
Workflow Media Assignment to Printers
In the 'Printer Pool' application select the 'Media Settings ...' icon to assign the media
defined in the 'Paper' application to the input trays of the selected printer. These media
can be regarded as your default media load.
Chapter 10 - Workflows
585
Workflow LCDS
Workflow LCDS
Introduction
The following chapter provides a short overview on the basic steps to print an LCDS file.
Illustration
Step 1: Create a New Catalog
See ‘LCDS-Module: 'New catalog'’ on page 214.
See ‘LCDS-Module: Organization of Resources’ on page 215.
Step 2: Copy and/or Convert Resources
See ‘LCDS-Module: 'LCDS Resources'’ on page 217.
Step 3: Compile JSLs
See ‘LCDS-Module: 'LCDS Resources'’ on page 217.
586
Chapter 10 - Workflows
Workflow LCDS
Step 4: Print LCDS Process
You can start the print process with the PJM Explorer applet. For details see chapter
"PJM" -> "Properties for LCDS file" in the Océ PRISMAproduction Server User's Guide.
Multiple Process Chains
The use of parallel LCDS Process chains is supported from V3.10. Two typical use cases
may be given here to explain the usage and advantages.
■
■
Use Océ IPDS twin fanfold system print-while-spooling both in the twin configuration
(one process chain supported in V3.0X) and 2 parallel process chains in a "two-single"
configuration.
Process (Copy, Compile, and Print (sequentially)) production data on a production
catalog.
Parallel a new test catalog may be created and resources may be copied and converted,
JSLs may be edited and compiled and test print done. This test actions may be performed parallel to print process on production catalog without interfering with each
other.
For details concerning use of this function for multiple process chains, please see also:
chapter "LCDS Parameter Configuration" -> " Description of the JCF Parameters" in
the Océ PRISMAproduction Server Administrator's Guide, for example keyword 'DeviceName1/2/3'.
Other LCDS Options
Form Sample
See chapter "PJM" -> "Properties for LCDS file" -> "Feed" in the Océ PRISMAproduction
Server User's Guide..
View CMD Files
You can view and delete Xerox CMD files with the $LCDS file system. Knowing the
contents of these files makes it easier to adjust the required workflow for the LCDSModule (which resources have to be loaded? Which clustering commands should be implemented in the stockset configuration?). You can open these ASCII files by double
clicking them in the $LCDS and $GCI file system, which is accessible via the 'Server
Files' application in the Explorer.
Save and Restore
Chapter 10 - Workflows
587
Workflow LCDS
In order to save or restore directories or single files (esp. whole LCDS catalogs) you can
use the tarscript command in the following way:
' /u/prismapro/bin/tarscript_HD <dir_name> <HD-file name> [SAVE|RESTORE]'
Example:
'/u/prismapro/bin/tarscript_HD /u/prismapro/data/cat/DEFAULT/tmp/examle.tar
SAVE'
This HD file can easily be copied (ftp, etc.) to other computers or USB-, DVD-media.
588
Chapter 10 - Workflows
Chapter 11
Backup Solutions
BackupEDGE: Installation and Configuration
Microlite BackupEDGE V2.1
BackupEDGE: Installation and Configuration
Introduction
Microlite BackupEDGE is the recommended backup tool within systems running Océ
PRISMAproduction Server software. BackupEDGE is capable of running "scheduled
backups" as well as a fully featured "disaster recovery". BackupEDGE was extensively
tested and is fully compliant to run on Océ PRISMAproduction Server systems.
Installation
Installation of BackupEDGE
Microlite BackupEDGE needs to be installed on every server on which backups should
be made. All necessary steps to be performed for a full installation are documented in the
official manual located on the Microlite BackupEDGE CD, which should be read before
installation as some default parameters have to be set up during installation (but it is
possible to redefine all configuration after installation).
Update BackupEDGE
If you have already an older installation of BackupEDGE, use the update mechanism of
the installer. Deleting BackupEDGE causes a complete lost of all preconfigurations and
also the connection to Océ PRISMAproduction Server. If this happened, remove the License PPS_BackupEDGE in the Océ PRISMAproduction Server License Manager, save
Licenses and add the License again.
BackupEDGE License
Océ Printing Systems GmbH offers a special license agreement with Microlite to the
customers of Océ PRISMAproduction Server. This means the license for BackupEDGE
will be installed and handled by Océ PRISMAproduction Server. The license for BackupEDGE can be ordered like any other license for Océ PRISMAproduction Server and
will be installed in the same way. The required license string is "PPS_BackupEDGE"
V2.0. This license also enables the integration of BackupEDGE with Océ PRISMAproduction Server software (automatic start/stop Océ PRISMAproduction Server when
performing scheduled backups).
Demo License
590
Chapter 11 - Backup Solutions
BackupEDGE: Installation and Configuration
After installing BackupEdge it will work 60 days as an evaluation copy with FULL
FUNCTIONALITY. For permanent use of BackupEDGE, the product must be licensed
and furthermore NO change in configuration already made is necessary.
Configuration
Recommended usage of Backup Media
Océ has extensively tested Microlite BackupEDGE with different media. In order to
create reliable backups, Océ recommends to use tape drives. The tests also showed, that
using DVD's as backup medias is NOT RECOMMENDED as the media are too damageable.
Disaster Recovery
Microlite BackupEDGE offers the functionality to create a full disaster recovery backup
which consists of a bootable media and the backup data. In order to use the disaster recovery functions, it is necessary to create a bootable media and to perform an unscheduled
full backup afterwards, so that this backup can easily restore the entire server after a crash.
Please see the Microlite BackupEDGE manuals on how to create a bootable media and
on how to perform an unscheduled full backup.
Note:
Please note that every time the hard disk or hardware configuration is changed in a way
that new / different partition tables are set up or new hardware kernel driver modules
have to be used, a COMPLETE set of disaster recovery media must be created! Also all
backups referring to the old hardware setup of the server are NOT usable anymore!
Further Information and Tips
As for every backup, it is absolutely recommended, to stop Océ PRISMAproduction
Server before performing any backup operation! This is necessary to stop all database
services and prevent backup of print jobs in progress, which would result in a backup of
just parts of jobs and other related data, which makes such a backup useless! All necessary
information about starting/stopping Océ PRISMAproduction Server for backup is provided in the next chapter.
Chapter 11 - Backup Solutions
591
Connectivity to Océ PRISMAproduction Server
Connectivity to Océ PRISMAproduction Server
Introduction
With Océ PRISMAproduction Server some predefined configurations will be provided,
which will configure some basic setups and also checkup scripts. BackupEDGE provides
an interface to create own Backup Sets or import predefined Backup Sets. Important
hereby is the fact, that such Backup Sets can also execute commands (such as to automatically request to stop Océ PRISMAproduction Server before starting the backup). Please
see the BackupEDGE manual on how to create your own Backup Sets or import those
provided by Océ PRISMAproduction Server.
In detail:
BackupEDGE provides three different scripts in the /etc directory, which are named:
■
■
■
'/etc/edge.start' (is executed BEFORE starting a backup)
'/etc/edge.passed' (is executed AFTER SUCESSFULLY finished a backup)
'/etc/edge.failed' (is executed AFTER the backup failed for any reason)
Within these scripts, commands can be executed or complete own scripts can be inserted
or called. The scripts can be used for any user defined actions to be done before or after
the backup.
Note:
This functionality will only work for executing “scheduled backups” with BackupEDGE.
Performing an “Unscheduled Full Backup” will not execute commands in any start/stop
file, this (for example stop Océ PRISMAproduction Server) has to be done MANUALLY
in this case.
BackupEdge will use the RETURN Code of "edge.start" to control further processing,
which means that a RETURN CODE equal "0" will start the backup, while a RETURN
CODE NOT equal "0" will skip the backup.
Océ PRISMAproduction Server will NOT touch any existing customer configuration,
which exists on the server when Océ PRISMAproduction Server is installed. However,
the above mentioned three files will be replaced (overwritten) by Océ PRISMAproduction
Server enabled configuration if the files are not changed from the installed default performed by BackupEdge itself. AND: The above mentioned scripts are preconfigured
within the default installation of BackupEDGE and will executed within the default
backup domain "system" only (without explicit reconfiguration this is default!). For information about usage and configuration of backup domains please see the BackupEDGE
documentation chapter 21, which covers this issue in more detail.
If an existing customer configuration of BackupEdge exists on the server when installing
Océ PRISMAproduction Server software, the files will NOT be replaced. The Océ
PRISMAproduction Server enabled files will be located also in path
'/u/prismapro/lib/backupEdgeconnector/' in any case.
592
Chapter 11 - Backup Solutions
Connectivity to Océ PRISMAproduction Server
Description of the Preconfigured Backup Sets of Océ
Two scripts will be provided by Océ PRISMAproduction Server itself. These scripts have
the functionality to start and stop Océ PRISMAproduction Server. The scripts are installed
in directory:
'/u/prismapro/lib/backupEdgeConnector'
Note:
If you want to use the preconfigured backup sets with BackupEDGE software running
in DEMO mode, please copy all files with name beginning with “edge.” located in
'/u/prismapro/lib/backupEdgeConnector' to the '/etc/ directory' and edit them for your
requirements. Then the scripts will be used the same way as if the Océ license is installed.
Also all changes to these files will be preserved if the Océ license will be installed afterwards.
Detailed description of the provided functionality of the scripts:
startPrisma < -f | -p >
This script just checks for Océ PRISMAproduction Server running and if not it will be
started and a message is sent to Océ PRISMAproduction Server. It has to be inserted/executed in both scripts '/etc/edge.passed'Océ PRISMAproduction Server and
'/etc/edge.failed'.
The parameter MUST be set to:
"-f" in file' /etc/edge.failed' and
"-p" in file '/etc/edge.passed'.
This will create a single Océ PRISMAproduction Server message if the backup was successfully completed or failed and a failure log file will be created in:
' /u/prismapro/diag/backupEdgeConnector'
stopPrisma
This script must be called in file '/etc/edge.start' to stop Océ PRISMAproduction Server
BEFORE starting the backup. At time of execution the script opens a popup message
window to all Océ PRISMAproduction Server 'Explorer' windows.
Chapter 11 - Backup Solutions
593
Connectivity to Océ PRISMAproduction Server
Note:
The message request window is opened on ALL (more than one if opened for example
by the Launcher) 'Explorer' windows. The first person to answer the request will "shutdown" Océ PRISMAproduction Server or "cancel" the Backup or whatever action can
be selected!!!
Please make sure not to interrupt any running jobs from other users!!!
It is NOT possible to use script "stopPrisma" WITHOUT any parameter. An empty
parameter set will only create an error for a "missing parameter"!
The possible parameters are:
#
Parameter
Description
-a MIN:
Automatic Stop of Océ PRISMAproduction Server and start
of backup in MIN minutes
-s:
Interactive, user is allowed to stop directly the timeout
-c:
Interactive, user is allowed to cancel the backup, only in combination with "-a" or "-s"
-t MIN:
Timeout if no user response in MIN Minutes, only in combination with "-c", but not with "-a"
-w SMIN:
Interactive, user is allowed to shift stop and wait of extra MIN
Minutes, only in combination with "-a" or "-t"
-m MAX:
Extention to "-w", MAX times shift can be done
Minimum Parameter SET is at least "-a MIN" or "-s"!
Parameter <MIN> is the time in minutes to wait for confirmation by the user.
The parameter sets within the script are based on two different methods in handling. All
sets based on parameter "a" will automatically stop Océ PRISMAproduction Server and
start the backup, while all sets based on parameter "s" will NOT stop Océ PRISMAproduction Server automatically and therefore not start the backup, there will have to be a
dedicated interaction to do so. Also there are additional parameters and sets of, to allow
better control and handling and also reduced permissions.
594
Chapter 11 - Backup Solutions
Connectivity to Océ PRISMAproduction Server
Parameter Sets and their Effects
Parameter "-a" will AUTOMATICALLY stop Océ PRISMAproduction Server after
<MIN> minutes if NO USER ACTION was done and start the backup process.
It is possible to combine parameter to "-a <MIN> -s" to allow users to stop Océ
PRISMAproduction Server and proceed with backup IMMEDIATELY.
Parameter "-a <MIN> -c" will allow users to cancel the timeout and to skip the backup
for this scheduled item.
Parameter set "-a <MIN> -sc" will allow the user to choose between both options.
It is also possible to create an extra delay with parameter "-w" which will allow users to
shift the operation for <SMIN> minutes for a single appearance. With additional parameter "-m <MAX>" it is possible to allow multiple times to shift for <SMIN> minutes but
only for <MAX> times.
Parameter "-s" will allow the user to start the backup manually. The pop up displayed
will remain and wait "FOREVER" and it is NOT possible to CANCEL the operation.
This is intended for use to allow only a manual start of the backup.
The parameter set "-sc" will also create a popup window "FOREVER" but will allow to
cancel the operation completely.
The parameter "-sct <MIN>" will add a timeout to the operation. If the backup is NOT
started MANUALLY within <MIN> time, the backup will be canceled AUTOMATICALLY. It is also possible to create an extra delay with parameter "-w" which will allow
users to shift the operation for <SMIN> minutes for a single appearance. With additional
parameter "-m <MAX>" it is possible to allow multiple times to shift for <SMIN> minutes
but only for <MAX> times.
A set of examples for possible combinations is located in the file '/etc/edge.start' which
can be used by just removing the comment character.
Note:
It is ONLY possible to use a single combination, so MAKE SURE to have ONLY a
single command active at a time.
Chapter 11 - Backup Solutions
595
Océ PRISMAproduction Server Backup: Tasks and Components
Océ PRISMAproduction Server Backup
(Additional Software)
Océ PRISMAproduction Server Backup: Tasks and Components
Introduction
The Océ PRISMAproduction Server Backup version 1.00.00 is an additional software,
which is delivered with Océ PRISMAproduction Server. To enable its function, the
software has to be installed on the master of an Océ PRISMAproduction Server cluster
only. The existing system is not changed.
Tasks
In general, the Océ PRISMAproduction Server Backup allows to backup all or part of
the data of an Océ PRISMAproduction Server cluster and
■
■
either to restore it in an identical configuration - same cluster, same Operating System,
same main Océ PRISMAproduction Server version
or to import it to a different configuration - different Operation System, different
(newer) Océ PRISMAproduction Server version, but same cluster regarding host names
and IP addresses
The creation of a backup is supported for Océ PRISMAproduction Server versions 3.00,
3.02, 3.04, 3.10, 4.0. Restoring is supported within identical versions. Importing is supported in the same or higher versions. As migration tool it is mainly intended to perform
the import of a Caldera environment in SuSE (for example to versions 3.04, 3.10).
The current version of Océ PRISMAproduction Server Backup is a supplement for
Configuration Backup/Restore of Océ PRISMAproduction Server. The Océ
PRISMAproduction Server Backup does not replace the functionality of the Configuration
Backup/Restore of Océ PRISMAproduction Server. Océ PRISMAproduction Server
Backup only saves and writes back configuration backups already created from the Configuration Backup/Restore. Therefore you have to use Configuration Backup/Restore
within Océ PRISMAproduction Server to save your configuration data.
Components
The prismabackup package consists of two RPM's:
596
Chapter 11 - Backup Solutions
Océ PRISMAproduction Server Backup: Tasks and Components
Server: oce-sys-prismabackup.rpm
Client: oce-sys-prismabackup_client.rpm
The two RPM's must be installed on the Océ PRISMAproduction Server Master server
and don't interfere with Océ PRISMAproduction Server itself. The RPM’s are located
on the Océ PRISMAproduction Server installation CD.
Server
The Server package installs a command line client, which acts as user front end as well
as a server, which collects all necessary data for the backup/restore action initialized by
the client.
A StorageManager writes the backup data directly to a connected network drive.
These are the plug-ins defined in Océ PRISMAproduction Server Backup and they deal
with the following type of data:
■
■
■
■
■
■
■
■
■
■
LCDS_APA_PrintResourcesPlugin: with all resources for LCDS in the cluster
AFP_PrintResourcesPlugin: with all resources for APA in the cluster
POD_ComposerResourcesPlugin: with the impositioning sets of the POD language
module in the cluster
POD_UnityRipResourcesPlugin: with the resource files needed by the PostScript
rippers in the cluster
OS_ConfigurationPlugin: with the Operating System configuration data.
Important: This plug-in is very special regarding the impact of the data it deals with.
The data it backs up are considered as "cannot be restored or imported directly". The
reuse of the data is planned to be done manually (for example, think of the consequences of the replacement of the '/etc/hosts' file)
ConfigurationPlugin: with the Océ PRISMAproduction Server configuration database
backups, all configuration backups are included in the system backup
Important: The current version of the Océ PRISMAproduction Server Backup only
saves and writes back configuration backups already created from the Configuration
Backup/Restore. Selecting the ConfigurationPlugin in Océ PRISMAproduction
Server Backup does not create a configuration backup. When restoring or importing
with Océ PRISMAproduction Server Backup, the configuration saved with the Configuration Backup/Restore is only written to the respective directory on the master.
Before you create a new backup with Océ PRISMAproduction Server Backup it is
advised to create a new configuration backup in Océ PRISMAproduction Server. This
ensured that the system backup contains the current configuration data.
JobsPlugin: with the jobs currently spooled in may be included in the backup
PFL_ArchivesPlugin: with the Print File Libraries in the cluster (currently no import
is possible from versions 3.00, 3.02 or 3.04 into version 3.10 or 4.0).
UserHomesPlugin: with the home directories of all/selected users in the cluster
MiscellaneousPlugin: with the configuration data of '/u/prismapro/cfg'
Chapter 11 - Backup Solutions
597
Océ PRISMAproduction Server Backup: Tasks and Components
Important: This plug-in is very special regarding the impact of the data it deals with.
The data it backs up are considered as "cannot be restored or imported directly". The
reuse of the data is planned to be done manually.
Client
The Client package installs the Graphical User Interface. The GUI is a graphical representation of the command line client of the server and must therefore like the server also
be installed on the master of a cluster. For technical reasons this GUI cannot be used
with Océ PRISMAproduction Server V3.00.
598
Chapter 11 - Backup Solutions
Océ PRISMAproduction Server Backup: Installation and Workflows
Océ PRISMAproduction Server Backup: Installation and
Workflows
Installation
Server
Install the Océ PRISMAproduction Server Backup Server package by using the rpm
utility:
#
Step
Action
1
copy the RPM oce-sys-prismabackup.rpm to a temporary directory
2
change to the temporary directory and call:
- 'rpm -ihv oce-sys-prismabackup' ... to install the package
- 'rpm -e oce-sys-prismabackup' ... to remove the package
After having successfully installed the package you'll find a directory '/usr/local/prismabackup'. It contains all static components and configuration data and is later on also used for
data created dynamically and as mount point for the actual network drive used by the
storage manager.
Client
Install the Océ PRISMAproduction Server Backup Client package by using the rpm
utility:
#
Step
Action
1
copy the RPM oce-sys-prismabackup_client.rpm to a temporary directory
2
change to the temporary directory and call:
- 'rpm -ihv oce-sys-prismabackup_client' ... to install the package
- 'rpm -e oce-sys-prismabackup_client' ... to remove the package
After having successfully installed the client package you'll find a directory '/usr/local/prismabackup'.
It contains the start script and the executable program files for the GUI.
Graphical User Interface
Do the following to start the System Backup window:
■
■
Login as root user on the master server.
Open a Linix shell and change to the following directory: '/usr/local/prismabackup'
Chapter 11 - Backup Solutions
599
Océ PRISMAproduction Server Backup: Installation and Workflows
■
Start the UI with: './prismabackup_gui.py'.
General Notes
If you start a Backup or a Restore/Import, Océ PRISMAproduction Server will be shut
down automatically.
When closing the window, it is checked if Océ PRISMAproduction Server is still down
an you will get a notice and the possibility to restart the system.
Additionally you can stop and start Océ PRISMAproduction Server via the traffic light
icons in the toolbar.
The Backups are written to the following predefined path: '/usr/local/prismabackup/mountdir'.
Backup and Restore Workflows
General
If you start a Backup or a Restore/Import, Océ PRISMAproduction Server will be shut
down automatically.
When closing the window, it is checked if Océ PRISMAproduction Server is still down
an you will get a notice and the possibility to restart the system.
Additionally you can stop and start Océ PRISMAproduction Server via the traffic light
icons in the toolbar.
600
Chapter 11 - Backup Solutions
Océ PRISMAproduction Server Backup: Installation and Workflows
The Backups are written to the following predefined path:
'/usr/local/prismabackup/mountdir'.
Create a Backup
To create a Backup, the following steps have to be performed:
■
■
■
■
Type in a ’Backup name’ (mandatory, without blanks).
Type in a ’Description’ (optional, without blanks).
Select at least one component.
The Backup Start button now gets active. Press this button to start the backup of the
selected components.
Note:
If ’Océ PRISMAproduction Server Configuration’ is selected as a component, you will
be asked to check if an configuration backup is already existant. You have to confirm
this dialog with ’OK’.
Under ’User Home Directories’, you can only select users, which are Océ PRISMAproduction Server users and at the same time have a Linux account.
When you start a backup, a message informs you that Océ PRISMAproduction Server
is shut down. You have to confirm the message to proceed:
During backup, a progress bar is displayed. Depending on the amout of resources to be
saved, this process might take a while.
If the backup is finished, the progress bar turns green. You have to close this dialog with
’OK’ or you can check the details of the process in this window.
Restore a Backup
Chapter 11 - Backup Solutions
601
Océ PRISMAproduction Server Backup: Installation and Workflows
To restore a backup, you have to perform the following steps:
■
■
■
■
Select the ’Backup path’. You don’t have to indicate "mountdir" in this case.
Under ’Available backup’ all backups in the selected path are listed. Select the backup
which you want to restore. Using the waste bin button, you can also delete selected
backups.
After selecting an available backup, the components included are shown in the
’Components’ section of the window. This allows you to select single components for
the restore. If you click on the tree nodes, the servers of the Océ PRISMAproduction
Server system are displayed on the first level. This allows you to deselect single servers.
Note that the deselection is only valid for the component which is selected in the
level above.
If a backup and at least one component is selected, the ’Start’ button gets active. Press
this button to start the restore process.
Note:
You can only restore backups, which have the same main version number as the current
Océ PRISMAproduction Server system.
All server names and corresponding IP addresses of the current system must be identical
with the server names and IP addresses of the system from which the backup has been
performed.
The restore of jobs can only be performed on an identical system:
- same server name
- same IP addresses
- same configuration of the print servers
The components ’OS Configuration’ and ’Miscellanous’ cannot be restored with this
GUI. If you need information on how to extract the contents of these components,
please contact your local service engineer.
Importing Components from Older Versions
In contrast to ’Restore’ you can use ’Import’ to import components from older versions,
for example from V3.02 to V3.10.
If the entry ’Do not overwrite existing files’ is activated, files which have the same name
will not be overwritten. Files with a different name will be stored.
History
The ’History’ view shows the list of all actions which have been performed on the system.
You can filter this list if you either activate ’Backup’, ’Restore’, ’Import’ or ’Error’. If you
select ’Error’ only these actions will be listed which have an error in their ’Status’ column.
602
Chapter 11 - Backup Solutions
Océ PRISMAproduction Server Backup: Command Line Client
Océ PRISMAproduction Server Backup: Command Line Client
Introduction
The client included in the prismabackup package is a Python script, which performs a
few functions directly (like preparing Océ PRISMAproduction Server for the Backup).
Command Line Script
Name of the command line script: prismabackup.py
Usage: 'prismabackup.py <command> <options>'
Details: 'prismabackup.py -h[?] <command>'
Overview of commands the script can perform:
#
Command
Performs
-h,?
displays this page
-v
displays version
PrepareBackup
prepares current Océ PRISMAproduction Server for Backup
creation
CreateBackup
creates a Backup
PrepareRestore
prepares current Océ PRISMAproduction Server for the restore
of a Backup
Restore
restores a Backup
PrepareImport
prepares current Océ PRISMAproduction Server for the import
of a Backup
Import
imports a Backup
History
displays the backup/restore/import history
SearchBackups
searches for Backups
Delete
deletes a Backup
GetPlugins
shows all possible plug-ins
GetPluginContents
shows contents of a plug-in
CreateSystemInfo
creates system information file for Backup
Note:
In the detailed descriptions below the following is true:
Chapter 11 - Backup Solutions
603
Océ PRISMAproduction Server Backup: Command Line Client
■
■
■
■
■
■
Command options in square brackets are optional
<string> represents an arbitrary string with no length restriction. If it contains special
characters it must be included in double quotes
<string list> represents a comma separated list of arbitrary strings with no length restriction (but without comma). If it contains special characters the whole list must be
included in double quotes
Strings enclosed in single quotes represent themselves, i.e. they must be entered as is
(without the single quotes)
Default values are underlined. Normally this is the value of the option if the option
is not defined at all
The sequence of the command line parameters is significant, they must be entered
in the order how they are described in this document - respective the help information displayed by the commands themselves
Create a Backup
Create a Backup
All directories / files defined in a template specific for the current Océ PRISMAproduction
Server version are collected from the servers of the cluster and written to a storage device
(at the moment only a mounted network drive is supported).
The data to be collected is defined specifically for each server type: Master, Slave and
PrintSlave. During runtime data may be excluded from the backup process:
■
■
either by including only certain plug-ins (command option '-plugins') - only the data
supported by the plug-ins listed will be included
and/or by including only certain users for the UserHomesPlugin (command option
'-users')
As for data integrity reasons the Océ PRISMAproduction Server Master server must be
shut down before performing the backup, the information about the current configuration
and status needed for the backup process is read from a properties file. It is named systeminfo.properties and contains information about the Océ PRISMAproduction Server version, the cluster, the logical library paths and users.
This file is created automatically during the preparation step for a backup, but it can also
be created manually by any text editor. The latter allows the creation of "emergency
backups" in case the Océ PRISMAproduction Server system is not fully operable.
Summary:
The backup process is performed in two steps:
604
Chapter 11 - Backup Solutions
Océ PRISMAproduction Server Backup: Command Line Client
#
Step
Action
Remarks
1
'PrepareBackup'
The properties file is created and Océ
PRISMAproduction Server is shut down.
2
'CreateBackup'
The system state is checked. If okay (= Océ
PRISMAproduction Server is down on Master
server and up on all Slave/PrintSlaves), the data is
collected and stored by the storage manager.
A backup can be created in all versions of Océ PRISMAproduction Server (3.00, 3.02,
3.04, 3.10, 4.0).
Description of the 'PrepareBackup' options: No options.
Description of the 'CreateBackup' options:
#
Option
Parameter
Meaning/Description
-name
<string>
Name of the backup
[-description]
<string>
Description of the backup
[-plugins]
<string list>
List of plug-ins. The backup is only created for the plug-ins defined in this list
Default: all plug-ins
[-jobs]
'all'
'all' ..
The complete job data base is included
(for example only all or nothing)
Default: No jobs are backed up
[-users]
'all' | <string list>
'all' ..
The home directories of all users visible
in ’Configuration’ -> ’User’, are backed
up (if the individual directory actually
exists)
<string list> ..
The home directories of the users listed
are backed up (if the individual directory
actually exists)
Default: No home directories are backed
up
Chapter 11 - Backup Solutions
605
Océ PRISMAproduction Server Backup: Command Line Client
Option
Parameter
Meaning/Description
[-haltonerror]
'true' | 'false'
'true' ..
The backup process is stopped when an
error occurs. The data already collected
will be accessible but may be incomplete
'false'..
The backup process continues with the
next plug-in when an error occurs. The
backup data of the plug-in in error may
be incomplete
Note:
Errors are reported on the console and logged in the Océ
PRISMAproduction Server
Backup log file.
Example console output for a Backup run (in Océ PRISMAproduction Server V 3.00):
606
Chapter 11 - Backup Solutions
Océ PRISMAproduction Server Backup: Command Line Client
#
Step
Action
1
Preparation step:
2
Data from the configuration database has been extracted to "systeminfo.properties"
3
Océ PRISMAproduction Server is stopped for the oncoming Backup run
4
Actual Backup step: it's a backup for version 3.00, the appropriate template
is requested (could also be omitted as the default is the template for the current version)
5
The LCDS resources plug-in is the first called and backs up the data on the
Master server. The time needed to create the tar library and to write it to the
external storage device is reported
6
The LCDS resources are also collected on the Slave server
7
There is an additional information line here in the console log reporting the
transfer of the tar library. This occurs only for backups in version 3.00, as
the automatic routing of the tar output directly to the Master server doesn't
work and the tar library must be intermediately stored on the Slave
8
The overall time needed to create the backup is reported
Chapter 11 - Backup Solutions
607
Océ PRISMAproduction Server Backup: Command Line Client
Restore a Backup
The directories / files collected in the backup are restored to a system with identical Operation System, the identical Océ PRISMAproduction Server cluster and the identical
Océ PRISMAproduction Server main version. Identical cluster means host names and
IP addresses must be identical.
A backup is identified by its Backup ID which is generated internally when the backup
is created. To scan for existing backups use the SearchBackups command described below.
As default all data in the backup is restored. However a selective restore is possible based
on:
■
■
either by including only data of certain plug-ins (command option '-plugins')
and/or by including only the data of certain servers (command option '-servers')
Note:
The restore operation is only supported in version 3.04, 3.10 and 4.0. Backup data of
version < 3.04 can only be imported.
When restoring only part of the data the user is responsible for data integrity.
As for data integrity reasons the Océ PRISMAproduction Server Master server must be
shut down before performing the restore, the information about the current configuration
and status is read from the systeminfo.properties file. This file is created automatically
during the preparation step for the restore, but it can also be created manually by any
text editor. The latter would allow a restore in case the Océ PRISMAproduction Server
system is not fully operable.
Summary:
The restore process is performed in two steps:
#
Step
Action
Remarks
1
'PrepareRestore'
The properties file is created and Océ
PRISMAproduction Server is shut down.
2
'Restore'
The system state is checked. If okay (= Océ
PRISMAproduction Server is down on Master
server and up on all Slave/PrintSlaves), the data is
collected and stored by the storagemanager.
Description of the 'PrepareRestore' options: No options
Description of the 'Restore' options:
608
Chapter 11 - Backup Solutions
Océ PRISMAproduction Server Backup: Command Line Client
#
Option
Parameter
Meaning/Description
-backupID
<string>
-backupID
[-plugins]
<string list>
List of plug-ins. The restore is only created for the plug-ins defined in this list
Default: all plug-ins
[-servers]
<string list>
List of Océ PRISMAproduction Server
servers. The restore is only performed for
the servers defined in this list Default: all
servers
[-jobs]
'all'
'all' ..
The complete job data base is to be restored (for example only all or nothing)
Default: No jobs are restored
Note:
-jobs and -servers options are
mutually exclusive. Reason: the
job information is distributed
among all servers. Therefore jobs
can only be restored into an
identical Océ PRISMAproduction Server cluster.
[-users]
'all' | <string list>
'all' ..
The home directories of all users in the
backup are restored <string list>.. the
home directories of the users listed are
restored.
<string list> ..
The home directories of the users listed
are restored.
Default: No home directories are restored
Chapter 11 - Backup Solutions
609
Océ PRISMAproduction Server Backup: Command Line Client
Option
Parameter
Meaning/Description
[-haltonerror]
'true' | 'false'
'true' ..
The restore process is stopped when an
error occurs. The directories/files already
restored remain untouched
'false'..
The restore process continues with the
next plug-in when an error occurs. The
restored directories/files of the plug-in
which raised the error may be incomplete
Note:
It's up the user to ensure data integrity when there are errors during the restore process. Errors are
reported on the console and
logged in the Océ PRISMAproduction Server Backup log file.
Import a Backup
The directories / files collected in the backup are imported in a system with a different
Operation System and / or a different Océ PRISMAproduction Server cluster (but with
identical host names and IP addresses) and / or a different Océ PRISMAproduction
Server main version.
A backup is identified by its Backup ID which is generated internally when the backup
is created. To scan for existing backups use the SearchBackups command described below.
As default all data in the backup is imported. However a selective import is possible based
on:
■
■
either by including only data of certain plug-ins (command option '-plugins')
and/or by including only the data of certain Océ PRISMAproduction Server servers
(command option '-servers')
Note:
The import operation is only supported in version 3.04, 3.10 and 4.0. Only Backup
data of versions less than the current version can be imported.
When importing only part of the data the user is responsible for data integrity.
As for data integrity reasons the Océ PRISMAproduction Server Master server must be
shut down before performing the import, the information about the current configuration
610
Chapter 11 - Backup Solutions
Océ PRISMAproduction Server Backup: Command Line Client
and status is read from the systeminfo.properties file. This file is created automatically
during the preparation step for the import, but it can also be created manually by any
text editor. The latter would allow an import in case the Océ PRISMAproduction Server
system is not fully operable.
Summary:
The import process is performed in two steps:
#
Step
Action
Remarks
1
'PrepareImport'
The properties file is created and Océ
PRISMAproduction Server is shut down.
2
'Import'
The system state is checked. If okay (= Océ
PRISMAproduction Server is down on Master
server and up on all Slave/PrintSlaves), the data is
collected and stored by the storagemanager.
Description of the 'PrepareImport' options: No options.
Description of the 'Import' options:
#
Option
Parameter
Meaning/Description
-backupID
<string>
Identifier of the backup as generated
when the backup was created.
[-mode]
'keep-files'
'keep-files' ..
Don't overwrite existing files Default:
overwrite files.
[-plugins]
<string list>
List of plug-ins. The import is only created for the plug-ins defined in this list.
Default: all plug-ins
[-servers]
<string list>
List of Océ PRISMAproduction Server
servers. The import is only performed for
the servers defined in this list Default: all
servers
Chapter 11 - Backup Solutions
611
Océ PRISMAproduction Server Backup: Command Line Client
Option
Parameter
Meaning/Description
[-jobs]
'all'
'all' ..
The complete job data base is to be imported (for example only all or nothing)
Default: No jobs are imported
Note:
-jobs and -servers options are
mutually exclusive. Reason: the
job information is distributed
among all servers. Therefore jobs
can only be imported into an
identical Océ PRISMAproduction Server cluster.
[-users]
612
'all' | <string list>
Chapter 11 - Backup Solutions
'all' ..
The home directories of all users in the
backup are restored <string list>.. the
home directories of the users listed are
imported.
<string list> ..
The home directories of the users listed
are imported.
Default: No home directories are imported
Océ PRISMAproduction Server Backup: Command Line Client
Option
Parameter
Meaning/Description
[-haltonerror]
'true' | 'false'
'true' ..
The import process is stopped when an
error occurs. The directories/files already
imported remain untouched
'false'..
The import process continues with the
next plug-in when an error occurs. The
imported directories/files of the plug-in
which raised the error may be incomplete
Note:
It's up the user to ensure data integrity when there are errors during the import process. Errors are
reported on the console and
logged in the Océ PRISMAproduction Server Backup log file.
History
To be able to understand what happened on an Océ PRISMAproduction Server system
regarding Océ PRISMAproduction Server Backup, a history file is maintained. Unlike
the backups which are controlled by the storage manager the history file is stored inside
the Océ PRISMAproduction Server structure (because it's Océ PRISMAproduction
Server s "memory", not that of the storage manager).
By using the 'History' command one can see in chronological order which backup / restore
/ import operations have been executed in the current Océ PRISMAproduction Server
system.
For convenience reasons only parts of the history (for example: all erroneous attempts)
can be listed.
Description of the 'History' options:
#
Option
Parameter
Meaning/Description
[-select]
'all'
| 'backup'
| 'restore'
| 'import'
| 'error'
Type of history entries.
Chapter 11 - Backup Solutions
613
Océ PRISMAproduction Server Backup: Command Line Client
Option
Parameter
Meaning/Description
[-file]
<string>
Location of the history file.
Default: current history file
' /u/prismapro/cfg/prismabackup/history.xml'
The following parameters are displayed for each backup found:
#
Date/Time
Date and time when the operation has been performed.
Backup ID
Identifier of the backup.
Type of Operation
Backup / Restore / Import.
Mount Point
Where data has been stored / retrieved from.
Result of Operation
Whether the operation was successful or an error occurred.
Example console output for a 'History' call:
Three backups have been created on the Océ PRISMAproduction Server system:
1 Date and Time
2 Backup ID
3 Operation performed was "backup" creation
4 Mount point was default
5 All backups have been created successfully
Locate Backups
Backups are identified by their Backup ID generated internally when the backup is created.
If find out the Backup IDs in an unknown environment or because the backups have
been created a long time ago, the 'SearchBackups' function has been implemented. The
search operation starts with the mount point to which the backups are written (this path
can be configured in the configuration file config.xml, see below).
As backups or directories containing backups can also be relocated manually, an optional
"search directory" can be defined for the search - so to speak as a temporary mount point
(rearranging directories is possible but not recommended)
Description of the 'SearchBackups' options:
614
Chapter 11 - Backup Solutions
Océ PRISMAproduction Server Backup: Command Line Client
#
Option
Parameter
Meaning/Description
[-dir]
<string>
Base directory for the search. Regarding
the storage manager this would correspond to changing the mount point.
The following parameters are displayed for each backup found:
#
Parameter
Description
Version
Version of Océ PRISMAproduction Server in which the backup
was created.
Name
Name of backup (short description of the backup).
Description
Detailed description of the backup.
User
User who created the backup.
Date
Date and time at which the backup was created.
Example console output for a SearchBackups call:
■
■
The default mount point of the storage manager is searched.
Three backups are known to the storage manager. Most important information are
the backup IDs (as they are the unique identifiers to be used in the restore, import,
… commands) but also backup names and descriptions. The latter are the "human
readable" identifiers of the backups.
Delete Backups
Backups can be deleted with the Delete command if they are not needed any more. They
can be located by means of the 'SearchBackups' command - as described above.
As backups or directories containing backups can also be copied / rearranged manually,
an optional "search directory" can be defined for the search - so to speak as a temporary
mount point.
Description of the 'Delete' options:
Chapter 11 - Backup Solutions
615
Océ PRISMAproduction Server Backup: Command Line Client
#
Option
Parameter
Meaning/Description
-backupID
<string>
Identifier of the backup to be deleted.
Note:
For security reasons no temporary definition of a different mount point is supported
with the Delete command.
Plug-in Specific Functions
There are two commands which support plug-in specific actions:
■
■
The command 'GetPlugins' which lists all plug-ins known to the framework.
The command 'GetPluginContents' which lists the content of a specific plug-in.
GetPlugins:
No parameters, lists all plug-ins known by the Océ PRISMAproduction Server Backup
framework. When the content of the plug-in data in backup is to be displayed by GetPluginContents, the plug-in name must be entered exactly as displayed by this command.
GetPluginContent:
The content of the plug-in specific data of the backup given is displayed.
Description of the 'GetPluginContents' options:
#
Option
Parameter
Meaning/Description
-plugin
<string>
Name of the plug-in for which the content is to be displayed. The names of the
plug-ins available are listed by the GetPlugins command.
-backupID
<string>
Identifier of the backup for which the
plug-in content is to be displayed.
[-dir]
<string>
Base directory in which the backup is located. Corresponds to a temporary overwrite of the mount point.
The following plug-in specific information is displayed for the backup given:
616
Chapter 11 - Backup Solutions
Océ PRISMAproduction Server Backup: Command Line Client
#
Parameter
Description
Type
Type of Océ PRISMAproduction Server server the data has
been backed up for: Master, Slave or PrintSlave.
IP Address
IP address of the Océ PRISMAproduction Server server.
Root Path
Physical root path from which the file sets listed below have
been taken.
(Set = group of file/subdirectories in a directory which are logically related. As there could be more than one such group in a
directory, an "exclude" mechanism is necessary to be able to
define different views on the content of the directory.)
Filesets…
List of file sets which have been included in the backup respectively have been excluded from the backup. Each file set is described by following parameters:
Physical Directory ..
Physical path of the file set (inside the Root Path)
Logical Directory ..
Name of logical path if applicable
Includes/Excludes ..
List of files/directories (inside the Physical Directory) which
have been included/excluded.
Example console output for a 'GetPluginContents' call:
#
1
The content which the plug-in for LCDS resource data has backed up in the
backup with the given ID is to be displayed.
2
On the Master server the directories' /u/prismapro/data/cat' and
'/u/prismapro/data/resimport/lcds' have been included.
3
The same directories have been included on the Slave server.
Chapter 11 - Backup Solutions
617
Océ PRISMAproduction Server Backup: Command Line Client
Utility Functions
The following utility function allows creating the properties file involved in the backup
process by request:
'CreateSystemInfo', creates the property file "systeminfo.properties".
When this command is executed, a possibly already existing property file is renamed to
<property file>.bak so that it's not overwritten by the new one.
Note:
The functionality of this command is implicitly called by the 'Prepare' command which
sets up the environment for a system backup.
'CreateSystemInfo':
No parameters, for the content of the file see chapter 'Properties Files' below.
Basic Configuration Files
The Océ PRISMAproduction Server Backup framework is highly configurable, both in
its behavior and in the components involved. It is implemented in Java, all components
which can be referenced by the configuration files must also be implemented in Java.
config.xml
In this configuration file the basic file paths and the storage managers are defined.
In detail these are:
■
■
■
The name and path of the history file Default:
'/u/prismapro/cfg/prismabackup/history.xml'
The name and path of the plug-ins configuration file Default:
'/usr/local/prismabackup/cfg/plugins.xml'
Type and basic parameters of the storage manager(s)
Note: In the current version of Océ PRISMAproduction Server Backup one type of
storage manager is supported - the MasterMountTar storage manager. This storage
manager tars data via the tar command and stores the data in a mounted network
drive on the Master server.
plugins.xml
In this configuration file all plug-ins are listed and for each plug-in the reference to the
technical implementation:
■
■
618
Name of the class which implements the plug-in client
Name of the class which implements the plug-in server
Chapter 11 - Backup Solutions
Océ PRISMAproduction Server Backup: Command Line Client
■
■
Name of the class which implements the plug-in content
Name of the class which implements the plug-in permissions
In the current version of Océ PRISMAproduction Server Backup all plug-ins refer to the
same implementation, the generic template based plug-in implementation.
backuptemplate-3xx.xml
This configuration file is used exclusively by the generic template based plug-in implementation.
The backup template file contains entries for all plug-ins. Each plug-in entry contains
file set lists for the different Océ PRISMAproduction Server server types.
Note:
There mustn't be an entry for each server. If there is no entry it simply means that no
data will be collected on that type of server. This is often true for PrintSlaves as there
aren't scarcely any user data available there: the PrintSlaves task is mainly to print and
all data needed is fetched "on the fly" from the other servers of the cluster.
Example (section of backuptemplate-300.xml):
Chapter 11 - Backup Solutions
619
Océ PRISMAproduction Server Backup: Command Line Client
#
620
1
It's the template for version 3.00.
2
The plug-in collects the AFP resource data, it's called AFP_PrintResourcesPlugin.
3
On each type of Océ PRISMAproduction Server server all files in path
'/u/prismapro/resources' are collected except the subdirectories/files in subdirectory "composer".
4
In contrast the entry for the POD_ComposerResourcesPlugin includes only
the "composer" subdirectory (plus all files in the logical directory
/$IMPSETS).
Chapter 11 - Backup Solutions
Océ PRISMAproduction Server Backup: Command Line Client
Properties Files
In contrary to the files listed in ’Basic configuration files’ (see chapter before) these files
are not part of the distribution but are generated dynamically when preparing a System
Backup.
The background for these files is that it has been decided to have Océ PRISMAproduction
Server not running on the Master server when performing the backup. This ensures that
there is no interference and that a backup can be created even of Océ PRISMAproduction
Server is not operational.
In contrary to the backup process itself Océ PRISMAproduction Server must be running
on the Master server when these to files are to be created. Some parts of the configuration
database and of the job database are extracted into these properties files.
As a fallback the files can also be built manually with the help of a simple text editor.
systeminfo.properties
This property file contains the basic information about the current Océ PRISMAproduction Server system which is necessary to be able to run a backup.
These are;
■
■
■
the current Océ PRISMAproduction Server version
the servers in the current cluster
the libraries on each server of the cluster
Example:
#
1
Version of current Océ PRISMAproduction Server is 3.04.00
2
The Master servers hostname is "foomaster.ops.de" and the IP address is
10.53.35.01
3
The (one and only) Slave servers hostname is "fooslave.ops.de" and the IP
address is 10.53.35.02
Chapter 11 - Backup Solutions
621
Océ PRISMAproduction Server Backup: Command Line Client
4
Logical - physical library name mapping on Master
5
Logical - physical library name mapping on Slave
Format of the Backups (of Mount Storage Manager)
Backups are identified by a unique Backup ID which is generated when the backup is
created. This ID is the one and only identifier for a backup, therefore it is not important
in which location a backup is stored - it can always by found by means of the ID.
Technically the ID is used as a directory name: all data which belongs to a backup is
stored in this directory. It's just plain files and a mix of the actual backup data and XML
files which describe the creation of the backup.
622
Chapter 11 - Backup Solutions
Océ PRISMAproduction Server Backup: Glossary
Océ PRISMAproduction Server Backup: Glossary
#
Term
Description
Backup data types
The possible types of data which are supported in Océ
PRISMAproduction Server Backup are:
AFP Resources, LCS Resources, POD Composer Resources,
POD Unity RIP Resources, Operating System Configuration,
Océ PRISMAproduction Server Configuration, Jobs, Print File
Libraries, User Home Directories.
Backup ID
The Backup ID is a unique internally generated number which
identifies a backup throughout its lifetime. It's recommended
to specify a descriptive name when creating a backup, so that
it can be found more easily if the ID has not been registered
somewhere.
Cluster
An Océ PRISMAproduction Server cluster is the sum of all
servers in a customer configuration. There is always one Master
server and up to 12 Slave servers in a cluster.
Same cluster regarding backup/restore means: Same number of
servers, same host names, same IP addresses.
Configuration
Backup
Océ PRISMAproduction Server has all its configuration data
stored in a central database. When the configuration is changed
all components are notified via a central event mechanism and
the applications can adapt their behavior appropriately.
Because of the central importance of this database there has
been a backup/restore system regarding configuration data from
the very beginning of Océ PRISMAproduction Server V3.
Compared to the Configuration Backup the Océ
PRISMAproduction Server Backup deals with all data of a
server cluster (and includes also the configuration backup data).
File Set
A group of files related to each other. Their location in the file
system is defined by the physical path definition (for flexibility
reasons it is separated in a "root path" and a "directory" path).
Their content is defined by a sequence of includes and excludes.
The excludes are necessary as a directory may contain more than
one file sets.
Example: the directory '/u/prismapro/resources' contains both
APA and LCDS resource files. When defining the APA file set
one has to exclude the LCDS files and the other way around.
Chapter 11 - Backup Solutions
623
Océ PRISMAproduction Server Backup: Glossary
624
Term
Description
Import
A backup can be restored or imported. Import means: crossing
Operation System (LINUX Caldera to SuSE), Océ
PRISMAproduction Server configuration and Océ
PRISMAproduction Server version boundaries. Thus importing
is more flexible than restoring. Only backups created by an Océ
PRISMAproduction Server version equal or lower than the
current one may be imported.
Plug-ins
The separation of the different data types in an Océ
PRISMAproduction Server system and the possibility to let the
developers / teams in charge program the actual backup/restore
operations is the heart of the concept. This has been achieved
by building a robust framework which allows to "plug in"
whenever necessary: when creating a backup, when restoring/importing, in the Java server, in the client, …
The generic plug-in: solution in Version 1. Doesn't support a
GUI and is based on templates that describe which data is to
be backed up for which Backup data type.
Restore
A backup can be restored or imported. Restore means: the Océ
PRISMAproduction Server cluster has not changed, Operation
System, Océ PRISMAproduction Server configuration and Océ
PRISMAproduction Server version are identical. Restore is intended to be used to rebuild a cluster after a serious crash.
Therefore not much flexibility has been built in.
Storage Manager
All archive data in Océ PRISMAproduction Server Backup is
routed through a storage manager module. It is crucial not to
bind plug-ins, client and Java server functions to any external
devices directly. The storage manager encapsulates this access
and therefore the support of additional storage devices can be
added without changes in the basics.
Chapter 11 - Backup Solutions
Mirror Print Jobs: Introduction
Mirror Print Jobs
Mirror Print Jobs: Introduction
Introduction
Océ PRISMAproduction Server makes it possible to mirror print jobs. This means it can
automatically transfer print jobs from the 'original server' to another Océ PRISMAproduction Server master called 'mirror server'. If the original server is not available anymore,
it should be possible to execute the job on the mirror server. To ensure this, Océ
PRISMAproduction Server checks if the mirrored job could be executed on the mirror
server.
The mirror server is defined globally on the original Océ PRISMAproduction Server
server. The actual mirroring can be defined for each job separately using the PJM user
interface, the PJM command line or specially configured Input Modules.
The print job mirroring is designed in such a way that the configuration of the original
server and the mirror server do not have to be the same. Differences between the two
configurations (for example printer name, resolution, job queue) must be adjusted using
special mirror ticket rules. External resources have to be made available also on the mirror
server. Different path names can also be handled by mirror ticket rules.
The general ticket rules (which modify the ticket before mirroring) and in case of mirroring
by input modules the job submission script as well as the default ticket have to be available
only on the ’Original server’.
The Océ PRISMAproduction Server job identifiers for mirrored jobs are identical on the
original server and on the mirror server. Therefore the used Job identifier range for each
server must be configured in such a way that these servers use different identifiers for locally created jobs. This prevents mirrored jobs from getting a job id, which is already locally used.
The regular exchange of jobstatus information between the two servers secures that either
the job on the original server can be printed or the job on the mirror server. It is only
possible to print the job twice, if the communication between the original server and the
mirror server is interrupted or defective.
Note:
The following terms are used: Original server is the server from which a job to be mirrored
is submitted. Mirror server is the server which receives the mirrored jobs.
Chapter 11 - Backup Solutions
625
Mirror Print Jobs: Introduction
Illustration
Normally the whole job is mirrored using the PJM (option 1 in the figure above). This
causes additional I/O load on the Original server. To reduce this load, some of the Input
Modules can mirror the data files on the fly to the mirror server (option 2 in the figure
above). Each received network data packet is immediately sent to the mirror server. This
means that during job submission the print data don’t have to be read from Hard Disk
and sent to the mirror server. Currently this feature is only available for the Download
and LP Input Module.
For a description of the possibility to mirror jobs via Input Modules see ‘'Input Modules':
Overview’ on page 460.
An Océ PRISMAproduction Server server can be an 'Original' server as well as a 'Mirror'
server at the same time. This means that 2 Océ PRISMAproduction Server servers can
serve as backup solution for each other.
626
Chapter 11 - Backup Solutions
Mirror Print Jobs: Prerequisites and Functionality
Mirror Print Jobs: Prerequisites and Functionality
Prerequisites
■
■
Interconnectivity License (must be installed on the original Océ PRISMAproduction
Server Master and on the second Océ PRISMAproduction Server Master server, which
is used as mirror server)
Under ’Configuration’ -> ’User Permissions’ special rights can be set to protect the
mirroring of jobs and the actions to control the mirrored jobs. These rights are only
visible if the above mentioned license is installed:
Under Print Job Manager Settings
- Allow to mirror jobs
Under Job Viewer Job Modification Settings:
- Allow to release mirrored jobs
- Allow to delete mirrored jobs
- Allow to pass control of mirrored jobs to mirror
Functionality
If the mirror function is enabled, the jobs are mirrored when they are created, i.e. on job
submission they are also transferred to the indicated mirror server. When a mirror job is
successfully submitted it has been generated on the original server and at the same time
on the mirror server. On the mirror server the mirrored job gets the state 'exception
mirrored'. The user can pursue the jobs in the appropriate job lists. The job states are
exchanged between the two servers. The state of the 'remote' job is reported in the tooltip
of the 'local' job.
Mirrored Jobs
The mirrored job remains on the mirror server at least until the job is finished on the
original system. You can modify the hold time in the system configuration of the mirror
server.
The mirrored job has the status ’Exception mirrored’ on the mirror system. To avoid
double printing, the job can only be activated if:
■
■
■
the original server is not available and
the user has the permission to release the job and
the job on the original server is not finished-complete.
Transfer Job Control
Generally speaking only one server has the control over the job. The job control can be
transferred to the other server and back again. On the server without job control, the job
Chapter 11 - Backup Solutions
627
Mirror Print Jobs: Prerequisites and Functionality
has the status ’Exception mirrored’. When transferring the job control, the status of the
job changes respectively. The possibility to manually transfer the control over the job to
the mirror server depends on the job status and on a permission granted to the user in
the user administration.
Mirror Policy
Controls the behavior of the system if mirroring jobs is enabled:
#
Parameter
Description
Mandatory
If this option is selected, the system only creates the job if mirroring was successful. In other words, the job is submitted on
both systems or it is not submitted at all.
Optional
In this case the system tries to mirror the job, but if this is not
successful, the job will be submitted on the original server anyway.
You can set these parameters in ’Configuration’ -> ’System’ and/or in the PJM ->
’Transfer Mode’. The PJM policy always overrides the setting in the ’System’ window.
If you set the policy in the PJM to ’Default’, the setting in ’Configuration’ -> ’System’
becomes valid.
Mirror Ticket Rules
Select a Ticket Rule, which has been configured to modify the ticket of the mirrored job
so that this job can be submitted on the mirror server. You can set this parameters in
’Configuration’ -> ’System’ and/or in the PJM -> ’Transfer Mode’. The Ticket Rule,
which is set in the system configuration, is only applied if the Ticket Rule setting in the
PJM is set to ’Default’.
628
Chapter 11 - Backup Solutions
Mirror Print Jobs: Workflow
Mirror Print Jobs: Workflow
Introduction
There are some user interfaces in the Océ PRISMAproduction Server 'Explorer', which
allow to make your settings for mirroring the print jobs on a different Océ
PRISMAproduction Server master server. All settings have to be done on the original
server except for the permissions to delete/release mirrored jobs (see below).
Basic Mirror Settings in Océ PRISMAproduction Server
Configuration -> System
In the section ’Mirroring’ you can define the global settings for this function (some of
these settings can be overwritten in the PJM):
#
UI Element
Description
Mirror Server
Sever name of the Océ PRISMAproduction Server master,
which receives the mirrored print jobs.
User Name
User name under which the mirrored job is generated on the
mirror server (future owner in the joblist). This user must exist
on the mirror server.
Password
Password for the user above.
Mirror Policy
See ’Mirror Policy’ in ‘Mirror Print Jobs: Prerequisites and
Functionality’ on page 627.
Ticketrule
See ’Mirror Ticket Rules’ in ‘Mirror Print Jobs: Prerequisites and
Functionality’ on page 627.
Mirror-Service
After the entries in ’Configuration’ -> 'System' have been completed, a mirror service is
created on the original server. This mirror service relates to the configured mirror server.
Therefore this server is displayed in the list of services (’Services’ application in the Océ
PRISMAproduction Server 'Explorer'). Per default this service is deactivated and must
be enabled via the ’Services’ menu or toolbar. If the mirror server is accessible, the service
gets the status ’online’ (see below):
Chapter 11 - Backup Solutions
629
Mirror Print Jobs: Workflow
Configuration -> Accounting
When mirroring jobs it is necessary to restrict the range of job IDs on the original system
as well as on the mirror system to avoid the creation of the same job IDs on both systems.
For example you can set the job range on the original Océ PRISMAproduction Server
master to 00000001 to 69999999 and on the mirror server from 70000000 to 99999999.
Configuration -> Ticket Rules
Generally you use Ticket Rules to modify an existing job ticket. If a Ticket Rule is selected
as mirror parameter in the PJM or in the system configuration, this rule should modify
the ticket of the mirrored job so that this job is printable on the mirror server. For example
you can select another printer for the printout of the mirrored job.
Configuration -> User Permissions
■
630
On the original server:
Allow to mirror jobs (PJM)
Default: service and admin=yes, applic and operator=no
Allow to pass control of mirrored jobs to mirror
Default: service and admin=yes, applic and operator=no
Chapter 11 - Backup Solutions
Mirror Print Jobs: Workflow
■
(see ’Transfer Job Control’ in ‘Mirror Print Jobs: Prerequisites and Functionality’ on
page 627)
On the mirror server:
Allow to delete mirrored jobs
If the user has this permission, the mirrored jobs can be deleted manually. Otherwise
the deletion is performed automatically (time delay can be set in the System Configuration of the mirror server -> ’Hold Finished Jobs [h]’).
Default: service and admin=yes, applic and operator=no
PJM -> Menu ’Job’ -> ’Transfer Mode’
To invoke the mirroring of jobs in the PJM window you have to open the ’Transfer
Mode’ dialog in the PJM. Here you can select the configured mirror server, the mirror
policy and the ticket rule which is only performed on the ticket to be mirrored.
The Ticket Rule selection offers three possibilities:
■
■
■
■
select one rule from the list of defined Ticket Rules,
select ’Default’ if the rule defined under ’Configuration’ -> ’System’ should be valid,
select ’none’ if no Ticket Rule should be applied to the mirror ticket.
The settings you make in this windows remain valid for all jobs until they are changed
again. These settings are not part of the job ticket.
Chapter 11 - Backup Solutions
631
Mirror Print Jobs: Workflow
Mirror Jobs via the PJM Command Line
You can also mirror jobs via the PJM command line, which offers the same functionality
as the graphical interface. You find the respective parameters in chapter "Command Line
Interface" -> "PJM" in the Océ PRISMAproduction Server Technical Reference Manual.
Mirror Jobs via Download
To be able to Mirror Jobs using the Download Input Module, the global mirror configuration must be performed in Océ PRISMAproduction Server ’Configuration’ -> 'System'.
After this is done, the mirror server can be selected in the Download port configuration.
The print data files are mirrored using the Download daemon if 'MirrorDataFile=Yes'
(see the figure ‘Mirror Print Jobs: Introduction’ on page 625, option 2). This setting can
be used only when in the job submission script no print data files are modified, since this
script is only executed on the Original server.
If 'MirrorDataFile=No' (see the figure in ‘Mirror Print Jobs: Introduction’ on page 625,
option 1), the print data files are transferred by PJM.
See also ‘'Download'’ on page 474 for more details.
Mirror Jobs using HotDir
To be able to Mirror Jobs using the HotDir Input Module the global mirror configuration
must be performed in Océ PRISMAproduction Server ’Configuration’. After this is done
the mirror server can be selected in the HotDir configuration.
The Print Data files cannot be mirrored with the HotDir daemon (MirrorDataFile=No),
the files are transferred by PJM.
See also ‘'HotDir'’ on page 488 for more details.
Mirror Jobs using LP
To be able to Mirror Jobs using the LP Input Module the global mirror configuration
must be performed in the Océ PRISMAproduction Server ’Configuration’. After this,
job submission scripts must be used to activate the print file mirroring and the use of the
ticket rules.
The print data files are mirrored using the LP daemon if 'MirrorDataFile=Yes' (see the
illustration in ‘Mirror Print Jobs: Introduction’ on page 625 -> option 2a). This setting can
only be used if no print data files are modified in the job submission script, since this
script is only executed on the Original server.
If 'MirrorDataFile=No', the print data files are transferred by PJM (see the illustration
in ‘Mirror Print Jobs: Introduction’ on page 625 -> option 1.
See also ‘'LP'’ on page 508.
See ’The Job Submission Script’ in ‘'Input Modules': Overview’ on page 460 for more details.
632
Chapter 11 - Backup Solutions
Chapter 12
Océ Document Designer
Integration in Océ
PRISMAproduction Server
Océ Document Designer for Océ PRISMAproduction Server
Océ Document Designer for Océ PRISMAproduction Server
Introduction
This chapter describes how the Document Designer LINUX command line version is
integrated in Océ PRISMAproduction Server V4.00.xx. The term ODDA (Océ Document
Designer Advanced) is used alternatively to address the Document Designer throughout
this chapter.
The integration is based on a hot directory scenario. A dynamic job ticket extension is
used to call the Document Designer in the Océ PRISMAproduction Server workflow.
No user interface is needed; the dynamic section can be added to an APA Job Ticket using
a plain text editor.
The resources referenced in the ODDA workflow step can be either addressed locally or
by the Océ PRISMAproduction Server library system.
The Document Designer executable is called directly in the workflow, i.e. it is assumed
that the primary use case will be long running production jobs with many pages.
Requirements
The following components are needed to use ODDA within Océ PRISMAproduction
Server:
■
■
ODDA-Connector RPM (license-dependent, delivered on the Océ PRISMAproduction
Server CD). Contains the ODDA-Océ PRISMAproduction Server connector and
demo files (installed in '/u/prismapro/demo/odda')
Designer Formatter LINUX RPM (license-dependent, CD must be ordered and installed separately for all versions from Océ PRISMAproduction Server V3.10.05). For
detailed information see the release notes/installation description distributed with the
RPM.
Usage of the Document Designer
The following steps are necessary to be able to use the ODDA support in Océ
PRISMAproduction Server:
■
634
Install the two RPMs mentioned above and provide the necessary licenses. When
successfully activated, an Océ PRISMAproduction Server workflow service "oddaservice" and a library named "ODDA" is available in Océ PRISMAproduction Server.
The library is designed as common access point for the ODDA resources "Workflow"
and "Job Configuration" called in the ODDA service. The library concept guarantees
that the resources are accessible from all servers within an Océ PRISMAproduction
Server cluster.
Chapter 12 - Océ Document Designer Integration in Océ PRISMAproduction Server
Océ Document Designer for Océ PRISMAproduction Server
■
■
Note: there are 2 licenses involved: the Océ PRISMAproduction Server Connector
license and ODDA Command Line license. The Océ PRISMAproduction Server
Connector license enables/disables the ODDA support, the ODDA license allows
execution of the ODDA Command Line program in the Océ PRISMAproduction
Server workflow.
Enable access to the resources used by the Document Designer during runtime (either
by mounting the appropriate directories or by copying the resources in the Océ
PRISMAproduction Server library system).
Create an APA-Ticket and add the dynamic ODDA section (see next chapter). Submit
the ticket via the standard PJM.
In an automated environment, the print input will most likely be dropped in hot folders
dedicated to specific ODDA workflows.
Job Ticket
To create an ODDA workflow, a dynamic job step calling the Document Designer
command line must be added to an APA-Ticket:
#
Step
Action
1
Link the file section with the dynamic job step "oddaservice"
2
Define the section in the Job Ticket which describes the name of the service
and the parameters which are forwarded by the workflow engine when the
service is called during runtime.
3
The name of the service must always be "oddaservice" as it is installed under
this name by the ODDA-RPM. The name of the dynamic section - lines 1)
and 2) in the ticket- could be different but are named identically here for
simplicity reasons.
4
The Document Designer Workflow Definition File. If <workflow file> is
prefixed by /$ODDA/, the addressed WFD file is temporarily extracted from
the "ODDA" library and the local copy is passed to the Document Designer
command line.
Chapter 12 - Océ Document Designer Integration in Océ PRISMAproduction Server
635
Océ Document Designer for Océ PRISMAproduction Server
Step
Action
5
The Document Designer Job Definition File (optional). If <job file> is prefixed by /$ODDA/ the addressed JOB file is temporarily extracted from the
"ODDA" library and the local copy is passed to the Document Designer
command line. Note: as the integration of ODDA in Océ PRISMAproduction Server is based on the AFP engine, only the latter is referenced by
"oddaservice". Only the AFP engine configurations can be referenced by (6).
6
The Engine Configuration Name referred to in the Job Definition File (optional, only valid if also a Job Definition File has been defined). The Engine
Configuration Name parameter must only be used if the Job Definition File
contains a respective AFP engine configuration and has been saved with option "Include all engine configs" by the ODDA Production GUI.
Note:
If there is more than one file defined in the [files] section and the Document Designer
should process them all, they can all refer to the same [oddaservice] dynamic extension.
If different WFDfiles and JOBfiles/Engines are to be used for different input files, extensions of their own must be defined. Also, tickets with a mix of conventionally processed
files and files to be processed by the Document Designer are valid.
Note:
If more than 1 file section in the Job Ticket references the Document Designer service,
it is called separately for each file in the list. The output files generated are "grouped",
this means they are printed as individual files and in the sequence given in the Job
Ticket.
ODDA Resources
Two resources control the behavior of the Document Designer command line apart from
the input data:
■
■
The Workflow Definition File
The Job Definition File
For details about the content and meaning of these files, consult the Document Designer
documentation.
These resources can be referenced either as local files or as Océ PRISMAproduction
Server library files. It is strongly recommended to use the implicitly created library
"ODDA" as only the Océ PRISMAproduction Server library concept guarantees the
availability of the content on all servers in a cluster. Alternatively, when using the local
636
Chapter 12 - Océ Document Designer Integration in Océ PRISMAproduction Server
Océ Document Designer for Océ PRISMAproduction Server
file approach the resource directories must be mounted on all servers of a cluster individually.
ODDA Service
The ODDA service "oddaservice" is called at the appropriate point in time in the workflow
when the dynamic extension described above is encountered in a Job Ticket.
It maps the parameters passed by the workflow engine to Document Designer command
line parameters including the input data. The output data created by the Document
Designer is passed to the next workflow step, normally the print step.
The "user interface" of the service is that of any Océ PRISMAproduction Server service:
■
■
■
■
An indication that the service is running in the Jobs Viewer
An entry in the ’Services’ application
One or more messages in the Message Window, mainly in case of an error
A termination information in the Jobs Viewer and the Message Window
The error information handling is based on the return code of the Document Designer
command line call. The current version of Document Designer supports only a few return
codes, therefore it is not possible to give the user detailed information just by interpreting
the return code. For that reason, the ODDA logging file is scanned for "Fatal Error" entries
and Océ PRISMAproduction Server error messages are created for these entries. These
should give the user/operator enough information to be able to deal with the error situation.
Assumptions:
■
■
The ODDA service links the input file by the name PrismaInput. That is, the data
input module in the ODDA workflow must be named PrismaInput.
The output created by the ODDA workflow is expected to be AFP as the ODDA
service is embedded in an Océ PRISMAproduction Server AFP workflow.
Using Hot Directories
See also "HotDir" in ‘'HotDir'’ on page 488.
In Océ PRISMAproduction Server, a hot directory is an important possibility to link
fully automated predefined job tickets with data coming in. This is also the preferred
approach for the current Document Designer use case.
Hot directories can be seen as input channels, which process "similar" data. So a separate
hot directory could be defined for each type of input data / Document Designer workflow
combination. On the other hand, also some logic can be applied to an Océ
Chapter 12 - Océ Document Designer Integration in Océ PRISMAproduction Server
637
Océ Document Designer for Océ PRISMAproduction Server
PRISMAproduction Server hot directories (Ticket Rules, scripts). This would also allow
processing the different combinations with one single hot directory.
To avoid the creation of too many hot directories or to make the logic applied to a single
hot directory not too complicated, the following approach is recommended:
■
■
Define different hot directories for different Document Designer workflows
Differentiate among different applications using the same Document Designer
workflows by Ticket Rules or small scripts
Demos
The examples mainly show how an ODDA job ticket must look like and allow the administrator to check after the installation whether the ODDA support works in principle.
638
Chapter 12 - Océ Document Designer Integration in Océ PRISMAproduction Server
Index
Index
Accounting Administration
Database Permissions ...................................320
General Settings ...........................................317
Legacy-Files ..................................................321
Overview ......................................................316
Authorization
Auto .............................................................258
External ........................................................258
Ldap .............................................................258
Authorization Modes
Authorization Modes ....................................264
B
Backup/Restore
Basic Concept ..............................................327
Convert old Backups ....................................335
Window Functions .......................................330
C
Cluster Configuration
Cluster Configuration ..................................276
Cluster Type
Jobsplitting ...................................................276
Printer ..........................................................276
Cofiguration
Backup/Restore ............................................327
Configuration
Accounting Administration ..........................316
Backup/Restore ...................................330, 335
Cluster .........................................................276
Consumables ................................................322
Devices ................................................298, 300
Events ..........................................................280
FCB .............................................................378
General Usage of the Applications ................256
Job Queues ...................................................375
LCDS Jobs ...................................................385
Library Paths ................................................337
Licenses ........................................................313
Logging ........................................................278
Master/Slave .................................................301
Message System ............................................304
Overview of Applications .............................250
Paper ............................................................413
Printers .........................................................339
System ..........................................................281
User Management ........................................258
Consumables
Consumables ................................................322
Country Settings
Country Settings ..........................................264
D
Devices Configuration
Devices Configuration .........................298, 300
DPconnect
Barcode Tab .................................................174
Configuration and Job Submission ...............153
Configuration Example ................................189
Data Processing ............................................164
Functionality ................................................147
Hints for using Ticket Templates .................177
Input Job Ticket Translation ........................172
Job Processing ..............................................160
Maintenance Programs .................................193
Meaning of Job Ticket Template Entries ......178
Translation Rules for Input Job Ticket Statements
......................................................................196
User Interface ...............................................159
E
Events Configuration
Events Configuration ...................................280
Explorer Launcher
Explorer Launcher ..........................................56
F
Forms
Forms ...........................................................414
G
GetTiff-Service
GetTiff-Service .............................................100
Graphic Arts_Plus
Graphic Arts_Plus ..........................................96
639
Index
I
M
Installation
Installation/Deinstallation/Update of
PRISMAproduction .......................................45
Update of SUSE Linux Enterprise Server 10 ....23
Installation of SUSE Linux
Create server configuration media ...................15
Overview ........................................................12
Prerequisites ...................................................13
Installation of SUSE Linux Enterprise Server 10 SP2
Installation of SUSE Linux Enterprise Server 10
SP2 .................................................................18
IP Address (change)
IP Address (change) ........................................51
Master/Slave Configuration
Master/Slave Configuration ..........................301
Message System
Automatic Answers .......................................309
Automatic Saving .........................................307
General Settings ...........................................305
Message Suppression ....................................312
Overview ......................................................304
Triggers ........................................................311
Mirror Print Jobs
Introduction .................................................625
Prerequisites and Functionality .....................627
Workflow .....................................................629
J
N
JCF (Job Control Files)
JCF (Job Control Files) ................................382
JCF Parameters
JCF Parameters ............................................387
Jobrequirement
Jobrequirement ............................................101
Network Configuration
Network Configuration ..................................32
Network Settings
Network Settings ............................................33
O
L
Launcher
Launcher ........................................................56
LCDS Parameter Configuration
Description of the JCF Parameters ...............387
Job Control Files (JCF) ................................382
LCDS Jobs Window ....................................385
Online Configuration ...................................403
Special Functions and User Scripts ...............405
LCDS-Module
New Catalog ................................................214
Organization of Resources ............................215
Stockset Configuration Tool ........................223
LDAP Parameter
LDAP Parameter ..........................................290
Library Paths
Library Paths ................................................337
Licenses
Licenses ........................................................313
Logging Configuration
Logging Configuration .................................278
Login Dialog
Login Dialog ................................................260
640
Océ Document Designer
Integration into PRISMAproduction ............634
P
Paper Configuration Tool
Paper Configuration Tool ............................413
Passwords
Aging Parameters ..........................................296
Complexity ..................................................297
PCL Converter
Concept .......................................................108
Conversion under Océ PRISMAproduction Server
......................................................................124
Fonts and Bins .............................................111
Operation .....................................................119
Resource Handling .......................................113
Troubleshooting ...........................................126
PCL Module
Print Parameter ............................................245
PCL-Module
General Features ...........................................232
Native Workflow ..........................................234
Index
Permissions
Permissions ..................................................271
Permissions (editable)
Permissions (editable) ...................................272
PPML Converter
PPML Converter ..........................................143
Workflow .....................................................145
Print File Manager
Media Configuration ....................................298
Print File Manager (PFM)
Print File Manager (PFM) ..............................68
Printer Configuration
Add a new Printer ........................................342
Cluster .........................................................365
Custom specific Infopages and Resources for Configured Printers .............................................362
General Tab .................................................349
Gray Curves .................................................370
Input Devices ...............................................367
Job Notification ...........................................346
Job Queues ...................................................364
Output Devices ............................................368
Overview ......................................................339
Postprocessing Devices .................................368
Print Parameter ............................................352
Printer Drivers/Backends ..............................355
Printer Notification ......................................369
Toner Stations ..............................................366
PRISMAproduction Backup
Command Line Client .................................603
Glossary .......................................................623
Tasks and Components ................................596
Properties for PCL file
PCL Native Workflow .................................237
S
Services Table
Services Table .................................................39
System Configuration
Country Preferences .....................................293
eMail Notification ........................................286
Job Parameter ...............................................285
LDAP Parameter ..........................................290
Mirroring .....................................................288
ODS Parameter ............................................282
Overview ......................................................281
Password ......................................................295
System Parameter .........................................284
T
Tabs
Tabs .............................................................414
TicketRules
Activate for LP, Download and HotDir .......440
Conditions ...................................................425
Definition of rules ........................................423
Foreach action ..............................................435
Introduction .................................................416
Main Window ..............................................418
Messages .......................................................427
Parameters ....................................................429
Return/Exit ..................................................428
Save and log .................................................439
Settings ........................................................426
Value tables ..................................................437
Variables .......................................................430
TIFF Converter
Concept .......................................................130
Operation .....................................................132
U
Unity
Unity ..............................................................75
AIMS: Extended AIMS ..................................91
Color Separation .............................................84
Conversion .....................................................94
GetTiff-Service .............................................100
Input Tray Switching .....................................82
Resources and Fonts .......................................77
Troubleshooting .............................................95
Unity Plus (Graphic Arts_Plus) ......................96
UnityRIP
UnityRIP ........................................................75
User Defined Paper
User Defined Paper ......................................414
User IDs
User IDs .........................................................62
User Laguage
User Laguage ................................................264
User Management
Create and Administrate Users .....................264
LDAP Support .............................................262
Overview ......................................................258
User Info Window ..............................269, 270
User Permissions ..........................................271
User Roles
641
Index
User Roles ......................................................63
W
Workflow
Color Selection .............................................578
Tab printing .................................................568
UP3I devices ................................................571
642