1
Océ User manual
Océ PRISMAproduction Server
LCDS-Module
o
Copyright
Copyright © 2001 - 2008 Océ
All rights reserved, including rights of translation, reprinting, reproduction by copying or
any other method, of this document as a whole or parts thereof. Offenders will be liable
for damages.
All rights, including rights created by patent grant or registration of a utility model or design,
are reserved.
Delivery subject to availability; right of technical modifications reserved.
All hardware and software names used are trademarks of their respective owners.
PRISMA®production and Océ CustomTone® are registered trademarks of Océ.
Adobe®, Acrobat®, Reader® and Distiller® are registered trademarks of Adobe® Systems
Incorporated.
PostScript® 3™ is a registered trademark of Adobe® Systems Incorporated.
Microsoft®, Windows®, Windows XP®, Windows Server 2003® are either registered
trademarks or trademarks of Microsoft® Corporation in the United States and/or other
countries.
Java™ and all Java-based trademarks are trademarks or registered trademarks of Sun®
Microsystems, Inc. in the United States and other countries.
SUSE Linux Enterprise® is a registered trademark of Novell®, Inc.
For this product we also offer seminars at our International Training Center in Poing.
Information:
Phone +49 8121 72 3940
Fax +49 8121 72 3950
Océ Printing Systems GmbH
ITC
Postfach 1260
85581 Poing
Germany
Edition: 09-2008
Contents
Contents
Chapter 1
Introduction.................................................................................................................7
Introduction........................................................................................................8
Introduction to the LCDS-Module...................................................................10
Chapter 2
The Océ PRISMAproduction Server Desktop.........................................................11
Log in to Océ PRISMAproduction Server Linux............................................12
Océ PRISMAproduction Server Menus..........................................................13
Applications for the LCDS-Module.................................................................16
Chapter 3
LCDS-Module Operation..........................................................................................17
LCDS-Module: 'New catalog'..........................................................................18
LCDS-Module: Organization of Resources.....................................................19
LCDS-Module: Stockset Configuration Tool..................................................21
Chapter 4
Océ PRISMAproduction Server 'Explorer'..............................................................29
Usage of the Océ PRISMAproduction Server 'Explorer'...............................30
'Explorer' Main Window Functions..........................................................30
'Explorer' Main Menu Functions...............................................................33
'Explorer' Workspace and Session Concept............................................38
Create and Save User Defined Workspaces and Sessions.....................40
Common Functions of the 'Explorer' Applications.................................44
'Classic Explorer'........................................................................................48
Océ PRISMAproduction Server 'Explorer' on a Windows PC................51
Overview of the 'Explorer' Applications (LCDS)......................................52
'Explorer' Applications....................................................................................54
'Connections'..............................................................................................54
'Connection Viewer'.............................................................................54
'Server Files'...............................................................................................56
'Server Files'.........................................................................................56
'All Jobs'.....................................................................................................62
'All Jobs'................................................................................................62
'All Jobs': Menu and Tool Bar Functions...........................................70
'All Jobs': 'Job Filter'............................................................................75
'All Jobs': 'Interrupt Jobs'....................................................................78
'All Jobs': 'Job Positioning for Job {0}'..............................................79
'All Jobs': 'Job details viewer'.............................................................81
'Servers'......................................................................................................83
3
Contents
'Servers'................................................................................................83
'Services'.....................................................................................................86
'Services'...............................................................................................86
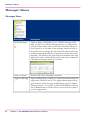
'Messages'..................................................................................................87
'Messages': Overview..........................................................................87
'Messages': Menus...............................................................................90
'Messages': Operator Requests.........................................................103
PJM (Print Job Manager).........................................................................155
Introduction to the Print Job Manager.............................................105
PJM Main Window.............................................................................106
PJM Ticket Menu................................................................................108
PJM 'Job Parameter' Section............................................................110
Jobsplitting per Job Copies...............................................................113
PJM 'List of Files' Section ('Edit' Menu)...........................................115
File Selection Box...............................................................................119
File Formats........................................................................................122
Virtual Directories...............................................................................124
'Job Attributes': Overview.................................................................126
'Job Attributes': 'Message'................................................................128
'Job Attributes': 'Store'......................................................................129
'Job Attributes': 'Print'.......................................................................133
'Job Attributes': 'Header/Trailer'.......................................................139
'Job Attributes': 'Start Job Events'...................................................141
'Job Attributes': 'Start Print Events'..................................................143
'Job Attributes': 'Notification'...........................................................144
'Job Attributes': 'Custom Settings'...................................................145
PJM 'Job' Menu..................................................................................146
PJM 'Utilities' Menu...........................................................................152
'Set Working Mode'............................................................................153
'Printer Pool'.............................................................................................169
'Printer Pool': Overview.....................................................................169
'Printer Pool': Tool Bar and Menu Functions...................................173
'Printer Pool': 'Printer Settings'.........................................................177
'Printer Pool': 'Printer Maintenance'.................................................180
'Printer Pool': 'Printer Filter'..............................................................183
LCDS Components...................................................................................185
'LCDS Channel'...................................................................................185
'LCDS Resources Import'...................................................................186
'LCDS Resources Export'...................................................................188
LCDS-Module: 'LCDS Resources'......................................................190
'Input Status'.............................................................................................196
'Input Status'.......................................................................................196
'Local files'................................................................................................199
'Local files'..........................................................................................199
4
Contents
Configuration..................................................................................................202
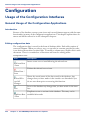
Usage of the Configuration Interfaces....................................................202
General Usage of the Configuration Applications...........................202
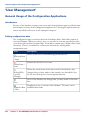
'User Management'..................................................................................204
General Usage of the Configuration Applications...........................204
'Events'......................................................................................................206
'Events' Configuration........................................................................206
'Paper'.......................................................................................................207
'Paper' Configuration Tool.................................................................207
Workflows.......................................................................................................210
Workflow 'Tab Printing'...........................................................................210
3
Workflow UP I Devices............................................................................213
Workflow 'Color Selection'......................................................................220
Workflow Media Assignement to Printers.............................................223
Workflow LCDS........................................................................................226
5
Contents
6
Chapter 1
Introduction
o
Introduction
Introduction
Océ PRISMAproduction Server V4.0
Océ Océ PRISMAproduction Server Server V4.0 is the fifth generation of Océ print
servers focusing mainly on IPDS printing systems.
Océ Océ PRISMAproduction Server Server is a high performance output management
system for corporate and commercial market segments. It can handle any application for
monochrome, CustomTone and full color printing in the transaction printing environment
AND on-demand segments ("Convergence"). It processes virtually any standard print
description language. Output is focused on high-speed IPDS devices. Additional backends
also allow non-IPDS devices to be driven in specific environments.
Customers printing AFP directly from mainframes can also benefit from the IPDS
backend, since it is also used within Océ PRISMAproduction Server Host (SPS module).
The Océ PRISMAproduction Server Server POD-Module makes the powerful workflow
engine suitable for graphical arts markets. In combination with additional PRISMA
products such as DocSetter and PRISMAweb, it forms the PRISMA for PoD suite.
This solution creates a unified - converged - platform for mid to very high volume
transaction printing and for publishing-type document printing on a variety of printing
systems, spanning the full gamut of output speeds.
Due to its modular, scalable concept, Océ Océ PRISMAproduction Server can be configured exactly to the customer's needs:
■ Use of additional PDLs on one system platform
■ Connection of one or more cutsheet and continuous feed printing systems
■ Single server and cluster solutions with additional print servers and RIPs
The integration of the individual components into a single workflow system under a
unified GUI makes the product a high availability system for all kinds of print applications.
Due to the following features Océ PRISMAproduction Server is a high performance
printer server, which combines stability and flexibility for production printing:
■ A better throughput of data allows you to connect more and faster printing systems.
Server HW platform independency for low volume installations
■ You can manage and print jobs of more than 2 gigabyte.
■ An extended LINUX server operating system supports modern server technologies.
■ The combination of several servers in a network increases performance and guarantees
high system stability.
■ SNMP assists you in monitoring an maintaining the system locally or via remote
control.
8
Chapter 1 - Introduction
Introduction
■
■
■
■
■
■
■
■
■
■
■
■
■
Océ PRISMAproduction Server Server V4.0 is a modular system which allows you to
combine all available language modules in one system.
Océ PRISMAproduction Server Server V4.0 is also a scalable system providing print
performance up to 1000 ipm.
You can enhance performance and stability by selecting from a variety of industrial
standard server models, by cross-linking servers and by the use of multi-processor
systems.
The "Print while spooling/downloading" function enables Océ PRISMAproduction
Server Server V4.0 to start printing during the transmission of data. This function is
provided for MVS Direct and MVS Download users as well as for offline users.
Support for VarioStream 9240 and ColorStream 10000 Full Color and Multilevel
Gray / Graphic Arts Plus.
Enhanced IPDS backend (AFP Color Consortium)
Enhanced JDF support with JDF Tickets and JMF Feedback.
Enhanced UP3I support
Enhanced PJL backend (now “PCL module”)
Using CIS in Workflow (Job Splitting, Indexing or Resource Packaging)
Server HW platform independency for low volume installations.
Two parallel LCDS Process chains.
DPconnect: DigiPath V4.0 support.
Graphical User Interface
The administration and configuration of the system is centralized in the Océ
PRISMAproduction Server 'Explorer'. This java-based graphical user interface has the
following features:
■ Monitoring and handling of all print jobs independent of the printer language,
workflow and interface by means of the common spool.
■ Changes in the configuration are detected automatically, for example printers and resources can be added dynamically to the system without restating the GUI.
■ Status changes are communicated by events, for example no polling in monitoring
components necessary, better overall performance.
■ Exact repositioning and reprinting of jobs in case of an error.
■ The Océ PRISMAproduction Server Explorer also works as a standalone application
in a distributed network allowing you to realize a centralized administration of the
system independent of the physical location of the server(s).
Chapter 1 - Introduction
9
Introduction to the LCDS-Module
Introduction to the LCDS-Module
LCDS-Module Basics
The LCDS-Module allows you to transform Xerox DocuPrint applications (X40xx, 41xx,
46xx, 48xx, 9700, 9800) for the fast IPDS printing systems. It contains apart from the
basic components of all Océ PRISMAproduction Server Server products the LCDS language module, which can be supplemented by other optional language modules. The
LCDS language module includes the linedata/DJDE data stream as well as metacode
applications. The original resources are converted to IPDS resources. Xerox Highlight
Color (HLC) is supported to a very large extent and is transformed to Océ CustonTone®.
In the printing process, the basic module of Océ PRISMAproduction Server takes over
spooling, control of all printing systems, and accounting functions.
10
Chapter 1 - Introduction
Chapter 2
The Océ PRISMAproduction Server Desktop
o
Log in to Océ PRISMAproduction Server Linux
Log in to Océ PRISMAproduction Server Linux
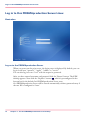
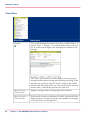
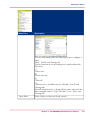
Illustration
Log on to the PRISMAproduction Server
When you power on the print server, the login screen is displayed. By default, you can
log in as the user "operator", "applic", "admin "or "service".
You can also log in as user "root" with the respective password.
After you have entered username and password click the 'Return' button. The KDE
desktop appears. Now click the 'Explorer' button ( ), which is preconfigured in the
bottom bar for the default Océ PRISMAproduction Server users.
Océ PRISMAproduction Server will be started automatically without password entry if
the user ID is configured as 'Auto'.
12
Chapter 2 - The Océ PRISMAproduction Server Desktop
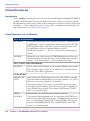
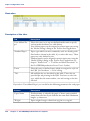
Océ PRISMAproduction Server Menus
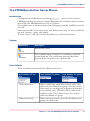
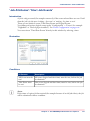
Océ PRISMAproduction Server Menus
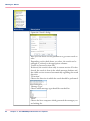
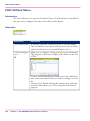
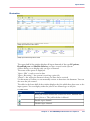
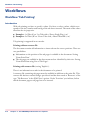
Introduction
Clicking the Linux KDE button and then
gives you access the Océ
PRISMAproduction Server menus, which call functions not included in the Java environment of the Océ PRISMAproduction Server 'Explorer'.
The available items in this menu depend on the language modules installed and on the
unser ID.
Some functions like 'Create menu entry' and 'Delete menu entry' are not accessible for
the users 'operator', 'applic' and 'admin'.
The user 'service' is the only user who has full access to all menu functions.
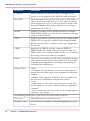
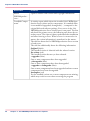
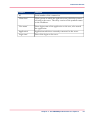
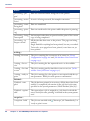
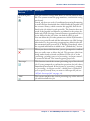
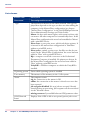
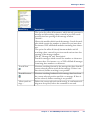
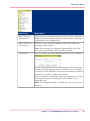
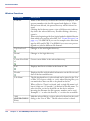
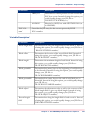
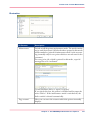
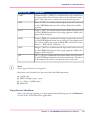
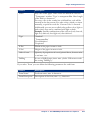
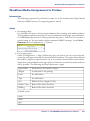
System
#
Menu Entry
Description
Reboots the system.
Reboot
Shutdown
This command opens a dialog box to confirm or cancel the
system shutdown. The system must always be shut down
properly before the print server is powered off!
User Utilities
There are different functions for the different basic users:
#
'User Utilities' for service:
'User Utilities' for admin:
'User Utilities' for applic
and operator:
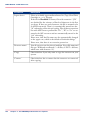
'Create menu entry'
Opens a shell script which allows you to create a new
menu entry for a defined user group. After the creation
of the entry you can assign any program to be launched
if you click the entry. This entry will be visible in the
submenu of the ’User Utilities’ menu, if you log on
under the defined user group.
'Delete menu entry'
Deletes the menu entries created for the different user
groups via a shell script.
Chapter 2 - The Océ PRISMAproduction Server Desktop
13
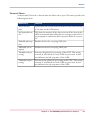
Océ PRISMAproduction Server Menus
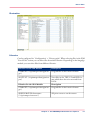
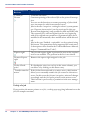
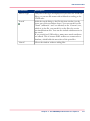
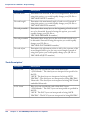
'User Utilities' for service:
'User Utilities' for admin:
'User Utilities' for applic
and operator:
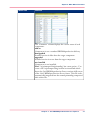
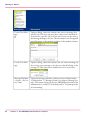
'PRISMA Status'
Issues a console message, which informs you on the start
and test of Océ PRISMAproduction Server components.
’User Scripts’
Allows the 'service' and 'admin' user to select and execute customized programs or shell scripts without direct
access to the operating system:
The scripts, which appear on the 'Sandard' tab are stored
in '/u/prismapro/cfg/userscripts/user'. The scripts/programs under the ’Standard’ tab are available for all users.
Depending on the log in ID, the second tab is labeled
with the respective user ID name. It provides
scripts/programs only accessible for this user ID. These
scripts are stored in '/u/prismapro/cfg/userscipts/admin
... service'.
Click on the folder button to select a user script, for
example "monthly report“. If you start the file by
clicking the traffic light, a script file is called up, for
example:
'#This is a script file which should be executed only in
June!'
'spsprt -class 3 -formdef F10101 -pagedef P1STD3
/u/pismapro/job/report'
'KCalc (Scientific Calculator)'
14
Starts the Linux calculator application. For the users
'service' and 'admin' this application can reached via
the KDE main menu ('Tools').
Chapter 2 - The Océ PRISMAproduction Server Desktop
Océ PRISMAproduction Server Menus
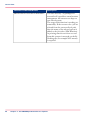
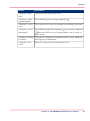
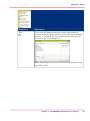
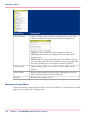
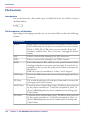
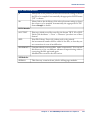
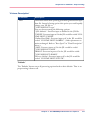
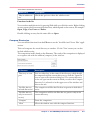
Reset Océ PRISMAproduction Server
#
Menu Entry
Reset Océ
PRISMAproduction
Server
Description
This feature stops and restarts the communicator and all
server processes (daemons, services) on the local system.
Every time a saving or restoring of the Océ PRISMAproduction Server configuration was performed, a ’Reset Océ
PRISMAproduction Server’ has to be executed on all
servers, starting with the master system. Please close Explorer window before executing ’Reset Océ PRISMAproduction
Server'.
Chapter 2 - The Océ PRISMAproduction Server Desktop
15
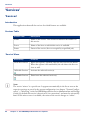
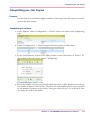
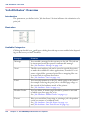
Applications for the LCDS-Module
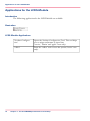
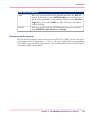
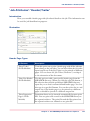
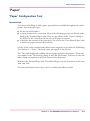
Applications for the LCDS-Module
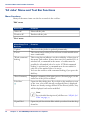
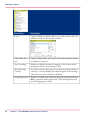
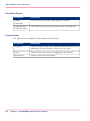
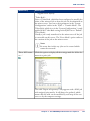
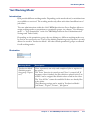
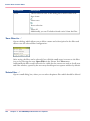
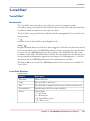
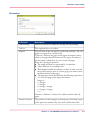
Introduction
The followinng applications for the LCDS-Module are available:
Illustration
LCDS-Module Applications
#
16
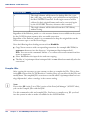
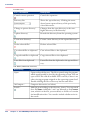
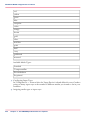
'Stockset Configuration'
Opens the Stockset Configuration Tool. This tool helps
you to assign stocknames to input bins.
('service', 'admin' and 'applic' users only).
'collect'
Starts the ’collect’ tool to trace the system ('service' user
only).
Chapter 2 - The Océ PRISMAproduction Server Desktop
Chapter 3
LCDS-Module Operation
o
LCDS-Module: 'New catalog'
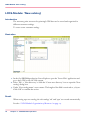
LCDS-Module: 'New catalog'
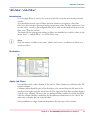
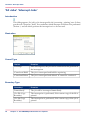
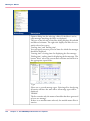
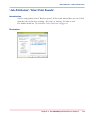
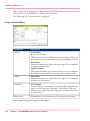
Introduction
The necessary print resources for printing LCDS data are be stored and organized in
different customer catalogs.
To create a new customer catalog:
Illustration
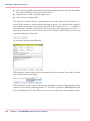
1. In the Océ PRISMAproduction Server Explorer open the 'Server Files' application and
go to the LCDS or the GCI file system.
2. Select ’File’ -> ’New directory’ or click the 'Create new directory' icon to open the 'New
catalog' dialog box:
3. Under 'New catalog name:' enter a name. The length of the field is restricted to 32 bytes.
Click ’OK’ to confirm the action.
Result
When setting up a new catalog, the sub catalogs 'rds' and 'xpar' are created automatically.
See also: ‘LCDS-Module: Organization of Resources’ on page 19.
18
Chapter 3 - LCDS-Module Operation
LCDS-Module: Organization of Resources
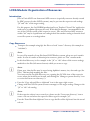
LCDS-Module: Organization of Resources
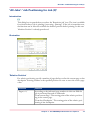
Introduction
JSLs in Unix ASCII text format and AFP resources (especially resources already created
by XRC process of other LCDS systems), may be put into the respective sub catalogs
“jsl” and “rds” of the target catalog.
For this purpose, the Océ PRISMAproduction Server 'Explorer''Server Files' application
with service or admin rights may be used. With this file manager, (recommended is the
use of the GCI file system of the respective server), JSLs and converted AFP resources
within “rds” may be copied from one catalog/subcat into another catalog or from the local
server file system to a catalog/subcat.
Copy Resources
1. Transport (for example using ftp) the files to a local “source” directory (for example to
'/u/admin').
Note:
In case of ftp transfer of text files from DOS/Windows system, please use ascii transfer
mode. In case of transfer of binaries/print resources, please use “bin” transfer mode.
2. In this local directory (or for example in the “jsl” or “rds” subcat of the source catalog),
mark/select the files (left mouse button) which you want to copy.
Note:
Please note, that the files may be sorted using alphabetic names, size, date and type (for
JSLs). This may help marking the files.
You can access the local file directory tree, opening the GCI file view of the respective
server, where the local files are located, and clicking the 'Change to parent directory' icon
to access the Linux root directory (/).
3. Press the 'Copy selected files to clipboard' icon in the upper right corner.
4. Change with the GCI file system (resource manager) to the target catalog. Change to the
“jsl” or “rds” sub catalog.
Note:
If the respective subcat is not created yet, please use the 'Create new directory' icon to
create a sub cat and select the respective subcat type for example “jsl”.
5. Press the 'Paste files from clipboard' icon to copy the files of the clip board into the actual
sub cat.
Chapter 3 - LCDS-Module Operation
19
LCDS-Module: Organization of Resources
Note:
Please note, that the file manager will issue an overwrite warning, if the files (JSL or AFP
resource) is already present. In this case it is recommended to skip / chancel the copy
process in order to avoid for example the overwriting of already changed JSLs.
20
Chapter 3 - LCDS-Module Operation
LCDS-Module: Stockset Configuration Tool
LCDS-Module: Stockset Configuration Tool
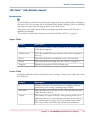
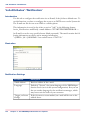
Introduction
This tool allows you to define the status of paper loading of the printer. In detail you
define in which input bin the various sorts of paper (stocknames) should be loaded for
the different applications. Therefore the SCT links stocknames to input bins (or input
bin combinations) and saves this configuration to SCT tables. When printing an LCDS
application you have to activate the matching SCT table.
A change of the arrangement of paper loading during an LCDS conversion process initiates
an operator message defining how to load the paper into the printer (form message/Otext).
The process works as follows: while converting an LCDS application the system checks
if the stocknames used by a STOCKS command are defined in the active SCT table. If
this is the case the table names will be reported by a form message or by Otext to the
operator. If the active table does not match the requirements, the system searches for a
matching table in the SCT.DAT file. If there is exactly one matching table, it will be set
active automatically after issuing a warning. If there are more than one matching tables,
a list of these tables appeares for the operator to choose from. In case the system cannot
find any matching table, a list of the required stocknames is issued for the operator to
create a new table with the respective settings.
The SCT table which is used by the x-filter during the conversion process is locked automatically by the system so it cannot be modified by the operator. This is done because
the name of the SCT table is used as FORM ID/form message or in the Otext allowing
the operator to view the requirements of paper loading of every job before it is printed.
The FORM ID gives information on the start configuration. An Otext message will be
displayed if the status of paperloading is changed during print process (by DJDE or JSL).
Note:
SCT configuration is only used if the tray selection of the PJM is set to 'by the stockset
configuration'.
Chapter 3 - LCDS-Module Operation
21
LCDS-Module: Stockset Configuration Tool
Illustration
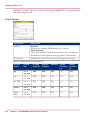
Overview
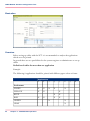
Before setting up tables with the SCT it is recommended to analyze the applications
which are to be printed.
In general there are two possibilities for the systems engineer or administrator to set up
tables:
Definition of tables for more than one application
Example:
The following 8 applications should be printed with different paper colors or forms:
#
Applications
1
2
3
4
WHITE
X
X
X
X
YELLOW
X
X
5
6
Stocknames
X
BLUE
RED
GREEN
GRAY
22
Chapter 3 - LCDS-Module Operation
X
X
X
X
X
X
X
X
X
X
7
8
LCDS-Module: Stockset Configuration Tool
Applications
FORMA
X
X
FORMB
X
X
FORMC
X
Using a printer with 4 input bins (for example Océ VP5000), you need to set up three
tables:
#
SCT table name
Stockname
Applications
COLOR01
WHITE/YELLOW/BLUE/RED
1245
COLOR02
WHITE/GREEN/GRAY
36
FORMX
FORMA/FORMB/FORMC
78
Using a printer with 3 input bins (for example Océ PS75), you need to set up five tables:
#
SCT table name
Stockname
Applications
COLOR04
WHITE/YELLOW/RED
12
COLOR05
WHITE/BLUE/RED
4
COLOR06
YELLOW/BLUE/RED
5
COLOR02
WHITE/GREEN/GRAY
36
FORMX
FORMA/FORMB/FORMC
78
Definition of many tables, each for one application
For a description of the workflow see the following chapter.
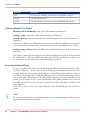
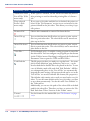
Functions of the SCT Window
To open the editor window open the Océ PRISMAproduction Server Menu and click
on Stockset Configuration.
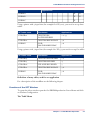
The ’Table’ Menu
Chapter 3 - LCDS-Module Operation
23
LCDS-Module: Stockset Configuration Tool
#
Menu Entry
Description
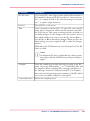
‘New SCT.DAT’
Creates a new SCT.DAT file. The old SCT.DAT will be
deleted. A warning is displayed asking you to confirm the operation.
‘Save’
Saves the modified SCT.DAT file.
‘Exit’
Exits the program. You are prompted to save changes.
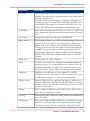
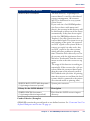
Buttons on the Main Window
#
24
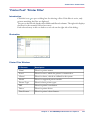
UI Element
Description
’Table’
Use the arrow button to open a list with all defined tables stored
in the SCT.DAT file to select from.
The following tables are predefined when you start the Stockset
Configuration Tool:
STANDARD
This table is always locked and therefore cannot be modified
or deleted. Activate this table when printing an application
without stockset definition to show the entry STANDARD in
the print queue window.
TEST
This table cannot be locked and should therefore only be used
for testing reasons.
FF1
Default table for fanfold printers (only one input bin).
CS1
Default table for cutsheet printers.
Chapter 3 - LCDS-Module Operation
LCDS-Module: Stockset Configuration Tool
UI Element
Description
’ACTIVE’
Checking this box will activate the table shown in the SCT
window. This table will be used and locked by the x-filter when
printing an application.
If you use the Print Job Manager to submit LCDS print jobs
you have to insert the name of the table which should be used
in the LCDS ‘File properties’ window in the field ‘Active SCTable’. This will have the same effect as checking this box.
’LOCKED’
If this box is checked (either by the user ‘service’ or ‘admin' or
by the system) the table shown in the window cannot be modified.
‘New name’
Changes the name of an existing, unlocked table.
‘Show actual’
This button enables you to view the actual settings of the table
assigned to the job, which is currently printing. This may be
helpful if the active table has been modified in the meantime.
During job conversion the used table is locked and cannot be
modified. A form message text will be generated for this job
displaying the table name, which is valid for the initial paperloading. This valid and unchanged table is shown in the SCT
window.
‘Show active’
Displays the active table, if present.
‘New’
Creates a new empty table. Define the maximum number of
input bins (up to 16) in the middle of the window. Insert the
required stocknames in combination with the number of the
input bins in the ‘Entries’ table at the bottom of the window.
‘Duplicate’
Duplicates the table shown in the window. You will be
prompted to insert a new name. Use this command if you want
to make minor changes to a copy of an existing table.
‘Update active’
Same as ‘Duplicate’ but duplicates the active (!) table and it’s
name. To differentiate the duplicates the SCT adds an increasing
number to this name. Use this command if you want to create
groups of similar tables.
'Delete‘
Deletes a selected table from SCT.DAT. Before this is done
you will be prompted to confirm.
'Catalog'
In this selection box define the catalog used for the modification
of the SC-tables.
'Printertype'
The space in this text field is limited to one word with a maximum of 14 characters. Insert any optional term (for example
"Cutsheet") which serves as a comment to the selected table.
Chapter 3 - LCDS-Module Operation
25
LCDS-Module: Stockset Configuration Tool
UI Element
Description
‘Comment’
Insert a comment for the entire table, for example on the
printer or on the application for which the table is designed.
‘Max. BIN’
Select the number of input bins of the printer. The number is
used to check active input bins in an active table. A warning
will be displayed if you try to add an input bin, which exeeds
the selected number. For cutsheet printers you can choose a
number between 1 and 16.
‘MAIN’
Number of stockbin used as MAIN input bin, for example
DJDE FEED=MAIN (you may insert a comment on the type
of paper used for this bin).
‘AUX’
Number of stockbin used as AUX input bin, for example DJDE
FEED=AUX or using the conditional processing command
RAUX (you may insert a comment on the type of paper used
for this bin).
‘FEED’
Equivalent to XEROX operator command FEED. If
FEED=MAIN, the settings of the active table are used. For
FEED=AUX or <n> only the stockbin AUX or <n> is used and
the settings of the active table are overridden.
'Entries'
This is the section where you define the combination of stocknames and input bins for the selected table. It is also possible
to modify an existing table by activating or deactivating the
stockname/bin combinations.
Column Titles
‘name’
= stockname. As a stockname you can choose any name (for
example the color of the paper) with a maximum of 6 characters.
‘number’
= number of the input bin. With the VP5000 a number can
also represent a combination of input bins (cluster).
‘active’
= single entries of a list can be activated or deactivated. This
feature enables you to adjust a table for different applications.
‘comment’
= insert a comment for the entry in the list (for example physical
input bins, type of paper, ...).
The following buttons refer to the entries of a selected table in the list.
26
‘New entry’
Click this button to create a new entry.
‘Duplicate entry’
Use this button to duplicate a selected (highlighted) entry in
the list.
Chapter 3 - LCDS-Module Operation
LCDS-Module: Stockset Configuration Tool
UI Element
Description
‘Delete entry‘
Deletes a selected (highlighted) entry in the list. Before this is
done you will be prompted to confirm.
Status bar
This bar at the bottom of the editor window indicates the status
of the SCT. For instance you will be informed, if the SCT.DAT
has been changed and needs to be saved. Activating a table will
automatically save the configuration.
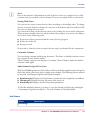
Note:
The term ‘Form’ is used with the LCDS-Module in the sense of general settings for
cutsheet inbin configuration defined in a SC-table. The form message window is generated if the stockset is defined in the start JDE or JDL. If the stockset is changed using
DJDE the conversion process automatically inserts OTEXT WAIT messages showing
the name of the SC-table.
Note:
It is recommended to avoid positioning forward or backward after interrupting the print
job (in the 'All Jobs' window), if the print data you want to skip contain OTEXT messages generated by the stockset handling. These messages will be processed in any case
leading to an improper reloading of paper.
Chapter 3 - LCDS-Module Operation
27
LCDS-Module: Stockset Configuration Tool
28
Chapter 3 - LCDS-Module Operation
Chapter 4
Océ PRISMAproduction
Server 'Explorer'
o
'Explorer' Main Window Functions
Usage of the Océ PRISMAproduction
Server 'Explorer'
'Explorer' Main Window Functions
Introduction
Océ PRISMAproduction Server 'Explorer' represents a frame, which provides access to
all java based Océ PRISMAproduction Server components like the PJM, job lists or the
message system, etc. Furthermore it allows you to configure workspaces and to individually adjust them to your requirements.
Log in
Log in to the system see: ‘Log in to Linux’ on page 12.
Clicking the Linux KDE button and then
(or clicking the icon in the bottom
bar of the Linux desktop) opens the login screen to the Océ PRISMAproduction Server
'Explorer':
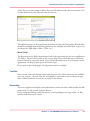
If the user is configured for 'Auto' login (see chapter "User Management" -> "User" in
the Océ PRISMAproduction Server Administrator's Guide), the 'Explorer' opens automatically.
The basic layout of the 'Explorer' is like follows:
30
Chapter 4 - Océ PRISMAproduction Server 'Explorer'
'Explorer' Main Window Functions
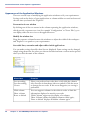
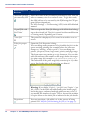
Illustration
Layout of the Explorer Window
The title bar offers standard functionality like maximizing, restoring, minimizing and
closing. It also contains a system menu which provides this functionality. The system
menu will pop-up when a single-right-click is made on the title bar OR when a left-click
is made on the Océ logo in the title bar. Double clicking the title bar maximizes the
'Explorer' or restores the former layout.
The functions of the 'Explorer' main menu are described here: ‘Explorer Main Menu
Functions’ on page 33
The navigation bar holds the workspaces of a session and allows users to navigate through
current open view areas. The latter are called workspaces. The navigation bar can be
minimized using the small icon in the left corner of the status bar.
The status bar gives the user usefull feedback about the activities of the Océ
PRISMAproduction Server system. On the left side a small button allows you to minimize/enlarge the navigation bar. Next to this icon the currently active workspace is displayed.
At the right side of the status bar, the following information is shown:
■
The icon with the red question mark indicates, that there are operator questions, which
have not yet been answered. Click on this icon to display the questions (see ‘Messages:
Operator Requests’ on page 103).
Chapter 4 - Océ PRISMAproduction Server 'Explorer'
31
'Explorer' Main Window Functions
■
■
■
A progress bar displays of the amount of free space on the /u filesystem. If you touch
this indicator with the mouse, a tooltip displays the usage of the /u file system of all
slaves in the cluster.
The color of the icon next to the progress bar indicates the status of the Océ
PRISMAproduction Server network:
Green: status ok, job acception and processing are enabled.
Red: either the servers or the job acception and/or the job processing have been disabled.
Next to this, the hostname and the currently logged-in user are displayed.
Function of the Title Bar Icons
#
32
Icon
Description
Minimize
Available in nomal mode, maximized mode and full screen.
Maximize/Restore
Available in normal mode, minimized mode and maximized
mode.
Close
Available in all modes.
Full Screen
Reduces the size of the title bar. Available in nomal mode
and maximized mode.
Normal Screen
Revertes the 'Full Screen' function. Available in full screen
mode.
Chapter 4 - Océ PRISMAproduction Server 'Explorer'
'Explorer' Main Menu Functions
'Explorer' Main Menu Functions
Introduction
The Océ PRISMAproduction Server 'Explorer' main menu is always located underneath
the title bar on the left side of the 'Explorer' window.
The "File" menu allows you to create or modify so called sessions to build a user defined
Océ PRISMAproduction Server interface which suits your needs.
With the help of the "View" menu, you can add applications to the sessions.
'File' Menu
#
#
Menu Item
Function
'New Session'
Opens a new 'Explorer' session, which not yet contains
workspaces or applications. You can use this empty session to
built an individually configured user interface.
'Open Session...'
Allows you select a predefined or user defined Explorer-Session.
See ‘Explorer Workspace and Session Concept’ on page 38.
'Import
Workspaces...'
Opens the same file selection dialog as above.
'Save Session As...'
You can save you own user defined session under a new name
(see ‘Create and Save User Defined Workspaces and Sessions’ on
page 40). Océ PRISMAproduction Server offers the $SHARED
directory to save sessions. You can also save sessions in other
directories if you have the permission to write into these directories. The user ’Operator’ has no right to save sessions in the
$SHARED directory.
'Revert to Default
Session'
This function is only visible for users, which have no permission
to modify sessions. The modification, which have been done
in the user interface are reset by reloading the default session
(see "Default Session" in ‘Create and Save User Defined
Workspaces and Sessions’ on page 40).
Chapter 4 - Océ PRISMAproduction Server 'Explorer'
33
'Explorer' Main Menu Functions
Menu Item
Function
'Preferences...'
Opens a dialog box with the following options: Application
menus can be made visible, as soon the mouse enters the title
bar of an application. Application lists can be sorted alphabetically. You can define a custom title bar. See ‘Explorer Workspace
and Session Concept’ on page 38.
'Exit'
Exits the 'Explorer'. The last settings of the explorer will automatically be saved. If you restart the program all windows will
be rebuilt.
'View' Menu
#
#
34
Menu Item
Function
'Add Workspace'
Click this entry to add an empty workspace or an application
from the list to the session. The application is opened in a new
workspace.
'Add Application'
As above, but does not offer an empty workspace and adds the
application selected to the workspace, which is currently active.
'Remove
Workspace'
Removes the active workspace. This applies to the icon in the
navigation bar.
'Properties'
Opens the properties dialog for the selected workspace. Here
you can modify the name of the workspace and its icon.
Chapter 4 - Océ PRISMAproduction Server 'Explorer'
'Explorer' Main Menu Functions
Menu Item
Function
'Small Navigation
Bar'
Deminishes the navigation bar to make the best use of the entire
screen. You still can select the workspaces, which are in the
session.
'Window' Menu
#
#
Menu Item
Function
'Select Previous
Workspace
'Select Next
Workspace'
Allows you to switch between the workspaces, which belong to
the current session.
Workspace Names
Lists all workspaces, which belong to the current session.
Clicking on them opens the respective application. If a
workspace contains more than one view, these views are integrated between two lines. If you select a view, the menu bar of
the respective application is expanded.
'Help' Menu
#
#
Menu Item
Function
'Help contents'
Opens the main help page for the Océ PRISMAproduction
Server 'Explorer'. You can also use F1.
'Context help'
If you have selected this menu item, you can click on a item of
the user interface to open a related help window (not all items
are linked to context sensitive topic).
Chapter 4 - Océ PRISMAproduction Server 'Explorer'
35
'Explorer' Main Menu Functions
36
Menu Item
Function
About
PRISMAproduction...
Opens a window with version and copyright information.
'Installed Components'
A window opens which shows the installed Océ PRISMAproduction Server release and its components. It is marked when
it was modified (upgraded, downgraded, ...) compared to the
original delivered software package. Every server in the Océ
PRISMAproduction Server cluster has an own panel. The first
tab shows the primary server, the following ones show the secondary servers. The request is always performed after installation
and when booting a server. When a server is connected to its
master, the version information is transferred to the master.
The title line shows the Océ PRISMAproduction Server version
of each server.
The title line additionally shows the following information:
Original (black)
The installed version is identical with the released version.
Pre-release (red)
The installed version has not yet been released.
+ upgrades (blue)
One or more components have been upgraded.
+ downgrades (blue)
One or more components have been downgraded
+ upgrades + downgrades (blue)
One or more components have been upgraded and one or more
components have been downgraded.
Incomplete (red)
For the installed version one or more components are missing,
which may result in errors when executing the program
Chapter 4 - Océ PRISMAproduction Server 'Explorer'
'Explorer' Main Menu Functions
Menu Item
Function
The ’Comment’ column displays the current status of each
component:
add on
Component is not a standard PRISMAproduction delivery
downgraded
Installed version is older than the target component.
upgraded
Installed version is newer than the target component.
not installed
Component is not installed.
Note: '/u/prismapro/bin/prismadiag' has a new option –V to
create a file /u/prismapro/diag/version/versions.html which
shows the Océ PRISMAproduction Server versions of all servers
of the Océ PRISMAproduction Server cluster. This file is also
automatically integrated into the normal prismadiag compressed
info archive file.
Chapter 4 - Océ PRISMAproduction Server 'Explorer'
37
'Explorer' Workspace and Session Concept
'Explorer' Workspace and Session Concept
Introduction
To provide a task related operation of the system, the 'Explorer' is based on a workspace
concept. A workspace is defined as an area that hosts one or more applications (also called
views). Only these applications are open, which the user needs for his special task. Additionally the applications are already arranged in an expedient way.
Definition
Task related workspaces can be described by the following features:
■
■
■
■
■
■
Each workspace can contain one or more application(s) (for example: PJM, PDC).
Only these applications are active which are required for the task.
The selection and arrangement of applications within a workspace can be modified.
You can change the size of the applications or hide them completely.
Changing to another workspace is always possible.
The full functionality of an application in a workspace is not restricted (for example
clicking on a job ticket opens the PJM).
The current settings are saved and will be restored if you open the explorer again.
Océ PRISMAproduction Server Sessions
Several workspaces can be opened at the same time. The navigation bar allows the user
to navigate through the currently open workspaces. This is called a "Session". Sessions
can be saved for later use. The figure below illustrates how a saved session can be opened
again. Note that the default path is $SHARED and that session files have the .psn extension.
See also: ‘Create and Save User Defined Workspaces and Sessions’ on page 40
Predefined Sessions
To open a session use the ’File’ -> ’Open Session...’ menu item. A dialog is opened, providing available sessions. Note that there are some predefined sessions like ’admin.psn’
and ’classic-operatior.psn’. These sessions are created again on every new installation of
Océ PRISMAproduction Server (i.e. all changes will be reset). With the commands ’New
Session’ and ’Save Session As...’ user defined sessions can be added to the list of predefined
sessions.
The following predefined sessions are available:
Classic-Operator Session
38
Chapter 4 - Océ PRISMAproduction Server 'Explorer'
'Explorer' Workspace and Session Concept
■
■
■
Monitoring of the jobs
Control of the printers
Monitoring of the print process
The Classic-Operator session is the default session for the user "operator"
Operator Session
■
In addition to the tasks of the classic-operator session, the operator session allows the
usage of the Print Job Manager.
The Operator session is the default session for the user "applic".
Admin Session
■
■
Gives access to all configuration tools of the system
Access to all devices, libraries and resources of the Océ PRISMAproduction Server
system.
The Admin session is the default session of the users "admin" and "service".
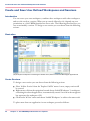
Classic Session
Opens the ’Classic Explorer’ as it is known from the previous versions of Océ
PRISMAproduction Server. On the left you find the familiar tree stucture, which allows
you to launch the applications with a double click of the mouse. See ‘Classic Explorer’ on
page 48.
Illustration
Chapter 4 - Océ PRISMAproduction Server 'Explorer'
39
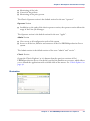
Create and Save User Defined Workspaces and Sessions
Create and Save User Defined Workspaces and Sessions
Introduction
You can create your own workspaces, combine these workspaces with other workspaces
and save the result as a session. What you are exactly allowed to do, depends on your
permissions as a Océ PRISMAproduction Server user. The following describes how you
can create/modify a session. To design a new session you can choose from the following
actions:
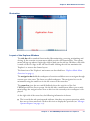
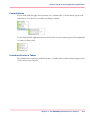
Illustration
[31] Sample workspace containing the Printer Pool, Servers and the Messages applications
Create Sessions
To design a new session you can choose from the following actions:
■
■
■
Select '&New Session' from the 'Explorer''&File' menu: A new, empty session will
be created.
Right-mouse-click on the navigation bar and choose '&Add Workspace'. A workspace,
containing the selected application, is automatically created. An icon in the navigation
bar represents the workspace. OR
Click on the '&View' menu and choose '&Add Workspace' to achieve the same result.
To place more than one application in one workspace proceed as follows:
40
Chapter 4 - Océ PRISMAproduction Server 'Explorer'
Create and Save User Defined Workspaces and Sessions
■
■
Right-mouse-click on the workspace icon in the navigation bar and select '&Add
Application' to add another application to you workspace. OR
Click on the '&View' menu and choose '&Add Application' to achieve the same result.
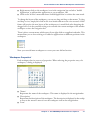
To change the layout of the workspace, you can use drag and drop or the menus. To drag
and drop a view, simply left-click on the view header and move the view around. A blue
frame will preview the new layout of the workspace as it would look after dropping the
dragged view. It is also possible to drag a view outside the current workspace into another
workspace or into the navigation bar.
There is also a context menu, which opens if you right-click on a application header. This
menu allows you to close existing or to add new applications on different positions in the
workspace:
Now you can add more workspaces to create your user defined session.
'Workspace Properties'
Each workspace has its own set of properties. When selecting the properties entry of a
workspace, a dialog is displayed.
■
■
■
'Name:'
Represents the name of the workspace. This name is displayed in the navigationbar.
'Description:'
Represents the description of the workspace. The description is displayed in the tooltip
as soon as the mouse is moved over the workspace icon in the navigationbar.
'Icon:'
Chapter 4 - Océ PRISMAproduction Server 'Explorer'
41
Create and Save User Defined Workspaces and Sessions
The icon to be used in the navigationbar as a representation of the workspace. When
no icon is choosen (an empty selection), a so-called dynamic icon will be used. This
dynamic icon shows the current layout of the workspace it represents.
Save Sessions
Your workspaces will automatically be saved when you log off. You can also save your
session explicitly under a name to which you can always return after modifications and
which can be assigned to another user.
To save a user defined session, click '&Save Session As...' in the '&File' menu. In the dialog box enter a suitable name and click ’OK’. The new workspace will automatically be
saved with the extension .psn.
Note:
Per default sessions are saved in the $SHARED directory. But the user ’operator’ is not
allowed to access this directory for writing. Therefore sessions can also be saved in the
$TARGET directory. The user ’operator’ is allowed to write to this directory also via
the Launcher. Additional sessions can be saved to any local directory.
Note:
Session files are not saved by the Configuration -> Backup/Restore component. For example in case of a new installation the adminstrator has to save the session files manually.
Default Session
Océ PRISMAproduction Server automatically saves the workspaces, which was last used
by a user, when he logs off from the 'Explorer' on a certain machine. When this user logs
on again, this workspace is loaded again.
If a user logs on and Océ PRISMAproduction Server finds no saved session, the default
session, which is assigned to the user, will be opened. The default session will for instance
always be opened if a new user logs on for the first time.
If needed, a different default session (pre or user defined) can be assigned to the user
group (exept for the standard user groups). The assignement is performed via the configuration application ’User Permissions’. See chapter "User Management" -> "User Permissions" in the Océ PRISMAproduction Server Administrator's Guide.
Note:
The default session is especially important, if the operation should be organized in a way
that certain users should only be allowed to work with some specified applications.
42
Chapter 4 - Océ PRISMAproduction Server 'Explorer'
Create and Save User Defined Workspaces and Sessions
Assign a Predefined Session to a User
Administrators have the possibility to create suitable sessions and to save them as default
sessions for these users who should only be allowed to work with selected applications
(e.g. operators). The administrator assigns such a custom made session as default session
to the operator user and withdraws his session rights.
The assigned default session will always be opened for users without session rights.
Without these permissions, the user is not able to leave his predefined session. The administrator has always the possibility to adjust the contents of the default session according
to the actual requirements. A message informs the user in case of modifications.
Chapter 4 - Océ PRISMAproduction Server 'Explorer'
43
Common Functions of the 'Explorer' Applications
Common Functions of the 'Explorer' Applications
Introduction
The following chapter contains some general notes on functions which are common for
all Océ PRISMAproduction Server 'Explorer' applications.
Menu Bar
The menu bar of an application opens if you click on the small black arrow right in the
title bar of every active application. The menu bar disappears again if your mouse pointer
leaves this area.
#
You can configure the way this menu bar is displayed by choosing ’File’ -> ’Preferences...’
in the main menu bar.
If you activate ’Always’, the menu bars will be always visible in all applications. Additionally you can define, if the applications in the 'Add Workspace' or 'Add Application' menus
should be sorted alphabetically.
The lower half of the 'Preferences' window allows you to set up a ’Custom Title Bar’,
which will be displayed right on top of the 'Explorer' window. This can be useful for example if you open several Océ PRISMAproduction Server systems via the Launcher. The
title bar helps you then to identify the server and/or user of the respective application.
You can use special tokens for the text of the title bar, which are replaced by the user
44
Chapter 4 - Océ PRISMAproduction Server 'Explorer'
Common Functions of the 'Explorer' Applications
name, the server name (long or short), the server IP address and/or the session name. You
can also define font, font size and color for the text.
The rightmost entry in the applications menu bar is always the help menu. Which other
menus are available depends on the application. For example, when the PJM is open, you
are shown the PJM menus (Edit, Ticket, etc.).
Menu ’Help’
The first entry in the ’Help’ menu always leads to the topic related to the active application
(F1-Help). The next entry refers to the context help. If you click this entry, the mouse
pointer turns into a question mark. If you click with this pointer on a cetain part in the
application, the help system opens the related topic.
If you want to print help pages, a local printer must be installed.
Tool Bar
The tool bar icons each launch a particular function. Not all the functions are available
for every context – the ones that are unavailable at a particular time are shown in gray.
Most toolbar functions can also be accessed via the menus.
Status Bar
The active application displays status information in the status bar. Additionally the disk
usage of the ’/u’ file system is always shown.
If you touch this indicator with the mouse, a tooltip displays the usage of the ’/u’ file
system of all slaves in the cluster.
Chapter 4 - Océ PRISMAproduction Server 'Explorer'
45
Common Functions of the 'Explorer' Applications
Appearance of the Application Windows
There are several ways of modifying the application windows to fit your requirements.
Settings such as the choice of open applications or column widths are saved and restored
the next time you launch the 'Explorer':
Presentation in one window
By clicking one of the two arrows in the column separating the application windows,
which provide a separarte tree view (for example ’Configuration’ or 'Server Files'), you
can display either the tree view or the application area.
Modify the window size
Drag the separator column between the windows to adjust the width of the workspace
and 'Explorer' tree panels to your requirements.
Sort table lines, customize and adjust tables inside applications
You can make settings that affect how lists are displayed. Some settings can by changed
simply using the mouse; for others you choose the function from a context menu opened
when you click the name of the column:
#
46
Menu Item
Function
Sort ascending
Sort descending
Unsort
Select your preferred sort order here or left-click the column
title. An arrow is then shown (the sort symbol). Click the arrow
to change the sort order. If the arrow disappears, no sorting is
performed.
Hide column
Show column
Reset to default
You can suppress columns in the tables in order to limit the
information displayed to match your needs.
’Hide Column’ suppresses the display of a column;
’Show Column’ makes the hidden columns visible again;
’Reset to default’ displays all hidden columns again.
Chapter 4 - Océ PRISMAproduction Server 'Explorer'
Common Functions of the 'Explorer' Applications
Menu Item
Function
Column resize
mode
Select one of the options, which are offered here or adjust the
column width using the mouse. Use the function ’Reset to default’ of the context menu to reset the default width of the
columns.
Chapter 4 - Océ PRISMAproduction Server 'Explorer'
47
'Classic Explorer'
'Classic Explorer'
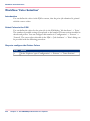
Definition
The move from the explorer tree towards a workspace management concept should not
be underestimated. It will take time for the user to get used to the new workspace concept.
For this reason the "old" explorer tree is still supported and is called the 'Classic Explorer'.
To use the classic explorer, it must be loaded just like a normal session. The Océ
PRISMAproduction Server installation installs the session file ’classic.psn’ for the classic
explorer by default.
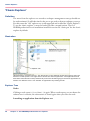
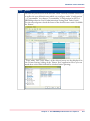
Illustration
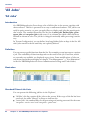
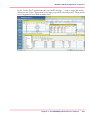
[38] Workspace 'Classic Explorer'. The left section of the window shows the Explorer tree: the
structure of the system. The right section shows the active application. The applications that
have been launched are each presented by a tab. The tab belonging to the active application is
shown in a different color. You activate an application by clicking its tab.
Explorer Tree
Nodes
Clicking a node opens (+) it or closes (-) it again. When a node opens, you are shown the
substructure it contains; the substructure is closed again when you close the node.
Launching an application from the Explorer tree
48
Chapter 4 - Océ PRISMAproduction Server 'Explorer'
'Classic Explorer'
Right-click the name of an application in the Explorer tree to show a shortcut menu with
functions for opening the application, for example open in a separate window.
Choose the function you want to use. The application is then opened and made active,
which means that its interface is shown on the Explorer application workspace. Doubleclicking the name of the application in the Explorer tree has the same effect as choosing
the function from the shortcut menu.
Shortcut menus in the Explorer tree
Right-click an application in the Explorer tree to open a context-sensitive shortcut menu
(which functions are shown will depend on the current working context). The menu also
contains functions for opening and activating applications. All these functions can also
be accessed via the application menus.
Application Area
The right section of the Explorer window shows the open applications. There is a separate
tab for each one. The tab gives the name of the application and a number if there are
multiple sessions of the same application running simultaneously. The active application
is shown with its own interface, and its tab is highlighted in a different color.
Opened applications
Click the tab to make an open application the active one. The interface belonging to this
application is then shown.
Another way of doing this is to choose 'Show existing' from the shortcut menu that is
displayed when you right-click the name of the application, which should be the active
one, in the Explorer tree.
Active application
The interface of the active application is displayed on the screen. The application functions
can be accessed via the menus. There are also icons available for most functions, enabling
rapid access to the functions in question.
The menus of the active application are shown in the menu bar..
Close the active application or position the tabs
Right-click the tab to display a pop up menu:
Chapter 4 - Océ PRISMAproduction Server 'Explorer'
49
'Classic Explorer'
#
50
Menu Item
Function
'Close'
Close the selected application.
'CloseAll'
Close all applications in the left window pane.
'Tab placement' -> 'Top', 'Bottom', 'Left', 'Right'
Places the tab oft the selected application on the
selected position. All other tabs will be positioned
accordingly.
Chapter 4 - Océ PRISMAproduction Server 'Explorer'
Océ PRISMAproduction Server 'Explorer' on a Windows PC
Océ PRISMAproduction Server 'Explorer' on a Windows PC
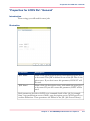
Introduction
You can access the Océ PRISMAproduction Server 'Explorer' from outside a server cluster
via the 'Explorer' Launcher. The Laucher invokes the 'Explorer' as a "local application".
Advantage of the Laucher approach
The local file system is accessible, applications can be started by the 'Explorer' (example:
when clicking on a PDF file, Acrobat is invoked automatically).
For more detailed information see the Océ PRISMAproduction Server Administration
Settings and Tasks Guide, chapter: "Remote Access to the Océ PRISMAproduction
Server Explorer".
Chapter 4 - Océ PRISMAproduction Server 'Explorer'
51
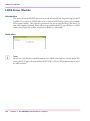
Overview of the 'Explorer' Applications (LCDS)
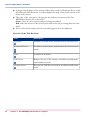
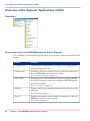
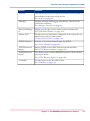
Overview of the 'Explorer' Applications (LCDS)
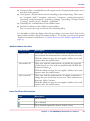
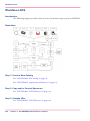
Illustration
The modules of the Océ PRISMAproduction Server 'Explorer'
The availability of the modules depends partly on the licenses, which are installed on the
system.
#
52
Module
Function
'Configuration'
Contains several submodules to configure, for example printers,
system settings and so on.
'Connections'
Provides an overview of all Java servers currently connected to
the Océ PRISMAproduction Server system.
See ‘Connection Viewer’ on page 54.
'Server Files'
Provides access to resource libraries, devices, archives (POD)
and LCDS resources on all servers of the Océ PRISMAproduction Server network.
See ‘Server Files’ on page 56.
'All Jobs'
Displays job lists with detailed information on the status of the
print jobs.
See ‘All Jobs’ on page 62.
'Servers'
Displays information on the computers connected to the Océ
PRISMAproduction Server system.
See ‘Servers’ on page 83.
Chapter 4 - Océ PRISMAproduction Server 'Explorer'
Overview of the 'Explorer' Applications (LCDS)
Module
Function
'Services'
This tab shows all services which are licensed on the system. It
also informs on the status of the service.
See ‘Services’ on page 86.
'Messages'
Displays messages and logging information. Details can be
viewed for each entry.
See ‘Messages: Overview’ on page 87.
'Print Job Manager'
Mighty tool for the creation and execution of print jobs.
See ‘PJM Main Window’ on page 106.
'Printer Pool'
Provides access to all printers configured in the system for administration and job control tasks.
‘Printer Pool: Overview’ on page 169.
'LCDS Channel'
Activate or deactivate channel input for LCDS.
See ‘LCDS Channel’ on page 185.
'LCDS Resources
Import'
Import LCDS resource files from an external medium.
See ‘LCDS Resources Import’ on page 186.
'LCDS Resources
Export'
Save Xerox resources from a PRISMA system to a Xerox formatted output media.
See ‘LCDS Resources Export’ on page 188.
'Local files'
Provides access to the local file system.
See ‘Local files’ on page 199.
Chapter 4 - Océ PRISMAproduction Server 'Explorer'
53
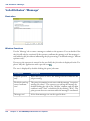
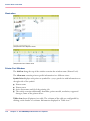
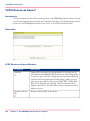
'Connection Viewer'
'Explorer' Applications
'Connections'
'Connection Viewer'
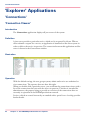
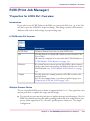
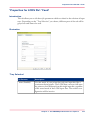
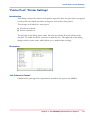
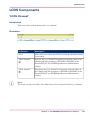
Introduction
The Connections application displays all java servers of the system.
Definition
A java server provides a particular service, which can be requested by clients. When a
client submits a request for a service, an application is launched on the client system in
order to deliver the service in question. The connection between this application and the
server is shown in the Connections window.
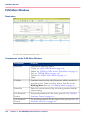
Illustration
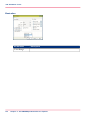
Operation
With the default settings, the user groups system, admin and service are authorized to
view connections. The operator does not have this right.
When you double-click a particular server, you are shown the connections viewer with a
list of the connections that exist with the server in question. This data is intended for
administrators, the purpose being to provide an overview of the connections that are
currently in operation in the PRISMAproduction network.
Services, which are started incorrectly are marked with a special icon. A tooltip provides
further details.
54
Chapter 4 - Océ PRISMAproduction Server 'Explorer'
'Connection Viewer'
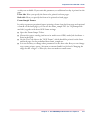
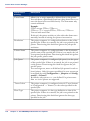
#
Column
Function
'Id'
Serial number of the connection.
'Client host'
Client system on which the application runs, which has connected itself to the server. The entry consists of the symbolic name
or the IP address.
'User name'
Linux login name of the application or the user, who started
the application.
'Application'
Applications which are currently connected to the server.
'Login time'
Date of the login to the server.
Chapter 4 - Océ PRISMAproduction Server 'Explorer'
55
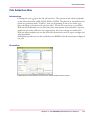
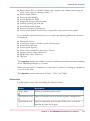
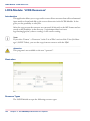
'Server Files'
'Server Files'
'Server Files'
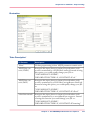
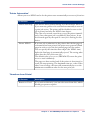
Introduction
This node allows you to access files and devices of all computers of the Océ
PRISMAproduction Server network.
Here you can execute all common directory operations or compare files and directories
(see also ‘Local files’ on page 199).
The 'Server Files' node leads you directly to the contents of libraries, devices, POD archives
and LCDS resource libraries.
The files can be resources, job tickets, print files or device files. Provided you have enough
rights, you can modify the physical path of some virtual directories (only possible for
$HEADER, $TARGET and $OUTPUT) and also move the files using the 'Library
paths' application in the 'Configuration' workspace (see chapter "Library path configuration" in the Océ PRISMAproduction Server Administrator's Guide). The PFL and
preprint archives for the POD-Module can be created and configured in the 'Archives'
application, which you also find in the 'Configuration' workspace (see chapter "Archives:
Overview" in the Océ PRISMAproduction Server Installation and Configuration Guide).
For a general description of the tool bar and menu functions within the file browser see
‘Local files’ on page 199.
The files can be combined in the categories Libraries, Devices and Archives.
56
Chapter 4 - Océ PRISMAproduction Server 'Explorer'
'Server Files'
Illustration
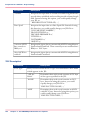
Libraries
Can be configured in: 'Configuration' -> 'Library paths'. When selecting files in the PJM
'List of Files' section you can select files from these libraries. Depending on the language
module you can select files from different libraries.
#
Libraries for the POD-Module
Description
$TARGET ('/u/prismapro/data/pjm/target')
Original files in their native format.
$OUTPUT ('/u/prismapro/data/pjm/output')
Saves files in the TIFF, PS and PDF format which have been reconverted from
IOCA.
Libraries for the APA-Module
Description
$TARGET ('/u/prismapro/data/pjm/target')
Original files in their native format.
$RESOURCES@<hostname>
('/u/prismapro/resources/')
All print resources on the master.
Chapter 4 - Océ PRISMAproduction Server 'Explorer'
57
'Server Files'
58
Libraries for the POD-Module
Description
$RESOURCES-LOCAL@<hostname>:
The base directory '/u/prismapro/resources/local' is used for a central resource
management. All resources are kept on
one central system.
The usage of this function is working automatically: If the resources for a job are
selected from the resources/local path,
then the name of the selected system is
added to the job ticket (PJM Window).
At printing time the resources are read
from this system via network on the fly.
Nothing else (for example NFS mount)
is required!
Chapter 4 - Océ PRISMAproduction Server 'Explorer'
'Server Files'
Libraries for the POD-Module
Description
$RESOURCES-SHARED
The base directory '/u/prismapro/resources/shared' is used for a distributed
resource management. All resources
MUST be distributed to every system
(Print Server).
If you work on a Océ PRISMAproduction Server cluster with master and
slave(s), the resources in this directory will
be distributed on all servers of the cluster
automatically. if they have been copied
via the Océ PRISMAproduction Server
'Explorer' (Java file system) into the resources/shared path. If a system is not up
and running at that point, the resources
are NOT copied to this system! If the resources are copied via other tools, they
are NOT copied to the other systems,
which will cause problems at printing
time! Therefore click a directory or a single resource with the right mouse button
and select ’Synchronize’ from the context
menu as soon as the other servers are up
again.
The usage of this function is working automatically: If the resources for a job are
selected from the resources/shared path,
then the name of the selected system is
NOT added to the job ticket. At printing
time the resources are read from the local
system, which is connected to the printer
(less network traffic at printing time).
$RESOURCES-SYSTEM@<hostname>
('/u/prismapro/resources/system')
System print resources.
Library for the LCDS-Module
Description
$XRESOURCE@<hostname>
('/u/prismapro/data/resimport/lcds')
Data from the LCDS resource import
directory.
Further Libraries (Examples)
$SHARED contains the preconfigured or user defined sessions. See ‘Create and Save User
Defined Workspaces and Sessions’ on page 40.
Chapter 4 - Océ PRISMAproduction Server 'Explorer'
59
'Server Files'
$HEADER contains user defined header pages for the PJM.
$COMPOSER; $MERGE; $OVERLAYS; $MARKS; $VARIABLE contain the resources
for the Professional Document Composer.
$IMPSET contains complete impositioning schemes for the Professional Document
Composer.
$HOME points to the home directory of the user, who is currently logged on. This directory is created on the Océ PRISMAproduction Server master, when a user with autologin is configured. Write permissions for this directory can be configured in 'Configuration' -> 'User Permissions' -> 'General Explorer settings'.
$DEMO ('/u/prismapro/demo'): In this path you find demo job for all language modules.
Devices (APA / LCDS / OLDS)
The input devices for the APA-, LCDS- and OLDS-Module are collected under this
node. Devices are configured under: 'Configuration' -> 'Devices'.
When selecting files in the PJM ’List of Files’ section you can select devices from this
path (APA and LCDS-Module).
Select files from the different input devices (CARTRIDGE, TAPE) which are collected
in the $DEVICE directory.
For LCDS resources select input devices presented under $DEVICE (XFLOPPY_35,
XRES_CARTRIDGE, XRES_TAPE). For LCDS print data you can select cartridge,
channel (additionally channel1 to channel4, if the corresponding service user script
’number_of_channels’ has been started) or tape under the $XDATA_DEVICE library.
You can also select JSLs and resources directly from the jsl and $XRESOURCE library.
Special Functions for Devices
If you click with the right mouse buttton on a device or a file within a device, the context
menu offers some extra functions:
#
60
Function
Description
'Rebuild catalog'
This function is available via the right mouse button in the
’Device’ application.
Chapter 4 - Océ PRISMAproduction Server 'Explorer'
'Server Files'
Function
Description
'Rewind'
This functions are available via the right mouse button in the
’Device’ application, if the device type is tape.
'Goto next entry'
'Skip forward'
'Unload device'
Archives (POD)
Lists the archives for printing and organizing POD data files:
■
■
$PFL (Print File Library) contains archives with jobs ready to print.
$PREPRINTS contains archives with jobs which still have to be modified.
Not all actions are allowed in the archive viewer, because this will disturb the internal
administration of the Print File Library (PFL). It is allowed to change and update directories and to delete files.
The following actions lead to error messages: Creating and deleting of directories, selecting,
copying and pasting of files. Operations dealing with files should be performed via the
Print Job Manager (PJM) or the Print File Manager (PFM). The PFM allows renaming
and deleting of files.
You create and modify archives under: 'Configuration' -> 'Archives'. See chapter "Archives:
PFL Archives".
Chapter 4 - Océ PRISMAproduction Server 'Explorer'
61
'All Jobs'
'All Jobs'
'All Jobs'
Introduction
Océ PRISMAproduction Server keeps a list of all the jobs in the system, together with
their attributes. This list is presented in an easy-to-understand manner. The job list can
easily be quite extensive, so users can apply filters to display only jobs that match particular criteria. The standard filtered lists are the list of active jobs, finished jobs, print
queue jobs and exception jobs (with errors). List columns for which a filter has been
defined are shown in color. The job list is changed continually while processing is underway.
In 'System Configuration' you can define, how long finished jobs are kept in the list. All
other jobs remain in the list until they are explicitly deleted.
Definition
You can execute specific functions from the list. For example you can interrupt or continue
a job. The availability of functions depends on the status of the job. Functions, which
are currently not available, are displayed as gray icons. Some modifications of jobs can
only be executed with special rights (see chapter "User Management" -> "User Permissions"
in the Océ PRISMAproduction Server Administration Settings and Tasks Guide).
Illustration
Standard Filtered Job Lists
You can present the following job lists in the 'Explorer':
■
■
62
'All Jobs': this list contains all the jobs on the system. If the scope of the list has been
restricted, the suffix “filtered” is shown to indicate this.
'Active Jobs': the standard filter for all processing and waiting states and for the states
'exception - service error' and 'exception - print error'.
Chapter 4 - Océ PRISMAproduction Server 'Explorer'
'All Jobs'
■
■
■
■
'Exception Jobs': standard filter for all exception states. Exception Jobs require an interaction of the operator.
'Print Queue': all jobs whose state has something to do with printing. These states
are: 'exception - hold' / 'exception - print error' / 'exception - printing interrupted' /
'processing - being interrupted' / 'processing - printing' / 'processing - in output control'
/ 'waiting - ready to print' / 'finished - reprintable'.
'Finished Jobs': standard filter for the finished states.
Job lists for which you have defined a custom filter:
You can restrict the scope of each job list by defining filters.
It is advisable to adjust the display of the list according to your own needs. You can for
instance hide columns, adjust the column width etc. To do this, you can use the general
'Explorer' functions as described in ‘Common Functions of the Explorer Applications’ on
page 44.
Authorizations for Jobs
#
Authorization
Description
'jobs.view.all'
Users with "jobs.view.all" authorization are shown all the jobs;
users without this authorization are shown only their own jobs.
With the default settings, the users applic, admin, service and
operator have this authorization.
'jobs.modify all'
Only users with this authorization can modify the properties
of jobs they do not own. Jobs are modified with the Edit Job
Properties button:
With the default settings, the users applic, admin, service and
operator have this authorization.
'jobs.control.all'
Only users with this authorization can submit commands to
change the state of jobs they do not own. These statements are
Interrupt, Halt, Continue.
With the default settings, the users applic, admin, service and
operator have this authorization.
Icons for Short Information
#
Icon
Description
Job is printing
Job is finished
Job is finished-reprintable (former ’locked’ status)
Chapter 4 - Océ PRISMAproduction Server 'Explorer'
63
'All Jobs'
Icon
Description
There is a message for this job
Job is in exception status
The job has a time limit, which has been exceeded. See note
below for more information.
Note:
If you use the PJM in command line mode, you can assign a time limit to the job. In
the ’Status’ column a tooltip informs you about the time limit of the job. If the printing
doesn’t start before the limit is reached or if the job is interrupted and the time limit
exceeds, the job gets the icon with the red alarm clock and a message. If you double click
the job, the message is displayed with a text, which you also define on the PJM command
line. The alarm clock and message will also appear, if the job is in the status ’processing
- in output control’. To define the time limit and the time limit message you have to
define two new parameters in the [job] section of the .OCT - file:
...
'[job]'
'Alarm_Delay=10'
'Alarm_Text=This is a important job! Please print immediately!'
...
'Alarm_Delay' represents the minutes between the "Accepted" time of the print job and
the time limit.
'Alarm_text' is the message shown in the message popup window, if the time limit is
reached.
Column Titles
#
64
Column
Description
'Job id'
Job identification number. This is assigned by the ODS.
'Owner'
The login name under which this job was started.
'Name'
The job name assigned by the owner.
Chapter 4 - Océ PRISMAproduction Server 'Explorer'
'All Jobs'
Column
Description
'Priority'
Indicates whether or not the job has been prioritized (for example given express rights).
The express right influences the process order of the job. Once
set, the express right causes that the job is moved to the beginning of the queue. If the requested services are available, the job
is processed before all other jobs. If you set express rights for
other jobs these will be moved to top of the processing.
If the job list is sorted by the 'Priority' column in descending
order, all jobs are on top, which will be processed next.
Print jobs in Océ PRISMAproduction Server have a 'Priority'
and a time stamp. The priority is shown in the print queue
column 'Priority'. Print jobs are put in the print queue with
priority '128'. Job with Express rights have priority 0 and a serial number. The priority is also shown via a tool tip. The priority can be changed with the Job properties window. You can
modify the priority of the job via the job properties. 0 represents
the highest priority and 255 the lowest.
'Steps'
States the current processing step (step x of y). A bar indicates
the progress.
'Queue'
Queue of this job
'Queue name'
Name of the queue of this job.
'Printed pages'
States the number of pages printed (n-th page of total). A bar
indicates the progress. As long as the number of pages is unknown '?' is displayed.
Note:
Pages means in this case the logical pages of the data
stream (and not the physical sheets)!
'Page position'
Indicates the print page position in the job and the page count
per job.
'Print range'
The range of pages to be printed.
Note:
Pages means in this case the logical pages of the data
stream (and not the physical sheets)!
Chapter 4 - Océ PRISMAproduction Server 'Explorer'
65
'All Jobs'
66
Column
Description
'Printer'
The printer on which the job is being (or will be) printed. Until
the state 'ready to print' the printer name can also be a cluster
name.
'Form'
The form used for the job, STD or user form defined in ’Configuration’ -> ’Paper’ -> ’Form’, selectable in the PJM ’Job attributes’ -> ’Print or SCT table name.
'Type'
The type of data stream in which the file exists (for example
AFP, PCL, PDF or PS).
If the job has been generated in the RAW format (pass through),
the correct format is displayed here only if the job was generated
with a suitable printer.
'Color'
If the job is to be printed with colors, this column states the
color names.
'Resolution'
240 dpi, 300 dpi, 600 dpi or MRM (Multi Resolution Mode).
'Copies'
The number of copies of the job. Once printing of the job is
underway, the entry in this column states how many copies of
the total (x copies of y) have already been printed. A bar indicates the progress.
Warning: If you define 'Copies' = 'per Job' (not 'Copies' = 'per
Job + Files') in the PJM and additionally print header pages
and ticket pages, the number of job copies is only indicated in
the job details window. The Job List will always display
Copies=1 in this case. Be careful when modifying the number
of copies via the job properties button.
'Status'
The status of the current processing step. The states are explained below.
'Accepted'
Date and time of the job acceptance.
'Started'
Date and time of jobstart.
'Modified'
Date and time of job modification.
'Printing started'
Date and time of start of printing.
'Printing finished'
Date and time of end of printing.
'Printing time'
Duration of printing.
'Pages/Copy'
Number of pages per copy.
'Size/Copy'
Size of one copy.
'Size'
Size of the entire print job.
Chapter 4 - Océ PRISMAproduction Server 'Explorer'
'All Jobs'
Note:
Due to the amount of information provided, the list can be very complex. If you click
a column title, you can hide or show columns. Thus you can adjust the list to your needs.
Sorting Table Lines
You can sort the entries in most lists in either ascending or descending order. To change
the sort order, left-click the column title. An arrow is then shown (the sort symbol). Click
the arrow to change the sort order.
You cancel the sorting via the shortcut menu or by clicking the arrow until it disappears.
When sorting columns with a bar, which indicates the progress of an action, the comparison is done in the following order:
■
■
■
Proportion of bytes processed and the entire job size (progress)
Entire size of the job
Bytes processed
If the result is, that the values are equal, the next step is performed for the comparison.
Customize Columns
You can change column widths using the mouse. The Reset to default function restores
the columns to their default widths.
’Hide Column’ suppresses the display of a column; ’Show Column’ makes the hidden
columns visible again.
Add Columns for Special Use Cases
With Océ PRISMAproduction Server files are delivered which supplement the description
file for the job list (jobsviewer.ptd) to display extra columns. The following files are released
in the path '/u/prismapro/cfg/odscontrol/ptds/examples':
■
■
■
dataformat.ptd: Displays the 'Dataformat' column (for the GraphicArts workflow).
filename.ptd: Displays the first file name of the print job.
download.ptd: Displays the Host Download parameters.
To add the additinal columns, you have to copy the desired ptd-file(s)one path higher
('/u/prismapro/cfg/odscontrol/ptds'). The new columns are initially hidden.
Job States
#
Status
Description
processing...
Chapter 4 - Océ PRISMAproduction Server 'Explorer'
67
'All Jobs'
Status
Description
'processing - prepare'
Data are converted before being sent to the printer.
'processing - service
active'
A service is being executed, for example conversion.
'processing - transfering data'
Data are transferred
'processing - printing'
Data are transferred to the printer while the printer is printing.
'processing - being
interrupted'
An interruption has been requested and the print of the current
copy is being completed.
'processing - in
output control'
All the data has been sent to the printer. The pages are being
stacked.
Single Fanfold: everything has been printed, but not yet stacked.
Twin only: recto pages have been printed, verso have not yet
been printed
waiting...
'waiting - for event'
The job is awaiting the occurrence of an event (see ‘Events
Configuration’ on page 206 and ‘Job Attributes: Start Print Events’
on page 143).
'waiting - for service'
The job is waiting for the requested service to be available.
'waiting - for time
to run'
The job is waiting until a time/date event occurs (see ‘Job Attributes: Start Job Events’ on page 141).
'waiting - ready to
print'
The job is waiting for a free printer or was started with the system parameter 'Hold job until operator confirmation'.
finished...
'finished - complete'
The job has been printed in its entirety. All the sheets have been
stacked. A completed job remains in the job list for the time
specified in the system parameters ('Hold Finished Jobs [h]').
'finished - reprintable'
The status when a job is assigned to a job class for which the
entry!!’Lock Jobs after printing' is defined in the system parameters.
exception...
'exception - hold'
68
The job was canceled with ('Interrupt' job 'Immediately') at
'ready to print' status.
Chapter 4 - Océ PRISMAproduction Server 'Explorer'
'All Jobs'
Status
Description
'exception - print
error'
The printer has reported an error.
'exception - printing interrupted'
Status following the interrupt command ( )
'exception - service
error'
Error caused by a service, for example error during conversion.
'exception - service
interrupted'
Status following the halt command ( ) or interrupt command
( ) when the job has not yet been printed or was at 'ready to
print' status.
'exception - waiting
for release'
The job was submitted in the PJM with the option 'Hold job
until operator confirmation'.
'exception - mirrored'
Status of a mirrored job on the mirror server.
Chapter 4 - Océ PRISMAproduction Server 'Explorer'
69
'All Jobs': Menu and Tool Bar Functions
'All Jobs': Menu and Tool Bar Functions
Menu Functions
Many of the menu items can also be accessed via the tool bar.
'Edit' menu
#
Menu Item
Function
'Select all'
Selects all the jobs.
'Deselect all'
Deselects all the jobs.
'View' menu
#
Menu Entry/Tool
Bar Icon
Function
'Update'
The view of the job list is updated permanently.
'Freeze'
The current status of the job list is frozen to make modifications
more comfortable.
'Weak command
locking'
This setting has an influence on the availability of functions of
the menu- and toolbar, if more than one job is marked. If it is
switched off, a command in the menu- or toolbar must be
possible for all marked job to be active. If 'Weak command
locking' is switched on, a command must be executable for
only one of the marked jobs to be active.
You can also enable a weak command locking if you press the
shift key.
'Show Summary'
Displays a summary of the print process ('Printed pages') in the
status bar of the job list window.
'Edit filter'
Opens the filter dialog box. If you click on the small arrow next
to the icon, a list of the already configured filters is displayed.
If there are already settings defined in the filtered job list, they
will be displayed and can be modified.
Note:
For a detailed description of job filters see: ‘All Jobs: Job
Filter’ on page 75.
'Open Filter'
70
Opens the job list with the filter which you select from the drop
down list.
Chapter 4 - Océ PRISMAproduction Server 'Explorer'
'All Jobs': Menu and Tool Bar Functions
Menu Entry/Tool
Bar Icon
Function
'Save filter'
Opens a dialog allowing you to save the filter settings under a
freeform name, which appears in the job list window.
You can also add a 'Description' of the filter, which appears as
tooltip for the filter name in the tree view.
Check 'Save for public access' if you wish the filter to be made
available to every user in the ODS network. If you leave the
box unchecked, the filter will only be available in the local 'Explorer' tree.
Click 'OK' to create a new entry under the node 'All Jobs' in
the tree view of the 'Explorer'.
'Delete Filter'
Deletes a filter which you can select from a pop up menu.
'Create default job
filters'
Resets all modifications you have made on the default filters.
'Job' Menu
This menu contains functions which apply to the selected job. You can also display the
Job menu functions by right-clicking an entry in the list:
#
Menu Entry/Tool
Bar Icon
Description
'Show job message'
This icon changes color when a message is pending for the selected job. This might happen when an error is encountered in
the job, for instance. Clicking the icon opens an additional
window showing the text of the message.
'Open Messages'
Opens the Océ PRISMAproduction Server 'Messages' window.
The display is filtered, so that only entries are visible, which are
related to the marked job.
'Write message'
Opens a window, which allows you to write a message for this
job. The message is sent to the messages module and can be
read there (for example from the job list via 'Open &Messages...').
'Show details of the
selected job'
This icon opens a tab with details about the selected job (see
‘All Jobs: Job details viewer’ on page 81).
Chapter 4 - Océ PRISMAproduction Server 'Explorer'
71
'All Jobs': Menu and Tool Bar Functions
Menu Entry/Tool
Bar Icon
Description
'Show the job analysis created by CIS'
Show the results of the job analysis performed by CIS. You can
select a summary view or a resources view. To get this result,
the APA job has to be executed by the PJM using the CIS program (license dependent).
See 'APA Settings' -> 'PreProcessing' (CIS) in the APA-Module
manual.
'Open PJM with
Job Ticket'
This icon opens the Print Job Manager with all the data belonging to the selected job. The job is opened in either modification
or viewing mode, depending on its status.
'View Job'
The print file is displayed; if it’s stored in an archive or as resource.
'Edit job properties'
Opens the 'Job Properties' dialog.
You can change some parameters of a job while the job is in the
queue awaiting printing (for example before the jobs state
changes to 'waiting - ready to print'). You can change the
printer, job queue, form, copy count, priority and page range.
The form name can contain up to 64 characters. You can also
add a file indicator (file number or file range) before the respective print range (for example 1:5-9; 3:6-10 or 1-3:10-;5-:1-).
The indication of the print range may contain up to 250 characters, line breaks after each semicolon are allowed.
Warning: If you define 'Copies' = 'per Job' (not 'Copies' = 'per
Job + Files') in the PJM and additionally print header pages
and ticket pages, unwanted multiple printouts may occur, if
you modify the number of copies. This is, because the number
of copies refers to the whole job as indicated in the job details.
'Reposition'
72
You can reposition a job while it is in the process of being
printed. See ‘All Jobs: Job Positioning for Job {0}’ on page 79.
Chapter 4 - Océ PRISMAproduction Server 'Explorer'
'All Jobs': Menu and Tool Bar Functions
Menu Entry/Tool
Bar Icon
Description
'Search in print
file'
You can search for strings (EBCIDIC or ASCII) within an AFP
file. The system returns the page numbers, on which the string
was found.
Search_afp does not work, if conditional processing/formatting
is used with line data/mixed data. Additionally the pagedef and
the resource library, which contains this pagedef, must be defined in the job ticket for each print file. The function does not
work, if the pagedef and libraries are defined in the printer defaults only. If the Carriage Control Character (parameter Pdscc)
is not defined in the job ticket, the default (ASA) is used.
You can define the job ticket parameters with the PJM interface
(select every print file and add the information via APA Settings
subwindow) or by generating an appropriate default ticket for
the automated input processes (LP, HotDir, Download), where
the required information is added to the "[filedefaults]" section.
'Delete'
When you choose this function, you are prompted to confirm
that you really want to delete the job. This prevents jobs from
being inadvertently selected and deleted. If the job is in the
'processing - printing' state or in 'processing - in output control',
it cannot be deleted. The button appears grayed out.
'Interrupt'
This function cancels the current processing step of the selected
job. You are prompted to confirm the operation; the job is then
immediately interrupted. If the job state is 'processing - printing'
or 'processing - in output control', a dialog box is opened for
you to specify exactly how you want to interrupt the job (see
‘All Jobs: Interrupt Jobs’ on page 78).
'Halt'
The system completes the current processing step of the selected
job and then halts the job.
Chapter 4 - Océ PRISMAproduction Server 'Explorer'
73
'All Jobs': Menu and Tool Bar Functions
Menu Entry/Tool
Bar Icon
Description
'Continue'/
'Restart'
'Continue execution'
Continues printing of the selected Job at the point of interruption.
You can use the function to resume processing of jobs which
were interrupted or which encountered errors.
Jobs in the state 'exception - waiting for release' (system parameter 'Operator intervention') can be reactivated in this way.
'Restart from beginning' (only possible for APA and POD jobs)
The restarted job is executed again from the very beginning
with all its original start parameters (if parameters have been
modified in the meantime, these modifications will be discarded).
Jobs in the state 'finished - reprintable' can be reprinted using
this button. This permission can be suppressed for certain users.
(A description can be found in the Technical Reference Manual,
chapter "Command Line Tools").
'Express right'
The job with express rights is processed as soon as the required
services are available. The position in the list is not altered.
'Remove Express
right'
Removes the express right assigned to the job.
'Delete Checkpoint'
If a checkpoint exists (see tool tip in the status column), you
can delete it by clicking on this menu entry.
'Transfer control to
mirror'
If the job has been mirrored on a mirror server, this function
allows you to manually transfer the job control to this mirror
server. On this server the job state 'exception - mirrored' changes
accordingly and the job can be printed on the mirror server.
This function is protected by a permission in the user management.
Tooltip of a job
If you position the mouse pointer on a job, a tooltip pops up giving information on the
job (for example starttime).
74
Chapter 4 - Océ PRISMAproduction Server 'Explorer'
'All Jobs': 'Job Filter'
'All Jobs': 'Job Filter'
Introduction
You can apply filters to restrict the content of job lists to entries that match particular
criteria.
You can define various types of filters and store them for use again at a later date.
Filters you have saved are presented in the pop up menu of the 'All Jobs' application. You
can also select a saved or preconfigured filter if you click on the small arrow next to the
filter icon ( ) in the tool bar.
The functions for creating and editing job filters are launched in a job list, either via the
menu 'View' -> '&Edit Filter...' or via the Filter icon:
Note:
Only the creator of a filter or the users 'admin' and 'service' are allowed to delete or to
overwrite a filter.
Illustration
Apply Job Filters
You can filter most of the columns of the job list. These columns are offered under 'Filterable columns'.
Columns which should be part of the filter have to be moved from the left part of the
window to the right, using the arrow buttons. The right part of the filter window displays
a tab for every column. On these tabs you define the filter conditions, which should be
valid for column. All filter conditions for the different columns have to be valid at the
same time to display the job using this filter.
The possibilities to assign conditions depend on the data type of the column.
Chapter 4 - Océ PRISMAproduction Server 'Explorer'
75
'All Jobs': 'Job Filter'
#
Buttons
Function
'All'
Activates the visibility of all criteria of the filter category.
'None'
Cancels all selections.
'Invert'
Cancels all selected criteria and sets all deselected criteria.
Different Methods for Filters
Marking with a checkmark: Only jobs of the marked are displayed.
Setting a range: Only jobs of the indicated range are displayed.
Setting a pattern: Only jobs with the job name ending with the indicated pattern are
displayed
You can also define more than one pattern in the text field. The different patterns have
to be separated by semicolon. The conventions for patterns are displayed as a tooltip.
Setting a range of time: Only jobs which are started in the range of time indicated are
displayed
The shortcut menu that you can open for column headings in the job lists also includes
an '&Edit Filter...' function. When you choose the function via the shortcut menu, you
are shown the relevant tab for the column heading in question.
Save User Defined Filters
To save your filter definitions an to make them selectable from the user interface, click
on 'Sa&ve Filter As...' in the 'View' menu. A dialog opens allowing you to save the filter
settings under a freeform name, which appears in the joblist window and also in the selection list, which opens if you click the small arrow next to the filter icon in the tool bar.
You can also add a 'Description' of the filter, which appears as tool tip for the filter name.
Check 'Save for public access' if you wish the filter to be made available to every user in
the ODS network. If you leave the box unchecked, the filter will only be available in the
local 'Explorer'.
Click 'Ok' to create a new entry under 'All Jobs' in the 'Add Workspace' list of the 'Explorer'.
Note:
By saving an empty filter, you can permanently save the column settings without restricting the actual content of the job list.
76
Chapter 4 - Océ PRISMAproduction Server 'Explorer'
'All Jobs': 'Job Filter'
Note:
For a full description of the 'View' menu see: ‘All Jobs’ on page 62
Chapter 4 - Océ PRISMAproduction Server 'Explorer'
77
'All Jobs': 'Interrupt Jobs'
'All Jobs': 'Interrupt Jobs'
Introduction
This dialog appears, if a job is to be interrupted in the 'processing - printing' state. It then
gets the state 'exception - hold'. You can define, which interrupt action has to be performed
(Action...) and on which position the interruption is to be executed.
Illustration
Cancel-Type
#
'Action'
Function
'Interrupt'
After interruption, the job can be continued at the position of
the interruption
'Cancel and Hold'
The job is interrupted and held for reprinting.
'Cancel and Delete'
The job is interrupted and deleted. It cannot be continued.
Boundary-Type
#
78
'Boundary'
Function
'Immediately'
The job will be interrupted immediately
'On File Copy
Boundary'
The interruption is performed, if the current copy of the file is
printed.
'On Job Copy
Boundary'
The interruption is performed, if the current copy of the job is
printed.
Chapter 4 - Océ PRISMAproduction Server 'Explorer'
'All Jobs': 'Job Positioning for Job {0}'
'All Jobs': 'Job Positioning for Job {0}'
Introduction
This dialog box is opened when you select the 'Reposition job' icon. The icon is available
for selection when a job is printing ('processing - printing'). If the job is in another state,
the function can be selected to define the absolute position before printing. In this case
'Absolute Position' is already preselected.
Illustration
'Relative Position'
For relative positioning, specify a number of pages before or after the current page or last
checkpoint. Printing resumes at the specified position. Be sure to enter the correct page
value.
#
Selection
Function
'Pages (+/-)'
According to the indicated page numbers in this text field the
job is positioned forward or backwards.
'From current Page': The starting point of the relative positioning is the current page.
'From last Checkpoint': The starting point of the relative positioning is last checkpoint.
Chapter 4 - Océ PRISMAproduction Server 'Explorer'
79
'All Jobs': 'Job Positioning for Job {0}'
Selection
Function
'Boundary'
The boundary of the current document is only taken into consideration if it is indicated. If you allow positioning beyond
document boundaries, in some cases printing may resume in a
different document.
'Immediately': The job is repositioned immediately.
'On File Copy Boundary': The job is repositioned after printing
the current file copy.
'On Job Copy Boundary': The job is repositioned after printing
the current job copy (containing more than one file).
'Absolute Position'
Positions to a particular page when you restart a print job. For absolute positioning,
specify a page number in the document and the document copy at which printing is to
resume. Be sure to enter the correct page and copy values.
#
80
Selection
Function
Page
Indicate the page in the file.
File Copy
Indicate the number of the file copy.
File Number
Indicate the file number as displayed in the 'Job details' or 'List
of files' in the PJM.
Job Copy
Indicate the number of the job copy.
Chapter 4 - Océ PRISMAproduction Server 'Explorer'
'All Jobs': 'Job details viewer'
'All Jobs': 'Job details viewer'
Introduction
You can display a detailed view of the processing status of any marked job by clicking on
the above icon. You can also call up this function by double clicking a job or by selecting
the respective entry from the pop up menu or the 'Job' menu.
This opens a tab with a list of all the processing steps of the selected job. The list is
modified continually.
The tool bar and job menu functions are described under ‘All Jobs’ on page 62.
Upper Table
#
Column
Description
'File/step'
The sequence number of the file within the job, and the number
of the processing step.
'Name/service'
The fully qualified file name and the service that is assigned to
the step.
'Server'
The name of the host on which the service was executed.
'Status'
The status of the processing step. See ‘All Jobs’ on page 62.
'Progress'
Displays the progress of the processing step.
Lower Table
Is displayed after the job has reached the status 'waiting - ready to print' and refers to the
file of the job.
#
Column
Description
#
Number of the file. This information is needed for absolute
positioning or for setting a printing range in PJM.
'File name'
Full path and name of the file. In case of chained files the name
of the first file is shown.
'Copies'
The number of copies of the file. Once printing of the job is
underway, the entry in this column states how many copies of
the total filecopies (x copies of y) have already been printed.
This entry can be edited after the job has been submitted.
Chapter 4 - Océ PRISMAproduction Server 'Explorer'
81
'All Jobs': 'Job details viewer'
Column
Description
'Formdef'
Form definition valid for the file. This entry can be edited after
the job has been submitted.
'Pagedef'
Page definition valid for the file. This entry can be edited after
the job has been submitted.
'Size'
Size of the file in kbytes
'Pages'
States the number of pages printed (n-th page of total). If the
number of pages cannot be identified '?' will be issued.
'Copies', 'Formdef' and 'Pagedef' can be modified. To do this the 'Print File Properties'
dialog can be opened either by double clicking the table entry or by clicking the 'Edit'
icon: .
82
Chapter 4 - Océ PRISMAproduction Server 'Explorer'
'Servers'
'Servers'
'Servers'
Introduction
The 'Servers' application lists all the computers available in the Océ PRISMAproduction
Server network. When you select a computer, a toolbar is activated which allows you to
enable or disable the computer. These functions are also accessible via the ’Server’ menu.
At the bottom of the application the status of the Océ PRISMAproduction Server network
is displayed.
Toolbar and 'Server' Menu (with marked server name)
This menu offers different functions depending on what type of host you have selected
(for example: print server).
#
Menu entry / Icon
Function
Cancel current operation
This function cancels the current ODS operation.
'Disable server'
Switches an active host to inactive state. No further jobs are
then accepted for this host.
'Enable server'
Switches an inactive host to active state. Jobs are then accepted
for this host again.
Chapter 4 - Océ PRISMAproduction Server 'Explorer'
83
'Servers'
List columns
#
84
Column Title
Description
'Host name'
The configured host name.
'Type'
The function of the host in the ODS network. The type displayed here depends on the type you have set when adding the
computer via the Master/Slave configuration (see chapter
"Master/Slave Configuration" in the Océ PRISMAproduction
Server Administration Settings and Tasks Guide):
Master: the host with master rights; each system can have only
one master. All other computers are automatically slaves. In the
Master/Slave configuration the server has been added as ’Master’
with a printXXX service.
Print server: a pure print server, which only drives printers. It
is inserted in the master/slave configuration as 'PrintSlave’
without a printXXX service.
Print server+: mainly a print server, but files can also be converted. In the 'Master/Slave Configuration' the server has been
added as ’Slave’ with a printXXX service.
Rip: a computer on which a converter or the Professional
Document Composer is installed. No printers are driven. In
the Master/Slave configuration the server has been added as
’Slave’ without a printXXX service
UnityRIP: a Windows computer on which the UnityRIP is
installed.
'Operating system'
States which operating system is installed
'Free memory'
The amount of free memory in the 'u' file system.
'Status'
The computer status:
ok: the connection to the master is OK
offline: the connection to the master is closed or an error has
been reported.
job acception disabled: No new jobs are accepted. Already
started job keep on processing. Job acceptance can be reactivated
via the ’Network’ menu.
missing resources: System falls below an ODS parameter value.
'ODS Network
Status'
Displays if the ODS is able to accept and process jobs or not.
Chapter 4 - Océ PRISMAproduction Server 'Explorer'
'Servers'
'Network' Menu
A menu called 'Network' is shown when the Hosts tab is open. This menu provides the
following functions:
#
Menu Entry
Function
'&Synchronize
time'
Synchronizes the system clocks on the hosts in the ODS network
to the time on the ODS master
'&Cleanup directories...'
This function searches all the directories on all the hosts in the
ODS network and deletes files that are no longer required. You
are prompted to confirm the delete operation before it is executed.
'En&able job acception'
Enables the host for accepting ODS jobs.
'&Disable job acception'
Disables the host for accepting ODS jobs.
'Ena&ble Job processing'
Activates the global job processing of the ODS. This setting
controls, if jobs which are in the ODS are processed. It does
not influence the job acceptance of the ODS.
'D&isable job processing'
Deactivates the global job processing of the ODS. This setting
controls, if jobs which are in the ODS are processed. It does
not influence the job acceptance of the ODS.
Chapter 4 - Océ PRISMAproduction Server 'Explorer'
85
'Services'
'Services'
'Services'
Introduction
This application shows all the services for which licenses are available.
Services Table
#
Column Title
Description
Name
Name of the service. The extension indicates the number of
this service.
Server
Name of the host on which this service is available.
Status
Status of the service (free or occupied by a specified job).
’Service’ Menu
#
Menu Entry
Function
'Hide free services'
When this option is checked, only the active services are shown.
When the option is left unchecked, the tab shows the free services as well.
'&Enable Services'
Activates the selected service(s).
'&Disable Services'
Deactivates the sekected service(s).
Note:
The service ’mirror’ is a special case. It appears automatically in the list as soon as the
respective settings are saved in the system configuration (see chapter "System Configuration" -> "Mirroring" in the Océ PRISMAproduction Server Administration and Settings
Guide). By default this service is deactivated (’no connection’) and must be activated by
hand. If the mirror server is available, the status of the service changes to ’online’.
86
Chapter 4 - Océ PRISMAproduction Server 'Explorer'
'Messages': Overview
'Messages'
'Messages': Overview
Introduction
The 'Messages' window displays all messages, which were sent by processes from the print
server environment. Different message types (logs, warnings, errors, operator questions
requiring an answer) are marked by different symbols in the type column. To provide
further clarity, you can filter the messages according to various criteria. You can save filters
under different names and switch between them easily. You can configure the Océ
PRISMAproduction Server message system using the 'Message System' configuration
tool. See chapter 'Message System' "Overview" in the Océ PRISMAproduction Server
Administration Settings and Tasks Guide. Here you can configure for example when
older messages are deleted, which operator requests should automatically be answered
and which messages should be exported to an external file.
The following information is provided for each message:
■
■
■
■
■
■
■
■
■
Type of the message
Date of the message
Time of the message
Name of the host that generated the message
ID of the job, the message belongs to
Message ID (hidden by default)
Name of the module having issued the message
Short description
Detailed description
Attention:
The pop up messages which you have to confirm to continue printing for example with
a standard form are shown only, if in the messages window in the ’View’ menu the entry
’Ignore questions’ is deactivated.
Chapter 4 - Océ PRISMAproduction Server 'Explorer'
87
'Messages': Overview
Illustration
Messages Window
The Messages window consists of the title bar, menu bar, tool bar, message information
list and a status bar.
The title bar contains the name of the window or the name of the saved filter the window
was opened with.
The menu bar contains the menus Messages, View and Help.
The tool bar contains some of the most important menu bar entries for quicker access.
The status bar indicates how many messages are stored in the database, how many message
are displayed in the window and how many questions are still not answered by the user.
The message information list contains one line for each message entry. By default, each
entry's time stamp and a short description of the message are displayed. You can enable
or disable the columns for displaying other information by clicking with the right mouse
button on the header of the list columns.
Additionally you can access a pop up menu by clicking a message entry with the right
mouse button. This menu allows you to view information on a selected message or to
deselect or delete this message.
Message Types
#
Information entries
Log entries
88
Chapter 4 - Océ PRISMAproduction Server 'Explorer'
'Messages': Overview
Warning
Error
Open question
Answered question
User generated notification entry
Chapter 4 - Océ PRISMAproduction Server 'Explorer'
89
'Messages': Menus
'Messages': Menus
'Messages' Menu
#
90
Menu Entry
Description
'Delete Messages
...'
Opens a dialog, which allows you to 'Delete messages older
than {0} days' or to 'Delete messages before {0}', whereas the
time given here either refers to the time when this dialog has
been opened or to the time of the message which has been selected first. If you change the date below the selection list, the
number of days from this date is updated in the list entry automatically. The fields for the time cannot be modified, they only
indicate the time, which will be used for the delete command.
The deleted messages cannot be restored.
'Select no Entry'
Deselects all selected messages in the list.
'Suppress Message
...'
Opens a dialog,where you have to cofirm for which module the
suppression should be active. The suppressed message will appear in the list of the message configuration tool (see chapter
'Message System': "Overview" in the Océ PRISMAproduction
Server Administrator's Guide). Here you can activate or deactivate the suppression.
Chapter 4 - Océ PRISMAproduction Server 'Explorer'
'Messages': Menus
Menu Entry
Description
'Search ...'
Chapter 4 - Océ PRISMAproduction Server 'Explorer'
91
'Messages': Menus
Menu Entry
Description
Opens the 'Search' dialog:
Here you can choose several parameters to get exact search results:
Depending on the check boxes you select, the search can be
enlarged or reduced to the appropriate columns.
'Search in Current Section only'
If selected, the search is done only in current section. If its deselected, the search is done in the whole message database and
the visible section is moved automatically regarding the search
direction.
''Direction':
Choose the direction in which the search should be performed.
'Message Type':
Choose which message type should be searched for.
'Host':
Choose the host computer which generated the messages you
are looking for.
92
Chapter 4 - Océ PRISMAproduction Server 'Explorer'
'Messages': Menus
Menu Entry
Description
The option list offers all hostnames, which already generated a
message and all searching values, entered in previous search
sessions since last opening of the message window.
'Module':
Choose the module which issued the message. Search for modules which contain the numbers or characters you insert here.
For instance XYZ will find all modules containing these characters.
The option list offers all already known modules and all
searching values, entered in previous search sessions since last
opening of the message window.
'Job-Id', 'Message-Id' and 'Description':
Search for messages which contain the numbers or characters
you insert here. For instance 123 or XYZ will find all messages
containing these numbers or characters.
'Search Next'
Continue searching forward in the message data base from the
current selected position until the last message. If there is no
line selected, further searching is not possible.
'Search Previous'
Continue searching backward in the message data base from
the current selected position until the 1st message. If there is
no line selected, further searching is not possible.
'Clear search settings ...'
Deletes the current selected search settings. A confirmation dialog must be replied, before the command is executed.
Chapter 4 - Océ PRISMAproduction Server 'Explorer'
93
'Messages': Menus
94
Menu Entry
Description
'Create User-Message'
Opens a dialog, where the current user enters a message for a
specific job. The user can enter here a short and a detailed description for a specific job id. If the job id stays on the value 0,
the message belongs to no job. The user name is not changeable
and will appear in the message window in the module column.
'Create Test-Message'
Opens a dialog, where the current user can enter a message id
for creating a test message to see the text, which belongs to the
message id. This function is enabled for service users only.
'Message Database'
-> Open... (for ’service’ only)
Opens the message database, which you have defined under
’Configuration’ -> 'Message System' (see chapter 'Message System': 'Automatic Saving' in the Océ PRISMAproduction Server
Administrator's Guide). The default path is: '/u/prismapro/data/custom/msg'.
Chapter 4 - Océ PRISMAproduction Server 'Explorer'
'Messages': Menus
Menu Entry
Description
'Save ...'
Saves either all displayed message entries (only displayed
columns and lines) from current section or the whole message
database to an ASCII file. You specify the file name and the
location in the 'Save' dialog box.
Note: Depending on the count of entries in the database, saving
may take a while.
Chapter 4 - Océ PRISMAproduction Server 'Explorer'
95
'Messages': Menus
'View' Menu
#
Menu Entry
Description
'Details ...'
To view the detailed description of an entry, double-click it, or
choose 'View' -> 'Details ...' or click the first button in the tool
bar. A window then displays the information available for the
message.
The 'Next' and 'Previous' buttons displays the next or prior
message details without closing and reopening the dialog. If the
message was a question, the tab 'Answer' displays the replied
answer itself, the name of the user, who answered the question
and the time, at which the question was answered.
96
'Move Section' ->
'First Section'
Displays messages from the beginning of the database.
'Move Section' ->
'Prior Section'
Positions the viewed area backward. Usually, the last half of the
displayed entries is removed and the same number of messages
is inserted before the displayed list.
Chapter 4 - Océ PRISMAproduction Server 'Explorer'
'Messages': Menus
Menu Entry
Description
'Move Section' ->
'Next Section'
Positions the viewed area forward. Usually, the first half of the
displayed entries is removed and the same number of messages
is appended to the displayed list.
'Move Section' ->
'Last Section'
Positions to the end of the database (also occurs when the
message window opens).
Note: New messages are displayed automatically only if the
view area is positioned to the end of the database.
'Section Size ...'
Opens a dialog, where the scrollable section size can be adjusted.
Because of performance issues and memory requirements, the
number of visible message entries is limited to 10,000 (default:
5000 lines). Lines which do not fit into the window are cached
and can be viewed by scrolling the window.
You can either key in the limit value via the keyboard or click
the arrow buttons in the dialog box. The default is 5000
cacheable lines.
Note: Increasing the number of visible lines uses more system
memory.
Chapter 4 - Océ PRISMAproduction Server 'Explorer'
97
'Messages': Menus
98
Menu Entry
Description
'Font ...'
Opens a dialog box which allows you to select a font, font size
and decoration for the message window:
'Time+Date Format'
Opens a dialog where you can select the time and date format
for different countries.
'Auto-Scrolling'
Enables or disables automatic jumping to the bottom of the
message list when a new message arrives.
'Show MessageTooltips'
if you move the mouse pointer over the description column of
a message, a tooltip displays the full description of this message.
This function can be enabled or disabled.
'Popup Questions'
Enables or disables the automatic opening of question dialogs.
Note: a question dialog opens only, if the message filter does
not hide appropriate entries.
Chapter 4 - Océ PRISMAproduction Server 'Explorer'
'Messages': Menus
Menu Entry
Description
'Edit Filter ...'
Chapter 4 - Océ PRISMAproduction Server 'Explorer'
99
'Messages': Menus
Menu Entry
Description
Opens a dialog box for selecting a filter. If the filter is active,
only messages matching the filter are displayed.
The tree on the left side of the filter dialog displays all available
and filtered columns. The right side displays the filter for currently selected tree entry.
'Starting time' and 'Ending time'
You can specify an exact period of time for which the messages
should be displayed.
'Starting time': starting time for displaying the first message.
'Ending time': ending time for displaying the last message. The
button 'Now!' selects the current date and time and shows it in
the appropriate input fields..
'Type'
Select one or several message types. Selecting all or deselecting
all entries will have the same effect: all message types will be
displayed.
'Module'
The list contains only the names of modules that have generated
at least one message.
If there is no module name selected, the module name filter is
inactive.
100
Chapter 4 - Océ PRISMAproduction Server 'Explorer'
'Messages': Menus
Menu Entry
Description
You can additionally select the following items to configure a
filter:
'Host', 'Job-Id' and 'Message-Id'
The list selection area in this dialog has a small toolbar with
this items:
'Select none'
'Invert selection'
'Select all'
'Add new entry' (available only for 'Module', 'Job-Id' and
'Message-Id')
'Exclude selected extries' = display all but items, selected in the
filter (available only for 'Type', 'Module', 'User', 'Host' and
'Message-Id')
'Open Filter'
Select a filter you have previously created.
Chapter 4 - Océ PRISMAproduction Server 'Explorer'
101
'Messages': Menus
Menu Entry
Description
'Save Filter As ...'
Opens a dialog, where the name and description of the filter
can be entered for saving the selected filter configuration.
The filter is not stored into a file, it appears in the Océ
PRISMAproduction Server Explorer as a new entry in the
message-node.
Additionally the entry can be selected to be visible for the current user only or for all users and if the window, opened by the
new entry should open in a separate window by default.
Delete Filter...
Opens a dialog where you can select a filter, which can be
deleted.
Clear Screen
Removes all messages from the screen. Messages are not not
deleted and can be restored with ’Refresh’.
Refresh
Refreshes the message entries.
Messages Context Menu
Some of the menu entries described above are also accessible via a context menu, which
appears if you right click a message entry.
102
Chapter 4 - Océ PRISMAproduction Server 'Explorer'
'Messages': Operator Requests
'Messages': Operator Requests
Introduction
Questions to the operator interrupt the printing process if certain operator actions are
required. If the Messages View menu entry Popup questions is activated, the operator
requests pop up automatically. Otherwise small icons in the status bar of the Océ
PRISMAproduction Server Explorer indicate if there are questions available or not.
Illustration
Icons in the Status Bar
The following icons indicate if there is a message to be answered to continue the print
process:
#
Icon
Description
'Show open questions'
Double click this icon to show open questions.
'Show open questions'
No open questions are available.
Operator Request Window
The layout of the bottom part of the window depends on the question. There can be
displayed:
Chapter 4 - Océ PRISMAproduction Server 'Explorer'
103
'Messages': Operator Requests
■
■
■
a list containing all allowed answers (one of these answers must be selected, the window
close button will then show the selected answer)
a number value (with a checked range value)
a free answer text input field
The selected or entered answer is transmitted to the sender, after the close button is selected. If the window is closed without selecting an answer, it's automatically reopened.
The number of questions is indicated in the title of the window, here: ’1 / 1’ (number of
open questions / number of questions). If there are more than one questions to be answered, two buttons are active at the bottom of the window, which allow you move one
question backwards or forwards:
An answered question looks like this:
If the operator request can be answered automatically by the system, there will be a check
box at the bottom of the dialog:
If the automatic answer is active, the message will appear in the list of the message configuration tool (see chapter 'Message System' -> "Overview" in the Océ PRISMAproduction
Server Administrator's Guide).Here you can activate or deactivate the automatic answer.
104
Chapter 4 - Océ PRISMAproduction Server 'Explorer'
Introduction to the Print Job Manager
PJM (Print Job Manager)
Introduction to the Print Job Manager
General
The Print Job Manager (PJM) is the common tool used to interactively define and
submit jobs to the Océ PRISMAproduction Server system.
The description of a print job is saved as the Job Ticket. Depending on the licensed
language modules for example APA-Module, POD-Module ...) different file formats can
be processed. The following description covers the formats which are available for the
language module described in this book.
The job ticket describes the print job for one print file or for a list of print files. The print
job contains the name of the print file, the type of data and the physical target of the
printout. Depending on the printer type a list of print files may contain different data
formats. After reformatting, for example PostScript, PCL or TIFF files can printed on
an IPDS printing system.
Apart from print jobs you can also store resources and reprints within the job ticket which
are released for production in a second step.
Based on a server/client concept these job tickets can be sent from any client to the server,
where they are analyzed and processed.
In connection with LCDS print jobs are interpreted in a more general way. They include
also the conversion of resources and compile jobs for the preparation of job description
languages.
Permissions
The Océ PRISMAproduction Server 'Explorer' user administration allows you to assign
permission groups which also contain PJM specific rights to single users.
Users of the default permission group ’Operator’ have restricted access to the PJM capabilities: They can only work in 'Production Mode', open and start existing job tickets
without making changes to the print parameters or saving a new ticket. Operators can
only change the job queue, destination printer and number of copies of a given print job.
They can add a print file in a preconfigured, empty job ticket. (See details on authorization
levels in ‘Set Working Mode’ on page 153).
PJM via Commandline
Apart from the graphical user interface, PJM can also be controlled via command line,
which also allows the execution of print jobs. See chapter "PJM Command Line Mode
Overview" in the Océ PRISMAproduction Server Administrator's Guide.
Chapter 4 - Océ PRISMAproduction Server 'Explorer'
105
PJM Main Window
PJM Main Window
Illustration
Components of the PJM Main Window
#
106
Component
Function
Menu Bar
Contains the following menus:
'Ticket' see ‘PJM Ticket Menu’ on page 108,
'Ed&it' see ‘PJM List of Files Section ('Edit' Menu)’ on page 115
'Job' see ‘PJM Job Menu’ on page 146
'Utilities' see ‘PJM Utilities Menu’ on page 152
'Help'
Tool Bar
Contains icons for a fast call of functions, which can also be
accessed via the 'Ticket' and 'Job' menus. You also set the
Working Mode here (see ‘Set Working Mode’ on page 153.
Status Bar
Shows the current status of the job ticket generation and the
job processing.
'Job Parameter'
Section
Set general parameters for the entire print job. See ‘PJM Job
Parameter Section’ on page 110.
'Job Attributes'
Section
Set detailed parameters for the output of the print job. See ‘Job
Attributes: Overview’ on page 126.
Chapter 4 - Océ PRISMAproduction Server 'Explorer'
PJM Main Window
Component
Function
'List of Files' Section
Set detailed parameters for the files to be printed in a print job.
See ‘PJM List of Files Section ('Edit' Menu)’ on page 115.
Chapter 4 - Océ PRISMAproduction Server 'Explorer'
107
PJM Ticket Menu
PJM Ticket Menu
Introduction
The 'Ticket' menu contains commands for managing, saving and organizing job tickets.
Some of the commands in the menu can also be accessed via toolbar buttons.
Illustration
#
108
Menu Entry
Description
'New'
Choose this command to create an empty job ticket with default
settings. If you click on the small arrow, you can select the
ticket type from a drop down menu.
You can only select tickets which correspond to the installed
Océ PRISMAproduction Server licenses. All others are grayed
out.
The selection 'Native Ticket' is only available, if a PCL printer
has been installed. If this ticket is selected, you can only define
a print range as job attribute. For further information see the
Technical Reference Guide, chapter "Print Parameters" ->
"Functions of the PCL/PJL Backend".
'Open'
Use this command to open an existing job ticket.
When you load a job ticket, a file selection box (see ‘File Selection
Box’ on page 119) is opened for you to select the job ticket. The
job tickets are saved with the extension .TIC.
'Save'
Choose this command to save the current job ticket under its
present name. If the ticket has no jobname, it will be saved with
the default name tmp.TIC. Modifyed settings are saved under
the current ticket name without notice. If the job ticket has not
yet been saved, a file selection box opens (see 'Save As ...').
Chapter 4 - Océ PRISMAproduction Server 'Explorer'
PJM Ticket Menu
Menu Entry
Description
'Save As ...'
When you choose this command, a dialog box is opened listing
the job ticket files that have already been saved.
When you save a job ticket, a file selection box (see ‘File Selection Box’ on page 119) is opened for you to select the item. The
dialog box lists all the files in the selected directory. The job
tickets are saved with the extension ‘.TIC’.
You can also overwrite an existing job ticket by selecting its
name in the list. The name of the ticket is then appended to
the path name. The default name of a new job ticket is ‘<jobname>.TIC’.
'Save Default'
The settings that you make on a regular basis in the main window – for example for job attributes – can be saved as defaults
for future use. To save a set of defaults, click this menu entry.
When you create a new job ticket, Océ PRISMAproduction
Server proposes these defaults as settings for the new ticket.
The 'Save Default' parameters are:
■ Ticket type
■ all 'Job Parameter': 'Job Name', 'Copies', 'Printer', 'Job
Queue'
■ all 'Job Attributes': 'Message', 'Store', 'Print', 'Header/Trailer', 'Notification'
■ 'File Properties ...' which have been saved as default.
'Clear Default'
Clears the default settings described above. After ’New’ an
empty job ticket is available again.
Chapter 4 - Océ PRISMAproduction Server 'Explorer'
109
PJM 'Job Parameter' Section
PJM 'Job Parameter' Section
Introduction
The 'Job Parameter' section cannot be accessed via the menu- or toolbar. Here you have
to define general settings for a print job.
Illustration
#
110
UI Element
Description
'Job Name'
Insert a job name to identify the print job. This name will be
displayed in the Job List under "Jobname".
It is recommended not to keep the default name "tmp". If you
keep it, you will not be able to differentiate the jobs by their
names.
Use a maximum of 64 characters, or as minimum at least 1
character, which is no blank. ’\’, '/' in the job name are rejected,
if an archive is addressed. ’/’ is rejected if you store in a directory.
Chapter 4 - Océ PRISMAproduction Server 'Explorer'
PJM 'Job Parameter' Section
UI Element
Description
'Copies'
Number of copies to be printed of the entire job and additional
options for jobs:
'per Job':
Number of copies of the job (max. 32767 copies).
'on Sheets': (POD-Module only)
Choosing this option will print the single pages one after the
other as many times as indicated in the ’Copies’ field (n-times
the first sheet and then n-times the second sheet and so on).
This function is only available if the Professional Document
Composer is installed and you are printing on an I mode
printer.
'per Job + Files':
Select this option to indicate that you want to print file copies.
The number of file copies can be specified in the ’List of Files’
section.
'as separate Jobs':
This setting has the effect that for every file an own job is created
in the 'List of Files'. The single jobs get an own job number
and the job names are deduced from the job name inserted
above. You can set for the single files different number of copies
in the 'List of Files'.
In further processing these copies are dealt with as job copies.
Note:
See also ‘Jobsplitting per Job Copies’ on page 113.
Chapter 4 - Océ PRISMAproduction Server 'Explorer'
111
PJM 'Job Parameter' Section
112
UI Element
Description
'Printer'
One printer selected from a list of all the printers in the
PRISMAproduction network. Select the printer on which the
job is to be printed.
Warning: Your choice will have an influence on PJM menu
functions because some settings depend on the selected printer.
If the option 'Access Each Printer of a Cluster' is enabled in the
'System Configuration', in addition to the cluster names all
single printers within a cluster are selectable from this list. Thus
jobs can be transferred to single printers, to single printers
within a cluster or to a cluster. If you select a single printer, tho
job will be printed only on this printer. If you select a cluster
of the type ’printer’, the job will be printed on any available
printer in this cluster, which matches the requirements of the
job. If you select a cluster of the type ’printer_jobs_splitting’,
the copies of the job will be distributed to the printers of the
cluster (see 'Configuration' -> 'Cluster').
In addition to the printers configured in the system, logical
printers <Any printer> are offered in this list. If you configure
printers with the resolution of 600, 300 or 240 dpi, logical
printers <Any xxx dpi printer> are offered, which match the
resolution configured.
If you select <Any printer>, the job will be executed on any
printer available (which has the resolution MRM). If you select
<Any xxx dpi printer>, the job will be printed on a printer which
matches the resolution. If the printer name starts with "TP...",
a TrueProof printer is configured in the System.
Next to the printer name text box you find another combo box
which allows you to select the desired resolution. The resolutions
offered here depends on the selected printer model.
'Job Queue'
Sets the job queue of the print job. Which job queues are listed
depends on the valid job queues defined for the selected target
printer.
You define Job queues under 'Configuration' -> 'Job queues'.
In the 'Printer Configuration' the job queues are assigned to
printers.
Chapter 4 - Océ PRISMAproduction Server 'Explorer'
Jobsplitting per Job Copies
Jobsplitting per Job Copies
Purpose
Use this function to distribute higher numbers of job copies (not file copies) on several
printers for faster output.
Jobsplitting Procedure
1. In the 'Explorer' under 'Configuration' -> 'Cluster' create a new cluster of the ’Jobsplitting'
type.
2. Under ’Configuration’ -> ’Printer’ assign at least two printers to this cluster.
3. In the 'Job Parameter' section of the PJM you have to select this cluster as 'Printer'. In
the example below the cluster name is "Jobsplitting".
4. Insert the number of copies per job and submit the job. It will be distributed evenly on
the number of printers in the cluster. Therefore the total number of job copies is divided
by the number of printers in the cluster. Every part of the job get’s it’s own job id. You
can verify the result in the joblist.
Chapter 4 - Océ PRISMAproduction Server 'Explorer'
113
Jobsplitting per Job Copies
Result
If one of the printers or except for one all printers of the cluster fail, the job will be
printed on the available printer because in the job list the name of the cluster and not of
a single printer is referenced.
The distributed jobs are always printed together (even on different printers). Other jobs,
which are located between the distributed jobs in the list and should actually be printed
before, will not be sent to the printer.
Note:
The express setting applies to the single job, which means the job will not be printed
together if you assign express rights to one of it’s parts.
114
Chapter 4 - Océ PRISMAproduction Server 'Explorer'
PJM 'List of Files' Section ('Edit' Menu)
PJM 'List of Files' Section ('Edit' Menu)
Introduction
The 'List of Files' section in the main PJM window is where you assemble and edit the
set of print files belonging to the job. You can set the format and parameters of each file
in the list.
All language module jobs support multiple entries in the 'List of Files'.
You can switch from right justification to left justification of the table entries if you click
the table heading. This might help you reading long list entries. The commands in the
'Ed&it' menu can all also be accessed via the tool bar in the 'List of Files' section.
These commands are used for editing the entries in the list.
Illustration
#
Menu Entry / Icon
Description
'Add File ...'
When you click 'Add File ...', a file selection box (see below)
opens for you to select the print file(s) you want to put in the
job ticket. Every file inserted is checked for the data format,
which is then displayed in the ’Format’ column.
If you have defined default values with the 'Pick Defaults'
function, every file which is inserted in the list contains this
data format and these file properties.
For the POD-Module: If you load reprints from the PFL into
the 'List of Files', these will automatically be connected with
the IOCA format, because they have been converted to this
format already. The 'List of Files' can contain a maximum of
9998 files.
'Default Path from
Ticket' (Edit menu
only)
Activating this option adds the path of the selected file as default
value, if you use the 'Pick Defaults' function.
Chapter 4 - Océ PRISMAproduction Server 'Explorer'
115
PJM 'List of Files' Section ('Edit' Menu)
116
Menu Entry / Icon
Description
'Submission clears
List of Files' (Edit
menu only)
If this option is checked, the list will be automatically deleted
after printing to avoid accidentally printing files of a former
job.
'Keep selected
Printer' (Edit
menu only)
If you open a job ticket and this box is checked, the printer selected in the 'Job Parameter' section is not overwritten by the
printer defined in the job ticket. This allows you to keep a specific printer.
'Remove File'
Choose this command to remove files from the list.
'Move File up'
You use this function chiefly when you want to print various
files in a particular order. The selected file can be moved one
place up in the list.
'Move File down'
You use this function chiefly when you want to print various
files in a particular order. The selected file(s) can be moved one
place down in the list.
'View File ...'
(POD-Module only). A suitable viewing program is started for
the selected file. You can configure one program per data format
via the 'Utilities' menu. If nothing is configured, the Professional
Document Viewer opens for TIFF and IOCA files.
'Pick Defaults'
The file properties that you make on a regular basis – for example for form definition, page definition, and so on – can be
saved as defaults for further files to be placed in the list. To save
a set of defaults, mark a file and click 'Pick Defaults'. All files
you subsequently place in the 'List of Files' are automatically
assigned the same settings. All options which can be set in the
'List of Files' are saved as defaults (file format, file properties).
The defaults only remain active until you next load a new job
ticket. To use the same defaults with every job ticket, you have
to save them permanently. You do this with 'Save Default' in
the Ticket menu.
Additionally you can use the path of the selected file as default
path for the other files. Therefore you have to activate the 'Default Path from Ticket' function in the 'Ed&it' menu.
'Format'
Set the format for the marked file (see ‘File Formats’ on page
122).
Chapter 4 - Océ PRISMAproduction Server 'Explorer'
PJM 'List of Files' Section ('Edit' Menu)
Menu Entry / Icon
Description
'File Copies'
Number of file copies, which should be created in this job (132767). The 'File Copies' field is active, if you select 'per Job
+ Files' in the 'Job Parameter' section. With 'ENTER' the value
will be transferred to the marked files.
Note: In this case no 'Chain files before Composing' is possible.
Like wise, such a job cannot be stored. Error messages will be
shown, when the job is executed.
LCDS Note: LCDS has its own 'JDL / DJDE based' XEROX
copy feature. LCDS 'JSL' copy counts do not show up in the
spool queue, because the actual copies may differ due to copy
modification entries, etc.
From V3.00.06: To be compatible with previous release, not
including the job grouping feature, the following change was
made for all jobs including a single file: After job submission,
the file copy count will be multiplied with the job copy count.
The result is entered in the job copy count and the file copy
count is set to 1.
'File Properties ...'
This command opens a window where you can adjust the settings of a print file.
You can also open the dialog box by double-clicking the file
name in the 'List of Files' section.
You will get different windows depending on the LCDS-Module
module you are working with.
See the respective chapters for the module dependent file
properties ('APA Settings', 'Properties for LCDS file' and 'File
Properties POD-Module ).
List of Files Columns
The colums titles displayed depend on the selected ticket type (POD, APA or LCDS).
#
Column Title
Description
'No'
Number of the file within the system.
'File'
Fully qualified filename.
Size
Size of the file in bytes.
'Format'
Format of the file. Is set automatically by the PJM.
'Compose' (POD
only)
Indicate if the file is modified by the Composer. See chapter
"POD File Properties -> Compose".
Chapter 4 - Océ PRISMAproduction Server 'Explorer'
117
PJM 'List of Files' Section ('Edit' Menu)
118
Column Title
Description
'Collect' (POD only)
Indicates, if the file is processed by the collect function. See
chapter "POD File Properties -> Collect".
'Formdef' (APA
only)
Indicates the form definition selected. See chapter "APA Settings
-> Resources".
'Pagedef' (APA only)
Indicates the page definition selected. See See chapter "APA
Settings -> Resources".
'JDL' (LCDS only)
Job Description Library. See chapter "Properties for LCDS file
-> General".
'JDE' (LCDS only)
Job Description Entry. See chapter "Properties for LCDS file
-> General".
Chapter 4 - Océ PRISMAproduction Server 'Explorer'
File Selection Box
File Selection Box
Introduction
Clicking this icon: opens the file selection box. The caption on the title bar depends
on the selected job ticket (APA, LCDS, POD or OLDS). The physical or virtual directories
which are presented under "Look In:" also vary depending on the active ticket type.
Select the file(s) to be inserted in one job ticket. The list can contain up to 9998 files.
With the POD-Module you can load job tickets and reprints from an archive. Options
within the job ticket, which are not supported by the server settings are marked red.
With the other modules you can also select files from devices such as tapes, cartidges and
other hard disks.
All Modules provide access to the vitual directory $DEMO, which contains preconfigured
test jobs.
Illustration
[143] Example of the POD file selection box with activated search options
Chapter 4 - Océ PRISMAproduction Server 'Explorer'
119
File Selection Box
Window Functions
#
120
UI Element
Description
'Look In:'
Name of the directory of which the contents is displayed. The
system remembers the last file opened and displays it. If this
file has been deleted, the parent directory will be selected instead.
Clicking the list button opens a view of all directories in hierarchy above the selected directory. Double clicking a directory
opens it.
Directories beginning with $ are logical paths for default libraries
from which you can also select files. See ‘Virtual Directories’ on
page 124. Via $DEVICE you can for example select files from
tape for APA and LCDS. Via $DEMO you can access preconfigured test jobs for different file formats.
'Up One Level'
Changes to the next higher directory.
'Home'
Changes to the login directory.
'Create New Folder'
Creates a new folder in the selected directory.
'List'
Displays the files in a folder in the form of a list.
'Details'
Displays the files with detailed information on the file size and
date of the last modification.
'File Name'
The file displayed here is selected and can be placed in the 'List
of Files'. If you press <shift> or <ctrl> when selecting files, you
can mark more than one file to be placed in the list.
When a Device (Tape) is selected, only a single file name is allowed. Only one (1) asterisk (*) is allowed in this file name. To
select the first, second or third file on the device without
knowing the filename the file sequence number can be used.
Examples: '1:' to select the first file, '2:' to select the second file.
'Add
APA/POD/LCDS/OLDS
File(s)
Adds the selected file(s) you have selected or found via the serch
dialog to the 'List of Files'. The file selection box is closed.
Chapter 4 - Océ PRISMAproduction Server 'Explorer'
File Selection Box
UI Element
Description
'Files of Type'
Only files of this type are displayed. If you select the UNIX file
filter, you can use file names with wildcards according to the
UNIX rules.
'Search'
Adds the search dialog to the file selection window (see the
lower part of the screenshot above). You can search for a file
’Name’ (wildcards * and ? are allowed) or for ’Content’ (text,
which is in the file, you search for) or for files of a certain
size/modification date. You can also include subdirectories in
the search.
If you search in a POD archive, many more search attributes
are offered. This is because POD archives are connected to a
database, which holds the meta data of the print files.
'Cancel'
Closes the window without adding files.
Chapter 4 - Océ PRISMAproduction Server 'Explorer'
121
File Formats
File Formats
Introduction
You set the format for a file, which is part of a PJM-Job in the 'List of Files' section of
the PJM window.
File Formats for all Modules
Depending on the language module you use, the selected files can have the following
formats:
#
POD-Module
122
IOCA
Image Object Content Architecture. This format is a subset of AFP.
Files in this format do not have to be converted. You can reconvert
IOCA to TIFF, PS or PDF, when you store the file: In the 'Job
Attributes' window select "Store as resource" and apply the desired
format.
PCL
Files are converted for printing by the PCL-Converter.
TIFF
Files are converted for printing by the TIFF-Converter.
RAW
Select this format for files, which are to be printed without further
checking and without conversion (pass through). It is under the resposibility of the user that the target printer is able to interpret the
data format.
RAW data cannot be modified by 'Collect' and 'Compose'.
PDF-Unity
File is in the PDF format and is converted for printing by the UnityConverter.
PS-Unity
File is in the PostScript2 or PostScript3 format and is converted for
printing by the Unity-Converter.
PDF-Unity+
Creates an object container data output. The files are then converted
by the printer controller (see "Unity Plus (GraphicArts_Plus)" in
the Océ PRISMAproduction Server Administration Settings and
Tasks Guide).
PS-Unity+
Creates an object container data output. The files are then converted
by the printer controller (see "Unity Plus (GraphicArts_Plus)" in
the Océ PRISMAproduction Server Administration Settings and
Tasks Guide).
Chapter 4 - Océ PRISMAproduction Server 'Explorer'
File Formats
#
APA- and LCDS-Modules
APA
Files to be printed with the APA-Module must have the AFP file
format. If you want to print ASCII-Linedata, you can also select
this format and modify corresponding parameters in the APA Settings dialog. If you select RAW, the data will be printed without
further checking.
LCDS
Files to be printed with the LCDS-Module must have the file formats LCDS Data, JSL, Resource or Sample.
Reconverting file formats
Files in the IOCA format can be reconverted into TIFF, PS or PDF, if you set the appropriate format in the 'Job Attributes' -> 'Store' -> 'Resource' dialog (the reconversion into
PS or PDF requires PS+PDF output license). The resulting files are stored in $OUTPUT.
A matching suffix will be added.
Chapter 4 - Océ PRISMAproduction Server 'Explorer'
123
Virtual Directories
Virtual Directories
Introduction
Under Look In in the file selection box you find so called logical paths like $TARGET
or $PFL (POD-Module). These paths lead to directories, where you can store specific
files dependent on their usage. Some of these directories can also be accessed via the 'Job
Attributes' -> 'Store' dialog. You can use 'Server Files' to administrate and modify the
logical directories. See ‘Server Files’ on page 56.
Virtual Directories for all Modules
#
APA- and POD-Modules
$TARGET
The original files in their native format are stored in "$TARGET/login#filename" if they are marked for public access and in "$TARGET/login/filename" if the files are not accessible by other users.
(A login name can be for example admin or service).
Under 'Job Attributes' -> 'Store' you can save files in their native
format.
$HOME
Home directory of the current Océ PRISMAproduction Server user.
Write permissions for this directory can be configured in 'Configuration' -> 'User Permissions' -> 'General Explorer settings'.
APA-, OLDS- and LCDS-Modules
$DEVICE
Device selection. Dependent on the module different source media
like cartridges, tapes or discettes are offered. You can add devices
with the 'Server Files' application.
LCDS-Module
124
$XDATA_DEVICE
Input devices for LCDS print data can be selected here: cartridge,
tape and channel. Additionally you can select channel 1 to 4 if via
the service user script "number_of_channels".
Select these devices, if you want to read LCDS data from a tape,
cartridge or online channel. You don't need to select single files because all data are processed. The suitable LCDS format "LCDS
Data" is set automatically.
$XRESOURCE
Library link to the LCDS resources import directory
'u/prismapro/data/resimport/lcds' for the import of LCDS-Xerox
resources from harddisk. All resources including JSLs have to be in
the "512 Byte Block" format. ASCII formatted JSLs must not be
imported via $XRESOURCE. The suitable LCDS format "Resource" is set automatically.
Chapter 4 - Océ PRISMAproduction Server 'Explorer'
Virtual Directories
APA- and POD-Modules
jsl
Library link to the jsl library of the selected custom catalog to choose
the JSL to be compiled. Automatically the appropriate LCDS format
"JSL" is chosen.
rds
Library link to the rds library of the selected custom catalog to choose
the resource to be sampled. Automatically the appropriate LCDS
format Sample is chosen.
POD-Module
$OUTPUT
Directory which stores files sorted by the format TIFF, PS or PDF.
Under 'Job Attributes' -> 'Store' -> 'Resource' just select one of these
formats.
$PFL
Print File Library: Stores job tickets ready to be printed.
An incremented number will be added to the files, so that they are
not overwritten in case of modification.
$PREPRINTS
Contains already converted files ‘under construction’. You can use
this directory to try out different schemes of impositioning without
converting the files again and again.
Modified files overwrite the old version.
All Modules
$DEMO
This directory contains demo jobs for all language modules.
Chapter 4 - Océ PRISMAproduction Server 'Explorer'
125
'Job Attributes': Overview
'Job Attributes': Overview
Introduction
The parameters you define in the 'Job Attributes' Section influence the submission of a
print job.
Illustration
Available Categories:
Clicking on the edit icon: will open a dialog box with up to seven enabled tabs (depending on the boxes you have checked):
#
126
Category
Function
'Message'
You can add a message for the operator to the job. The job can
be interrupted until the operator confirms this message.
See: ‘Job Attributes: Message’ on page 128.
'Store'
The files used within a job can be stored in special directories,
to make the available for other applications, if needed. For instance original files, generated print files or mapping files can
be stored each in separate directories.
See: ‘Job Attributes: Store’ on page 129.
'Print'
You can add parameters to the job, which apply to the printer,
for example reducing the print job to a defined page range or
the control of the hardware mode of the printer.
See: ‘Job Attributes: Print’ on page 133.
'Header/Trailer'
You can define, if header pages should be printed or not and
of which type these page are to be.
See: ‘Job Attributes: Header/Trailer’ on page 139.
'Events'
Here you can define if executing or printing a job is dependent
on the occurrence of a defined event.
See: ‘Job Attributes: Start Job Events’ on page 141
and ‘Job Attributes: Start Print Events’ on page 143.
Chapter 4 - Océ PRISMAproduction Server 'Explorer'
'Job Attributes': Overview
Category
Function
'Notification'
If a defined job status is reached, an E-mail will be issued.
See: ‘Job Attributes: Notification’ on page 144.
'Custom Settings'
The "Custom Settings" tab is for other print job parameters
that are not set on any of the other tabs (for example because
they are user-defined, or rarely used). You can use the tab to
enter freeform parameter names and values.
See: ‘Job Attributes: Custom Settings’ on page 145.
Chapter 4 - Océ PRISMAproduction Server 'Explorer'
127
'Job Attributes': 'Message'
'Job Attributes': 'Message'
Illustration
Window Functions
Use the 'Message' tab to enter a message to submit to the operator. You can decide if the
the job will only be continued if the operator confirms the message or if the message is
only added to the job without influencing the job processing. The default setting is "Inform
operator only".
If a note to the operator is entered in the text field, the job ticket is displayed in the 'Explorer''All Jobs' application with a special icon:
The text is displayed by double-clicking the print job name.
#
128
UI Element
Description
'Inform operator
only'
When this option is active, the message does not influence the
job processing.
'Hold job until operator confirmation'
The print job remains in wait state with the message "exceptionwaiting for release". The operator can call up the message by
double-clicking the job in the 'All Jobs' window, and can then
confirm it with "Start" or hold the job by clicking "Wait". The
print process does not continue unless the message is confirmed.
'Message text'
A free form message text can be typed in here..
Chapter 4 - Océ PRISMAproduction Server 'Explorer'
'Job Attributes': 'Store'
'Job Attributes': 'Store'
Introduction
You can save a print file for further use by storing it in a purpose-defined directory (library). The directories (libraries) to be selected depend on the language module used
(ticket type APA, POD or LCDS).
Illustration
Store Options for the POD-Module
#
Type of Data
Directories / Libraries
'Native Data'
The original (native) files are stored in $TARGET'/login#filename. The login name can be for example ’service’ or ’applic’.
This option is available for all language modules.
'As Preprint'
The already converted print data are stored in the Preprint
archive for further processing (adding impositionig schemes).
Chapter 4 - Océ PRISMAproduction Server 'Explorer'
129
'Job Attributes': 'Store'
Type of Data
Directories / Libraries
'Resource'
130
Chapter 4 - Océ PRISMAproduction Server 'Explorer'
'Job Attributes': 'Store'
Type of Data
Directories / Libraries
The created print job is saved as a resource of the specified type.
A resource file is created especially for the print file preparation
process. These files are called during the process and contribute
specific elements to the print job. A resource file might also
have to run through various components of the Print Job
Manager (for example a converter) before it can be saved to
one of the logical paths for further use.
Resources can be prepared for the Professional Document
Composer as overlays, variable data, etc. They can also take the
form of user defined header pages to be used with the "Print"
function. Resource files can be saved for later editing – a logical
path might be declared a location for storing files that are still
in native format or which have already been converted into
TIFF or in IOCA but need to undergo further processing before
they can be used as print files.
■ Target
Stores the original files as IOCAs in the $TARGET directory.
■ Header
Stores user defined Header files in the $HEADER directory.
■ Tiff
Stores TIFF data with the ending *.TIFF in the $OUTPUT
directory.
■ Ps
Stores PS data with the ending *.PS in the $OUTPUT directory (requires PS+PDFoutput license).
■ Pdf
Stores PDF data with the ending *.PDF in the $OUTPUT
directory (requires PS+PDFoutput license).
■ Marks
File type containing user defined marks which can be used
when working with the ‘Professional Document Composer’.
Users create from a ‘black sheet’ marks of a defined size. The
files are saved in the §COMPOSER directory with the
ending *.mrk.
■ Variable Data
Type of files which are connected with static documents,
for example when creating serial letters via the PDC. The
files are saved in the $COMPOSER directory with the
ending *.var.
■ Overlays
Chapter 4 - Océ PRISMAproduction Server 'Explorer'
131
'Job Attributes': 'Store'
Type of Data
Directories / Libraries
■
■
■
Files which are connected to other files in the PDC. They
are saved in the $COMPOSER directory with the ending
*.ovl.
Tab Resources
Resource files for tab printing, which should only contain
tab pages and are stored in the $COMPOSER directory
with the ending *.tab.
Merge
Files which could be inserted into existing documents by
pages. They are saved in the $COMPOSER directory with
the ending *.mrg.
Mapping
Files which could be used to overlay IOCA files. They are
saved in the $COMPOSER directory with the ending *.map.
'In PFL'
The created print job is stored in the selected archive of the
Print File Library as a job which is ready for production.
'Public'
If this function is enabled, the file can be accessed by other users
in the Océ PRISMAproduction Server system. It is stored under
'directory/user#filename'. Example: '$TARGET/admin#15pages.ps'.
If the file is not stored for public use, it will be saved in the directory ’user’. Example: '$TARGET/admin/15pages.ps'
Store Options for the APA- and LCDS-Modules
#
132
Type of Data
Directories
'Native Data'
The original (native) files are stored in $TARGET'/login#filename. The login name can be for example ’service’ or ’applic’.
This option is available for all language modules.
'Resource'
Only available for the APA-Module. Data can be stored here
as "Packed AFP". These AFP containers can be used within
other AFP files.
'Public'
If this function is enabled, the file can be accessed by other users
in the Océ PRISMAproduction Server system. It is stored under
'directory/user#filename'. Example: '$TARGET/admin#15pages.txt'.
If the file is not stored for public use, it will be saved in the directory ’user’. Example: '$TARGET/admin/15pages.txt'
Chapter 4 - Océ PRISMAproduction Server 'Explorer'
'Job Attributes': 'Print'
'Job Attributes': 'Print'
Introduction
Use the options on this tab to manipulate the print output. For further settings use the
‘Professional Document Composer’
Chapter 4 - Océ PRISMAproduction Server 'Explorer'
133
'Job Attributes': 'Print'
Illustration
#
All Modules
Description
'Print Range'
134
Chapter 4 - Océ PRISMAproduction Server 'Explorer'
'Job Attributes': 'Print'
All Modules
Description
Enter one or more print ranges (assuming you do not want to
print the entire document).
You can choose different ways of defining the printing range:
5 (= page 5).
5- (= all pages beginning page 5)..
-5 (= page 1 though 5).
5-8 (= page 5 though 8).
6-7; 15- (= page 6 through 7 and all pages from page 15).
If you want to restrict the print range for a user defined header,
you can only do this via the 'Job Properties' dialog in the 'All
Jobs' application.
Only APA-Module and POD-Module with the setting "per job
+ files": You can also enter ranges of more than one print file.
Therefore you identify the files via the file number in the 'List
of Files'.
Examples:
1:1-10;2:2-3 (= file No.1 from page 1 through page 10 and file
No.2 from page 2 through page 3)
3-5:1-5;10- (= file No.3, No.4, No.5, pages 1 to 5 each and
page 10 to end of file)
1-3:10-;5-:1- (= file No.1, No.2, No.3, for each file page 10 to
end of file and from file 5 all pages to end of job)
Note:
Pages means in this case the logical pages of the data
stream (and not the physical sheets)!
'Form'
In this field you can enter or select a specific "form" (size and
appearance of the logical page) which will be assigned to the
whole printjob. In the 'All Jobs' window the selected form will
be displayed giving you the possibility to print only jobs of the
same form. You define the forms available in the PJM with the
'Paper' tool to be selected from the 'Explorer' ’Configuration’
view.
If the SCT tool is used for LCDS jobs, the table name of the
active SCT table is used as 'form' entry. In this case the PJM
'Form' entry is not used.
Chapter 4 - Océ PRISMAproduction Server 'Explorer'
135
'Job Attributes': 'Print'
136
All Modules
Description
'Input Tray'
The selection provided here depends on the definition of input
tray names you make under 'Configuration' -> 'Printers' ->
'Input Devices' (see chapter "Printer Configuration" -> "Input
Devices" in the Océ PRISMAproduction Server Administration
Settings and Tasks Guide). The input tray of the printer itself
has to be set to "Remote".
'Default': Information on the input trays is read from the data
stream.
'Printer Default': The information comes from the configuration
of the printer.
'Output Tray'
The selection provided here depends on the definition of output
tray names you make under 'Configuration' -> 'Printers' ->
'Output Devices' (see chapter "Printer Configuration" ->
"Output Devices" in the Océ PRISMAproduction Server Administration Settings and Tasks Guide). The output tray of the
printer itself has to be set to "Remote".
To work with the settings of the 'UP3I Devices', you have to
activate the UP3I-tray, you configured in the printer configuration (see ‘Workflow UP3I Devices’ on page 213).
'Default': Information on the input trays is read from the data
stream.
'Printer Default': The information comes from the configuration
of the printer.
Chapter 4 - Océ PRISMAproduction Server 'Explorer'
'Job Attributes': 'Print'
All Modules
Description
'Print Mode'
These parameters enable you to set the hardware mode on the
printer. The "Print mode" defines the relation between logical
pages and the physical page when printing on a continuous feed
printer.
You can enter any mode, even if there is a different one selected
for the Composer. However, when you use the hardware mode,
the settings for this mode will be executed in addition to the
mode settings specified in the Composer.
Example: If you have selected "Two up" mode in the Composer
and ‘Identical copies’ for the hardware mode, the document
will first be processed for two-up and then an identical copy
will be made of this two-up.
Example: If you select the default "No Two up", the document
will just be manipulated by the "Two-up" of the Composer.
'No Two up'
One logical page will be printed on the physical page.
'Normal Two up'
The logical pages 1 and 2 will be printed on the first physical
page, pages 3 and 4 on the second physical page.
'Identical Copies'
The logical page 1 and it’s copy (copies) will be printed on the
first physical page, logical page 2 and it’s copy (copies) will be
printed on the second physical page.
'Invers Two up'
The logical pages 2 and 1 will be printed on the first physical
page, pages 4 and 3 on the second physical page.
'Default'
The information comes from the data stream.
'Printer Default'
The information comes from the configuration of the printer.
'Color Selection'
Select the color(s) with which the job is to be printed. The
number of fields depend on the number of toner stations of the
printer. For details see ‘Workflow Color Selection’ on page 220.
POD-Module
Description
'Proof Print'
This command superimposes a grid on each page, which helps
you measure the position of images more exactly. If this button
is active and the number of copies is higher than 1 an error
message is displayed.
'Tab Printing'
Printing of tabs within a document. For details see ‘Workflow
Tab Printing’ on page 210.
Chapter 4 - Océ PRISMAproduction Server 'Explorer'
137
'Job Attributes': 'Print'
138
All Modules
Description
'UP3I Devices'
Connection to UP3I postprocessing devices. For details see
‘Workflow UP3I Devices’ on page 213.
APA- / LCDSModule
Description
RESOURCE
PACKAGING
If this option is activated, external resources will be packed in
the printdata file as inline resources.
LCDS-Module
Description
'Catalog'/
'Catalog Host'
Here you define the GCI-Catalog, in which the whole LCDS
job is running. You can also define the computer, on which the
catalog is stored.
Chapter 4 - Océ PRISMAproduction Server 'Explorer'
'Job Attributes': 'Header/Trailer'
'Job Attributes': 'Header/Trailer'
Introduction
Here you can add a header page with job-related details to the job. This information can
be used for job identification purposes.
Illustration
Header Page Types
#
UI Element
Description
'Print Ticket'
(POD-Module)
Turn this option on to print a header page with all the information relating to the job ticket. You can also define the job ticket
input/output tray if the Job Ticket is to be printed on different
paper. You can rotate the Job Ticket ('Rotation'') to adapt it
to the orientation of the document.
'Print User Header'
(POD-Module)
Use this option to add a user-specific header page from the
$HEADER directory. When you click the open file button, a
file selection box with the predefined $HEADER directory
opens for you to load a custom-defined header page. You can
also type in a specific filename. You can also select the in- and
output bin, if the header page is to be printed on a different
paper or should be ejected to a different output bin.
'Print Separation
Pages' (PODModule)
Separation sheets can be inserted automatically between print
files. You can print a file stored in the $HEADER-library on
the separation sheets. The print files and the files printed on
the separation sheets are chained to one print file.
Chapter 4 - Océ PRISMAproduction Server 'Explorer'
139
'Job Attributes': 'Header/Trailer'
UI Element
Description
'Print System
Header' (POD-,
LCDS- and APAModules)
The 'System Header' presents system-related data, for example
the time and duration of the print process, the job's number in
the system's internal queue, the size of the job, the name of the
print file, etc. The information can also be reduced to error
messages.
Note:
For LCDS and APA-Tickets the print of a system
header is always enabled.
140
Chapter 4 - Océ PRISMAproduction Server 'Explorer'
'Job Attributes': 'Start Job Events'
'Job Attributes': 'Start Job Events'
Introduction
A job is only processed (for example converted), if the events selected here are true. Until
then the job is in the state 'waiting - for event' or 'waiting - for time to run'.
There are two kinds of events: Time/Date Events and Logical Events.
You define and activate logical events under 'Configuration' -> 'Events' (for example
"Nightshift" or "Reel of paper installed"). See ‘Events Configuration’ on page 206.
You can activate 'Time/Date Events' directly in this window by selecting a time.
Illustration
Conditions
#
UI Element
Description
'All Events must be
true'
All events (logical and date/time) must be true, before the job
is submitted.
'One Event must
be true'
One event (logical and date/time) must be true, before the job
is submitted.
Note:
If the timer of a print job has expired (for example because of an old job ticket), the job
will be submitted without comment.
Chapter 4 - Océ PRISMAproduction Server 'Explorer'
141
'Job Attributes': 'Start Job Events'
Time/Date Events
#
UI Element
Description
'Enable
Time/Date'
You can only set the time if this option is activated.
'Pick local Date' /
'Pick local Time'
Click these buttons to set the current system time and date.
Logical Events
The logical events configured in the database are listed here.
#
142
UI Element
Description
'Required'
Check the boxes of the events which should be relevant for job
submission. You are allowed to select up to 8 events.
'Event'
Output of the event name as configured in the database.
'Description'
Output of the event description.
Chapter 4 - Océ PRISMAproduction Server 'Explorer'
'Job Attributes': 'Start Print Events'
'Job Attributes': 'Start Print Events'
Introduction
A job is only printed (status ’Ready to print’), if the events selected here are true. Until
then the job is in the state 'waiting - for event' or 'waiting - for time to run'.
For further details see ‘Job Attributes: Start Job Events’ on page 141
Illustration
Chapter 4 - Océ PRISMAproduction Server 'Explorer'
143
'Job Attributes': 'Notification'
'Job Attributes': 'Notification'
Introduction
Use this tab to configure the notification via an E-mail, if the job has a defined state. To
use this function, you have to configure the access to an SMTP server on the System tab.
The E-mail can also be sent as an SMS to a cellular phone.
This information is stored in the ticket at section "[job]" in the following format:
Active_Notification=.mailNotify <email-Address> <START|FINISHED|ERROR...>
An E-mail is sent for every specified status (blank separated). The email contains the following information as subject and as message information:
"<JOBID>: Job '<JOBNAME>' has reached status <STATUS>"
Illustration
Notification Settings
#
144
UI Element
Description
'eMail Address'
Receiver address of the e-mail.
'Language'
Default is "System", the system language of Océ PRISMAproduction Server (as set in the system configuration). But you can
also set another language for the notification messages, which
may better suit the needs of your customer.
'Trigger on Status
Change'
If the job enters a status marked, an e-mail will be sent to the
address above.
Chapter 4 - Océ PRISMAproduction Server 'Explorer'
'Job Attributes': 'Custom Settings'
'Job Attributes': 'Custom Settings'
Introduction
The Custom Settings tab is for other print job parameters which are not set on any of
the other tabs (for example because they are user defined, or rarely used). You can use
the tab to enter free form parameter names and values.
Illustration
Example:
The image above shows a use case where user defined information is added to the legacy
accounting record 1032 which is always written for every job.
To write user accounting information in Rec 1032, the following has to be done:
For use with a POD or a APA job ticket an OCT (Océ Custom Ticket) must be created
with at least one of the following sections:
[job]
Job_Info1=u_acc1;job-usertext for acc1
Job_Info2=u_acc2;job-usertext for acc2
Job_Info3=u_acc3;job-usertext for acc3
... etc.
[files]
Info1=u_acc1;usertext for acc1 related to file 1
Info2=u_acc2;usertext for acc2 related to file 1
...etc
[files]
Info1=u_acc1;usertext for acc1 related to file 2
..etc until
Info6=u_acc6;usertext for acc6 related to file 2
Chapter 4 - Océ PRISMAproduction Server 'Explorer'
145
PJM 'Job' Menu
PJM 'Job' Menu
Introduction
The items of this menu provide you with detailed information on printjobs and allow
you to modify output settings as well as to submit printjobs.
Most of the functions are also accessible via the main toolbar of the PJM.
146
Chapter 4 - Océ PRISMAproduction Server 'Explorer'
PJM 'Job' Menu
Illustration
#
Menu Entry
Description
'Transfer Mode ...'
Chapter 4 - Océ PRISMAproduction Server 'Explorer'
147
PJM 'Job' Menu
Menu Entry
Description
Opens a dialog with the following options:
'Print data will be copied to the Server.'
The print files are copied to the ODS Master. In this case they
can exist two times.
'Create links to the print files if possible. Copies files if they are
not on the ODS master''- Do not change the files until the job
is finished -'
If this option is selected, a link to the print files is created on
the ODS master. This may be faster, but the files must not be
changed, until the print job is finished.
'Mirror Jobs during Submission'
For a detailed description of the mirror concept see the Administration Settings and Tasks Guide, chapter "Backup Solutions"
-> "Mirror Print Jobs". Check this option, if you want the job
to be created twice. Once on this server and also on a mirror
server (2nd PRISMAproduction master). This provides a greater
security because the job can be executed on the mirror system
if the original system is not accessible. This function is license
dependent.
If this option is checked, the PJM toolbar displays "Mirroring"
on the right hand side.
'Mirror Server':
Select the mirror server, which is configured in the 'System
Configuration'.
'Mirror Policy':
■ 'Default': Select this option if the setting in the 'System
Configuration' should be valid.
■ 'Mandatory': If this option is selected, the system only creates
the job if mirroring was successful. In other words, the job
is created on both systems or it is not submitted at all.
■ 'Optional': In this case the system tries to mirror the job,
but if this is not successful, the job will be created on the
148
Chapter 4 - Océ PRISMAproduction Server 'Explorer'
PJM 'Job' Menu
Menu Entry
Description
original server anyway.
'Ticket Rule':
Select a Ticket Rule, which has been configured to modify the
ticket of the mirrored job so that this job can be submitted on
the mirror server. You can set this parameter in the 'System
Configuration' and/or in the 'PJM' -> 'Transfer Mode'. The
Ticket Rule, which is set in the 'System Configuration', is only
applied if the Ticket Rule setting in the PJM is set to ’Default’.
'Force Mode':
Usually a job is only transferred to the mirror server if the job
is executable on this server. The 'Force Mode' option enforces
the creation of the job on the mirror server.
Note:
Be aware that in this way jobs can be created which
cannot be executed!
'Show All Parameter ...'
Click this option to display all the settings made for all the elements in a print job:
The table 'Papers at Inputtrays' only appears with a POD job
with assigned print media. It will always be updated, which
means that the table can be modified by each step of the converter or by the composer settings.
Chapter 4 - Océ PRISMAproduction Server 'Explorer'
149
PJM 'Job' Menu
150
Menu Entry
Description
'Information ...'
Use this dialog box to enter details relating to the user ('User'
tab) and recipient ('Receiver' tab).
You can also enter unformatted data of any type on the 'Shipment' tab. The contents of the 'Account' field also appears in
the accounting record. Here you can insert an information
which makes it easier to identify the print job (for example the
customer account id).
In the current version of PJM, the input field permits entries
to a maximum length of 1024 bytes. There is no length restriction for the data you enter on the 'Shipment' tab.
'Determine Requirements ...'
(POD-Module only)
Opens a dialog which allows you to add job requirements to
the job ticket, which can be displayed as information in the 'All
Jobs' window. If no physical destination printer is defined in
the job, the operator then has the possibility to route the job
to the correct printer.
For a detailed description of the 'Jobrequirements' feature and
parameters see chapter "POD-Module Components" -> "Jobrequirement" in the Océ PRISMAproduction Server Administration Settings and Tasks Guide.
'Attributes ...'
This menu item calls the dialog which you can also access in
the window section 'Job Attributes'.
The number of available tabs depends on the settings in this
window section.
Here you define, where the converted and/or composed data
should be stored or how they should be printed. For details see
‘Job Attributes: Overview’ on page 126.
'Release for Production ...'
(POD-Module only)
This function allows you to release a job for production by
storing the job in the ‘Print File Library’. In this mode the option to store job tickets in the PFL is disabled in the 'Job Attributes' -> 'Store' dialog.
Chapter 4 - Océ PRISMAproduction Server 'Explorer'
PJM 'Job' Menu
Menu Entry
Description
'Execute'
The 'Execute' command starts a print job for the job ticket
currently displayed in the main PJM window, using the job
name you have specified. When printing begins, the server assigns a unique eight-digit number to the print job. This job ID
is displayed in the status bar on your workstation, together with
a message to indicate how the task is progressing. An message
is displayed if an error occurs. The job ID is also displayed in
the 'All Jobs' window.
You can check the status of a job in the 'All Jobs' application.
If the option 'Operator Intervention' is activated in the general
settings in the 'System Configuration' tool or if you select 'Hold
job until operator confirmation' on the 'Message' tab in the
'Job Attributes' dialog, the print job gets the status 'exception
- waiting for release' and will only be executed after you click
'&Continue' in the job list.
'Cancel Submission'
You can cancel the submission of a job. This is possible as long
as the PJM starts the job.
Chapter 4 - Océ PRISMAproduction Server 'Explorer'
151
PJM 'Utilities' Menu
PJM 'Utilities' Menu
Introduction
This menu allows you to open the TrueProof Viewer (TrueProof must be installed in
this case) and to configure other data viewers like Acrobat Reader.
Illustration
#
Menu Entry
Description
'True Proof Viewer
...'
If available, opens the TrueProof viewer to view documents.
This tool allows an exact proof of the printout and can also be
used for documents on an external Windows-Server.
'Viewer Configuration ...'
Allows you to configure a fitting viewer for every data format.
This program is then used to display a file which is in the 'List
of Files'.
'Format' Double clicking this column opens a list with file formats. Select one format, which you want to configure a viewer
for.
'Viewing Tool' Double clicking this column opens a file selection box, which allows you to select the path to the desired
program.
152
Chapter 4 - Océ PRISMAproduction Server 'Explorer'
'Set Working Mode'
'Set Working Mode'
Introduction
PJM provides different working modes. Depending on the mode selected, certain functions
are available or restricted. The working modes only allow task related modifications of
job tickets.
The user administration within the Océ PRISMAproduction Server Explorer allows to
assign working modes as permissions to permission groups (see chapter "User Management" -> "User Permissions" in the Océ PRISMAproduction Server Administration
Settings and Tasks Guide).
Depending on the permission group, the user belongs to, different working modes can
be used or are restricted to use. Users of the default permission group ’Operator’ are only
allowed to work in 'Production Mode'. All other default permission groups are allowed
for all working modes.
Illustration
#
Working Mode
Description
'Production Mode'
(Default permission group "Operator")
Users (operators) can only send completed jobs or reprints to
the printer.
The 'Print' function is turned on and 'Store' is turned off. If
an empty ticket is loaded, the files which are placed in the 'List
of Files' can be assigned the default values stored in the ticket.
The 'List of Files'' cannot be modified if there are already files
in the ticket.
The following settings can be made in 'Production Mode':
'Job Name', 'Copies', 'Printer', 'Job Queue'
Chapter 4 - Océ PRISMAproduction Server 'Explorer'
153
'Set Working Mode'
154
Working Mode
Description
'Preparation Mode'
At this authorization level users can prepare resources (for example for print jobs) for both the Composer and for reprints. Data
is stored in the "Preprint" archive (POD-Module), in $TARGET with the APA-Module.
The 'Print' and 'Header' functions can be set in this mode and
can be saved with the job ticket but will not be executed on job
submission.
If the preparation in this mode is finished, the job can be released for production via the menu 'Job' -> 'Release for Production ...' . It is then transferred to a PFL.
'Expert Mode'
There are no restrictions at this authorization level.
Chapter 4 - Océ PRISMAproduction Server 'Explorer'
'Properties for LCDS file': Overview
PJM (Print Job Manager)
'Properties for LCDS file': Overview
Introduction
If vou select a new LCDS-Ticket in the PJM, you can use the Edit icon ( ) in the 'List
of Files'to open the LCDS File Properties dialog. This dialog contains several tabs for
different tasks such as feed settings or preprocessing steps.
LCDS-Module File Formats
#
'Format'
Description
LCDS Data
Common format if you want to print LCDS data.
JSL
Use this format to compile JSLs which you have loaded in the
'List of Files'.
JSLs must be compiled to be used with the LCDS-Module (see
‘LCDS-Module: LCDS Resources’ on page 190.
Resource
If you load Xerox resources into the List of Files, these resources
can be copied and converted by the PJM for further use in the
LCDS-Module (see ‘LCDS-Module: LCDS Resources’ on page
190
Sample
Use this format for sample printouts of LCDS resources (for
example fonts).
You can also sample forms to produce preprinted paper (see
‘Properties for LCDS file: Feed’ on page 159).
Multiple Process Chains
The use of parallel LCDS process chains is supported from V3.10. Two typical use cases
may be given here to explain the usage and advantages.
■
Two typical use cases may be given here to explain the usage and advantages. Use Océ
IPDS twin fanfold system print-while-spooling both in the twin configuration (one
process chain supported in V3.0X) and 2 parallel process chains in a "two-single"
configuration.
Chapter 4 - Océ PRISMAproduction Server 'Explorer'
155
'Properties for LCDS file': Overview
■
Parallel a new test catalog may be created and resources may be copied and converted,
JSLs may be edited and compiled and test print done. This test actions may be performed parallel to print process on production catalog without interfering with each
other.
For details concerning use of this function for multiple process chains, please see also the
following chapters:
■
■
■
"LCDS Parameter Configuration: Description of JCF Parameters" in the Océ
PRISMAproduction Server Administration Settings and Tasks Guide, for example
Keyword DeviceName1/2/3.
‘Server Files’ on page 56 -> "Devices".
As well as chapter ‘LCDS-Module: LCDS Resources’ on page 190.
Tabs in the LCDS Files Properties Dialog
#
156
'General'
'Feed'
'Preprocessing'
See ‘Properties for LCDS
file: General’ on page 157.
See ‘Properties for LCDS
file: Feed’ on page 159.
See ‘Properties for LCDS
file: Preprocessing’ on page
162.
Chapter 4 - Océ PRISMAproduction Server 'Explorer'
'Properties for LCDS file': 'General'
'Properties for LCDS file': 'General'
Introduction
These settings you will need for most jobs.
Illustration
#
UI Element
Description
'JDL Name'
Name of the job description library with which the print job is
to be started. This JDL is defined in one of the JSL files on the
print server. If you don’t enter this parameter, DFAULT will
be used.
'JDE Name'
Name of the job description entry, with which the print job is
to be started. If you don’t enter this parameter, DFLT will be
used.
Both parameters describe as LCDS start command details of the job, for example
fonts, copy modification entries (CME), page description entries (LCDS specific) or
stockset definitions. These parameters are defined in the JSL (Job Source Library).
Chapter 4 - Océ PRISMAproduction Server 'Explorer'
157
'Properties for LCDS file': 'General'
158
UI Element
Description
'File Number'
Defines the range of files to be printed on a multifile tape or
cartridge.
The default value is 1 – 0: print all files.
Examples:
0 - 0 = all files
1 - 0 = all files
1 - 1 = first file
2 - 5 = files 2,3,4 and 5
2 - 0 file 2 to end of tape or cartridge.
If you select a file from harddisk, the file number settings will
be inactive.
Chapter 4 - Océ PRISMAproduction Server 'Explorer'
'Properties for LCDS file': 'Feed'
'Properties for LCDS file': 'Feed'
Introduction
This tab allows you to edit those job parameters which are related to the selection of input
trays. Depending on the "Tray Selection" you choose, different parts of the tab will be
grayed out and cannot be used.
Illustration
'Tray Selection'
#
UI Element
Description
'none (Fanfold)'
Use this mode, if your printer has only one input bin, like a
continuous forms printer. The LCDS data converter will cause
the printer to feed all sheets from this single input bin, regardless
of the actual needs of the LCDS input data. The stockset configuration will be inactive.
Chapter 4 - Océ PRISMAproduction Server 'Explorer'
159
'Properties for LCDS file': 'Feed'
UI Element
Description
'by the stockset
configuration'
Choose this option if your printer has several numbered input
bins, like a cutsheet printer. The LCDS data converter will
translate the stock names used by the LCDS input data into
input bin numbers as specified in the "Stockset Configuration"
parameter set, which you choose from the now active list box.
This parameter set must haver been configured previously in
the Stockset Configutation application (see ‘LCDS-Module:
Stockset Configuration Tool’ on page 21).
'by the printer'
Choose this option if your printer has several numbered and
named input bins and a touchscreen menu, which allows you
to set up media names (like a cutsheet printer). The LCDS data
converter will transfer the stock names used by the LCDS input
data to the printer. The mapping of tray names to tray numbers
is defined by the printer itself and is usually configurable by the
printers control panel. "Stockset Configuration" will be inactive
in this dialog.
'Input Bins'
#
UI Element
Description
'MAIN'
sets the tray number of the main input bin. In most cases you
use "1"
'AUX'
sets the tray number of the auxiliary input bin. In most cases
you use "2".
'FEED'
"MAIN" is equivalent to the Xerox operator command "FEED
MAIN". It means that the sheets are fed according to the
FEED=... JDL/DJDE options.
FEED "tray number" feeds the following sheets from the specified tray, regardless of the stock specifications in the
FEED=...JDL/DJDE options. This command overrides any
job-specified feed source.
AUX Forms
You can specify a form to be printed on each sheet, which is to be drawn from the AUX
bin. This makes sense even for fanfold printers. The combo boxes show you, which
160
Chapter 4 - Océ PRISMAproduction Server 'Explorer'
'Properties for LCDS file': 'Feed'
overlays are available. If you omit this parameter, no additional overlay is printed on the
page.
Front side: Here you specify the form to be printed on front pages.
Back side: Here you specify the form to be printed on back pages.
Forms Sample Feature
In order to generate preprinted paper (printing a form A on the front page and optional
a form B on the back page), you can use the forms_sample.TIC (in '/u/prismapro/demo/lcds') together with these AUX forms settings:
■
■
■
■
Open the Forms Sampe Ticket.
Choose the correct catalog (and server in multi server ODS) under Job Attributes ->
Print in the PJM.
On the 'Feed' tab choose the "AUX Forms", which should be printed on the front
and back page, for the predefined data forms_sample.txt.
It is not necessary to change other parameters on the three tabs. But you can change
copy count, printer, queue, job name or mount formId on job level. Changing the
range for this 2 Pages / 1 Sheet job, does not make too much sense.
Chapter 4 - Océ PRISMAproduction Server 'Explorer'
161
'Properties for LCDS file': 'Preprocessing'
'Properties for LCDS file': 'Preprocessing'
Introduction
In the LCDS architecture all the processing of the input data is determined
■
■
by the JSL parameters (which you select by a start JDL and JDE)
by DJDE commands (which may be enclosed in the input data)
Every time the format of your LCDS input data changes, you usually will have to modify
your JSL file to reflect these changes. However there may be situations, when the format
of your input data has been changed, but you don’t want to modify your JSL file, for
example because the JSLs on your system have become very complex and the exact locations, where the JSLs are to be modified, are difficult to find. In this case data preprocessing
allows you to modify the processing of the input data without actually changing the JSL
files
Depending on the 'Data Description' you choose, different parts of the tab will be grayed
out and can not be used.
162
Chapter 4 - Océ PRISMAproduction Server 'Explorer'
'Properties for LCDS file': 'Preprocessing'
Illustration
'Data Description'
#
UI Element
Description
'None'
No data preprocessing is done. All JSL parameters remain active.
'ASCII line controls (UNIX)'
Interprets the input data as a stream of records where each
record is terminated by a UNIX-like LineFeed. Instead of using
this option, you could equally change your JSL to:
'VOLUME HOST=UNDEF; '
'RECORD STRUCTURE=U, CONSTANT=X’0A’.'
'ASCII line controls (DOS)'
Interprets the input data as a stream of records where each
record is terminated by a DOS-like CarriageReturn-LineFeed.
Instead of using this option, you could equally change your JSL
to:
'VOLUME HOST=UNDEF; '
'RECORD STRUCTURE=U, CONSTANT=X’0D0A’.'
'other line controls'
Interprets the input data as a stream of records where each
record is terminated by a user-defined byte sequence. Instead
of using this function you could change your JSL to:
'VOLUME HOST=UNDEF; '
'RECORD STRUCTURE=U, CONSTANT=X’hexstring’.'
Chapter 4 - Océ PRISMAproduction Server 'Explorer'
163
'Properties for LCDS file': 'Preprocessing'
UI Element
Description
'Variable'
Interprets the input data as a stream of variable long blocks and
records where each block and record begins with a binary length
field. Instead of using this option, you could equally change
your JSL to:
' RECORD STRUCTURE=VB, ...;'
'Barr Spool'
Interprets the input data as a Barr Spool file. Instead of using
this function, you could equally change your JSL file to:
'VOLUME HOST=BARRPC; '
'BLOCK LTHFLD=0; '
'RECORD PREAMBLE=2;'
'LTHFLD=2; '
'POSTAMBLE=2;'
'ADJUST=4;'
'converts ASCII
line controls to
IBM3211'
Interprets the input data as a stream with ASCII CarriageReturn,
LineFeed and FormFeed. These control bytes are translated into
IBM3211 PCC bytes.
'skip ASCII line
controls'
Interprets the input data as a stream with ASCII CarriageReturn,
LineFeed and FormFeed.
'PCC Description'
#
UI Element
'PCC type'
164
Description
Here you can override the PCC type. You can indicate a PCC name
which appears in the JSL.
'<JSL defined>'
Determines that each record contains a PCC byte
of the type as specified in the JSL.
'NONE'
Determines that each record contains no PCC
byte. Instead of using this option, you could
equally change your JSL file to:
'LINE PCCTYPE=NONE,...;'
'ANSI'
Determines that each record contains an ANSIcoded PCC byte. Instead of using this option, you
could equally change your JSL file to:
'LINE PCCTYPE=ANSI,...;'
Chapter 4 - Océ PRISMAproduction Server 'Explorer'
'Properties for LCDS file': 'Preprocessing'
UI Element
'PCC Column'
Description
'IBM3211'
Determines at which position of each record the
PCC byte occurs. Instead of using this option, you
could equally change your JSL file to:
'LINE PCCTYPE=IBM3211;'
'ANSION'
Identical to ANSI, but with ADVTAPE=NO (as
in ONLINE).
Overrides the JSL entry for the convert process by LINE
PCC=number.
'Variable Description'
#
UI Element
Description
'Block length field'
Determines how long the length field of each block is. Instead
of using this option, you could equally change your JSL file to:
' BLOCK LTHFLD=number;'
'Block offset'
Determines the location of the record block field. Instead of
using this option, you could equally change your JSL file to:
'BLOCK OFFSET=number;'
'Block length'
Determines the maximum length of each block. Instead of using
this option, you could equally change your JSL file to:
'BLOCK LENGTH=number;'
'Block preamble'
Determines how many bytes at the beginning of each block are
to be discarded. Instead of using this option, you could equally
change your JSL file to:
'BLOCK PREAMBLE=number;'
'Block postamble'
Determines how many bytes at the end of each block are to
discarded. Instead of using this option, you could equally change
your JSL file to:
'BLOCK POSTAMBLE=number;'
'Block adjust'
Determines the adjustment value to add to the contents of the
block length field to give true block length. Instead of using
this option, you could equally change your JSL file to:
'BLOCK ADJUST=number;'
'Record length
field'
Determines how long the length field of each record is. Instead
of using this option, you could equally change your JSL file to:
'RECORD LTHFLD=number'
Chapter 4 - Océ PRISMAproduction Server 'Explorer'
165
'Properties for LCDS file': 'Preprocessing'
UI Element
Description
'Record offset'
Determines the location of the record length field. Instead of
using this option, you could equally change your JSL file to:
'RECORD OFFSET=number;'
'Record length'
Determines the maximum length of each record. Instead of
using this option, you could equally change your JSL file to:
'RECORD LENGTH=number;'
'Record preamble'
Determines how many bytes at the beginning of each record
are to be discarded. Instead of using this option, you could
equally change your JSL file to:
'RECORD PREAMBLE=number;'
'Record postamble'
Determines how many bytes at the end of each record are to
be discarded. Instead of using this option you could equally
change your JSL file to:
'RECORD POSTAMBLE=number; '
'Record adjust'
Determines the adjustment value to add to the contents of the
record length field to give the true record length. Instead of
using this option you could equally change your JSL file to:
'RECORD ADJUST=number;'
'Code Description'
#
166
UI Element
Description
'Data Code'
Here you can override the code of the data bytes:
'<JSL defined>': The data bytes are interpreted as specified in
the JSL.
'ASCII': The data bytes are interpreted as being ASCII.
'EBCDIC': The data bytes are interpreted as being EBCDIC.
'Metacode': The data bytes are interpreted as being ASCII with
embedded Metacode.
'PCC Code'
Here you can override the code of the PCC bytes:
'<JSL defined>': The PCC bytes are interpreted as specified in
the JSL.
'ASCII': The PCC bytes are interpreted as being ASCII.
'EBCDIC': The PCC bytes are interpreted as being EBCDIC.
Chapter 4 - Océ PRISMAproduction Server 'Explorer'
'Properties for LCDS file': 'Preprocessing'
'Volume Description'
#
UI Element
Description
'Host'
Determines which host operating system has generated the input
data file. Instead of using option this option you could equally
change your JSL file to:
'VOLUME HOST=type'.
You can choose among the following options:
'<JSL defined>': Processes input as defined in the JSL file.
'UNDEF': Processes input as if in the JSL would be coded:'VOLUME HOST=UNDEF'.
'Online Hard Disk': Processes input as if in the JSL would be
coded: 'VOLUME HOST=BARRPC'. (Other parameters remain unchanged. Refer to "Barr Spool" in "Data Description"
above.)
'ANSI': Processes input as if in the JSL would be coded:
'VOLUME HOST=ANSI'.
'IBMOS': Processes input as if in the JSL would be coded:
'VOLUME HOST=IBMOS'.
'BS2000 Online': Processes input as if in the JSL would be
coded: 'VOLUME HOST=EXOTIC'.
'Defaults'
The 'Defaults' button resets all processing options back to their defaults. That is: no
preprocessing is done at all.
Chapter 4 - Océ PRISMAproduction Server 'Explorer'
167
LCDS Driver Module
LCDS Driver Module
Introduction
The above mentioned LCDS data converter tabs (General, Feed, Preprocessing) are NOT
available if you print an LCDS ticket with a selected LCDS driver printer (for example
a Docuprint model). The respective parameters are not needed for the LCDS driver. A
new tab is displayed instead, which allows you to define the PCC type (IBM3211, ANSI,
none) of the input file (will be translated to IBM3211 internally).
Illustration
Note:
Please note, that for the normal Download case, which is the only use case for the LCDS
driver, the PCC type is already defined (OCT: Pdscc). This GUI parameter may be used
for HD testcases.
168
Chapter 4 - Océ PRISMAproduction Server 'Explorer'
'Printer Pool': Overview
'Printer Pool'
'Printer Pool': Overview
Introduction
The 'Printer Pool' entry in Océ PRISMAproduction Server 'Explorer' opens a window
containing all the administration functions for the printers configured in the system.
Here it is possible to control all printers of a Océ PRISMAproduction Server cluster in
a single window, even if they are physically connected to different print servers.
Available operations:
■
■
■
■
■
Activate and stop printers
Adjust parameters for job selection on each printer like assigning job queues to printers
(see also ‘Printer Pool: Printer Settings’ on page 177
Set the NPRO time (the time after which the last page printed is to be ejected)
Interrupt, cancel and delete a running print job
View printer dependent messages.
The Administrator window consists of the title bar, tool bar, menu bar, client area and
a status bar.
Clicking the 'Toggle View' icon
view':
you can switch between 'Table view' and 'Symbol
Chapter 4 - Océ PRISMAproduction Server 'Explorer'
169
'Printer Pool': Overview
Illustration
[179] Printer Pool Symbol View
[180] Printer Pool Table View
Printer Pool Window
The title bar along the top of the window contains the window name (Printer Pool).
The client area contains printer-specific information in 2 different views:
Symbol view displays each printer as symbol for 130x70 pixels size with information on
the right side of the symbol:
■
■
■
■
Printer name
Printer status
Active form name and id of the printing job.
The tooltip contains additionally: hostname, printer model, resolution, supported
datatype, name of the printer driver.
Table view shows all printers in a table. The columns of the table are configurable by
clicking on the header of a column. Information displayed in 'Table view':
170
Chapter 4 - Océ PRISMAproduction Server 'Explorer'
'Printer Pool': Overview
■
■
■
■
■
■
■
■
■
Printer status (PS) as a symbol column and a separate text column (processing, not
ready, active, inactive, message, halted, ...)
Printer name (Name)
Printer model (Model)
Printer Resolution (DPI)
Supported datatype (Data-Format)
Id of the printing job (Job-Id)
Active Form name (Form)
Active job queue(s) (Job-Queue)
Printer status (Status) in text form, corresponds to the printer status symbol
If you click the right mouse button, you can select the following additional columns to
be displayed:
■
■
■
■
■
■
■
■
Hostname (Server)
Continuous forms or Cutsheet printer (Printertype)
Printer driver (Driver)
Printer speed (Speed)
Toner colors installed on the printer (Colors)
Printer autostart status (Autostart)
NPRO time value (Timeout)
Operator
The status bar displays the number of printers and the used and licensed speed ranking
of the 'PRISMAproduction 3.0' license.
Before you can execute a command, you must select a printer by clicking on a symbol or
on a row in the table.
The menu bar contains the menus "Printer", "View" and "Help".
Status Info
Possible printer status infos (including the displayed colors)
#
Status
Description
Active (blue)
Printer is active but prints no job.
Spool inactive (red)
Spool is down and can be activated in printer configuration.
Spool halted (red)
Spool is temporarily inactive and will be active, as soon the
database becomes ready again.
Chapter 4 - Océ PRISMAproduction Server 'Explorer'
171
'Printer Pool': Overview
172
Status
Description
Draining (yellow)
Printer is draining.
Starting (yellow)
Printer is starting.
Error (red)
Printer detected an error.
Inactive (black)
Printer is inactive, but ready to be started.
License (red)
Printer is waiting on a free PRISMAproduction license.
Message (red)
Printer waits for an operator answer in the message window.
Printing (green)
Printer prints a job.
Waiting (red)
Printer waits for an occupied printer, which is connected via
TCP/IP.
Chapter 4 - Océ PRISMAproduction Server 'Explorer'
'Printer Pool': Tool Bar and Menu Functions
'Printer Pool': Tool Bar and Menu Functions
Introduction
The 'Printer Pool' functions, which are accessible via the tool bar and menus are described
below:
#
Icon / Menu Entry
Description
Printer Menu
'Settings ...'
See ‘Printer Pool: Printer Settings’ on page 177
'Media Settings ...'
Opens a dialog, which allows you to add or modify the media,
which are assigned to the input trays of the selected printer.
You can only modify the list if the selected printer is not active.
If you modify a media, which is assigned to an input tray, this
media will be added to the list of user defined papers in the
'Paper' application (see ‘Paper Configuration Tool’ on page 207).
If you click the button with the three dots, you can add a paper
from a list, which contains all standard and user defined papers.
'Printer Panel ...'
The 'Printer Panel' icon or menu entry is only active, if a
TrueProof printer is configured and selected.
'Maintenance Report ...'
See ‘Printer Pool: Printer Maintenance’ on page 180
Chapter 4 - Océ PRISMAproduction Server 'Explorer'
173
'Printer Pool': Tool Bar and Menu Functions
Icon / Menu Entry
Description
Printer Menu
174
'Activate Printer'
'Disable Printer'
Printers can be separately enabled or disabled. When a printer
is enabled, the corresponding print server process is loaded and
started. When the printer state is "halted" (for example because
the current print job has been interrupted), it can be reactivated
by selecting the 'Activate Printer' command.
'Reset Printer'
Cancels and resets an active printer process. Before the command is executed, you are prompted to confirm this action because of a possible data loss. Additionally the user has to try to
stop that printer and interrupt the running print job, before
this command is executed. This procedure is required because
of the really dangerous data loss problems.
'Claim Printer'
Opens a dialog box where you can select a user group to which
all new messages for the selected printer will be assigned.
Chapter 4 - Océ PRISMAproduction Server 'Explorer'
'Printer Pool': Tool Bar and Menu Functions
Icon / Menu Entry
Description
Printer Menu
'Cancel Job and
Halt Printer'
This entry opens a dialog box, where the user selects the job
cancel procedure.
The toolbar additionally contains a sub-menu, where the cancel
procedure can be selected directly. To open this menu, click on
the "arrow down" button to the right of the stop sign.
Action
Every cancel command sets the printer into the "Halted" state.
After interrupting the printout, you can print one or more jobs
belonging to a different job queue. Once these jobs have been
printed, you can switch back to the job queue you interrupted
and then continue the printout.
■ 'Interrupt Printjob'
Halts printing of the current job and sets the printer into
the 'Halted' state The job stays in the queue. If it will be
printed again, printing will resume at the point, where the
job was interrupted.
■ 'Cancel and Hold Printjob'
Halts printing of the current job and sets the printer into
the 'Halted' state. The job stays in the queue and if it will
be printed again, it will be reprinted from the beginning.
■ 'Cancel and Delete Printjob'
Halts printing of the current job and sets the printer into
'Halted' state. The job is deleted from the job list.
Boundary
Each of the cancel commands requires a selection of the
boundary, on which the command should be executed.
■ 'Immediately'
Cancels the job immediately
■ 'On File-Copy Boundary'
Cancels printing of the current job when the current copy
of the current print file has been printed.
■ 'On Job-Copy Boundary'
Cancels printing of the current job when the current copy
of the job (containing more than one file) has been printed.
View Menu
Chapter 4 - Océ PRISMAproduction Server 'Explorer'
175
'Printer Pool': Tool Bar and Menu Functions
Icon / Menu Entry
Description
Printer Menu
'Toggle View'
Clicking this entry, you can switch between 'Table view' and
'Symbol view'.
'Orientation'
In the 'Symbol view' select whether the printer symbols should
be presented horizontically or vertically.
'Wrap Lines'
Opens a dialog box, which allows you to select columns of the
'Table view' for which the lines should be wrapped.
'Font ...'
Opens a dialog box, which allows you to select a font and font
properties for the 'Table view'.
'Edit Filter ...'
'Open Filter'
'Save Filter As ...'
'Delete Filter ...'
See ‘Printer Pool: Printer Filter’ on page 183
'Messages ...'
Opens the message window but displays messages of the selected
printer only.
'Cluster ...'
Opens a dialog where the printer cluster configuration is displayed in two views:
- which printer is member of which clusters
- which cluster contains which printers as it's member:
'Refresh'
Refreshes the printer pool entries.
Help Menu
'Licensed Print
Speed'
176
Opens a dialog box, where the licensed speed ranking of the
Océ PRISMAproduction Server license is displayed:
Chapter 4 - Océ PRISMAproduction Server 'Explorer'
'Printer Pool': 'Printer Settings'
'Printer Pool': 'Printer Settings'
Introduction
This dialog contains the rules for each printer separately, how the print jobs are assigned
to the printer and which automatic settings are activated for that printer:
The settings are divided in 2 major parts:
■
■
Job selection checks
Printer automation
The left side of the dialog shows under Job selection checks all items, which can be
checked. To enable the check, you have to mark the box. The right side of the dialog
displays tabs for some items, which allow you to make further settings.
Illustration
'Job Selection Checks'
Checks before printing if the requirements needed for the printer are fulfilled.
Chapter 4 - Océ PRISMAproduction Server 'Explorer'
177
'Printer Pool': 'Printer Settings'
#
178
Check before
printing:
Description
'Form Name'
Allows you to assign manually a defined form to the printer.
You can choose a predefined form form a drop down list or you
enter the form in the text field directly. The form name may
contain wildcards.
Example:
STD*0 accepts STD10, STD1110,
STD1010 *T*1* accepts STD10, STD1110, STD1010
'Proceed with next Form'
If selected, the printer switches to jobs with other forms automatically, instead of waiting for operator intervention.
'Resolution'
The printer compares it's configured resolution to that of the
spooled jobs. If there is no match, the job is not printed on the
printer. Deactivating this check box ignores the job specific
resolution.
'Printer Name'
The printer compares it's configured name to the destination
printer name of the spooled jobs. If there is no match, the job
is not printed on the printer. Deactivating this check box ignores
the job specific printer name.
'Job Queue'
The printer compares it's configured job queue(s) to the queue
of the spooled jobs. If there is no match, the job is not printed
on the printer. Deactivating this check box ignores the job
specific queue.
You can assign one, more or all defined job queues for each selected printer. Only job queues predefined in your system can
be assigned (by using Configuration -> Jobqueue and Configuration -> Printers).
By default, only queues 1 to 3 are defined. Per printer more
than 100 active queues are supported.
'Toner Colors'
The printer compares it's configured color id ('Toner Stations'
in 'Configuration' -> 'Printers') to the colors specified in the
spooled jobs.
'Data Type'
The printer compares it's data type definition to that of the
spooled jobs. If there is no match, the job is not printed on the
printer. Deactivating this check box ignores the data type,
specified in the job.
Chapter 4 - Océ PRISMAproduction Server 'Explorer'
'Printer Pool': 'Printer Settings'
'Printer Automation'
Allows you to set NPRO and to let the printer start automatically as soon as a job arrives.
#
UI Element
Description
'Printer Start+Stop'
This feature allows printer sharing over the network. Select it,
if you want any printer to be activated automatically as soon as
a print job arrives. The printer will be disabled as soon as the
job is printed and after the NPRO time elapses.
The value of 0 seconds causes here to stop the printer immediately, if no subsequent job is available for that printer. It can
be activated again by the spool if a new job is waiting for this
device.
'Printer NPRO'
If no new job is submitted to the printer after the last page of
a document has been printed, the print server generates blank
pages in order to eject the last printed page into the stacker.
You can specify the time that must elapse (the NPRO time)
before the final page is automatically ejected. The setting takes
effect after the start of the next job.
The default value of 00.00.00 (HH.MM.SS) causes the print
server to wait indefinitely.
The pages are then stacked only if the printer is deactivated or
a new job starts printing. The maximum time are 12 hrs. If the
value is out of range, the time will automatically be set to the
minimum or maximum value for the next print job.
'Questions from Printer'
#
UI Element
Description
'Restrict to Users'
If you activate this entry, you can select users from a list, which
should get operator requests.
Chapter 4 - Océ PRISMAproduction Server 'Explorer'
179
'Printer Pool': 'Printer Maintenance'
'Printer Pool': 'Printer Maintenance'
Introduction
If you click this icon ( ) or the corresponding menu entry, a window is opened which
provides a reporting function for the accounting whenever the operator carries out
maintenance tasks on the printer (for example replaces or refills consumables like developer stations or toners).
180
Chapter 4 - Océ PRISMAproduction Server 'Explorer'
'Printer Pool': 'Printer Maintenance'
Illustration
#
UI Element
Description
'Maintenance'
Switch on/off the printer maintenance mode. The mode remains
active until deactivated. All jobs which are printed in this mode
will be marked as ’printed in maintenance mode’ in the accounting (normally only for test prints which are not relevant for the
customer).
For every print job, which is printed in this mode, a special
message has to be confirmed:
'Printer hardware defect, a repair is required.'
If you check this box, the printer is disabled and becomes the
status ’Defect’. If the maintenance mode is switched off, the
defect switch is cleared automatically.
'Page counter'
Here you can enter the counters which the printer internally
displays.
Chapter 4 - Océ PRISMAproduction Server 'Explorer'
181
'Printer Pool': 'Printer Maintenance'
182
UI Element
Description
'Consumables'
Use this section to log the activities related to consumables (for
example 'change', 'refill' or 'clean'. Additionally you can also
indicate for example how much toner has been refilled.
The 'Consumable name' field can be edited if the administrator
did not predefine consumables in 'Configuration' -> 'Consumables' (see chapter "Consumables" in the Océ PRISMAproduction Server Administration Tasks and Settings Guide). If the
consumables have been preconfigured, only these elements are
selectable and no free-form text can be entered. The text field
'Remark' is also filled automatically with the contents of the
’Description’ column in 'Configuration' -> 'Consumables'. In
this case the text can be modified by the operator.
In the entry 'Others' still unknown (not configured) consumables can be typed in.
If you click "OK", the information is transferred to the accounting database.
Chapter 4 - Océ PRISMAproduction Server 'Explorer'
'Printer Pool': 'Printer Filter'
'Printer Pool': 'Printer Filter'
Introduction
Click this icon: to open a dialog box for selecting a filter. If the filter is active, only
printers matching the filter are displayed.
The tree on the left side displays all available and filtered columns. The right side displays
the filter for the currently selected tree entry.
Each selected entry in the tree leads to a new tab on the right side of the dialog:
Illustration
Printer Filter Window
#
UI Element
Description
'Name'
Filter for printer names.
'Server'
Filter for server, which the printer is connected to.
'Cluster'
Filter for cluster, which are defined in the system.
'Model'
Filter for supported printer models.
'Printer-Type'
Filter for basic printer types.
'DPI'
Filter for printer's resolution.
'Driver'
Filter for printer driver.
'Data-Format'
Filter for printer's data formats.
Chapter 4 - Océ PRISMAproduction Server 'Explorer'
183
'Printer Pool': 'Printer Filter'
UI Element
Description
Icons
The list selection area in this dialog has a small toolbar with
these items:
Select none
Invert selection
Select all
Additionally you can 'Exclude selected extries' from the filter.
'Save Filter As ...'
Opens a dialog, which allows you to define a name and a description for the filter and
then to save the selected filter configuration:
After saving, the filter can be selected if you click the small arrow icon next to the filter
icon or by selecting the entry Open Filter in the Printer Pool View menu.
Additionally the filter can be selected to be visible for the current user only or for all users
and if the window, opened by the new entry should open in a separate window by default.
'Delete Filter ...'
Opens a small dialog box, where you can select theprinter filter which should be deleted
.
184
Chapter 4 - Océ PRISMAproduction Server 'Explorer'
'LCDS Channel'
LCDS Components
'LCDS Channel'
Introduction
This tool can be used to monitor the /370 channel.
Illustration
#
UI Element
Description
Server
Select the server within the ODS on which the channels should
be switched.
'Open channel'
Activate the /370 channel in connection with the value of the
ChanCondCode parameter (ONLINE/OFFLINE) in the
PrintLCDS.JCF (see PRISMAproduction Administrators
Guide).
'Close channel'
Deactivate the /370 channel in connection with the value of
the ChanCondCode parameter (ONLINE/OFFLINE) in the
PrintLCDS.JCF (see PRISMAproduction Administrators
Guide).
Note:
The icons are only accessible, if the ifilter has not been started with the 370 channel.
Chapter 4 - Océ PRISMAproduction Server 'Explorer'
185
'LCDS Resources Import'
'LCDS Resources Import'
Introduction
Use this applet to import LCDS resource files from an external medium into any directory
on the Océ PRISMAproduction Server system. This is useful, if resources are to be imported from a Xerox DocuPrint system in the original format for further export to another
Xerox DocuPrint system.
Illustration
LCDS Resources Input Window
#
186
UI Element
Description
'Device:'
Select the external device (and the server, which the device is
connected to), from which the files are to be imported.
The following devices are selectable:
XFLOPPY_35 (3.5"-Floppy 1.2 MB),
XRES_TAPE,
XRES_CARTRIDGE.
These devices can be connected to every server in the masterslave network.
'Directory:'
Defines the target directory. You cannot directly insert the path.
Select it via a file selection box by clicking the folder button.
'Files in directory:'
The table shows the contents of the currently selected directory.
Per default the files are sorted by date.
'Start Import'
Starts the import process. All files found on the device are stored
in the given directory. (If not yet existent, this directory will be
created before the import process.) After finishing the import
process, the table is updated. If errors occur during import (for
example no floppy in drive) a message box appears displaying
all relevant ifilter messages.
Chapter 4 - Océ PRISMAproduction Server 'Explorer'
'LCDS Resources Import'
UI Element
Description
'Cancel operation'
Cancels the export job started.
Chapter 4 - Océ PRISMAproduction Server 'Explorer'
187
'LCDS Resources Export'
'LCDS Resources Export'
Introduction
Use this command to save Xerox resources from a Océ PRISMAproduction Server system
to a Xerox formatted output media, for example for backup or for distributing resources
form one Océ PRISMAproduction Server server to several Xerox DocuPrints.
Illustration
LCDS Resources Export Window
#
188
UI Element
Description
'Add file'
Opens a file selection box, which allows you to select one or
more files from the XRESOURCES directory. This dialog allows
you also to open the GCI catalog (prevents you from choosing
converted resources from the rds subcatalog), where you can
select the required files (of the types CMD, FNT, FRM, IMG,
JSL, LGO) from the sub catalogs. The files selected will be
added to the file list. The files collected here may be located on
different servers.
'Remove selected
file'
Removes selected files from the list.
Chapter 4 - Océ PRISMAproduction Server 'Explorer'
'LCDS Resources Export'
UI Element
Description
'Device:'
Select the external device (and the server, which the device is
connected to), on which the files are to be stored. The following
devices are selectable: XFLOPPY_35 (3.5"-Floppy 1.2 MB),
XRES_TAPE, XRES_CARTRIDGE. These devices can be
connected to every server in the master-slave network.
'Format Floppy'
Defines if the floppy is formatted at the beginning of the export
process. Obviously this function is not available for tape drives.
'Start Export'
When clicking the Start Export button, the selected files are
copied to a temporary directory and written to the selected
output device.
Note: The output device is written newly, so existing data on
the output device are overwritten. This applies to floppies, too.
When clicking to the Start button you will be asked by the Input
process, whether you want to overwrite the data on the output
device. It is possible to save the content of the output device
before overwriting it using the Xerox Format Resource Import
window.
All files in the list will be written on the medium. During this
process messages will be issued in the messages window by the
I-filter.
If errors occur during import (for example no floppy in drive)
a message box appears displaying all relevant ifilter messages.
'Cancel operation'
Cancels the export job started.
Chapter 4 - Océ PRISMAproduction Server 'Explorer'
189
LCDS-Module: 'LCDS Resources'
LCDS-Module: 'LCDS Resources'
Introduction
This application allows you to copy and/or convert Xerox resources from a Xerox formatted
input media or from hard disk to the correct directories in the LCDS-Module. It also
gives you the possibility to edit JSLs.
After the copy process the resources are converted (if selected) to the AFP format and are
stored on the harddrive in the directory ('/u/prismapro/data/cat/<catalog>/fnt(img,lgo,frm'), where <catalog> is the current catalog.
Note:
If you select 'Format' -> 'Resources' in the 'List of Files' section of the 'Print Job Manager' (LCDS-Ticket), you can also copy/convert resources with the PJM!
Attention:
This program is not available to the user "operator"!
Illustration
Resource Types
The LCDS-Module accepts the following resource types:
190
Chapter 4 - Océ PRISMAproduction Server 'Explorer'
LCDS-Module: 'LCDS Resources'
#
Resource Type
Description
CMD
Command files (*.CMD) are transferred into the system from
an input media. After this they only serve for information purposes. They will not be converted or processed in any way.
FNT
Fonts (*.FNT) are transferred from input media and converted
to Océ PRISMAproduction Server fonts. Kanji fonts will be
rejected.
LGO
Logos (*.LGO) are transferred from input media and converted
to Océ PRISMAproduction Server page segments. Multi color
logos will be accepted.
FRM
Forms (*.FRM) are transferred from input media and converted
to Océ PRISMAproduction Server overlays. Color substitution
lists (I-lists) will be processed in GRAPHIC and LOGO statements ('...INK inkref1, [inkref2] [...];')
IMG
Images (*.IMG) are transferred from input media and converted
to Océ PRISMAproduction Server page segments. Multi color
images will be accepted.
JSL
JSL’s (*.JSL) are transferred from input media and converted
to Océ PRISMAproduction Server internal formats. They have
to be compiled in order to use them for data conversion.
Note:
Other types of resources are ignored.
Resources can be loaded onto the server from the following media:
■
■
■
■
9 track tape
IBM Cartridge (3480, 3490)
3,5“ disk (1,2 MB format)
Hard disk
'Copy/Convert' Workflow
Before you can start copying, you must perform the following steps in the Resources
section of the 'LCDS Resources' application:
Chapter 4 - Océ PRISMAproduction Server 'Explorer'
191
LCDS-Module: 'LCDS Resources'
#
192
UI Element
Description
'Input device:'
Select an available input medium from a list (Tape, Hard Disk,
Cartridge or 3 1/2’’ Floppy).
If the device Harddisk is chosen, files with extension “.JSL”
are checked for the existence of line feed characters in the first
400 bytes. If there are such characters, the file is assumed to be
in ASCII-text mode. Then it is automatically moved into the
“jsl” subcatalog of the selected catalog. Files without extensions
but with AFP resource prefixes like “O1”, “IX” or “C0” are assumed to be AFP resources and are automatically moved to the
“rds” subcatalog.
Please note, that the file names are also automatically changed
to the upper case, which is the default of both subcatalogs.
Please note, that there is no overwrite protection.
'Resource name:'
Lists all resources on the selected medium. Xerox file name and
file type. Wildcards are allowed (* = all files, A*.FNT = all fonts,
which start with character ’A’).
'Copy'
Check this box if you only want to copy the resources on your
system.
'Convert'
Check this box also to ensure that the resources are converted
after copying.
Chapter 4 - Océ PRISMAproduction Server 'Explorer'
LCDS-Module: 'LCDS Resources'
UI Element
Description
'Copy/Convert'
Button
When you click the 'Copy/Convert' button, the system begins
loading the relevant resources onto the server. During copying,
the button is dimmed, which means that the function is not
available. The names of the resources being copied to the server
are displayed in the 'Messages' window.
When the files have been read and the 'Convert' checkbox is
marked, the Xerox resources of type FNT, FRM, IMG or LGO
are converted to the LCDS-Module format and saved in the
directory '/u/prismapro/data/cat/<catalog>/rds' where <catalog>
is the current catalog.
If you ftp resources from an MVS or Elixir system, be sure that
all files are in upper case. If the LCDS-Module has been installed
with the default settings, the original resources will be deleted
after successful conversion. Otherwise they will be moved to
'/u/prismapro/data/cat/<catalog>/FNT_conv' ('FRM_conv,
IMG_conv, LGO_conv' respectively).
After completion of the conversion, a status report is displayed
in the 'Messages' window showing how many files have been
read and converted successfully or unsuccessfully.
When conversion is complete, the 'Copy/Convert' button is
available again.
Cancel Operation
Button
Aborts the current 'Copy/Convert' operation.
After a successful conversion, the Xerox resources can be deleted or kept (optional). If
needed, the resources can then be converted again without reading them from tape once
more. In any case, the backups of all Xerox resources must be saved in the original Xerox
tape format on tapes or diskettes.
Deletion Mode
Depending on the Deletion_mode you set with the 'LCDS Jobs' tool in the 'Configuration' workspace of the Océ PRISMAproduction Server Explorer (see "LCDS Parameter
Configuration" -> "LCDS Jobs" in the Océ PRISMAproduction Server Administration
Settings and Tasks Guide), every single element (every single resource) will be processed
in the following way after successful conversion:
Chapter 4 - Océ PRISMAproduction Server 'Explorer'
193
LCDS-Module: 'LCDS Resources'
#
Deletion Mode
Description
0
The single element will be moved to backup files (fnt_conv,
frm_conv, img_conv and lgo_conv), which serve as input library
for the CONVERT function. So all single resources will be
collected in their original format and can be converted again
by the CONVERT function, whenever this is needed.
1
The single element will be deleted from the COPY library
without saving.
Regardless of the Deletion_mode 0 or 1 the resource element is not available on the system
for the COPY function anymore after successful conversion.
Regardless of the Deletion_mode it is recommended to keep the original data on the
Xerox resource tape or on the Xerox floppy.
Note the following when loading resources from Harddisk:
■
■
■
Copy Xerox resources with corresponding extensions (for example ABC.FRM) in
uppercase characters into the directory '/u/prismapro/data/resimport/lcds'.
Note: You can use the command 'chfnm –u' to convert all resource names from lowercase to uppercase.
Select Harddisk as the input device and start copying.
The files in '/u/prismapro/data/resimport/lcds' are not deleted automatically after the
conversion!
Compile JSLs
After copying the resources on your system you have to compile the JSLs. This is done
in the JSL section of the 'LCDS Resources' window. Here you can also edit the JSLs and
modify them. The compiled JSL's are written to one file called '/u/prismapro/data/cat/<catalog>/ldparm.dat', where <catalog> is the current catalog.
Note:
If you select JSL in the 'List of Files' section of the Print Job Manager' (LCDS-Ticket),
you can also compile JSLs with the PJM!
Use this command to edit and compile JSLs. You have to compile every JSL you load
into the system in order to make it available for the LCDS-Module.
194
Chapter 4 - Océ PRISMAproduction Server 'Explorer'
LCDS-Module: 'LCDS Resources'
#
UI Element
Description
JSL file name
Type in the JSL ( max 6 digits) name without file extension to
be compiled or choose a JSL file from the list. Type in an asterisk (*) to compile all JSLs in the selected catalog. You can also
use ’?’ to replace single characters.
List box
Lists all JSL’s on the server.
'Edit'
Starts a notepad to edit the JSL’s. To edit a JSL, enter the JSL
name (max. 6 characters) without the file extension and click
the 'Edit' button. This opens an editing window in which you
can make changes. To save changes, close the window. You are
then asked whether you want to save the file. Answer Yes to
save the file, or No to discard the changes. When you have finished editing, you must compile the JSL to make the changes
effective.
Wildcards in the JSL filename are rejected by the UI, if the JSL
editor is called.
Note:
An imported JSL can be used further on a Xerox system
after export with the 'LCDS Resources Export' Explorer
applet.
'Compile'
Starts the compile process after selecting or typing in the JSL
name. (If you use wildcards like ’*’ or ’?’ all matching JSLs will
be compiled. When compiling JSLs, messages will appear in
the ’Message’ window for each processed JSL. The compiler
shows start and stop messages and a summary of all JSLs which
were read, successfully compiled or interrupted.
'Cancel Operation'
Aborts the compile process.
Chapter 4 - Océ PRISMAproduction Server 'Explorer'
195
'Input Status'
'Input Status'
'Input Status'
Introduction
This window shows the 'LP', 'Download' and 'HotDir' input queues, their status and
the jobs which are currently received. Additionally this window supports activating and
deactivating of individual queues.
The windoow can be switched between table- and symbol view.
See also: chapter "Input Modules" -> "Download", "HotDir" and "LP" in the Océ
PRISMAproduction Server Administrator's Guide.
Note:
During very high load of jobs the jobs shown in the window may not be real time or
the window may freeze completely. This does not have any influence to the job transmission. The window is usable again, after it is reopened.
196
Chapter 4 - Océ PRISMAproduction Server 'Explorer'
'Input Status'
Illustration
[222] Input Status Table View
[223] Input Status Symbol View
The upper half of the window displays all input channels of the type LP printer,
Download port and HotDir directory you have created on the system.
A filter allows you to display only one type of channel.
The status of the queue is displayed:
'Open - Idle' = ready to receive data
'Open - Receiving' = the system is receiving a print job
'Closed' = the respective daemon is down, no data can be received
Via the menu or toolbar you can manually activate or deactivate the daemons. You can
also reset the job counter.
The table in the lower half of the window displays the jobs which have been sent to the
input queues. You can display either the jobs of one channel type or all jobs.
Tool Bar Icons#
Icon
Description
Reset job counter. Resets the counter for active, finished and
error jobs to 0. The job list below is deleted.
Enable input channel.
Disable input channel.
Chapter 4 - Océ PRISMAproduction Server 'Explorer'
197
'Input Status'
Icon
Description
Filter applications: 'No Filter', 'LP', 'Download', 'HotDir'.
Toggle View:
Table view: Shows information in form of a table.
Symbol view: Displays the same information as symbols
'Show all Jobs': Displays all jobs of all input channels.
198
Chapter 4 - Océ PRISMAproduction Server 'Explorer'
'Local files'
'Local files'
'Local files'
Introduction
The 'Local files' entry provides access to files on your local computer system.
Generally existing access rights for files and directories are observed. Only these functions
are offered, which are allowed for the respective object.
The 'Local files' entry provides the usual functions for managing files. You can select two
start positions:
'/' ( ):
Provides access to the local file system (highest level).
'Home' ( ):
Displays the home directory of the user, who is logged on. This directory has been created
by the system when a new Océ PRISMAproduction Server user with auto login has been
set up on the Océ PRISMAproduction Server master. This $HOME directory is also
accessible via the PJM. The administrator defines the write permission for this directory
in the permission management application (see chapter User Management -> User Permissions in the Océ PRISMAproduction Server Administrator's Guide).
The files on all servers in the Océ PRISMAproduction Server cluster are accessible via
'Server Files'.
Local Files Window
Column Titles#
Column
Description
'File name'
Name of the file
'Type'
File type (file or directory)
'Size'
Size of the file or number of directories or files in the directory.
'Last modified'
Specifies when the file was last modified
'Access'
Access rights:
'-/-': No access
'r/-': Read access
'r/w': Read/Write access
'-/w': Write access
Chapter 4 - Océ PRISMAproduction Server 'Explorer'
199
'Local files'
Tool Bar Icons#
Icon / UI Element
Description
'Cancel current operation'
Cancels the operation
Directory List
Shows the open directory. Clicking the arrow
down button opens a history of the previously
visited directories.
'Change to parent directory'
Changes from the open directory to the nexthigher directory in the hierarchy.
'Update directory'
Rereads the directory from the operating system.
'Create new directory'
Creates a new directory in the opened directory.
'Delete selected files'
Deletes selected files.
'Cut selected files to clipboard'
Cuts selected files to the clipboard.
'Copy selected files to clipboard'
Copy selected files to the clipboard.
'Paste files from clipboard'
Pastes files from the clipboard to the opened directory.
'File' Menu (additional functions)#
200
Menu Entry
Description
Open
Opens a selected directory. The file is opened using the program,
which would usually be used by the operating system. You can
open a PDV file with all available PDV versions, if there is no
other viewing program assigned on the operating system level.
Double clicking the file or directory has the same effect.
'&Compare...'
Compares directories (see below)
Search...
Adds the search dialog to the directory viewer. You can search
for a file Name (wildcards * and ? are allowed) or for Content
(text, which is in the file, you search for) or for files of a certain
size/modification date. You can also include subdirectories in
the search.
Chapter 4 - Océ PRISMAproduction Server 'Explorer'
'Local files'
’View’ Menu (additional functions)#
Menu Entry
Description
'Files in subdirectories'
Check this option to show the subdirectories:
Functions in the list
You can select multiple entries by pressing Shift while you click the entries. Right-clicking
an entry opens a shortcut menu with functions, which depend on the context, for example.:
Open, Copy, Cut, Paste and Delete.
Double-clicking an entry has the same effect as Open.
Compare Directories
You can call this function from the File menu on the 'Local files'and 'Server Files' applications.
This tool compares the actual directory to another. Via the ’View’ menu you can also
include subdirectories.
The comparison itself is based on the filenames. The result of the comparison is displayed
on a separate tab with the addition [compare] in the title bar.
#
UI Element
Description
'Directory to compare'
You can either key in the name of the directory which should
be compared with the current directory or click the 'Open file'
icon to open a file selection dialog box. The current directory
is the one open on the screen in which you select the Compare
function. It is referred to in the upper area of the window and
also on the tab.
'List files that are
in both directories'
The comparison will list the files that are present in both directories.
'List files that are
only in current directory'
The comparison will list the files that are present only in the
current directory.
'Compare'
Starts the comparison
'Close'
Closes the window area with the compare function.
Chapter 4 - Océ PRISMAproduction Server 'Explorer'
201
General Usage of the Configuration Applications
Configuration
Usage of the Configuration Interfaces
General Usage of the Configuration Applications
Introduction
Because of the database concept, some icons and control elements appear with the same
functionality in many of the configuration applications. This chapter explains these elements and will be referred to in the subsequent chapters.
Editing configuration data
The configuration data is stored in the form of database tables. Each table consists of
rows and columns. When you select a row, you can edit its contents provided its value
is not derived from values in other fields. To modify a column entry, double click it with
the mouse. There is a standard set of functions and icons for editing tables:
Configuration Icons#
Icon
Description
Inserts a new row or item following the selected one.
Add new Row
/ Item
Deletes the selected row or item.
Delete Row /
Item
Reload /Discard all
Changes
Save
Duplicate Row
/ Item
202
Shows the actual status of the data stored in the database. Any
changes that you have made via the interface are discarded if you
do not save them prior to executing this function.
Saves to the database any changes that you have made via the interface.
Duplicates a row or an item in the database. The entry can be
modified afterwards.
Chapter 4 - Océ PRISMAproduction Server 'Explorer'
General Usage of the Configuration Applications
Context Menus
If you click with the right mouse button on a column title a context menu opens with
functions to sort the list or to hide and display colums.
If you click with the right mouse button in the list a context menu opens with commands
to insert or delete rows.
Predefined Entries in Tables
If a column must contain a predefined entry, a double click on the column displays a list
of the entries you can pick.
Chapter 4 - Océ PRISMAproduction Server 'Explorer'
203
General Usage of the Configuration Applications
'User Management'
General Usage of the Configuration Applications
Introduction
Because of the database concept, some icons and control elements appear with the same
functionality in many of the configuration applications. This chapter explains these elements and will be referred to in the subsequent chapters.
Editing configuration data
The configuration data is stored in the form of database tables. Each table consists of
rows and columns. When you select a row, you can edit its contents provided its value
is not derived from values in other fields. To modify a column entry, double click it with
the mouse. There is a standard set of functions and icons for editing tables:
Configuration Icons#
Icon
Description
Inserts a new row or item following the selected one.
Add new Row
/ Item
Deletes the selected row or item.
Delete Row /
Item
Reload /Discard all
Changes
Save
Duplicate Row
/ Item
204
Shows the actual status of the data stored in the database. Any
changes that you have made via the interface are discarded if you
do not save them prior to executing this function.
Saves to the database any changes that you have made via the interface.
Duplicates a row or an item in the database. The entry can be
modified afterwards.
Chapter 4 - Océ PRISMAproduction Server 'Explorer'
General Usage of the Configuration Applications
Context Menus
If you click with the right mouse button on a column title a context menu opens with
functions to sort the list or to hide and display colums.
If you click with the right mouse button in the list a context menu opens with commands
to insert or delete rows.
Predefined Entries in Tables
If a column must contain a predefined entry, a double click on the column displays a list
of the entries you can pick.
Chapter 4 - Océ PRISMAproduction Server 'Explorer'
205
'Events' Configuration
'Events'
'Events' Configuration
Introduction
It is possible to make the start of a job dependent on the occurrence of a particular event.
Job execution is directed with the "Start Job Events" and "Start Print Events" functions
in the Job Attributes Section of the PJM (see chapter "Job Attributes" -> "Start Job
Events" and chapter "Job Attributes" -> "Start Print Events" in the Océ PRISMAproduction Server User's Guides.
The events that users can choose in the PJM to direct job execution have to be defined
using this configuration interface. This interface is also used during processing to confirm
the occurrence of a particular event.
Illustration
Column Titles
#
Column
Description
'Events Name'
Name of the event. This is used in the PJM for directing and
controlling the events. A typical event name would be “roll
loaded”.
'Description'
For instance “roll with red paper must be loaded on the printer”.
'Active'
Setting an event to “active” state indicates that it has occurred.
This setting can also be changed by the operator.
For a description of the menu and toolbar icons see: ‘General Usage of the Configuration
Applications’ on page 204.
206
Chapter 4 - Océ PRISMAproduction Server 'Explorer'
'Paper' Configuration Tool
'Paper'
'Paper' Configuration Tool
Introduction
You can use this dialog to define paper types which are available throughout the whole
system. You need paper types:
■
■
■
for the use in DPconnect,
as input parameters for conversion. Most of the default paper types are already predefined in the 'Standard Paper' table. They are also offered in the ’Convert’ dialog in
the PJM. For the conversion only the size of the paper is relevant,
to describe the contents of the input trays. You can use the ’User defined Paper’ table
to define any paper with specific attributes.
Use the 'Form' table to define forms which can be assigned to a job under the PJM dialog
'Job Attributes' -> 'Print'. The form names also appear in the job lists.
The 'Tab' table displays all available tabsets together with their description. These tabs
are available in the 'Tab Printing' dialog of the PJM (POD only). You have to select the
tabset which corresponds to the tabset inserted into the printer.
With the tabs 'Standard Paper' and 'User defined Paper' you can chose between the units
'mm' and 'inch'
You can switch between four tabs to show or modify the different tables:
Chapter 4 - Océ PRISMAproduction Server 'Explorer'
207
'Paper' Configuration Tool
Illustration
Description of the tabs:
#
Tab
Description
'User defined Paper'
Select this entry to set up user defined medias and to specify
various media attributes (see table below).
User defined papers can be assigned to printer input trays using
the 'Media Settings' dialog in the 'Printer Pool' application
'Standard Paper'
Paper types which are most commonly used, are already predefined and are shown in the table, if you select this entry. These
papers are only defined by size.
Standard papers can be assigned to printer input trays using the
'Media Settings' dialog in the 'Printer Pool' application (see
chapter "Printer Pool" -> "Tool Bar and Menu Functions" in
the Océ PRISMAproduction Server User's Guides).
'Form'
Select this entry to define forms, which are assigned to a job via
the PJM 'Job Attributes' -> 'Print' dialog.
'Tab'
All available tabs are described in this table. These tabs are
provided fpr tab printing in the PJM. You have to select the
type, which has the same number, size and sorting as the tabs
inserted.
If you select 'User defined Paper' you can define the following parameters for each paper:
#
208
Column
Description
'Paper Name'
Freeform name to identify the paper. Choose some standard
names from a list box if you click into the name field. Maximum
length: 40 characters.
'Weight'
Paper weight. Integer values from 40g/m² to 200g/m².
Chapter 4 - Océ PRISMAproduction Server 'Explorer'
'Paper' Configuration Tool
Column
Description
'Color'
Any color of the paper. Some colors are offered in a list box.
'Transparent' switches ’Type’ to transparent film. Max. length
of the field: 40 characters.
For every color in the combo box a defined hex code will be
inserted in the data stream. For other colors, which you insert
manually, a special hex code for ’Custom Color’ is inserted.
Additionally you can use so called color prefixes: clear, light or
dark, where clear can be combined with light or dark.
Example: Possible combinations of the color red: red, clear red,
light red, dark red, clear light red, clear dark red.
'Type'
'Standard'
'Transparentfilm'
'Precuttabulator'
'Preprinted'
'X Size'
Width of the paper in mm or inch.
'Y Size'
Height of the paper in mm or inch.
'Order Count'
Quantity of proposition of sorted printed sheets, between min.
0 and max. 100.
'Drilling'
In case of drilled paper insert max. 4 holes. DPconnect needs
the setting ’Drilling=3’.
If you select 'Form' you can define the following parameters for each form:
#
Column
Description
'Form Name'
Freeform name, max. 8 characters.
'Form Description'
Description of the form, max. 255 characters.
Chapter 4 - Océ PRISMAproduction Server 'Explorer'
209
Workflow 'Tab Printing'
Workflows
Workflow 'Tab Printing'
Introduction
With tab printing you have to specify a tabset. You have to select a tabset, which corresponds to the size, number and sorting of the tab sheets inserted. The name of the tabset
describes also its properties.
■
■
Example 1: A4Tab03E1n: 'A4 Tabs with 3 Sheets Single Flag (1-n)'
Example 2: LetTab07W1n: 'Letter Tabs with 7 Sheets Waterfall (1-n)'
Tab printing is supported in two modes:
Printing without resource file:
The document contains all information to insert tabs on the correct positions. There are
two possibilities:
■
■
Information on the position of the tab pages is available in the document. Setting
'From Print Data'.
The tab pages are available in the data stream and are identified by their size. Setting
'From Print Data using Size of Tab Pages'.
Printing with resource file (setting 'Explicit'):
There is no information on tabs in the document to be printed.
A resource file containing tab pages must be available in addition to the print file. This
resource file has been created using a special tool and has been saved as 'Resource' of the
type 'Tab Resource' in the PJM 'Store' options. Under 'Positions' you indicate, before
which document pages a tab page has to be inserted.
210
Chapter 4 - Océ PRISMAproduction Server 'Explorer'
Workflow 'Tab Printing'
Illustration
#
UI Element
Description
'Tab Printing'
Has to be activated to make the settings for tab printing.
'Tab Set'
The required tab set is set here.
'Explicit'
The positions of the tab pages are indicated explicitly. The tab
pages are expected in a resource file.
'Positions': Indicate the pages of the input document, before
which a tab page should be inserted. The input document is
the document, which does not yet contain tab pages.
Rules for entering the position:
■ The single positions are separated by a semicolon.
■ Values must be in ascending order.
■ With duplex/tumble documents you have to take care that
the position always refers to a front page (you cannot insert
tab sheets before back pages).
■ The positions can be described by the following expressions
(’n’ is the last page of the input document):
integer n
n - integer
n / integer
n / integer - integer
n / integer + integer
n+1
'Resource': Indicate a resource file, which contains only tab
pages.
'From Print Data'
The positions of the tab pages are already part of the data stream
of the print data (makes only sense with a DPconnect file).
Chapter 4 - Océ PRISMAproduction Server 'Explorer'
211
Workflow 'Tab Printing'
212
UI Element
Description
'From Print Data
using Size of Tab
Pages'
The data stream contains pages, which can be identified as tab
pages by their size. This method can only be used with special
DocSetter documents.
Chapter 4 - Océ PRISMAproduction Server 'Explorer'
3
Workflow UP I Devices
3
Workflow UP I Devices
Introduction
The UP3I parameters are processed by the Professional Document Composer, which
adds the information to the data stream.
The connection of UP3I devices is realized via a special output tray. This output tray is
created in 'Configuration' -> 'Printers' -> 'Output Devices'. In the "Type" column select
the UP3I device from a list.
Illustration
3
Configuration of UP I Devices
If you select the tray with the UP3I devices as 'Output Tray', the button 'UP3I Devices'
becomes active in the PJM 'Job Attributes' -> 'Print' dialog.
Select 'Job Attributes' -> 'Print' -> 'UP3I Devices' to enter parameter for these devices.
Every device configured in 'Configuration' -> 'Printers' -> 'Output Devices' is represented
by a tab. The parameters offered refer to the device on the active tab only. You can decide
for example in case of a stitcher, which corner of the paper is to be stitched or in case of
an cutter you define the line for the cut.
Chapter 4 - Océ PRISMAproduction Server 'Explorer'
213
3
Workflow UP I Devices
If the output tray is changed, the PJM checks if the UP3I parameters fit to the new tray.
If they don't fit, the PJM offers to remove the parameters.
The following UP3I devices can be configured:
Duplo Booklet Maker
#
UI Element
Description
Stitcher
Use Stitcher:
■ Activate Stitcher.
'Without': no rotation; 'With': Rotate by 90 degrees. The rotation works only for formats like A4, letter and similar formats.
Axis Offset
Distance from the outer edge to the inner edge. For recommended values see table below.
Staple Positions
The staples will always be positioned centric. You can influence
the distance of the staples by entering values in these fields.
Folder
Axis Offset
Distance from the outer edge to the inner edge. For recommended values see table below.
Trimmer
Use Trimmer
Activate trimmer. The trimmer cuts the booklet along the open
edge to avoid creeping of the pages. ’Trim Offset’: Distance
from the outer edge to the inner edge. For recommended values
see table below.
Restrictions
Information on the restrictions of this postprocessing type.
Recommend Settings for Duplo Bookletmaker:
214
Chapter 4 - Océ PRISMAproduction Server 'Explorer'
3
Workflow UP I Devices
#
Format
name
Format
size
Printing
direction
Position
in Duplo
Rotation
Stitch
Axis
Offset
Fold
Axis
Offset
Staple
Position
A
Staple
Position
B
Trim
Offset
A4
210 x
297
mm
LEF
SEF
Yes
148,5
148,5
52
157
147
A4 +
215 x
305
mm
LEF
SEF
Yes
152,5
152,5
54
162
149
A4
SEF
297 x
210
mm
SEF
SEF
No
148,5
148,5
52
157
147
Letter
216 x
279
mm
LEF
SEF
Yes
139,7
139,7
54
162
138
Letter
SEF
279 x
216
mm
SEF
SEF
No
139,7
139,7
54
162
138
Legal
356 x
216
mm
SEF
SEF
No
177,8
177,8
54
162
176
Ledger 432 x
279
mm
SEF
SEF
No
216
216
70
210
214
A3
420 x
297
mm
SEF
SEF
No
210
210
75
225
208
A3 +
430 x
305
mm
SEF
SEF
No
215
215
76
228
210
General
length
x
width
LEF
SEF
Yes
width/2
width/2
length/4
length
* 3/4
width/2
-2
mm
General
SEF
width
x
length
SEF
SEF
No
width/2
width/3
length/4
length
* 3/4
width/2
-2
mm
Chapter 4 - Océ PRISMAproduction Server 'Explorer'
215
3
Workflow UP I Devices
All values are in mm. The most common formats appear bold. LEF=Long edge forward.
SEF=Short edge forward.
Duplo Stitcher
#
UI Element
Description
Stitcher
Rotation:
Without: no rotation; With: Rotate by 90 degrees.
Stitch Positions:
The staples will always be positioned centric. You can influence
the distance of the staples by entering values in these fields.
Restrictions
Information on the restrictions of this postprocessing type.
Recommended Settings for Duplo Stitcher#
216
Format
name
Format
size
Printing
direction
Position
in Duplo
Rotation
Stitch
Position
A
Stitch
Position
B
A4
210 x
297 mm
LEF
LEF
No
75
225
A4 +
215 x
305 mm
LEF
SEF
No
76
228
A4 SEF
297 x
210 mm
SEF
LEF
Yes
75
225
Letter
216 x
279 mm
LEF
LEF
No
70
210
Letter
SEF
279 x
216 mm
SEF
LEF
Yes
70
210
Chapter 4 - Océ PRISMAproduction Server 'Explorer'
3
Workflow UP I Devices
Format
name
Format
size
Printing
direction
Position
in Duplo
Rotation
Stitch
Position
A
Stitch
Position
B
Legal
356 x
216 mm
SEF
Not passible
Ledger
432 x
279 mm
SEF
A3
420 x
297 mm
SEF
A3 +
430 x
305 mm
SEF
General
length x
width
LEF
SEF
Yes
length/4
length *
3/4
General
SEF
width x
length
SEF
SEF
No
length/4
length *
3/4
All values are in mm. The most common formats appear bold. LEF=Long edge forward.
SEF=Short edge forward.
VP 5000 High Capacity Stacker
#
UI Element
Description
Offset
Indicate if you wish an offset when stacking.
Restrictions
Information on the restrictions of this postprocessing type.
Chapter 4 - Océ PRISMAproduction Server 'Explorer'
217
3
Workflow UP I Devices
VP 5000 High Capacity Stacker (with Stitcher)
#
UI Elemen
Description
Rotator
Degrees:
Select a rotation by 0 or 90 degrees.
Stacker
Alternate Offset:
Indicate if you wish an offset when stacking.
Restrictions
Information on the restrictions of this postprocessing type.
Note: You cannot use rotation and stacker at the same time!
This leads to a paper jam.
VP 5000 Stitcher
#
218
UI Element
Description
Corner Staple
Use Stapler:
Activate device. ’Position’: Select the corner, where the staples
should be positioned. ’Staple Offset’: Enter an offset value.
Edge Stitch
Use Stitcher:
Activate device. ’Stitch Offset’: Enter an offset value, which indicates the distance from the upper and lower edge of the paper.
If nothing is entered here, the staples will be placed near the
upper and bottom edge of the document.
Chapter 4 - Océ PRISMAproduction Server 'Explorer'
3
Workflow UP I Devices
UI Element
Description
Stacker
Offset:
Indicate if you wish an offset when stacking. Stacker means here
the internal stacker of the stitcher.
Restrictions
Information on the restrictions of this postprocessing type.
The UP3I values will be added to the ticket parameters.
Chapter 4 - Océ PRISMAproduction Server 'Explorer'
219
Workflow 'Color Selection'
Workflow 'Color Selection'
Introduction
You can define the colors in the PJM to ensure, that the print job submitted is printed
with the correct colors.
Select Colors in the PJM
You can define the colors for the print job in the PJM dialog 'Job Attributes' -> 'Print'.
The number of possible settings corresponds to the number of toner stations installed in
the selected printer. You can configure this number in ’Configuration’ -> 'Printers' ->
'General'. The toner colors selectable in the PJM -> 'Job Attributes' -> 'Print' dialog can
be provided with the following procedure:
Steps to configure the Printer Colors
#
220
Step
Action
1
In the 'Explorer' open 'Configuration' -> 'Printers' -> 'Toner Stations':
Chapter 4 - Océ PRISMAproduction Server 'Explorer'
Workflow 'Color Selection'
Step
Action
2
On this tab you find a list with all toner colors currently available from Océ
as well as the user defined toners which you configure under 'Configuration'
-> 'Consumables' (see chapter 'Consumables' Configuration in the Océ
PRISMAproduction Server Administration Settings and Tasks Guide).
For the selected printer check the boxes of the desired toners under 'Available
for Printer'.
'Toner name' and 'Color names' of the selected toners are also displayed in
the 'Printer Settings' dialog of the 'Printer Pool' application. Here you can
mark those colors which should be checked before printing:
Chapter 4 - Océ PRISMAproduction Server 'Explorer'
221
Workflow 'Color Selection'
Step
Action
3
In the PJM in 'Job Attributes' -> 'Print' dialog you can now select the toner
color for the respective toner station of the active printer in the 'Color Selection' section:
'Color Selection': The color allocations configured in 'Configuration' ->
'Printers' -> 'Toner Stations' are offered here. The number of list boxes shown
depends on the toner stations installed in the selected printer.
If you submit this print job, the color names also appear in the "Color" column of the 'All Jobs' application:
222
Chapter 4 - Océ PRISMAproduction Server 'Explorer'
Workflow Media Assignement to Printers
Workflow Media Assignement to Printers
Introduction
The following steps must be performed to make use of the Attribute based Input Media
Selection (AIMS) features of a supporting printer model:
Steps
1. Set messages flags:
It is advisable to activate a monitoring mechanism when working with media attributes.
This mechanism will issue messages in case of a mismatch of the paper types defined in
Océ PRISMAproduction Server and provided by the printer. Therefore you can select a
special tuning set "Activate media attribute mismatch (MMT) message" on the Print
Parameter tab in 'Configuration' -> 'Printers'.
2. Create paper types:
Under 'Configuration' -> 'Paper' define the papers you wish to use on your production
system by entering a name and the intended media attributes. The paper names defined
here will be assigned to input bins later on. It is necessary that the names and attributes
match those entries defined on the target printers. Otherwise no match on media attributes
will be possible. The following attributes characterize a paper
#
Paper Name
Freeform text, but must be unique.
Weight
As indicated on the package
Color
See table below.
Type
See table below.
Size
Width (X Size), Height (Y Size)
Order Count
Reserved for future functions
Drilling
Reserved for future functions
Available colors:
#
white
black
gray
Chapter 4 - Océ PRISMAproduction Server 'Explorer'
223
Workflow Media Assignement to Printers
red
yellow
green
blue
turquoise
violet
orange
brown
gold
silver
noColor
pink
buff
ivory
goldenrod
mustard
Available Media Types:
#
Standard
Transparentfilm
Precuttabulator
Preprinted
3. Configuring Input Trays:
In 'Configuration' -> 'Printers'select the 'Input Devices' tab and define for every Cutsheet
printer as many input trays as the number of different medias you intend to use in your
workflow.
4. Assigning media types to input trays:
224
Chapter 4 - Océ PRISMAproduction Server 'Explorer'
Workflow Media Assignement to Printers
In the 'Printer Pool' application select the 'Media Settings ...' icon to assign the media
defined in the 'Paper' application to the input trays of the selected printer. These media
can be regarded as your default media load.
Chapter 4 - Océ PRISMAproduction Server 'Explorer'
225
Workflow LCDS
Workflow LCDS
Introduction
The following chapter provides a short overview on the basic steps to print an LCDS file.
Illustration
Step 1: Create a New Catalog
See ‘LCDS-Module: New catalog’ on page 18.
See ‘LCDS-Module: Organization of Resources’ on page 19.
Step 2: Copy and/or Convert Resources
See ‘LCDS-Module: LCDS Resources’ on page 190.
Step 3: Compile JSLs
See ‘LCDS-Module: LCDS Resources’ on page 190.
226
Chapter 4 - Océ PRISMAproduction Server 'Explorer'
Workflow LCDS
Step 4: Print LCDS Process
You can start the print process with the PJM Explorer applet. For details see chapter
"PJM" -> "Properties for LCDS file" in the Océ PRISMAproduction Server User's Guide.
Multiple Process Chains
The use of parallel LCDS Process chains is supported from V3.10. Two typical use cases
may be given here to explain the usage and advantages.
■
■
Use Océ IPDS twin fanfold system print-while-spooling both in the twin configuration
(one process chain supported in V3.0X) and 2 parallel process chains in a "two-single"
configuration.
Process (Copy, Compile, and Print (sequentially)) production data on a production
catalog.
Parallel a new test catalog may be created and resources may be copied and converted,
JSLs may be edited and compiled and test print done. This test actions may be performed parallel to print process on production catalog without interfering with each
other.
For details concerning use of this function for multiple process chains, please see also:
chapter "LCDS Parameter Configuration" -> " Description of the JCF Parameters" in
the Océ PRISMAproduction Server Administrator's Guide, for example keyword 'DeviceName1/2/3'.
Other LCDS Options
Form Sample
See chapter "PJM" -> "Properties for LCDS file" -> "Feed" in the Océ PRISMAproduction
Server User's Guide..
View CMD Files
You can view and delete Xerox CMD files with the $LCDS file system. Knowing the
contents of these files makes it easier to adjust the required workflow for the LCDSModule (which resources have to be loaded? Which clustering commands should be implemented in the stockset configuration?). You can open these ASCII files by double
clicking them in the $LCDS and $GCI file system, which is accessible via the 'Server
Files' application in the Explorer.
Save and Restore
Chapter 4 - Océ PRISMAproduction Server 'Explorer'
227
Workflow LCDS
In order to save or restore directories or single files (esp. whole LCDS catalogs) you can
use the tarscript command in the following way:
' /u/prismapro/bin/tarscript_HD <dir_name> <HD-file name> [SAVE|RESTORE]'
Example:
'/u/prismapro/bin/tarscript_HD /u/prismapro/data/cat/DEFAULT/tmp/examle.tar
SAVE'
This HD file can easily be copied (ftp, etc.) to other computers or USB-, DVD-media.
228
Chapter 4 - Océ PRISMAproduction Server 'Explorer'
Index
Index
All Jobs
........................................................................62
Job details viewer ............................................81
Job list columns ..............................................64
Job states ........................................................67
Menu and tool bar functions ..........................70
Standard filtered job lists (All Jobs, Active Jobs,
Exception Jobs, Print Queue, Finished Jobs) ...62
Organization of Resources ..............................19
Stockset Configuration Tool ...........................21
Local Files
Directory viewer ...........................................199
M
Menu Bars (Appearence)
........................................................................44
Messages
Delete, find and create messages .....................90
Menus ............................................................90
Operator requests .........................................103
Overview ........................................................87
View and filter messages .................................96
C
collect
........................................................................16
Configuration
All Jobs ...........................................................62
Events ..........................................................206
General Usage of the Applications .......202, 204
Paper ............................................................207
E
Events Configuration
......................................................................206
Explorer
Classic Explorer ..............................................48
F
Forms
......................................................................208
I
Input Module
Display Input Module status info .................196
Input Status
......................................................................196
L
LCDS-Module
File Formats .................................................155
Multiple Process Chains ...............................155
New Catalog ...................................................18
P
Paper Configuration Tool
......................................................................207
Preferences
........................................................................44
Print Job Manager
Components of the main window ................106
Configure data viewers .................................152
Define job name, copies, printer and job queue
......................................................................110
Expert Mode ................................................153
File formats in the List of Files .....................122
File Selection Box .........................................119
Introduction .................................................105
Job Attributes: Custom settings ....................145
Job Attributes: Generate messages ................128
Job Attributes: Header/Trailer pages ............139
Job Attributes: Notify job states by eMail .....144
Job Attributes: Overview ..............................126
Job Attributes: Print options ........................133
Job Attributes: Start Job Events ....................141
Job Attributes: Start Print Events .................143
Job Attributes: Store options ........................129
Job Menu .....................................................146
Job Parameter section ...................................110
Job ticket parameter .....................................147
Jobrequirements ...........................................147
Jobsplitting per job copies ............................113
List of Files handling (Edit Menu) ................115
Main window overview ................................106
Mirror print jobs ..........................................147
Open the TrueProof viewer ..........................152
PJM working modes .....................................153
229
Index
Preparation Mode .........................................153
Production Mode .........................................153
Properties for LCDS file: Overview ..............155
Ticket Menu (New, Open and Save tickets) ..108
Transfer Mode .............................................147
Utilities Menu ..............................................152
Virtual directories accessible via the file selection
box ...............................................................124
Printer Pool
Create filtered printer lists ............................183
Job Selection Checks ....................................177
Overview ......................................................169
Printer automation .......................................179
Printer Maintenance .....................................180
Printer Settings .............................................177
Tool bar and menus .....................................173
PRISMA Status
........................................................................13
PRISMAproduction Menu
........................................................................13
R
Reboot
........................................................................13
Reset
S
Sessions
........................................................................38
Sessions (User defined)
........................................................................40
Shutdown
........................................................................13
Stockset Configuration
........................................................................16
T
Tables (Appearence)
........................................................................44
Tabs
......................................................................208
U
User Defined Paper
......................................................................208
User Scripts
230
........................................................................13
User Utilities
........................................................................13
W
Workflow
Color Selection .............................................220
Tab printing .................................................210
UP3I devices ................................................213
Workspaces
........................................................................38
Workspaces (User defined)
........................................................................40