1
DCCONFIGURATOR
Software Programming Utility for NDC-F16,
NDC-F16PS and DLK-642 Access Control
Panels
USER MANUAL
®
Dc Configurator
http://www.itvsystems.com.ua
Integrated Technical Vision
1
2
Integrated Technical Vision
http://www.itvsystems.com.ua
This manual covers installation of DC Configurator software intended for NDCF16, NDC-F16PS and DLK-642 access control panels programming.
All rights to this document are possessed by Integrated Technical Vision Ltd.
Copying, printing or any other kind of unauthorised reproduction of this document or of its part is stictly prohibited.
Informatin due to design changes and product umprovements is the subject to
change without notice in this manual. ITV Ltd reserves the right to change the
product any time and it will subsequently affect the contents of this manual.
ITV assumes no responsibility for any mistakes that can appear in the manual.
The company guaratees that this User Manual is up to date and fully
corresponds to the software you acquire.
ITV is a registed trademark of Integrated Technical Vision Ltd.
http://www.itvsystems.com.ua
Integrated Technical Vision
3
Contents
System Requirements ................................................................................... 5
Program Installation ....................................................................................... 5
Program Start ............................................................................................... 6
Projects. Creating and Opening ..................................................................... 6
Filling the project information ............................................................................... 7
Panel ..................................................................................................................... 7
Doors ..................................................................................................................... 8
Cardholders (Users) .............................................................................................. 9
Holidays .............................................................................................................. 11
Enrolled cards List ............................................................................................... 12
Event log ............................................................................................................. 13
Panel Programming ..................................................................................... 14
Panel downloading ...................................................................................... 16
Panel uploading ........................................................................................... 17
Projects. Saving and Closing. ............................................................................. 18
Program closing .......................................................................................... 19
Main Notions ....................................................................................................... 19
4
Integrated Technical Vision
http://www.itvsystems.com.ua
System Requirements
Program is designated for NDC-F16, NDC-F16PS and DLK-642 Access Control
Panels programming, creating projects, gathering information about enumerated
panels programming, panels event log retrieving and RF ID enrolment.
System Requirements
•
•
•
•
Intel 80486 or higher CPU
16 MB RAM and more
Display resolution 800x600 and more
Microsoft® Windows™ 95, Windows™ 98, Windows™ 2000,
Windows™ XP, Microsoft® Windows™ NT 4.0 operating systems.
Program Installation
1.
2.
3.
Insert floppy disk into the Floppy Drive (A: , for instance)
Choose START/RUN…
In the edit line type appears A:\SETUP.EXE press OK. The installation will
start
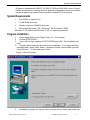
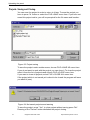
4.
Program will prompt you the path for the installation. If you agree with the
prompted path, press “Next” button, otherwise choose required path yourself
using “Browse…” button and press “Next”.
Figure 1 Set-up Window
5.
Installation program will copy the files into the chosen folder and create the
http://www.itvsystems.com.ua
Integrated Technical Vision
5
Program Start
i c o n
on the desktop.
The
Installation is complete.
Program Start
To start the program click twice on the icon on your desktop. The program start
window (Figure 2) will appear.
Figure 2 Running program
Projects. Creating and Opening
You have to create new project to start work with panel. You can do it by
pressing
button or selecting FILE >CREATE PROJECT menu item.
The newly created project is named "Project 1", the next - "Project 2" and so on.
All projects are displayed in the project list in the left part of the window. To
select the desired project find it's name in the list of projects and click on it.
If you want to revert to the earlier created project (to open a project), press
* button or select FILE->OPEN menu item and choose the desired project file.
6
Integrated Technical Vision
http://www.itvsystems.com.ua
Projects. Creating and Opening
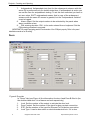
Filling in the project information
Panel
Figure 3 The Panel tab
In the "Panel" tab (see Figure 3) you can fill in the information:
1.
Panel Name. Type the reasonable panel name here, describing its location,
for instance.
2.
Panel Type. Choose the type of the panel from the drop-down list. All panel
types, supported by the program, listed here. As soon as the panel type is
chosen, the maximal values for inputs, outputs, users etc. are filled in. It is not
recommended to set these values manually. Although you can do it after
having checked the box "Manual settings". Look in the panel installation
manual for allowable values.
3.
Panel ID. Type or choose the address in the RS-485 drop line, assigned to
the panel. Valid values are from 0 to 31.
4.
Number of COM port. Type or choose the serial communication port
number the panel is connected to.
5.
Door Type. Panel can supervise one double-sided door or two single-sided
doors. You have to set the number of doors - one or two in the 'Door Type'
panel in case of single-sided door type utilization.
6.
Bell. Set the number of the output to be activated for bell and bell sound
duration. This output will be activated by the panel when alarm condition
arises.
http://www.itvsystems.com.ua
Integrated Technical Vision
7
Projects. Creating and Opening
7.
Antipassback. Antipassback test (test for the subsequent entrance with the
same ID) is performed only for double-sided door. If antipassback is active you
can set the time for antipassback testing. To set this time unlimited you have to
set zero value. SOFT antipassback means, that in case of the subsequent
entrance with the same ID access is granted, but the "Antipassback violation"
event is logged.
8. Alarm output. Set the output number to be activated by the panel when
alarm condition arises.
9. PIN entering duration. PIN - is the code entered from a keyboard. Set the
PIN entering duration in seconds.
IMPORTANT! Be careful assigning panel's ID and number of the COM port properly. Refer to the panel
installation manual as for ID setting.
Doors
Figure 4 Door tab
In "Doors" tab (see Figure 4) the information for door A and Door B filled in (for
the double-sided door it is entrance and exit respectively)
1. Lock. Set the number of the output to activate the door lock.
2. Door Contact. Set the number of the input for door contact connection.
3. RTE. Set the number of the input for Request To Exit button connection.
4. Lock Type. It can be door strike or electromechanical lock. If it is door
8
Integrated Technical Vision
http://www.itvsystems.com.ua
Projects. Creating and Opening
strike, lock output will be energized till door is open (door contact becomes
open) or till door time expires. For electromechanical lock the output is
energized for 'Lock pulse time' set in the 'Lock type' panel.
5.
Door Time. Door time may be supervised. Set the door time in seconds. If
door is open for a period, longer than time set, alarm condition arises
Cardholders (Users)
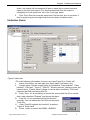
Figure 5 Users tab
Fill in the following information for every user (see Figure 5) in 'Users tab”:
I.
Name (Line where you can type user family name, first name, etc.)
II. Access rights. Set the access rights in checkboxes "Card enabled", "Card
blocked", "Card lost", "Door A", "Door B", "Security service" (allows to enter the
blocked door), "Cancel Alarm" (allows to cancel alarm condition), "PIN used"
(denotes that PIN used along with ID)
III. Expiry Term. If it is necessary to restrict the access with this ID on certain
date, mark checkbox "Expired" and choose the date.
IV. Card ID. It is not recommended to fill this field
manually. You can obtain the Card ID from the panel.
To do this:
1) Clear "Card ID supplied by controller" checkbox
Figure 6 'Enroll card'
2) Press button or select the PANEL->ENROLL
http://www.itvsystems.com.ua
Integrated Technical Vision
9
Projects. Creating and Opening
CARD
prompt
menu item.
3) The panel will prompt you to enroll the
card (see Figure 6). Pass the RF ID card
to the reader.
4) Card ID will appear in proper field
Also you can select Card ID from the list of
the enrolled cards (see Enrolled cards
List). To do this:
5) Clear "Card ID supplied by controller"
checkbox
6) Press the button at the card ID field
7) The list of the enrolled cards (see
Figure 7) will appear. Select desired card
and press "Apply".
You can register card code manually:
1) Press “...” button
2) After “Card code editor” appears,
Figure 7.
fill in the lines and press “OK”
V.
Schedule. Fill the week schedule
table for the user. After the changes made
"Apply" and "Cancel" buttons appear.
To confirm the changes made, press "Apply"
IMPORTANT! Check the schedule
thoroughly. Access time should be inserted
correctly. The start time of the period is to be
less than the end time. Format is HH:MM.
IMPORTANT! Unused start and end timeof period
must be marked with '-' sign
To select the desired user you can either use
buttons:
(first user in the list),
(previous user in the list),
(next
user in the list),
(last user in the list),
or press button and choose desired user from the list appear (see Figure 8).
Select user and press "Apply".
To add user press
button. When adding
new user program
will prompt (see
Figure 9) you to copy current user settings
(schedule, access rights, validity term) for
new user settings. Press "Yes" if you want
to copy settings.
To remove selected user from the list press
button. You will be prompted for removal:
If you really want to remove it, press "Yes".
If the removed user ID was selected from
Figure 8.
10
Integrated Technical Vision
http://www.itvsystems.com.ua
Projects. Creating and Opening
the list of enrolled ID's, this ID will appear in this list again.
Figure 9.
Figure 10.
Holidays
Figure 11 Holidays tab
In "Holidays" tab you are to fill the holiday list. On holidays access is granted on
periods, stated in "Holidays" row of the "Schedule" table. To add the date to the
list of holidays, select it in calendar and confirm your choice by pressing the
"Add" button. To remove the date from the holiday list select it in the list and
press the "Delete" button.
http://www.itvsystems.com.ua
Integrated Technical Vision
11
Projects. Creating and Opening
Enrolled cards List
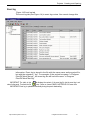
Figure 12 Enrolled cards tab
Enroled cards tab (see Figure 12) contains the list of the enroled ID cards. This
list is for the storage of ID cards numbers and titles given to users. This approach provides issuing cards to users without card enrolment for each particular user and issuing cards without panel.
To add new
ID cards to the list (batch enrollment):
1) P r e s s
button or select PANELS->BATCH ENROLLMENT menu
item
2) After "Enroll card" (see Figure 6) appears, pass cards to the reader
subsequently
3) If an ID card is not enrolled yet (neither for user nor to the list of enrolled
cards) the prompt for card name typing will appear (see Figure 13). Type the
card name.
Figure 13 Prompt for card name typing
4) Press "Apply" button to confirm name
You can clear the list of enrolled cards with
"Clear" button pressing.
IMPORTANT! You can edit neither name nor
card ID in this table. It is used only for viewing the list
of enrolled cards.
12
Integrated Technical Vision
http://www.itvsystems.com.ua
Projects. Creating and Opening
Event log
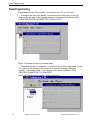
Figure 14 Event log tab
The event log tab (see Figure 14) is event log review. You cannot change this
information. Event log is stored in the file with the same name as the project file,
but with the extension ".log". For example, if the project has name "c:\Program
Files\DCWork\Test.prj", the event log file will have the name "c:\Program
Files\DCWork\Test.log"
IMPORTANT! The table in this
tab displays the content of the event log file, but the event log is not
stored in the panel. To refresh the file
press button or choose PANELS->RETREIVE LOG menu item.
IMPORTANT! Event log is updated automatically during the panel downloading.
http://www.itvsystems.com.ua
Integrated Technical Vision
13
Panel Programming
Panel Programming
To determine the list of the panels, connected to your PC, you have to:
•
Determine the list of the panels, connected to all serial ports of your PC,
select in the left part of the program window "Controllers" and choose PANELS->FIND DEVICES CONNECTED TO ALL PORTS.
Figure 15 Search devices on all serial ports
•
Determine the list of the panels, connected to the certain serial ports of your
PC, select in the left part of the program window the desired COM port
number, "Controllers-COM 1" for instance, and choose PANELS->FIND
DEVICES CONNECTED TO COM PORT.
Figure 16 Search devices on the certain serial port
14
Integrated Technical Vision
http://www.itvsystems.com.ua
Panel Programming
If panels are found, the '+' sign will
appear at the port name.
To see the panels, connected to this
port click on this sign (See Figure 17).
To determine the ID of the certain
panel, select it in the list. The panel
named “My Panel” is selected on
Figure 19 . It is connected to COM1
serial port and has ID (address) equal
to zero.
Figure 17. Panels on COM1found
Figure 18. List of
panels on COM1
Figure 19. “My panel” is
selected
http://www.itvsystems.com.ua
Integrated Technical Vision
15
Panel downloading
Panel downloading
After filling all parameters in project, you can download the panel with it. In order
to do this
press button in the toolbar line or select the PANELS->DOWNL O A D
CONTROLLER.
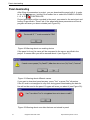
Project information will be recorded in the panel, connected to the serial port and
having ID specified in "Panel" tab. If the panel with these parameters not found,
program will warn you about mistake (see Figure 20):
Figure 20 Warning about non existing device
If the panel is found its name will be compared to the name, specified in the
project. If names differ you will be warned about it (see Figure 21):
Figure 21 Warning about different names
If you want to download panel anyway, press "Yes" or press "No" otherwise.
If the ID card is not assigned to any user during panel downloading the data for
him will not be send to the panel. Program will warn you about it (see Figure 22):
Figure 22 Warning about user data that was not stored in panel
16
Integrated Technical Vision
http://www.itvsystems.com.ua
Uploading the panel
During the panel downloading the event log file is updated automatically.
The panel is loaded with the following data:
-
Panel configuration, filled in the "Panel" tab
Doors settings, specified in "Doors" tab
User data specified in "Users" tab, except users names ("Name" field)
Table of holidays, filled in "Holidays" tab
Date and time, actual in PC
Panel uploading
To upload the panel press
CONTROLLER menu item.
button or select the PANELS->UPLOAD
The data stored in panel will be uploaded from the panel connected to the serial
port and having the address (ID) specified in the "Panel" tab. If the panel with
these parameters is not found, program will warn you about the mistake (see
Figure 20). If the panel is found, its name will be compared to the name,
specified in the project. If names are different, you will be warned about it (see
Figure 21).
The following data is retrieved from the panel:
-
Panel Name (in the "Panel" tab)
Panel Type (in the "Panel" tab)
User data specified in "Users" tab, except the users names ("Name" field)
Table of holidays, filled in "Holidays" tab
If you do not remember settings of the panel connected to the certain serial port
and with certain ID, create new project, set number of the COM port and ID.
Then upload the panel into this project. The event log file will be created.
http://www.itvsystems.com.ua
Integrated Technical Vision
17
Uploading the panel
Projects. Saving and Closing.
You can save the project in order to return to it later. To save the project you
have to press button or select the FILE->SAVE menu item. If you have not
saved this project earlier, you will be prompted for the file name and location:
Figure 23. Project saving
To save the project under another name, choose FILE->SAVE AS menu item.
If you do not want to work with the project you can close it. To close the project
select it from the list of projects and choose FILE->CLOSE menu item.
If you want to close all projects, select FILE->CLOSE ALL menu item.
If the project which is not saved yet is about to be closed the program will warn
you about it (see):
Figure 24. Not saved project saved warning
To save the project, press "Yes", to close project without saving press "No".
Pressing of the "Cancel" button abolishes the project closing.
18
Integrated Technical Vision
http://www.itvsystems.com.ua
Program closing
Program closing
To close the program press ⌧button in the right upper corner of program
window or select FILE->EXIT menu item. If you have not saved some projects
before exit, you will be warned about it (See Figure 24)
To save the project, press "Yes", to close the project without saving press "No".
Pressing of the "Cancel" button cancels project closing.
Main Notions
Here are some notions mentioned above:
Project
Data set describing the full range of panel settings.
Panel
Access control panel is ment for access control of two doors and can operate as
a stand-alone unit with fully distributed database without dependancy on a
computer system.
Doors
Reader, access control panel or a part of it, door supervision devices and door
locking device form an access point, that is a door.
One panel can control up to two doors, it can be a two-sided door with entrance
and exit simultaneous control or two one-sided doors with entrace control solely.
Users
People that have some access rights and possess unique identification card
and/or pin code numbers.
Holidays
Dates that are met once a year. Access on these days is granted according to a
holiday row in a schedule table, it is different to an ordinary business
dayschedule.
Enrolled Cards
Cards that already have titles and ID and help to assume a card to a user
without panel engaging.
Event Log
List of events uploaded from a panel and reflecting time and matter of every
event. It cannot be changed and is refreshed only while panel upnloading.
http://www.itvsystems.com.ua
Integrated Technical Vision
19
Panel Downloading
The process of project data transference from PC to a panel.
Panel Uploading
Transeference of information from panel to project.
20
Integrated Technical Vision
http://www.itvsystems.com.ua