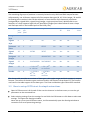
1
AGRICAB
FP7 SICA 282621
2
geoland
Software User Guide
Ref: VGTExtract_SUG_EN
Date:
2013-01-02
Issue:
2.1.0
Author(s):
T. Jacobs, P. Claes, B. Smets, T. Van Roey, H. Eerens (VITO)
Dissemination level:
Public
Software User Guide
VGTExtract
Change Record
Issue
Date
Page(s) /
Description of Change
Section(s)
1.0
2005-11-30
All
First issue
1.1
2006-06-14
All
French translation
1.2
2006-07-04
App. A
Updated list of pre-defined regions: round-off to integer
degrees
1.3
2006-09-25
All
3
Minor changes
Added Help desk contact and section 3.3 on combination
of VGTExtract with EUMETCast reception
Flag value was renamed to Missing Data value
Added MARS and GMFS related pre-defined regions
4.4
App. A
1.4
2010-03-20
All
Updated to reflect VGTExtract version 1.4, which includes
support for Geoland2 products and a number of interface
changes (updated screenshots).
Several sections were also added (e.g. conversion to
WinDisp from the Tech Note, 2.2, 3.4, 3.5, chapter 4 on
integration in end-user software, App. B & C) or restructured
1.4.2
2010-12-14
1.4
2.0.1
2012-08-30
All
2.1.0
2013-01-02
All
Date: 2013-01-02
Acknowledgement to Geoland2 BioPar contribution.
Version numbering kept in line with software version.
Updated to first release of v2.0 (2.0.1). Changed lead
project from DevCoCast to AGRICAB.
Updated to release v2.1. Work-around for BioPar v1
product sticking. Update to use of GeoTiff format
Screenshots in chapter 5.
Issue: 2.1.0
Page 2 of 63
Software User Guide
VGTExtract
TABLE OF CONTENTS
1
BACKGROUND ................................................................................................................................................... 7
1.1
1.2
1.3
1.4
1.5
1.6
2
INSTALLATION AND UPGRADE ..........................................................................................................................11
2.1
2.2
3
Scope and Objectives ............................................................................................................................................ 7
What’s new in version 2.1? .................................................................................................................................. 8
Structure of this user guide .................................................................................................................................. 9
Related documents ............................................................................................................................................... 9
Acknowledgements ............................................................................................................................................ 10
Contact ............................................................................................................................................................... 10
Installation and requirements ............................................................................................................................ 11
Upgrading to a new version ................................................................................................................................ 12
BASIC USAGE ....................................................................................................................................................13
3.1 Supported input products .................................................................................................................................. 13
3.1.1
Newly supported products and datasets .................................................................................................. 14
3.1.2
Known limitations ..................................................................................................................................... 14
3.1.3
Working with Geoland2’s tiled products in HDF5 format ......................................................................... 16
3.2 Supported output formats and data types ......................................................................................................... 18
3.3 How to set up VGTExtract for simple extractions ............................................................................................... 19
3.4 How to run VGTExtract in Batch mode ............................................................................................................... 20
3.5 How to combine VGTExtract with GEONETCast reception ................................................................................. 21
3.6 Common issues ................................................................................................................................................... 21
3.6.1
Issue 1: Output data type is not supported in output file format ............................................................. 22
3.6.2
Issue 2: Flag values ................................................................................................................................... 22
3.6.3
Issue 3: Use of Product Specific settings ................................................................................................... 22
3.6.4
Issue 4: Data ranges .................................................................................................................................. 23
3.6.5
Issue 5: Configured offset is not taken into account ................................................................................. 25
3.6.6
Issue 6: Geographic region intersect ......................................................................................................... 25
3.7 How to convert to physical values ...................................................................................................................... 25
3.8 How to manage the processing and pre-defined region settings....................................................................... 26
3.8.1
Managing the processing settings ............................................................................................................ 26
3.8.2
Managing the pre-defined region settings ............................................................................................... 27
4
FIRST STEPS TOWARDS INTEGRATION IN GIS AND REMOTE SENSING SOFTWARE ............................................29
4.1
4.2
4.3
4.4
4.5
5
General approach ............................................................................................................................................... 29
Integration in ILWIS open source GIS ................................................................................................................. 29
Integration in WinDisp ........................................................................................................................................ 30
Integration in SPIRITS ......................................................................................................................................... 30
Integration in other GIS and Remote Sensing software ..................................................................................... 32
THE GRAPHICAL INTERFACE EXPLAINED ...........................................................................................................33
5.1 The main window ............................................................................................................................................... 33
5.1.1
Screenshot ................................................................................................................................................. 33
5.1.2
Window elements ..................................................................................................................................... 33
5.1.3
Main window - Processing Settings section .............................................................................................. 34
5.1.3.1
5.1.3.2
5.1.4
Screenshot ...........................................................................................................................................................34
Section elements .................................................................................................................................................34
Main window - Input section .................................................................................................................... 35
5.1.4.1
5.1.4.2
5.1.4.3
Screenshot ...........................................................................................................................................................35
Selecting input files ..............................................................................................................................................35
Popup menu ........................................................................................................................................................36
Date: 2013-01-02
Issue: 2.1.0
Page 3 of 63
Software User Guide
VGTExtract
5.1.4.4
5.1.5
Property window .................................................................................................................................................36
Main window - Output section.................................................................................................................. 38
5.1.5.1
5.1.5.2
5.1.5.3
Screenshot ...........................................................................................................................................................38
Section elements .................................................................................................................................................39
Output overview ..................................................................................................................................................39
5.1.6
Control buttons ......................................................................................................................................... 39
5.1.7
Progress Indicator ..................................................................................................................................... 40
5.2 Troubleshooting in the Logging window ............................................................................................................ 40
5.2.1
Screenshot ................................................................................................................................................. 40
5.2.2
Window elements ..................................................................................................................................... 41
5.2.3
Advanced troubleshooting ........................................................................................................................ 41
5.3 Configuring the processing in the Settings window ........................................................................................... 42
5.3.1
Screenshot ................................................................................................................................................. 42
5.3.2
Window elements ..................................................................................................................................... 42
5.3.3
Output filename patterns ......................................................................................................................... 44
5.3.4
Settings window – ROI panel .................................................................................................................... 45
5.3.4.1
5.3.4.2
5.3.4.3
5.3.5
Settings window – ROI panel – ROI Map selection window ...................................................................... 46
5.3.5.1
5.3.5.2
5.3.6
Screenshots .........................................................................................................................................................46
Window elements ................................................................................................................................................47
Settings window – Output panel ............................................................................................................... 47
5.3.6.1
5.3.6.2
5.3.7
Screenshot ...........................................................................................................................................................45
Tab panel elements .............................................................................................................................................45
Predefined ROIs ...................................................................................................................................................45
Screenshot ...........................................................................................................................................................47
Tab panel elements .............................................................................................................................................48
Settings window – Product specific panel ................................................................................................. 49
5.3.7.1
5.3.7.2
Screenshot ...........................................................................................................................................................49
Tab panel elements .............................................................................................................................................49
5.4 More information on VGTExtract itself: the About window ............................................................................... 51
5.4.1
Screenshot ................................................................................................................................................. 51
6
APPENDICES .....................................................................................................................................................52
Appendix 1
Appendix 2
Appendix 3
List of pre-defined Regions of Interest ............................................................................................... 52
Settings for conversion to WinDisp IDA ............................................................................................. 56
Settings for conversion to physical values ......................................................................................... 58
Date: 2013-01-02
Issue: 2.1.0
Page 4 of 63
Software User Guide
VGTExtract
List of Terms and Abbreviations
Term(s)
Description
AGRICAB
The EU FP7-funded project “A framework for enhancing EO capacity for
Agriculture and Forest Management in Africa as a contribution to GEOSS”
Batch
Batch processing is a synonym for automated processing or processing without
user intervention.
CNES
National centre for space research in France.
EUMETCast
EUMETCast is a satellite broadcasting system for environmental data, operated
by EUMETSAT and one of the principle components of GEONETCast, the
worldwide satellite broadcasting infrastructure.
DevCoCast
The GEONETCast for and by Developing Countries project, funded under the
European Union’s Seventh Framework Programme for Research (FP7).
GDAL
Geospatial Data Abstraction Library
GUI
Graphical User Interface. GUIs consist typically of a set of windows that allow
users to interactively (by clicking with their mouse) use the program.
JAI
Java Advanced Imaging library.
JDK
Java Development Kit
JRC
Directorate General (DG) Joint Research Centre of the European Commission
JRE
Java Runtime Environment
PUMA and
AMESD
The Preparation for Use of Meteosat Second Generation (MSG) in Africa and
African Monitoring of the Environment for Sustainable Development projects,
funded by the European Development Fund.
ROI
Region Of Interest. A ROI is a rectangular area on a map.
SPOT and
SPOT
IMAGE
SPOT refers to a series of satellite platforms. VITO processes data from the
Vegetation instruments aboard SPOT4 and SPOT5 satellites. SPOT IMAGE holds
the commercial rights to distribute high resolution SPOT data from different
sensors on the same SPOT series of satellites.
VGT
Vegetation, the name of 2 instruments aboard the SPOT4 and SPOT5 satellites.
VGT4AFRICA This project (2005-2007) was a joint initiative by VITO, JRC and MEDIAS-France
and distributed VGT derived products to African end users via EUMETCast.
VITO
Flemish Institute for Technological Research, Belgium
Date: 2013-01-02
Issue: 2.1.0
Page 5 of 63
Software User Guide
VGTExtract
List of Figures
Figure 1 Four Geoland2 V1 fCOVER tiles, extracted for Niger ........................................................... 17
Figure 2 QuantumGIS example showing the four stacked layers ...................................................... 17
Figure 3 Mosaic from four fCover tiles, produced with gdalwarp ..................................................... 18
Figure 4 Fixing Product Specific settings ............................................................................................ 23
Figure 5 Main window ....................................................................................................................... 33
Figure 6 Processing Settings section of the main window ................................................................ 34
Figure 7 Input section of the main window ....................................................................................... 35
Figure 8 Input node popup menu ...................................................................................................... 36
Figure 9 Properties of a folder ........................................................................................................... 36
Figure 10 Properties of a regular product (left) and new V1 product (right) ................................... 36
Figure 11 Properties of a Product Group ........................................................................................... 37
Figure 12 Properties of a Dataset in a product (left) or product group (right) ................................. 37
Figure 13 Output section of the main window .................................................................................. 38
Figure 14 Examples of progress bars ................................................................................................. 40
Figure 15 Logging window ................................................................................................................. 40
Figure 16 Settings window ................................................................................................................. 42
Figure 17 ROI panel on the Settings window ..................................................................................... 45
Figure 18 Continent selection in the ROI Map Selection window ..................................................... 46
Figure 19 Selecting a region in the ROI Map Selection window ........................................................ 46
Figure 20 Output panel of the Settings window, partly disabled (bottom) when overruled by
Product Specific Settings ............................................................................................................. 48
Figure 21 Product Specific panel of the Settings window .................................................................. 49
Figure 22 About window .................................................................................................................... 51
Date: 2013-01-02
Issue: 2.1.0
Page 6 of 63
Software User Guide
VGTExtract
1 Background
1.1
Scope and Objectives
The primary aim of VGTExtract is to facilitate the integration of SPOT-VEGETATION products (VGT)
into commonly used GIS and Remote Sensing software for further visualisation, analysis and postprocessing. These products are distributed by VITO and its partners under license from CNES and
SPOT IMAGE (for basic products like NDVI) or in a variety of projects such as VGT4Africa (FP6),
Geoland2 (FP7) and DevCoCast (FP7), and through various channels (web and FTP sites,
EUMETCast satellite broadcast, fixed media).
VGT products are usually distributed in the form of zipped archives that consist of one or more
data files in HDF (4 or 5) or GeoTiff file format, a text or XML file containing the product's
metadata, a copyright document and a sub-sampled Tiff image for quick content checking (socalled Quicklook image).
VGTExtract searches for VGT products in a given directory and its subdirectories. For each product
found, VGTExtract can automatically unpack (uncompress) the product and perform the following
actions on the resulting unzipped HDF data files:
Mosaic the data layers, when they are provided as a set of regular tiles (e.g. ten by ten
degrees, as in Geoland2 products);
Extract a given rectangular geographic bounding box or Region of Interest (ROI);
Convert to a set of file formats;
Change data type as may be required by the output format;
Apply a linear encoding of the form output = (scale * input) + offset to all values except one
(and only one) special value for missing data.
When extracting the geographic region from an input image, VGTExtract checks if the desired
output region intersects with the region covered by the input image. When this intersect is only
partial, VGTExtract automatically fills the non-intersecting part of the output image with missing
data values. This means that the output file will always have the size of the desired region, but it
may be partly empty in those areas that were not present in the input image.
VGTExtract uses the metadata to perform these processing steps on the data files, for instance to
check if the conversion would cause a loss of information. It uses the quicklook image only to
provide a glimpse of the product’s contents. At present, the software does not re-create nor
update the metadata or quicklook files.
VGTExtract has two modes of operation:
GUI or interactive mode
Batch or automatic mode
When run in batch mode, VGTExtract automatically processes a set of VGT products, using settings
(ROI, data type conversion, data type information needed for the processing the VGT products)
that were saved previously in interactive mode. This mode can be called from the command line,
Date: 2013-01-02
Issue: 2.1.0
Page 7 of 63
Software User Guide
VGTExtract
and is hence easy to run at regularly scheduled times without supervision, e.g. when products
arrive automatically via the GEONETCast satellite broadcast.
In GUI or interactive mode, the user has the ability to add new settings, change existing settings
and save the settings for later use. In this mode, the user also can process some VGT products
interactively for instance to test the new settings.
The VGTExtract program was originally intended for African VGT4AFRICA project participants and
users, more particularly members of the PUMA/AMESD user networks. As it remains freely
available to all interested users, and has since been extended to work also with other types of
VGT-derived products (e.g. other basic SPOT-VEGETATION products such as S1, S10, derived
products from GMES Global land service), it is currently used in a wider user community.
VGTExtract is distributed freely and "as is". VITO cannot be held responsible for any damages
resulting from (mis-)use of this program. Users are allowed to redistribute it and are encouraged,
but not required, to inform VITO when they do so.
1.2
What’s new in version 2.1?
This document has been updated to reflect the release of version 2.1 of the VGTExtract software.
While the introduction of major version 2 (version change from 1.4 to 2.0) implied that important
changes were made in how the software works, with still some limitations, version 2.1 is intended
to start addressing those (and other) limitations, based on further testing and user feedback.
The main changes and objectives of the version 2.0 were summarized as:
Addition of a new, underlying “engine” application, as required for handling the HDF5 multiband and GeoTiff input formats introduced by the newly supported Geoland2 global
biophysical parameter products.
The support for more products and datasets: Geoland2’s improved products (so-called Version
1 or V1) and the basic SPOT-VEGETATION P Segment data, as outlined in section 3.1.
Smoother integration with VITO’s new SPIRITS software for basic SPOT-VEGETATION products
like 10-day NDVI synthesis (S10 NDVI).
At the same time, the Graphical User Interface was extended to:
Recognize and group continental coverages that are aligned to the ten-by-ten degree tile
boundaries, to allow their sticking to global coverages.
Handle colour previews of Geoland2’s V1 products.
Provide better warnings for common issues with VGTExtract installations, such as lack of write
privileges on the settings and temporary workspace folders.
Clarify that the Output settings panel’s data type, scale, offset and missing data value
parameters are overruled when the Product Specific Settings are in use, as shown in section
5.3.
An important limitation in version 2.0 was the inability to stick the tiles of the new Geoland2 V1
products. While this limitation is not fully fixed yet, v2.1 provides a way to work around this issue,
as shown in section 3.1.
Date: 2013-01-02
Issue: 2.1.0
Page 8 of 63
Software User Guide
VGTExtract
A second important improvement in v2.1 is in the output of GeoTiff files, an important format for
GIS users. The previously generated GeoTiffs had a slight problem in geo-location and in
photometric interpretation, which lead some GIS software to misread the GeoTiff data. This
problem in the GeoTiff format has been fixed, and verified in a set of 10 different GIS and remote
sensing software, both commercial and free.
Thirdly, the Graphical User Interface was improved to make sure it prints all decimal numbers in a
consistent format. Before, some were printed in a format according to your computer’s
internationalization (language, etc) settings, while others were not.
1.3
Structure of this user guide
The first chapter is an introduction. Chapter 0 gives a description of installation, upgrade and
removal of the VGTExtract software. Chapter 3 gives several step-by-step procedures (checklists)
for basic usage and also describes how to use VGTExtract in combination with a
EUMETCast/GEONETCast satellite receiver. Chapter 4 gives more information on the first steps
and limitations in using VGTExtract to integrate the SPOT-VGT data into various end-user software
for further analysis and visualization. Chapter 5 describes the various windows and options of the
user interface in more detail. The appendices give a list of the predefined geographic regions, and
typical conversion settings to use for extractions to WinDisp IDA format (eight bits-per-pixel) and
to convert from digitally encoded to physical values. As they are separated at the end of this
document, they can easily be printed for hands-on use.
1.4
Related documents
RD1: VGT4Africa user manual, 1st edition, 2006. EUR 22344 EN, European Communities. By
Bartholomé, E. (editor). Available in English and French on
http://www.devcocast.eu/ViewContent.do?pageId=40
RD2: http://www.devcocast.eu and http://www.devcocast.eu/Documents.do, DevCoCast project
web site and the Documents page
RD3: http://www.spot-vegetation.com and http://www.vgt.vito.be, SPOT-VEGETATION web sites
RD4: http://www.geoland2.eu and http://www.land.eu, Geoland2 project web site and Land.eu
portal.
RD5: http://www.agricab.info, the AGRICAB project website
Date: 2013-01-02
Issue: 2.1.0
Page 9 of 63
Software User Guide
VGTExtract
1.5
Acknowledgements
The VGTExtract software was originally developed by VITO in the framework of the FP6VGT4AFRICA project that disseminates scientific images (products) to African users via the
EUMETCast system.
After the VGT4Africa project ended, VITO continued the development of VGTExtract in the frame
of the FP7-DevCoCast project (May 2008 – Sept 2011) and FP7-AGRICAB (Oct 2011 – March 2015).
To support the tiled products delivered in Geoland2 (GMES land) project, VITO also contributed as
part of its Geoland2 Biophysical Parameter (BioPar) Core Mapping Service (CMS) efforts.
Its initial concept was inspired by the CropVGT software from University of Venice, Italy (IUAV).
VGTExtract and CropVGT are now developed and maintained separately.
1.6
Contact
For technical assistance in using VGTExtract software, please send an e-mail to the Help Desk
service at [email protected] or [email protected]. The same help desk can also provide more
information about the retrieval and characteristics of the SPOT-VGT products.
Date: 2013-01-02
Issue: 2.1.0
Page 10 of 63
Software User Guide
VGTExtract
2 Installation and upgrade
2.1
Installation and requirements
Download: http://www.devcocast.eu/VGTExtract.do (primary site), but also AGRICAB and
Geoland2 portals (see RD4 and 5)
VGTExtract is written in the platform-independent Java language, and is designed as a shell that
launches a few internal applications (written in C++). The VGTExtract software is distributed in
binary form, without source code and only Linux and Windows platforms are currently supported.
So, in order to run VGTExtract properly, a Java Virtual Machine (JVM) must be installed. As the
JVM may have been installed prior to the VGTExtract installation and to provide a smaller
installation program (faster download), the installation program comes in two forms, with or
without a packaged JVM, and separately for Windows and Linux platforms. For new users, it is
recommended to download the installer with JVM, as this offers the most flexibility.
Note: the version 2.1 is only available for Windows. Linux versions are still planned for subsequent
2.x releases.
JVMs are freely available from Oracle at http://java.com/en/download/index.jsp, as part of the
larger Java Runtime Environment (JRE) or Java Development Kit (JDK) packages. The JDK is for use
by Java software developers, whereas the JRE is sufficient to run Java programs. Though most
Windows systems offer a Microsoft JVM, the use of this JVM is not tested and it is recommended
to use the latest Oracle JVM instead.
In terms of Java version, Java 6 (version 1.6.x) is to be used. As it is possible to install multiple Java
versions alongside each other, and newer versions offer backward compatibility, installing the
latest Java should not cause any problems. To check the version, please type in java –version at
the command line, or check Control Panel – Java on Windows.
In addition to the Java Virtual Machine, the Java Advanced Imaging (JAI) library needs to be
installed in order to have the Quicklook previews of the VGT products. Without JAI, VGTExtract will
still work fine, only the previews are then unavailable. JAI comes included in the installer and can
be downloaded freely on http://java.sun.com/products/java-media/jai/index.jsp.
When processing, VGTExtract will create files in the temp subfolder in its installation path. For this
reason, it is required that there is sufficient free disk space (100MB or more) on the hard disk
where VGTExtract is installed. And if it is installed in a system path, such as c:\program
files\VGTExtract on Windows, administrator privileges may be required for both the installation
and for running the software. To avoid this, install VGTExtract in an un-protected path, such as
c:\VGTExtract.
As of version 2.0, VGTExtract warns users at start-up when the expected folders cannot be written
to.
Since VGTExtract version 1.4, the user has the option to install the African pre-defined regions, the
Latin American ones, or both as separate install sets. The JAI library is now by default included in
the installation. Not installing JAI can be done by choosing the Custom install set and then deselecting the JAI library entry.
Date: 2013-01-02
Issue: 2.1.0
Page 11 of 63
Software User Guide
VGTExtract
2.2
Upgrading to a new version
To upgrade VGTExtract to a newer version, it is recommended to first remove the old version,
using the un-install program provided. This is however not strictly required, and it is possible to
install several versions of VGTExtract side-by-side in separate folders, if the input and output data
folders are separate.
When the old version is removed, any custom created files, such as any previously defined
settings, are left behind. When the new version is then installed in the same path, it will find those
settings files and is normally able to use them. As the format of the settings files may vary
between versions, e.g. because of support for new products, it is recommended to re-create the
settings files from scratch.
For instance, it may still be possible to edit and use the old settings in the processing, but the
Settings window will not allow to add or configure the settings for the newly added products.
Microsoft Windows Vista and 7 can prevent VGTExtract from writing files under Program Files and
moves them transparently into Users/your_user/appData/VirtualStore. This is done by the file
virtualization policy of Windows’ User Account Control service. Note that files may be left in this
folder when uninstalling VGTExtract. To circumvent the file virtualisation completely, it is
recommended to make sure the proper user(s) takes ownership of the VGTExtract subfolder under
Program Files, and is (or are) given Full Control permission over this folder and all its sub-folders.
Alternatively, the virtualisation policy or UAC may be disabled altogether, but this is not
recommended. Changing these security settings however does require administrator privileges. Or
VGTExtract can be installed under a non-privileged folder, such as directly in c:\VGTExtract.
Date: 2013-01-02
Issue: 2.1.0
Page 12 of 63
Software User Guide
VGTExtract
3 Basic usage
VGTExtract can be run in two modes: in the regular, Graphical User Interface (GUI) mode, which
involves user interaction and in Batch mode for automated processing. Before Batch mode can be
used, however, the processing settings first need to be defined. Usually, this is done by using the
GUI mode once to define the settings, try them out and save them. Alternatively, it is possible to
avoid the GUI mode completely and to change the processing settings by hand, by editing the XML
settings files stored in the Settings subdirectory of the VGTExtract installation directory (e.g. in an
XML editor). But this approach of direct XML editing is not recommended.
Section 3.3 explains a typical setup of VGTExtract, in a few simple steps. Section 3.4 shows how to
use VGTExtract in Batch mode for automated processing, and section 3.5 combines the Batch
mode with EUMETCast/GEONETCast reception to automatically extract received products. Section
3.7 describes how to add the conversion from digital values to physical values. Section 3.8 explains
how the processing settings can easily be managed and shared with other users, as well as how to
customize the list of pre-defined regions.
3.1
Supported input products
This version of VGTExtract continues to support all the products supported in previous versions,
including:
Basic VEGETATION synthesis products (see also [RD3]):
Daily synthesis (S1)
ten-daily synthesis (S10), both with full set of bands and with just the NDVI (S10 NDVI)
SPOT-VEGETATION derived, added value products:
NDWI, DMP, VPI, SWB, Phenology, LAI, FCOVER and Albedo products over Africa, as produced
in VGT4Africa (on continent/country/region scales) and similar South American products,
produced by Geoland2 (version 0), that are now all distributed through the DevCoCast project
website and the EUMETCast satellite broadcast;
The same products, as provided in ten by ten degree tiles in Geoland2, version 0 (see also
[RD4]), as well as the Burnt Area product (both in tiles and countries) over Africa.
Please note that the VGT4Africa Phenology, LAI, FCOVER and Albedo products have been split over
multiple partial products to reduce the file size for the EUMETCast dissemination and web
downloads. In particular:
The Phenology data is now split across the PHENOKS (Key Stages) and PHENOMAX (max NDVI
in season) products.
LAI and FCOVER products only contain the LAI & FCOVER values, plus error budgets. BIOQ
products contain quality information about the LAI & FCOVER data.
ALBEDO data are spread over BBDHRT (total wavelength range), BBDHRV (only visible
wavelength range), BBDHRN (only Near-Infrared wavelengths), ALBE (error budgets on
BBDHRT, BBDHRV and BBDHRN) and ALBQ (quality-related information).
Date: 2013-01-02
Issue: 2.1.0
Page 13 of 63
Software User Guide
VGTExtract
3.1.1 Newly supported products and datasets
Since version 2.0, support for the following products and datasets was added:
Basic VGT P Segments, but only in Geographic Lat/lon coordinates as re-projection is not
supported.
Geoland2’s upgraded (so-called Version 1) products, that mostly cover the full globe with
improved algorithms, more validation and more robust production systems:
o Improved LAI, FCOVER and Directional-Hemispherical reflectance (albedo).
o The addition of FAPAR, 30-day NDVI (not to be confused with the basic 10 day NDVI)
and the Bi-Hemispherical reflectance (albedo).
o Burnt Area with added datasets for number of burnt area detections and
uncontaminated (un-filtered) observations used (both per dekad), date of burn per
dekad, variable season reset date in the seasonal date of burn and seasonality
statistics.
o Water Body combining the existing and a new detection algorithm and a mask for
Permanent Water and still limited to the African continent.
3.1.2 Known limitations
While the added support for basic P segments and the new Geoland2 version 1 (V1) products
means many more datasets are available, this support remains with some limitations. It is
expected that most of these will be addressed in subsequent releases of VGTExtract, while closely
following the product developments.
Seasonality text files in Burnt Area V1 product (e.g. season status, season event database) are
ignored.
For P Segments, all bands were added, but support for the sub-sampled bands (zenith and
azimuth angles, water vapour, ozone and aerosol grids) needs further testing.
Additionally, a limitation to the use of Geoland2 products in GeoTiff format (Water Body v1, NDWI
v1) was found. While the software is able to extract the right data window from those products,
the resulting output files are given an incorrect (or missing) geo-location.
For a limited number of datasets (bands), the new V1 and the existing V0/VGT4Africa products
have different characteristics (i.e. data type, missing data value). This has a few implications:
For the correct interpretation as physical values and further processing, the table in Appendix
3 indicates the differences in scale, offset and flags.
The default processing settings (that are created when pressing the New button in the main
window) are set up for V1 and may need modification for V0. While these default settings
assume that no linear encoding is required (scale = 1, offset = 0), the differences in missing
data values and data type between V0 and V1 may cause some issues in dealing with Geoland2
V0 products after upgrading VGTExtract to version 2.0 or higher.
Date: 2013-01-02
Issue: 2.1.0
Page 14 of 63
Software User Guide
VGTExtract
For example, the VGT4Africa LAI, FCOVER and Albedo products included eight bits-per-pixel
quality information, called the Status Maps SMA and SMB (with 0 assumed as missing data
indication). The Geoland2 V0 products renamed this to Quality Flag (QFLAG), while keeping the
content characteristics. In Geoland2 V1 products, however, the QFLAG was extended to 16 bitsper-pixel (unsigned short) and given a different missing data value, 65535.
Because the default processing settings include the data type and missing data value of V1 (ushort,
65535), they are incorrect for processing Geoland2 V0 products’ QFLAG.
The below table summarizes the main changes in characteristics between V0 and V1 products.
Product(s)
Dataset(s)
Change
Water
Bodies
All
251 was introduced as missing data value in all V1 bands.
For the detection band (SWB), V0 and VGT4Africa used 0 as
missing data value, while 0 actually corresponded to “ocean”
or “free water”.
For the seasonality dates, V0 and VGT4Africa also used 0, but
interpreting 251 as a number of dekads since 1 Jan 1980
yields a dekad before VGT’s launch.
Therefore, the configuration of 251 as missing data value is
relatively harmless.
LAI,
FCOVER,
30d NDVI,
FAPAR
NMOD, QFLAG
Albedo
Albedo bands in
visible, NIR and
total broadband
spectrum, and the
uncertainties
thereof,
NMOD’s (number of observation days) missing data value was
set to 255. V0 and VGT4Africa used the 0 value, which
signifies “number observations”.
As illustrated in the example above, the QFLAG’s data type
was changed to 16-bits-per-pixel (ushort) and the missing
data value changed to 65535.
NMOD, QFLAG
The flags were changed from 32765 OutOfRange_sup, 32766
OutOfRange_inf, 32767 Invalid (=missing data) to 65535 =
invalid, 65534 = out of range inferior and 65533 = out of
range superior.
As the significant value range does not exceed 10000, both
cannot be mistaken for significant values. Furthermore, the
conversion to signed 16-bits-per-pixel (short) yields the same
flags in V0, and negatives in V1 (-1, -2, -3).
NMOD and QFLAG have been changed in the same way as for
LAI, FCOVER etc. The number of bits actually used in QFLAG
however varies.
Burnt Area
FDOB in season
Date: 2013-01-02
In addition to the season reset date, which affects the
interpretation (but not VGTExtract’s settings), the missing
data value was changed to 65535.
Issue: 2.1.0
Page 15 of 63
Software User Guide
VGTExtract
3.1.3 Working with Geoland2’s tiled products in HDF5 format
The Geoland2 V1 products in multi-band HDF5 format could only be region-extracted and
converted in format, the 10x10 degree tiles could not be sticked (this resulted in an error in v2.0).
While it requires more work to enable VGTExtract to directly stick the V1 tiles, v2.1 does provide
with a work-around solution, as many users had difficulty with this. This work-around makes
VGTExtract recognize the V1 product tiles as separate products, rather than part of a group of
tiles. This means the tiles can be converted in format and region-extracted, resulting in separate
output files (one per tile). These can then be sticked together in a different software, such as
GDAL’s gdalwarp utility, or many GIS and Remote Sensing software.
As example, let’s extract the green cover fraction (fCOVER) data for country Niger (0 to 16°E, 11°N
to 24°N). This means a combination of four different tiles: horizontal (H) 18 and 19, vertical (V) 6
and 7. After retrieving those tiles (ZIP files), they are run through VGTExtract. For simplicity, we’ll
use the default processing settings for fCOVER:
scale = 1, offset = 0 (i.e. no change in pixel value),
missing data value of 255 (the default setting, see also the Product User Manual),
output data type of Unsigned Byte
Furthermore, on the Output tab, we’ll opt to convert to ENVI format (other formats are also
possible) and on the ROI tab, we select the Niger output region.
Important: the default output file name pattern, %p_%y%m%d_%r_Extract%e, would generate
the same output file name for all tiles. Instead, we’ll use the pattern “%f%e”, which is translated to
the input file name (%f), along with the appropriate file name extension (%e, .img for ENVI
format). When processing several layers, the band name (%p) or custom code (%c) should be
further added.
With simple colouring (stretched to the data value range in the image) and adding the country
border for clarity, the resulting images for the sample product with nominal date of 2012-04-03
are as follows:
H18V6
Date: 2013-01-02
H19V6
Issue: 2.1.0
Page 16 of 63
Software User Guide
VGTExtract
H18V7
H19V7
Figure 1 Four Geoland2 V1 fCOVER tiles, extracted for Niger
As can be seen, the extraction automatically adds the missing data values to those areas that were
not covered by the individual input tiles, so that the four resulting images have the same coverage.
In many generic GIS and remote sensing software, such as the free QuantumGIS, these layers can
now be opened on top of each other. After checking that the GIS recognizes the 255 value for
“missing data”, the software visualizes the complete image.
Figure 2 QuantumGIS example showing the four stacked layers
Of course, one more step is needed to merge the different tiles together into one image. In
QuantumGIS, this can be achieved via the Merge operation in the Raster menu, which effectively
runs the gdal_merge script. Make sure to put the “no data” value to the value 255 (-n 255) that we
used to indicate missing data.
While gdal_merge can be automated by itself, it is based on the gdalwarp command-line utility,
which offers even more flexibility.
An example command would be
gdalwarp –of GTiff –srcnodata 255 –dstnodata 255 g2_BIOPAR_FCOVER*.img stickedImage.tif
Date: 2013-01-02
Issue: 2.1.0
Page 17 of 63
Software User Guide
VGTExtract
The resulting image, applying similar colouring as in Figure 1:
Figure 3 Mosaic from four fCover tiles, produced with gdalwarp
In this command, it is again important to recall the missing data value (255). In the above example,
we specified it for both the input tiles (-srcnodata option) and the output image (-dstnodata).
Other useful gdalwarp options include:
-te (target extent) for further region extraction,
-t_srs (target spatial reference system) for re-projection,
-tr (target resolution) for re-sampling,
and -cutline to mask the pixels outside or inside a specific polygon (defined with a given vector
data source such as a shapefile)
For further information, see GDAL and gdalwarp. The GDAL library and its utilities are included and
used in most of the free and open source GIS and remote sensing software available.
3.2
Supported output formats and data types
ASCIIGrid
HDF4
ENVI
Tiff and GeoTiff (greyscale)
ILWIS
IDRISI32 (.rst / .rdc)
ER-Mapper
Raw binary (without header bytes, band sequential)
Date: 2013-01-02
Issue: 2.1.0
Page 18 of 63
Software User Guide
VGTExtract
The mosaicing of groups of products is currently limited to only HDF4 and ENVI output formats.
Unfortunately, not all formats support all of the output data types (8, 16, 32 bit integer, 32 and 64
bit floating point numbers) that can be selected, or even the four most commonly used ones
(unsigned Byte, signed Short, signed (long) Integer, single-precision Float). WinDisp IDA is one
example, as it only supports eight bits-per-pixel (Byte) images (but it does allow to store a slope
and intercept value in the header bytes of the binary file).
Data type
Bits
per
pixel
Bytes
per
pixel
Lowest value
Highest value
ILWIS
IDRISI32
WinDisp
IDA
ASCII
-Grid
Unsigned
Byte
8
1
0
255
Yes
Yes
Yes
Yes
Signed
Byte
8
1
-128
127
No
No
No
No
Unsigned
Short
16
2
0
65535
No
No
No
Yes
Signed
Short
16
2
-32768
32767
Yes
Yes
No
Yes
Unsigned
Integer
32
4
0
4294967295
No
No
No
No
Signed
Integer
32
4
-2147483648
2147483647
Yes
No
No
No
Float
32
4
≈ -3.4 × 1038
or -Infinite
≈ 3.4 × 1038
or +Infinite
No
Yes
No
Yes
Double
64
8
≈ -1.79769 ×
10308 or
-Infinite
≈ 1.79769 ×
10308 or
+Infinite
Yes
No
No
No
The above table provides an overview of data types, their value ranges and their support in output
formats. The names of the data types are those listed in VGTExtract’s drop-down list. The formats
not listed in the table support all the data types. The Float and Double types follow IEEE standard.
3.3
How to set up VGTExtract for simple extractions
Open VGTExtract.exe in GUI mode. Either use the shortcut in the Start menu, or use the -gui
parameter on the command line.
Select existing settings from the settings list and click the Edit button or click New to make new
settings. This opens the Settings window.
Note: the very first time VGTExtract starts, it will automatically open the Settings window to
create the first set of processing settings.
Date: 2013-01-02
Issue: 2.1.0
Page 19 of 63
Software User Guide
VGTExtract
Make sure to adjust and remember the name of the set of processing settings (top left). This
name is used to store the processing settings in an XML file on disk as well as for the Batch
mode processing.
Edit the geographic region settings on the ROI tab : either choose a predefined region from the
drop-down list or define a custom region via the text fields or via the Map Select button.
On the Output tab, choose the output file format. This typically depends on the software that
the data will be exported to / integrated in (see section 4 for examples) for further processing
or visualization.
If only one specific type of dataset (data “layer”) is going to be processed, and all the input
products are of the same type (e.g. only NDVI products) and version (basic VGT, VGT4Africa,
Geoland2 V0, V1), then the scale, offset, missing data value and output data type can be
directly configured in the Output tab.
When a mix of different datasets, and/or different types of products are to be processed, it’s
better to not use the settings on the Output tab, but rather enable the Use Product Specific
Settings checkbox. This opens the Product Specific tab, where scale, offset, output data type,
missing data values and file name suffixes (custom codes) can be configured per dataset. The
default settings account for the proper data types and missing data values and use scale = 1
and offset = 0 (e.g. no encoding).
Note: these Product Specific settings overrule the settings on the Output tab. See section 3.7
for an example of using the scale/offset encoding.
Close the Settings window via the OK button. The processing settings are then saved on disk,
so they can be recalled and edited again later.
Enter the output directory or select it via the Browse button.
Test the processing by first selecting any combination of folders, products (ZIP file) or datasets
(layers within products) in the Input section of the main window. Use Ctrl-click to select
multiple, non-contiguous entries, or Shift-click to select a contiguous set. Then hit the Start
button to run the processing interactively. The progress can be followed in the Output section
(green bullets are successfully created outputs, yellow ones for on-going, red are for errors)
and the Logging window.
3.4
How to run VGTExtract in Batch mode
First follow the steps above to set up the VGTExtract processing settings. Remember the name
of the set of settings that were added or edited. This name is needed to make Batch mode use
the settings.
Run VGTExtractBatch.exe settings_name. This will run VGTExtract in Batch mode, using the
defined processing settings. VGTExtract will then search for input VGT products in the input
directory and start processing them automatically, storing the results in the output directory.
The input and output directory, as well as the default settings_name, are saved in the
config.xml file in the root folder of the VGTExtract installation. The config.xml file is
overwritten when the GUI mode is exited. In a future release, it will be possible to also define
the input/output folders using command line parameters.
Date: 2013-01-02
Issue: 2.1.0
Page 20 of 63
Software User Guide
VGTExtract
Put the command in the Scheduled Tasks (Windows) or Cron (Linux) settings in order to run it
on regular time intervals (e.g. once per day). The Scheduled Tasks can be opened via the
Control Panel. The Cron settings are usually specified using the crontab command. It is
recommended to test the batch processing first manually (starting it from the command
prompt), before scheduling it to run regularly.
3.5
How to combine VGTExtract with GEONETCast reception
It is highly recommended not to run VGTExtract or any image processing directly on the
reception computer that is linked to the satellite dish, because the computations & hard disk
operations done may interfere with data reception. Therefore, first set up the GEONETCast /
EUMETCast station to share or forward the incoming VGT products to one or more other
computers, e.g. via a shared network disk or FTP.
When multiple people are working with the same extraction results, it can be useful to
perform the automated extraction once, on one of the processing computers, and then share
the results over the network. Alternatively, each of the processing computers can run its own
copy of VGTExtract to apply its own settings.
In either case, set up VGTExtract to run in Batch mode on the processing computer, as in
section 3.4.
To extract multiple regions, to convert the data to multiple formats or data types (e.g. for use
in several analysis software) or to use separate output file name patterns, separate sets of
settings (settings XML files) need to be created. VGTExtractBatch.exe must then be called
separately for each set of settings, either in a script or in separate scheduled tasks.
Usually, the directory where the reception station shares the VGT products is used as input
folder for all settings. When using separate input and/or output folders, the config.xml file thus
needs to be duplicated. In the script that runs the multiple instances of VGTExtractBatch.exe,
make sure it copies the right config.xml to the root folder of the VGTExtract installation prior
to launching the batch processing.
Add the call to VGTExtractBatch.exe (single run) or to the script (multiple runs) to the
Scheduled Tasks (Windows) or cron settings (Linux) to make them run at regular time intervals.
Finally, don’t forget to manage the data properly, e.g. through the GEONETCast Data Manager,
to archive or clean up the input products when all extractions are successfully completed.
3.6
Common issues
In this section, a number of commonly encountered problems that users face when running
VGTExtract are covered, along with potential solutions. For more troubleshooting, please refer to
the help desk (see section 1.6) or see section 5.2.
Date: 2013-01-02
Issue: 2.1.0
Page 21 of 63
Software User Guide
VGTExtract
3.6.1 Issue 1: Output data type is not supported in output file format
Unfortunately, some output file formats do not support all data types. WinDisp IDA format for
instance only allows eight bits per pixel data, and though the Tiff and GeoTiff formats allow it,
many software cannot work with Tiff or GeoTiff files with Float or Double data type. And regular
image viewers often fail to open or read such Tiff/GeoTiff files, making it more difficult to quickly
inspect the data visually.
When trying to use an output data type that is not supported by the output format, the processing
in VGTExtract will fail (red sphere in the output overview), and an “Internal Error” message is
displayed in the Logging window, which contains the message
ImgExtractor/NotSupportedDataType [DataType=XXX] (in VGTExtract 1.4 or earlier) or
ImgTool/NotSupportedDataType [DataType= XXX] (in VGTExtract 2.0 or higher), where XXX is
replaced with the output data type that was entered in the processing settings.
To solve this issue, one option is to leave the scale = 1 and offset = 0 in VGTExtract and perform
the decoding operation in the GIS / RS software that will be used for further analysis.
A second option would be to embed the scale and offset directly into the output file’s header, if
the output format allows this, as is the case with WinDisp IDA (use Header menu – Edit in WinDisp
5). Unfortunately, the current version of VGTExtract does not do this automatically. This is planned
for a future release.
For reference, section 3.2 summarizes the support of the various data types per output format.
3.6.2 Issue 2: Flag values
Most datasets also contain one or more special values, representing for instance missing data,
snow, clouds, etc. These values, usually called flags, should be excluded from the linear encoding.
VGTExtract, but also some alternative software such as gdal_translate, however supports only one
flag value, representing all missing or invalid data.
In practice, this means that scale and offset may be accidentally applied to some or all of the flag
values, in particular for the DMP and VPI datasets. Support for multiple flags is planned for a
future release.
3.6.3 Issue 3: Use of Product Specific settings
By default, the scale, offset and missing data flag values from the Output tab of the Settings panel
are used. This is fine when extracting the same type of datasets or products, e.g. only want to deal
with NDVI, and hence the same settings apply for all processed datasets.
When combining products, or datasets of separate types (e.g. 8-bit NDVI and 16-bit DMP), the
same settings cannot be used, as at least the output data type or scale/offset will need to be
different. This is only possible if the Use Product Specific settings checkbox is checked, as the
settings on Product Specific tab of the Settings window are specified per dataset.
Important: When mixing different types of product or dataset, it is best to rely on the Product
Specific settings.
At the same time, remember also that these specific settings overwrite the general ones on the
Output tab. This is true for scale, offset, missing data value and output data type, but NOT for the
output format, which can only be specified on the Output tab.
Date: 2013-01-02
Issue: 2.1.0
Page 22 of 63
Software User Guide
VGTExtract
In VGTExtract version 2.0, this was clarified by making the relevant parts of the Output tab
unusable when the Product Specific Settings checkbox is ticked, as shown in section 5.3.6.
Another issue is that, when adding new settings and then open the Product Specific settings tab
for the first time, all the datasets in the table are disabled (Included checkbox is unchecked by
default). This means that, when one simply checked the Use Product Specific Settings checkbox,
without modifying the Product Specific settings tab, VGTExtract would simply not process any
input data.
The solution is to check the Included checkbox next to the Vegetation product family in the
Product Specific settings tab, thus marking all VGT datasets for inclusion in one go. This is shown in
the figure below. As of VGTExtract version 1.4, the Included checkbox has more appropriate
default values.
Figure 4 Fixing Product Specific settings
3.6.4 Issue 4: Data ranges
In the derived input products (e.g. not the basic 10-day NDVI), VGTExtract uses the metadata in
the products (product description XML files) to derive the ranges of data values and flags. Before
performing the processing, VGTExtract checks the compatibility of these ranges with the output
data type, when applying the configured scale, offset and missing data value flag. In simplified
terms, this means that VGTExtract checks if the output data type’s limitations are sufficient to
store the values that are being generated by the processing. This prevents loss of part of the data
range and helps to check the consistency of the scale, offset, missing data value and output data
type settings.
An example:
When converting 16-bit DMP values to WinDisp IDA format and setting the output data type to
Unsigned Byte while leaving the scale = 1 and offset = 0, VGTExtract will generate the following
errors:
(1) Unable to start processing: Input image is incompatible with given
processing settings.
(2) The negative missing data value <-5> is not supported by the unsigned output
data type <Unsigned Byte>.
Date: 2013-01-02
Issue: 2.1.0
Page 23 of 63
Software User Guide
VGTExtract
(3) Encoding dataset <DMP> of file <VGT4AFRICA_DMP_20090101_Egypt.ZIP> with
scale <1> and offset <0>, will make some flag values negative and thus
unsupported by the unsigned output data type <Unsigned Byte>.
Flag values:
-300, -257, -5, -4, -3, -2, -1, -2
Flag values after encoding:
-300, -257, -5, -4, -3, -2, -1, -2
(4) Encoding dataset <DMP> of file <VGT4AFRICA_DMP_20090101_Egypt.ZIP> with
scale <1> and offset <0>, will make some flag values fall outside of the range
of the output data type <Unsigned Byte>, [ 0 ... 255 ].
Flag values:
-300, -257, -5, -4, -3, -2, -1, -2
Flag values after encoding:
-300, -257, -5, -4, -3, -2, -1, -2
(5) Encoding dataset <DMP> of file <VGT4AFRICA_DMP_20090101_Egypt.ZIP> with
scale <1> and offset <0>, will make some significant values fall outside of the
range of the output data type <Unsigned Byte>, [ 0 ... 255 ].
Range of significant values:
[ 0 ... 32767 ]
Range of significant values after encoding:
[ 0 ... 32767 ]
(1) tells the user that the processing was not started because the compatibility check failed.
(2) gives an error as the missing data value (-32768), which is never encoded with scale/offset
would not fit into the output data type’s limitations.
(3) and (4) explain that some or all of the flag values would be lost as they violate the output data
type’s limitation (signed/unsigned or value range) after their encoding with scale and offset.
(5) gives a similar indication as (4), but for part or all of the range of significant (i.e. non-flag) DMP
values
To solve these issues, the scale, offset, missing data value and/or output data type settings need
to be modified.
Please do note that the data precision is not always checked:
When decoding the DMP to physical values by applying scale = 0.01 and offset = 0, but accidentally
forgetting to change the output data type to Float or Double (leaving it to Signed Short),
VGTExtract will not generate an error, as the output data range (0...327.67) is well inside the range
supported by Signed Short. As Short is an integer type, the decimal digits are lost. The flags (-1, 2...) that are incorrectly encoded with scale = 0.01 (resulting in -0.01, -0.02,...) will likewise be set
to integer values (e.g. several will become 0, effectively losing flag information).
Date: 2013-01-02
Issue: 2.1.0
Page 24 of 63
Software User Guide
VGTExtract
New in v2.1: In version 2.1, the user interface shows all decimal numbers using dot (.) for decimal
separator and removing the grouping of thousands. Earlier versions used localized numbers
(adjusted to the operating system’s regional settings), but inconsistently.
3.6.5 Issue 5: Configured offset is not taken into account
VGTExtract versions 1.1.43 and earlier incorrectly applied the offset parameter. This bug has been
fixed from version 1.2 onwards. Users of older versions are recommended to upgrade to the latest
version, or to perform the encoding in other freeware tools such as GDAL utilities.
3.6.6 Issue 6: Geographic region intersect
Whereas earlier versions of VGTExtract simply generated images filled with missing data values
(e.g. “empty” images of the right size), the recent versions generate an error when trying to clip a
region that does not intersect with the input data’s spatial coverage.
An example:
VGT4Africa products are not only provided for the entire African continent, but also for the
individual countries. When trying to cut for instance Botswana out of an African input coverage,
this will work fine. When the same region is clipped from an input image that only covers Sudan, it
will fail with an ROI intersect error. Extracting Botswana out of a coverage of South Africa will
work, as there is an intersect (e.g. part of Botswana covered in the input image).
The non-intersecting part of the Botswana output image will then be automatically padded with
the missing data value.
The Geoland2 products that were generated as ten by ten degree tiles are automatically mosaiced
into a larger image before the output region is clipped. The intersect is of course checked against
the overall coverage of the mosaiced tiles, not of any of the individual tiles.
3.7
How to convert to physical values
For many datasets (layers) in the products, the data are stored in digital numbers to make the files
smaller. This means that, to retrieve the physical values, a linear decoding operation must be
performed, e.g. PV = (DN * Scale) + Offset, with PV = physical value and DN = digital number.
VGTExtract can perform this operation, and save the result in the output file. As the resulting
physical values are often floating point numbers (numbers with a number of decimals), they will
need to be stored with output data type set to Float (single precision or 32 bits per pixel) or
Double (double precision or 64bits per pixel).
The appropriate scale and offset values were first documented in the product chapters of the
VGT4Africa User Manual [RD1] and are now mentioned in the Product User Manuals and in the
product information on the web site. For convenience, they are summarized per dataset in
Appendix 3.
Date: 2013-01-02
Issue: 2.1.0
Page 25 of 63
Software User Guide
VGTExtract
An example:
NDVI datasets are stored as eight bits per pixel (or Byte) values, between 0 and 255, with 0 as flag
value for missing data. Using the formula PV = (0.004 * DN) - 0.1, i.e. scale = 0.004 and
offset = -0.1, one can derive again the real, dimensionless NDVI index values, which thus range
between -0.096 (DN=1) and 0.92 (DN=255), with steps of 0.004.
3.8
How to manage the processing and pre-defined region settings
Both the processing settings and pre-defined regions in the drop-down list of the Settings window,
are saved as simple XML files on disk, respectively in the settings and roi subfolders under the
VGTExtract installation folder (e.g. by default c:\program files\VGTExtract\settings and
c:\program files\VGTExtract\roi on Windows).
3.8.1 Managing the processing settings
Sharing sets of VGTExtract processing settings with other users then becomes as simple as copying
the right XML file. The name of the set of settings, as mentioned in the drop-down list of the main
window, is used in the name of the XML file, which makes it easy to find the right file. It is
recommended not to copy the files between different versions of VGTExtract. See the instructions
on upgrading to a newer VGTExtract version in section 2.2 for more details.
When copying the processing settings, pay attention to keep the name property unique among the
different sets of settings, as this will appear in the drop-down list (two items with same name will
confuse users). The easiest way to do this is to keep the name consistent with the XML file’s name,
which must be unique within the settings folder.
The name property is highlighted in bold in the below snippet taken from the first lines of an
example processing settings XML file.
<?xml version="1.0" encoding="UTF-8"?>
<java version="1.6.0_13" class="java.beans.XMLDecoder">
<object class="be.vito.vgt.cropvgt.datamodel.ProcessingSettings">
<void property="multi"> <boolean>true</boolean> </void>
<void property="name"> <string>Demo_Africa</string> </void>
</object>
<object class="java.util.Vector">
<void method="add">
<object class="be.vito.vgt.cropvgt.datamodel.BandCollectionSettings">
<void property="bandSettings">
<void method="add">
<object class="be.vito.vgt.cropvgt.datamodel.BandSettings">
<void property="code"> <string>1</string> </void>
<void property="mask"> <boolean>false</boolean> </void>
<void property="maskFlagValue"> <double>-32768.0</double> </void>
<void property="name"> <string>B0</string> </void>
Date: 2013-01-02
Issue: 2.1.0
Page 26 of 63
Software User Guide
VGTExtract
<void property="outputTypeId"> <string>short</string> </void>
</object>
</void>
...
As the processing setting XML files can become relatively complex, only advanced users should
edit these XML files directly in a text or XML editor such as the free XML Notepad from Microsoft.
Removing sets of processing settings can be done with the Delete button on the main menu, or by
simply deleting the corresponding XML file.
3.8.2 Managing the pre-defined region settings
The pre-defined region settings are much simpler in structure than the processing settings files,
and can easily be opened and edited. Let’s look at the Africa region as example:
<?xml version="1.0" encoding="UTF-8"?>
<java version="1.5.0" class="java.beans.XMLDecoder">
<object class="be.vito.vgt.cropvgt.datamodel.PresetROI">
<void property="id"> <string>africa</string> </void>
<void property="name"> <string>Africa</string> </void>
<void property="roiEast"> <double>60</double> </void>
<void property="roiNorth"> <double>38</double> </void>
<void property="roiSouth"> <double>-35</double> </void>
<void property="roiWest"> <double>-26</double> </void>
</object>
</java>
The first line tells it’s an XML file, encoded in Unicode character set, which is the default for XMLs.
The second line refers to the Java XML decoder. The object class makes it clear to VGTExtract that
the object properties relate to a pre-defined region, with a specific data model. The id property is
used in the XML file’s name, and is a unique identification code for the region – there should not
be two regions with the same id. The name property is the string that will be listed in the dropdown selection list on the ROI tab of the Settings window.
And finally, the four roiEast, roiNorth, roiSouth and roiWest properties define the geographic
extent of the region, expressed in decimal degrees latitude or longitude. Negative longitude values
are used for the western hemisphere and negative latitudes for the southern hemisphere. As the
values are of type Double, floating point (decimal) numbers can be specified, e.g. 20.5. As of
VGTExtract version 1.3.3, up to ten decimals are supported, which gives finer control than earlier
versions.
This makes it also easy to create new pre-defined regions: just copy-paste the file and adjust the
properties (making sure the id property is unique). The next time VGTExtract runs, the newly
added region can be selected from the drop-down list.
Date: 2013-01-02
Issue: 2.1.0
Page 27 of 63
Software User Guide
VGTExtract
Sharing them with colleagues or between VGTExtract installations can be done by simply copying
the XML file. The structure has – so far – not been changed in the different versions of VGTExtract,
so there should not be any version compatibility issues.
Likewise, deleting a pre-defined region, thus shrinking the drop-down selection list, is as simple as
deleting the corresponding XML file.
Date: 2013-01-02
Issue: 2.1.0
Page 28 of 63
Software User Guide
VGTExtract
4 First steps towards integration in GIS and Remote Sensing
software
4.1
General approach
When processing only products of the same type, the scale/offset can be entered on VGTExtract’s
Output settings tab. When processing multiple types of VGT4Africa data (i.e. NDVI, NDWI, DMP,…)
together, the user must use the Product Specific settings. These can be accessed and edited on the
Product Specific tab of the VGTExtract settings window, but only if the checkbox use Product
Specific settings at the bottom is checked.
The user is always free to enter different scale/offset conversion parameters than those listed in
this document. This is however only recommended for advanced users, as it may affect data
precision (i.e. level of detail in the dataset).
Make sure to first read at least the Common issues (section 3.6) and the conversion to physical
values (section 3.7) sections for more details.
4.2
Integration in ILWIS open source GIS
Downloads: http://52north.org/communities/ilwis/download - ILWIS Open
http://www.itc.nl/Pub/WRS/WRS-GEONETCast/GEONETCast-toolbox.html - GEONETCast Toolbox
extension to ILWIS
ILWIS and its GEONETCast Toolbox extension are a good way to start analysing the VGT products.
ILWIS is commonly used and is now available as a free, open source GIS/Remote Sensing software.
The toolbox offers an import function for (nearly) all the VGT products (NDVI + derived ones)
available on the GEONETCast broadcast. At present, this includes the basic S10 NDVI, the derived
products covering African (VGT4Africa, Geoland2’s V0 Burnt Area) and South America (Geoland2
V0). Import routines for Geoland2’s V1 products will be added when they are distributed via
GEONETCast.
Note that the toolbox only imports the products as they are broadcasted on GEONETCast,
meaning only the continental coverages. When specific countries or regions were downloaded,
it’s better to fall back on VGTExtract to convert the VGT data into ILWIS format.
VGTExtract thus supports more VGT datasets and product types and in more formats, as not all of
them are broadcasted.
To fully benefit from ILWIS’s functionality and for instance the built-in colour palettes, the easiest
solution is to convert the VGT data to physical values (see section 3.7). When doing so, it is
important to use the Double output data type, as the ILWIS format does not support single
precision (32-bit) Float.
Date: 2013-01-02
Issue: 2.1.0
Page 29 of 63
Software User Guide
VGTExtract
4.3
Integration in WinDisp
Download: http://www.fao.org/giews/english/windisp/windisp.htm - WinDisp 5.1
The WinDisp software from UN-FAO uses its own format, called IDA, which supports only eight
bits-per-pixel data values (Unsigned Byte output data type). As some datasets are 16 bits (or
higher), and the conversion to physical values usually produces (32 or 64-bit) floating point
numbers, a specific encoding with scale and offset is often required.
For convenience, the scale and offset factors to use for the conversion to WinDisp IDA format have
been summarized in a table in Appendix 2.
As some of the original datasets are already encoded to minimize the file size (e.g. DMP is stored
with a scale factor 100), applying a further scale/offset as part of the conversion to WinDisp
format (reducing 16 bit to 8 bit) will be on top of the original encoding. The flags may also be
affected.
The current version of VGTExtract does not add the appropriate slope/intercept information to
the header of the WinDisp IDA formatted output file. This information can be added manually in
WinDisp, using the Header – Edit command.
4.4
Integration in SPIRITS
VITO’s SPIRITS software (previously called MARSFOOD or MARS Application) is a graphical
extension to a set of Glimpse command-line programs that were developed by VITO for the MARS
unit at the JRCC. These applications are used in the fields of agriculture and food security and
particularly aim to perform time series analysis.
SPIRITS has a built-in, generic import routines that use GDAL utilities to convert to ENVI format
extended with additional header fields (flags, scale, offset, value ranges, etc.). Methods to adjust
the ENVI header file and to perform file renaming are also provided. As described in the tutorials,
SPIRITS also offers a way to embed the Status Map quality information as flags (VGT Flag).
VGTExtract’s ENVI output format has been adjusted to smoothen the integration in SPIRITS in
several version. For instance, in version 2.0, the Values and Flags header extensions were added
for basic SPOT-VEGETATION products, whereas they were only available for the derived products
in earlier versions.
SPIRITS and its internal Glimpse programmes often use a typical file name pattern, as in the
following example:
vt0901i.img
with v = VEGETATION sensor, t = ten-daily period, 09 = year 2009, 01 = 1st dekad in the year and
i = NDVI, with the quality information from the Status Map embedded into the data as flags.
Using the substitution parameters in the file name patterns (see section 5.3.3), in particular the
custom codes per dataset (%c) – which can only be edited when using the Product Specific settings
– it is possible to replicate such file naming.
Date: 2013-01-02
Issue: 2.1.0
Page 30 of 63
Software User Guide
VGTExtract
Most of the products distributed in VGT4Africa, DevCoCast and Geoland2 projects cover ten-day
periods and are derived from SPOT-VEGETATION, the following output file name pattern can be
used:
vt%j%k%c%e
The “t” (short for “ten-daily”) can be substituted with a “d” (daily) for basic S1s. The %j and %k will
be substituted by the two digit year and two digit month respectively, and %e by the file name
extension (.img) (see 5.3.3).
Please note that, though they are created and delivered with 10 day frequency, the Burnt Area
and LAI, FCOVER, FAPAR, 30d NDVI and ALBEDO products cover a different & often larger time
period. For Burnt Area, the V0 date of burn is reset on 1st of April and thus covers the range from
preceding April until the date mentioned in the filename. In Burnt Area V1, the season reset date
varies per geographic location, as datasets are provided that cover the burn season or only the
latest dekad. The other products all cover a 30-day synthesis period.
The custom code (%c) is set to the file name suffixes from MARS (e.g. “p” for flagged DMP). As
some of the derived products like water bodies & phenology are not common to MARS, the
custom code (%c) has been given some values that may be unfamiliar to SPIRITS. Tests have so far
not revealed any issues caused by this.
It should be noted that SPIRITS only works with the four most commonly used data types,
Unsigned Byte, Signed Short (16 bits), Signed Integer (32 bits) and single precision Float data types,
whereas the ENVI format allows also the other data types. To accommodate this, it is sufficient to
convert all datasets of type Unsigned Short to Signed Short. The datasets that are delivered as
Unsigned Short type (e.g. the seasonality dates in Water Body and Phenology, but also the Albedos
and their uncertainties) can be safely converted to Signed Short. Only the Burnt Area dates of burn
are encoded two-digit year and three-digit day-of-year, which has a significant range (18000..
38366) beyond that of Signed Short.
At present, however, VGTExtract may still give some errors on the data range when performing
this conversion from Unsigned to Signed Short types. The single precision Float type or 32-bit
signed integer types can solve the problem at the cost of disk space.
For the first burn dates of Burnt Area, and the seasonality dates of Water Bodies and Phenology, it
is good practice to subtract a fixed offset. This effectively reduces the values to the Signed Short
range.
For example:
The Burnt Area first date of burn has a range of 18001 (1 Jan 1980) until 38365 (31 Dec 2018).
Subtracting an offset of 10000 is possible for VGT, as it changes the two-digit year since 1980 into
year since 1990.
The Water Body or Phenology start/end of season dates are encoded as number of dekads since 1
Jan 1980 (=dekad 1). While accounting for the fact that water body looks 45 dekads into the past
and Phenology 54 dekads, a simple strategy can be to take the dekad of the concerned product
(e.g. 1 August 2012), then subtract 2 years and take start-of-year (e.g. 1 Jan 2010). This start of
year is an integer multiple of 36 dekads after 1 Jan 1980: (2010-1980)*36=1080. Subtract this
value as offset and then interpret the dates as being the number of dekads since 1 Jan 2010.
Date: 2013-01-02
Issue: 2.1.0
Page 31 of 63
Software User Guide
VGTExtract
4.5
Integration in other GIS and Remote Sensing software
For integration into other GIS and Remote Sensing software, the output formats ENVI (flat bandsequential binary + text header) or GeoTiff are usually good options. For IDRISI and ERDAS ER
Mapper, specific output formats are foreseen.
There are a few known issues with such conversions:
The IDRISI32 output format (.rst and .rdc) is not supported by older IDRISI16 versions (that use
.img and .doc). Simply changing the file name extension (.rst => .img and .rdc => .doc) should
solve this, if the .rdc file does not contain the new fields (version, display min/max) and when
the output data type is Short (16 bit).
It is known that some implementations of the GeoTiff library do not work well with data types
larger than 16 bits per pixel, in particular the floating point types.
Some GIS and remote sensing software invert the colours and pixel values of the GeoTiff files
produced with earlier versions of VGTExtract. Extensive tests with recent versions of ten (10)
different, commonly used software have ensured us that this has been fixed in VGTExtract v2.1.
Furthermore the geo-location in the GeoTiff files has also been corrected.
Date: 2013-01-02
Issue: 2.1.0
Page 32 of 63
Software User Guide
VGTExtract
5 The graphical interface explained
Please note that the below screenshots were taken on a computer running Windows XP operating
system. The actual look-and-feel may differ for other operating systems.
5.1
The main window
5.1.1 Screenshot
Figure 5 Main window
5.1.2 Window elements
The main window of the VGTExtract tool can be roughly divided into five parts:
The Processing Settings section at the top
The Input section on the left
The Output section on the right
The control buttons (Start-Stop-Pause-Logging-About-Exit)
The Progress Indicator at the bottom
Date: 2013-01-02
Issue: 2.1.0
Page 33 of 63
Software User Guide
VGTExtract
5.1.3 Main window - Processing Settings section
5.1.3.1
Screenshot
Figure 6 Processing Settings section of the main window
5.1.3.2
Section elements
Section
element
Description
Settings
list
The settings list gives an overview of the names of all the sets of processing
settings that are defined and allows to select one such set. When starting
the processing (using the Start button) the selected settings will be used.
Similarly, the Edit and Delete buttons, described below, also apply to the
selected item in the list. Behind the scenes, each item in the list
corresponds to an XML configuration file that contains the related
processing settings and that is stored in the Settings subdirectory of the
VGTExtract installation directory. Editing these XML files directly is however
not recommended. For processing in Batch mode, one of the names in the
list is to be given as settings_name command line parameter in order to use
the corresponding settings.
Add
button
This button opens the Settings window, where the name of a new set of
processing settings can be defined and the new processing settings can be
entered. When the new processing settings are accepted via the OK or
Apply button of the Settings window, they will be saved and added to the
list under the name entered.
Edit
button:
Clicking the Edit button will open the Settings window for changing the
processing settings of the currently selected set.
Delete
button
The selected set of settings will be deleted completely when this button is
clicked.
Date: 2013-01-02
Issue: 2.1.0
Page 34 of 63
Software User Guide
VGTExtract
5.1.4 Main window - Input section
5.1.4.1
Screenshot
Figure 7 Input section of the main window
5.1.4.2
Selecting input files
The Input section of the main window gives an overview of the contents of the hard disk (file
system) in a tree structure. The overview only shows the directories (folders) and SPOTVEGETATION product groups (representing a set of ZIP files, such as Geoland2 tiles), products
(representing a single ZIP file) and data layers (that are available in the group or product). The
recognized and supported items are indicated by a special icon, all other files are not shown.
New in v2.0: The groups of ten-by-ten degree tiles are now marked with “TILES” and those with
continental tiles (continental coverages clipped at the same grid as tiles, to allow them to be
sticked together) are marked as “CONTINENTAL TILES”.
New in v2.1: Tiles of Geoland2 V1 products are now recognized as separate products rather than
part of a group of tiles. This is required to allow the work-around described in section 3.1.
Important: when a product (ZIP file) is un-compressed manually, VGTExtract may no longer
recognize it and it may not be shown in the tree.
It’s possible to select any node (directory, product group, product or dataset/layer) in the tree as
the input for VGTExtract processing. Several nodes can be selected at once. When the Start button
is clicked on the main window (see 5.1.6), VGTExtract will collect all the selected nodes, scan
through them and their child nodes (subdirectories), looking for VEGETATION derived products to
process. Any products that are found are added to the output overview (see 5.1.5) on the main
window, indicating that they are ready to be processed. If the product specific settings are enabled
in the Settings window, only datasets that are allowed by those settings (Included checkbox) will
be processed.
Important: VGTExtract will not complain when the input selection does not include any datasets
to be extracted. In such case, it simply reports “Done”.
Date: 2013-01-02
Issue: 2.1.0
Page 35 of 63
Software User Guide
VGTExtract
To select multiple nodes in the input tree, either hold down the Shift-key or the Ctrl-key while
clicking on nodes. Clicking on a node, followed by holding down Shift and clicking on a second
node will select both nodes, as well as all nodes in-between (range select).
Holding down the Ctrl-key while clicking on nodes adds or removes an individual node in a
multiple, non-contiguous selection.
5.1.4.3
Popup menu
Figure 8 Input node popup menu
When right-clicking on a node (directory, product group, product, or dataset) in the input tree, the
popup menu shown above appears. This menu allows to open the node's properties in the
Property window or to refresh the node, for instance to re-scan a directory and its subdirectories.
5.1.4.4
Property window
Figure 9 Properties of a folder
Figure 10 Properties of a regular product (left)
and new V1 product (right)
Date: 2013-01-02
Issue: 2.1.0
Page 36 of 63
Software User Guide
VGTExtract
Figure 11 Properties of a Product Group
Figure 12 Properties of a Dataset in a product (left) or product group (right)
As shown in the examples above, the properties shown by the Property window are different for
folders, products, product groups and datasets (layers) in products or groups. The folder
properties for instance only provide the full path on disk of the folder. The product properties
include product's name (ZIP file), the file size, start date of the ten-day composite period, the
enclosing geographical bounding box coordinates and a list of the datasets in the product. If Java
Advanced Imaging is installed, the Quicklook image is shown as a preview of the content of the
most important dataset in the product. The Quicklook image appears resized and in greyscale for
basic, VGT4Africa and Geoland2 V0 products. Geoland2’s V1 colour Quick Looks are shown with a
scrollbar to view them in detail.
Date: 2013-01-02
Issue: 2.1.0
Page 37 of 63
Software User Guide
VGTExtract
For groups of products, the file name is replaced by the logical group name, the size represents
the total size of all the files in the group (the number of files is also mentioned), the start date of
the composite period and list of datasets in the group. The quicklook image is replaced by an icon
representing a group of images.
The coordinates enclose the entire group. This does not mean that the group contains all the
products (i.e. tiles) needed to completely fill this enclosing bounding box. Some products may be
missing when they were not properly downloaded, or completely unavailable (i.e. when they only
cover sea, they are not produced).
5.1.5 Main window - Output section
5.1.5.1
Screenshot
Figure 13 Output section of the main window
Date: 2013-01-02
Issue: 2.1.0
Page 38 of 63
Software User Guide
VGTExtract
5.1.5.2
Section elements
Section
element
Description
Text field
This field contains the directory where the output files are saved.
Browse
button
This button opens a file dialog where the output directory can be selected.
Output
overview
When the application starts processing, the output overview list (see
below) will be filled with the names of all the output files the application
will generate. Left of the filename, a red, green, yellow or gray sphere will
indicate the status of processing of the corresponding file.
5.1.5.3
Output overview
The sphere that appears left of each output file in the overview, can have four colours:
A gray sphere ( ) indicates that this output is foreseen, but its processing still needs to start.
A yellow sphere ( ) indicates that the output file is being processed. The name of this item
will also appear in the progress bar (see 5.1.7) at the bottom of the main window.
A green sphere ( ) indicates that the processing of this item has finished successfully. The
output file will appear in the designated directory or in a subdirectory, depending on the value
of the output filename field in the Settings window (see 5.3.3).
A red sphere ( ) indicates that there was an error while processing that file. When holding
the mouse pointer over the filename for a few moments, a textbox (tooltip) will appear,
explaining the nature of the error. The error is also recorded in the Logging window (see 5.2).
5.1.6 Control buttons
The following table describes the control buttons on the main window.
Button
name
Description
Start
After clicking the Start button, VGTExtract will collect the selected input
nodes (products, product groups, datasets) and recursively scan the
selected input directories for VGT products (or groups) to process. The
application will then place fill the output overview with the expected
output files and start the processing.
Stop
While the processing is on-going, this button can be used to stop the
processing when it has finished the current output image.
Pause /
Resume
This button temporarily halts the on-going processing. When paused, click
this button again to continue the processing. The application will finish the
output image it was processing before halting.
Date: 2013-01-02
Issue: 2.1.0
Page 39 of 63
Software User Guide
VGTExtract
Logging
The Logging button opens the Logging window that shows the different
steps in the processing of each file, as well as an explanation of any errors if
they occurred. There is also a possibility to save the contents of the Logging
window to a file.
About
This button opens the About window that gives information about the
VGTExtract software itself, such as version number, contact information
and copyright notice.
Exit
Clicking this button will close the VGTExtract application.
5.1.7 Progress Indicator
The progress indicator reports what VGTExtract is currently doing (e.g. looking for input files,
unzipping or processing a VGT product). It also gives an overall view of the progress. Here are
some examples:
Figure 14 Examples of progress bars
5.2
Troubleshooting in the Logging window
5.2.1 Screenshot
Figure 15 Logging window
Date: 2013-01-02
Issue: 2.1.0
Page 40 of 63
Software User Guide
VGTExtract
5.2.2 Window elements
Window
element
Description
Text field
This text field displays messages about the processing steps being
performed and any errors that may have occurred. The messages follow
this pattern:
Processing item <name of output> (x out of y)
Step 1: checking product intersect and compatibility
Step 2: preparing the input data (unzip,…)
Step 3: launching the actual extraction/mosaicing process
Step 4: clean up
When processing a product group, two steps are pre-pended to the four
listed above: a check on the intersect of the entire group and a check of
the output format.
When all outputs are processed, the message “All Done!” is logged.
These messages are useful for troubleshooting and are thus important
when contacting the VITO help desk for support. They can easily be copypasted into an e-mail or saved in a text file via the Save button.
Attach to
main
window
button
When selected, the Logging window will follow the main window when
it’s moved around. If it is not selected, then the Logging window can be
placed anywhere on the screen, independently from the main window.
Save button This button saves the contents of the text field (the messages) to a file on
disk. When the button is clicked, a Save File dialog will open to specify
the file name of and folder where the file is to be stored.
The Close button closes the Logging window.
Close
button
5.2.3 Advanced troubleshooting
When using the Logging window does not suffice to solve the issue, and the section on Common
Issues (see 3.6) doesn’t provide the answer, then it is best to contact the help desk for technical
support. Contact information is listed in section 1.6. Providing the help desk with a copy of any
error messages from the Logging window can help them locate and re-produce the problem,
which is the first step in solving it.
If necessary, it is possible to set up VGTExtract so that it prints more information on what it’s
doing (debugging information, useful only to the code developers). This is done by adjusting the
logging.properties file and other files in the root folder of the VGTExtract installation. When
needed, the help desk will provide instructions on these changes.
Date: 2013-01-02
Issue: 2.1.0
Page 41 of 63
Software User Guide
VGTExtract
5.3
Configuring the processing in the Settings window
5.3.1 Screenshot
Figure 16 Settings window
5.3.2 Window elements
The Settings can be entered either with the Add button (to add a new set of settings) or the Edit
button (to edit an existing set) on the main window. The below table describes the window
elements and their meaning both when adding (2nd column) and editing (3rd column).
Window
element
When Adding
When Editing
Name
In this field, the name for the new
set of processing settings can be
entered. The name will be added
to the Settings List of the main
window (see 5.1.3) after clicking
the Apply or OK button. The name
can only contain characters that
are valid in a filename, as the
same name is used to store the
settings in an XML file on disk.
This field can be used to change
the name for the existing set of
processing settings that are being
edited. The changes to the settings
will be saved under the new name.
If the name is not changed, the old
settings are overwritten. This
name can only contain characters
that are valid in a filename.
Date: 2013-01-02
Issue: 2.1.0
Page 42 of 63
Software User Guide
VGTExtract
Output file
This field contains the file name
pattern that will be used when
VGTExtract creates output files
during processing. The
substitution parameters that can
be used in the output file name
pattern are described in section
5.3.3.
In this field the output file name
pattern can be edited. The
substitution parameters for such
patterns are described in section
5.3.3.
The tab
panels
These three tab panels organize the settings into 3 categories. The 3rd
tab, with the product specific settings, is only available when the Use
product specific settings checkbox is checked. The different tabs or
panels are described in the next sections.
ROI tab for geographic region of interest
Output tab for default conversion settings to apply to all datasets
Product Specific tab for conversion settings defined per type of dataset,
which overwrite the default settings on the Output tab when enabled
Use product
specific
settings
checkbox
Selecting this option enables the Product Specific tab.
Apply button
The Apply button will save the
settings and will add the new
settings name to the list in the
main window. The Settings
window will remain open for
further editing of the processing
settings.
Clicking this button will save the
changes made to the settings. The
Settings window remains open.
OK button
The OK button will save the
settings and will add the new
settings name to the list in the
main window. The Settings
window will be closed.
The OK button applies all changes
that were made and closes the
Settings window.
Cancel button
The Cancel button closes the
Settings window without saving
the set of processing settings that
were added (unless they were
already saved with the Apply
button).
Clicking this button will close the
Settings window without saving
the changes unless they were
already saved with the Apply
button.
Date: 2013-01-02
Issue: 2.1.0
Page 43 of 63
Software User Guide
VGTExtract
5.3.3 Output filename patterns
The output file name pattern is used to generate the name of the output files when VGTExtract
saves them during processing. This pattern can be specified in the Output filename text field.
In general, output file names may only contain characters that are valid for the operating system
(Windows or Linux). Besides the normal file name characters, the below special substitution codes
will be automatically replaced with the corresponding values when the output files are created.
For convenience, the list of substitution parameters can be opened by clicking the ? button just to
the right of the Output Filename text field.
%s : The name for the set of settings
%p : The dataset/layer/band code (B0, NDV, ...)
%r : If used, the name of the pre-defined region or an empty string otherwise
%f : The name of the input file
%y : The year (four digits)
%j : The year (two digits)
%k : The dekad of the year (two digits)
%m : The month of the year (two digits)
%n : The dekad of the month (one digit)
%d : The day of the month (two digits)
%c : The custom code as defined in the Product Specific settings, which defaults to the MARS
file name suffix (e.g. “i” for NDVI dataset)
%e : The file extension, depending on the output format
%% : The literal %
The default pattern for newly created settings is
%p_%y%m%d_%r_Extract%e
The date parameters (year, month, day, dekad in year/month) are taken from the input file or
group and represent the “nominal date” of the product/group. For most products, but not for
Burnt Area, LAI, FCOVER and Albedo, this approximately matches the start date of the time period
that is used in the calculations.
When path separators are used (“/” on Linux, “\” on Windows) in the pattern, the required
directories will be created automatically. As the substitution parameters can be used in the folder
names as well, it is very easy to organize the output files by year-month-day, by type, etc.
Example: the pattern %y\%m\%d\%p_%y%m%d_%r_Extract%e will store the files in separate
folders by four digit year, two digit month and two digit day, using the default file names.
Section 4.4 gives a more elaborate example that reconstructs typical MARS file naming.
Date: 2013-01-02
Issue: 2.1.0
Page 44 of 63
Software User Guide
VGTExtract
5.3.4 Settings window – ROI panel
5.3.4.1
Screenshot
Figure 17 ROI panel on the Settings window
5.3.4.2
Tab panel elements
The geographic Region Of Interest (ROI) that will be extracted from the input files can be specified
on the ROI tab panel of the Settings window. There are three ways to specify this desired ROI:
If the desired ROI matches any of the pre-defined ROIs (see Appendix 1), select the pre-defined
ROI from the list on the left. Its coordinates will then be placed into the text fields on the right.
The geographical coordinates (lat/lon) of the desired region can be entered directly into the
text fields.
Or the region can be selected by clicking on the Map Select button, which will open the ROI
map selection window (see below). After an ROI is selected from that map, the ROI's
geographical coordinates will be entered in the text fields automatically.
The radio buttons Preset ROI and Manual Input define whether VGTExtract uses the predefined
ROI currently selected on the list or the manual (or map selected) ROI settings for processing. Only
one of both radio buttons can be enabled. The radio buttons automatically switch when a list
selection is made and when the text fields are edited or an ROI is selected from the map, but it is
possible to change them manually.
As of version 1.3.3, the coordinates can now be entered and displayed with ten decimal digits,
allowing finer control and more accurate extractions. It also fixed the bug that caused incorrect
East and North boundaries to be used when the coordinates were entered manually in the text
fields.
5.3.4.3
Predefined ROIs
See Appendix 1 for a complete list of pre-defined regions, or section 3.8 on how to manage them.
Date: 2013-01-02
Issue: 2.1.0
Page 45 of 63
Software User Guide
VGTExtract
5.3.5 Settings window – ROI panel – ROI Map selection window
5.3.5.1
Screenshots
Figure 18 Continent selection in the ROI Map Selection window
Figure 19 Selecting a region in the ROI Map Selection window
Date: 2013-01-02
Issue: 2.1.0
Page 46 of 63
Software User Guide
VGTExtract
5.3.5.2
Window elements
This window allows to select an ROI interactively from a map, in 2 steps:
First select the desired continent by clicking into the red rectangle that surrounds it (see Figure
18).
After clicking on the continent, a map of the selected continent will open where initially the
ROI of the entire continent is selected. On this map (Figure 19 shows an example for Africa), a
custom region can then be selected by simply clicking and dragging. The selected region is
shown by a red rectangle, together with the top-left and bottom-right geographical
coordinates printed just outside the rectangle.
The three buttons that appear below the map display are described in the following table.
Button
Description
-
When a continental map is shown, this button goes back to the world map, to
select a different continent.
OK
The OK button saves the selected region and closes the ROI map selection
window. The coordinates of the selected ROI are written into the text fields on
the ROI panel.
Cancel
The Cancel button closes the ROI map selection window without saving the
coordinates of the selected region.
5.3.6 Settings window – Output panel
5.3.6.1
Screenshot
Date: 2013-01-02
Issue: 2.1.0
Page 47 of 63
Software User Guide
VGTExtract
Figure 20 Output panel of the Settings window,
partly disabled (bottom) when overruled by Product Specific Settings
5.3.6.2
Tab panel elements
Panel element
Description
Output format
list
In this list, the output file format is selected for the all output files. For a
complete list of supported formats, please see section 3.2.
Data type list
Here, the output data type is chosen for all output images. Section 3.2
describes the supported data types, which depend on the selected output
format.
Scale and Offset
text fields
The pixel values of the output image can be encoded using the scale and
offset values given in the textboxes on the right. This may be required to
make the values fit into the range supported by the output data type.
The formula used for this output encoding is:
output_pixel_value = ( scale * input_pixel_value ) +
offset
Specifying a scale of 1 and an offset of 0 prevents output encoding. Decimal
values are allowed for scale and offset.
Important!
Please note that VGTExtract superimposes the encoding on any existing
encoding of the input images. Many SPOT-VGT data are provided in an
encoded form – for instance NDVI is provided as eight bit (Byte) images, with
a scale of 0.004 and offset of -0.1 that need to be applied to convert back to
physical values.
Date: 2013-01-02
Issue: 2.1.0
Page 48 of 63
Software User Guide
VGTExtract
Missing data
value text field
The missing data value is a special numerical value that is used to indicate
missing or invalid pixel values (typically a large negative value or 0). Since
this value needs to be treated as a flag and not as a valid pixel value, it will
not be encoded with scale and offset in the output. Missing data values are
simply copied from input to output, with data type conversion.
Since version 2.0, the data type list, scale and offset text fields and missing data value text fields
are disabled when they are overruled by the Product Specific settings (i.e. when the checkbox is
ticked at the bottom of the Settings window).
5.3.7 Settings window – Product specific panel
5.3.7.1
Screenshot
Figure 21 Product Specific panel of the Settings window
5.3.7.2
Tab panel elements
When the Use product specific settings checkbox on the Settings window is enabled, the Product
specific settings panel shown in the screenshot above can be used to define the processing
settings per type of input image. The settings on the output panel are used when the product
specific panel is disabled and apply to the processing of all images.
Date: 2013-01-02
Issue: 2.1.0
Page 49 of 63
Software User Guide
VGTExtract
On the left, a tree-like structure is shown that contains (from top to bottom):
A folder for the entire set of settings that are being edited. The name of this folder will appear
in the list of settings in the main window.
A folder for each family of products supported in the processing settings. VGTExtract only
treats Vegetation (VGT) derived products.
In the Vegetation folder, there is one item for each type of dataset that appears in VGT
products. As of VGTExtract version 1.4, the datasets are listed by their description, rather than
by the acronyms shown in the above figure.
Important: when expanding the Vegetation folder, it may be needed to resize (maximize) the
window to keep the settings table visible.
On the right, there is a table where each row corresponds to the processing settings for one item
in the tree and each column represents a specific processing setting. The following columns are
present:
Column
name
Description
Included
Enable the checkbox in this column to include the item from the tree in the
processing. The checkbox for top-level element, the entire set of all
settings, cannot be disabled since this would disable all processing.
Enabling the checkbox for the Vegetation folder will include all possible
Vegetation images.
A shaded grey checkbox for the Vegetation folder item indicates that
some, but not all, of the Vegetation products are included in the
processing.
Missing
The missing data value is a special numerical value that is used to indicate
Data Value missing or invalid pixel values. In this column, one such value is defined for
each image individually. Missing data values are not encoded in the output
image, only copied from the input image because they represent a flag, not
a valid pixel value.
Data Type
The data type column allows to select the output data type for each output
image. For more information on the supported output data types, see the
data type list description in §4.4.6.
Scale and
Offset
The pixel values of the output image can be encoded using the scale and
offset values given in the corresponding columns.
For more information on the encoding of output images, see the Scale and
Offset text fields on the output panel (§4.4.6).
Date: 2013-01-02
Issue: 2.1.0
Page 50 of 63
Software User Guide
VGTExtract
5.4
More information on VGTExtract itself: the About window
5.4.1 Screenshot
Figure 22 About window
Date: 2013-01-02
Issue: 2.1.0
Page 51 of 63
Software User Guide
VGTExtract
6 Appendices
Appendix 1
List of pre-defined Regions of Interest
Pre-defined regions in Africa
Region Name
Min
Max
Min
longitude longitude latitude
Max
latitude
Africa
26°W
60°E
35°S
38°N
Algeria
9°W
12°E
18°N
38°N
Angola
11°E
25°E
19°S
4°S
Benin
0°E
4°E
6°N
13°N
Botswana
20°E
30°E
27°S
17°S
Burkina Faso
6°W
3°E
9°N
16°N
Burundi
28°E
31°E
5°S
2°S
Cameroun
8°E
17°E
1°N
14°N
Cape Verde
25.5°W
22.5°W
14.5°N
17.5°N
Central African Republic
14°E
28°E
2°N
12°N
Chad
13°E
25°E
6°N
24°N
CILSS region
18°W
25°E
4°N
28°N
Comoros
43°E
46°E
13°S
11°S
Congo
11°E
19°E
6°S
4°N
Congo, Democratic Republic
12°E
32°E
14°S
6°N
Djibouti
41°E
44°E
10°N
13°N
Eastern Africa
26°E
47°E
12°S
17°N
Egypt
24°E
36°E
21°N
32°N
Equatorial Guinea
5°E
12°E
2°S
4°N
Eritrea
36°E
44°E
12°N
18°N
Ethiopia
33°E
48°E
3°N
15°N
Gabon
8°E
15°E
4°S
3°N
Gambia, the
17°W
13°W
13°N
14°N
Ghana
4°W
2°E
4°N
12°N
Guinea
16°W
7°W
7°N
13°N
Guinea-Bissau
17°W
13°W
10°N
13°N
Ivory Coast
9°W
2°W
4°N
11°N
Kenya
33°E
42°E
5°S
5°N
Lesotho
27°E
30°E
31°S
28°S
Date: 2013-01-02
Issue: 2.1.0
Page 52 of 63
Software User Guide
VGTExtract
Liberia
12°W
7°W
4°N
9°N
Libya
9°E
26°E
19°N
34°N
Madagascar
42°E
51°E
26°S
11°S
Malawi
32°E
36°E
18°S
9°S
Mali
12.5°W
5.5°E
10°N
25°N
Mauritania
17.5°W
4.5°W
14°N
28°N
Mauritius
57°E
58°E
21°S
20°S
Morocco
18°W
-0°E
20°N
36°N
Mozambique
30°E
41°E
27°S
10°S
Namibia
11°E
26°E
29°S
16°S
Niger
0°E
16°E
11°N
24°N
Nigeria
2°E
15°E
4°N
14°N
Reunion
55°E
56°E
22°S
20°S
Rwanda
28°E
31°E
3°S
1°S
Sao Tome and Principe
6°E
8°E
0°N
2°N
Senegal
18°W
11°W
12°N
17°N
Seychelles
55°E
56°E
5°S
4°S
Sierra Leone
14°W
10°W
6°N
10°N
Somalia
40°E
52°E
2°S
12°N
South Africa
14°E
33°E
35°S
22°S
Southern Africa
8°E
40°E
35°S
6°N
Sudan
21°E
39°E
3°N
24°N
Swaziland
30°E
33°E
28°S
25°S
Tanzania, United Republic of
29°E
41°E
12°S
-0°N
Togo
1°W
2°E
6°N
12°N
Tunisia
7°E
12°E
30°N
38°N
Uganda
29°E
36°E
2°S
5°N
West Africa
26°W
17°E
1°N
37°N
Zambia
22°E
34°E
19°S
8°S
Zimbabwe
25°E
34°E
23°S
15°S
Date: 2013-01-02
Issue: 2.1.0
Page 53 of 63
Software User Guide
VGTExtract
Pre-defined regions in South and Central America
Region Name
Min
Max
Min
longitude longitude latitude
Max
latitude
S-America
93°W
33°W
56°S
25°N
Central America
93°W
77°W
7°N
19°N
Caribbean Islands
88°W
59°W
10°N
24°N
Mercosur
70°W
34°W
40°S
0°
Argentina
74°W
53°W
56°S
21°S
Belize
90°W
87°W
15°N
19°N
Bolivia
70°W
57°W
23°S
9°S
Brazil
75°W
34°W
34°S
6°N
Chile
76°W
66°W
56°S
17°S
Colombia
82°W
66°W
5°S
14°N
Costa Rica
86°W
82°W
8°N
12°N
Cuba
85°W
74°W
19°N
24°N
Dominican Republic
73°W
68°W
17°N
20°N
Ecuador
81°W
75°W
6°S
2°N
El Salvador
91°W
87°W
13°N
15°N
Falkland Islands
62°W
57°W
53°S
50°S
French Guiana
55°W
51°W
2°N
6°N
Galapagos Islands
93°W
89°W
2°S
2°N
Guatemala
93°W
88°W
13°N
18°N
Guyana
62°W
56°W
1°N
9°N
Haiti
75°W
71°W
18°N
21°N
Honduras
90°W
83°W
12°N
17°N
Jamaica
79°W
76°W
17°N
19°N
Nicaragua
88°W
82°W
10°N
16°N
Panama
84°W
77°W
7°N
10°N
Paraguay
63°W
54°W
28°S
19°S
Peru
82°W
68°W
19°S
0°
Puerto Rico
68°W
65°W
17°N
19°N
Suriname
59°W
53°W
1°N
7°N
Trinidad and Tobago
62°W
60°W
10°N
12°N
Uruguay
59°W
53°W
35°S
30°S
Venezuela
74°W
59°W
0°
13°N
Date: 2013-01-02
Issue: 2.1.0
Page 54 of 63
Software User Guide
VGTExtract
Pre-defined regions foreseen in support of MARS and GMFS users:
ROI Name
Min
Max
Min
longitude longitude latitude
Max
latitude
Africa, as defined by MARS
18°W
52°E
36°S
38°N
IGA, as defined by MARS
20°E
54°E
6°S
28°N
SAC, as defined by MARS
10°E
59°E
36°S
6°N
WAF, as defined by MARS
19°W
25°E
4°N
28°N
CILSS, as defined by GMFS
25.5°W
25°E
4°N
28°N
EAF, as defined by GMFS
21°E
52°E
12°S
23°N
Ethiopia, as defined by GMFS
33°E
48.1°E
3.2°N
15.2°N
Malawi, as defined by GMFS
32.38°E
36.06°E
17.22°S
9.13°S
Mozambique, as defined by
GMFS
27.5°E
44°E
27°S
10°S
SAD, as defined by GMFS
7°E
58.5°E
36°S
6°N
Senegal, as defined by GMFS
17.5°W
11.1°W
12.2°N
16.5°N
Sudan, as defined by GMFS
20.35°E
40.07°E
3.6°N
23.15°N
Zimbabwe, as defined by GMFS
25.1°E
33.3°E
22.5°S
15.35°S
Note: the continental tile windows, aligned to ten-by-ten degree grid used for tiles, are likely to be
added in a future version of VGTExtract.
Date: 2013-01-02
Issue: 2.1.0
Page 55 of 63
Software User Guide
VGTExtract
Appendix 2
Dataset
Settings for conversion to WinDisp IDA
Unit (input)
Scale
Offset
Missing data
value
Notes
0.00769
3
0
After conversion,
subtract 3 from the
eight-bit digital value
(except for value 0),
then unit = 1.3 kg
DM/ha/day
1
Offset
0 (default)
depending
on dekad
Dry Matter Productivity product
Dry Matter
Productivity
0.01 kg DM /
ha / day
Small Water Bodies product
Water Body start
of season (WBS,
WBSTARTDATE)
Water Body end
of season (WBE,
WBENDDATE)
Date,
expressed as
number of
dekads since
1980-01-01.
Same approach as for
phenology dates
(below). Water body
seasonality only looks
back 45 dekads (1 year
+ 3 months).
Phenology products (PHENOKS, PHENOMAX, PHENOMON)
Validated start
date of season
(PHSTART)
Date,
expressed as
number of
dekads since
Half senescence
1980-01-01
date (PHHALF)
(reference
Date of Max NDVI dekad).
(PHMAX)
1
Offset
0 (default)
depending
on dekad
Un-validated start
of season
(PHSMON)
Un-validated date
of maximum
NDVI
(PHMAXMON)
The simplest way to
convert to eight bitsper-pixel is to change
the reference dekad
by simply subtracting
a certain number of
years or dekads. Take
into account that the
products can look as
far as 54 dekads (1.5
years) into the past.
For instance: for data
covering 2nd half
2008, 2007-01-01 can
be used as new
reference.
Albedo products: VGT4Africa’s BBDHRT, BBDHRV, BBDHRN, ALBE, ALBQ
Geoland2 products AL-BH and AL-DH
Albedo datasets
in Near-Infrared,
Visible and Total
wavelengths
Date: 2013-01-02
Dimensionless 0.00769
Or 0.01
0
Issue: 2.1.0
0
Scale by 0.00769
yields 1.3% per unit,
scaling by 1/100 yields
values in the range 0 ..
Page 56 of 63
Software User Guide
VGTExtract
Uncertainties on
albedo values
100% reflected light
Geoland2 V1 products LAI, FCOVER, 30d NDVI, FAPAR and Albedos
16-bits-per-pixel
quality
information
(QFLAG)
Depending on the product being processed, some bits do not apply. A division
by a power of 2 may thus help.
Alternatively, it can be useful to extract from the QFLAG specific masks for
clouds, snow, etc. typically by masking all bits except one or two.
As for eight bits-per-pixel quality information (Status Maps), routines to assist
with the bitwise operations are foreseen to be added in a future release.
Notes:
The above table only lists those datasets/products for which a scale and/or offset needs to be
entered into VGTExtract’s configuration to perform the conversion to an output image of data
type Unsigned Byte. This data type is required for WinDisp IDA output format, but may be used for
other formats as well. Please make sure the output data type is set correctly.
There are actually several possible values for the conversion of DMP values. Those listed above are
a compromise between ease of interpretation (factor 1.3) and precision. For example, a scale
factor of 0.0075 would also work for the albedo and simplifies the interpretation further (each unit
after conversion will be 1.3333... or 1 + 1/3 %), while at the same time sacrificing a little in
precision.
Where the missing data value is not the default (i.e. for the DMP and Albedo), the value was
changed so that the compatibility check would not fail and VGTExtract would allow the
conversion. The term “missing data value” is then mis-leading, as the value indicated does not
necessarily represent a flag for missing data (see 3.6.2 for the common issues on converting flags).
Date: 2013-01-02
Issue: 2.1.0
Page 57 of 63
Software User Guide
VGTExtract
Appendix 3
Settings for conversion to physical values
To convert from digital numbers to physical values the following formula needs to be applied:
PV = (scale * DN ) + Offset, where PV = output physical value, DN = the digital number stored in
the input data file and scale and offset are the parameters given below.
Note: the Product User Manuals (PUM) of several Geoland2 version 1 products give the
scale/offset for the formula solved for DN (DN = (scale * PV) + Offset) instead. This explains why
the values below differ from those in the Geoland2 V1 PUM documents.
Dataset
Scale
Offset
Missing data
value
Flags
Resulting values
Normalized Difference Vegetation Index (NDVI) and Water Index (NDWI) products
NDVI
0.004
-0.1
0
Dimensionless
NDWI
0.008
-1
255
Dimensionless
Vegetation Productivity Indicator (VPI) product
VPI
0.5
-5
251
251 missing
252 cloud
253 snow
254 sea
255 background
Historical probability
[%]
Dry Matter Productivity (DMP) product
DMP
0.01
0
-5
-300 METmis
-257 NDVI<0
-5 missing
-4 cloud
-3 snow
-2 sea
-1 back
-2 back
[kg DM/ha/day]
0
0
251 = missing (V1 only)
Classes:
0 ocean
70 free water
150 humid vegetation
220 free water &
humid vegetation
255 dry land
Small Water Bodies product
Water bodies
detection (SWB)
Date: 2013-01-02
1
Issue: 2.1.0
Page 58 of 63
Software User Guide
VGTExtract
Water Bodies
Global Water
Watch detection
(GWWR)
1
0
251
251 = missing
Classes:
0 = ocean
70 = water
255 = dry land
Permanent
Water
1
0
251
251 = missing
Classes:
0 = ocean
70 = water
255 = dry land
Water Body
Season Start
(WBS,
WBSTARTDATE)
1
0
0
0 = missing
(VGT4Africa)
251 = missing (V1)
Date [number of
dekads since 1 Jan
1980]
Water Body
Season Flag
(WBF, WBFLAG)
1
0
0
251 = missing (V1 only)
0 = ocean
1 = season visible
2 = season visible &
possible new season
start
3 = possible new
season start
4 = on-going season
5 = only single date
events
6 = season end without
start
255 = dry land
Water Body
Manual
Validation Mask
(MVM)
1
0
0
251 = missing (V1 only)
0 = ocean
1 = validated water
body
2 = other valid
detection
8 = noise
128 = pixel in
investigated area
255 = unchecked dry
land
Water Body
Season End
(WBE,
WBENDDATE)
Date: 2013-01-02
Issue: 2.1.0
Page 59 of 63
Software User Guide
VGTExtract
Phenology products (PHENOKS, PHENOMAX, PHENOMON)
Validated start
date of season
(PHSTART)
1
0
0
0 No data
Date [number of
dekads since 1 Jan
1980]
0.004
-0.1
0
0 = missing
Dimensionless
Length of season
(PHLENGTH)
1
0
0
0 = missing
[Number of dekads]
Monitoring flag
(PFHMON)
1
0
0
0 = No monitoring
value
0 = No monitoring
value
1 = NDVI increase last 3
dekads
2 = NDVI increase last 2
dekads & desertic area
3 = NDVI increase last 2
dekads
Half senescence
date (PHHALF)
Date of Max
NDVI in season
(PHMAX)
Un-validated
start of season
(PHSMON)
Un-validated
date of maximum
NDVI
(PHMAXMON)
Value of max
NDVI in season
(PHMAXVAL)
Value of NDVI at
un-validated
season max
(PHMAXMONVAL
)
Date: 2013-01-02
Issue: 2.1.0
Page 60 of 63
Software User Guide
VGTExtract
4 = NDVI increase last 3
dekads & threshold
exceeded
Burnt Area products
First Date of Burn 1
(FDOB) in season
0
65535 (V1
only)
65535 = missing (V1
only)
Date, expressed as
YYDDD, where YY = 2digit year since 1980
and DDD = day in the
year (0...366). Season
reset is 1 April for V0,
depending on location
for V1.
First Date of Burn 1
(FDOB) in dekad
0
65535
65535 = missing
Date, expressed as
YYDDD, where YY = 2digit year since 1980
and DDD = day in the
year (0...366).
Burnt Area
composite per
dekad
1
0
255
255 = missing
Number of detected
burns among the
unfiltered observations
Contaminated
Pixel mask
(obs_passed_dek
ad)
1
0
255
255 = missing
Number of uncontaminated pixels (in
dekad) used for burn
detection
seasonStatus
Textual seasonality information for Burnt Area, in plain text format. Currently
not supported in VGTExtract.
seasonEventData
base
Fraction Green Cover (FCOVER), Leaf Area Index (LAI), fraction Absorbed PAR (FAPAR), 30-day
NDVI
FCOVER
0.004
0
Uncertainty on
FCOVER,
V0/VGT4Africa
0.004
0
Uncertainty on
FCOVER, V1
0.005
0
LAI
0.033
333...
(1/30
0
Date: 2013-01-02
255
255= invalid
254 = out of range
inferior
253 = out of range
superior
0 = bare soil ... 1 = full
cover; multiply by 100
to get [% soil covered]
Dimensionless, 0 =
bare soil, 5-6 = dense
canopy
Issue: 2.1.0
Page 61 of 63
Software User Guide
VGTExtract
)
Uncertainty on
LAI
0.005
0
30-day NDVI
0.004
-0.1
Dimensionless
FAPAR
0.01
0
FAPAR values in range
from 0..94% of PAR
absorbed
Uncertainty on
FAPAR
0.005
0
Directional (BBDHR*, AL-DH) and Bi-Hemispherical (AL-BH) Albedo
in visible, NIR and full wavelength ranges
Albedo
Uncertainties on
Albedo
0.000
1
0
In
V0/VGT4A
fr32767
In V1
65535
In V0 / VGT4Africa:
32765 OutOfRange_sup
32766 OutOfRange_inf
32767 Invalid
In V1:
65535 = invalid
65534 = out of range
inferior
65533 = out of range
superior
Dimensionless, 0 =
dark surface (nonreflective), close to 1 =
bright surface. Multiply
by 100 to get [%
reflected light/energy]
Bitwise Quality and auxiliary information for NDVI, NDWI, LAI, FCOVER, FAPAR, Albedo
8-bit Status Map
(SM) for basic
NDVI and NDWI
1
0
N/A
N/A
Bitwise interpretation
8-bit Status Map
for Albedo
products (SMA)
1
0
N/A
N/A
Bitwise interpretation
8-bit Status Map
for LAI and
FCOVER (SMB)
1
0
N/A
N/A
Bitwise interpretation
16-bit quality
information
(QFLAG) for V1
LAI, FCOVER,
FAPAR, 30d NDVI
and Albedo
1
0
65535
65535 = invalid
Bitwise interpretation
Date: 2013-01-02
Issue: 2.1.0
Page 62 of 63
Software User Guide
VGTExtract
Number of Valid
Observations
during synthesis
period (NMOD)
for LAI, FCOVER,
FAPAR, 30d NDVI
and Albedo
1
0
255 (V1
only)
255 = missing (V1 only)
Number of
observations
Land Cover Map
(LMK) for LAI,
FCOVER, FAPAR,
30d NDVI and
Albedo
1
-200
0
0 = invalid
After subtracting offset
200, GLC2000 class
number
Notes:
As it is common practice to store EO data in its encoded form (to reduce disk space, conserve
processing memory,...), the above scale/offset are often applied during interpretation or
visualization (i.e. map legend), rather than by actually performing the calculation (through
software like VGTExtract).
If the calculation is performed nevertheless:
all flags need to be accounted for (see 3.6.2 for the common issues on converting flags with
VGTExtract)
the output physical values are usually floating point (decimal) numbers, which require either
Float or Double output data type
See also section 3.7 and [RD2] for more information and up-to-date product/dataset
characteristics.
The above settings cover basic SPOT-VEGETATION S10 NDVI and VGT4Africa / Geoland2 version 0
(disseminated in DevCoCast and AGRICAB projects) and Geoland2 version 1 products. See also
section 3.1 for more details on the product support.
The basic SPOT-VEGETATION synthesis (S1, S10) products and P Segment bands are further
detailed on [RD3] and this is not repeated here.
Date: 2013-01-02
Issue: 2.1.0
Page 63 of 63