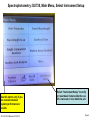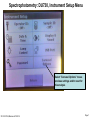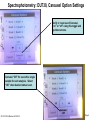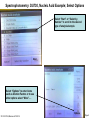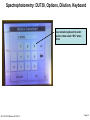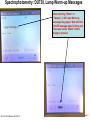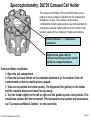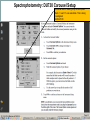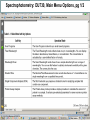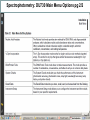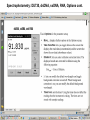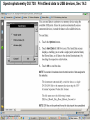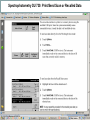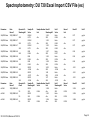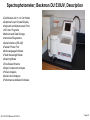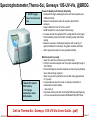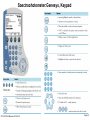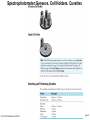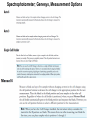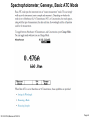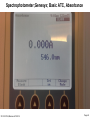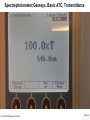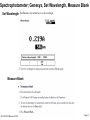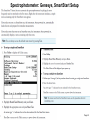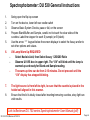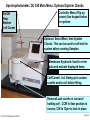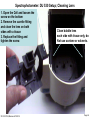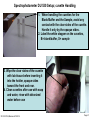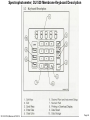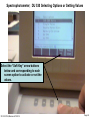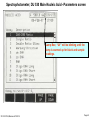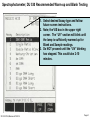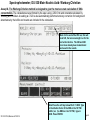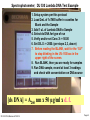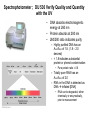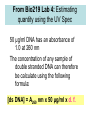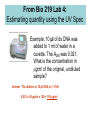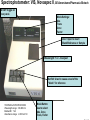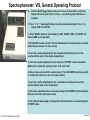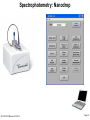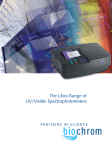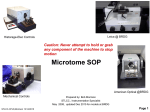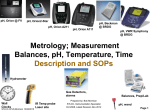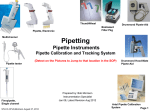
1
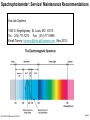
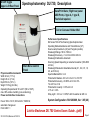
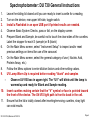
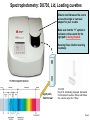
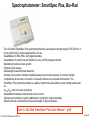
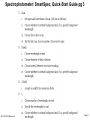
Beckman DU 730, UV/VIS at BRDG x 3 ThermoSci, Genesys 10S-UV-Vis x 4 @ BR Bio-Rad, SmartSpec Plus @ BR Spectrophotometry SOPs NovaspecII, VIS, @FV Beckman DU 530, UV/VIS At FV. Prepared by: Bob Morrison FVCC, Instrumentation Specialist STLCC-CPLS;Morrison 6/12/2015 Original May 2008, Last Revision June 2015, add Genesys Nanodrop @ BR x 2 Page 1 Spectrophotometer: Service/ Maintenance Recommendations Ace Lab Systems 1550 S. Kingshighway St. Louis, MO 63110 Tel.: (314) 771-7272 Fax: (314) 771-6956 Email: Tammy [email protected] (Nov 2010) STLCC-CPLS;Morrison 6/12/2015 Page 2 On/off Toggle Upper Left Rear Panel Spectrophotometry: DU 730, Description Save/Print Data ; Right rear panel USB Ports; 2 type A, 1 type B, Flashdisk required. Cell or Carousel Holder Well Main Menu Control Panel Physical and Environmental Width 45 cm (17.7 in) Height 20 cm (7.9 in) Depth 50 cm (19.7 in) Weight 15.5 kg (34.2 lbs) Operating Requirements 10 to 40°C (50 to 104°F), max. 90% relative humidity (non-condensing) Power and Interface Connections Power 100 to 120 V; 200 to 240 V; 50/60 Hz; automatic changeover Ports USB 1.1 Performance Specifications DU Series 700 UV/Vis Scanning Spectrophotometer Operating Mode Absorbance and Transmittance (%T) Source Lamp Deuterium (UV) and Tungsten (visible) Wavelength Range 190 to 1100 nm Wavelength Accuracy + 1 nm from 200 to 900 nm Wavelength Calibration Automatic Scanning Speed Depending on selected resolution (100-4500 nm/min) Wavelength Resolution Selectable Interval (0.1, 0.2, 0.5, 1.0, 2.0, and 5.0 nm) Spectral Bandwidth ≤ 3 nm Photometric Readout -0.3 to 3.0 Å or 0.1 to 100 %T Photometric Accuracy + 0.005 Å at 0.0 to 0.5 Å 1% at 0.5 to 2.0 Å Photometric Linearity < 0.5% at 2.0 Å ≤ 1% at > 2.0 Å Stray Light > 3.3 Å or < 0.05%T with KI-solution at 220 nm System Configuration: SN 1283669, Ver. 1.05 (40) Link to Beckman DU 700 Series Users Guide ..(pdf) STLCC-CPLS;Morrison 6/12/2015 Page 3 Spectrophotometer: DU 730 General Instructions 1. 2. 3. 4. 5. Leave the sliding lid closed until you are ready to insert cuvette for a reading Turn on the device, rear upper left side, toggle switch. Install a Flashdisk in an open USB port if printed results are needed. Observe Basic System Checks, pass or fail, on the display screen Prepare Blank and Sample, be careful not to touch the clear sides of the cuvettes. Label the stopper for each S (sample) or B (blank) 6. On the Main Menu screen, select “Instrument Setup” to inspect and/or reset previous settings on items like use of the carousel. 7. On the Main Menu screen, select the general category of use ( Nucleic Acid, Protein Assay, etc.) 8. Follow the Menu options to enter dilution factors and other setting values. 9. UV Lamp Warm Up is required before reading “blank” and samples – Observe UV-VIS box in upper right. The “UV” will blink until the lamp is warmed up and ready for Blank and Sample reading. 10. Insert cuvettes making certain that the “V” symbol or face is pointed toward the front of the device. The UV-VIS light path is front to back in the cell. 11. Ensure that the lid is totally closed after inserting/removing cuvettes, stray light can void results. STLCC-CPLS;Morrison 6/12/2015 Page 4 Spectrophotometry: DU730, Lid, Loading cuvettes Slide to door/lid toward the rear to access the single or carousel adapter for your cuvette. Make sure that the “V” symbol or indicator on the cuvette for the light path is facing forward. Securely Close lid after inserting cuvette(s). V Light path, front to rear STLCC-CPLS;Morrison 6/12/2015 170-2510 Pkg of 50, individually packaged, disposable UV-transparent cuvettes, DNase and RNase free, volume range 50–1,500 μl Page 5 Spectrophotometry: DU730, Main Menu, Select Instrument Setup Use this option only if you are concerned about system performance or results. STLCC-CPLS;Morrison 6/12/2015 Select “Instrument Setup” to verify or reset basic features like the use Of a carousel or not, date/time, etc. Page 6 Spectrophotometry: DU730, Instrument Setup Menu Select “Carousel Options” to see previous settings and/or reset for this analysis STLCC-CPLS;Morrison 6/12/2015 Page 7 Spectrophotometry: DU730, Carousel Option Settings Verify or reset use of Carousel, “on” or “off” using this toggle and up/down arrows. Carousel “Off” for use with a single sample for each analysis. Select “OK” when desired status is set. Carousel: Off STLCC-CPLS;Morrison 6/12/2015 Page 8 Spectrophotometry: DU730, Nucleic Acid Example; Select Options Select “Start” or “Select by Number” to scroll to the desired type of analysis/sample. Start Select “Options” to enter items such as Dilution Factors or to see other options select “More”…. Options STLCC-CPLS;Morrison 6/12/2015 Page 9 Spectrophotometry: DU730, Options, Dilution, Keyboard Use numeric keyboard to enter factors, then select “OK” when done STLCC-CPLS;Morrison 6/12/2015 Page 10 Spectrophotometry: DU730, Lamp Warm-up Messages After selecting “Blank” or “Sample”, a UV Lamp Warm-up message may appear. Wait until the UV-VIS message stops blinking and the menu shows “Blank” before trying to proceed. Blank STLCC-CPLS;Morrison 6/12/2015 Page 11 Spectrophotometry: DU730 Carousel Cell Holder The Carousel Cell Holder (Part no A23620) allows you to load up to seven cuvettes of solution into the instrument for analysis at one time. The cuvettes can be various combinations of blanks and samples. Use the Setup Mode to activate the Carousel Options and set up the number of cell positions used and the orientation of blanks and samples. Position numbers: 1 - 7 stamped on cuvette slot Alignment tab (yellow dot) on carousel must be aligned with similar tab/dot on compartment below. Carousel Holder Installation: 1. Open the cell compartment. 2. Place the Carousel Holder on the rotatable attachment on the bottom of the cell compartment so that the marking faces upward. 3. Take care to position the holder exactly. The Alignment Tab (yellow) on the holder and the rotatable attachment must line up exactly. 4. Turn the holder slightly to the left or right until the guide key locks into position. This establishes contact with the instrument. (For instrument setup options and procedures, see "Carousel and Module Options" on the next slide). STLCC-CPLS;Morrison 6/12/2015 Page 12 Spectrophotometry: DU730 Carousel Setup Technical Note: In testing, only the first option Blank 1, read 1-7 was selectable. This is being investigated BobM 4/7/09 STLCC-CPLS;Morrison 6/12/2015 Page 13 Spectrophotometry: DU730, Main Menu Options, pg 1/2 STLCC-CPLS;Morrison 6/12/2015 Page 14 Spectrophotometry: DU730 Main Menu Options pg 2/2 STLCC-CPLS;Morrison 6/12/2015 Page 15 Spectrophotometry: DU730, dsDNA, ssDNA, RNA, Options cont. STLCC-CPLS;Morrison 6/12/2015 Page 16 Spectrophotometry DU 730: Print/Send data to USB devices, Sec 14.3 STLCC-CPLS;Morrison 6/12/2015 Page 17 Spectrophotometry DU 730: Print/Send Scan or Recalled Data STLCC-CPLS;Morrison 6/12/2015 Page 18 Spectrophotometry: DU 730 Excel Import CSV File (ex) Parameter: 260/280 Ratio 260/280 Ratio 260/280 Ratio 260/280 Ratio 260/280 Ratio 260/280 Ratio 260/280 Ratio 260/280 Ratio 260/280 Ratio Parameter: ds DNA ds DNA ds DNA Date: Operator ID: Name 2 Wavelength 1 10/9/2008 9:37 260 10/9/2008 9:37 260 10/9/2008 9:37 260 10/9/2008 9:38 260 10/9/2008 9:38 260 10/9/2008 9:38 260 10/9/2008 9:39 260 10/9/2008 9:39 260 10/9/2008 9:39 260 Date: Operator ID: Name 2 ConcX 10/9/2008 9:40 50 10/9/2008 9:40 50 10/9/2008 9:40 50 STLCC-CPLS;Morrison 6/12/2015 Sample ID: Value EILENE 0.072 EILENE 0.071 EILENE 0.071 BOB 0.064 BOB 0.064 BOB 0.063 BECKY -0.016 BECKY -0.017 BECKY -0.016 Sample ID: Wavelength 1 BECKY 260 BECKY 260 BECKY 260 Sample Number Result 1 Unit Wavelength 2 1.125 Abs 280 1.125 Abs 280 1.122 Abs 280 1.127 Abs 280 1.135 Abs 280 1.129 Abs 280 1.052 Abs 280 1.08 Abs 280 1.07 Abs 280 Sample Number Result 1 Value Unit 1.138 0.066 Abs 1.132 0.066 Abs 1.136 0.066 Abs Unit 1 Value Ratio 0.064 Ratio 0.063 Ratio 0.063 Ratio 0.057 Ratio 0.056 Ratio 0.056 Ratio -0.016 Ratio -0.015 Ratio -0.015 Unit 1 Wavelength 2 Ratio 280 Ratio 280 Ratio 280 Name 1 Unit Result 2 Unit 2 0.07 μg/mL 0.07 μg/mL 0.07 μg/mL 0.06 μg/mL 0.06 μg/mL 0.06 μg/mL -0.02 μg/mL -0.02 μg/mL -0.02 μg/mL Result 2 Unit 2 3.324 μg/mL 3.294 μg/mL 3.286 μg/mL Abs Abs Abs Abs Abs Abs Abs Abs Abs Name 1 Value 0.058 0.058 0.058 Page 19 Spectrophotometer; Beckman DU 530UV, Description Cell Module with 1 cm Cell Holder Graphical Liquid Crystal Display Keyboard and Alphanumeric Pad 100 User Programs Methods and Data Storage Instrument Diagnostics Serial Interface (RS-232) Parallel Printer Port Multi-Language Software Fixed Wavelength Mode Scanning Mode Time-Based Kinetics Single Component Analysis Protein Analysis Nucleic Acid Analysis Performance Validation Software STLCC-CPLS;Morrison 6/12/2015 Page 20 Spectrophotometer;Themo-Sci, Genesys 10S-UV-Vis, @BRDG 1. On/Off toggle, lower rear at power line 2. Basic ATC (select TEST button) 3. To Change parameters, select Utility button Research Quality with Routine Simplicity • Accelerate through wavelength scans with scan speeds up to 3,600nm/minute • Depend on dual-beam optics for superior photometric accuracy • Acquire data from the UV to the near-IR • Small footprint for easy transport and storage • Increase sample throughput with the integrated 6-cell changer • Thermostatting options with both circulating water and Peltier cooling • Measure unusual or challenging samples with a variety of optional holders for test-tubes, long path cuvettes and filters • Add a sipper accessory for easy sample handling Maintenance-Free Lamp • Save time with the instant-on xenon flash lamp • Perform accurate analysis over the entire wavelength range of 190-1100nm • Prevent damage to sensitive samples as the lamp only flashes when data is being acquired • Save money with long-lifetime xenon flash lamp (guaranteed for 3 years) • Lamp produces almost no heat so sample compartment temperature remains stable • - See more at: http://www.thermoscientific.com/content/tfs/en/product/genesy s-10s-uv-vis-spectrophotometer.html#sthash.MyLKfIhY.dpuf Link to Thermo-Sci, Genesys, 10S-UV-Vis Users Guide ..(pdf) STLCC-CPLS;Morrison 6/12/2015 Page 21 Spectrophotometer;Themo-Sci, Genesys 10S-UV-Vis, @BRDG STLCC-CPLS;Morrison 6/12/2015 Page 22 Spectrophotometer;Genesys, Keypad STLCC-CPLS;Morrison 6/12/2015 Page 23 Spectrophotometer;Genesys, Cell Holders, Cuvettes STLCC-CPLS;Morrison 6/12/2015 Page 24 Spectrophotometer; Genesys, Measurement Options STLCC-CPLS;Morrison 6/12/2015 Page 25 Spectrophotometer; Genesys, Basic ATC Mode STLCC-CPLS;Morrison 6/12/2015 Page 26 Spectrophotometer: Genesys, Select Basic ATC button To access basic ATC test/measurements STLCC-CPLS;Morrison 6/12/2015 Page 27 Spectrophotometer;Genesys; Basic ATC, Absorbance STLCC-CPLS;Morrison 6/12/2015 Page 28 Spectrophotometer;Genesys, Basic ATC, Transmittance STLCC-CPLS;Morrison 6/12/2015 Page 29 Spectrophotometer; Genesys, Basic ATC, Concentration STLCC-CPLS;Morrison 6/12/2015 Page 30 Spectrophotometer; Genesys, Set Wavelength, Measure Blank Set Wavelength Measure Blank STLCC-CPLS;Morrison 6/12/2015 Page 31 Spectrophotometer;Genesys, Measuring Samples STLCC-CPLS;Morrison 6/12/2015 Page 32 Spectrophotometer: Genesys, SmartStart Setup STLCC-CPLS;Morrison 6/12/2015 Page 33 Spectrophotometer: DU 530 General Instructions 1. 2. 3. 4. 5. 6. 7. 8. Swing open the flip-top screen Turn on the device, lower left rear cradle switch Observe Basic System Checks, pass or fail, on the screen Prepare Blank/Buffer and Sample, careful not to touch the clear sides of the cuvettes. Label the stopper for each S (sample) or B (blank) Use the arrow “^” keypad below the screen displays to select the Assay and/or to set other options and values. UV Lamp Warm Up REQUIRED – Select Nucleic Acid, then Select Assay 1 260/280 Ratio – Observe UV-VIS box in upper right. The “UV” will blink until the lamp is warmed up and ready for Blank and Sample reading. – The warm-up time can be from 2-10 minutes. Do not proceed until the “UV” display has stopped blinking. The light source is from left-to-right, be sure that the cuvette is placed in the holder/cell aligned in this manner. Ensure that the lid is totally closed after inserting/removing cuvettes, stray light can void results. Link to Beckman DU 700 series Spectrophotometer User Manual (pdf) STLCC-CPLS;Morrison 6/12/2015 Page 34 Spectrophotometer: DU 530 Main Menu; Optional System Checks On/Off Rear Bottom Left Corner Controller Menu (Flip up screen) Use keypad below for options Optional: Select More, then System Checks. This can be used to self-test the system before running Samples. Membrane Keyboard: Used to enter data and activate displayed items. Cell/Curvett Lid: Swing up to access cuvette and/or cell holder fitting Remove/Load cuvette or carousel holding cell : CCW to 9am position to remove, CW to 12pm to lock in place STLCC-CPLS;Morrison 6/12/2015 Page 35 Spectrophotometer: DU 530 Setup; Cleaning Lens 1. Open the Cell and loosen the screw on the bottom 2. Remove the cuvette fitting and clean the lens on both sides with a tissue 3. Replace the fitting and tighten the screw. STLCC-CPLS;Morrison 6/12/2015 Clean bubble lens each side with tissue only, do Not use acetone or solvents. Page 36 Spectrophotometer DU 530 Setup; cuvette Handling 1. When handling the cuvettes for the Blank/Buffer and the Sample, avoid any contact with the clear sides of the cuvette. Handle it only by the opaque sides. 2. Label the white stopper on the cuvettes, B= blank/buffer, S= sample 3. Wipe the clear sides of the cuvette with lab tissue before inserting it into the holder, opaque sides toward the front and rear. 4. Clean cuvettes after use with soap and water, rinse with deionized water before use STLCC-CPLS;Morrison 6/12/2015 Page 37 Spectrophotometer; DU 530 Membrane Keyboard Description STLCC-CPLS;Morrison 6/12/2015 Page 38 Spectrophotometer; DU 530 Selecting Options or Setting Values Select the “Soft Key” arrow buttons below and corresponding to each screen option to activate or set the values. STLCC-CPLS;Morrison 6/12/2015 Page 39 Spectrophotometer; DU 530 Main-Nucleic Acid –Parameters screen Lamp Box; “UV” will be blinking until the lamp is warmed up for blank and sample readings. STLCC-CPLS;Morrison 6/12/2015 Page 40 Spectrophotometer; DU 530 Recommended Warm-up and Blank Testing 1. Select desired Assay type and follow future screen instructions. 2. Note; the VIS box in the upper right corner. The “UV” section will blink until the lamp is sufficiently warmed up for Blank and Sample readings. 3. Do NOT proceed until the “UV” blinking has stopped. This could take 2-10 50.000 minutes. STLCC-CPLS;Morrison 6/12/2015 Page 41 Spectrophotometer; DU 530 Main-Nucleic Acid- Warburg-Christian Assay #4, The Warburg-Christian method is designed to give the most accurate calculation of DNA concentration. The calculations are performed by the spec using 260.0 nm and constants calculated by Warburg and Christian. A reading at 320 is also automatically performed and any correction for background absorbance by the buffer and cuvette are included in the calculation. Note: At the end of the WC run, this will read 320, the last wavelength run for the correction factors. The 260 and 280 runs have already been made/stored and used in the results. STLCC-CPLS;Morrison 6/12/2015 Note:Press the soft key below DIL X: 1.0000. Type in the dilution factor of the DNA in the 1X TNE buffer (ex: 1μL DNA to 2 mL 1X TNE, type in 2000. Press ENTER. Page 42 Spectrophotometer; DU 530 Lambda DNA Test Example 1. Setup system per this protocol 2. Load 2mL of 1xTNE buffer in cuvettes for Blank and the Sample 3. Add 1 uL of Lambda DNA to Sample 4. Select ds DNA for type of run 5. Verify and/or set Conc X: = 50.00 6. Set DIL X: = 2000. (per steps 2,3, above) 7. Before reading the BLANK, wait for the “UV” to stop 50.000 blinking in the UV- VIS box in the upper right of the screen. 8. Run BLANK, then you are ready for samples 9. Run DNA sample, record at least 3 readings and check with concentration on DNA source [ds DNA] = A260 nm x 50 µg/ml x d. f. STLCC-CPLS;Morrison 6/12/2015 Page 43 Spectrophotometry; DU 530 Lamps and other Maintenance Issues Access to Lamps and Mirrors for replacement and cleaning. 1. Push in both sides of the small door in the upper part of the back panel. 2. Swing up and remove the door. 3. Loosen (ccw) the two screws holding the lamp cover plate and remove the plate. 4. Carefully clean circular mirror, it is free to rotate, not fixed. 5. DO NOT touch the lamps with bare fingers. Use a cloth or lab wipe. Remove/Load cuvette or carousel holding cell : CCW to 9am position to remove, CW to 12pm to lock in place STLCC-CPLS;Morrison 6/12/2015 Page 44 Spectrophotometry: DU 530 Lab-Assays #1 and #4 Sample wavelength (nm) 1x TNE buffer 325 DNA Sample 1 260 DNA Sample 2 260 DNA Sample 3 260 [μg/mL] Reading 1 260/280 DNA Sample 2 260/280 DNA Sample 3 260/280 STLCC-CPLS;Morrison 6/12/2015 [μg/mL] Reading 3 Average The Assay #4 Warburg-Christian results are entered in this area of your lab worksheet. Unless the Dilution Factor was set on the Spectrophotometer, this must be calculated here. Ratio 1 DNA Sample 1 [μg/mL] Reading 2 Ratio 2 Ratio 3 Average The Assay #1, 260/280 ratio results are entered here. Take 3 Readings. Page 45 Spectrophotometer ; DU 530 Verify Quality and Quantity with the UV • DNA absorbs electromagnetic energy at 260 nm • Protein absorbs at 280 nm • 260/280 ratio indicates purity – Highly purified DNA has an A260/A280 of 1.8. (1.8 – 2.0 desired) – < 1.8 indicates substantial protein or phenol contamination • Pure protein ratio = 0.6 – Totally pure RNA has an A260/A280 of 2.0 – RNA in the DNA is detected as DNA inflated [DNA] • RNA can be degraded, either chemically or enzymatically, prior to measurement From Bio219 Lab 4: Estimating quantity using the UV Spec 50 µg/ml DNA has an absorbance of 1.0 at 260 nm The concentration of any sample of double stranded DNA can therefore be calculate using the following formula: [ds DNA] = A260 nm x 50 µg/ml x d. f. From Bio 219 Lab 4: Estimating quantity using the UV Spec Example: 10 µl of ds DNA was added to 1 ml of water in a cuvette. The A260 was 0.021. What is the concentration in g/ml of the original, undiluted sample? Answer: The dilution is 10 µl/1000 µl = 1/100 0.021 x 50 µg/ml x 100 = 105 µg/ml Spectrophotometer: VIS, Novaspec II, GE/Amershame/Pharmacia Biotech On/Off Toggle on rear panel. Mode Settings: Abs Trans Conc Factor Door: Open to insert Blank/Reference or Sample Wavelength: + or – to adjust Set Ref: Used to cause a read of the “blank” for reference TECHNICAL SPECIFICATIONS Wavelength range: 330-800 nm Bandwidth: 7 nm Absorbance range: -0.300 to 2.50 Mode Button: Use to select Abs, Conc, Trans, Factor Spectrophometer: VIS, General Operating Protocol A. Push the On/Off toggle button on the rear to turn on the machine. It will then display CALC and cycle from 1,2,3, then ---- to indicate system calibration is complete. 1. Press "+" or "-" wavelength buttons to set the desired wavelength. Press +/- to change CONC or FACTOR. 2. Press "MODE" button to cycle display to: ABS, TRANS, CONC, or FACTOR. Set mode to ABS is recommended. 3. Fill a BLANK cuvette at least ¾ full with distilled water and wipe outside of cuvette with a tissue to ensure it is clean and dry. 4. Insert the cuvette completely into the compartment orienting the line on the cuvette with the mark on the sample compartment . 5. Close the sample compartment cover and press "SET REF" to zero instrument. ABS will be 0.0 after this operation, Trans =100, Conc=.001. 6. Remove the cuvette and fill a cuvette at least ¾ full with SAMPLE and wipe outside of cuvette with a tissue to ensure it is clean and dry. 7. Insert the cuvette completely into the compartment orienting the line on the cuvette with the mark on the compartment. 8. Close the compartment cover and a new reading for the SAMPLE will be displayed. Read and record the absorbance values. 9. Every time the wavelength is changed the instrument must be re-zeroed using the SET REF button. STLCC-CPLS;Morrison 6/12/2015 Page 50 Spectrophotometer: VIS only, Novaspec III, or Plus (Planning info only) NOVASPEC III 80-2118-00 NOVASPEC PLUS 80-2117-50 VWR CAT# 97058-518 VWR CAT # 97058-500 Each $2,335.00 Each $2,735.00 NOVASPEC PLUS Supplier: GE Healthcare Novaspec* Plus Visible Spectrophotometer^ Wavelength range, nm: 330–830 nm, Absorbance range, A: -0.3–2.500, Wavelength accuracy: +/- 2 nm, Optical system: Single beam, monochromator STLCC-CPLS;Morrison 6/12/2015 Page 51 Spectrophotometry: Nanodrop STLCC-CPLS;Morrison 6/12/2015 Page 52 Spectrophotometry: NanoDrop, Instrument Setup Illustration Power Adapter White USB Standard A/B cord USB B plug USB A port STLCC-CPLS;Morrison 6/12/2015 Page 53 Spectrophotometry: NanoDrop,Hardware Setup Protocol 1. Use the bench CPU Host or checkout #3 or #4 or the Staff laptop as they are the only ones presently loaded with the Nanodrop Application Software 2. Locate a Nanodrop device from the bottom drawer cabinet under the CEQ 8000 Genetic Analyzer device 3. Retrieve a Nanodrop power adapter (black) and USB (white) cable from the same area 4. Connect the power adapter to a 110 volt outlet and then to the round port on the Nanodrop device 5. Connect the white USB cord from the Nanodrop device to a USB port on the Host CPU. 6. Also connect a Flashdisk to the Laptop if you want to transport report data for further analysis and printing STLCC-CPLS;Morrison 6/12/2015 Page 54 Spectrophotometry: NanoDrop, Software, Main Menu Link to Nanodrop User Manual – (pdf) STLCC-CPLS;Morrison 6/12/2015 Page 55 Spectrophotometry; NanoDrop, Test Protocol 1. Double click the NanoDrop Software icon from the Host/Laptop desktop 2. Follow the on screen procedures (page #4) to select the type of Sample being tested 3. Open the Nanodrop switch blade reader (arm) and wipe the bottom and arm pedestal surfaces clean of any solution or lint/debris. Close the arm to the down position. 4. The System will perform initialization procedures and then ask for a "BLANK" test 5. Pipette < 2 uL of SAMPLE on the reader and inspect to see that a good bead of the sample is formed. If the Sample is not beaded, wipe clean and pipette again. 6. Select the "MEASURE" button on the screen and the test will run automatically 7. Examine the plot and concentration data displayed on the Screen. Write down any important data and proceed. 8. Continue with further samples as required STLCC-CPLS;Morrison 6/12/2015 Page 56 Spectrophometry; NanoDrop, Technique Illustrations Wipe Arm Pedestal also Dispense <2uL to Lower Pedestal Observe good bead Before proceeding Bead Supported by Surface Tension before “Measure” command Wiping Lower Pedestal Before and After Each Test STLCC-CPLS;Morrison 6/12/2015 Page 57 Spectrophotometry; NanoDrop; Save Report Protocol 1. After all samples have been run, on the Main Screen select Show Reports 2. Select the Reports Tab at the top of the screen 3. Select the "Save Report" button 4. Select "Export Report Table Only" button to save the current report data to a neutral file format (.txt) 5. Save the Report.txt file to your flashdisk or another file to email it to another computer for further analysis or printing STLCC-CPLS;Morrison 6/12/2015 Page 58 Spectrophotometry; NanoDrop Import Saved Report.txt file to Excel 1. On a computer with MS Office and printer access, install the flashdisk or download the exported file from Email. 2. Open the Excel application and select DATA in the top toolbar 3. Select "Import External Data" from the drop down menu 4. Select "Import Data" 5. Locate the report.txt file on the flashdisk or other media and open the file 6. Follow the Excel file import procedures, select the "Delimited" option, then “Next” and “Finish” to import the file 7. Review the Report data in the Excel spreadsheet, adjust column widths as needed 8. Save the Excel file to the flashdisk or other location for processing and printing STLCC-CPLS;Morrison 6/12/2015 Page 59 Spectrophotometry; NanoDrop;Troubleshooting; Ratio Error Messages 1. If you get a message similar to "Ratio between long and short path out of tolerance", use this procedure 2. Residue has likely collected on the pedestals (lower and/or arm) from previous use 3. Place >2uL of dH2O on the pedestal, close the arm, press down lightly on the arm for 2 min 4. Wipe the pedestals and repeat the water soak procedure 5. Wipe the pedestals >30 times (lower and arm) with a clean lab wipe 6. Place a <2uL bead of dH2O on the lower pedestal and look for a good bead of water 7. Retest with your sample, if the problem persist, the pedestals need to be reconditioned STLCC-CPLS;Morrison 6/12/2015 Page 60 Spectrophotometry: NanoDrop;Troubleshooting Reconditioning the Pedestals 1. Locate the PR-1 Reconditioning Kit in the Nanodrop drawer 2. Use the supplied applicator, apply a pin-size drop of the compound on the lower and arm pedestals 3. Spread the amount around with the applicator and let it dry 30 seconds 4. Using a folded clean lab wipe, remove the PR-1 compound by rubbing vigorously the lower and arm pedestals. Be careful not to put too much pressure on the arm while rubbing. 5. The appearance of a black residue on the wipe is normal, use another wipe and continue 6. Test the effectiveness of the reconditioning by pipetting a <2 uL sample of dH2O and look for a good bead 7. Resume testing with samples STLCC-CPLS;Morrison 6/12/2015 Page 61 Spectrophotometry: Nanodrop Calibration STLCC-CPLS;Morrison 6/12/2015 Page 62 Spectrophotometer: Nanodrop, Calibration Kit Step 1/2 STLCC-CPLS;Morrison 6/12/2015 Page 63 Spectrophotometer: Nanodrop, Calibration Kit Step 2/2 STLCC-CPLS;Morrison 6/12/2015 Page 64 Spectrophotometer: Nanodrop, Cal Kit Ordering STLCC-CPLS;Morrison 6/12/2015 Page 65 Spectrophotometer: Nanodrop, R126B Latest Calibration Test Results STLCC-CPLS;Morrison 6/12/2015 Page 66 Spectrophotometer: Nanodrop, R127 Latest Calibration Test Results STLCC-CPLS;Morrison 6/12/2015 Page 67 Spectrophotometer: Nanodrop, Solenoid Cleaning STLCC-CPLS;Morrison 6/12/2015 Page 68 Spectrophotometer: SmartSpec Plus, Bio-Rad The UV/visible SmartSpec Plus spectrophotomer has a working wavelength range of 200–800 nm. It is the perfect tool for routine applications such as: Quantitation of DNA, RNA, and oligonucleotides Quantitation of proteins via the Bradford, Lowry, and BCA assay methods Monitoring bacterial culture growth Simple kinetic assays Wavelength scans with peak detection A simple, menu-driven interface simplifies assays and provides answers to common sample computations at the touch of a button. Conversion factors can be stored and modified. The SmartSpec Plus spectrophotometer is capable of performing calculations and providing results such as: A260/A280 ratio for nucleic acid purity Quantitation that takes dilution factors into account Sample concentration in µg/ml (additionally in pmol/µl for oligonucleotides) Molar extinction coefficient and molecular weight of oligonucleotides Link to Bio-Rad SmartSpec Plus User Manual – (pdf) STLCC-CPLS;Morrison 6/12/2015 Page 69 Spectrophotometer: SmartSpec, Quick-Start Guide pg 1 STLCC-CPLS;Morrison 6/12/2015 Page 70 Spectrophotometer: SmartSpec, Quick-Start Guide pg 3 STLCC-CPLS;Morrison 6/12/2015 Page 71 Spectrophotometer: SmartSpec, Quick-Start Guide pg 4 STLCC-CPLS;Morrison 6/12/2015 Page 72