1
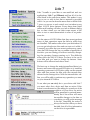
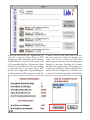
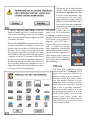
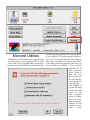
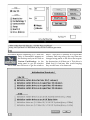
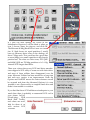
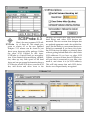
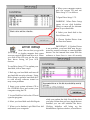
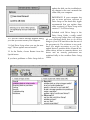
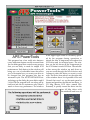
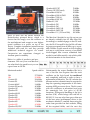
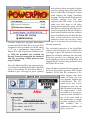
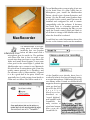
DOUBLE-CLICK
September 2000
SCSI Utilities
Executive Contact List
Please feel free to contact any of the following individuals if you
have comments or questions relating to Macintosh Users East or
Macintosh computing in general.
Position/Name
Phone#
Mac Evangelist
Bruce Cameron
Hm: (905) 983-9205 Orono
Email: [email protected]
Past President
Hugh Amos
Bus: (905) 683-4760 Ajax
Hm: (905) 683-4320
Meeting Coordinators
Mark Fenton
Jim Foster
Hm: (905) 430-8234
Email: [email protected]
Hm: (905) 432-0921 Courtice
Email: [email protected]
Treasurer
Membership Chairman
Doug Kettle
Hm: (905) 683-3214 Ajax
BBS Administrator
Jim Foster
Hm: (905) 432-0921 Courtice
Email: [email protected]
MaUsE BBS - The Source
Courtice
(905) 404-9874 ....56k
Special Events
Chris Greaves
(705) 887-2508 Fenelon Falls
Email: [email protected]
Executive at Large
John Field
Hm:905-885-8718
Mary McCarthy
Greeter/Blithe Spirit
MaUsE Message Line
(905) 433-0777
Double Click
http://hottub.ca/mause
Double Click Editor
Michael Shaw
Hm: (905) 576-2097 Oshawa
Email: [email protected]
FAX: 905-576-5527
Printing & Distribution
Doug Kettle
Hm: (905) 683-3214 Ajax
Cover Design
Sean Murphy
From the Editor
A few weeks ago I overheard a Mac user complaining bitterly about the high cost of
upgrading his hardware to meet the demands
of modern computing. Well...let me just say
this about that: personally, I consider the cost
of computing to be incredibly cheap. When I
dig out the old MacUser and Macworld magazines at bedtime I see ads for RAM at $39.00
U.S. per Meg, and 8-Megabyte, 33 Mhz systems selling for 4 to 10 thousand American
dollars without enough power to pull a sick
toddler off a pee pot. How can anyone complain about the minuscule cost of a new 400
Mhz Mac CPU that ships with 128 Megs of
RAM, a 6 or 10 Gig Hard Drive, and enough
computing power to run a small maritime
nation like Portugal or Spain ?
The point is that thrifty Mac users can & do
continually hunt for bargains because Mac
systems from a few years ago are still very
usable far beyond the abilities of similarly
aged 386, 486 and 586 systems.
With these older Macs in mind and in recognition of the reluctance of Mac users in general
to buy what can be had for free, I have put
together an issue about some very nice FREE
utilities for working with the SCSI hard drives
that these older Macs can thrive on. For the
adventuresome I have also included an
account of my experience with a cheap &
cheerful hardware upgrade that anyone can
perform...it ain’t rocket surgery !
For any MaUsE members with a keyboard and
a complete command of the alphabet, I have a
special notice on the bottom half of Page 23.
Contents
Free SCSI Tools...Page 3
Lido 7...Page 4
Micronet Utilities...Page 8
Hard drive Setup...Page 12
APS Utilities...Page 14
Output Enablers...Page 16
MacRecorder...Page 21
Meeting News...Page 24
Free SCSI Utilities
Everybody and his dog is upgrading what
was once a hideously expensive part of the
Macintosh computer---the SCSI hard drive.
The new versions of the high-power publishing and graphics applications are so
huge compared to the previous versions that it has become normal for
new Macs to ship with up to 30 Gig
hard drives installed. With video files
and movie clips manipulated and
saved as documents even 30 Gigs will
soon be considered small. The pricing
of the new big drives is ridiculously
low compared to the prices of a few
years ago. For example...my venerable
Quadra 950 has an Elite WREN
Seagate SCSI hard drive, about 2.1
GIGs unformatted, that cost MORE
seven or eight years ago when it was
new than you would pay now for a
complete new G4 CPU with a ten
Gigabyte drive installed in it !!! In 1986
Apple offered its customers a 20 Meg hard
drive for the princely sum of $1500.00
American.
What this means to the cheapskates among us
is that there are suddenly more second-hand
SCSI-2 hard drives sized from 500 Meg to several gigs available from private individuals
and from auctions like eBay. Those of us with
older Macs, (like the Compacts, the Mac II
family, Performas, Centris and Quadras) can
take advantage of these cheap second-hand
drives and the smaller versions of programs
that we run on them under various System 7
and OS8.X can benefit greatly from the speed
boost and extra room realised when we put in
a relatively modern bigger drive. Some of my
favourite Mac models originally shipped with
one measly 80, 160 or 230 Megabyte SCSI
Apple hard drive but they have all
been upgraded since to at least 500
Megs. My Quadra 840AV has internal
bays in it for two SCSI drives and my
Quadra 950 can accept up to five SCSI
drives inside and more on the external SCSI bus.
An unfortunate repercussion of
upgrading the hard drive with a second-hand SCSI drive is that most versions of Apple's Hard Drive Setup
program will not work on many Mac
models if the hard drive is not an
original Mac hard drive so you may
need to resort to a third-party program to set up your new SCSI drive.
There are many excellent commercial
hard drive utility programs like FWB
Hard Disk Toolkit and SilverLining that will
enable you to partition, erase, initialise or
reformat your non-Apple SCSI drives to work
with your Mac but there are actually a couple
of FREE utilities that will do the trick cheaply
and effectively.
All of these utilities are available as free
downloads from somewhere on the internet
and you should be able to find them by doing
a search with any browser.
The warning in the box below is to be taken
s e r i o u s l y.
Although
these
programs are very
user-friendly and
give
warnings
before proceeding
with most irreversible
operations it is still possible to make a ter-
rible mistake and wipe out information accidentally. Only use hard drive utilities on
drives that you know contain no important
data.
The usual procedures that you will execute
with a SCSI utility are formatting /initialising,
partitioning, and mapping out bad sectors.
We will look at each of these procedures and
define what it does to the hard drive and
when it is required.
Formatting / Initialising
Formatting is required when the drive you
have acquired has been used in a nonMacintosh environment. Everybody knows
how to re-format a floppy drive and has had
the experience of putting a PC formatted 1.4
Meg floppy into his or her Mac and being told
that the disk is unreadable. Do you want to
format the disk as a 1.4 Meg Macintosh Disk ?
Of course you do. The floppy won’t work
with your Mac until you do. When the
Macintosh system is connected to a external
SCSI hard drive that does not have the right
formatting the same thing happens.
Formatting the disk will make it Mac-compatible. Unfortunately it will also make it a bit
smaller. Just as your 1.4 Meg floppy can only
hold 1.3 Megs once formatted, your new SCSI
drive will hold less than its rated volume
when it gets formatted, too. About ten per
cent is lost in this procedure. Initialisation is
part of the formatting action. The new disk
must have a master directory installed that
will recognise and keep track of the location
and number of files and folders on it and act
as a desktop data base for the hard drive. All
information previously on the disk is
destroyed by this action. It is a good idea to
re-format your hard drive at least once each
year. The process checks the disk for any bad
sectors and excludes them from the map of
usable disk space. After this procedure the
Mac will not try to store information on these
bad sectors.
Partitioning
There are lots of reasons to partition the hard
drive. I like to keep more than one system
available in my Macs and the easiest way to
do this is to partition the Hard Drive, install a
different system on each partition and then
select the partition as the StartUp disk in the
Startup disk control panel. This is especially
useful with more than one processor type
installed in the same Mac, like my Quadra 950
with a 33 Mhz 68040 and a 66 Mhz PPC
processor, or my Macintosh IIci which has a
25 Mhz 68030 and a 40 Mhz 68040 processor
installed. Repair utilities that cannot be run
off the disk they are repairing can often act
from another partition, and multiple versions
of programs and copies of files can be effectively segregated if operating from separate
partitions. A partitioned drive can hold more
files and small files will take up less room. All
information previously on the disk is
destroyed by partitioning. Each
partition has its own icon and
can be used just like a separate
internal SCSI hard drive.The
programs in this issue will show
you how to do this.
Lido 7
Lido 7 installs in your Mac as one small init and two
applications, Lido 7 and PMount, and has all of its features listed in the pull-down menus. This makes it very
easy to use...so easy in fact that no manual is provided
with it. As you can see from the menu lists to the left Lido
7 gives you access to and control over just about every
aspect of SCSI drive features. Every menu item listed
under each heading will take you into a different dialog
box or chart where you can select some aspect of the
drive to test or some characteristic to alter or set preferences for.
It is the nature of SCSI Utilities that they cannot perform
many of their operations upon the drive in which they
are installed. This makes sense when you think about it:
you can get info about a drive and run tests on it while it
is running your Mac but you cannot perform any operations that will change the size or number of partitions of
the drive you are running off without seriously disrupting the operating System running on it. The difficulty
arises when the only SCSI drive you have is the one in
your Mac and you want to change its features. Some
actions will be allowed and others won’t.
The best way to change the main internal hard drive is to
borrow and connect an external SCSI drive to it, install an
operating system and a SCSI drive utility on the external
drive and then restart the Mac with the external drive
selected as the Startup drive. With the internal drive offline you will be able to perform any operation you want
on your internal SCSI drive.
To see what you can safely do to your drive with Lido 7
you must select first a drive and then an action. If the
action is non-destructive, like asking for a read-out of the
condition of your drive, the action
will be permitted to proceed immediately but if the action will cause
irreversible changes to the data on
your drive you will get the message
to the left. Cancelling the action is
always the best bet unless you have
decided that all of the information
on the drive is expendable.
When you launch the Lido 7 application you
will get a window listing all your SCSI
devices and their addresses. SCSI scanners,
CD-ROM drives, external SCSI drives, and
SCSI removable like Zip, SyQuest and others
will all show up. Before you can do anything
to them with Lido 7 you must select a SCSI
device with a single click. All potentially permitted operations will be greyed out until this
is done. Then you can select from the menu
bar and proceed to make the changes you
want. You can test a drive from the Tests
menu or get volume info without making any
changes to the drive. Selecting Get Volume
Info from the Special menu will prompt you
to select the volume for which you need information The Show Map button will allow you
to view the Volume Usage Map which will let
you see the SCSI drive as allocation
blocks.This feature will show you how full
For the purpose of demonstrating this program I have attached a 40 Meg external
Quantum drive to my Quadra and assigned it
SCSI address 6. I select this drive with one
click. All of the Lido 7 commands are now
available. We will pretend that this is a new
unformatted SCSI drive that has been wiped
clean. The first action required is that it be formatted so that my Mac can read from it and
write to it. To achieve this I simply click the
Format button. After about 40 seconds I get
your drive is and how badly fragmented the
files are.
the message below.
Larger drives take more
time to format so
patience must be exercised. During the formatting procedure it appears that nothing is
happening but it is. When the formatting is finished the box below
appears to suggest the next step
in preparing the drive for use.
there are plentiful exclamation
points throughout the dialogs.
Who could have known that formatting a drive would be so exciting ?
As the program
suggests
we
will now open
up the Partition menu and
select to create this drive as
one, two, or more partitions
for use with Macintosh or
A/UX.
I selected Two 50% Mac Setup... from the
Partitions menu and Lido 7 created two partitions of about 20 Megs each from the 40 Meg
drive. As the resultant dialog suggests, its time
to initialise the drive
When I click Initialise I am presented with a
bunch of hard disk icons (below) so that I can
decide what the new drive will look like on the
Desktop. When I select an icon and click OK
the program proceeds to initialise the drive
and install new drivers. When this operation is
complete, in about 15 seconds for this drive,
the two icons for the two partitions appear on
the Desktop among the other drive icons and
the two empty drives are available for use. A
larger drive may take considerably more time
for some or all of these operations.
There are a lot of other features
in Lido 7, like the options under
the Tests and Special menus that
I haven’t even mentioned, that
an advanced SCSI user could
appreciate but I suspect that if a
Mac user needs more than Lido 7
has to offer then the commercial
programs must be used. For the
rest of us Lido 7
will suffice. I know that for
many of us SCSI utilities are
something we seldom or never
use but if you must work with
SCSI devices or you intend to
upgrade your SCSI drive it
helps to have a few tools like
Lido 7 to walk you through
basic formatting, partitioning
and initialising The interface is
logical and the program proceeds step-by-step so that you
don’t need to know the purpose or the effect of formatting
and initialising.
PMount
The other little application which
comes with Lido 7 is PMount, a SCSI
utility that scans your SCSI bus on
Startup and lets you set special conditions for each SCSI device. When
you first launch PMount you are
presented with a double window
with a list of all your SCSI devices
and a list of possible operations.
From the double window you can
set preferences for each of your SCSI
devices individually. You can writeprotect your disks, mount and
unmount them, set a Password for
each SCSI device or set one of them
to be your Boot Disk.
Micronet Utilities
Old Micronet SCSI hard drives shipped with
an early version of this program (v5.3.1) and I
have used it and recommended it frequently
because of the NUPORT menu which can help
identify mystery NuBus cards. Besides that it
is an excellent SCSI utility and this latest version, 7.2.7 can be downloaded free from the
Mac files on the Micronet internet site. Above
is the main panel that appears each time you
launch Micronet Utilities. I have already
selected the 40
Meg Quantum
drive, which is
why the icon
has turned yellow and the buttons are all activated.Firstly I
click Format to
get the message
to the left and
click on OK.
This program
offers an abundance of warnings and opportunities for the
novice to reconsider
every
movement before committing to it. After the
Drive is Formatted it appears on
the Desktop and you can click on
Custom Partitioning... in the
main panel to get the window
above and then Shortcuts to get the window
below. I will elect to initialise as 2 equal Mac
volumes. Each step along the way there are
changes being made to the drive that require
the destruction of all data on it. This drive is
blank but if it had any files worth keeping
they would have to be removed.
If I click OK after making my choice in the
Initialisation Shortcuts I will be asked to select an
icon. I choose Clarus, the dogcow, and click OK.
The Micronet 40 Meg Hard Drive is now two twenties. If I had chosen six equal partitions I would
have six Micronet drive icons on the desktop, all
about 7 Megs each. This would not be a good idea
as seven Megs is too small a partition to be of much
practical use. The other two drive icons, PPC Q950
and 68040 Q950 are 700 Meg partitions of a 1.4 Gig
internal SCSI Seagate hard drive.
There was a time when every SCSI hard drive manufacturer shipped a SCSI utility of some sort with their drives
and most of these utilities have disappeared over the
years. Micronet Utilities has been around for a long time
and each new version is an improvement. From the
Options and NuPORT menus the various features can all
be accessed and from the Advanced Options it is even
possible to set a Password for a complete hard drive and
make it inaccessible to outsiders.
If you find that these SCSI utilities are inadequate to your
needs then there is probably a commercial SCSI tool in
your future. LaCie’s
SilverLining,
FWB
Hard Disk Toolkit,
and others are available for those of us
with serious SCSI
concerns.
SCSIProbe 4.3
Here’s the most common SCSI utility of them all. This simple program in version 4.3 or the new updated
Adaptec 5.1.3 release can be found in just
about every freeware utility package. Unlike
the other SCSI Utilities in this issue,
SCSIProbe is a Control Panel, not an application. It has limited drive-modifying capabilities, takes up very little space on the hard
drive and can get general information about a
SCSI device, mount SCSI drives, scan the SCSI
bus, add device and drive icons to the
Desktop, and control how and when external
hard drives and other SCSI devices are
mounted. The new version from Adaptec has
an updated appearance and a few added features, like the ability to cue external devices to
flicked on command. If you have a lot of similar SCSI devices this helps you identify them
without getting behind them all to check their
SCSI addresses. If you have no other SCSI
Utilities you must at least have SCSIProbe to
tell you what is connected to your Mac, who
made it, and where it is (its SCSI address).
This will help ensure that each SCSI device
has its own unique identity recognised.
6. When your computer restarts,
eject the system CD and use
Drive Setup 1.7.2 as follows.
7. Open Drive Setup 1.7.2.
WARNING When Drive Setup
opens, do not click Initialise.
Doing so erases all the information on your hard disk.
8. Select your hard disk in the
List of Drives list.
9. Choose Update Driver from
the Functions menu.
Drive Setup
Here’s the one that you get with
an Apple computer that comes
with the original Apple hard drive in it. When
you click on the icon you get the window above listing all your SCSI
devices.
IMPORTANT If Update Driver
is not available, your hard disk may be protected by security software or unrecognisable
drivers. See the manual that came with the
software to learn how to turn off security
To use Drive Setup 1.7.2 to update your
hard disk, follow these steps:
1. Back up your hard disk and turn off
any hard disk security software. Using
Drive Setup to update a hard disk driver with security software turned on
may cause problems.
2. Insert your system software CD in
the CD-ROM drive and restart your
computer using the CD.
3. Locate Disk First Aid on the CD and
open the program.
4. Select your hard disk and click Repair.
5. When you’re finished, quit Disk First Aid
and restart your computer.
while you update the disk. Even if the drive
you have chosen does not have Apple drivers
installed you can still initialise the drive.
Clicking Initialise will bring up the
Initialisations Options window, as seen above.
update the disk, see the troubleshooting chapter in the user’s manual that
came with your computer.
IMPORTANT: If your computer has
one or more previous versions of
Drive Setup on the hard disk, Apple
recommends that you replace these
older version(s) of Drive Setup with
version 1.7.2 of Drive Setup.
10. Click OK when a message appears telling
you that you must restart your computer.
11. Quit Drive Setup when you see the message, “Driver update was successful.”
12. In the Finder, choose Restart from the
Special menu.
If you have problems or Drive Setup fails to
Included with Drive Setup is the
Drive Setup Guide, a really useful
step-by-step helper that will answer
all your questions about how to do all the
things to your SCSI hard drive that the rest of
the programs do. The solutions to any problems you might encounter as you try to
update drivers, partition disks, format & initialise drives, mount or unmount drives, test
drives and set security preferences are
explained fully in the excellent Drive Setup
Guide.
APS PowerTools
This program has a few really nice features:
every important feature can be accessed from
the one main panel that controls every process
that you are likely to need for simple SCSI
maintenance. Each button in the window will
bring up a set of selectable items that allow
you to customise how you want your drive to
be changed but this program also has an
automatic cycle. The AUTO INITIALISE button brings up the dialog box seen below and if
I click OK the program will run along all by
itself and ask me for assistance only when it
needs to know my preferences. The window
in the upper right corner is constantly updated by the program during operations to
inform the user of important trivia about the
SCSI drive and its technical specs. The window on the left shows all the components in
the SCSI chain for each SCSI bus. The red slider bar moves the window up and down so
you can scroll through the list of devices and
volumes to select the drive you want to work
with. The Drive Icon selector on the right side
of the window has a lot of possible icons and
I found that once I set up the main panel to
format and partition the selected test drive, (a
121 Meg Maxtor SCSI drive named Plus
External), it quickly turned the drive into the
two 60 Meg drives with
the attributes and icons of
my choice. As each progressive step was completed the next came up. I had to fill in my
choices and before each action was allowed to
proceed I was warned of the data-destroying
consequences of the action and given the
option of backing down from the act. For
amateur or inexperienced SCSI drive users
this program has the advantage over some of
the others in that the program presents operations in order instead of presenting a menu
from which you must make an educated
choice from a lot of possible courses to follow.
There is a certain sameness about all SCSI
drive utilities because they all perform the
same functions, and the warnings that all of
the programs display are an example of this.
Every time you alter a SCSI drive you wipe it
out. SCSI Utilities are not something that you
would use every day and never on a drive
that has data on it that you can’t afford to lose.
If your exposure to SCSI programs is nonexistent the best drives to experiment with
when you are first familiarising yourself with
SCSI utilities are small cheap drives that have
little or no commercial value. For this article
on SCSI Utilities I connected a pair of small
SCSI drives, 40 and 120 Megabytes, to my
Quadra 950 external SCSI bus and ran all the
utilities on one or the other of them. There
was no data worth saving on either drive and
all of the SCSI utilities worked flawlessly.
Clock Chipping
I happened onto this one like I find most
things on the internet: by serendipity. I can’t
remember now what I was looking for or at
that led me to this but I do know that I had no
intention of attempting the surgery involved
in this procedure before I committed to perform it.
All computers operate at a certain frequency
with which operations are performed. Within
a certain class of computers, for example
Mac's with a 68030 processor, the higher the
frequency, the higher frequency of operations
processed, and the faster the computer provided there is no other speed effecting hardware like a cache or slow data path. The
designer of the computer, Apple in this case,
will use components that are rated at the same
frequency or faster than the final computer
will be. In this case the 68030's are made by
Motorola. All 68030's are generally alike in
what they do, but they are not alike in how
fast they can do it. Motorola sells several
68030 processors rated at 16, 20, 25, 33, 40 and
50MHz for Mac's, accelerators and such. A
large frequency difference will require a different mask during production of the processor, but small changes may not. Motorola only
needs to guarantee that the chip they mark as
20MHz will function properly at 20MHz
under a variety of conditions. Some chip vendors will test parts at different frequencies
and sort the chips accordingly while others
may just label the them at will and sell the
chips at the different price as long as they are
within the specifications. Because of this it is
reasonable that the 20 and 25's actually come
from the same batch, are
separated on demand,
and tested to make sure
they will withstand that
frequency. And thus it is
reasonable that a 20MHz
processor will function
fine at a higher frequen-
cy, say 25MHz. Running the 20MHz part at
25MHz will generate more heat than at
20MHz, but no more than the 25MHz part if
they came from the same production mask.
Many of the components in the computer
need to be synchronised, so a fundamental
frequency is generated by a crystal oscillator
to synchronise them. Other parts like NuBus
cards and video do not have to be the same
frequency, so they may have separate crystal
oscillators. A typical computer may have
three crystal oscillators to clock different
groups of components on the motherboard.
Provided the components that are clocked by
a particular crystal oscillator are capable of a
speed increase, that crystal oscillator may be
replaced with one of a higher frequency. How
much a specific Mac can be sped up by this
method depends on how the motherboard
was designed, the components used, and
what things the crystal oscillator that controls
the processor also controls. With some of the
newer Mac's, there are a few MHz differences
in the top stable speeds reported for the same
model, so part of this is luck of the draw.
Output Enablers, www.oi.com/~oe/, sells
low-cost snap-on Macintosh accelerators.
These accelerators work by replacing the signal coming from the computer's original oscillator with one of a higher frequency. Some
users have seen performance increases of up
to 60% using OE accelerators, which gives
them one of the best price/performance ratios
in the accelerator market. All their kits come
with a second slightly slower oscillator that
the customers can use if their computer doesn't work at the highest speed.
Quadra 800/PPC
Centris 650/PPC(mod)
PowerMac 6100/66
PowerMac 6100/66 DOS
PowerMac 7100/66
PowerMac 8100/100
Radius 81/100
PowerBook 520
PowerBook 540
PowerBook 3400/180
PowerBook 3400/200
PowerMac G3 / (233 and 266)
Most of their kits are based around the
RocketSocket, pictured above, which is a
device that fits snugly over the oscillator on
the motherboard and accepts a new higherspeed oscillator in a socket on top of the
device. Complete installation instructions are
included with each kit, and they provide
additional technical support via e-mail.
Frequencies are sometimes changed to
increase speed or stability.
76 MHz
76 MHz
82 MHz
80 MHz
82 MHz
123 MHz
125 MHz
38 MHz
38 MHz
225 MHz
225 MHz
300 MHz
The Mac that I decided to try this out on was
an already wickedly fast 40 Mhz Mac IIfx.
According to a technical page on the OE website, the Do It Yourself kit for the IIfx will raise
its processor speed from 40 Mhz up to a possible 50 Mhz. A quick search on click chipping
took me to a site where a survey of successful
clock-chipped Mac owners submitted their
results for each Mac model, a site which yielded the information in the chart below:
Below is a table of products and performance. Pick out your own Mac and
see what kind of a speed boost you can
expect from an OE kit.
Macintosh model
IIsi
IIfx
Centris 610
Centris 650
Centris 660AV
Centris 650 (mod)
Quadra 610
Quadra 650
Quadra 660AV
Quadra 700
Quadra 800
Quadra 840AV
Quadra 900
Quadra 950
Quadra 650/PPC
Speed with kit
27.5 MHz
50 MHz
28.6 Mhz
29.5 MHz
34 MHz
40 MHz
30 MHz
44 MHz
34 MHz
35 MHz
42 MHz
48 MHz
35 MHz
45 MHz
76 MHz
Unfortunately the output Enablers IIfx kit is
one of the few that requires that the stock
oscillator on the logic board be unsoldered
and completely removed in order to have a
replacement soldered in. The OE website also
informs me that a heatsink may be required to
keep the operating temperature of the fasterrunning 68030 processor down. The kit comes
with two oscillators, as advertised, and costs
the amazingly low, low price of $15.00
American. Postage and handling of the kit is
another $5.00, which brings the total bill to
$20.00 U.S. I can see why these guys claim one
of the best price/performance ratios in the
accelerator market. I emailed them using the
order form provided on their website, filling
all the required fields, and the next day
received confirmation via email that the order
had been processed and that the kit is on its
way. The $15.00 charge for the IIfx kit is actually the most modest pricetag on the Output
Enablers site, but many of the kits for newer
models are two or three times that and
include a chiller fan.
For more information about the mechanics of
these clock chippers and what you can expect
from a chipped Mac there is a selection of
Frequently Asked Questions on the Output
Enablers site and for even more information
you can visit the clock chipping site at :
http://socrates.berkeley.edu/~schrier/mhz.
html.
This is how it worked for me. When the kit
arrived I was surprised at how little I got.
There was a little plastic receptical with 4 tiny
legs out the bottom
and 4 tiny holes on
the top, a pair of tiny
metal
oscillators
rated at 100 Mhz and
92.94 Mhz to replace
my 80 Mhz oscillator
and a heatsink with
adhesive to attach to
the 68030 processor.
Also three sheets of
instructions
that
were generic and
had little or nothing
to do with the IIfx.
Knowing that I was
looking for a 80 Mhz
thingy, I removed the
top cover, the drive
shelf, (with floppy &
hard drive attached),
and disconnected the
logic board from the
power supply and
speaker. It honestly
took less than ten
minutes to totally
strip down the Mac IIfx and find the 80 Mhz
oscillator on it. Another 15 or 20 minutes of
farting around with the soldering gun and a
bit of copper wick to suck the solder out of the
connections and the original oscillator
popped off the logic board. Just touch the little solder spots on the back side of the logic
board with a light-duty soldering gun and the
solder turns as liquid as water and can be
sucked up easily with copper wick designed
for this purpose.
I installed the little socket, (flat black plastic,
about one half by three
quarters of an inch and
an eighth of an inch
thick), by placing its 4
legs into the 4 holes left
Socket
Before
by the gone oscillator and re-touching the solder with the soldering gun. I stripped the
plastic cover off the bottom of the heatsink
and stuck it to the processor. The heatsink is
included with the kit and fits perfectly on top
of the raised rectangle on
Socket &
the 68030 processor. I stuck
Oscillator
an oscillator into the receptical and re-assembled the
Mac IIfx. The first oscillator
I tried was the low-speed
92.94 Mhz job and I got no
video and the Chimes of
Death. Son of a bitch, to coin a phrase. This
was not what I had in mind. Luckily the
placement of the little receptical right
beside the IIfx ROM SIMM makes
removal of the oscillator and replacement very easy. Less than a minute. The
next oscillator I tried was the 100 Mhz
job and the IIfx fired up nicely....and
then froze after a few minutes with a
Finder Error. Hmmmm..... I shut it off
and restarted it. Blank screen and Chimes of
Death again. Hmmmm....
I wonder if I can get another IIfx motherboard
off eBay....or maybe I should read the three
pages of instructions again....or go back onto
the internet and read the Frequently Asked
After
Questions. I was not
happy with these
results, but you can
tell by the pictures
with this article that I
did persevere and got
the
oscillator
to
behave but it was a
bit spooky for a
while. The oscillators
have 4 long skinny wire legs that fit neatly
into the 4 holes in the receptical. I suspect that
the first few times I put the 100 Mhz oscillator
in it may have been loose and just sitting in
the socket holes. I removed the oscillator, bent
the little legs and splayed them out a bit and
stuck the 100 Mhz oscillator back into the
receptacle. If you try this upgrade make sure
that you bend these pins a little bit to improve
contact so that they grip the holes they fit into.
Adding a fan will also improve the stability of
the new setup. I just happened to have a little
silent fan like the ones that fit into external
After
hard drive cases. with a “Y’ connection cable I
powered it from the hard drive and secured it
to blow across the heatsink attached to the
processor. I don’t know if the added cooling
or the bent wires on the oscillator did the trick
but the utilities I ran all confirm that the 40
Mhz Macintosh IIfx is now running at a solid
and consistent 50 Mhz, considerably faster by
25% than the 40 Mhz that Apple set it to run
at. To check and double check the results I ran
a bunch of different Mac utilities, like Apple
Personal Diagnostics, Norton’s Utilities,
Clockometer, and Snooper to see if they all
would even run at the new speed and all pick
up on the changes. They all did. The Apple
Personal Diagnostics program benchmarks
system rated the 50 Mhz IIfx as an over-all 22
compared with the normal over-all IIfx rating
of 17, for a performance improvement of
almost 30% with all processor attributes tested. With the Pseud040 cdev enabled the
Daystar PowerPro recognised the enhanced
Mac IIfx as having a 68040 processor running at 50 Mhz !
Since this Macintosh IIfx is the same one I previously used to publish the Double Click from
when I first became the newsletter Editor, I
decided to put it through its paces, opening
After
and working with a document in Quark
and also copying files to the hard drive
from a QuickTake 100 Digital Camera
while running the Apple QuickTake
program. The operations all progressed
normally enough and the new,
improved Mac IIfx seems to be dead
stable and feels faster at all tasks.
Startup seems especially quick, with all
the little icons whizzing onto the screen.
Since the restart after the last Chimes of
Death when I fiddled with the oscillator
legs & installed the fan the Mac IIfx has
been on best behaviour and has not
crashed or frozen up even once. I have
kept it on for days on end without any
adverse symptoms.
The successful connection of the QuickTake
camera to the Printer port was a hurdle that I
was happy to pass. The literature that accompanies the oscillators indicates that the Serial
Ports have proven to be a limiting factor in
clock chipping several of the 68040 Macs, and
I hoped that it would not be a problem for the
68030 Mac IIfx as well.
Time will tell how beneficial this upgrade was
but from this initial experience with Output
Enablers’ $15.00 Mac IIfx accelerator it certainly appears that their
claims of being the lowcost upgrade supplier are
well-founded. The 25%
speed boost that I have
experienced with this old
Mac IIfx must be the cheapest improvement I have
ever made to it. If your personal favourite old Mac is
one of the ones listed in
this article then you might
consider checking out the
Mhz numbers that a
replacement oscillator can
get for yours, too.
MacRecorder
The MacRecorder is an interesting piece of antique Mac
hardware that was popular
before all Macs came with a
microphone port for audio in. The problem
with Macs like that is that in order to get
sounds into them you have to copy them onto
disks and install from floppies or use some
other port for the sound input. I picked this
MacRecorder up to connect to my Macintosh
IIfx which has no microphone port. From the
quality names printed on it, (Farallon), and
the software with it, (Macromedia), I figured
it to be a good deal at the price, which was
practically free. I paid postage from Seattle to
a Mac user out there who had no need of it.
To use MacRecorder you must plug it into one
of the Serial Ports of a Mac which has no
Microphone port, install the MacRecorder
Driver, which is just a System Extension. and
restart. (For the IIfx and some Quadras there
is a Serial Switch control panel that must be
installed and configured as well to ensure
compatibility with the software. It de-tunes
the Serial Ports to a broader spectrum of
acceptance). After restarting the Mac you can
open the Sounds control panel and check to
see if there is a image of the MacRecorder in it
when the Sound In is selected.
I could find no useful information about this
device on the internet and even the members
of the Quadlist were sketchy about how it
works and what it does beyond simply acting
as a serial microphone. I had better luck in my
own library where I found an old MacWorld
magazine from ten
years ago that had
an ad for the $159
F a r a l l o n
M a c R e c o r d e r,
described as a
“sound digitizer”
and bundled with
SoundEdit,
the
early version of
what later became
Macromedia
Sound Edit 16.
In another issue of MacWorld I found an article in which readers rated the fifty top hardwares and softwares of the year...for 1991.
Under the heading of DIGITAL AUDIO the
Farallon MacRecorder was given the nod by
64% of the respondees, which made it the
most highly approved-of hardware device in
the survey. All the other categories (printers,
modems, monitors, video cards and other
devices) shared votes fairly evenly but the
MacRecorder dominated its classification.
The MacRecorder functions as a microphone
but it has two input ports of its own, marked
“Microphone” and “Line.” I have no idea
what these ports are for since the
MacRecorder works just fine with nothing
else plugged into it, and sound files created
with it connected to the Mac IIfx defaulted to
crystal-clear 8-bit stereo at 22.254 kilohertz.
Submissions to the
Double Click
MaUsE Club members are more than welcome
to submit original articles about any Mac-related topic. If you have any opinions, experiences,
rants, reviews of hardware or software products
you have used, or information you would like to
share with other MaUsE Club members, please
feel free to make a submission either to Michael
Shaw on the Source FCC BBS or via email to
me at: [email protected].
Text portions submitted in SimpleText and
graphics in PICT or JPEG format will simplify
editing on my end. Don’t be shy. There’s lots of
room in the upcoming issues for your article.
September MaUsE
Meeting
Will be held in the Lecture Room at the Henry Street
High School at 7:30 P.M. on September 27th.
Park at the rear of the School in the West Lot, enter the
building through the West Entrance and follow the signs.
Possible Meeting highlights will be Jim & Bruce’s recent
excellent MacWorld adventure,
a possible demo of OSX on Jim’s iMac,
and a silent auction of an older complete Mac system.
See you there!