1
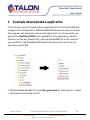
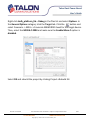
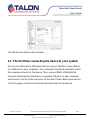
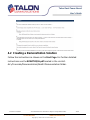
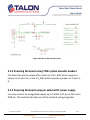
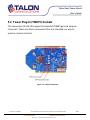
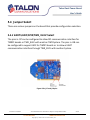
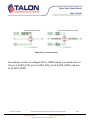
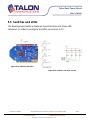
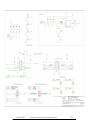
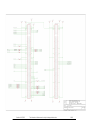
Talon Oasis Tower Board
User’s Guide
Getting Started with the
Oasis Tower Board
1
Overview
The Oasis Tower Board is a device based off of Freescale’s Kinetis KW2x
Tower System Module and the TWRKW24D512 device. This user manual is
designed to guide users in the process of gathering the necessary resources
and configuring the correct settings in the integrated development
environment (IDE) in order to run an application. In this guide, we will be
using a demonstration application from the Kinetis Software Development
Kit.
Revision 1.0 07/2015
The information in this document is subject to change without notice
1/29
TALON COMMUNICATIONS
3750 Convoy St. SUITE 320
SAN DIEGO CA 92111
+1 619.583.1846
WWW.TALONCOM.COM
Copyright © 2015 Talon Communications, Inc.
Talon Oasis Tower Board
User’s Guide
Contents
1
Overview.............................................................................................................................................................1
2
Resources ...........................................................................................................................................................3
3
4
5
2.1
Downloading and Installing IAR Embedded Workbench............................................................................3
2.2
Downloading the Kinetis Software Development Kit .................................................................................5
Example demonstration application ..................................................................................................................7
3.1
Configuring the settings in IAR Embedded Workbench .............................................................................8
3.2
The first time connecting the device to your system .............................................................................. 11
3.3
Loading the application into the device .................................................................................................. 12
BeeKit Wireless Connectivity Toolkit ............................................................................................................... 13
4.1
BeeKit Installation.................................................................................................................................... 13
4.2
Creating a Demonstration Solution ......................................................................................................... 14
System Overview ............................................................................................................................................. 15
5.1
Power Supply ........................................................................................................................................... 16
5.1.1 Powering the board using the USB micro connector ............................................................................. 16
5.1.2 Powering the board using TWR system elevator headers ..................................................................... 17
5.1.3 Powering the board using an external DC power supply ....................................................................... 17
5.2
Debug/Development Interface................................................................................................................ 18
5.3
Tower Plug-In (TWRPI) Sockets ............................................................................................................... 19
5.4
Jumper Select .......................................................................................................................................... 21
5.4.1
UART1/ADC/SPI0/TWR_ELEV Select............................................................................................... 21
5.4.2 UART1/ADC/SPI0/TWR_ELEV Select....................................................................................................... 23
5.5
6
Switches and LEDs ................................................................................................................................... 24
Schematics ....................................................................................................................................................... 25
Revision 1.0 07/2015
The information in this document is subject to change without notice
2/29
TALON COMMUNICATIONS
3750 Convoy St. SUITE 320
SAN DIEGO CA 92111
+1 619.583.1846
WWW.TALONCOM.COM
Copyright © 2015 Talon Communications, Inc.
Talon Oasis Tower Board
User’s Guide
2
Resources
In order to be able to complete each step of this guide, you will need the
following:
•
•
•
•
•
Oasis Module Tower Board
IAR Embedded Workbench or other supported IDE
Kinetis Software Development Kit (KSDK)
P&E’s USB Multilink Universal development interface
BeeKit Wireless Connectivity Toolkit (recommended)
NOTE: It is highly recommended that you install the BeeKit Wireless
Connectivity Toolkit before connecting the board to your system. The drivers
in this toolkit will allow you to use the device to its fullest potential. See
Section 4 for detailed instructions.
2.1 Downloading and Installing IAR Embedded
Workbench
The Oasis Tower Board supports many other IDEs, but for this guide we will
be using IAR Embedded Workbench. Once you have downloaded and
installed IAR Embedded Workbench, you will be asked to enter a license
number. If you do not already have a license number, then click Register
with IAR systems to get an evaluation license.
Revision 1.0 07/2015
The information in this document is subject to change without notice
3/29
TALON COMMUNICATIONS
3750 Convoy St. SUITE 320
SAN DIEGO CA 92111
+1 619.583.1846
WWW.TALONCOM.COM
Copyright © 2015 Talon Communications, Inc.
Talon Oasis Tower Board
User’s Guide
When asked to select an evaluation license type, you may choose either the
30-day time-limited evaluation or the Kickstart, size-limited evaluation.
Choose a license type that will best fit your needs. After registering and
confirming your registration, you will be emailed a link which contains your
assigned license number. Enter this license number into the textbox of the
license wizard to activate IAR Embedded Workbench (make sure to include
the hyphens when typing in the license number).
Revision 1.0 07/2015
The information in this document is subject to change without notice
4/29
TALON COMMUNICATIONS
3750 Convoy St. SUITE 320
SAN DIEGO CA 92111
+1 619.583.1846
WWW.TALONCOM.COM
Copyright © 2015 Talon Communications, Inc.
Talon Oasis Tower Board
User’s Guide
2.2 Downloading the Kinetis Software Development Kit
Now that IAR Embedded Workbench is installed and activated, you are now
able to load programs into the device. First, we will download demonstration
applications which are in the Kinetis SDK located on Freescale’s website. The
example application we will be using is only available in the previous versions
of KSDK, so click on the “Previous” tab. Choose the KSDK v1.1.0 standalone
release for the K21DA and KW24D devices as shown below.
Revision 1.0 07/2015
The information in this document is subject to change without notice
5/29
TALON COMMUNICATIONS
3750 Convoy St. SUITE 320
SAN DIEGO CA 92111
+1 619.583.1846
WWW.TALONCOM.COM
Copyright © 2015 Talon Communications, Inc.
Talon Oasis Tower Board
User’s Guide
Then, choose the appropriate version for your operating system by selecting
the checkbox and proceed with the download.
Run the KSDK installer and choose the installation directory. When asked to
choose the install set, choose Kinetis SDK Basic. Inside the installation
directory are several folders which include the demonstration applications
(located in <install-dir>/demos) and documents describing what each
application does (located in <install-dir>/doc).
Revision 1.0 07/2015
The information in this document is subject to change without notice
6/29
TALON COMMUNICATIONS
3750 Convoy St. SUITE 320
SAN DIEGO CA 92111
+1 619.583.1846
WWW.TALONCOM.COM
Copyright © 2015 Talon Communications, Inc.
Talon Oasis Tower Board
User’s Guide
3
Example demonstration application
In this section, we will choose a demo application from the Kinetis SDK and
configure the settings within IAR Embedded Workbench to allow us to load
the program into the device and run the application. For this example, we
will use the FlexTimer PWM demo application. This application could be
found in <install-dir>/demos/ftm_pwm/iar/twrkw24d512. In this location,
you will find an IAR Embedded Workbench Workspace file which can be
opened using the IDE.
In IAR Embedded Workbench, open ftm_pwm.eww by selecting File -> Open
-> Workspace then locate the file.
Revision 1.0 07/2015
The information in this document is subject to change without notice
7/29
TALON COMMUNICATIONS
3750 Convoy St. SUITE 320
SAN DIEGO CA 92111
+1 619.583.1846
WWW.TALONCOM.COM
Copyright © 2015 Talon Communications, Inc.
Talon Oasis Tower Board
User’s Guide
3.1 Configuring the settings in IAR Embedded Workbench
Once the workspace is opened, you should see a separate window which lists
all of the files and displays the active project. First, set ksdk_platform_lib –
Debug as active by checking if ksdk_platform_lib – Debug is displayed in the
dropdown list or if ksdk_platform_lib – Debug is bold in the files overview
tab. If ksdk_platform_lib – Debug is not set as active, then select it in the
dropdown list or right click the project name and select Set as active.
Revision 1.0 07/2015
The information in this document is subject to change without notice
8/29
TALON COMMUNICATIONS
3750 Convoy St. SUITE 320
SAN DIEGO CA 92111
+1 619.583.1846
WWW.TALONCOM.COM
Copyright © 2015 Talon Communications, Inc.
Talon Oasis Tower Board
User’s Guide
Right-click ksdk_platform_lib – Debug in the files list and select Options. In
the General Options category click the Target tab. Click the
button and
select Freescale -> KW2x -> Freescale MKW24D512xxx5 for the target device.
Then, select the MISRA-C:2004 and make sure the Enable Misra-C option is
disabled.
Select OK and rebuild the project by clicking Project->Rebuild All.
Revision 1.0 07/2015
The information in this document is subject to change without notice
9/29
TALON COMMUNICATIONS
3750 Convoy St. SUITE 320
SAN DIEGO CA 92111
+1 619.583.1846
WWW.TALONCOM.COM
Copyright © 2015 Talon Communications, Inc.
Talon Oasis Tower Board
User’s Guide
Right-click the ftm_pwm – Debug project and select Options. Select the
General Options category, and as we did earlier select Freescale -> KW2x ->
Freescale MKW24D512xxx5 for the target device. Select the Debugger
category and for the Driver dropdown list select PE micro.
Then, select the PE micro subcategory under Debugger and ensure that
OSJtag is chosen in the dropdown list of the P&E Hardware interface type.
Revision 1.0 07/2015
The information in this document is subject to change without notice
10/29
TALON COMMUNICATIONS
3750 Convoy St. SUITE 320
SAN DIEGO CA 92111
+1 619.583.1846
WWW.TALONCOM.COM
Copyright © 2015 Talon Communications, Inc.
Talon Oasis Tower Board
User’s Guide
Click OK to close Options the window.
3.2 The first time connecting the device to your system
Use a micro USB male to USB male cable to connect the Oasis Tower Board
to a USB port on your computer. Your computer should automatically install
the necessary drivers for the device. Then, connect P&E’s USB Multilink
Universal development interface to a separate USB port on your computer
and connect it to the JTAG connector on the Oasis Tower Board (see section
4.2). Once again, the drivers will automatically install for this device.
Revision 1.0 07/2015
The information in this document is subject to change without notice
11/29
TALON COMMUNICATIONS
3750 Convoy St. SUITE 320
SAN DIEGO CA 92111
+1 619.583.1846
WWW.TALONCOM.COM
Copyright © 2015 Talon Communications, Inc.
Talon Oasis Tower Board
User’s Guide
3.3 Loading the application into the device
Once the settings have been configured, compile the program by clicking the
Make icon on the toolbar at the top of the IDE.
Then load the program into the device by clicking the
Download and
Debug icon on the same toolbar. You will enter debugging mode and another
toolbar will appear.
Click the
Go icon to run the FlexTimer PWM application. If everything has
been done correctly, you should now see LED D7 slowly increase its
brightness for 5 seconds and then repeats. Note: you will need a jumper on
J21 pins 2-3 to enable the LED (see section 4.4.2).
You can now try running different demo applications by opening a different
*.eww file and repeating the same procedure. Refer to the <installdir>/doc/Kinetis SDK v.1.1 Demo Applications User's Guide.pdf for more
information about what each application does.
Revision 1.0 07/2015
The information in this document is subject to change without notice
12/29
TALON COMMUNICATIONS
3750 Convoy St. SUITE 320
SAN DIEGO CA 92111
+1 619.583.1846
WWW.TALONCOM.COM
Copyright © 2015 Talon Communications, Inc.
Talon Oasis Tower Board
User’s Guide
4
BeeKit Wireless Connectivity Toolkit
In order to use the device’s full capabilities, you must install BeeKit Wireless
Connectivity Toolkit. Similar to the KSDK, the BeeKit toolkit provides
demonstration projects that will allow the user to quickly see the capabilities
of the device. Furthermore, installing the toolkit before connecting the
device will allow your system to automatically install the necessary drivers
the first time the device is connected. In this section, we will go through a
step-by-step guide to generating a program using the toolkit and loading it
into the device.
4.1 BeeKit Installation
First you will need to download and install the BeeKit Wireless Connectivity
Toolkit. This could be found on the Freescale website by simply searching for
“BeeKit.” Once it is installed, run BeeKit.exe located in <installdir>/Freescale/BeeKit. This will open the application and take you to the start
page which will instruct you on how to get started.
NOTE: If you wish to use the BeeKit demo applications, you must have the
30-day time-limited evaluation or the full version of IAR Embedded
Workbench. The Kickstart version will not work because the applications
exceed the size limit.
Revision 1.0 07/2015
The information in this document is subject to change without notice
13/29
TALON COMMUNICATIONS
3750 Convoy St. SUITE 320
SAN DIEGO CA 92111
+1 619.583.1846
WWW.TALONCOM.COM
Copyright © 2015 Talon Communications, Inc.
Talon Oasis Tower Board
User’s Guide
4.2 Creating a Demonstration Solution
Follow the instructions as shown on the Start Page. For further detailed
instructions see the BKWCTKQSG.pdf located in the <installdir>/Freescale/Documentation/BeeKit Documentation folder.
Revision 1.0 07/2015
The information in this document is subject to change without notice
14/29
TALON COMMUNICATIONS
3750 Convoy St. SUITE 320
SAN DIEGO CA 92111
+1 619.583.1846
WWW.TALONCOM.COM
Copyright © 2015 Talon Communications, Inc.
Talon Oasis Tower Board
User’s Guide
5
System Overview
This section details the locations and descriptions of each major component
and connector on the Oasis Tower Board. These components include the
switches, jumpers, LEDs, and connectors.
Figure 5-1. Oasis Tower Board
Revision 1.0 07/2015
The information in this document is subject to change without notice
15/29
TALON COMMUNICATIONS
3750 Convoy St. SUITE 320
SAN DIEGO CA 92111
+1 619.583.1846
WWW.TALONCOM.COM
Copyright © 2015 Talon Communications, Inc.
Talon Oasis Tower Board
User’s Guide
5.1 Power Supply
There are various ways to supply power to the board. The following
subsections will describe each method in detail. For additional information
about the power management circuit see the schematics in section 5.
5.1.1 Powering the board using the USB micro connector
The device contains a USB micro-B connector on the board. This connector is
one way to power the Oasis Tower Board. A jumper must be placed in pins J1
1-2 when using this method.
Figure 5-2a. Micro USB interface
Revision 1.0 07/2015
The information in this document is subject to change without notice
16/29
TALON COMMUNICATIONS
3750 Convoy St. SUITE 320
SAN DIEGO CA 92111
+1 619.583.1846
WWW.TALONCOM.COM
Copyright © 2015 Talon Communications, Inc.
Talon Oasis Tower Board
User’s Guide
Figure 5-2b. Micro USB interface circuit
5.1.2 Powering the board using TWR system elevator headers
The board can also be powered by either the 3.3V_ELEV which requires a
jumper on J1 pins 3-4, or the 5.5_ELEV which requires a jumper on J1 pins 56.
5.1.3 Powering the board using an external DC power supply
You may connect an unregulated supply up to 5.5VDC to J1 pins 2/4/6 and a
GND pin. This method will make use of the onboard voltage regulator.
Revision 1.0 07/2015
The information in this document is subject to change without notice
17/29
TALON COMMUNICATIONS
3750 Convoy St. SUITE 320
SAN DIEGO CA 92111
+1 619.583.1846
WWW.TALONCOM.COM
Copyright © 2015 Talon Communications, Inc.
Talon Oasis Tower Board
User’s Guide
5.2 Debug/Development Interface
A JTAG connector is used to connect emulators/probes to enable target
system debugging.
Figure 5-3a. JTAG Connector
Figure 5-3b. JTAG connector circuit
Revision 1.0 07/2015
The information in this document is subject to change without notice
18/29
TALON COMMUNICATIONS
3750 Convoy St. SUITE 320
SAN DIEGO CA 92111
+1 619.583.1846
WWW.TALONCOM.COM
Copyright © 2015 Talon Communications, Inc.
Talon Oasis Tower Board
User’s Guide
5.3 Tower Plug-In (TWRPI) Sockets
The connectors J9 and J10 support the standard TWRPI general purpose
connector. These are 20-pin connectors that are mounted in a way to
prevent reverse insertion.
Figure 5-4a. TWRPI Connectors
Revision 1.0 07/2015
The information in this document is subject to change without notice
19/29
TALON COMMUNICATIONS
3750 Convoy St. SUITE 320
SAN DIEGO CA 92111
+1 619.583.1846
WWW.TALONCOM.COM
Copyright © 2015 Talon Communications, Inc.
Talon Oasis Tower Board
User’s Guide
Figure 5-4b. TWRPI 20-Pin Primary Connector Circuit
Figure 5-4c. TWRPI 20-Pin Secondary Connector Circuit
Revision 1.0 07/2015
The information in this document is subject to change without notice
20/29
TALON COMMUNICATIONS
3750 Convoy St. SUITE 320
SAN DIEGO CA 92111
+1 619.583.1846
WWW.TALONCOM.COM
Copyright © 2015 Talon Communications, Inc.
Talon Oasis Tower Board
User’s Guide
5.4 Jumper Select
There are various jumpers on the board that provide configuration selection.
5.4.1 UART1/ADC/SPI0/TWR_ELEV Select
The pins in J17 can be configured to allow SPI communication interface for
TWRPI boards or TWR_ELEV with another TWR System. The pins in J18 can
be configured to support ADC for TWRPI boards or to allow a UART
communication interface through TWR_ELEV with another System.
Figure 5-5a. J17 and J18 pins
Revision 1.0 07/2015
The information in this document is subject to change without notice
21/29
TALON COMMUNICATIONS
3750 Convoy St. SUITE 320
SAN DIEGO CA 92111
+1 619.583.1846
WWW.TALONCOM.COM
Copyright © 2015 Talon Communications, Inc.
Talon Oasis Tower Board
User’s Guide
Figure 5-5b. J17 and J18 circuits
For example, in order to configure SPI for TWRPI boards, you would connect
J17 pins 2-3 (SPI0_PCS), pins 5-6 (SPI0_SCK), pins 8-9 (SPI0_MOSI), and pins
11-12 (SPI0_MISO).
Revision 1.0 07/2015
The information in this document is subject to change without notice
22/29
TALON COMMUNICATIONS
3750 Convoy St. SUITE 320
SAN DIEGO CA 92111
+1 619.583.1846
WWW.TALONCOM.COM
Copyright © 2015 Talon Communications, Inc.
Talon Oasis Tower Board
User’s Guide
5.4.2 UART1/ADC/SPI0/TWR_ELEV Select
These pins are used to configure the status of the LEDs and they also have
the capability to support a UART0 connection through TWR_ELEV with
another TWR system.
Figure 5-6a. UART0/LED Select Pins
Revision 1.0 07/2015
Figure 5-6b. UART0/LED Select Circuit
The information in this document is subject to change without notice
23/29
TALON COMMUNICATIONS
3750 Convoy St. SUITE 320
SAN DIEGO CA 92111
+1 619.583.1846
WWW.TALONCOM.COM
Copyright © 2015 Talon Communications, Inc.
Talon Oasis Tower Board
User’s Guide
5.5 Switches and LEDs
The development platform features 4 push buttons and 4 blue LED
indicators. In order to configure the LEDs see section 4.4.2.
Figure 5-7a. Switches and LEDs
Figure 5-7b. Switches and LEDs circuits
Revision 1.0 07/2015
The information in this document is subject to change without notice
24/29
TALON COMMUNICATIONS
3750 Convoy St. SUITE 320
SAN DIEGO CA 92111
+1 619.583.1846
WWW.TALONCOM.COM
Copyright © 2015 Talon Communications, Inc.
6
Schematics
Revision 1.0 07/2015
The information in this document is subject to change without notice.
25/29
Revision 1.0 07/2015
The information in this document is subject to change without notice.
26/29
Revision 1.0 07/2015
The information in this document is subject to change without notice.
27/29
Revision 1.0 07/2015
The information in this document is subject to change without notice.
28/29
Revision 1.0 07/2015
The information in this document is subject to change without notice.
29/29