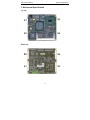
1
ETe-P3T User's Manual ETe-P3T / CET Pentium III ETX Module User's Manual Version 1.1 23 / 06 / 2004 MSC Vertriebs GmbH Design Center Neufahrn 1 ETe-P3T User's Manual Copyright Notice This document is copyrighted, 2003, by MSC Vertriebs GmbH. All rights are reserved. MSC Vertriebs GmbH reserves the right to make improvements to the products described in this manual at any time without notice. No part of this manual may be reproduced, copied, translated or transmitted in any form or by any means without the prior written permission of MSC Vertriebs GmbH. Information provided in this manual is intended to be accurate and reliable. However, MSC Vertriebs GmbH assumes no responsibility for its use, nor for any infringements upon the rights of third parties which may result from its use. * Important Information This product is not an end user product. It was developed and manufactured for further processing by trained personnel. EMC Rules This unit has to be installed in a shielded housing. If not installed in a properly shielded enclosure, and used in accordance with the instruction manual, this product may cause radio interference in which case the user may be required to take adequate measures at his or her own expense. 2 ETe-P3T User's Manual Contents 1. General Information ......................................................................................... 4 1.1. Revision History ........................................................................................ 4 1.2. Introduction ............................................................................................... 4 2. Technical Information...................................................................................... 5 2.1. Specifications ............................................................................................ 5 2.2. Block Diagram............................................................................................ 9 2.3. Installation ................................................................................................. 10 2.3.1. Jumpers and switches ..................................................................... 10 2.3.2. Installing a DRAM SO-DIMM module .............................................. 10 2.4. Watchdog .................................................................................................. 11 2.5. Interrupts, DMA channels, Upper memory................................................ 12 3. Mechanical Specification................................................................................. 14 4. ETX Connectors ............................................................................................... 16 5. BIOS................................................................................................................... 32 3 ETe-P3T User's Manual General Information 1. General Information 1.1. Revision History Rev. Description 1.0 Initial Release 1.1 1.2 Website address updated 2.3.2 Max dram module height specified 5. BIOS manual rev. 0.5 1.2. Introduction The ETe-P3T / CET is an all-in-one Pentium III cpu module. It is fully compliant with the ETX standard. The module is based on Mobile INTEL Tualatin CPUs and the VIA Twister-T Chipset PN133T. The performance ranges from 400 or 650MHz Ultra Low Voltage (ULV) Celeron CPUs ( ETe-CET) up to 800 or 933MHz Pentium III (ETe-P3T) embedded processors. All these cpus are on the embedded roadmap of INTEL, which means that the processors are long term available. Since there is, except for the cpu, no functional difference between ETe-P3T and ETe-CET, the module in this manual is always referenced as ETe-P3T. The VIA Twister-T Chipset PN133T supports 100MHz (Celeron) or 133MHz (Pentium III) front side bus. The ETE-P3T supports 3.3V SDRAM. It provides a 144-pin standard SO-DIMM socket giving you the flexibility to configure your system up to 512 MB of SDRAM . The PN133T integrates an S3 Savage4 graphics controller (AGP4x) with up to 32MB Video RAM (UMA). On board features include an PCI 100MBit Ethernet controller (82551ER), two EIDE ports, audio, parallel / floppy, serial, keyboard and mouse interfaces, four usb ports and a TV encoder option. Please visit our website http://www.msc-ge.com where you can find drivers, firmware updates and documentation ( --> IPC Systems & Boards --> IPC Embedded --> ET(e)/ETX ). 4 ETe-P3T User's Manual Technical Information 2. Technical Information 2.1. Specifications Core: CPU : Intel Embedded Tualatin processor (µFCBGA, soldered) : Celeron ULV (Ultra Low Voltage) 400, 650MHz Pentium III Embedded LV (Low Voltage) 800, 933MHz ChipSet: VIA Twister-T Chipset PN133T VT8606 North Bridge VT82C686B South Bridge Cache: 256KB (Celeron) or 512KB (Pentium III) second level cache (on chip) Memory: 1 Standard 144-Pin SO-DIMM socket (max. 512MByte) optional second SO-DIMM socket on solder side (max 512MB, requires higher baseboard ETX connectors) ISA-Bus Interface: VT82C686B South Bridge ETX connector X2 PCI-Bus Interface: VT8606 North Bridge 3 external PCI bus masters (if onboard ethernet enabled) 4 external PCI bus masters (if onboard ethernet disabled) ETX connector X1 Video: VT8606 North Bridge S3 Savage4 AGP 4x VGA Controller up to 32MB RAM (UMA) CRT-Interface Flat Panel Interface (LVDS, two 18bit channels) TV Out (option): VT1621 TV-Encoder Note: If this option is used, no flat panel interface available ! Ethernet : INTEL 82551ER PCI 10/100 MBit Ethernet controller 5 ETe-P3T User's Manual Technical Information Audio: VT82C686B AC97 Audio controller VT1612A AC97 Codec USB: integrated in VT82C686B South Bridge 4 USB 1.1 ports (1.5MBit/s or 12MBit/s) EIDE: integrated in VT82C686B South Bridge 2 Ports (primary, secondary) for up to 4 devices Ultra ATA/66/100 PIO Mode 4 PCI IDE Busmaster Floppy Disk: integrated in VT82C686B South Bridge shared with parallel port Serial, COM1, COM2 : 2 x TTL IrDA on COM2 Parallel: integrated in VT82C686B South Bridge 1 Parallel Port (PS/2-compatible/ECP/EPP via SETUP configurable) shared with floppy port Keyboard, Mouse: MFII-Keyboard Interface, PS/2-Mouse Interface integrated in VT82C686B South Bridge Realtime Clock: integrated in VT82C686B South Bridge, external battery required Watchdog PIC12C509A Start delay and timeout configurable via SETUP creates hardware reset 6 ETe-P3T User's Manual Technical Information BIOS: 512 KByte Flash ROM 29F040 (TSOP32) PhoenixBIOS 4.0 Release 6.1 EEPROM: EEPROM for CMOS Setup backup Systemmonitoring: 1 fan with speed input (valid only if optional fan connector is used) 2 temperatures CPU : Board : MAX1618 VT82C686B South Bridge) 4 voltages (CPU core, +2.5V, +3.3V, + 5V) 7 ETe-P3T User's Manual Technical Information Power supply: +5V ±5% Supply current (DOS prompt) : +5V 2.0 A ULV Celeron 400MHz +5V 2.5 A ULV Celeron 650MHz +5V 2.7 A LV Pentium III 800MHz +5V 2.8 A LV Pentium III 933MHz +5V 3.1 A LV Pentium III 1GHz (*) (*) the 1 GHz version is not long term available ! CMOS battery power consumption: +3V 2.5µA RTC / CMOS integrated in VT82C686B southbridge Environment: Temperature operating non operating 0 .. + 60°C -25 .. + 85°C Humidity (rel.) operating non operating 0 - 95 % 5 - 95 % A heat spreader plate is available from MSC providing a standard thermal interface for the module. The heat spreader is not a heat sink ! The heat spreader is thermally connected to the cpu and the VT8606 (Twister-T north bridge) using a 3mm aluminium plate (for the cpu) and thermal gap pads. About 75% of the power dissipated by the module is conducted to the heat spreader. The thermal solution (passive or active) has to be designed for 7.5W (400MHz) to about 13W (1GHz). Dimensions: 95 x 114 x 12 mm 8 9 ISA Core-Diode (ISA) X2 BIOS Flash UBat SMBus I2C GPIO VT1612A CODEC X1 (PCI, 4 x USB, Audio) USB 0 .. 3 Floppy/LPT VIA SouthBridge VT82C686B Keybd Mouse Pentium III LV Celeron ULV (µFCBGA) or VIA Eden (EBGA) INTEL 82551ER LAN Controller PCI PCI PN133T (VIA Twister-T) VT8606 Northbridge S3 Savage4 2D/3D graphics accelerator I2C LVDS CRT I2C (EDID) (DDC) (optional) VT1621 X4 (Speaker, EIDE, Batt, SMBus, I2C, PwrCtrl, PwrMgmt, LAN) Core-Diode Temp.-Sensor MAX1618 Watchdog PIC12C509A EIDE COM1 COM2 IrDA ISA Bus X3 IrDA, Keybd/Mouse, Floppy/LPT, LVDS/DFP, CRT, TVout, ) FSB PCI (COM1/2, SDRAM SO-DIMM 1 max. 512 MB SDRAM SO-DIMM 2 max. 512 MB (optional) + 5V MSC ETe / P3T / C3E Core-Diode +3,3V I/O Voltage Core Voltage ETe-P3T User's Manual Technical Information 2.2. Block Diagram ETe-P3T User's Manual Technical Information 2.3. Installation 2.3.1. Jumpers and switches There are no jumpers or switches. 2.3.2. Installing a DRAM SO-DIMM module The ETe-P3T board has a standard SO-DIMM socket for 3.3V SDRAM SO-DIMM modules : Module organization Capacity 8M x 64 64 MByte 16M x 64 128 MByte 32M x 64 256 MByte 64M x 64 (see note) 512MByte PC133 type modules are required. Note : Module height should not exceed 1200mil (= 30.48 mm) 10 ETe-P3T User's Manual Technical Information 2.4. Watchdog The ETe-P3T board has a watchdog function implemented using a PIC microcontroller with an SMBus interface. Via SETUP the watchdog can be enabled and configured. If the watchdog is enabled a counter is started which creates a reset if it is not retriggered within a programmable time window. Watchdog : Enabled / Disabled (default) Initial Delay : Timeout : 1s, 5s, 10s, 30s (default), 1min, 5min, 10min, 30min 0,4s, 1s, 5s, 10s, 30s (default), 1min, 5 min, 10min Start on Boot: if yes, watchdog starts at the end of POST (power on selftest) before the OS is loaded The watchdog is controlled by an ISA I/O port . The ISA I/O address can be configured via SETUP (250h / 270h / 290h / disabled) Watchdog Control Register : Bit Bit 0 Bit 1 Dir RUN (R/W) TRIGGER (R/W) Bit 2 TIMEOUT (R) Function Watchdog Enable, timeout counter active Bit has to be toggled within the selected timeout window Bit is 0 after power up or after Bit 0 is set to 1. The Bit is set to 1 by a Watchdog Timeout . Transition 0 -->1 clears Bit 0. 11 ETe-P3T User's Manual Technical Information 2.5. Interrupts, DMA channels, Upper memory IRQ 0 1 2 3 4 5 6 7 8 9 10 11 12 13 14 15 used for Timer 0 Keyboard Slave 8259 COM2 COM1 Audio / LPT2 Floppy Disk Controller LPT1 Real Time Clock PCI PCI / COM3 PCI / COM4 PS/2 Mouse Floating Point Unit Primary IDE Secondary IDE available No No No No No Yes No No No Yes Yes Yes No No No No comment (1) (1) (1) / (2) / (3) (1) (1) (1) (1) / (3) (1) / (3) (1) (1) (1) (1) If the device is disabled in SETUP, the interrupt is available. (2) Can be used by legacy audio (sound blaster) (3) Can be used by external Super I/O controller FDC37C669 PCI Devices PCI Device PCI Interrupt REQ/GNT (0..3) AGP INTA --- Ethernet Controller 82551ER INTC 2 INTA / INTB --- INTC --- Sound (MODEM, not used) USB 0..3 (Southbridge) 12 IDSEL AD13 AD18 ETe-P3T User's Manual Technical Information DMA channels DMA used for available 0 Yes 1 (Yes) 2 Floppy Disk Controller No 3 (ECP, if enabled) (No) 4 Cascade No 5..7 --- Yes comment Can be used by legacy audio (sound blaster) LPT ECP mode (default) Memory map Upper Memory used for C0000h..CFFFFh VGA BIOS available D0000h..DBFFFh comment No 64 KB VGA BIOS Yes ISA bus or shadow RAM DC000h..DFFFFh USB Buffer No E0000h..FFFFFh System BIOS No SMBus address map Device A6 A5 A4 A3 A2 A1 A0 R/W SMBus host (82C686B slave) 0 0 0 1 0 0 0 x 10h / 08h core temperature (MAX1618) 0 1 0 1 0 1 0 x 54h / 2Ah clock synthesizer (ICS9250-08) 1 1 0 1 0 0 1 x D2h / 69h watchdog (PIC12C509) 1 0 1 1 0 0 0 x B0h / 58h CMOS backup EEPROM #1 1 0 1 0 1 0 0 x A8h / 54h CMOS backup EEPROM #2 1 0 1 0 1 0 1 x AAh / 55h SPD EEPROM (SO-DIMM) 1 0 1 0 0 0 0 x A0h / 50h *) 8 bit address (with R/W) / 7 bit address (without R/W) 13 address *) ETe-P3T User's Manual Mechanical Specification 3. Mechanical Specification Top view : X1 X3 X2 X4 Bottom view : X2 X4 X1 X3 14 ETe-P3T User's Manual Mechanical Specification Mechanical drawing 2,5mm X4 X2 X3 X1 1,8 Heat spreader options for ETe-P3T/CET : • Heat spreader with through hole standoffs (3mm) • Heat spreader with threaded corner standoffs (2,5mm) 15 ETe-P3T User's Manual ETX Connectors 4. ETX Connectors Connector X1 (PCI, USB, Audio) Pin Signal Pin Signal Pin Signal Pin Signal 1 GND 2 GND 51 VCC 52 VCC 3 PCICLK3 4 PCICLK4 53 PAR 54 SERR# 5 GND 6 GND 55 GPERR# 56 RESERVED 7 PCICLK1 8 PCICLK2 57 PME# 58 USB2# 9 REQ3# 10 GNT3# 59 LOCK# 60 DEVSEL# 11 GNT2# (*) 12 3.3V 61 TRDY# 62 USB3# 13 REQ2# (*) 14 GNT1# 63 IRDY# 64 STOP# 15 REQ1# 16 3.3V 65 FRAME# 66 USB2 17 GNT0# 18 RESERVED 67 GND 68 GND 19 VCC 20 VCC 69 AD16 70 CBE2# 21 SERIRQ 22 REQ0# 71 AD17 72 USB3 23 AD0 24 3.3V 73 AD19 74 AD18 25 AD1 26 AD2 75 AD20 76 USB0# 27 AD4 28 AD3 77 AD22 78 AD21 29 AD6 30 AD5 79 AD23 80 USB1# 31 CBE0# 32 AD7 81 AD24 82 CBE3# 33 AD8 34 AD9 83 VCC 84 VCC 35 GND 36 GND 85 AD25 86 AD26 37 AD10 38 AUXAL 87 AD28 88 USB0 39 AD11 40 MIC 89 AD27 90 AD29 41 AD12 42 AUXAR 91 AD30 92 USB1 43 AD13 44 ASVCC 93 PCIRST# 94 AD31 45 AD14 46 SNDL 95 INTC# 96 INTD# 47 AD15 48 ASGND 97 INTA# 98 INTB# 49 CBE1# 50 SNDR 99 GND 100 GND (*) REQ / GNT 2 used by onboard ethernet controller (82551ER) 16 ETe-P3T User's Manual Signal VCC GND 3V RESERVED SERIRQ Signal ETX Connectors Description Power Supply +5V, +/-5% Power Ground Power Supply +3.3V Not connected Serial interrupt request I/O I I O n.a. n.c. Description of PCI Bus Signals Note external supply external supply Do not use externally Do not connect Not supported GNT0..3# PCI bus grant AD0..31 CBE0..3# PAR SERR# GPERR# PME# LOCK# DEVSEL# TRDY# IRDY# STOP# FRAME# PCIRST# INTA# INTB# INTC# INTD# PCI Adress-/ Databus PCI bus command/byte enables PCI bus parity PCI bus system error PCI bus grant parity error PCI bus power management event PCI bus lock PCI bus device select PCI bus target ready PCI bus initiator ready PCI bus stop PCI bus frame PCI bus reset PCI bus interrupt A PCI bus interrupt B PCI bus interrupt C PCI bus interrupt D I/O Note PCI outputs 3,3V signal level PCI inputs 5V tolerant O I REQ2# used by onboard LAN controller 82551ER O GNT2# used by onboard LAN controller 82551ER I/O I/O I/O I/O I/O I/O Not supported I/O I/O I/O I/O I/O I/O O I I I I Description of USB Signals USB Port 0 USB Port 1 USB Port 2 USB Port 3 I/O Note I/O I/O I/O I/O PCICLK1..4. REQ0..3# Signal USB0, USB0# USB1, USB1# USB2, USB2# USB3, USB3# PCI clock output PCI bus request 17 ETe-P3T User's Manual Signal SNDL SNDR AUXAL AUXAR MIC ASGND ASVCC ETX Connectors Description of Audio Signals Line-Level stereo output left Line-Level stereo output right Auxiliary input A left Auxiliary input A right Microphone input Analog ground of sound controller Analog supply of sound controller 18 I/O O O I I I I O Note 0.7VRMS 0.7VRMS 3.3V ETe-P3T User's Manual Connector X2 (ISA) Pin Signal Pin Signal Pin Signal Pin Signal 1 GND 2 GND 51 VCC 52 VCC 3 SD14 4 SD15 53 SA6 54 IRQ5 5 SD13 6 MASTER# 55 SA7 56 IRQ6 7 SD12 8 DREQ7 57 SA8 58 IRQ7 9 SD11 10 DACK7# 59 SA9 60 SYSCLK 11 SD10 12 DREQ6 61 SA10 62 REFSH# 13 SD9 14 DACK6# 63 SA11 64 DREQ1 15 SD8 16 DREQ5 65 SA12 66 DACK1# 17 MEMW# 18 DACK5# 67 GND 68 GND 19 MEMR# 20 DREQ0 69 SA13 70 DREQ3 21 LA17 22 DACK0# 71 SA14 72 DACK3# 23 LA18 24 IRQ14 73 SA15 74 IOR# 25 LA19 26 IRQ15 75 SA16 76 IOW# 27 LA20 28 IRQ12 77 SA18 78 SA17 29 LA21 30 IRQ11 79 SA19 80 SMEMR# 31 LA22 32 IRQ10 81 IOCHRDY 82 AEN 33 LA23 34 IO16# 83 VCC 84 VCC 35 GND 36 GND 85 SD0 86 SMEMW# 37 SBHE# 38 M16# 87 SD2 88 SD1 39 SA0 40 OSC 89 SD3 90 NOWS# 41 SA1 42 BALE 91 DREQ2 92 SD4 43 SA2 44 TC 93 SD5 94 IRQ9 45 SA3 46 DACK2# 95 SD6 96 SD7 47 SA4 48 IRQ3 97 IOCHK# 98 RSTDRV 49 SA5 50 IRQ4 99 GND 100 GND 19 ETe-P3T User's Manual Signal VCC GND Description Power Supply +5V, +/-5% Power Ground I/O Note I external supply I external supply Signal SD0..15 Description of ISA Bus Signals ISA Databus SA0..19 LA17..23 SBHE# BALE AEN MEMR# SMEMR# ISA Addressbus ISA Addressbus ISA Byte High Enable ISA Address Latch Enable ISA Address Enable ISA memory read ISA memory read in lowest 1MB address range ISA memory write ISA memory write in lowest 1MB address range ISA IO read ISA IO write ISA IO check ISA IO channel ready ISA 16Bit memory device ISA 16Bit IO device ISA memory refresh cycle pending ISA No waitstates ISA Master ISA System clock (8 MHz) ISA Oscillator (14,31818 MHz) ISA Reset signal ISA DMA request I/O Note I/ O all ISA outputs 3,3V signal level all ISA inputs 5V tolerant O O O O O O O MEMW# SMEMW# IOR# IOW# IOCHK# IOCHRDY M16# IO16# REFSH# NOWS# MASTER# SYSCLK OSC RSTDRV DREQ0..7 DACK0#..7# TC IRQ3..7 IRQ9..12 IRQ14..15 ISA DMA acknowledge ISA DMA end ISA Interrupt request ISA Interrupt request ISA Interrupt request 20 O O O I I I I O I n.c. Not supported O O O I I DRQ2 used by onboard floppy controller (see 2.5) O DACK2# used by onboard floppy controller (see 2.5) I/O I Interrupt table see 2.5 I Interrupt table see 2.5 I Interrupt table see 2.5 ETe-P3T User's Manual Connector X3 (CRT, Display, TVout, Serial, Parallel, Mouse, Keyboard) Standard pinout with LVDS and LPT Pin Signal Pin Signal Pin Signal Pin Signal 1 GND 2 GND 51 LPT/FLPY# 52 RESERVED 3 R 4 B 53 VCC 54 GND 5 HSY 6 G 55 STB#/RES 56 AFD#/DENSEL 7 VSY 8 DDCK 57 RESERVED 58 PD7/RES 9 DETECT# 10 DDDA 59 IRRX 60 ERR#/HDSEL# 11 LCDDO16 12 LCDDO18 61 IRTX 62 PD6/RES 13 LCDDO17 14 LCDDO19 63 RXD2 64 INIT#/DIR# 15 GND 16 GND 65 GND 66 GND 17 LCDDO13 18 LCDDO15 67 RTS2# 68 PD5/RES 19 LCDDO12 20 LCDDO14 69 DTR2# 70 SLIN#/STEP# 21 GND 22 GND 71 DCD2# 72 PD4/DSKCHG# 23 LCDDO8 24 LCDDO11 73 DSR2# 74 PD3/RDATA# 25 LCDDO9 26 LCDDO10 75 CTS2# 76 PD2/WP# 27 GND 28 GND 77 TXD2 78 PD1/TRK0# 29 LCDDO4 30 LCDDO7 79 RI2# 80 PD0/INDEX# 31 LCDDO5 32 LCDDO6 81 VCC 82 VCC 33 GND 34 GND 83 RXD1 84 ACK/DRV1 35 LCDDO1 36 LCDDO3 85 RTS1# 86 BUSY#/MOT1# 37 LCDDO0 38 LCDDO2 87 DTR1# 88 PE/WDATA# 39 VCC 40 VCC 89 DCD1# 90 SLCT#/WGATE# 41 JILI_DAT 42 LTGIO0 91 DSR1# 92 MSCLK 43 JILI_CLK 44 BLON# 93 CTS1# 94 MSDAT 45 BIASON 46 DIGON 95 TXD1 96 KBCLK 47 COMP 48 Y 97 RI1# 98 KBDAT 49 SYNC 50 C 99 GND 100 GND 21 ETe-P3T User's Manual Signal VCC GND N.C. LTGIO0 Description Power Supply +5VDC, 5% Power Ground Not connected General Purpose IO I/O I I n.a. O Signal HSYNC VSYNC R G B DDCK DDDA Description of analog CRT signals Horizontal Sync Vertical Sync Red channel RGB Analog Video Output Green channel RGB Analog Video Output Blue channel RGB Analog Video Output Display Data Channel Clock Display Data Channel Data I/O Note O O O O O I/O I/O Signal SYNC Y C COMP Description of TV signals (option) I/O Note Composite sync O TVout option only Luminance for S-Video or Red for SCART O TVout option only Chrominance for S-Video or Green for SCART O TVout option only Composite Video or Blue for SCART O TVout option only Signal DTR1..2# RI1..2# TXD1..2 RXD1..2 CTS1..2# RTS1..2# DCD1..2# DSR1..2# Description of COMx signals Data terminal ready of COM1/COM2 Ring indicator of COM1/COM2 Data transmit of COM1/COM2 Data receive of COM1/COM2 Clear to send of COM1/COM2 Request to send of COM1/COM2 Data carrier detect of COM1/COM2 Data set ready of COM1/COM2 22 Note external supply external supply Do not connect Used for parallel display option (VSYNC) I/O Note I I O I I O O I ETe-P3T User's Manual Signal KBDAT KBCLK MSDAT MSCLK IRTX IRRX Description of keyboard and infrared signals Keyboard Data Keyboard Clock Mouse Data Mouse Clock Infrared Transmit Infrared Receive Signal Description of FDC signals (shared with LPT) LPT/FLPY# LPT or Floppy Interface configuration input STB#/RES nc AFD#/DENSEL density select: low = 250/300Kb/s high = 500/1000Kb/s PD0/INDEX# Index signal PD1/TRK0# Track signal PD2/WP# Write protect signal PD3/RDATA# Raw data read PD4/DSKCHG# Disc changed PD5/RES nc PD6/RES nc PD7/RES nc ERR#/HDSEL# Head select INIT#/DIR# Direction SLIN#/STEP# Motor step ACK/DRV1 Drive 1 select BUSY#/MOT1# Motor 1 select PE/WDATA# Raw write data SLCT#/WGATE# Write enable 23 I/O Note I/O O I/O O O I I/O Note I Connect to GND O I I I I I O O O O O O O ETe-P3T User's Manual Signal LPT/FLPY# STB#/RES AFD#/DENSEL PD0/INDEX# PD1/TRK0# PD2/WP# PD3/RDATA# PD4/DSKCHG# PD5/RES PD6/RES PD7/RES ERR#/HDSEL# INIT#/DIR# SLIN#/STEP# ACK/DRV1 BUSY#/MOT1# PE/WDATA# SLCT#/WGATE# Description of LPT signals (shared with FDC) LPT or Floppy Interface configuration input Strobe signal Automatic feed Databus D0 Databus D1 Databus D2 Databus D3 Databus D4 Databus D5 Databus D6 Databus D7 LPT error Initiate Select Acknowledge Busy Paper empty Power ON 24 I/O Note I Connect to VCC (resistor 4K7) O O I/O I/O I/O I/O I/O I/O I/O I/O I O O I I I I ETe-P3T User's Manual Signal BIASON DIGON BLON# LCDDO0 LCDDO1 LCDDO2 LCDDO3 LCDDO4 LCDDO5 LCDDO6 LCDDO7 LCDDO8 LCDDO9 LCDDO10 LCDDO11 LCDDO12 LCDDO13 LCDDO14 LCDDO15 LCDDO16 LCDDO17 LCDDO18 LCDDO19 Description of LVDS Flatpanel signals Display contrast voltage ON Display Power ON Display Backlight ON Y0Y0+ Y1Y1+ Y2Y2+ YCLKYCLK+ nc nc Z0Z0+ Z1Z1+ Z2Z2+ ZCLKZCLK+ nc nc I/O Note O O O O O O O O O O O O (*) O (*) O O O O O O O O O (*) O (*) (*) 24 Bit displays are not supported by Twister-T display controller 25 ETe-P3T User's Manual Signal DIGON BLON# Description of TTL Flatpanel signals Display Power ON Display Backlight ON I/O O O LCDDO0 LCDDO1 LCDDO2 LCDDO3 LCDDO4 LCDDO5 LCDDO6 LCDDO7 LCDDO8 LCDDO9 LCDDO10 LCDDO11 LCDDO12 LCDDO13 LCDDO14 LCDDO15 LCDDO16 LCDDO17 R0 R1 R2 R3 R4 R5 G0 G1 G2 G3 G4 G5 B0 B1 B2 B3 B4 B5 O O O O O O O O O O O O O O O O O O SHFCLK EN HSYNC VSYNC Shift Clock Display Enable Horizontal Sync Vertical Sync O O O O Note: Displays with 2 pixels/clock are not supported in parallel mode 26 Note VT8606 Pins FPD0 FPD2 FPD4 FPD6 FPD8 FPD10 FPD12 FPD14 FPD16 FPD18 FPD20 FPD22 FPD24 FPD26 FPD28 FPD30 FPD32 FPD34 LVDS mode pin description LCDDO18 LCDDO19 BIASON LTGIO0 ETe-P3T User's Manual Alternate X3 pinouts LCD Parallel (assembly option) Pin Signal Pin Floppy (LPT/FLPY# = low) Signal Pin Signal Pin Signal 1 GND 2 GND 51 LPT/FLPY# 52 RESERVED 3 R 4 B 53 VCC 54 GND 5 HSY 6 G 55 RESERVED 56 DENSEL 7 VSY 8 DDCK 57 RESERVED 58 RESERVED 9 DETECT# 10 DDDA 59 IRRX 60 HDSEL# 11 B4 12 SHFCLK 61 IRTX 62 RESERVED 13 B5 14 EN 63 RXD2 64 DIR# 15 GND 16 GND 65 GND 66 GND 17 B1 18 B3 67 RTS2# 68 RESERVED 19 B0 20 B2 69 DTR2# 70 STEP# 21 GND 22 GND 71 DCD2# 72 DSKCHG# 23 G2 24 G5 73 DSR2# 74 RDATA# 25 G3 26 G4 75 CTS2# 76 WP# 27 GND 28 GND 77 TXD2 78 TRK0# 29 R4 30 G1 79 RI2# 80 INDEX# 31 R5 32 G0 81 VCC 82 VCC 33 GND 34 GND 83 RXD1 84 DRV 35 R1 36 R3 85 RTS1# 86 MOT 37 R0 38 R2 87 DTR1# 88 WDATA# 39 VCC 40 VCC 89 DCD1# 90 WGATE# 41 JILI_DAT 42 VSYNC 91 DSR1# 92 MSCLK 43 JILI_CLK 44 BLON# 93 CTS1# 94 MSDAT 45 HSYNC 46 DIGON 95 TXD1 96 KBCLK 47 COMP 48 Y 97 RI1# 98 KBDAT 49 SYNC 50 C 99 GND 100 GND 27 ETe-P3T User's Manual Connector X4 (EIDE, Ethernet, Speaker, Batterie, I2C, SMBus, etc.) Pin Signal Pin Signal Pin Signal Pin Signal 1 GND 2 GND 51 SIDE_IOW# 52 PIDE_IOR# 3 5V_SB 4 PWGIN 53 SIDE_DRQ 54 PIDE_IOW# 5 PS_ON 6 SPEAKER 55 SIDE_D15 56 PIDE_DRQ 7 PWRBTN# 8 BATT 57 SIDE_D0 58 PIDE_D15 9 KBINH 10 LILED 59 SIDE_D14 60 PIDE_D0 11 RSMRST# 12 ACTLED 61 SIDE_D1 62 PIDE_D14 13 ROMKBCS# 14 SPEEDLED 63 SIDE_D13 64 PIDE_D1 15 EXT_PRG 16 I2CLK 65 GND 66 GND 17 VCC 18 VCC 67 SIDE_D2 68 PIDE_D13 19 OVCR# 20 GPCS# 69 SIDE_D12 70 PIDE_D2 21 EXTSMI# 22 I2DAT 71 SIDE_D3 72 PIDE_D12 23 SMBCLK 24 SMBDATA 73 SIDE_D11 74 PIDE_D3 25 SIDE_CS3# 26 SMBALRT# 75 SIDE_D4 76 PIDE_D11 27 SIDE_CS1# 28 DASP_S 77 SIDE_D10 78 PIDE_D4 29 SIDE_A2 30 PIDE_CS3# 79 SIDE_D5 80 PIDE_D10 31 SIDE_A0 32 PIDE_CS1# 81 VCC 82 VCC 33 GND 34 GND 83 SIDE_D9 84 PIDE_D5 35 PDIAG_S 36 PIDE_A2 85 SIDE_D6 86 PIDE_D9 37 SIDE_A1 38 PIDE_A0 87 SIDE_D8 88 PIDE_D6 39 SIDE_INTRQ 40 PIDE_A1 89 GPE2# 90 CBLID_P# 41 BATLOW# 42 GPE1# 91 RXD# 92 PIDE_D8 43 SIDE_AK# 44 PIDE_INTRQ 93 RXD 94 SIDE_D7 45 SIDE_RDY 46 PIDE_AK# 95 TXD# 96 PIDE_D7 47 SIDE_IOR# 48 PIDE_RDY 97 TXD 98 HDRST# 49 VCC 50 VCC 99 GND 100 GND 28 ETe-P3T User's Manual Signal VCC GND N.C. Description Power Supply +5VDC, 5% Power Ground Not connected I/O I I n.a. Note external supply external supply Do not connect Signal PIDE_D0..15 PIDE_A0..2 PIDE_CS1# PIDE_CS3# PIDE_DRQ PIDED_AK# PIDE_RDY PIDE_IOR# PIDE_IOW# PIDE_INTRQ CBLID_P# Description of IDE signals Primary IDE Databus Primary IDE Addressbus Primary IDE chip select channel0 Primary IDE chip select channel1 Primary IDE dma request Primary IDE dma acknowledge Primary IDE ready Primary IDE IO read Primary IDE IO write Primary IDE interrupt request Cable ID primary I/O I/O O O O I O I O O I I Note SIDE_D0..15 SIDE_A0..2 SIDE_CS1# SIDE_CS3# SIDE_DRQ SIDED_AK# SIDE_RDY SIDE_IOR# SIDE_IOW# SIDE_INTRQ DASP_S PDIAG_S HDRST# Secondary IDE Databus Secondary IDE Addressbus Secondary IDE chip select channel0 Secondary IDE chip select channel1 Secondary IDE dma request Secondary IDE dma acknowledge Secondary IDE ready Secondary IDE IO read Secondary IDE IO write Secondary IDE interrupt request Secondary IDE Drive active Secondary IDE Master/Slave negotiation HardDrive reset I/O O O O I O I O O I n.a. n.a. O 29 VT82C686B GPI1 ETe-P3T User's Manual Signal TXD+, TXDRXD+, RXDACTLED LILED SPEEDLED Description of Ethernet signals Ethernet Twisted Pair transmit signal pair Ethernet Twisted Pair receive signal pair Ethernet activity LED Ethernet link LED Ethernet speed LED, ON at 100Mb/s I/O O I O O O Note Signal SPEAKER Description of Misc. signals Speaker output I/O O Note 3.3V signal level Connect the speaker between SPEAKER and VCC BATT PWGIN I2CLK I2DAT SMBCLK SMBDAT SMBALRT# KBINH 5V_SB PS_ON PWRBTN# OVCR# ROMKBCS# EXT_PRG# GPCS# GPE1# GPE2# BATLOW# EXTSMI# RSMRST# Battery supply Power good input I2C Bus clock I2C Bus Data SM Bus clock SM Bus Data Not supported Keyboard inhibit Supply of internal suspend circuit Power Save ON Power Button Over current detect for USB Do not connect Do not connect General purpose chip select LID input Ring Input Battery low External SMI Resume Reset I I O I/O O I/O I n.a. I O I I n.a. n.a. n.a. I I I I I 30 3.3V tolerant input 3.3V tolerant input 3.3V tolerant input 3.3V tolerant input 3.3V tolerant input ETe-P3T User's Manual BIOS 31 ETe-P3T User's Manual BIOS 5. BIOS 32 PhoenixBIOS 4.0 User's Manual for MSC ETe-P3T/CET/C3E Version 0.5 Copying of this document, and giving it to others and the use or communication of the contents therof, are forbidden without express authority. Offenders are liable to the payment of damages. All rights are reserved in the event of the grant of a patent or the registration of a utility model or design. Weitergabe sowie Vervielfältigung dieser Unterlage, Verwertung und Mitteilung ihres Inhalts nicht gestattet, soweit nicht ausdrücklich zugestanden. Zuwiderhandlungen verpflichten zu Schadenersatz. Alle Rechte für den Fall einer Patenterteilung oder GebrauchsmusterEintragung vorbehalten. The information contained in this users manual is subject to change without previous notice. The programs are provided "as is" without warranty of any kind either expressed or implied, including but not limited to the implied warranties of merchantability and fitness for a particular purpose. This publication could contain technical Contents PhoenixBIOS 4.0 User's Manual inaccuracies or typographical errors. Furthermore, MSC and Phoenix Technologies will not be held liable for errors in this users manual as well as coincidental or sequential damages in connection with the delivery, performance and use of this material. MS-DOS, Windows and Microsoft are registered trademarks of the Microsoft Corporation. PS/2 and IBM are trademarks of the International Business Machines Corporation. Copyright 2004, Phoenix Technologies Ltd. Copyright 2004, MSC Vertriebs GmbH Zeppelinstraße 1a 85375 Neufahrn Germany Page ii PhoenixBIOS 4.0 User's Manual Contents Purpose of Document This guide explains how to configure your PC and optimize its performance using the Setup program. It also explains how to use the BIOS function calls in writing computer programs. Page iii Contents PhoenixBIOS 4.0 User's Manual History of Changes Date Paragraph Description 04.06.03 Rev. 0.1 Initial Revision 27.10.03 Rev. 0.2 04.11.03 Rev. 0.3 13.02.04 Rev. 0.4 Add LAN boot ROM description add option to configure VGA IRQ assignment 22.06.04 Rev. 0.5 PCI/PnP ISA UMB Region Exclusion CC00 – CFFF [Available] removed. Add option to boot from USB-Device: USB Boot Device: [Floppy;Other]. Suspend Mode removed. Page iv PhoenixBIOS 4.0 User's Manual Contents Contents INTRO About This Manual ................................................................................................ 1 Chapter 1 - The Setup Guide ................................................................................ 2 Chapter 2 - PhoenixBIOS Utilities ......................................................................... 3 Chapter 3 – BIOS Update ..................................................................................... 4 1 The Setup Guide ................................................................................................ 4 THE MAIN MENU .................................................................................................. 5 The Menu Bar ............................................................................................... 6 The Legend Bar ............................................................................................ 7 The Field Help Window ................................................................................. 8 The General Help Window ............................................................................ 9 Main Menu Selections ................................................................................. 10 Masters and Slaves..................................................................................... 11 POST Options ............................................................................................. 15 THE ADVANCED MENU ........................................................................................ 18 Memory Cache ............................................................................................ 20 PCI / PnP Configuration .............................................................................. 22 PCI/PnP ISA UMB Region Exclusion .......................................................... 24 PCI/PnP ISA IRQ Resource Exclusion........................................................ 25 PCI IRQ Routing.......................................................................................... 26 I/O Device Configuration Menu ................................................................... 28 Memory Shadow ......................................................................................... 35 Advanced Chipset Control........................................................................... 36 Hardware Monitor........................................................................................ 38 The Security Menu ...................................................................................... 39 THE POWER MENU............................................................................................. 42 Temperature Management.......................................................................... 45 THE BOOT MENU ............................................................................................... 47 THE EXIT MENU ................................................................................................. 48 Saving Values ............................................................................................. 49 Exit Discarding Changes ............................................................................. 50 Load Setup Defaults.................................................................................... 51 Discard Changes......................................................................................... 52 Save Changes............................................................................................. 53 PHOENIXBIOS MESSAGES ................................................................................. 54 Page v Contents PhoenixBIOS 4.0 User's Manual 2 Boot Utilities ..................................................................................................... 58 PHOENIX QUIETBOOT ......................................................................................... 58 Press <ESC> .............................................................................................. 59 Press <F2>.................................................................................................. 60 POST Error ................................................................................................. 61 Keyboard Input Request.............................................................................. 62 PHOENIX MULTIBOOT ......................................................................................... 63 The Setup Boot Menu ................................................................................. 64 The Boot First Menu.................................................................................... 65 Boot with Blanked Video ............................................................................. 66 3 BIOS Update .................................................................................................... 67 Update Disk......................................................................................................... 67 Phoenix Phlash ................................................................................................... 68 INSTALLATION .................................................................................................... 68 CREATE THE CRISIS RECOVERY DISKETTE ........................................................... 68 UPDATING THE CRISIS RECOVERY DISKETTE ........................................................ 69 EXECUTING PHOENIX PHLASH ............................................................................. 69 CRISIS RECOVERY MODE ................................................................................... 73 Index ................................................................................................................... 74 Appendix : BIOS Post Codes Page vi About This Manual This manual is divided into the following chapters: Page 1 PhoenixBIOS 4.0 User's Manual Chapter 1 - The Setup Guide This chapter describes a typical menu-driven Phoenix Setup program, which allows you to specify changes in the computer hardware (e.g. add a new diskette drive) and optimize system performance. Setup maximizes your control over your system's features and performance. This Setup Guide is only an example. The Setup menus on your computer may be quite different. Consult the Setup manual supplied with your computer. Page 2 PhoenixBIOS 4.0 User's Manual Contents Chapter 2 - PhoenixBIOS Utilities This chapter describes two new features that give you more control over the boot process: • • Phoenix QuietBoot Phoenix MultiBoot Page 3 PhoenixBIOS 4.0 User's Manual Chapter 3 – BIOS Update This chapter describes how to use BIOS update disk and the Phoenix Phlash utility for upgrading your BIOS without having to replace the BIOS ROM chip. 1 The Setup Guide With the PhoenixBIOS Setup program, you can modify BIOS settings and control the special features of your computer. The Setup program uses a number of menus for making changes and turning the special features on or off. Note: The menus shown here are from a typical system. The actual menus displayed on your screen may be quite different and depend on the hardware and features installed in your computer. Page 4 PhoenixBIOS 4.0 User's Manual The Setup Guide The Main Menu To start the PhoenixBIOS Setup utility: 1. Turn on or reboot your system. PhoenixBIOS displays this message: Press <F2> to enter SETUP 2. Pressing <F2> displays the Main Menu, which looks like this: PhoenixBIOS Setup Utility Main Advanced Security Power Boot Exit Item Specific Help CPU Type CPU Speed System Memory Extended Memory Intel(R) Celeron(TM) CPU 400 MHz 640 kB 56320 kB System Time: System Date: [16:19:20] [03/06/2003] Legacy Diskette A: [1.44MB, 31/2“] Primary IDE Master: Primary IDE Slave: Secondary IDE Master: Secondary IDE Slave: <Tab>, <Shift-Tab>, or <Enter> selects field. [WDC WD200EB-32CPF0-(PM)] [None] [FX5401W-(SM)] [None] POST Options F1 ESC Help Exit ↑↓ ←→ Select Item Select Menu -/+ Enter Change Values SelectSub-Menu F9 F10 Setup Defaults Save and Exit See p. 6 for a description of the fields on this menu. Page 5 The Setup Guide PhoenixBIOS 4.0 User's Manual The Menu Bar The Menu Bar at the top of the window lists these selections: Main Advanced Security Power Boot Exit Use this menu for basic system configuration. Use this menu to set the Advanced Features available on your system's chipset. Use this menu to set User and Supervisor Passwords and the Backup and Virus-Check reminders. Use this menu to configure Power-Management features. Use this menu to configure Boot options. Exits the current menu. Use the left and right ↔ arrow keys to make a selection. See the section below, "Exiting Setup," for a description on exiting the Main Menu. Page 6 PhoenixBIOS 4.0 User's Manual The Setup Guide The Legend Bar Use the keys listed in the legend bar on the bottom to make your selections or exit the current menu. The chart on the following page describes the legend keys and their alternates: Key <F1> or <Alt-H> <Esc> ↔ arrow keys ↑ or ↓ arrow keys <Tab> or <Shift-Tab> <Home> or <End> <PgUp> or <PgDn> <F5> or <-> <F6> or <+> or <Space> <F9> <F10> <Enter> <Alt-R> Function General Help window (See below). Exit this menu. Select a different menu. Move cursor up and down. Cycle cursor up and down. Move cursor to top or bottom of window. Move cursor to next or previous page. Select the Previous Value for the field. Select the Next Value for the field. Load the Default Configuration values for this menu. Save and exit. Execute Command or Select P Submenu. Refresh screen. To select an item, use the arrow keys to move the cursor to the field you want. Then use the plus-and-minus value keys to select a value for that field. The Save Values commands in the Exit Menu save the values currently displayed in all the menus. To display a sub menu, use the arrow keys to move the cursor to the sub menu you want. Then press <Enter>. A pointer () marks all sub menus. Page 7 The Setup Guide PhoenixBIOS 4.0 User's Manual The Field Help Window The help window on the right side of each menu displays the help text for the currently selected field. It updates as you move the cursor to each field. Page 8 PhoenixBIOS 4.0 User's Manual The Setup Guide The General Help Window Pressing <F1> or <Alt-H> on any menu brings up the General Help window that describes the legend keys and their alternates: General Help Setup changes system behavior by modifying the BIOS configuration. Selecting incorrect values may cause system boot failure; load Setup Default values to recover <Up/Down> arrows select fields in current menu. <PgUp/PgDn> moves to previous/next page on scrollable menus. <Home/End> moves to top/bottom item of current menu. Within a field, <F5> or <-> selects next lower value and <F6>, <+>, or <Space> selects next higher value. <Left/Right> arrows select menus on menu bar. <Enter> displays more options for items marked with a . <F9> loads factory-installed Setup Default values. <F10> save current settings and exit Setup. <ESC> or <Alt-X> exits Setup; in sub-menus, pressing these keys returns to the previous menu. <F1> or <Alt-H> displays General Help (this screen). [Continue] The scroll bar on the right of any window indicates that there is more than one page of information in the window. Use <PgUp> and <PgDn> to display all the pages. Pressing <Home> and <End> displays the first and last page. Pressing <Enter> displays each page and then exits the window. Press <Esc> to exit the current window. Page 9 The Setup Guide PhoenixBIOS 4.0 User's Manual Main Menu Selections You can make the following selections on the Main Menu itself. Use the sub menus for other selections. Feature Options CPU Type N/A CPU Speed N/A System Memory N/A Extended Memory N/A System Time System Date LegacyDiskette A: HH:MM:SS MM/DD/YYYY Disabled 1.44 MB, 3 ½" 2.88 MB, 3 ½" Description Displays type of processor detected during bootup. Displays the clock rate detected during bootup. Displays amount of conventional memory detected during bootup. Displays the amount of extended memory detected during bootup. Set the system time. Set the system date. Select the type of floppy-disk drive installed in your system. You can set the boot sequence of the bootable drives by selecting Boot Sequence on the Main Menu or opening the Boot Menu. Page 10 PhoenixBIOS 4.0 User's Manual The Setup Guide Masters and Slaves The Master and Slave settings on the Main Menu control these types of devices: • Hard-disk drives • Removable-disk drives • CD-ROM drives There is one IDE connector on your motherboard, usually labeled "Primary IDE". There are usually two connectors on each ribbon cable attached to IDE connector. When you have connected two drives to this connector, the one on the end of the cable is the Master. When you enter Setup, the Main Menu displays the results of Autotyping– information each drive provides about its own size and other characteristics–and how they are arranged as Masters or Slaves on your machine. Note: Do not attempt to change these settings unless you have an installed drive that does not autotype properly (such as an older hard-disk drive that does not support autotyping). If you need to change your drive settings, select one of the Master or Slave drives on the Main Menu. This will display a menu like this: PhoenixBIOS Setup Utility Main Primary IDE Master [ST34321A-(PM)] Type: [User] CHS Format Cylinders: [ 8894] Heads: [ 15] Sectors/Track: [ 63] Maximum Capacity: 4104MB None = disabled any attached drive CD-ROM = a CD-ROM drive is installed ATAPI Removable = removable disk drive is installed LBA Format Total Sectors: 8404830 Maximum Capacity: 4104MB Multi-Sector Transfers: LBA Mode Control: 32-bit I/O: Transfer Mode: Ultra DMA Mode: SMART Monitoring: F1 ESC Help Exit ↑↓ ←→ User = drive parameters must be entered by user [16 Sectors] [Enabled] [Disabled] [FPIO 4 / DMA 2] [Mode 2] Enabled Select Item Select Menu Item Specific Help -/+ Enter Auto = detect drive parameters automatically Change Values SelectSub-Menu F9 F10 Setup Defaults Save and Exit Use the legend keys listed on the bottom to make your selections and exit to the Main Menu. Page 11 The Setup Guide PhoenixBIOS 4.0 User's Manual Note: that capacity is displayed in ‘real’ Mbytes (1MB=1024*1024 Bytes) Drives with a total capacity greater than 8Gbyte operate in LBA format only. The CHS parameters are not displayed by the fixed disk menu. In this case the menu is shown like this: PhoenixBIOS Setup Utility Main Primary IDE Master [IBM-DPTA-372050-(PM)] Type: [Auto] LBA Format Total Sectors: 40088160 Maximum Capacity: 20525MB Multi-Sector Transfers: LBA Mode Control: 32-bit I/O: Transfer Mode: Ultra DMA Mode: SMART Monitoring: F1 ESC Help Exit ↑↓ ←→ [16 Sectors] [Enabled] [Disabled] [FPIO 4 / DMA 2] [Mode 2] Enabled Select Item Select Menu -/+ Enter Change Values SelectSub-Menu Item Specific Help User = you enter parameters of hard-disk drive installed at this connection. Auto = autotypes hard-disk drive installed here. 1-39 = you select pre-determined type of hard-disk drive installed here. CD-ROM = a CD-ROM drive is installed here. ATAPI Removable = removable disk drive is installed here. F9 F10 Setup Defaults Save and Exit Use the chart on the following page to configure the hard disk drive with Advanced Hard Disk Features: Page 12 PhoenixBIOS 4.0 User's Manual Feature Type Cylinders Heads Sectors/Track Multi-Sector Transfers LBA Mode Control Options None Auto User IDE Removable ATAPI Removable CD-ROM Description None = Autotyping is not able to supply the drive type or end user has selected None, disabling any drive that may be installed. Auto = Autotyping, the drive itself supplies the information. User = You supply the hard-disk drive information in the following fields. IDE Removable = Removable Disk Drive ATAPI Removable = Removable disk drive. CD-ROM = CD-ROM drive. 1 to 65536 1 to 16 1 to 63 Disabled 2 sectors 4 sectors 8 sectors 16 sectors Disabled Enabled Number of cylinders. Number of read/write heads. Number of sectors per track. Any selection except Disabled determines the number of sectors transferred per block 32-Bit I/O Disabled Enabled Transfer Mode Standard Fast PIO 1 Fast PIO 2 Fast PIO 3 Fast PIO 4 FPIO 3 / DMA 1 FPIO 4 / DMA 2 Disabled Mode 0 Mode 1 Mode 2 Mode 3 Mode 4 Mode 5 Ultra DMA Mode The Setup Guide Enabling LBA causes Logical Block Addressing to be used in place of Cylinders, Heads, & Sectors. Enables 32-bit communication between CPU and IDE card. Requires PCI or local bus. Selects the method for transferring the data between the hard disk and system memory. The Setup menu only lists those options supported by the drive and platform. Ultra DMA Mode supports 33/ 66/100 MB/sec transfer rate for fixed disk drives. Page 13 The Setup Guide SMART Monitoring PhoenixBIOS 4.0 User's Manual ‘Enabled’ installs Self-Monitoring Analysis-Reporting Technology, which issues a warning if an IDE failure is imminent. WARNING: Incorrect settings can cause your system to malfunction. Page 14 Enabled Disabled PhoenixBIOS 4.0 User's Manual The Setup Guide POST Options Selecting "POST Options" on the Main Menu displays the POST Options menu. PhoenixBIOS Setup Utility Main POST Options F1 ESC QuietBoot Mode: QuickBoot Mode: Floppy Check: Summary screen: Boot with keyboard: SETUP prompt: POST Errors: POST Warmstart Reset [Disabled] [Enabled] [Disabled] [Disabled] [Enabled] [Enabled] [Disabled] [Enabled] Boot Video Device: LCD Panel Type: [Both] [1024x768 TFT] Help Exit ↑↓ ←→ Select Item Select Menu -/+ Enter Item Specific Help Display the diagnostic Screen during boot Change Values SelectSub-Menu F9 F10 Setup Defaults Save and Exit Use the legend keys to make your selections and exit to the Main Menu. Use the following chart to select your boot options. Feature QuietBoot Mode Options Disabled Enabled QuickBoot Mode Enabled Disabled Floppy Check Disabled Enabled Disabled Enabled Disabled Enabled Summary screen Boot with keyboard Description Suppress the diagnostic screen during boot. Optionally a customer-specific graphic illustration can be displayed. Allows the system to skip certain tests while booting. This will decrease the time needed to boot the system. Enabled verifies floppy type on boot; disabled speeds boot Displays system summary screen during bootup. Allow system bootup without an attached keyboard. POST will not report keyboard errors if this option is set to Enabled Page 15 The Setup Guide PhoenixBIOS 4.0 User's Manual Setup Prompt Disabled Enabled POST Errors Disabled Enabled POST Warmstart Reset Disabled Enabled Boot Video Device Auto Both LCD Panel Type Auto 800x600 TFT 1024x768 TFT 2ppc 1280x1024 TFT 2ppc 640x480 DSTN 800x600 DSTN 1600x1200 TFT 2ppc 1024x768 TFT 640x480 TFT 800x600 TFT 1024x768 TFT 1280x1024 TFT 1400x1050 TFT 2ppc 1024x768 TFT parallel 800x600 TFT parallel 640x480 TFT parallel Note: Default BIOS settings are highlighted. Page 16 Display during POST an information text how to enter Setup; Disabled doesn’t display this info. Pauses and displays SETUP entry or resume boot prompt if error occurs on boot. If disabled, system always attempts to boot. If Enabled POST performs a Hard Reset on ISA and PCI bus after a warmstart. This feature is recommended if any PCI busmaster is enabled by Setup (Submenu Advanced PCI configuration). Disabled is the default setting which should normally be used. Auto: If CRT is connected CRT will be active; otherwise flatpanel will be used. Both: CRT and flatpanel are active. Select from this list the flat panel display which is actually mounted to your system. ppc = pixel per clock parallel : used for the “parallel option” of the ETe display interface PhoenixBIOS 4.0 User's Manual The Setup Guide Help for invalid Display Type selection If an invalid display type has been selected, flat panel display becomes dark or unreadable. In this case the following recommendations help to get a valid system configuration: • • • If possible attach a CRT monitor to VGA connector and reboot the system with a system reset. In many cases BIOS sign on is displayed on monitor. Enter Setup and select correct flat panel type. Save & Exit to restart the system. If BIOS sign on is not displayed although a CRT monitor is attached, do the following: Turn off the system. Turn on again and immediately press <F2> key on your keyboard to enter Setup (note that <F2> key is detected after BIOS keyboard detection has passed after some seconds; this is indicated by flashing keyboard LEDs). Although the screen is dark, Setup is executed. Press <F9> and then <Enter> to force BIOS default settings (Boot display is set to CRT/Flat panel simultaneous mode, Display type is set to 640x480 TFT). Press <F10> and <Enter> to save Setup configuration and restart the system. BIOS sign on should be displayed on monitor. Enter Setup again and select correct flat panel type of your system. If no CRT monitor can be attached try the following: Turn off the system. Turn on again and immediately press <F2> key on your keyboard to enter Setup (note that <F2> key is detected after BIOS keyboard detection has passed after some seconds; this is indicated by flashing keyboard LEDs). Although the screen is dark, Setup is executed. Press <F9> and then <Enter> to force BIOS default settings Press <End> key and then <Enter>. Now you are in the submenu ‘Display Type’ at position of the highlighted default type (640x480 TFT). Use <Up> and <Down> cursor keys to select the display type of your system. Note that the menu wraps if cursor reaches the top or bottom menu item. Display type is selected with <Enter> key. Press <F10> and <Enter> to save Setup configuration and restart the system. BIOS sign on should be displayed on flat panel display. Page 17 The Setup Guide PhoenixBIOS 4.0 User's Manual The Advanced Menu Selecting "Advanced" from menu bar on the Main Menu displays a menu like this: PhoenixBIOS Setup Utility Main Advanced Security Power Boot Exit Item Specific Help Setup Warning Setting items on this menu to incorrect values may cause your system to malfunction. Large Disk Access Mode: [DOS] Small LBA-Disk CHS Translation [Yes] Processor Serial Number: [Disabled] Memory Cache PCI Configuration I/O Device Configuration Memory Shadow Advanced Chipset Control Hardware Monitor F1 ESC Help Exit ↑↓ ←→ Select Item Select Menu -/+ Enter Change Values SelectSub-Menu UNIX, Novell NetWare, or other operating systems, select 'Other', If you are installing new software and the drive fails, change this selection and try again. Different operating systems require different representations of drive geometries. F9 F10 Setup Defaults Save and Exit Use the legend keys to make your selections and exit to the Main Menu. Use the chart on the following page to configure the Large Disk Access Mode Features: Page 18 PhoenixBIOS 4.0 User's Manual Feature The Setup Guide Options Large Disk Access Mode Other DOS Small LBA-Disk CHS Translation Yes No Description Select ‘DOS’ if you have DOS. Select ‘Other’ if you have UNIX, Novell NetWare or other operating systems. If you are installing new operating system software and the drive fails, change this setting and try again. A large disk is one that has more than 1024 cylinders, more than 16 heads, or more than 63 tracks per sector. Warning: Incorrect settings can cause your system to malfunction. Select if CHS translation should be made for LBAcapable harddisk with less than 1024 cylinders, e.g. CompactFlash(R). If you have problems with booting from a CompactFlash(R), try to change this setting. No – translate CHS only if HDD has >1024 cyls. Yes – translate CHS for all LBA-capable disks. Processor Serial Number Enabled Disabled Each CPU has a unique serial number. When ‘disabled’, access to this serial number is denied. The system must be reset or restarted from power-on for setting to take effect. Page 19 The Setup Guide PhoenixBIOS 4.0 User's Manual Memory Cache Enabling cache saves time for the CPU by holding data most recently accessed in regular memory (dynamic RAM or DRAM) in a special storage area of static RAM (SRAM), which is faster. Before accessing regular memory, the CPU first accesses the cache. If it does not find the data it is looking for there, it accesses regular memory. Selecting "Memory Cache" from the Advanced Menu displays a menu like the one shown here. The actual features displayed depend on your system's hardware. PhoenixBIOS Setup Utility Advanced Memory Cache F1 ESC Item Specific Help Memory Cache: Cache System BIOS area: Cache Video BIOS area: Cache Extended Memory Area: [Enabled] [Write Protect] [Write Protect] [Write Back] Cache Cache Cache Cache Cache Cache Cache Cache [Disabled] [Disabled] [Disabled] [Disabled] [Write Protect] [Write Protect] [Write Protect] [Write Protect] Help Exit D000 D400 D800 DC00 E000 E400 E800 EC00 – – – – – – D3FF: D7FF: DBFF: DFFF: E3FF: E7FF: EBFF: EFFF: ↑↓ ←→ Select Item Select Menu -/+ Enter Change Values SelectSub-Menu Sets the state of the memory cache. F9 F10 Setup Defaults Save and Exit Use the legend keys listed on the bottom to make your selections and exit to the Main Menu. Use the chart on the following page to configure the memory cache. Page 20 PhoenixBIOS 4.0 User's Manual Feature Memory Cache Cache System BIOS area Cache Video BIOS area Cache Extended Memory area Cache segments, e.g., D000-D3FF Options Disabled Enabled uncached Write Protect uncached Write Protect uncached Write Through Write Protect Write Back Disabled Write Through Write Protect Write Back The Setup Guide Description Generally enables or disables all memory caching. Caches the system BIOS and improves performance. Caches the video BIOS and improves performance. Controls caching of system memory above one megabyte. Controls caching of individual segments of memory usually reserved for shadowing system or option ROMs. WARNING: Incorrect settings can cause your system to malfunction. NOTE: The contents of this menu depend on the chipset installed on your motherboard, and chipsets vary widely. Consult your dealer or the computer manual before changing the items on this menu. Incorrect settings can cause your system to malfunction. Page 21 The Setup Guide PhoenixBIOS 4.0 User's Manual PCI / PnP Configuration Selecting "PCI / PnP Configuration" from menu bar on the Advanced menu displays a menu like this: PhoenixBIOS Setup Utility Advanced PCI Configuration Installed O/S: ISA graphics device installed: Default Primary Video Adapter: VGA IRQ Assignment Item Specific Help [Other] [No] [AGP] [Enabled] PCI/PNP ISA UMB Region Exclusion PCI/PNP ISA IRQ Resource Exclusion PCI IRQ Routing PCI PCI PCI PCI Slot Slot Slot Slot 1 2 3 4 Master Master Master Master Reset Configuration Data: F1 ESC Help Exit ↑↓ ←→ Select Item Select Menu [Disabled] [Disabled] [Disabled] [Disabled] [No] -/+ Enter Change Values SelectSub-Menu F9 F10 Setup Defaults Save and Exit PCI Devices are devices equipped for operation with a PCI (Peripheral Component Interconnect) bus, a standardized hardware system that connects the CPU with other devices. Use this menu to configure the PCI devices installed on your system and to reserve system resources for non-PnP ISA devices. Use the legend keys to make your selections and exit to the Advanced menu. Page 22 PhoenixBIOS 4.0 User's Manual The Setup Guide The following table illustrates the possible selections: Feature Installed O/S Options Other Plug&Play ISA graphics device installed No Yes Default Primary Video Adapter PCI AGP DisabledI Enabled VGA IRQ Assignment eg. PCI Slot 1 Master Reset Configuration Data Disabled Enabled No Yes Description Select ‘Yes’ if you are using a Plug & Play capable operating system. Select ‘No’ if you need the BIOS to configure non-boot devices. Enable ISA (non-VGA) graphics device to access palette data in PCI VGA device. Select Bootdisplay on either PCI VGA card or AGP VGA. Select if an IRQ should be assigned to the integrated VGA adapter Enable selected device as a PCI bus master. ‘Yes’ erases all configuration data in ESCD, which stores the configuration settings for non-PnP plug-in devices. Select ‘Yes’ when required to restore the manufacturer's defaults. Page 23 The Setup Guide PhoenixBIOS 4.0 User's Manual PCI/PnP ISA UMB Region Exclusion Selecting "PCI/PNP ISA UMB Region Exclusion" from menu bar on the PCI Configuration menu displays a menu like this: PhoenixBIOS Setup Utility Advanced PCI/PNP ISA UMB Region Exclusion D000 D400 D800 DC00 F1 ESC - Help Exit D3FF: D7FF: DBFF: DFFF: ↑↓ ←→ Item Specific Help Reserves the specified block of upper memory for use by legacy ISA devices. [Available] [Available] [Available] [Available] Select Item Select Menu -/+ Enter Change Values SelectSub-Menu F9 F10 Setup Defaults Save and Exit Use the following chart in reserving upper memory: Feature Upper Memory Block: e.g. D400 – D7FF Page 24 Options Available Reserved Description Reserves the specified block of upper memory for use by legacy ISA devices. PhoenixBIOS 4.0 User's Manual The Setup Guide PCI/PnP ISA IRQ Resource Exclusion Selecting "PCI/PNP ISA IRQ Resource Exclusion" from menu bar on the PCI Configuration menu displays a menu like this: PhoenixBIOS Setup Utility Advanced PCI/PNP ISA IRQ Resource Exclusion IRQ IRQ IRQ IRQ IRQ IRQ IRQ F1 ESC 3: 4: 5: 7: 9: 10: 11: Help Exit Item Specific Help Reserves the specified IRQ for use by legacy ISA devices. [Available] [Available] [Available] [Available] [Available] [Available] [Available] ↑↓ ←→ Select Item Select Menu -/+ Enter Change Values SelectSub-Menu F9 F10 Setup Defaults Save and Exit NOTE: IRQ 15 exclusion depends upon Secondary IDE channel selection Use the following chart in reserving IRQs: Feature IRQ: e.g. IRQ 7 Options Available Reserved Description Reserves the specified IRQ for use by legacy ISA devices. Page 25 The Setup Guide PhoenixBIOS 4.0 User's Manual PCI IRQ Routing Selecting "PCI IRQ Routing" from menu bar on the PCI /PnP Configuration menu displays a menu like this: PhoenixBIOS Setup Utility Advanced PCI IRQ Routing Shared PCI IRQs: PCI IRQ line 1: PCI IRQ line 2: PCI IRQ line 3: PCI IRQ line 4: F1 ESC Help Exit Page 26 ↑↓ ←→ Item Specific Help [Auto] [Auto Select] [Auto Select] [Auto Select] [Auto Select] Select Item Select Menu -/+ Enter PCI devices can use hardware interrupts called IRQ’s. A PCI device cannot use IRQ’s already in use by ISA devices. Change Values SelectSub-Menu F9 F10 Setup Defaults Save and Exit PhoenixBIOS 4.0 User's Manual The Setup Guide Use the chart on the following page in configuring the PCI devices: Feature Shared PCI IRQs PCI IRQ line 1 PCI IRQ line 2 PCI IRQ line 3 PCI IRQ line 4 Options Share One IRQ Share Two IRQs Share Three IRQs Auto Disabled Auto Select IRQ 3 IRQ 4 IRQ 5 IRQ 7 IRQ 9 IRQ 10 IRQ 11 IRQ 12 IRQ 14 IRQ 15 Description Share ‘n’ IRQ’s: Forces PCI devices to use at most ‘n’ IRQs. ‘Share One IRQ’ means that all PCI devices in system are shared to one IRQ line. This frees up remaining IRQ lines for non-PnP ISA devices. Auto: Minimizes PCI IRQ Sharing Disabled : Do not use IRQ with PCI interrupt. Auto Select: IRQ assigment is selected by Plug&Play with priority. IRQ n Selection: Forces PCI device to use selected IRQ. This selection is used for drivers which rely on a specific IRQ. Be careful to choose an IRQ which is NOT used by any ISA device. Page 27 The Setup Guide PhoenixBIOS 4.0 User's Manual I/O Device Configuration Menu Most devices on the computer require the exclusive use of system resources for operation. These system resources can include Input and Output (I/O) port addresses and Interrupt lines for getting the attention of the CPU. Allocating these resources to various devices is called device configuration. • Manually by you. • Automatically by the BIOS during POST (See "ROM BIOS Functions" in the PhoenixBIOS Programmer’s Guide) • Automatically by a PnP Operating System such as Windows 9x after the Operating System boots To configure the serial and parallel ports, the diskette controller, the USB Controller and the IDE Controller, select "I/O Device Configuration" on the Advanced Menu to display this menu and specify how you want to configure these I/O Devices: Page 28 PhoenixBIOS 4.0 User's Manual The Setup Guide PhoenixBIOS Setup Utility Advanced I/O Device Configuration F1 ESC Item Specific Help Serial Port A: Serial Port B: Mode : Onboard Parallel Port Serial Port C: Serial Port D: External Parallel Port Mode : Onboard Diskette Controller External Diskette Controller Local LAN Controller: Local LAN Boot Local Bus IDE Controller: Legacy USB Support: USB Boot Device: OnChip USB Device: OnChip USB 2 Device: Onboard Legacy Audio: PS/2 Mouse: [Auto] [Auto] [Normal] [Disabled] [Auto] [Auto] [Auto] [Bi-directional] [Enabled] [Disabled] [Enabled] [Disabled] [Both] [Disabled] [Floppy] [Enabled] [Enabled] [Disabled] [Auto Detect] Watchdog: Watchdog delay: Watchdog timeout: Watchdog start on boot: [250h] [5 seconds] [30 seconds] [No] Help Exit ↑↓ ←→ Select Item Select Menu -/+ Enter Change Values SelectSub-Menu (*) (*) F9 F10 Setup Defaults Save and Exit (*) “Onboard Parallel Port” or “Onboard Diskette Controller” are alternatives since they share the same signal pins. Only one of both selections will appear depending on the status of the LPT/FLPY# signal on pin 51 of ETe-connector X3. Use the legend keys to make your selections and exit to the Main Menu. Use the following charts to configure the Input/Output settings: Page 29 The Setup Guide PhoenixBIOS 4.0 User's Manual Serial Ports Feature Options Serial Port A: Serial Port B: Serial Port C: Serial Port D : Disabled Enabled Auto Base I/O Address (Port A-D) 3F8 2F8 3E8 2E8 IRQ 3 IRQ 4 Normal, ASKIR, IRDA Interrupt (Port A-D) Mode (Port B, Port D) Page 30 Description Configure Serial Port using options: Disabled: No configuration Enabled: User configuration Auto: BIOS or OS chooses configuration. If you select Enabled, choose one of these combinations. If you select Enabled, choose one of these combinations. Select the mode for Serial Port B or D PhoenixBIOS 4.0 User's Manual The Setup Guide Onboard Diskette Controller Feature Floppy Disk Controller Options Disabled Enabled Auto Description Configure diskette controller using options: Disabled: No configuration Enabled: User configuration Auto: BIOS or OS chooses configuration. Page 31 The Setup Guide PhoenixBIOS 4.0 User's Manual Parallel Port Feature LPT: Options Disabled Enabled Auto Mode Uni-directional ECP EPP Bi-directional Base I/O Address 378 278 3BC IRQ5 IRQ7 Interrupts DMA Channel Page 32 DMA 1 DMA 3 Description Configure parallel port using options: Disabled: No configuration Enabled: User configuration Auto: BIOS or OS chooses configuration. Set the mode for the parallel options: Uni-directional ECP EPP Bi-directional If you select Enabled for the Parallel Port, choose one of these I/O addresses. If you select Enabled for the Parallel Port, choose one of these interrupt options. Set the DMA channel for the parallel port PhoenixBIOS 4.0 User's Manual The Setup Guide Other Devices Feature Local LAN Controller Local LAN Boot: Local Bus IDE adapter Legacy USB Support USB Boot Device On chip USB Device On chip USB 2 Device PS/2 Mouse Watchdog: Watchdog delay: Watchdog timeout: Watchdog start on boot: Options Disabled Enabled Disabled Enabled Disabled Primary Secondary Both Disabled Enabled Floppy Other Enabled Disabled Enabled Disabled Enabled Auto Detect Disabled 250h 270h 290h 1second 5 seconds 10 seconds 30 seconds 1 minute 5 minutes 10 minutes 30 minutes 0.4 seconds 1second 5 seconds 10 seconds 30 seconds 1 minute 5 minutes 10 minutes No Yes Description Enables the local LAN controller. Enable boot from the local LAN controller (installs the PXE Boot ROM) Enable the integrated local bus IDE adapter Enable support for Legacy Universal Serial Bus USB Boot Device: choose Floppy for USB Floppy device or Other for any other mass storage device Enable USB Port 0 – 1 Enable / Disable USB Port 2 – 3 ‘Disabled’ disables any installed PS/2 mouse and frees up IRQ 12. ‘Enabled’ forces the PS/2 mouse port to be enabled regardless if a mouse is present. ‘Auto Detect’ lets the BIOS control the mouse. Watchdog base i/o address Initial watchdog delay before starting the down counter Watchdog trigger timeout period. If the watchdog is enabled and not triggered within the specified time window a system reset will be generated. If YES is selected, the watchdog starts automatically at the end of POST, before OS is booted. Warning: If you choose the same I/O address or Interrupt for more than one port, the menu displays an asterisk (*) at the conflicting settings. It also displays this message at the bottom Page 33 The Setup Guide PhoenixBIOS 4.0 User's Manual of the menu: * Indicates a DMA, Interrupt, I/O, or memory resource conflict with another device. Resolve the conflict by selecting another setting for the devices. Page 34 PhoenixBIOS 4.0 User's Manual The Setup Guide Memory Shadow Shadowing for System BIOS and Video BIOS improves performance, if enabled. PhoenixBIOS Setup Utility Advanced Memory Shadow System Shadow: Video Shadow: F1 ESC Help Exit ↑↓ ←→ Item Specific Help [Enabled] [Enabled] Select Item Select Menu Enabled copies Video BIOS to shadow RAM. Improves performance. -/+ Enter Change Values SelectSub-Menu F9 F10 Setup Defaults Save and Exit Use the following chart in shadowing BIOS: Feature System Shadow Video Shadow Options Enabled Disabled Enabled Description Is always enabled Enabled copies Video BIOS to shadow RAM. Improves performance Page 35 The Setup Guide PhoenixBIOS 4.0 User's Manual Advanced Chipset Control Selecting "Advanced Chipset Control" from menu bar on the PCI /PnP Configuration menu displays a menu like this: PhoenixBIOS Setup Utility Advanced Advanced Chipset Control F1 ESC Item Specific Help PCI Delay Transaction: [Enabled] Aperture Size: Frame Buffer Size: AGP Rate: [64M] [8 Mb] [1X] Spread Spectrum Modulation [Disabled] Help Exit ↑↓ ←→ Select Item Select Menu -/+ Enter If any items in this menu require changes, please consult your system Supervisor. Change Values SelectSub-Menu F9 F10 Setup Defaults Save and Exit Use the following chart in configuring the Advanced Chipset Control: Feature PCI Delay Transaction Options Enabled Disabled Description Enabling Delayed Transaction enables the chipset's embedded 32-bit posted write buffer to support delayed transaction cycles. This means that transactions to and from the ISA bus are buffered and the PCI bus can be freed to perform other transactions while the ISA transaction is underway. Aperture Size 2 MB 4 MB 8 MB 16 MB 32 MB 64 MB 128 MB 256 MB Size of memory that can be used by your software for textures. Page 36 PhoenixBIOS 4.0 User's Manual Frame Buffer Size AGP Rate Spread Spectrum Modulation The Setup Guide None 8 MB 16 MB 32 MB 1X 2X 4X Disabled ±0.25% -0.5% Increasing Size of framebuffer will decrease size of system memory, because of shared memory. Use None for external VGA card only. Set AGP speed Clock controller spread spectrum modulation reduces system EMI by 8dB to 10dB NOTE: The contents of this menu depend on the devices installed on your system. Incorrect settings can cause your system to malfunction. Page 37 The Setup Guide PhoenixBIOS 4.0 User's Manual Hardware Monitor Hardware Monitor displays actual system voltages, temperatures and Fan speed. PhoenixBIOS Setup Utility Advanced Hardware Monitor F1 ESC Vcore +2.5V Voltage +3.3V Voltage +5V Voltage 1.21V 2.45V 3.23V 4.97V CPU Temperature Board Temperature 51°C 41°C CPU Fan speed No Function Help Exit ↑↓ ←→ Select Item Select Menu -/+ Enter Item Specific Help If any items in this menu require changes, please consult your system Supervisor. Change Values SelectSub-Menu F9 F10 Setup Defaults Save and Exit Use the following chart in configuring the Advanced Chipset Control: Feature Voltages (e.g. Vcore) Options none Temperature (e.g. CPU ) Fan speed (e.g. CPU ) none none Page 38 Description Displays actual voltage on board Displays actual temperature Displays actual fan speed PhoenixBIOS 4.0 User's Manual The Setup Guide The Security Menu Selecting "Security" from the Main Menu displays a menu like this: PhoenixBIOS Setup Utility Main Advanced Security Power Boot Exit Item Specific Help F1 ESC Supervisor Password Is: User Password Is: Clear Clear Set Supervisor Password Set User Password [Enter] [Enter] Diskette access: Fixed disk boot sector: Virus check reminder: System backup reminder: Password on boot: [Supervisor] [Normal] [Disabled] [Disabled] [Disabled] Help Exit ↑↓ ←→ Select Item Select Menu -/+ Enter Supervisor Password controls access to the setup utility. Change Values SelectSub-Menu F9 F10 Setup Defaults Save and Exit Use the legend keys to make your selections and exit to the Main Menu. Enabling "Supervisor Password" requires a password for entering Setup. The passwords are not case sensitive. Pressing <Enter> at either Set Supervisor Password or Set User Password displays a dialog box like this: Set Password Enter new password: [ Confirm new password: [ ] ] Type the password and press <Enter>. Repeat. Page 39 The Setup Guide PhoenixBIOS 4.0 User's Manual Note: In some systems, the User and Supervisor passwords are related; you cannot have a User password without first creating a Supervisor password. In other systems, you can create and use them independently. The User password is stored to system microcontroller. This allows to lock the keyboard by pressing CTL-ALT-S . The lock is indicated by flashing the keyboard LEDs. To unlock the keyboard enter the valid user password. Use the following chart to configure the system-security and anti-virus options. Feature Set Supervisor Password Options Up to seven alphanumeric characters Set User Password Up to seven alphanumeric characters Diskette access User Supervisor Fixed disk boot sector Normal Write Protect Page 40 Description Pressing <Enter> displays dialog box for entering the supervisor password. In related systems, this password gives full access to Setup menus. To clear an existing Supervisor password, enter the password and hit <Enter> to clear. Note however that any existing User Password cannot be changed if Supervisor password has been cleared. Pressing <Enter> displays the dialog box for entering the user password. In related systems, this password gives restricted access to SETUP menus. To clear an existing User password, enter the password and hit <Enter> to clear. Supervisor requires to enter the supervisor password to boot from or access the floppy disk. Write protects the boot sector on the hard disk for virus protection. Requires a password to format or Fdisk the hard disk. PhoenixBIOS 4.0 User's Manual Virus check reminder System backup reminder Password on boot Disabled Daily Weekly Monthly Disabled Enabled The Setup Guide Displays a message during bootup asking (Y/N) if you have backed up the system or scanned it for viruses. Message returns on each boot until you respond with "Y". Daily displays the message on the first boot of the day, Weekly on the first boot after Sunday, and Monthly on the first boot of the month. Enabled requires a password on boot. Requires prior setting of the Supervisor password. If supervisor password is set and this option disabled, BIOS assumes user is booting. Page 41 The Setup Guide PhoenixBIOS 4.0 User's Manual The Power Menu Selecting "Power" from the menu bar displays a menu like this: PhoenixBIOS Setup Utility Main Advanced Security Power Boot Exit Item Specific Help Power Savings: [Disabled] Idle Mode: Standby Timeout: Auto Suspend Timeout: Off Off Off Hard Disk Timeout: Video Timeout: Disabled Disabled Resume on Modem Ring: Resume on Time: Resume Time: [Off] [Off] [00:00:00] Maximum Power Savings Conserves the greatest Amount of system power. Maximum performance Conserves power but Allows greatest system Performance. To alter These settings, choose Customized. To turn off Power management, choose Disabled Temperature Management F1 ESC Help Exit ↑↓ ←→ Select Item Select Menu -/+ Enter Change Values SelectSub-Menu F9 F10 Setup Defaults Save and Exit Use this menu to specify your settings for Power Management. Remember that the options available depend upon the hardware installed in your system. Those shown here are from a typical system. A power-management system reduces the amount of energy used after specified periods of inactivity. The Setup menu pictured here supports a Full On state, and a Standby state with partial power reduction. Use the Advanced Options on this menu to specify whether or not system activity can prevent entering Standby state (activity events) or terminate the Standby state and restore Full On (wakeup events). Use the legend keys to make your selections and exit to the Main Menu. Page 42 PhoenixBIOS 4.0 User's Manual The Setup Guide Use the chart on the following page in making your selections: Feature Power Savings Options Disabled Customize Maximum Power Savings Maximum Performance Idle Mode Off On Standby Timeout Off 1 Minute 2 Minutes 4 Minutes 6 Minutes 8 Minutes 12 Minutes 16 Minutes Auto Suspend Timeout Off 5 Minute 10 Minutes 15 Minutes 20 Minutes 30 Minutes 40 Minutes 60 Minutes Disabled 10 Seconds 15 Seconds 30 Seconds 45 Seconds 1 Minute 2 Minutes 4 Minutes 6 Minutes 8 Minutes 10 Minutes 15 Minutes Hard Disk Timeout Description Maximum options: pre-defined values. Select Customize to make your own selections from the following fields. Disabled turns off all power management. Turn on or off the Idle Mode power savings. Idle Mode slows down the CPU during brief periods when the system is not busy. Amount of time the system needs to be in Idle Mode before entering the Standby Mode. Standby Mode turns off various devices in the system, including the screen, until you start using the computer again. Amount of time the system needs to be in Standby before entering the SUSPEND Mode. Amount of time the hard disk needs to be inactive before it is turned off. Page 43 The Setup Guide Video Timeout Resume On Modem Ring PhoenixBIOS 4.0 User's Manual Disabled 10 Seconds 15 Seconds 30 Seconds 45 Seconds 1 Minute 2 Minutes 4 Minutes 6 Minutes 8 Minutes 10 Minutes 15 Minutes Off On Resume On Time Off On Resume Time 00:00:00 Page 44 Amount of time the user input devices need to be inactive before the screen is turned off. Enabled wakes the system up, when an incoming call is detected on your modem. On Time Enabled wakes the system up at a specific time. Specify the time when the system is to wake up. <Tab>, >Shift-Tab> or <Enter> selects field. PhoenixBIOS 4.0 User's Manual The Setup Guide Temperature Management Selecting "Temperature Mangement " from menu bar on the Power menu displays a menu like this: PhoenixBIOS Setup Utility Power Temperature Management CPU Clock Throttling Thermal Source Select CPU Alarm Temperature CPU Alarm Hysteresis Board Alarm Temperature F1 ESC Help Exit ↑↓ ←→ Select Item Select Menu Feature CPU Clock Throttling Thermal Source Select CPU Alarm Temperature CPU Alarm Hysteresis Item Specific Help [Disabled] [CPU Sensor] [80°C] [5°C] [60°C] -/+ Enter Change Values SelectSub-Menu Options Disabled 75% 50% 25% CPU Sensor Board Sensor 65°C 70°C 75°C 80°C 85°C 90°C 3°C 4°C 5°C 6°C CPU clock will be throttled to the selected value, when reaching the temperature threshold. F9 F10 Setup Defaults Save and Exit Description CPU clock will be throttled to the selected value when reaching the temperature threshold. Select thermal alarm sensor either from CPU or from board If CPU temperature exceeds given value clock throttling. CPU temperature which must decrease below critical temperature until clock throttling is stopped. Page 45 The Setup Guide Board Alarm Temperature Page 46 PhoenixBIOS 4.0 User's Manual 35°C 40°C 45°C 50°C 55°C 60°C 65°C 70°C If board temperature exceeds given value clock throttling will start. PhoenixBIOS 4.0 User's Manual The Setup Guide The Boot Menu After you turn on your computer, it will attempt to load the operating system (such as Windows 98) from the device of your choice. If it cannot find the operating system on that device, it will attempt to load it from one or more other devices in the order specified in the Boot Menu. Boot devices (i.e., with access to an operating system) can include: hard drives, floppy drives, CD ROMs, removable devices (e.g., Iomega Zip drives), and network cards. Note: Specifying any device as a boot device on the Boot Menu requires the availability of an operating system on that device. Most PCs come with an operating system already installed on hard-drive C:. Selecting "Boot" from the Menu Bar displays the Boot menu, which looks like this: PhoenixBIOS Setup Utility Main Advanced Security Power Boot Exit Item Specific Help -Removable Devices Legacy Floppy Drives LS - 120 COSM -Hard Drive Bootable Add-in Cards WDC AC1100H - (PM) CD-ROM Drive Network Boot IBA FE Slot 0010 (*) F1 ESC Help Exit ↑↓ ←→ Select Item Select Menu Keys used to view or configure devices <Enter> expands or collapses devices with a + or - r in <Ctrl+Enter> expands all <Shift + 1> enables or disables a device. <+> and <-> moves the device up or down. <n> may move removable device between hard or removable disk. <d> removes a device that is not installed. -/+ Enter Change Values SelectSub-Menu F9 F10 Setup Defaults Save and Exit Use this menu to arrange to specify the order of the devices from which the BIOS will attempt to boot the Operating System. Use the <Enter> key to expand or collapse the devices marked with <+> or <->. Press <Ctrl+Enter> to expand all such devices. To move a device, first select it with the up-or-down arrows, and move it up or down using the <+> and <-> keys. Pressing <n> moves a device between the Removable Devices and Hard Drive. Pressing <Shift+1> enables or disables a device. (*) IBA FE Slot 0010: When “Local LAN Boot” is set to “enabled” this option appears here to select the priority of the LAN boot ROM Page 47 The Setup Guide PhoenixBIOS 4.0 User's Manual The Exit Menu Selecting "Exit" from the menu bar displays this menu: PhoenixBIOS Setup Utility Main Advanced Security Power Boot Exit Item Specific Help Exit Saving Changes Exit Discarding Changes Load Setup Defaults Discard Changes Save Changes F1 ESC Help Exit ↑↓ ←→ Select Item Select Menu Exit System Setup and save your changes to CMOS. -/+ Enter Change Values Execute Command F9 F10 Setup Defaults Save and Exit The following sections describe each of the options on this menu. Note that <Esc> does not exit this menu. You must select one of the items from the menu or menu bar to exit. Page 48 PhoenixBIOS 4.0 User's Manual The Setup Guide Saving Values After making your selections on the Setup menus, always select either "Saving Values" or "Save Changes." Both procedures store the selections displayed in the menus in CMOS (short for "battery-backed CMOS RAM") a special section of memory that stays on after you turn your system off. The next time you boot your computer, the BIOS configures your system according to the Setup selections stored in CMOS. After you save your selections, the program displays this message: Values have been saved to CMOS! Press <space> to continue If you attempt to exit without saving, the program asks if you want to save before exiting. During bootup, PhoenixBIOS attempts to load the values saved in CMOS. If those values cause the system boot to fail, reboot and press <F2> to enter Setup. In Setup, you can get the Default Values (as described below) or try to change the selections that caused the boot to fail. Page 49 The Setup Guide PhoenixBIOS 4.0 User's Manual Exit Discarding Changes Use this option to exit Setup without storing in CMOS any new selections you may have made. The selections previously in effect remain in effect. Page 50 PhoenixBIOS 4.0 User's Manual The Setup Guide Load Setup Defaults To display the default values for all the Setup menus, select "Load Setup Defaults" from the Main Menu. The program displays this message: ROM Default values have been loaded! Press <space> to continue If, during bootup, the BIOS program detects a problem in the integrity of values stored in CMOS, it displays these messages: System CMOS checksum bad - run SETUP Press <F1> to resume, <F2> to Setup The CMOS values have been corrupted or modified incorrectly, perhaps by an application program that changes data stored in CMOS. Press <F1> to resume the boot or <F2> to run Setup with the ROM default values already loaded into the menus. You can make other changes before saving the values to CMOS. Page 51 The Setup Guide PhoenixBIOS 4.0 User's Manual Discard Changes If, during a Setup Session, you change your mind about changes you have made and have not yet saved the values to CMOS, you can restore the values you previously saved to CMOS. Selecting “Discard Changes” on the Exit menu updates all the selections and displays this message: CMOS values have been loaded! Press <space> to continue Page 52 PhoenixBIOS 4.0 User's Manual The Setup Guide Save Changes Selecting “Save Changes” saves all the selections without exiting Setup. You can return to the other menus if you want to review and change your selections. Page 53 The Setup Guide PhoenixBIOS 4.0 User's Manual PhoenixBIOS Messages The following is a list of the messages that the BIOS can display. Most of them occur during POST. Some of them display information about a hardware device, e.g., the amount of memory installed. Others may indicate a problem with a device, such as the way it has been configured. Following the list are explanations of the messages and remedies for reported problems. *If your system displays one of the messages marked below with an asterisk (*), write down the message and contact your dealer. If your system fails after you make changes in the Setup menus, reset the computer, enter Setup and install Setup defaults or correct the error. 0200 Failure Fixed Disk Fixed disk is not working or not configured properly. Check to see if fixed disk is attached properly. Run Setup. Find out if the fixed-disk type is correctly identified. 0210 Stuck key Stuck key on keyboard. 0211 Keyboard error Keyboard not working. *0212 Keyboard Controller Failed Keyboard controller failed test. May require replacing keyboard controller. 0213 Keyboard locked - Unlock key switch Unlock the system to proceed. 0220 Monitor type does not match CMOS - Run SETUP Monitor type not correctly identified in Setup *0230 Shadow Ram Failed at offset: nnnn Shadow RAM failed at offset nnnn of the 64k block at which the error was detected. *0231 System RAM Failed at offset: nnnn System RAM failed at offset nnnn of in the 64k block at which the error was detected. *0232 Extended RAM Failed at offset: nnnn Extended memory not working or not configured properly at offset nnnn. 0250 System battery is dead - Replace and run SETUP The CMOS clock battery indicator shows the battery is dead. Replace the battery and run Setup to reconfigure the system. 0251 System CMOS checksum bad - Default configuration used System CMOS has been corrupted or modified incorrectly, perhaps by an application program that changes data stored in CMOS. The BIOS installed Default Setup Values. If you do not want these values, enter Setup and enter your own values. If the error persists, check the system battery or contact your dealer. *0260 System timer error The timer test failed. Requires repair of system board. *0270 Real time clock error Real-Time Clock fails BIOS hardware test. May require board repair. 0271 Check date and time settings BIOS found date or time out of range and reset the Real-Time Clock. May require setting legal date (1991-2099). Page 54 PhoenixBIOS 4.0 User's Manual The Setup Guide 0280 Previous boot incomplete - Default configuration used Previous POST did not complete successfully. POST loads default values and offers to run Setup. If the failure was caused by incorrect values and they are not corrected, the next boot will likely fail. On systems with control of wait states, improper Setup settings can also terminate POST and cause this error on the next boot. Run Setup and verify that the wait-state configuration is correct. This error is cleared the next time the system is booted. 0281 Memory Size found by POST differed from CMOS Memory size found by POST differed from CMOS. 02B0 Diskette drive A error 02B1 Diskette drive B error Drive A: or B: is present but fails the BIOS POST diskette tests. Check to see that the drive is defined with the proper diskette type in Setup and that the diskette drive is attached correctly. 02B2 Incorrect Drive A type - run SETUP Type of floppy drive A: not correctly identified in Setup. 02B3 Incorrect Drive B type - run SETUP Type of floppy drive B: not correctly identified in Setup. 02D0 System cache error - Cache disabled RAM cache failed and BIOS disabled the cache. On older boards, check the cache jumpers. You may have to replace the cache. See your dealer. A disabled cache slows system performance considerably. 02F0: CPU ID: CPU socket number for Multi-Processor error. *02F4: EISA CMOS not writeable ServerBIOS2 test error: Cannot write to EISA CMOS. *02F5: DMA Test Failed ServerBIOS2 test error: Cannot write to extended DMA (Direct Memory Access) registers. *02F6: Software NMI Failed ServerBIOS2 test error: Cannot generate software NMI (NonMaskable Interrupt). *02F7: Fail-Safe Timer NMI Failed ServerBIOS2 test error: Fail-Safe Timer takes too long. device Address Conflict Address conflict for specified device. Allocation Error for: device Run ISA or EISA Configuration Utility to resolve resource conflict for the specified device. CD ROM Drive CD ROM Drive identified. Entering SETUP ... Starting Setup program *Failing Bits: nnnn The hex number nnnn is a map of the bits at the RAM address which failed the memory test. Each 1 (one) in the map indicates a failed bit. See errors 230, 231, or 232 above for offset address of the failure in System, Extended, or Shadow memory. Fixed Disk n Fixed disk n (0-3) identified. Page 55 The Setup Guide PhoenixBIOS 4.0 User's Manual Invalid System Configuration Data Problem with NVRAM (CMOS) data. I/O device IRQ conflict I/O device IRQ conflict error. PS/2 Mouse Boot Summary Screen: PS/2 Mouse installed. nnnn kB Extended RAM Passed Where nnnn is the amount of RAM in kilobytes successfully tested. nnnn Cache SRAM Passed Where nnnn is the amount of system cache in kilobytes successfully tested. nnnn kB Shadow RAM Passed Where nnnn is the amount of shadow RAM in kilobytes successfully tested. nnnn kB System RAM Passed Where nnnn is the amount of system RAM in kilobytes successfully tested. One or more I2O Block Storage Devices were excluded from the Setup Boot Menu There was not enough room in the IPL table to display all installed I2O block-storage devices. Operating system not found Operating system cannot be located on either drive A: or drive C:. Enter Setup and see if fixed disk and drive A: are properly identified. *Parity Check 1 nnnn Parity error found in the system bus. BIOS attempts to locate the address and display it on the screen. If it cannot locate the address, it displays ????. Parity is a method for checking errors in binary data. A parity error indicates that some data has been corrupted. *Parity Check 2 nnnn Parity error found in the I/O bus. BIOS attempts to locate the address and display it on the screen. If it cannot locate the address, it displays ????. Press <F1> to resume, <F2> to Setup, <F3> for previous Displayed after any recoverable error message. Press <F1> to start the boot process or <F2> to enter Setup and change the settings. Press <F3> to display the previous screen (usually an initialization error of an Option ROM, i.e., an add-on card). Write down and follow the information shown on the screen. Press <F2> to enter Setup Optional message displayed during POST. Can be turned off in Setup. PS/2 Mouse: PS/2 mouse identified. Run the I2O Configuration Utility One or more unclaimed block storage devices has the Configuration Request bit set in the LCT. Run an I2O Configuration Utility (e.g. the SAC utility). System BIOS shadowed System BIOS copied to shadow RAM. Page 56 PhoenixBIOS 4.0 User's Manual The Setup Guide UMB upper limit segment address: nnnn Displays the address nnnn of the upper limit of Upper Memory Blocks, indicating released segments of the BIOS which can be reclaimed by a virtual memory manager. Video BIOS shadowed Video BIOS successfully copied to shadow RAM. Page 57 2 Boot Utilities Phoenix Boot Utilities are: • Phoenix QuietBoot™ • Phoenix MultiBoot™ Phoenix QuietBoot displays a graphic illustration rather than the traditional POST messages while keeping you informed of diagnostic problems. Phoenix MultiBoot is a boot screen that displays a selection of boot devices from which you can boot your operating system. Phoenix QuietBoot Right after you turn on or reset the computer, Phoenix QuietBoot displays the QuietBoot Screen, a graphic illustration created by the computer manufacturer instead of the text-based POST screen, which displays a number of PC diagnostic messages. To exit the QuietBoot screen and run Setup, display the MultiBoot menu, or simply display the PC diagnostic messages, you can simply press one of the hot keys described below. The QuietBoot Screen stays up until just before the operating system loads unless: • You press <Esc> to display the POST screen. • You press <F2> to enter Setup. • POST issues an error message. • The BIOS or an option ROM requests keyboard input. The following explains each of these situations. Page 58 PhoenixBIOS 4.0 User's Manual Boot Utilities Press <ESC> Pressing <Esc> switches to the POST screen and takes one of two actions: 1. If MultiBoot is installed, the boot process continues with the text-based POST screen until the end of POST, and then displays the Boot First Menu, with these options: • • • Load the operating system from a boot device of your choice. Enter Setup. Exit the Boot First Menu (with <Esc>) and load the operating system from the boot devices in the order specified in Setup. 2. If MultiBoot is not installed, the boot process continues as usual. Page 59 Boot Utilities PhoenixBIOS 4.0 User's Manual Press <F2> Pressing <F2> at any time during POST switches to the POST screen (if not already displayed) and enters Setup. Page 60 PhoenixBIOS 4.0 User's Manual Boot Utilities POST Error Whenever POST detects a non-fatal error, QuietBoot switches to the POST screen and displays the errors. It then displays this message: Press <F1> to resume, <F2> to Setup Press <F1> to continue with the boot. Press <F2> if you want to correct the error in Setup. Page 61 Boot Utilities PhoenixBIOS 4.0 User's Manual Keyboard Input Request If the BIOS or an Option ROM (add-on card) requests keyboard input, QuietBoot switches over to the POST screen and the Option ROM displays prompts for entering the information. POST continues from there with the regular POST screen. Page 62 PhoenixBIOS 4.0 User's Manual Boot Utilities Phoenix MultiBoot Phoenix MultiBoot expands your boot options by letting you choose your boot device, which could be a hard disk, floppy disk, or CD ROM. You can select your boot device in Setup, or you can choose a different device each time you boot by selecting your boot device in The Boot First Menu. MultiBoot consists of: • The Setup Boot Menu • The Removable Format Menu • The Fixed Disk and Removable Disk Menus • The Boot First Menu The following describes each one of these menus. Page 63 Boot Utilities PhoenixBIOS 4.0 User's Manual The Setup Boot Menu In the Setup Boot Menu you can select the order of the devices from which the BIOS attempts to boot the operating system. During POST, if the BIOS is unsuccessful at booting from one device, it will try the next one on the list. Please see “Boot Menu” in Chapter 1 for a detailed desription. Page 64 PhoenixBIOS 4.0 User's Manual Boot Utilities The Boot First Menu Display the Boot First Menu by pressing <Esc> during POST. In response, the BIOS first displays the message, "Entering Boot Menu ..." and then displays the Boot Menu at the end of POST. Use the menu to select any of these options: 1. Override the existing boot sequence (for this boot only) by selecting another boot device. If the specified device does not load the operating system, the BIOS reverts to the previous boot sequence. 2. Enter Setup. 3. Press <Esc> to continue with the existing boot sequence. Boot Menu Use <↑> or <↓> to select a boot device or the Setup utility Pres <Enter> to accespt or <Esc> to exit. 1. +Diskette Drive 2. +Removable Devices 3. +Hard Drive 4. ATAPI CD-ROM Drive 5. Network Boot <Enter Setup> If there is more than one bootable hard drive, the first one in the Boot Connection Device Menu is the one represented here. Page 65 Boot Utilities PhoenixBIOS 4.0 User's Manual Boot with Blanked Video For OEM purpose the BIOS allows booting with blanked Video. This feature is enabled by VGA utility VGACONF.EXE . Video can be enabled only by software executing extended VGA BIOS Function AX=5F54h (Set Panel ON/OFF). However the video is enabled by System BIOS in case of POST errors are encountered or if Setup is requested by user (F2 key). In addition video is enabled by system BIOS for one of the following situations: • • Hot Key request for Multiboot Menu (ESC Hotkey) Summary Screen option is enabled Note that the blanked video option should be enabled for OEMs only and should not be confused with Quiet Boot option supported by BIOS. Page 66 3 BIOS Update Update Disk Update BIOS with MSC-Update-Disk: • Insert an empty, writeable floppy disk in your desktop PC. • Extract Update-Disk-Image-File to floppy disk by executing “Uxxxxvvv.exe”. • Insert the still writeable floppy disk to your system with MSC-Board. • Switch on power. • The system will boot FreeDOS from drive A:. • If you want to update your system BIOS press [u] otherwise press [a]. • Parameters for VGA BIOS will be written to EEPROM. • The System and VGA BIOS will be programmed. • After programming has terminated press any key. • Switch off power. • Remove update disk and switch on power. • Enter setup with “F2”, change settings, if necessary, and exit setup with the option “Exit Saving Changes”. Note: After the system has been updated, the CMOS has been changed to defaults and therefore it is necessary to enter setup to configure the system and exit setup with the option “Exit Saving Changes”. Page 67 Phoenix Phlash PhoenixBIOS 4.0 User's Manual Note: Even if you want to use default settings, enter setup and exit with the option “Exit Saving Changes”. Otherwise BIOS will restore settings from EEPROM every boot process and display the message, which indicates this. Note: If your Update-Disk is write-protected, your system will hang. In this case make your Update-Disk writeable and boot again. Phoenix Phlash Phoenix Phlash gives you the ability to update your BIOS from a floppy disk without having to install a new ROM BIOS chip. Phoenix Phlash is a utility for "flashing" (copying) a BIOS to the Flash ROM installed on your computer from a floppy disk. A Flash ROM is a Read-Only Memory chip that you can write to using a special method called "flashing." Use Phoenix Phlash for the following tasks: • Update the current BIOS with a new version. • Restore a BIOS when it has become corrupted. Installation Phoenix Phlash is shipped on a floppy disk with your computer as a compressed file called CRISDISK.ZIP that contains the following files: CRISDISK.BAT Executable file for creating the Crisis Recovery Diskette. PHLASH.EXE Programs the flash ROM. PLATFORM.BIN Performs platform-dependent functions. BIOS.ROM Actual BIOS image to be programmed into flash ROM. MINIDOS.SYS Allows the system to boot in Crisis Recovery Mode. MAKEBOOT.EXE Creates the custom boot sector on the Crisis Recovery Diskette. To install Phoenix Phlash on your hard disk, follow this simple procedure: 1. Insert the distribution diskette into drive A: 2. Unzip the contents of CRISDISK.ZIP into a local directory, presumably C:\PHLASH. 3. Store the distribution diskette in a safe place. Create the Crisis Recovery Diskette If the OEM or dealer from whom you purchased your system has not provided you with one, then you should create a Crisis Recovery Diskette before you use the Phlash utility. If you are unable to boot your system and successfully load the Page 68 PhoenixBIOS 4.0 User's Manual Phoenix Phlash Operating System, the BIOS may have been corrupted, in which case you will have to use the Crisis Recovery Diskette to reboot your system. There are several methods that you can use to create the Crisis Recovery Diskette. Below is one recommended procedure. 1. Be sure you have successfully installed the Phlash Utility onto your hard disk. 2. Insert a clean diskette into drive A: or B: 3. From the local directory, enter the following: CRISDISK [drive]: where [drive] is the letter of the drive into which you inserted the diskette. For help, type /? or /h. CRISDISK.BAT formats the diskette, then copies MINIDOS.SYS, VGABIOS.EXE (if available), PHLASH.EXE, PLATFORM.BIN and BIOS.ROM to the diskette, and creates the required custom boot sector. 4. Write protect and label the Crisis Recovery Diskette. NOTE: You can only supply a volume label after the Crisis Recovery Diskette has been formatted and the necessary files copied because MINIDOS.SYS must occupy the first directory entry for the diskette to boot properly. Updating the Crisis Recovery Diskette If the BIOS image (BIOS.ROM) changes due to an update or bug fix, you can easily update the Crisis Recovery Diskette. Simply copy the new BIOS.ROM image onto the Crisis Recovery Diskette. No further action is necessary. Executing Phoenix Phlash You can run Phoenix Phlash in one of two modes: Command Line Mode Crisis Recovery Mode WARNING! For your own protection, be sure you have a Crisis Recovery Diskette ready to use before executing Phlash. Page 69 Phoenix Phlash PhoenixBIOS 4.0 User's Manual Command Line Mode Use this mode to update or replace your current BIOS. To execute Phlash in this mode, move to the directory into which you have installed Phoenix Phlash and type the following: phlash Phoenix Phlash will automatically update or replace the current BIOS with the one which your OEM or dealer supplies you. Phlash may fail if your system is using memory managers, in which case the utility will display the following message: Cannot flash when memory managers are present. If you see this message after you execute Phlash, you must disable the memory manager on your system. To do so, follow the instructions in the following sections. Page 70 PhoenixBIOS 4.0 User's Manual Phoenix Phlash Disabling Memory Managers To avoid failure when flashing, you must disable the memory managers that load from CONFIG.SYS and AUTOEXEC.BAT. There are two recommended procedures for disabling the memory managers. One consists of pressing the <F5> key (only if you are using DOS 5.0 or above), and the other requires the creation of a boot diskette. Page 71 Phoenix Phlash PhoenixBIOS 4.0 User's Manual DOS 5.0 (or later version) For DOS 5.0 and later, follow the two steps below to disable any memory managers on your system. If you are not using at least DOS 5.0, then you must create a boot diskette to bypass any memory managers (See Create a Boot Diskette, below). 1. Boot DOS 5.0 or later version. (In Windows 95, at the boot option screen, choose Option 8, "Boot to a previous version of DOS.") 2. When DOS displays the “Starting MS-DOS” message, press <F5>. After you press <F5>, DOS bypasses the CONFIG.SYS and AUTOEXEC.BAT files, and therefore does not load any memory managers. You can now execute Phlash. Page 72 PhoenixBIOS 4.0 User's Manual Phoenix Phlash Create a Boot Diskette To bypass memory managers in DOS versions previous to 5.0, follow this recommended procedure: 1. Insert a diskette into your A: drive. 2. Enter the following from the command line: Format A: /S 3. Reboot your system from the A: drive. Your system will now boot without loading the memory managers, and you can then execute Phlash. NOTE: The boot diskette you create here is distinct from a Crisis Recovery Diskette. See previous pages for details about creating the Crisis Recovery Diskette. Crisis Recovery Mode You should only have to operate Phoenix Phlash in this mode only if your system does not boot the operating system when you turn on or reset your computer. In these cases, the BIOS on the Flash ROM has probably been corrupted. Boot your system with the Crisis Recovery Diskette taking these steps: 1. Insert the Crisis Recovery diskette (which your dealer supplied or one that you should have created from the instructions above) into drive A:. 2. Reset your computer, power on-off, or press <Ctrl> <Alt> <Del> to reboot the system. 3. When your system reboots, Phoenix Phlash will restore the BIOS from the diskette and successfully boot the operating system. Page 73 Index Index <Esc> 59 <F1> 56 <F1> 61 <F2> 56, 60 <F3> 56 32-Bit I/O 13 Autotype 11 BIOS.ROM 68 Boot First Menu 59, 65 cache 20, 21 Cache 56 CMOS 49 error 54, 55, 56 save Setup values 49 COM port 30 CRISDISK 69 CRISDISK.BAT 68, 69 CRISDISK.ZIP 68 Crisis disk 68 Crisis Recovery disk 73 Crisis Recovery Diskette 68 cursor 7 date 10 device configuration 28 Direct Memory Access 55 diskette 10 controller 31, 33 DMA 55 error address conflict 55 exit menu 48 extended memory 10 Fast PIO 13 Flash ROM 68 floppy drive - see diskette floppy seek 15 Full On 41 help window 8 I/O device error 56 I/O chip 28 IDE disk adapters 11 Large Disk Mode 19, 23 legend bar 7 Page 74 PhoenixBIOS 4.0 User's Manual LPT port 32 MAKEBOOT.EXE 68 memory 10 menu bar 6 MINIDOS.SYS 68, 69 MultiBoot 58, 59 multi-Sector Transfers 13 NMI 55 Non-Maskable Interrupt 55 NVRAM error 56 OEM screen 58 option ROM QuietBoot 62 Option ROM 56 Parity Check 56 password 38 PCI 22 Peripheral Component Interconnect 22 Phlash 68 PHLASH.EXE 68, 69 PLATFORM.BIN 68 POST <ESC> 59 <F2> 60 option ROM 62 Power Management 41 PS/2 Mouse 33, 56 QuietBoot 58 QuietBoot 58 RAM extended 56 ROM default values 49 security 38 Setup 56 get CMOS values 52 get ROM defaults 51 help window 8 MultiBoot 59 QuietBoot 59 save values to CMOS 49 start 4 Setup Boot Menu 64 shadow 56 PhoenixBIOS 4.0 User's Manual Index Shadow 56 Standby 41 sub menu 7 summary screen 15 system resources 28 time-of-day 10 UMB 57 UMB recovery 57 Update Disk 67 Upper Memory Blocks 57 VGABIOS.EXE 69 wait states 55 Page 75 Appendix : POST Codes POST Errors and Beep Codes Recoverable POST Errors Whenever a recoverable error occurs during POST, PhoenixBIOS displays an error message describing the problem. PhoenixBIOS also issues a beep code (one long tone followed by two short tones) during POST if the video configuration fails (no card installed or faulty) or if an external ROM module does not properly checksum to zero. An external ROM module (e.g. VGA) can also issue audible errors, usually consisting of one long tone followed by a series of short tones. Terminal POST Errors There are several POST routines that issue a POST Terminal Error and shut down the system if they fail. Before shutting down the system, the terminal-error handler issues a beep code signifying the test point error, writes the error to port 80h, attempts to initialize the video, and writes the error in the upper left corner of the screen (using both mono and color adapters). The routine derives the beep code from the test point error as follows: 1. The 8-bit error code is broken down to four 2-bit groups (Discard the most significant group if it is 00). 2. Each group is made one-based (1 through 4) by adding 1. 3. Short beeps are generated for the number in each group. Example: Testpoint 01Ah = 00 01 10 10 = 1-2-3-3 beeps Test Points and Beep Codes At the beginning of each POST routine, the BIOS outputs the test point error code to I/O address 80h. Use this code during trouble shooting to establish at what point the system failed and what routine was being performed. Phoenix Technologies, Ltd. Page 1 Appendix : POST Codes Some motherboards are equipped with a seven-segment LED display that displays the current value of port 80h. For production boards which do not contain the LED display, you can purchase a card that performs the same function. If the BIOS detects a terminal error condition, it halts POST after issuing a terminal error beep code (See above) and attempting to display the error code on upper left corner of the screen and on the port 80h LED display. It attempts repeatedly to write the error to the screen. This may cause "hash" on some CGA displays. If the system hangs before the BIOS can process the error, the value displayed at the port 80h is the last test performed. In this case, the screen does not display the error code. The following is a list of the checkpoint codes written at the start of each test and the beep codes issued for terminal errors. Unless otherwise noted, these codes are valid for PhoenixBIOS 4.0 Release 6.0. Code 02h 03h 04h 06h 07h 08h 09h 0Ah 0Bh 0Ch 0Eh 0Fh 10h 11h 12h 13h 14h 16h 17h 18h 1Ah 1Ch 20h 22h Page 2 Beeps 1-2-2-3 1-3-1-1 1-3-1-3 POST Routine Description Verify Real Mode Disable Non-Maskable Interrupt (NMI) Get CPU type Initialize system hardware Disable shadow and execute code from the ROM. Initialize chipset with initial POST values Set IN POST flag Initialize CPU registers Enable CPU cache Initialize caches to initial POST values Initialize I/O component Initialize the local bus IDE Initialize Power Management Load alternate registers with initial POST values Restore CPU control word during warm boot Initialize PCI Bus Mastering devices Initialize keyboard controller BIOS ROM checksum Initialize cache before memory Autosize 8254 timer initialization 8237 DMA controller initialization Reset Programmable Interrupt Controller Test DRAM refresh Test 8742 Keyboard Controller Phoenix Technologies Ltd. Appendix : POST Codes Code 24h 28h 29h 2Ah 2Ch 2Eh 2Fh 32h 33h 36h 38h 3Ah 3Ch 3Dh 41h 42h 45h 46h 47h 48h 49h 4Ah 4Bh 4Ch 4Eh 4Fh 50h 51h 52h 54h 55h 58h 59h 5Ah 5Bh 5Ch 60h 62h 64h 66h 67h 68h 69h Beeps 1-3-4-1 1-3-4-3 2-1-2-3 2-2-3-1 Phoenix Technologies, Ltd. POST Routine Description Set ES segment register to 4 GB Autosize DRAM Initialize POST Memory Manager Clear 512 kB base RAM RAM failure on address line xxxx* RAM failure on data bits xxxx* of low byte of memory bus Enable cache before system BIOS shadow Test CPU bus-clock frequency Initialize Phoenix Dispatch Manager Warm start shut down Shadow system BIOS ROM Autosize cache Advanced configuration of chipset registers Load alternate registers with CMOS values Initialize extended memory for RomPilot Initialize interrupt vectors POST device initialization Check ROM copyright notice Initialize I20 support Check video configuration against CMOS Initialize PCI bus and devices Initialize all video adapters in system QuietBoot start (optional) Shadow video BIOS ROM Display BIOS copyright notice Initialize MultiBoot Display CPU type and speed Initialize EISA board Test keyboard Set key click if enabled Enable USB devices Test for unexpected interrupts Initialize POST display service Display prompt "Press F2 to enter SETUP" Disable CPU cache Test RAM between 512 and 640 kB Test extended memory Test extended memory address lines Jump to UserPatch1 Configure advanced cache registers Initialize Multi Processor APIC Enable external and CPU caches Setup System Management Mode (SMM) area Page 3 Appendix : POST Codes Code 6Ah 6Bh 6Ch 6Eh 70h 72h 76h 7Ch 7Dh 7Eh 80h 81h 82h 83h 84h 85h 86h 87h 88h 89h 8Ah 8Bh 8Ch 8Fh 90h 91h 92h 93h 95h 96h 97h 98h 99h 9Ah 9Ch 9Dh 9Eh 9Fh A0h A2h A4h A8h Page 4 Beeps 1-2 POST Routine Description Display external L2 cache size Load custom defaults (optional) Display shadow-area message Display possible high address for UMB recovery Display error messages Check for configuration errors Check for keyboard errors Set up hardware interrupt vectors Initialilze Intelligent System Monitoring Initialize coprocessor if present Disable onboard Super I/O ports and IRQs Late POST device initialization Detect and install external RS232 ports Configure non-MCD IDE controllers Detect and install external parallel ports Initialize PC-compatible PnP ISA devices Re-initialize onboard I/O ports. Configure Motheboard Configurable Devices (optional) Initialize BIOS Data Area Enable Non-Maskable Interrupts (NMIs) Initialize Extended BIOS Data Area Test and initialize PS/2 mouse Initialize floppy controller Determine number of ATA drives (optional) Initialize hard-disk controllers Initialize local-bus hard-disk controllers Jump to UserPatch2 Build MPTABLE for multi-processor boards Install CD ROM for boot Clear huge ES segment register Fixup Multi Processor table Search for option ROMs. One long, two short beeps on checksum failure Check for SMART Drive (optional) Shadow option ROMs Set up Power Management Initialize security engine (optional) Enable hardware interrupts Determine number of ATA and SCSI drives Set time of day Check key lock Initialize typematic rate Erase F2 prompt Phoenix Technologies Ltd. Appendix : POST Codes Code AAh ACh AEh B0h B1h B2h B4h B5h B6h B7h B9h BAh BBh BCh BDh BEh BFh C0h C1h C2h C3h C4h C5h C6h C7h C8h C9h CAh CBh Beeps 1 CCh CDh CEh D2h E0h E1h E2h E3h E4h E5h E6h Phoenix Technologies, Ltd. POST Routine Description Scan for F2 key stroke Enter SETUP Clear Boot flag Check for errors Inform RomPilot about the end of POST. POST done - prepare to boot operating system One short beep before boot Terminate QuietBoot (optional) Check password (optional) Initialize ACPI BIOS Prepare Boot Initialize DMI parameters Initialize PnP Option ROMs Clear parity checkers Display MultiBoot menu Clear screen (optional) Check virus and backup reminders Try to boot with INT 19 Initialize POST Error Manager (PEM) Initialize error logging Initialize error display function Initialize system error handler PnPnd dual CMOS (optional) Initialize note dock (optional) Initialize note dock late Force check (optional) Extended checksum (optional) Redirect Int 15h to enable remote keyboard Redirect Int 13h to Memory Technologies Devices such as ROM, RAM, PCMCIA, and serial disk Redirect Int 10h to enable remote serial video Remap I/O and memory for PCMCIA Initialize digitizer and display message Unknown interrupt The following are for boot block in Flash ROM Initialize the chipset Initialize the bridge Initialize the CPU Initialize system timer Initialize system I/O Check force recovery boot Checksum BIOS ROM Page 5 Appendix : POST Codes Code E7h E8h E9h EAh EBh ECh EDh EEh EFh F0h F1h F2h F3h F4h F5h F6h F7h Beeps POST Routine Description Go to BIOS Set Huge Segment Initialize Multi Processor Initialilze OEM special code Initialize PIC and DMA Initialize Memory type Initialize Memory size Shadow Boot Block System memory test Initialize interrupt vectors Initialize Run Time Clock Initialize video Initialize System Management Manager Output one beep Boot to Mini DOS Clear Huge Segment Boot to Full DOS * If the BIOS detects error 2C, 2E, or 30 (base 512K RAM error), it displays an additional word-bitmap (xxxx) indicating the address line or bits that failed. For example, "2C 0002" means address line 1 (bit one set) has failed. "2E 1020" means data bits 12 and 5 (bits 12 and 5 set) have failed in the lower 16 bits. Note that error 30 cannot occur on 386SX systems because they have a 16 rather than 32-bit bus. The BIOS also sends the bitmap to the port-80 LED display. It first displays the check point code, followed by a delay, the high-order byte, another delay, and then the low-order byte of the error. It repeats this sequence continuously. Page 6 Phoenix Technologies Ltd.