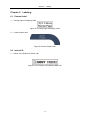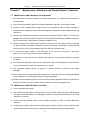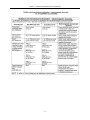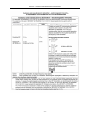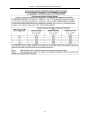
1
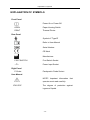
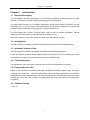
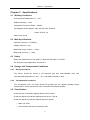
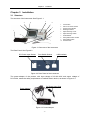
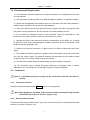
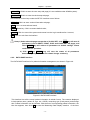
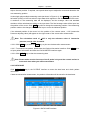
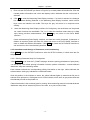
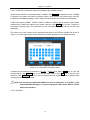
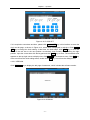
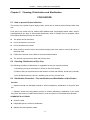
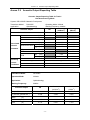
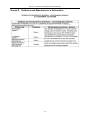
Address: 9990 NW 14ST Suite 105 Doral, FL 33172 Phone: +1‐888‐334‐4640 Fax: +1‐786‐621‐1842 Email: [email protected] CONTENTS CONTENTS PRECAUTIONS ................................................................................................................................................. IV WARNINGS......................................................................................................................................................... IV CAUTIONS.......................................................................................................................................................... VI EXPLANATION OF SYMBOLS ..................................................................................................................... VII CHAPTER 1 INTRODUCTION ....................................................................................................................... 1 1.1 GENERAL DESCRIPTION ........................................................................................................................ 1 1.2 INTENDED USE ....................................................................................................................................... 1 1.3 INTENDED LOCATION OF USE ................................................................................................................ 1 1.4 CONTRAINDICATIONS ............................................................................................................................. 1 1.5 EXPECTED SERVICE LIFE....................................................................................................................... 1 1.6 SOFTWARE VERSION ............................................................................................................................. 1 CHAPTER 2 SPECIFICATIONS ..................................................................................................................... 2 2.1 WORKING CONDITIONS .......................................................................................................................... 2 2.2 MAIN SPECIFICATIONS ........................................................................................................................... 2 2.3 SAFETY ................................................................................................................................................... 2 2.4 STORAGE AND TRANSPORTATION CONDITIONS .................................................................................... 2 2.4.1 Storage Conditions....................................................................................................................... 2 2.4.2 Transportation Conditions ......................................................................................................... 2 2.5 CLASSIFICATION ..................................................................................................................................... 2 CHAPTER 3 INSTALLATION ......................................................................................................................... 4 3.1 STRUCTURE ............................................................................................................................................ 4 3.2 ENVIRONMENTAL REQUIREMENTS ......................................................................................................... 5 3.3 CONNECTION .......................................................................................................................................... 5 3.3.1. Connection of Probe ................................................................................................................ 5 3.3.2. Disconnection of Probe ........................................................................................................... 5 3.3.3. Connection of Power Supply ................................................................................................. 6 3.3.4. Disconnection of Power Supply ............................................................................................ 6 3.3.5. Connection of Foot Switch ..................................................................................................... 7 3.3.6. Replacement of Printing Paper.............................................................................................. 7 CHAPTER 4 OPERATION............................................................................................................................... 8 4.1 STARTUP AND SHUTDOWN ..................................................................................................................... 8 4.1.1. Check before Startup ............................................................................................................... 8 4.1.2. Startup Procedure ..................................................................................................................... 8 4.1.3. Check before Use ...................................................................................................................... 8 4.1.4. Shutdown Procedure ............................................................................................................... 9 4.2 INTERFACE INTRODUCTION .................................................................................................................... 9 4.2.1. Startup Interface ........................................................................................................................ 9 4.2.2. PACHYMETER Interface ........................................................................................................ 10 -I- CONTENTS 4.2.3. Patient Interface (Patient Information Interface) ............................................................. 12 4.2.4. SETUP Interface ...................................................................................................................... 13 4.2.5. DATA BASE Interface............................................................................................................. 14 4.3 OPERATION .......................................................................................................................................... 15 4.3.1 Positioning ...................................................................................................................................... 15 4.3.2 Pachymetry...................................................................................................................................... 15 4.3.3 DATA BASE ..................................................................................................................................... 16 4.3.4 Display of Saved Information ..................................................................................................... 17 4.3.5 Amendment and Storage of Parameters, and Clock Setting .............................................. 18 CHAPTER 5 CLEANING, DISINFECTION AND STERILIZATION ......................................................... 22 FOR EUROPE: ............................................................................................................................................... 22 5.1 HOW TO PREVENT CROSS-INFECTION ................................................................................................. 22 5.2 CLEANING, DISINFECTION OF EYE CUP ............................................................................................... 22 5.3 STERILIZATION PROCEDURE – PRE-STERILIZATION AND STERILIZATION OF THE PROBES ............... 22 5.4 PREPARATION OF STERILIZATION AGENT ............................................................................................ 23 5.5 STANDARD METHOD ............................................................................................................................ 24 FOR U.S.A ...................................................................................................................................................... 27 5.6 CLEANING OF THE MAIN UNIT OF GRU-5000P .................................................................................. 27 5.7 HOW TO PREVENT CROSS-INFECTION ................................................................................................ 27 5.8 METHOD ............................................................................................................................................... 27 5.8.1 Preparation ...................................................................................................................................... 27 5.8.2 Thorough Cleaning ........................................................................................................................ 28 5.8.3 Disinfection ..................................................................................................................................... 28 5.8.4 Rinsing after Disinfection ............................................................................................................ 29 CHAPTER 6 LABELING................................................................................................................................ 30 6.1 EXTERNAL LABEL ................................................................................................................................ 30 6.2 INTERNAL ID ......................................................................................................................................... 30 CHAPTER 7 MAINTENANCE, ATTENTIONS AND SIMPLE DEFECTS TREATMENT ..................... 31 7.1 MAINTENANCE AND ATTENTIONS TO INSTRUMENT ............................................................................. 31 7.2 MAINTENANCE AND ATTENTIONS TO PROBE ....................................................................................... 31 7.3 MAINTENANCE OF LCD SCREEN......................................................................................................... 32 7.4 TROUBLE SHOOTING............................................................................................................................ 32 CHAPTER 8 SERVICE AND SUPPORT INFORMATION ........................................................................ 34 8.1 WARRANTY ........................................................................................................................................... 34 8.2 ACCESSORIES AND MATERIALS........................................................................................................... 34 8.2.1 Consumables ........................................................................................................................... 34 8.2.2 Detachable Parts ..................................................................................................................... 34 8.2.3 Materials .................................................................................................................................... 34 8.3 SOFTWARE UPDATE AND SERVICES .................................................................................................... 34 ANNEX A PRUDENT USE STATEMENT.................................................................................................... 36 - II - CONTENTS A.1 STATEMENT .......................................................................................................................................... 36 A.2 PRINCIPLE OF ALARA(AS LOW AS REASONABLY ACHIEVABLE) ................................................ 36 ANNEX B PROMPT MESSAGE................................................................................................................... 37 ANNEX C.1 ACOUSTIC OUTPUT REPORT (IEC60601-2-37) ............................................................... 38 ANNEX C.2 ACOUSTIC OUTPUT REPORTING TABLE ........................................................................ 39 ANNEX D GUIDANCE AND MANUFACTURER’S DECLARATION ...................................................... 40 ANNEX E REFERENCES.............................................................................................................................. 44 - III - Precautions and Warnings PRECAUTIONS The device should be operated by trained technicians. It is prohibited to use the device on patients with eye trauma, inflammation or infection. Please read the manual carefully before installation and operation Please refer to Chapter 5. Cleaning, Disinfection and Sterilization to avoid cross-infection while using. Disconnect AC power before cleaning the housing case. Please refer to Chapter 7. Maintenance, Attentions and Simple Defects Treatment for maintenance attentions. WARNINGS The customer is fully responsible for maintenance and management of the instrument after purchasing. Do not make any modification to the software and hardware of the device without authorization. The power adaptor provided with the device meets the safety standard of medical electrical devices. If damaged, contact the Manufacturer to purchase. Use of other adaptors may cause safety risk. The manufacturer won't be responsible for any damage or injury caused by any failure to follow the instructions in the User Manual. The manufacturer reserves the right to modify equipment characteristics without previous notice under FDA Laws and MDD (93/42/EEC) Regulation. The quality guarantee of the device will be invalid if it is opened (even partially), modified or repaired in any way by anyone who is not authorized by the manufacturer. ____________________ This device is not intended for therapeutic use. It is prohibited to use the device on patients with eye trauma, inflammation or infection. The device should be used cautiously on patients without independent behavior abilities or who are highly sensitive to contacting measurements, whose ineffective cooperation may result in inaccurate measurements. - IV - Precautions and Warnings According to FDA laws, the GRU-5000 is a prescription Device and is to be used by or under the supervision of a licensed physician. This device is not intended for fetal use. While plugging in the probe, make sure the red mark on the probe align with the red mark on the socket. While unplugging the probe, please be sure you are pulling the connector instead of the cable. Do not scratch the surface of the probe. Do not drop the probes. If the probe drops during using or moving, check the top and the housing of probe carefully, and then check if it works well. Stop using if there is any problem and contact the manufacturer or local distributor for service. Warnings of predicable potential hazards are contained in the User Manual. Please maintain vigilance at any time to those unpredictable hazards. The manufacturer won’t be responsible for damages and losses caused by negligence or ignorance of the preventive measures in the User Manual. The assembly, expanding, readjustment, improvement and repair should be operated by personnel authorized by the manufacturer. Do not open the housing for repair without permission. The manufacturer won’t be responsible for the consequences of safety and effectiveness caused by unauthorized repair. Keep the original package properly. All detachable accessories should be put into the original package before moving and transportation. Without written consent of the manufacturer, no individual or organization is allowed to copy, modify, or translate any part of the User Manual. For any question, please contact the Manufacturer or your Local Distributor -V- Caution CAUTIONS HOW TO PREVENT CROSS-INFECTION It is prohibited to use the device on patients with eye trauma, inflammation or infection. Between uses on different patients, the probe and eye cup must be thoroughly cleaned and disinfected to prevent cross-infection. The Manufacturer advocates a preventive action and a cleaning procedure in Chapter 5. Cleaning, Disinfection and Sterilization. ____________________ CAUTION Federal (US) Law restricts this device to sale by or on the order of a physician. _____________________ TISSUE EXPOSURE TO ULTRASOUND ENERGY: The GRU-5000 is designed for use in ophthalmology only. While the manufacturer is not aware of any reports of adverse effects from using ophthalmic ultrasound scanner, even at FDA pre-enactment levels, no other use is intended or implied. The system controls limit of the output energy within the parameters specified for its intended purpose. Please refer to Annex A of the User Manual. No control of ultrasound energy is available to the users other than the duration of exposure, considering the current concern for possible unknown hazards, and despite the extremely low output intensities used in this ultrasound system. The manufacturer recommends that patients’ exposure time during measurement be minimized. - VI - Explanation of Symbols EXPLANATION OF SYMBOLS Front Panel Power On or Power Off OPEN Paper Housing Switch PRINT Thermal Printer Rear Panel Symbol of "Type B" Refer to User Manual Serial Number CE Mark Manufacturer FOOT SWITCH Foot Switch Socket Power Input Socket Right Panel P-Probe Pachymetric Probe Socket User Manual NOTE! Important information that operator must read carefully. IPX1/IPX7 The degree of protection against ingress of liquids - VII - Chapter 1 Introduction Chapter 1 Introduction 1.1 General Description The GRU-5000P Ultrasonic Pachymeter is an ultrasonic measuring instrument based on pulse reflection. It comprises Corneal Thickness Measuring Unit (Pachymeter). The Pachymeter consists of a 15-20MHz pachymetric probe (probe model: Prb1000P) and the measuring unit. It is on the basis of the measurement of time interval between the anterior and posterior interface reflection waves to get the corneal thickness (CT). The GRU-5000P has a built-in Thermal Printer, used to print out patient information, corneal thickness measuring result and corneal thickness distribution map. The built-in memory of the GRU-5000P can store up to 180 patients' records. 1.2 Intended Use The GRU-5000P is intended for corneal thickness measurement in clinical ophthalmology. 1.3 Intended Location of Use The GRU-5000P is suitable to be applied in hospitals and ophthalmology clinics. As the foot switch's protective degree against ingress of liquids is IPX1, it is not suitable to be used in operating room and other locations where it is easy to splash liquid. 1.4 Contraindications It is prohibited to use the device on patients with eye trauma, inflammation or infection. 1.5 Expected Service Life Based on the experience of products sold (and considering technology update cycle), as well as the aging of the major part – transducer will probably reduce the basic performance, the product's expected service life is determined as five years according to the normal usage of six hours each working day. (Service life may extend if the major parts, like probe, are returned to manufacturer for update.) 1.6 Software Version V1.0.0.10 -1- Chapter 2 Specifications Chapter 2 Specifications 2.1 Working Conditions Environmental Temperature: 5℃-40℃ Relative Humidity: ≤80% Atmospheric Pressure: 70kPa-106kPa The Separate Power Supply: Input: AC100~240V, 50/60Hz, Output: DC12V, 4A Rate Power: 50 VA 2.2 Main Specifications Ultrasonic frequency: 15-20MHz; Display resolution: 1µm; Measuring scope: 0.23mm~1.2mm; Measuring accuracy: ≤±5µm 2.3 Safety Satisfy the requirements of IEC 60601-1:2005 and IEC 60601-2-37:2007. The acoustic output parameters: see Annex C. 2.4 Storage and Transportation Conditions 2.4.1 Storage Conditions The device should be stored in non-corrosive gas and well-ventilated room with environmental temperature of -20℃-40℃ and relative Humidity≤80%. 2.4.2 Transportation Conditions The accessories such as Probe should be packed into the original package before transportation. Severe impact and crash, rain and snow shall be avoided. 2.5 Classification As per the type of protection against electric shock: Class I As per the degree of protection against electric shock: Type B As per the degree of protection against ingress of liquids: — Main unit: IPX0; — Part of Probe that can be immersed: IPX7; -2- Chapter 2 Specifications — Foot switch: IPX1 As per the disinfection and sterilization method recommended by the manufacturer: — see §5 Cleaning, Disinfection and Sterilization. As per the safety degree when used under flammable anesthetic gas mixed with air or under flammable anesthetic gas mixed with oxygen or Nitrous oxide: not allowed. As per working mode: continuous working -3- Chapter 3 Installation Chapter 3 Installation 3.1 Structure The structure of the instrument: See Figure 3.1. 3 5 4 6 1. 2. 3. 4. 5. 6. 7. 8. 9. 10. 2 7 1 8 9 Foot Switch Color LCD Touch Screen Power Input Indicator Working Indicator Paper Housing Cover Paper Housing Switch Probe Holder Pachymeter Probe Socket Pachymeter Probe Power Switch 10 Figure 3.1 Structure of the Instrument The Rear Panel: See Figure3.2 DC Power Input Socket Foot Switch Socket USB Interface Figure 3.2 Rear Panel of the Instrument The power adaptor of the product, with input voltage of AC100-240V and output voltage of DC12V/4A, meets the safety requirements of medical electric device, as shown in Figure 3.3: DC Power Input Plug Power Adaptor Figure 3.3 Power Adaptor -4- Chapter 3 Installation 3.2 Environmental Requirements 1) The instrument should be operated in a clean environment. Air-conditioned environment is recommended. 2) The instrument should be placed on a stable worktable or platform. Avoid direct sunlight. 3) Please use the supplied Power Adaptor which is in accordance with the safety standard of medical electric equipment; do not use any other adaptors. 4) The power outlet should be with good grounding. Improper connection of protective earth may cause not only interference, but also the risk of increasing leakage current. 5) Do not block the ventilation window of the instrument. When the temperature of the instrument is not normal, please contact the manufacturer for service. 6) Although the EMC of the instrument meets the requirements of IEC 60601-1-2, it should be placed to avoid strong electromagnetic radiation equipment (such as microwave, radio frequency therapy equipment, etc.). 7) Please do not put the instrument in a place where it is difficult to disconnect the power supply. 8) The instrument should be placed in a position where the operator can face the instrument and view the screen easily. The distance between the instrument and the patient should enable the probe to contact the patient's eye conveniently. 9) The instrument should always be placed safely to prevent falling of the probe. 10) The instrument has no special protective measures for discharge effect of cardiac defibrillators; it is not suitable for use with high-frequency surgical equipment. 3.3 Connection Note: It is prohibited to plug in or plug out any accessories while the instrument is running. 3.3.1. Connection of Probe Plug the Pachymeter probe into the P-Probe socket on the right panel. Note: While plugging in the probe, make sure the red mark on the probe align with the red mark on the socket, as shown in Figure 3.4 (a). 3.3.2. Disconnection of Probe To disconnect the probe, please hold the ring of the connector and pull it out along the horizontal direction, as shown in Figure 3.4 (b). -5- Chapter 3 Installation Note: Don't pull the probe cable strongly while unplugging the probe. (a) Connection of Probe (b) Disconnection of Probe Figure 3.4 Connection/Disconnection of Probe 3.3.3. Connection of Power Supply Figure 3.5 Connection of External Interface 1) Plug the DC Power Output Plug of the Power Adaptor in the Power Input Socket on the rear panel of the instrument; 2) Connect one end of the Power Cable with the Power Adaptor, and the other end to the wall outlet, as shown in Figure 3.5. 3.3.4. Disconnection of Power Supply 1)Turn off the Power Switch on the front panel; 2)Disconnect the main power plug of the Power Adaptor and the wall outlet. Note: Take care of safety while connecting or disconnecting the power supply. -6- Chapter 3 Installation 3.3.5. Connection of Foot Switch Plug the Foot Switch connector into the Foot Switch Socket on the rear panel of the instrument, as show in Figure 3.5. 3.3.6. Replacement of Printing Paper The built-in printer is a thermal printer that uses thermal printing paper. Please purchase and replace the printing paper according to the specific model provided by the Manufacturer, see §8.2.1 Consumables. Replacement of printing paper: 1) Press "OPEN" button to open the cover of the paper housing; 2) Take out the reel of the paper from the paper holder and add new paper, see Figure 3.6; Figure 3.6 Replacement of Printing Paper 3) Pull out the printing paper from the paper slot for about 1cm, and push lightly to close the cover of the paper housing. Pay attention not to let the paper stuck in the slot. Close the paper housing finally. Note: 1) If the paper doesn't run properly, please check installing method and reinstall. 2) The thermal paper has thermal side, when the paper runs normally but nothing printed out, please open the paper housing and reinstall the printing paper with the other side. -7- Chapter 4 Operation Chapter 4 Operation 4.1 Startup and Shutdown 4.1.1. Check before Startup Before the instrument is started up, please check: 1)Whether the instrument is put in a proper place and whether the equipment around may cause interference; 2)Whether the appearance of the instrument is fine and whether there is crack on the housing and LCD screen; 3)Whether the probe is connected properly, and whether there is crack or damage on the surface of probe and cable; whether the probe cables are intertwined or intertwined with other cables; 4)Whether the foot switch is connected properly and has mechanical response when press, and whether the foot switch cable is intertwined with other cables; 5)Whether there is printing paper; and 6)Whether the connection of power supply is completed and the Power Indicator lights up; whether the Power Cable is intertwined with other cables. 4.1.2. Startup Procedure 1)Make sure there is no problem and the Power Indicator lights up before the instrument is started. 2)Start the instrument: Press the Power Switch button on the Front Panel for over 2 seconds, the instrument starts working. Now the Working Indicator lights up and the main interface appears on the screen. 4.1.3. Check before Use After the instrument is started up, please check: 1) Whether the Working Indicator lights up; 2) Whether the touch screen is effective; 3) The parameter setting, following §4.3.5 Amendment and Storage of Parameters, and Clock Setting for operation in detail; and 4) Whether disinfection of the probe has been carried out as required; whether the surface of the probe is deformed or damaged and whether the probe cable is damaged. In case eye cup is used, check whether the eye cup has been disinfected and whether there is visible damage. -8- Chapter 4 Operation 4.1.4. Shutdown Procedure While the instrument is switched on, press the Power Switch on the front panel for 2 seconds, the instrument will switch off. Place the instrument and its accessories properly after shutdown: 1) Put the probe into the probe holder and make sure the probe cable can't be dragged by accident, or disconnect the probe and put it properly; 2) Put the foot switch properly and make sure the foot switch cable is placed properly to prevent others from stumbling by the cable and drop of instrument; 3) Plug out the Main Power Plug of the Power Adaptor cable and put it properly. 4.2 Interface Introduction 4.2.1. Startup Interface Switching on the GRU-5000P, the buzzer will beep shortly and then enter the Login Interface (see Figure 4.1). Figure 4.1 Login Interface Click ENTER key directly under the Login Interface will enter the PACHYMETER Interface of the default ADMIN user system. Click ▼ to select other user system, see Figure 4.3; after selection, click ENTER key to enter the corresponding PACHYMETER Interface of the relevant user system. See §4.3.5 for amendment of the user name, in which ADMIN is the particular system name that can’t be amended. -9- Chapter 4 Operation Figure 4.2 System Selection Interface 4.2.2. PACHYMETER Interface The PACHYMETER Interface is shown in Figure 4.3. Corneal Thickness Distribution Map Patient Information Display Area Figure 4.3 PACHYMETER Interface ↷ ↶ : Direction key. Use clockwise and counterclockwise arrows to control the cursor's forward and reverse circular motion. Thus determine the input position of measuring data; SAVE: Input key. Click it to save the current measuring value to the cursor's position; meanwhile the cursor will move to the next position; OS: OS/OD selection key. Click it to change left/right eye selection; SCAN: Start-to-measure key. Click it to start measuring; the color of key will be changed from light blue to green; CLEAR: Clear key. Click it to clear all measuring results; - 10 - Chapter 4 Operation MENU: Menu key. Click it to enter the MENU Interface; MEM: Memory key. Click it to save measuring results; PRINT: Print key. Click it to print out results; MANUAL: Manual or automatic selection key. Click it to select manual or automatic measurement, where there are five display statuses respectively Manual, AUTO(1), AUTO(2), AUTO(3) and SINGLE (Singe-Point Multiple Measurement). The corresponding corneal thickness distribution map will be changed also. DEL: Delete key under the Singe-Point Multiple Measurement Interface. Click it to delete the selected measuring result. The average value of each group and standard deviation displayed will be updated accordingly. Figure 4.4 Singe-Point Multiple Measurement (SINGLE) Interface Click the Patient Information Display Area at the bottom of the screen will enter the PATIENT Interface as well. - 11 - Chapter 4 Operation 4.2.3. Patient Interface (Patient Information Interface) Indicator Figure 4.5 PATIENT Interface (Patient Information Interface) In normal measuring interface, click the Patient Information Display Area at the bottom of the screen to enter the Patient Information Interface directly. The Patient Information Interface is used to input patient information, including patient name, ID, age, OS/OD and sex accordingly. Click the position of the corresponding key, the cursor appears, and then input the information. Patient name should be no more than 12 characters. Click the text box of NAME will call out the alphabetical keypad, click the keypad to enter patient name (as shown in Figure 4.6). Click the text box of NAME again to cancel the alphabetical keypad and complete inputting. ID is made up of 8 digits with the input range from 00000000 to 99999999, click the numerical key at the right side to input numbers when the cursor is located in the text box. Input age with the same method and the range for age is from 00 to 99. Figure 4.6 Patient Information Interface (Alphabetical Keypad) - 12 - Chapter 4 Operation There are two ways to select OS/OD: one is clicking OS/OD key, the OS and OD lights up alternatively (the indicator lights up means selected); the other is clicking the area of OS or OD directly for selection. Patient's sex can be set with the same method. PACHYMETER: Click it to choose returning to the PACHYMETER Interface; NEW: New Patient key. Click it, the Patient ID will be restored to default value, new patient information can be input at the moment, meanwhile all data measured in other interfaces will be cleared; DATABASE: Click it to enter the DATABASE interface; SETUP: Click it to enter the SETUP interface; Numerical keys are used to input number 0-9; the keys are used to control the left and right movement of the cursor respectively. Under the PATIENT Interface, in case of changing into other interfaces, the patient information entered will be displayed at the bottom of the screen. The displayed information contains: name, ID, age, sex and OS/OD for reference. If the information is not input, the default patient name is empty, the ID is: ------ and the age is: --. 4.2.4. SETUP Interface The Setup Interface, as shown in Figure 4.7. Tab Page Figure 4.7 SETUP Interface The Setup Interface consists of five parameter setup tab pages. Click the corresponding key to enter each tab page. P-PRINT: Click it to enter the print parameter tab page for Pachymeter; P-IOP: Click it to enter the IOP parameter tab page for Pachymeter; - 13 - Chapter 4 Operation LOGIN SET : Click it to enter the user setup tab page (it is not available under ADMIN system). CLOCK SET: Click it to enter the clock setup tab page; The functions of other keys under the SETUP Interface are as follows: VERSION: Click it to enter version information tab page; SAVE: Click it to save selected result; RESET: Reset key. Click it to restore default value; LOGOFF: Click it to cancel the system and reenter into the Login Interface after 1 second; EXIT: Click it to exit from the interface. Note:1) Under other tab pages except that of CLOCK SET, click SAVE key will save all parameters in the A-PRINT, P-RINT, P-IOP and LOGIN SET tab pages; and click PRESET key will restore all parameters to default settings. Please confirm before operation. 2) Click SAVE or PRESET key will save the status of all parameters automatically, so please make the related change cautiously. 4.2.5. DATA BASE Interface The DATA BASE Interface is for patient information management, as shown in Figure 4.8. Figure 4.8 DATA BASE Interface This interface lists all the saved patient information in tabular format. The contents displayed include patient name, patient ID, age, sex, OS/OD, measuring type (Pachymeter) and storage time. Patient information can be checked. Click the line of corresponding patient information, the blue bar appears, then click OK to enter the Measuring Data Display Interface - 14 - of the save Chapter 4 Operation information and observe the measuring result. (Please refer to §4.3.3 DATA BASE and §4.3.4 Display of Saved Information) CLEAR key is used to clear all the patient information, clicking this key will call out a dialog box to confirm the request of clear or not. Choose YES to clear all information which can not be restored; choose NO to exit directly. Click DELETE key to delete the selected information only. All deletions are not recoverable, please operate cautiously. Click EXIT key to exit. 4.3 Operation 4.3.1 Positioning Place the instrument beside the patient. The distance between should enable the probe to contact the patient's eye easily. The instrument should face the operator and the foot switch should be placed appropriately for operation. Please ensure the instrument is located safely and will not cause falling and hurting people by accidental operation. Switch on the instrument after completing the above steps. 4.3.2 Pachymetry 4.3.2.1 Click the Patient Information Display Area in the PACHYMETER Interface to enter the Patient Information Interface and input patient's information accordingly. The default patient name is empty, patient ID is: -----, age: -------, and sex: MALE. Please update the patient information in time to prevent any error. 4.3.2.2 Click the Patient Information Display Area at the bottom of the screen to enter the Patient Information Interface. Input patient's information as per the same method of §4.2.3 and then return to the PACHYMETER Interface. If patient information is not input, the system's default selection is OS and MALE, which appear in the Patient Information Display Area at the bottom of the screen. 4.3.2.3 Click MANUAL key to choose manual mode: MANUAL, automatic mode: AUTO(1), AUTO(2), AUTO(3) or enter the SINGLE interface. 4.3.2.4 Give surface anesthesia to the cornea to be tested, disinfect the front top of the P probe and make it dry. Press the foot switch, or click SCAN key and move the probe within 5 seconds onto the corresponding position of the cornea indicated by the corneal thickness distribution map cursor. Touch the cornea gently and make measurement. The measuring result appears in the dialogue box on the right top of the screen. The SCAN key is green during measurement and returns to light blue after measurement. If no suitable data acquired, the instrument will stop measurement after 5 seconds and return to the status ready for measurement. 4.3.2.5 Under automatic measuring mode, if suitable data are acquired, the instrument will input the value in the position of the cursor by itself, and then the cursor will skip to the next measuring position. Under manual measuring mode, it's required to click SAVE key or press the left switch (SAVE) of the foot switch to input data which appears in the position of the cursor, and then the cursor will - 15 - Chapter 4 Operation skip to the next position. If required, use up and down keys to adjust the cursor and determine the next measuring position. Under single-point multiple measuring mode (as shown in Figure 4.4), click SAVE key or press the left switch (SAVE) of the foot switch to input data which appears in the data box of the left cursor. A maximum of five measuring data will be displayed; and the average value and standard deviation will be calculated according to the input data. The final average value will be input into the position of the cursor. Click SAVE key will not change the measuring position. If the measuring position needs to be changed, use direction keys to move the indicated position. If the selected position of the cursor is in the position of the cornea center, △IOP (Intraocular Pressure adjusting value) will appear on the right center of the screen after measurement. Note: The calculation result of △IOP is only the reference value of intraocular pressure, see §4.3.5.2 for details. 4.3.2.6 Click MEM key to save or PRINT key to print out the data after measurement. 4.3.2.7 To measure new patient, please enter the Patient Information Interface. Click NEW key to re-input patient information and enter the PACHYMETER Interface again. 4.3.2.8 Click CLEAR key to clear the measuring data. Note: Please make sure the front top of the P probe is dry and the corneal surface is moist each time when you start measurement. 4.3.3 DATA BASE Click DATA BASE key in the PATIENT Interface to enter the data base and check patient information. If data are saved after measurement, the patient's information will be saved in the data base. Figure 4.9 DATA BASE Interface - 16 - Chapter 4 Operation The data base will display the saved patient information in tabular format, as shown in Figure 4.9. The displayed information include: patient name, ID, age, sex, OS/OD and type of measurement (Pachymeter). The operator can select the patient information (by clicking the position of the patient information, blue bar means selected). Click OK to call out the Measuring Data Display Interface and observe the measured result. At the moment, some of the functions are invalid in the Measuring Data Display Interface. The invalid function keys turn to grey and there is no response after clicking. Please refer to §4.3.4 for details. CLEAR key is used to clear all patients’ information. Click this key and the dialogue box will be called out to confirm the operation. Select "YES" to confirm clearance of all data. The data cleared are not recoverable. Select "NO" to exit without clearing. Click DELETE key to delete one patient's information. The use of DELETE key is similar with that of CLEAR key. Click EXIT key to exit. Note:1) All deletions are unrecoverable, so please operate cautiously. 2) The maximum storage capacity of the GRU-5000P is 180 items of patient information. Please process the data in time to prevent storage error. 3) When the information storage is large, the time required to read patient information will be longer, please wait patiently. 4.3.4 Display of Saved Information The GRU-5000P has the function of saving and displaying the measuring data. The saved measuring interface and data at the time of measuring can be loaded according to the operator's selection, which is convenient for observation and analysis. See Figure 4.10. Figure 4.10 Measuring Data Display Interface The operating method is as follows: - 17 - Chapter 4 Operation 1) Enter into the DATA BASE (as shown in Figure 4.9) to check patient information list. Click the needed patient information and a blue bar displays which indicates that the current item is selected. 2) Click OK to enter the Measuring Data Display Interface. If no item is selected, the dialogue box will indicate Nothing Selected. In the Measuring Data Display Interface, some function keys under the interface are invalid. The keys are grey and there is no response when clicking. 3) Under the Measuring Data Display Interface for Pachymetry, the saved data can be printed out. Other functions are unavailable. The "****" under this interface means there is no data input during previous measurements. Click BACK key can return to the DATA BASE Interface. Under the Measuring Data Display Interface, the data can not be processed. If clearance or deletion is required, please exit from this mode and return to the DATA BASE Interface to clear or delete the selected information. Click EXIT key under the DATA BASE Interface to exit and return to the normal working interface. 4.3.5 Amendment and Storage of Parameters, and Clock Setting Click SETUP key in the PATIENT Interface to enter the SETUP Interface, in which there are five tab pages. 4.3.5.1 Printing Parameter Setup for Pachymeter Click P_PRINT key to enter the P_PRINT tab page, where the printing parameters of pachymetry can be set up. The default printing information includes: patient information, corneal thickness distribution map and measuring results. Each indicator indicates the corresponding printing information on the right. Yellow indicates the selected status, while grey indicates the unselected status. Click the position of the indicator to select, the yellow indicator lights up means that this part is selected to be printed out. Click again to turn off the indicator, which turns to grey and means that the selected part will not be printed out. Patient information is the necessary part for printing; while measuring result and corneal thickness distribution map can be selected to print out one item, or to print out all of them. - 18 - Chapter 4 Operation Patient Information Corneal Thickness Distribution Map Measuring Result Figure 4.11 P_PRINT 4.3.5.2 IOP Parameter Setup Figure 4.12 IOP Parameter Setup Click P_IOP key to enter the IOP Parameter Setup tab page, as shown in Figure 4.12. The IOP (Intraocular Pressure) parameter consists of the Standard Central Corneal Thickness (Standard CCT) and IOP Coefficient. The deviation of the corneal thickness measuring value to the standard CCT can be substituted into the empirical formula to work out the IOP adjusting value (△IOP). The △IOP is only as the reference value of the IOP measurement. The system’s IOP parameter setting is: Standard CCT: 550 μ m, and IOP Coefficient: 0.50mmHg/10μm. The empirical formula is: △IOP = (Standard CCT – Measuring CCT) × IOP Coefficient. Note: Please refer to Annex D. Experienced doctors may amend the set value of the IOP parameter based on the relevant research results. Click the IOP parameter text box to make amendment, using the keypad to input data which can be used only after saving by clicking the SAVE key. - 19 - Chapter 4 Operation 4.3.5.3 LOGIN SET Parameter Setup (Unavailable under ADMIN System) Under startup selection, the default system is ADMIN, click ENTER key directly to enter. If ADMIN is selected, the system will enter the default setting, which means the printing setup and IOP parameter are all default settings. These values can be amended and saved after amendment. If other user system (USER1, USER2, USER3, USER4 or USER5) will be selected, click system selection key to select the required user system, and then click ENTER key to enter. The gain of this system, printing setup, IOP parameter and IOL calculating parameter can be set and used separately. The name of the user system can be amended and saved in the SETUP Interface as shown in Figure 4.13. When login again, the amended name will be displayed in the LOGIN Interface. Figure 4.13 LOGIN SET Parameter Setup Complete all amendments mentioned in §4.3.5.1~§4.3.5.3 and select SAVE key to save the selected result. Click RESET key to recover the initial values. Click EXIT key to exit from the interface. Click LOGOFF key to exit from the system and the system can be re-selected after entering into the LOGIN Interface. Note: The functions of SAVE and RESET will save all parameters in P_PRINT, P_IOP and LOGIN SET tab pages, or reset all settings to initial values. Please confirm before the operation. 4.3.5.4 Clock Set - 20 - Chapter 4 Operation Figure 4.14 CLOCK SET If it is required to reset date and time, please click CLOCK SET key in this interface to enter the clock set tab page, as shown in Figure 4.14, where time is displayed in real-time. Click CLOCK SET key to change the clock setting. At that time, the clock stops, click NEXT key to move the cursor in the text box to the next position successively and circularly until reaching the right position. Input the correct time with the keypad and click SAVE key to store. The amended value appears on the top right corner to display time. Click RESET key to restore to zero. Click EXIT key once to exit from the clock editing status; double click EXIT key to exit from the dialogue box. 4.3.5.5 VERSION Click VERSION key to display the tab page of statement, which includes the software version. Figure 4.15 VERSION - 21 - Chapter 5 Cleaning, Disinfection and Sterilization Chapter 5 Cleaning, Disinfection and Sterilization FOR EUROPE: 5.1 How to prevent Cross-Infection The surface of the probe must be always clean, which can be cleaned with soft tissue after each use. Front part of the probe may be washed with distilled water, physiological saline water, alcohol, chloramphenicol eye drop or Cidex liquid disinfectant, which is usually found in hospitals. Other FDA-cleared disinfectants may also be used. The probe can be immersed. Do not immerse the connector. Do not autoclave the probes. After cleaning, rinse the end of the probe thoroughly with clean water to remove all traces of the liquid used. Follow the instruction on the label of commercial disinfectants. The surface should then be dried with lint-free cloth. 5.2 Cleaning, Disinfection of Eye Cup The following procedure of disinfection is suggested for the eye cups we provided: 1) Immerse eye cups in the solution of Cidex for about 20 minutes. 2) Take out the eye cups and remove the remains of Cidex with alcohol, and let it dry naturally. 3) Put the disinfected eye cups in a sterilizing tray (or box) for next uses. 5.3 Sterilization Procedure – Pre-sterilization and Sterilization of the Probes Forward: ---- Operator should use standard method to ensure satisfactory sterilization of the probe after use. ---- Operator should use risky-patient protocol to ensure satisfactory sterilization of the probe every time after use on a patient where there is a risk of infection of Creutzfeld-Jacob disease. OPERATOR’S CLOTHING One-off overall. Disposable gloves, sterile for sterilization. Glasses and anti-rejection masks. - 22 - Chapter 5 Cleaning, Disinfection and Sterilization EQUIPMENT Soft silk brush (surgical nail brush) 3×500 ml stainless steel (or plastic), autoclavable-soaking trays. One-off hand cloths. Distilled water. PRODUCTS Cleaning-predisinfectant: Aniosyme ® P.L.A. (Company: ANIOS), or predisinfectant: Alkazyme ® alcalin (Company: ALKAPHARM). The products must be diluted at 0.5% with warm water (25 ℃-30 ℃) from the tap or distilled water. The contents of the tray must be changed every day.℃ Disinfectant type Alkacide ® (Company ALKAPHARM). The product must be changed diluted at 5% with distilled water. The solution must be changed every day. 6 Chlorometric degree solution of sodium hypo chloride at 20 ℃. The contents of the tray must be changed after each use. Demineralized or distilled water. NOTES: Please disconnect the probes from the instrument. Please be sure the instrument is TURNED OFF before disconnecting probes. Avoid splashing liquids onto probe connectors (end of the cable, which is connected to the machine). 5.4 Preparation of Sterilization Agent STERILIZATION-PREDISINFECTION 1) Proteolytic enzyme based agents (2 possibilities) 1-0.5% Alkazyme solution in water (20g sachet) 2) Pour in 1L warm clean water (25-30℃) 3) Put in the unopened sachet. 4) Wait for 1 minute. 5) Pour in 4 L water and stir it. The Alkazyme solution can be used within 8 days if kept in sealed flasks. The solution can also be made up in a 4L recipient using demineralized or distilled water fill up the soaking tray from there. - 23 - Chapter 5 Cleaning, Disinfection and Sterilization OR: ---- 1-0.5% Aniozyme solution in water (25g sachet): 1) Pour in 1L warm water (25-30℃) 2) Put into the unopened sachet. 3) Wait for 1 minute 4) Pour in 4L warm water and stir. Sterilization Agent 1) ---- 1-0.5% Alkacide solution in water: 2) Pour 5L distilled in flask 3) Pour in the Alkacide 4) Stir it The Alkacide solution can be used within 8 days if kept in sealed flask. Please pour in soaking tray (500ml) when sterilization is necessary. Replacing Contents of soaking trays For frequent use, the contents of the trays should be replaced at the beginning of the morning and beginning of the afternoon. Wait 10 minutes after the last sterilization before emptying out the Alkazyme or Aniozyme solutions. 5.5 Standard Method NOTES: Please disconnect the probes from the machines. Machines must be turned off first. Please avoid splashing any liquid onto the electrical connectors. P- Probe Sterilization 1. Immerse the probe and the cable (except the 2. Clean the probe and the cable in the solution connector) in the solution of Alkazyme or with the brush for 1 minute. Aniozyme for 5 to 15 minutes depending on the perceived level of risk - 24 - Chapter 5 Cleaning, Disinfection and Sterilization 3. Rinse the probe and the cable in 4. Immerse the probe and the cable in the demineralized or distilled water. Do not wet the Alkacide solution for 5 to 20 minutes depending connectors. on the estimated level of risk. Please keep the connectors dry. 5. Rinsing Rinse the probe end with demineralized or distilled water keeping the connectors dry. 6. Drying Dry it with a sterile compress. 7. Now the probe is ready for use. METHOD FOR HIGH RISK PATIENTS NOTES: Please disconnect the probes from the machines. Machines must be turned off first. Please avoid splashing any liquid onto the electrical connectors. A) Sterilization & Pre-sterilization 1. Immerse the probe and the cable (except 2. Clean the probe and the cable in the Chosen connector) in a solution of Alkazyme or solution for 1 minute using the brush. Aniozyme for 5 to 15 minutes depending on the perceived level of risk. - 25 - Chapter 5 Cleaning, Disinfection and Sterilization B) Rinsing C) Sterilization 3. Rinse the probe and the cable with 4. Immerse the probe and the cable (except demineralized or distilled water. Please do not connector) in a 6 chlorometric degree solution splash liquid onto the connector. hypochloride for 60 min. at 20℃keeping the connectors dry. D) Rinsing 5. Rinse the probe and the cable with demineralized or distilled water. E) Disinfection 6. Dry with a sterile compress if the rinsing water was sterile. F) Rinsing 7. Rinse the probe end with demineralized or distilled water keeping the connectors dry G) Drying. 8. Dry with a sterile compress if the rinsing water was sterile. 9. The probe is ready for use. - 26 - Chapter 5 Cleaning, Disinfection and Sterilization FOR U.S.A 5.6 Cleaning of the Main Unit of GRU-5000P Use soft cloth with water or neutral cleanser (e.g. diluted Bianex® Special Efficiency Multi-Enzymatic Cleanser) to clean the instrument surface. For further disinfection, please use soft cloth with disinfectant solution (e.g. Sporicidin Sterilizing and Disinfecting Solution) to wipe the instrument surface. Remove the residual cleanser or disinfectant with clean soft cloth dampened in sterile water. Make sure the instrument is completely dry before using. Note: 1) Do not use any corrosive cleanser and disinfectant when cleaning the instrument surface; keep water and any other liquids away from the instrument. 2) Do not immerse the instrument in disinfectant solution. 5.7 How to Prevent Cross-Infection The probe that are intended to come in contact with mucous membranes, belong to semi-critical device. To prevent cross-infection, before initial use and in between patient use, the probe must be thoroughly cleaned and subjected to a germicidal process with a broad spectrum of activity. Note: It is prohibited to use the device on patients with eye trauma, inflammation or infection. 5.8 Method Before initial use and in between patient use, the P-Probe should be processed by high level disinfection. The recommended procedures are as below: 5.8.1 Preparation a) OPERATOR’S CLOTHING —— Liquid-proof gowns. —— Disposable gloves. —— Eye protection and face masks. b) EQUIPMENT —— Soft silk brush (surgical nail brush). —— Four glass containers larger than 500ml and capable of immersing the probe. —— One-off sterile cloth. - 27 - Chapter 5 Cleaning, Disinfection and Sterilization —— Sterile water. c) PRODUCTS —— Cleanser: Bianex® Special Efficiency Multi-Enzymatic Cleanser —— Disinfectant: Sporicidin Sterilizing and Disinfecting Solution (K003087) 5.8.2 Thorough Cleaning a) Prepare the cleaning solution by adding 1-2ml Bianex® Special Efficiency Multi-Enzymatic Cleanser into 500ml of sterile water. Additional amounts maybe required for hard-to-remove matter. The water temperature should be from 20℃ to 64℃. b) Immerse the P-Probe that need to be disinfected into the container with 500ml cleaning solution for 5 minutes (Do not immerse the probe connector). Clean the P-Probe carefully in the cleaning solution with a soft silk brush and shake it to wash; and then take it out and wipe off the cleaning solution with sterile cloth. c) Rinse the cleaned P-Probe by immersing it in 500ml sterile water for 1 minute. d) Drain the P-Probe and wipe it with sterile cloth. Note: 1) Disposable gloves, eye protection and liquid-proof gowns should be worn when cleaning soiled probe and/or eye up. 2) All detail information for Bianex® Special Efficiency Multi-Enzymatic Cleanser, please refer to the manufacturer’s instruction. 5.8.3 Disinfection Use disinfectant solution immersion method: a) Activate and prepare the disinfectant solution (Sporicidin Sterilizing and Disinfecting Solution) according to the manufacturer’s instructions. b) Sporicidin Indicators should be used before each use of this solution to determine whether glutaraldehyde is at or above its minimum concentration of 0.6% and phenol is at or above its minimum recommended concentration of 1.3%. Do not use beyond 14 days even if the respective concentration of active ingredients is above the minimum recommended concentration as indicated by the indicator strips. c) Disinfect the P-Probe by immersing it completely in about 500ml of disinfectant solution for a minimum of 20 minutes at 25℃. Please keep the probe connector dry during disinfection. d) Drain it and wipe off the disinfectant solution with sterile cloth. Note: 1) Disposable gloves, eye protection, face masks and liquid-proof gowns should be worn when disinfecting soiled probe and/or eye up. 2) Containers filled with disinfectant solution should be kept closed and stored - 28 - Chapter 5 Cleaning, Disinfection and Sterilization in a well ventilated, low traffic area at room temperature. 3) All detail information for Sporicidin Sterilizing and Disinfecting Solution, please refer to the manufacturer’s instruction. 5.8.4 Rinsing after Disinfection a) Thoroughly rinse the disinfected probe by immersing it in three separate copious volumes of 500ml sterile water. Each rinse should be a minimum of 1 minute in duration. Use fresh portions of water for each rinse. b) Take out the P-Probe, and let it dry naturally. c) After disinfection processing, put the P-Probe into a sterile box. Now the P-Probe is ready for use. Note: 1) Steam sterilization is prohibited. 2) Disconnect the probe from GRU-5000P before disinfection; the power of GRU-5000P should be turned off before disconnecting the probe, hold the probe cable connector, do not pull the probe cable; While connecting the probe, make sure the red mark on the probe align with the red mark on the socket. See Figure 3.4. 3) Do not immerse probe cable connector into water or other liquid; keep the probe cable connector dry throughout the disinfection process of probe. 4) After disinfection, check carefully whether the surface of the probe is deformed or damaged and whether the probe cable is damaged. In case of any abnormity, stop using and contact the manufacturer or your local distributor for service. - 29 - Chapter 6 Labeling Chapter 6 Labeling 6.1 External Label 1) Printing Paper Packaging Label Figure 6.1 Printing Paper Packaging Label 2) Probe Socket Label Figure 6.2 Probe Socket Label 6.2 Internal ID 1) Button cell: CR2032/3V, lithium cell Figure 6.3 ID of Button Cell inside the Main Unit - 30 - Chapter 7 Maintenance, Attentions and Simple Defects Treatment Chapter 7 Maintenance, Attentions and Simple Defects Treatment 7.1 Maintenance and Attentions to Instrument 1) The instrument should be operated in a clean environment. Air-conditioned environment is recommended. 2) The instrument should be placed on a stable worktable or platform. Avoid direct sunlight. 3) Please use the supplied Power Adaptor which is in accordance with the safety standard of medical electric equipment; do not use other adaptors or adaptors of other equipment with the instrument. 4) Although anti-interference measures which are in accordance with IEC 60601-1-2 have been adopted, the instrument should be placed to avoid strong electromagnetic radiation equipment (such as microwave, radio frequency therapy equipment, etc.) 5) Routine inspection and maintenance should be carried out only if the mains power is switched off. None corrosive detergent is allowed to clean the housing. Avoid water and liquid flowing into the housing. Only a mild detergent may be used with soft tissue cloth. 6) In humid area and/or season, if the instrument is not used for a long time, it should be power-on for one hour per month to get the damp out. 7) Avoid drop or severe shock when moving the instrument. Give particular attention to protect the probe. 8) Do not block the ventilation window of the instrument. When the temperature of the instrument is not normal, please contact the manufacturer for service. 9) The instrument should always be placed in a secure location to prevent probe falling damages. 10) The instrument has no special protective measures for discharge effect of cardiac defibrillators; it is not suitable for use with high-frequency surgical equipment 11) Please follow the related provisions of the local environment protection when the instrument is abandoned. Same way can be taken with the electronic devices (computers, etc). 7.2 Maintenance and Attentions to Probe 1) Do not autoclave the probes. 2) Don't wind the probe cable in coil less than 9 cm (3.5 inches); Check the probe cable regularly and stop using immediately if it is damaged or broken, contact the manufacturer or the local distributor for service. 3) Probe should be handled gently to avoid collision and drop, in order to prevent break and damage. 4) Avoid drop or scratch of the surface of probe when the probe is used or moved; make sure the probe is removed from the main unit and put into the packing bag during transportation. - 31 - Chapter 7 Maintenance, Attentions and Simple Defects Treatment 5) If the probe drops during using or moving, check the top and the housing of probe carefully, and then check if it works well. Stop using if there is any problem and contact the manufacturer or local distributor for service. 6) The whole probe cable including the cable plug is prohibited to be immersed into water or other liquid. 7) The connection and/or disconnection of probe should be done only if the system is powered off. While plugging in the probe, make sure the red mark on the probe align with that on the socket. Hold the probe plug and don't plug probe cable while plugging off the probe. 8) If the dialogue box on the screen prompts “PLEASE CHECK THE PROBE!”, it indicates the probe connection is abnormal. Click "OK" to close the dialogue box and check if the probe is well connected. 9) The probes provided with the instrument should be used in the instrument only and not be used for other purposes. 7.3 Maintenance of LCD Screen 1) Clean the LCD screen with glasses cloth, lens tissue or other soft material. 2) Don't touch the LCD screen with hard object, which will cause irreparable damage to the screen. 3) Avoid strong shock and vibration during transportation. 4) Complete the touch-screen operation with finger belly. 7.4 Trouble Shooting 1) In case of connection failure, please check first if the power supply and probe are well connected. 2) In case of printing failure, please check first if it is out of printing paper or paper jam. 3) In case of clock failure which can not be restored by restarting, possibly, the clock battery is used up. The battery can't be replaced by operator, please contact your distributor for repair. 4) In case of display or operation failure, please switch off the power and restart, check if it is back to normal. 5) In case of overheat or other abnormalities, please switch off the mains power immediately to prevent danger. 6) The over-current protection fuse is sealed inside the power adaptor and can't be replaced by user. If the power adaptor has no DC output, please pull out the main power plug and contact the manufacturer for repair. If above operations are not effective, please don’t open the housing without authorization. Contact your local distributor immediately. Explain the problems in detail for proper and in time support. If required, we can provide the complete maintenance and repair manual to the authorized qualified engineers of service stations. - 32 - Chapter 7 Maintenance, Attentions and Simple Defects Treatment The Pachymeter is a high-tech product designed and built with high level of precision. Only qualified trained engineers are authorized to repair the instrument. We are not responsible for problems caused by any kind of unauthorized repair. - 33 - Chapter 8. Service and Support information Chapter 8 Service and Support Information 8.1 Warranty 1) The product has a warranty of one year from the date of purchasing, on the premise of using in accordance with the User Manual. 2) If the device does not work properly, please contact your local distributor or the manufacturer immediately. 3) Following repairs will be charged within warranty period: 4) Problems caused by man-made damages; Damages caused by unauthorized repair; Damages caused by inappropriate operation. We provide continuous maintenance and repair after warranty period with certain charges. 8.2 Accessories and Materials 8.2.1 Consumables SN Description Manufacturer Model 1 Printing Paper Beijing Xun Pu Electronic Technology Company —— 8.2.2 Detachable Parts Specification 57mm×40mm Thermal Printing Paper SN Description Model Specification 1 P-Probe Prb1000P 20MHz 2 Power Adaptor HES49-12040 12V/4A 3 Foot Switch MD-1000.FS-2 —— 8.2.3 Materials Material of Housing Model Flame Retardant ABS Engineering Plastic(not less than FV-2) MCN-6000 Note: 1) The probe, power adaptor and foot switch used in the system must be provided by the Manufacturer. 2) The consumables used in the system must be product (with specification) designated by the Manufacturer. 8.3 Software Update and Services The Manufacturer will provide users with software update information and services. In case of software update due to correction of defects, the Manufacturer will provide users with - 34 - Chapter 8. Service and Support information free software update service. For the expansion of software functions, the manufacturer will provide users with software update information, and according to users’ demand, provide software update service with certain charges. - 35 - Annex A Prudent Use Statement Annex A Prudent Use Statement A.1 Statement Although there is no evidence so far the diagnostic ultrasound instrument will lead to biological effects in humans, it is possible to prove the existence of biological effects in future applications. The radiated acoustic power of the instrument itself is very low; still we must use ultrasound prudently in clinical applications. Do the best to complete patients' examinations within shortest time and with lowest power, on the premise of achieving necessary clinical information. A.2 Principle of ALARA(As Low As Reasonably Achievable) The principle of ALARA should be implemented to perform ultrasound procedure. Try to use lowest level of energy that will not result in biological effect. The ultrasonic energy depends on acoustic output intensity and exposure time. The ultrasonic intensity required may vary depending on different patients and clinical cases. Not all examinations can be accomplished with lowest ultrasonic energy output. Lowest ultrasonic energy will produce low-quality image or weak Doppler signal which will influence the reliability of diagnosis. However the acoustic power higher than practical use will not be helpful to improve the quality of diagnostic information, but will increase the risk of biological effect. The operator must be responsible for the safety of patients and use ultrasound on purpose, that is to apply ultrasonic output power according to the principle of ALARA. - 36 - Annex B Prompt Message Annex B 1. Prompt Message System start-up prompt: Switch on the system, it will read parameter and self-check, displaying "THE SYSTEM IS CHECKING …PLEASE WAIT…". After checking, it will enter the normal interface. 2. Probe checking prompt: If probe is not connected, the system will prompt automatically when scanning. The dialogue box will display "PLEASE CHECK THE PROBE!" reminding you to check the probe connection. 3. Nothing Selected prompt: If the operation is wrong and unable to select the correct item, the dialogue box will prompt "PLEASE SELECT AN ITEM!" or "NO DATA!", indicating that no correct item is selected. 4. Confirming prompt for deleting or saving: When deleting some item or saving the result of a patient's case, the dialogue box will pop up. "ARE YOU SURE TO SAVE?" prompts to confirm saving or not. "ARE YOU SURE TO DELETE?” prompts to confirm deletion or not. "ARE YOU SURE TO CLEAR ALL THE DATA PERMANENTLY?" prompts the cleared data are not recoverable and whether to continue the clearance. "ARE YOU SURE TO DELETE THE ITEM PERMANENTLY?" prompts the deleted data are not recoverable and whether to continue the deletion. 5. Whistle prompt: a) Three short beeps of buzzer "beep - beep - beep" prompt measurement failed. For Pachymeter, three short beeps prompt that proper measuring data are not found. b) A long beep of buzzer "beep-" prompts measurement completed. For Pachymeter, it prompts proper data have been found within measuring time. - 37 - Annex C.1 Acoustic Output Report (IEC60601-2-37) Annex C.1 Acoustic Output Report (IEC60601-2-37) Index Mode MI - TIS Scanning TIS TIS Non- Non- scanning scanning Aaprt≤1cm Global Maximum Index Value Acoustic working frequency (fawf) 2 Aaprt>1cm TIB Scanning 2 TIB Nonscanning 0.21 - 0.09 - - - 20.3 - 20.3 - - - Bounded output power - (P1) TIC - - Attenuated output power 0.97 (Pα) - - - - - Associated acoustic parameter Attenuated spatial-peak temporal-average intensity (Ispta,α) Attenuated peak-rarefactional 0.42 acoustic pressure (pr,α) -12dB output beam area - (Aaprt) - - - - Break-point depth (zbp) Equivalent aperture - diameter (Deq) - Depth for TIS (zs) Depth for TIB(zb)=depth - at max [Ipi,α×Pα] Depth at max. attenuated pulse-intensity integral 0.2 information (z at max. Ipi,α) Other - Pulse duration (td) 0.05 Pr at max Ipi 0.85 Ipi,α at max MI 17.1 Supplementary information: Operating accessory: P probe Prb1000P Frequency: 20MHz - 38 - Annex C.2 Acoustic Output Reporting Table Annex C.2 Acoustic Output Reporting Table Acoustic Output Reporting Table for Track1 Non-Autoscanning Mode System: GRU-5000P Ultrasonic Pachymeter Transducer Model: Prb1000P Application: Ophthalmology Operating Mode: A-Mode Working Frequency: 20MHz I SPTA.3 MI (mW/cm2) Acoustic Output 0.101 Maximum index value parameter 0.016 5.32 0.00060 0.00060 (MPa) W0 (Mw) fc (MHz) 16.612 16.612 16.612 (cm) 1.00 1.00 1.00 Beam dimensions acoustic (W/cm2) Pr.3 ZSP Associated I SPPA.3 x-6 (cm) 0.136 0.136 y-6 (cm) 0.135 0.135 PD (usec) PRF Control Conditions 0.056 0.056 (Hz) EDB Operating 0.412 55 Az (cm) Ф0.4 Ele (cm) Ф0.4 -- -- -- -- -- -- -- -- Transducer Model: Prb1000P Operation Mode: A Mode Application: Ophthalmology Working Frequency: 20MHz I SPAT.3 I SPPA.3 ( mW/cm2 ) ( W/cm2 ) 3 3 3 K ( P=0.90, gamma=0.9 ) 4.258 4.258 4.258 Mean (x) 0.095 0.014 4 .727 StdDev ( Sx ) 0.006 0.002 0.563 (X) 0.119 0.021 7.124 Acoustic Output Sample Size Limit MI - 39 - Annex D Guidance and Manufacturer’s Declaration Annex D Guidance and Manufacturer’s Declaration - 40 - Annex D Guidance and Manufacturer’s Declaration - 41 - Annex D Guidance and Manufacturer’s Declaration - 42 - Annex D Guidance and Manufacturer’s Declaration - 43 - Annex D Guidance and Manufacturer’s Declaration Annex E References Sunil Shah, FRCS(ED) , FRCOphth. Accurate intraocular pressure mea-sure-ment-the myth of modern ophthalmology? Ophthalmology, 2000, 107:1805-1807. - 44 -