1
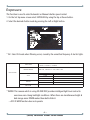
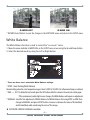
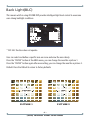
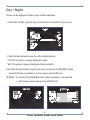
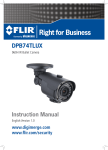
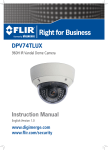
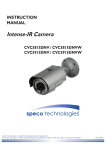
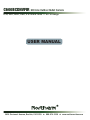
C600BCDNVFIR 600 Line Outdoor Bullet Camera D/N, OSD, WDR, DNR, 2.8-12mm LENS — 80’ IR Range USER MANUAL 3625 Cincinnati Avenue, Rocklin, CA 95765 ♦ 888-874-3336 ♦ www.northernvideo.com CAUTION CAUTION CAUTION RISK OF ELECTRIC SHOCK DO NOT OPEN RISK OF ELECTRIC SHOCK RISK OF DOELECTRIC NOT OPENSHOCKCAUTION:TO REDUCE THE RISK OF ELECTRIC SHOCK DO NOT OPEN DO NOT REMOVE COVER(OR BACK). CAUTION:TO REDUCE THE RISK OF ELECTRIC SHOCK USER-SERVICEABLE PARTS INSIDE. CAUTION:TO REDUCE THE RISK OF ELECTRIC NO SHOCK DO NOT REMOVE COVER(OR BACK). DO NOT REMOVE COVER(ORREFER BACK).SERVICING TO QUALIFIED SERVICE PERSONNEL. NO USER-SERVICEABLE PARTS INSIDE. NO USER-SERVICEABLE PARTS INSIDE. REFER SERVICING TO QUALIFIED SERVICE PERSONNEL. REFER SERVICING TO QUALIFIED SERVICE PERSONNEL. ISO14001 ISO14001 ISO14001 The lightning flash with an arrowhead symbol, within an equilateral triangle is intended to alert the user to the presence of uninsulated dangerous voltage within the product's enclosure that may be of sufficient magnitude to constitute a risk of electric shock to persons. The exclamation point within an equilateral triangle is intended to alert the user to the presence of important operating and maintenance (servicing) instructions in the literature accompanying the appliance. INFORMATION - This equipment has been tested and found to comply with limits for a Class A digital device, pursuant to part 15 of the FCC Rules & CE Rules. These limits are designed to provide reasonable protection against harmful interference when the equipment is operated in a commercial environment. This equipment generates, uses, and can radiate radio frequency energy and, if not installed and used in accordance with the instruction manual, may cause harmful interference to radio communications. Operation of this equipment in a residential area is likely to cause harmful interference in which case the user will be required to correct the interference at his own expense. WARNING - Changes or modifications not expressly approved by the manufacturer could void the user’s authority to operate the equipment. CAUTION : To prevent electric shock and risk of fire hazards: ☞Do NOT use power sources other than those specified. ☞Do NOT expose this appliance to rain or moisture. This installation should be made by a qualified service person and should conform to all local codes. (600TVL) 2D-DNR DAY & NIGHT COLOR CAMERA OSD QUICK MANUAL EASY QUICK MANUAL TO SET UP OSD 600TVL (2D-DNR) About Smart-IR/D-WDR/BLC/2D DNR(600TVL) Core Technology Smart MD Multi Language New Smart-HD DSP Chipset Ensures 600TVL Ultra High Resolution. OSD D&N 600TVL Smart-i Low Light DNRⅡ RS-485 HLC Innovative Technology of Powerful High-Resolution under Ultra Low Light Level : Min. Illumination 0.00001 Lux Smart-i HD DSP is the 3rd generation core chipset actualizing 600TVL ultra high resolution! One Step Upgrade: The best video quality even at night is ensured through 2D filtering with the function of noise removal. 2D-DNR, Min. Illumination 0.01 Lux All In One: 2D DNR, Smart IR, Privacy Zone, RS-485 (Option) Lens 1. Move the arrow indicator to LENS using the Up and Down buttons on the Set Up menu screen. 2. Select the desired lens type by pressing the Left or Right button. SETUP DC LENS EXPOSURE WHITE BAL. BACKLIGHT DAY&NIGHT DPC SPECIAL RESET EXIT ATW1 OFF AUTO DC:DC Auto Iris Lens ※Default: Fixed board lens & Manual vari-focal lens are set at MANUAL. -1(600TVL) 2D-DNR DAY & NIGHT COLOR CAMERA Exposure This function is used to select Automatic or Manual shutter speed control. 1. On the Set Up menu screen select EXPOSURE by using the Up or Down button. 2. Select the desired shutter mode by pressing the Left or Right button. SETUP LENS EXPOSURE WHITE BAL. BACKLIGHT DAY&NIGHT DPC SPECIAL RESET EXIT DC ATW1 OFF AUTO * FLK : Select FLK mode when flickering occurs; caused by the unmatched frequency of electric lights. ΄Ά΅΅Ͷ ͳͺ΅ͿͶ΄΄ ͶΉ΄ΆͶ Ͳʹ ͵Έ͵ ͲΆ΅ͧͦ͑͢͢͝͠͡͝͠͡͝ͷͽͼ͑ͣͦ͑ͦ͑͑ͣ͑ͥ͢͢͢͢͢͢͝͠͡͝͠͡͡͝͠͡͡͡͝͠͡͡͡͝͠͡͡͡͝ ͦ͢͢͢͢͢͠͡͡͡͝͠͡͡͡͡͝͠͡͡͡͡͡ ;ͺͿͫ͑͡͡͡͝͵ͶͷͲΆͽ΅ͫ͑ͦ͑͡͡͝;ͲΉͫ͑ͣͦͦ ͷͷ ͽΈ͑ ;ͺ͵͵ͽͶ ͺ ͷͷ Ϳ ͵ͶͷͲΆͽ΅ ͵ͶͷͲΆͽ΅ ͽͶ·Ͷͽͫ͑;ͺͿ͑͑͡͡͡͝͵ͶͷͲΆͽ΅͑ͤͦ͑͡͝;ͲΉ͑ͧͤ͡ Ͷ΅ΆͿ * DWDR: This camera which is using 2D-DNR DSP provides intelligent light level control to overcome even strong backlight conditions. When there are simultaneous bright & dark image areas DWDR makes them both distinct. →OFF: D -WDR function does not operate. -2(600TVL) 2D-DNR DAY & NIGHT COLOR CAMERA D-WDR OFF D-WDR ON * RETURN: Select Return to save the changes in the EXPOSURE menu and return to the SETUP menu. White Balance The White Balance function is used to control the “on-screen” colors. 1. Move the arrow indicator to WHITE BAL on the SETUP menu screen using the Up and Down button. 2. Select the desired mode by using the Left or Right button. SETUP LENS EXPOSURE WHITE BAL. BACKLIGHT DAY&NIGHT DPC SPECIAL RESET EXIT DC ATW1 OFF AUTO * There are three user's selectable White Balance settings. * ATW1 : (Auto Tracking White Balance) Normal setting; when the color temperature range is from 1,800˚K to 10,500˚K. (Ex: a fluorescent lamp or outdoors) * AWC → SET : To obtain the best results press the SET button while the camera is focused onto white paper. If the environment, and/or light source changes, the White Balance will require re-adjustment. * MANUAL : U sed for fine adjustment of White Balance. Set White Balance first using ATW1 or AWC then change to MANUAL and press SETUP button. Increase or decrease the value of R-Gain(Red) and B-Gain(Blue) while monitoring the color of the image. OUTDOOR / INDOOR / MANUAL selectable. -3(600TVL) 2D-DNR DAY & NIGHT COLOR CAMERA Back Light(BLC) This camera witch is using 2D-DNR DSP provides intelligent light level control to overcome even strong backlight conditions. BLC AREA SEL. AREA STATE GAIN HEIGHT WIDTH LEFT/RIGHT TOP/BOTTOM RETURN AREA1 ON 095 005 004 006 005 RET * OFF: BLC function does not operate. User can select and define a specific area on scene and view the area clearly. Press the "ENTER" button at the AREA menu, you can change the area like a picture 1. Press the "ENTER" button again after area setting, you can change the area like a picture 2. Default: Press the Default to return to factory defaults. POSITION SIZE PICTURE 1 PICTURE 2 -4(600TVL) 2D-DNR DAY & NIGHT COLOR CAMERA Day / Night Picture can be displayed in either colour of black and white. 1. Select DAY / NIGHT using the Up or Down button on the SETUP menu screen. SETUP LENS EXPOSURE WHITE BAL. BACKLIGHT DAY&NIGHT DPC SPECIAL RESET EXIT DC ATW1 OFF AUTO 2. Select the desired mode using the Left and Right buttons. * COLOR : The picture is always displayed in color. * BW : This picture is always displayed in black and white. Select BW using the button and press the menu to activate COLOR BURST option. ※ Smart-IR function is available to use for camera with IR LED only. IR SMART : It controls the IR LED(bright portion base), satuation is not expected. => This function can be utmost only at BURST OFF. IR SMART D&N B/W BURST IR SMART IR LEVEL RETURN OFF ON LOW RET IR GAIN HEIGHT WIDTH LEFT/RIGHT TOP/BOTTOM RETURN -5(600TVL) 2D-DNR DAY & NIGHT COLOR CAMERA 090 006 006 004 004 RET SMART IR OFF SMART IR ON * AUTO: The mode will automatically switches to COLOR in normal condition and switches to BW mode when ambient illumination is low. DPC When the camera becomes hot after operating a couple of days, white spots are shown on the screen especially at low light condition and they are recorded together with normal image. By using this function, white spots are removed and you can get clean images. COVER THE LENS THEN PROCESSING NOW... PRESS ENTER KEY -6(600TVL) 2D-DNR DAY & NIGHT COLOR CAMERA Special When the SETUP menu screen is displayed, select SPECIAL using the Up and Down buttons. SETUP LENS EXPOSURE WHITE BAL. BACKLIGHT DAY&NIGHT DPC SPECIAL RESET EXIT DC ATW1 OFF AUTO Select one of the mode using the Up and Down button. SPECIAL CAM TITLE OFF MOTION OFF PRIVACY OFF PARK. LINE OFF IMAGE ADJ. LANGUAGE ENGLISH RETURN RET 1. CAM TITLE : Give the name of the camera after selecing ON. 2. MOTION: Selecte areas (MAX 4 AREAS) where you want to make focus more. 3. PRIVACY: Select areas (MAX 8 AREAS) where you want to hide on the screen. 4. PARK. LINE: At this mode, possible parking line is shown on the screen. This technology can be applied to car rear view camera. 5. IMAGE ADJ.: Select the sub-menu by using Up or Down button. -7(600TVL) 2D-DNR DAY & NIGHT COLOR CAMERA ͽͶͿ΄͑΄Ͳ͵ ͵ͶͷͲΆͽ΅ Ϳ ͽͶ·Ͷͽͫ͑;ͺͿ͑͑͡͡͡͝͵ͶͷͲΆͽ΅͑ͧ͑͡͡͝;ͲΉ͑ͣͦͦ ͷͷ ͣ͵Ϳ ;ͺ ͷͿ΅͑ʹͽ ͺ;ͲͶ͑Ͳ͵ͻ͟ ͷͷ Ϳ ͵ͶͷͲΆͽ΅ ͷͷ Ϳ͑ Έͺ΅Ͷ ͵ͶͷͲΆͽ΅ ͵ͶͷͲΆͽ΅ ͧ͑͢ʹͽ͑΄ͶͽͶʹ΅ͲͳͽͶ ʹͿ΅Ͳ΄΅ ͽͶ·Ͷͽͫ͑;ͺͿ͑͑͡͡͡͝͵ͶͷͲΆͽ΅͑ͤͦ͑͢͝;ͲΉ͑ͣͦͦ ΄ͲͿͶ΄΄ ͽͶ·Ͷͽͫ͑;ͺͿ͑͑͡͡͡͝͵ͶͷͲΆͽ΅͑ͣͦ͑͡͝;ͲΉ͑ͤ͢͡ ʹ΅ ͵ͺ΄ͽͲΊ ͵ͶͷͲΆͽ΅ ͽʹ͵ Ά΄Ͷ ͷͷ ͿͶ͑͟ͺ;ͲͶ ͵ͶͷͲΆͽ΅ Ϳ͑ 5-1) 2DNR 2DNR is used to reduce the level of background noise in a low luminance environment. * ON: Activates 2DNR - Digial noise reduction can be adjusted. * OFF: Deactivates 2DNR - noise is not reduced. IMAGE ADJ. LENS SHAD. OFF 2 DNR ON MIRROR OFF FONT COLOR CONTRAST 140 SHARPNESS 160 DISPLAY LCD NEG. IMAGE OFF RETURN RET -8(600TVL) 2D-DNR DAY & NIGHT COLOR CAMERA 5-2) MIRROR Horizontal flip is available according to the situation. 5-3) DISPLAY Accoring to the sort of your monitor, select CRT or LCD or USER to optimize image on screen. IMAGE ADJ. LENS SHAD. OFF 2 DNR ON MIRROR OFF FONT COLOR CONTRAST 140 SHARPNESS 160 DISPLAY LCD NEG. IMAGE OFF RETURN RET LANGUAGE * English & Simplified Chinese are avaliable. RESET Resets the camera settings to the factory defaults. EXIT Press the SET button in the EXIT menu to save the current settings and exit the SETUP menu. -9(600TVL) 2D-DNR DAY & NIGHT COLOR CAMERA OSD Control Button - 10 (600TVL) 2D-DNR DAY & NIGHT COLOR CAMERA