1
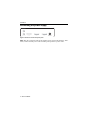
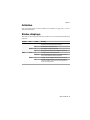
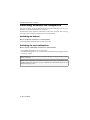
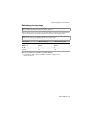
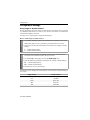
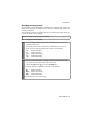
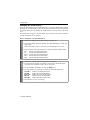
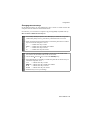
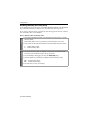
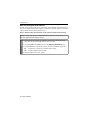
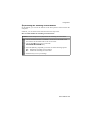
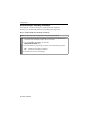
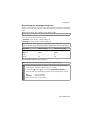
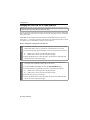
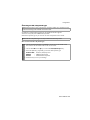
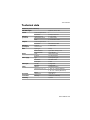
G&D miniMUX2 Installation and Operation About this manual This manual has been carefully compiled and examined to the state-of-the-art. G&D neither explicitly nor implicitly takes guarantee or responsibility for the quality, efficiency and marketability of the product when used for a certain purpose that differs from the scope of service covered by this manual. For damages which directly or indirectly result from the use of this manual as well as for incidental damages or consequential damages, G&D is liable only in cases of intent or gross negligence. Caveat Emptor G&D will not provide warranty for devices that: Are not used as intended. Are repaired or modified by unauthorized personnel. Show severe external damages that was not reported on the receipt of goods. Have been damaged by non G&D accessories. G&D will not be liable for any consequential damages that could occur from using the products. Proof of trademark All product and company names mentioned in this manual, and other documents you have received alongside your G&D product, are trademarks or registered trademarks of the holder of rights. © Guntermann & Drunck GmbH 2010. All rights reserved. Version 1.30 – 22/10/2010 Firmware: 1.5.3 Guntermann & Drunck GmbH Dortmunder Str. 4a 57234 Wilnsdorf Germany Phone +49 2739 8901-100 Fax +49 2739 8901-120 http://www.GDsys.de [email protected] i · G&D miniMUX2 Contents Contents Safety instructions ............................................................................................ 1 The »miniMUX2« KVM switch ........................................................................ 2 Package contents .............................................................................................. 3 Installation ....................................................................................................... Overview of the interfaces .................................................................................. Setting up the device .......................................................................................... Connecting the console devices .......................................................................... Connecting the computers .................................................................................. Connecting the power supply ............................................................................. 4 4 4 5 6 7 Initiation .......................................................................................................... 8 Status displays .................................................................................................. 8 Switching between the computers ..................................................................... 9 Switching via buttons ......................................................................................... 9 Switching via key combinations ......................................................................... 9 Switching via step keys .................................................................................... 10 Configuration ................................................................................................. Overview of the functions and default settings .................................................. Operating the setup mode ................................................................................ Operating the setup menu ................................................................................ Configuration settings ...................................................................................... Using single or double hotkeys ................................................................... Changing the single hotkey ......................................................................... Changing the double hotkey ....................................................................... Changing the select keys ............................................................................. Disabling/Enabling the hotkey delay .......................................................... Resetting the defaults ................................................................................. Auto-accessing the first channel .................................................................. (De)activating the switching via front buttons ............................................. (De)activating the switching via hotkeys ..................................................... (De)activating the switching via step keys ................................................... Changing the scan code set of a PS/2 keyboard ........................................... Selecting the PS/2 keyboard type ............................................................... Enabling or resetting a PS/2 mouse ............................................................ Selecting the USB keyboard type ................................................................ 11 11 12 13 15 15 16 17 18 19 20 21 22 23 24 25 26 27 28 Technical data ................................................................................................ 30 Order numbers ................................................................................................ 32 G&D miniMUX2 · ii Safety instructions Safety instructions Please read the following safety instructions carefully before you start operating the G&D product. The instructions well help in avoiding damages to the product and in preventing possible injuries. Keep this manual handy for all persons who will be using this product. Follow all warnings or operating instructions which are on the device or stated in this user manual. , Beware of electric shocks To avoid the risk of electric shock, do not open the device or remove the covers. If service is required, please contact our technicians. , Disconnect the main power plug or the power supply before installation Before installation, ensure that the device has been disconnected from the power source. Disconnect the main power plug or the power supply of the device. , Ensure constant access to the power plugs During the installation of the devices, ensure that the power plugs remain accessible. ! Avoid tripping hazards Avoid tripping hazards while laying cables. , Only use a grounded voltage source Operate this device by using a grounded voltage source. , Use only the provided G&D power pack Operate this device with the provided G&D power pack or with the power pack listed in the manual. ! Operate the device only in designated areas. The devices are designed for indoor use. Avoid exposure to extreme cold, heat or humidity. 1 · G&D miniMUX2 The »miniMUX2« KVM switch The »miniMUX2« KVM switch The miniMUX2 KVM switch enables the user to operate up to two computers via one console. Both keyboard and mouse that are connected to the KVM switch can be used to operate the computers centrally. A monitor, which is also connected to the KVM switch, displays the video output of both computers. NOTE: In addition to the basic version (for one video channel), the miniMUX2MC2 is available as a variant which supports two video channels per computer. To switch between the computers, the user is enabled to use the buttons on the front panel of the KVM switch or, more comfortably, configurable key combinations. Support of PS/2 and USB input devices A PS/2 or a USB keyboard can be used to operate the KVM switch and the connected computers. While connecting the console mouse, the user can choose between these connection types. Two variants of the KVM connection cable are available to connect the computer to the KVM switch: PS/2 variant (»CPU« KVM connection cable) Two PS/2 interfaces transmit both mouse and keyboard signals to the computer. USB variant (»CPU-USB« KVM connection cable) A USB interface transmits both mouse and keyboard signals to the computer. The signals of both input devices can be transmitted to the computers through PS/2 or USB interfaces, independently from the connection type of both console keyboard and console mouse (PS/2 or USB). NOTE: To use the expanded functions of special keyboards, use the CPU KVM connection cable for applying a PixelPower keyboard. Apply the CPU-USB KVM connection cable for employing a USB multimedia or Sun keyboard. G&D miniMUX2 · 2 Package contents Package contents miniMUX2 (basic version) 1 × miniMUX2 KVM switch 1 × power pack (12V/24W) 1 × IEC power cable 2 × KVM connection cable to connect the computers 1 × data cable (Update-Cable-2) 1 × Installation and Operating Guide miniMUX2-MC2 1 × miniMUX2-MC2 KVM switch 1 × power pack (12V/24W) 1 × IEC power cable 2 × KVM connection cable to connect the computers 2 × video cable (VGA-M/M) 1 × data cable (Update-Cable-2) 1 × Installation and Operating Guide NOTE: The KVM switches of the miniMUX2 series are available as desktop or as rackmount variant (see Order numbers on page 32). 3 · G&D miniMUX2 Installation Installation Overview of the interfaces The front panel of the KVM switch The front panel of the miniMUX2 KVM switch provides two USB interfaces to connect a USB keyboard and/or mouse. The front panel also provides a Service port. This port is used for operating the setup menu (see page 12) and for carrying out firmware updates. USB K/M PC 1 PC 2 User Service Act. Stat. Figure 1: Front view of the KVM switch The active channel can be selected by using one of the two buttons on the front panel. The front panel also provides several LEDs (see Status displays on page 8). The back panel of the KVM switch The back panel of the KVM switch provides interfaces to connect the console devices and the computers. The following page contains a detailed description of these interfaces. Setting up the device 1. Ensure that the computers, which are to be connected to the KVM switch, are turned off. If the computers are provided with both keyboard and mouses, unplug the cables of the input devices from the interfaces of the computers. 2. Place the KVM switch between the computers and the console. Please mind the maximum cable length between the KVM switch and the computers, which are to be connected: PS/2 variant of KVM connection cable: maximum 6 metres USB variant of KVM connection cable: maximum 4 metres 3. Before installing the KVM switch, decide which button on the front panel of the device should be assigned to which computer. NOTE: While connecting the computer to the KVM switch, mind the interface numbers on the back panel of the device. The numbers of these interfaces correspond to the numbers at the buttons on the front panel of the device. G&D miniMUX2 · 4 Installation Connecting the console devices Mouse PS/2 Keyb. PS/2 Monitor CPU 1 CPU 2 Main Power Figure 2: Interfaces to connect the console devices Keyb. PS/2: Plug the connection cable of the PS/2 keyboard in this socket. Mouse PS/2: Plug the connection cable of the PS/2 mouse in this socket. NOTE: You can also connect a USB keyboard and/or USB mouse to the USB K/M interfaces on the front panel of the device. The PS/2 interfaces (on the back panel of the KVM switch) as well as the USB interfaces on the front panel of the device can be used for connecting both console keyboard and console mouse. Monitor: Connect the console monitor to this interface. Additional interface of the multichannel variant Mouse PS/2 Monitor 2 VGA CPU 1.2 VGA CPU 2.2 Keyb. PS/2 Monitor CPU 1 CPU 2 Main Power Figure 3: Interfaces to connect the second console monitor Monitor 2: Connect the second console monitor to this interface 5 · G&D miniMUX2 Installation Connecting the computers Mouse PS/2 Keyb. PS/2 Monitor CPU 1 CPU 2 Main Power Figure 4: Interfaces to connect the console devices CPU 1: Connect a KVM connection cable to this interface. CPU 2: Connect a KVM connection cable to this interface. IMPORTANT: KVM connection cables to connect a computer to the KVM switch are available as PS/2 or as USB variant (see page 2). Connect the computers to be operated to the KVM connection cables (see below). »CPU« KVM connection cable: Connect the 15-pin D-Sub plug to the computer’s graphics output. Connect the purple plug to the computer’s PS/2 keyboard interface. Connect the green Mini-DIN plug to the computer’s PS/2 mouse interface. »CPU« KVM connection cable: Connect the 15-pin D-Sub plug to the computer’s graphics output. Connect the USB-A plug to one of the computer’s USB interfaces. Additional interface of the multichannel variant Mouse PS/2 Monitor 2 VGA CPU 1.2 VGA CPU 2.2 Keyb. PS/2 Monitor CPU 1 CPU 2 Main Power Figure 5: Interfaces to connect »Video channel 2« of both computers VGA CPU 1.2: Use one of the supplied VGA-M/M video cables to connect this inter- face to the second video output of the first computer. VGA CPU 2.2: Use one of the supplied VGA-M/M video cables to connect this inter- face to the second video output of the second computer. G&D miniMUX2 · 6 Installation Connecting the power supply Mouse PS/2 Keyb. PS/2 Monitor CPU 1 CPU 2 Main Power Figure 6: Socket to connect the power pack Power: Plug the connection cable of the supplied power pack in this interface. Afterwards, connect the IEC power cable with the power pack and a power outlet. 7 · G&D miniMUX2 Initiation Initiation After the KVM switch has been installed (see Installation on page 4 ff.), it can be operated immediately. Status displays The LEDs on the front panel of the device enable you to control the operational status at all time: Section LED Status Meaning CPU 1 … 2 Active on The KVM switch is currently active on this channel. All inputs are transmitted to this computer. off The channel is currently inactive. on The computer is ready for operation. off No computer connected or the computer is turned off. on The keyboard was properly initialised. blinking The LED is blinking after the device has been turned on and until the keyboard has been initialised. on The KVM switch is supplied with the necessary voltage. off The KVM switch is turned off or the necessary voltage cannot be supplied. If necessary, check the proper connection of the power pack. Status User Active Status G&D miniMUX2 · 8 Switching between the computers Switching between the computers The user can either use the the buttons on the front panel of the device or key combinations to switch between different computers. Keyboard and mouse inputs are transmitted to the active computer. The video signal of the active computer is displayed at the console monitor. Switching via buttons How to use buttons to switch to a certain channel: Press the button of the channel you wish to activate. Switching via key combinations How to use key combinations to switch to a certain channel: Press Hotkey+Select key on the console keyboard. The default settings allow you to switch between channels by pressing Ctrl and the select keys 1 and 2. IMPORTANT: Switching between the channels takes place if the pressed key combination is released. NOTE: If one of these key combinations interferes with a key combination of an installed application program, the key combination of the KVM switch can be adjusted (see page 16 ff.). 9 · G&D miniMUX2 Switching between the computers Switching via step keys IMPORTANT: The use of step keys is disabled in the default settings. Information on how to enable this function can be found on page 24. Insted of using select keys to switch to a computer that is connected to the KVM switch, you can use step keys to switch the channels in ascending or descending order. IMPORTANT: The active step keys depend on the selected select keys. The following table lists the step keys depending on the active select keys. Select keys »Back« step key »Forward« step key 1 ... 2 9 0 NUM 1 ... 2 NUM 9 NUM 0 A ... B I K F1 ... F2 F9 F10 How to use step keys to switch to a certain channel: 1. Press Hotkey+»Back« step key or Hotkey+»Forward« step key on the console keyboard. G&D miniMUX2 · 10 Configuration Configuration The configuration of the KVM switch can optionally be changed in the setup mode or in the setup menu: Enable the setup mode using the console keyboard. You can change the configuration via special setup keys. The setup menu is operated with a terminal emulator and provides a user interface to configure the device. Overview of the functions and default settings The following table lists functions that can be configured as well as their default settings of the KVM switch. Detailed description of the functions is given in the following pages: Function Default Page Using single or double hotkeys single hotkeys 15 Changing the single hotkey Ctrl 16 Changing the double hotkey Ctrl+Shift 17 Changing the select keys 1 and 2 18 Disabling/Enabling the hotkey delay 7 seconds 19 Resetting the defaults Auto-accessing the first channel 20 disabled 21 (De)activating the switching via front buttons enabled 22 (De)activating the switching via hotkeys enabled 23 (De)activating the switching via step keys disabled 24 Changing the scan code set of a PS/2 keyboard scan code set 2 25 Selecting the PS/2 keyboard type standard 26 Enabling or resetting a PS/2 mouse Selecting the USB keyboard type 27 PC Multimedia 28 Basic operation of the setup mode as well as the setup menu is explained in the following pages. All functions that can be configured for the KVM switch are described in detail from page 15 ff. 11 · G&D miniMUX2 Configuration Operating the setup mode The setup mode can be enabled using the console keyboard. After enabling, the configuration of the KVM switch can be changed by using various step keys. NOTE: Only one setup function can be performed after the calling of the setup mode. If you want to perform more functions, please restart the setup mode. How to enable the setup mode: Press the Hotkey+Backspace (Standard: Ctrl+Backspace) key combination to enable the setup mode. NOTE: The successful activation of the setup mode is displayed by the blinking NUM, and Scroll control LEDs on the keyboard. Additionally, the yellow User LED will blink at the KVM switch. IMPORTANT: The key combination for enabling the setup mode needs to be pressed for seven seconds. After the first call of the setup mode, the hotkey delay can be disabled by pressing the setup key 8 (see page 19). How to perform a setup function: After enabling the setup mode, press one of the setup keys described on the following pages. How to end the setup mode without performing a function: Press ESC to end the setup mode. G&D miniMUX2 · 12 Configuration Operating the setup menu The setup menu provides a convenient alternative to view and edit the configuration of the KVM switch. The switch can be operated through the setup menu which both easy operation and adjustment of several settings within a session. The setup menu can be operated via any terminal emulator (e.g. HyperTerminal or PuTTY). Use the supplied service cable to connect the computer on which the terminal emulator is installed with the Service port of the device. How to establish a connection within the terminal emulator: 1. Start any terminal emulator (e.g. HyperTerminal or PuTTY). 2. Establish a new connection in the terminal emulator and enter the following settings: Bits per second: Data bits: Parity: Stop bits: Flow control: 115.200 8 none 1 none Use the provided data cable (Update-Cable-2) to connect the computer to the Service port at the front panel of the KVM switch. How to call up the setup menu: 1. Use the terminal emulator to establish the connection to the KVM switch. 2. Connect the jack plug of the serial data cable to the Service port at the front panel of the device. As soon as the connection has been successfully established, the setup menu will be displayed in the terminal emulator (see figure on page 14). IMPORTANT: If the serial data cable is already connected to the Service socket while the connection is being established, the terminal emulator displays no data! In this case, unplug the data cable from the Service socket and reconnect it afterwards. 13 · G&D miniMUX2 Configuration The setup menu lists all settings in tabular form: Settings for miniMUX Show System Info ... Hotkey: Ctrl Double Hotkey: NO Select Key: 1..2 Hotkey Delay: YES Set System Defaults ... Select Ch.1 after Power up: No Select Channel via Front Button: Yes Select Channel via Hotkey: Yes Select Channel via Step Key: No PS/2 Scan Code Set: 2 PS/2 Keyboard Type: Standard USB Keymode: ... 'Space': Toggle 'S': Save The right column displays the active setting of the respective function. Menu items with submenus containing more settings are indicated with three dots (...) in the right column. How to operate the setup menu: 1. Use the Arrow or Arrow keys to select the desired menu item. The active entry is marked with angular arrows . 2. Depending on the type of menu item, following action(s) can be carried out: Menu items whose settings are displayed in the right column can be changed by pressing the Space key (repeatedly). A menu item that has a sub-dialogue available can be opened by pressing Enter. NOTE: The following pages provide detailed information on how to change a certain function. G&D miniMUX2 · 14 Configuration Configuration settings Using single or double hotkeys If many application programs with key combinations are operated on one computer or if different G&D devices are used in one cascade, the number of available key combinations might be restricted. In such a case, it is appropriate to apply double hotkeys. Setup Mode How to enable single or double hotkeys: 1. Press Hotkey+Backspace (default: Ctrl+Backspace) to enabled the setup mode. If the hotkey delay is active, press the key combination for seven seconds. 2. Press one of the setup keys listed below to enable the use of single or double hotkeys: Setup Menu S enables single hotkeys A disables double hotkeys 1. Use the terminal emulator to establish a connection to the KVM switch and connect the serial data cable to the Service socket. 2. Use the Arrow or Arrow keys to select the Double Hotkey entry. 3. Press the Space key (repeatedly) to enable the use of single or double hotkeys: No enables single hotkeys Yes disables double hotkeys 4. Press the S key to save your settings. Depending on your settings, the active hotkey is converted into a double hotkey (or vice versa): Single Hotkey Double Hotkey Ctrl Ctrl+Shift Alt Alt+Shift Alt Gr Alt Gr+Ctrl Win Win+Ctrl Shift Shift+Win 15 · G&D miniMUX2 Configuration Changing the single hotkey Press the hotkey and the Backspace key simultaneously to start the setup mode of the KVM switch. Pressing the hotkey and the select key simultaneously enables the switching of channels. If an application program or another G&D device uses the same hotkey within the cascade, the hotkey can be changed. NOTE: The single hotkey Ctrl is preset at default. Setup Mode How to change the current hotkey: 1. Press the Hotkey+Backspace (default: Ctrl+Backspace) key combination to enable the setup mode. If the hotkey delay is active, press the key combination for seven seconds. 2. Press one of the setup keys listed below to enable a certain hotkey: Setup Menu Ctrl Alt Alt Gr Win Shift enables Ctrl hotkey enables Alt hotkey enables Alt Gr hotkey enables Win hotkey enables Shift hotkey 1. Use the terminal emulator to establish a connection to the KVM switch and connect the serial data cable to the Service socket. 2. Use the Arrow or Arrow keys to select the Hotkey entry. 3. Press the Space key (repeatedly) to enable a certain hotkey: Ctrl Alt Alt Gr Win Shift enables Ctrl hotkey enables Alt hotkey enables Alt Gr hotkey enables Win hotkey enables Shift hotkey 4. Press the S key to save your settings. G&D miniMUX2 · 16 Configuration Changing the double hotkey If the use of double hotkeys is enabled (see page 15), press the double hotkey and the Backspace key simultaneously to start the setup mode of the KVM switch. Switching of channels takes place by pressing the double hotkey and a select key at the same time. If an application program or another G&D device uses the same hotkey within the cascade, the hotkey can be changed. Setup Mode How to change the current double hotkey: 1. Requirement: enabling of the double hotkeys (see page 15). 2. Press Double hotkey+Backspace (default: Ctrl+Shift+Backspace) to enable the setup mode. If the hotkey delay is active, press the key combination for seven seconds. 3. Press one of the setup keys listed below to activate the desired double hotkey: Setup Menu Ctrl Alt Alt Gr Win Shift enables Ctrl+Shift double hotkey enables Alt+Shift double hotkey enables Alt Gr+Ctrl double hotkey enables Win+Ctrl double hotkey enables Shift+Win double hotkey 1. Requirement: enabling of the double hotkeys (see page 15). 2. Use the terminal emulator to establish a connection to the KVM switch and connect the serial data cable to the Service socket. 3. Use the Arrow or Arrow keys to select the Hotkey entry. 4. Press the Space key (repeatedly) to enable the desired double hotkey: Ctrl+Shift Alt+Shift Alt Gr+Ctrl Win+Ctrl Shift+Win enables Ctrl+Shift double hotkey enables Alt+Shift double hotkey enables Alt Gr+Ctrl double hotkey enables Win+Ctrl double hotkey enables Shift+Win double hotkey 5. Press the S key to save your settings. 17 · G&D miniMUX2 Configuration Changing the select keys In the default settings, use the enabled select keys 1 and 2 to switch between the computers that are connected to the KVM switch. For instance, you can switch to computer 2 by pressing Hotkey+2 (default: Ctrl+2). Setup Mode How to choose a different select key set: 1. Press Hotkey+Backspace (default: Ctrl+Backspace) to enable the setup mode. If the hotkey delay is active, press the key combination for seven seconds. 2. Press one of the setup keys listed below to activate the particular set of select keys to switch the computers 1 and 2: Setup Menu 1 NUM 1 Y F1 enables select keys 1 and 2 enables select keys NUM 1 and NUM 2 enables select keys A and B enables select keys F1 and F2 1. Use the terminal emulator to establish a connection to the KVM switch and connect the serial data cable to the Service socket. 2. Use the Arrow or Arrow keys to select the Select Key entry. 3. Press the Space key (repeatedly) to enable the particular set of select keys to switch the computers 1 to 2: 1 ... 2 NUM 1 ... 2 A ... B F1 ... F2 enables select keys 1 und 2 enables select keys NUM 1 und NUM 2 enables select keys A und B enables select keys F1 und F2 4. Press the S key to save your settings. G&D miniMUX2 · 18 Configuration Disabling/Enabling the hotkey delay In the default settings of the switch, the Hotkey+Backspace (default: Ctrl+Backspace) key combination must be pressed for seven seconds to start the setup mode. If you want to start the setup mode directly after having pressed the key combination, the hotkey delay can be disabled. Setup Mode How to disable/enable the hotkey delay: 1. Press Hotkey+Backspace (default: Ctrl+Backspace) simultaneously to enable the setup mode. If the hotkey delay is active, press the key combination for seven seconds. 2. Press one of the setup keys listed below to enable/disable the hotkey delay: Setup Menu 7 enables hotkey delay 8 disables hotkey delay 1. Use the terminal emulator to establish a connection to the KVM switch and connect the serial data cable to the Service socket. 2. Use the Arrow or Arrow keys to select the Hotkey Delay entry. 3. Press the Space key (repeatedly) to disable/enable the hotkey delay: Yes enables hotkey delay No disables hotkey delay 4. Press the S key to save your settings. 19 · G&D miniMUX2 Configuration Resetting the defaults This function resets the default settings of the KVM switch. IMPORTANT: Performing this function reactivates the default settings of the KVM switch as shown on page 11. Setup Mode 1. Press Hotkey+Backspace (default: Ctrl+Backspace) to enable the setup mode. Setup Menu How to reset the default settings: 1. Use the terminal emulator to establish a connection to the KVM switch and connect the serial data cable to the Service socket. If the hotkey delay is active, press the key combination for seven seconds. 2. Press the setup key listed below to reset the default settings: D resets default settings 2. Use the Arrow or Arrow keys to select the Set System Defaults entry. 3. Press Enter to reset the default settings. 4. Confirm the pop up security query with Enter. Pressing the Q key cancels the function. G&D miniMUX2 · 20 Configuration Auto-accessing the first channel Usually, after turning on the device, the recently active channel is accessed. The setting can be changed so that the computer connected to the first channel is automatically accessed when the device is turned on. How to disable/enable the automatic access of the first channel after booting: Setup Menu NOTE: Use the setup menu to enable/disable the option to automatically access the first channel after booting the device. 1. Use the terminal emulator to establish a connection to the KVM switch. Now plug the serial data cable into the service socket. 2. Use the Arrow or Arrow keys to select the Select Ch.1 after Power up entry. 3. Press the Space key (repeatedly) to select between the following options: No accesses the recently active channel after booting Yes accesses channel 1 after booting 4. Press the S key to save your settings. 21 · G&D miniMUX2 Configuration (De)activating the switching via front buttons In the defaults, you can use the buttons on the front panel to switch between the computers. If desired, you can deactivate the front buttons in the setup menu. How to enable/disable the switching via front buttons: Setup Menu HINWEIS: Use the setup menu to (de)activate the switching via front buttons. 1. Use the terminal emulator to establish a connection to the KVM switch and connect the serial data cable to the Service socket. 2. Use the Arrow or Arrow keys to select the Select Channel via Front Button entry. 3. Press the Space key (repeatedly) to choose one of the following options: Yes disables the switching via front button No enables the switching via front button 4. Press the S key to save your settings. G&D miniMUX2 · 22 Configuration (De)activating the switching via hotkeys In the defaults, you can use hotkeys to switch between the computers. If desired, you can deactivate this kind of switching in the setup menu. How to enable/disable the switching via hotkeys: Setup Menu NOTE: Use the setup menu to (de)activate the switching via hotkeys. 1. Use the terminal emulator to establish a connection to the KVM switch and connect the serial data cable to the Service socket. 2. Use the Arrow or Arrow keys to select the Select Channel via Hotkey entry. 3. Press the Space key (repeatedly) to choose one of the following options: Yes disables the switching via hotkeys No enables the switching via hotkeys 4. Press the S key to save your settings. 23 · G&D miniMUX2 Configuration (De)activating the switching via step keys Instead of using hotkeys to switch to one of the channels connected to the KVM switch, you can also use step keys to switch the channels in ascending or descending order. NOTE: The use of step keys is disabled in the default settings. After enabling the step keys, you can use the following key combinations to switch channels in ascending or descending order: descending: »back« step key (default: Hotkey+9) ascending: »forward« step key (default: Hotkey+0) IMPORTANT: The active step keys are dependent on the selected select keys (see page 18). The following table lists the step keys depending on the active select keys. Select keys »Back« step key »Forward« step key 1 ... 2 9 0 NUM 1 ... 2 NUM 9 NUM 0 A ... B I K F1 ... F2 F9 F10 How to disable/enable the use of step keys: Setup Menu NOTE: Use the setup menu to enable or disable the usage of step keys. 1. Use the terminal emulator to establish a connection to the KVM switch. Now plug the serial data cable into the service socket. 2. Use the Arrow or Arrow keys to select the Select Channel via Step Key entry. 3. Press the Space key (repeatedly) to choose between the following options: Off [Step-Keys] step keys disabled step keys enabled 4. Press the S key to save your settings. G&D miniMUX2 · 24 Configuration Changing the scan code set of a PS/2 keyboard NOTE: This function is only relevant for computers which are connected to the KVM switch using a PS/2 KVM connection cable. If a key is pressed on the PS/2 keyboard, the keyboard processor sends a data packet that is called scan code. The two common scan code sets (sets 2 and 3) contain different scan codes. The KVM switch interprets all inputs of the PS/2 keyboard with scan code set 2. If the pipe (“|”) cannot be entered or if the arrow keys of the keyboard do not work as expected, it is recommended to switch to scan code set 3. Setup Mode How to change the setting of the scan code set: 1. Press Hotkey+Backspace (default: Ctrl+Backspace) to enable the setup mode. If the hotkey delay is active, press the key combination for seven seconds. 2. Press one of the setup keys listed below to activate a particular scan code set: 2 enables scan code set 2 for PS/2 keyboard inputs 3 enables scan code set 3 for PS/2 keyboard inputs Setup Menu 3. Restart the KVM switch. After the restart, the keyboard is initialised and the selected scan code set does apply. 1. Use the terminal emulator to establish a connection to the KVM switch and connect the serial data cable to the Service socket. 2. Use the Arrow or Arrow keys to select the PS/2 Scancode Set entry. 3. Press the Space key (repeatedly) to activate a particular scan code set: 2 enables scan code set 2 for PS/2 keyboard inputs 3 enables scan code set 3 for PS/2 keyboard inputs 4. Press the S key to save your settings. 5. Restart the KVM switch. After the restart, the keyboard is initialised and the selected scan code set does apply. 25 · G&D miniMUX2 Configuration Selecting the PS/2 keyboard type NOTE: This function is only relevant for computers which are connected to the KVM switch using a PS/2 KVM connection cable. In addition to standard PS/2 keyboards, the KVM switch also supports PixelPower Clarity (blue) and SKIDATA1 keyboards. Select the keyboard type if you want to use such a keyboard at the console. NOTE: The PS/2 keyboard type can only be selected in the setup menu. Setup Menu How to select the PS/2 keyboard type: 1. Use the terminal emulator to establish a connection to the KVM switch and connect the serial data cable to the Service socket. 2. Use the Arrow or Arrow keys to select the PS/2 Keyboard Type entry. 3. Press the Space key (repeatedly) to choose the keyboard type: PixelPower Blue PixelPower (blue) keyboard SKIDATA1 SKIDATA1 keyboard Standard standard PS/2 keyboard 4. Press the S key to save your settings. G&D miniMUX2 · 26 Configuration Enabling or resetting a PS/2 mouse NOTE: This function is only relevant for computers which are connected to the KVM switch using a PS/2 KVM connection cable. Compared to USB mouses, PS/2 mouses do not support hot plug technology. You can therefore insert the PS/2 plug during operation, but it may be possible that the computer does not detect the input device. To enable or reset the PS/2 mouse, the KVM switch can be used to send a special command to the computer. Since the commands differ depending on the mouse type and the installed operating system, four different setup keys are provided. NOTE: A PS/2 mouse can only be reset or enabled in the setup mode. Setup Mode How to enable or reset a PS/2 mouse: 1. Press Hotkey+Backspace (default: Ctrl+Backspace) to enable the setup mode. If the hotkey delay is active, press the key combination for seven seconds. 2. Press one of the following setup keys to enable or reset the PS/2 mouse: M I E R enables the PS/2 mouse of a Linux PC enables the PS/2 wheel mouse of a Linux PC enables the PS/2 wheel mouse with additional keys of a Linux PC resets the PS/2 mouse interface of a Windows PC 27 · G&D miniMUX2 Configuration Selecting the USB keyboard type NOTE: This function is only relevant for computers which are connected to the KVM switch using a USB KVM connection cable. Various manufacturers added special keys to the standard keyboards. Some keyboards are provided with multimedia keys which enable the user to easily operate special multimedia functions of the computer. Compared to standard keyboards, Sun desktops and servers are provided with separate keys (Solaris Shortcut Keys) to operate special system functions. These keys can be used at the console after enabling the keyboard mode for Sun desktops and servers. If the console only has a standard keyboard available, several key combinations are provided to emulate Solaris Shortcut Keys (see page 29). Select the USB keyboard type in the setup menu in order to use all keys of such keyboards. NOTE: The USB keyboard type can only be changed in the setup menu. Setup Menu How to select the USB keyboard type: 1. Use the terminal emulator to establish a connection to the KVM switch. If the setup menu is not displayed, the Switch mode of the service port is enabled. Enter »#!« to change to the setup menu. 2. Use the Arrow or Arrow keys to select the row USB Keymode of the channel and press Enter. 3. Use the Arrow or Arrow keys to select the channel whose setting you want to change in the Set USB Keymode submenu. 4. Press the Space key (repeatedly) to select one of the following keyboards: PC Multimedia PC Standard SUN German SUN US Apple Multimedia keyboard Standard keyboard Sun keyboard (German layout) Sun keyboard (American layout) Apple keyboard 5. Repeat steps 3 and 4 to change this setting for another channel. 6. Press the S key to save your settings. IMPORTANT: Changing to the SUN German or SUN US keymode requires a reboot of the Sun computer. G&D miniMUX2 · 28 Configuration If the console is provided with a sun keyboard, use the Solaris Shortcut Keys of this keyboard after enabling. When using a standard keyboard, these functions can be performed by using the key combinations listed below: Key combination »Solaris Shortcut Key« of Sun keyboard Ctrl+Alt+F2 Again Ctrl+Alt+F3 Props Ctrl+Alt+F4 Undo Ctrl+Alt+F5 Front Ctrl+Alt+F6 Copy Ctrl+Alt+F7 Open Ctrl+Alt+F8 Paste Ctrl+Alt+F9 Find Ctrl+Alt+F10 Cut Ctrl+Alt+F11 Help Ctrl+Alt+F12 Mute Ctrl+Alt+NUM+ Loud Ctrl+Alt+NUM- Quiet Ctrl+Alt+NUM* Compose Ctrl+Alt+Pause Shutdown Pause+A Stop 29 · G&D miniMUX2 Technical data Technical data MINIMUX2 (BASIC VERSION) Switchable signals Console Interfaces per console Computer keyboard, mouse, video Connections per device: 1 Connection: directly at the device Keyboard/mouse: 2 × PS/2 socket USB keyboard/mouse: 2 × USB-A socket Video: 1 × D-Sub HD 15 socket Connections per device: 2 Connection: KVM connection cable Interfaces per computer Keyboard, mouse & video: 1 × MDR socket Video Signal type: analog Video resolution: up to 1920 × 1440 @ 75 Hz Video bandwidth: up to 400 MHz Mode: local service socket Interface: 2,5 mm phone jack Type: external power pack Connection: Mini-DIN 4 socket Power input: 12 VDC Standby: 1,1W@12VDC Operation: 4,5W@12VDC Material: anodised aluminium Dimensions (w × h × d): 160 × 44 × 210 mm (Desktop) 19“ × 1U × 210 mm (Rackmount) Weight: approx. 0,8 kg Temperature: +5 to +40 °C Humidity: < 80%, non-condensing Update Power supply Power input Casing Operational environment Conformity CE, RoHs G&D miniMUX2 · 30 Technical data MINIMUX2-MC2 Switchable signals Console keyboard, mouse, video Connections per device: 1 Connection: directly at the device Keyboard/mouse: 2 × PS/2 socket USB keyboard/mouse 2 × USB-A socket Video: 2 × D-Sub HD 15 socket Connections per device: 2 Connection: KVM connection cable Interfaces per computer Keyboard, mouse & video: 1 × MDR socket Additional video: 1 × D-Sub HD 15 socket Video Signal type: analog Video resolution: up to 1920 × 1440 @ 75 Hz Video bandwidth: up to 400 MHz Mode: local service socket Interface: 2,5 mm phone jack Type: external power pack Connection: Mini-DIN 4 socket Power input: 12 VDC Standby: 1,4W@12VDC Operation: 5W@12VDC Material: anodised aluminium Dimensions (w × h × d): 160 × 44 × 210 mm (Desktop) 19“ × 1U × 210 mm (Rackmount) Weight: approx. 0,8 kg Temperature: +5 to +40 °C Humidity: < 80%, non-condensing Interfaces per console Computer Update Power supply Power input Casing Operational environment Conformity 31 · G&D miniMUX2 CE, RoHs Order numbers Order numbers miniMUX2 KVM connection cables A210 0034 miniMUX2 A210 0035 miniMUX2-RM A610 0007 A610 0008 A610 0009 A610 0058 A610 0059 miniMUX2-MC2 A210 0036 miniMUX2-MC2 A210 0037 miniMUX2-MC2-RM CPU-2 CPU-4 CPU-6 CPU-USB-2 CPU-USB-4 Video cables A630 0001 A630 0002 A630 0003 A630 0004 A630 0005 VGA-M/M-1 VGA-M/M-2 VGA-M/M-4 VGA-M/M-5 VGA-M/M-6 G&D miniMUX2 · 32 Guntermann & Drunck GmbH Dortmunder Str. 4a 57234 Wilnsdorf Phone +49 2739 8901-100 Fax +49 2739 8901-120 http://www.GDsys.de [email protected] A9200046 Germany