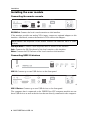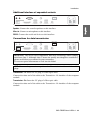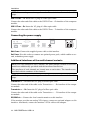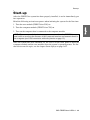
1
Guntermann & Drunck GmbH www.gdsys.de G&D FIBREVision-USB 2.0 DE Installationsanleitung EN Installation Guide A9100153-1.20 Zu dieser Dokumentation Diese Dokumentation wurde mit größter Sorgfalt erstellt und nach dem Stand der Technik auf Korrektheit überprüft. Für die Qualität, Leistungsfähigkeit sowie Marktgängigkeit des G&D-Produkts zu einem bestimmten Zweck, der von dem durch die Produktbeschreibung abgedeckten Leistungsumfang abweicht, übernimmt G&D weder ausdrücklich noch stillschweigend die Gewähr oder Verantwortung. Für Schäden, die sich direkt oder indirekt aus dem Gebrauch der Dokumentation ergeben, sowie für beiläufige Schäden oder Folgeschäden ist G&D nur im Falle des Vorsatzes oder der groben Fahrlässigkeit verantwortlich. Gewährleistungsausschluss G&D übernimmt keine Gewährleistung für Geräte, die nicht bestimmungsgemäß eingesetzt wurden. nicht autorisiert repariert oder modifiziert wurden. schwere äußere Beschädigungen aufweisen, welche nicht bei Lieferungserhalt angezeigt wurden. durch Fremdzubehör beschädigt wurden. G&D haftet nicht für Folgeschäden jeglicher Art, die möglicherweise durch den Einsatz der Produkte entstehen können. Warenzeichennachweis Alle Produkt- und Markennamen, die in diesem Handbuch oder in den übrigen Dokumentationen zu Ihrem G&D-Produkt genannt werden, sind Warenzeichen oder eingetragene Warenzeichen der entsprechenden Rechtsinhaber. Impressum © Guntermann & Drunck GmbH 2011. Alle Rechte vorbehalten. Version 1.20 – 23.05.2011 Firmware: 1.9.006cpu; 1.8.004con Guntermann & Drunck GmbH Dortmunder Str. 4a 57234 Wilnsdorf Germany Telefon Telefax +49 (0) 2739 8901-100 +49 (0) 2739 8901-120 http://www.GDsys.de [email protected] i · G&D FIBREVision-USB 2.0 Inhaltsverzeichnis Sicherheitshinweise .......................................................................................... 1 Die FIBREVision-USB 2.0-Serie ...................................................................... Übertragungsreichweite zwischen den Modulen .................................................... Zusätzliche Funktionen erweiterter Varianten ..................................................... Verfügbare Erweiterungen ................................................................................. 3 3 3 3 Lieferumfang .................................................................................................... 4 Standardlieferumfang der FIBREVision-USB 2.0-Serie ....................................... 4 Zusätzlicher Lieferumfang der erweiterten Varianten .......................................... 4 Installation ....................................................................................................... 5 Vorbereitung ..................................................................................................... 5 Installation des Rechnermoduls .......................................................................... 5 Anschluss des Rechners ................................................................................ 6 Optional: Anschluss der Geräte des lokalen Arbeitsplatzes ............................ 6 Zusätzliche Schnittstellen der erweiterten Varianten ...................................... 7 Anschlüsse für Datenübertragung ................................................................. 7 Anschlüsse für Stromversorgung ................................................................... 8 Zusätzliche Schnittstellen der Multi-Channel-Varianten ................................ 8 Installation des Arbeitsplatzmoduls .................................................................... 9 Anschluss des entfernten Arbeitsplatzes ........................................................ 9 Anschlüsse für USB 2.0-Geräte ..................................................................... 9 Zusätzliche Schnittstellen der erweiterten Varianten .................................... 10 Anschlüsse für Datenübertragung ............................................................... 10 Anschlüsse für Stromversorgung ................................................................. 11 Zusätzliche Schnittstellen der Multi-Channel-Varianten .............................. 11 Inbetriebnahme ............................................................................................... 12 Weiterführende Informationen ....................................................................... Ergänzende Hinweise für die MC4-Variante ..................................................... Zulässige Ausrichtungen und Abstände der Geräte ..................................... Temperaturwarnungen ............................................................................... Unterstützung beliebiger Grafikauflösungen ..................................................... DDC-Weiterleitung mit Cache-Funktion .......................................................... 13 13 13 14 14 15 Statusanzeigen ................................................................................................ 16 Technische Daten ........................................................................................... Allgemeine Eigenschaften ................................................................................ Individuelle Eigenschaften der Module ............................................................. Strom- und Leistungsaufnahme ........................................................................ Eigenschaften der Übertragungsmodule ............................................................ 19 19 20 23 24 G&D FIBREVision-USB 2.0 · ii Sicherheitshinweise Sicherheitshinweise Bitte lesen Sie die folgenden Sicherheitshinweise aufmerksam durch, bevor Sie das G&D-Produkt in Betrieb nehmen. Die Hinweise helfen Schäden am Produkt zu vermeiden und möglichen Verletzungen vorzubeugen. Halten Sie diese Sicherheitshinweise für alle Personen griffbereit, die dieses Produkt benutzen werden. Befolgen Sie alle Warnungen oder Bedienungshinweise, die sich am Gerät oder in dieser Bedienungsanleitung befinden. , Vorsicht vor Stromschlägen Um das Risiko eines Stromschlags zu vermeiden, sollten Sie das Gerät nicht öffnen oder Abdeckungen entfernen. Im Servicefall wenden Sie sich bitte an unsere Techniker. , Ziehen Sie den Netzstecker des Geräts vor Installationsarbeiten Stellen Sie vor Installationsarbeiten sicher, dass das Gerät spannungsfrei ist. Ziehen Sie den Netzstecker oder die Spannungsversorgung am Gerät ab. , Ständigen Zugang zu den Netzsteckern der Geräte sicherstellen Achten Sie bei der Installation der Geräte darauf, dass die Netzstecker der Geräte jederzeit zugänglich bleiben. ! Lüftungsöffnungen nicht verdecken Bei Gerätevarianten mit Lüftungsöffnungen ist eine Verdeckung der Lüftungsöffnungen unbedingt zu vermeiden. ! Korrekte Einbaulage bei Geräten mit Lüftungsöffnungen sicherstellen Aus Gründen der elektrischen Sicherheit ist bei Geräten mit Lüftungsöffnungen nur eine aufrechte, horizontale Einbauweise zulässig. ! Stolperfallen vermeiden Vermeiden Sie bei der Verlegung der Kabel Stolperfallen. , Geerdete Spannungsquelle verwenden Betreiben Sie dieses Gerät nur an einer geerdeten Spannungsquelle. , Verwenden Sie ausschließlich das G&D-Netzteil Betreiben Sie dieses Gerät nur mit dem mitgelieferten oder in der Bedienungsanleitung aufgeführten Netzteil. ! Betreiben Sie das Gerät ausschließlich im vorgesehenen Einsatzbereich Die Geräte sind für eine Verwendung im Innenbereich ausgelegt. Vermeiden Sie extreme Kälte, Hitze oder Feuchtigkeit. 1 · G&D FIBREVision-USB 2.0 Sicherheitshinweise Besondere Hinweise zum Umgang mit Laser-Technologie Die Geräte der FIBREVision-Serie verwenden Baugruppen mit Laser-Technologie, die der Laser-Klasse 1 entsprechen. Sie erfüllen dabei die Richtlinien gemäß DIN EN 60825-1:2001-11, IEC 60825-1 sowie U.S. CFR 1040.10 und 1040.11. LASER KLASSE 1 DIN EN 60825-1:2001-11 Class 1 Laser Product Complies with 21 CFR 1040.10 and 1040.11 Beachten Sie zum sicheren Umgang mit der Laser-Technologie folgende Hinweise: ! Blickkontakt mit dem Laserstrahl vermeiden Obwohl Laserstrahlung der Klasse 1 als ungefährlich angesehen wird, ist der direkte Blick in den Strahl zu vermeiden. Blicken Sie nicht mit optischen Instrumenten in den Strahl. ! Optische Anschlüsse stets verbinden oder mit Schutzkappen abdecken Decken Sie die optischen Anschlüsse der Transmission-Buchse und die Kabelstecker stets mit einer Schutzkappe ab, wenn diese nicht verbunden sind. ! Ausschließlich von G&D zertifizierte Übertragungsmodule verwenden Es ist nicht zulässig, solche Übertragungsmodule zu verwenden, die nicht der Laser-Klasse 1 gemäß DIN EN 60825-1:2001-11 entsprechen. Durch die Verwendung solcher Module kann die Einhaltung von Vorschriften und Empfehlungen zum sicheren Umgang mit Laser-Technologie nicht sichergestellt werden. Die Gewährleistung zur Erfüllung aller einschlägigen Bestimmungen kann nur in der Gesamtheit der Originalkomponenten gegeben werden. Aus diesem Grund ist der Betrieb der Geräte ausschließlich mit solchen Übertragungsmodulen zulässig, die von G&D zertifiziert wurden. G&D FIBREVision-USB 2.0 · 2 Die FIBREVision-USB 2.0-Serie Die FIBREVision-USB 2.0-Serie Die KVM-Extender der FIBREVision-USB 2.0-Serie übertragen die Signale von Tastatur, Maus und USB-Geräten sowie das Videosignal zwischen dem Arbeitsplatz und dem entfernten Rechner. Ein FIBREVision-System besteht aus zwei wesentlichen Komponenten: Rechnermodul: An das Rechnermodul (FIBREVision-CPU) wird der zu bedienende Rechner angeschlossen. Zusätzlich zum entfernten Arbeitsplatz kann am Rechnermodul ein (optionaler) lokaler Arbeitsplatz eingerichtet werden. Arbeitsplatzmodul: An das Arbeitsplatzmodul (FIBREVision-CON) werden die Geräte des entfernten Arbeitsplatzes (Monitor, Tastatur, Maus sowie USB-Geräte) angeschlossen. Über Lichtwellenleiter wird das Rechner- mit dem Arbeitsplatzmodul verbunden. Übertragungsreichweite zwischen den Modulen Die maximale Kabellänge hängt von der Art der Lichtwellenleiter ab: Art der Lichtwellenleiter max. Kabellänge Multimode-Faser 550 Meter Singlemode-Faser 2 Kilometer Tabelle 1: Übersicht der maximalen Übertragungslängen verschiedener Signaltypen HINWEIS: Die KVM-Extender der FIBREVision-USB 2.0-Serie sind sowohl als Multimode- als auch als Singlemode-Variante verfügbar. Zusätzliche Funktionen erweiterter Varianten Audio: Die Audio-Übertragung (nur in Kombination mit der RS232-Option erhältlich) ermöglicht die bidirektionale Übertragung von Audiosignalen zwischen dem entfernten Arbeitsplatz und dem Rechner. RS232: Die RS232-Übertragung (nur in Kombination mit der Audio-Option erhältlich) ermöglicht den Anschluss externer serieller Geräte an das Arbeitsplatzmodul. Die Signale des externen Gerätes werden transparent über das Arbeits- sowie das Rechnermodul zwischen dem Gerät und dem Rechner übertragen. Verfügbare Erweiterungen FIBRE-Power: Die Erweiterung FIBRE-Power ermöglicht die Bedienung der Taster ATX-Power und Reset des Rechners am entfernten Arbeitsplatz. 3 · G&D FIBREVision-USB 2.0 Lieferumfang Lieferumfang Standardlieferumfang der FIBREVision-USB 2.0-Serie 1 × Rechnermodul (FIBREVision-CPU) 1 × Arbeitsplatzmodul (FIBREVision-CON) 2 × Stromversorgungskabel (PowerCable-2 Standard) 1 × Videokabel (DVI-D-SL-M/M-2) 1 × PS/2-Twin-Kabel (Twin-PS/2-M/M-2) 2 × USB-Gerätekabel (USB-AM/BM-2) 1 × Servicekabel (Update-Cable-2) 1 × Installationsanleitung 1 × Bedienungsanleitung Zusätzlicher Lieferumfang der erweiterten Varianten Im Lieferumfang einer erweiterten Variante der FIBREVision-Serie befinden sich zusätzlich die unten aufgeführten Kabel. Varianten mit Audio- und RS232-Übertragung 2 × Audio-Kabel (Audio-M/M-2) 1 × serielles Anschlusskabel (RS232-M/F-2) Zusätzlicher Lieferumfang der Multi-Channel-Varianten Die Multi-Channel-Varianten der FIBREVision-USB 2.0-Serie beinhalten für jeden Videokanal ein separates Videokabel. Die Variante FIBREVision-MC2 wird beispielsweise mit zwei Videokabeln ausgeliefert. HINWEIS: Zur Montage der Geräte in einem 19”-Rack sind im Lieferumfang der Multi-Channel-Geräte Rackmount-Sets (19" RM-Set-435) enthalten. Die Montage der Geräte im Rack kann wahlweise mit der Front- oder Rückseite nach vorn erfolgen. Single-Channel-Geräte sind wahlweise als Desktop- oder Rackmount-Variante verfügbar. Die Rackmount-Varianten sind immer mit der Frontseite nach vorn im Rack zu platzieren. G&D FIBREVision-USB 2.0 · 4 Installation Installation WICHTIG: Die Geräte verwenden Baugruppen mit Laser-Technologie, die der Laser-Klasse 1 entsprechen. Sie erfüllen dabei die Richtlinien gemäß DIN EN 60825-1:2001-11, IEC 60825-1 sowie U.S. 21 CFR 1040.10 und 1040.11. Beachten Sie diesbezüglich folgende Sicherheitshinweise: Blickkontakt mit dem Laserstrahl vermeiden auf Seite 2 Optische Anschlüsse stets verbinden oder mit Schutzkappen abdecken auf Seite 2 Ausschließlich von G&D zertifizierte Übertragungsmodule verwenden auf Seite 2 Vorbereitung HINWEIS: Um bei Installation mehrerer Geräte übereinander eine gute Luftzirkulation zu erreichen und die gegenseitige thermische Beeinflussung zu vermeiden, wird empfohlen, maximal drei Geräte unmittelbar übereinander zu platzieren. Planen Sie im Anschluss daran einen Zwischenraum (min. 2 cm) ein. 1. Stellen Sie sicher, dass die zulässige Umgebungstemperatur (siehe Technische Daten auf Seite 19) in der unmittelbaren Nähe des Gerätes eingehalten und nicht durch andere Geräte beeinflusst wird. 2. Schalten Sie den am KVM-Extender anzuschließenden Rechner ggf. aus und ziehen Sie die Kabel von Monitor, Tastatur und Maus aus den Schnittstellen. 3. Platzieren Sie das Rechnermodul (FIBREVision-CPU) in der Nähe des Rechners. Die maximale Kabellänge zwischen dem Rechnermodul und dem anzuschließenden Rechner beträgt fünf Meter. 4. Platzieren Sie das Arbeitsplatzmodul (FIBREVision-CON) in der Nähe des entfernten Arbeitsplatzes. Die maximale Kabellänge zwischen dem Arbeitsplatzmodul und den Geräten des Arbeitsplatzes beträgt fünf Meter. 5. Entnehmen Sie die mitgelieferten Kabel der Verpackung des KVM-Extenders und legen Sie diese für die Installation der Geräte bereit. Installation des Rechnermoduls An das Rechnermodul FIBREVision-CPU wird der Rechner angeschlossen, dessen Signale an den entfernten Arbeitsplatz übertragen werden. Zusätzlich besteht die Möglichkeit, einen lokalen Arbeitsplatz an das Rechnermodul anzuschließen. TIPP: Beim Anschluss der Kabel ist vorzugsweise blockweise und von unten nach oben vorzugehen. So vermeiden Sie, dass bereits gesteckte Kabel die Sicht auf die Bezeichnung der Schnittstellen versperren. 5 · G&D FIBREVision-USB 2.0 Installation Anschluss des Rechners Line Out Line In Mouse RS232 Mouse CPU Red. Power USB 2.0 Trans. USB 2.0 CPU Tx Rx Main Power Class 1 Laser Product Tx Rx Transmission DVI/VGA Out DVI CPU Keyb. Keyb. CPU USB CPU DVI CPU: Verbinden Sie den digitalen Videoausgang des Rechners mit dieser Schnittstelle. Verwenden Sie hierzu das Kabel DVI-D-SL-M/M-2. HINWEIS: Die Signale von Maus und Tastatur beider Arbeitsplätze können wahlweise über die PS/2-Schnittstellen oder über die USB-Schnittstelle an den Rechner übertragen werden. Keyb. CPU: Verbinden Sie die PS/2-Tastatur-Schnittstelle des Rechners mit dieser Schnittstelle. Verwenden Sie hierzu den violetten Stecker des PS/2-Twin-Kabels. Mouse CPU: Verbinden Sie die PS/2-Maus-Schnittstelle des Rechners mit dieser Schnittstelle. Verwenden Sie hierzu den grünen Stecker des PS/2-Twin-Kabels. USB CPU: Verbinden Sie eine USB-Schnittstelle des Rechners mit dieser Schnittstelle. Verwenden Sie hierzu das Kabel USB-AM/BM-2. USB 2.0 CPU: Verbinden Sie eine »High-Power« USB-Schnittstelle des Rechners mit dieser Schnittstelle. Verwenden Sie hierzu das Kabel USB-AM/BM-2. Optional: Anschluss der Geräte des lokalen Arbeitsplatzes Am Standort des Rechnermoduls können Sie optional eine zusätzliche Zugriffsmöglichkeit auf den Rechner einrichten. Schließen ggf. die Tastatur und die Maus sowie den Monitor des lokalen Arbeitsplatzes an die nachfolgend aufgeführten Schnittstellen an. Line Out Line In Mouse RS232 Mouse CPU Red. Power USB 2.0 Trans. USB 2.0 CPU Tx Rx Main Power Class 1 Laser Product Tx Rx Transmission DVI/VGA Out DVI CPU Keyb. Keyb. CPU USB CPU DVI/VGA Out: Schließen Sie den Monitor des lokalen Arbeitsplatzes an. Ist der Monitor mit einem analogen VGA-Eingang ausgestattet, stecken Sie einen optionalen Adapter auf diese Schnittstelle und schließen hieran das VGA-Kabel des Monitors an. Keyb.: Schließen Sie die PS/2-Tastatur des lokalen Arbeitsplatzes an. Mouse: Schließen Sie die PS/2-Maus des lokalen Arbeitsplatzes an. G&D FIBREVision-USB 2.0 · 6 Installation Zusätzliche Schnittstellen der erweiterten Varianten Line Out Line In Mouse RS232 Mouse CPU Red. Power USB 2.0 Trans. USB 2.0 CPU Tx Rx Main Power Class 1 Laser Product Tx Rx Transmission DVI/VGA Out DVI CPU Keyb. Keyb. CPU USB CPU Line Out: Verbinden Sie die Line-In-Schnittstelle des Rechners mit dieser Schnitt- stelle. Verwenden Sie hierzu das Kabel Audio-M/M-2. Line In: Verbinden Sie die Line-Out-Schnittstelle des Rechners mit dieser Schnitt- stelle. Verwenden Sie hierzu das Kabel Audio-M/M-2. RS232: Verbinden Sie eine 9-polige serielle Schnittstelle des Rechners mit dieser Schnittstelle. Verwenden Sie hierzu das Kabel RS232-M/F-2. Anschlüsse für Datenübertragung Line Out Line In Mouse RS232 Mouse CPU Red. Power USB 2.0 Trans. USB 2.0 CPU Tx Rx Main Power Class 1 Laser Product Tx Rx Transmission DVI/VGA Out DVI CPU Keyb. Keyb. CPU USB CPU WICHTIG: Das Gerät verwendet Baugruppen mit Laser-Technologie, die der Laser-Klasse 1 entsprechen. Obwohl Laserstrahlung der Klasse 1 als ungefährlich angesehen wird, ist der direkte Blick in den Strahl zu vermeiden. Blicken Sie nicht mit optischen Instrumenten in den Strahl! HINWEIS: Entfernen Sie die Schutzkappen der Transmission-Schnittstelle und der Kabelstecker. Transmission – Tx: Stecken Sie den LC-Stecker eines Glasfaserkabels ein. Das andere Ende des Kabels ist mit der Schnittstelle Transmission – Rx des Arbeitsplatzmoduls zu verbinden. Transmission – Rx: Stecken Sie den LC-Stecker eines Glasfaserkabels ein. Das andere Ende des Kabels ist mit der Schnittstelle Transmission – Tx des Arbeitsplatzmoduls zu verbinden. 7 · G&D FIBREVision-USB 2.0 Installation HINWEIS: Entfernen Sie die Schutzkappen der USB 2.0 Trans.-Schnittstelle und der Kabelstecker. USB 2.0 Trans. – Tx: Stecken Sie den LC-Stecker eines Glasfaserkabels ein. Das andere Ende des Kabels ist mit der Schnittstelle USB 2.0 Trans. – Rx des Arbeitsplatzmoduls zu verbinden. USB 2.0 Trans. – Rx: Stecken Sie den LC-Stecker eines Glasfaserkabels ein. Das andere Ende des Kabels ist mit der Schnittstelle USB 2.0 Trans. – Tx des Arbeitsplatzmoduls zu verbinden. Anschlüsse für Stromversorgung Line Out Line In Mouse RS232 Mouse CPU Red. Power USB 2.0 Trans. USB 2.0 CPU Tx Rx Main Power Class 1 Laser Product Tx Rx Transmission DVI/VGA Out DVI CPU Keyb. Keyb. CPU USB CPU Main Power: Stecken Sie das mitgelieferte Stromversorgungskabel ein. Red. Power: An diese Buchse kann ein optionales Tischnetzteil angeschlossen werden. Hierdurch wird eine zweite, redundante Stromversorgung des Gerätes erreicht. Zusätzliche Schnittstellen der Multi-Channel-Varianten HINWEIS: Für jeden zusätzlichen Videokanal ist das Rechnermodul zusätzlichen mit den unten aufgeführten Schnittstellen ausgestattet. Die Bezeichnungen der Schnittstellen sind um die Ziffern des Kanals ergänzt. HINWEIS: Entfernen Sie die Schutzkappen der Transmission-Schnittstelle und der Kabelstecker. Transmission x – Tx: Stecken Sie den LC-Stecker eines Glasfaserkabels ein. Das andere Ende des Kabels ist mit der Schnittstelle Transmission x – Rx des Arbeitsplatzmoduls zu verbinden. Transmission x – Rx: Stecken Sie den LC-Stecker eines Glasfaserkabels ein. Das andere Ende des Kabels ist mit der Schnittstelle Transmission x – Tx des Arbeitsplatzmoduls zu verbinden. DVI CPU x : Verbinden Sie den digitalen Videoausgang des Rechners mit dieser Schnittstelle. Verwenden Sie hierzu das Kabel DVI-D-SL-M/M-2. DVI/VGA Out x : Schließen Sie den Monitor des lokalen Arbeitsplatzes an. Ist der Monitor mit einem analogen VGA-Eingang ausgestattet, stecken Sie einen optionalen Adapter auf diese Schnittstelle und schließen hieran das VGA-Kabel des Monitors an. G&D FIBREVision-USB 2.0 · 8 Installation Installation des Arbeitsplatzmoduls Anschluss des entfernten Arbeitsplatzes Speaker Micro In Mouse RS232 USB 2.0 Trans. Tx Rx Main Power Class 1 Laser Product Tx Rx Transmission DVI/VGA Out USB Keyb./Mouse Keyb. USB 2.0 Devices Red. Power DVI/VGA Out: Schließen Sie den Monitor des Arbeitsplatzes an. Ist der Monitor mit einem analogen VGA-Eingang ausgestattet, stecken Sie einen optionalen Adapter auf diese Schnittstelle und schließen hieran das VGA-Kabel des Monitors an. HINWEIS: Die Maus sowie die Tastatur des entfernten Arbeitsplatzes können wahlweise als PS/2- oder USB-Gerät angeschlossen werden. USB Keyb./Mouse: Schließen Sie die USB-Tastatur und/oder USB-Maus des Arbeits- platzes an. Keyb.: Schließen Sie die PS/2-Tastatur des Arbeitsplatzes an. Mouse: Schließen Sie die PS/2-Maus des Arbeitsplatzes an. Anschlüsse für USB 2.0-Geräte USB 2.0 Power Red. Main Status Trans. Sys. Console Video K/M Service USB 2.0: Schließen Sie ggf. bis zu zwei USB-Geräte an der Frontseite an. Speaker Micro In Mouse RS232 USB 2.0 Trans. Tx Rx Main Power Class 1 Laser Product Tx Rx Transmission DVI/VGA Out USB Keyb./Mouse Keyb. USB 2.0 Devices Red. Power USB 2.0 Devices: Schließen Sie ggf. bis zu zwei USB-Geräte an der Rückseite an. Der am Rechnermodul FIBREVision-CPU angeschlossene Recher kann diese USBGeräte – zusätzlich zu den direkt am Rechner angeschlossenen USB-Geräten – nutzen. 9 · G&D FIBREVision-USB 2.0 Installation Zusätzliche Schnittstellen der erweiterten Varianten Speaker Micro In Mouse RS232 USB 2.0 Trans. Tx Rx Main Power Class 1 Laser Product Tx Rx Transmission DVI/VGA Out USB Keyb./Mouse Keyb. USB 2.0 Devices Red. Power Speaker: Schließen Sie die Lautsprecher des Arbeitsplatzes an. Micro In: Schließen Sie ein Mikrofon an. RS232: Verbinden Sie das serielle Endgerät mit dieser Schnittstelle. Anschlüsse für Datenübertragung Speaker Micro In Mouse RS232 USB 2.0 Trans. Tx Rx Main Power Class 1 Laser Product Tx Rx Transmission DVI/VGA Out USB Keyb./Mouse Keyb. USB 2.0 Devices Red. Power WICHTIG: Das Gerät verwendet Baugruppen mit Laser-Technologie, die der Laser-Klasse 1 entsprechen. Obwohl Laserstrahlung der Klasse 1 als ungefährlich angesehen wird, ist der direkte Blick in den Strahl zu vermeiden. Blicken Sie nicht mit optischen Instrumenten in den Strahl! HINWEIS: Entfernen Sie die Schutzkappen der Transmission-Schnittstelle und der Kabelstecker. Transmission – Tx: Stecken Sie den LC-Stecker eines Glasfaserkabels ein. Das andere Ende des Kabels ist mit der Schnittstelle Transmission – Rx des Rechnermoduls zu verbinden. Transmission – Rx: Stecken Sie den LC-Stecker eines Glasfaserkabels ein. Das andere Ende des Kabels ist mit der Schnittstelle Transmission – Tx des Rechnermoduls zu verbinden. G&D FIBREVision-USB 2.0 · 10 Installation HINWEIS: Entfernen Sie die Schutzkappen der USB 2.0 Trans.-Schnittstelle und der Kabelstecker. USB 2.0 Trans. – Tx: Stecken Sie den LC-Stecker eines Glasfaserkabels ein. Das andere Ende des Kabels ist mit der Schnittstelle USB 2.0 Trans. – Rx des Rechnermoduls zu verbinden. USB 2.0 Trans. – Rx: Stecken Sie den LC-Stecker eines Glasfaserkabels ein. Das andere Ende des Kabels ist mit der Schnittstelle USB 2.0 Trans. – Tx des Rechnermoduls zu verbinden. Anschlüsse für Stromversorgung Speaker Micro In Mouse RS232 USB 2.0 Trans. Tx Rx Main Power Class 1 Laser Product Tx Rx Transmission DVI/VGA Out USB Keyb./Mouse Keyb. USB 2.0 Devices Red. Power Main Power: Stecken Sie das mitgelieferte Kaltgerätekabel ein. Red. Power: An diese Buchse kann ein optionales Tischnetzteil angeschlossen werden. Hierdurch wird eine zweite, redundante Stromversorgung des Gerätes erreicht. Zusätzliche Schnittstellen der Multi-Channel-Varianten HINWEIS: Für jeden zusätzlichen Videokanal ist das Arbeitsplatzmodul zusätzlichen mit den unten aufgeführten Schnittstellen ausgestattet. Die Bezeichnungen der Schnittstellen sind um die Ziffern des Kanals ergänzt. HINWEIS: Entfernen Sie die Schutzkappen der Transmission-Schnittstelle und der Kabelstecker. Transmission x – Tx: Stecken Sie den LC-Stecker eines Glasfaserkabels ein. Das andere Ende des Kabels ist mit der Schnittstelle Transmission x – Rx des Rechnermoduls zu verbinden. Transmission x – Rx: Stecken Sie den LC-Stecker eines Glasfaserkabels ein. Das andere Ende des Kabels ist mit der Schnittstelle Transmission x – Tx des Rechnermoduls zu verbinden. DVI/VGA Out x : Schließen Sie den Monitor des Arbeitsplatzes an. Ist der Monitor mit einem analogen VGA-Eingang ausgestattet, stecken Sie einen optionalen Adapter auf diese Schnittstelle und schließen hieran das VGA-Kabel des Monitors an. 11 · G&D FIBREVision-USB 2.0 Inbetriebnahme Inbetriebnahme Nach der ordnungsgemäßen Installation des FIBREVision-Systems kann dieses sofort in Betrieb genommen und eingesetzt werden. Beachten Sie folgende Einschaltreihenfolge bei der ersten Inbetriebnahme des Systems: 1. Schalten Sie das Arbeitsplatzmodul (FIBREVision-CON) ein. 2. Schalten Sie das Rechnermodul (FIBREVision-CPU) ein. 3. Schalten Sie den, am Rechnermodul angeschlossenen, Rechner ein. HINWEIS: Die empfohlene Einschaltreihenfolge stellt sicher, dass das FIBREVisionSystem die Eigenschaften des angeschlossenen Monitors auslesen und an den Rechner weiterleiten kann (siehe DDC-Weiterleitung mit Cache-Funktion auf Seite 15). Nach dem Einschalten des Systems signalisieren die LEDs an den Frontseiten des Rechner- und des Arbeitsplatzmoduls den Betriebszustand des Systems. Weitere Hinweise hierzu erhalten Sie im Kapitel Statusanzeigen ab Seite 16. G&D FIBREVision-USB 2.0 · 12 Weiterführende Informationen Weiterführende Informationen Ergänzende Hinweise für die MC4-Variante Zulässige Ausrichtungen und Abstände der Geräte Beachten Sie die in der Tabelle angegebenen Hinweise zur korrekten Ausrichtung und der zu beachtenden Mindestabstände der Geräte sowie die ergänzenden Hinweise: Arbeitsplatzmodul (-MC4-CON) Geräteober- und Unterseite: Bei Geräteoberseite: mindestens 3 cm Geräteunterseite: mindestens Mindestabstände horizontal aufrecht (bevorzugt) linke Geräteseite senkrecht nach oben Geräterückseite senkrecht nach oben Montage mehrerer Geräte übereinander ist spätestens alle drei Geräte ein Abstand von mindestens 2 cm einzuplanen. Geräteunterseite: Bei stehender Unterbringung (z. B. auf einer Tischplatte) wird unter der Geräteunterseite ein freier Raum von mindestens 7,9 mm (entspricht der Höhe der Gerätefüße) empfohlen. Geräteseiten: mindestens 5 cm Luftzirkulation horizontal aufrecht (bevorzugt) linke Geräteseite senkrecht nach oben Geräterückseite senkrecht nach oben Es ist stets sicherzustellen, dass Es ist stets sicherzustellen, dass der rechten Seite (und ggf. der der Unterseite und den Seiten Unterseite) kühle Luft in ausreikühle Luft in ausreichender Menge zuströmt. chender Menge zuströmt. Die erwärmte Luft muss ungehin- Die erwärmte Luft muss ungehindert von den linken Seite (und ggf. dert von der Oberseite und den der Oberseite) fortströmen könSeiten fortströmen können. nen. Ergänzende Hinweise Zulässige Ausrichtungen Rechnermodul (-MC4-CPU) Die zuströmende Luft muss in allen Fällen kühler sein als die zulässige Umgebungstemperatur Technische Daten auf Seite 19. Berücksichtigen Sie ggf. die Auswirkungen von in der Nähe befindlichen Wärmequellen (beispielsweise durch weitere Geräte). Die Unterbringung in geschlossenen beschränkten Räumlichkeiten ist in der Regel nicht zulässig. Vermeiden Sie die Verdeckung der Lüftungsöffnungen. 13 · G&D FIBREVision-USB 2.0 7,9 mm (entspricht der Höhe der Gerätefüße) Geräteseiten: mindestens 5 cm Weiterführende Informationen Temperaturwarnungen Die Temperatur im Arbeitsplatz- sowie im Rechnermodul der Variante FIBREVision-USB 2.0-MC4 wird permanent überwacht. WICHTIG: Zur Vermeidung der Überhitzung des Gerätes wird das Videosignal der Kanäle 2 bis 4 abgeschaltet, sobald der kritische Wert erreicht ist! Vor dem Erreichen des kritischen Wertes wird dem Anwender das Erreichen einer Warnstufe durch verschiedene Aktionen signalisiert: Warnstufe Aktion ≥ 70 °C Die Sys-LED am Gerät blinkt. ≥ 71 °C Auf allen vier Monitoren des Arbeitsplatzmoduls wird das Bild mit einem blinkenden Rahmen dargestellt. ≥ 72 °C Auf allen vier Monitoren des Arbeitsplatzmoduls wird das Bild mit einem schnell blinkenden Rahmen dargestellt. ≥ 73 °C Die Videokanäle 2 bis 4 werden ausgeschaltet; die Monitore 2 bis 4 zeigen kein Bild. Auf dem Monitor des Videokanals 1 wird weiterhin das Bild mit einem schnell blinkenden Rahmen dargestellt. Unterstützung beliebiger Grafikauflösungen Grundsätzlich unterstützt das FIBREVision-System jede Auflösung, die über eine Single-Link-Schnittstelle gemäß DVI-Spezifikation 1.0 übertragen werden kann. Dies betrifft vor allem die Pixelrate, die zwischen 25 und 165 MHz liegen darf. Für die üblichen Timingstandards VESA DMT und VESA SMT sind somit Auflösungen zwischen 640 × 480 Bildpunkten bei 60 Hz und 1600 × 1200 Bildpunkten bei 60 Hz möglich. 1920 × 1200 Bildpunkte bei 60 Hz werden nach VESA CVT-RB übertragen. Innerhalb der genannten Rahmenparameter sind beliebige Bildwiederholraten und Auflösungen möglich. Welche Bildschirmmodi zur Auswahl stehen, hängt maßgeblich von der Grafikkarte, dem installierten Gerätetreiber sowie dem Betriebssystem und dem angeschlossenen Monitor ab. Die vom Rechner an das Rechnermodul (FIBREVision-CPU) übertragenen Bilddaten werden mit dem gleichen Timing an den Monitor des entfernten Arbeitsplatzes weitergegeben. Frequenzen und Bildlage des Signals am Rechnermodul entsprechen somit jenen des Grafikkartenausgangs. G&D FIBREVision-USB 2.0 · 14 Weiterführende Informationen HINWEIS: Einige Grafikkarten unterscheiden bei der Erstellung des Videosignals nach digitaler und analoger Ausgabe. Solche Grafikkarten erzeugen digital ausgegebene Bildsignale zum Teil mit nicht-standardisierten Timings. Derartige Timings weichen von den Vorgaben des Bildschirms ab, um die Frequenzen der digitalen Signale zu reduzieren. Auf das FIBREVision-System und digital angeschlossene Bildschirme hat dies üblicherweise keine Auswirkung. Analog angeschlossene Bildschirme können aufgrund des nicht-standardisierten Timings die Bildgröße und die Bildlage möglicherweise nicht korrekt wiedergeben. DDC-Weiterleitung mit Cache-Funktion Das FIBREVision-System unterstützt Enhanced-DDC (Enhanced Display Data Channel), um die Eigenschaften des am Arbeitsplatzmoduls (FIBREVision-CON) angeschlossenen Monitors auszulesen und an den Rechner weiterzuleiten. Diese Eigenschaften umfassen beispielsweise Informationen über die bevorzugte Auflösung und die unterstützten Frequenzen des Monitors. Damit der am Rechnermodul (FIBREVision-CPU) angeschlossene Rechner schon während des Bootvorgangs Zugriff auf die Eigenschaften des entfernten Monitors hat, ist eine Cache-Funktion in das System integriert. Auch wenn das Rechner- oder das Arbeitsplatzmodul ausgeschaltet oder nicht miteinander verbunden sind, stehen entweder die Eigenschaften des zuletzt angeschlossenen Monitors oder die Werksvorgabe im FIBREVision-System zu Verfügung. Üblicherweise werden die DDC-Informationen des Monitors unverändert an den Rechner weitergeleitet. Stellt das FIBREVision-System aber fest, dass sich die Informationen des Monitors nicht vollständig auslesen lassen oder diese unzulässige Einträge enthalten, werden die Informationen vervollständigt oder korrigiert. 15 · G&D FIBREVision-USB 2.0 Statusanzeigen Statusanzeigen Die LEDs an den Frontseiten des Rechner- sowie des Arbeitsplatzmoduls geben Ihnen die Möglichkeit, den Betriebsstatus jederzeit zu kontrollieren. Statusanzeigen am Rechnermodul Power Red. Main Status Trans. Sys. CPU Video K/M Service LED Status Bedeutung K/M an Der CPU-Eingang (PS/2 oder USB) ist aktiv und bereit. Eine lokale Tastatur wurde erkannt. aus Keine Spannung auf der PS/2-Schnittstelle bzw. dem USB-Bus vorhanden. blinkt Der CPU-Eingang (PS/2 oder USB) ist aktiv und bereit. Eine lokale Tastatur wurde nicht erkannt. blitzt Es ist Spannung am USB-Eingang des Rechnermoduls vorhanden. Der Rechner ist aber (noch) nicht betriebsbereit. flackert Es werden Tastatur- und Mauseingaben an den Rechner übermittelt. Der Rhythmus des Flackerns wird durch die Eingaben des Anwenders bestimmt. an Die Hauptspannungsversorgung liefert die erforderliche Spannung. aus Der Netzschalter ist ausgeschaltet oder die Verbindung des Gerätes mit dem Stromnetz ist nicht hergestellt. Prüfen Sie den korrekten Anschluss des Stromversorgungskabels. an Das optionale Netzteil ist angeschlossen und eine Spannung von 12 Volt verfügbar. aus Das optionale Netzteil ist nicht (korrekt) angeschlossen. an System betriebsbereit. blinkt Setup-Modus aktiviert. blinkt langsam Interne Kommunikation fehlerhaft. Schalten Sie das Gerät aus und wieder ein. blinkt schnell nur Multichannel-Varianten -MC4: Die Temperatur innerhalb des Geräts übersteigt den zulässigen Wert (s. Seite 18) oder der Lüfter ist defekt. blitzt zyklisch Die mit dem Update-Assistenten in das Gerät übertragene Firmware wird an alle Komponenten des Systems übertragen. Dieser Vorgang kann einige Minuten dauern. Main Red. Sys. G&D FIBREVision-USB 2.0 · 16 Statusanzeigen LED Status Bedeutung Trans. an Die Kommunikation mit dem Arbeitsplatzmodul wurde erfolgreich aufgebaut. blinkt Die Kommunikation mit dem Arbeitsplatzmodul konnte nicht hergestellt werden. an Am Videoeingang wurde ein stabiles Bildsignal festgestellt. blinkt Das vom Rechner eingehende Videosignal wurde nicht erkannt oder es ist qualitativ nicht ausreichend, um durch das System verarbeitet zu werden. Video Statusanzeigen am Arbeitsplatzmodul USB 2.0 Power Red. Main Status Trans. Sys. Console Video K/M Service LED Status Bedeutung K/M an Es wurde eine Tastatur (PS/2 oder USB) erkannt. blinkt Es wurde keine Tastatur (PS/2 oder USB) erkannt. an Die Hauptspannungsversorgung liefert die erforderliche Spannung. aus Der Netzschalter ist ausgeschaltet oder die Verbindung des Gerätes mit dem Stromnetz nicht hergestellt. Prüfen Sie den korrekten Anschluss des Stromversorgungskabels. an Das optionale Netzteil ist angeschlossen und eine Spannung von 12 Volt verfügbar. aus Das optionale Netzteil ist nicht (korrekt) angeschlossen. an System betriebsbereit. blinkt Setup-Modus aktiviert. blinkt langsam Interne Kommunikation fehlerhaft. Schalten Sie das Gerät aus und wieder ein. blinkt schnell nur Multichannel-Variante -MC4: Die Temperatur innerhalb des Geräts übersteigt den zulässigen Wert. blitzt zyklisch Die mit dem Update-Assistenten in das Gerät übertragene Firmware wird an alle Komponenten des Systems übertragen. Dieser Vorgang kann einige Minuten dauern. an Die Kommunikation mit dem Rechnermodul wurde erfolgreich aufgebaut. blinkt Die Kommunikation mit dem Rechnermodul konnte nicht hergestellt werden. Main Red. Sys. Trans. 17 · G&D FIBREVision-USB 2.0 Statusanzeigen LED Status Bedeutung Video an Das am Videoeingang des Rechnermoduls eingehende Bildsignal wird korrekt durch das Arbeitsplatzmodul empfangen. blinkt Es werden keine Bilddaten vom Rechnermodul empfangen. G&D FIBREVision-USB 2.0 · 18 Technische Daten Technische Daten Allgemeine Eigenschaften FIBREVISION-USB 2.0-SERIE Grafik Signaltyp (Eingang): Signaltyp (Ausgang): Farbtiefe: Auflösung @ 60 Hz: Auflösung @ 85 Hz: Pixelrate: Horizontalfrequenz: Vertikalfrequenz: digital (DVI-D; single link) digital oder analog (DVI-I) 24 Bit max. 1920 × 1200 Bildpunkte max. 1280 × 1024 Bildpunkte 25 MHz bis 165 MHz 25 kHz bis 130 kHz 20 Hz bis 100 Hz USB 2.0 Übertragungsart: transparent Übertragungsrate: bis 480 Mbit/s Unterstützte Geräte: High-Power-Devices (bis 500 mA) Übertragungsart: Auflösung: Abtastrate Bandbreite: Übertragungsart: Übertragungsrate: Übertragene Signale: Typ: Anschluss: Spannung: Typ: Anschluss: Spannung: transparent, bidirektional 24 bit digital, Stereo 96 kHz 22 kHz transparent max. 115.200 bit/s RxD, TxD, RTS, CTS, DTR, DSR, DCD internes Netzteil Kaltgerätestecker (IEC-320 C14) AC100-240V/60-50Hz externes Netzteil miniDIN-4 Power-Buchse +12VDC Audio kostenpflichtige Option RS232 kostenpflichtige Option Hauptstromversorgung redundante Stromversorgung 19 · G&D FIBREVision-USB 2.0 Technische Daten Individuelle Eigenschaften der Module FIBREVISION-USB 2.0-CPU | RECHNERMODUL Schnittstellen für Rechner Video: PS/2-Tastatur/Maus: USB-Tastatur/Maus: Audio: RS232: 1 × DVI-D-Buchse 2 × PS/2-Buchse 1 × USB-B-Buchse 3,5-mm-Klinkenbuchse (Line In) 3,5-mm-Klinkenbuchse (Line Out) 1 × D-Sub 9-Buchse Monitor: 1 × DVI-I-Buchse Tastatur/Maus: Tastatur-/Maus-/Video: 2 × PS/2-Buchse 1 × LC-Duplex-Buchse Gehäuse USB 2.0: Material: Maße (B × H × T): Einsatzumgebung Gewicht: Temperatur: Luftfeuchte: 1 × LC-Duplex-Buchse Aluminium eloxiert 210 × 44 × 210 mm (Desktop) 19” × 1 HE × 210 mm (Rackmount) ca. 1,5 kg +5 bis +45 °C < 80%, nicht kondensierend kostenpflichtige Option kostenpflichtige Option Schnittstellen für lokalen Arbeitsplatz Schnittstellen zum Arbeitsplatzmodul FIBREVISION-USB 2.0-CON | ARBEITSPLATZMODUL Schnittstellen für Arbeitsplatz Monitor: Tastatur: RS232: 1 × DVI-I-Buchse 1 × PS/2-Buchse 1 × USB-A-Buchse 1 × PS/2-Buchse 1 × USB-A-Buchse 2 × USB-A-Buchse (Frontseite) 2 × USB-A-Buchse (Rückseite) 3,5-mm-Klinkenbuchse (Speaker) 3,5-mm-Klinkenbuchse (Micro In) 1 × D-Sub 9-Stecker Tastatur-/Maus-/Video: 1 × LC-Duplex-Buchse Gehäuse USB 2.0: Material: Dimensionen (B × H × T): Einsatzumgebung Gewicht: Temperatur: Luftfeuchte: 1 × LC-Duplex-Buchse Aluminium eloxiert 210 × 44 × 210 mm (Desktop) 19” × 1 HE × 210 mm (Rackmount) ca. 1,5 kg +5 bis +45 °C < 80%, nicht kondensierend Maus: USB 2.0: Audio: kostenpflichtige Option kostenpflichtige Option Schnittstellen zum Rechnermodul G&D FIBREVision-USB 2.0 · 20 Technische Daten FIBREVISION-USB 2.0-MC2-CPU | RECHNERMODUL Schnittstellen für Rechner Video: PS/2-Tastatur/Maus: USB-Tastatur/Maus: Audio: RS232: 2 × DVI-D-Buchse 2 × PS/2-Buchse 1 × USB-B-Buchse 3,5-mm-Klinkenbuchse (Line In) 3,5-mm-Klinkenbuchse (Line Out) 1 × D-Sub 9-Buchse Monitor: Tastatur/Maus: Tastatur-/Maus-/Video: USB 2.0: Material: Maße (B × H × T): Gewicht: Temperatur: Luftfeuchte: 2 × DVI-I-Buchse 2 × PS/2-Buchse 2 × LC-Duplex-Buchse 1 × LC-Duplex-Buchse Aluminium eloxiert 435 × 44 × 210 mm ca. 3,1 kg +5 bis +40 °C < 80%, nicht kondensierend kostenpflichtige Option kostenpflichtige Option Schnittstellen für lokalen Arbeitsplatz Schnittstellen zum Arbeitsplatzmodul Gehäuse Einsatzumgebung FIBREVISION-USB 2.0-MC2-CON | ARBEITSPLATZMODUL Schnittstellen für Arbeitsplatz Monitor: Tastatur: RS232: 2 × DVI-I-Buchse 1 × PS/2-Buchse 1 × USB-A-Buchse 1 × PS/2-Buchse 1 × USB-A-Buchse 2 × USB-A-Buchse (Frontseite) 2 × USB-A-Buchse (Rückseite) 3,5-mm-Klinkenbuchse (Speaker) 3,5-mm-Klinkenbuchse (Micro In) 1 × D-Sub 9-Stecker Tastatur-/Maus-/Video: USB 2.0: Material: Dimensionen (B × H × T): Gewicht: Temperatur: Luftfeuchte: 2 × LC-Duplex-Buchse 1 × LC-Duplex-Buchse Aluminium eloxiert 435 × 44 × 210 mm ca. 3,1 kg +5 bis +40 °C < 80%, nicht kondensierend Maus: USB 2.0: Audio: kostenpflichtige Option kostenpflichtige Option Schnittstellen zum Rechnermodul Gehäuse Einsatzumgebung 21 · G&D FIBREVision-USB 2.0 Technische Daten FIBREVISION-USB 2.0-MC4-CPU | RECHNERMODUL Schnittstellen für Rechner Video: PS/2-Tastatur/Maus: USB-Tastatur/Maus: Audio: kostenpflichtige Option RS232: kostenpflichtige Option Schnittstellen für lokalen Arbeitsplatz Schnittstellen zum Arbeitsplatzmodul Gehäuse Einsatzumgebung 4 × DVI-D-Buchse 2 × PS/2-Buchse 1 × USB-B-Buchse 3,5-mm-Klinkenbuchse (Line In) 3,5-mm-Klinkenbuchse (Line Out) 1 × D-Sub 9-Buchse Monitor: Tastatur/Maus: Tastatur-/Maus-/Video: USB 2.0: Material: 4 × DVI-I-Buchse 2 × PS/2-Buchse 4 × LC-Duplex-Buchse 1 × LC-Duplex-Buchse Aluminium eloxiert (oben, seitlich) Stahlblech verzinkt (unten) Maße (B × H × T): Gewicht: Temperatur: Luftfeuchte: 435 × 44 × 2185mm ca. 3,1 kg +5 bis +35 °C < 80%, nicht kondensierend FIBREVISION-USB 2.0-MC4-CON | ARBEITSPLATZMODUL Schnittstellen für Arbeitsplatz Monitor: Tastatur: Maus: USB 2.0: Audio: kostenpflichtige Option RS232: kostenpflichtige Option Schnittstellen zum Rechnermodul Gehäuse Einsatzumgebung Tastatur-/Maus-/Video: USB 2.0: Material: Dimensionen (B × H × T): Gewicht: Temperatur: Luftfeuchte: 4 × DVI-I-Buchse 1 × PS/2-Buchse 1 × USB-A-Buchse 1 × PS/2-Buchse 1 × USB-A-Buchse 2 × USB-A-Buchse (Frontseite) 2 × USB-A-Buchse (Rückseite) 3,5-mm-Klinkenbuchse (Speaker) 3,5-mm-Klinkenbuchse (Micro In) 1 × D-Sub 9-Stecker 4 × LC-Duplex-Buchse 1 × LC-Duplex-Buchse Aluminium eloxiert (oben, seitlich) Stahlblech verzinkt (unten) 435 × 44 × 285 mm ca. 3,1 kg +5 bis +35 °C < 80%, nicht kondensierend G&D FIBREVision-USB 2.0 · 22 Technische Daten Strom- und Leistungsaufnahme Stromaufnahme (max.) VARIANTE MAIN POWER REDUNDANT POWER ARU2-CPU ARU2-CON MC2-ARU2-CPU MC2-ARU2-CON MC4-ARU2-CPU AC100-240V/60-50Hz/0.3-0.2A 12VDC/1.2A AC100-240V/60-50Hz/0.6-0.3A 12VDC/2.2A AC100-240V/60-50Hz/0.5-0.3A 12VDC/1.9A AC100-240V/60-50Hz/0.6-0.3A 12VDC/2.6A AC100-120V/210-240V, 60-50Hz, 0.9-0.4A 12VDC/3.3A MC4-ARU2-CON AC100-120V/210-240V, 60-50Hz, 0.9-0.4A 12VDC/3.2A Leistungsaufnahme (max.) VARIANTE MAIN POWER REDUNDANT POWER ARU2-CPU ARU2-CON MC2-ARU2-CPU MC2-ARU2-CON MC4-ARU2-CPU MC4-ARU2-CON 17,5W@100VAC, 17,5W@240VAC 28W@100VAC, 28W@240VAC 24,5W@100VAC, 24,5W@240VAC 32W@100VAC, 33W@240VAC 46W@100VAC, 45W@240VAC 45W@100VAC, 43W@240VAC 14W@12VDC 23,6W@12VDC 20W@12VDC 27W@12VDC 38W@12VDC 37W@12VDC 23 · G&D FIBREVision-USB 2.0 Technische Daten Eigenschaften der Übertragungsmodule MULTIMODE-ÜBERTRAGUNGSMODUL Datenübertragung Kabellänge (max.) Leistungsdaten Art: Lichtwellenleiter (2 Glasfasern) Schnittstellentyp: LC-Duplex Multimode 50/125 μm, Klasse OM2: 550 Meter (Fasern mit 500 MHz*km), 500 Meter (Fasern mit 400 MHz*km) Multimode 62,5/125 μm, Klasse OM1: 220 Meter (Fasern mit 160 MHz*km), 275 Meter (Fasern mit 200 MHz*km) Wellenlänge (): 850 nm (770 nm bis 860 nm) Optische Abgabeleistung (PAVG) in 50 oder 62,5 μm MMF: -9,5 dBm bis -3 dBm Empfangsempfindlichkeit (PMIN): -17 dBm Empfindlichkeit – Stressed (PS): -13,5 dBm (50 m MMF) SINGLEMODE-ÜBERTRAGUNGSMODUL Datenübertragung Kabellänge (max.) Leistungsdaten Art: Lichtwellenleiter (2 Glasfasern) Schnittstellentyp: LC-Duplex Singlemode 9/125μm, Klasse OS1: 2 Kilometer Wellenlänge (): 1310 nm (1270 nm bis 1360 nm) Optische Abgabeleistung (PAVG) in 9 μm SMF: -9,5 dBm bis -3 dBm Empfangsempfindlichkeit (PMIN): -19 dBm Empfindlichkeit – Stressed (PS): -14,4 dBm G&D FIBREVision-USB 2.0 · 24 About this manual This manual has been carefully compiled and examined to the state-of-the-art. G&D neither explicitly nor implicitly takes guarantee or responsibility for the quality, efficiency and marketability of the product when used for a certain purpose that differs from the scope of service covered by this manual. For damages which directly or indirectly result from the use of this manual as well as for incidental damages or consequential damages, G&D is liable only in cases of intent or gross negligence. Caveat Emptor G&D will not provide warranty for devices that: Are not used as intended. Are repaired or modified by unauthorized personnel. Show severe external damages that was not reported on the receipt of goods. Have been damaged by non G&D accessories. G&D will not be liable for any consequential damages that could occur from using the products. Proof of trademark All product and company names mentioned in this manual, and other documents you have received alongside your G&D product, are trademarks or registered trademarks of the holder of rights. © Guntermann & Drunck GmbH 2011. All rights reserved. Version 1.20 – 23/05/2011 Firmware: 1.9.006cpu; 1.8.004con Guntermann & Drunck GmbH Dortmunder Str. 4a 57234 Wilnsdorf Germany Phone +49 2739 8901-100 Fax +49 2739 8901-120 http://www.GDsys.de [email protected] i · G&D FIBREVision-USB 2.0 Contents Contents Safety instructions ............................................................................................ 1 FIBREVision-USB 2.0 series ............................................................................ Maximum transmission distances between modules ............................................... Special functions of expanded variants ............................................................... Available expansions ......................................................................................... 3 3 3 3 Scope of delivery ............................................................................................... 4 Standard scope of delivery of the series ............................................................... 4 Additional scope of delivery for expanded variants ............................................. 4 Installation ....................................................................................................... 5 Preparation ....................................................................................................... 5 Installing the computer module .......................................................................... 5 Connecting the computer ............................................................................. 6 Optional: Connecting the local console devices ............................................. 6 Additional interfaces for expanded variants ................................................... 7 Connections for data transmission ................................................................ 7 Connecting the power supply ....................................................................... 8 Additional interfaces of the multi-channel variants ........................................ 8 Installing the user module .................................................................................. 9 Connecting the remote console ..................................................................... 9 Connecting USB 2.0 devices ......................................................................... 9 Additional interface of expanded variants ................................................... 10 Connections for data transmission .............................................................. 10 Connecting the power supply ..................................................................... 11 Additional interfaces of the multi-channel variants ...................................... 11 Start-up .......................................................................................................... 12 Further information ........................................................................................ Special advices regarding the MC4 variant ....................................................... Permitted device adjustments and distances ................................................ Temperature warnings ............................................................................... Support of any resolution ................................................................................. DDC transmission with cache function ............................................................ 13 13 13 14 14 15 Status displays ................................................................................................ 16 Technical Data ............................................................................................... General Features ............................................................................................. Individual Module Features .............................................................................. Current and power consumption ...................................................................... Transmission Module Features ........................................................................ 19 19 20 23 24 G&D FIBREVision-USB 2.0 · ii Safety instructions Safety instructions Please read the following safety instructions carefully before you start operating the G&D product. The instructions well help in avoiding damages to the product and in preventing possible injuries. Keep this manual handy for all persons who will be using this product. Follow all warnings or operating instructions which are on the device or stated in this user manual. , Disconnect the main power plug or the power supply before installation Before installation, ensure that the device has been disconnected from the power source. Disconnect the main power plug or the power supply of the device. , Ensure constant access to the power plugs During the installation of the devices, ensure that the power plugs remain accessible. ! Do not cover the ventilation openings Ventilation openings prevent the device from overheating. Do not cover them. ! Ensure proper installation position For reasons of electric safety, the device has to be installed upright and horizontally. ! Avoid tripping hazards Avoid tripping hazards while laying cables. , Only use a grounded voltage source Operate this device by using a grounded voltage source. , Use only the provided G&D power pack Operate this device with the provided G&D power pack or with the power pack listed in the manual. ! Operate the device only in designated areas. The devices are designed for indoor use. Avoid exposure to extreme cold, heat or humidity. 1 · G&D FIBREVision-USB 2.0 Safety instructions Special instructions for dealing with laser technology The devices of the FIBREVision series use components with laser technology which comply with laser class 1. They meet the requirements according to DIN EN 60825-1:2001-11, IEC 60825-1 as well as U.S. CFR 1040.10 and 1040.11. LASER CLASS 1 DIN EN 60825-1:2001-11 Complies with 21 CFR 1040.10 and 1040.11 Class 1 Laser Product Mind the following advices when dealing with laser beams: ! Avoid eye contact with laser beam Although class 1 laser are considered nonhazardous, direct eye contact should be avoided. Do not stare into the beam or view directly with optical instruments. ! Always connect optical connections or cover them with protection caps Optical connections of the Transmission socket as well as cable plugs must always be covered with a connector or a protection cap. ! Only use G&D certified transmission modules It is not allowed to use transmission modules that do not comply with laser class 1 according to DIN EN 60825-1:2001-11. By applying such modules, the compliance of the given instructions and recommendations for laser safety cannot be guaranteed. The guarantee of complying with all relevant instructions can only be given by applying original components. The devices must therefore ony be operated G&D certified transmission modules. G&D FIBREVision-USB 2.0 · 2 FIBREVision-USB 2.0 series FIBREVision-USB 2.0 series KVM extenders of the FIBREVision-USB 2.0 series transmit signals of keyboard, mouse and USB devices as well as video signals between console and remote computer. A FIBREVision system consists of two main components: Computer module: The computer to be operated is connected to the computer mod- ule (FIBREVision-CPU). In addition to the remote console, an optional local console can be installed at the computer module. User module: The devices of the remote console (monitor, keyboard, mouse, and USB devices) are connected to the user module (FIBREVision-CON). Fibre optics are used to connect computer module and user module. Maximum transmission distances between modules The maximum cable length depends on the applied fibre optics: Type of fibre optics Max. cable length Multimode fibre 550 meters Singlemode fibre 2 kilometers Table 1: Overview of the maximum transmission lengths of different signal types NOTE: KVM extenders of the FIBREVision-USB 2.0 series are available as multimode or singlemode variants. Special functions of expanded variants Audio: Audio transmission (only available in combination with RS232 option) enables the bidirectional transmission of audio signals between remote console and computer. RS232: RS232 transmission (only available in combination with Audio option) enables the connection of external serial devices to the user module. User module and computer module transmit the signals of external devices in a transparent way from device to computer. Available expansions FIBRE-Power: The FIBRE-Power expansion allows you to operate the ATX-Power and Reset buttons of the computer at the remote console. 3 · G&D FIBREVision-USB 2.0 Scope of delivery Scope of delivery Standard scope of delivery of the series 1 × Computer module (FIBREVision-CPU) 1 × User module (FIBREVision-CON) 2 × Power cable (PowerCable-2 Standard) 1 × Video cable (DVI-D-SL-M/M-2) 1 × PS/2 twin cable (Twin-PS/2-M/M-2) 2 × USB device cable (USB-AM/BM-2) 1 × Service cable (Update-Cable-2) 1 × Installation guide 1 × Operating guide Additional scope of delivery for expanded variants The scope of delivery for expanded variants of the FIBREVision series additionally includes the cables that are listed below. Variants with audio and RS232 transmission 2 × Audio cable (Audio-M/M-2) 1 × serial connection cable (RS232-M/F-2) Additional scope of delivery for multi-channel variants Multi-channel variants of the series include a separate video cable for each video channel. FIBREVision-MC2 variants, for example, are shipped with two video cables. NOTE: The scope of delivery of multi-channel devices provides several rackmount sets (19” RM-Set-435) in order to install the devices to a 19” rack. The devices can either be installed with the front panel or the back panel facing forwards. Single-channel devices are available as desktop or as rackmount variant. Rackmount variants must be installed to the rack with the front panel facing forwards. G&D FIBREVision-USB 2.0 · 4 Installation Installation IMPORTANT: The devices use components with laser technology which comply with laser class 1. They meet the requirements according to DIN EN 60825-1:2001-11, IEC 60825-1 as well as U.S. CFR 1040.10 and 1040.11. Please consider the following safety guidelines regarding this matter: Avoid eye contact with laser beam on page 2 Always connect optical connections or cover them with protection caps on page 2 Only use G&D certified transmission modules on page 2 Preparation NOTE: When installing the devices, please make sure to only place a maximum of three devices directly on top of each other. This way, the devices are still provided with enough air and mutual thermal interference can be avoided. After having installed three devices, provide for a distance of at least 2 cm. 1. The ambient temperature limit close to the devices must neither be exceeded (see Technical Data on page 19) nor influenced by other devices. 2. Turn the computer to be connected to the KVM extender off and unplug the cables of monitor, keyboard and mouse from their interfaces. 3. Put the computer module (FIBREVision-CPU) close to the computer. Remember that the maximum cable length between the computer module and the computer to be connected must not exceed five meters. 4. Put the user module (FIBREVision-CON) close to the remote console. Remember that the maximum cable length between the user module and the console devices must not exceed five meters. 5. Place the supplied cables ready for installation. Installing the computer module The computer, whose signals are transmitted to the remote console, is connected to the FIBREVision-CPU computer module. A local console can also be connected to the computer module. ADVICE: Preferably connect the cables block by block and from bottom to top. This way, already connected cables do not block the view on interface descriptions. 5 · G&D FIBREVision-USB 2.0 Installation Connecting the computer Line Out Line In Mouse RS232 Mouse CPU Red. Power USB 2.0 Trans. USB 2.0 CPU Tx Rx Main Power Class 1 Laser Product Tx Rx Transmission DVI/VGA Out DVI CPU Keyb. Keyb. CPU USB CPU DVI CPU: Use the DVI-D-SL-M/M-2 cable to connect the computer’s digital video output to this interface. NOTE: Mouse and keyboard signals can either be transmitted to the computer via PS/2 or USB interfaces. Keyb. CPU: Use the purple plug of the PS/2 twin cable to connect the computer’s PS/2 keyboard interface to this interface. Mouse CPU: Use the green plug of the PS/2 twin cable to connect the computer’s PS/2 mouse interface to this interface. USB CPU: Use the USB-AM/BM-2 cable to connect the computer’s USB interface to this interface. USB 2.0 CPU: Use the USB-AM/BM-2 cable to connect one of the computer’s »High- Power« USB interfaces to this interface. Optional: Connecting the local console devices It is also possible to install an optional console at the computer module. Connect keyboard, mouse and monitor of the local console to the highlighted interfaces in the image below. Line Out Line In Mouse RS232 Mouse CPU Red. Power USB 2.0 Trans. USB 2.0 CPU Tx Rx Main Power Class 1 Laser Product Tx Rx Transmission DVI/VGA Out DVI CPU Keyb. Keyb. CPU USB CPU DVI/VGA Out: Connect the local console monitor to this interface. If the monitor provides an analog VGA input, connect an optional adapter to this interface. Afterwards, connect the monitor’s VGA cable to the adapter. Keyb.: Connect the PS/2 keyboard of the local console to this interface. Mouse: Connect the PS/2 mouse of the local console to this interface. G&D FIBREVision-USB 2.0 · 6 Installation Additional interfaces for expanded variants Line Out Line In Mouse RS232 Mouse CPU Red. Power USB 2.0 Trans. USB 2.0 CPU Tx Rx Main Power Class 1 Laser Product Tx Rx Transmission DVI/VGA Out DVI CPU Keyb. Keyb. CPU USB CPU Line Out: Use the Audio-M/M-2 cable to connect the computer’s Line In interface to this interface. Line In: Use the Audio-M/M-2 cable to connect the computer’s Line Out interface to this interface. RS232: Use the RS232-M/F-2 cable to connect one of the computer’s 9-pin serial interfaces to this interface. Connections for data transmission Line Out Line In Mouse RS232 Mouse CPU Red. Power USB 2.0 Trans. USB 2.0 CPU Tx Rx Main Power Class 1 Laser Product Tx Rx Transmission DVI/VGA Out DVI CPU Keyb. Keyb. CPU USB CPU IMPORTANT: The device uses components with laser technology which comply with laser class 1. Although class 1 lasers are usually not considered dangerous, please avoid direct eye contact for your own safety. Do not use optical instruments to look into the beam! NOTE: Remove the protection caps from the Transmission interface and the cable plugs. Transmission – Tx: Insert the LC plug of a fibre optic cable. Connect the other end of the cable to the Transmission – Rx interface of the user module. Transmission – Rx: Insert the LC plug of a fibre optic cable. Connect the other end of the cable to the Transmission –Tx interface of the user module. 7 · G&D FIBREVision-USB 2.0 Installation NOTE: Remove the protection caps from the Transmission interface and the cable plugs. USB 2.0 Trans. – Tx: Insert the LC plug of a fibre optic cable. Connect the other end of the cable to the USB 2.0 Trans. – Rx interface of the user module. USB 2.0 Trans. – Rx: Insert the LC plug of a fibre optic cable. Connect the other end of the cable to the USB 2.0 Trans. – Tx interface of the user module. Connecting the power supply Line Out Line In Mouse RS232 Mouse CPU Red. Power USB 2.0 Trans. USB 2.0 CPU Tx Rx Main Power Class 1 Laser Product Tx Rx Transmission DVI/VGA Out DVI CPU Keyb. Keyb. CPU USB CPU Main Power: Connect the supplied power cable to this interface. Red. Power: Use this socket to connect an optional power pack, which enables a sec- ond, redundant power supply. Additional interfaces of the multi-channel variants NOTE: For each additional video channel, the multi-channel variants of the computer module are additionally provided with the interfaces listed below. The interfaces of each channel are located next to each other. The names of the interfaces show the channel number. NOTE: Remove the protection caps from the Transmission interface and the cable plugs. Transmission x – Tx: Insert the LC plug of a fibre optic cable. Connect the other end of the cable to the Transmission x – Rx interface of the user module. Transmission x – Rx: Insert the LC plug of a fibre optic cable. Connect the other end of the cable to the Transmission x – Rx interface of the user module. DVI CPU x : Use the DVI-D-SL-M/M-2 cable to connect the computer’s digital video output to this interface. DVI/VGA Out x : Connect the local console monitor to this interface. If the monitor provides an analog VGA input, connect an optional adapter to this interface. Afterwards, connect the monitor’s VGA cable to the adapter. G&D FIBREVision-USB 2.0 · 8 Installation Installing the user module Connecting the remote console Speaker Micro In Mouse RS232 USB 2.0 Trans. Tx Rx Main Power Class 1 Laser Product Tx Rx Transmission DVI/VGA Out USB Keyb./Mouse Keyb. USB 2.0 Devices Red. Power DVI/VGA Out: Connect the local console monitor to this interface. If the monitor provides an analog VGA input, connect an optional adapter to this interface. Afterwards, connect the monitor’s VGA cable to the adapter.. NOTE: Mouse and keyboard of the remote console can either be PS/2 or USB devices. USB Keyb./Mouse: Connect a USB keyboard and/or mouse to this interface. Keyb.: Connect the PS/2 keyboard of the local console to this interface. Mouse: Connect the PS/2 mouse of the local console to this interface. Connecting USB 2.0 devices USB 2.0 Power Red. Main Status Trans. Sys. Console Video K/M Service USB 2.0: Connect up to two USB devices to the front panel. Speaker Micro In Mouse RS232 USB 2.0 Trans. Tx Rx Main Power Class 1 Laser Product Tx Rx Transmission DVI/VGA Out USB Keyb./Mouse Keyb. USB 2.0 Devices Red. Power USB 2.0 Devices: Connect up to two USB devices to the front panel. The computer that is connected to the FIBREVision-CPU computer module can use these USB devices as well as the devices that are directly connected to the computer. 9 · G&D FIBREVision-USB 2.0 Installation Additional interface of expanded variants Speaker Micro In Mouse RS232 USB 2.0 Trans. Tx Rx Main Power Class 1 Laser Product Tx Rx Transmission DVI/VGA Out USB Keyb./Mouse Keyb. USB 2.0 Devices Red. Power Speaker: Connect the console speakers to this interface. Micro In: Connect a microphone to this interface. RS232: Connect the serial end device to this interface. Connections for data transmission Speaker Micro In Mouse RS232 USB 2.0 Trans. Tx Rx Main Power Class 1 Laser Product Tx Rx Transmission DVI/VGA Out USB Keyb./Mouse Keyb. USB 2.0 Devices Red. Power IMPORTANT: The device uses components with laser technology which comply with laser class 1. Although class 1 lasers are usually not dangerous considered, please avoid direct eye contact for your own safety. Do not use optical instruments to look into the beam! NOTE: Remove the protection caps from the Transmission interface and the cable plugs. Transmission – Tx: Insert the LC plug of a fibre optic cable. Connect the other end of the cable to the Transmission – Rx interface of the computer module. Transmission – Rx: Insert the LC plug of a fibre optic cable. Connect the other end of the cable to the Transmission – Rx interface of the computer module. G&D FIBREVision-USB 2.0 · 10 Installation NOTE: Remove the protection caps from the Transmission interface and the cable plugs. USB 2.0 Trans. – Tx: Insert the LC plug of a fibre optic cable. Connect the other end of the cable to the USB 2.0 Trans. – Rx interface of the computer module. USB 2.0 Trans. – Rx: Insert the LC plug of a fibre optic cable. Connect the other end of the cable to the USB 2.0 Trans. – Tx interface of the computer module. Connecting the power supply Speaker Micro In Mouse RS232 USB 2.0 Trans. Tx Rx Main Power Class 1 Laser Product Tx Rx Transmission DVI/VGA Out USB Keyb./Mouse Keyb. USB 2.0 Devices Red. Power Main Power: Connect the supplied power cable to this interface. Red. Power: Use this socket to connect an optional power pack, which enables a sec- ond, redundant power supply. Additional interfaces of the multi-channel variants NOTE: For each additional video channel, the multi-channel variants of the user module are additionally provided with the interfaces listed below. The interfaces of each channel are located next to each other. The interfaces are provided with the numbers of the channels. NOTE: Remove the protection caps from the Transmission interface and the cable plugs. Transmission x – Tx: Insert the LC plug of a fibre optic cable. Connect the other end of the cable to the Transmission x – Rx interface of the computer module. Transmission x – Rx: Insert the LC plug of a fibre optic cable. Connect the other end of the cable to the Transmission x – Tx interface of the computer module. DVI/VGA Out x : Connect the local console monitor to this interface. If the monitor provides an analog VGA input, connect an optional adapter to this interface. Afterwards, connect the monitor’s VGA cable to the adapter. 11 · G&D FIBREVision-USB 2.0 Start-up Start-up After the FIBREVision system has been properly installed, it can be immediately put into operation. Mind the following activation sequence when initiating the system for the first time: 1. Turn the user module (FIBREVision-CON) on. 2. Turn the computer module (FIBREVision-CPU) on. 3. Turn on the computer that is connected to the computer module. NOTE: The recommended activation sequence ensures that the FIBREVision system is able to read out the features of the connected monitor and transmit them to the computer (see DDC transmission with cache function on page 15). After the system has been switched on, the LEDs on the front panel of both the computer module and the user module show the system’s operating status. For further advices on this topic, see the chapter Status displays on page 16 ff. G&D FIBREVision-USB 2.0 · 12 Further information Further information Special advices regarding the MC4 variant Permitted device adjustments and distances Please mind the following advices regarding the proper installation and the minimum distances of the devices as well as the additional advices: User module (-MC4-CON) Device top and bottom side: When Device top side: at least 3 cm Device bottom side: at least 7,9 mm Minimum distances upright horizontal (preferred) left device side upright rear side upright installing several devices on top of each other please provide a distance of at least 2 cm every three devices. Device bottom side: If the device is standing on a table, for example, provide a free space of at least 7,9 mm (equals the height of the device stands). Device sides: at least 5 cm Air circulation upright horizontal (preferred) left device side upright rear side upright Always ensure that the right-hand Always ensure that the sides and side (and if necessary the bottom the bottom side are cooled by air. side) of the devices are cooled by Heated air must be able to stream air. away from the sides and the top Heated air must be able to stream side. away from the left side (and if necessary the top side). Additional advices Permitted adjustments Computer module (-MC4-CPU) The incoming streaming air must be cooler than the permissible ambient temperature (see Technical Data on page 19). Note the effects of heat sources (e. g. other devices) in the immediate vicinity of the KVM extender. Do not place the devices into closed, constricted spaces. Avoid covering the ventilation openings. 13 · G&D FIBREVision-USB 2.0 (equals the height of the device stands) Device sides: at least 5 cm Further information Temperature warnings The temperature in both the user module and the computer module of the FIBREVision-USB 2.0-MC4 variant is permanently monitored. IMPORTANT: To protect the device from overheating, the video signal of the channels 2 to 4 is switched off when the temperature reaches the critical value! Before the temperature reaches the critical value, the user is warned by several alarm signals: Alarm level Action ≥ 70 °C Blinking Sys-LED at device. ≥ 71 °C All four monitors of the user module display the image with a blinking frame. ≥ 72 °C All four monitors of the user module display the image with a fast blinking frame. ≥ 73 °C Video channels 2 to 4 are switched off; the monitors 2 to 4 display no image. The monitor of video channel 1 still displays the image with a fast blinking frame. Support of any resolution The FIBREVision system usually supports all resolutions that can be transmitted through a single link interface according to DVI specification 1.0. This especially applies for the pixel rate which can be between 25 MHz and165 MHz. Common timing standards such as VESA DMT and VESA SMT transmit resolutions between 640 x 480 pixels at 60 Hz and 1600 × 1200 pixels at 60 Hz. 1920 × 1200 pixels at 60 Hz are transmitted according to VESA CVT-RB. Almost any refresh rate and resolution within the technical constraints can be transmitted. The available display modes are largely dependent on the applied graphics card, graphics driver, operating system and connected monitor. The image data that are transmitted from the computer to the computer module (FIBREVision-CPU) are forwarded to the monitor of the remote console with the same timing. Frequencies and the signal’s image position at the computer module correspond to those at the graphics output. NOTE: When generating the video signal, some graphics cards differentiate between digital and analog output. Such graphics cards put out digital image signals with partly non-standardised timings. Such timings do not comply with the monitor’s default to reduce the frequencies of digital signals. This usually has no affect on the FIBREVision system and the digitally connected displays. Due to the non-standardised timing, however, analog monitors might not be able to display both image size and image position properly. G&D FIBREVision-USB 2.0 · 14 Further information DDC transmission with cache function The FIBREVision system supports Enhanced-DDC (Enhanced Display Data Channel) to read out data from the monitor that is connected to the computer module (FIBREVision-CON) and transmit the data to the computer. This data includes information regarding the preferred resolution and the supported monitor frequencies. The system provides an integrated cache function. This way the computer that is connected to the computer module (FIBREVision-CPU) can already access the remote monitor during the booting process. Even if the computer module or the user module are turned off or the devices are not interconnected, the properties of the most recently connected monitor or a default data block are provided in the FIBREVision system. The DDC information of the monitor are transmitted one-to-one. In case, the FIBREVision system determines that the display cannot be read without errors or that the entries are invalid, the information are completed or corrected. 15 · G&D FIBREVision-USB 2.0 Status displays Status displays The LEDs on the front panel of computer and user module enable you to control the operational status at any time. Status displays at the computer module Power Red. Main Status Trans. Sys. CPU Video K/M Service LED Status Meaning K/M an CPU input (PS/2 or USB) is active and ready for operation. A local keyboard was found. blinking CPU input (PS/2 or USB) is active and ready for operation. A local keyboard was not found. flashing Voltage is provided at the USB input of the computer module but the computer is not (yet) ready for operation. flickering Keyboard and mouse inputs are being transmitted to the computer. The rhythm of the flickering is determined by the inputs of the user. off No voltage at PS/2 interface or USB bus. off The power switch is turned off or the connection with the mains could not be established. Please check if the power cable is properly connected to the device. on The main power supply provides the necessary voltage. off The optional power pack is not (properly) connected. on The optional power pack is connected and provides the required voltage (12 Volt). blinking Activated setup mode. cyclic flashing The firmware that the update wizard transmitted to the device is being transmitted to all system components. This process may take several minutes. fast blinking only -MC4 multichannel variants: The temperature in the device exceeds the valid values (see page 19) or the fan is not working. on System ready for operation. slow blinking Defective internal communication. Restart the device. Main Red. Sys. G&D FIBREVision-USB 2.0 · 16 Status displays LED Status Meaning Trans. blinking The communication with the user module could not be established. on The communication with the user module has been successfully established. blinking The video signal coming in from the computer could not be detected or cannot be processed due to its lacking quality. on Stable image signal at video input. Video Status displays at the user module USB 2.0 Power Red. Main Status Trans. Sys. Console Video K/M Service LED Status Meaning K/M blinking No keyboard (PS/2 or USB) was found on A keyboard (PS/2 or USB) was found. off The power switch is turned off or the connection with the mains could not be established. Please check if the power cable is properly connected to the device. on The main power supply provides the necessary voltage. off The optional power pack is not (properly) connected. on The optional power pack is connected and provides the required voltage (12 Volt). blinking Activated setup mode. cyclic blinking The firmware that the update wizard transmitted to the device is being transmitted to all system components. This process may take several minutes. fast blinking only -MC4 multichannel variants: The temperature in the device exceeds the valid values. on System ready for operation. slow blinking Defective internal communication. Restart the device. blinking The communication with the computer module could not be established. on The communication with the computer module has been successfully established. Main Red. Sys. Trans. 17 · G&D FIBREVision-USB 2.0 Status displays LED Status Meaning Video blinking The video signal coming in from the computer could not be detected or cannot be processed due to its lacking quality. on Stable image signal at video input. G&D FIBREVision-USB 2.0 · 18 Technical Data Technical Data General Features FIBREVISION-USB 2.0 SERIES Graphics Signal type (input): Signal type (output): Colour depth: Resolution @ 60 Hz: Resolution @ 85 Hz: Pixel rate: Horizontal frequency: Vertical frequency: digital (DVI-D; single link) digital or analog (DVI-I) 24 Bit max. 1920 × 1200 pixels max. 1280 × 1024 pixels 25 MHz to 165 MHz 25 kHz to 130 kHz 20 Hz to 100 Hz USB 2.0 Transmission type: transparent Transmission rate: up to 480 Mbit/s Supported devices: High-power devices (up to 500 mA) Transmission type: transparent, bidirectional 24 bit digital, stereo 96 kHz 22 kHz transparent max. 115.200 bit/s RxD, TxD, RTS, CTS, DTR, DSR, DCD internal power pack IEC plug (IEC-320 C14) AC100-240V/60-50Hz external power pack miniDIN-4 power socket +12VDC Audio premium option RS232 premium option Resolution: Sampling rate: Bandwidth: Transmission type: Transmission rate: Transmitted signals: Main power supply Redundant power supply Type: Connection: Voltage: Type: Connection Voltage: 19 · G&D FIBREVision-USB 2.0 Technical Data Individual Module Features FIBREVISION-USB 2.0-CPU | COMPUTER MODULE Interfaces for computer Video: PS/2 keyboard/mouse: USB keyboard/mouse: Audio: 1 × DVI-D socket 2 × PS/2 socket 1 × USB-B socket RS232: 3.5-mm jack plug (Line In) 3.5-mm jack plug (Line Out) 1 × D-Sub 9 socket Monitor: 1 × DVI-I socket Keyboard/mouse: Keyboard/mouse/video: 2 × PS/2 socket 1 × LC-Duplex socket Casing USB 2.0: Material: Dimensions (W × H × D): Operational environment Weight: Temperature: Air humidity: 1 × LC-Duplex socket anodised aluminium 210 × 44 × 210 mm (desktop) 19” × 1 HU × 210 mm (rackmount) ca. 1.5 kg +5 to +45 °C < 80%, non-condensing premium option premium option Interfaces for local console Interfaces to user module FIBREVISION-USB 2.0-CON | USER MODULE Interfaces for console Monitor: Keyboard: Maus: USB 2.0: Audio: premium option RS232: premium option Interfaces to computer module Casing Operational environment Keyboard/mouse/video: USB 2.0: Material: Dimensions (W × H × D): Weight: Temperature: Air humidity: 1 × DVI-I socket 1 × PS/2 socket 1 × USB-A socket 1 × PS/2 socket 1 × USB-A socket 2 × USB-A socket (front panel) 2 × USB-A socket (back panel) 3.5-mm jack plug (Speaker) 3.5-mm jack plug (Micro In) 1 × D-Sub 9 plug 1 × LC Duplex socket 1 × LC Duplex socket anodised aluminium 210 × 44 × 210 mm (desktop) 19” × 1 HU × 210 mm (rackmount) ca. 1.5 kg +5 to +45 °C < 80%, non-condensing G&D FIBREVision-USB 2.0 · 20 Technical Data FIBREVISION-USB 2.0-MC2-CPU | COMPUTER MODULE Interfaces for computer Video: PS/2 keyboard/mouse: USB keyboard/mouse: Audio: RS232: 2 × DVI-D socket 2 × PS/2 socket 1 × USB-B socket 3.5-mm jack plug (Line In) 3.5-mm jack plug (Line Out) 1 × D-Sub 9 socket Monitor: Keyboard/mouse: Keyboard/mouse/video: USB 2.0: Material: Dimensions (W × H × D): Weight: Temperature: Air humidity: 2 × DVI-I socket 2 × PS/2 socket 2 × RJ45 socket 1 × RJ45 socket anodised aluminium 435 × 44 × 210 mm approx. 3.1 kg +5 to +40 °C < 80%, non-condensing premium option premium option Interfaces for local console Interfaces to user module Casing Operational environment FIBREVISION-USB 2.0-MC2-CON | USER MODULE Interfaces for console Monitor: Keyboard: RS232: 2 × DVI-I socket 1 × PS/2 socket 1 × USB-A socket 1 × PS/2 socket 1 × USB-A socket 2 × USB-A socket (front panel) 2 × USB-A socket (back panel) 3.5-mm jack plug (Speaker) 3.5-mm jack plug (Micro In) 1 × D-Sub 9 plug Keyboard/mouse/video: USB 2.0: Material: Dimensions (W × H × D): Weight: Temperature: Air humidity: 2 × RJ45 socket 1 × RJ45 socket anodised aluminium 435 × 44 × 210 mm approx. 3.1 kg +5 to +40 °C < 80%, non-condensing Maus: USB 2.0: Audio: premium option premium option Interfaces to computer module Casing Operational environment 21 · G&D FIBREVision-USB 2.0 Technical Data FIBREVISION-USB 2.0-MC4-CPU | COMPUTER MODULE Interfaces for computer Video: PS/2 keyboard/mouse: USB keyboard/mouse: Audio: premium option RS232: premium option Interfaces for local console 4 × DVI-D socket 2 × PS/2 socket 1 × USB-B socket 3,5-mm jack plug (Line In) 3,5-mm jack plug (Line Out) 1 × D-Sub 9 socket Casing Monitor: Keyboard/mouse: Keyboard/mouse/video: USB 2.0: Material: 4 × DVI-I socket 2 × PS/2 socket 4 × RJ45 socket 1 × RJ45 socket anodised aluminium (top, sides) galvanized steel plate (bottom) Operational environment Dimensions (W × H × D): Weight: Temperature: Air humidity: 435 × 44 × 285 mm ca. 3.1 kg +5 to +35 °C < 80%, non-condensing Interfaces to user module FIBREVISION-USB 2.0-MC4-CON | USER MODULE Interfaces for console Monitor: Keyboard: Maus: USB 2.0: Audio: premium option RS232: premium option Interfaces to computer module 4 × DVI-I socket 1 × PS/2 socket 1 × USB-A socket 1 × PS/2 socket 1 × USB-A socket 2 × USB-A socket (front panel) 2 × USB-A socket (back panel) 3,5-mm jack plug (Speaker) 3,5-mm jack plug (Micro In) 1 × D-Sub 9 plug Casing Keyboard/mouse/video: USB 2.0: Material: 4 × RJ45 socket 1 × RJ45 socket anodised aluminium (top, sides) galvanized steel plate (bottom) Operational environment Dimensions (W × H × D): Weight: Temperature: Air humidity: 435 × 44 × 285 mm approx. 3.1 kg +5 to +35 °C < 80%, non-condensing G&D FIBREVision-USB 2.0 · 22 Technical Data Current and power consumption Current consumption (max.) VARIANT MAIN POWER REDUNDANT POWER ARU2-CPU ARU2-CON MC2-ARU2-CPU MC2-ARU2-CON MC4-ARU2-CPU AC100-240V/60-50Hz/0.3-0.2A 12VDC/1.2A AC100-240V/60-50Hz/0.6-0.3A 12VDC/2.2A AC100-240V/60-50Hz/0.5-0.3A 12VDC/1.9A AC100-240V/60-50Hz/0.6-0.3A 12VDC/2.6A AC100-120V/210-240V, 60-50Hz, 0.9-0.4A 12VDC/3.3A MC4-ARU2-CON AC100-120V/210-240V, 60-50Hz, 0.9-0.4A 12VDC/3.2A Power consumption (max.) VARIANT MAIN POWER REDUNDANT POWER ARU2-CPU ARU2-CON MC2-ARU2-CPU MC2-ARU2-CON MC4-ARU2-CPU MC4-ARU2-CON 17.5W@100VAC, 17.5W@240VAC 28W@100VAC, 28W@240VAC 24.5W@100VAC, 24.5W@240VAC 32W@100VAC, 33W@240VAC 46W@100VAC, 45W@240VAC 45W@100VAC, 43W@240VAC 14W@12VDC 23,6W@12VDC 20W@12VDC 27W@12VDC 38W@12VDC 37W@12VDC 23 · G&D FIBREVision-USB 2.0 Technical Data Transmission Module Features MULTIMODE TRANSMISSION MODULE Data transmission Mode: Interface: Cable length (max.) Multimode 50/125 μm, Performance data Fibre optics (2 fibres) LC Duplex class OM2: 550 meters (fibres with 500 MHz*km), 500 meters (fibres with 400 MHz*km) Multimode 62.5/125 μm, class OM1: 220 meters (fibres with 160 MHz*km), 275 meters (fibres with 200 MHz*km) Wavelength (): 850 nm (770 nm to 860 nm) Optical power output (PAVG) in 50 oder 62.5 μm MMF: -9.5 dBm to -3 dBm Receiver sensitivity (PMIN): -17 dBm Sensitivity – Stressed (PS): -13.5 dBm (50 µm MMF) SINGLEMODE TRANSMISSION MODULE Data transmission Art: Port type: Cable length (max.) Singlemode 9/125μm, class OS1: Performance data Fibre optics (2 fibres) LC Duplex 2 kilometers Wavelength (): 1310 nm (1270 nm to 1360 nm) Optical power output (PAVG) in 9 μm SMF: -9.5 dBm to -3 dBm Receiver sensitivity (PMIN): -19 dBm Sensitivity – Stressed (PS): -14.4 dBm G&D FIBREVision-USB 2.0 · 24 NOTES NOTES Das Handbuch wird fortlaufend aktualisiert und im Internet veröffentlicht. The manual is constantly updated and available on our website. http://gdsys.de/A9100153 Guntermann & Drunck GmbH Dortmunder Str. 4a 57234 Wilnsdorf Germany http://www.GDsys.de [email protected]