1
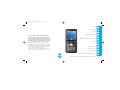
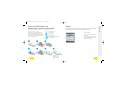
08178 White phone.aw7
22/7/08
14:13
Page 1
Published by Hutchison 3G UK Limited.
All rights in this publication are reserved and no
part may be reproduced without the prior written
permission of the publisher.
Helpful information.
© 2008 Hutchison 3G UK Limited. A Hutchison
Whampoa company.
Find out more about 3’s services
Hutchison 3G UK Limited trading as 3 is a service
provider. “
” and “
“ is the
manufacturer of the 3Skypephone S2 mobile.
AMOI has provided the information on its
features and use set out in this user guide.
© 2008 AMOI.
The contents are believed to be correct at the
time of going to press, but any information,
products or services mentioned may be modified,
supplemented or withdrawn. The provision of any
products and services by Hutchison 3G UK Limited
is subject to 3’s customer terms (available at
three.co.uk). The customer terms will take
precedence if there is any discrepancy with this
publication.
‘3’ and related images, logos and names referred
to in this publication are trademarks of the
Hutchison Whampoa group of companies.
This publication is printed on fully recyclable paper.
DD_0508_8005_WPUG DD08178 Jul08
3Skypephone S2 mobile user guide
> Visit three.co.uk
> For more information on My3 visit
three.co.uk/my3
> Email [email protected] or
call customer services on 333 (0870 7330
333 from another mobile).
Useful numbers
Mobile
Other phones
3 customer services
333
0870 7330 333
Mail (voicemail, email
and faxmail)
123
07782 333 123
Videomail
123 (select video call option)
Pay As You Go top-up
444
0870 7330 444
Directory enquiries
118 333
118 333
International
directory enquiries
118 313
118 313
Disabled and elderly
enquiries
195
Emergency calls
999
999
3Skypephone S2 User Guide
08178 White phone.aw7
22/7/08
14:13
Page 3
Get set up
1
Your mobile explained
2
Set up Skype
3
Planet 3 and the mobile internet
4
Calls
5
Text, multimedia and email messages, and Skype chat
6
You can even use your mobile as a plug and play dongle – a high speed
wireless modem to get a laptop online when you’re out and about.
Contacts
7
Not only that but the phone has a 3.2 megapixel camera so if you fancy
photo blogging you’ve got the picture quality you need, and a beautiful
big 2.2 inch QVGA screen. Navigation is by a carousel at the bottom of
the screen which scrolls through your key applications.
Feeds
8
Media and Game Centre
9
Extra features and security
10
Connectivity settings
11
Troubleshooting, handset safety and maintenance, and index
12
Get online with your mobile.
Who wants to hang around when your mates are waiting online?
Just one click and you’re straight onto Windows Live Messenger,
Facebook, or whichever web hangout you prefer. You’ll be using our
HSDPA network. And that means extremely fast download speeds.
All in all, it’s never been easier or quicker to get online from your mobile.
Which means you can communicate the way you want to.
Please see section 12 for AMOI’S health and safety information related to your mobile
08178 White phone.aw7
22/7/08
14:13
Page 5
Contents.
1.
2.
3.
4.
Get set up
1.1 Insert your USIM, battery and memory
card, and charge your mobile
1.2 Wizard
1.3 General set up
1.5 Choose a text entry method
1.6 Phone maintenance
5.
Your mobile explained
2.1 Get to know your mobile
2.3 Your mobile’s screen
2.6 Switcher
2.7 The handset’s menu options
2.8 Auto-install modem drivers
2.9 Using the modem
Set up Skype
3.1 Sign into Skype
3.2 Skype settings
3.2 Skype status icons
Planet 3 and the mobile internet
4.1 The mobile internet
4.2 Find out what you can do on Planet 3
4.3 Facebook
6.
Calls
5.1
5.1
5.1
5.1
5.1
5.1
5.1
5.2
5.2
5.2
5.2
5.2
5.3
5.3
Make voice and video calls
Make a call from Contacts
Make Skype-to-Skype calls
Make emergency calls
Receive calls
Reject calls
End a call
Conference calls
Make a call from Call log
Call divert
Call features
Show my number
Video call settings
Call log
Text, multimedia and email messages,
and Skype chat
6.1 Text messages
6.1 Skype chat
6.1 Multimedia messages
6.1 Take a picture or video and send it
6.2 Set up your email
6.2 Write an email message
6.2 Retrieve an email
6.2 Reply to an email
6.2 Browse into mail
7.
Contacts
7.1 Add a contact
7.1 Access contacts
7.1 Edit a contact
7.1 Delete a contact
7.1 Add a photo to a contact
7.1 Copy a contact between USIM and mobile
7.1 Copy contacts between USIM and mobile
7.2 Add a Skype contact
7.2 Import your Skype contacts
10. Extra features and security
10.1 Set an alarm
10.1 Calendar
10.1 Calculator
10.2 Activate your USIM PIN
10.2 Change your USIM PIN
10.3 Network settings
10.3 Airplane mode
10.3 Master reset
10.3 Language
8.
Feeds
8.1 Access to feeds
8.1 Add a feed
8.1 View a feed
8.1 Update a feed
8.1 Mark a feed as read
8.2 Edit a feed
8.2 Delete a feed
11. Connectivity settings
11.1 Connect with a Bluetooth headset
11.1 Transfer files from your mobile
using Bluetooth
11.2 Transfer files between your mobile
and PC
11.2 PC synchronisation
9.
Media and Game Centre
9.1 Play music
9.2 Take photos or make video clips
9.2 View your photos or video clips
9.3 Access games and apps
9.3 Download games and apps
12. Troubleshooting, handset safety and
maintenance, and index
12.1 Troubleshooting
12.3 Safety precautions
12.8 Index
08178 White phone.aw7
22/7/08
14:13
Page 7
Get set Your
up mobile explained
1 Get set up.
1
1
1
First things first.
It’s dead simple to get started, and this section shows you how. Install the
USIM and battery, charge the mobile for a few hours, and then adjust the
settings so you get the look and the sounds you want.
1
1
1.1
Insert your USIM, battery and memory card, and charge your mobile
1.2
Wizard
1.3
General set up
1.5
Choose a text entry method
1.6
Phone maintenance
1
1
1
1
1
1
1
08178 White phone.aw7
22/7/08
14:13
Page 9
Your 3 USIM can only be used in mobiles
which are enabled for 3 services.
The Wizard will appear when you first turn on your mobile to take you through setting the
time and date. You need to do this so that your phone will work properly.
1
Remove battery cover
2
Remove battery
> Set the current time.
3
Insert your USIM
> Then select your preferred time format.
4
Insert memory card
> Set the date.
Insert your battery and battery cover
> Then select your preferred date format.
Charge your battery
> Then press Save, or Skip if you want to set
the time and date later.
5
7
1
2
3
4
5
6
User guide
1
Illustrations
If you try to use the USIM in other mobiles you
could seriously damage the mobile and may be
unable to use it, including making emergency calls.
If you do that, we are not responsible for any such
damage or usage problems.
1.1
Wizard.
Get set up
Insert your USIM, battery and
memory card, and charge your mobile.
6
7
Fully charge the
battery before using
it for the first time.
User guide
1.2
08178 White phone.aw7
22/7/08
14:13
Page 11
General set up.
1
Get set up
This section shows you how you can adjust various settings to make your mobile perform
exactly as you like. It explains how to set the time and date, sounds and wallpapers, as well
as showing the various ways of entering text available.
Power on
Set the wallpaper
Set your screen saver
> Press and hold
to switch on your mobile.
After powering on, you may need a security
check (entering PIN or handset code if set).
The first time you switch it on you will be
asked if you want to set the time and date.
Select Save to start it or Skip to do it at
another time.
> Press
from the Start Screen and select
Settings > Phone settings > Display >
Main screen.
> Press
from the Start Screen and select
Settings > Phone settings > Display >
Screensaver setting.
> Select Show wallpaper > Enable, then press
the left soft key to select your preferred image
> Select.
> Select Image > select your preferred
image > Select.
Power off
> Press and hold
> You can also select Show clock > Enable or
select Show text > Edit > Edit text > Save.
Voicemail and videomail
to switch off the mobile.
Set your ringtone
To set up voicemail and videomail:
> Press
from the Start Screen and select
Settings > Profiles.
> Voicemail: press and hold
. Follow the
voice prompts to choose a PIN and record
your greeting.
> Select Options > Edit > OK.
> Select Ringtones & alerts > Change > select
from track or artist or album etc > Select.
1.3
User guide
> Or you can select Date & time > Enable
or select Off to turn off the screen saver.
> Videomail: press and hold
for a video
call. Then follow the voice prompts to record
your video greeting.
User guide
1.4
08178 White phone.aw7
22/7/08
14:13
Page 13
Phone maintenance.
While writing a message, entering contact details etc, you will need to select an appropriate text
entry method.
Mobile phones are complex electronic devices and must be looked after carefully.
The following advice can help you to look after your mobile and prolong its life.
Text entry status icons
T9Abc
Predictive text mode, initial
T9ABC
Predictive text mode, caps lock
T9abc
Predictive text mode, lower case
Abc
Multipress text input mode, initial
ABC
Multipress text input mode, caps lock
abc
Multipress text input mode, lower case
123
Numeric input mode
Changing input modes
The multipress, T9 and numeric input modes can be
changed by pressing
within a text box.
> ABC Input: use the keypad to enter letters,
numbers, symbols, and other characters.
Press the same key repeatedly to cycle
through available characters. If you do not
press a key for two seconds, the character
in the block cursor is accepted, and the
cursor moves to the next position.
> T9 Text Input: you press each key only once,
even if the character you want is not the first
character on the key. It tries to predict the word.
1.5
User guide
> 123 Input: if you want to input a series of
numbers, you need to change to 123 mode or
press and hold the particular key for three secs.
> Symbol Input: In abc and 123 mode, short press
and you can access the symbol menu. While
in T9 mode, press and hold
for a few
seconds to access the symbol menu.
> Select Options > Dictionary > Add to/Go to, to
view the dictionary or add new words to it.
> Press the # key, then the abbreviation of each
language is shown:
Italiano – IT
English – ENG
Francais – FR
Deutsch – DE
Dansk – DA
Svenska – SV
1
Get set Your
up mobile explained
Choose a text entry method.
1
1
> The mobile and its spare parts should be kept
out of the reach of children.
1
> Keep the mobile dry. Rain, moisture or water
will corrupt its electronic circuitry. If your
mobile does get wet, remove the battery
immediately.
1
> Don’t put the mobile in dusty places or this will
affect the everyday use of the mobile.
1
> Don’t touch the screen with a sharp object.
1
> Don’t expose the mobile to high temperatures.
High temperatures will shorten the life of
electronic devices, destroy the battery and
destroy or melt a mobile’s plastic shell.
1
> Don’t expose the mobile to low temperatures.
Otherwise, when the temperature rises,
moisture will condense in the mobile and
could damage the mobile’s electronic circuitry.
1
1
> Don’t throw, knock or shake the mobile
intensely as this could damage the electronic
circuitry and structure of the mobile.
1
> Please use a clean, soft cloth to clean the
camera lens and other delicate surfaces.
1
User guide
1.6
08178 White phone.aw7
22/7/08
14:13
Page 15
12
Your mobile explained
2 Your mobile
explained.
1
1
1
Your mobile can do a lot of things.
This section explains what all the icons and symbols mean,
and shows you how to find your way around your mobile.
2.1
Get to know your mobile
2.3
Your mobile’s screen
2.6
Switcher
2.7
The handset’s menu options
2.8
Auto-install modem drivers
2.9
Using the modem
1
1
1
1
1
1
1
1
08178 White phone.aw7
22/7/08
14:13
Page 17
Get to know your mobile.
Camera
1
Familiarise yourself with its features.
12
Your mobile explained
1
Watch music videos and goals,
play games and much more
Press the right soft key and wait
a few seconds for
. It’s
free to browse. We’ll tell you of
any costs before downloading
Start screen
Moving between icons
in Switcher
Press up or down
for volume
and browsing
1
Switcher key
for multitask
1
Clear character
Press
to clear character(s)
Select menu
Takes you to the main menu
1
Camera key
1
Moving between icons
in Switcher
Make voice calls
To make voice calls and view
recent calls
1
End key (on / off power)
To end calls and services
1
Add, find or edit a contact
Access voicemails
Press and hold for voicemail
Press
(down) to find a contact
including Skype. Press Options to
send or edit contacts
1
USB connector, headset
and charger socket
1
Navigate menu
Navigate left, right, up, down.
Press
to confirm
2.1
User guide
1
User guide
2.2
08178 White phone.aw7
22/7/08
14:13
Page 19
Your mobile’s screen.
Your mobile’s screen is divided into three basic screens: the Status bar, the Main Screen
and the Prompt box.
Main Screen
If you are not on the Start Screen,
the screen will show the main
menu or the submenu related
to that particular feature.
Switcher
Quick access to all open
applications and easy to
close open applications.
The Prompt box
Displays various prompts in the
soft key boxes. These are activated
by pressing the appropriate left
and right soft key under each one.
2.3
User guide
Function description
Icon
Function description
2
Signal strength – shows the
strength of your mobile’s
connection with the network
indicates you are
outside the video service area
Battery – shows the level of battery.
shows little battery power left
Profile – Normal – notifies you of
an incoming call or message.
Silent.
Vibrate only.
Loud.
Headset.
In car.
Customised.
Airplane.
MMS – appears when there are
new multimedia messages
Your mobile explained
Status bar
Shows what operations are taking
place, Skype status (see page 3.2),
and the battery and signal strength.
See the next page for status icon details.
Icon
Email – appears when there are
new emails
Push message – appears when
there are new push messages
Sending message
HSDPA network is available
EDGE network is available
Message – appears when there
are new text messages
New messages – appears when
there are new unread text and
multimedia messages
GPRS network is available
Alarm clock – appears when the
alarm clock is set
Roaming – appears when you are
out of your home area and have
registered on a different network
User guide
2.4
08178 White phone.aw7
22/7/08
14:13
Page 21
Switcher.
Icon
Function description
Bluetooth activated – this icon
indicates Bluetooth is active and
connected to another device.
If Bluetooth isn’t connecting with
the other device, this icon will be
grey but not blue
Hide – Bluetooth is hidden from
other Bluetooth enabled devices
Memory full – appears when the
mobile memory is nearly full. In this
case it may be necessary to release
some memory on your mobile
Calendar – appears on the day
when a calendar event exists
Video call forward
Voice call forward
Minimise media player – music
is playing in the background
2.5
User guide
The Switcher shows your most important
applications and anything you’ve got open at the
moment. It’s a carousel of icons at the bottom of
the screen, showing up to twenty icons. Whatever
function you’re using, you can access the Switcher
instantly by pressing the Switcher key on the side
of your phone. And when the phone is idle the
Switcher shows.
> To close a current application select
Options > Close.
2
Your mobile explained
PDP (Packet data protocol) – PDP
always on
> To see the help about Switcher select
Options > About Switcher.
You can choose to add or take away icons from
the carousel, so if you’ve got a favourite website
or application you can get to it straight away.
When you’re using an application and you call up
the Switcher, the home icon appears in the centre.
If the phone is idle, the home icon doesn’t appear
(seeing as you’re already there).
Switcher key
for multitask
> To add an item to the Switcher customise area,
select Options > Add items to switcher.
> To remove item from the Switcher customise
area, select Options > Remove from
switcher.
> To set Switcher mode to Active one touch
Switcher, select Options > Activate one
touch switcher.
> To access an open application, use left or
right key to select the application and
then press
.
User guide
2.6
08178 White phone.aw7
22/7/08
14:13
Page 23
The handset’s menu options.
Auto-install modem drivers.
Take a look below to see all of your handset’s menu options and what they include. Press
Media player
Now playing
Artist
Album
Track
Movies
Playlist
Recently played
Recently added
3MusicStore
Games and
apps
Homepage
Mshop
Bejeweld
Facebook
PAC-MAN
Skype
Tetris
2.7
User guide
Web
Enter address
Search
My bookmarks
History
Saved pages
Planet 3
Messages
New
Inbox
Skype chats
Email
Outbox
Drafts
Sent
Template
Settings
My stuff
Music
Pictures
Movies
Others
Memory card
(if memory
card inserted)
Call log
Contacts
Feeds
Alarm
Tools
Video camera
Calendar
Calculator
Notepad
PC Suite
World time
Stopwatch
Voice recorder
SIM Application
(if supported)
Settings
Profiles
Phone settings
Connectivity
Calls
Network settings
Security settings
Java settings
Settings master
reset
Your mobile gives you a broadband internet
connection for your laptop when you’re out
and about.
It’s simple to use as your handset has in-built
drivers that will automatically install when you
first connect up to your PC.
Just plug your mobile into your laptop and
installation will start automatically (if your PC
doesn’t forbid auto run function). The Mobile
Modem software will start up on your laptop
screen and you will see a button saying Connect.
Click this and you’ll get online.
The Mobile Modem software also shows you the
strength of your mobile signal and how fast your
internet connection is.
2
Your mobile explained
Camera
.
Offline
Weak signal / slow
Medium signal / medium
Strong signal / fast
Note
1 This mobile modem application can not be supported in Max OS
2 This mobile modem application can not support dialling up via bluetooth
User guide
2.8
08178 White phone.aw7
22/7/08
14:13
Page 25
Using the modem.
You can use the phone’s modem to dial up a network via either USB or Bluetooth.
3 Set up Skype.
To dial up via Bluetooth
> Press
.
Click the phone icon in the top right hand corner of
the screen and select Open Network Preferences,
then click the ‘+’ icon.
Note: If Bluetooth won’t embed in your PC, you will
need to set up the Bluetooth accessory card, card
drivers and application software which you will need
to purchase. To configure them for the Bluetooth
modem, follow the instructions in the software and
modem user guide.
Connect your Mac to the internet
using your phone
First you will need to install the software. Connect
your phone to your Mac using a USB cable. When
prompted, double click on the file S2 USB
Driver.pkg. Then follow the on screen instructions
to complete the installation.
Once the driver software has been loaded you may
need to change a few settings before you can start
using the internet.
2.9
User guide
In the Interface box select S2 Proprietary USB
Modem and then click Advanced.
Change the Vendor to AMOI, the model to S2 and
the APN to three.co.uk. Click OK.
Change the telephone number to *99# and
click Apply.
You should now be able to connect to the internet
by clicking Connect.
3
With Skype on 3, you can make Skype-to-Skype calls from
your mobile. This means you can call people all over the
world who use Skype, including other Skype on 3 users.
3.1
Sign into Skype
3.2
Skype settings
3.2
Skype status icons
Set up Skype
> Select Settings > Connectivity > Mobile
Modem connection > Via Bluetooth.
08178 White phone.aw7
22/7/08
14:13
Page 27
Sign into Skype.
Skype settings.
Skype status icons.
If you have a Skype account
To create a new account
Change Skype status
> From the Start screen, scroll to Skype
and press OK.
If you don’t have a Skype account
> From the Start screen, scroll to Skype
and press OK.
The Skype status icon you select will appear on
your mobile’s status bar. This can be seen by
your Skype buddies.
> Select Options > Change status.
You can choose to set your own status to:
> Scroll to Sign me in and set it as Automatically
or Manually.
> If you select Automatically, you’ll automatically
sign into Skype each time you turn on your mobile.
> From the Start screen, scroll to Skype
and press OK.
> Scroll to Create account for new users
and press
.
> Read the Skype End User Licence,
Terms of Service and Privacy Policy available
at www.skype.com/eula, www.skype.com/tos,
www.skype.com/privacy or on the CD version
of this user guide, select Accept and enter
a username, password and an email address
on the Create account screen.
> Select OK to save the settings.
3
Sign out of Skype
Online – others will see you as online
(default setting when you sign in)
> From the Start screen, scroll to Skype
and press OK.
Away – others will see you as away
> Select Options > Sign out.
Not Available – others will see you
as not available
Change Skype sign in setting
Do Not Disturb – others will see you
as do not disturb
> From the Start screen, scroll to Skype
and press OK.
Invisible – others will see you as offline
Set up Skype
> Select Sign in for existing users, then enter
your username and password.
> Select Options > Settings > Sign me in
Automatically / Manually.
You can:
> Import your Skype contacts to your mobile
when you activate your Skype account for the
first time.
> Otherwise to import your Skype contacts –
see page 7.2
> For Skype calls – see page 5.1
> For Skype chat – see page 6.1
> Add a Skype contact – see page 7.2
3.1
User guide
User guide
3.2
08178 White phone.aw7
22/7/08
14:13
Page 29
With so many sites designed to work on mobiles, you can now
get the best of the web on your mobile. And with Planet 3 you
can download music, the latest goals and games plus much more.
4.1
The mobile internet
4.2
Find out what you can do on Planet 3
4.3
Facebook
4
Planet 3 and the mobile internet
4 Planet 3 and
the mobile
internet.
08178 White phone.aw7
22/7/08
14:13
Page 31
The mobile internet.
Find out what you can do on Planet 3.
> Press
> Web > Google / Yahoo to enter
the website URL and select Go to.
Itching to check your webmail? You can get
Hotmail, Yahoo! Go and Gmail when you
need them.
Search the internet
Looks like rain? Get personalised weather reports
on your mobile, everyday.
Go to mobile websites
Internet on your mobile really is a useful tool for
everyone, you can access all your favourite sites
everyday, even when you are out and about away
from your computer. Try some of these ideas:
Need train times? Want to change your travel
plans? Then check out National Rail, My Trains or
AA.com.
Taken a wrong turn? Search Google, or even get a
map to your destination with Google Maps.
Here are just a few more sites you might want to
try out on the move:
YouTube, facebook, BBC, flickr, bebo, skype.
Email & Social Networks – Meet
friends, chat, or check out each other’s
pics and videos with Eyevibe, Facebook,
Windows Live Messenger and more.
Restricted – If you’re over 18, this is
where you can access adult
entertainment, gambling, horror and
adult comedy.
Music – Fill your phone with tracks
galore at the 3 MusicStore.
Travel & Guides – Where to go to keep
an eye on the jams, check your
directions, pick the place to meet your
mates, or even book a cab or a holiday.
News & Info – Keep up with what’s
going down. Get the news from ITN,
the BBC and others, as well as weather,
horoscopes, magazines and more.
Games & Puzzles – Whether it’s brain
(s)training, old arcade favourites or allaction adrenaline fests – we’ve got the
latest releases.
Sport – All the action across all the
major sports, with updates from
Sky Sports, Football365, the BBC
and many others.
Entertainment – Find out what’s on at
the cinema, or watch your favourite TV
from the BBC, ITV, MTV, Kerrang, Kiss and
loads of others on your mobile.
4.1
User guide
4
Planet 3 and the mobile internet
> Press
> Web and select then scroll to
Google / Yahoo to enter the search word(s)
and select Go to.
From
you can…
Watch music videos and goals, play games and much more. It’s free to
browse and we’ll tell you how much they cost before you download them.
Personalise & Downloads – loads of
useful links, to Dialtunes, Realtunes, Pix,
all sorts of applications and loads more.
Everything you need to help you get
your mobile looking and working just
the way you like it.
Shopping & Lifestyle – lets you put in
or check bids on eBay, order CDs and
stuff on Amazon, look for a new job or
even a new home, and generally keep
your life ticking along.
All this plus news, showbiz,
movie trailers, comedy and
more through
.
User guide
4.2
08178 White phone.aw7
22/7/08
14:13
Page 33
Facebook.
Use your phone to get on Facebook, see what’s going on, and make any updates you want.
It’s a ‘light Facebook’ experience with an adapted
interface – you can navigate through the important
‘hot spots’ on the site and then update your status,
send messages, respond to requests, and so on.
You can also get a regularly updated summary of all
notifications, requests, inbox changes, pokes, walls
and news feeds.
4.3
User guide
Right. Let’s get some basic functions sorted out.
Making and receiving calls is as easy as you’d expect. But there’s also a
number of useful 3 services that will make it easier for you to manage
your calls. Conference calls, Caller ID, Call Divert… take a look at the list
below for the complete picture.
5
Calls
To access Facebook, press the Switch key on the right
of your mobile and select Facebook. You can then
log into your existing Facebook account by entering
your email address and password, or register for a
new account via your phone.
5 Calls.
5.1
Make voice and video calls
5.1
Make a call from Contacts
5.1
Make Skype-to-Skype calls
5.1
Make emergency calls
5.1
Receive calls
5.1
Reject calls
5.1
End a call
5.2
Conference calls
5.2
Make a call from Call log
5.2
Call divert
5.2
Call features
5.2
Show my number
5.3
Video call settings
5.3
Call log
08178 White phone.aw7
22/7/08
14:13
Page 35
Make voice and video calls.
Make voice and video calls
Make Skype-to-Skype calls
Conference calls
Call features
To make a call from the Start screen:
> Enter the mobile number.
> From the Start screen, scroll to Skype and press
OK and scroll to your preferred contact.
During a call, press Options to access the
following features:
> Press
> Press
While on a call, you can make another call or
receive a second call and talk with up to three
people at the same time.
to make a voice call.
for Skype-to-Skype calls.
> Enter the second number and press
to make another call.
Make a call from Contacts
Make emergency calls
> Press Options > Conference.
> Press
Enter the appropriate emergency numbers for your
location then press
.
Make a call from Call log
Receive calls
> Press
from the Start screen and scroll
to your preferred contact.
(down).
> Scroll to your preferred contact and press
for voice call.
> Scroll to your preferred contact and select
Options > Call > Video call > OK for a video call.
> To answer a call press
Reject calls
> Press
.
End a call
> Press
.
.
> Press
for a voice call.
> Hold: select to place the caller you are talking
to on hold. Select Retrieve to remove the call
from hold.
> Call log: select to view your call log list.
> Contacts: select to view your Contacts list.
Call divert
> Messages: select to access the Messages
menu.
Lets you transfer incoming voice and video calls
to a specified number. For video calls, it must be
to another video mobile number.
Show my number
> Press
.
> Select Settings > Calls > Call divert.
5
> Mute: select to turn off the microphone so
that you can hear the caller but the caller
cannot hear you. Select Mute off to switch
on the microphone again.
Calls
> Select Options > Video call > OK for a video call.
> See page 7.2 for how to import Skype contacts.
Enables you to choose whether your mobile
number will be hidden or not during a call.
> Press
.
> Select Settings > Calls > Call settings >
Show my number.
5.1
User guide
User guide
5.2
08178 White phone.aw7
22/7/08
14:13
Page 37
Make voice and video calls.
Video call settings
Enables you to change settings for video calls.
> Press
and select Settings > Calls > Video
call settings.
> My video size: allows you to set the size for your
own video. You can choose either large or small.
From the call log you have a number of options
available. Choose your preferred contact, and select
Options to access any of the following:
Functions
View detail
Displays the status, time, name,
number and picture (the picture
will be displayed only when the
number has been saved in the
contacts and assigned the picture
to the number) of this call.
Call
Makes a voice or video call to
the selected number.
> My video position: allows you to set the
position of your image on the display. You can
choose either left or right.
> Hide my video: allows you to choose whether
to display your own video on the screen.
> Block my video: enables you to allow or stop
the sending of your own video to the other party.
Call log
Send message Send a message or an email to the
selected number.
Skype
To view call log:
> From the Start screen, press
.
Caution:
Press
(left) or
(right) to switch between
All calls / Missed calls / Dialled calls /
Answered calls / Most used.
Create contact Creates a new contact, and the
contact will be added to the
Contact list automatically.
Add to contact Adds the number to the
contact which has been saved
in Contact list.
Delete
Delete all
5.3
User guide
Skype call or Skype chat to the
selected number.
Deletes the selected contact from
the list.
Deletes all contacts in current list.
Send videos, pictures and emails to your friends – and chat to
other Skype users.
6.1
Text messages
6.1
Skype chat
6.1
Multimedia messages
6.1
Take a picture or video and send it
6.2
Set up your email
6.2
Write an email message
6.2
Retrieve an email
6.2
Reply to an email
6.2
Browse into mail
6
Text, multimedia and email
messages, and Skype chat
Options
6 Text, multimedia
and email
messages,
and Skype chat.
08178 White phone.aw7
22/7/08
14:13
Page 39
Text, multimedia and email messages,
and Skype chat.
You can send and receive text, picture, video and voice messages, plus email on your mobile.
Text messages
Multimedia messages
Set up your email
Retrieve an email
> Press
from the Start screen. Scroll to select
Messages and select New > Message.
> Press
from the Start screen. Scroll to select
Messages and select New > Message.
> Press
from the Start screen. Scroll to
select Messages and select Settings > Email.
> Press
from the Start screen. Scroll to
select Messages and select Email.
> Enter the mobile number at To(1) or press
Contacts to select preferred contact.
> Select Options > Edit > Account details
> OK.
> Select OK > Retrieve to retrieve your
preferred email.
> Scroll to Message and write the message.
Press Send to send the message.
> Enter the mobile number or email address at
To(1). Scroll to Message and press Options and
select Insert picture / video / sound and select
a file. Press Send to send the message.
Skype chat
Take a picture or video and send it
> From the Start screen, scroll to Skype and
press OK.
> From Start screen press
your mobile.
> Scroll to select the preferred Skype contact,
then select Options > Start chat.
> Select Options > Capture mode to switch
between camera and video mode.
Skype chat is a network dependent feature.
You can view your Skype chat log by pressing
from the Start screen. Scroll to select Messages and
select Skype chats.
6.1
User guide
> Select Back and press
to take photo or to
start video recording, and press Stop (left soft
key) to stop video recording.
> Select Send to send the message. Follow
the menu.
Reply to an email
> Scroll to the email, and select Retrieve > View
> Options > Reply.
Write an email message
Browse into mail
> Press
from the Start screen. Scroll to
select Messages and select New > Email.
> Press
> Enter the email address at To(1). Scroll to
Message and write the message. Press Send
to send the message.
6
> Press
from the Start screen. Scroll to
select Messages and select Email.
Text, multimedia and email
messages, and Skype chat
> Write your message and select Send.
on the right of
> At Account name enter your name. Then
scroll to Username and enter your mobile
number starting with 447xxxxxxxx but without
plus +. Then scroll to Password, enter the
4-digit PIN selected for voicemail and
press Save.
> Select
.
>
Mail.
From the browser you can send emails and view
and manage emails, voicemails and contacts.
User guide
6.2
08178 White phone.aw7
22/7/08
14:13
Page 41
7 Contacts.
The place to find all your numbers in one place.
7.1
Add a contact
7.1
Access contacts
7.1
Edit a contact
7.1
Delete a contact
7.1
Add a photo to a contact
7.1
Copy a contact between USIM and mobile
7.1
Copy contacts between USIM and mobile
7
7.2
Add a Skype contact
7.2
Import your Skype contacts
Contacts
08178 White phone.aw7
22/7/08
14:13
Page 43
Contacts.
Add a contact
Add a photo to a contact
Add a Skype contact
> Enter a contact number from the Start screen and
select Options > Create contact.
You can add a photo to a contact stored on the
mobile (not on your USIM card).
> From the Start screen, scroll to Skype and
press OK.
> Enter name and other details and select Save.
> Press
Access contacts
> Scroll to highlight the desired contact, select
Options > Edit.
> Select Options > Add a contact to enter the
contact’s Skype name and select Save. You’ll
also have the option to save the Skype contact
in your phone book.
> Press
(down) from the Start screen.
> Scroll to the desired contact and select View.
Edit a contact
> Press
> Scroll to Picture > Options > From pictures and
select your preferred image or Picture > Options
> New photo to take a photo. Press OK to save
the setting.
Import your Skype contacts
Copy a contact between USIM and mobile
> Press
> Press
> Select Options > Skype > Get contacts
from Skype.
(down) from the Start screen.
> Select Options > Edit to edit your contact and
then press Save.
(down) from the start screen.
> Scroll to the contact and press
delete the contact.
> Yes to
(down) from the Start screen.
> Scroll to the desired contact and select Options >
Move contacts > Copy to your USIM / Copy to
your phone.
You can save your Skype contacts onto your
mobile along with your other contacts.
(down) from the Start screen.
7
Contacts
Delete a contact
> Press
(down) from the Start screen.
Copy contacts between USIM and mobile
> Press
(down) from the Start screen.
> Select Options > Mark > Mark > Mark.
> Scroll to select the desired contact(s) > Options >
Move contacts > Copy to your USIM / Copy to
your phone.
7.1
User guide
User guide
7.2
08178 White phone.aw7
22/7/08
14:13
Page 45
8 Feeds.
Keep right up to date on the stuff you’re interested in.
Feeds are basically a way of letting you know every time there’s a change
on a website you like, as long as it provides an RSS feed. That could mean
updates on news, sports scores, entertainment gossip – whatever you’re
interested in.
8.1
Access to feeds
8.1
Add a feed
8.1
View a feed
8.1
Update a feed
8.1
Mark a feed as read
8
8.2
Edit a feed
8.2
Delete a feed
Feeds
08178 White phone.aw7
22/7/08
14:13
Page 47
Set up your feeds.
It’s easy to choose a new feed and set it up. You can also set how often you want to be updated
with any changes on the website.
Access to feeds
Update a feed
Edit a feed
> Press
> Press
> Press
from the Start screen.
> Scroll to select Feeds.
Add a feed
> Press
Feeds.
from the Start screen. Scroll to select
> Select Options > Add a feed > OK.
> To add a web feed from your browser, look for
the RSS icon . When you see it use the Options
menu to add the feed.
from the Start screen.
> Scroll to select Feeds to enter the Feeds list,
then select Options > Edit.
> Select Options > Set auto Update to update the
content of all feeds automatically. You can also
set the feeds to update Once an hour, Once a
day, Once a week or Never.
> Press
> Press
View a feed
> Scroll to select Feeds to enter the Feeds list, then
select Options > Mark as read to mark the
selected feed as read.
from the Start screen.
> Scroll to select Feeds to enter the Feeds list,
then select Options > Delete feed > Yes.
8
from the Start screen.
Feeds
from the Start screen.
> Scroll to select Feeds to enter the Feeds list, then
select View or select Options > View feed.
Delete a feed
Mark a feed as read
> Alternatively, you can enter a feed URL manually
and select Add.
> Press
from the Start screen.
> Scroll to select Feeds to enter the Feeds list, then
select Options > Update > Selected to update
the single focus feed or select Options > Update
> All to update the content of all feeds manually.
> To mark all feeds as read, select Options > Mark
all as read.
> Select Go to to go to browser. This will take
you to the page of the website related to
that particular feed.
8.1
User guide
User guide
8.2
08178 White phone.aw7
22/7/08
14:13
Page 49
9 Media and
Game Centre.
9.1
Play music
9.2
Take photos or make video clips
9.2
View your photos or video clips
9.3
Access games and apps
9.3
Download games and apps
Media and Game Centre
Play music, take pictures, record videos or play games.
The media centre is where you’ll find all the fun stuff
your mobile can do for you.
9
08178 White phone.aw7
22/7/08
14:13
Page 51
Multimedia.
The media centre on your mobile lets you take photos and videos and play music.
Play music
> Press
Take photos or make video clips
The icons are:
from the Start screen.
Icon Functions
> Select Media player > Artist, Album, Track,
Recently added, etc.
Indicates the current volume status,
press Side Up key to increase the
volume and press Side Down key to
decrease the volume.
See the Now Playing screen below:
Repeat play.
(down) to play the next file.
Press
file.
(up) to play the previous
Press
to switch between
Play and Pause.
Press
Play the previous file
Play/Pause
Playing time
Volume status
Press
(left) to fast reverse.
(right) to fast forward.
on the right
> Select Options > Capture mode to switch
between camera and video mode.
> Select Back and press
to take a
photo or to start video recording, and
select Stop (left soft key) or Camera key
to stop video recording.
Media and Game Centre
Press
> From Start screen, press
of your mobile.
> For additional camera features, select Options
by pressing the left soft key.
View your photos or video clips
> Press
.
> Select My stuff > Pictures > Photos to view
photos or My stuff > Movies > Video rec to
view movies.
9
> Select your preferred picture or video clips and
select OK.
Play list indication
Repeat play
Fast reverse
Fast forward
Play the next file
9.1
User guide
User guide
9.2
08178 White phone.aw7
22/7/08
14:13
Page 53
Games and applications.
Your mobile supports Java so you can download games from Planet 3 Games,
and play them on your mobile.
Access games and apps
> Press
.
10 Extra features
and security.
> Select Games and apps.
Download games and apps
Select Homepage to access and download new
applications and games for your mobile.
User guide
10.3
Airplane mode
Extra features and security
9.3
Your mobile has a bunch of useful extra features, including a
Calendar with alarms to remind you of specific appointments,
an alarm clock and a way to lock your mobile.
10.3
Master reset
10
10.3
Language
10.1
Set an alarm
10.1
Calendar
10.1
Calculator
10.2
Activate your USIM PIN
10.2
Change your USIM PIN
10.3
Network settings
08178 White phone.aw7
22/7/08
14:13
Page 55
Alarm.
Set up your PIN number.
The alarm can be set to ring at a specific time within 24 hours. The alarm signal rings
even if the mobile is set to silent or turned off.
Make sure you protect your mobile number so that only you can use it.
Set an alarm
Calculator
Activate your USIM PIN
Change your USIM PIN
To use the calculator:
Your PIN (Personal Identification Number) code
protects the information stored on your USIM.
> Scroll to select Alarm > Alarm1. Press OK to set
your alarm.
> Press
> Scroll to select Tools > Calculator.
To activate your USIM PIN:
Once you have activated your PIN, each time
you turn on your mobile, you’ll need to enter
your PIN.
> After setting, select Save.
> Use
> Press
> Press
> Press
.
Calendar
To create a new event/task:
> Press
to Add, Multiply, Divide or Subtract and
to select calculator. Press
to delete a
number and
for decimal point.
.
.
> Scroll to select Settings > Security settings >
Activate PIN > Enable.
> Scroll to select Settings > Security settings >
Change PIN.
> Enter the default PIN 0000, and press OK.
> Enter your default PIN (0000), press OK and
enter your new PIN (4-8 digit) twice.
Extra features and security
You can use the calendar to keep track of
important meetings.
.
> Select OK to save the setting.
.
> Scroll to select Tools > Calendar.
> Scroll to your preferred date. Press View and
select Yes to create a new calendar entry.
> Select New event / New to do > OK.
> Enter the details and select Save.
Caution
> If you enter an incorrect PIN code three
times in succession, your USIM and mobile
functions will be locked. For more details,
please refer to Safety precautions on
page 12.3.
10
> If you do not know the correct PIN code
and PUK code, please contact your
operator or network service provider.
10.1
User guide
User guide
10.2
08178 White phone.aw7
22/7/08
14:13
Page 57
Network settings.
You can also manually select the network you wish to be on when travelling abroad.
Network settings
> Press
.
> Scroll to select Settings > Network settings >
Search > Manual.
> Select your preferred network and press Select.
Airplane Mode
Master reset
The Master reset function enables you to reset your
mobile back to the factory settings.
> Press
from the Start screen.
> Scroll to select Settings > Settings master
reset.
> Enter the default handset code 0000 and
press OK.
> Press
to mark the preferred menu, then
select Options > Reset > Yes to reset the marked
settings. To reset all factory settings, select
Options > Reset all > Yes
.
10.3
User guide
Language
This function allows you to choose the language
for the display of your mobile. Several options
are available.
> Press
.
> Scroll to select Settings > Phone settings >
Language.
> Press
(up) or
(down) to select the
preferred language and select OK.
Extra features and security
> Scroll to select Settings > Network settings >
Airplane Mode > OK > On / Off to turn on / off
the airplane mode.
For more details about master reset settings, select
Options > Guide.
10
08178 White phone.aw7
22/7/08
14:13
Page 59
11 Connectivity
settings.
Keep track of your appointments and updates of your
contacts by copying them to your PC and connect to your
friends’ mobiles with Bluetooth.
11.1
Connect with a Bluetooth headset
11.1
Transfer files from your mobile using Bluetooth
Transfer files between your mobile and PC
PC synchronisation
Connectivity settings
11.2
11.2
11
08178 White phone.aw7
22/7/08
14:13
Page 61
Bluetooth synchronisation.
Connect with a Bluetooth headset
Before making calls with a Bluetooth headset, you
must first set up the headset to work with your
mobile. Once you’ve done this, your mobile
remembers the headset’s ID. You can find more
details in your Bluetooth headset user guide.
To connect with a Bluetooth headset:
> Press
.
> Scroll to select Settings > Connectivity >
Bluetooth > Switch on > Select to switch on
the Bluetooth function.
Transfer files from your mobile using
Bluetooth
You can transfer files from your mobile to PC or to
other mobiles via Bluetooth.
> Press
.
Transfer files between your mobile and PC
PC synchronisation
Connect your mobile and PC using the USB cable.
You don’t need to install any drivers on your PC.
You’ll need to make sure that your mobile’s
memory card is inserted.
You can set up your mobile and PC so that the
Contacts, Calendar, SMS and files are up to date
and match each other. For more information,
please refer to the PC sync software made for
your mobile.
> Scroll to select My stuff and select your
preferred file.
> First insert the USB cable into your handset
and your PC.
> Select Options > Send as > Bluetooth > Select
Search and select the device you want to transfer
to, then follow the instructions.
> Select Memory card transfer.
> Open your media folder on your PC. Then drag
and drop your preferred tracks between your
PC and mobile.
> Scroll to Search for new devices > Select.
Connectivity settings
Make sure that your headset’s Bluetooth is switched
on. See your Bluetooth headset user guide for how
to connect your mobile and headset.
11
11.1
User guide
User guide
11.2
08178 White phone.aw7
22/7/08
14:13
Page 63
Any problems, questions or queries?
You’ll find the answers here!
12.1
Troubleshooting
12.3
Safety precautions
12.8
Index
Troubleshooting, handset safety and maintenance, and index
12 Troubleshooting,
handset safety
and maintenance,
and index.
12
08178 White phone.aw7
22/7/08
14:13
Page 65
Troubleshooting.
Having problems with your mobile? See below for a list of common questions. If we can’t
answer your questions here, then just call us on 333 from your mobile or 0870 7330 333
from another mobile.
The mobile can’t be switched on
The person you are calling cannot hear your voice
The battery can’t be charged
Solution
Possible reason
Solution
Possible reason
Solution
You are not holding
down for long
enough.
Press and hold.
Call status has been set
to mute.
Turn off the mute
function on the call
menu.
The battery is worn
out and the charging
time takes too long.
Charge when the
mobile prompts
low battery.
The battery power is
used up.
Charge the battery.
Incorrect battery
insertion.
Check and insert the
battery correctly.
The microphone is too
far from the sound
source.
Put the mobile’s
microphone closer
to your mouth.
The battery doesn’t
connect well to
the mobile.
Ensure the battery
has been inserted
correctly.
The incoming call doesn’t ring
The mobile is switched off automatically
Possible reason
Solution
Low battery power.
Charge the battery.
The call volume is too low
Possible reason
Solution
The call volume has
been set too low.
Increase the call
volume.
12.1
User guide
Can’t display network
Possible reason
Solution
Possible reason
Solution
The mobile has been
set to silent mode.
Reset the ring type
in Profiles to Normal
or Loud.
The USIM card has
been incorrectly
inserted.
Refer to the USIM card
insertion method.
The ring volume has
been set too low.
Increase the volume
in Profiles.
The phone has been
set to Airplane Mode.
The call diverting
option has been set.
Cancel call diverting
in Settings.
Change the setting
when it is safe to
do so.
Possible reason
Solution
The memory card has
been incorrectly
inserted.
Insert the memory
card correctly
according to
instructions in the
user manual.
The memory card
has been damaged.
Replace the
memory card.
Troubleshooting, handset safety and maintenance, and index
Possible reason
The mobile does not recognise the
memory card
12
User guide
12.2
08178 White phone.aw7
22/7/08
14:13
Page 67
Safety precautions.
Safety precautions.
Usage environment
Medical devices
Hearing aids
Password access
Please remember to obey the relevant rules and
regulations whenever use your mobile. This will help
keep you and others around you safe.
Please switch off your mobile near electronic
medical equipment (such as heart pacemakers,
hearing aids etc). Most medical devices can shield
the mobile’s RF signal, but some can’t. If you have
any questions or need to find out more, please
consult your doctor or medical device manufacturer.
Phones may cause interference to some hearing
aids. If there is any interference, please get in
touch with the manufacturers of the hearing aid
immediately.
Your mobile and USIM card can be protected by a
password to stop others using it without your
permission.
I
I
Using the mobile in a plane can cause
interference and danger to an aircraft navigation
system and network. You must switch off your
mobile before boarding and make sure your
mobile is switched off during the whole flight.
Please place the mobile somewhere safe and
don’t put it on a seat or in places where it could
fall and break. To keep safe on the road, please
don’t use the mobile when you’re driving. If you
must use it, please use the mobile on hands-free
kit with a fixed cradle (and make sure you still
exercise proper control of the vehicle) or stop at a
safe location by the roadside before making or
answering a call.
Pacemaker
Pacemaker manufacturers advise keeping a
distance between your mobile and heart
pacemaker of at least 6 inches (15.3cm), or the
mobile could interfere with the pacemaker.
Anyone wearing a pacemaker should do the
following:
I
Always keep a distance between the mobile and
pacemaker of more than 6 inches (15.3cm) when
the mobile is switched on.
I
Avoid carrying the mobile in a breast pocket.
I
Listen to the mobile using the ear on the opposite
side of the body to the pacemaker.
If you are unsure as to the level of interference,
please switch off the mobile at once and consult
a doctor immediately.
User guide
It is impossible to ensure your mobile can be
connected successfully in every situation, so
please don’t rely purely on your mobile as the
only means of communication in an emergency
(such as medical first aid).
Make an emergency call
If your mobile is switched off, please turn on your
mobile and check whether the network signal is
strong enough.
You can’t use Skype to make emergency calls.
1. Input the local emergency number correctly
(such as 999). Different areas have different
emergency numbers.
2. Press
Caution
12.3
Phone password
Emergency calls
to call.
Caution
While making an emergency call, you should
try to provide all important information
correctly. Don’t end the call without being told
to do so by the emergency services.
Troubleshooting, handset safety and maintenance, and index
I
Switch off your mobile when close to petrol stations,
bunkers, chemical factories or explosive areas and
follow any safety signs and instructions there.
Breaking any rules could cause explosion or injury.
This protects your handset from unauthorised use
by other people. The preset password is 0000.
Please modify your handset password as soon as
possible and keep it secret.
PIN code
This is a personal identification code which is
used to protect the USIM card from unauthorised
use by other people. Generally, the PIN code and
USIM card are provided together. After activating
the PIN code, you can use the handset normally
by correctly inputting your password each time.
Caution
If you input your PIN code incorrectly three
times in succession, the USIM card will be
locked. You will need to input the PUK code to
unlock it. (If you don’t have a PUK code, please
contact your operator and USIM card provider
for this information. Please input all characters.)
User guide
12
12.4
08178 White phone.aw7
22/7/08
14:13
Page 69
Safety precautions.
Safety precautions.
Note about charging the battery
Battery information and care
This is the password which activates the special
USIM card functions. Usually, the PIN2 code and
the USIM card will be provided together. If you
incorrectly input the PIN2 code three times in
succession, it will be locked and you will need to
input PUK2 to unlock it again.
The handset uses a lithium battery. How long a
charged battery lasts will be influenced by the
system’s environment and mobile settings.
I
Never use any battery that has been damaged.
I
When you use the handset near a network
station, the power consumption is very low,
which means that how long you can use it
before charging the battery depends greatly
on the signal strength of the network and
other factors.
I
The battery charging time will depend on the
amount of electricity remaining and the type
of battery and charger used. When the
operation time is noticeably shorter than
normal, it is time to buy a new battery.
I
PUK code
This is used to unlock the PIN code. If you
incorrectly input the PUK code ten times in a
row, then the USIM card cannot be used again.
Usually the PUK code and USIM card are
provided together. If you lose PUK code or it isn’t
supplied with USIM card, please contact your
network operator or USIM card provider.
Please use the battery and charger provided
by the AMOI Company. AMOI will take no
responsibility for damage caused by using
the wrong battery or charger.
Caution
Generally, the charging time is 3-5 hours
according to the current status of the mobile
(whether switched on, making a call, etc).
I
Don’t touch the handset, battery or charger with
wet hands while it’s charging.
PUK2 code
Caution
This is used to unlock the PIN2 code. Usually the
PUK2 code and the USIM card are provided together.
PUK2 can modify the locked PIN2 code. If you
incorrectly input the PUK2 code ten times in a row,
you will not be able to access some of the functions.
Please apply to your operator for a new card. The
PUK2 code cannot be changed. If you lose it, please
contact your service provider.
To charge a new battery as fully as possible,
please charge and discharge the mobile twice or
three times.
12.5
User guide
I
Only use batteries that are compatible with
your handset and only recharge your battery
with a compatible charger. If a charger is not
in use, disconnect it from the power source.
Do not leave the battery connected to a
charger for more than a week, as overcharging
may shorten its life.
I
Do not connect the anode and cathode of a
battery the wrong way round.
I
Do not leave the battery in places with too
high or too low temperature (such as in a car
during summer or winter), or the battery
capacity will be reduced and battery life will
be shortened. Always try to keep the battery
at room temperature.
I
Do not short-circuit the battery. This may
damage the electronic core or the protected
circuit inside the battery. Accidental shortcircuiting can take place when a metal object
(coin, clip or pen) causes a direct connection
between the anode and cathode of the
battery, for example when you carry a spare
battery in a pocket or bag. Short-circuiting the
terminals may damage the battery or the
object causing the short-circuiting. So please
store the battery carefully and on its own.
I
Don’t burn your handset battery or treat it as
common rubbish. Please follow the local
environmental policy in order to avoid
endangering life and causing environmental
damage, and recycle your batteries.
I
If your handset, battery or other charging
device leaks due to carelessness, you must not
put it inside any piece of equipment that heats
up (such as drier, microwave etc). The handset
or other products may go wrong, and you
could even cause the handset, battery or other
charging device to burn, expand
and explode.
Troubleshooting, handset safety and maintenance, and index
PIN2 code
12
AMOI will take no responsibility for any direct or
indirect damage caused by user error.
User guide
12.6
08178 White phone.aw7
22/7/08
14:13
Page 71
Safety precautions.
Index.
Note about using spare parts
Other safety information
I
I
I
I
Please switch off the handset and disconnect
the handset and charger before removing the
battery from the mobile.
As the mobile’s spare parts are not waterproof,
please keep all spare parts dry.
You should pull out the plug of any spare part
correctly when you switch off the power; don’t
pull strongly on the power line.
If the handset, battery, and charger don’t
operate normally, please contact one of our
maintenance centres with a qualified repair
service as soon as possible.
I
I
When you are not using your handset, it is a good
idea to switch it off. You can remove the battery
to save energy.
If you use earphones to listen to music or watch a
film, please don’t turn the volume up too high as
this could damage your hearing.
Don’t dismantle the terminal and battery of the
mobile – this should be left to qualified staff.
A
Airplane mode
10.3
B
Battery
– Charging
– Power display
1.1
2.4
C
Call
– Conference
– Features
– Making
– Receiving
– Video call settings
10.2
10.1
10.1
10.1
10.3
10.3
F
Facebook
Feeds
– Access
– Add
– Delete
– Edit
– Mark as read
– Update
– View
12.7
User guide
S
Games and applications
9.3
General set up
– Choosing a text entry method1.5
– Ringtone
1.3
– Voicemail and videomail
1.4
– Wallpaper
1.3
Safety notice
Safety precautions
Skype
– Call
– Chat
– Sign in
– Sign out
– Status
Switcher
I
5.2
5.2
5.1
5.1
5.3
E
Extra feature and security
– Activate and change
your USIM PIN
– Alarm
– Calculator
– Calendar
– Master reset
– Network settings
G
4.3
8.1
8.1
8.2
8.2
8.1
8.1
8.1
Inserting
– Memory card
– USIM card and battery
1.1
1.1
M
Menu tree
Messages
– Email messages
– Multimedia messages
– Setting up your email
– Text messages
Mobile internet
Modem
Multimedia
– Playing music
– Taking a photo or video
– Viewing photos and
video clips
2.7
12.3
12.3
5.1
6.1
3.1
3.2
3.2
2.6
Troubleshooting, handset safety and maintenance, and index
I
Please put all spare parts (such as USIM card,
storage card, battery, etc) out of reach of children.
T
Transfer
Troubleshooting
11.1
12.1
W
6.2
6.1
6.2
6.1
4.1
2.8
9.1
9.2
Wizard
1.2
Y
Your mobile
– Back view
– Front view
– Keys and navigation
– Side view
– Start screen
2.2
2.1
2.1
2.2
2.3
9.2
P
Phone maintenance
Planet 3
Power on / off
1.6
4.2
1.3
12
User guide
12.8