1
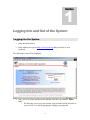
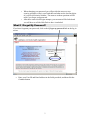
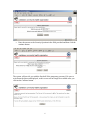
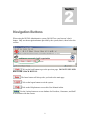
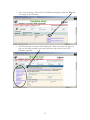
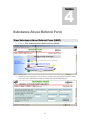
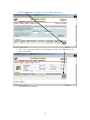
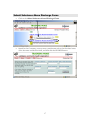
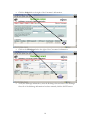
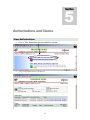
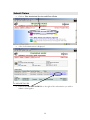
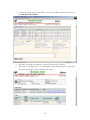
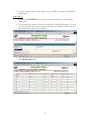
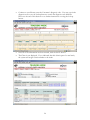
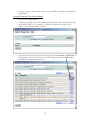
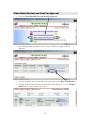
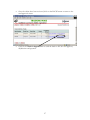
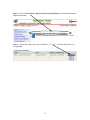
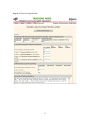
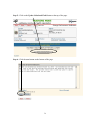
Service Provider User Manual
Prepared by: PCE Systems
29592 Northwestern Highway
Southfield, MI 48334
WASHTENAW COMMUNNITY HEALTH ORGANIZATION
Administrative Website Manual
2
Table of Contents
Section 1 - Logging Into and Out of the System............................................................. 4
Logging Into the System................................................................................................. 4
What If I Forget My Password?...................................................................................... 5
Logging Out of the System............................................................................................. 7
Section 2 - Navigation Buttons......................................................................................... 8
Section 3 - Consumer Information .................................................................................. 9
View Consumer Demographics ...................................................................................... 9
View Screening and Assessment Records .................................................................... 10
Section 4 - Substance Abuse Referral Form................................................................. 13
View Substance Abuse Referral Form (SARF)............................................................ 13
Submit Substance Abuse Forms ................................................................................... 15
Submit Substance Abuse Discharge Forms .................................................................. 17
Section 5 - Authorizations and Claims.......................................................................... 19
View Authorizations ..................................................................................................... 19
Submit Claims............................................................................................................... 20
To Add a HCFA-1500 .............................................................................................. 20
Add a UB-92 ............................................................................................................. 23
Using the Diagnosis Code Lookup Button ............................................................... 25
Claim Batch Review and Send for Approval................................................................ 26
Section 6 - Provider Staff Directory .............................................................................. 28
View Staff Directory..................................................................................................... 28
Add a Staff Member (Contact) ..................................................................................... 29
Section 7 - Performance Improvement Network Indicators....................................... 31
3
1
Section
Logging Into and Out of the System
Logging Into the System
•
Open Internet Explorer
•
In the address box type in http://www.ewcho.org and press Enter on your
keyboard.
The following screen will be displayed:
•
Enter your User Name and Password, and then click the Login button. Please
note:
o The first time you access your account; your password will be the same as
your User ID. You will be prompted to change your password.
4
o When changing your password you will provide the answer to two
security questions; what is your birth-date and what are the last four digits
of your Social Security Number. The answers to these questions will be
used if you forget your password.
o After three unsuccessful login attempts, your account will be locked and
you will have to call the Help Desk to have it unlocked.
What If I Forget My Password?
If you have forgotten your password, click on the I forgot my password link on the log in
screen.
•
Enter your User ID and Email address in the fields provided, and then click the
Continue button.
5
•
Enter the answer to the Security Question in the field provided and then click the
continue button.
The system will provide you with the first half of the temporary password. Be sure to
write down the password displayed, as this screen will no longer be available after you
click on the Continue button.
6
The second half of the password will be sent to your email account.
Logging Out of the System
Always log out of the system before shutting down the browser a log out is also
necessary when you leave your computer unattended. Logging out prevents unauthorized
Users from entering the Administrative System.
•
Click on the Logout button
The following screen will be displayed:
If you wish to return to the login screen click the here link. It is now safe to close your
browser.
7
2
Section
Navigation Buttons
When using the WCHO Administrative system, DO NOT use your browser’s back
button. Only use the navigation buttons provided by the system; that is, those below the
red line.
Click on the back button to go to the previous page. DO NOT USE YOUR
BROWSER’S BACK BUTTON.
The home button will always take you back to the main page.
Click on the logout button to exit the system.
Click on the Help button to access this User Manual online.
Use the Lookup button to access database for Providers, Consumers, and Staff
in accordance with the screens.
8
3
Section
Consumer Information
View Consumer Demographics
•
Click on View Consumers
•
Search for the Consumer, you may enter a partial name such as the first three letters
of the last name and the first initial, and then click the SEARCH button.
9
•
Click the View link to the right of the Consumer’s name.
The Consumer’s demographic information is displayed. Use the scroll bars on the right
side of the screen to move through the data.
View Screening and Assessment Records
•
Click on View Screening and Assessment Records
10
•
Search for the Consumer, you may enter a partial name such as the first three letters
of the last name and the first initial, and then click the SEARCH button.
•
Click on the Screening and Assessment link to the right of the Consumer’s
information
11
•
A list of all screenings conducted by ACCESS will be displayed, click the View link
to the right of the assessment.
•
The Screening and Assessment will be displayed. There are twenty-nine pages of
data, use the index provided on the left hand side of the screen to access the
information quickly.
12
4
Section
Substance Abuse Referral Form
View Substance Abuse Referral Form (SARF)
•
Click on View Substance Abuse Referral Forms (SARF)
•
Search for the Consumer, you may enter a partial name such as the first three letters
of the last name and the first initial, and then click the SEARCH button.
13
•
Click the Select link to the right of the Consumer’s information
•
A list of the Consumer’s SARF’s will be displayed. Click on the View link to the
right of the SARF.
•
The SARF will be displayed
14
Submit Substance Abuse Forms
•
Click on Submit Substance Abuse Admission Forms
•
Search for the Consumer, you may enter a partial name such as the first three letters
of the last name and the first initial, and then click the SEARCH button.
15
•
Click the Select link to the right of the Consumer’s information
•
Click on the Admission link to admit the SARF.
•
Verify the SARF information and add any additional information needed. Once all
of the admission information has been entered and verified, click the SAVE button.
16
Submit Substance Abuse Discharge Forms
•
Click on the Submit Substance Abuse Discharge Forms
•
Search for the Consumer, you may enter a partial name such as the first three letters
of the last name and the first initial, and then click the SEARCH button.
17
•
Click the Select link to the right of the Consumer’s information
•
Click on the Discharge link to the right of the Consumer’s information.
•
Verify the discharge information, enter the discharge date and reason for discharge.
Once all of the discharge information has been entered, click the SAVE button.
18
5
Section
Authorizations and Claims
View Authorizations
•
Click on View Authorized Services and Enter Claims
•
A list of all authorizations is displayed.
19
Submit Claims
•
Click on View Authorized Services and Enter Claims
•
A list of all authorizations is displayed.
To Add a HCFA-1500
•
Click on the Add HFCA-1500 link to the right of the authorization you wish to
submit a claim against.
20
•
Use the drop down menu to select the batch that this claim will belong to. If you do
not wish to include this claim is a batch at this time select PEND CLAIM from the
drop down menu.
•
Enter the received date
•
Scroll to the bottom of the screen and enter the diagnosis. You may type in the
diagnosis code or use the lookup button to search the diagnosis code database.
Please see the end of this Section to see further instructions on using the lookup
button.
21
•
Continue to scroll, enter the detail lines. If you need additional detail lines click on
the Add More Detail Lines
•
Once all of the claim information is entered, click the SAVE button.
•
The Claim is now displayed. If you indicated that this claim is part of a new batch,
the system will assign a batch number to the claim.
22
•
You may change or delete claim until it is sent to WCHO for approval, adjudication
and payment.
Add a UB-92
•
Click on the Add UB-92 link to the right of the authorization you are entering a
claim against.
•
Use the drop down menu to select the batch that this claim will belong to. If you do
not wish to include this claim is a batch at this time select PEND CLAIM from the
drop down menu. Enter a received date.
•
Scroll down; enter the detail lines for the claim. If you need more detail lines, click
the Add More Lines link.
23
•
Continue to scroll down; enter the Consumer’s diagnosis code. You may type in the
diagnosis code or use the lookup button to search the diagnosis code database.
Please see the end of this Section to see further instructions on using the lookup
button.
•
Once all of the information has been entered, click the SAVE button.
•
The Claim is now displayed. If you indicated that this claim is part of a new batch,
the system will assign a batch number to the claim.
24
•
You may change or delete claim until it is sent to WCHO for approval, adjudication
and payment.
Using the Diagnosis Code Lookup Button
•
Click on the Lookup button
•
Search for the diagnosis code by entering the partial name of the diagnosis and click
the SEARCH button. For example, to search for a depression diagnosis type
“depre” in the field provided (see below)
•
Any diagnosis matching the keyword will appear, use the Previous and Next links to
change pages. Once you have found the correct diagnosis, click the Select link to
the right of the diagnosis information.
25
Claim Batch Review and Send for Approval
•
Click on Claim Batch Review and Send for Approval
•
Any existing batches that have not been sent to WCHO for approval will be
displayed.
•
To view the claims that are included in the batch click on the Work with Batch link.
•
A listing of all the claims included in the batch will be displayed. Use the Change or
Delete links to edit or remove the claims.
26
•
Once the claims have been reviewed, click on the BACK button to return to the
send approval screen.
•
Click on the Send for Approval link to send the batch to WCHO for approval,
adjudication and payment.
27
6
Section
Provider Staff Directory
The Provider Directory is a list of the Provider’s Staff members that have access to the
Encompass system. System Administrators will use the Staff Directory to add additional
Users to the database.
View Staff Directory
•
Click on Provider Staff Directory
•
A listing of the Provider Staff Members with access to Encompass will be displayed
28
•
Click on the View link to view the details of the Staff Member, such as licensing and
credentials.
Add a Staff Member (Contact)
•
Click on Provider Staff Directory
•
To avoid entering a duplicate record, search the Staff Member database before
adding a new Staff record. If your search does not return any results, it is safe to
enter a new record, click on the Add Contact link.
•
Enter the following information about the Staff Member
o
o
o
o
o
Name
Contact Information – phone, fax numbers and email address
Job Information – department, job title, hire date, and job functions
ORR Training – dates of initial and last OOR training dates
Credentials – Use the drop down menu to select educational degree, discipline,
and billing type.
29
o License – Use the drop down menu to select license type, enter the license
number, license name, State, and expiration date.
o User ID – Enter the Staff Members User ID.
•
Once all of the Staff Member information has been entered, click the SAVE Button
•
The new Staff Member will now appear in the directory and a User ID has been
added.
30
7
Section
Performance Improvement
Network Indicators
Step 1: Click on Performance Indicator button.
31
Step 2: Click on Performance Improvement Network Indicators to submit performance
Improvement Data.
Step 3: Choose the quarter you wish to update (1, 2, 3 or 4). Click on the quarter you
are updating.
32
Step 4: Fill out all required fields.
33
Step 5: Click on the Update Calculated Fields button at the top of the page.
Step 6: Click the save button on the bottom of the page.
34