1
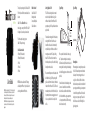
S120R
For iPhone
Thank you for purchasing the Cobra iRadar S120R
for iPhone, the world’s first connected radar/laser
detector.
iRadar S120R uses Bluetooth® wireless
technology to connect your iPhone®/iPod Touch®
to display radar, laser and speed camera alerts.
Follow these simple steps to get your
iRadar S120R up and running.
Cobra iRadar is made for
iPod touch (5th Generation)
iPod touch (4th Generation)
iPhone 5
iPhone 4S
iPhone 4
User Guide
NOTE: This device complies with part 15 of FCC rules: Operation is subject
to the following two conditions: (1) This device may not cause harmful
interference, and (2) This device must accept any interference received
including interference that may cause undesired operation.
CAUTION: Modifications or parts not approved by Cobra Electronics
Corporation may violate FCC Rules and void authority to operate this
equipment.
NOTE: Location-based alerts and GPS settings
available only with iPhone. Only radar/laser alerts
and settings will work with iPod touch.
What’s in the box?
Cobra iRadar S120R
Mounting bracket
Screw, nut & bolt pack
Cable-tie fasteners
Setting Up iRadar S120R
The S120R has been designed to be mounted
under the hood, behind the vehicle’s grille or
within an air intake at the front of the vehicle if
appropriate using the ’L’ shaped bracket and screw
pack provided.
Find a suitable mounting position for the detector,
ensuring that the front of the unit has a clear
view of the road ahead and is unobstructed by
any metallic objects and that there is a sufficient
mounting area to attach the ’L’ shaped fixing
bracket. The S120R needs to be mounted in as
horizontal a position as possible so that it is looking
directly down the road ahead.
We recommend that you mount the detector either
behind the vehicle’s grille (if the openings of the
grille are at least 10mm in diameter) or within an air
intake at the front of the vehicle. The S120R can be
mounted anywhere at the front of the vehicle, but
for optimum performance we suggest you mount
it as close as possible to the license plate of the
vehicle.
Typical Fitting
Typical Fitting
Typical Fitting
10mm
Minimum
Typical Fitting
When you have found a suitable location, using
the ’L’ shaped mounting bracket as a template,
drill between 2 and 4 pilot holes into the selected
mounting surface for attaching the bracket using
either the self-tapping screws or the nuts and bolts
provided.
You will need to attach the bracket using at least
2 screws or 2 nuts and bolts to ensure that the
bracket is well secured. Remember that there is a
lot of vibration within the engine compartment
so it isFitting
very important that the S120R mounting
Typical
bracket is secured correctly.
Mounting Notes
When mounting and connecting the power cables
of the S120R ensure that you mount the unit and
cables away from any moving parts such as aircooling fans or the fan belt. Position the unit so
that device and power cables do not interfere with
any moving parts within the engine compartment
or interfer with any part of the vehicle that could
endanger you or your passengers. Please check
that all surfaces are safe to drill through before
beginning any work.
Connecting the iRadar S120R
The S120R is powered by wiring it directly to your
vehicles 12V electrical system using the cable
supplied. Connect the red (positive) wire to a
switched 12V ignition supply, this will power on the
detector when the ignition is switched On, and Off
when the ignition is Off.
Connect the black (negative) wire to a chassis
ground or battery ground. In many cases, this
wire can be attached to any metal portion of the
vehicle frame. The LED will blink red if the power
connection has been completed successfully. This
LED can be located near to the point where the
power cable enters the rear of the device.
It is not advisable to connect the S120R directly
to the vehicle battery as after long periods
of vehicle inactivity the vehicle battery may
become discharged.
COBRA LASER DETECTORS
Pairing iRadar S120R
iRadar S120R uses Bluetooth®
wireless technology to
communicate with your iPhone.
On your iPhone/iPod
touch, enter
the Settings menu.
Press Bluetooth and make sure
Bluetooth is switched to ON.
iRADAR should appear
under Devices.
Note: Your iPhone/iPod
touch may take 30 seconds
to one minute to recognize
the device.
It will initially appear as
“Headset” and will then turn
into iRADAR. If you cannot
see the device, try restarting
both iRadar and your iPhone/
iPod touch and re-do steps 1
through 5.
Press iRADAR,
then press Pair.
The LED on the detector unit
will flash blue. When pairing
has been completed, it will
turn solid blue.
Bluetooth Pairing Tips
If you are having trouble initializing or
maintaining your Bluetooth connection take the
following steps:
1) Turn off your Cobra iRadar detector device, wait 30
seconds, and then turn it back on. On your iPhone/
iPod Touch, turn Bluetooth Off and then On again.
2) If you are still not connected, go to the Bluetooth
Settings menu on your iPhone/iPod Touch. Press
the
button to the right of iRadar and then
press “Forget this Device”. Wait approximately
30 seconds for iRadar to appear under Devices
and then press iRadar to reinitialize pairing.
3) If iRadar does not appear under Devices or
you experience an intermittent Bluetooth
connection, completely turn off both your
iPhone/iPod Touch and iRadar detector unit, wait
30 seconds, and then turn them back on.
Now that you are paired with iRadar S120R, you
must connect using the IRadar App. Note that the
S120R will not function if the App is not running. If
the App is not running you are not protected.
Downloading the App
To download the app you must enter
the iTunes Store and search for “Cobra
iRadar”. Follow the onscreen instructions to download and install the Cobra
iRadar app.
Cobra iRadar App
The iRadar app is what separates Cobra
from any other detectors out there.
Make sure to check out the Tutorial for
a full explanation of app features. The
Tutorial automatically is displayed the first
time you launch the app and then subsequently can be accessed from the Menu.
Information on specific settings and
explanations of radar bands can be
found by pressing the
buttons in
the settings menus.
iRadar Community
When you, or any other iRadar user, detects a radar or
laser signal the alert information is anonymously sent
to Cobra’s cloud servers. Within seconds, that information is processed and displayed on your map as part of
a Threat Area.
As you approach a specific Threat
Area you will hear a short beep
and then the app will indicate the
Cobra’s assessment of the reliability
of the threat.
High-Threat Area means multiple
reports have confirmed a legitimate
threat in the area recently.
Medium or Low-Threat Area means
signals have been detected but
have either not been confirmed or
have not been reported lately.
Paying attention to threat areas will allow you to be
warned of potential threats before you enter radar
detection range. Community Radar/Laser alert sharing
means that you have an entire network of users working to keep you and your wallet safe.
GPS RADAR DETECTOR