1
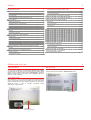
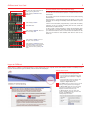
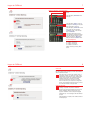
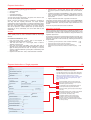
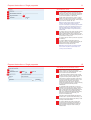
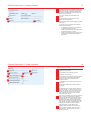
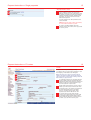
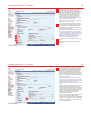
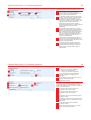
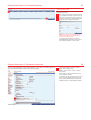
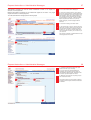
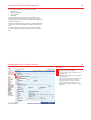
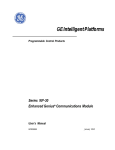
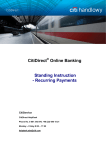
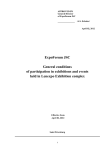
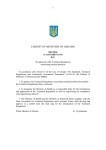
CitiDirect Guide
User manual
> CitiDirect and Your Card
> Logon to CitiDirect
> Payment instructions
> Account information
May 2010
Dear User,
We glad that you have decided to use CitiDirect® Online Banking
system to manage accounts of Your company in Citi.
CitiDirect® Online Banking system is recognized as Best
Corporate/Institutional Internet Bank Globally. It utilizes leading edge
technologies and international standards and continuously receives
international awards. We hope you will find CitiDirect® Online Banking
useful and it will help you to save your time and resources with Citi.
We would like to highlight that your opinion is very important for us. You
are always welcome to send your suggestions and comments to
CitiDirect implementation and support team [email protected]. It will
help us to become best servicing bank for you.
Best regards,
Saule Zhakayeva
Deputy Chairman
“Citibank Kazakhstan” JSC
3
Content
CitiDirect and Your Card
4
“Cumulative Payment Instruction Details” section
23
Access to CitiDirect
4
“Beneficiary Details” section
24
Access codes receipt
4
“Individual Details” section
PIN code change
4
Payment instructions > Payments for branches
26
5
Payment instructions > Administrative Messages
27
6
Payment instructions > Modify payments
29
Recommendations for the Card and PIN code usage
Logon to CitiDirect
25
CitiDirect welcome screen
6
Manual input
30
CitiDirect Challenge > Card’s Response
8
Input from preformat
31
Client code
8
Copy payments
33
CitiDirect download
8
Import files
36
Payment instructions
9
Payment instructions > Delete payments
39
Accounts
9
Payment instructions > Sign (authorize) payments
40
Instructions’ cut-off times
9
Payment instructions > Release payments to Bank
41
Payment instructions > Single payments
Single payment
10
Payment instructions > View payments
42
10
Payment instructions > Search payments
43
“Payment Method” section
11
“Cross Border Funds Transfer Details” section
12
“Beneficiary Details” section
14
“Regulation Details” section
15
Payment instructions > Ɂɚɹɜɥɟɧɢɹ ɧɚ ɦɟɠɜɚɥɸɬɧɵɣ ɨɛɦɟɧ
16
Account information
45
Account information > Inquiries
46
Account information > Reports
50
Account statement details report
50
Payment order report
FX orders
16
Payment instructions > Cumulative payments
21
Cumulative payment
21
“Payment Method” section
22
53
Account information > Export data
56
Account information > Delphi reports
in Citibank Kazakhstan format
57
4
CitiDirect and Your Card
Access to CitiDirect
PIN code change
For the access to CitiDirect, you should have SafeWord Card (“Card”)
and PIN code for the Card. For the Cards and PIN mailers receipt
please contact to CitiDirect administrator (“Administrator”) or Bank’s
CitiDirect implementation and support team (“Support team”) by
telephone 7 (727) 2 980 518.
After Card receipt you should change PIN code. For that please unseal
envelope and find out initial PIN in “SafeWord PIN” section.
Access codes receipt
Bank will deliver to you the Card and the PIN code in sealed envelope.
Upon Card and PIN envelope receipt please check that Card’s serial
number matches with the serial number indicated on the envelope in
“Card #:“ section; in case of mismatch immediately contact
Administrator or Support team.
Initial PIN code
Card’s serial number
Serial number
indicated on envelope
5
CitiDirect and Your Card
1
To change PIN code, please switch on
Card by pressing “ON” button.
2
Card will display “ENTR PIN”. Enter
initial PIN.
Recommendations for the Card and PIN code usage
Do not forget PIN code, as the code is not matter to restore. In case of
the code loss, the Card should be replaced. To replace the Card contact
Administrator.
Do not pass Card and do not disclose PIN code to 3rd parties including
Administrators.
3
Card will display “HOST?”.
Keep the Card in a place secured against 3rd parties; in case of the
Card theft, loss or damage immediately contact Administrator to replace
the Card.
Press “PIN” button.
Life time of the Card battery is approximately 3 years. After the battery
expiration, do not try to replace the battery with new one; contact the
Administrator to replace the Card.
5
Card will display “NEW PIN”. Enter new
PIN, for example 1234.
In case of need in access termination, contact the Administrator. After
the confirmation on access termination receipt from the Administrator,
you should terminate the card. For that remove both batteries for the
Card, this will make the Card disabled; after that the Card can be
thrown out.
6
Card will display “AGAIN”. Enter new
PIN again, in our case 1234.
4
7
Card will display “SUCCESS” and then
immediately “HOST?”, which means that
you have successfully changed PIN
code. Switch off Card by pressing “ON”
button.
6
Logon to CitiDirect
Before working in CitiDirect contact Administrator to check requirements of your computer and to create CitiDirect shortcut on a desktop of your
computer. Click shortcut to logon to CitiDirect, welcome screen will be displayed.
CitiDirect welcome screen
1
In welcome screen select required language. For
that in language section click English prompt.
2
• If you are logging in to CitiDirect first time using
new Card, then select “New User” in “Sign-on
Name” field.
• If you have already logged in to CitiDirect, then
during daily logging in your name will be
displayed in “Sign-on Name” field.
3
Click “Submit” button to continue. If this is your first
time login, then registration screen will appear.
In “Sign-on Name” field: enter your name. During
next time login to CitiDirect your name will be
displayed in CitiDirect welcome screen.
1
In “Sign-on ID” field: enter your card’s serial
number, indicated on back side of the card under
bar-code; click “Submit” to go to
Challenge/Response window.
2
3
7
Logon to CitiDirect
CitiDirect Challenge > Card’s Response
1
Switch on Card by pressing “ON”
button.
2
Card will display “ENTR PIN”. Enter
PIN code.
3
Card will display “HOST?”. Enter 9 first digit from “Challenge:” field (first
digit of this field is always 9).
3
Card will display “CHALLNG?”. Enter
to the Card rest of 8 digits from
“Challenge:” field, in our example
they are 94320003.
4
Immediately after entering to the
Card last digit of CitiDirect challenge,
Card will generate response, which
should be entered in “Response:”
field; after that click “Submit” button.
In Card’s Response:
“0” is digit 0, not letter Ɉ;
“5” is digit 5, not letter S;
“8“ is digit 8, not letter B;
“A” id letter A, not letter R.
4
Switch off Card by pressing “OFF”
button.
8
Logon to CitiDirect
Client code
If you are logging in to CitiDirect first time using new Card,
then Client code window will appear; in other case CitiDirect
will show download window.
1
1
Enter client code in “Client code” window, which is
combination of digits. To obtain client code contact
Administrator or Support team; click “Submit” button.
If client code is correct, then CitiDirect will check
installed components. If checking of installed
components is performing more than 5 minutes,
then it is means that your computer’s configuration
doesn’t meet CitiDirect requirements, and you need
to contact Administrator or Support team.
CitiDirect download
2
After checking is complete, CitiDirect will start
installing of required components. Installation
process in percents will be displayed on the screen.
During installation CitiDirect might prompt your
agree on installation of some components (digital
certificates, etc). You should agree with all CitiDirect
prompts.
2
After installation is complete, main CitiDirect window
will be displayed.
9
Payment instructions
CitiDirect allows initiating following payment instructions:
•
•
•
•
Single payments;
FX orders;
Cumulative payments;
Administrative messages.
You can input and sign instructions in any place of the world in case
you have Internet access, Card and PIN.
Usually, instruction processing scheme in CitiDirect is configured in
such way that after inputting instructions will require signature
(authorization). After that, depending on configured authorization levels,
instructions are being passed from level to level during authorization
from users. After authorization is complete on all levels, instruction
either will be passed on release required level (if manual release is
configured) or will be automatically sent to the Bank after the last
authorization.
Accounts
Effective 7 of June 2010 new format of international bank account
number (IBAN) should be used in Kazakhstan. IBAN has fixed length
20 chars:
KZCCBBBXXXPNNNNNNAAA, where
•
•
•
•
First and second chars – country code of the Republic of
Kazakhstan. International code KZ is used.
Third and fourth chars CC – check digits, which is used for
validation of bank account.
Fifth, sixth and seventh chars BBB – bank code. Bank code is
assigned to every bank by National Bank of Kazakhstan. Last three
digits of existing local BIC are used. For example, for accounts
opened in Citibank Kazakhstan (currently BIC is 190501832), bank
code will be 832.
Eighth to tenth chars XXX – chars, used at discretion of Citibank.
•
•
•
Eleventh char P – account prefix, which is used to identify type of
the account opened in Citibank (corporate card, current account,
etc).
Twelfth to seventeenth chars NNNNNN – base number of account,
which is unique identifier of client in Citibank Kazakhstan. For every
client, all account opened in Citibank Kazakhstan will have one
base number.
Eighth to twentieth chars AAA – digit code of the account.
Combination of base number and digit code of account NNNNNNAAA
is called internal account number and is unique in all operation systems
of Citibank Kazakhstan, and also provides unique identification of the
account.
There are only internal account numbers in CitiDirect.
Instructions’ cut-off times
Bank is processing received instructions in defined cut-off times. If you
will send instructions after cut-off, then Bank will process them on next
operation date in case when these instructions comply with Bank’s and
legislation requirements
For example, cut-off time for single payment instructions is 16.00. if you
will send such instruction at 16.10, then Bank receiving this instruction
same day, will process it next business day. Following cut-off times are
set by the Bank:
•
•
•
Cumulative payments (transfers to cards of Citibank Kazakhstan)
Single payments (in foreign currencies); FX orders
Single payments (in local currencies); cumulative payments
(pension and social contributions, transfers to cards of third-party
banks)
13.00
14.00
16.00
10
Payment instructions > Single payments
Single payment
Single payments are used for transfers to separate
beneficiaries, for example, service provider.
To create single payment: in the menu select “Payments >
Input New Outgoing”. Payment details screen will appear.
Note: during inputting details avoid to use special
characters; allowed characters are upper- and lower-case
letter of Kazakh, Russian and English alphabet, digits,
space and following chars:
?”, ( ) . ’
1
2
3
4
“Payment Method” section is used to input your
account and method of payment (single payment,
cumulative payment, FX order).
“Cross Border Funds Transfer Details” section is
used to input details of payment (transaction
reference number, payment purpose code, budget
code, etc).
“Beneficiary Details” section is used to input details
of beneficiary (beneficiary name, beneficiary
account number, beneficiary code).
“Regulation Details” section is used only for
payment in foreign currencies to input details
according to currency regulation (references to
contract numbers, confirmation related to validation
of currency control).
11
Payment instructions > Single payments
“Payment Method” section
1
1
2
3
4
5
2
In “Preformat Code” field: you can select preformat,
if it was created previously. Preformats are being
created for the same kind of payments, for example,
for monthly payment for communication services. If
you don’t have preformat – skip this field.
In field “Debit Account Number / Currency / Name”:
indicate your internal account number. To indicate
account – click library look-up button; select required
account from the list and click “OK”.
Note: if you don’t have account in the required
currency, then indicate any foreign currency
account. For example, if you need to pay in Russian
rubles, but you have only US dollars account, then
select US dollars account, while rubles currency
code and amount indicate in “Payment Currency /
Amount” field.
3
4
5
In “Payment Currency” field: input manually currency
code of the payment (if you know): USD for US
dollars, RUB for Russian rubles, EUR for Euro and
GBP for GB pounds; or click library look-up button, if
you don’t know currency code.
In “Payment Amount” field: input amount of payment
to beneficiary.
In “Payment Method” field: select type of the
payment. To select – click library look-up button (for
single payments select “Cross Border Funds
Transfer” from the list) and click “OK”.
Note: library look-up button for payment methods
become active only after account number and
currency code are indicated.
12
Payment instructions > Single payments
“Cross Border Funds Transfer Details” section
1
2
1
3
4
5
2
3
4
5
“Confidential” check-box is not used in common
cases. Check-box is used only if processing
scheme is set up for confidential payments. To set
up such scheme contact Administrator.
In “Transaction Reference Number” field: indicate
reference number of payment. If manual numbering
of payments is set up, then this field is require
manual input. If automatic numbering of payments
is set up, then this field is inactive for input. In such
case skip this field, reference number will be
assigned to payment after clicking “Submit” or
“Submit and Create Preformat”. To setup numbering
of payments (manual/ automatic) contact
Administrator.
In “Value Date” field: indicate date, on which you
want Bank to process payment. During creating new
payment, system automatically indicates current
date in “Value Date” field. If required indicate future
date. For example, if you are creating payment
today, but in value date indicating tomorrow’s date,
then Bank receiving this payment today, will
process it next business day.
“Remitter Code” field automatically indicates your
remitter code. In case when this field is empty – you
need to set up Account familiar name library. To set
up library contact Administrator.
In “Payment Details Code” field: input payment
purpose code and click library look-up button. In
“Payment Details Code Description” system will
show description of purpose code according to
indicated value.
13
Payment instructions > Single payments
1
1
2
In “Payment Details” field: input details of the
payment.
3
In “Charges Indicator” field: select one of the
options for charges deduction.
3
2
In “Budget Code” field: input budget code and click
library look-up button. In “Budget Code Description”
field system will show description of budget code
according to indicated value. This field should be
filled only for tax payments.
For KZT payments this field automatically indicates
option OUR.
For foreign currency payments, system allows to
select one of three options:
•
•
•
If “OUR” option is selected, then charges will
be applied to Remitter by its bank.
If “BEN” option is selected, then charges will be
applied to Beneficiary by its bank.
If “SHA” option is selected, then charges will be
applied to both Remitter and Beneficiary by
their banks.
14
Payment instructions > Single payments
“Beneficiary Details” section
2
1
4
3
6
5
1
In “Beneficiary Name” field: input name of a
beneficiary of the payment.
2
In “Beneficiary Code” field: input code of a
beneficiary of the payment.
7
3
8
In “Beneficiary Account Number” field: input 20-char
account number in international format (IBAN).
Structure of the account is described in the
”Accounts” section.
4
In “Beneficiary Tax Code” field: input tax code of a
beneficiary.
5
In “Beneficiary IIN/BIN” field: input IIN / BIN of a
beneficiary.
6
7
8
In “Beneficiary Bank – Routing method” field: input
method of transfer. For KZT payments method is
always “IS”, for RUB - “RU”; for payments in other
currencies method is usually “IS”, when SWIFT
code of a beneficiary bank is known, otherwise
select method form the list.
Input code of a beneficiary bank. For KZT payments
SWIFT codes are used (previously 9-digit BIC
codes were used). SWIFT code of a bank consists
of exactly either 8 or 11 chars and might contain
upper-case Latin letter and digits. After inputting
SWIFT code, click library look-up button on the left
side of a field. According to indicated SWIFT code
CitiDirect will find bank and will fill its details in
“Beneficiary Bank – Name/ Address” field.
Details of intermediary bank can be filled in the
same way as for beneficiary bank. For KZT and
RUB payments – details of intermediary bank
should not be filled.
15
Payment instructions > Single payments
“Regulation Details” section
1
1
2
“Currency Legislation Amendments” checkbox is
used by resident companies for payments not
related to execution of currency transactions, which
are subject to regulations for retrieving registration
certificate, notification certificate, passport of deal
registration, and which amount do not exceed
defined USD equivalent.
As of 7th of March 2010: USD equivalent is set to
10’000 US dollars.
Attention: payment remitter is taking responsibility
for incorrect details indicated in payment.
2
In “Currency Legislation Details” field: input
contracts, invoices, etc numbers, which you provide
for currency control.
16
Payment instructions > FX orders
FX order
FX order is used to buy or sell foreign currency.
To create FX order: in the menu select “Payments > Input
New Outgoing”. Order details screen will appear.
1
2
Note: if amount to buy or sell is more than 30’000 US
dollars or equivalent, then Bank sets special conversion
rate for suck kind of FX order. Before creating contact with
Bank’s treasury to get special rate.
3
1
2
3
In “Preformat Code” field: you can select preformat,
if it was created previously. Preformats are being
created for the same kind of orders, for example, for
weekly FX order to buy USD and sell KZT. If you
don’t have preformat – skip this field.
In field “Debit Account Number / Currency / Name”:
indicate your internal account number, from which
you will sell currency. For example, to sell KZT and
buy USD: indicate KZT account. To indicate
account – click library look-up button; select
required account from the list and click “OK”.
In “Payment Currency” field: input manually
currency code of the payment (if you know): USD
for US dollars, RUB for Russian rubles, EUR for
Euro and GBP for GB pounds; or click library lookup button, if you don’t know currency code.
17
Payment instructions > FX orders
1
2
1
3
2
4
3
5
4
5
In “Payment Amount” field: input amount to sell. If
you don’t know amount to sell and exchange rate,
then input any amount less than 30’000 USD or
equivalent; for example, input 10 USD. You can
return to this field later, after getting conversion rate
in next steps, which will allow you to calculate and
fill amount to sell.
In “Payment Method” field: select “FX” by clicking
library look-up button and selecting required type of
payment from the list.
In “Transaction Reference Number” field: indicate
reference number of payment. If manual numbering
of payments is set up, then this field is require
manual input. If automatic numbering of payments
is set up, then this field is inactive for input. In such
case skip this field, reference number will be
assigned to payment after clicking “Submit” or
“Submit and Create Preformat”. To setup
numbering of payments (manual/ automatic) contact
Administrator.
“Confidential” check-box is not used in common
cases. Check-box is used only if processing
scheme is set up for confidential payments. To set
up such scheme contact Administrator.
“Remitter Code” field automatically indicates your
remitter code. In case when this field is empty – you
need to set up Account familiar name library. To set
up library contact Administrator.
18
Payment instructions > FX orders
1
2
1
2
3
4
3
4
In “Value Date” field: indicate date, on which you
want Bank to process payment. During creating new
payment, system automatically indicates current
date in “Value Date” field. If required indicate future
date. For example, if you are creating payment
today, but in value date indicating tomorrow’s date,
then Bank receiving this payment today, will
process it next business day. In case of changing
exchange rate on next day, Bank will process FX
order based on new exchange rate; amount to buy
or amount to sell will be also changed based on
new exchange rate.
In “Credit Account Number” field: indicate account
number, to which you will buy currency. For
example, if you buy USD, indicate USD account. To
indicate account – click library look-up button; select
required account from the list and click “OK”. If you
don’t have account to which buy currency, then skip
this field, for example, you want to buy RUB, but
you have only USD account.
In “Beneficiary Code” field: input code of a
beneficiary. For any FX order always indicate
beneficiary code of a bank – 14.
In “Payment Details Code” field: input one fo the
following payment purpose codes: 213 – to buy
foreign currency; 223 – to sell foreign currency; 230
– for cross-currency conversion. After inputting
code, click library look-up button. CitiDirect will
show description of selected code in “Payment
Details Code Description” field.
19
Payment instructions > FX orders
1
In “FX code” field: input exchange code. To select
code click library look-up button. In the library
exchange codes grouped by sell codes and buy
codes. Look for appropriate code. For example, you
buy USD for payment to abroad company for
services. In such case, you should select code
“Companies buy FCY for non-res. (services)”.
Select required code in the list and click “OK”
button. CitiDirect will show description of selected
code in “FX Code Description” field.
Note: for cross-currency conversion – you should
select code, related to “buy FCY”.
2
In “FX Purpose” field: input purpose, for which you
perform conversion. To select purpose click library
look-up button; select required value in the list.
CitiDirect will show description of selected code in
“FX Purpose Description” field.
Note: there are might be several purposes; in such
case you should indicate main purpose, for which
you perform main part of conversion. For example,
you buy 1’200’000.00 USD, where 900’000.00 you
plan to pay to vendors for goods, and rest
300’000.00 – to pay for other purposes. In such
case indicate 01 “For goods and services”.
1
2
3
4
3
In “Credit Currency” field: indicate code of currency
to buy.
4
In “Payment Details” field: indicate name of your
company.
20
Payment instructions > FX orders
1
In “Exchange Rate” field: indicate conversion rate.
In case, when sell or buy amount do not exceed
30’000.00 USD or equivalent, Bank set standard
rates, which are automatically maintained in the
system. To get standard rate click rate look-up
button. CitiDirect will show rate in “Exchange Rate”
field and immediately will calculate amount to buy
based on amount to sell, exchange rate, currency to
buy and currency to sell.
Note: if you don’t know exact amount to sell, then
you need to input approximate amount in “Payment
Amount” field, after that click on rate look-up button.
After getting exchange rate in the system –
calculate amount to sell based on rate and amount
to buy.
If system shows zero exchange rate, then it means
that rates still didn’t maintained by Bank and you
need to wait till rates update, otherwise system will
not allow you to submit such FX order. You need to
suspend creating payment till the Bank to maintain
rates. It is recommended to create FX orders
starting at 10.00; till this time Bank already
maintains rates in the system.
1
Other reason of zero exchange rates is that amount
to buy or sell exceeds of 30’000.00 USD or
equivalent. In such case you need to contact Bank’s
treasury to get special rate. In case, when obtained
rate differ from standard rate – input rate manually
in “Exchange Rate” field.
21
Payment instructions > Cumulative payments
Cumulative payment
Cumulative payments are used for transfers to list of
beneficiaries, for example, transfers to payroll and
corporate Cards, issued by bank; or pension and social
contributions. Payments contain common part and list of
individuals.
To create cumulative payment: in the menu select
“Payments > Input New Outgoing”. Payment details screen
will appear.
Note: during inputting details avoid to use special
characters; allowed characters are upper- and lower-case
letter of Kazakh, Russian and English alphabet, digits,
space and following chars:
?”, ( ) . ’
1
“Payment Method” section is used to input your
account and method of payment (single payment,
cumulative payment, FX order).
2
“Cumulative Payment Instruction Details” section is
used to input details of payment (transaction
reference number, payment purpose code, etc).
3
“Beneficiary Details” section is used to input details
of beneficiary (beneficiary name, beneficiary
account number, beneficiary code).
4
“Individual Details” section is used to input list of
individuals (first and last names, dates of birth,
amounts).
22
Payment instructions > Cumulative payments
“Payment Method” section
1
1
2
3
4
In “Preformat Code” field: you can select preformat,
if it was created previously. Preformats are being
created for the same kind of payments, for example,
for monthly pension contributions. If you don’t have
preformat – skip this field.
5
2
3
4
5
In field “Debit Account Number / Currency / Name”:
indicate your internal account number. To indicate
account – click library look-up button; select required
account from the list and click “OK”.
In “Payment Currency” field: input manually currency
code of the payment (if you know): USD for US
dollars, RUB for Russian rubles, EUR for Euro and
GBP for GB pounds; or click library look-up button, if
you don’t know currency code.
In “Payment Amount” field: input total amount of
payment to individuals.
In “Payment Method” field: select type of the
payment. To select – click library look-up button (for
cumulative payments select “Cumulative Payment
Instruction”.
23
Payment instructions > Cumulative payments
“Cumulative Payment Instruction Details” section
1
2
3
4
1
5
2
3
4
5
“Confidential” check-box is not used in common
cases. Check-box is used only if processing
scheme is set up for confidential payments. To set
up such scheme contact Administrator.
In “Transaction Reference Number” field: indicate
reference number of payment. If manual numbering
of payments is set up, then this field is require
manual input. If automatic numbering of payments
is set up, then this field is inactive for input. In such
case skip this field, reference number will be
assigned to payment after clicking “Submit” or
“Submit and Create Preformat”. To setup numbering
of payments (manual/ automatic) contact
Administrator.
In “Value Date” field: indicate date, on which you
want Bank to process payment. During creating new
payment, system automatically indicates current
date in “Value Date” field. If required indicate future
date. For example, if you are creating payment
today, but in value date indicating tomorrow’s date,
then Bank receiving this payment today, will
process it next business day.
“Remitter Code” field automatically indicates your
remitter code. In case when this field is empty – you
need to set up Account familiar name library. To set
up library contact Administrator.
In “Payment Details Code” field: input payment
purpose code and click library look-up button. In
“Payment Details Code Description” system will
show description of purpose code according to
indicated value.
24
Payment instructions > Cumulative payments
1
In “Transaction Type” field: input type of transaction:
•
•
•
1
2
3
“Pension FT” for pension contribution;
“Social FT” for social deductions;
“Salary FT” for transfers on bank Cards.
2
In “Payment Details” field: input details of the
payment, for example, “mandatory pension
contributions”.
3
In “Period” field: input month and year of payment,
for which transfer is being made.
“Beneficiary Details” section
1
3
6
2
4
5
Details of beneficiary-company should be indicated in this
section. For pension and social contributions – section
should contain details of the pension fund, for transfers to
bank Cards – details of bank.
1
In “Beneficiary Name” field: input name of a
beneficiary-company of the payment.
2
In “Beneficiary Code” field: input code of a
beneficiary-company of the payment.
3
In “Beneficiary Tax Code” field: input tax code of a
beneficiary-company.
4
In “Beneficiary Account Number” field: input account
of a beneficiary-company (9-digit format or 20-char
IBAN format).
5
In “Beneficiary IIN/BIN” field: input BIN of a
beneficiary-company.
6
Input method and code of transfer (“IS” for IBAN
format, “B2” for 9-digit BIC format).
25
Payment instructions > Cumulative payments
“Individual Details” section
1
Details of individuals should be indicated in this section
(first and last names, etc).
2
1
This section has a table view. Individuals are shown
in rows. Details of individuals are shown in columns.
2
“New”, “Edit”, “Delete” buttons are used to fill list of
individuals. When clicked – separate window will be
appeared to input / edit details of individuals:
Attention: for pension and social payments input
last, first and patronymic names exactly as they
present in SIC registration card.
For example, if SIC registration card contains
“ȺɆȺɇɈȼȺ/ȺȿɈȼȺ” as last name, then the same
value should be inputted to “Last name” field.
26
Payment instructions > Payments for branches
You can create payments by order of own branches. In such case you create payment as
usual, while “Payment Details” should contain special wording.
1
Indicate branch details in first line of “Payment
Details” field in following format:
“NAME/” + “Branch name” + <space> + “RNN/” +
“Branch RNN”
Rest three lines of “Payment Details” field can be
used for details of payments.
For example, if you pay by order of “Euro-stroy JSC,
Aktau”, which RNN is 600911045457, then in first
line of “Payment Details” field you should indicate:
NAME/Euro-stroy JSC, Aktau RNN/600911045457
1
27
Payment instructions > Administrative Messages
Administrative messages are used for official notifications to Bank or for request, for
example, to cancel payments.
1
Because administrative messages can be initiated with regards to own funds – they might
require authorization as well as payments.
2
To create administrative message perform following steps:
2
1
3
4
3
In menu select “Administrative Messages”.
To create new message switch to “Input / Modify”
tab; to sign message switch to “Authorization Req’d”
tab (you can authorize only those messages, which
were created by other users; messages which you
have created cannot be authorized by yourself); if
manual release is configured – switch to “Release
Req’d” tab (release can be done only for duly
signed messages); to view messages switch to
“View” tab.
To create new message click “New” button.
In “Account Number / Currency / Name” field: click
library look-up button, select your account from the
list. Purpose of this field is to indicate remitter for
the Bank, i.e. only name of account holder will be
send to the Bank. Therefore, you can select any of
your accounts.
After account is selected – additional fields for input
will be appeared on the screen.
4
28
Payment instructions > Administrative Messages
1
2
1
2
3
4
In “Transaction Reference Number” field: input
reference number of your message.
If you have previously created templates for
messages, then click library look-up button for
“Administrative Message Code / Description” field
and select required template from the list.
3
In “Message Text” field: input everything, that you
want to send to the Bank.
4
Click “Submit” button to save message. After that
message should be signed all levels and released
to the Bank.
29
Payment instructions > Modify payments
You can create payments by one of the following ways:
•
•
•
•
Manual input;
Input from preformats;
Copy payments;
Import files.
To understand which of the ways is more convenient for you –
calculate a volume of daily payments. If number of daily payment
does not exceed five, then you can create payments manually, from
preformat or copy them.
Please note, that before copying payment you need to find existing
payment from which to copy details – this search can take some
time.
If number of payments to create is big and it takes more that 30
minutes to create them manually, then import is more convenient
way.
30
Payment instructions > Modify payments
Manual input
1
2
1
In menu select “Payments > Input New Outgoing”,
payment details screen will appear.
2
Input payment details (skip “Preformat Code” field
for manual input).
Please refer to appropriate section of this guide for
detailed information.
One completed click “Submit” to save payments or
“Submit and Create Preformat” to save both
payment and preformat. CitiDirect will validate
entered details and will pass payment to next
processing level ɭɪɨɜɟɧɶ (authorization, validation,
release, etc).
31
Payment instructions > Modify payments
If preformat were previously created in CitiDirect, then you can select it by indicating its code
in “Preformat Code” field and then clicking library look-up button on the left side of field.
Input from preformat
1
2
1
2
In menu select “Payments > Input New Outgoing”,
payment details screen will appear.
If you know preformat code, then input it in
“Preformat Code” field and click library look-up
button on the left side; CitiDirect will retrieve
preformat details and will fill payment details
accordingly.
If you don’t now preformat code, then click library
look-up button. Select required preformat from the
list and click “OK”; CitiDirect will retrieve preformat
details and will fill payment details accordingly.
CitiDirect support only English letter in preformat
codes. Therefore, we to fill preformat codes with
digits, for example, with account number, this will
allow to strictly identify preformats. For that, if you
pay to “Glots” company to account
KZ018013010250203001, then you can name
preformat as 3010250203001 (last 13 digits of
account), this will simplify search of such preformat.
32
Payment instructions > Modify payments
3
4
3
4
After selecting preformat, fill required fields, like
reference number and amount.
One completed click “Submit” to save payments.
CitiDirect will validate entered details and will pass
payment to next processing level ɭɪɨɜɟɧɶ
(authorization, validation, release, etc).
33
Payment instructions > Modify payments
If payment were created previously, then you can find it and copy; CitiDirect will create exact
copy of the payment, and automatically fill value date with current date.
Copy payments
1
2
2
3
1
In menu select “Payment > Modify”.
CitiDirect will switch to “Input/ Modify” tab.
Run search (please refer to “Search payment”
section of this guide for detailed information),
CitiDirect will show list of found payment.
3
34
Payment instructions > Modify payments
4
5
4
Highlights required payments by clicking them while
“Ctrl” button is depressed.
5
Click “Go to Details” button to go to details of
payments, CitiDirect will open first of highlighted
payments.
35
Payment instructions > Modify payments
6
7
Click “Copy” button to copy the payment.
CitiDirect will show message window, where will
inform you about creating copy of the payment; click
“OK” button.
Note: CitiDirect will create exact copy of the
payment while “Value Date” field will contain current
date.
8
Once completed, click “Submit” to save payments.
CitiDirect will validate entered details and will pass
payment to next processing level ɭɪɨɜɟɧɶ
(authorization, validation, release, etc).
7
6
8
36
Payment instructions > Modify payments
For import files you should, first of all input payments in your accounting system, then
generate output file in special CitiDirect format, which contain required payments. Then you
login to CitiDirect and upload import file in to CitiDirect. During file upload CitiDirect validates
payments. If payments are correct, then CitiDirect will pass them to authorization; if
payments contain uncritical error, then CitiDirect will pass them to invalid queue for correction
and further release to Bank; if payments contain critical errors, then CitiDirect will reject such
payments and you should correct payments in accounting system and re-generate output file.
Import is convenient when you have more than 5 - 10 payment per day. Using import you can
avoid double inputting of payments, which reduces operational errors, and your time and
resources.
Before using import – it should be configured. To setup import contact Administrator.
In CitiDirect you can import both single and cumulative payments. Before running import –
generate file and then perform following steps:
Import files
1
2
3
4
5
In menu select “Import transaction”.
System will switch to “Run” tab.
Highlight required import profile:
•
“Single payments” for single payments;
•
“Cumulative payments” for cumulative
payments.
Click “Run” button to upload file.
In file selection window click “Yes” to import all files
from folder or “No” to select one file:
2
3
1
5
Select required file to import:
4
37
Payment instructions > Modify payments
1
1
3
5
2
2
3
4
To understand whether payment are still uploading,
have been uploaded or rejected by CitiDirect: switch
to “Run History” tab.
CitiDirect will show result of file import.
Note the run status of file. Status “Processing”
means that file is still under processing.
Run status is not updating automatically. In case
when status is”Processing”, periodically click
“Update Screen” status till the processing
completed.
Note: Once completed run will get one of the
following statuses:
4
5
•
“Completed” means run is completed; in such
case “Txns Processed” column will contain
number of uploaded payments. Zero value
means that file duplication, i.e., you have
already uploaded such file before. You should
change reference number in one of the
payments in accounting system, re-generate
file and upload it again.
•
“Completed with Errors” means file has errors.
If in such case “Txns Processed” column will
contain 0, then it means file has critical error.
Click “View Run Details > View Errors” to get
error description.
On error contact Administrator. On successful
completion continue working with payments
(“Payments” in menu).
38
Payment instructions > Modify payments
To change payment details perform following steps:
1
2
2
3
1
3
4
5
In menu select “Payments > Modify”.
ɂɡɦɟɧɟɧɢɟ ɩɥɚɬɟɠɟɣ
Switch to “Input / Modify” tab and perform run
search.
Highlight required payments.
4
Click “Go to Details” button. CitiDirect will open first
of highlighted payments.
5
Change required details and click “Submit” to save
changes, authorize payment on all required levels.
39
Payment instructions > Delete payments
•
If payments are not sent to the Bank yet, for example, waiting for authorization or
checking, then You can delete them.
•
If the payments were sent to the Bank already, it is impossible to delete them in
CitiDirect. However, You may call immediately to the Bank and aware them that the
payment is wrong. After that, send confirming administrative message, where You need
to state number, date and amount of the payment. Basing on this message, Bank will be
able to stop the payment, unless it is still possible.
In order to delete payment do the following in CitiDirect:
1
2
3
4
2
5
6
4
1
Choose “Payments” -> “Modify”
Switch to “Input/Modify” sheet
Find the payment, by entering search criteria
Mark the payments to delete
Press “Delete” button
System will ask You to state the reason for deletion.
But it is not compulsory and You may ignore it by
clicking “OK” to confirm
6
5
3
40
Payment instructions > Sign (authorize) payments
Authorization of the payments can only be done by the users having corresponding rights in
CitiDirect.
It is possible to set up to 9 levels of authorization. If level is equal to zero, then there will not
be any authorizations. Moreover, each level may be adjusted to require up to 9
authorizations
1
2
With installed authorization levels, a payment goes to first level of authorization after its
creation and goes further by the ladder after authorizations on each level.
3
It is prohibited to participate twice on making the payment in CitiDirect. So, if You have
created the payment, it is not allowed to authorize it at any level, even having the
authorization rights at that particular level.
4
Choose “Payments” -> “Authorize” menu
System will switch to “Authorization required” sheet
Mark the payments to authorize
Click one of the following buttons according to
operations to make with payments:
•
“Authorize” button to confirm the payment;
•
“Send to Repair” button to modify the payment;
Then payment must be reauthorized again at
all levels;
•
“Delete” button to reject the payment and
delete it;
•
“Go to Details” to view the details of the
payment (it is still possible to authorize the
payment in details window);
•
“Other Options” to make additional operations
with payment.
In order to authorize the payments do the following:
2
3
1
4
41
Payment instructions > Release payments to Bank
There are two ways of sending payments: automatically or manually.
1
If it is set to send automatically, the payments will be sent directly to the Bank after their
authorization at all levels.
Manual sending is additional method of control of the payments, as there is an opportunity to
check again it before sending. With manual sending do the following:
2
2
3
4
3
1
System will switch to “Release Req’d” sheet
Mark the payments to send
Click one of the following buttons according to
operations to make with payments:
•
“Release” to send the payment to the Bank;
•
“Send to Repair” button to modify the payment;
Then payment must be reauthorized again at
all levels;
•
“Delete” button to reject the payment and
delete it;
•
“Go to Details” to view the details of the
payment (it is still possible to authorize the
payment in details window);
•
“Other Options” to make additional operations
with payment.
Notice: While sending to the Bank, initially
payment will have “Sent” status. Wait until status
changes to “CB Accepted” by periodically updating
screen.
4
42
Payment instructions > View payments
Review of the payment is necessary when You need to know the status of the payment or its
details.
In order to view details do the following in CitiDirect:
2
1
Choose “Payments” -> “Release” menu
1
Choose “Payments” -> “View All menu. “View” sheet
becomes active.
2
“View” sheet allows seeing payments created during
the last two days; to see earlier payments refer to
“Search Payments” section.
43
Payment instructions > Search payments
When You need to find the payments for deletion, modifying or copying, do the following:
1
Switch to necessary sheet, for example to “View” for
reviewing the payments, “Input/Modify” for deletion
or modifying.
2
Click “Other Options” -> “Search” or click on the
“Magnifier” button.
1
2
2
44
Payment instructions > Search payments
1
2
3
1
Press “Clear” button to clear old criteria
2
Define criteria to find the payment, for example, the
input date.
3
Click “Run Search”, after which CitiDirect will show
the payments satisfying entered criteria.
45
Account information
CitiDirect reflects account information in a real-time just right after
transactions are processed by Bank. You can obtain summary
balance on the accounts, view current balances or details of
processed payments in specific currency for specific date for specific
accounts.
•
Delphi Reports in Citibank Kazakhstan format. Types of reports
provided by CitiDirect are global and look equal for every country.
There are reports implemented by the Citibank Kazakhstan, which
are adjusted following the local demands (use “Inquiries” ->
“Additional Services”).
CitiDirect gives information for the last 3 months. In order to obtain
information for larger period You need to speak to CitiService
department of the Bank
•
Automated files and reports delivery (AFRD) is used for delivering
chosen reports and export files to particular e-mail at particular
time specified by the user. In order to receive reports You do not
need to access CitiDirect and connect to internet. Hence, it
consumes the time. Refer to the Administrator to adjust AFRD.
•
To get a quick access to information use Inquiries
•
For providing an accounting to officials, for audit or presentation
purposes use Reports. Reports are built slower than Inquiries,
but their appearance is more suitable for named aims.
•
Export allows uploading information about the accounts in
structured form for further downloading to Your accounting
software. Convenience of export is that You do not have to
check manually which payments were processed by Bank,
because Your accounting software will do it automatically after
downloading the export file. Therefore this procedure saves
much time and work if there are many processed payments
However, Your accounting software must be adjusted to accept
export files beforehand by the specialists supporting that
software.
46
Account information > Inquiries
To retrieve information about balance and transactions do the following:
2
3
1
Switch to “Inquiries” -> “Cash Statement Inquiries”->
”Balance Summary Inquiries”
2
Choose “Criteria” sheet. Window will show the fields
where the search criteria should be filled.
3
4
1
4
5
5
6
6
Ɂɚɩɪɨɫɵ
7
9
8
Click on the button to choose the Citibank branch,
where the accounts were opened. If there are
accounts only at Almaty branch, then the fields will
contain “881 / ALMATY CITIBANK”, otherwise – list
of branches, where the accounts were opened.
If You need to retrieve balance of particular
account, choose it from the list. Otherwise, skip this
field.
Enter period for which You need a balance
Press “Submit” to confirm
7
“Balance Summary” sheet will become active,
where the balances of the accounts are shown.
8
If You need to know which transactions were
processed for specific account, double click on the
account or press “Go to Details”.
9
“Cash Statement” sheet will become active, where
outgoing and incoming payments processed by
Bank will be shown.
47
Account information > Inquiries
1
2
3
4
8
9
7
1
“Cash Statement” sheet contains information about
outgoing and incoming payments processed by
Bank
2
Account section contains balance summary for
chosen account, including incoming and outgoing
balance, also the amount of processed payments.
3
Payments section contains the list of incoming and
outgoing payments processed by Bank for particular
account.
4
To return to the list of accounts, click “Return to
Balance Summary”.
5
To view the details of particular payment click “Go
to details”
6
“Balance Detail” sheet will become active, where
the details of the payments will be shown
7
To return to the payments list switch to “Cash
Statement” sheet
8
In order to return to account balance switch to
“Balance Summary” sheet
9
To search again switch to “Criteria” sheet or press
“Criteria” button
5
6
48
Account information > Inquiries
For quickly accessing the particular accounts You may use inquiry called “Transaction
Summary Inquiry”. Named type of inquiry allows finding payments using the criteria as
account number, period, amount, currency, etc.
2
1
Switch to “Inquiries” -> “Cash Statement Inquiries”->
”Transaction Summary Inquiries”
2
Choose “Criteria” sheet. Window will show the fields
where the search criteria should be filled.
3
1
3
Press “Submit” to confirm
49
Account information > Inquiries
4
4
“Summary” sheet will become active, where the
payments corresponding to search criteria will be
shown.
5
To view the details of the payment double click on
the payment or click “Go to Details”.
6
CitiDirect will switch to “Details” sheet, containing
details of chosen payment.
7
To return to the payments list choose “Summary”
sheet.
8
To run the search with other criteria switch to
“Criteria” sheet.
5
8
6
7
50
Account information > Reports
Ɉɬɱɟɬɵ
1
To view the detailed account statement report,
switch to “All Reports” -> “Cash Statement Reports”
2
At “Report Summary” section choose “Account
Statement Details Report”
3
In order to form report with specific criteria click
“Edit Report”.
4
“Fields” section contains the list of report criteria.
Define the format of the report by clicking on the
“Format” field.
5
On the appeared window choose “Adobe (PDF)” for
example and press “OK”
2
1
3
5
4
6
6
Define the period by clicking on the “Statement
Date”
7
Switch to “Absolute” sheet and enter beginning and
end date of the statement period, then press “OK”.
7
51
Account information > Reports
1
2
Press “Save and Run” to save the report for further
use and run with entered criteria.
Enter the name for the report and click “OK”
2
3
4
1
5
6
3
CitiDirect will create the new report with entered
name.
On the “View Reports” sheet CitiDirect shows the
status of the report. Either Waiting or “Running”
statuses mean that it is not finished. Wait until
status becomes “Available”.
Click “View Report” to build the report
System will show additional window warning about
confidentiality of the report. Press “OK”.
4
6
CitiDirect will offer the path to save the report.
5
Account information > Reports
52
Formed statement contains the account balance, amount
and details of incoming and outgoing payments.
Statement in pdf format is ready to be printed or stored in
local storage.
53
Account information > Reports
2
1
3
1
To form the report about transaction initiation in
format of National bank of Kazakhstan switch to “All
Reports” -> “Payments – CEEMEA Reports”
2
At “Report Summary” section choose “National
Bank of Kazakhstan Transaction Initiation Report”
3
In order to form report with specific criteria click
“Edit Report”.
4
“Fields” section contains the list of report criteria.
Define the format of the report by clicking on the
“Format” field.
5
On the appeared window choose “Adobe (PDF)” for
example and press “OK”
5
4
6
6
Define the period by clicking on the “Statement
Date”
7
Switch to “Absolute” sheet and enter beginning and
end date of the statement period, then press “OK”.
7
54
Account information > Reports
1
2
Press “Save and Run” to save the report for further
use and run with entered criteria.
Enter the name for the report and click “OK”
2
3
1
4
5
3
4
6
CitiDirect will create the new report with entered
name.
On the “View Reports” sheet CitiDirect shows the
status of the report. Either Waiting or “Running”
statuses mean that it is not finished. Wait until
status becomes “Available”.
Click “View Report” to build the report
System will show additional window warning about
confidentiality of the report. Press “OK”.
6
5
CitiDirect will offer the path to save the report.
55
Account information > Reports
Formed report contains payment orders in National Bank
format. Report includes the payments in national currency
at all levels of processing, both sent and deleted or
pending.
1
Report marks sent payments with the stamp stating
that payment was accepted by bank for processing;
other payments does not contain such stamp
2
If payments contain incorrect or old information
about Your company – sender, it is necessary to
modify client’s library referring to the Administrator.
2
1
56
Account information > Export data
1
2
1
3
To build the export file switch to “Export Data”
menu.
Choose necessary profile from the list.
Press “Run” after which CitiDirect will process that
action Click “OK”.
2
3
4
4
5
6
6
7
7
ɗɤɫɩɨɪɬ
5
Switch to “Run History” sheet
The results of the process will not be updated
automatically. Hence, periodically press “Update
Screen” to view the current status.
Update screen until the status changes to “Saved”
In order to save the export file to a local storage
click “Download” and choose the path and name of
the file.
57
Account information > Delphi reports in Citibank Kazakhstan format
Via additional services CitiDirect offers the following types of reports in Citibank Kazakhstan
format: statements, payment orders in national currency, and payments in foreign currency.
1
2
3
1
4
Switch to “Inquiries” -> “Additional Services” after
which Delphi XP window appears
Choose “Account Receivables” -> “Reports”
Enter the start and end date of the period. Delphi
keeps reports during 31 days of the calendar, after
which it will be deleted. Delphi does not contain
reports of days without processed transactions and
of current day.
Press “Run Search”
3
2
4
58
Account information > Delphi reports in Citibank Kazakhstan format
1
Delphi XP contains 3 types reports, which is viewed
on screen as “Advices -0” contains statements;
“Payment Order -0” contains payments in national
currency in National Bank of Kazakhstan format
with Bank stamp; “MT103-0” contain payments in
foreign currency in SWIFT format with Bank stamp.
If there is none of a type, Delphi will not show
corresponding record.
2
2
1
3
4
5
6
4
6
3
5
Click on the necessary record
System will show the list of the reports for entered
period. Each report is reflects the information of one
particular day. So, there will be 5 reports for a
week. At the last day of the month Bank forms the
statement for the whole month, which will be
available at first day of next month.
It is allowed to download a group of reports by
ticking each necessary report.
After choosing the reports press “Download”
In order to view one report click “Download” near
the needed record.
Account information > Delphi reports in Citibank Kazakhstan format
Formed report entirely reflects the format of the
statements provided by Citibank Kazakhstan.
59