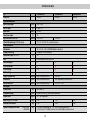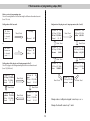
1
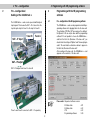
X-QAM twin 3/5/6
Operating instructions
Picture
X-QAM twin x
Contents
Contents
5
Contents
Picture
Programming with the KC 3 . . . . . . . . . . . . . . . . . . . Page11
5.1
. . . . . . . . . . . . . . . . . . . . . . . . . . . . . . . . . Page 2
Parameters of the base unit /
. . . . . . . . . . . . . . . . . . . . . . . . . . . . . . . . Page 4
Choosing a slot . . . . . . . . . . . . . . . . . . . . . . . . . Page11
1
Description . . . . . . . . . . . . . . . . . . . . . . . . . . . . . . . . Page 4
5.1.1 Adjusting the bus address . . . . . . . . . . . Page11
2
Pre – configuration / Cabling . . . . . . . . . . . . . . . . . . Page 5
5.1.2 Choosing the slot . . . . . . . . . . . . . . . . . . Page11
3
Programming with the HE programming software . . Page 5
Pictographs
4
5.2
Adjusting the SAT input parameters . . . . . . . . . Page11
3.1
Pre – configuration of the HE programming software . Page 5
5.2.1 Adjusting the SAT – IF input frequency . Page11
3.2
Activating the NIT processing . . . . . . . . . . . . . . Page 6
5.2.2 Choosing the input . . . . . . . . . . . . . . . . . Page11
3.3
Programming the card parameters . . . . . . . . . . Page 6
5.2.3 Adjusting the symbol ratio . . . . . . . . . . . Page12
3.4
Testing the input signal quality . . . . . . . . . . . . . Page 7
5.2.4 Adjusting the Viterbi ratio . . . . . . . . . . . . Page12
3.5
Level adjustment . . . . . . . . . . . . . . . . . . . . . . . . Page 7
3.6
Setting the PID filter . . . . . . . . . . . . . . . . . . . . . Page 8
5.3.1 Setting the RF output frequency . . . . . . . Page12
3.7
PID remapping . . . . . . . . . . . . . . . . . . . . . . . . . Page 8
5.3.2 Adjusting the output data ratio . . . . . . . . Page12
3.8
Error messages . . . . . . . . . . . . . . . . . . . . . . . . Page 8
5.3.3 Setting the type of modulation . . . . . . . . Page13
3.9
Changing the Operator – ID . . . . . . . . . . . . . . . Page 9
5.3.4 Switching – off the output signal . . . . . . . Page13
5.3
Setting the RF output parameters . . . . . . . . . . Page12
Basics of programming with the KC 3 . . . . . . . . . . Page10
5.3.5 Inverting the output spectrum . . . . . . . . . Page13
4.1
Basics . . . . . . . . . . . . . . . . . . . . . . . . . . . . . . . . Page10
5.3.6 Error messages . . . . . . . . . . . . . . . . . . . Page13
4.2
Order of programming . . . . . . . . . . . . . . . . . . . Page10
5.3.7 Level adjustment of the X-QAM x – card . . Page13
4.3
Store
. . . . . . . . . . . . . . . . . . . . . . . . . . . . . . . . Page10
3
6
Technical data . . . . . . . . . . . . . . . . . . . . . . . . . . . . . . Page14
7
Short overview of KC 3 programming steps . . . . . Page15
Pictographs
1 Description
1
Pictographs and safety information
Pictographs are icons with specific meanings. The following
pictographs are used in the installation and operating
instructions:
Description
The X-QAM twin x – cards are used for processing of two
QPSK – modulated SAT – IF – signals into two QAM –
modulated adjacent channels in the frequency range
from 47 to 862 MHz. The signal processing of the X-QAM
twin x – modules is realized with the Direct Digital ® technology. The two output channels can be switched
on and off separately from one another. Each board has
a level control for level matching of the individual plug-in
boards to the same output level via KC 3 or HE programming software.
Warns about situations in which there is danger of lethal
injury due to hazardous electrical voltage and non-compliance with these instructions.
Recycling: All of our packaging materials (packaging,
identification sheet, plastic foil and bag) are fully recyclable.
English:
Electronic equipment is not household waste – in accordance
with directive 200/96/EC OF THE EUROPEAN PARLIAMENT
AND THE COUNCIL of 27th January 2003 on used electrical
and electronic equipment, it must be disposed of properly. At the
end of its service life, take this unit for disposal at a relevant official collection point.
Except the X-QAM twin 3, which converts the input signals quasi-transparent, all X-QAM twin x – cards are
equipped with the possibility to program PID filters and
PID remapping as well as an optional NIT processing.
There is also implemented an optional editing function for
the Operator – ID.
Francaise:
Les appareils électroniques doivent pas être mis dans la poubelle de la maison, mais doivent être recycles correctement
selon la directive 200/96/EG DU PARLAMENT ET DU
CONSEIL EUROPEEN du 27 janvier 2003 concernant les
appareils électroniques et électriques usages. Nous vous prions de metre cet appareil á la fin de son utilisation dans un
emlacement prévu pour son recyclage.
If the output data ratio is undervalued, all X-QAM twin x –
cards adapt the data ratio on the minimum requested
value.
A further feature is the automatically level adjustment, if
different kinds of modulation are chosen, independent
from the kind of modulation (chapter “Level adjustment”).
Nederlands:
Elektronische apparaten horen - volgens richtlijn 200296EG
van het Europese Parlement d.d. 27 januari 2003 - niet thuis bij
het gewone huisvuil maar moeten gescheiden ingezameld worden. Lever gebruikte elektrische en elektronische apparatuur
aan het eind van hun levensduur in bij de daarvoor bedoelde
verzamelpunten.
Please note:
Authorized and qualified personnel only, is allowed
to change the plug-in modules. Before this, the operating instructions, and especially the security advises, of the V16 base unit have to be read and
followed. All works have to be done according to the
security standards DIN VDE 0701, part 1 and 200.
4
2 Pre – configuration
2
3 Programming with HE programming software
Pre – configuration /
Cabling of the X-QAM twin x
3
Programming with the HE programming
software
The X-QAM twin x – cards can be operated with bridged
input signals. This means the SAT – IF is taken from the
loop-through output of tuner A to the input of tuner B.
3.1
Pre – configuration of the HE programming software
Tuner B
The X-QAM twin x – cards can be programmed via HE programming software after plugging them into the base unit.
The activating of PID filter, NIT processing or the editing of
the Operator – ID can only be done with the programming
software! If it is not possible to choose the X-QAM twin x –
card from the list in the „Overview of the base unit“, you
should check the settings at “Options” and “Favoured plug-in
cards”. The card must be activated as below, to appear on
the list in the „Overview of the base unit“.
After reading out the base unit, the X-QAM twin x – card
appears on the used slot of the base unit.
Tuner A
SAT – IF input
SAT – IF output
SAT – IF bridged from tuner A to tuner B
☞
Tuner A and Tuner B connected to SAT – IF separately
5
Please note: Requested software version
X-5 Basis twin:
X-8 Basis twin:
V16:
Programming software:
4.01
x.22
x.22
5.00
3 Programming with HE programming software
3.2
3 Programming with HE programming software
Activating the NIT processing
3.3
Programming the card parameters
The NIT processing can only be activated via HE programming software. Therefore, the option “Generate
CABLE – NIT” has to be chosen (“Design” → “Network
NIT”)
In the overview of the base unit, the output channels of
the X-QAM twin x – cards are chosen at “RF parameters”.
In those channels, the former QPSK bouquets are fed in
as QAM bouquets. The chosen channel is always channel A. Channel B is automatically determined as adjacent
channel of channel A.
The X-QAM twin 3 has no possibility to create the NIT,
the input NIT is transferred to the output. If you activate
the NIT processing, the X-QAM twin 5 and X-QAM twin 6
create the NIT in each channel fed by this type of card.
This NIT includes every QAM channel of the local network. At “NIT – information” the parameters of the chosen
QAM bouquet are displayed.
Those information are TS-ID, ONID, output frequency,
data ratio and type of modulation.
If you now click on the “Details” button, a window opens
for configuring the card details. Here you can make the
relevant settings for the operation.
6
3 Programming with HE programming software
3 Programming with HE programming software
3.4
Testing the input signal quality
If you use the button “Check signal
quality”, the C/N and the Bit error
ratio of the input signal of the card
will be displayed.
3.5
Level adjustment
The level adjustment of the X-QAM twin x – card can also
be done via HE-programming software. For this you just
have to click on “Level control“ in the window “Parameters of the Plug-in card”.
The following window appears:
First of all you should push the button „Parameter read“,
to read out the already programmed state of attenuation.
At the area „Input parameters“ those data are displayed,
which are stored in the SAT data base for the concerned
transponder. At the area “RF output parameters” all relevant
settings for the output signal can be done. You can activate
or deactivate the output signal, determine the output channel grid (2, 4, 6 or 8 MHz), invert the spectrum and adapt
the output data ratio (1.725; 3.450; 5.175 and 6.900 MS/s).
☞
The next step is
the correction of
the attenuation in
0.5 dB – steps in
a range between
0 and 15.5 dB.
To store the
changed values
press „Parameter write“.
If the output data ratio is undervalued, all X-QAM twin x –
cards adapt the data ratio on the minimum requested value.
In the output you can set the type of modulation. The view
of the parameters of the X-QAM twin 3 differs in the
nonexistent “Options of channel A + B” – window.
7
3 Programming with HE programming software
3 Programming with HE programming software
If the output level of the adjacent channels is different,
each level can be adapted on the IF in a range between
-1 dB to +1 dB (0.1 dB – steps). This function is supported only via HE programming software and not possible
with the KC 3.
☞
If different types of modulation are chosen for channel A
and B, an automatically level adjustment is made for
each channel separately, based on 90 dBµV for QAM 64.
Examples:
Channel A:
Channel B:
QAM 64; level 90 dBµV → QAM 128; level 93 dBµV
Channel A:
Channel B:
QAM 64; level 90 dBµV → QAM 256; level 96 dBµV
The level will also be adapted automatically if the bandwidth of the output signal has been changed.
3.6
Setting the PID filter
3.7
The setting of PID filter is not supported by the X-QAM
twin 3. This function is only possible with the X-QAM twin
5 and X-QAM twin 6. The setting of the PID filter makes
possible the blocking of up to four services from the processed transport stream. You can filter out for example
Audio or Video PIDs of some programs. If you filter out a
Video PID, the Set-Top-Box will find the program, but it
can not show the picture. In the field “Transport Stream
Information” the TS-ID and ON-ID of the chosen transponder is displayed.
PID remapping
The X-QAM twin 5 and X-QAM twin 6 offer the option to
remap PIDs, this means to change the “name” of the PID.
The PIDs have to be inserted hexadecimal. If you type in
a “0000”, the PID remapping is deactivated.
3.8
Error messages
If errors appear during the operation of the plug-in card,
the error code is displayed in the field “card status”
8
3 Programming with HE programming software
3 Programming with HE programming software
After activating the OP-ID processing, the view of the parameters of the plug-in card will change as below:
With the button “Error info” you can display the meaning
of the error code. If a hardware error is displayed, please
contact our customer service.
3.9
Changing the Operator-ID
The X-QAM twin 5 and X-QAM twin 6 offer the option to
change the Operator-ID. Therefore you have to choose
“Options” → “Favoured plug-in cards” and then click on
“Extended card functions”. The following window opens:
Now you have the option to process the CAT with the
insertion of a CA – system – ID and an Operator – ID.
9
4 Basics of programming with KC 3
4
Basics of programming with the KC 3
4.1
Basics
4 Basics of programming with KC 3
The programming of the parameters is made via key-pad
or as stepwise change of pre-defined parameters with the
cursor keys ↑ and ↓.
After plugging the KC 3 handheld on the base unit, the
start menu appears. The software version is displayed.
Please give this number to our customer service if you
have questions regarding the plug-in card. To see this
menu later once again, you have to plug the KC 3 out and
in again. By pressing the cursor keys ← or → you get
into the menu for adjusting the parameters of the base
unit, and then to the
☞
Please note:
Input values must be complete!
4.2
Order of programming
Programming of the specific parameters of the card
1.
2.
which consists of 4 lines. You can switch between these
lines with the ↑ and ↓ keys.
3.
4.
Line 1:
OK
Line 2:
Line 3 / 4:
Choose the Plug-in card (line 1)
Type in the output parameters of the Plug-in card
(line 3/4)
Adjust the input parameters
Store the settings by pressing the
“OK/Store” button
Type of card, here X-QAM twin A/B Status
4.3
Choosing the input parameters
RF – output parameters
Store
After finishing the data input, the new parameters have to
be stored by pushing the “OK/Store” button. After pushing
this button, the parameters are saved.
10
5 Programming with KC 3
5
☞
5 Programming with KC 3
Programming with the KC 3
5.2
By pressing the cursor keys ↑ and ↓ you get to the
second line. Here you can type in the requested SAT –
IF – input parameters.
Please note:
With the KC 3 it is not possible to set PID filter, Operator
– IDs or to remap PIDs.
After choosing the slot (chapter 4), the programming of
the Plug-in card can begin.
5.1
Choosing parameters of the base unit / slot
5.1.1
Adjusting the bus address of the base unit
5.2.1
changes with the “OK / Store” – button.
☞
• Select line 3 with the cursor keys ↑ and ↓
• Adjust the bus address with the cursor keys
← or → in a range between 001 – 020, 241
View on KC 3
with X-5 twin
• Store changed addresses with „OK / Store“
Adjusting the SAT – IF – input frequency
Line 2:
Type in the SAT – IF via keypad or change the frequency
in 1 MHz steps with the cursor keys ← or →. Store the
If you connect several base units with the ASTRO bus
system, you have to make sure, that the connected base
units are adjusted on different bus addresses (delivery
state 241).
LNC-Power
XY-Input off
Adress
241
Adjusting the SAT input parameters
Please Note: Frequency range of the tuner between
950 MHz and 2150 MHz
The wrong input of the input frequency does not lead to an
error message. The frequency will be written in the plug-in
module after pressing the “OK/Store” button.
Then the tuner locks at the highest or lowest possible frequency, which definitely leads to a malfunction of the module.
Change to the next submenu with “Menü / Read” – button
5.1.2
03: Twin 6-A OK
SAT-Freq 1102 MHz
RFOut 113,0 MHz
Channel C4…S2
View on KC 3
with X-QAM twin 6
Choosing the slot
5.2.2
• Select line 1 with the cursor keys ↑ and ↓
Choosing the input
By pressing the cursor keys ↑ and ↓ you get to the
second line. With the “Menü / Read” – button you jump to
the submenu “SAT – input”. Here you can choose the
requested SAT – input with the cursor keys ← or → . By
pressing the “Menü / Read” – button you change to the
next submenu.
• Choose the required slot with the cursor
keys ← or →
11
5 Programming with KC 3
5.2.3
5 Programming with KC 3
Adjusting the symbol ratio
5.3.1
By pressing the cursor keys ↑ and ↓ you get to the
second line. With the “Menü / Read” – button you jump
to the submenu “symbol ratio”. Type in the transponder
symbol ratio via numerical keypad, or change the symbol
ratio with cursor keys ← or → in 0,01 MS steps. If the
symbol ratio is indicated with 3 decimal places, please
round off or round up mathematically.
The RF-output frequency can be adjusted in line three with
the input of the frequency value by keypad or with the stepwise change by cursor keys ← or → (100-kHz-steps).
☞
Example:
5,996 MS → 6,00 MS or 5,994 MS → 5,99 MS
The demodulator itself corrects this small difference.
5.2.4
Please note:
The adjusting of the output frequency should always be done
by choosing the channel in line 4. This makes sure that the
frequency is according to the corresponding channel grid.
Therefore the frequency in line 3 is changed automatically with
the changed output channel. The output channel can be changed with the cursor keys ← or →. The input will not be
checked, this means that a wrong input is stored after pushing
the “OK/Store” button without warning!
After finishing the data input, the new parameters have to be
stored by pushing the “OK/Store” button. After pushing this
button, the parameters are saved.
Adjusting the Viterbi ratio
5.3.2
By pressing the cursor keys ↑ and ↓ you get to the
second line. With the “Menü / Read” – button you jump
to the submenu “Viterbi”. Adjust the Viterbi ratio with the
cursor keys ← or →. By setting the Viterbi ratio on “Auto”,
the transmitted Viterbi ratio will be detected and adjusted
automatically.
5.3
Adjusting the RF output frequency
Adjusting the output data ratio
By pressing the cursor keys ↑ and ↓you get to the third
line. With the “Menü / Read” – button you jump to the submenu “DatRate”. Type in the QAM output data ratio via
numerical keypad. With the cursor keys ← or → you can
choose the following pre-programmed data ratios:
6,900
5,175
3,450
1,725
Adjusting the RF output parameters
By pressing the cursor keys ↑ and ↓ you get to the
third / fourth line. Here you can set the requested RF
output parameters.
MS
MS
MS
MS
compliant
compliant
compliant
compliant
to
to
to
to
8
6
4
2
MHz
MHz
MHz
MHz
channel
channel
channel
channel
bandwidth
bandwidth
bandwidth
bandwidth
If the chosen data ratio is too low, the output data ratio
adapts automatically on the lowest for the transmission
requested data ratio. By pressing the “Menü / Read” – button you change to the next submenu.
12
5 Programming with KC 3
5.3.3
5 Programming with KC 3
Change the output spectrum with cursor keys ← or →.
Changes have to be saved by pressing the “OK / Store”
– button. By pressing the “Menü / Read” – button you
change to the next submenu.
Adjusting the type of modulation
By pressing the cursor keys ↑ and ↓ you get to the third
line. With the “Menü / Read” – button you jump to the submenu “Modulat.”. Adjusting of the type of modulation is
done with the cursor keys ← or →. The following types of
modulation are possible:
16 QAM / 32 QAM / 64 QAM / 128 QAM / 256 QAM
5.3.6
After the input of the operating parameters, and the
saving of the parameters in the card with the “OK/Store”
button, you can make an operation check. In line 1 on the
right hand is displayed the state of the card. After choosing the third line and pushing the “Menü/Read” –button,
the actual error state is displayed.
If different types of modulation are chosen for channel A
and B, an automatically level adjustment is made for each
channel separately, based on 90 dBµV for QAM 64.
5.3.4
Switching-off the output signal
The error message 00000010 for example is displayed, if
there is no input signal. If there is any other error message, please contact our customer service.
By pressing the cursor keys ↑ and ↓ you get to the third
line. With the “Menü / Read” – button you get to the submenu “Output On / Off”.
Output Off: Modulator of the card is switched off
Output On: Modulator of the card is switched on
5.3.7
Level adjustment of the X-QAM x – card
By pushing the “Menü / Read” – button in the third line of
the display, you get to the level adjustment of the X-QAM
twin x – card. The attenuation can be set in a range between 0 to 15.5 dB in 0.5 dB – steps for both channels
with the cursor keys ← or →. The changes have to be
stored by pushing the “OK / Store” – button.
Switch the output signal with cursor keys ← or →. To save the
settings press the “OK / Store” – button. By pressing the
“Menü / Read” – button you change to the next submenu.
5.3.5
Error messages
Inverting the output spectrum
By pressing the cursor keys ↑ and ↓ you get to the third
line. With the “Menü / Read” – button you get to the submenu “Spectrum normal / invers”.
☞
Spectrum invers: output spectrum of the digital
signal inverted (inverted sideband)
Spectrum normal: output spectrum of the digital signal
normal (erect sideband)
13
Important note:
You should never compensate outgoing cable attenuation by different level adjustment of the plug-in card! To
do this, use the output coupler U-901 (order no.: 380 190)
or VZN 8 (order no.: 380 191).
6 Technical data
Typ
Order no.
QPSK-Demodulator:
Input Freq.-range
SAT IF input
Input level
Spectrum shape
Input data rate adjustable
[MHz]
[Ω]
[dBµV]
[%]
[MBaud]
Viterbi-Decodierung (DVB-Standard)
QAM-Modulator:
Modulation
Signal processing
Spectrum shape cos-roll-off
FEC
Data rate adjust
PCR-Correction
PID-Filterung
NIT-Handling
Output symbol rate
Bandwidth
Brutto data rate
HF output:
Connections
Frequency range
Output level
MER (Equalizer, 64 QAM)
Shoulder attenuation
Spurios frequency distance
40–862 MHz
>950 MHz
X-QAM twin 3
330 581
X-QAM twin 5
330 584
920 – 2150
F-jack, 75
50 – 80
35
10,0– 30,0
2,4– 30,0
X-QAM twin 6
330 585
1/2; 2/3; 3/4; 5/6; 7/8, automatic/manuel
[%]
[MBaud]
[MHz]
[MBits]
[Ω]
[MHz]
[dBµV]
[dB]
[dB]
[dB]
16-, 32-, 64-, 128-, 256-QAM (digital realization)
compliant to DVB-Standard
15
Reed-Solomon (204,188)-Code
✔
✔
✔
✔
–––
✔
–––
✔
dep. on input data ratio
3,45 – 6,9
dep. on input data ratio
4–8, depending on symbol ratio
dep. on input data ratio
ca. 13,8 … 55,2
✔
✔
✔
✔
IEC-Jacks, 75
47–862 (C2–C69) (1-MHz-steps adjustable)
80 … 96, adjustable
≥ 37
≥ 40
≥ 45
≥ 49
≥ 49
≥ 59
> 60 discrete disturbancies > 57 noise similar disturbancies
> 20 referred to 100 dBµV system level und 90 dBµV operation level
14
7 Short-overview of programming steps (KC 3)
Short-overview of programming steps
View of the configuration of the base unit might be different with another base unit
(here: X-5 twin)
Configuration of the base unit
X5 – Serie
Version x.xx
1 = deutsch
(next < > )
Configuration of the plug-in cards / output parameters (line 3 and 4)
03:Twin6 – B
OK
SAT-Freq 1353 MHz
RF-Out 121,0 MHz
Channel
S2…S3
X5 Setup
Menü / Read
Password
Off
03:Twin6 – B
OK
SAT-Freq 1353 MHz
DatRate 6,900 MS
Menü / Read
Menü / Read
or
X5 – Serie
Version x.xx
1 = deutsch
(next < > )
Menü / Read
03:Twin6 – B
OK
SAT-Freq 1353 MHz
Modulat. 64 QAM
03:Twin6 – B
OK
SAT-Freq 1353 MHz
Attenuat.
0,0 dB
LNC Power
XY Input Off
Address
241
Menü / Read
Configuration of the plug-in card / input parameter (line 2)
View of the plug-in card configuration might be different with another card
(here: X-QAM twin 6)
03:Twin6 – B
OK
SAT-Freq 1353 MHz
RF-Out 121,0 MHz
Channel
S2…S3
Menü / Read
Menü / Read
03:Twin6 – B
OK
SymRate 27,50 MS
RF-Out 121,0 MHz
Channel
S2…S3
Menü / Read
03:Twin6 – B
OK
SAT-Freq 1353 MHz
Error
00000010
03:Twin6 – B
OK
Input
X
RF-Out 121,0 MHz
Channel
S2…S3
Menü / Read
03:Twin6 – B
OK
SAT-Freq 1353 MHz
Output
On
03:Twin6 – B
OK
SAT-Freq 1353 MHz
Spectrum normal
Menü / Read
Menü / Read
Menü / Read
03:Twin6 – B
OK
Viterbi
3/4
RF-Out 121,0 MHz
Channel
S2…S3
Change values / settings via keypad / cursor keys ← or →.
Change the line with cursor keys ↑ and ↓.
15
82 350 450 03 / 06 GB
ASTRO Strobel
Kommunikationssysteme GmbH
Olefant 1–3
D-51427 Bergisch Gladbach (Bensberg)
Tel.: +49 (0 ) 22 04 / 4 05 - 0
Fax: +49 (0 ) 22 04 / 4 05 - 10
eMail: [email protected]
www.astro-kom.de