1
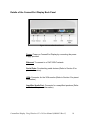
ConnectPort™ Display
Using Windows™ CE v5.0
User Manual
www.digi.com
©Digi International Inc. 2008. All Rights Reserved.
The Digi logo is a registered trademark of Digi International, Inc.
ConnectPort and ConnectPort Display are trademarks of Digi International, Inc.
Microsoft, Windows, Windows CE are trademarks of Microsoft corporation. All other
trademarks mentioned in this document are the property of their respective owners.
Information in this document is subject to change without notice and does not represent
a commitment on the part of Digi International. Digi provides this document “as is,”
without warranty of any kind, either expressed or implied, including, but not limited to,
the implied warranties of fitness or merchantability for a particular purpose. Digi may
make improvements and/or changes in this manual or in the product(s) and/or the
program(s) described in this manual at any time. This product could include technical
inaccuracies or typographical errors. Changes are periodically made to the information
herein; these changes may be incorporated in new editions of the publication.
ConnectPort Display Using Windows CE v5.0 User Manual (90000951 Rev C)
2
Digi Contact Information
Product information is available on the Digi website, www.digi.com, including:
Support Forums
Knowledge Base
Data sheets/product briefs
Application/solution guides
For more information about Digi products, or for customer service and technical support, contact Digi
International.
To Contact Digi International by:
Use:
Mail
Digi International
11001 Bren Road East
Minnetonka, MN 55343
U.S.A.
World Wide Web:
http://www.digi.com/support/
email
http://www.digi.com/support/
Telephone (U.S.)
(952) 912-3444 or (877) 912-3444
Telephone (other locations)
+1 (952) 912-3444 or (877) 912-3444
ConnectPort Display Using Windows CE v5.0 User Manual (90000951 Rev C)
3
Contents
1
Introduction
7
Product Overview
2
Details of the ConnectPort Display Front Panel
8
Details of the ConnectPort Display Back Panel
10
Getting Started
Initial Set Up
3
7
11
11
Configuring the ConnectPort Display
Viewing Control Panel Options
Configuring a Password
12
12
13
Setting the Date and Time
13
Configuring the System (Storage Memory and Program Memory)
Configuring a Device Name
13
Configuring Network Connections
Configuring Screen Resolution
13
14
Configuring Internet Explorer for the Windows XP User Agent
4
ConnectPort Display Features
Media Player 9
16
16
Connecting to a Shared Network Resource
Internet Explorer 6
5
15
16
Remote Desktop Connection
WordPad
13
16
17
17
Storing Files and Using USB Flash Drives
Storing Files on the ConnectPort Display
Using USB Flash Drives
18
18
19
ConnectPort Display Using Windows CE v5.0 User Manual (90000951 Rev C)
4
6
Hardware Specifications
Dimensions
20
Environmental
Pinouts
20
20
Power Requirements
7
20
23
Regulatory and Safety Information
24
Federal Communications Commision (FCC) Regulatory Information
(USA only) 24
FCC Regulation – Part 15 Declaration of Conformity (DOC)
24
Department of Communication (DOC) Notice (Canada only)
25
European Community – CE Mark Declaration of Conformity (DOC)
International EMC Standards
Safety Standards
25
26
27
Important Safety Information
28
ConnectPort Display Using Windows CE v5.0 User Manual (90000951 Rev C)
5
This page intentionally blank.
ConnectPort Display Using Windows CE v5.0 User Manual (90000951 Rev C)
6
1
Introduction
This chapter provides a brief overview of the ConnectPort
Display features.
Product Overview
Digi’s ConnectPort Display uses the Windows CE v5.0 operating
system. Together, they create an environment which supports the
following features:
•
•
•
•
•
•
Internet Explorer 6
Media Player 9
Remote Desktop Connection
Microsoft .NET Compact Framework 2.0
WordPad
PowerPoint Viewer
The unit provides a total of eight ports enabling the use of
additional peripherals such as a monitor, USB keyboard, USB
mouse, USB Flashdrive, microphone, headphones, Serial devices,
and speakers.
The ConnectPort Display uses an AU1200 MIPS-II based
processor with 128MB of RAM of which about 40MB is available for
user programs.
ConnectPort Display Using Windows CE v5.0 User Manual (90000951 Rev C)
7
Details of the ConnectPort Display Front Panel
Figure 1-ConnectPort Front Panel
System Status LED: Blinks green during normal operation.
Microphone: Not available at this time.
Unamplified Audio Port: Headphone or amplified speaker
connection.
Port Status LEDs: Not available at this time.
USB Ports: The two USB 2.0 ports are used for PC peripherals like
a keyboard, mouse, and USB Flash Drive.
Reset Button: Is used to either reboot or factory reset the
ConnectPort Display.
To reboot the ConnectPort Display, press and hold the Reset
Button until the System Status LED blinks amber. Then, release
the Reset Button. While the System Status LED is still blinking
amber, press and hold the Reset Button until the ConnectPort
Display reboots.
ConnectPort Display Using Windows CE v5.0 User Manual (90000951 Rev C)
8
To factory reset the ConnectPort Display, push and hold the Reset
Button while powering on the unit.
ConnectPort Display Using Windows CE v5.0 User Manual (90000951 Rev C)
9
Details of the ConnectPort Display Back Panel
Figure 2-ConnectPort Back Pamel
Power: Power on ConnectPort Display by connecting the power
supply provided.
Ethernet: To connect to a 10bT/100bT network.
Serial Ports: For attaching serial devices (Refer to Section 5 for
pinout information).
VGA: Connector for the VGA monitor (Refer to Section 5 for pinout
information).
Amplified Audio Port: Connector for unamplified speakers (Refer
to Section 5 for pinout information).
ConnectPort Display Using Windows CE v5.0 User Manual (90000951 Rev C)
10
2
Getting Started
This section provides the preliminary stages of setting up the
ConnectPort Display.
Initial Set Up
First, connect the monitor. Next, connect the Ethernet cable, USB
devices, Serial devices, and speakers as needed. Then, insert
power connector. After approximately 5 seconds, the System
Status LED on the front panel will blink green. Once the LED
begins blinking green, the Windows CE desktop will then display
approximately 10 seconds later (Refer to Figure 3).
Figure 3-Windows CE desktop display
ConnectPort Display Using Windows CE v5.0 User Manual (90000951 Rev C)
11
3
Configuring the ConnectPort Display
This chapter provides the information necessary to configure the
ConnectPort Display.
______________________________________________________________________
Viewing Control Panel Options
Figure 4-Control Panel
ConnectPort Display Using Windows CE v5.0 User Manual (90000951 Rev C)
12
Configuring a Password
From the Start menu select Settings Control Panel Password.
This brings up the Password Properties dialog box. Type in a
password and then confirm by re-typing the password. If the
passwords match, the Enable Password Protection will enable,
allowing the user to check At Power On. Check the At Power On
box and then click OK. The password is now saved and required
every time the unit powers on.
Setting the Date and Time
From the Start menu select Settings Control Panel Date/Time.
This brings up the Date/Time Properties dialog box. From here,
select the desired calendar date by clicking on the corresponding
date. The Current Time field requires both time and AM/PM entries
to be manually typed in. Next, the Time Zone provides multiple
selections for the specific area desired. Finally, click Apply to
update the time and date.
Configuring the System (Storage Memory and Program Memory)
From the Start menu select Settings Control Panel System.
This brings up the System Properties dialog box. The Memory tab
is used when determining how much of the ConnectPort Display’s
memory will be allocated for storage and running programs.
Configuring a Device Name
From the Start menu select Settings Control Panel System.
This brings up the System Properties dialog box. Next, select the
Device Name tab. These settings are used to identify the
ConnectPort Display to other computers.
Configuring Network Connections
From the Start menu select Settings Control Panel Network
and Dial-up Connections. Then select the LAN911X icon. This
brings up the “LAN911X Ethernet Driver” Settings dialog box where
the IP Address is configured.
ConnectPort Display Using Windows CE v5.0 User Manual (90000951 Rev C)
13
Configuring Screen Resolution
From the Start menu select Programs Command Prompt. At the
command prompt type the command “setdisplay.” This displays the
supported screen resolution settings (Refer to Figure 5).
Figure 5-Changing Screen Resolution
For example, the following command will configure the ConnectPort
display for a 1280 x 1024 screen resolution:
setdisplay 1280 1024
ConnectPort Display Using Windows CE v5.0 User Manual (90000951 Rev C)
14
Configuring Internet Explorer for the Windows XP User Agent
Start Internet Explorer. From the View menu select Internet
Options. This brings up the Internet Options dialog box. From the
User Agent drop down box, select Same as Windows XP. Click OK
to exit the dialog box.
ConnectPort Display Using Windows CE v5.0 User Manual (90000951 Rev C)
15
4
ConnectPort Display Features
This section lists the features of the ConnectPort Display and, when
necessary, provides a brief comment or insight to that particular
feature.
Media Player 9
Windows Media Player 9 is used for playing audio, video and
viewing images. The ConnectPort Display supports MPEG 2, MP3,
and WAV file formats.
Remote Desktop Connection
This allows the CnnectPort Display to remotely control a PC on the
Network.
From the Start menu select Programs Command Prompt. Then,
at the “\>” prompt, type the following example to connect to a target
PC with IP address 192.168.0.2:
cetsc /v:192.168.0.2
Connecting to a Shared Network Resource
This allows the ConnectPort Display to share files with other
devices on the network.
From the Start menu select Programs Windows Explorer. In the
Address field enter something like the following (where “testpc1” is
the name of the shared device on the network):
\\testpc1
ConnectPort Display Using Windows CE v5.0 User Manual (90000951 Rev C)
16
Internet Explorer 6
Microsoft’s popular Web browser is included and there is a
short-cut provided on the Desktop.
WordPad
WordPad, a simple word processor, is also included.
ConnectPort Display Using Windows CE v5.0 User Manual (90000951 Rev C)
17
5
Storing Files and Using
USB Flash Drives
This section provides details on how to store files on the
ConnectPort Display and use files from attached USB
Flash Drives.
Storing Files on the ConnectPort Display
The ConnectPort Display stores files locally in two different
locations. One location is called “System Flash” and the other is
called “User Flash.” Both may be accessed by double-clicking the
My Device icon located on the Desktop (Refer to Figure 6).
The User Flash provides 1GB of non-volatile storage and the
smaller System Flash is where the ConnectPort Display stores
system information including the Registry and Desktop.
Figure 6-Contents of My Device Folder
ConnectPort Display Using Windows CE v5.0 User Manual (90000951 Rev C)
18
Using USB Flash Drives
USB Flash Drives can be used by attaching them to the front panel
of the ConnectPort Display. Once connected, they can be
accessed by double-clicking on the My Device icon located on the
Desktop.
ConnectPort Display Using Windows CE v5.0 User Manual (90000951 Rev C)
19
6
Hardware Specifications
This section provides the physical dimensions, environmental,
pinouts, and power requirements of the ConnectPort Display.
Dimensions
Length: 4.35 in (11.05 cm)
Width: 7.20 in (18.29 cm)
Height: 1.03 in (2.61 cm)
Weight: 10.00 oz. (311.00 g)
Environmental
Operating temperature: 32o F to 131o F (0o C to 55o C)
Relative humidity: 0% to 95% (non-condensing)
Pinouts
Serial Port 1 Pinouts
Pin Number
EIA-232 Signal
1
DCD
2
RxD
3
TxD
4
DTR
5
GND
6
DSR
7
RTS
ConnectPort Display Using Windows CE v5.0 User Manual (90000951 Rev C)
20
8
CTS
9
RI
Serial Port 2 Pinouts
Pin Number
EIA-232 Signal
1
N/C
2
N/C
3
CGND
4
TxD
5
RxD
6
GND
7
N/C
8
N/C
Video Port DB15 Pinouts
Pin Number
VGA Signal
1
RED
2
GREEN
3
BLUE
4
ID2
5
DDC_GND
6
RED_GND
7
GREEN_GND
ConnectPort Display Using Windows CE v5.0 User Manual (90000951 Rev C)
21
8
BLUD_GND
8
DDC_+5V
10
SYNC_GND
11
ID0
12
DDC_SDA (ID1)
13
HSYN
14
VSYN
15
DDC_SCL (ID3)
Amplified Speaker Port (Audio)
Where Pin 1 is the right-most pin on the connector, and Pin 4 the left-most.
Pin Number
Signal
1
Right +
2
Right -
3
Left -
4
Left +
Amplified Speaker Port (Audio) Watts per Channel
Speakers
Watts Per Channel
8Ω
1.4
4Ω
2.1
ConnectPort Display Using Windows CE v5.0 User Manual (90000951 Rev C)
22
Power Requirements
The ConnectPort Display uses a 120/230VAC 50/60Hz power
adapter that supplies 5VDC to the unit. It is recommended that
only the enclosed power supply be used with ConnectPort Display.
However, power to the ConnectPort Display may be supplied by a
UL Listed Direct Plug-In Power Unit or Information Technology
Equipment Rated Power Unit rated 5VDC, at least 2.9 A if used in
the U.S. and Canada or a power supply with similar rating and
approved by your local safety code if it is used elsewhere. For
polarity, see the following diagram:
ConnectPort Display Using Windows CE v5.0 User Manual (90000951 Rev C)
23
7
Regulatory and Safety Information
Federal Communications Commission (FCC) Regulatory
Information (USA only)
This equipment has been tested and found to comply with the limits
for a Class B digital device, pursuant to Part 15 of the FCC Rules.
These limits are designed to provide reasonable protection against
harmful interference in a residential installation. This equipment
generates, uses, and can radiate radio frequency energy and, if not
installed and used in accordance with the instructions, may cause
harmful interference to radio communications. However, there is no
guarantee that interference will not occur in a particular installation.
If this equipment does cause harmful interference to radio or
television reception, which can be determined by turning the
equipment off and on, the user is encouraged to correct the
interference by one or more of the following measures:
•
•
•
Increase the separation between the equipment
and the receiver.
Connect the equipment into an outlet that is on a
circuit different from the receiver.
Consult the dealer for help.
Warning: The connection of a non-shielded interface cable to
this equipment will invalidate the FCC Certification for this
device.
FCC Regulation - Part 15 Declaration of Conformity (DOC)
ConnectPort Display Using Windows CE v5.0 User Manual (90000951 Rev C)
24
This device complies with the requirements of the Code of Federal
Regulations listed below:
FCC Title 47 CFR, Part 15 Class B for a digital device.
Operation is subject to the following two conditions:
•
This device may not cause harmful interference,
and
•
This device must accept any interference received,
including interference that may cause undesired
operation.
Department of Communication (DOC) Notice (Canada only)
This Class B digital apparatus meets the requirements of the
Canadian Interference- Causing Equipment Regulations.
Cet appareil numerique de la Classe B respecte toutes les
exigences du Reglement sur le materiel brouiller du Canada
European Community - CE Mark Declaration of Conformity
(DOC)
According to ISO/IEC Guide 22 and EN 45014
Manufacturer's Name:
Digi International
Corporate Headquarters:
11001 Bren Road East
Minnetonka MN 55343
Manufacturing Headquarters:
10000 West 76th Street
Eden Prairie MN 55344
Digi International declares, that the product:
Product Name:
ConnectPort Display
Model Numbers:
50001323-xx
50001333-xx
ConnectPort Display Using Windows CE v5.0 User Manual (90000951 Rev C)
25
50001334-xx
50001335-xx
conforms to the relevant EU Directives listed here:
•
EMC Directive 2004/108/EC|
•
Low Voltage Directive 2006/95/EC
•
R&TTE 1999/5/EC
using the relevant section of the following EU standards and other
normative documents:
International EMC Standards
Immunity
•
•
•
EN55024 (1998+A1,A2)
EN61000-3-2(2000+A2)
EN61000-3-3(1995+A1,A2)
Emissions
•
•
EN55022 Class B(2006)
CISPR22
Safety
•
•
IEC 950
EN 60950 (2001)
EN61000-3-3: 1995, EN61000-3-2: 2000 and EN55024: 1998
Test
Electrostatic Discharge
Specification
EN61000-4-2
Requirement
+/-2kV, 4kV contact, indirect
+/-2kV, 4kV, 8kV air
Radiated Immunity
EN61000-4-3
80 MHz to 1000 MHz at 3 V/m
Electrical Fast Transient
Burst Immunity
EN61000-4-4
+/-1kV (A/C), +/-0.5kV (I/O)
ConnectPort Display Using Windows CE v5.0 User Manual (90000951 Rev C)
26
Surge Immunity
EN61000-4-5
+/-0.5kV, 1kV, 2kV common mode and
differential mode on power lines
Conducted Immunity
EN61000-4-6
0.15 MHz to 80 MHz at 3Vrms
Magnetic Immunity
EN61000-4-8
1 A/m Not Applicable
Voltage Dips & Interrupts
EN61000-4-11
>95% at 10ms, 30% at 500ms, & >95%
at 5sec reduction of rated voltage
Quasi-Stationary Current Harmonics
Test 230V at 50Hz, 39th Odd Harmonics
and 40th Even harmonics
EN55022 Class B (1994 w/A1: 1995 & A2: 1997)
Test
Specification
EN55022
1
Radiated Emissions
Conducted Emissions
1
Requirement
Class B
CISPR 22
Class B
This product has been tested with shielded cables.
Use shielded cable or unshielded cable with snapon ferrite, such as Fair-Rite Part#:0461164281 or
similar, to ensure continued compliance with Class
B emission limits. Unshielded cable without ferrite
may be used for Class A limits.
Safety Standards
This device complies with the requirements of following safety
standards below:
•
UL 1950, 3rd edition
•
CSA No. 950
ConnectPort Display Using Windows CE v5.0 User Manual (90000951 Rev C)
27
Important Safety Information
•
•
•
•
•
•
•
•
•
•
•
•
To avoid contact with electrical current:
Never install electrical wiring during an electrical
storm.
Never install an Ethernet connection in wet
locations unless that connector is specifically
designed for wet locations.
Use caution when installing or modifying Ethernet
lines.
Use a screwdriver and other tools with insulated
handles.
You and those around you should wear safety
glasses or goggles.
Do not place Ethernet wiring or connections in any
conduit, outlet or junction box containing electrical
wiring.
Installation of inside wire may bring you close to
electrical wire, conduit, terminals and other electrical
facilities. Extreme caution must be used to avoid
electrical shock from such facilities. You must avoid
contact with all such facilities.
Ethernet wiring must be at least 6 feet from bare
power wiring or lightning rods and associated wires,
and at least 6 inches from other wire (antenna
wires, doorbell wires, wires from transformers to
neon signs), steam or hot water pipes, and heating
ducts.
Do not place an Ethernet connection where it would
allow a person to use an Ethernet device while in a
bathtub, shower, swimming pool, or similar
hazardous location.
Protectors and grounding wire placed by the
service provider must not be connected to,
removed, or modified by the customer.
Do not touch uninsulated Ethernet wiring if lightning
is likely!
ConnectPort Display Using Windows CE v5.0 User Manual (90000951 Rev C)
28
•
External Wiring: Any external communications
wiring you may install needs to be constructed to all
relevant electrical codes. In the United States this is
the National Electrical Code Article 800. Contact a
licensed electrician for details.
ConnectPort Display models may contain a lithium button cell
CR2032. There is a risk of explosion if the battery is replaced by an
incorrect type. Dispose of used batteries according to instructions
included with the replacement battery, or return them to a recycling
center. Do not incinerate. Digi International assumes no liability for
the end user’s attempt to make changes to the ConnectPort
Display, including those that require opening the enclosure.
China RoHS statement:
The Table of Toxic and Hazardous Substances/Elements and their Content shall apply to any product covered by
this manual and labeled with the following symbol:
The Table of Toxic and Hazardous Substances/Elements and their Content
as required by China’s Management Methods for the Control of Pollution from Electronic Information Products
Toxic and Hazardous Substances or Elements
Part Name
Lead
(Pb)
Mercury
(Hg)
(部件名称)
301-1002-08
(铅)
X
(汞)
O
(有毒有害物
有毒有害物质
有毒有害物质或元素)
或元素
Hexavalent Polybrominated
Cadmium Chromium
biphenyls
(Cd)
(Cr (VI))
(PBB)
(镉)
O
(六价铬)
O
(多溴联苯)
O
Polybrominated
diphenyl ethers
(PBDE)
(多溴二苯醚)
O
O: Indicates that this toxic or hazardous substance contained in all of the homogeneous materials for this
part is below the limit requirement in SJ/T 11363-2006.
表示该有毒有害物质在该部件所有均质材料中的含量均在SJ/T11363-2006 标准规定的限量要求以下.
X: Indicates that this toxic or hazardous substance contained in at least one of the homogeneous
materials used for this part is above the limit requirement in SJ/T 11363-2006.
示该有毒有害物质至少在该部件的某一均质材料中的含量超出SJ/T11363-2006 标准规定的限量要求.
ConnectPort Display Using Windows CE v5.0 User Manual (90000951 Rev C)
29
ConnectPort Display Using Windows CE v5.0 User Manual (90000951 Rev C)
30