1
Océ User Manual
Océ PRISMAsatellite for ERP
Application guide
Copyright
© 2009 Océ
All rights reserved. No part of this work may be reproduced, copied, adapted, or transmitted
in any form or by any means without written permission from Océ.
Océ makes no representation or warranties with respect to the contents hereof and specifically disclaims any implied warranties of merchantability or fitness for any particular purpose.
Further, Océ reserves the right to revise this publication and to make changes from time
to time in the content hereof without obligation to notify any person of such revision or
changes.
Edition: 2.0
Trademarks
Trademarks
Trademarks
All trademarks of third parties mentioned in this on-line help are the exclusive property
of the respective parties and are hereby respected by Océ-Technologies B.V.
Océ-Technologies B.V. makes no representation or warranties with respect to the contents
hereof and specifically disclaims any implied warranties of merchantability or fitness for
any particular purpose.
3
Contents
Contents
Chapter 1
Introduction.........................................................................................................9
Introduction...............................................................................................10
What is Océ PRISMAsatellite for ERP.....................................................11
The concept of Océ PRISMAsatellite for ERP.........................................14
Océ PRISMAsatellite for ERP users.........................................................19
Introduction to the Console Window......................................................21
Start Océ PRISMAsatellite for ERP Console...........................................23
Quit Océ PRISMAsatellite for ERP Console............................................24
Chapter 2
Job management..............................................................................................25
Job Management.....................................................................................26
Change the job properties.......................................................................27
Change the print order.............................................................................28
Use the Form attribute.............................................................................29
Deleting One or More Jobs.....................................................................31
Scheduling a Job......................................................................................32
Suspending One or More Jobs...............................................................33
Reprinting a Retained Job.......................................................................34
Restarting an Interrupted Job.................................................................35
Viewing a Job...........................................................................................36
Redirecting One or More Jobs................................................................38
Redirecting a Device................................................................................39
Chapter 3
The Console Window.......................................................................................41
The Console Window...............................................................................42
The File Menu...........................................................................................43
Hosts Properties.................................................................................43
Queues Properties..............................................................................44
Devices Properties..............................................................................45
Input Channel Properties...................................................................47
Backup.................................................................................................48
The View Menu.........................................................................................53
Jobs.....................................................................................................53
Queues................................................................................................54
Device notification window...............................................................55
Job Store.............................................................................................56
Error Jobs............................................................................................57
4
Contents
Job logging.........................................................................................58
Adjust Time Ruler...............................................................................59
Filter job views....................................................................................60
Goto.....................................................................................................62
Refresh................................................................................................63
Status Bar............................................................................................64
Window Titles.....................................................................................65
Confirm Drag and Drop......................................................................66
The Job Menu...........................................................................................67
Suspend..............................................................................................67
Resume................................................................................................68
Move to Top........................................................................................69
Redirect...............................................................................................70
Activate................................................................................................71
Restart.................................................................................................72
View Document..................................................................................73
Print.....................................................................................................74
Print with options...............................................................................75
Delete...................................................................................................76
Properties............................................................................................77
The Queue Menu......................................................................................78
Hold.....................................................................................................78
Release................................................................................................79
Spoolin On..........................................................................................80
Spoolin Off..........................................................................................81
Properties............................................................................................82
The Device Menu......................................................................................83
Form....................................................................................................83
Spoolout on........................................................................................84
Spoolout off........................................................................................85
Redirect...............................................................................................86
Backup devices...................................................................................87
Media Mapping...................................................................................89
Tray Mapping......................................................................................90
Devices Properties..............................................................................92
The Job Store Menu................................................................................94
Creating a New Job Store Folder......................................................94
Renaming a Job Store Folder............................................................95
Enable / disable a Volume.................................................................96
Printing a Job Store Folder................................................................97
Print a Job store folder with options................................................98
View the properties of jobs in the Job store....................................99
Delete a Job store folder..................................................................100
Volume properties............................................................................101
5
Contents
Folder Properties..............................................................................102
Chapter 4
The Job Ticket Editor.....................................................................................103
The Job ticket editor..............................................................................104
The Basic Tab.........................................................................................105
The Scheduling tab................................................................................108
The Output Settings tab.........................................................................110
The Processing tab.................................................................................113
The Advanced tab..................................................................................114
The Custom tab......................................................................................117
The Fax/Mail tab.....................................................................................119
The Overview tab...................................................................................121
Chapter 5
The Job Store..................................................................................................123
The Job store pane................................................................................124
Print jobs from the Job store................................................................126
Print with options...................................................................................127
Printing a Job Store Folder...................................................................128
Print a Job store folder with options....................................................129
View jobs from a job store folder.........................................................130
Delete print jobs from a Job store folder.............................................131
Renaming a Job Store Folder...............................................................132
Creating a New Job Store Folder..........................................................133
Delete a Job store folder.......................................................................134
Move a Job store folder.........................................................................135
Move print jobs between Job store folders.........................................136
Redirect print jobs..................................................................................137
Volume properties..................................................................................138
Folder Properties....................................................................................139
Chapter 6
Additional information...................................................................................141
Job States...............................................................................................142
Glossary..................................................................................................143
Chapter 7
Hidden..............................................................................................................149
The PCL viewer window........................................................................150
The Schedule Pane tab..........................................................................151
The Device Colors tab............................................................................152
The Window Background tab................................................................153
Adjust Date/Time....................................................................................154
Error message........................................................................................155
Printing instructions...............................................................................156
6
Contents
Storing rules...........................................................................................160
7
Contents
8
Chapter 1
Introduction
Introduction
Introduction
Introduction
Welcome to Océ PRISMAsatellite for ERP. Océ PRISMAsatellite for ERP Console gives
you full control over your print jobs and printers. The user interface feature provides
configurable window management and is highly customizable to your needs.
The online help of Océ PRISMAsatellite for ERP Console provides all the necessary information about the interface and how to use the various options.
Topics
This introduction chapter includes the following topics:
- the concept of Océ PRISMAsatellite for ERP
- the users of the Océ PRISMAsatellite for ERP interfaces
- the basics of Océ PRISMAsatellite for ERP Console.
10
Chapter 1 - Introduction
What is Océ PRISMAsatellite for ERP
What is Océ PRISMAsatellite for ERP
Introduction
Océ PRISMAsatellite for ERP is a sophisticated Output Management System. Océ
PRISMAsatellite for ERP enables you to connect a variety of computer systems to one
or more Océ printers, as well as printers made by other manufacturers. Print jobs sent to
Océ PRISMAsatellite for ERP are recognized, and can be processed before they are sent
to a printer. This processing may be necessary to send a print job to a certain printer, but
it may also influence the way a print job is printed.
As a distributed Output Management System, Océ PRISMAsatellite for ERP collects
data from different host systems and can automatically handle the entire print process
including data transformation and rendering to printers.
Jobs are accepted via an Input channel.
■ BSD input channels accept data from legacy system using a LPR client.
■ Office input channels accept jobs from windows applications.
■ Océ PRISMAsatellite for ERP is also accessible via a raw TCP/IP connection just like
a printer.
■ Files can also be dropped in a specified Hot folder. Océ PRISMAsatellite for ERP will
create jobs from every file found in that directory.
Océ PRISMAsatellite for ERP, equipped with the interface software for SAP systems, is
a perfect match for SAP systems. The SAP package allows you to submit and track print
jobs from SAP systems to Océ PRISMAsatellite for ERP servers.
Océ PRISMAsatellite for ERP runs on:
■ Windows XP Professional
■ Windows 2000 Server
■ Windows 2003 Server
■ Windows 2008 server (32 bits)
■ Windows 2003 server on VMware ESX Server3
■ It can also run on a set of connected Windows 2000 / 2003 / 2008 systems.
Ease of management is provided with a single point of administration, as well as with a
single view on the entire realm. The use of several systems makes Océ PRISMAsatellite
for ERP a scalable configuration. Different roles can be assigned to each host. One system
can be dedicated to run an electronic-form application while another system can be dedicated to generate the printer output data. It also allows a higher availability of the total
output management system. While one system is in for maintenance, the print service
can continue on another system.
Apart from a printer device, you can also specify a fax, an E-mail output device or a Job
store.
Chapter 1 - Introduction
11
What is Océ PRISMAsatellite for ERP
The fax output support is based on the RightFax server to take care of the actual delivery
of faxes. Océ PRISMAsatellite for ERP will deliver the output document to the RightFax
server instead of to a physical printer. This is done at the very end of the data flow, which
means that all options available for other devices are also available for Fax output. This
includes Input channels, recognition, splitting and data processing.
The Mail output channel is based on an SMTP server to take care of the actual delivery
of Emails. The Océ PRISMAsatellite for ERP server has to be able to contact this SMTP
server. Océ PRISMAsatellite for ERP can retrieve a recipient mail address and/or fax
number based on its name.Océ PRISMAsatellite for ERP will deliver the output documents
to the SMTP server instead of to a physical printer. This is done at the very end of the
data flow, which means that all the options available for devices are also available for Mail
output. This includes Input channels, Recognition, splitting and data processing
Jobs can be processed automatically without operator intervention, or they can be put in
the job store automatically, waiting for the operator to define the processing. The Job
store contains volumes distributed on different hosts. Volumes contain folders and folders
contain print jobs and/or other folders.
Jobs are processed according to pre-defined flows.
There are two ways to pre-define job flows:
■ Compatibility mode
The processing steps are defined with the Administrator interface to identify jobs and
process them.
If the job flows are complex, it can be difficult for the Administrator to keep a clear
overview of the processing steps.
■ Output process workflow
The concept of output process workflow is introduced in Océ PRISMAsatellite for
ERP 2.0.
With the output process workflow, the job flows are defined as a sequence of steps.
The execution of steps can be controlled by defining conditions. The definition in
steps presents a clear overview of the entire job flow for Administrators.
The purpose of Océ PRISMAsatellite for ERP
The main purpose of the output management system is:
■ to provide job control and job flow management.
■ to improve the productivity of the attached printers by concentrating and streamlining
print jobs from multiple host connections.
■ to improve the applicability of the attached printers by providing for additional print
job processing.
12
Chapter 1 - Introduction
What is Océ PRISMAsatellite for ERP
Further, Océ PRISMAsatellite for ERP enables you to change job attributes of the received
jobs. The job attributes are saved in a Job ticket, and can be changed with the Job ticket
editor. Examples of attributes which can be changed are:
■ the paper input tray of a printer
■ the schedule of the print jobs
■ the duplex print mode.
Chapter 1 - Introduction
13
The concept of Océ PRISMAsatellite for ERP
The concept of Océ PRISMAsatellite for ERP
Introduction
This topic describes the functional modules of Océ PRISMAsatellite for ERP. Further
the data flow of print jobs is described. For a good understanding of the concept, the
definition of a job ticket, and a print job, is given at front.
Job ticket
A job ticket contains the process and print instructions of the associated data file.
Print job
A print job is the association of the data file to be printed and a job ticket.
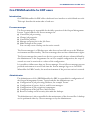
Océ PRISMAsatellite for ERP is designed to be an automatic Output Management System,
it can be configured to handle documents received and print them without any human
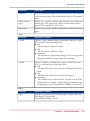
intervention. The job flow within Océ PRISMAsatellite for ERP is shown in the illustration
below.
custom
Input
Channels
Document Processing
Socket
Other
printers
Converters
FormScape
Océ
printers
JetForm
SAP
4
3
1
Office
E-mail
1 555 234 - 75 - 88
Job
Job
Job
Legacy
Job
job
submission
Output
Controllers
Job Queues
Fax
2
5
Hot folder
Job
Recognition
Distributed
Configuration
DB
Distributed
Job Store
Interfaces
Viewer
Process Manager
Console
Administrator
[1] The concept of Océ PRISMAsatellite for ERP
Job flow
Jobs are processed according to pre-defined flows.
There are two ways to pre-define job flows:
14
Chapter 1 - Introduction
Programmer
Core
Services
The concept of Océ PRISMAsatellite for ERP
■
■
Compatibility mode
The processing steps are defined with the Administrator interface to identify jobs and
process them.
If the job flows are complex, it can be difficult for the Administrator to keep a clear
overview of the processing steps.
Output process workflow
The concept of output process workflow is introduced in Océ PRISMAsatellite for
ERP 2.0.
With the output process workflow, the job flows are defined as a sequence of steps.
The execution of steps can be controlled by defining conditions. The definition in
steps presents a clear overview of the entire job flow for Administrators.
In compatibility mode, a typical print job goes through four stages:
Stages of compatibility mode#
Stage
Description
1 Input
Jobs are created by an Input Channel. At creation time of the
job, the information available to the input channel (for example
job name and user name) is stored in the job ticket. These job
attributes can be used for further job processing.
After a job is accepted, the first process step is 'RECOGNITION'.
2 Recognition
The Job Recognition module defines the process steps for the
job(s). The job data and the job ticket are analyzed to define
the final job ticket. The Recognition Module is based on the
SIF (Separation Instruction File) and the ART (Association
Rules Table). Incoming data may be processed before recognition starts.
During this step, one submitted job may lead to several jobs in
Océ PRISMAsatellite for ERP. Submitted data may be split
into several jobs and may be processed several times.
If a document processing module needs to be activated for the
job, the job state changes to 'DATA_PROCESSING'.
Chapter 1 - Introduction
15
The concept of Océ PRISMAsatellite for ERP
Stage
Description
3 Processing
If needed one or several Document Processing modules, for
example FormScape or Accelio, are called in order to generate
the document to be printed. A Document Processing module
can be accessed over the network, and can handle jobs in parallel.
When all needed Document Processing modules are ready with
the job, the job state is changed to 'WAIT'.
Note:
Multi processing allows you to specify multiple outputs
for one incoming job.
4 Output
The print jobs are generated and sent to an output device. The
output controller also detects the state of the output device and
provides for error recovery.
Note:
Apart from a printer device, you can also specify a fax,
email output device, custom defined devices or a Job
store.
Note:
Post processing linked to the Output channel provides
data handling on the fly while sending data to the output device.
In the output process workflow, a print job goes through the following stages:
Stages of output process workflow#
16
Stage
Description
1 Input
Jobs are created by an Input Channel. At creation time of the
job, the information available to the input channel (for example
job name and user name) is stored in the job ticket. These job
attributes can be used for further job processing.
Chapter 1 - Introduction
The concept of Océ PRISMAsatellite for ERP
Stage
Description
2 Execution
The output process workflow, which is assigned to the input
queue, is executed.
An output process workflow consists of four phases:
■ The modification phase
The incoming data can be transformed. For example, you
can use an input filter or a TRF.
■ The creation phase
Certain data can be extracted from the data flow. Data can
also be split. For example, you can use SIF objects.
■ The preparation phase
This phase can enhance data by applying e-Form application.
■ The distribution phase.
This phase delivers documents to the suitable output device.
These phases are executed in a sequence of steps. The steps can
be executed under certain conditions. The conditions are
equivalent to the ART concept but are now available for every
step.
Interfaces
The three interfaces, Console, Administrator, and Programmer, provide for control of
the system on three different user levels.
Several forms of the Console are available:
■ Native console:
The native console is started locally on the Océ PRISMAsatellite for ERP server. The
user can connect to the server via a local log in, or via a Windows Desktop Remote
Connection.
■ Remote console:
The remote console is started from a client host. Remote console software must be
installed on the client to connect to the Océ PRISMAsatellite for ERP server. After
authentication, the user has remote access to most of the features of the native console.
Both the client and the Océ PRISMAsatellite for ERP server must be in the same
network.
■ Web console:
After authentication, the user has remote access to queues, devices, jobs and job store.
The level of details is less than for the native or remote console.
Chapter 1 - Introduction
17
The concept of Océ PRISMAsatellite for ERP
Input Channels
An Input Channel collects the data and creates print jobs. Several data streams can be
received in parallel. Input channels are independent of the job format.
The following channel types can be configured:
Channel types#
Type
Description
SAP
The SAP input channel offers the job submission and tracking
from a SAP application.
Office
The Office input channel offers Windows users an access to
printers in the network. Printers can be shared. Documents sent
to such a printer will be routed via Océ PRISMAsatellite for
ERP.
Raw Socket
Accepts data over a configurable socket port number and generates a job in Océ PRISMAsatellite for ERP. It simulates a PJL
printer: each application generating data for a PJL printer can
be connected to it.
Legacy
The Legacy input channel offers a print interface to any mainframe or Unix platform. The interface is based on the BSD-lpd
standard protocol (RFC 1179). Operating systems like MVS,
AIX, and HP-UX all support BSD-lpd spooling.
Hot folder
Files can be dropped in a specified Hot folder. Océ PRISMAsatellite for ERP will create jobs from every file found in
that folder.
Job queue
A job queue is a collection of print jobs that wait to be processed. One job queue can
service one or more devices. A multi device queue offers load balancing.
18
Chapter 1 - Introduction
Océ PRISMAsatellite for ERP users
Océ PRISMAsatellite for ERP users
Introduction
Océ PRISMAsatellite for ERP offers a dedicated user interface to each defined user role.
This topic describes the main tasks of each user.
Process manager
The Process manager is responsible for the daily operation of the Output Management
System. Typical tasks for the Process manager are:
■ Control the job processing.
■ Change job properties.
■ Control the job flow.
■ Manage and print jobs in the Job Store.
■ Make backups of the system.
You can only create a backup via the native console.
The Process manager is a Windows user who does not have full access to the Windows
environment and functionality. The Process manager does not have Administrator rights.
The Process manager has control over devices, queues and job store volumes defined by
the Administrator or the Programmer. In case of a complex configuration, the scope of
control can even be restricted to a subset of the configuration.
It is possible to define more then one Process manager. For each Process manager an own
personal environment is saved. Each time the Process manager logs on to Océ PRISMAsatellite for ERP Console, the saved environment of the previous session is restored.
Administrator
The Administrator of Océ PRISMAsatellite for ERP is responsible for configuration of
the Output Management System. Typical tasks for the Administrator are:
■ Configuration of job processing attributes, for example 'Forms'.
■ Configuration of queues, devices, and Process managers.
■ Configuration of job recognition components.
■ Configuration of the Job Store, Mail and Fax.
■ Restore a backup and if necessary also make the backups.
The Administrator is also responsible for the maintenance of the Account files. A backup
can be performed either by a Process manager or by the Administrator.
Chapter 1 - Introduction
19
Océ PRISMAsatellite for ERP users
programr
The Programmer of Océ PRISMAsatellite for ERP is responsible for the installation and
programming of the Output Management System. The Programmer configures the
needed hosts, input channels and processing objects.
The tasks of the Programmer are carried out by your local Océ Consultant.
20
Chapter 1 - Introduction
Introduction to the Console Window
Introduction to the Console Window
Introduction
The Console interface of Océ PRISMAsatellite for ERP enables you to:
■ manage the print jobs
■ manage folders and print jobs stored into the job store
■ manage the printers and queues assigned to you by the Administrator of the system.
Several views are available. Each view focused on one aspect of Océ PRISMAsatellite
for ERP management. A specific view gives a global overview of the state of the jobs,
queues and printers.
You can easily view the occupation rate of the queues so you can plan the print jobs
for the next hours or even days. You can easily determine when resources are free and
which resources need manual intervention.
The window of Océ PRISMAsatellite for ERP Console consists of the following parts:
Océ PRISMAsatellite for ERP Console parts#
Contents
Quantity or function
Title bar
The title bar shows the name of the application and enables you
to minimize, maximize and close the application.
Menu bar
The menu bar provides access to all actions and options of the
application.
Toolbar
The toolbar is adapted depending on the current view in order
to quickly access the mostly used actions.
Navigation pane
Allows quick access to the individual panes.
Note:
You change the order of the items in this pane. Use
drag and drop to reorder the items.
'Jobs' pane
Shows all the available jobs in a list.
Note:
Multiple selection is possible here.
Chapter 1 - Introduction
21
Introduction to the Console Window
Contents
Quantity or function
'Queues' pane
Shows the available queues:
■ Schedule
■ Jobs in preprocessing
■ Queuedjobs
■ Retained jobs
'Devices' pane
Shows the devices which are attached to the queue selected in
the 'Queues' pane.
Note:
Multiple selection is possible here.
22
'Job Store'
Shows the available Job store volumes and Job store folders. It
also shows the Schedule pane.
'Schedule' pane
Shows only the jobs ready to be printed in the order the jobs
will be printed. The jobs shown here reside in the queues shown
in the 'Queues' pane.
'Jobs in Pre-processing' pane
Shows the jobs, for the selected queue, that are in recognition
or are in process by a Document Processing application.
'Queued Jobs' pane
Shows the jobs in the selected queue. The jobs ready to be
printed are shown in the expected print order.
'Retained jobs'
pane
Shows the printed jobs, for the selected queue, which are not
deleted.
Jobs stored
Shows the print job(s) stored in the selected Job store folder.
Status bar
Shows the status of the selected devices, queues, and the system
time.
Chapter 1 - Introduction
Start Océ PRISMAsatellite for ERP Console
Start Océ PRISMAsatellite for ERP Console
Start the native console
1.
2.
3.
4.
5.
Log on to Windows as a 'Process manager' or 'Administrator'.
Click 'Start' on the Taskbar.
Click 'Programs'.
Click Océ PRISMAsatellite for ERP.
Click Océ PRISMAsatellite for ERP 'Console'.
Or double-click the short-cut icon on the desktop.
Start the remote console
Click 'Start' on the Taskbar.
Click 'Programs'.
Click Océ PRISMAsatellite for ERP.
Click Océ PRISMAsatellite for ERP 'Console'.
Or double-click the short-cut icon on the desktop.
5. You are asked tor authenticate yourself:
Define:
■ The name of the Océ PRISMAsatellite for ERP server that you want to access remotely.
■ Your user name and password.
1.
2.
3.
4.
Chapter 1 - Introduction
23
Quit Océ PRISMAsatellite for ERP Console
Quit Océ PRISMAsatellite for ERP Console
Introduction
You can quit Océ PRISMAsatellite for ERP Console in one of the following ways:
Quit Océ PRISMAsatellite for ERP Console
1. On the 'File' menu, click 'Exit'.
Or
2. On the title bar, click 'X'.
Or
3. Right-click the title bar, and click 'Close'.
Or
4. Press 'Alt+F4'.
Note:
You can close the Océ PRISMAsatellite for ERP Console while print jobs are still being
submitted from the Job store. In that case you are asked to confirm that you want to
close the Océ PRISMAsatellite for ERP Console.
24
Chapter 1 - Introduction
Chapter 2
Job management
Job Management
Job Management
This section describes how you can start your daily tasks. The interface offers you several
alternatives to execute the same action. The alternatives are listed in short procedures.
26
Chapter 2 - Job management
Change the job properties
Change the job properties
Introduction
Use the Job Ticket Editor to change the properties of a job.
You can start the Job Ticket editor in one of the following ways:
Change the job properties
1. Double-click a job. Or
Select a job and choose 'Properties' from the 'Job' menu. Or
Right-click a job and click 'Properties...'.
2. The Job Ticket Editor opens.
3. Change the job properties and click 'OK'.
Change the job status
1. Double-click a job.
The Job Ticket Editor opens.
2. Click the 'Basic' tab.
3. Select the 'State' option.
4. Click the 'Change' button.
5. Select the state from the 'New state' drop-down list.
6. Click 'OK'.
Chapter 2 - Job management
27
Change the print order
Change the print order
Introduction
You can change the print order in one of the following ways:
Change the print order
1. Select one or more jobs
2. Choose 'Move to top' from the 'Job' menu.
Or
1. Right-click one or more selected job(s)
2. Click 'Move to top'.
Or
1. Right-click a job
2. Click 'Properties'.
3. The Job Ticket Editor opens. Change the job state to 'TOP'.
Or
1. Drag-and-drop the job(s) within a pane to the top of the same pane.
Or
1. Assign a higher priority to the job on the 'Basic' tab of the Job Ticket Editor.
28
Chapter 2 - Job management
Use the Form attribute
Use the Form attribute
Introduction
You can select a 'Form' for a job, or mount/unmount a 'Form' on a device.
You can mount or unmount a 'Form' on a device via the 'Mount/Unmount Form' window.
Select a Form for a job
1. Right-click the job
2. Click 'Properties'.
Or
1. Double-click the job.
Or
1. Select a job
2. On the 'Job' menu, click 'Properties'.
Mount or unmount a Form on a device
1. Right-click the device
2. Choose 'Mount/Unmount Form' from the menu.
The 'Mount/Unmount Form' window appears.
3. Select the 'Form'.
4. Click the 'Mount' or 'Unmount' button.
Or
1. Select a device
2. On the 'Device' menu, click 'Mount/Unmount Form'.
The 'Mount/Unmount Form' window appears.
3. Select the 'Form'.
4. Click the 'Mount' or 'Unmount' button.
Chapter 2 - Job management
29
Use the Form attribute
Or
1. Double-click the device
2. The 'Device properties' window opens
3. Click '..' next to the 'Form' field.
The 'Mount/Unmount Form' window appears.
4. Select the 'Form'.
5. Click the 'Mount' or 'Unmount' button.
30
Chapter 2 - Job management
Deleting One or More Jobs
Deleting One or More Jobs
Introduction
You can delete one or more jobs in one of the following ways:
Toolbar button:
Delete one or more jobs
1. Select one or more jobs and choose 'Delete' from the 'Job' menu.
Or, right-click one or more selected job(s), and click 'Delete'.
Or, select one or more jobs and hit the delete key.
Chapter 2 - Job management
31
Scheduling a Job
Scheduling a Job
Introduction
You can schedule jobs in one of the following ways:
Schedule a job
1. Right-click the job in the 'Queued Jobs' pane
2. Click 'Properties'. The Job Ticket Editor opens
3. Change the job properties on the 'Scheduling' tab and click 'OK'.
Or
1. Double-click a job. The Job Ticket Editor opens
2. Change the job properties on the 'Scheduling' tab and click 'OK'.
32
Chapter 2 - Job management
Suspending One or More Jobs
Suspending One or More Jobs
Introduction
You can suspend one or more jobs in one of the following ways:
Suspend one or more jobs
1. Select one or more jobs and choose 'Suspend' from the 'Job' menu.
Suspend one or more jobs
1. Right-click one or more selected job(s) in the 'Jobs in Data Processing' pane
2. Click 'Suspend'.
Tip: To start the suspended job(s), follow one of the procedures mentioned above and
click on 'Resume' instead of 'Suspend'.
Chapter 2 - Job management
33
Reprinting a Retained Job
Reprinting a Retained Job
Introduction
You can reprint jobs from the 'Retained jobs' pane in one of the following ways:
Reprint a retained job
1. Select one or more jobs
2. Choose 'Resume', 'Top' or 'Redirect' from the 'Job' menu.
Or
1. Right-click one or more selected job(s)
2. Click 'Resume', 'Top' or 'Redirect'.
Or
1. Select one or more jobs and drag them to another queue in the 'Queues' pane.
34
Chapter 2 - Job management
Restarting an Interrupted Job
Restarting an Interrupted Job
Introduction
You can restart an interrupted job and a job in progress on a device that has run in error.
You can specify the start page number in one of the following ways:
Toolbar button:
Restarting an Interrupted Job
1. Open the Job Ticket Editor for the job.
2. Click 'Change' on the 'Basic' tab.
3. Enter the start page number in the 'Restart from page' field.
Or
1. Right-click the job and click 'Restart'.
2. Enter the start page number in the 'Restart from page' field.
Or
1. Select a job and choose 'Restart' from the 'Job' menu.
2. Enter the start page number in the 'Restart from page' field.
Note:
The possibility to restart part of job depends of the PDL. PostScript and PCL print jobs
provide correct information about the number of pages in a print job. Therefore, you
can reprint PostScript and PCL jobs from a given page number or from the page the
jobs were interrupted. It is only possible to reprint a PCL job if the target device supports
PJL.
Chapter 2 - Job management
35
Viewing a Job
Viewing a Job
Introduction
When you view a document, you will always see the most up-to-date document with respect to the workflow steps.
You can also view earlier versions of the document:
■ The input document:
This is the original document that was submitted to Océ PRISMAsatellite for ERP.
■ The temporary document:
This document requires one or more process steps before the document is completed.
The temporary document can be restored to an earlier version.
You can view a job in one of the following ways:
Toolbar button:
View a job
1. Select a job
2. Choose 'View document' from the 'Job' menu.
Or
1. Right-click a job
2. Click 'View document'.
Or
1.
2.
3.
4.
Right-click a job
Click 'Properties'
The Job Ticket Editor opens
Click 'Run the viewer'.
Or
1. Select a job
2. Choose 'Properties' from the 'Job' menu
3. The Job Ticket Editor opens
36
Chapter 2 - Job management
Viewing a Job
4. Click 'Run the viewer'.
View a document created by the recognition process
1. Right-click a job.
2. Click 'View input document ...'.
Chapter 2 - Job management
37
Redirecting One or More Jobs
Redirecting One or More Jobs
Introduction
You can redirect one or more jobs from one device to another.
Contradictions between source and destination device are highlighted and indicated:
■ A warning, for example different input bins.
■ Severe contradictions, for example PDL incompatibilities.
Note:
You can not redirect jobs between devices when severe incompatibilities occur.
The process manager has to start the redirect process manually.
It is also possible to specify backup devices that have to be used when an error occurs and
persists for a given period of time.
You can redirect one or more jobs in one of the following ways:
Toolbar button:
Redirect one or more jobs
1. Select one or more jobs and choose 'Redirect' from the 'Job' menu
2. Select the new queue from the 'Redirect job' window.
3. Click 'Select'.
Or
1. Select one or more jobs and drag the jobs to another queue in the 'Queues' pane.
Or
1.
2.
3.
4.
38
Right-click one or more selected job(s) in the 'Queued Jobs' or 'Retained jobs' pane
Click 'Redirect'
Select the new queue from the 'Redirect job' window.
Click'Select'.
Chapter 2 - Job management
Redirecting a Device
Redirecting a Device
Introduction
You can redirect a device in one of the following ways:
Toolbar button:
Redirect a device
1.
2.
3.
4.
Select a device from the 'Devices' pane
Choose 'Redirect' from the 'Device' menu
Select the new device from the 'Redirect device' window.
Click 'Select'.
Or
1.
2.
3.
4.
Right-click a device in the 'Devices' pane
Click 'Redirect'
Select the new device from the 'Redirect device' window.
Click 'Select'.
Chapter 2 - Job management
39
Redirecting a Device
40
Chapter 2 - Job management
Chapter 3
The Console Window
The Console Window
The Console Window
Introduction
This chapter describes in detail all menu options and panes of the Console window.
The Console window
In the Console window you can:
■ reach all actions and dialogue boxes available in Console via the menu bar.
■ right-click an object to open the contextual menu.
■ resize, open and close the window and internal panes.
■ click a toolbar button to start an action.
■ use the navigation bar to switch between 'Jobs', 'Queues', 'Devices' and 'Job Store'.
More characteristics of the 'Console' window:
■ changes to the interface are restored at the next logon.
■ a menu item or toolbar button, is dimmed if the currently selected object does not
allow the action.
■ at least one of the panes must remain open.
42
Chapter 3 - The Console Window
Hosts Properties
The File Menu
Hosts Properties
Use 'Hosts Properties' to view the state of the available hosts. You can not change the
state of the hosts from the 'Console' interface.
The possible states are:
■ 'ACTIVE MASTER'
■ 'ENABLED'
■ 'DISABLED'.
Chapter 3 - The Console Window
43
Queues Properties
Queues Properties
Use 'Queues Properties' to view the properties of the available queues. This is the window
from which you can control the Job Store.
The available type of queues are:
■ Printer/fax/mail queue.
■ Job store queue.
■ Archive queue.
Every queue has a dedicated icon.
44
Chapter 3 - The Console Window
Devices Properties
Devices Properties
Use 'Device properties' to view the properties of the available devices.
Toolbar button:
Click a device to display the following device information:
Device information#
Contents
Quantity or function
Comment
Displays the 'Comment' string from the Job Ticket.
Message
Displays the current device state.
Active job
Displays the title of the job.
Model
Displays the printer model.
Speed
Displays the nominal speed of the printer model.
Redirect to
Use 'Redirect' to redirect the selected device to another device.
Redirection is permanent. When you redirect a device, all active
jobs are interrupted and routed to the target device. All waiting
jobs and new jobs are automatically forwarded to the target
device. The redirection remains active until you cancel it.
Form
Allows you to mount/unmount a 'Form' on the device.
Spoolout
Use 'Spoolout on' to start the device to send jobs to the printer.
The 'Spoolout off' option enables you to (temporarily) stop the
device to send jobs to the printer.
Tray mapping
The check box is set when a tray mapping object is attached to
the device.
When you uncheck the 'Tray mapping' check box, the tray
mapping object linked to the device will be deleted after a confirmation message. Tray mapping objects linked to the device
are not visible in the 'Administrator' interface.
From the 'Device properties' window you can:
■ redirect a device
■ mount or unmount a 'From'.
■ change the 'Spoolout' setting of the device:
Chapter 3 - The Console Window
45
Devices Properties
Spoolout setting#
46
Contents
Quantity or function
On
The device can send jobs to the printer.
Off
The device can not send jobs to the printer.
Chapter 3 - The Console Window
Input Channel Properties
Input Channel Properties
Use 'Input Channel Properties' to view the properties of the available input channels.
From the 'Input Channel Properties' window you can change the state of an input
channel.
The possible states of the input channels are:
States of the input channels#
Contents
Quantity or function
ACTIVE
The input channel can receive jobs.
NOT ACTIVE
The input channel can not receive jobs.
Chapter 3 - The Console Window
47
Backup
Backup
Introduction
The Backup utility enables you to create a copy of the data on your hard disk. In the
event that the original data on your hard disk is accidentally erased or overwritten or becomes inaccessible because of a hard disk malfunction, you can use the copy to restore
your lost or damaged data.
The backup facility relies on the Windows Backup service.
Creating a backup can be done by either the Administrator of the system or by an Operator. A restore action can only be done by the Administrator. Both operations are always
local to one system.
Backup options
'Backup' provides the following options:
Backup options#
48
Option
Function
Whole system
backup
The Whole system backup saves all data on the local Océ
PRISMAsatellite for ERP server. This includes the Windows
files and settings as well as all the Océ PRISMAsatellite for ERP
files and setting. All the disks are saved.
Chapter 3 - The Console Window
Backup
Option
Function
Print server backup The Print server backup saves:
■ All files that belong to the local Océ PRISMAsatellite for
ERP print server.
■ The Océ PRISMAsatellite for ERP libraries located in the
Windows system directories.
■ The Windows resources that are used by Océ PRISMAsatellite for ERP.
■ Additional files that are stored under the Océ PRISMAsatellite for ERP installation directory, for example FormScape
files.
■ Print job data and tickets that are stored on the local host.
■ The contents of the registry related to Océ PRISMAsatellite
for ERP.
Note:
In case of a realm, the data and ticket may be stored on
different hosts. To make sure that you backup both the
job data and the ticket in case of a realm, choose the
backup type 'Jobs'.
Configuration
backup
Saves all the objects defined in the whole Océ PRISMAsatellite
for ERP realm. This includes for example, devices, queues, filters
definition, SIFs, etc .
The Configuration backup does not include resources of
FormScape projects, Accelio projects or other binaries for data
processing.
Chapter 3 - The Console Window
49
Backup
Option
Function
Jobs backup
The Jobs backup saves the jobs in the print server.
For example, the jobs that are in the queues on the local host
where the backup is executed. Both the job data and job ticket
are saved. Only local jobs are included in the backup.
The Jobs backup is done in two steps:
■ The directory referred to by 'Temporary files directory' is
created. This is a backup structure for all the job tickets that
are managed from the local host and the related data. Files
located remotely will be imported.
■ The contents of the 'Temporary files directory' is saved on
the backup location.
Since all the jobs will be copied in the 'Temporary files directory'
before the physical backup, it is important to refer to a directory
with sufficient disk space.
The disk space should be at least equal to the added size of the
following directories:
■ $install/SV
■ $install/tmp
■ $install/GW
Note:
In case of a realm configuration there might be more
space needed since data files may have to be imported.
Job store backup
The Job store backup saves the data in the Volumes of the Job
store. The Job store backup saves only the Volumes on the local
host.The Job store backup uses also the 'Temporary files directory' location to store some temporary files.
Custom backup
The Custom backup opens the Windows backup utility and
enables you to specify the data to be saved, and the location,
yourself.
Note:
Whatever the backup type, all concerned files are saved, even if they have not been
changed since the previous backup. There is no incremental backup available.
50
Chapter 3 - The Console Window
Backup
Backup location
Backup creates a duplicate copy of the selected data on your hard disk by backing up the
data to another storage device such as a hard disk or a tape. When you select 'File', you
must enter the name and the path of the backup file that will contain the saved data.When
you select 'Tape', you must enter the name of a media pool that, indirectly, will specify
the tape device that Windows will use to save the data.
Media pools
The Windows Administrator must define the media pools.
A media pool is defined in Windows, it is a collection of tapes or disks to which the same
management policy applies. All media in a Removable Storage system (for example a tape
drive) belong to a media pool, and each media pool holds only one type of media. The
backup utility uses media pools to gain access to specific tapes or disks within a library.
To define and manage the media pools, start the Windows 'Computer Management'
program (Start menu, Programs, Administrative tools, Computer management). The
media pools objects are defined in the tree branch Storage > Removable Storage > Media
pools.
Please consult the Windows online help to get detailed information on how to use media
pools for you backup device.
Temporary files directory
Some temporary files may be necessary to prepare the backup operation. The specified
directory will be used to store these files. Specifying a network path can be necessary if
the local system is low on free disk space. See also, the 'Job store backup' section.
Océ PRISMAsatellite for ERP service
The Océ PRISMAsatellite for ERP Print Server service must be stopped before any
backup or restore operation can take place. The Océ PRISMAsatellite for ERP backup
and restore utility takes care of stopping and starting the Océ PRISMAsatellite for ERP
service. Backup and restore will only continue if the service is stopped.
Backup procedure
1. Click 'Backup' from the 'File' menu.
2. Click the required 'Backup type'.
3. Enter the name of the backup in the 'Backup to' field.
Or, click 'Browse' to browse to the backup location.
Chapter 3 - The Console Window
51
Backup
4. Click 'OK'. The Windows Backup service starts.
52
Chapter 3 - The Console Window
Jobs
The View Menu
Jobs
Introduction
You can:
■ select this option to open the 'Job' toolbar
■ clear this option to close the 'Job' toolbar.
■ specify 'Job notification' options.
Auto close
Select 'Auto close when OK' to close the 'Job notification' window automatically after
you solved the printer error or printer warning.
Chapter 3 - The Console Window
53
Queues
Queues
You can select or deselect the following Queues options:
■ Queues
■ Schedule
■ Devices
■ Jobs in pre-processing
■ Queued jobs
■ Retained jobs
54
Chapter 3 - The Console Window
Device notification window
Device notification window
Introduction
The 'Device notification' window opens when:
■ a printer warning or error occurs
■ a new job has the state 'SCHEDULED' (the 'WAIT FOR ACTIVATION' job attribute was specified)
■ you drag the device icon out of the 'Devices' pane.
The window shows the current state of the device. This information is equal to the information shown in the 'Device' pane.
By default the window stays on top of the desktop until you close it.
In the 'Device notification' window you can:
■ perform every operation that is available in the 'Devices' pane
■ select or clear 'Auto Close'.
Open on error
When you select 'Open on Error' the 'Device notification' window opens automatically
in case of a printer error.
Clear this option if you do not want that the 'Device notification' window opens on an
error.
Open on warning
When you select 'Open on warning' the 'Device notification' window opens automatically
in case of a printer warning.
Clear this option if you do not want that the 'Device notification' window opens on a
warning.
Auto close
Select 'Auto close when OK' to close the 'Device notification' window automatically after
you solved the printer error or printer warning.
Chapter 3 - The Console Window
55
Job Store
Job Store
You can select or deselect the following items:
- Stored jobs
- Folders
- Schedule
56
Chapter 3 - The Console Window
Error Jobs
Error Jobs
Allows you to specify if you want to open the 'Jobs in Error' dialog. This dialog shows
all the print jobs that were causing problems.
Chapter 3 - The Console Window
57
Job logging
Job logging
Introduction
Job logging reports about jobs that were processed during the day. Job logging gives a
global picture of the activity that took place during the day.
Job log attributes
For every job, the following attributes are shown:
■ The title of the job.
■ The queue that processed the job.
■ The job identifier.
■ The submission time.
■ The printed time.
An empty value indicates that the job was not printed.
■ The job status.
58
Chapter 3 - The Console Window
Adjust Time Ruler
Adjust Time Ruler
Introduction
The 'Adjust Time Ruler' window or 'Zoom tool' controls the time scale of the 'Schedule'
pane. The job boxes are scaled accordingly.
When you adjust the time scale, a small window shows the time that corresponds to the
end of the 'Schedule' pane. This window closes after a few seconds automatically or by
a click on the arrow.
Open the time ruler
Click option'Zoom tool'.
This option enables you to open the 'Adjust Time Ruler' window.
Note: Two other ways to open the 'Adjust Time Ruler' window:
- Click
on the 'Schedule' pane.
- Click on the time ruler of the 'Schedule' pane.
Adjust the time ruler in one of following ways:
1. Click '<' to enlarge or '>' to reduce, the time scale.
2. Move the slider to the left to enlarge or to the right to reduce, the time scale.
Chapter 3 - The Console Window
59
Filter job views
Filter job views
Introduction
You can activate a job selection filter to restrict the list of jobs in the Océ PRISMAsatellite
for ERP Console.
Only those jobs that meet the criteria in the filter will be displayed in the 'Jobs' section.
Specify the Job filter
■ Click the 'Jobs' section'.
■ Click 'View' - 'Filter job views...'.
The 'Job selection' dialog appears.
■ Specify the job filter parameters and click 'OK'.
Note:
Use the 'Reset' button to clean-up all fields and reset the job filter parameters.
When you have activated a job filter, this will be indicated in the Océ PRISMAsatellite
for ERP Console by a filter icon.
Job filter parameters
#
Component
Functional name
Activate job selection filter
Select this option to activate the job filter.
Status
Allows you to filter jobs by job status.
Submitted
Allows you to filter jobs by date.
Queue
Allows you to only show jobs from a specific Queue.
Note:
Please note that you can also specify a Queue manually.
60
Owner
Allows you to only show jobs from a specific Queue.
Name
Allows you to only show jobs from a specific Name.
Chapter 3 - The Console Window
Filter job views
Component
Functional name
Form
Allows you to only show jobs that use a specific Form.
The drop-down list for 'Forms' allows you to filter per Form
name. It does not allow you to filter all jobs without manual
forms.
Note:
Please note that you can also specify a Form manually.
Custom
Allows you to only show jobs that have a custom attribute
within the Job ticket.
Chapter 3 - The Console Window
61
Goto
Goto
The 'Goto' option allows you to quickly access the following panes:
- Jobs
- Queues
- Devices
- Job store
62
Chapter 3 - The Console Window
Refresh
Refresh
Use 'Refresh' to renew the displayed information in case the screen does not show the
information you expect.
Note:
The screen is also refreshed automatically.
Chapter 3 - The Console Window
63
Status Bar
Status Bar
Status Bar
This option enables you to display the status bar of Océ PRISMAsatellite for ERP Console.
Clear 'Status Bar' to display a larger number of jobs.
64
Chapter 3 - The Console Window
Window Titles
Window Titles
Use 'Window Titles' to display the title bar of the panes.
Clear 'Window Titles' to display a larger number of jobs.
Tip: With 'Window Titles' cleared, the window title of the 'Queued Jobs', 'Jobs in Data
Processing' and 'Retained jobs' pane is available in a ToolTip.
Chapter 3 - The Console Window
65
Confirm Drag and Drop
Confirm Drag and Drop
You can redirect jobs or put jobs on top of a queue, with an easy drag-and-drop operation.
The drag-and-drop operation has to be confirmed if 'Confirm drag and drop' is selected.
Clear 'Confirm drag and drop' to perform the drag-and-drop operations without confirmation.
66
Chapter 3 - The Console Window
Suspend
The Job Menu
Suspend
Use 'Suspend' to interrupt one or more jobs.
Job toolbar button:
Chapter 3 - The Console Window
67
Resume
Resume
Use 'Resume' to start one or more suspended jobs.
Job toolbar button:
68
Chapter 3 - The Console Window
Move to Top
Move to Top
Introduction
The 'Move to top' option allows you to change the order of jobs in Queues.
Toolbar button:
Move to Top
Select a job and click 'Job' - 'Move to top' to move the selected job to the first position
in the Queue.
Chapter 3 - The Console Window
69
Redirect
Redirect
Use 'Redirect' to move one or more selected jobs from the 'Schedule' or 'Queued Jobs'
pane to another queue.
Jobs with the state 'Top' are placed as the first jobs in the new queue. Jobs with a state
different from 'Top' are placed as the last jobs in the new queue.
Job toolbar button:
70
Chapter 3 - The Console Window
Activate
Activate
Use 'Activate' to activate jobs:
■ That are in the 'SCHEDULED' status,
■ for which the 'WAIT FOR ACTIVATION' status was selected in the job ticket.
Toolbar button:
Chapter 3 - The Console Window
71
Restart
Restart
Use 'Restart' to restart a job that has been interrupted or to restart a job after a device
error.
Toolbar button:
Note:
The possibility to restart part of job depends of the PDL. PostScript and PCL print jobs
provide correct information about the number of pages in a print job. Therefore, you
can reprint PostScript and PCL jobs from a given page number or from the page the
jobs were interrupted. It is only possible to reprint a PCL job if the target device supports
PJL.
72
Chapter 3 - The Console Window
View Document
View Document
Use 'View Document' to open the 'Document Viewer'.
Job toolbar button:
You can view different stages of the same document:
■ View document...
View the final stage of a document. For example, the document after the application
of filters.
■ View temporary document
View the document before the application of filters.
■ View input document...
View the document as received on job arrival.
Chapter 3 - The Console Window
73
Print
Print
This option allows you to print the selected job(s).
Toolbar button:
74
Chapter 3 - The Console Window
Print with options
Print with options
Introduction
The 'Print with options' option allows you to specify additional print options before
printing the job.
Toolbar button: .
Print with options
1. Select the print job(s).
2. Click 'Print with options... ' from the 'Job' menu.
The 'Job ticket editor' dialog appears, allowing you to specify additional options for the
print job(s).
3. Specify the options and click 'OK'.
The job(s) are sent to the selected Queue specified in the options.
Chapter 3 - The Console Window
75
Delete
Delete
Introduction
You can delete one or more jobs in one of the following ways:
Toolbar button:
Delete one or more jobs
1. Select one or more jobs and choose 'Delete' from the 'Job' menu.
Or, right-click one or more selected job(s), and click 'Delete'.
Or, select one or more jobs and hit the delete key.
76
Chapter 3 - The Console Window
Properties
Properties
Use 'Properties' to open the Job Ticket Editor for the selected job.
Job toolbar button:
Chapter 3 - The Console Window
77
Hold
The Queue Menu
Hold
Use 'Hold' to hold the selected queue. In that case jobs are still received but not sent to
printers.
Queue toolbar button:
78
Chapter 3 - The Console Window
Release
Release
Use 'Release' to resume the selected queue. When a queue is set to 'Hold', jobs are still
received but not sent to printers. When you click 'Release', the jobs will be send to the
printers again.
Queue toolbar button:
Chapter 3 - The Console Window
79
Spoolin On
Spoolin On
Use 'Spooling On' to start the selected queue to receive jobs.
Queue toolbar button:
80
Chapter 3 - The Console Window
Spoolin Off
Spoolin Off
Use 'Spooling Off' to stop the selected queue to receive jobs.
Queue toolbar button:
Chapter 3 - The Console Window
81
Properties
Properties
Use 'Properties' to open the 'Queues Properties' window for the selected queue.
Toolbar button:
82
Chapter 3 - The Console Window
Form
The Device Menu
Form
Introduction
Use 'Form' to mount or unmount a 'Form' to the selected device.
A 'Form' prevents that Océ PRISMAsatellite for ERP sends a job to the printer that requires a resource that is not available in the printer. For example, if a job requires preprinted paper for invoices, create then a 'Form' called 'Invoice'. The Process Manager
has to confirm to Océ PRISMAsatellite for ERP that the required paper is available in
the printer. Only jobs that need the requested 'Form' can be scheduled to the printer.
Device toolbar button:
A printer, without a 'Form' attached, prints all jobs that do not require a 'Form'.
Chapter 3 - The Console Window
83
Spoolout on
Spoolout on
Use 'Spoolout on' to start the device to send jobs to the printer.
Device toolbar button:
84
Chapter 3 - The Console Window
Spoolout off
Spoolout off
The 'Spoolout off' option enables you to stop the device to send jobs to the printer.
Use this option in case the printer is in error or in maintenance.
Device toolbar button:
Chapter 3 - The Console Window
85
Redirect
Redirect
Use 'Redirect' to redirect the selected device to another device.
Use this option in case the printer is not available for a longer period.
Redirection is permanent. When you redirect a device, all active jobs are interrupted and
routed to the target device. All waiting jobs and new jobs are automatically forwarded to
the target device. The redirection remains active until you cancel it.
You can not redirect a device:
■ that has no equivalent capabilities
■ that is already redirected
■ that is already the target of a redirection.
Device toolbar button:
86
Chapter 3 - The Console Window
Backup devices
Backup devices
Introduction
When a device has an error that remains for a period of time, jobs can automatically be
redirected to a second device that acts as 'backup device'. The 'Backup devices...' option
allows you to select one or more devices that can act as backup for a specific device.
Backup devices
Backup devices parameters#
Parameter
Description
Main device
Shows the main device details.
Comment
Shows the main device details.
Persisting time
Specify the time after which the backup device has to start acting
as backup device for the main device.
Backup devices
Shows the available devices within the Océ PRISMAsatellite
for ERP configuration.
Selected item compatibility
Provides more information about the compatibility of the selected backup device.
Selected device
model
Shows the backup device details.
Comment
Shows the backup device details.
Unsupported languages
Printer languages of the main device that are not supported by
the backup device are shown here.
Not available features
Features of the main device that are not supported by the
backup device are shown here (for example 'Mailbox').
Specify backup devices
■ Select the main device in the 'Devices' section.
■ Click 'Device' - 'Backup devices...'.
■ Select the backup device.
Note: In case of unsupported languages or not available features, this is indicated in
the bottom of the dialog.
■ Click the '>>>' button to add the device as a backup device for the main device.
Note: Repeat this step for each backup device that you want to add.
■ Click 'OK' to confirm the changes.
Chapter 3 - The Console Window
87
Backup devices
Note:
When a backup device takes over the tasks from a main device, the main device is reported
as 'redirected' in the Console. If you reset this redirection, the main device will act as
primary device again.
88
Chapter 3 - The Console Window
Media Mapping
Media Mapping
This option allows you to create mappings between logical trays and media. This is especially useful for the Océ VP 2105 which is not based on Input tray numbers but on Media
specifications.
In the case of the Océ VP 2105, the mapping for Input bins is defining a set of 4 values
defining the media for each logical number
- Paper size
- Media type
- Media color
- Media weight
In other cases, the mapping is simply an association of 2 numbers.
Chapter 3 - The Console Window
89
Tray Mapping
Tray Mapping
Introduction
Tray mapping objects can be used to adjust tray selection from a document to tray
numbers available on the printer.
Tray mapping can be defined for a given printer model within the 'Administrator' interface
or for a specific device from the 'Console' interface. The object created from the 'Console'
is not visible from the Administrator interface.
When a device tray mapping object is available for both a 'device model' and a for a 'device', only the tray mapping defined for the device will be used.
When a tray mapping object is available while printing (either defined per device model
or per device), by default tray mapping always takes place. This behavior can nevertheless
be tuned from the Job ticket / Job template using the 'Advanced' tab - 'Tray mapping'
option.
Mapping applies to both Input trays and Output bins. They are limited to PCL documents.
Any rule consists of 2 fields:
■ 'Id' stands for the value found in the printer instruction out of the document. Values
can be selected in the range of 1 to 128.
■ 'Value' stands for the logical unit.
Creating a mapping rule object always starts with a set of default rules.
To edit the rule, select the value of the ID column and double-click it. Use the 'Value'
drop down list to select a value.
Note:
Please note that the value of the default tray / bin can be tuned from the 'Default' drop
down list.
Two different frames are available, for Input trays and Output bins respectively.
Example
A document contains the following data:
.....<ESC>&l3H......
The document needs to be printed on an Océ VP2090 (PCL). A rule is defined to re-assign
the '3' out of the escape sequence into the tray 1 of the printer.
On an Océ VP2090, the selection of tray 1 requires <ESC>&l21H as printer instruction.
While parsing data, the above escape sequence is detected and checked with respect to
any existing mapping rule.
From the rule to re-assign '3' into logical 'tray 1', the printer instruction from the document will be replaced by the printer instruction to select 'tray 1' which is <ESC>&l21H.
90
Chapter 3 - The Console Window
Tray Mapping
Tray mapping
This option allows you to re-assign tray numbers differently within a document.
Tray mapping rules defined for a printer model (refer to the Administrator interface /
define tray mapping objects) will be ignored when tray mappings are defined for a
printer from the above printer model.
This function is limited to PCL documents.
Tray mapping objects are used to control the mapping of logical tray numbers to trays
available on the printer. This tray mapping is controlled from the Job ticket. Use the
'Tray mapping' option on the 'Advanced' tab of the Job ticket to control the tray mapping.
By default, 'unspecified' is used for the Job template and 'automatic' for the Job ticket.
Select 'on' to enable tray mapping.
Chapter 3 - The Console Window
91
Devices Properties
Devices Properties
Use 'Device properties' to view the properties of the available devices.
Toolbar button:
Click a device to display the following device information:
Device information#
Contents
Quantity or function
Comment
Displays the 'Comment' string from the Job Ticket.
Message
Displays the current device state.
Active job
Displays the title of the job.
Model
Displays the printer model.
Speed
Displays the nominal speed of the printer model.
Redirect to
Use 'Redirect' to redirect the selected device to another device.
Redirection is permanent. When you redirect a device, all active
jobs are interrupted and routed to the target device. All waiting
jobs and new jobs are automatically forwarded to the target
device. The redirection remains active until you cancel it.
Form
Allows you to mount/unmount a 'Form' on the device.
Spoolout
Use 'Spoolout on' to start the device to send jobs to the printer.
The 'Spoolout off' option enables you to (temporarily) stop the
device to send jobs to the printer.
Tray mapping
The check box is set when a tray mapping object is attached to
the device.
When you uncheck the 'Tray mapping' check box, the tray
mapping object linked to the device will be deleted after a confirmation message. Tray mapping objects linked to the device
are not visible in the 'Administrator' interface.
From the 'Device properties' window you can:
■ redirect a device
■ mount or unmount a 'From'.
■ change the 'Spoolout' setting of the device:
92
Chapter 3 - The Console Window
Devices Properties
Spoolout setting#
Contents
Quantity or function
On
The device can send jobs to the printer.
Off
The device can not send jobs to the printer.
Chapter 3 - The Console Window
93
Creating a New Job Store Folder
The Job Store Menu
Creating a New Job Store Folder
Introduction
The 'New folder' option allows you to create new Job store folders.
Toolbar button: .
Create a new Job store folder
1. Select the 'Volume'.
2. Click 'New folder' from the 'Job Store' menu.
3. Enter the Job store folder name and press 'Enter'.
The new Job store folder is added within the selected 'Volume'.
Create a new Job store sub-folder
1. Select the Job store folder.
2. Click 'New folder' from the 'Job Store' menu.
3. Enter the Job store folder name and press 'Enter'.
The new Job store folder is added within the selected folder.
94
Chapter 3 - The Console Window
Renaming a Job Store Folder
Renaming a Job Store Folder
Introduction
The 'Rename' option allows you to change the name of a Job store folder.
Rename a Job store folder
1. Select the folder from the Job store volume that you want to rename in the Job store
pane.
2. Click 'Rename folder' from the 'Job Store' menu.
3. Change the Job store folder name and press 'Enter'.
Chapter 3 - The Console Window
95
Enable / disable a Volume
Enable / disable a Volume
Introduction
Use the Enable / Disable options from the 'Job Store' menu to enable or disable the selected Volume.
Toolbar buttons: and
Enable / disable a Volume
1. Select the Volume in the Job store pane.
2. Click 'Enable' from the 'Job Store' menu to enable a Volume.
3. Click 'Disable' from the 'Job Store' menu to disable a Volume.
Note:
A Volume contains (sub)folders with jobs. These folders are only visible if they are
controlled by a Process manager.
96
Chapter 3 - The Console Window
Printing a Job Store Folder
Printing a Job Store Folder
Introduction
You can print individual jobs within a folder and also complete folders using the printing
instructions defined by the Administrator.
Toolbar button:
Printing a Job Store Folder
1. Select the Job store folder.
2. Click 'Print' from the 'Job Store' menu.
The print jobs within the selected Job store folder will be sent to the connected output
device.
Chapter 3 - The Console Window
97
Print a Job store folder with options
Print a Job store folder with options
Introduction
You can print individual jobs within a folder and also complete folders using the printing
instructions defined by the Administrator. The 'Print with options... ' option allows you
to specify additional print options before printing the jobs from the Job store folder.
Toolbar button:
Print a Job store folder with options
1. Select the Job store folder.
2. Click 'Print with options... ' from the 'Job Store' menu.
The 'Job ticket editor' dialog appears, allowing you to specify additional options for the
print jobs.
3. Specify the options and click 'OK'.
The print jobs within the selected Job store folder will be send to the selected queue.
Note:
Another way to print with option is to drag and drop a folder to the destination queue.
The option dialog box will appear with the queue name filled in.
98
Chapter 3 - The Console Window
View the properties of jobs in the Job store
View the properties of jobs in the Job store
Introduction
The 'Properties' option allows you to view the properties of jobs in the Job store.
Print a Job store folder with options
1. Select the Job store folder.
2. Select a job in the Job store.
3. Click 'Job' - 'Properties'.
The 'Properties' dialog will show the properties of the selected job.
Chapter 3 - The Console Window
99
Delete a Job store folder
Delete a Job store folder
Introduction
The 'Delete' option from the 'Job Store' menu allows you to delete a Job store folder.
Toolbar button:
Note:
When you want to delete a Job store folder that contains print jobs, you will have to
confirm the delete action. Job store folders with Printing instructions or Storing rules
can not be deleted.
Delete a Job store folder
1. Select the Job store folder you want to delete
2. Click 'Delete' from the 'Job Store' menu.
The selected Job store folder will be deleted.
100
Chapter 3 - The Console Window
Volume properties
Volume properties
The volume properties dialog shows the:
■ Name
■ Host
■ Path
■ Free disk space
■ Total disk space
Chapter 3 - The Console Window
101
Folder Properties
Folder Properties
Introduction
All folder properties are read only.
The general tab of the folder properties dialog shows the:
- Name
- Volume
- Path
- Number of jobs in the folder
- Number of jobs in folder and sub-folders
The Printing instructions tab of the properties dialog shows:
- If stored jobs should be deleted after submission.
- The sorting order
- If reverse is selected.
- If job bundling is selected
- A comment field
The Storing rules tab of the properties dialog shows:
- If jobs are stored in folders
- If jobs are stored in sub-folders
- What Queues are used
- A comment field
102
Chapter 3 - The Console Window
Chapter 4
The Job Ticket Editor
The Job ticket editor
The Job ticket editor
Introduction
The Job ticket editor enables you to view a job ticket as well as to modify some of the
job attributes.
A print job consists of one or more documents and their associated Job tickets. A Job
ticket is a collection of the print job attributes. The two main groups of attributes are job
identification attributes and job process attributes. The attributes are organized into
functional areas. You can distinguish the following functional areas in the Job ticket:
- Scheduling
- Document processing
- Output processing
- Printer settings
- Identification
- Job State.
The attributes can be specified at different steps during job life. At job submission, different
sets of attributes are available. It depends on the available user interface as to which attributes can be added. To make the job submission as simple as possible, the job attributes
can be automatically defined during the recognition phase in Océ PRISMAsatellite for
ERP. For example, the user name and job name can be used to determine how to process
the job.
Note:
The Job ticket settings overrule the settings specified in the job data if JEC on the target
device is supported. Almost all Job ticket attributes can be specified in a Job template.
104
Chapter 4 - The Job Ticket Editor
The Basic Tab
The Basic Tab
Parameters
Identification#
Element
Description
Id
Displays the job identification string assigned by Océ PRISMAsatellite for ERP.
Submitted
Displays the date and time when the job was submitted.
Size
Displays the size of the job in bytes. The value is independent
of the number of copies.
Title
Displays the title of the job. The default of 'Title' is the name
of the first document within the job.
User
Displays the name of the user who submitted the job.
Name
Displays a name assigned to the job for easy identification
Host
Displays the host name where the job was submitted.
Comment
A free string for remarks about the print job. The default of
'Comment' is an empty string.
Status#
Contents
'State'
Shows the status of the job. The 'Change' button allows you
to change the status.
'Error'
Specifies the cause of the error during the preprocessing phase
or while printing.
'Printed / Sent'
When printing is in progress, the percentage already send or
printed (depending on the level of comfort of the printer) is
indicated together with the number of copies already handled.
Render
The name of the output device (printer) that has processed the
output (printed the job).
Chapter 4 - The Job Ticket Editor
105
The Basic Tab
Destination#
Contents
Quantity or function
'Destination'
Identifies the queue that manages the job. One or more devices
can be the target of the specified queue. The destination is
mostly fixed at job submission. For example, a user in a windows
environment selects the printer to print.
Note:
Job recognition can also define the destination.
Note:
The Job Store check box allows to restrict the view to
only print or Job store queues.
'Form'
Specify a 'Form' if the job must use special print resources, like
paper. The 'Form' prevents the job to print without the resources.
For example, if a job requires pre-printed paper for invoices,
the 'Form' called 'Invoice' can be associated with the job. You
must confirm to Océ PRISMAsatellite for ERP that the required
paper is in the printer. Only jobs that need the requested 'Form'
can be scheduled to the printer.
A printer that does not have a 'Form' attached, prints all jobs
that do not require a 'Form'.
The default of 'Form' is empty, which allows all jobs to be
scheduled.
Print range#
Contents
Quantity or function
'Entire document'
Select this option if you want to print the complete print job.
'Page(s)'
When you do not want to print the complete print job, you
can specify the print range here.
Note:
Page range printing is not supported for PDF documents.
Copies#
106
Contents
Quantity or function
'Copies'
The number of copies to print. The default of 'Copies' is '1'.
Chapter 4 - The Job Ticket Editor
The Basic Tab
Contents
Quantity or function
'Collate'
Select 'Collate' to deposit the copies in sets of jobs.
Clear 'Collate' to deposit the copies in sets of pages.
By default 'Collate' is set to 'Automatic'.
'View document'
Opens the document viewer.
Note:
The status frame shows information mainly available in read-only mode.
Chapter 4 - The Job Ticket Editor
107
The Scheduling tab
The Scheduling tab
The 'Scheduling' tab has the following parameters:
The Scheduling parameters#
Parameter
Description
Priority
Enables you to change the job priority. The value must be between 1 (lowest priority) and 100 (highest priority).
The default of 'Priority' is 20.
Wait for activation
Enable option 'Wait for activation' to print only jobs with state
'ACTIVE' or state 'INTERRUPTED'.
■ Job status 'ACTIVE':
To print a job you must change the state of the job from
'SCHEDULED' to 'ACTIVE'.
A job in 'SCHEDULED' status blocks the device to which
the job is assigned. Other jobs cannot be printed.
■ Job status 'INTERRUPTED':
When a device is deactivated, a job in 'SCHEDULED' status
or in 'ACTIVE' status changes to state 'INTERRUPTED'.
When the device is reactivated, the jobs in 'INTERRUPTED' status print first.
Print after
Define the day and time to print the job.
The job is printed at the defined time on the defined day of the
week.
The default of 'Print after' is the submission date and time.
Note:
For example, you have defined that jobs - that use this
Job template - must be printed on Tuesdays at 15.15h.
The job is submitted on Tuesday at 16.15h. This job
is then printed next Tuesday at 15.15h.
108
Chapter 4 - The Job Ticket Editor
The Scheduling tab
Parameter
Description
Retention period
Specifies the time interval, in minutes, for the print job to remain on the system after it has been printed. The original data
and the data to be printed will stay in the queue until the job
is printed, and until the retention period has expired.
Use this option to save the print job for reprints.
Select 'INFINITE' to let the print job remain on the system
permanently.
The default of 'Retention period' is 0 (delete immediately).
Note:
Since the attribute is checked periodically, a job can
still exist for a short time after the period has expired.
Expiration time
Define the day and time to delete jobs from the queue that have
not been printed yet.
The job is deleted from the queue at the defined time on the
defined day of the week.
This option is not used when you do not define a time.
A job can leave the queue in two ways:
■ The job is printed,
■ The job is not printed but it is removed by this option.
You can define both option 'Print after' and option 'Expiration
time'.
The time defined for option 'Print after' must expire before the
time defined in 'Expiration time'. Otherwise, the job is rejected.
Note:
Since the attribute is checked periodically, a job can
still exist for a short time after the period has expired.
Chapter 4 - The Job Ticket Editor
109
The Output Settings tab
The Output Settings tab
Introduction
The 'Output Settings' tab has the following parameters.
Note:
Whether an option can be selected, depends on the printer model used.
The output settings
To distinguish the boundaries of the print jobs easily, you can add the following pages
to a job:
■ Header
■ Trailer
■ Separator
By default, there is no additional page.
Additional Pages#
Parameter
Description
Additional Pages
110
Header
Starts the print with an additional Banner page. You can select
one of the specified banner pages from the list. Select 'None' if
you don't want to use a Banner page. Select 'Standard' to use
the default Banner page.
You can also specify the Media settings (for example the tray
number) for the Banner page.
Trailer
Ends the print with an additional page. The contents of this
trailer page is fixed, and includes the following information:
■ Job title
■ Job identifier
■ Name of the host where the job was submitted
■ Document name
■ Priority
■ Job owner
■ Name of the printer that was used to print the document
■ Submission time
■ Start of print time
■ End of print time.
Chapter 4 - The Job Ticket Editor
The Output Settings tab
Parameter
Description
Separator
Inserts an additional page between sets of copies. The contents
of this separator page is fixed, and includes only the 'Document
name'.
Media (header
page)
Allows you to specify a 'Media' type that has to be used for the
header page. This option can only be used for Media-based
printers (for example Océ VP 21xx).
Input tray
Allows you to specify which tray should be used for the banner
pages.
2-sided#
Contents
Quantity or function
2-sided
Option '2-sided' defines if pages are printed 1-sided or 2-sided.
You can define the following values:
■ On
The document is printed 2-sided.
■ Off
The document is printed 1-sided.
■ Automatic
The document is printed depending on the settings within
the printer and the settings within the document.
Tumble
Option 'Tumble' is enabled when option '2-sided' has value
'On'. You can define the following values:
■ Off
The back side of the sheet is remains as defined in the document.
■ On
The back side of the sheet is turned 180 degrees.
■ Automatic
The tumble mode as defined in the job data is used. If the
job data does not contain a tumble setting, the default setting
of the printer is used. The default of 'Tumble' is 'Automatic'.
Binding#
Contents
Quantity or function
Edge
Specifies the physical paper binding edge. Possible values are
Left, Right, Top, Bottom.
The default of 'Edge' is 'Left'.
Chapter 4 - The Job Ticket Editor
111
The Output Settings tab
Contents
Quantity or function
Offset
Specifies how much the image, on both the front and the rear
of the sheet, will move from the specified binding edge. The
unit is in millimeters.
The default of 'Offset' is 0 millimeters.
Media catalog#
Contents
Quantity or function
Name
Specifies the name of media known by the printer (Océ VP2110
printer).
The Media name has to be selected from the list that is retrieved
from the printer.
Note:
The 'Name' field is created using the media catalogue
entries retrieved from the printer if a destination Queue
has been selected (in the “Basic” tab). If no destination
Queue has been selected, any string can be used for this
field, no validation will be performed.
Properties
Lists the properties of the media like the color, weight, ....
Note:
The 'Properties' field is only available in read mode.
Options#
Contents
Quantity or function
Input tray
Specifies the input tray from which the paper must be fed.
The default of 'Input tray' is empty.
Staple
Specifies whether or not the printed job must be stapled. If
multiple collated copies are requested, each copy is stapled.
The default of 'Staple' is 'No'.
Output bin
Specifies the output bin for the printed job.
The default of 'Output bin' is empty.
Jogging
Select the offset stacking on the printer.
Options#
112
Contents
Quantity or function
Resolution
Specifies the resolution in which the print job has to be printed.
The default of 'Resolution' is empty.
Chapter 4 - The Job Ticket Editor
The Processing tab
The Processing tab
The processing tab
#
Parameter
Description
Data processing
Available
All the available processing items are shown here
Note:
Use the '>>>' button to add not used processing items
to the 'Used' section.
Used
All the processing items used for the selected Job template are
shown here.
Note:
Use the '<<<' button to remove used processing from
the 'Used' section
Parameters
The parameters are displayed in read mode for each selected
'Data processing' item from the 'Used' pane.
Chapter 4 - The Job Ticket Editor
113
The Advanced tab
The Advanced tab
The Advanced tab
#
Component
Functional name
Print mode
Raw
Raw mode controls the rendering of the document. When set,
data is given 'as is' to the output device without any translation
of Job ticket attributes into device specific commands.
Mailbox
Mailbox can only be selected for devices that support Mailbox.
The mailbox recipient can be specified here.
Note:
If no mailbox lookup table is specified or if the resolution returns empty, the mailbox recipient name remains unchanged.
Security
You can specify a PIN code ('Security').
This password has to be confirmed on the printer when printing from the mailbox.
Printer settings
Select one of the available 'Printer settings' objects here.
Mailbox lookup
Allows you to select a Mailbox lookup table.
Mailbox resolution takes place at the end of the recognition
process. The attribute can not be specified using the Job ticket
editor.
This table specifies which Mailbox will be used, based on the
job's variables. You can also specify the password that will be
used for the 'Security' setting.
Job wrapping
Header
The 'Header' allows you to select data that will be combined
with the document.
Trailer
The 'Trailer' allows you to select data that will be added to the
document.
Miscellaneous
114
Chapter 4 - The Job Ticket Editor
The Advanced tab
Component
Functional name
Project
Project can be used to identify a project name used by the EForm application. The project name can, for instance, identify
a FormScape existing branch name.
The browse button allows you to explore the file system and
search for the source file of the project. Because the value of
the field will be given as-is to the E-Form application, special
attention is required if the type suffix of the file is not supported. In that case it should be erased from the field once browsing
is completed.
FormScape and Accelio data processing definitions are supporting this variable. New definitions have their identifier ended
with '-2'.
Printer
Printer can be used to easily identify a Windows existing
printer using the Browse button. The attribute is required for
FormScape. It should only be used together with the FormScape_2 definition.
Tray mapping
Specifies whether tray mapping is allowed on the document.
By default tray mapping is allowed.
Tray mapping requires a tray mapping object to be defined.
The object may be defined for a printer model (within the
Administrator interface) or for a specific device (Console interface).
Note:
When a device tray mapping object is available for
both a device model and for a device, only the tray
mapping defined for the device will be used.
Formatter
Formatter identifies the type of output for the ODDe e-Form
application.
Archive profile
Allows you to select a profile that controls the export of jobs
(for instance to an archive system).
Account
Identifies an account number.
This identifier will be saved as a field of the record written in
the accounting file at job completion.
The field is only available to the Job template editor. It can
also be initialized from the incoming Job ticket or during the
recognition process.
Chapter 4 - The Job Ticket Editor
115
The Advanced tab
Component
Functional name
Class
Allows you to specify value that can be assigned as a job class
attribute
Recipient
Identification of the recipient(s) of the printed document. This
is a free string. The default of 'Recipient' is an empty string.
Content type
This option refers to the type of data. It usually refers to the
PDL (Page Description Language) of the document. The attribute is mainly used for information purposes.
Group
Identifies a group of users. This attribute should be considered
as a dedicated comment.
PIF
116
PIF name
Since Form Merge is a Data Processing module, the associated
variables can be specified here. Select the name of the PIF to
use.
PIF variables
The PIF variables are available in a text box. Line feeds are
translated into space characters by the editor. When the PIF
variables are displayed, the instructions are displayed on separate lines.
Chapter 4 - The Job Ticket Editor
The Custom tab
The Custom tab
Introduction
The Océ PRISMAsatellite for ERP Programmer interface can be used to add custom
variables. Custom variables (attributes) will become available within the entire Océ
PRISMAsatellite for ERP environment.
The Custom tab
#
Component
Functional name
Custom variables
Insert a custom variable
■ Click 'Insert' to insert a custom variable.
■ Select one of the custom variables that were created using
the Océ PRISMAsatellite for ERP Programmer interface.
■ Enter the value for that custom variable and click 'OK'.
Remove a custom variable
■ Select the custom variable that you want to remove.
■ Click on 'Remove'.
Modify a custom variable value
■ Select the custom variable and click in the 'Value' cell.
The 'Value' cell will change and can be edited.
■ Change the value and press 'Enter'.
Free variables
A set of 10 variables can be used as free Job ticket attributes.
They can be initialized during the recognition process and remain accessible during the workflow of the job.
InputPageRange
Page range printing can fail on some printers. You can solve this:
■ Create a page range before the data is filtered
■ Re-apply the filters
Define the custom variable 'InputPageRange'.
The value of InputPageRange defines the maximum number of lines per page, e.g. 64.
A page boundary is now detected when:
■ a Form Feed character is detected, or
■ when the number of lines per page is reached.
Chapter 4 - The Job Ticket Editor
117
The Custom tab
You can define the custom variable in the job template. In this way, you create a general
behavior of page range printing for all printers.
Or you can define the custom variable in the job ticket of the job that needs to be
reprinted.
118
Chapter 4 - The Job Ticket Editor
The Fax/Mail tab
The Fax/Mail tab
The Fax/Mail tab
The 'Fax/Mail' tab has the following parameters:
The Fax/Mail tab#
Parameter
Description
Mail
Mail to
Define the Email address of the recipient(s).
From
Define the Email address of the sender.
Cc
Define the Email address of the recipient(s).
Bcc
Define the Email address of the recipient(s).
Reply to
Specify the Email address to use when the recipient replies to
the Email message.
Note:
This Email address can differ from the address specified
in the 'From' field.
Subject
The subject of the Email message.
Profile name
Use the drop-down box to select one of the available Email
profiles.
Lookup
Allows you to select a Mail lookup table.
The lookup table allows you to link a name to an Email address.
The address resolution is ignored if no lookup table is specified.
The job is forced in 'SUSPEND' state when the address resolution fails.
Note:
For more information about lookup tables, please refer
to the Océ PRISMAsatellite for ERP Technical Reference Manual.
Fax
Fax to name
Specify the recipient name
Fax to number
Specify the recipient fax number. This number will be used to
send the fax to.
Chapter 4 - The Job Ticket Editor
119
The Fax/Mail tab
Parameter
Description
From
Specify the user ID of the sender. This user ID has to be a valid
ID on the 'RightFax' fax server.
Profile name
Use the drop-down box to select one of the available fax profiles.
Note:
Fax settings can be composed during the recognition
phase or by using a fax profile. Fax profiles allow you
to use the settings from the profile for the specific job.
Lookup
Allows you to select a Fax lookup table
The lookup table allows you to link a name to an Fax number.
The address resolution is ignored if no lookup table is specified.
The job is forced in 'SUSPEND' state when the address resolution fails.
Note:
For more information about lookup tables, please refer
to the Océ PRISMAsatellite for ERP Technical Reference Manual.
120
Chapter 4 - The Job Ticket Editor
The Overview tab
The Overview tab
The overview tab
The 'Overview' tab gives you an overview of print job attributes and their assigned values
which are not visible in the other tabs. The attributes are shown with a leading character
that reflects the status of the attribute:
'-', the attribute is read-only
'+', the attribute can be written. Click the object to open the attribute field for modification.
Double-click the objects in the tree to expand or close the tree.
Tracing (Job ticket only)
The Overview tab also contains the 'Job Processing Trace ...' button.
When you click this button, a separate window will appear that contains all steps processed
by the job so far. This window is in 'read' mode and is not updated while opened.
The 'Job processing trace' consists of a sequence of records that contain a time stamp and
a text identifying the step. It also contains the resources or results related to the step.
Chapter 4 - The Job Ticket Editor
121
The Overview tab
122
Chapter 4 - The Job Ticket Editor
Chapter 5
The Job Store
The Job store pane
The Job store pane
Introduction
Jobs can be automatically processed without operator intervention, or they can automatically be put into job storage, waiting for the operator to define the processing.
The Job store gives you access to your jobs as in a file manager.
To access the Job store, click the 'Show Job store' button in the toolbar.
The Job Store
The job store contains 'Volumes' and 'Folders'.
Job store items#
Component
Functional name
Volume
The volume specifies a location on a hard disk where print jobs
and folders can be stored.
Folder
Folders are part of a volume and allow you to group print jobs.
Double-click the volume to view the available folders.
Incoming Jobs
Shows all jobs currently in processing mode in the input queues
connected to the Job store but not stored yet. Jobs that can not
be processed, due to an error, are displayed with a special icon.
The layout of the columns is similar to the Queued Jobs pane
used for output queues. Additional columns are available that
specify the name of the input queue, the destination volume
and folder defined for that queue. This allows you to sort jobs
by input queue or by destination in the Job store.
Job store
Shows the jobs stored in the folder currently selected in the Job
Store pane. When you select a volume in the Job store pane,
the Stored jobs pane is empty.
The columns of this pane are similar to the other print job
panes, with no ranking information. An additional column
specifies the job name of the stored job.
The Job Store pane shows the:
■ Job store volumes and folders
■ Incoming jobs with corresponding job status
■ Stored jobs
■ Output queues
■ Indication on the device status through the Queue icons
124
Chapter 5 - The Job Store
The Job store pane
■
Currently printing and waiting jobs in the Schedule pane.
Note:
A Volume contains (sub)folders with jobs. These folders are only visible if they are
controlled by a Process manager.
When a print job has an error before entering the Job Store, the Incoming Jobs icon will
change.
When a device has an error, the corresponding queue icon also changes. A notification
window appears.
Chapter 5 - The Job Store
125
Print jobs from the Job store
Print jobs from the Job store
Introduction
When you print stored jobs from the Job store, the print jobs will be sent to Océ PRISMAsatellite for ERP queues. The print job information (optional) and printing instructions
(for example originator host and username) are used to create new print jobs in Océ
PRISMAsatellite for ERP queues. What happens with these print jobs depends on the
output device that is connected to that queue.
You can print individual jobs within a folder and also complete folders using the printing
instructions defined by the Administrator.
Jobs created from stored jobs can be handled like any other print jobs. You can print the
jobs using default printing instructions. Those settings can also be overwritten using the
'Print with options... ' feature.
Print jobs from the Job store
1. Select the job(s) in the Job store folder.
2. Click 'Print' from the 'Job' menu.
The selected job(s) will be sent to the connected output device.
Note:
This option is available if printing instructions are attached to the (parent) folder.
126
Chapter 5 - The Job Store
Print with options
Print with options
Introduction
The 'Print with options... ' option allows you to specify additional print options before
printing the job.
Toolbar button:
Print with options
1. Select the print job(s) from the Job Store.
2. Click 'Print with options... ' from the 'Job Store' menu.
3. The 'Job ticket editor' dialog appears, allowing you to specify additional options for the
print job(s).
4. Specify the options and click 'OK'.
5. The job(s) are sent to the selected Queue specified in the options
Chapter 5 - The Job Store
127
Printing a Job Store Folder
Printing a Job Store Folder
Introduction
You can print individual jobs within a folder and also complete folders using the printing
instructions defined by the Administrator.
Toolbar button:
Printing a Job Store Folder
1. Select the Job store folder.
2. Click 'Print' from the 'Job Store' menu.
The print jobs within the selected Job store folder will be sent to the connected output
device.
128
Chapter 5 - The Job Store
Print a Job store folder with options
Print a Job store folder with options
Introduction
You can print individual jobs within a folder and also complete folders using the printing
instructions defined by the Administrator. The 'Print with options... ' option allows you
to specify additional print options before printing the jobs from the Job store folder.
Toolbar button:
Print a Job store folder with options
1. Select the Job store folder.
2. Click 'Print with options... ' from the 'Job Store' menu.
The 'Job ticket editor' dialog appears, allowing you to specify additional options for the
print jobs.
3. Specify the options and click 'OK'.
The print jobs within the selected Job store folder will be send to the selected queue.
Note:
Another way to print with option is to drag and drop a folder to the destination queue.
The option dialog box will appear with the queue name filled in.
Chapter 5 - The Job Store
129
View jobs from a job store folder
View jobs from a job store folder
Introduction
You can view jobs from the job store folder.
Toolbar button:
View jobs from a Job store folder
1. Select the print job that you want to view in the Job store folder.
2. Click 'Properties' from the Menu bar or select 'Properties' from the contextual menu.
130
Chapter 5 - The Job Store
Delete print jobs from a Job store folder
Delete print jobs from a Job store folder
Introduction
You can handle print jobs in Job store folders like any other print job, so you can delete
print jobs from the Job store folder.
Toolbar button:
Delete print jobs from a Job store folder
1. Select the print job(s) you want to delete in the Job store folder.
2. Click 'Delete' from the 'Job' menu.
The selected job(s) will be deleted from the Job store folder.
Chapter 5 - The Job Store
131
Renaming a Job Store Folder
Renaming a Job Store Folder
Introduction
The 'Rename' option allows you to change the name of a Job store folder.
Rename a Job store folder
1. Select the folder from the Job store volume that you want to rename in the Job store
pane.
2. Click 'Rename folder' from the 'Job Store' menu.
3. Change the Job store folder name and press 'Enter'.
132
Chapter 5 - The Job Store
Creating a New Job Store Folder
Creating a New Job Store Folder
Introduction
The 'New folder' option allows you to create new Job store folders.
Toolbar button: .
Create a new Job store folder
1. Select the 'Volume'.
2. Click 'New folder' from the 'Job Store' menu.
3. Enter the Job store folder name and press 'Enter'.
The new Job store folder is added within the selected 'Volume'.
Create a new Job store sub-folder
1. Select the Job store folder.
2. Click 'New folder' from the 'Job Store' menu.
3. Enter the Job store folder name and press 'Enter'.
The new Job store folder is added within the selected folder.
Chapter 5 - The Job Store
133
Delete a Job store folder
Delete a Job store folder
Introduction
The 'Delete' option from the 'Job Store' menu allows you to delete a Job store folder.
Toolbar button:
Note:
When you want to delete a Job store folder that contains print jobs, you will have to
confirm the delete action. Job store folders with Printing instructions or Storing rules
can not be deleted.
Delete a Job store folder
1. Select the Job store folder you want to delete
2. Click 'Delete' from the 'Job Store' menu.
The selected Job store folder will be deleted.
134
Chapter 5 - The Job Store
Move a Job store folder
Move a Job store folder
Introduction
You can use the drag-and-drop mechanism to move Job store folders.
Move a Job store folder
1. Select the Job store folder you want to move.
2. Drag-and-drop the selected Job store folder to the new position.
The selected Job store folder will be moved.
Chapter 5 - The Job Store
135
Move print jobs between Job store folders
Move print jobs between Job store folders
Introduction
You can use the drag-and-drop mechanism to move print jobs between Job store folders.
Move print jobs between Job store folders
1. Select the print jobs you want to move.
2. Drag-and-drop the print jobs to the new Job store folder.
The print jobs will be placed in the new Job store folder.
136
Chapter 5 - The Job Store
Redirect print jobs
Redirect print jobs
Introduction
Print jobs in the 'Incoming jobs' can be redirected to a Queue manually.
Redirect print jobs
1. Select the print job(s) you want to redirect in the 'Incoming jobs' pane.
2. Click 'Redirect' from the 'Job' menu.
The 'Redirect job' dialog appears.
3. Select the Queue you want to move the print job(s) to and click 'Select'.
The selected print job(s) will be redirected to the selected Queue.
Chapter 5 - The Job Store
137
Volume properties
Volume properties
The volume properties dialog shows the:
■ Name
■ Host
■ Path
■ Free disk space
■ Total disk space
138
Chapter 5 - The Job Store
Folder Properties
Folder Properties
Introduction
All folder properties are read only.
The general tab of the folder properties dialog shows the:
- Name
- Volume
- Path
- Number of jobs in the folder
- Number of jobs in folder and sub-folders
The Printing instructions tab of the properties dialog shows:
- If stored jobs should be deleted after submission.
- The sorting order
- If reverse is selected.
- If job bundling is selected
- A comment field
The Storing rules tab of the properties dialog shows:
- If jobs are stored in folders
- If jobs are stored in sub-folders
- What Queues are used
- A comment field
Chapter 5 - The Job Store
139
Folder Properties
140
Chapter 5 - The Job Store
Chapter 6
Additional information
Job States
Job States
A print job has different states in its life within Océ PRISMAsatellite for ERP. The job
state depends the phase where the job resides. The following overview describes the possible job states.
Possible job states#
142
State
Description
RECOGNITION
The job is under control of a recognition module. This is usually the first state a job may receive when the job enters Océ
PRISMAsatellite for ERP.
The state 'RECOGNITION' will not be assigned to a job if
both the input channel and the queue have no SIF attached.
DATA_PROCESSING
The job is under control of a document processing module.
SUSPEND
The job is interrupted manually. To print, the job state must
be changed to 'WAIT' or 'TOP' manually.
WAIT
The job is ready to print and wait for the target device to become available.
TOP
The job is the first job in the queue.
ACTIVE
The job and the target device are ready to print.
SCHEDULED
The job attribute 'Wait for activation' is set. A manual confirmation is required to start the print job to print.
FILE-TRANSFER
The files needed for the print job must be local on the host before the print job can be sent to the device. A job gets the state
'FILE_TRANSFER' during the transfer of the job data.
INTERRUPTED
The target device of the print job in was stopped while the print
job was in process.
TERMINATED
The print job is complete.
DEVICE_ERROR
The target device of the print job is in error. The state is displayed with a complementary error message.
SENT
The document has been transferred to the device. Printing is
still in progress. This state is only supported for devices that are
able to acknowledge the rendering of the document
Chapter 6 - Additional information
Glossary
Glossary
Introduction
This topic defines many Océ PRISMAsatellite for ERP related terms.
Accelio
An application for electronic forms and advanced job processing.
ART
(Association Rules Table) A set of rules that select the default job template based on the
attributes of the print job.
Administrator
The user who maintains and configures the system.
BSD
(Berkeley Software Distribution) Identifies the standard lpr print protocol based on the
BSD Unix Operating System.
Console
The user interface of Océ PRISMAsatellite for ERP which continuously displays the status
of the jobs and queues.
Content type
Identifies the data type of a print job. For example, PostScript.
Data flow process
Process within the job cycle that transforms and controls the data flow.
Delete
To remove an object or to remove a job from the configuration.
Chapter 6 - Additional information
143
Glossary
Device
A logical unit that refers to a physical peripheral.
DNS
(Domain Naming System) Software that locates computers by domain name. The DNS
server maintains a database of domain names (host names).
Document Designer
An application for electronic forms and advanced job processing.
Domain
A subnetwork comprised of a group of clients and servers under the control of one security database.
E-Form
A document with a standardized layout that is merged as an overlay or underlay with the
print job data.
Editor
Software used to create and edit files that contain only text. For example, a batch file.
Filter
A process that changes data, such as a conversion routine that changes one data, text or
graphics format into another.
Form
An object that prevents Océ PRISMAsatellite for ERP sending a job to the printer that
requires a resource that is not available in the printer.
FormScape
An application for electronic forms and advanced job processing.
144
Chapter 6 - Additional information
Glossary
Host
A computer system that provides services to other computer systems.
Input Channel
The connection point where jobs enter the system.
Input processing
Processing applied on arrival of data and before the recognition phase.
Job template
A default job ticket.
Job ticket
A job ticket contains the process and print instructions for the associated data file.
Legacy
Identifies the print jobs from a mainframe or Unix environment.
Office Input Channel
Identifies the print jobs from a Windows environment.
Output bin
A tray where printed sheets are collected.
PCL
(Printer Control Language) The command language for the HP printers.
PJL
(Printer Job Language) The job control language for the HP Printers.
Chapter 6 - Additional information
145
Glossary
PostScript
The page description language from Adobe.
Print job
The association of the data file to be printed and a job ticket.
Printer setting
An object that allows you to insert printer instructions in the data stream while sending
data to the printer.
Priority
Job attribute that influences the job scheduling.
Process Manager
The user who controls the jobs within a set of queues.
Programmer
The user who maintains and programs the system.
Queue
A collection of print jobs that wait to be processed.
Realm
A group of servers under the control of one security database.
Recognition
Process that identifies the attributes of a print job.
Redirect
Process that diverts data from its normal destination to another destination.
146
Chapter 6 - Additional information
Glossary
SAP
Enterprise Resources Planning (ERP ) application from the German company SAP.
Scheduling policy
A method used to schedule jobs for execution.
SIF
(Separator Instruction File) A recognition program that scans the data stream on programmed search criteria. The SIF can split up the data stream into smaller parts and adds
job attributes to the job ticket.
SNMP
(Simple Network Management Protocol) A widely-used network monitor and control
protocol.
Suspend
To pause a print job.
Top
Assigns the highest priority to a job and places the job as the first job in the queue.
TRF
(Translation Filter) A process that changes the format of incoming data, for example
EBCDIC to ASCII.
Viewer
A program that displays the contents of a file.
Chapter 6 - Additional information
147
Glossary
148
Chapter 6 - Additional information
Chapter 7
Hidden
The PCL viewer window
The PCL viewer window
Introduction
The PCL viewer application, enables you to check the contents and layout of the print
job. For help with the viewer refer to the online help of the viewer.
Note:
In cases where a Windows printer is available, it is possible to print from the viewer.
However, we recommend that you print your jobs via the Console interface of Océ
PRISMAsatellite for ERP.
Job Ticket
To change the properties of the job from the 'Viewer' window, click 'Job Ticket'.
150
Chapter 7 - Hidden
The Schedule Pane tab
The Schedule Pane tab
Introduction
On this tab you can change the colors of the 'Schedule Pane':
■
■
■
■
Background
Printing Jobs
Waiting Jobs
Holding Jobs.
To change the colors
Clear 'Use default'.
Click the color option you want to change.
The 'Color' sheet opens.
Click the color you want to apply,
or, click 'Define Custom Colors' to create your own color.
5. Click 'OK'. The 'Color' sheet closes.
6. Click 'OK' or click 'Apply'.
1.
2.
3.
4.
Chapter 7 - Hidden
151
The Device Colors tab
The Device Colors tab
Introduction
On this tab you can change the colors of the device:
■
■
Error messages
Warning messages.
The Device Colors tab
Clear 'Use default'.
Click the color option you want to change.
The 'Color' sheet opens.
Click the color you want to apply,
or, click 'Define Custom Colors' to create your own color.
5. Click 'OK'. The 'Color' sheet closes.
6. Click 'OK' or click 'Apply'.
1.
2.
3.
4.
152
Chapter 7 - Hidden
The Window Background tab
The Window Background tab
Introduction
On this tab you can change the background color of all panes in the 'Console' interface.
Change the background color
1. Click 'Default color' or 'Default bitmap' to apply a default scheme.
Or
2. Click 'Bitmap file' to apply your own bitmap.
Chapter 7 - Hidden
153
Adjust Date/Time
Adjust Date/Time
Use 'Adjust Date/Time' to access the Windows 2000 date and time setting.
For more information on the date and time setting, refer to the Windows 2000 online
help.
154
Chapter 7 - Hidden
Error message
Error message
Introduction
The error information window opens when an error or warning occurred. The message
informs you on the nature of the problem. The window stays on top of the desktop until
you close it.
Error message
1. Click 'OK'.
Information for Océ Service
If you cannot solve the problem yourself, and you call Océ Service, keep the following
information at hand:
■ your company name and your own name
■ your Océ account number
■ the version number of Océ PRISMAsatellite for ERP
■ the nature of the error that occurred
■ the exact warning or error message, including the error number (if any).
Chapter 7 - Hidden
155
Printing instructions
Printing instructions
The printing instructions tab allows you to view the following settings:
#
Component
Functional name
Delete stored jobs
after submission
Allows the Océ PRISMAsatellite for ERP Administrator to
specify if the print job must be removed from the Job Store after
the job was submitted successfully to the output queue (not after
it was printed).
Sort by
The Océ PRISMAsatellite for ERP Administrator can define
the order in which the jobs within a folder are submitted to an
output queue. Available criteria are
■ Job Name (alphabetical order of job name)
■ Store Time (the time the job was stored).
If the folder contains sub-folders, the jobs are submitted in
the specified order within each sub-folder. There is no sorting
across sub-folders. The sub-folders are always processed in
their alphabetical order of name.
Note:
By default, no sorting will be used.
156
Include subfolders
Select this option if you want to include subfolders.
If the folder contains sub-folders, the jobs are submitted in the
specified order within each sub-folder. There is no sorting across
sub-folders. The sub-folders are always processed in their alphabetical order of name.
Reverse
The Océ PRISMAsatellite for ERP Administrator can specify
to submit jobs in the reverse order as specified in the 'Sort by'
section.
Chapter 7 - Hidden
Printing instructions
Component
Functional name
Job bundling
Allows you to bundle a set of jobs so that they are printed as a
single job. A bundled job appears as a single job in the print
queue.
When several jobs are bundled, the job ticket attributes are read
exclusively in the Job template associated to these 'Printing instructions'.
The Job template attributes apply to the whole bundle, so jobs
are first bundled before using the Job template.
The header page contains, if defined, the job name of the bundle
and the job title.
Jobs can be bundled following different rules
■ By folder
All jobs of each (sub-)folder are merged. One bundle per
sub-folder is therefore submitted, plus one bundle for jobs
in the root folder (the folder to which these Printing instructions are attached). If a folder contains no job, no bundle is
created. The job name of the bundle contains the (sub)folder name. A job title can also be specified in the Job
template. This job title is the same for all generated bundles.
■ Across folders
All jobs in the root folder and sub-folders are merged together. One bundle is submitted for all jobs. The job name of
the bundle contains the name of the root folder. A job title
can also be specified in the Job template. Note that sorting
is always done on a 'per folder' basis.
Note:
Sorting always takes place before bundling, so jobs are
first sorted within their (sub-)folder, and after that they
are bundled.
Maximum bundle
size
Allows you to limit the size (in number of jobs) of each bundle.
Chapter 7 - Hidden
157
Printing instructions
Component
Functional name
Job templates
You can select a Job template from the list of Job templates already available.
If several Job templates are selected, printing the stored jobs
will lead to the creation of several jobs in the queues, one for
each Job template (multi-processing).
When bundling and multi-processing are used together, first
the jobs are bundled to build one or several new documents.
After that several jobs are created for each bundled document
(one job per processing).
Use stored job ticket
The 'Use stored job ticket' option allows you merge the ticket
settings of the stored job with the selected Job template to produce the job ticket of the submitted job
Note:
If this option is set to 'No', the ticket attributes of the
stored jobs are ignored when they are printed.
Processing
Several workflows can be referred to in order to allow multi
processing. Several rule entries need to be defined for that purpose. The editing of rules is done in a separate window. The
order of the rules can be tuned with the up and down buttons.
Rules can also be deleted with the delete button.
Note:
A Job template is mandatory while a Queue name is
optional. The selection of Queue makes the Job template focus on workflow only.
Static / dynamic
158
Chapter 7 - Hidden
Defining the workflow for a job is based on Job templates.
The name of the Job template must refer to an existing Job
template. To select a Job template from the list of defined ones,
select the 'Static' option and select the Job template from the
list using the '>>' button. \
To select a Job template based on a value of a Job ticket attribute, select 'Dynamic' and enter the name of the job attribute
or select it from the list.
Printing instructions
Component
Functional name
Target Queue
The name of the target Queue can be selected in a similar way.
Static selection allows you to select from the list while dynamic
allows you to identify the name of the Queue from the value
of a Job ticket attribute.
The '>>' button is used to select a Queue whatever is selected
'Static' or 'Dynamic'.
Jobstore
Selecting the 'Jobstore' check-box will limit the list of Queues
displayed to the Queues feeding the job store.
Comment
The comments specified by the Océ PRISMAsatellite for ERP
Administrator are displayed here.
Chapter 7 - Hidden
159
Storing rules
Storing rules
The storing rules tab allows you to view the following settings:
#
160
Component
Functional name
Stored in folder
Indicates that the print jobs are stored in the selected folder
Sorted in sub-folders
Indicates whether print jobs are sorted in sub-folders of the selected folder
Replace existing
jobs
When a job is stored in a folder, you may want it to replace the
job(s) with the same name stored in the same folder. So if you
just want to save the latest version of a job select the 'Replace
existing jobs' option.
Queues
Indicates the Queue(s) connected to the selected folder.
Comment
The comments specified by the Océ PRISMAsatellite for ERP
Administrator are displayed here.
Chapter 7 - Hidden
Index
Index
......................................................................119
A
Account
Account ........................................................114
Activate
Activate ..........................................................71
Additional Pages
Additional Pages ...........................................110
Adjust Date/Time
Adjust Date/Time ........................................154
Administrator
Administrator .................................................19
Advanced tab
Advanced tab ................................................114
Archive profile
Archive profile ..............................................114
Auto close
Auto close .......................................................55
B
Backup
Backup ...........................................................48
Backup device
Backup device .................................................87
Backup devices
Backup devices ...............................................87
Banner page
Banner page ..................................................110
Basic Tab
Job Ticket Editor .........................................105
C
Capabilities
Capabilities .....................................................89
Class
Class .............................................................113
concept
concept ...........................................................14
Console window
Console window .............................................42
Content type
Content type ................................................113
Create Job store folder
Create Job store folder ...........................94, 133
Custom tab
Custom tab ..................................................117
Custom variables
Custom variables ..........................................117
D
Delete Job
Delete Job .......................................................76
Delete Job store folder
Delete Job store folder .........................100, 134
Devices properties
Devices properties ....................................45, 92
Drag and drop
Drag and drop ................................................66
E
Edge
Edge .............................................................110
Enable / disable Volume
Enable / disable Volume .................................96
Error message
Error message ...............................................155
Expiration time
Expiration time ............................................108
F
Fax
Fax ...............................................................119
Folder
Folder ...........................................................124
Folder properties
Folder properties .................................102, 139
Form
Form ........................................................29, 83
Formatter
Formatter .....................................................113
Free variables
Free variables ................................................117
H
Header
Header ................................................110, 114
Hold
161
Index
Hold ...............................................................78
M
I
Incoming jobs
Incoming jobs ..............................................124
Input channel
Input channel .................................................47
Input tray
Input tray .....................................................110
InputPageRange
InputPageRange ...........................................117
Introduction to the Console Window
Introduction to the Console Window .............21
J
Job
Job ..................................................................53
Job Management
Job Management ............................................26
Job Processing Trace
Job Processing Trace ....................................121
Job properties
Job properties .................................................27
Job States
Job States .....................................................142
Job status
Job status ........................................................27
Job store
Job store .......................................................124
Job store pane
Job store pane ...............................................124
Job Ticket Editor
Job Ticket Editor ............................................27
Job ticket editor
Job ticket editor ............................................104
Job Ticket Properties
Job Ticket Properties ......................................77
Job toolbar
Job toolbar ......................................................53
Job wrapping
Job wrapping ................................................114
Mail from
Mail from .....................................................119
Mail to
Mail to .........................................................119
Mailbox
Mailbox ........................................................114
Mailbox lookup
Mailbox lookup ............................................114
Main device
Main device ....................................................87
Media
Media .............................................................89
Media (header page)
Media (header page) .....................................110
Media Mapping
Media Mapping ..............................................89
Miscellaneous
Miscellaneous ...............................................114
mount/ unmount on a device
mount/ unmount on a device .........................29
N
Not available features
Not available features ......................................87
O
Offset
Offset ...........................................................110
Open on error
Open on error ................................................55
Open on warning
Open on warning ...........................................55
Output bin
Output bin ...................................................110
Output settings
Output settings ............................................110
P
L
Lookup
Lookup .........................................................119
Lookup table
Lookup table ................................................114
162
PCL viewer
PCL viewer ...................................................150
Persisting time
Persisting time ................................................87
Print from Job store
Print from Job store ......................................126
Index
Print Job store folder
Print Job store folder .............................97, 128
Print order
Print order ......................................................28
Print with options
Print with options ..................................75, 127
Priority
Priority .........................................................108
Process manager
Process manager ..............................................19
Processing tab
Processing tab ...............................................113
Profile name
Profile name .................................................119
programr
programr ........................................................19
Q
Queue
Queue ............................................................54
Queue toolbar
Queue toolbar ................................................54
Queues Properties
Queues Properties ....................................44, 82
Quit
Quit ...............................................................24
Resolution
Resolution ....................................................110
Restart
Restart ............................................................72
Restart interrupted
Restart interrupted ..........................................35
Resume
Resume ....................................................68, 79
S
Schedule a job
Schedule a job .................................................32
select for a job
select for a job .................................................29
Selected device model
Selected device model .....................................87
Separator
Separator ......................................................110
Spoolin Off
Spoolin Off ....................................................81
Spoolout off
Spoolout off ....................................................85
Spoolout on
Spoolout on ....................................................84
Storing rules
Storing rules .................................................160
Suspend
Suspend ...................................................33, 67
R
Raw
Raw ..............................................................114
Recog again
Recog again ..................................................114
Redirect Device
Redirect Device ..............................................86
Redirect device
Redirect device ...............................................39
Redirect Job
Redirect Job .............................................70, 86
Redirect jobs
Redirect jobs ...................................................38
Refresh
Refresh ...........................................................63
Rename Job store folder
Rename Job store folder .........................95, 132
Reply to
Reply to ........................................................119
Reprint
Reprint ...........................................................34
T
The Fax/Mail tab
The Fax/Mail tab .........................................119
The Job ticket editor
The Job ticket editor ....................................104
The Overview tab
The Overview tab .........................................121
The Processing tab
The Processing tab .......................................113
Time Ruler
Zoom tool ......................................................59
Toolbar
Toolbar ....................................................53, 54
Tracing
Tracing .........................................................121
Trailer
Trailer .................................................110, 114
Tray mapping
Tray mapping ........................................90, 114
163
Index
Tumble auto
Tumble auto ................................................110
Tumble off
Tumble off ...................................................110
Tumble on
Tumble on ...................................................110
U
Unsupported languages
Unsupported languages ...................................87
V
View a job
View a job ......................................................36
View Document
View Document .............................................73
Viewer
Viewer ............................................................36
Volume
Volume ........................................................124
Volume properties
Volume properties ...............................101, 138
W
Wait for activation
Wait for activation .......................................108
164