1
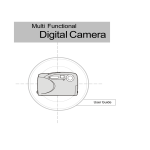
Trust FamilyC@m 200
UK
TRST FAMILYC@M 200
User’s Manual
Version 1.0
Trust FamilyC@m 200
Thank you
Thank you very much for purchasing this product from the Trust range. We wish you hours of fun
with it. Please read this manual carefully before using the product.
Registration
Register your purchase now at the Trust Internet site, www.trust.com, so that you are able to
receive optimal guarantee and service support. You will be automatically informed of
developments to your product and of other Trust products. You will also have the chance to win
some spectacular prizes.
Copyright statement
No part of this instruction manual may be reproduced or transmitted, in any form or by any means,
electronic or mechanical, including photocopying, recording, or information storage and retrieval
systems, for any purpose other than the purchaser's own personal use, without prior written
permission from the manufacturer.
Disclaimer statement
The manufacturer specifically disclaims all warranties, either express or implied, including, but not
limited to, implied warranties for the marketability and suitability for a particular purpose, with
respect to the software, the accompanying product manual(s) and written material, and all other
accompanying hardware. The manufacturer reserves the right to revise or make improvements to
its product at any time and without obligation to notify any person of such revisions or
improvements.
In no event shall the manufacturer be liable for any consequential or incidental damages, including
any loss of business profits or any other commercial damages, arising out of the use of its
products.
All company or product names are trademarks or registered trademarks of their respective
owners.
01 UK 12479 FAMILYC@M200
Trust FamilyC@m 200
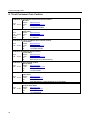
Table of Contents
1.
2.
3.
4.
5.
Introduction ..................................................................................................................................... 2
1.1
Conventions used in this manual........................................................................................... 2
1.2
Contents of the package.......................................................................................................... 2
1.3
Minimum system requirements .............................................................................................. 2
Safety................................................................................................................................................ 3
2.1
General ...................................................................................................................................... 3
2.2
Batteries .................................................................................................................................... 3
Functions of the ‘Trust FamilyC@m 200’ ..................................................................................... 4
3.1
Camera functions ..................................................................................................................... 4
3.2
LCD display function ............................................................................................................... 4
3.2.1
Battery condition ............................................................................................................... 4
3.2.2
Camera function ................................................................................................................ 5
Installation ....................................................................................................................................... 6
4.1
Inserting batteries .................................................................................................................... 6
4.2
Installing stand ......................................................................................................................... 6
4.3
‘Trust FamilyC@m 200’ setup program installation ............................................................. 7
4.4
Installing Ulead Photo Express 3.0 SE................................................................................... 8
4.5
Ulead Photo Explorer 6.0 installation................................................................................... 12
Using the camera and applications............................................................................................. 15
5.1
Taking a photo........................................................................................................................ 15
5.2
Taking a video clip ................................................................................................................. 15
5.3
Erasing memory ..................................................................................................................... 15
5.3.1
Erasing the last photo / video clip ................................................................................. 15
5.3.2
Erasing all photos / video clips...................................................................................... 16
5.4
WEBCAM ................................................................................................................................. 16
5.5
Using Ulead PhotoExpress 3.0 SE........................................................................................ 16
5.5.1
Loading photos ............................................................................................................... 16
5.5.2
Loading video clips......................................................................................................... 19
5.5.3
Live video images ........................................................................................................... 19
5.6
Using Ulead Photo Explorer.................................................................................................. 20
6.
Troubleshooting............................................................................................................................ 22
7.
Specifications ................................................................................................................................ 23
8.
Trust Customer Care Centres ...................................................................................................... 24
1
UK
Trust FamilyC@m 200
1. Introduction
This instruction manual is intended for users of the Trust FamilyC@m 200. Prior knowledge is not necessary
to install and use this product. If you have any questions, please consult one of the Trust Customer Care
Centres. You can find more information about these Customer Care Centres on the last page of this
electronic manual, as well as at the back of the quick installation manual.
1.1
Conventions used in this manual
The following conventions have been used in this manual to indicate instructions:
<key>
Here you should press a key. The name of the key is given between brackets.
‘System’
This is a specific term used in a program. These are the terms used by, for example,
Microsoft Windows 98.
[DIR]
Key in the text shown in square brackets [….].
{term}
The text between the parentheses {….} is the English term, e.g. {File} used in the figure
referred to.
Additional information will be shown as follows:
NOTE:
If you connect the ‘Trust FamilyC@m 200’ to a USB HUB, then the USB HUB should have its own
power supply.
The examples assume that the letter “D” has been assigned to your CD-ROM drive. If your system uses a
different drive letter for your CD-ROM drive, for example “E”, you should replace “D” by “E”.
1.2
Contents of the package
Please check the contents of the package before reading the instruction manual. It should contain the
following:
• Trust FamilyC@m 200
• Camera stand
• CD-ROM containing the drivers, software and instruction manuals
• USB cable
• Type AAA battery (3)
• Quick installation manual
If anything is missing or damaged, please contact one of the Trust Care Centres. You can find more
information at the back of this instruction manual.
1.3
Minimum system requirements
• Intel Pentium 166 MMX CPU
• USB port
• Windows 98
• 32 MB RAM
• 60 MB hard disk space available
• 4x CD-ROM drive
Recommended system configuration for full operation of the programs:
• ISDN adapter or modem with internet subscription
• Sound card with speakers and microphone
2
Trust FamilyC@m 200
2. Safety
2.1
General
1.
Do not use the device in a damp environment.
2.
Do not try to repair the device yourself.
3.
Under the following circumstances have the device repaired by qualified personnel:
UK
a) The cable or plug is damaged or worn.
b) Liquid has entered the device.
c) The device has fallen and/or the casing has been damaged.
4.
2.2
Position the device so that the cables cannot be damaged.
Batteries
1.
The batteries are not rechargeable. Do not try to recharge these batteries. This may cause danger of
explosion.
2.
Do not throw the batteries into an open fire. The batteries may explode.
3.
Never drill a hole in the batteries.
4.
Keep the batteries out of the reach of small children.
5.
Take the batteries out of the camera if the camera is not used for an extended period of time in order to
save battery capacity.
When the batteries are empty, ask your local government where you can recycle them.
3
Trust FamilyC@m 200
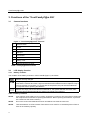
3. Functions of the ‘Trust FamilyC@m 200’
3.1
Camera functions
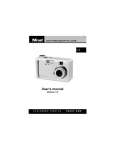
Figure 1: ‘Trust FamilyC@m 200’ functions
A
Release button
B
Viewer
C
Lens
D
USB port
E
LCD screen
F
ON / OFF & MODE button
G
Battery cover
H
Standard attachment point
Table 1: FamilyC@m 200 functions
3.2
LCD display function
3.2.1
Battery condition
The condition of the battery is shown in LCD screen E (Figure 1) as follows:
Batteries are fully charged.
Battery capacity is low. When the camera is switched on, this symbol will start blinking three
times and the camera will sound a signal to indicate that the batteries must be replaced. Only a
few more pictures can be taken. To prevent loss of the pictures, they all must be loaded into
the computer before replacing the batteries.
Batteries are empty. When the camera is switched on, this symbol will blink five times, after
which the camera will automatically be switched off. Replace the batteries.
Table 2: Battery condition
NOTE:
If the capacity of the battery is low or empty, all pictures you want to save must first be loaded into
the computer and saved before replacing the batteries. When replacing the batteries, all pictures
are erased from the camera memory.
NOTE:
Do not mix old and new batteries because old batteries can drain the new ones.
NOTE:
Take the batteries out of the camera if the camera is not used for an extended period of time in
order to save battery capacity.
4
Trust FamilyC@m 200
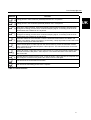
3.2.2
Camera function
DISPLAY
Function
Taking photos in VGA resolution (640x480) between 80 ~110 photos.
UK
Taking photos in CIF resolution (352x288) between 240 ~ 320 photos.
Video clip in VGA resolution. Push the automatic release button and keep it pressed down.
During the recording you will hear a continuous beeping signal. A recording of 20 seconds
can be taken with a maximum of 110 photos.
Video clip in CIF resolution. Push the automatic release button and keep it pressed down.
During the recording you will hear a continuous beeping signal. A recording of 60 seconds
can be taken with a maximum of 320 photos.
Automatic release in VGA resolution. Push the automatic release button and ‘BUSY’ will
appear in the display. During count-down (10 seconds), a beep signal will be heard which will
speed up until the photo has been taken.
Erases the last photo or video clip from the camera memory. Press the automatic release
within 3 seconds to erase the last photo / video clip from. The camera will return to the start
mode after 3 seconds.
Erases all photos / video clips from the camera memory. Press the automatic release within 3
seconds to erase the last photo / video clip from. The camera will return to the start mode
after 3 seconds.
Indicates that the camera memory is full. Loads all photos / video clips into the computer and
then empty the camera memory before the camera can be used again.
The camera is set to the Web-cam function.
The camera is transmitting photos to the computer.
Table 3: Camera functions
5
Trust FamilyC@m 200
4. Installation
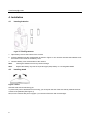
4.1
Inserting batteries
Figure 2: inserting batteries
1. Open battery cover at the bottom of the camera
2. Insert the batteries into the compartment as shown in Figure 2. You can also read how the batteries must
be inserted on the inside of the battery cover.
3. Close the battery cover at the bottom of the camera.
Note:
Inserting the batteries incorrectly causes damage.
Note:
Replace the battery only with an equivalent type (AAA) battery or a rechargeable NiMH
4.2
Installing stand
Figure 3: Stand
Hold the stand with its side facing you.
To prevent the point of attachment from turning, you must push the end of the wire entirely towards the front
or back of the pedestal (See Figure 3).
Next, turn the camera with point H (Figure 1) on the end of the wire until it is hand tight.
6
Trust FamilyC@m 200
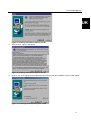
4.3
‘Trust FamilyC@m 200’ setup program installation
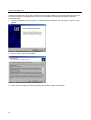
1. Insert the CD in the PC and the installation program will start up automatically. If this does not occur, start
up ‘Setup.exe’ on the CD-ROM.
UK
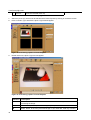
Figure 4: setup program installation
2. Click on ‘Windows 98 / Me’ for the Windows 98 setup program or Windows Me.
Click on ‘Windows 2000’ for the Windows 2000 setup program.
Figure 5 will appear.
Figure 5: setup program installation
3. Click on ‘Next’ to start installation. After installation, Figure 6 will appear.
7
Trust FamilyC@m 200
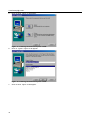
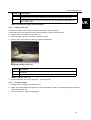
Figure 6: setup program installation
4. Click on ‘Finish’ to complete installation and restart the computer.
5. Connect the USB connection D (see Figure 1) of the camera to a free USB port of your computer.
Windows 98 detects the new hardware and automatically installs the Trust FamilyC@m 200 setup
program.
You have completed installing the setup program. Proceed to chapter 4.4 for installation of Ulead Photo
Express 3.0 SE.
4.4
Installing Ulead Photo Express 3.0 SE
Ulead Photo Express 3.0 SE is an image editor which you can use to load and edit the images on your
computer that you have taken using the your FamilyC@m 200. Follow the instructions below to install Ulead
Photo Express 3.0 SE.
1.
In the installation screen, click on 'Install Ulead Photo Express 3.0 SE'. See figure 4. Figure 7 will
appear.
Figure 7: Installing Ulead Photo Express 3.0 SE
8
Trust FamilyC@m 200
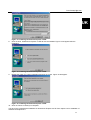
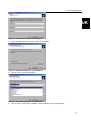
2.
Click on 'Install'. Figure 8 will appear.
UK
Figure 8: Installing Ulead Photo Express 3.0 SE
3.
Click on 'Next'. Figure 9 will appear.
Figure 9: Installing Ulead Photo Express 3.0 SE
4.
Click on 'Yes' to accept the license agreement and continue with the installation. Figure 10 will appear.
Figure 10: Installing Ulead Photo Express 3.0 SE
9
Trust FamilyC@m 200
5.
Click on 'Next'. Figure 11 will appear.
Figure 11: Installing Ulead Photo Express 3.0 SE
6.
Click on ‘Typical’. Figure 12 will appear.
Figure 12: Installing Ulead Photo Express 3.0 SE
7.
10
Click on 'Next'. Figure 13 will appear.
Trust FamilyC@m 200
UK
Figure 13: Installing Ulead Photo Express 3.0 SE
8.
Click on 'Next'. Ulead Photo Express 3.0 SE will now be installed. Figure 14 will appear after the
installation.
Figure 14: Installing Ulead Photo Express 3.0 SE
9.
Disable the option for 'online' registration and click on 'Finish'. Figure 15 will appear.
Figure 15: Installing Ulead Photo Express 3.0 SE
10. Click on 'Finish' to restart your computer.
You have now completed the installation of Ulead Photo Express 3.0 SE. See chapter 4.5 for installation of
Ulead Photo Explorer 6.0.
11
Trust FamilyC@m 200
4.5
Ulead Photo Explorer 6.0 installation
Ulead Photo Explorer 6 is an image processing program which enables you to load and process photos you
have taken with your FamilyC@m 200 on the PC. For installation of Ulead Photo Explorer 6 follow the
instructions below.
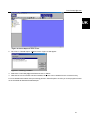
1. Go to the installation screen and click on ‘Install Ulead Photo Explorer 6.0. See Figure 4. Figure 16 will
appear.
Figure 16: Ulead Photo Explorer 6.0 installation
2. Click on ‘Next’. Figure 17 will appear
Figure 17: Ulead Photo Explorer 6.0 installation
3. Press ‘YES” to accept the licence agreement and proceed. Figure 18 will appear.
12
Trust FamilyC@m 200
UK
Figure 18: Ulead Photo Explorer 6.0 installation
4. Enter your data and click on ‘Next’. Figure 19 will appear.
Figure 19: Ulead Photo Explorer 6.0 installation
5. Click on ‘Next’. Figure 20 will appear.
Figure 20: Ulead Photo Explorer 6.0 installation
6. Click on ‘Next’ to start up the installation. After installation, Figure 21 will appear.
13
Trust FamilyC@m 200
Figure 21: Ulead Photo Explorer 6.0 installation
7. Disable the ‘I would like to launch Ulead Photo Explorer’ option and click on ‘Finish”. Click on ‘Finish’ to
complete installation.
You have completed installation of Ulead Photo Explorer 6.0 SE. See chapter 5 for use of the camera and the
applications.
14
Trust FamilyC@m 200
5. Using the camera and applications
5.1
Taking a photo
Note:
The number of photos that can be taken depends on the amount of colour and the clarity
of the object to be photographed. If photos are taken of a colourful object with a great deal
of clarity it will take up more memory than when a dark object is photographed with a dark
background.
Follow the instructions below for taking photos, see also chapter 3.1 and 3.2 for this.
1.
Press the ON /OFF switch (F) for 2 seconds and release it to switch the photo camera on. The LCD
screen (E) will now go on and the photo camera is ready for use.
2.
Find the object you want to photograph in the viewer (2).
Note:
If the object to be photographed is less than 10 cm from the lens, the distance is too short
to use the viewer.
3.
Press the release (A) to record the object.
4.
You must wait about 2 seconds. (BUSY disappears from the LCD screen) before you can take the next
photo. If the memory is full, the word ‘FULL’ will blink in the LCD screen. To make new photos you must
empty the memory. For more information see chapter 5.3.1.
5.
You can take photos in 2 resolutions, VGA (640x480) and CIF (352x288). You can set the resolution by
pressing MODE button (F). The standard setting for the camera is the highest VGA (640x480)
resolution. By pressing the function button (F) you can go to the lower CIF (352x288) resolution.
6.
In the VGA mode, the camera is provided with an automatic release, which causes a time delay of 10
seconds before the photo is being taken. You can set this by pressing the MODE button (F) four times.
The symbol for the automatic release will now appear on the LCD screen. Now, press release button (A)
to activate the automatic release. At this moment the word ‘BUSY’ will appear on the LCD screen and
the automatic release symbol will start blinking. During count-down (10 seconds) a beep signal will
sound which will start beeping more quickly as the time for taking the photo is running down.
7.
If the camera is not in use for an extended period, it will automatically switch off after one minute.
Note:
Keep the lens surface clean so as not to affect the quality of the photo
To take a good photo, you must first keep the object in view for some seconds before taking the photo.
5.2
Taking a video clip
You can take photos in two resolutions, VGA (640x480) and CIF (352x288).
1. Press the ON / OFF button (F) for 2 seconds and release it to switch the camera on. The LCD screen (E)
will now go on and the photo camera is ready for use.
2. Press the function button (F) twice to take a video clip in the VGA resolution or three times to take a
video clip in the CIF resolution.
3. Press the automatic release button (A) and keep it pressed down. During recording you will hear a beep
signal.
5.3
Erasing memory
For erasing the memory, you can choose between removing all photos / video clips or only the last photo /
video clip.
5.3.1
Erasing the last photo / video clip
Press the MODE button (F) five times. A blinking wastebasket symbol 10 will appear on the LCD screen.
Now, press the Release button (A) to erase the most recently taken photo / video clip.
15
UK
Trust FamilyC@m 200
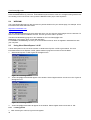
5.3.2 Erasing all photos / video clips
Press the MODE button (F) six times. A wastebasket symbol with the word ALL will appear along with the text
ALL blinking on the LCD screen. Now, press the Release button (A) to erase all photos.
5.4
WEBCAM
The Trust FamilyC@m 200 can also be used very well as webcam for your internet page, for example. A few
informative sites about webcams follow:
http://www.camarades.com
http://www.teveo.com
You can download software from these sites with which you can send live video images over the Internet. For
further information about installation and use, we refer you to the sites in question
The Microsoft NetMeeting program is also suitable for the Trust FamilyC@m 200.
NetMeeting is a program, which comes with Windows.
For installation of NetMeeting we refer you to the Windows manual, which is supplied in standard form with
your computer.
5.5
Using Ulead PhotoExpress 3.0 SE
A short description for the use of the camera in Ulead Photo Express 3.0 SE is given below. For more
information about Photo Express 3.0 SE, please read this program's manual on the CD-ROM.
1.
Start Photo Express 3.0 SE. Figure 22 will appear once.
Figure 22: selecting camera
2.
Trust FamilyC@m 200 Still will appear in the window. Select ‘Digital camera’ and click on ‘OK’. Figure 23
will appear once.
Figure 23: selecting camera
3.
Trust FamilyC@m 200 Video will appear in the window. Select ‘Digital camera’ and click on ‘OK’.
5.5.1
Loading photos
1. After selecting the camera, Figure 24 will appear.
16
Trust FamilyC@m 200
UK
Figure 24: main Photo Express screen
4.
Select ‘Get’ (A) and then ‘Camera’ (B) in the Photo Express main menu.
5.
The ‘Import Module’ screen will appear next to the photo album. At ‘Trust FamilyC@m 200 Still’, select
data source’ (C).
6.
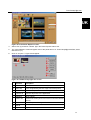
Click on ‘Acquire’ F, Figure 25 will appear.
Figure 25: TWAIN FamilyC@m 200 screen
Function
Description
G
Photo
Photo taken in the camera memory.
H
Video clip
To be recognised by the blue edge around the picture.
I
Transfer
Transfers the photo selected to the application
J
Transfer All
Transfers all photos to the application
K
Snapshot
Takes a photo
L
Erase Last
Erases most recent photo from screen G and the camera
memory.
M
Erase All
Erases all photos from figure G and the camera memory
N
Cancel
O
Play
Plays the video clip
17
Trust FamilyC@m 200
P
Save As…
Saves the recorded video clip
Table 4: Instructions for TWAIN FamilyC@m 200 screen
7.
Select the photo (G), which must be transferred to Photo Express by clicking on it with the mouse.
8.
Press ‘Transfer’ (H) to transfer the photo. Figure 26 will appear.
Figure 26: Processing a photo in Photo Express
9.
Double-click on the photo. Figure 27 will appear.
Figure 27: Processing a photo in Photo Express
Function
18
Description
Q
In this submenu of the ‘Edit’ screen there are various functions you can use for
processing the image.
R
‘Print’ button; prints the processed image on your printer.
S
‘Share’ button; to save the processed image on your hard disk, send it by e-mail or
Trust FamilyC@m 200
Function
Description
fax, or saving it as an HTML document (Internet).
T
‘Express’ button; even more functions you can use for processing the image.
U
‘Web Studio’ button; Here you can create your own Web Album or Web Show for
your internet page.
UK
Table 5: Processing a photo in Photo Express
5.5.2
Loading video clips
Ulead Photo Express 3.0 SE makes it possible to load the video clips taken.
A video clip can be recognised by the blue frame around the picture. See Figure 25.
1. Repeat steps 1 through 6 from chapter 5.5.1
2. Select the video clip (H) by clicking on it with the mouse.
3. Click on ‘Play’ (O) to play the video clip. Figure 28 will appear.
Figure 28: Playing a video clip
Function Description
V
Play button
W
Play settings such as screen size and speed
Table 6: Playing a video clip
4. To save the video clip, click on ‘Save As…’ (P) in Figure 25.
5.5.3
Live video images
1. Repeat steps 1 through 4 from chapter 5.5.1
2. Again, the ‘Import Module’ will appear next to the photo album. Select ‘Trust FamilyC@m 200 Video’ at
‘Select data source’ (C).
3. Click on ‘Acquire’ F, Figure 29 will appear
19
Trust FamilyC@m 200
Figure 29: Live Video image
Function
Description
X
Snapshot
Takes photos of the current image
Y
Video Format
Setting resolution and depth of colour
Z
Video Source
Setting the video Format, exposure, clarity, etc.
Table 7: Playing a video clip
4. Click on the ‘Snapshot button (X) to take a photo.
5. The photo is then loaded automatically in Photo Express 3.0 SE where it can be processed.
6. Settings such as Resolution and depth of colour can be set by pressing the ‘Video Format’ button (Y).
Camera settings can be changed by pressing the ‘Video source’ button (Z).
For more detailed information about processing photos in Photo Express, we refer you to the program
manual. For this, click on “START ! Programs ! Ulead Photo Express 3.0 SE ! Screenbook”
5.6
Using Ulead Photo Explorer
A brief description of the use of the camera in Ulead Photo Explorer 6.0 follows. For further information about
Photo Explorer 6.0, please consult the manual of this program on the CD enclosed.
1. Start up Photo Explorer 6.0 SE. Figure 30 will appear.
20
Trust FamilyC@m 200
UK
Figure 30: Photo Explorer main screen
2. Go to File ! TWAIN Aquire ! Select Source. Figure 31 will appear.
Figure 31: selecting a camera
3. Select the ‘Trust FamilyC@m 200 Still’ and click on ‘Select’.
4. Now that the correct camera has been installed, the photos can be loaded from the camera memory.
For more detailed information about processing photos in Photo Explorer we refer you to the program manual
on the CD-ROM: D:\Software\Pex6\C360.pdf
21
Trust FamilyC@m 200
6. Troubleshooting
Problem
Cause
Possible solution
Windows does not find any
new hardware after
connecting the camera.
The computer's USB port does
not work.
Delete the USB port from the
Device Manager and reinstall it.
Camera is connected to a
USB HUB.
USB HUB has no power supply.
Check whether the USB HUB
adapter is connected.
The computer crashes when The USB port has shared an IRQ Remove cards from the computer
a USB device is used.
with another device.
or divide the IRQ's differently.
Consult your Windows and/or PC
manual for this.
The error message ‘Capture The camera is not correctly
device was not detected’ is
connected to the USB port.
displayed.
The camera is connected to a
USB HUB that does not have a
power supply.
Connect the camera to a USB port.
Trust FamilyC@m 200 is
marked with an exclamation
point ‘!’ in ‘Equipment
management’.
The camera is connected to a
USB HUB that does not have a
power supply.
Connect the camera to a USB
HUB that has a power supply or to
a USB port on your computer.
FamilyC@m 200 does not
function in combination with
TV / capture card.
Conflict between camera and TV
card.
Continue as follows:
Connect the camera to a USB
HUB that has a power supply or to
a USB port on your computer.
1) Remove the TV Capture card.
2) Install FamilyC@m 200.
3) Install the TV Capture card.
Table 8: Troubleshooting
Check the FAQ's on the Internet (www.trust.com). You can also register your product via www.trust.com so
that you are able to receive optimal guarantee and service support. You will be automatically informed of
developments to your product and of other Trust products. You will also have the chance to win some
spectacular prizes.
If you have any problems with the USB connection, we refer you www.trust.com/customercare/help/usb.
A number of tips are listed here, which might solve your USB problem.
If you still have any problems after trying these solutions, please contact one of the Trust Customer Care
Centres. You can find more information on the last page of this electronic manual, as well as at the back of
the quick installation manual. Please have the following information available:
• The article number. This is: 12479.
• Your hardware information.
• A good description of what precisely does not work.
• A good description of when precisely the problem takes place.
22
Trust FamilyC@m 200
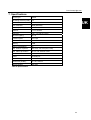
7. Specifications
Sensor type:
CMOS
Recording element (CCD):
1/3”
Focus:
Fixed focus
Pixel resolution:
300K (640x480)
Colour depth:
24 bits
Distance:
5 cm to endless
Exposure:
1/25 – 1/1.000 sec (auto)
Minimum lighting:
50 Lux
Transfer speed:
max 3 fps
TWAIN interface:
Yes
Memory
8 MB
Memory expandable?
No
Max. number of photos
320 CIF & 110 VGA (640 x 480)
Max. Video clip duration
60 sec. CIF & 20 sec. VGA
Connection:
USB 1.0
Power:
Via USB port
Windows support
Windows 98 / Windows ME / Windows 2000
Dimensions (HxBxL):
97 x 65 x 26 mm
Camera weight:
100 gram
UK
Table 9: Specifications
23
Trust FamilyC@m 200
8. Trust Customer Care Centres
Inhabitants of Greet Britain and Ireland should contact:
GB Office
Internet
www.trust.com
From:
E-mail
[email protected]
9:30 – 17:00
Fax
+44-(0)1376-514633
Tel.
+44-(0)1376-500000
Inhabitants of Italy should contact:
Italian Office
From:
Internet
www.trust.com
[email protected]
9:00 – 13:00 E-mail
Fax
051-6635843
/ 14:00 –
Tel.
051-6635947
18:00
Inhabitants of France and North Africa should contact:
French Office
From:
Internet
www.trust.com
[email protected]
9:00 – 17:00 E-mail
Fax
+33-(0)1-48174918
Tel.
+33-(0)803-083080
Inhabitants of Germany should contact:
German Office
From:
Internet
www.trust.com
[email protected]
9:00 – 17:00 E-mail
Fax
02821-58873
Tel.
0800-00TRUST (=0800-0087878)
Inhabitants of Spain should contact:
Spanish Office
From:
Internet
www.trust.com
[email protected]
9:00 – 17:00 E-mail
Fax
+31-78-6543299
Tel.
+31-902 160937
Inhabitants of the Netherlands should contact:
Dutch Office
From:
Internet
www.trust.com
[email protected]
9:00 – 17:00 E-mail
Fax
078-6543299
Tel.
0800-BELTRUST (=0800-23587878) of 078-6549999
Inhabitants of all other European countries should contact:
European Head Office
From:
Internet
www.trust.com
[email protected]
9.00 – 17.00 E-mail
Fax
+31-78-6543299
Tel.
+31-78-6549999
24