1
Your Television's
Directions for Use
44PL9523
55PL9523
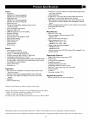
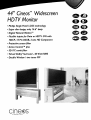
Highlights
• Liquid-crystal-on-silicon
(LCOS)
High-definition
Imaging
• High-resolution
Displaymt280
x 720 pixels
Features
Digital Natural
Modon TM
Digital
Crystal
Clear
Active
Contro[TM--analyzes
Two-tuner,
TM
Surround,
3DY/C
Filter
Comb
Component
Center
signal
40-watt
RMS
and DVI Input
Channel Audio input
Side AV Convenience
Matching
incoming
PiP (Picture-in-Picture)
Double-window
Dolby_Virtual
HD
and adlusts
Jacks
stand and swivel available
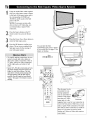
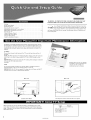
Refer to the Quick Use and Setup Guide (supplied wlth yourTV)
for information
on basic connections,
remote
control button
descriptions,
on-screen
menu language, and Autoprogram.
PHILIP$
3135
035
2;301
Once your PHILIPS purchase is registered, you're eligible to receive all the privileges
of owning a PHILIPS product. So complete and return the Warranty Registration
Card enclosed with your purchase at once. And take advantage of these important benefits.
Congratulations on your purchase,
and welcome to the "family!"
Dear
PHILIPS
product
PHILIPS
owner:
Thank you for your confidence in PHILIPS.You've selected one of the best-built, best-backed produ
today. And we'll do everything in our power to keep you happy with your purchase for many years to come.
As a member of the PHILIPS "family;' you're entitled to protection
ranties and outstanding service networks in the industry.
by one of the most comprehensive war-
What's more, your purchase guarantees you'll receive all the information and special offers for which
you qualify,plus easy access to accessories from our convenient home shopping network
And most importantly, you can count on our uncompromising commitment to your total satisfaction.
All of this is our way of sayingwelcome-and
thanks for investing in a PHILIPS product.
Sincerely,
Lawrence
President
J. Blanford
and Chief Executive
Know these
safetysymbols
P.S. Remember, to get the most from your
PHILIPS product, you must return your
Warranty Registration Card within 10
days. So please mail it to us right now!
Officer
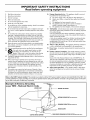
_, This "bolt of lightning" indicatesuninsulatedmaterial within your unit may causean electrical shock. For the safety of everyone in your household, please do not remove product cov_The
"exclamationpoint" calls attention to features for which you should read the enclosed
literature closely to prevent operating and maintenance problems.
WARNING:TO PREVENTFIREOR SHOCK HAZARD, DO NOT EXPOSETHIS EQUIPMENT
TO RAIN OR MOISTURE.
CAUTION:To prevent electric shock, match wide blade of plug to wide slot, and fully insert.
ATTENTION: Pour _viter les chocs _lectriques, introduirela lame laplus large de la fiche dans
la borne correspondante de la prise et pousser jusqu'au fond.
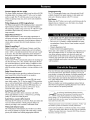
IMPORTANT
SAFETY INSTRUCTIONS
Read before operating equipment
L
Read these instructions.
2.
Keep
these instructions.
16.
3.
Heed
all warnings.
4.
Follow
5.
Do not use this apparatus
6.
Clean only with a dry cloth.
7.
Do not Mock any of the ventilation
with the manufacturers
instructions.
8.
Do not install near any heat sources such as radiators, heat registers, stoves, or other apparatus (including amplifiers)
that produce
heat_
Damage Requiring
by qualified service
A.
B.
all instructions.
near water.
C.
D.
openings.
Install
in accordance
E.
17.
Service - The appliance
personnel when:
should
be serviced
The power supply cord or the plug has been damaged;
or
Objects have fallen, or liquid has been spilled into the appliance; or
The appliance has been exposed to rain; or
The appliance does not appear m operate normally or
exhibits a marked change in performance;
or
The appliance has been dropped, or the enclosure damaged.
Tilt/Stability
- All televisions
must comply
with recommended
international
global safety standards
for tilt and stability properties
of its cabinet design.
• Do not compromise
these design standards by applying excessive pull force to the front, or top, of the cabinet which could ultimately overturn lhe product.
• Also, do not endanger yourself, or children, by placing electronic equipmenffloys
on the top of the cabinet. Such items could
unsuspectingly
fall from the top of the set and cause product damage and/or personal injury.
9.
Do not defeat the safety purpose of the polarized or groundingtype plug. A polarized plug has two blades wifh one wider than
the other. A grounding
type plug has two blades and 1bird grounding prong, The wide blade or third prong are wovided
for your
safety. When the provided plug does not fit into your outlet, consult an electrician
for replacement
of the obsolete outlet.
10.
Protect the power cord from being walked on or pinched particularly at plugs, convenience
receptacles,
and 1he point where they
exit from the apparatus.
18.
Wall or Ceiling
a wall or ceiling
11.
Only
19.
12.
_
Power
power
20.
Outdoor
Antenna
Grounding
- If an outside antenna is connected to the receiver, be sure the antenna system is grounded so as to
provide some protection
against voltage surges and built up static
charges.
13.
14.
use attachments/accessories
specified
by the manufacturer.
Use only with a cart, stand, tripod, bracket, or table
specified by the manufacturer,
or sold with the apparatus. When a cart is used, use caution when moving
the cari]apparatus
combination
to avoid injury from tip-over.
Unplug this apparatus during lightning storms or when unused for
long periods of time.
Refer all servicing
to qualified
service
personnel.
Servicing
15.
Section
This product may contain lead and mercury. Disposal of these
materials may be regulated due to environmental
considerations.
For disposal or recycling information,
please contact your local
authorities or the Electronic Industries Alliance: www.eiae.org
- An outdoor
810 of the National
antenna
Electric
should
be located
Code, ANSI/NFPA
away
to
from
No. 70-
1984, provides information
with respect to proper grounding of
the mast and supporting structure,
grounding of the lead-in wire to
is
required when the apparatus has been damaged in any way, such
as power-supply
cord or plug is damaged,
liquid has been spilled
or objects have fallen into apparatus, the apparatus
has been
exposed to rain or moisture, does not operate normally, or has
been dropped.
Lines
lines.
Meunting
- The appliance
should be mounted
only as recommended
by the manufacturer.
an antenna discharge unit, size of grounding
connectors,
location
of antenna-discharge
unit, connection
to grounding electrodes,
and
requirements
for the grounding electrode.
See Figure below.
21.
Object
and Liquid
do not fall and liquids
openings.
Entry
- Care should
are not spilled
be taken so that objects
into the enclosure
through
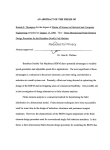
Note to the CATV system installer: This reminder isprovided to call the CATV system installer'sattention to Article 820-40 of the NEC that i
provides guidelines for proper grounding and, in particular, specifies that the cable ground shall be connected to the grounding system of the building,as c ose to the point of cab e entry as practica.
Example
of Antenna
Grounding
as per NEC - National
Electric
Code
GROUND
CLAMP
ELECTRICSERVICE EQUIPMENT
ANTENNA LEAD IN WIRE
POWERSERVICE GROUNDING ELECTRODESYSTEM INECART
258,PA_T
H)
INTRODUCTION
Welcome/Registration
Safety/Precautions
of Your TV .................
2
..............................
2-3
Features ........................................
5
Setting the TV for Stereo Programming ...............
41
Turning theAVL (Audio Volume Leveler) on or off ......
42
Adjusting the DeltaVotume ........................
43
Selecting an AutoSound TM Option ...................
44
FEATURES
_
CONNECTING
TO
YOUR TV ACCESSORYDEVICES
InformationaboutTV Signals ........................
6
Descriptions of Jacks,Cables,and Connectors ...........
7
PanelJack Compatibility Information ..................
B
Pre-connectionRecommendations ...................
9
Connecting a VCR ...............................
10
Connecting a VCR and Cable Box ...................
11
Connecting an S-Video Device .....................
12
Connecting a StandardDVD Player ..................
13
Connecting a Progressive-scan
DVD Player ............
14
Connecting an HD SatelliteReceivertoYPbPr
15
.........
Connecting an HD SatelliteReceiver to DVI ...........
16
Connecting SurroundSoundEquipment ..............
17
Connecting to the Side Inputs:VideoGame System ......
18
Labeling the Audio/Video Input Sources...............
19
USING
THE
REMOTE
Using Closed Captioning ..........................
45
_
46
47
Setting the Sleeptimer ......................
Setting the On Timer .......................
CHANNELS
Using the Channel List ............................
48
[_
49
50
Removing Channels from the Channel List .......
Using Lock Channel ........................
Using Lock After ................................
51
Blocking Programming Based on TV Ratings ...........
52
Blocking Programming Based on Movie Ratings .........
53
Turning the Antenna Attenuator on or off .............
54
GENERAL
Turning the Menu Background on or off ..............
55
[]Using
Surf ................................
Using Dual Screen and PIP....................
56
57
CONTROL
Changing Channels or Input Sources in Dual Screen/PIP . .58
Programming the Remote Control ................
[]Setup
20-21
Selecting a Picture Freeze Option
Codes for Accessory Devices .........
22-23
Using the TV Remote'sVCR-specific Buttons ..... 24
Using Active Control
TM
Plus .......................
Using the Zoom Control ..........................
USING
THE
ON-SCREEN
60
25
Selecting an On-screen Display Option ...............
61
26
Selecting aTime Zone and Setting the Daylight
SavingsControl ................................
62
Setting up or Changing a PIN (Personal
Identification Number) ..........................
63
27
Setting the Subwoofer Control
64
28
29
ADDITIONAL
MENUS
the Picture Controls
................
[]Selecting
a Digital Processing Option
Selecting a Dynamic Contrast Option
.........
........
Selecting a DNR (Dynamic
Option
Turning on Color
Noise Reduction)
Enhancement
Selecting an AutoPicture
TM
.....................
Option
Selecting a Picture Format Option
..................
................
.
_
the TV and Headphone Volume
.............
Selecting aTV Equalizer Option
...............
Adjusting TV Speaker Balance .................
Turning Loudness on or off
........................
Selecting a Sound Mode Option
Using Alternate Audio (SAP)
....................
.......................
.....................
INFORMATION
Cleaning the TV .................................
65
.30
Cleaning or Replacing the Filters ............
66-67
31
Replacing the Lamp ......................
68-69
32
Resetting the Lamp'sLifetime Counter ...............
33-34
Troubleshooting ..............................
SOUND
Adjusting
59
Resetting the Audio/Video Settings to Factory
Default Values .................................
PICTURE
Adjusting/Setting
...................
35
73
Index .........................................
74
Limited Warranty ................................
38
39
40
4
71-72
Product Specifications ............................
Factory Service Locations ......................
36
37
70
75-76
78
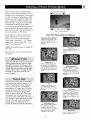
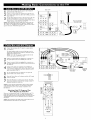
Autoprogramming
The TV's Autoprogram feature scans (when activated) for all
available channels from regular antenna or cable signals and
stores active broadcast stations in the TV's memory.
Compact
design with low weight
The unique Philips single-panel liquid-crystal-on-silicon
(LCOS)
technology allows for a large screen TV with a very low depth
and low weight. This TV will find a place in any living room
without occupying a large area, and it can be easily handled by
two persons.
Surf Button
Philips Auto Surf rMallows you to easily switch between only the
channels lhat are of interest to you. Surf allows two-channel
surfing or nine-channel surfing.
Philips Single-panel,
LCOS Imaging System
The Philips single-panel LCOS technology produces unmatched
high-resolution
and flicker-free video with superb brightness.
This technology enables a large-screen-size TV with low weight
and shallow depth without any concerns for convergence or
image retention.
Digital Natural Motion TM
Digital Natural Motioff rM offers razor-sharp reproduction of
movement and motion. Its unique and highly advanced processing calculates motion trajectories of moving picture elements. It
corrects jerky movement from both studio programs or movie
material.
As you unpack your TV, please note the included items:
• Quick Use and Setup Guide to help you set up your new TV.
• Directions]br Use manual--contains
information on safety,
set maintenance, Factory Service Center locations, and product warranty
• Warranty Registration Card
• Remote Control (with supplied batteries).
Please take a few minutes to complete your registration
card.
The serial number for the TV is on the rear of the set. For
your future reference, please write down the serial and
model number of this television in the space provided on the
warranty page at the back of this manual. (In the unlikely
event you should need to place a service call, these numbers
will be needed.)
Digital CrystalClear TM
Digital CrystalClear'rM--with
Dynamic Contrast, comb filter,
9-bit processing, luminance enhancements, and color enhancemerits---offers a crisp and natural picture from any type or quality of source. The comb filter supports the picture demands of
DVD players and other advanced high-resolution
video sources.
Active Control
TM
Plus+
Active Conlrof rM Plus+ atttomatically analyzes the incoming signals from the Tuner, AV 1, AV2, and Side video inputs 50 times
per second and adjusts key picture settings. In addition to measuring picture noise, this feature uses an ambient light sensor to
Miust the picture settings accor_fing to viewing conditions in the
room.
Your new television and its packing contain materials that can
be recycled and reused. Specialized companies can recycle
your product to increase the amount of reusable materials and
minimize the amounts that need to be properly disposed of.
Your product also uses batteries that should not be thrown
away when depleted, but should be handed in and disposed of
as small chemical waste.
Dolby* Virtual Surround
Dolby processing circuitry provides an enhanced cinema surround sound effect without the need for rear speakers.
Double-window, Two-Tuner PIP
Your TV features double-window, two-ttmer
PIP with second
tuner double window. The TV also has single PIP (free positioning), as well as threefold and sixfold side PIPs. In addition, you
get photo finish, freeze Main, and freeze PIR Replay lets you
play back the previous few seconds in a PIP screen--if you
missed the action, replay it as much as you want.
When you replace your existing equipment,
please find out
about the local regulations regarding disposal of your old television, batteries, and packing materials.
Audio/Video (A/V) Jack Panel
The A/V jack panel allows direct connections with VCRs,
DVDs, high-definition receivers, or other devices, provirfing
quality TV picture and sound playback.
Star_
_As
Energy
AudioVolume
Leveler (AVL) Control
AVL keeps the TV sound at an even level. Peaks and valleys that
occur at commercial breaks or during program changes are
reduced, provkfing a more consistent, comfortable sound.
Energy
lution
Consumer
Star_
an Energyhas determined
Philips
Electronics
this
product meets the
Energy Star® guidelines
for energy efficiency.
is a U.S. registered mark, Using products with the
Star_
label can save energy.
and lowers
*Manufactured
the double-D
Active
Conlrol,
Crystal
Clear,
the viewing of channels or programs with certain ratings, and thus
prevent your children from watching inappropriate materials.
of Philips
Electronics.
utility
under
symbol
V-Chip (with Channel Lock)
The V-Chip feature (with Channel Lock) will allow you to block
5
Partner,
license
Consumer
from Dolby
are trademarks
AutoPicture,
Digital
Saving
energy
reduces
air pol-
bills.
AutoSound,
Natural
Motion,
Eleclronics.
All rights reserved.
Laboratories.
of Dolby
"Dolby"
and
Laboratories.
AutoSurf,
Cineos,
Digital
and Pixel Plus are trademarks
Copyright
2003
Philips
Consumer
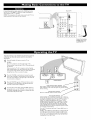
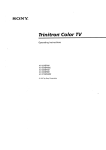
Over the Air
Analog
Signal
TV
Antenna
atYour
Home
Digital
Signal
Satellite
Sa_llites
S_elliteTV
Satellite
Receiver
atYour
Home
Compa_
Satellite
Dish
Home
Telephone Line
Cable
Cable TV
For Direct Connection
toYour TV or to a
Cable Box,VCR, or
Satellite Receiver
Company
CableTV Signal (Analog)
[
Your
High-definition-ready
Set
m
High-definition
television
offers
a picture
with
unprecedented
crispness
and
clarity.
The TV broadcast
industry is moving
the signal standard.
Currently,
the number of programs
being broadcast
in high definition
is limited, but this is changing.
your TV, you will need to connect
a satellite receiver, cable box, or set-top box that can decode HD signals.
6
toward high definition
To view high-definition
plograms
as
on
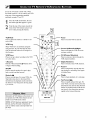
This page contains descriptions and illustrations of jacks, cables,
and connectors you might use in making connections, The cables
and connectors are not supplied with your TV, but you can purchase at your electronics dealer. Or you can order them by calling
our Customer Care Center at 1-800-531-0039.
DVI-D
Cable
This jack
Minimized
video, Allows
of uncompressed
Differential
encrypted
digital
The DVI-D
picture
jacks
part of the picture
is separaled
and while portion.
Be sure to connect
jacks receive
cables,
because
allows
only the picture
T
the color
1he left
the S-Video
twin-lead
wires from an antenna
connection
300- to 75-ohm
Adapter
to the antenna
and
input on the
TV. If your antenna
is already
an RF coaxial
you will not need 1his
cable
Twin-lead Adapter
equipped
with
Audio Input Jacks
Cables used:Audio with RCA-type
phono plugs
Provide sound for the video inputs. If your
accessory device has only one oulput for
audio, connect it to the left (color coded
while) audio jack on the TV.
Audio Jacks
C_bles Used:Audio
with RCA-type
Phono Plugs
Your TV also has monitor oulput ("MON
OUT") audio ("L" and "R") jacks and a subwoofer output jack. Use Audio cables with
RCA-type phono plugs to make connections.
signal.
RGB+HV
Input Connector
Cable used: HD DBt5
Twin-lead
adapter.
from the black
because
300- to 75-ohm
Accepts
than 1he
Video (composile)
and right audio
Component Video Jacks
Cnbles Used: Component
Video with RCA-type
Phono Plugs
S-VIDEO Jack
Cable Used: S-Video
quality
Signal Splitter
Cables Used: RF
Coaxial (75£_)
Signal Splitter
Allows you to mule an antenna or cable TV
signal to two inputs.
is not for computer
S-Video
Input Jacks
Cable used: S-Video
a higher
Screw-on
Type Cable
Signaling)
Component Video Input Jacks
Cables used: component video with
RCA-type phono plugs
Allow you to connect accessory devices such
as DVD players. Separating the video into
three signals, these inputs provide excellent
quality. Be sure to connect the left and right
audio cables, because the Y, Pb, Pr jacks
receive only lhe picture signal.
NOTE: See the "Helpful Hint" on page 13
for more information.
Provide
Or
transmissions
conlent.
jack used in this product
connections.
Coaxial (75D)
Push-on
Type Cable
works only with DVI TMDS
(Transition
digital
DVI-D Jack
Cables Used: DVI-D
Input Connector
used: DVI-D
Antenna RFJack
Cable Used: RF
Tuner (RF) Input Jack
Cables used: RF coaxial cable (75_)
Allows you to connect an antenna, cable TV,
or components having RF outputs to the
antenna input on the TV. RF coaxial cables
are available in push-on or screw-on type.
VGA/HD15Jack
CaNeUsed:HD DB1S
Allows you to connect equipment with RGB.
3.Smm Stereo Mini Phone
Plug to RCA
3.5ram Stereo Mini Phone Plug
Jack Adapter
to RCA JackAdapter
Allows
a connection
between
3.5mm
stereo
out jack on a com-
audio
the
_h
_L._.._
puter and the left and right audio inputs
on the television.
Connect A/V cables
Video
ite")
Cable
(called
Input
"CVBS"
or"compos-
Jack
used:
Video
with
RCA-type
Video (Composite)
Cable Used:Video
RCA-type
Jack
with
with RCA-type
adapter,
phono
plugs m the
then to the TV.
Phono Plugs
phono plugs
Provide
better
antenna
RF input. Be sure to connect
audio cables,
picture
performance
because
only the picture
signal.
video ("V')
with RCA-type
tions.
the
the video jacks receive
output
("MON
jack. Use a video cable
phono
Center
plug to make connec-
Channel
Amp
Speaker
Terminals
(+ and -)
Allow a connection
from a SUlTOUnd
sound
Your TV also has a monitor
OUT")
than the
receiver.
Set the EXT/INT
to EXT to use the TV speakers
cenler
speakers
arrangement.
in a surround
switch
as the
sound
Center
Channel Amp Speaker
Terminals (for the connection
of speaker wires)
AV 1 Input Jacks
Signals accepted: NTSC (4800.
Inputs available: YPbPr, S-Video (Y/C), and
CVBS, plus audio left and right.
Use only one of the video signal inputs at a time.
If you should forget and have more than one type of
signal connected, the set will automatically show the
one of better quality: CVBS--good,
S-Video--better, and YPbPr--best.
For sound, connections must
llllll
_1
I
be made to the AVI audio inputs.
2
3
MON OUT Output Jacks
Provide video and audio output signals from all TV
when those sources are being viewed on the main
screen. Output from the audio L_ jacks is at a fixed
vc;lume level; changing the TV volume does not
_ect them. Adjust the volume at your external
home cinema system.
®
AV 2 Input Jacks
Signals accepted: NTSC (480i),
@
Inputs available: S-Video (Y/C) and CVBS, plus
audio left and right.
Use only one of the video signal inputs at a time.
If you should forget and have both types of signal
connected, the set will automatically show the
S-Video, since it is of better quality than CVBS. For
sound, connections must be made to the AV2 audio
inputs.
4
SUB OUT Output Jack
Provides a signal to an external powered subwoofer.
((e)) Ilq
AV3 Input Jacks
Signals accepted: NTSC (4800, 480p, 720p, and
1080i, plus audio left and right.
Inputs available: YPbPr, plus audio. For sound,
connections must be made to the AV3 audio inputs.
AV4 Input Jacks
Signals accepted: NTSC (4800, 480p, 720p, and
1080i, plus audio left and right.
Inputs available: YPbPr, plus audio. For sound,
connections must be made to the AV4 audio inputs.
EXT
+
SpeakerTerminals and EXT(ernal)/INT(ernal)
Speaker Switch Located on the Back Left Side
of the TV
Definitions:
NTSC--National
AV5 Input
S-Video (Y/C)--provides
brightness.
Signals accepted: NTSC (4800, 480p, 720p, I080i,
plus audio left and right.
Inputs available: RGB+HV. For sound, connections must be made to the AV5 audio inputs.
AV6 Input Connector
Signals accepted: Digital only (TMDS [Transition
Minimized Differential Signaling] encoded, uncompressed); DVI 480i, 481_p, 720p, and 1080i, plus
audio left and right.
Inputs available: DVI TMDS, plus audio. For
sound, connections must be made to the AV6 audio
inputs.
Intended
use of the input: digital set-top boxes and
inputs from other digital video devices.
NOTE: This DVI jack is not for computer connections. VGA cannot be connected.
((e))l
tklI) ) Ivim
TUNER Input Jack
Signals accepted: RF modulated NTSC.
Inputs available: 75_ RF coaxial.
Connector
on the Left Side of
the TV
Television
CVBS--labeled
Composite
System Committee.
"V," provides a small step up in quality from the "t_ner (RF) input. Called
Video.
YPbPr-_rovides
better picture quality than CVBS. Separates
the best quality video signal. Called Component
the signal into color and
Video Input, the signal is
split into three paris, two color and one brightness.
CENTER CHANNEL AMP
INPUT Click-fit Terminals
Provides speaker-wire input terminals for connection of an external
SIDE JACK PANEL
Signals accepted:
(4800.
Analog NTSC
speakers become the center speakers for the home-cinema surround-
Inputs available: S-Video (Y/C)
and CVBS, plus audio left and
right.
Output available: Headphone.
Only one of the inputs can be used
at a time. Select the Side source,
sound system.
NOTE: If no audio is heard from
the set, check to make sure the
and Ihe 'IV detects the input to
which you have connected.
Connections must be made to the
Center Channel Amp switch is in
the tNT position. This switch
should be in the EXT position
only when an external center
channel input is connected to the
Click-fit Terminals.
audio inputs for sound.
home-cioema surround-sound
system amplifier. For Ihis use, set the
switch to "EX'I;" and the "IV
8
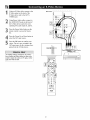
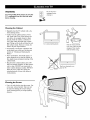
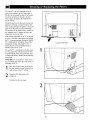
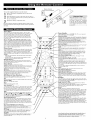
Positioning the TV
Before connecting accessory devices--VCR,
DVD player, or HD satellite receiver, for exampie--please
keep the following in mind:
• Place the TV on a flal surface. An unlevel surface may adversely affect picture pertormance.
• Do not place the TV on shag carpet or any surface that will block the ventilation openings at
the Ix)ttom of the set. Blockage will cause the
TV to overheat and shut down.
• Allow 4 to 6 inches of space behind the TV
for ventilation.
•
•
•
•
•
An optional swivel and an optional stand are
available for use with your TV. See your electronics dealer.
Test various locations in the room to find the
optimal spot to locate the set for best viewing.
Do not place the TV in direct sunlight or near
a heating appliance.
Do not expose the TV to rain or moisture.
To prevent any unsafe situations, do not place
objects on top of the TV.
Providing
Surges
•
•
•
Protection
Against
it will not be exposed
to heat or moisture.
For safety, do not
set objects on top
of the TV,
Accessory
Place the TV on
a flat surface,--------_
Power
Devices
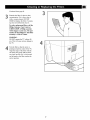
Connecting
Cables
Be sure to insert each cable firmly into Ihe correct jack.
Examples
Do not place 1he TV on a surface that will block
1he air filters localed underneath the set,
from
Overheating
• Arrange accessory devices so that air can circulate freely around them.
• Don't stack the accessory devices. Arrange
them to allow tor good ventilation. The
optional Philips stand provides enough room
for two accessory devices, side by side.
• If you connect an audio receiver or amplifier,
place it on the top shelf so the heated air from
it will not flow around other components.
Using the Connection
This Manual
X
Situate the TV where
Allow 4 to 6 inches
behind the TV for
venti|alion.
Connect all accessory devices before you plug
any of their power cords into the wall outlet or
power strip. NEVER plug your TV into an
outlet that is controlled by a wall switch.
Turn off the TV and/or accessory devices
betore you connect or disconnect any cables.
Ensure that all antennas and cables are properly grounded. See page 3, "Important Safety
Instructions."
Protecting
_
Optional
Optional
Stand
in
The accessory device jack panels shown are fur
example purpose only. The jack panels on your
accessory devices may look difterent. Also, note
that connections can be made in various ways.
The examples are presented only as guides.
9
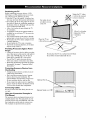
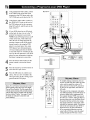
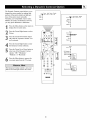
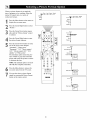
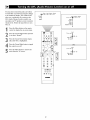
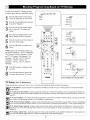
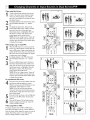
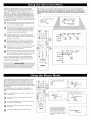
Connect
theincoming
antenna
or cable
TVsignaltotheANTINjackonthe
backoftheVCR.
Back ofTV F
®
@
Using
acoaxialcable,
tothe
OUTjackonthe
backconnect
oftheVCRand
totheTUNERjackonthebackofthe
TV.
3
IncomingCaNe TV
or Antenna Signal
Using A/V cables, connect from the
AUDIO and VIDEO OUT jacks on die
back of the VCR to the corresponding
AV2 audio (L and R) and video (V)
jacks on the back of lhe TV.
remote
access button
the Source
Press thecontrol
Source to Select
on the
list.
Press the Cursor Up or Down button to
select the AV2 input source.
(example
only)
\
/
Press the OK button to confirm your
choice. The set is now swilched to the
AV2 input source for the viewing
grams from the VCR.
of pro-
NOTE: Since you've connected the
cable TV signal directly to the TV's
tuner (slep 2 above), you can walch the
unscrambled
programs by simply tuning to the desired channel. To store
channels in the TV's memory, you
must use Autoprogram,
which you can
access through "Install" in the TV's
on-screen menu. See the Autoprogram
section in the Quick Use and Setup
Guide that came with the TV. If you
use Autoprogram,
you can select channels by pressing the CH + or - buttons
on the TV remote control (in TV
mode). Otherwise, you must press the
digit (number) buttons to tune directly
to the channel you desire.
N
®
MnLII_
Color Coding Used on Jacks and Plugs to
simplify connections:
Yellow: Video (Composite Video)
Red: Right Audio
White: Left Audio,
10
\
\
\
NOTE:
A cable box with AUDIO
OUT jacks
such as the one used in the example on this
page might pass stereo sound to the TV. Check
with your cable TV company. The RF jack out-
Incoming
Cable TV
Back of TV
Signal
put jack on a cable box (commonly labeled
"OUT TO TV," "OUTPUT," or "OUT") will
not pass stereo sound to your TV.
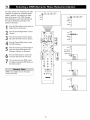
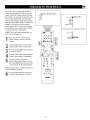
Splitter
Connect the incoming cable TV signal
to a two-way signal splitter. The signal
splitter enables you to route the cable
signal to the TV without using the
OUT TO TV jack on the cable box,
which will not pass stereo sound to the
TV.
Signal
Using
a coaxial cable,
to one
of
the connectors
on theconnect
signal splitter
and to the TUNER jack on the back of
the TV.
Using connector
a coaxial on
cable,
to the
other
the connect
signal splitter
and to the CABLE IN jack on the back
of the cable box.
4
O00
Using Audio/Video
cables, connect to
the AUDIO and VIDEO OUT jacks on
the back of the cable box and to the
corresponding
AUDIO and VIDEO
jacks on the back of the VCR.
IN
Using Audio/Video
to
cables,
connect
[
the AUDIO and VIDEO OUT jacks on
the back of the VCR and to the corresponding
AV2 audio (L and R) and
video (V) input jacks on the back of
the TV.
Press the Source Select button on the
remote control to access the Source
list.
NOTE: Since you've connected the
cable TV signal directly to the TV's
tuner (step 2 above), you can watch
the unscrambled
programs by simply tuning to the desired channel. To
store channels in the TV's memory,
you must use Autoprogram,
which
you can access through "Install" in
the TV's on-screen menu. See the
Autoprogram
section in the Quick
Use and Setup Guide that came with
the TV. If you use Autoprogram,
you can select channels by pressing
the CH + or - buttons on the TV
remote control (in TV mode).
Otherwise, you must press the digit
(number) buttons to tune directly to
the channel you desire.
Press the Cursor Up or Down button to
select the AV2 input source.
Press the OK button to confirm your
choice. The set is now switched to the
AV2 input source for the viewing of programs from the cable box or the VCR.
Color Coding Used on ,lacks and Plugs to
simplify connections:
Yellow: Video (Composite Video)
Red: Right Audio
White: Left Audio.
11
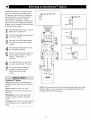
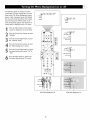
UsinganS-Video
cable,connect
tothe
S-Video
outputonthebackofthe
S-Video
deviceandtotheAV2SVIDEOinput.
Back ofTVF
I
I
I
I
I
UsingStereo
Audiocables,
connect
to
theAUDIO
OUTjacks
ontheback
of
theS-Video
deviceandtothecorresponding
AV2audioinputs(L andR).
Press
theSource
Select
buttononthe
remote
controltoaccess
theSource
list.
m
Press the Cursor Up or Down button to
select the AV2 input source.
Press the OK button to confirm your
choice. The set is now switched to the
AV2 input source for the viewing
grams from the S-Video device.
of pro-
Back
ii!!i!ii!iiiil
¸i+iiii!i
iiil
¸ii!i
,i
only)
\
To simplify making connections, the connectors on audio and video cables are often color
coded lo match the colors on TV jacks, red for
right, and white for left.
000
I
J
PHIMPS
12
I
_
II
\
\
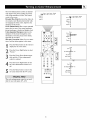
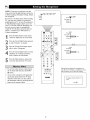
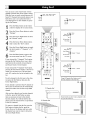
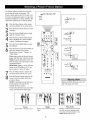
Using Component Video cables, connect to the YPbPr jacks on the back of
the standard DVD player and to the
Back of TV
AV 1 YPbPr jacks on the back of the
TV.
2
3
4
Using Stereo Audio cables,
connect
to
the AUDIO OUT jacks on the back of
the DVD player and to the corresponding AV 1 audio (L and R) jacks on the
back of the TV.
Press the Source Select button on the
remote control to access the Source
list,
Press the Cursor Up or Down button to
select the AVI input source.
Press the OK button to confirm your
choice, The set is now swilched to the
AVI input source for the viewing
grams from the DVD player.
®
[]
®
of pro-
ii!!i!ii!iiiil
,ii
¸iiii
¸ii!i
¸iiiiii!i
il ii!i ii!ili)ii!i iiiiii!i
¸!iii!!iii
¸ii!ili)ii!i
ii!iliN
¸ii;i!iiiil
i iiiiii!i
ili!i!!ii
ii!ili!i
i i i!ii
ii!iiii!i
ii!!ilil
lV2:H_ne
lV3:H_ne
• If you do not know whether your DVD
player is standard or progressive scan, you
can connect it to either AV3 or AV4, and the
TV will automaJically determine the lype of
output,
• To simplify making connections, the connectors on audio and video cables are often
color coded to match lhe colors on TV
jacks: green for Y, blue for Pb, and red for
Pr; also red for right audio, and white for
left audio.
lV4:H_ne
lV_:H_ne
AV6:None
SlOE:None
• The names for the component video jacks
may differ depending on the DVD player or
accessory digital source equipment used,
For example, besides YPbPr, you may see
R-Y/B-Y/Y; or CrCbY, Although abbrevialions and terms may vary, the letters B and
R stand for the blue and red color component signal connectors, respectively, and Y
indicates the luminance signal, If necessary,
refer to the user manual for your DVD or
digital accessory for more information.
• If you experience difficulties receiving
sound with a DVD disc, check the sound
settings through the DVD disc's menu.
2q: ?
®
13
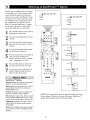
Using Component Video cables, connect
to the YPbPr jacks on the back of the
progressive-scan DVD player and to the
AV3 YPbPr jacks on the back of the TV.
2
3
Back ofTV F
Using Stereo Audio cables, connect to
the AUDIO OUT jacks on the back of
the DVD player and to the corresponding AV3 audio (L and R) jacks on the
back of the TV.
If your DVD player has an I/P switch
on the back, be sure it is set to the "P"
position for progressive-scan mode.
NOTE: Some DVD players have an I/P
switch on the back, while others may
allow the user to change the mode by
pressing a button on the DVD player's
remote control or by using the DVD
player's on-screen menu. Also, some
DVD players have dedicated progressive-scan output jacks that are labeled
as such and require no switching by the
user. See the user manual for your DVD
player for more information on placing
the player in progressive-scan mode.
remotethecontrol
Press
Sourceto Select
access button
the Source
on the
list.
Press the Cursor Up or Down button to
select the AV3 input source.
Press the OK button to confirm your
choice, The set is now switched lo the
AV3 input source for the viewing
grams from the DVD player,
of pro-
i¸i!iiii!ilJiiiiii!i!ill
i iill
¸ IJiiiiiii!iiiii!ii!iii
¸i!ii!iiii!!ill
¸ii
¸!iiiiiiiii!!N ! iiii:!
!:ii!i!Ni
¸i!ii!iiii!!i
¸ii
¸!iiiiiii!i!i!iiii!!ill
i ¸ii
¸!iiiiiii!i!i!iiii!!ii
i ii!!i
:!!;ii!ii!iiii!!ill
i!iii!i i
Inputs AV3-AV6 allow horizontal and vertical
picture panning using the Cursor Left, Right,
Up, and Down buttons. The Side input allows
vertical picture panning; left and right panning
with the Side input is possible when the input
has been labeled "Game," See pages 20 and 21
for details on side panel connections and
source labeling.
®
II#ILI_S
14
To simplify making connections, the connectors on audio and video cables are often
color coded to match the colors on TV
jacks: green for Y, blue for Pb, and red for
Pr; also red for right audio, and white for
left audio.
The names for the component video jacks
may differ depending on the DVD player or
accessory digital source equipment used,
For example, besides YPbPr, you may see
R-Y/B-Y/_, or CrCbY, Although abbreviations and terms may vary, the letters B and
R stand for the blue and red color component signal cormectors, respectively, and Y
indicates the luminance signal. If necessary,
refer to the user manual for your DVD or
digital accessory for more informalion.
If you experience difficulties receiving
sound with a DVD disc, check the sound
sethngs through the DVD disc's menu.
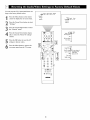
Using Component Video cables, connect to the YPbPr jacks on the back of
the HD satellite receiver and to the cor-
Back of TV
responding AV4 YPbPr jacks on the
back of the TV.
2
®
Using Stereo Audio cables, connect to
the AUDIO OUT jacks on the back of
the HD satellite receiver and to the corresponding AV4 audio (L and R) jacks
on the back of the TV.
3
Refer to the user manual
satellite receiver to complete the connections to the HD satellite receiver
and to use the HD satellite receiver's
on-screen
4
for the HD
setup menus.
After completing HD satellite receiver
connections
and setup through the onscreen setup menus, press the Source
Select button on the TV remote to
access the Source list.
Press the Cursor Up or Down button to
select the AV4 input source.
Press the OK button to confirm your
choice. The set is now switched to the
AV4 input source for the viewing of programs from the HD satellite receiver.
!ili
¸ii!i!iiiii!i
i
¸iiiiii!ii!i!i!ili!i!i!ili!i!i!ili i!i!ili i!i!ili!i!i
To simplify making connections, the conhectors on audio and video cables are often
color cotlex.t to match the colors on TV
jacks: green for Y, blue for Pb, and rexl for
Pr; also red for right audio, and white for
left audio,
_llae names for the component video jacks
may differ depending on the DVD player or
accessory digital source equipment used,
For example, besides YPbPr, you may see
R-Y/B-Y/Y; or CrCbY, Although abbreviations anti terms may vary, the letters B and
R stand for the blue and red color component signal cormectors, respectively, and Y
intricates the luminance signal. If necessary,
refer to the user manual for your DVD or
digital accessory for more informalion.
Inputs AV3-AV6 allow horizontal and vertical picture panning using the Cursor Left,
Right, Up, and Down buttons. The Side
input allows vertical picture panning; left
and right panning with the Side input is possible when the input has been labeled
"Game." See pages 20 and 21 for details on
side panel connections and source labeling.
®®®
®
PfllLIPS
15
Using a DVI cable, connect to the DVI
jack on the back of the HD satellite
receiver and to the corresponding
AV6
DVI jack on the back of the TV.
2
Back ofTV
®"®_I
Using Stereo Audio cables, connect to
the AUDIO OUT jacks on the back of
the HD satellite receiver and to the
corresponding
AV6 audio (L and R)
jacks on the back of the TV.
3
Refer to the user manual
on-screen
4
for the HD
satellite receiver to complete the connections to the HD satellite receiver
and to use the HD satellite receiver's
setup menus.
After completing HD satellite receiver
connections
and setup through the onscreen setup menus, press the Source
Select button on the TV remote to
access the Source list.
Press the
Up or
Down button
select
the Cursor
AV6 input
source.
to
Press the OK button to confirm your
choice. The set is now switched to the
AV6 input source for the viewing of
programs from the HD satellite receiver.
To simplify making connections,
nectors on audio cables are often
coded lo match the colors on TV
for fight audio, and white for left
the concolor
jacks: red
audio.
Because DVI is such new technology,
electronics industry is still working
toward a decision on one standard.
the
Philips testing has determined that compatibility issues exist with respect to a
limited number of high-definition
receivers when they are connected to the
DVI input on this television. If you
should experience difficulties, please
contact our Customer Care Center at 1800-53l -0039.
Inputs AV3-AV6 allow horizontal and vertical picture panning using the Cursor Left,
Right, Up, and Down buttons. The Side
input allows vertical picture panning; left
and fight panning with the Side input is
possible when the input has been labeled
"Game." See pages 20 and 21 for details on
side panel connections and source labeling.
®@
®®@
®
LIHILIPS
16
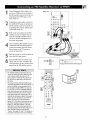
Back of'IV
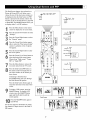
Using speaker wires, connect to the
Center Speaker oulput terminals
(+, -) on the back of the surround
sound receiver and to the corresponding (+, -) CENTER CHANNEL
AMP terminals on 1he back of 1he TV.
2
Set the CENTER CHANNEL AMP
INPUT switch to EXT. This allows
the TV cabinet speakers to be used
as the center speakers in a surround
sound arrangement.
3
Using Stereo Audio cables, connect
to the MON OUT L and R jacks on
the back of the TV and to the corresponding TV IN jacks on 1he back of
the receiver.
Using
an Audio
cable,
connectof the
to the
SUB OUT
jack on
the back
TV and to the Audio Input jack on
the back of a powered subwoofer.
Powe_d
Subwoo_r
Using speaker wires, connect to the
R and L Front Speakers terminals
and to the corresponding
terminals
on the backs of the front speakers.
Front
Speakers
Using speaker wires, connect to the
Surround Speakers terminals (+, -)
on the back of the receiver and to the
corresponding terminals (+, -) on 1he
back of the surround speakers,
Press the Menu button on the remote
control to display the on-screen
menu.
Back of Receiver
(example only)
Press the Cursor Down button to
_neral
select "Settings."
Press the Cursor Right button to
select "General."
Press the Cursor
Down button
repeatedly
selected.
Subwoofer
untd
General
Da_ight _avlng
Settings
Change PIN
Subw_0ter
Set_ng_
Lamp
tamp replaced
N0 * Yes
Daylight saving
Cha_e
PiN
S_wonfer
y_s* R_
is
Press the Cursor Right or Left button
to select "Yes."
NIN
"Yes" must be activated
for the Subwoofer
To simplify making connections,
the com]ectors on audio cables are
often color coded to match the colors on TV jacks: red for right audio,
and white for left audio.
menu selection before the SUB OUT jack
will supply output. This is because 1he sub-
woofer's low frequencies are redirected to the
main TV speakers
when "No" is selected.
17
Using the Audio/Video
cable supplied
with your video game system, connect
to the back of the game system and to
the corresponding
S-VIDEO and
AUDIO (L and R) jacks in the Side
panel of the TV.
Panel on
Side of
TV
NOTE: If your game system cable
does not have an S-Video plug, you
can instead make a regular Video
connection.
2
3
4
Press the Source button on the TV
remote control to access the Source
list.
Press the Cursor Up or Down button
select the Side input source.
to
Press the OK button to confirm your
choice. The set is now switched to the
Side input source for the viewing of
your video game system.
You can label the Side
Audio/Video
input source "Game"
if you would like, See page 21 for
details on Labeling.
!ilil
¸ii!i!iiiii!i
¸ii!i!i!i!iiii!i!i!iiii!i!i!iiii!i!i!iiii!i!i!iiii!i!ii!
¸iiii!i ¸i!;ii
¸iiil
¸iiii!ii!iii!ii!iii!ii!iii!ii!iii!ii!iii!ii!i
¸ii
i
AV6:_one
To simplify making connections,
the connectors on audio and video cables are
often color coded to match the colors on
TV jacks: yellow for video (composite),
red for right audio, and white for left
audio.
Inputs AV3-AV6 allow horizontal and vertical picture panning using the Cursor Left,
Right, Up, and Down buttons. The Side
input allows vertical picture panning; left
and fight panning with the Side input is
possible when the input has been labeled
"Game." See page 21 for details on source
labeling.
\\\
®®®
®
The side panel is also
convenient for connecting equipment
such as camcorders
or
cameras. If the equipment has an S-Video
PHIUPS
Camcorder
output jack, it is the
suggested one to use for your connection to
receive the best picture. Otherwise,
you can
make a regular Video connection. You must
also make an audio connection (L and R for
stereo or L for mono) to receive sound.
Neither an S-Video or Video cable carries a
sound signal.
18
\
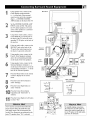
Youcanlabelalltheexternal
Audio/Video
inputsources--AV
i, AV2,AV3,AV4,AV5,
AV6,andSide--according
tothetypeof
accessory
deviceyouhaveconnected
toeach
input.
Afterlabeling,
youcanusetheSource
Select
buttontocyclethrough
andselect
your
desired
source.
Thelabelswill appear
alongsidethechannel
indicalor
whenyouselectthe
AVinputsources.
Picture
IV(_
Sound Features Cha_nels
=
=
1
:
=
Settings
Oemo
Install
IV
General
Setting_Dev,_
Install
Source
Press
theMenubuttonontheremote
controltodisplaytheon-screen
menu.
Settings _AV3AV2AVI
Press
theCursorDownbuttontoselect
"Settings."
Press
theCursor
Rightbutton
repeatedly
toselect
the"Source"
menu.
Source
Press
theCursor
Down
repeatedlytoselect
anyof
thebutton
AVInputs-AV1,AV2,AV3,AV4,AV5,AV6,or
Side.A listoflabelswill appear
nextto
theselected
AVinput.
Settings _AV3AV2AV]
Press
theCursorRightbuttontoenter
thelist.
Press
theCursorUporDownbuttonto
scrollandselect
oneofthelabelsin the
list.
Press
theMenubuttonontheremote
controltoremove
theon-screen
menu
fromtheTVscreen.
Press
theSource
Select
buttononthe
remote
controltodisplaythelistofAV
inputsandtheirlabels.
Settings _AVI
@@@@
zl]w
PHILIPS
Source
Settings
IV
This is just a sample
labeling
might
AVI:DVD
of what the
AV2:Eecorde_
look like. Your
AV3:SAT
Source Labels will depend on the
options you choose to label the
AV4:ffD
AVS:Other
AV6:HD
AV inputs.
I Source _
19
SIDE:Can_era I
Source
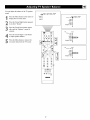
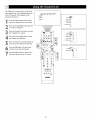
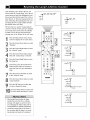
The remote control supplied with your television
may also work with a variety of infrared-controlled accessory devices such as cable boxes,
VCRs, amplifiers, Hi) satellite receivers, satellite
receivers, DVD players, and CD players.
Press the CBL, VCR, AMP, HD, SAT,
AMP
DVD, or CD Mode button, depending
on the type of accessory device you
want to operate. If the function buttons--Play,
CH + or -, Stop, for example--on the remote control work the
device, the remote is ready to use and
SAT
no further steps are required.
If the remote does not work with the
accessory
device,
Using the Code Entry
proceed
....................
L-,:23mDI ........
to step 2.
DVD
Method
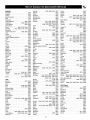
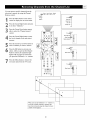
Please look up the code(s) for your brand of
accessory device (listed on pages 24-25)
before
you begin the next few steps.
Press
the desired
Mode
button you
that corresponds
to the type
of device
wish to operate--CBL,
VCR, AMP,
HD, SAT, DVD, or CD. A green light
will indicate the mode labeled on the
VGFI
top of the button, while a red light will
indicate the mode labeled on the bottom of the button. If needed, hold the
button down and the light will toggle
between the green and red settings.
Press
and hold
the at1 and
3 Digittime until
(Number)
buttons
the same
the Backlight and selected Mode bettons light up. Then release both buttons.
Within
30 the
seconds
completingbuttons,
step 3
and
using
Digit of
(Number)
enter the four-digit code from pages
24-25 for your brand of device. Several
codes may be listed for your brand, so
you may need to try them all before the
@®@
remote will operate the device.
If a valid code number has been entered, the
Backlight and Mode buttons will turn off and
then blink twice. The remote control will
assign
that code number
to the mode selected.
Try the function buttons to see if the remote
will operate your accessory device.
@@@®
z_M
If yes, no other steps are required.
PHILIPS
If no, try the procedure again with another code
number listed by your brand. Several attempts
may be needed to complete all code numbers.
If none of the codes work, please
page 23 to try the Auto Search
refer to
Method.
2O
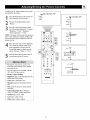
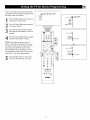
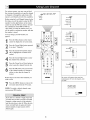
The Auto Search Method of programming
the
remote control can take several minutes to
complete. So before starting, it
ed that you sit in a comfortable
least six feet from the accessory
will have to hold the remote so
is recommendposition at
device. You
that it is
pointed at the front of the device
time the search is taking place.
Turn the accessory
device's
2
for the entire
device on using the
power button,
Press the desired
Mode button that cor-
responds to the type of device you
wish to operate--CBL,
VCR, AMR
HD, SAT, DVD, or CD. A green light
will indicate the mode labeled on the
top of the button, while a red light will
indicate the mode labeled on the bottom of the button.
If needed,
hold the
button down and the light will toggle
between the green and red settings.
Press and hold the 1 and 3 Digit
(Number) buttons at the same time until
the Backlight and selected Mode buttons light up. Then release both buttons.
Press and release
ton on the remote
Backlight buttons
Mode button will
The remote
available
the red POWER butcontrol, The
and the selected
turn off.
will start the Auto Search of all
codes, sending
a command
to chan-
nel up. The backlight will blink after each
code is tried. For devices such as DVD or CD
players, insert a disc and press PLAY on the
device. The remote control will send a command to switch to the next track. Switch AV
receivers to the tuner function.
IMPORTANT:
Watch the channel
indicator
PHILIPS
of your accessory device closely, Once the
right code is found, the channels on your
device
will start to scan up.
Press and release the red POWER button on the remote control as soon as
the channels start to change. The
Backlight buttons and selected Mode
button will blink twice to indicate the
Auto Search code setup is complete,
NOTE: If any other buttons are pressed during the procedure, the Auto Search will end.
Remember, Auto Search can take several minutes to complete, so please be patient,
21
Amplifier
Aiwa ............................
Carver .............
Curtis Mathes .......
Denon .............
GE ...............
Harman/Kardon
......
JVC ...............
Linn ...............
Magnevox ..........
Marantz .....................
Nakamichi ........................
0433
..........
..........
..........
..........
..........
..........
..........
..........
Optimus ..........................
Panasonic ........................
0296
0327
0187
0105
0919
0358
0296
0296
0296, 0348
0348
0422
0335
Philips ......................
Pioneer .....................
Realistic
.........................
Sansui ...........................
0296, 0919
0040, 0327
0422
0348
Sony .......................
Soundesign .......................
Technics .........................
Victor ............................
Wards ......................
Yamaha ..........................
0716, 0247
0105
0335
0358
0040, 0105
0381
Cable
Box
ABC .........
0030, 0028, 0034,
......................
0040,
Allegro ......................
Americast
........................
Antronix ..........................
Archer .................
0049,
Belcor ...........................
Bell & Howell ......................
Cable Star ........................
Cabletenna
.......................
Cableview ........................
0035, 0038,
0041, 0044
0180, 0342
0926
0049
0180, 0824
0083
0041
0083
0049
0049
Century ..........................
0180
Citizen ......................
0180, 0342
Colour Voice ......................
0052
Comtronics
.......................
0067
Contec
..........................
0046
Eastern ..........................
0029
Emerson .........................
0824
Everquest
...................
0042, 0067
Focus ...........................
0427
GO Electronics
....................
0083
Garrard ..........................
0180
Gemini
..........................
0042
General instrument ,, .0303, 0503, 0038, 0837
GoldStar ....................
0067, 017t
Goodmind ........................
0824
Hamlin ............
0047, 0036, 0286, 0061
Hitachi ...........................
0038
Hytex ............................
Jasco ..................
0042,
Jerrold ............
0030, 0039,
.................
0038, 0503,
Memorex .........................
Movie Time .......................
NSC ............................
Oak ........................
Optimus ..........................
Panasonic
..............
0048,
Paragon
.........................
Philips ......................
Pioneer ................
0171,
Popular Mechanics
.................
Pulsar ...........................
Quasar ..........................
0034
0180, 0342
0303, 0041,
0042, 0837
0027
0090
0090
0046, 0034
0048
0134, 0027
0027
0052, 0180
0560, 0904
0427
0027
0027
RCA ............................
Radio Shack ........
0042,
Recoton ..........................
Regal .......................
Regency .........................
Rembrandt
.......................
Runco ...........................
SL Marx ..........................
Samsung ....................
Scientific Atlanta .....
0035,
Signal ......................
Signature .........................
Sprucer ..........................
Starcom .....................
Stargate ................
Starquest .........................
Sylvania
.........................
TV86 ............................
Tandy ...........................
Teleview .........................
Texscan ..........................
Tocom ......................
Toshiba ..........................
Tusa ............................
Unika .......................
United Artists ......................
Universal
..........
0049,
Viewstar .....................
Zenith ..................
Zentek ...........................
0048
0342, 0910, 0824
0427
0047, 0286
0029
0038
0027
0067
0067, 0171
0044, 0504, 0904
0042, 0067
0038
0048
0030, 0042
0067, 0042, 0824
0042
0028
0090
0285
0067
0028
0039, 0040
0027
0042
0180, 0049
0034
0083, 0180, 0218
0285, 0090
0027, 0552, 0926
0427
CD Player
Aiwa ............................
Burmester ........................
California Audio Labs ................
Carver .................
0184,
DKK ............................
Denon ......................
Emerson .........................
Fisher ......................
Garrard .....................
Genexxa ....................
Harman/Kardon
...............
Hitachi ...........................
JVC .............................
Kenwood ..........
0055, 0217,
...........................
Krell ............................
LXI .............................
Linn .............................
MCS ............................
MTC ............................
Magnavox
...................
Marantz ................
Mission ..........................
NSM ............................
Nikko ............................
0206,
0030,
0201,
0420,
0059,
0200,
0853,
0653,
0184
0447
0056
0464
0027
0900
0332
0206
0447
0332
0184
0059
0099
0064,
0708
0184
0332
0184
0056
0447
0184, 0332
0184, 0056, 0207
0184
0184
0201
Onkyo ......................
Qptimus ...........
0447, 0059,
.............
0464, 0332, 0027,
Panasonic ...................
Parasound ........................
0128,
0206,
0064,
0056,
0895
0495,
0172
0330
0447
Philips ......................
0184, 0653
Pioneer ............
0059, 0495, 0271, 0332
Proton ...........................
0184
QED ............................
0184
Quasar ..........................
0056
RCA ..............
0080, 0332, 0206, 0791
Realistic ................
0206, 0207, 0447
Rotel .......................
0184, 0447
SAE ............................
0184
22
Sansui ......................
Sanyo ...........................
Sco_ ............................
Sears ...........................
Sharp ..................
Sherwood ........................
0184, 0332
0206
0332
0332
0064, 0207, 0888
0207
Sony ..................
0027,0212,0517
Soundesign .......................
0172
Tascam ..........................
0447
Teac ..............
0420, 0447, 0201, 0207
Technics ....................
0330, 0056
ViGor ............................
0099
Wards ......................
0080, 0184
Yamaha .....................
0214,0063
Yorx .............................
0488
Surround
Sound
Receiver
ADC ............................
0558
Adcom ...........................
0643
Aiwa ..............
0148,0432,0185,0216
Akai ........................
0251, 0103
Capetronic ........................
0558
Carver ............
0035,0216,0387,0069
Casio ............................
0222
Clarine_e .........................
0222
Curtis Mathes .....................
0107
Denon .................
Eme_on
.........................
Fisher ..................
Garrard .....................
Harman/Kardon
..........
Inkel ............................
JBL .............................
JVC .............................
Kenwood ..........
0054,
...........................
Koss ............................
LXI .............................
Linn .............................
0031, 0798, 0300
0451
0069, 0246, 0387
0451, 0490
0137, 0216, 0918
0089
0137
010t
0341, 0t04, 0069,
0213,0340
045t
0208
0216
Lloyd's ...........................
0222
MCS .......................
0066,0373
Magnavox ..... 0216,0418,0558,0t55,0222
Marantz ................
02t6, 0t55, 0066
Modulaire
........................
0222
NAD ............................
0347
NEC ............................
0262
Nakamichi ...................
0374, 0124
Onkyo .................
0162,0407,0127
Optimus ...........
0208, 0204, 0213, 0246,
.............
0558,0765,0828,0069,0697
Panasonic
..............
0066, 0336, 0545
Penney ..........................
0222
Philips ......................
0216, 0418
Pioneer .......
0t07, 0041, 0177, 0558, 0657
Quasar ..........................
0066
RCA .........
0081,0373,0558,0387,0557
Realistic
...............
0208, 0222, 0190
Sansui .................
02t6, 0220, 0373
Sanyo ......................
0246, 0828
Sco_ .......................
0t90, 0349
Sharp ...........................
Sherwood ...............
0213
0529, 0518, 0089
Sony ..................
0185, 0t95, 050t
Soundesign .......................
0697
Teac .......................
0490, 0190
Technics ...........
0336, 0066, 0235, 0545
ViGor ............................
0101
Wards ........
0081, 004t, 0107, 0t85, 0216
Yamaha .....................
0203,0213
Yorx .............................
0222
Zenith ...........................
0884
Satellite
AlphaStar
........................
Amplica ..........................
Amway ..........................
Astro Industries ....................
BSR ............................
0799
0099
0102
0122
0122
Capetronic ........................
Channel Master ...............
Chaparral ...............
Curtis Mathes ................
DX Antenna .......................
Drake .............
0091,
Echostar ......
0307, 0802,
Expressvu ........................
General Instrument ........
HTS ............................
Hitachi ...........................
Homecable
.......................
0122
0045, 0239
0080, 0236, 0243
0088, 0099
0068
0272, 0045, 0176
0175, 0186, 0296
0802
0388, 0896, 0654
0802
0846
0265
Hughes Network Systems ............
Hytek ............................
IQ ..............................
IQ Prism .........................
JVC .............................
Janeil ...........................
Jerrold ......................
Legend ..........................
Macom .....................
Magnavox ...................
Memorex ....................
Next Level ........................
Panasonic ...................
Philips .................
0227,
Pico .............................
Primestar ....................
RCA ..................
0593,
Radio Shack ......................
Ramsey ..........................
Realistic
.........................
STS ........................
Sony ............................
Star Choice .......................
Star Trak .........................
Toshiba ................
0109,
Uniden .......
0265, 0079, 0101,
...........................
Zenith ..................
0091,
0388,
0088,
0749,
0296,
0179,
0749,
0654,
0170,
0237,
0817,
0397,
0103,
0883,
0776
0122
0237
0237
0802
0179
0654
0296
0045
0751
0751
0896
0728
0751
0102
0388
0882
0896
0102
0079
0068
0666
0896
0207
0088
0751,
0749
0088
VCR
Admiral .....................
Adventura ........................
Aiko .............................
0075, 0236
0027
0305
Aiwa ...................
0334, 0027, 0064
Akai
..................
0133, 0068, 0088
America Action
....................
0305
American High ....................
0062
Asha ............................
0267
Audiovox .........................
0064
Beaumark ........................
0267
Bell & Howell ......................
0131
Brocksonic ........................
0236
Broksonic ..... 0148, 0211, 0029, 0236, 0506
CCE .......................
0099, 0305
Calix ............................
0064
Canon ...........................
0062
Capehart .........................
Carver
..........................
Cineral
..........................
Citizen ......................
Colt .............................
0047
0108
0305
0305, 0064
0099
Craig .........
0064, 0099, 0074, 0267, 0298
Curtis Mathes .......
0062, 0068, 0087, 0189
Cybernex .........................
0267
Daewoo ...........
0305, 0588, 0047, 0072
Daytron ..........................
0047
Denon ...........................
0069
Dynatech .........................
0027
Etectrohome
......................
0064
Electrophonic ......................
0064
Emerex ..........................
0059
Emerson ..........
0211, 0029, 0236, 0305,
.................
0148, 0235, 0506, 0588,
.............
0088, 0239, 0027, 0064,0070
Fisher ..................
0074, 0131, 0081
Fuji ........................
0060, 0062
Funai ............................
0027
GE ..........
0062, 0087, 0075, 0229, 0267
Garrard ..........................
0027
Go Video ....................
0459, 0553
GoldStar
....................
0064, 0065
Gradiente ....................
0035, 0027
HFQ ............................
0074
Harley Davidson
...................
Harman/Kardon
...............
Harwood .........................
0027
0065, 0108
0099
Headquarter
......................
Hitachi ............
0069, 0132,
Hughes Network Systems ............
JVC ...................
0094,
Jensen ..........................
KEC ........................
KLH .............................
Kenwood ...............
0068,
Kodak ......................
LXI .............................
0073
0027, 0068
0069
0035, 0068
0068
0064, 0305
0099
0094, 0065
0062, 0064
0064
Lloyd's ......................
Logik ............................
MEI .............................
MGA ..................
0070,
MGN Technology ...................
MTC .......................
Magnasonic .......................
Magnavox .....
0062, 0108, 0027,
Magnin ..........................
Marantz .....................
Marta ............................
Matsushita ..............
0062,
Memorex .....
0131, 0074, 0027,
.............
0062, 0073, 0267,
..................
0066, 0236,
Minolta ......................
Mitsubishi ..........
0070, 0088,
Motorola
....................
Multitech
....................
NEC ..............
0065, 0068,
Nikko ............................
Nikon ............................
Noblex ...........................
Olympus .........................
Optimus ......
1089, 1189, 0075,
.............
1075, 0131, 0189,
Optonica .........................
Orion .............
0506, 0029,
Panasonic .........
0062, 1189,
...........................
Penney , ,0062, 0267, 0064, 0069,
Pentax ......................
Philco ..................
0062,
Philips ...0108, 0062, 0089, 0645,
Pilot .............................
Pioneer ..........................
Portland ..........................
Profitronic ........................
Proscan .....................
Protec ...........................
0027, 0235
0099
0062
0088, 0267
0267
0027, 0267
0305
0066, 0176
0267
0108, 0062
0064
0189, 0481
0064, 0075,
1064, 0334,
1189, 1289
0132, 0069
0075, 0094
0062, 0075
0027, 0099
0094, 0131
0064
0061
0267
0062
1289, 0064,
0459, 0481
0089
0211, 0236
0189, 0252,
0481, 0643
0065, 0081
0069, 0132
0236, 0506
1108, 1208
0064
0094
0047
0267
0087, 0229
0099
23
Pulsar ...........................
Quarter ..........................
Quartz ...........................
Quasar ............
0062, 0189, 0481,
RCA .........
0087, 0176, 0229, 0069,
.................
0062, 0075, 0133,
Radio Shack .................
0027,
Radix ............................
Randex ..........................
Realistic ......
0027, 0131, 0074, 0075,
......................
0062, 0089,
ReplayTV ....................
0641,
Ricoh ............................
Runco ...........................
STS .............................
Samsung ....................
0072,
Sanky ......................
0066,
Sansui...0068,
0506, 0027, 0094, 0236,
Sanyo .............
0074, 0073, 0131,
Scott .........
0211, 0148, 0070, 0072,
Sears ........
0081, 0132, 0064, 0069,
.................
0062, 0073, 0074,
Semp ...........................
Sharp .......................
0075,
Shintom ..........................
Shogun ..........................
Singer ...........................
Sony .........
0060, 0061, 0059, 0027,
Sylvania ...........
0062, 0108, 0027,
Symphonic
.......................
TMK .......................
0235,
Tatung ...........................
Teac .......................
0027,
Technics
....................
0062,
Teknika ................
0027, 0062,
Thomas ..........................
Tivo .............................
Toshiba ................
0072, 0239,
Totevision
...................
0064,
Unitech ..........................
Vector ...........................
Vector Research ...................
Video Concepts ...............
Videosonic ........................
Wards...0062,
0087, 0089,
........
0267, 0069, 0075,
White Westinghouse
...........
XR-1000 ................
Yamaha ..........................
Zenith ,, .0066, 0027, 0060,
DVD Player
Harman/Kardon
....................
JVC ........................
Kenwood .........................
Magnavox ........................
Mitsubishi
........................
Onkyo ......................
Panasonic ...................
Philips ......................
Pioneer ................
Proscan ..........................
RCA ............................
Samsung .........................
Sharp ...........................
Sony ............................
Technics .........................
Theta Digita .......................
Toshiba ..........................
Yamaha .....................
Zenith ......................
0027,
0099,
0099,
0061,
0066
0073
0073
1189
0132,
0267
1064
0064
0064
0064,
0073
0643
0061
0066
0069
0267
0075
0298
0267
0239
0027,
0131
0072
0089
0099
0267
0099
0062
0070
0027
0267
0068
0068
0189
0064
0027
0645
0070
0267
0267
0072
0065
0072, 0088
0267
0074, 0239,
0108, 0176
0305, 0236
0027, 0062
0065
0236, 0506
0609
0650, 0585
0561
0530
0548
0654,
0517,
0530,
0598, 0552,
0530
0659
0566
0659
0549
0549
0600
0657
0560
0517
0598
0530
0517, 0572
0618, 0530
To use the TV remote control with a VCR,
first make certain it is set to control your VCR
using one of lhe programming
methods
explained on pages 22 and 23.
Press lhe VCR mode button.
Be sure
the button
is green.
light thai appears
Point of
front
thethe
topVCR
of the(remote
remote sensor
toward winthe
dow) when pressing
VCR
Power
Press in turn the VCR on and off.
Mode
Press to place the remote
trol a VCR.
VCR
the buttons.
in a mode to con-
Prog.
Many VCRs have an automatic programming function. If your VCR has this function, the universal code set will assign it to
this function.
Cursor Up/Down/Left/Right
Press to navigale the VCR on-screen
customer controls.
VCRTimer
Press to set up a timer recording
on-screen menu.
CH (Channel Selection)
Press to scan up or down through the
VCR channel numbers,
in the VCR
• (Record)
Hold the • (Record) and Play _ buttons down
to begin a VCR recording.
Digits (Numbers)
Press in directly select VCR channels,
Pause II
Press in temporarily stop the tape during playback or recording. Press again
to release Pause.
Stop •
Press to stop the motion of a tape in playback, rewind, and fast forward.
Rewind _1_1
Press to rewind tapes. For some VCRs, the
Stop button may have to be pressed first,
then Rewind. In playback mode, hold down
the button to view the picture moving rapidly in reverse.
Play I_
Press in begin playback
of a videotape.
Fast Forward
Press to rapidly advance the tape. For
some VCRs, you may need to press the
Stop button first, then the Fast Forward
button. In playback mode, hold the button clown to view lhe picture moving
rapidly in the forward direction.
Remember, the VCR buttons on the remote will
not operate your VCR if those features are not
found on your VCR remote control.
NOTE: All VCR functions (particularly Search,
Rewind, and Fast Forward) will operate the
same as with the remote control provided with
the VCR.
24
Active Control TM Plus+ monitors incoming
video signals from the Tuner, AVI, AV2, and
Side inputs and adjusts key picture settings
for best picture quality. In addition to measuring picture noise, this feature uses an ambient
light sensor (located on the front of 1he TV)
to adjust the picture settings according to
viewing conditions in the room. When you
choose to turn Active Control TM Plus+ on,
you have the options Minimum, Medium, or
Maximum. Maximum is the recommended
option.
I Active Control
(_)
Medium
Maximum
the remote control to display the
"Active Control" menu,
Press the Cursor Right button to display the Active Control TM information
window. You will notice how the values constantly change
ControF M is working.
A_to Picture
Sharpness
DynamicContlast
[
E
NOTE: The Active Control TM values
shown in the information window will
based on the current AutoPicmre TM setSoft,
Press the Menu
on-screen
menu button
from the
to TV
remove
screen.
the
Active
Control
TM
E
Plus+ Settings
Minimum--Sharpness,
and Noise Reduction
Dynamic Contrast,
are controlled auto-
malically,
Medium--Sharpness,
Color, Dynamic
Contrast, and Noise Reduction are controlled
automatically,
Maximum--Sharpness,
Color, Dynamic
Contrast, Noise Reduction, and Contrast are
controlled
[_inimum
[_edium
•
_Nt0+]
(O L*
Personal
_
I
!0
o
while Active
ting: Personal, Rich, Natural,
Multimedia,
or Eco.
(_
Active Control : Hinimum
Press the
Up or Down
button to
select
one Cursor
of the options:
"Minimum,"
"Medium,"
"Maximum,"
or "Off,"
3
Off
[ Active Control
[_aximum
NOTE: Active Control TM Plus is not available for use with the AV3-AV6 input sources.
Press the Active Control TM button on
off
Minimum
automatically,
25
This television offers a unique feature
Zoom. The Zoom Controls allows you
magnify the on-screen picture by 4, 9,
times. The magnified picture can also
panned with the cursor buttons.
Press the ZOOM
control
to display
called
to
or 16
be
button on the remote
the Zoom menu.
Press
button
select the
one OK
of the
zoomrepeatedly
options
or 16x).
Zoom
to 9x,
(4x,
tons toand
Press
panhold
the picture
any of the
up, Cursor
down, butleft or
right.
Zoom
menu
frombutton
the TV
screen and
Press the
Zoom
to remove
the
return the picture to its normal size.
ACm_
_Nl_l[t Cl]_H{IL pI_T_IE
Z00_
PHILIPS
26
To adjust your TV picture controls, select a channel and follow these steps.
Press the Menu button on the remote control to show the on-screen menu.
Picture
Sound
Features
Channels
Picture
Sound Features
Channelx
Demo
Settings T
Install
Brighmes_
Press lhe Cursor Right button to select
"Picture."
Color
C°n_lalt I
Sharpness
Press
button to
select
one ofthe
theCursor
picture Down
adjustments:
"Contrast,"
"Brigbmess," "Color," "Sharpness,"
"Color temperature," or '_fint."
Picture
Contr_xt
NOTE: The menu will show only four items at a
time, so you will need to continue scrolling with
the Cursor Down button to at[just the color temperature and tint.
4
40
Brighmesx
Color
Sha
Press the Cursor Left o1"Cursor Right button to adjust the selected control. Or, if
color temperature is chosen, press the
Cursor Right button to choose from the
options "Normal," "Warm," or "Cool."
Picture
TV
Oigimlprocesslng
Color
ler_ramm(
Press the Menu button to remove the onscreen menu from the TV screen.
Dym_nlkcon_t
I
DR[Ii
Picture
•
Remember, when the bar scale is centered, the control settings are at normal,
mid-range levels.
Colorenh_ncement
lint
• The tint control is not available
AV5 and AV6 input sources.
Picture
Control
with the
Auto pictur_
Pict_
Settings
zoom
•
Brightness adds or subtracts
darkest part of the picture.
•
Color adds or eliminates
•
Sharpness
ture.
•
Tint adjusts lhe picture to obtain natoral
skin tones.
•
Color temperature
"Cool," or "Warm"
•
Normal
•
Cool makes whites, bluish.
•
Warm
improves
light from lhe
PHILIPS
color.
lhe detail in the pic-
offers "Normal,"
picture preferences.
keeps whites, white.
makes whites, reddish.
27
I
40
The Digital Processing control gives you a
choice of different picture scanning modes.
Picture
Progressive Scan doubles the number of picture lines, eliminating line flicker and providing a jitter-free picture.
Sound
Features Channels
Settingx
Picture
Tg =
Denlo
Install
Sound
Features
Channels
_
gontrzs_
Movie Plus provides motion compensation to
prevent bands of light (a halo effect) that may
occur around moving images in the picture.
Brighmexs
Color
Sharpnexs
Digital Natural Motion offers a razor-sharp
reproduction
of movement and motion, Its
unique and highly advanced processing calculates motion trajectories of moving picture
elements. It corrects jerky movement from
both studio programs or movie malerial,
Picture
goHtra]t
4D
B6ghmess
Press the Menu button on the remote
display
2
3
the on-screen
Color
to
Sha
menu.
Press lhe Cursor Right button to select
"Picture."
Picture
Press the Cursor Down button repeatedly until the "Digital processing"
control is selected.
ColurTemper_OJr_
Digital prig
Progressive Scan
Dyr_
Hovie Plus
Digital _atural
contrast
/lotion
Pressdigital
the Cursor
Right submenu,
button to enter
the
processing
Press the Cursor Up or Down button to
select Progressive Scan, Movie Plus, or
Digital Natural Motion.
Picture
Digi_ p_e(esslng
Press the Menu button to remove the
on-screen menu from the TV screen.
Progressiv
e Scan
Hovie Plus
A_E
Digital gaturat
ZOOM
Motion
[]
PHILIPS
Picture
Progressive
Digit_t pre(e_ng
Scan
Hovie Plus
NgDal Natural Motion
[]
Picture
Progressive
Scan
Hovie PIus
Digi_ _
28
Digitalgaturat Motion
The Dynamic Contrast control allows you to
sharpen the picture quality by making dark
portions of the picture darker and light portions of the picture more noticeable.
Normally, you will probably want to select
Medium. In certain circumstances,
however,
you may prefer Minimum
Picture
Sound Features Channels
Setdngs
Pi_re
Sound Features Channels
Denm
Install
Brightness
or Maximum.
Color
C°ntra_t I
Sharpness
Press the Menu button on the remote to
display the on-screen menu.
Press the Cursor
Picture,
Right button
to select
Piclure
Con_ra_t
Press the Cursor Down button repeat_
edly until the "Dynamic contrast" control is selected,
Brightnes_
Color
Sh
Press
the Cursor
Right submenu.
button to enter
file Dynamic
Contrast
Press the Cursor Up or Down button to
select one of the Dynamic Contrast
options: "Off," "Minimum,"
"Medium,"
or "Maximum."
Press the Menu button to remove the
on-screen menu from the TV screen,
Pictu_
1V _-----
E
C_r
D_
ZOlIM
29
processing
Dynamicconl_ast
_DNR
®
PHILIPS
Tempera_re
40
For many reasons, one of which is poor cable
reception, the picture can sometimes appear
slightly speckled (an indication of signal
noise in the picture). The DNR (Dynamic
Noise Reduction) control can help eliminate
this type of interference and improve the
quality of the picture.
Press the Menu button on the remote
display
the on-screen
Picture
Sound
Tv
T
Features
1211annels
Settings
Picture
Sound
Features
Demo
Con_st
Install
gfi
Co!or
to
menu.
Press the Cursor Right button to select
"Picture."
Pi(ture
Contrast
Brightness
Press the Cursor Down button repeatedly until the DNR control is selected.
Color
Sha
Press the Cursor Right button to enter
the DNR submenu.
Pkture
Press the Cursor Up or Down button to
select one of the DNR options: Off,
Minimum, Medium, or Maximum.
Color
_ernpera_ure
Digital processing
DIman_ con_'a_
Press the Menu button to remove the
on-screen menu from the TV screen.
Yousimply
can also
access the
the DNR
DNR button
control on
by
pressing
the remote control.
Pi[ture
ACrNE
DNR is not available for use with input
sources AV3-AV6.
ZOOM
PHILIPS
3O
Pi[ture
40
1211annels
The Color Enhancement
control
can dramati-
cally improve the picture quality of pictures
with a high saturation of color. This control
works in four ways:
Dynamic
Blue Stretch corrects the white colors toward a more bluish-colored
white with-
Picture
Sound teatures
Senings
1V =
Denlo
display
the on-screen
Press the Cursor
"Picture."
Color
C°n_rastI
SAarpne_s
_icture
Co_tr_xt
40
_rightnesx
Color
SAa
to
menu.
Right button
Sound teatures
Brightnes_
green color in case of low green broadcasts,
giving landscapes a fresher and brighter look.
Color-dependent
Sharpness
improves the
sharpness of file picture through the color
information. Gives the picture more details,
especially in red colors.
Skin-tone
Correction
adjusts for over saturation of red that often appears in skin tones.
Press the Menu button on flae remote
Picture
_"
Install
out changing the other colors. Improves 1he
sharpness of the picture.
Green Enhancement
offers a more saturated
1
2
3
Channels
Piclure
to select
CoE__h_nc_ment
On • Off
Tint
Auto picture
Press the Cursor Down button repeatedly until the "Color enhancement"
control is selected.
Pic_ur_ t
[]
®
the color
Press
the enhancement
Cursor Right control
button toonturn
or
off.
Piclure
CoE__h_nc_ment
Tint
ACn_
Press the Menu button to remove the
on-screen menu from flae TV screen.
Auto picture
Pic_ur_ t
zoo/a
NiN
The color enhancement
control
PHILIPS
is not avail-
able for use with inputs AV3-AV6.
31
Olt • On
Channels
Whether you're watching a movie or playing
a video game, your TV has automatic video
control settings to match your current program source or content. AutoPicture TM quickly resets your TV's video controls for a number of different types of programs and viewing conditions that you may have in your
home. The Personal AutoPicture TM settings
are the same as the Picture control adjustments made within the on-screen menu,
Pidure
Sound _eatures Channels
Sotting_
Piffle
Channels
Install
Brighmess
Color
C°ntr_st T
Sharpness
Press the Menu button on the remote to
display the on-screen menu.
Picture
Co_tr_st
2
3
Sound Ieatures
Dem0
40
_rightness
Press the Cursor Right button to select
"Picture."
Color
SEa
Press the Cursor
Down button repeat-
edly until the "Auto picture"
selected,
control
is
Pictur_
Color enhancement
PressAutoPicmre
the
the Cursor TMRight
submenu.
button to enter
Tint
Auto pitier€
Press the Cursor Down or Up button
select one of the AutoPicture TM
to
Picture f
options: "Personal,"
"Rich," "Natural,"
"Soft," "Multimedia,"
or "Eco."
Pictur_
Press the Menu button to remove the
on-screen menu from the TV screen.
Auto •
You can
also select
AutoPicture
TM settings
by simply
pressing
the Picture
button on the remote control.
iii! TM!i!i!iiii!i!i!iiii!i!i!iiii!i!i!iiiii_i_ii
TMiiill
TMiI!I
TMii_il
TMi!i!iiiiiiiiiiiil
TMII_II
AutoPicture
TMiii_i_i_i!i!_i_i_i
TM
PHILIPS
Pictur_
TM!iiii!i_!!ii_iiiiiii!iiiiiiii!iiiiiii!iiiiiii!iiiiiii!iiiiill
Options
Per_nal
settings are based on your personal
choice or viewer control preferences.
Auto •
Rich emphasizes very vibrant colors. (This is
a good choice when AV mode is used in a
brightly lighted room.)
Natural sets picture controls at midlevel settings for consistent viewing conditions.
Soft emphasizes warm colors. (This is a good
choice for dimly lighted room. It gives a cinema-like effect when the light is switched off.)
NOTE: The Personal option shows the personal settings made in the
Picture submenu. When you select one of the preset AutoPicture TM
options, those settings become flae Personal settings.
Multimedia
emphasizes soft colors. (This is
a good choice for playing computer games,
for example.)
ECO reduces brighmess and contrast settings
to low levels as a power consumption saving
measure.
32
Your TV's wide screen (16:9 aspect ratio)
delivers a home-cinema
experience that isn't
possible with a conventional
(4:3 aspect ratio)
set. The 16:9 format of high-definition
(HD)
programs and other widescreen-format
video
sources appear more lifelike, dramatic, and
theatrical. Black or gray bars are diminished
or eliminated. As the television industry
moves toward the high-definition
format standard and more HD broadcasts become available, you will be able to see the broadcasts
they were intended
in 16:9 format.
Conventional
as
NOTE: The Automalic
AV3-AV6,
option
is disabled
Screen
Size
YourTV's 16:9ScreenSize
For flexibility in viewing conventional
4:3format video sources on your TV's wide
screen, you have the options Automatic,"
"Super zoom," "Panoramic,"
"4:3," "Movie
expand 14:9," "Movie expand 16:9," "16:9
subtitle," or "Wide screen."
4:3
YourTV's
Picture
Format
Automatic (not depicted)
Makes the picture fill the screen
as much as possible when the
presence
detected. of black or gray bars is
for
Panoramic
Evenly
picture
screen.
Page 36 explains how to select a picture formal option.
Inputs AV3-AV6 allow horizontal and vertical
picture panning using the Cursor Left, Right,
Up, and Down buttons. The Side input allows
vertical picture panning; left and fight panning
with the Side input is possible when the input
has been labeled "Game." See pages 20 and 21
for details on side panel cormections and
source labeling.
The term aspect ratio refers to the relationship between the width and height of a TV
screen. Historically,
TV screen width has
been 33 percent greater than its height,
amounting to a 4:3 aspect ratio. The width
of your widescreen TV, however, is nearly
80 percent greater than its height, which
means its aspect ralio is 16:9. This screen
corresponds
well with the tendency of the
eyes to feel more comfortable
with fields of
view and action planes that are horizontally
oriented. The wide screen is also proportionally truer to the formats in which
movies are filmed and presented in theaters.
Options
Super
stretches
the edges of the
to fill the TV's wide
zoom
Removes the black or gray bars
on the sides of a 4:3-format picture with minimal distortion. Part
of the top and bottom portions of
the picture are excluded from the
screen.
Movie expand 14:9
Expands the picture to 14:9 movie
aspect ratio. Part of the top and bottom portions of the picture are
excluded from the screen. Black or
gray bars are shown
right sides.
4:3
Displays a conventional 4:3 picture without change. Black or
gray bars will show at the left and
right sides.
at the [ely and
16:9 subtitle
Zoonls the picture for a full view
of subtitles or other information
displayed
at the bottom of the
pictm'e. Part of the top portion of
the picture is excluded
from the
screen.
Movie expand 16:9
Alters the image both horizontal[y (stretched)
and vertically
(cropped)
to fill the TV's wide
screen. Part of the top and bottom
portions of the picture will be
excluded
from the screen.
33
Wide
Evenly
picture
screen
stretches
the width
to fill the screen.
of the
Choose
apictureformatsizetomatchthe
typeofprogram
you'rewatching.
Select
the
normal4:3aspect
ratioor avarietyof
widescreen
formats.
Press the Menu button on the remote to
display the on-screen menu,
Picture
Sound _eatu_es Channels
Settings
Pk u_e
Sound Features Cllannels
Dern0
Install
BdCon_astg_t_iilI
Color
Shar_2_i I
Press the Cursor
"Picture."
Right button to select
Press the Cursor Down button repeatedly until the "Picture format" control
is selected.
Picture
C0ntralt
40
€_ighmes_
Color
Sha
Press
the Cursor Right
button to enter
the picture-format
submenu.
Press the Cursor Down button to select
one of the seven screen formats:
Picture
"Automatic,"
"Super zoom,"
"Panoramic,"
"4:3," "Movie expand
14:9," "Movie expand 16:9," "16:9
subtitle," or "Wide screen."
The Automatic option senses the presence of black or gray bars around the
picture and zooms the picture to reduce
or eliminate the bars.
NOTE:
Color enhancement
Tint
_to
pic_'e
Picture [
Picture
The Automatic option is not avail-
®
able with AV5 (computer) connections.
Press the Menu button to remove the
on-screen menu from the TV screen.
You can also select a picture format
simply by pressing the Picture Format
button on the remote control.
ZlIOM
PHILIPS
34
Picture
Besides the normal volume level control, your
TV also has a headphone volume control.
This control can be adjusted when using
headphones
without having to adjust the main
volume control for the TV cabinet speakers.
Television Volume
Headphone Volume
Picture
Sound [eatu_es Channels
Settings
To control the television volume:
Demo
Install
Press the Volume + button on the
remote control to increase the television volume level.
[_I:_I
I III@] 40
Sound
remote thecontrol
Press
Volumeto decrease
- button on
the the
television volume level.
Features
Channels
Volume
Equ_izer
Balance
NOTES:
•
@
The Volume scroll will not appear on
screen if the on-screen display is set to
"Minimum."
•
Loudness
ffeadph
See page 63 for details.
The Volume level can also be adjusted
within the on-screen menu. Select the
Sound menu and cursor down to the
Volume control. Use the Cursor Left and
Right buttons
Sound
Volume
Equaiizer
Balance
to adjust.
Loudness
Headph
40
To control the Headphone volume:
Press theto Menu
control
displaybutton
the on-screen
on the remote
menu.
Press the Cursor
"Sound."
Right button
Plug your headphones
to select
phone (3.5mm)
Side paneh
Press until
the Cursor
Down button
repeatedly
the "Headphone
volume"
control is selected.
zo_
PHILIPS
Press the the
Cursor
Right button
increase
headphone
volume to level.
Press the Cursor
decrease
Left button to
the headphone
volume
level.
Press the Menu button on the remote
control to remove the on-screen menu
from the TV screen.
35
into the head-
output jack
"1 the TV s
TheEqualizer
controlwill change
thedynamicsofthesoundbeingheardthrough
theTV.
Youcanadjust
thesettings
forthePersonal
Equalizer
option.Theotheroptionshavebeen
preset
atthefactoryandcannot
bechanged.
Picture
Sound Features Channels
Sot_ing_
Der_o
TVl
z
z
TV :
:
SO_
Featules Channels
:
=
Install
Equ_lize_
Press
theMenubuttonontheremote
to
displaytheon-screen
menu.
Balance
Lrsudll_is
%lume I
ffe_clphone volume
Press
theCursor
Rightbuttonrepeatedly toselect
"Sound."
Sound
edlyuntilthe"Equalizer"
Press
theCursorDownbutton
control
repeatis
selected.
Equalizer
Press
theCursor
RightbContinue
uttontoenter
theequalizer
submenu.
to
press
theCursor
Rightbuttontoselect
oneof theoptions:
"Speech,"
"Music,"
"Movie,""Multimedia,"
or"Personal."
Auto Sound:Speed1
120 Hz
II1_111111
500 Hz
III1_11111
L5 kHz
III1_11111
5 kHz
IIII1_1111
10 EHz
IIIIII01111
Sound
If youselectthePersonal
optionand
wanttomakeadjustments,
press1he
CursorDownbuttontoselectan
adjustment,
thenpress1heCursorLeft
Equalizer
Auto Sound: Music
120 Hz IIIIIII1€_1
500 Hz IIIIII1_111
L5 EHz IIIII1_1111
or Right button to adjust the slider control to the desired position.
5 kEz
IIIII1_111
10 kEz
IIIIII1_11
Sound
NOTE: If you attempt to change 1he settings
for the factory preset options Speech, Music,
Movie, or Multimedia,
file Equalizer control
will default to the Personal option.
Equalizer
Press the Menu button to remove the
on-screen menu from the TV screen.
Auto Sound: Movie
110 Hz
IIIII1_111
500 Hz
IIIII1_1111
L5 kffz
III1_11111
5 kffz
IIIII1_1111
10 kffz
IIIII1_111
ZuoM
PHILIPS
Sound
Equalizer
Auto Sound: Multimedia
110 Hz
IIIIII1_11
500 Hz
L5 kHz
IIIII1_111
III1_11111
5 kffz
III1_11111
10 kffz
IIII1_11111
Sound
Equalizer
36
Auto Sound:Persona_
110 Hz
IIIIII10-111
500 Hz
IIII1_1111
5 kffz
IIIII1_111
10 kffz
IIIIII1_111
You can adjust the balance of the TV speaker
sound.
Press the Menu button on the remote
to
Picture
Sound Features Ch_nnelx
Sound Features Channels
Senings
Demo
display
the on-screen
menu,
Inst_ll
Equalizer
Balance
Press
the Cursor
Right button
ly
to select
"Sound,"
Loudnesx
V°lume I
Headphone volume
repeated-
Press until
the Cursor
Down button
edly
the "Balance"
control repeatis
selected.
AVI
Sound
Volume
Press
the speaker
Cursor Right
or Lefl button
to adjust
balance,
Equalizer
Balance
2
Loudnesx
Press the Menu button to remove the
on-screen menu from the TV screen,
Headph
AVI
Sound
Volume
Equalizer
Balance
Loudnesx
Headph
A_EyVE
ZO0_
PHILIPS
37
0
Turning the Loudness control on provides a
volume-dependent
bass-boost effect to the
speakers. Follow 1he steps here lo turn the
Loudness control on.
Pktu_e
Sound
Tv
T
Features
Settings
Sound _eatures Channels
Demo
TV
Install
Press the Menu button on the remote
display
the on-screen
C_annels
to
menu,
Headph_
Press
the Cursor
Right button
ly
to select
"Sound."
Volume
Equalize_
Balance
Loudness
repeatedSound
Press
the Cursor
Down button
repeatedly until
the "Loudness"
control
is
selected.
Volume
Equalize_
Balance
Loudness
ness
off. Right to toggle loudPress on
theorCursor
_mllR'_Rmml.
®
Em
@
Off" On
Headph
lifO÷
Press the Menu button to remove the
on-screen menu from the TV screen,
Sound
Volume
Equalize_
Balance
Loudness
Headph
Z_OM
PHILIPS
38
On • Off
The Sound Mode control allows you to place
the TV sound into either Incredible
Picture
Surrounff TM or Dolby* Virtual mode. The
steps below explain how to select one of
those options.
Sound teatures
Channels
Settings
Sound Features Cllannels
Demo
IV
Install
Volume
Equalizer
Press the Menu button on the remote
display
the on-screen
to
Balan(e
menu.
Press
the Cursor
Right button
ly
to select
"Sound,"
Headph_
Loudnesx
repeatedSound
Press until
the Cursor
Down mode"
button control
repeat- is
edly
the "Sound
selected,
IVsoo; 2
Presssound
the
the Cursor
mode submenu.
Right button to enter
Press the Cursor Up or Down button to
select one of modes, either "Incr.
Surround" or "Dolby Virtual."
Incredible
Surround
programs by making
and fuller.
enhances
stereo
the sound broader
Dolby Virtual creates a virtualized
surround-sound
experience from two
speakers using Dolby Pro Logic*.
Dolby Virtual retains all the original
multichannel
audio information
and
®
provides the listener with the sensation
of being surrounded
by additional
speakers.
When finished, press the Menu button
to remove the on*screen menu from the
TV screen.
ZOoM
PHILIPS
Sound
IV S_
optioncansimply
You
also select
by pressing
a soundthemode
Surround button on the remote
control.
*Manufactured under license from Dolby
Laboratories. "Dolby", "Pro Logic", and lhe double-D symbol are Irademarks of Dolby
Laboratories.
Incredible Surround is a Irademark of Philips
Consmner Electronics. Copyright 2003 Philips
Consumer Electronics. All rights reserved.
39
Forbroadcasts
thatcontain
SAP(Secondary
AudioProgram)
information,
theAltAudio
ControlcanbesettoSARSentasathird
audiochannel,
SAPisanadditional
partofthe
stereo
broadcast
system
thatcanbeheard
apart
fromthecurrent
TVprogram
sound.
TVstationsarefreetouseSAPforanynumber
of
purposes.
Picture
Sound Features Channels
Sound teatures Channels
TV =
D_mo
Set_ing_T
=
Inst_ll
Equalizer
B_tance
[.rsudn_sl
V°lume I
He_clphone volume
If anSAPsignalisnotpresent
withaselected
program,
the"AirAudio"optionin1heTV's
on-screen
menucannot
beselected
andwill
appear
grayed
out.
Sound
Sound mode
If SAPis available
onthetuned
channel:
Air auclio
Nain • SAP
Press the Menu button on the remote to
display the on-screen menu.
[]
Sound
Press
the Cursor
Right button repeatedly
to select
"Sound."
Sound mode
Press until
the Cursor
edly
the Air Down
Audio button
control repeatis
selected.
Air _udio
Pressselect
and
the Cursor
either "Main"
Right button
or "SAR"
to toggle
Press the Menu button to remove the
on-screen menu from the TV screen.
You can also select SAP by simply
pressing the Alternate Audio button
the remote control.
on
z_t_
PHILIPS
40
SAP • N_in
Your TV can output stereo sound. It has both
an amplifier and twin speakers through which
the stereo sound can be heard.
Picture
Sound Features Channels
Settingx
So_
Features C_annels
Den_
Press the Menu button on the remote
display
the on-screen
to
Install
Equalizer
menu,
Balance
loudness
V°lume I
Headphone volume
Press
the Cursor
Right button
ly
to select
"Sound."
repeated-
Press
the Cursor
Down button control
repeat- is
edly until
the "Mono/Stereo"
selected.
Sound
Sound mode
Ait audio
Pressselect
and
the Cursor
either Mono
Right button
or Stereo.
to toggle
Hon o • Stereo
NOTE: If the signal being received is in
mono, it cannot be set to Stereo. If, however,
the signal is being received in Stereo, lhe TV
can be placed in the Mono mode. (If you
select the Mono option, remember to return
the Mono/Stereo
control back lo Stereo when
Sound
So_d mod_
A_t audio
using the TV with stereo programming.)
Si_reo • _on_
Press the Menu button to remove the
on-screen menu from the TV screen,
Acffv_
zm3_
PHILIPS
41
You may have noticed the peaks and valleys
of sound 1hat occur between program changes
or at commercial
breaks. The volume levels
often vary considerably.
By turning on 1he
AVL (Audio Volume Leveler) control, you
can make your TV produce a more consistent
volume level. Follow the steps below to turn
AVL on.
Picture
Sound Features Channels
Set_ingx
Sound Ieatures Channels
TV =
Denm
=
Install
Equalizer
Balance
Loudness
V°lume T
Headphone volume
Press the Menu button on the remote
control
to display
the on-screen
menu.
Sound
Press
the Cursor
Right button repeatedly
to select
"Sound."
AVL
011• On
Del_a volume
lib
Press
the Cursor
button
edly until
AVL is Down
highlighted.
W
m
m
repeat-
[]
dae
on or Right
off,
Presscontrol
the Cursor
button to toggle
Sound
Press the Menu button to remove
menu from the TV screen.
dae
AVL
D
Auto xound
@®@
z_
PHILIPS
42
On • 0_f
The volume
channel and
widely. The
the volume
level coming from channel to
broadcast to broadcast can vary
Delta Volume control will allow
to be increased for channels wilh
weaker audio signals while allowing other
channels with stronger signals to be reduced.
When the Delta Volume control is adjusted or
changed, it will affect only the currently
tuned channel. The TV will store the setting
for that channel in its memory and remember
it when the channel is luned again.
NOTE:
The Delta Volume
control
1V_-_
Picture
:
Sound Features Channels
TV :
Demo
Senings T
:
%und
_i',
Features Channels
:
z
Inst_tl
[qualizer
B_tance
Loudness
Volullley
Headphone volume
Sound
does not
work with 1he headphones.
AVL
Press the CH + or - button on the
remote control
channel.
Oei_a volume
to tune to a specific
@
Press the Menu button on the remote
control to show the on-screen menu,
Press the Cursor Right button repeatedly to select "Sound."
Press
the"Delta
Cursorvolume"
Down button
repeatedly
until
is highlighted.
Press the Cursor Lefl button to
decrease the overall volume, or press
the Cursor Right button to increase the
overall volume for lhe tuned channel.
Repeat the steps above to adjust the delta volume for additional channels.
Press the Menu button to remove the
on-screen menu from the TV screen,
@@@@
Zl]Dt_
PHILIPS
43
0
AutoSound
TM allows
you to select from four
factory-set controls and a personal control.
The personal control consists of settings you
adjust through the on-screen Sound menu.
The four factory-set controls--Speech,
Music, Movie, or Multimedia--enable
you to
tailor the TV sound to enhance the particular
program you are watching. Follow these steps
to select any of 1he options.
Picture
Sound Features Channds
Settings
Sound Features ChanneE
Demo
Install
[qualaer
Balance
L0udn_s$
VolulIleI
Headphone volume
Press the Menu button on the remote to
display the on-screen menu,
Press
the Cursor
Right button
ly
to select
"Sound."
repeated-
Press until
the Cursor
Down
buttoncontrol
repeat-is
edly
the "Auto
sound"
selected.
PressAutoSound
the
the CursorTM Right
submenu.
button to enter
Press the Cursor Up or Down button
select an option: "Speech," "Music,"
"Movies," "Multimedia,"
or
"Personal,"
to
Press the Menu button to remove the
on-screen menu from the TV screen.
You can also select AutoSound
TM
settings by simply pressing the
Sound button on 1he remote
control,
fli rS
PHILIPS
AutoSound TM Options
Speech brings voices to 1he forefront and
emphasizes
ground.
Music
them. Moves music lo the back-
emphasizes
Movies provides
and music.
music over voices.
a balance
between
voices
NOTE: The Personal option shows the personal settings made in the Sound
submenu. When you select one of the preset AutoSound TM options, those
settings become the Personal settings.
Multimedia
provides sound balance best
suited for gaming consoles or interactive
media,
Personal presents the TV's sound according
to the settings you make within the sound
menu.
44
Closed Captioning (CC) allows you to read lhe voice
content of television programs on the TV screen.
Designed to help the hearing impaired, Ibis feature uses
on-screen text boxes 1o show dialogue and conversations while the TV program is in progress. Captions
will appear on screen during captioned broadcasts.
Picture Sound Features Channels
Settingl
[)emo
IV
Demo
_t6ngs_
Follow steps 1 through 7 to select a Closed
Captioning option:
Press
the Menu
control
to display
button
Geaelal Source
Inltall
Inlt_[I
on the remote
the on-screen
Press the Cursor Down button
to select "Settings."
menu.
repeatedly
General
Press the Cursor Right button to select
"General."
Press the Cursor Down button
to select "Caption service."
Sourc_
Menu background
Surf
Dual icr_en Iormat
_t_ngs
Freez
repeatedly
Press the Cursor Right button to enter the
caption service submenu.
General
Press lhe Cursor Up or Down button to
select one of the caption modes:
CC-1, CC-2, CC-3, or CC-4--Dialogue
(and descriptions)
for the action on the
caplioned
TV program shows on screen.
CC-1 is used most frequently. CC-2 may
be used for alternate languages if fhey
are being lransmitted.
T-l, 1"-2, 1"-3, or T-4--Often
used for a
channel guide, schedules, bulletin board
information
for captioned wograms, news,
weather information,
or stock market
Freeze [ormat
@
_elet AVset6ngl
Caption service
_ttings_
T_
®
®
OSD
Se_ngs _neral
reports.
NOTES
• Text Modes (T-I through
on screen as boxes and
T-4) appear
C_ption service
may Mock portions of lhe TV screen.
• Not all caption services are necessarily
being used by a TV channel during the
transmission
of a caplioned
program.
Press the Menu button to remove the onscreen menu from the TV screen.
To turn Closed
Captioning
Press the CC button
control.
Access the CC "Oil/On/On during
mute control," using the CC button
on the remote control or the
"Features" on-screen menu.
I cIoled c_ptionz[_
Off
On
On during mute
on or off:
on the remote
Press the Cursor Up or Down button
repeatedly
to select "Off," "On," or "On
during mute."
Off--Closed
captioning service will not
be displayed on lhe TV screen.
On--Closed
captioning information
(if
available) will display on the TV screen.
On during mute---Closed
Caplioning
information will turn on only when lhe
Mule button is pressed. Turns the Closed
Captioning
information
off when the TV
volume is restored.
Press the Menu button on the remote
! remove the on-screen
display
from the TV screen.
to
Off
Off
[Clo_ed captions(_
On
Ic u 0d® o°0ur,°
m°te]
On
On during mute
r
NOTES: • The captions
and product commercials
your area's TV program
The captionext wograms
45
do not always use correct spelling and grammar. * Not all 'IV programs
made for broadcast include Closed Captioning infurmation.
Refer to
listings for the TV channels and times of shows with Closed Captioning.
are usually noted in the TV listings with service marks such as "CC."
NOTE: If you have not selected your time
zone and set the Daylight Savings control, do
so before making a Sleeptimer setting. Details
are on page 64,
Tv
l
Picture
Sound
Features
C_annels
Settings
Features
Channels
0emo
If you have ever fallen asleep while watching
TV, you may have wished you could have
programmed your TV to turn off automatically. The Sleeptimer feature allows you to set
your TV to do that. With the Sleeptimer control, you can set a timer to automatically
switch the TV off after a period of time you
choose--5 minutes up to 180 minutes in
5-minute increments.
Press the Menu button on the remote
control to display the on-screen menu.
Press
Cursor Right
button repeatedly
untilthe"Features"
is selected.
Clused cap_iuns
Install
Sieep_imer
On
Features
Closed captions
Sleeptimer
n
_
m
m
_
5 min.
On
I
0(3(3 0
teatu_es
Press totheselect
Cursor
Down button repeatedly
"Sleeptimer."
Closed
captions
Sleeptimer
Press
the Cursor
Right button
to set the
sleeptimer
in 5-minute
increments,
from 5 minutes to 180 minutes.
180 min.
On
Press the Menu button to remove the
on-screen menu from the TV screen,
During the last minute of a sleeptimer
setting, the TV will display a countdown
screen
that will allow you to cancel the setting.
• To see how many minutes remain before
1he TV shuts itself off, press the INFO+
11_ button.
• An on-screen countdown will appear during the last minute before the TV shuts
itself off, At this time, you may cancel
1he Sleeptimer setting by pressing the OK
button on 1he remote control,
PHILIPS
gee sleeptimer will switch off the 11/ in 45
seconds.
Cancel@
46
NOTE: If you have not selected your time
zone and set the Daylight Savings control, do
so before making an On Timer setting. Details
are on page 64,
Picture
Sound
Tv
T
Featu_s
Ch_nels
Settings
Femurs
Oemo
The On Timer control
allows
you to set a time
Fnstall
C_osedcaptions
Sieeptim_
for the TV to come on automatically
at a certain time of day. The on timer can be set to
work once or daily at a time you specify.
On
Press the Menu button on the remote
control
menu.
to display the on-screen
Femurs
Press the Cursor Right button
edly to select "Features,"
repeat-
(]osed captions
Sleeptimer
On
Press the Cursor Down button repeatedly to select the "On timer" control.
@
Press
the
Onthe
Timer
Cursor
submenu.
Right button to enter
Press the Cursor Up or Down button to
select "On."
Press the Cursor Right button to shift
the menu to the start-channel submenu.
Press the Cursor Up or Cursor Down
button to select the channel you would
like the TV to tune to when it turns on.
Press the Cursor Right button to shift
the menu to the day/daily submenu.
Press the Cursor Up or Down button
to select the day to turn on or select
"Daily."
@
Press the Cursor Right button to
! enter the AM/PM submenu,
Press the Cursor Up or Down button
to select "AM" or "PM."
_
k
Press
the start
Cursortime.
Right button
enter the
Press the Number
buttons
to
to enter
the time. Use "0" first if entering a
singlel digit (for example, input "0,
1, 3, 0" for 1:30).
Press the OK button to confirm.
Press tbe Menu button to remove tbe
on-screen menu from the TV screen.
47
_nels
The Channel
List control
shows
all 1he avail-
able channels that Auto Programming
placed
in file TV memory. The channels can be
selected from 1his list.
Press the Menu button on the remote
IV &'_
Picture
=
Sound Features Channds
=
a
:
D_m0
Set_ing_T
Channel li_t
Install
Channellock
control to display the on-screen menu.
Lockafter
11/ rain
Press
the Cursor
Right
ly
to select
"Channels."
button repeated-
Press the Cursor Down button
file "Channel list" control.
to select
ChanneIi
Channei iist
Press the Cursor Right button to enter
file Channel List submenu,
_annei io&
Lock alter
TV _atin
Press the Cursor Up or Down button to
select a specific channel from the list.
Press the OK button, The television
will tune to the selected channel,
Press the Menu button to remove the
on-screen menu from the TV screen,
@®@
ACI_E
@@@@
PHILLIS
48
You can remove specific channels from the
television's
memory by using the Channel
Remove control.
Picture Sound Features Channels
131annels
D_m0
SetlingxT
Install
Press the Menu button on the remote
control
to display
the on-screen
Channel list
menu.
Channellock
Lock alter
11/ r_in
Press
the Cursor
Right
ly
to select
"Channels."
button repeated-
Press totheselect
Cursor
button
repeatedly
the Down
"Channel
remove"
control,
Channels
Hoviera6ngsio&
Ch_nel
the
channelsRight
in the
television's
Presslisttheof Cursor
button
to enter
@
memory.
r_move
Antera_aat_
Press the Cursor Up or Down button to
select a channel you want to remove.
Channels
Press the OK button to activate your
choice. After you activate the Channel
Remove control, the channel(s) high-
g_annel
lighted will no longer be tuned when
you press 1he CH(annel) + or - buttons.
Press the Menu button to remove the
on-screen menu from the TV screen.
Channels
_n_
A_E
ZOOM
I
I
I
I
'
I
I
When
you use the CH(annel)
+ or - buttons
scroll the available
channels,
have been removed
using the channel
control
channels
will not appear.
49
that
remove
to
1
Forvarious
reasons,
youmaywanttoblock
theviewingofmaterials
ona specific
channel
orchannels
orthrough
theaudio/video
(AV)
inputs.Lock Channel provides 1his capability.
Before using the Lock Channel feature for the
first time, you will be asked to enter the PIN
number. Use the digit buttons on 1he remote
control to enter 1he PIN you choose. All number combinations
from 0000 to 9999 are
Piclure
Sound teatures
Channels
1V_
Qlannels
[lem0
Settings T
Channellist
Install
Ch_nnellock
Lock _fter
11/ r_in
valid. After you enter the number once, you
will be asked to confirm the number, and then
the number is stored.
To set or change your PIN number,
page 65.
Channels
see
Channel lis_
Channellock
Lock after
Press ff_e Menu button on the remote
control
to display
the on-screen
IV ra6n
;.
menu.
Press
the Cursor
Right button repeatedly
to select
"Channels."
Press
Cursor Down
button repeatedly tothehighlight
the "Channel
lock"
control,
the
lock submenu.
Presschannel
the Cursor
Right button to enter
Press the Cursor Up or Down button to
select a specific channel from the list.
Press the OK button.
of 1he channel
number
The oval in front
will change
yellow to show 1hat the channel
locked.
A_ETVX
_DTJXt_C_I*HIIL pIgT_IE
to
is
Z011_
Repeat steps 5 and 6 for other channels
want to lock.
you
pllll.ll_
This screen will appear when tuned to a
locked channel. "lb view the channel, enter
your PIN.
Press the MENU button to remove the
on-screen menu from the TV screen.
This channel is Iockecl.
To unlock the channel,
pleaseenter your PIX.
NOTE: To unlock a locked channel, enter
your personal PIN number,
ff you tune to a channel or input source 1hat
is locked and you enter your PIN, all locked
channels or input sources will be unlocked
until the television is shut off. When 1he television is turned back on again, previously
locked channels
locked again.
or input sources
will be
5O
You may want to block programming after a
certain time of day. This feature is excellent for
limiting the amount of time your children watch
TV or for preventing them watching unsuitable
programs 1hat are oflen shown al night.
NOTE:
3 a.m.
The set automatically
Piclure
Sound Features Channels
Setlings
Qlanllels
Demo
Channel list
Install
unlocks after
Channel lock
Lock alter
11/ I_in
Press the Menu button on the remote
control
menu.
to display
the on-screen
I_annels
2
3
Press the Cursor Right button repeatedly to select "Channels."
Channellock
Press the Cursor
Lock after
Down button
IV ratin
repeatedly
control.
to select the "Lock
afler"
enter
Press the
the Lock
CursorAfter
Rightsubmenu
button to
(with
the options "Off" or "On").
Press the Cursor Up or Down button
to select "On" from the submenu. A
submenu
with the options
of "AM"
or "PM" will appear.
Press 1he Cursor Right button to
enter the AM/PM submenu. A box
with the time (or area where
can be entered) will appear.
®
the time
Acr¢_
Press the Cursor Up or Down button
to select AM or PM.
Press the Cursor Right button to
enter the Lock After time.
This ckannel is locked.
Press the Number
buttons
To unlock the ckannel,
to enter
the time you want the television
lock all channels.
ple_e enter youg PIN.
to
Press the Menu button to remove the
on-screen menu from the TV screen.
Once
display
:NIN
enter
the time has expired,
this screen.
all channels
"lb view the channels,
your PIN.
ff you tune to a channel or input source 1hat
is locked and you enter your PIN, all locked
channels or input sources will be unlocked
until the television is shut off. When 1he television is turned back on again, previously
locked channels or input sources will be
locked again.
51
will
You can select specific TV Ratings to block
broadcast signals that have unsuitable content,
Pictu_
Sound
Features
Channdx
Settingx
Press the Menu button on the remote
_annels
Demo
control to display the on-screen menu.
Channel lixt
Install
Channell0ck
Lock after
Press
the Cursor
Right
ly
to select
"Channels."
button repeated-
P/ratin
Press totheselect
Cursor
button lock"
repeatedly
the Down
"TV ratings
control.
Channdx
Chan_l lilt
I"/
Press
Cursor Lock
Right listbutton
to enter
the TVtheRatings
of options,
Press the Cursor Up or Down button
select one of the ratings,
Press the OK button
choice,
to activate
Ci
V_4
ANF
W
DV_
m
_hannetlock
Lockafter
@
to
1Vraiin
your
NOTE: Some of the TV Rating options contain specific subratings. "TV-Y7" contains the
"(FV) Fantasy Violence" subrating; "TV-PG"
and "TV-14" contain "(D) Dialogue,"
"(L)
Language,"
"(S) Sex," and "(V) Violence"
subratings; "TV-MA" contains "(L)
Language,"
subratings.
@®@
@®
"(S) Sex," and "(V) Violence"
If the PIN message is displayed, enter
your PIN.
Channdx
AC_
Press the Menu button to remove the
on-screen menu from the TV screen,
1V ralings l_k
®®@@
ZDa_
PHIUP$
TV
Ratings
_Some'iV Ratings havesubrating options.
(from TV Broadcasters)
None--.-programs that are either rated "None" or have no content advisory. Selecting this option will block all such programs.
N
younger
V-Y (All
children.
Children)--programs
N
V-Y7 (Directed to Older Children)--programs designed for children ages 7 and older. These prograns may be more appropriate for children who
have acquired the development skills needed to distinguish between make-believe and reality. Such programs may include mild fantasy and comic violence (FV).
TV-G (General
Audience)--most
designed to be appropriate for all children, especially ones ages 2-6. These programs are not expected to frighten
parents will consider
programs that are raled TV-G m be suitable
for children of all ages. Such programs
have little
or no violence, no strong language, and little or no sexual dialogue or sexual situations.
TV-PG
(Parental
Guidance
Suggested)--programs
contain malefial that parenls may find unsuitable
has one or more of the following: moderale violence (V), some sexual situations
TV-14 (Parents
Strongly
Cautioned)--programs
programs have one or more of the following:
(S), infrequent
for younger children. This lype of programming
coa_e language (L), or some suggestive
contain material thai many parents will find unsuitable
intense violence (V); intense sexual situations
dialogue (D).
for children under 14 years of age. These
(S); strong, coarse language (L); or intensely suggestive
dialogue (D).
N
V-MA (Mature Audience
Only)--specifically
designed to be viewed by adults and therefore may be unsuitable for childaen under 17. Such programs have
one or more of the following: graphic violence (V); explicit sexual situations (S); or crude, indecent language (L).
59
You can prevent the viewing of unsuitable
programming
based on movie ratings.
Picture
Setfing_
Press the Menu button on the remote
control
to display
the on-screen
Sound Features Channels
Channetl
Demo
menu.
C_annel list
Install
Channel Io&
[o&
Press
the Cursor
Right
ly
to select
"Channels."
button repeated-
after
TV ratin
Press totheselect
Cursor
edly
the Down
"Movie button
ratingsrepeatlock"
control.
Channas
"FI
Press
the Cursor
enter
the Movie
Ratings Right
Lock button
list oftooptions.
Press the Cursor
Up or Down button
select the rating
you want to lock.
Press the OK button
choice.
NOTE: When
higher ratings
turned on. (for
selected, "NCmatically turn
to activate
m
_
MT
m
Movie
_afings
bck
m
_nnel
m
_nna
remove
at
@
to
your
a rating is tamed on, all
(and subratings) will be
example, if "R" is
17" and "X" will autoon also.)
If the PIN message is displayed, enter
your PIN.
®
Press the MENU button to remove the
on-screen menu from the TV screen.
Channas
PHILIPS
Movie
Ratings
from the Motion
I
Picture Association
NR (Not Rated)--progra_s
G (General
of America)
that the Motion Picture Association
Audience)--all
ages admitted.
Most parents
of America
will find programs
have little or no violence,
no strong language,
and little or no sexual
PG (Parental
Suggested)--contain
material
following:
Guidance
moderate
PG-13 (Parents
violence,
Strongly
some sexual situations,
Cantioned)--contain
material
violence,
R (Restrieted)-=specifically
for adults. Anyone
designed
or adult guardian. Such pmgrmns
suggestive dialogue.
NC-17 (No one under
indecent
or sexual
coarse
language,
or some suggestive
that parents may find unsuitable
sexual situations,
coarse language,
for children
or suggestive
the age of 17 will be admitted)---should
intense
violence;
of all ages. Such programs
intense
These programs
have one or more of the
dialogue.
under the age of 13. Progrmns
that are rated PG-
dialogue.
under the age of 17 should view programs
have one or more of the following:
for children
situations.
that are rated R only with an accompanying
sexual situations;
be viewed by adults only. These programs
strong, coarse
have graphic
language;
violence;
parent
or intensely
explicit sex; or crude,
language.
X (Adults
coarse
that are rated G to be suitable
dialogue
that parents may find unsuitable for younger children.
infrequent
13 have one or more of the following:
h_ chosen not to rate.
Only)--contain
and intensely
one or more
suggestive
of the following:
very
graphic
language.
53
violence,
very graphic
and explicit
or indecent
sexual
acts,
or very
If youlivenearatelevision
station's
transmittertower,youmayreceive
aninterfering
signalfromdae
stationwhilewatching
odaer
TV
channels.
Yourtelevision's
Antenna
Attenuator
controlisdesigned
toreduce
the
strength
ofsucha signalin thepresence
ofa
strongmainsignal.Thedefaultsetting
forthe
Antenna
Attenuator
is"Off."If youneedto
usethefeature,
simplytoggleit "On"inthe
on-screen
menu.
Thesetting
youmake
applies
tothechannel
youarecurrently
watching
andwill remaininplaceuntilyou
change
thesetting.
Picture
Sound Featurex Channels
Tv
l
Settings
_annds
Derne
Channel list
lnxtall
Channellock
Lock a_r
111ratin
_'lanllds
HGvierz_ings lock
Press
theMenubuttonontheremote
controltodisplaytheon-screen
menu.
Channellemove
Antenn_art
Off * On
Press
theCursor
Rightbuttonrepeatedly
toselect
"Channels."
[]
Channdx
edlytoselect
Press
theCursor
the"Antenna
Downbutton
attenuator"
repeatcontrol.
M_e _afings
I]',an nel remlwe
Antennaa
Press
thecontrol
theCursor
"On"or"Off."
Rightbuttontotoggle
Press
theMenubuttontoremove
the
on-screen
menufromtheTVscreen,
A_rE_E
ZOOM
PHILIPS
54
On • Off
You have the option of turning on a background that will make reading the on-screen
menu easier. The Menu Background
control
places a light, transparent green field behind
the on-screen menu that reduces the contrast
Picture
Sound Features Channels
tV
posed by the picture. When turned on. the
menu background
appears only while the onscreen menu is displayed on 1he TV screen.
General
Source
Set_ings_Derno
Install
Press the Menu button on the remote
control to display the on-screen menu.
General Source
Menu background
Press the Cursor Down button to select
"Settings,"
Surl
Dual scceen format
Set6_gs
_reeze
Press the Cursor Right button to select
floe "General" menu.
Press the Cursor
the "Menu
Down button to select
background"
control.
General
Press the Cursor Right button to toggle
file menu background control "On" or
"Off."
ltenu background
Off • On
Surf
Dualscreen fomlat
Settings
Freeze
Press the Menu button to remove the
on-screen menu from the TV screen.
@
@
(t®@
zoo_
With Menu Background off
55
With MenuBackgroundon
You can access a list of previously viewed
channels with the Surf on the remote control.
With Surf you can easily switch between different TV channels lhat currently interest you,
Surf allows you to set up the television to
cycle through two or nine channels by pressing the Surf button,
Picture
TV_I_
Sound Features
=
=
1
Cha_nels
=
Setting_
Oemo
TV
General
Source
Install
Set_ings_Deva,0
Imtall
t
2
3
4
Press the Menu button on the remote
control
to display
the on-screen
menu.
Press the Cursor Down button to select
General Source
"Settings."
Menu background
Press the Cursor Right button
the "General" menu.
Press the Cursor
to select
Surf
Dual gzeen 10rmat
Set6ngs
_reeze
Down button repeat-
edly to select the "Surf"
control.
Press the Cursor Right button to toggle
the Surf control to "2 channels" or "9
channels,"
Henu background
Press the Menu button to remove the
on-screen menu from the TV screen.
Dual screenformat
Settings
Freeze
Deneral
Surf
If you selecled the "2 channels" Surf option,
pressing the Surf button allows you to alternate between the currently viewed channel
and the previously viewed channel.
2 channels * 9 channels
[]
Dene_
Henu backglound
If you selecled the "9 channels" Surf option,
pressing the Surf button displays a Surf list in
which you can place up to 9 favorite channels. A/V sources also can be included in the
list.
To add a channel
Surf
Setdngs
Freeze
zl]_
to the list, tune to the chan-
nel, press the Surf button,
Cursor Right button.
PHILIPS
Using 9 Channels
favorite channels
then press the
If you attempt to add more than 9 channels to
1he list, the last channel will be automatically
removed to make room for the newly added
channel.
Surf, place up to 9
in the Surf list,
2 Channels Surf
•
After you have placed your favorite channels
in the list, press the Surf button as many
times as necessary to tune lo the desired
favorite channel. Or, with the Surf list displayed, press the Cursor Down or Up buttons
lo tune to a channel.
22
If you decide you don t walt a charnel
list, you can remove it.
9 Channels Surf
To remove a channel from the list, press the
Surf button to display the list, press the
Cursor Down or Up buttons until you select
the channel you want to remove, then press
the Cursor Right button,
9 charmed • 2 channels
Doa_s_en Iomlat
" ..
t-L_]
,_
' -_
...... _:. _ '_
] ] ] ] ]
56
_ ,
I
I
i 1 the
The Dual Screen feature, also referred to as
Picture In Picture (PIP), will allow you to
choose the size of the dual screen window to
be displayed when the Dual Screen (or PIP)
button is pressed on the remote control. The
window can be set to Dual Screen, Large PIP,
or Small PIP. The MultiPIP button allows you
to display either 3 or 6 PIP windows.
Pictu_
Sound Features Channels
Sot_ing_
Demu
11/
General
Source
Install
Demo
Sottings_
Install
Press the Menu button on the remote
control to display the on-screen menu.
General Source
Press the Cursor Down button to select
"Settings."
Menu backgnaund
Sua
Press the Cursor Right button to select
the "General" menu.
Dualsc,_n lurma_
Setlings
F_e_ze
Press totheselect
Cursor
edly
the Down
"Dual button
screen repeatformat"
control. A submenu or list of options
will appear.
General
Nenu ha&ground
Press the Cursor Right button to enter
flae list of options,
Surf
Dual _cre_afimllat
Settings
Freeze
Press the Cursor Up or Down button to
select the desire dual screen format.
Dual ic_een
Large PiP
Small PIP
Choose from "Dual screen," "Large
PIP," or "Small PIP."
General
Press the Menu button to remove the
on-screen menu from the TV screen.
Press the Dual Screen/PIP button on
the remote control to display 1he second video window in flaeformal you
have chosen.
Dual sr_en
Sottingl
Continuing to hold the Dual
Screen/PIP button will cycle lhrough
the Dual Screen PIP options.
Press the Dual Screen button again to
retum the lelevision to the main video
screen,
To display 3 PIP screens, press 1he
MultiPIP button. To display 6 PIP
screens, press the MultiPIP button
again and briefly hold it until the
screens appear.
Press the MultiPIP
turn PIP off.
Dual Screen
Small PIP
Large PIP
button again to
See the next page for information on changing channels or input sources in the Dual or
PIP screens.
PIP 3
57
PIP 6
When using
Dual
10
Screen:
A light-colored
border
indicates
screen.
If the screen
whose
source
you want Io change
press the Cursor Right
the desired screen.
the selected
channel
or input
is not selected,
or Left buuon
to select
the change
"I5
CH (Channel
channelsSelection)
in the selected
+ or - buttons.
screen, press
Or:
10
Source
Select
Then, within
6 seconds,
"I_ change
the button.
input source,
first press
the
press the Cursor
desired
Up or Down
input source
OK button
source
appears
NOTE:
until your
is highlighled.
to confirm.
Press
The desired
in the selected
the screen)
before
the
input
screen.
If the list of input sources
(leaves
I4
"times
out"
you can make your
selection,
press the Source
to display
fhe list again.
Select button
again
10
TV
AVI:I)'/I)
When using Large
When
or Small
the PIP window
Cursor
Up or Down
PIP:
is on screen,
button
press
1he
to select either
the
main or PIP screen. A light-colored
border surrounds the PIP screen when it is selected. The
PIP screen
must be selected
before
its channel
or input source can be changed.
the change
To
CH (Channel
channels Selection)
in the PIP
+ or
screen,
- buttons.
press
Or:
the
Source a Select
6 secTo select
differentbutton.
input Then,
source, within
first press
onds, press the Cursor
desired
input source
OK button
source
to confirm.
appears
NOTE:
(leaves
Up or Down
is highlighled.
The desired
in the PIP screen.
the screen)
before
"times
out"
you can make your
press the Source
to display
fhe list again.
Select button
again
the PIP screen:
Press
the Cursorindicator
Up or appear
Down
and direction
Within
the
input
If the list of input sources
selection,
To reposition
until your
Press
6 seconds,
button.
The ball
on screen.
press the OK button.
A mul-
tidirectional
symbol appears on screen.
NOTE: If the ball and direction indicator
"time out" (leave the screen)
the OK buuon,
Down button
simply
before
you press
press the Cursor
Up or
again.
Press the Cursor Up, Down, Left, or Right buttons to move the PIP window to the desired
location.
Press the OK button.
The ball and direction
indicator reappear and "time
screen) in about 6 seconds.
When using
"I_ change
PIP3
channels
out" (leave the
or PIP6:
when
in PIP3 or PIP6 modes,
press the Cursor
Right,
Left, Up, or Down
buuons
select
whose
channel
you want to
change.
above
the screen
Then follow
to change
or source
step 2 or 3 in either
channels
to
section
PHILII_
or input sources.
58
z4
The Freeze control provides three ways for
you to stop the action of programs. The
Freeze control options allow you to get a better look at exciting sports plays or copy down
broadcasted
addresses or phone numbers. The
steps below explain how to select an option.
Picture
Sound
Features Channels
Settings
Demo
TVl
:
TV
General
Source
Install
Settings_Den_
Install
Press the Menu button on the remote
control
to display
Press the Cursor
"Settings."
the on-screen
menu,
Down button to select
General
Press
light the
the "General"
Cursor Right
menu.
button
Source
Menu background
to high-
Surl
Dual screenf0rrnat
Press
Cursor Down
button format"
repeatedly tothehighlight
the "Freeze
control. A submenu will appear.
Press the Cursor
the submenu.
Right button
Settings
treeze
to enter
General
Press the Cursor Up or Down button to
select the desired freeze format.
Henu background
Choose from "Freeze,"
"Photo finish."
Dual xcreen format
"Replay,"
Surf
or
Freeze
Settingx
Freeze stops motion in the main screen
image while the audio continues to play.
Replay displays and replays a few seconds of stored video information
in the
General
single-PIP window.
Photo finish displays a series of frozen
frames in six PIP windows. A TV picture consists of a series of frames.
Freeze
Settings
on-screen
menu button
from the
screen.
Press the Menu
to TV
remove
the
zo_
Press the Freeze
Format button on the
remote control to display
you have chosen.
PHILIPS
the format
Replay and Photo Finish are not available with inputs AV3-AV6,
NOTE: Continuing to hold the Freeze
Format button will cycle the TV
through the Freeze modes.
To return the television to the main video
screen, press the Freeze button again.
Freeze
Stops motion
onthe
mmnscreen.
Photo finish
Replay
Replays
video.
a few seconds
59
of stored
Displays six still frames from a "IV picture while the current program continues to play on the main (center) screen.
NOTE: Frame order will vary.
YoucanresettheTV'sSound
andPicture
settingstothefactorydefaultvalues.
Press the Menu button on the remote
control to display the on-screen menu.
Picture
Sound
Femurs
_annels
Settings
Der, lo
IV
General
Source
Install
Demo
Settingx_
Install
Press the Cursor Down button to select
"Settings,"
the
menu.
Press"General"
the Cursor
Right button to select
General Soerce
Press totheselect
Cursor
repeatedly
the Down
"Reset button
AV settings"
control,
Menu background
Surf
Dual _een format
Press the OK button
settings
to factory
Set_ngs
Freeze
to reset the AV
values.
Press the Menu button to remove the
on-screen menu from the TV screen,
Settings _e_al
Reset AV settings_
) To erase settings and
Caption _vice
r_t
them to their
defualt valuex.
OSD
Time zone
Daylight saving
ACrlV_
_autlO CO_nOL pB_T_CE
ZaO_
PHILIPS
6O
please press OK.
The television's on-screen display (OSD) can
be set to show only the current channel number or the channel number with additional TV
operating modes and stares-screen information.
Picture
Sound
_eatures Channels
Oemo
Settings T
1'/
General
Source
Install
Dem0
Senings_
Install
Press theto Menu
on the remote
control
displaybutton
the on-screen
menu.
Press the Cursor Down button to select
"Settings,"
General
the
Press"General"
the Cursormenu.
Right button to select
Source
Menu background
Surf
Dual screen _rnlat
@
Press totheselect
Cursor
edly
the Down
"OSD" button
control.repeat-
Settingx
Freeze
between
Press the "Minimum"
Cursor Right and
button
"Normal."
to toggle
Normal mode--the
on-screen display
stays on screen. Channel/Input
source,
call letters and program name (if provided by the signal source), picture format, and sound mode are shown.
Settingx _eral
I
Reset AV xet6ngs
Cap6on xervice
OSD,
Daylight xaving ,
Minimum
mode (default mode)channel/Input
source, call letters, and
program name (if provided by the signal source) are shown. The on-screen
display disappears after a few seconds.
In Minimum mode, the volume scroll
Settingx _eral
I
Reset AV xet6ngs
Cap6on xervice
bar will not be displayed when you
press the volume control.
Press the Menu button to remove the
on-screen menu from the TV screen.
OSD,
Time zone
Zoom
i
,ow_ ..,iv----- Normal
l r-
Daylight xaving ,
@@@@
PHILIPS
j
, Minimum • Rormal
Time zone
t0 W_
Minimum
Mode
61
, Normal ° Minimum
Your television can acquire the current time
from the signal being received. It needs to
know your Time Zone, however, and whether
or not you use Daylight Savings.
Picture
Sound Ieatures Channels
Settings
Demo
Press the Menu button on the remote
control
to display
the on-screen
TV
General
Source
Install
Demo
Settings_
menu.
Install
Press
the Cursor Down button to highlight "Seltings."
General Source
Press
the Cursor
Right button
repeatedly
to select
the "General"
menu.
m
1V
¢k
WB
Menu background
Su_
MP
Press
Cursor
edly totheselect
the Down
"Time button
Zone" repeatcontrol.
Du_ screenformat
_reeze_
Press the Cursor Right button to enter
the list of available time zones.
General
Press the
select
yourCursor
time zone.
Up or Down button to
Reset AVsettings
Press the Cursor Left button, then press
the Cursor Down button to select the
"Daylight Savings" control.
Caption service
0SD
}]me zone
Set6ngs
O_yligfi_
Press the Cursor Right button to toggle
"Daylight Savings" to "Automatic" for
the TV to change to Daylight Savings
Time automatically. Or select "Off."
Set6ngs_f_n
eral
Press the Menu button to remove the
on-screen menu from the TV screen.
]]me
zone
@@@@
ZOOM
PHILIPS
General
Reset RV settings
Captfon service
0SD
Settings
lime zone
D_ylight
Off * Automate
General
Reset RV settings
Captfon service
0SD
Settings
lime zone
D_ylight
62
Auom_tfo* Off
In the General menu, you can set up a new
PIN number or change an existing one for the
Lock Channel feature.
Pictu_
Sound
Features
Channelx
Settingx
Press
the Menu button
control
2
3
4
to display
on fine remote
the on-screen
Demu
menu.
IV
General
%urce
Install
Demo
Settingx_
Press
the Cursor
Down button to select
Install
"Settings."
Press the Cursor Right button to select
the "General" menu.
General Source
Press the Cursor Down button repeatedly to select either "Set PIN" or
"Change PIN."
Menu background
Surl
IPu_ sawn _mla_
freeze
NOTES:
• If no PIN exists yet, lhe menu will
show "Set PIN." Simply follow the
on-screen instructions to set your
PIN.
General
• If a PIN has previously been entered,
the menu will show "Change PIN,"
• All number combinations from 0000
to 9999 are valid numbers.
Press the OK or Cursor
begin the process.
Right button
to
Change PIE
E
To dlange your PIE.
Subwooter
please prexs Oh.
Settingx
Lamp rating
Lamp re
Ple_e enter your
current Pffl.
Enter your current PIN using the Digit
buttons on the remote control.
If you have forgotten your PIN, you
can enter the overriding/default
PIN
0-7-i-i.
Enter a new four-digit
PIN.
Please
enter
your new
PIN.
Re-enter your new PIN using the Digit
buttons to confirm the code. Your PIN
is now changed.
Press the Menu button on the remote
control to remove the on-screen menu
from the TV screen.
_r
Setting_
__o_r_l
To confirm your new PIE,
I
please enter it again.
Change PIN _ _ Your PIN hal been changed.
Subwooter
Lamp rating
Lamp replaced
m
63
If you connect a home-cinema
surroundsound system with subwoofer to your TV (see
page 19), you will need to select the
Subwoofer "Yes" option in the TV's onscreen menu. These sleps explain how.
Piclure
Sound Features Channelx
IVN-_
Demc_
Senings T
TV
to display the on-screen
Source
General
S0u_ce
Dem0
Set6ngs_
Press the Menu button on the remote
control
General
Inst_ll
[nxlall
menu.
Press the Cursor Down button to select
"Seltings."
Nenu b_ckground
Press"General"
the
the Cursor
menu,
Right button to select
Surf
Dual sa'eenfomlat
Fre_ze_
_
Press
Cursor
button repeatedly totheselect
the Down
"Subwoofer"
control.
Press the Cursor Right button to toggle
the Subwoofer control to "Yes" or
General
"No." Select Yes if you have connected
an external subwoofer to the SUB
OUT jack on the back of the TV.
Daylightsavingl
_ange
Press the Menu button on the remote
control to remove the on-screen menu
from the TV screen.
"Yes" must be activated
for the Subwoofer
menu selection before the SUB OUT jack
will supply output. This is because the subwoofer's low frequencies are redirected to the
main TV speakers when "No" is selected.
Pig
Subwoofer
Senings
No * Yes
L_r_p
Lamp replaced
@®@
®
Genmal
D_ylights_vingl
_ange
ACI1_E
PIE
Subwoofer
Setlings
Lamp rating
@@@@
zo_
PHILIPS
64
Lamp re
Yex° No
Be sure 1he TV is
unplugged before
cleaning it.
WARNING
To avoid possible shock hazard, be sure the
TV is unplugged from the electrical outlet
before cleaning.
Cleaning
the Cabinet
• Regularly dust the TV cabinet
nonscralching
duster.
with a dry,
• Gently wipe the cabinet surfaces with a
soft, clean cloth, Even if the surfaces are
very dirty, do not apply cleaner to 1hem
directly, Soak the cloth in a solution of
cool, clean water and mild soap or detergent. Wring out the cloth and wipe the cabinet surfaces clean. Then use a clean, dry
cloth to dry 1he wiped surfaces,
l!
lse a nonscratching
• Occasionally
vacuum the ventilation slots
on the back cover of 1he set. See the next
section on "Cleaning or Replacing the
Filters,"
duster.
Soak the wiping cloth in
cool, clean water and mild
detergent. Then ring the
cloth out before using.
• Never use thinners, insecticide sprays, or
other chemicals on or near the cabinet, as
1hey might cause permanent marring of the
cabinet finish.
• The television contains plastic parts. DO
NOT use benzine, thinners, or other chemicals to clean. DO NOT use insecticide or
other volatile substances nearby. DO NOT
allow the TV to come into contact for
extended periods
vinyl products,
Cleaning
•
of time with rubber
or
@
the Screen
Use a dry soft cloth to wipe the screen. Use
even, easy, vertical strokes. Take care not
to scratch or damage the screen surface.
Avoid wearing jewelry or using anylhing
abrasive.
65
TheCineos
TVhastwofiltersthaicoverair
inletsonthebottom
of the set. Maintaining a
free flow of air through the inlets is very important. If the air filters are allowed to become
dirty, clogged, or blocked,
the set will rise.
the temperature
Should the heat level be allowed to become
high due to blockage,
in
too
a sensor will detect this,
[]llhhllliii
i
o
and a warning message will appear on screen to
alert you to check the air inlets for blockage.
The message will be displayed for 6 seconds, It
will reappear every 15 minutes
temperature remains too high,
as long as the
If the internal temperature of the TV is allowed
to rise to a level that if prolonged could damage
the TV, a warning message alerting you that the
TV is shutting down will appear. Then, if the
temperature remains at this high level for 1
minute, the TV will enter Standby mode, In
Standby mode, the TV is off.
itLocations of Air Filters
WARNING:
Do not tip the TV when remow
ing or installing the filters. This may result in
instability of the TV.
Place your fingers under one of the filter slots located at either bottom left or
right in back of the TV cabinet,
Grasp
straight theout,filter and gently
o
,,i
Be sure the TV is not placed on a surface (such
as a shag carpet) that will prevent the free flow
of air through the inlets, and periodically clean
or replace the filters as detailed in the following
instructions,
Continued
iiiiii1_1,_1,,,_
o
pull it
on the next page.
2
66
o
3
Continued from page 68.
3
Examine the filter for dust or other
contamination. If it is dirty, clean it
with a vacuum cleaner. DO NOT
WASH it. Replace the filter if vacuuming does not sufficiently clean it.
To order replacement filters, call the
Philips Customer Care Center at
1-800-531-0039. A Philips associate
will be happy to assist you. The part
number for the Philips TV inlet filter
assembly is 3135 037 51810.
WARNING:
DO NOT operate the TV without fillers. This will cause serious damage to
lhe TV.
4
4
Turn the filter so that the arrow is
pointing
toward the center
of the TV.
Align the edges of the filter with the
slot track, then gently slide it all the
way back into the slot. A click sound
can be heard as 1he filter reaches 1he
correct position.
67
The Cineos TV uses a lamp with a limited
lifetime to illuminate the picture. A Lifetime
counter in the TV records the operating time
of the lamp. One hundred hours before the
lamp reaches the end of its life, a warning
message will appear on screen. This will
allow you to prepare to replace the lamp or
take action right away. The message will disappear within 6 seconds. It will reappear each
time the TV is turned on until the lamp is
replaced.
To order a replacement
lamp, call the
Philips Customer Care Center at
1-800-531-0039.
A Philips associate will
be happy to assist you. The part number
for the Philips TV replacement
lamp is
3122 438 71310.
Here are the steps for replacing
the lamp:
Power off the TV. Unplug
2
2
the TV.
The lamp door is located on the back
of the TV next to the power cord.
Gently slide the door completely
to the
right to open.
3
CAUTION:
The lamp gets extremely
hot. Allow a cool-down time before
removing
the lamp.
Unscrew
the thumb screws until they
are dangling,
Lift the handle
Continued
NOTE:
out.
4
on page 71.
A blinking
\
orange light in the
Nk
///
-'-_
Active Standby
_
I_
[[//
Window means that the _ __..._/H/
lamp is worn out, dead,
or has expired and
needs to be replaced.
_
Nk
X_
68
uuuuuuu_uuuu_uuuuu_uuuuuuuu
_uuuu_uuuuuuuuuuuuuuuuuuuuu
Continued from page 70,
CAUTION: When removing the lamp,
do not touch the glass envelope, It may
still be hot,
Grasp the handle, then pull oat and
slightly down to remove.
WARNING: The lamp contains mercury. Dispose of the lamp in accordance with local, state, and federal
regulations.
CAUTION:
When installing the new
lamp, do not touch the glass envelope.
Oil from skin can reduce lamp life.
_uuuuuuuuuuuuuuuuuuuuuuuuuu
Align the groove on top of 1he new
lamp's housing with the corresponding
groove pocket inside the TV, 1hen slide
the new lamp into place.
Tighten the thumb screws clockwise
until finger tight only. Do not overtighten.
Slide the lamp door closed.
IMPORTANT:
The door must be
u_u_uu_uuu_uu_uuu_uuu_u_uu_
closed completely lo the left.
Otherwise, the TV will not operate.
Go tothepage
72 Rating
for instructions
for setting
Lamp
and resetting
the
Lamp Lifetime Counter.
Go to page 72 for instructions
Lamp Lifetime
screen
69
menu.
counter
through
for resetl!ng
the
the TV s on-
Afterinstalling
anewlampintheTV,you
needtoenterthe"Lamprating"listin theonscreen
menu
andselect
thealphabetical
code
1hatis provided
withthelamp.Thiswill bea
letterfromA-Z. Theletterrepresents
thelifetimeof1helamp.Byinputting
thecode,you
aretellingtheTV'sLampLifetimeCounter
1helifetimeofthenewlamp.
Thenextstepis to use the "Lamp replaced
IVY'
Picture
=
Sound I_eatures Channels
Demo
Settings_
Install
IV
General
Source
Demo
Senings_
Instatl
control" to tell the TV thai you have installed
a new lamp. This control resets the Lifetime
Counter to 0 for 1he new lamp and begins
keeping track of the lifetime of 1he new lamp.
General
_urce
Menu Geckground
Surf
Press the Menu button on the remote
control
to display
the on-screen
Dual scr_n [orma_
Set_ngx
freeze
menu.
Press the Cursor Down button to select
"Settings,"
General
Press"General"
the
the Cursor
menu.
Right button to select
Change PIN
Subwoofer
Lamp ra6ng
Settings_
Lamp r
Press until
the Cursor
repeatedly
"Lamp Down
rating"button
is selected,
Press the Cursor Right button to enter
the rating list,
General
If necessary, press the Cursor Down
button as many times as necessary to
select the letter for your replacement
lamp.
Press the Cursor
to the "General"
Left button
menu.
to return
Press the Cursor
Down button to select
Lamp
Settings
@@@@
PHILIPS
"Lamp
replaced."
General
Change PtN
Subwoofi_r
Press the OK button to confirm
you have changed
that
SeKings_
Lamp ra6ng
the lamp.
Lamp r
Press OK after you replaced
the lamp.
Press the Menu button to remove the
on-screen menu from the TV screen.
General
_ange PIE
Subwoofer
• One hundred hours before the lamp
reaches the end of its life, a warning
Settings_
Lamp ra6ng
Lamp r
message will appear on screen to alert
you. Changing the lamp at this point is
recommended
for optimal performance.
• A blinking orange light on the front of
the set means that the lamp is not working anymore and needs to be replaced.
7O
ReviewThis
List of Symptoms
and Checks
Before
Requesting
Service
You may be able to solve the problem yourself. Charges for TV installation and adjustment of customer controls are not covered under your warranty.
If you need to call a customer service representative,
please know the model number and serial number of your product before you
call. This information
is displayed on the back of lhe product. Also, please take a moment to identify the problem you are having,
and be prepared to explain this to the representative.
If you believe the representative
will need to help you with operations, please
stay near the product. Our representative
will be happy to assist you. To reach our Customer
Care Center, call 1-800-531-0039.
TV-related
TheTV
Checks
won't switch on.
Make sure the power
plug is plugged
in.
If you're using the TV remote control to turn the TV on, be sure the remote is in TV mode. (page *Q6)
Plug somelhing else in to be sure the wall outlet (or extension cord) is receiving power.
The remote control could have a problem. See the troubleshooting
section "Remote-relaled
Checks" on page 74.
Make sure the lamp door is not ajar. The TV is designed not to operale with the lamp door open. (pages *QI, 71)
If a red light is blinking on the front of the TV, the set has entered protection mode. Unplug and plug the set back in a couple of
times and try to switch it on. If the problem persists, contact the Customer Care Center at 1-800-531-0039.
TheTV
•
•
switches
off unexpectedly.
If the lamp door is open, lhe TV will shut down. The TV is designed not to operate when the lamp door is ajar.
If a red light is blinking on the front of the TV, the set has entered protection mode. Unplug and plug the set back in a couple of
times and try to switch
• The Sleeptimer
it on. If the problem
persists,
contact the Customer
Care Center at 1-800-531-0039.
may have been set to turn the TV off. Turn lhe TV back on if desired.
(page 48)
TheTV
switches on unexpectedly.
• The On Timer may have been set. (page 49)
An on-screen
message tells you that it is time to replace
the lamp.
• The message appears on screen when the lamp has 100 hours of life left, and will reappear each time the TV is turned on until the
lamp is replaced. Prepare to replace the lamp or take action right away. (pages 70-72)
An on-screen
message instructs
you to check the air inlets for blockage.
• Check the air inlets and filters for blockage and clean or replace the air filters as necessary. (pages 68-69)
You have a picture
but no sound.
• Make sure Mute is not on. (page *Q6)
• The TV speakers may be turned off. Make sure the Center Channel Amp Switch on lhe back of the TV is in lhe INT position.
(page 7)
You
•
•
•
have
no
picture.
If you have made a connection to the TV's Tuner jack be sure in use Autoprogram.
(page *Q8).
If you want to view materials from an accessory device (DVD player, VCR, or satellite receiver, for example) be sure you have
selected the input source to which you have connecled the device--AV
1, AV2, AV3, AV4, AV5, AV6, or Side. (pages *Q4, *Q6,
10-16, 18, 20)
Make sure you have made connections
correctly. (pages *Q3-5, 10-16, 18, 20)
You have no picture
and no sound.
• If you see a blinking orange light on the front of the set, this means lhal the lamp is worn out, dead, or has expired and needs in
be replaced. (pages 70-72)
You see scrolling images.
• Make sure you have made connections correctly. (pages *Q3-5, 10-16, 18, 20)
*Q refers to the Quick Use and Setup Guide thai came wilh your TV.
71
TV-related
The
Checks
picture
appears
(continued
doubled
from
page 73)
or tripled.
• If you are using an antenna, be sure it is facing in the correct direction. Also, check in see if it may be receiving signals that are
being reflected off of mountains or buildings.
The
picture
shakes
or is not
clear.
• If you are using an antenna, make sure it is not broken or shorted, and make sure the antenna cable is connected properly and
securely.
• If you are using a VCR and selecting channels on lhe TV, make sure the TV/VCR mode on lhe VCR is set to TV.
The
picture
has no colors
or colors
are not
correct.
• Make sure you have made connections correctly. (pages *Q3-5, 10-16, 18, 20)
• If you have connected accessory equipment, such as an HD satellite receiver, make sure the color setting on the accessory equipment is correct. See the user manual for the HD satellite receiver.
TheTV
sound
has an unusual
quality.
• Check the TV's Equalizer control in be sure it is set to the option you want. (page 39)
Remote-related
The
remote
Checks
control
does
not
work.
• Make sure nothing is blocking the path between the remote control and the TV or accessory device you want to operate.
• Make sure you point the remote directly at the TV or accessory device you want to operate.
• If you want to operate the TV, make sure lhe remote is in TV mode. If you want to operate an accessory device, program the
remote for the device if necessary and make sure the remote is in the appropriate mode for the device. (pages *Q6, 22-26)
• Make sure you have installed the batteries correctly. (page *Q6)
• The batteries could be dead. When lhe batteries in the remote run low, the remote will send a "Battery Low" command to the TV,
The TV will lhen display a message on the screen reminding you to replace the batteries as soon as possible.
• You may want to try taking the remote batteries out and putting them back in. NOTE: Afler taking the batteries out, you may
need to reprogram the remote for use with accessory devices.
*Q refers to the Quick Use and Setup Guide thai came with your TV,
72
Picture
• ScreenSize
44PL9523: 44" measured diagonally
55PL9523:55" measured diagonally
• Visible Screen Size
44PL9523: 44" measured diagonally
55PL9523:55" measured diagonally
• Aspect ratio:16:9
• Display technology: Philips single-panel liquid crystal
on silicon (LCOS)
• Flicker free;perfect convergence
Resolution: 1280 x 720
1080i HD performance and line doubling
Brightness: 450 Nits
Contrast ratio: 400:1
Screen protector with anti-glare coating
Digital Natural Motion TM
Digital Crystal Clear TM
Active Control TM
Widescreen Plus
Picture Freeze
•
•
•
•
•
•
•
•
Miscellaneous
• Mains: AC 110V-+ 10%
• Power consumption: Normal operation: 233W
Standby:<1W
• Input and output jacks (see page 7)
• Product dimensions (d x w x h)
44PL9523: 14.6" x 46.7" x 31.7"
55PL9523: 17.4" x 56.6" x 38.1"
• Product weight (excluding packaging)
44PL9523:73.1 Ibs
55PL9523:95.5 Ibs
• Universalremotecontrol:RC2043,
universalRCmanagingTVand
accessory devices
Sound
Sound system: Hi-fi Stereo
Virtual Dolby* Surround processing
Output: 2 x 20W RMS at 2% distortion
Frequency response: 20Hz-15kHz, +l/-3dB (ampL)
Loudspeaker configuration: two 2"/two 5"
Control:Volume, 5-band Audio Equalizer Controls (with adjustments
at 120Hz, 500Hz, 1.5KHz, 5KHz, and 10KHz), Balance,AVL (on/off),
and Headphone (volume, balance)
• Center channel input
• Subwoofer out
Supporting
Features
Digital Color Transient Improvement (CTI)
Picture Freeze
Auto Aspect Ratio Adaptation
Incredible Surround TM
Automatic Volume Leveler (AVL)
Independent headphone volume control
EasyTuneTM (auto search,auto tune, auto install)
Alternate channel
Operation
• Easy,menu-driven installationand operation; direct-access menus
and cursor control
• Selection of three menu languages:English,French, and Spanish
• On-screen status display on programs and functions (on-screen
display)
• Sleeptimer
• Favorite channel listing
Design
and specifications
are subject
to change
without
Parts that will need to be replaced
at some point during
• Philips
TV inlet filler assembly:
part number
• Philips
TV lamp:
part number
To order the parts, contact
*Manufactured
AutoLock
AutoSurf
TM
Low-power standby (<IW)
Supplied Accessories
•
Remote control with two "AA" size batteries
notice.
lhe life of the product:
3135 037 51810
3122 438 71310.
the Philips
under license
AutoLock TM to protect children from objectionable programming
with V-chip technology
Closed Captioning
AutoPicture TM control: Soft, Natural, Rich, Multimedia, Personal
AutoSound TM control: Movie, Speech,Music, Personal
Eightwidescreenmodes:Automatic, SuperZoom, Panoramic,4:3,
Movie Expand 14:9, Movie Expand 16:9, 16:9 Subtitle, and Wide
Screen
Subtitle and heading shift (scroll the screen with the cursor buttons)
Auto Format/Auto Screen Fit
Smart Clock
Customer
from Dolby
and Easy Tune are Irademarks
Care Center
Laboratories.
of Philips
at 1-800-531-0039.
"Dolby"
Consumer
and the double-D
Eleclronics.
Copyright
73
symbol
2003
are Irademarks
Philips
of Dolby
Consumer
Laboratories.
Electronics.
All rights
reserved.
A
F
Active Control TM Plus+, 27
Active Control TM Plus+Window, *Q5
Active StandbyWindow, *Q5, 70, 72
Alternate Audio (SAP) Control, 42
Antenna Attenuator, 56
Audio/Video Input Sources, Labeling,21
AutoPicture TM Options, 34
AutoSound TM Options, 46
AVL (AutoVolume Leveler), 44
AV5 Clock Frequency and Phase,Adjusting, 17
Factory Service Locations, 77-78
Features,List of, 5
Filters, Cleaning or Replacing,68-69
B
Buttons, *Q5
Windows, *Q5
Channel List, 50-51
Channels, Programming into the TV's
Memory, *Q8
Cleaning the TV, 68
Closed Captioning, 47
Color Enhancement, 33
Connections
Camcorder, 20
Computer, 16
HD Satellite Receiver to DVI, 18
HD Satellite Receiver toYPbPr, 15
Progressive-scan DVD Player,14
Standard DVD Player,13
Surround Sound,19
S-Video, 12
VCR, 10
VCR and Cable Box, 11
Video Game System, 20
D
Daylight Savings,Setting, 64
Delta Volume, 45
Digital Processing Options, 30
Dolby**Virtual (See Sound Mode Options)
Dual Screen/PIPFormat
Changing Channels or Input Sources, 60
Selecting, 59
DVI Input Jack,7-8,18
Dynamic Contrast Options, 31
Dynamic Noise Reduction Options, 32
under
Use and Setup Guide
license
Headphone Volume,Adjusting, 37
I
Incredible Surround TM (See Sound Mode
Options)
J
Lamp
Replacing,71-72
Resetting the Lifetime Counter, 73
Cabinet
**Manufactured
Safety Instructions, *Q1,2-3, 9, 68- 69, 70-71
SAP (SeeAlternate Audio [SAP] Control)
Service (See Factory Service Locations)
SignalSplitter, *Q4, 8,11
Sleeptimer,48
Sound Mode Options, 41
Specifications, Product, 75
Stand (Optional), Mounting, *Q3
Stereo, Setting the TV for, 43
Subwoofer
Output Jack,7_1,19
Control (in on-screen menu), 19
Surf Options, 58
Surround Sound (See Connections and Sound
Mode Options)
S-Video Input Jacks,7-8,12
Swivel (Optional), Mounting, *Q2
H
L
C
to the Quick
S
JackslCableslConnectors, Descriptions, 7
Blocking Programs
Based on TV Ratings,54
Based on Movie Ratings,55
*Q refers
Remote SensorWindow, *Q5
RGB+HV Input Jack,7_1, 16
Lamp Lifetime Counter, 72
Lamp Rating Control, 72
Language,Setting for the On-screen
Menu, *Q8
Lock After, 53
Lock Channel, 52
Loudness Control, 40
T
Time Zone, Selecting, 64
Troubleshooting, 73-74
Tuner (RF) Input Jack,*Q3-5, 7_1,
10-11
M
TV Equalizer Options, 38
TV Signals
Information on, 6
Ways of Receiving,6
TV Speaker Balance, 39
TV Volume, 37
Menu Background, 57
MultiPIP Options, 61
O
On-screen Display Options, 63
On Timer, 49
Overheating, Preventing *Q1-2, 9, 68-69
Twin-lead Adapter, 8
V
P
PanelJacks,Compatibility Information, 7-8
Panningthe Screen, *Q6, 20, 35
Picture Controls, 29
Picture Format Options, 35-36
Picture Freeze Options, 61
PIN, Setting up or Changing,65
Power Surges,Protecting Against, 9
Pre-connection Recommendations, 9
Product End of Life Disposal, 5
Video Game Systems (See Connections)
Volume,Adjusting
Headphone, 37
TV, 37
W
Warranty, 80
Welcome, 2
Y
YPbPr Input Input Jacks,7_1,13-15
R
Remote
Control
Programming,
22-23
Using with the TV, *Q6
Using with VCR, 26
that came
from Dolby Laboratories.
wilh your TV.
"Dolby"
and the double=D
7,4
symbol
are trademarks
of Dolby
Laboratories.
•
_ Charlotte
.\/
Atlants/N Georgia
• Dallas
\
"_ Indlcatu
In-Home Service Only _--_
Milwaukee: call Chicago
Cincinnati and Columbus: call Cleveland
\
• Tampe/W Florida
_'k" Ft. Myers/SW Florida
Miami/SE Rorida
Nashville and Chattanooga: carl Knoxville
Washington/Baltimore:
call Philadelphia
Charlotte: call Atlanta
San Antonio: call Houston
Aft Florida locations:
call Tampa
• Indicates In-Home/Csrw-In Service
Toll-freenumbersprovidedon the nextpage
NOTE:If you residein one of our PhilipsFactoryServiceBranchareas(seethe directoryon the next page),you cancontactthe nearestService
Branchto obtainefficientand expedientrepairfor your product.If yourproductis In-Warranty,you shouldhaveproof-of-purchaseto ensureNo
ChargeService.ForOut-of-Warranty
service,callthe locationnearestyou.
NOTA:Si vous r_sidezdansunedes r_gionsdesserviespar unesuccursalede serviceapr_sventedu fabricantPhilips(voir liste ci-dessous),vous
pourrezcontacterla branchede serviceapr_sventela plusprosde chezvous pour obtenirun serviceapr_sventerapideet efficace.Si le produitest
sous garantie,il suffira de presenterunepreuved'achatpourb_n_ficierd'un servicesansfrais. Pourles produitsnon couvertspar la garantie,contactezle centrele plus prosde chezvous.
NOTA:Si Ud. resideen unade nuestraszonasparasucursalesPhilipsde servicioal de f_brica(verdirectoriom_sabajo),U& puedecomunicarsecon
la sucursalde serviciom_scercanaparaobtenerunareparaci6noportunay eficazde su producto. Si su productoest_todaviabajogarantfa,U&
debepresentarcomprobantede compraparano ocasionarningunoscargospor servicio. Paraserviciodespu_sdel vencimientode la garantia,Ilame
al lugar m_scercanode los abajoindicados.
In Canada
Howyou canobtainefficientand expedientcarry-in,maiNn,or in-homeservicefor your product
PleasecontactPhilipsat
1-800-661-6162(Frenchspeaking)
1-800-531-0039(Englishor Spanishspeaking)
_anada
Commentobtenirle serviceapr_s-ventepour lesproduitsapport_sou envoy_spar la poste& notrecentrede serviceou le service&domicile
Veuillezcontacterphilips_:
1-800-661-6162(Francophone)
1-800-531-0039(Anglaisou Espagnol)
Enel Canad_
C6morecibirservicioefficienteparasu producto,en persona,
porcorreoo a domicillo
Favorde comunicarsecon Philipsal:
1-800-661-6162(franc6fono)
1-800-531-0039(Ingleso Espafiol))
Rev
HH - 1/9/2003
3135 015 07541
75
OUALITYSERVICE
IS AS CLOSEAS YOURTELEPHONE!
SIMPLYLOOKOVERTHELISTBELOWFORTHE NUMBEROFA FACTORY
SERVICECENTER
NEARYOU. YOUR PRODUCT
WILLRECEIVE
EFFICIENT
ANDEXPEDIENT
CARRY'IN,MAIL'IN, OR IN'HOMESERVICE,ANDYOUWILLRECEIVE
PEACEOF MIND,
KNOWINGYOURPRODUCT
IS BEINGGIVENTHE EXPERT
ATTENTION
OF PHIUPS' FACTORY
SERVICE.
COMMENTORTENIRNOTRESERVICEAPRESVENTERAPiDEETEEFiCACESOIT PARCOURR]ER,._ DOMiCiLE,OU EN SE PRESENTANT._ UN CENTREDE SERVICEPHIUPS. PLUS DE 600 CENTRESDE
RECEPTIONDE PRODUITS_ R_PARER_ TRAVERSLEPAYS:CONTACTERLECENTREDE SERVICEAUXCONSOMMATEURSLEPLUS PROCHEPOUR SAVOIRL'EMPLACEMENT
RE CES DEPOTSDANS
UR RAYONRE 50 _ 75 MtLES(80 KM _ 120 KM) DU CENTRERE SERVICELOCAL.
C()MO OBTERERUN SERVIMOOPORTUROY EFiCIERTEPOR CORREO,ER CASA0 EN PERSONAPARASU PRODUCTOA TRAV_SDE UR CERTROPHiLIPS DE SERViCIO. MAS DE 600 SITIOS POR
TOO0 ELPAlS PARALA RECEPCiORDE PRODUCTOSNECESITADOS
DE REPARACIONES:
COMUNICARSECON ELCENTRODE SERVtCIODE FABRICAMAS CERCAROPARA ESTOSLUGARESDERTRO
DE UN RADIODE 80 A 120 KM (50 A 75 MtLLAS)DELCERTRODE SERVICtOLOCAL.
ATLANTA
Philips Factory Service
550 Franklin Road.,Suite F
Marietta, GA 30067
800-273-1501
CLEVELAND
Philips Factory Service
950 KeynoteCircle
Brooklyn Heights, OH44131
800-331-7037
CHICAGO
Philips FactoryService
1279 W. Hamilton Pkwy.
Itasca, IL 60143
800-531-2922
TAMPA
Philips Factory Service
1911 US Highway301 North, Suite 100
Tampa,FL 33619
800-442-2027
DETROIT
Philips Factory Service
25173 Dequindre
Madison Heights, MI 48071
800-438-1398
SAN FRANCISCO
Philips Factory Service
681 EastBrokaw Rd.
SanJose, CA95112
800-300-9013
DALLAS
Philips Factory Service
415 N. Main St_et, #107
Euless,TX 76040
800-952-3254
KNOXVILLE
Philips FactoryService
One Philips Drive
Building 2
Knoxville,TN 37914
800-821-1767
HOUSTON
Philips Factory Service
1110 N. Post OakRd., Suite 100
Houston, TX 77055
800-952-3254
LOSANGELES
Philips Factory Service
20930 Bonita, Ste. V
Carson,CA90746
800-300-9013
76
PHILADELPHIA
Philips FactoryService
354 Dunks Ferry Rd.
Bensalem,PA 19020
800-847-9320
This page is intentionallyleft blank.
77
PHILIPS
TELEVISION
One Year Free Labor
One Year Free Service on Parts
30 clays Free Service on Television
This product
WHO
IS COVERED?
You must have proof of purchase to receive warranty service. A sales
receipt or other document showing that you purchased the product is
considered proof of purchase.
MAKE
SURE YOU
KEEP...
Pleasekeep your sales receipt or other document showing proof of
purchase. Attach it to this owner's manual and keep both nearby.
Also keep the original box and packing maserial in case you need to
return your product.
WHAT
IS COVERED?
Warranty coveragebeginsthe day you buy your product. For one year
thereafter (30 days for the TV screen), all parts will be repaired or
replaced, and labor and transportation are free. After one year from the
day of purchase, you pay for the replacement or repair of all parts and
for all labor and transportation charges.
All parts, includingrepaired and replaced parts, are covered only for
the original warranty period. When the warranty on the product
expires, the warranty on all replaced and repaired parts also expires.
BEFORE
REQUESTING
SERVICE...
Pleasecheck your owner's manual before requesting service.
Adjustments of the controls discussedthere may saveyou a service call
TO GET WARRANTY
SERVICE...
Repair must be performed by an authorized service center or a factory
service center. If you do not live near a factory servicecenter,contact
your dealer. If your dealer is an authorized service center, he will
arrange repair, if your dealer is not an authorized service center, he
will direct you to the authorized service center engaged by him to
service the products he sells.
WHAT
IS EXCLUDED?
Your warranty does not cover:
• labor charges for installationor setup of the product, adjustment of
customer controls on the product, and installasion or repair of
antenna systems outside of the product.
• product repair and/or part replacement because of misuse, accident, unauthorized repair or other cause not within the control of
Philips Consumer Electronics Company.
• reception problems caused by signal conditions or cable or antenna
systems outside the unit.
• a product that requires modification or adaptation to enable it to
operate in any country other than the country for which it was
designed, manufactured, approved and/or authorized, or repair of
products damaged by these modifications.
• incidental or consequential damagesresulting from the product.
(Some states do not allow the exclusion of incidentalor consequential damages, so the above exclusion may not apply to you. This
includes, but is not limited to, prerecorded material, whether copy*
righted or not copyrighted.)
• a product used for commercial or institutionalpurposes.
(In U.S.A.,Puerto Rico and U.S.Virgin lalands,all implied warranties,
inckiding implied warranties of merchantability and fitnessfor a particular
purpose, are limited in duration to the duration of this express warranty.
But, becausesome states do not allow limitationson how long an implied
warranty may last, this limitation may not apply to you.)
(In Canada,this warranty is given in lieu of all other warranties. No
other warranties are expressed or implied,includingany impliedwarranties of merchantability or fitness for a particular purpose. Philips is
not liable under any circumstances for any direct, indirect, special, inci*
dental or consequential damages,howsoever incurred,even if notified
of the possibility of such damages.)
IF YOU
HAVE
QUESTIONS...
Pleasecontact Philips at:
1-800-531-0039, if calling from the USA (English or Spanish Speaking)
1-800-66 I-6162, if calling from Canada (French Speaking)
1-800-531-0039, if calling from Canada (English or SpanishSpeaking).
REMEMBER...
Pleaserecord below the model and serial numbers found on the product. Also, please fill out and mail your warranty registration card
promptly. It will be easier for us to notify you if necessary.
WHERE
IS SERVICE
AVAILABLE?
Warranty service is available in all countries where the product is officially distributed by Philips Consumer Electronics Company. In countries where Philips Consumer Electronics Company does not distribute
the product, the local Philips service organization will attempt to provide service (although there may be a delay if the appropriate spare
parts and technical manual(s) are not readily available).
Philips Consumer
Screen
can be repaired in-home.
MODEL#
SERIAL#
Electronics, P.O. Box 520890, Miami, FL 33152, (402) 536-4171
EL6551E001
/ 3-03
78
WARNING: TO PREVENT FIRE OR SHOCK HAZARD, DO NOT
EXPOSE THIS UNIT TO RAIN OR EXCESSIVE
MOISTURE.
Warning .......................................................
See the User Manual ..............................................
1
1
Positioning the TV ...............................................
Mounting the Swivel to the TV ......................................
Mounting the Swivel and TV to the Stand .............................
Making Basic Connections to 1be TV ...............................
Operating the TV ................................................
Using the Remote Control .........................................
2
2
3
3-5
5
6
Using the On-screen Menu .........................................
Using the Demo Mode ............................................
Using the Installation Features ......................................
As an Energy
Star®meets
Partner,
Electronics
has determined
this product
the Philips
Energy Consumer
Star® guidelines
for energy
efficiency. Energy Star® is a U.S. registered mark. Using products with
the Energy
Star® label can save energy.
Saving energy
reduces
air pollution
and
lowers utility bills.
7
7
8
In addition to providing information about safety, connecting accessory devices,
and using 1he TV's features, the Directions for Use manual explains how to care
for and maintain your Cineos television. The TV contains air filters that must be
maintained and eventually replaced, and a lamp that eventually will need to be
replaced.
Air Filters
The air filters (localed
blockage.
NOTE:
Allow
slots.
at the bottom
DO NOT operate
four to six inches
of the TV) must be kept clean
the TV without
of space behind
the filters.
Damage
to the TV will occur.
the TV for air flow through
IMPORTANT:
Excessive heat inside the TV resulting
will cause the TV lo shut down or not
and free of
the back
from inadequate
ventilation
to operate.
Keep the Directions for Use manual
accessible to correctly maintain and
care for your TV, as well as to
understand and use its features,
Lamp
An on-screen
expected
message
lifetime
will alert you when the lamp is nearing
so that you can change
it before
the end of its
it wears out.
IMPORTANT:
The TV will not operate if 1be lamp door is left open, and 1he TV
will shut down if the door is opened during operalion.
Back of TV
Back of TV
Ventilation Slots
Door
t
"I1
Locations of Air Filters
The lamp door must be closed for the TV to operate.
When you turn on your TV for the first time it will prompt you to enter
some setup information about Language preference and Channel programming. See page 8 in this Quick Use and Setup Guide for more information
about these menus.
Language
Select your menu language with
the cursor up/down.
Press the 0g key on the remote
control to confirm.
3135 035 21291
Autoprogram
Before connecting accessory
receiver, for example--please
devices
VCR, DVD player, or HD
keep the following in mind:
• Place the TV on a flat surface. An unlevel
affect picture performance.
Situate
exposed
surface may adversely
Allow
4 to 6 inches of space behind
•
To purchase an optional swivel and/or stand to go with your
Philips Cineos TV, see 1he electronics
dealer where you bought
your TV.
•
Test various locations in the room to find the optimal
locate the set for best viewing.
•
Do not place the TV in direct sunlight or near a heating appliance.
•
Do not expose
•
To prevent
the TV.
it will not be
to heat or moisture.
For safety, do not
set objects on top
of the TV.
• Do not place the TV on shag carpet or any surface that will
block the air inlets at the bottom of the set. Blockage will cause
the TV to overheal and shut down.
•
the TV where
1he TV for ventilation.
Allow 4 to 6 inches
behind the TV for
ventilation.
spot to
the TV to rain or moisture.
any unsafe
situations,
do not place objects
on top of
Do not place the TV on a surface that will block
the air filters located underneath the set.
Following
NOTE:
are instructions
Attach
the swivel
for mounting
before hooking
Remove the foam cushion
and place it on the floor.
NOTE:
Carefully
polybag
the optional
swivel.
2
Remove and Place on Floor
up 1he TV.
from around your TV
At least two people are required
to perform
lay 1he TV back fiat on the foam cushion
Guide the holes
sponding
two rubber
on the bumpers
bottom ofonthetheTV.
swivel
1his task.
polybag.
into the corre-
Use the supplied
Tighten
the screwsscrews
until hand
(4) to tight.
fasten Dothenotswivel
overtighten.
to the TV.
Polybag
Be sure the swivel
is in center position.
Optional Swivel
Place the TV and mounted swivel upright on a level surface, preferably a TV stand. An unlevel surface may
adversely affect picture performance.
3
4
\,
Screws
Rubber Bumpers
?
Optional Stand
Swivel in Center Position
Install the positioningdowels in the stand.
2
Place the TV and mounted swivel on the stand,aligning the fmnt
and sides of the TV wi_hthe front and sides of the stand.This will
help properly seat the TV on the positioning dowels and alignthe
pre-dlilled holes on the stand and swivel.
3
4
Use the supplied screws (2) and screw key to thslen the swivel to
the stand.
Place accessory deviees--HD salellite receiver,cable box, DVD
player, or VCR, for exampl_mside the stand. (See the TV Quick
Use arm Setup Guide and Directiom'fi)r Use manual for connection information.) Route the power cords through the opening in
the bottom of the stand shelf, and mule the connection cables
through |he openings in the back of the stand.
Before swiveling the TV, make sure you have left enough slack in
the cords of any connected accessory devices. This will prevent
damage to the cords.
4
II
J
Screws
Placing theTV
on the Stand
without
the Swivel
If you should decide not to purchase the optional swivel, you can
place the TV directly on the stand,
Rubber Locators
• First remove the nut and washer from each supplied rubber
locator (2),
• Place the rubber locators in the pre-drilled holes in the stand,
• Replace the washer and nut on each rubber locator,
• Tighten each nut.
• While aligning the corresponding holes in the bottom of the
TV with the rubber locators, set the TV on the stand. The
rubber locators will prevent the TV from sliding.
Back of TV
Connect the cable TV signal to the TUNER jack on the back of
the TV. See page 8 for details on using Autoprogram to store channels in the TV's memory,
NOTE: This connection will supply stereo sound to the TV if it is
being broadcast by the station you are watching.
m
ow
I
Incoming
CableTV
Signal
RGB+HV
®
Connect the incoming cable
TV signal to the TUNER
jack on the back of the TV,
Back of TV
Connect
theincoming
cableTVsignaltotheCABLEIN
jackonthebackofthecablebox.
Connect
acoaxialcable(notsupplied)
totheTOTVjack
onthebackofthecableboxandtotheTUNERjackonthe
backoftheTV.
Incoming
Cable -IV
Signal
m
ow
I
toCH3or4
(whichever
iscorrect
foryourcable
box),box
SettheOutput
Channel
switch
ontheback
ofthecable
thentunetheTVtothecorresponding
channel.
Oncetuned,
change
channels
atthecablebox,nottheTV.
Back of Cable Box
(example only)
\
NOTE: This connection will not supply stereo sound to the TV.
The reason is lhat the RF output on a cable box--labeled "TO
TV," "OUT," or "OUTPUT," for example--will not send a slereo
signal to lhe tuner I VHF/UHF) input on a TV.
OUTPUT
®
(_R
_
t"
TOTV
3
4
ffrANOAFIO/
1t0 ItlpUTS
1t0 ItlPUTS
Connect the incoming cable TV signal to a signal splitter
(not supplied).
The signal splitter enables you to avoid having to use the
TO TV jack on the back of the cable box. This jack will not
supply stereo sound to lhe TV.
NOTE: Your cable box may have a different
TO TV jack, such as OUTPUT or OUT.
label for the
Connect a coaxial cable (not supplied) to a connector on
the signal splitter and to the TUNER jack on the TV.
Connect a coaxial cable (not supplied) to a connector on
the signal splitter and to the CABLE IN jack on the back of
the cable box.
Outputs
Inpu_.f
AUDIO LA/V
Connect
and cables
R outputs
(not on
supplied)
the backto of
thethe
VIDEO
cable box
and and
to the AV2 video (labeled V) and audio (labeled L and R)
jacks on the back of the TV.
k
Signal Splitter
(example)
To view programs from your cable box, first press the
Source button on dae remote control.
IV
AVl:None
I S°"rce
Press the Cursor Down or Up buttons
source is selected.
(_
until the AV2 signal
AV2:N°ne
AV3:Nene
I
AV4:Nene
AVS:Nene
AV6:None
SIOE:None
input
the viewing
cableAV2
TV
Press source
the OK becomes
button tocurrent
confirm foryour
selection. ofThe
programs through your cable box.
i!!i !i!i!iiii!ii !;
NOTE: If your cable box Audio/Video
outputs will not supply
video and stereo audio to the TV, you will need to make the
connection shown above in the example "Cable Box widl
RF IN/OUT."
Watching
Don't
CableTV
Require
Programs
the
Cable
That
Box
Since you've connected the cable TV signal directly to the TV's
tuner (step 2 above), you can also watch the unscrambled programs by simply tuning to lhe desired channel. You must first use
Autoprogram, however, to store channels in lhe TV's memory.
See page 8.
NOTE: This connection will supply stereo sound to the TV if it is
being broadcast by the station you are watching.
sou_
_ve
_H_OL
P_ue_
@@@@
PHILIPS
Incoming
CableTV
Signal
Back of TV
Connect the incoming antenna signal to the TUNER jack on the
back of the TV. See page 8 for details on using Autoprogram to
store channels in the TV's memory.
NOTE: This connection will supply stereo sound to the TV if it is
being broadcast by the station you are watching.
I
Incoming
Antenna
Signal
®
_
RGB÷HV
Rt
Connect the incoming
Antenna signal to the
TUNER jack on the
back of the TV.
Your television has a set of buttons located on the top of the
cabinet for use when the remote control is not needed or
unavailable.
Press the Standby-On
button
to tom the TV on.
NOTES:
Due to the complexity
Cineos
product,
and advanced
a tom-on
design
of the
time of 20 to 30 seconds
should
be expected.
When you mm the TV off, it remains
mode
(orange
to any presses
during
in Active
light on) for 30 seconds
of the remote control
Standby
and will not respond
or cabinet
buttons
thai time. This is to protect the lamp.
Press
thethe
VOLUME
button button
to increase
the the
sound
level or
VOLUME + (up)
- (down)
to lower
sound
level. Or use the buttons
on-screen
to navigate
right or left when the
//
menu is displayed.
Cabinet Buttons
Presschannels,
the CHANNEL
• bultons
(up) or •to (down)
select
TV
Or use the
navigate button
up andto down
when 1he on-screen menu is displayed,
To access the
themenu,
on-screen
menu,
press the+ MENU
button. and
To
navigate
use the
VOLUME
(up)/- (down)
CHANNEL
•
as described
in the previous
Active Control TM Plus+ Window
This window contains a sensor that monitors the ambient
light conditions in the room and adjusts key picture settings
for best viewing.
(up)iV (down) buttons to navigate the menu
steps.
Receives
commands
Remote Sensor Window
from the remote control.
Active Standby Window
Active Standby--the
condition in which the TV is either in
the process of turning on or off. Active Standby is entered by
pressing the Standby-On button 0J on the TV or remote
control. An orange light appears in the window. Active
Standby mode occurs when the TV is turned on--to allow
for the automatic calibration of the clock
and for 30 seconds after the TV has been powered off. The 30-second
Active Standby period at power off is to protect the lamp.
During this time, the TV will not respond lo presses of cabinet or remote control buttons.
On--the
TV has picture and sound. A green
the window.
light shows
in
Standby--the
condition in which the TV is plugged into the
AC outlet and is in the off state. No light is on in the window. The TV's microprocessors
and their standby supplies
are the only active components
in this state, and the power
consumption
is less than 1 watt.
Remote Control
(shown from the bottom)
Toloadthesupplied
batteries
Remove the battery
the remote.
into the remote:
compartment
door on the back of
Place
batteries
the remote.
Be sure
(+) of
and (-)theends
of the (2-AA)
batteries in line
up correctly
(the the
inside
the case is marked).
When the batteries in your remote
Reattach
will
the battery compartment
control
door.
run low, the remote
send
a "Battery
to the TV. The
a message
Be sure to point the remote at the Remote Sensor window on the
front of the television when using the remote control to operate the
television.
Source
you
to confirm.
The source
becomes
Press to turn the TV on or off, NOTE:
off complelely
unless it is unplugged.
Alternate
Audio
reminding
the batteries
as soon
NOTES:
•
With AV3-AV6
is not available.
connecfions,
•
In Dual-screen mode, press the Piclure Format button to switch
between a full or 4:3 letterbox picture format.
Motion
the Automatic
picture formal option
Press to toggle the sound modes Incredible
Virtual. (See page 41 in the Directionsfi_r
EXIT
This button is nol applicable to the Cineos Television. Select the
Digital Natural Mofion TM option through the on-screen menu. (See
page 30 in the Directions for Use.)
Format
Pressing will apply one of the Freeze modes.
NOTE: The Freeze mode must be set using the TV's on-screen menu.
Freeze mode stops action in lhe main screen. Sound will continue
lo be heard. Press again to resume normal viewing.
Replay mode displays a few seconds of stored video in lhe
PIP window.
Photo Finish mode displays six stored frames from the picture.
Continuing to hdd the Freeze Format button down will cycle the TV
through the Freeze modes: Freeze, Replay, and Photo Finish.
(See page 61 in the Directionsf!_r
Use.)
DNR
(Dynamic
Noise
Reduction)
Press this buuon repeatedly
to select Off, Minimum,
Maximum.
(See page 32 in the Directions for Use.)
Medium,
or
your choice or Io confirm
Volume
(VOL)
Press + or- to adjust
settings when in the menus.
the volume.
Mute
to interrupt
or restore sound.
Surf (AutoSurf
TM )
If you set the Surf conlrol in the TV's on-screen menu to two channels, this btaton will allow you to toggle between the current channel and the last viewed channel. If you choose the nine-channel
Surf, pressing this btaton allows you to add and scroll up to nine of
your favorite channels.
(See page 58 in the Directionsfi_r
Use.)
VCR
When the remote is in the VCR mode, these buttons will allow you
start a recording (O), rewind a tape ('_'_l),
stop the playback of a
tape (I), play a videotape (_1_), fastforward
a videotape (_1_1_),
use the VCR timer ([_}), or pause the playback of a videotape (| |).
(See page 26 in the Directionsf!_r
Use.)
Sound (AutoSound
TM)
Press to select lhe next item in lhe AutoSound
and Dolby*
Press this btaton to exit lhe menus provided by universal devices
such as VCRs, satellite receivers, DVD players, and so forth.
1
INFO
+
Press to display (when available) information
about the current
channel, program,
source, number or name, local time, CC availability, SAP availability,
program ratings, display formal, sound
mode, and remaining
length of a Sleeptlmer
setting.
CC (Closed
Captioning)
Press to select On, Off, or On with Mute.
Dh'ections fi)r Use.)
(See page 47 in the
adjustments
Additionally,
use these buttons to pan the screen up or down to
show any excluded parts of the picture. Left or right panning is
possible with the Side input source when "Game" is selecled as the
type of source for the Side input. (See page 21 in the Dir*'ctionsfor
Use manual.)
Also use with the Dual Screen/PIP
feature to select a screen or
reposition a PIP screen.
Menu
Press to display
the TV's
CH (Channel
Press to browse
Selection)
through the TV channels.
on-screen
menu
or to turn it off.
Digit (Number
Buttons)
Press to directly access a specific TV channel. For a two- or threedigit channel, enler all numbers. Press a single-digit
button and
hold for 1 second lo directly access a single-digit
channel. These
buttons can also be used to enter values in certain on-screen
menu
conlrols.
Press this button on the right side of the remote control. The backlighting of the buttons VOL, CH, t]_, and the digit buttons stays on
for 5 seconds after pressing the buuon.
Active
Control
TM Plus
NOTE: Active Conlrol TM Plus is not available
for use with lhe
AV3, AV4, AV5, and AV6 input sources.
Press to toggle the options Off; Minimum,
Medimn, and Maximum.
Maximum is the recommended
option. (See page 27 in the
Directions f!_r Use.)
Zoom
NOTE: Zooming is disabled in Dual Screen mode.
Press the Zoom buuon to activate the zoom function.
menu. The facto-
ry-set options are Speech, Music, Movies, and Multimedia,
each
corresponding
with specific settings of treble and bass. You can
also select the Personal option, which is based on the adjustments
you make through the Sound menu. (See page 46 in the Directions
for Use.)
Press lhe OK
button repeatedly
to select one of the zoom magnifications
(lx, 4x,
9x, or 16x). Additionally,
you can shift the selected zoom window
over the screen with the Cursor Up, Down, Left, or Right btatons.
The zoom window is reset after selecting another TV channel,
another picture format, or when another display format is selected
automatically.
Press the Z_om buuon again to turn off the zoom
function. (See page 28 in the Directionsfi_r
Use.)
Picture
AutoPicture
TM)
Press to select the next ifem in the AutoPicture
TM
TM
Backlight
OK
Press to activate
Surround
Use.)
Cursor
Up, Down,
Right, and Left
Use to navigate the on-screen
menu and make control
or settings.
TM
powered
VCR Prog (functional
only inVCR
mode)
Many VCRs have an automatic programming
function. If your
VCR has this function, the universal code set will assign it to this
function. (See page 26 in the Directionsfi_r
Use.)
Surround
Sound
Format
Press lo display a list of available plclure formats for showing video
images in the lraditional 4:3 proportions.
Press this button repeatedly
lo select another picture format. Choose from Automalic, Super
zoom, Panoramic, 4:3, Movie expand 14:9, Movie expand 16:9, 16:9
subtitle, and Wide screen. (See pages 35-36 in the Directionsf!_r
Use.)
The TV is never
When you tune to a channel where SAP (Second Audio Program) is
available, you can toggle between Main and SAR If not available,
only Main can be selected. (See page 42 in the Directions for Use.)
active
VCR, or AMP mode as indicated above the button. A green indicator
lights up. Press the same button again more lhan 1 second to use the
remote conlrol in the mode indicated below lhe bullon (HD, SAT,
DVD, or CD). A red indicator lights up. Press the button again more
than 1 second to return to the function named above the buuon. (See
pages 22-23 in the Directions for Use.)
Press
to replace
Power-Standby
Mode
( TV, CBL, VCR, AMP, HD, SAT, DVD, or CD)
Press one of these buttons lo use the remole control in the TV, CBL,
Freeze
then display
on the screen
Select
then press the OK button
on the TV screen.
Natural
TV will
control
command
as possible.
Press to display a list of input source options--TV,
AV1, AV2,
AV3-AV6,
or Side. If you have labeled the source you desire, press
the Source Select bulton to select the next item in the list. (See
page 21 in the Directionsfi_r
Use.)If
you have not labeled the
source, use the Cursor Up/Down btatons to select the next item,
Picture
low"
TM
menu. The facto-
ry-set options are Rich, Natural, Soft, Multimedia,
and Eco, each
corresponding
with specific factory settings of Conlrast, Color,
Sharpness,
DNR, Dynamic Contrast, and Color enhancements.
You
can also select the Personal option, which is based on the adjustments or settings you make through the Picture menu. (See page 34
in the Directions for Use.)
Dual Screen/PIP
(Picture-in-Picture)
Press to turn the PIP dual screen on or off. Continuing
to hold lhe
Dual Screen/PIP
btaton down will cycle through the Dual
Screen/PIP
options. (See pages 59_50 in the Directionsfi)r
Use.)
PIP Swap
Press to swap the main picture with the PIP window picture, or to
swap the left and right screens when in Dual Screen PIP mode.
Press again to restore pictures to their original position.
MultiPIP
The first press of this buuon displays PIP3 (the default option).
long press of the button cycles through PIP3 and PIP6. Another
press turns PIP off.
A
Active Control, AutoPicture,
AutoSound,
AutoSurf,
Incredible
Surround,
and Natural Motion are trademarks
of Philips Consumer
Electronics.
Copyright
2003 Philips Consumer
Electronics.
All rights reserved.
*Manufactured
under license from Dolby Laboratories.
double-D
symbol are trademarks
of Dolby Laboratories.
"Dolby"
and the
The TV's on-screen menu controls are viewed within a
mobile map or pipe system. This system allows you to
move along linked paths tied to specific Feature Title categories ("TV," "Picture," "Sound," "Features," and
"Channels").
Each press of a Cursor button on the remote
moves the cursor control to balls indicating specific controls. Each specific control may have multiple features that
can be adjusted or set. The animated on-screen menu structure will expand to show all available on-screen controls. As
it expands, it will display a series of balls grouped together
to reveal more controls.
Pipes represent
the structure
tie all the controls together
low to access the available
2
Balls indicate
of the on-screen
menu. They
The first time you turn on the TV after purchasing it, it will be in
inform you that you can change the menu language and on-screen
Spanish. Also included in this mode is Autoprogram to encourage
channels into the TV's memory. For more details on the Language
page 8.
Picture
or controls
available
Channels
Picture
Sound
Features Channels
Settings
Settings
Demo
Demo
Install
Install
Pipes
and show the path you can folcontrols.
the titles of features
Sound features
a special mode designed to
displays to English, French, or
you to have the set program
and Autoprogram features, see
Balls
_
Feature Titles
on
this television. When highlighted,
some of these controls
may show more Pipes and Balls, indicating subcategories
or lists of controls
subcontrols
within
the highlighted
control.
These
will also have Pipes and Balls.
Picture
Sound Features
Channels
IV
The Puck
within
the tells
on-screen
you which
menu.way
The movement
arrows on may
the Direction
take place
Indicator
simulate
(Up, Down,
the Cursor
buttons
on the remote control
Settings
Left, or Right).
Demo
Install
The Slideradjustments
controls willto be
features,
allowing
the displayed
values of on
the some
controls.
Some
may show a box containing
tings. Others
To navigate
a list of multiple
the on-screen
menu, start by pressing
button
on the remote control.
screen
menu in its starting
This will display
set-
Down button
Demo,
controls.
or Install
Right button
of the Picture,
Sound,
the Menu
the on-
position.
Press the Cursor
the Cursor
options
may have only an "On" or "Off" option.
to select any of the Setting,
Starting
on the remote
Features,
Picture
from the TV item, press
control
or Channel
Sound Features Channels
TV :
to select any
Contrastt
controls.
See the "Using the Demo Mode" and "Using the Installation
Features" on this page and the next. Refer to the Directionsfi)r
Use manual for all oilier control descriptions (Picture, Sound,
Features, Channels, or Settings).
,0
Brightness
Color
ACITI/E
Sharpness
Z[ff_N
Pressing
Pressing
payed
the Menu button once will display the on-screen menu.
the Menu button any time the on-screen menu is disw 11remove
the on-screen
PHILIPS
menu from the TV screen.
Several features of this television can be placed in a demo
mode, which will show you how the feature works. Auto
Demo will automatically
show all the feature demos one
after another except for the Dealer Demo mode. Specific
demo modes can be selected from the list of options within
the Demo control (Auto demo, Dual screen, PIP, and Install,
for example).
Tv
T
Picmre
Sound Feamres Channels
Settings
©©©©
The Dealer Demo also has a sublist of the following
options: Digital options, Lightsensor, and 3D Y/C Comb
filter.
31
51
Set'rigs
hulo demo
Oemo
Demo
Dual screen
Install
Install
freeze-Replay-Photo finish
Install
Main Nenu
Ncture
I
Press the Cursor
Press the Menu button on the remote control
on-screen menu.
Press the Cursor
is selected.
Down button repeatedly
to show the
until "Demo"
more Demo Mode options.
I{I
42g@@
Demo
Dual screen
freeze-Replay-Photo finish
Install
Demo
Main der_o
Ne_
A_tO
Press the Cursor
the list of Demo
Right button to shift the menu to display
mode options.
Press the Cursor
mode option.
Down or Up button to select a Demo
z0c,_
PHILIPS
Press the Cursor
Right button to activate
the Demo.
Install
Main N¢_
Picmre
I
3
4
Down button
To see the Dealer Demo sublist,
press the Cursor Down button to
select Dealer Demo, then press the
Cursor right. Press the Cursor
Down or Up to select a mode, then
press the Cursor Right to activate
the mode.
Picture
treeze-Replay-Pho_o finish
hcdve Control
Dealer dem0
hight_enso_
0igital
_O
_/C op_iom
Comb fiDer l
to see
When you
you to set
If you are
time, skip
plug in your TV for the first time it will prompt
the Language and Autoprogam
the channels.
setting up the TV after turning it on for the first
steps 1-3. If you are returning to the Language
and Autoprogranl
features,
Picture
use steps 1-3 below.
Presson-screen
the
the MENU
menu.
button on the remote
Tv
!
Set_ingx
control
Press the Cursor Down button repeatedly
is selected.
Sound Features Channels
to show
@
until "Install"
Settings
Denm
Demo
Install
lnxtall
Language
31
Pressselect
and
the Cursor
"Language"
Right button
or "Autoprogram."
to shift the menu to the left
Language
gu_oprog¢_m
Language
Autoprogr_m
T
English ,
Press the cursor down to select
Englilh_
Selec_ your menu langaage
T
Fransais,
your menu language
Espafiol i
Pian_aii T,L
Esp_fiol_
control to congrm.
For Spanish- and French-speaking
TV owners, an on-screen
Language option is present. The Language control enables
you to set the TV's on-screen menu to be shown in either
English, Spanish, or French.
Initial TV
Language
Press
the Cursor
Down (French).
button to select English,
(Spanish),
or Francais
Press the MENU
button to remove
setup
begins
here.
gu_oprog¢_m
Espafiol
Englith _
After you have made your language selection,
OK button to confirm your selection.
with
the cursor up/down.
Press the OK key 0n the remote
press the
The I_ngu_gey_u h_ve d_osen is
zo0_
h_nsaislt
EspaEo
English
PHILIPS
the on-screen
menu
from the TV screen.
Your TV can automatically
set itself for local area (or cable
TV) channels. This makes it easy for you to select only the
TV stations in your area by pressing the CH + or - button
on the remote control.
Picture
Sound
Fealurex
Cl_annels
!
Settings
Demo
lnxtall
Settings
Denlo
Language
If you are setting up the TV after turning it on for the first
time,continue
with steps 4-10. If you are returning to the
Language and Autoprogram
features, begin with steps 1-3
above.
gutoprogran_
gutoprogranl
Press the Cursor Down button to select "Install" mode
control.
_
Press the Cursor
mode options:
galhleT_aw_2il:bla_ChhlaOn_netind
and stole
Prexstee culsor down to proceed.
Right button to display a list of Install
"Antenna,"
"Automatic,"
Automatic
I_
or make your own
saec_ion.
Press the Cursor Up or Down button to select one of the
options. Select "Antenna"
for normal outside_ or inside_
Autoproglam
Install mode
detects coming into the TV. The programming
process
may be faster if you choose the specific type of connection you have made, either Antenna or Cable.
Press the Cursor
mode selection.
Left button
after making
your "Install"
Autoproglarn
Press the Cursor
Down button to select "Install."
Press the Cursor Right button to start the programming
process,
Install
_
mode
S_art
24 analog channels found
To butopmpan_ Analogd_nels, press the _Sgh_a_ow.
Press the Menu button to remove the on-screen menu
from the TV screen when the Autoprogramm
ng process
has finished.
Autoprogr_m
Install mode
_
60 analog channels found
A_toprog¢ammingis complete
After Autoprogram
is finished, check the results. Press the CH
(+) or (-) button on the remote control to see which channels
you can select. See page 51 in the DirectionsJbr
Use manual
for instructions on removing channels.
detection of
eagle o_ ann_enna
"Cable."
type antenna. Select "Cable" for a cable company supplied signal. When "Automatic"
is selected, the TV will
automatically
set the mode based on the type of signal it
Keep the p_edefined automatic
Sta,t
44" Cineos_ Widescreen
HDTV Monitor
• Philips Single Panel LCOS technology
• Super slim design; only 14.6" deep
• Digital Natural
Motion
• Flexible inputs for Data or HDTV:
HDCP,
_0
TM
DVI with
15 Pin DSUB, 2 sets HD Component
• Protective
screen filter
• Active Control TMplus
• 3D Y/C comb filter
• Virtual Dolby _ Surround - 40 Watt
• Double Window / two tuner PIP
CINe®S
RMS
44" Cineos Widescreen
HDTV Monitor
Picture
Sound
Quality
quality
Philips Single Panel LCOS technology
Virtual Dolby ® Surround processing
Phgipssingle panel LCOStechnologyproduces!_ighresolution,flicker free videowithout
a visible pixelgrid. This P!_gipspatented reflective technologyenables a large screen
size TV with low weig!lt and small footprint without any concerns for convergence
or burn-in.
Dolby®processingcircuitry for enhancedsurround sound effect creates the sensationof
Dolby®Pro Logic without the hassle of additional rear speakers.
Eliminates motion judder from film based sources such as DVD's for distor_fon free,
natural _ewin_
Sound system: Hi-Fi Stereo
Receivesstereo broadcasts.Producessound for performance through 4 speakerswith
an output of 2 x 20W RMS.The loudspeaker configuration consistsof two 2" tweeters
and two 5" woofers.Full user controllable equalizer via the OSD menu with 4 presets
"Movie, Speech,Music and Multimeda".
Active Control
Connectivity
Digital
Natural
Motion
Plus
TM
TM
By continua!ly adjusting picture settings over 60 times per second, Active Control P/us
ensures tl_at the viewing experience is always optimal. Changes in ambient light are
even automatically
•
compensated for!
Remote
Screen size: 44"
Visible screen size: 44"
Aspect ration: 16 : 9
Resolution: 1280 x 720
720P HD performance
and line doubling
Brightness: 450 Nits
Contrast ratio: >400 : 1
Screen
protector
Broad input standard support
• AVI: S-Video, CVBS, Y Pb Pr and stereo sound
• AV2: S-Video, CVBS and stereo sound
• AV3: Standard or composite Y Pb Pr supporting 480i, 480p, 720p
and 1080i inputs and stereo sound.
• AV4: Standard or composite Y Pb Pr supporting 480i, 480p, 720p
and 1080i inputs and stereo sound.
• AV5: 15-pins D-SUB input supporting standard resolutions
up to 1280 x 1024 with stereo sound.
• AV6: DVI-D input with stereo sound
• Side: S-Video and CVBS with stereo sound.
• Monitor out; subwoofer out and center channel input.
• Headphone output
Ease of use
• Ergonomicuniversal remote control
• Easymenu driven installation and operation. Direct access
menus and cursor control.
• Selection of three menu languages:English,French, Spanish.
• Onscreen status display on programs and functions (OSD)
• Sleep timer
• Favorite channel listing
• AutoLock TM to protect young children from objectionable
programming with V-chip technology.
• Closed Captioning
• Smart Picture control: Soft, Natural, Rich, Multimedia, Personal
Center Channel Input
Side Panel
Ja_Panel
@
i_rr
• Smart Sound Control: Movie, Speech, Music, Personal
• 6 wide screen modes: 4:3, Zoom 14:9, Zoom 16:9,
Subtitle Zoom, Super Zoom,Widescreen
• Subtitle and heading shift
• Autoformat / Auto Screen Fit (invLWSSB)
• Smart Clock
Miscellaneous
•
Mains: AC 110V -+ 10%
• Power consumption: Normal operation: 270 Watts
Stand by: <IW
• Product dimension (d x w x h): 14.6 x 46.7 x 31.7"
• Product weight: 73.1 Ibs.
• Carton dimensions (d x w x h): 19.5 x 52.5 x 36.5"
• Shipping weight: 89.5 Ibs.
• UPC: 0 37849 93418 0
Universal remote control- RC2043/01B
Universal RC managingTV and peripherals.
Digital
Natural
Surround,
Virtual
Motion,
Cin_os_
Dolby
Digital
Crystal
Clear, Active
and gasycune are trademarks
is a trademark
of Dolby
As an ENERGY STAR _=Parmer,
Specifications
subject
Ph[_ips has determined
in USA 108207
©2003
Philips Consumer
A Division
E[ectronlcs
of Ph[_ips Electronics
www.philip_com
or AOL
North
glectronlcs Company.
that this product
for energy effidency.
co change without
Printed
Auto Surf, Incredible
Laboratories.
meets the ENERGY STAR '_guldel[nes
Optional ST449523/ZA stand (shown on front) provides the
ideal solution to table top placement with an emphasis on high
design, storage, and safety.
Optional SW449523ZA swivel provides greater viewing flexibility
by allowing safe easy rotation of the set.
Control,
of Philips Consumer
notice.
Co.
America
keyword:
Corp.
philips