1
Commercial in Confidence
AMC+ 2.0 Admin User Guide for
Blackberry (RIM) mobile phones
Aastra Technologies Limited
www.aastra.com
th
December 12 , 2011
AMC+ 2.0 User Guide
Contents
Contents
1 Welcome to the AMC Solution
1.1 Overview . . . . . . . . . . . . . . . . . . . . . . . . . . . . . . . . . . . . . . . . .
1.2 Fixed Mobile Convergence . . . . . . . . . . . . . . . . . . . . . . . . . . . . . . . .
5
5
5
2 Introduction to the User Guide
2.1 User information . . . . . . . . . . . . . . . . . . . . . . . . . . . . . . . . . . . . .
2.2 Disclaimer . . . . . . . . . . . . . . . . . . . . . . . . . . . . . . . . . . . . . . . . .
2.3 Trademarks . . . . . . . . . . . . . . . . . . . . . . . . . . . . . . . . . . . . . . . .
6
6
6
6
3 Introduction to the AMC+
3.1 Feature Overview . . . . . . . . . . . . . . . . . . . . . . . . . . . . . . . . . . . . .
3.2 How to read this Manual . . . . . . . . . . . . . . . . . . . . . . . . . . . . . . . . .
7
7
8
4 Restrictions
4.1 By Mobile HardWare Platform
4.2 By Network (Cellular) . . . .
4.3 By Mobile OS Version . . . .
4.4 Details . . . . . . . . . . . . .
.
.
.
.
.
.
.
.
.
.
.
.
.
.
.
.
.
.
.
.
.
.
.
.
.
.
.
.
.
.
.
.
.
.
.
.
.
.
.
.
.
.
.
.
.
.
.
.
.
.
.
.
.
.
.
.
.
.
.
.
.
.
.
.
.
.
.
.
.
.
.
.
.
.
.
.
.
.
.
.
.
.
.
.
.
.
.
.
.
.
.
.
.
.
.
.
.
.
.
.
.
.
.
.
.
.
.
.
.
.
.
.
.
.
.
.
.
.
.
.
5 Data Usage Overview
9
9
9
10
10
12
6 Installation and AMC+ configuration from the AMC Portal
6.1 Version Requirements . . . . . . . . . . . . . . . . . . . . . .
6.2 Permissions . . . . . . . . . . . . . . . . . . . . . . . . . . .
6.3 Installation . . . . . . . . . . . . . . . . . . . . . . . . . . .
6.4 Opening the Application . . . . . . . . . . . . . . . . . . . .
6.5 AMC+ configuration . . . . . . . . . . . . . . . . . . . . . .
6.6 AMC+ License activation . . . . . . . . . . . . . . . . . . . .
6.7 Blackberry Enterprise Server (BES) . . . . . . . . . . . . . .
.
.
.
.
.
.
.
13
13
13
13
15
16
16
17
7 General Operation
7.1 Configure Wi-Fi Access Points (APs) . . . . . . . . . . . . . . . . . . . . . . . . . .
7.2 Home Screen Navigation . . . . . . . . . . . . . . . . . . . . . . . . . . . . . . . . .
7.3 Registration Status . . . . . . . . . . . . . . . . . . . . . . . . . . . . . . . . . . . .
18
18
19
19
8 Features of the AMC+
8.1 Placing Calls . . . .
8.2 Accepting Calls . . .
8.3 Emergency Calls . .
8.4 Corporate Phonebook
8.5 Call Types . . . . . .
8.5.1 Call . . . . .
8.5.2 Callback . .
21
21
22
22
23
24
24
24
.
.
.
.
.
.
.
.
.
.
.
.
.
.
.
.
.
.
.
.
.
.
.
.
.
.
.
.
.
.
.
.
.
.
.
.
.
.
.
.
.
.
.
.
.
.
.
.
.
.
.
.
.
.
.
.
.
.
.
.
.
.
.
.
.
.
.
.
.
.
.
.
.
.
.
.
.
.
.
.
.
.
.
.
.
.
.
.
.
.
.
.
.
.
.
.
.
.
.
.
.
.
.
.
.
.
.
.
.
.
.
.
.
.
.
.
.
.
.
.
.
.
.
.
.
.
.
.
.
.
.
.
.
.
.
.
.
.
.
.
.
.
.
.
.
.
.
.
.
.
.
.
.
.
.
.
.
.
.
.
.
.
.
.
.
.
.
.
.
.
.
.
.
.
.
.
.
.
.
.
.
.
.
.
.
.
.
.
.
.
.
.
.
.
.
.
.
.
.
.
.
.
.
.
.
.
.
.
.
.
.
.
.
.
.
.
.
.
.
.
.
.
.
.
.
.
.
.
.
.
.
.
.
.
.
.
.
.
.
.
.
.
.
.
.
.
.
.
.
.
.
.
.
.
.
.
.
.
.
.
.
.
.
.
.
.
.
.
.
.
.
.
.
.
.
.
.
.
.
.
.
.
.
.
.
.
.
.
.
.
.
.
.
.
.
.
.
.
.
.
.
.
.
.
.
.
.
.
.
.
.
.
.
.
.
.
.
.
.
.
.
.
.
.
.
.
.
.
.
2
AMC+ 2.0 User Guide
Contents
.
.
.
.
.
.
.
.
.
.
.
.
.
.
.
.
.
.
24
25
26
26
26
26
26
26
27
27
27
28
28
28
28
29
29
29
9 Mobile Least-Cost Routing (MLCR)
9.1 (HTTPS) Callback . . . . . . . . . . . . . . . . . . . . . . . . . . . . . . . . . . . .
9.2 Call Reverse . . . . . . . . . . . . . . . . . . . . . . . . . . . . . . . . . . . . . . . .
9.3 Travel SIM . . . . . . . . . . . . . . . . . . . . . . . . . . . . . . . . . . . . . . . .
30
30
30
31
10 IM and Presence
10.1 Adding Contacts . . . . .
10.2 Being Added . . . . . . .
10.3 Chatting . . . . . . . . . .
10.4 Parallel Chats . . . . . . .
10.5 Setting the Presence Status
.
.
.
.
.
32
32
33
33
33
33
.
.
.
.
.
.
.
.
.
.
.
.
.
34
34
34
34
35
35
35
37
38
38
39
39
40
40
8.6
8.7
8.5.3 Direct Call (Mobile call without passing the PBX)
8.5.4 Anonymous Call . . . . . . . . . . . . . . . . . .
In-Call Features . . . . . . . . . . . . . . . . . . . . . . .
8.6.1 Hold call . . . . . . . . . . . . . . . . . . . . . .
8.6.2 Consultation . . . . . . . . . . . . . . . . . . . .
8.6.3 Blind Transfer . . . . . . . . . . . . . . . . . . .
8.6.4 Toggle, Complete Transfer, and Conference . . . .
8.6.5 Fast Forwarding . . . . . . . . . . . . . . . . . .
8.6.6 Handover to Cellular Networks (GSM) . . . . . .
8.6.7 Handover to VoIP . . . . . . . . . . . . . . . . . .
8.6.8 Automatic Handover to VoIP . . . . . . . . . . . .
Out-Of-Call Features . . . . . . . . . . . . . . . . . . . .
8.7.1 Call Forwarding . . . . . . . . . . . . . . . . . .
8.7.2 Call Pickup . . . . . . . . . . . . . . . . . . . . .
8.7.3 Call Retrieve . . . . . . . . . . . . . . . . . . . .
8.7.4 Voice Mail . . . . . . . . . . . . . . . . . . . . .
8.7.5 Activate and Deactivate DnD . . . . . . . . . . . .
8.7.6 Absence Info . . . . . . . . . . . . . . . . . . . .
.
.
.
.
.
.
.
.
.
.
.
.
.
.
.
11 Settings
11.1 Options Menu . . . . . . . . . .
11.1.1 Connect and Disconnect
11.1.2 Auto Handover . . . . .
11.2 FMC Numbers . . . . . . . . .
11.2.1 PBX Dialing-in Number
11.2.2 Travel SIM Number . .
11.2.3 Callback Number . . . .
11.2.4 MTC Number(s) . . . .
11.2.5 Call Reverse Number . .
11.2.6 Voice Mail Number . . .
11.2.7 Fast Forwarding Number
11.3 Dual Mode . . . . . . . . . . .
11.4 VoIP Settings . . . . . . . . . .
.
.
.
.
.
.
.
.
.
.
.
.
.
.
.
.
.
.
.
.
.
.
.
.
.
.
.
.
.
.
.
.
.
.
.
.
.
.
.
.
.
.
.
.
.
.
.
.
.
.
.
.
.
.
.
.
.
.
.
.
.
.
.
.
.
.
.
.
.
.
.
.
.
.
.
.
.
.
.
.
.
.
.
.
.
.
.
.
.
.
.
.
.
.
.
.
.
.
.
.
.
.
.
.
.
.
.
.
.
.
.
.
.
.
.
.
.
.
.
.
.
.
.
.
.
.
.
.
.
.
.
.
.
.
.
.
.
.
.
.
.
.
.
.
.
.
.
.
.
.
.
.
.
.
.
.
.
.
.
.
.
.
.
.
.
.
.
.
.
.
.
.
.
.
.
.
.
.
.
.
.
.
.
.
.
.
.
.
.
.
.
.
.
.
.
.
.
.
.
.
.
.
.
.
.
.
.
.
.
.
.
.
.
.
.
.
.
.
.
.
.
.
.
.
.
.
.
.
.
.
.
.
.
.
.
.
.
.
.
.
.
.
.
.
.
.
.
.
.
.
.
.
.
.
.
.
.
.
.
.
.
.
.
.
.
.
.
.
.
.
.
.
.
.
.
.
.
.
.
.
.
.
.
.
.
.
.
.
.
.
.
.
.
.
.
.
.
.
.
.
.
.
.
.
.
.
.
.
.
.
.
.
.
.
.
.
.
.
.
.
.
.
.
.
.
.
.
.
.
.
.
.
.
.
.
.
.
.
.
.
.
.
.
.
.
.
.
.
.
.
.
.
.
.
.
.
.
.
.
.
.
.
.
.
.
.
.
.
.
.
.
.
.
.
.
.
.
.
.
.
.
.
.
.
.
.
.
.
.
.
.
.
.
.
.
.
.
.
.
.
.
.
.
.
.
.
.
.
.
.
.
.
.
.
.
.
.
.
.
.
.
.
.
.
.
.
.
.
.
.
.
.
.
.
.
.
.
.
.
.
.
.
.
.
.
.
.
.
.
.
.
.
.
.
.
.
.
.
.
.
.
.
.
.
.
.
.
.
.
.
.
.
.
.
.
.
.
.
.
.
.
.
.
.
.
.
.
.
.
.
.
.
.
.
.
.
.
.
.
.
.
.
.
.
.
.
.
.
.
.
.
.
.
.
.
.
.
.
.
.
.
.
.
.
.
.
.
.
.
.
.
.
.
.
.
.
.
.
.
.
.
.
.
.
.
.
.
.
.
.
.
.
.
.
.
.
.
.
.
.
.
.
.
.
.
.
.
.
.
.
.
.
.
.
.
.
.
.
.
.
.
.
.
.
.
.
.
.
.
.
.
.
.
.
.
.
.
.
.
.
.
.
.
.
.
.
.
.
.
.
.
.
.
.
.
.
.
.
.
.
.
.
.
.
.
.
.
.
.
.
.
.
.
.
.
.
.
.
.
.
.
.
.
.
.
.
.
.
.
.
.
.
.
.
.
.
.
.
.
.
.
.
.
.
.
.
.
.
.
.
.
.
.
.
.
.
.
.
.
.
.
.
.
.
.
.
.
.
.
.
.
.
.
.
.
.
.
.
.
.
.
.
.
.
.
.
.
.
.
.
.
.
.
.
.
.
.
.
.
.
.
.
.
.
.
.
.
.
.
.
.
.
.
.
.
.
.
.
.
.
.
.
.
.
.
.
.
.
.
.
.
.
.
.
.
.
3
AMC+ 2.0 User Guide
11.5 Network Settings . . . . . . . . . . . . . .
11.6 Call Preference . . . . . . . . . . . . . . .
11.6.1 Background Mode . . . . . . . . .
11.7 Exception Numbers . . . . . . . . . . . . .
11.8 Misc. Settings . . . . . . . . . . . . . . . .
11.8.1 HTTPS Port . . . . . . . . . . . . .
11.8.2 International Prefix . . . . . . . . .
11.8.3 Maximum Number Length . . . . .
11.8.4 OTA-URL . . . . . . . . . . . . .
11.8.5 Default IM Host . . . . . . . . . .
11.8.6 IM/Presence enabled . . . . . . . .
11.8.7 Anonymous Call Prefix . . . . . . .
11.8.8 Automatic Start . . . . . . . . . . .
11.8.9 Call Reverse Enabled . . . . . . . .
11.8.10 Show ’Close’ in menu . . . . . . .
11.8.11 LCR enabled . . . . . . . . . . . .
11.8.12 Operator Supported Dialing (OSD)
Contents
.
.
.
.
.
.
.
.
.
.
.
.
.
.
.
.
.
.
.
.
.
.
.
.
.
.
.
.
.
.
.
.
.
.
.
.
.
.
.
.
.
.
.
.
.
.
.
.
.
.
.
.
.
.
.
.
.
.
.
.
.
.
.
.
.
.
.
.
.
.
.
.
.
.
.
.
.
.
.
.
.
.
.
.
.
.
.
.
.
.
.
.
.
.
.
.
.
.
.
.
.
.
.
.
.
.
.
.
.
.
.
.
.
.
.
.
.
.
.
.
.
.
.
.
.
.
.
.
.
.
.
.
.
.
.
.
.
.
.
.
.
.
.
.
.
.
.
.
.
.
.
.
.
.
.
.
.
.
.
.
.
.
.
.
.
.
.
.
.
.
.
.
.
.
.
.
.
.
.
.
.
.
.
.
.
.
.
.
.
.
.
.
.
.
.
.
.
.
.
.
.
.
.
.
.
.
.
.
.
.
.
.
.
.
.
.
.
.
.
.
.
.
.
.
.
.
.
.
.
.
.
.
.
.
.
.
.
.
.
.
.
.
.
.
.
.
.
.
.
.
.
.
.
.
.
.
.
.
.
.
.
.
.
.
.
.
.
.
.
.
.
.
.
.
.
.
.
.
.
.
.
.
.
.
.
.
.
.
.
.
.
.
.
.
.
.
.
.
.
.
.
.
.
.
.
.
.
.
.
.
.
.
.
.
.
.
.
.
.
.
.
.
.
.
.
.
.
.
.
.
.
.
.
.
.
.
.
.
.
.
.
.
.
.
.
.
.
.
.
.
.
.
.
.
.
.
.
.
.
.
.
.
.
.
.
.
.
.
.
.
.
.
.
.
.
.
.
.
.
.
.
.
.
.
.
.
.
.
.
.
.
40
41
42
42
42
42
42
43
43
43
43
43
44
44
44
44
44
12 Factory Reset of the AMC+
45
13 Manual download from the Aastra portal
46
14 For Administrators and Technicians
14.1 Access to Hidden Screen . . . . . . . . . . . . . . . . . . . . . . . . . . . . . . . . .
14.2 Advanced Settings . . . . . . . . . . . . . . . . . . . . . . . . . . . . . . . . . . . .
14.3 Recording and Retrieving Traces . . . . . . . . . . . . . . . . . . . . . . . . . . . . .
47
47
47
48
4
AMC+ 2.0 User Guide
1 Welcome to the AMC Solution
1 Welcome to the AMC Solution
Thank you for choosing this Aastra Mobile Client product. Our product meets the strictest requirements
with regard to quality and design. The following user’s guide will assist you in using the Aastra Mobile
Client Plus application and answer most of the questions that may arise. If you require further technical
support or information about other Aastra products, please refer to our website at http://www.
aastra.com. It provides additional notes and hints on the product.
1.1 Overview
The Aastra Mobile Client brings system telephony features to your mobile telephone. It takes just a few
steps to install after which the Aastra Mobile Client Plus can be used immediately and conveniently
without spending too much time learning it.
1.2 Fixed Mobile Convergence
Fixed Mobile Convergence (FMC) is the integration of mobile telephones into the fixed-line communications system of a company. The Aastra Mobile Client Plus software (AMC+) allows you to access
the Aastra communications system services from your mobile phone, enabling complete integration
with the communications system as a normal extension.
• Use your mobile phone with the Aastra communications system - the familiar communications
environment accompanies you around the world and is always available.
• Switch at any time from mobile telephone to system telephone - even in the middle of a call. Depending on the situation, select the mobile telephone or stationary system telephone - accessible
worldwide - with the best audio quality.
• Always be accessible under one single number - free people calling you from having to keep
track of several network and call numbers.
5
AMC+ 2.0 User Guide
2 Introduction to the User Guide
2 Introduction to the User Guide
2.1 User information
This user’s guide describes the AMC+ application. You will find the user’s guide and other documents
for your application at www.aastra.com or www.aastra.com/docfinder. For more information please refer to the documentation or to your dealer’s homepage. It is your responsibility to inform
yourself about the scope of functions, operation and proper use of your equipment.
• Check whether you have all the user information available on your product, whether it conforms
to your product’s version and whether it is up to date.
• Read through the user information carefully before using the AMC+.
• Store the user information within easy reach and refer to it whenever uncertainties arise in connection with the use of the application.
• If individual features differ on the Aastra communications systems, a reference is made in this
user’s guide.
2.2 Disclaimer
This product was manufactured in accordance with ISO 9001 quality guidelines. This product and the
user information belonging to it have been produced with the utmost care. The product’s functions have
been tested and approved after comprehensive conformity tests. Nonetheless errors cannot be entirely
excluded. The warranty is limited to the replacement of defective hardware. The manufacturers shall
not be liable for any direct or indirect damage that may be caused by incorrect handling, improper use,
or any other faulty behavior on the part of a product. Potential hazards are mentioned in the relevant
places in the user information. Liability for loss of profit shall be excluded in any case.
2.3 Trademarks
The designations used in this manual for software and hardware are registered trademarks and are thus
R
subject to the relevant regulations. Aastra, Aastra 800, Aastra 5000, Aastra IntelliGate
Series, Aastra
TM
400 Series, Aastra A700, MX-ONE , OpenCom100, and OpenCom1000 are registered trademarks of
Aastra Technologies Limited.
6
AMC+ 2.0 User Guide
3 Introduction to the AMC+
3 Introduction to the AMC+
Thank you for using the AMC+ for Blackberry-based mobile phones. The AMC+ is an application
that runs on most phones based on the RIM Version 5.0 and 6.0 enabling the use of our AMC Solution.
This solution lets its users enjoy unified communications via one single handset. AMC+-applications
are available for Symbian, BlackBerry, iPhone and Android.
3.1 Feature Overview
Your AMC+ is the key to a variety of communication services normally rendered by several phones
and/or applications. This comprises:
1. Integrated usage of cellular networks via your corporate PBX
2. Access to PBX features (Conference, Consultation etc.)
3. Voice-over-IP (VoIP) telephony via Wi-Fi or mobile datachannel *
4. Automatic handovers (VoIP » cellular network, cellular network » VoIP) *
5. Mobile Least Cost Routing (HTTPS call back & Travel SIM) *
6. Corporate directory search *
7. IM and Presence *
8. Encrypted VoIP *
Furthermore, as part of our AMC Solution, your AMC+ offers a range of features to make use of mobile
least-cost routing (LCR) which enables you to make dynamic use of the most favorable rates depending on your location and on available networks. All user relevant information regarding the above
mentioned possibilities and features will be given at the appropriate points throughout this manual.
The features 3-8 (marked with *) are optional license to be configured via the AMC portal.
The License might be missing if the service does not exist or is not configured on the AMC+
phone
7
AMC+ 2.0 User Guide
3 Introduction to the AMC+
3.2 How to read this Manual
This manual is designed to guide you step by step through the installation, configuration and usage
of your AMC+, providing you with useful hints and advice to facilitate the handling of your AMC+.
Throughout this manual we will print any terminology used in the AMC+ or in the main menu of your
mobile phone in italic letters.
This manual does not describe how to operate the other functionality of your mobile phone.
Please refer to the documentation of the available desktop software or the user manual of
the device itself. General pieces of information will be marked with the i-icon to the left.
Information for technicians and/or administrators will be given throughout this manual.
Those pieces of information will be marked with the icon to the left.
8
AMC+ 2.0 User Guide
4 Restrictions
4 Restrictions
There are some restrictions on the Blackberry devices which the AMC+ is subject to.
New smart phone types/models are released every week. To avoid solution complexity and to ease
management, it is recommended to implement a mobile phone policy in the company to standardize on
a limited amount of phone models. A smart phone is like a computer. You have to reboot them now
and then to ensure consistent behavior (the recommendation is once a day on average).
The AMC+ is a powerful application, and if you have all features turned on, the AMC+ as well as the
data connections, battery life can in worst cases be 50% shorter (dependent on phone type, OS version,
network and user scenarios).
There are a handful of destination numbers which are Emergency numbers (000, 110, 112, 118, 119,
911 and 999) which together with your mobile operator’s service numbers will result in pure cellular
calls ("Direct calls") where the AMC+ should be inactive. Please make sure these are not part of your
number plan.
4.1 By Mobile HardWare Platform
Please note that there are certain restrictions for third-party applications on practically all mobile platforms. For the Blackberry platform in particular this comprises the lack of VoIP-capable Wi-Fi connections (only some devices), as well as certain settings in cellular networks. When using WiFi make
sure to have a phone with OS 5.0. or higher for best performance.
Note: CDMA phones might not support WiFi.
4.2 By Network (Cellular)
The functionality and features of the AMC+ are also subject to the used network. In cellular-only
networks the AMC+ can send feature requests by calling the AMCC and transmitting feature codes
via DTMF. The restriction here is the feedback from the system (AMCC). If no data connection is
available, features requiring feedback (for example: checking the statuses for Do not Disturb (DnD) or
Call Forwarding) are not available! If Dual-mode usage is part of the solution, you must make sure the
WiFi network is "Voice ready".
Some mobile network operators does not send out their Identity in the signaling available for AMC+ to
present in a Network status bar. If this is the case only "Cellular Network" will be presented.
9
AMC+ 2.0 User Guide
4 Restrictions
4.3 By Mobile OS Version
Please note that some devices with the firmware version 4.5 slow down noticeably during operation
(while placing calls, for example, the navigation reacts unusually slow). This is the case in the native
dialer of these Smartphones and, as a consequence, also in the AMC+.
Firmware Updates
RIM releases regular firmware updates for Blackberry. It is recommended to regularly
update the firmware of your device. After updating with the Desktop manager, the configuration of your AMC+ will be lost and must be reloaded.The application itself, however, will
be preserved.
4.4 Details
• Which possibilities exist to present Caller-ID information received by cellular channel are limited
by the mobile platform as such.
• At an incoming anonymous call the AMC+ can mismatch when trying to find a Caller ID. This is
especially valid if number fields in the Active Directory are used for any other information than
numbers.
• The establishment of mobile-data connection when the AMC+ has been logged off or is activated
from sleep mode, can be perceived as slow. Until the AMC+ is fully registered the call setup time
will be longer. With a non-Operator-Supported SIM, the destination number will in this case be
sent over DTMF.
• Muting, or changing the call volume during cellular calls always has to be done via the native
dialer menu, which means that you have to leave the in-call screen of the AMC+. A call muted in
Wi-Fi will be unmuted by the mobile OS at handover to GSM/3G! On some (particularly older)
devices there is no possibility to adapt the call volume.
• The default sound profile "Normal" sets notifications of third-party applications to "Silent". If
the AMC+ doesn’t replay ringtones, the sound profile has to be edited manually. In order to do
that, look for the sub-profile "Other" in the Profile you would like to use. There you will find the
setting "AMC+ call".
This option can also be used to assign a specific ring tone to the AMC+.
• The Blackberry phones have keylock facilities that can password protect the phones. These
keylocks apply to all applications and hence also to the AMC+. The only exception to the keylock
(if configured this way) is a cellular call which can be accepted without removing this keylock.
However, this does not apply to VoIP calls in the same fashion. There you do need to enter the
password, because this accesses application features of your device.
Note: To do anything except accepting a cellular call (such as features, etc.), you will also need
to enter the keylock.
10
AMC+ 2.0 User Guide
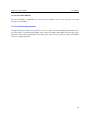
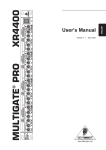
(a) Setting on older Blackberry devices .
4 Restrictions
(b) Setting on newer Blackberry devices .
• The AMC+ cannot recognize the connection of a headset. However, most times a connected
headset will be used automatically. If this is not the case please use the option Headset in the
in-call menu of the AMC+.
• Bluetooth headsets could interfere with Wi-Fi systems, as both systems use 2.4 GHz frequency
band contention can be an issue. Each WiFi transmitter blocks out 20 of the available 79 Bluetooth channels. This is specifically valid for lower end Bluetooth headsets.
• RIM security timer needs to be allowed to be rested by AMC+. If not allowed, users might have
to type in password for answering and hanging up VoIP calls if device locking is enabled.
• To use fast call setup method via data channel for a cellular call, there must be access to 3G or
wifi for the call setup signaling.
• To get automatic handovers between Wi-Fi and Cellular networks, "Enable handover" has to be
selected in the AMC+’s "Options" menu.
• When a HTTPS Callback comes in and if the ring tone volume is not low, a high frequency click
sound sometimes can be heard. The generation of this cannot be influenced from AMC+.
• When initializing a GSM Callback, the originating call has to be terminated by the user, only
then will a Callback be set up from the AMCC.
• Dialing from the AMC+ Contacts with a character like "p" inserted after the destination number
and before post-dial keys is not supported, as the AMC+ has no way of knowing when to send
the keys.
• Currently, the AMC+ cannot de-register itself automatically after a factory reset. Please finish the
de-registration manually. It is possible that the registration has to be terminated on the AMCC.
11
AMC+ 2.0 User Guide
5 Data Usage Overview
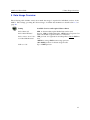
5 Data Usage Overview
The following table clarifies exactly how much data usage is required for individual services of the
AMC+. The settings governing the allowed usage of cellular data channels are described in 11.5 on
page 40.
Setting
Available Services and required data volumes
Packet Data Off
Packet Data Minimal
0KB, no features that require Packet Data can be used.
Approx. 3KB per Callback attempt, 10KB for the Corporate Contacts search with a typical result set of 5-10 users.
5KB per hour for registrations and keepalives without IM/Presence
100KB for average IM/Presence usage per hour
300- 500KB per hour for feature usage in calls.
Up to 43MB per hour
Packet Data Local Network & GPRS Dynamic
VoIP over 3G
12
AMC+ 2.0 User Guide
6 Installation and AMC+ configuration from the AMC Portal
6 Installation and AMC+ configuration from the AMC Portal
The following describes the supported possibilities for the installation of the AMC+ on your Blackberry
phone.
Useful Advice
Note:
Your Smartphone offers you the possibility to open certain applications by pressing one of
its two convenience keys (left and right). To configure this, go to Options in the main menu
and open the section Screen/Keyboard, scroll down to Right Side Convenience Key opens:
and change its value to AMC+.
Make sure your mobile operator’s service numbers do not conflict with the number series
of your PBX.
6.1 Version Requirements
There are different AMC+ packages for Blackberry.Please check the version of the native software of
your Blackberry to check if you have the matching AMC+ version! Open the main menu, open the
Options and select the About information.
Note: Please use the Desktop Manager Version that is appropriate for your firmware!
6.2 Permissions
Please note that, no matter which installation method you use, the AMC+ needs certain permissions
to run successfully on Blackberry. At the first startup, the AMC+ will ask for these permissions to be
granted and will shut down again, if one of them is not. The pop-up will reappear at the next startup if
one of the permissions was not granted. Please accept them all to start using your AMC+.
6.3 Installation
Using the AMC portal , it is possible for the Administrator to deploy a download link via SMS or
Email.
This way of downloading enables you to centralize the download of the AMC+ Client for Blackberry.
It gives every user the possibility to actively download the AMC+ Client or an upgraded version of the
client. This is an ideal way to facilitate mass deployments.
Follow the link and install the AMC+ Client like any other application on your smart phone. Please
refer to your Blackberry phone documentation for more information.
It is mandatory that an access point is configured on your Smartphone! If this is not the case this
option for the installation and configuration of your AMC+ is not possible. This configuration is also
important for later registrations of the AMC+ with the AMC Controller. Make sure that the following
settings are configured correctly:
13
AMC+ 2.0 User Guide
6 Installation and AMC+ configuration from the AMC Portal
1. Go to Options → Advanced options → TCP/IP
2. First check the APN checkbox and then enter the details for your access point: access point name
(APN), username and password (if authentication is necessary).
3. Go to the Browser Configuration and open the Options menu, then set the Browser to WAP
Browser for Packet Dataor to Hotspot Browser for Wi-Fi.
4. Save and exit.
It should now be possible to download the Client from the AMC portal.
• Open the browser of your Blackberry phone and type in the URL of the file (alternatively open
the link you received via Email or SMS)
• Select Download and confirm
• The phone will prompt you. Mark the check box in front of Set application permissions
• Your Blackberry phone will now execute the download, notify you of its success and, depending
on the device, prompt you to reboot the phone.
• After this reboot or immediately after the download of the file your AMC+ Blackberry is installed
and ready to be configured.
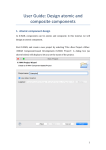
During the installation you could be prompted to configure security settings for what resources the AMC application should be allowed to access on the phone. Compare with the
security SW on your PC! Allow AMC maximum possible access. If you are allowed to:
also check in the native Options - Applications settings for AMC+, that all access rights
have been set to "Allow".
Note:
To avoid communication with the Wi-Fi access point disturbing the coming configuration
download, make sure only the Mobile network is enabled in the Manage Connections native
settings. Having Bluetooth communication activated during configuration download can
also disturb the download.
14
AMC+ 2.0 User Guide
6 Installation and AMC+ configuration from the AMC Portal
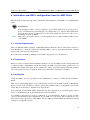
6.4 Opening the Application
You will now be promted to enter your AMC User Account key and mobile phone number (in international format). The key is used to fetch your configuration from the AMC Portal. If the administrator
has created the AMC+ license it will be included in the configuration download. If added to the configuration the LCR file will also be downloaded and finally the feature file. In order to avoid disturbing
ongoing download of the different configuration items, a pause has been implemented between each of
them. Please don’t close AMC+ before all components have been downloaded.
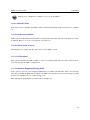
After the installation, you will find the AMC+ in the Applications or Download folder of your device.
It is recommended to move the AMC+ to an easy accessible place.
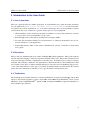
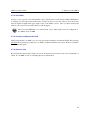
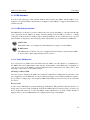
Figure 1: Open the AMC+ by selecting its icon and pressing the Trackball. To enter the Settings press
the Option Key and select Settings.
If configuration download fails, make sure the mobile data Access Point for your mobile provider is
configured correctly (if unknown, see their web page). Please see section 6.3, steps 1 - 4.
15
AMC+ 2.0 User Guide
6 Installation and AMC+ configuration from the AMC Portal
6.5 AMC+ configuration
To avoid mobile operators blocking what they see as ”strange” SMS content - AMC+ downloads the
configuration (settings, MLCR and features in named order) Over The Air. From the AMC Portal
can be sent out either SMS or e-mail with the SW download link and as a second step the AMC User
Account key. When entering the AMC User Account key and the mobile phone number in international
format, the configuration download will start. If the license was created by the administrator prior to
download, it will be included in the configuration.
Before trying to download the configuration, make sure the mobile data channel is activated. After
configuration update please restart AMC+ to load the settings. If there is no data channel available
the download will fail. After a time out, the AMC SW will start but without configuration. Then
close AMC+, activate your mobile data channel and restart AMC+ to retry activating the configuration
downloads. If this fails again your administrator can make a manual download possible. In the AMC+
Settings menu you can press the Blackberry button to download the configuration, feature and LCR
settings manually.
6.6 AMC+ License activation
Grace Period
AMC+ is installed with a 30 days trial period. During these 30 days a license download is
necessary to avoid license expiration. The AMC+ will inform you about the expiration of this
license period.
Useful Advice
The AMC+ license information gets included in the configuration data when the AMC portal
administrator selects "Create license" for a specific user. This means the license information
will activate a client at configuration download. A client with expired license will download the
configuration at every startup.
If a window is presented where you are requested to enter an activation key, your trial period has
expired. In such case, contact your administrator. Make sure your administrator has created the license.
16
AMC+ 2.0 User Guide
6 Installation and AMC+ configuration from the AMC Portal
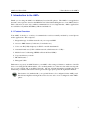
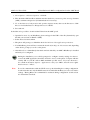
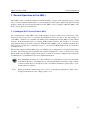
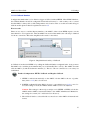
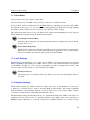
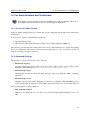
6.7 Blackberry Enterprise Server (BES)
It is also possible to deploy the AMC+s for your enterprise via a BES (if it is part of your network).
The procedures for software deployment are best described by the Blackberry documentation for your
version of the BES. Basically the needed Security settings on the BES server will be visible after
importing the application to the server. If this is your chosen deployment method, please make sure
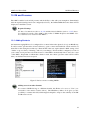
that the following Application Control Policies are set for the AMC+:
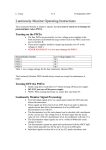
Figure 2: Blackberry Enterprise Server interface, focus on mentioned Application Control Policies.
17
AMC+ 2.0 User Guide
7 General Operation
7 General Operation of the AMC+
The AMC+ seeks to blend in seamlessly with the usability concepts of the platform it runs on, and
tries to closely match the functionality of your smartphone’s native phone application. The following
chapter contains all user-relevant information for the AMC+: how to navigate within the AMC+, and
how to use in- and out-of-call features.
7.1 Configure Wi-Fi Access Points (APs)
An essential service of the AMC+ is the VoIP telephony. It is here crucial to be connected to a WiFi access point or have access to a mobile data channel in order to use this or the other features of
your AMC+ . If Wi-Fi is not available, the AMC+ will communicate with the AMCC via the cellular
network. If desired,mobile least-cost routing (LCR) features Callback and Call Reverse come into
play whenever there is no Wi-Fi connection. If Packet Data (GPRS or 3G) is available and allowed, it
will be used to enable more comfortable access to your corporate PBX features such as Conference,
Consultation etc.
The needed settings for Packet Data access are normally auto-configured by your mobile subscription
provider. The following section describes the needed configuration to access a Wi-Fi access point.
Please make sure the Wi-Fi settings on the phone as such are correctly configured and consult the
documentation of your Blackberry for more detailed information.
Press the Blackberry button to see all available icons, enter Manage Connections and click
in the Wi-Fi checkbox. You might have to select the Wi-Fi Options menu to setup a Wi-Fi
connection if this has not already been done. For further information, please refer to your
mobile phone User Guide.
Note:
When in Wi-Fi, the default ring tone is silence for third-party applications. This can be
changed in the native Profiles settings (refer to 4.4).
18
AMC+ 2.0 User Guide
7 General Operation
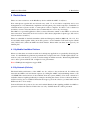
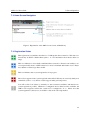
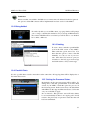
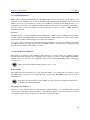
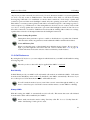
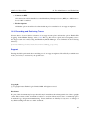
7.2 Home Screen Navigation
Figure 3: Explanation of the AMC+ home screen on Blackberry.
7.3 Registration Status
This registration icon indicates that there is a VoIP-capable data connection. This data connection may be Wi-Fi or Packet Data (refer to 11.5 for information about Packet Data settings).
This icon indicates a successfully established data connection. Features can usually be accessed perceivably faster. A SIP-connection is used for feedback and feature access. Please
note that this connection produces traffic.
This icon indicates that a system registration is in progress.
The red icon appears if the system registration has failed. This may be caused by faulty user
credentials, (refer to 11.4). Please contact support if this problem persists.
You will see this icon if there is currently no data connection available, and therefore no
system registration possible. Whenever a configured Access Point becomes available, the
AMC+ can re-registers itself in the system if it is configured to do so. Please note that
system registration (data access) is needed for fast mode call setup method.
19
AMC+ 2.0 User Guide
7 General Operation
Registrations in Data Networks other than Wi-Fi
Please note that certain settings have to be enabled for the AMC+ to register over Packet
Data (refer to 11.5) . Even if these settings are set to allow Packet Data, in order to save
battery a connection/system registration will only be held as long as there is user interaction. The connection will be terminated (and along with this the AMC+ will de-register
itself) when there is no interaction. If this happens, there will be no re-connection and reregistration until there is user interaction (Corporate Phonebook search etc.) that requires a
re-connection, or if there is an incoming call.
Static Roaming
When the AMC+ is turned off, calls will only be routed to the GSM Number of a user if
Static Roaming is activated for this user. If Static Roaming is deactivated on the AMCC, the
AMC+ will not be available in cellular-only networks.
20
AMC+ 2.0 User Guide
8 Features of the AMC+
8 Features of the AMC+
The following explains all call related services of your AMC+.
General Availablility of Features
Available in- and out-call features depend on your PBX; for some features please consult
your PBX documentation. More or less features than the ones described below might be
available in your specific case. Features displayed by the AMC+ can be configured through
the feature file and can hence even vary on a per-user basis. The Feature file is downloaded
when you start your AMC+ the first time. It can also be downloaded manually. There can
be several feature files available but only one is assigned per user.
Contacts Sorting
Sorting in the AMC+ is always done by Family name. This is not configurable as might be
the case in the native Contacts. The reason is that access to this capability can differ widely.
Wi-Fi with Blackberry Smartphones
A number of Blackberrys do not support WiFi. Please note that in such cases references to
Packet Data only concern GPRS and the like, not WiFi. Please refer to the documentation
of your Blackberry to find out if WiFi is supported. If your phone is Wi-Fi capable, please
refer to section 7.1 for information about Wi-Fi Access Point configuration.
8.1 Placing Calls
Calls with the AMC+ can be made from within its screens and/or outside of them. This depends on
your Call Preference configuration, refer to 11.6. To place a call using the AMC+, type in or select a
number in the Contacts screen or Call List, and press the green phone button. As soon as a call has
been established, in-call features will become available (in Wi-Fi and cellular networks with or without
Packet Data). If a Wi-Fi or Packet Data connection is available the AMCC will give feedback about the
status of the call(s). This feedback will be displayed as icons at the end of the status line of a call.
Call Setup Time
The call setup time when using the AMC+ is slightly longer than when using the native
application, because the call is set up via the call manager (AMCC) in the enterprise network. If the AMC+ is registered over the cellular network the call setup time is usually less
then 10 seconds. If the phone does not have access to data the call setup is done via DTMF
which usual takes aprox. 10-20 seconds.
21
AMC+ 2.0 User Guide
8 Features of the AMC+
Options Key
You can also enter or select a phone number (from the Contacts or Call List view), press the Options
key (Blackberry key) and select a call type.
8.2 Accepting Calls
AMC+ calls can be accepted like all other calls by pressing the concerned key . Which calls are
intercepted by the AMC+ is governed by the 11.6 setting.
Ringer off
From the latest version on, the incoming-call screen gives you the option to turn the ring
tone off. This option is identical to the function of the native OS.
Caller ID
The AMC+ for Blackberry supports the transmission of Caller IDs ("see who’s calling")
via the AMCC. To make use of this possibility, and to not be subject to different policies
regarding the transmission of Caller IDs of the different providers, Packet Data has to be set
to Local Network or GPRS Dynamic; refer to 11.5.
8.3 Emergency Calls
Emergency calls have to be placed as direct calls, i.e. not with the AMC+. This is done automatically
for the major emergency numbers such as 112 and 911. Local emergency numbers that have to be
dialed directly can be specified as Exception Numbers. Refer to 11.7 on page 42.
22
AMC+ 2.0 User Guide
8 Features of the AMC+
8.4 Corporate Phonebook
There are some differences between this contact screen and the native contact screen. The AMC+ also
has some additional services, for example access to your Corporate Contacts.
Note:
This is an optional feature and will only be visible if access on the AMCC side has been
enabled, and your device has data connectivity. Please type at least one letter into the
number field on the home screen to enable the corporate directory search in the menu. It is
not possible to perform an empty search.
The main menu view offers the possibility to search
your Corporate Contacts (in many cases an Active
Directory server) if a data connection (Wi-Fi, GPRS
etc.) is available. Select the option Get Corporate
Contacts. You can either search on First or Last name
but not on both.
Search Corporate Contacts
Type in at least one letter into the search field and press the icon to start the search. Upon
a search request, the AMCC will only forward the first 25 results to the AMC+. If that list
does not contain the contact you are looking for, provide a more specific request.
Example: If entering the first four letters returns more than 25 items - and the one you are
looking for is missing - enter the first 5 or 6 letters to further specify your search.
23
AMC+ 2.0 User Guide
8 Features of the AMC+
8.5 Call Types
There are several call types that you can select before dialing. They give you manual access to the
potentially cost saving features of the AMC+. Please see the picture below.
Note: Which of the following call types are available depends on the configuration done by your administrator.
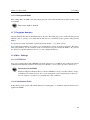
8.5.1 Call
Select Call to dial the selected or entered number. The
AMC+ will automatically route the call as specified for
your system.
Figure 4: Call type selection on Blackberry.
8.5.2 Callback
Demand a Callbackand let yourself be connected with the called party. No call will be established from
your smartphone. This may have a favorable effect on costs. A Callback can be requested via HTTPS
(default) or by calling the Callback Number. The HTTPS Callback is perceivably faster.
General setup and functionality of Callback is described in 11.2.3. To use the HTTPS
Callback, the HTTPS Port must be set (refer to 11.8.1).
8.5.3 Direct Call (Mobile call without passing the PBX)
This option gives you the possibility to place a call "directly" through the mobile network. Such a call
will then not be routed through your enterprise network.
Automatic Routing
Administrators may specify and deploy routing rules (for Callback etc.) with in an (M)LCR
Table and deploy it to the AMC+.
24
AMC+ 2.0 User Guide
8 Features of the AMC+
8.5.4 Anonymous Call
When you select an Anonymous Call the called party will not see your caller ID. Unlike Direct Call,
this feature has to be routed through your enterprise network.
Further Configuration
1. This is a PBX-driven feature. Not every PBX supports this.
2. The Anonymous Call Prefix has to be set in the Settings of your AMC+, refer to 11.8.7.
3. An Access Code has to be configured on the AMCC to match the feature code that triggers an
Anonymous Call on your PBX (please refer to the Aastra Mobile Client Controller Administrator
Manual).
25
AMC+ 2.0 User Guide
8 Features of the AMC+
8.6 In-Call Features
If a data channel (Wi-Fi or Packet Data) is available during a call, your AMC+ will enable the in-call
features of your PBX. The range of offered features depends on the used PBX. However, some of the
standard features are the same with almost all PBXs.
Native Dialer Integration
The first couple of options are derived from the native
dialer. Please note that there might be known issues regarding this functionality (refer to section 4).
8.6.1 Hold call
A party can be put on hold by clicking the Hold option
on the screen.
8.6.2 Consultation
Clicking on the Consultation option in the in-call features screen puts the currently active call on hold
and opens the call screen where you can call a second party.
8.6.3 Blind Transfer
Transfer a call to a second party. Select this feature and choose a contact or select a number. Your call
will be terminated and disappear from the home screen as soon as the other party has picked up.
8.6.4 Toggle, Complete Transfer, and Conference
If there are two active calls (one of them on Hold), you can Toggle back and forth between them, enter a
three-party conference (Complete conference), or join the two calls (Complete transfer) and terminate
the calls on your end.
8.6.5 Fast Forwarding
This option will forward the call to a predefined number. While in theory this can be any number, this
feature is most often used to transfer the call to the desk phone with a single touch of a button. While
the transfer to the predefined number is being executed, the AMC+ offers you the possibility to Unhold
(resume) the call (the transfer will be interrupted).
Please note that this feature is excuted like a Blind Transfer. If your PBX does not support Blind
Transfers, the Fast Forwarding feature will not be available.
26
AMC+ 2.0 User Guide
8 Features of the AMC+
For immediate transfer a Fast Forwarding Number has to be set (refer to 11.2.7). If no Fast
Forwarding Number has been set, the AMC+ will open a keypad with which you can dial
or choose a contact.
8.6.6 Handover to Cellular Networks (GSM)
It is possible to trigger a manual Handover to GSM/3G (cellular networks). You can find the selection
in the AMC+ Main Menu (Blackberry button)when in call.
8.6.7 Handover to VoIP
It is also possible to trigger a manual Handover to VoIP if the Wi-Fi coverage is good enough, as above
the selection can be found in the AMC+ Main Menu(Blackberry button). If the access point provides
VoIP over 3G (Packet Data activated in AMC+ Network Settings and Allow VoIP over 3G checkbox
selected) and a handover is made, it will not be possible to get back to a Wi-Fi access point during the
call. This depends on that the phone can only have one single IP-address.
8.6.8 Automatic Handover to VoIP
If Auto Handover has been enabled in the settings of the AMC+, a handover from WiFi to Cellular
will be performed automatically if the WiFi signal strength gets too weak to maintain a reliable VoIP
connection. A handover from Cellular to WiFi on the other hand will be performed if a known network
with sufficient quality gets into range during an ongoing cellular call. At the availability of a network
with sufficient quality, the AMC+ will take some time to assure it is a stable connection before a
handover is performed.
At the availability of a network with sufficient quality, the AMC+ will take some time to assure it is a
stable connection before a handover is performed.
If an access point provides VoIP over 3G (and the AMC+ is set to use this), it will not be possible to get
back to a WiFi access point during the call. This depends on that the phone can only have one single
IP address.
Note: A call muted in WiFi will automatically be unmuted at handover to GSM/3G!
27
AMC+ 2.0 User Guide
8 Features of the AMC+
8.7 Out-Of-Call Features
Out-of-call features give you the possibility to use your smartphone as a full-fledged equivalent of
a desk phone. Open the context-sensitive menu of the home screen to access the following out-call
features.
8.7.1 Call Forwarding
You have the option to configure rules about when and to which destination Call Forwarding is to be
done. There are three different rules: Always, On no Reply and on Busy. A different number may be
configured for each of them.
Rules can be cancelled globally with Cancel call forwarding or switched on and off with Toggle
On/Off.
If a call has been forwarded to your AMC+, this will be indicated by a diversion arrow in
front of the caller’s number.
8.7.2 Call Pickup
A pick-up group is a group of people who are notified if one group member receives a call, for example
a support group. If there is an inbound call for your pick-up group, the AMC+ will notify you with a
pop-up window and give you the option to pick up the call. Clicking on Call Pickup in the Features
screen also enables you to pick up the first incoming call for your pick-up group.
Pickup Groups
There might also be adjustments to be made on the AMCC and PBX-side. Please consult the
Aastra Mobile Client Controller Administrator Manual (keywords: PBX Access Codes, Pickup
Groups).
8.7.3 Call Retrieve
This out-call feature enables you to fetch a call from the waiting loop. If this does not work as expected,
please verify that your PBX supports this feature, and contact support if the problem persists.
28
AMC+ 2.0 User Guide
8 Features of the AMC+
8.7.4 Voice Mail
Listen to your corporate voice mail with this option. Click on the selection in the AMC+ Main Menu.
A waiting voice message will be indicated by a small cassette icon just left of the icon for the mobile
network signal strength in the upper right corner of the AMC+ screen. Once you have listened and
deleted your received voice mail(s) this icon will disappear.
Please note that MWI has to be activated and a Voice Mail Number must be configured on
the AMCC and your PBX.
8.7.5 Activate and Deactivate DnD
Temporarily disable your AMC+ as your corporate extension with Do-not-Disturb (DnD). This prevents
inbound calls from being forwarded to your AMC+ (VoIP and cellular). Deactivate DnD to be available
for inbound calls again.
8.7.6 Absence Info
By selecting the Absence Info menu you can set the absence reason and in some cases the day/time of
return, in your PBX as well as cancelling already set information.
29
AMC+ 2.0 User Guide
9 Mobile Least-Cost Routing (MLCR)
9 Mobile Least-Cost Routing (MLCR)
The following explains how to actively use the features Callback, Call through, Call Reverse, and SIM
Switch.
About MLCR
It is possible to configure number patterns (first couple of digits of a phone number) which
will trigger an automatic least-cost routing. These ’routing rules’ can be deployed to the
AMC+ from the Aastra administration portal by the Administrator. The Administator can
configure several different MLCR lists in the Portal to customize the MLCR rules for each
user if necessary.However, a different routing feature can be selected manually by the user
even if these routing rules are present, refer to 8.5.
9.1 (HTTPS) Callback
Use Callback to reduce costs of outbound calls made via the AMC+. In a Callback call the call to
both the A- and B-party are setup from the PBX. How to start a Callback is explained in 8.5 on page
24. If your company makes global use of the MLCR, dialing certain phone numbers might trigger a
Callback automatically! Rules for automatic routing can be made and deployed to the AMC+s using
the AMCC.
Note: The HTTPS Callback request goes through a data connection that might not be available or fail.
In the case of failure, the AMC+ will automatically fall back to a "regular" Call-through call. The call
is still placed through the PBX, however, you do not have the cost benefits anymore.
Note: When a HTTPS Callback comes in and if the ring-tone volume is not low, a high frequency click
sound can sometimes be heard. The generation of this cannot be influenced by the AMC+.
General setup and functionality are documented on page 37.
9.2 Call Reverse
If Call Reverse is enabled, inbound calls (to the users mobile number) can be transformed into outgoing
calls to make use of favorable tariffs for calls from the cellular network. This happens automatically,
so from the user perspective a Call Reverse completely resembles an inbound call: you can decline or
accept it.
Required Settings
For this to work as intended the MTC Number has to be set, refer to 11.2.4.
General setup and functionality are explained in section 11.2.5 on page 38.
30
AMC+ 2.0 User Guide
9 Mobile Least-Cost Routing (MLCR)
9.3 Travel SIM
You can take advantage of using local SIM cards in different locations. Note that Travel SIM is a
feature that is not part of the LCR file. There are two ways to activate a new SIM card.
1. If enabled, Travel SIM will be available in the Option menu of the home screen. Selecting SIM
Switch will register your new SIM Card by setting up an unanswered call to the AMCC.
2. After insertion of the new SIM card, the AMC+ will open a dialog in which you can select to
execute a Travel SIM and register your new SIM card. If you select the option Later, the pop-up
will reappear at the next startup.
Please note that the new SIM number has to be configured in the AMCC to be able to
register it from the AMC+.
Several Number Support
The AMC Solution is able to manage several SIM Cards (GSM Numbers) per user. Please
efer to page 35 for general setup and functionality. A SIM number must not be used more
than once in your system!
31
AMC+ 2.0 User Guide
10 IM and Presence
10 IM and Presence
The AMC+ enables basic mobile presence and the ability to chat with your smartphone. Immediately
after the required settings have been configured(see below), the Online/Offline Presence Status will be
displayed on the Home screen.
Required Settings
UC has to be turned On (refer to 11.8.6) and the Default IM Host (refer to 11.8.5) has to
be configured correctly on the AMC+, and profiles of XMPP Endpoints and XMPP User
Accounts have to be created on the AMCC.
10.1 Adding Contacts
An instant messaging ID has to be configured for a contact in the native phone book of your Blackberry.
To add a contact open the native Contacts directory, open a contact and click Edit. Click on Add field,
then click on the setting Instant Message. Enter the ID of the user, tap the default "AIM" setting, select
"Jabber" as protocol/way of chatting - and save your changes. If such an ID is configured you can see
your contact’s basic presence state in the Contacts of the AMC+ automatically if he or she is also a user
of the AMC+. Dependent on which chat software is used, the contact’s presence status will be visible
after your invitation has been accepted.
Figure 5: Native screens for adding IM IDs.
Adding users from other domains
If a contact’s IM ID belongs to a different domain, this ID has to be set as a "User" (see
screenshots of the native Contacts below). The Blackberry address book gives you the
possibility to rename this field, which might be helpful to improve the usability of the IM
and Presence service.
32
AMC+ 2.0 User Guide
10 IM and Presence
Limitation
Please note that once added to the IM roster, a contact cannot be deleted, blocked or ignored.
An option to delete IM contacts will be implemented in a later version of the AMC+.
10.2 Being Added
If somebody adds you as an IM contact, a pop-up window will prompt
you to accept or decline this invitation. If you accept an IM invitation,
the contact’s IM ID will be stored and you will be able to see whether
he is online, offline etc.
10.3 Chatting
To start a chat, touch the speech-bubble
icon in the Dial screen on the AMC+.
Then touch the option Start Chat. You
have then the option to enter a chat ID
manually, or to choose one of your contacts. Once the Chat screen is open (see
screenshot to the left), type in a message
and click return to send your message.
10.4 Parallel Chats
It is also possible have several conversations at the same time. All ongoing chats will be displayed as a
list in the Chat screen.
10.5 Setting the Presence Status
By default your first presence status will be Offline. To
change this, touch the speech-bubble icon in the Dial
screen of your AMC+. Touch the option Set presence in
the following screen. In the screen shot to the left Online
and Offline are the supported Presence States . Select the
one you would like to apply.
Do not Disturb: This presence state will in the future
be set automatically if there is an ongoing call. It will
return to the previously set presence status after the call
has been terminated.
33
AMC+ 2.0 User Guide
11 Settings
11 Settings
There are a couple of mandatory settings that have to be configured to be able to use all of your AMC+’s
features. All settings, mandatory and optional, are explained in this chapter.
Configuration Loss with Firmware Updates
With a firmware update, the AMC+ application will not be deleted. However, the configuration of your AMC+ will be lost and must be reloaded. To download the configuration data
manually, open the Settings section on your AMC+, then open the context-sensitive menu,
and select the option Configuration Download.
If the Hide settings checkbox has been set by the Admin in the AMC Portal, some of them
might not be visible to the user.
Never change preconfigured Settings!
Every number has to be configured on the AMCC, and will hence in most cases be preconfigured on the AMC+. If one of them does not work properly, ask your administrator to
check if the according feature has been activated for your User Account on the AMCC. If
your AMC+ has been preconfigured, simply skip the Configuration chapter. However, you
may want to consult it, to fully understand how your AMC+ works. The AMC+ downloads
the configuration from the Aastra portal.
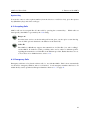
11.1 Options Menu
The following settings are available in the Options menu of your AMC+.
11.1.1 Connect and Disconnect
Continue or cancel your current system registration with this option. For an explanation of the registration icons refer to 7.3.
11.1.2 Auto Handover
Disable or enable automatic handovers from Wi-Fi to cellular networks and vice versa. If this is enabled, a handover from Wi-Fi will be performed automatically if the Wi-Fi signal strength decreases too
much to maintain a reliable VoIP connection. A handover to Wi-Fi on the other hand will be performed
if a known network with sufficient quality gets into range during an ongoing cellular call.
34
AMC+ 2.0 User Guide
11 Settings
11.2 FMC Numbers
In order to take advantage of the available AMC Solution features the AMC+ and the AMCC "communicate" via special numbers which must be configured on the AMCC to trigger a certain behavior in
cellular networks.
11.2.1 PBX Dialing-in Number
The PBX Dialing-in Number is used for cellular calls. It is used by the AMC+ to route the calls through
your company network (AMCC). It makes extension dialing from the AMC+ possible i.e. (calling
colleagues via their extensions numbers and not their full numbers). It also ensures that your corporate
phone number is displayed to the called party and not the number of your currently used SIM card.
AMCC-Side
This number has to be configured for the PBX Dialing-in purpose on the AMCC!
E.164 Format
The PBX Dialing-in Number has to be configured in E.164 format to ensure that the AMC+
is always able to dial it independently from its location.
11.2.2 Travel SIM Number
If you select Activate SIM Card in the main menu, the AMC+ uses this number to communicate to
the AMCC that a new SIM card has been inserted. If the number of this SIM card is configured for
your User Account on the AMCC, your new SIM card will be activated and you will be able to take
advantage of the features of the AMC Solution.
Advantage of Travel SIM
All of the services offered by the AMC+ are exclusively available for configured users. However, some
users might have several SIM cards, mostly for taking advantage of lower tariffs in different countries.
It is possible to configure up to ten cell phone (SIM card) numbers per user, but only one at a time will
be "active".
How it works
A call to Travel SIM number is placed and hung up immediately. This guarantees that the call is free of
charge since it is never really established. If the Travel SIM request was unsuccessful, you will not be
able to make calls from now on, since the AMCC cannot authenticate you. Such a failure should not
happen, unless your new SIM number was configured incorrectly on the AMCC.
35
AMC+ 2.0 User Guide
11 Settings
What to do if Travel SIM doesn’t work
Your previously used SIM card will continue to work, unless there is a problem on
theAMCC-side: Check if there is a temporary problem by reinserting the former SIM card.
If it does not work, the error is likely to be located at the AMCC.
If repeated attempts to Activate SIM Cards fail and if the configured number of the second
SIM card is correct, the reason could be an improper Caller ID sent from your new SIM
card. In those cases the switch has to be conducted manually on the AMCC.
36
AMC+ 2.0 User Guide
11 Settings
11.2.3 Callback Number
Configure the number that is to be dialed to trigger a Callback without HTTPS. Like all FMC Numbers,
the Callback Number should be configured in international format, i.e. with country code, to ensure
that the AMC+ is always able to dial it independent on its location. How to use this and other call types
with the mobile phone in hand is explained in section 8.5.
How it works
There are two ways to send the B-party number to the AMCC, either via an HTTPs request over the
data channel or via a regular call. After the AMCC has received the number, the call setup is identical
for the two scenarious. Below the simplified call scenario is described.
Figure 6: Simplified functionality of Callback.
A Callback is invoked via HTTPS or by calling the Callback Number configured in the Settings menu.
The AMC+ also sends the phone number that you would actually like to call (1). The AMCC in return
calls the AMC+ (2) and the destination number (3). The two calls are connected as soon as they are
established.
Further Configuration: HTTPS Callback and Regular Callback
1. HTTPS is enabled automatically on the AMCC. On the AMC+s the use of packet
data (refer to 11.5) has to be allowed.
2. If HTTP (configurable in the Hidden Settings) or non-default ports (11.8.1) are to be
used, the settings on both, the AMCC and the AMC+s, have to be adjusted.
Caution: The settings for the used port and protocol (HTTPS or HTTP) on both the
AMCC and the AMC+s must match! Refer to the AMCC Administrator Manual for
the settings in concern (UC » Addional Client Features).
3. The Callback Number, as described above, must be set on the AMC+s in international
format.
37
AMC+ 2.0 User Guide
11 Settings
11.2.4 MTC Number(s)
MTC stands for Mobile Terminated Call. The MTC Number will be associated as Caller ID for your
corporate system (AMCC). You could say that this is the identification the AMCC uses towards the
AMC+, and it can be used when an operator uses CLIP-call screening. If the MTC Number is set,
all Enterprise calls must come with this Caller ID otherwise they will not be handled by the AMC+.
In order to make sure that the number is positively matched, you have to enter your PBX number in
international format.
Use Case
The MTC Number or prefix identifies a call as an Enterprise (AMC+) Call. All AMC Solution features
become available for identified Enterprise Calls. In the case of the Call Reverse scenario an incoming
call from this number confirms/triggers the ”call reverse behavior”.
Note: To be able to present some Caller ID information when an operator uses CLIP-call screening,
the AMC+ introduces an entry in the Contacts if an MTC number is set in the client configuration. The
entry is removed whenever the AMC+ is exited.
11.2.5 Call Reverse Number
The Call Reverse Number is only mandatory if the feature is to be used. It has to be a number, again in
international format, that has been configured for the Call Reverse purpose on the AMCC and an MTC
Number (refer to 11.2.4) has to be configured correctly. Only calls from the MTC Number will trigger
a Call Reverse!
This can be enabled and disabled globally; refer to 11.8.9.
How it works
The calling party will basically be put on hold by the AMCC; as a consequence a Call Reverse from
the calling party’s perspective is no different from a normal call. The AMCC will even play back a
ring-back tone.
Only inbound calls coming from the AMCC are affected by this! Regular inbound calls to
your SIM card remain untouched.
Advantages of Call Reverse
Call Reverse turns inbound calls into outbound calls and thus reduces cost, especially in Europe and
other countries with high termination charges. Through these charges calls from fixed line to mobile
are expensive whereas calls from mobile to fixed line are typically cheap.
38
AMC+ 2.0 User Guide
11 Settings
11.2.6 Voice Mail Number
If your Voice Mail is configured here, you have the possibility to access your corporate voice mail
messages via the AMC+.
11.2.7 Fast Forwarding Number
Configure the phone number for the phone you want to have as Fast Forwarding destination In most
cases this will be your desk-phone number, but it can be any number. The AMC+ will offer the option
Fast Forwarding in the in-call features menu. This option can be used to transfer an active call instantly
to the pre-configured number.
39
AMC+ 2.0 User Guide
11 Settings
11.3 Dual Mode
Select Cellular Only, Single Mode or Dual Mode:
If set to Cellular Only, the AMC+ will only allow connections to cellular networks.
In Single Mode it allows cellular networks and Packet Data for signaling ( Packet Data and/or WiFi,
this depends on the device), i.e., if you want to have SIP signaling over Wi-Fi but call-setup signaling
and media over the cellular network, you need to select the Single Mode setting!
The setting Dual Mode allows Voice-over-Wi-Fi, but it requires that the Blackberry device supports
Wi-Fi and that the required settings in the native OS are made.
Consumption of Packet Data
The Packet Data setting lets you specify when packet data (for example Packet Data) should
be used; refer to 11.5.
Native-Dialer Dependent
Whether a data channel is established via Wi-Fi or via Packet Data depends on the Network
Preferences you have chosen in the native Blackberry application. If a preferred Wi-Fi
network is available, this network will be used for the data channel.
11.4 VoIP Settings
The IP address is the IP address or host name of your AMCC (or the first network device in between
AMC+ and AMCC). The default port is 5062. The Username is the username that has been registered
on the AMCC. Usually it is your corporate phonenumber (to make it unique in the system). The
Password is the one that belongs to your user name in the AMCC.
Transport Protocol
The transport protocol should be TCP only! The reasons are system performance and battery time.
11.5 Network Settings
Unlike Wi-Fi connections, cellular connections cannot carry data. A data channel is not necessary
to make use of certain services, such as accessing PBX (in-call) features, but it makes signalling
faster.Availability of data channels depends on your provider and on your contract. Many contracts
come with a certain amount of data traffic included Packet Data.
The Packet Data settings described here allow you to determine if and how the AMC+ is allowed to use
cellular Packet Data. You can choose to generally disable it for the AMC+ (Off ), use it exclusively for
HTTP(S) requests (Minimal, i.e. Corporate Contacts access, HTTPS Callbacks etc.), or allow its usage
40
AMC+ 2.0 User Guide
11 Settings
only in your provider’s network (Local Network). To use it whenever needed for a system registration
(no Voice over 3G) set this to GPRS Dynamic. The checkbox Allow VoIP over 3G allows incoming
and outgoing VoIP calls to be established over Packet Data connections. It also keeps a packet-data
connection open even if the screen backlight is turned off by the operating system due to user inactivity.
This enables a constant system registration and with it, succesfull receiptions of incoming responses to
service requests, e.g., Call Reverse etc. The setting Maintain 3G Connection is a subset of Allow VoIP
over 3G, i.e., it keeps packet-data connections open even if the backlight is turned off, but it does not
allow this connection to be used for VoIP. Please note that without enabling either of these two settings,
a packet-data connection is interrupted whenever the backlight is turned off.
Native Settings Dependent
Smartphones have preference options to enable or disable the use of packet data. If turned
off in the native menu, any preferences made within the AMC+ remain without effect!
Costs and Battery Life
Please note that the usage of data channels may drain the phone’s battery. If costs run too
high, a provider might also disconnect the call. Section "Packet Data" 11.5 on page 40
contains information about the amount of data consumed by certain features.
11.6 Call Preference
By setting the Call Preference you can configure in which situations your AMC+ shall handle incoming
and outgoing calls.
The rule you choose here will only be applied if the AMC+ is activated.
Dual Identity
In Dual Identity mode your AMC+ will only handle calls made from within the AMC+. Calls made
from the native Blackberry menu, will not be handled by the AMC+ automatically. However, if you
choose Enterprise Call in the menu, the AMC+ will handle the call.
If a call is made from the Contacts (even if the screen is entered through the AMC+!), you
have to select Enterprise Call in the context-sensitive menu to use the AMC+ for dialing!
Always AMC+
With this setting, the AMC+ is automatically used for all calls. This means that even calls initiated
from the native dialer will be handled by the AMC+!
Please make sure that the native setting "Send my caller ID" is set to "Set By Network"
under "Call Settings" if this option is used.
41
AMC+ 2.0 User Guide
11 Settings
11.6.1 Background Mode
This setting shifts the AMC+ into the background, but calls will be handled by it and its features will
be available.
This feature might be disabled.
11.7 Exception Numbers
Specify numbers that must be dialed directly in all cases. The main purpose is to make sure that special
numbers such as operator voice mail and the like are not considered for any special routing via the
AMC+.
To specify more than one number, separate them with dashes "-" (no white spaces).
Note: Emergency numbers do not have to be specified here, as they are treated separately. The major
emergency numbers for all continents such as 112 and 911 are preloaded in the AMC+. If you have
any special or regional numbers however, you can configure them here.
11.8 Misc. Settings
11.8.1 HTTPS Port
If a port is configured here and if HTTP(S) has been activated on your AMCC, data connections will be
established automatically whenever necessary(for Callbacks, to access the Corporate Contacts etc.).
Information about HTTPS
Whenever Hypertext Transfer Protocol Secure (HTTPS) is used, you will be asked to accept
a certificate for security reasons. Go to your smartphone’s native menu and open Options »
Security Options » Certificates to generally allow this certificate.
11.8.2 International Prefix
In this field you can specify with which characters a leading plus "+" should be replaced whenever it is
signaled in DTMF.
42
AMC+ 2.0 User Guide
11 Settings
11.8.3 Maximum Number Length
The Maximum Number Length determines after how many digits (of a phone number) the AMC+ will
send DTMF (in cellular networks). In most cases, this depends on the first network device on the way
(gateways and trunks in many countries support up to 19 sometimes even 21 digits). To ensure the
correct functionality, simply set this value to "0".
Attention
This setting can be used to expedite the dialing of Call-through calls, basically getting it to the
same level as with operator supported dialing (OSD) functions enabled. This feature will attach
the destination number to the Call-through number. It does not require a data connection. You
should however be aware that it only works in countries without fixed number lengths and if you
have a trunk with your carrier that allows passing the additional digits.
11.8.4 OTA-URL
The OTA-URL is the link to the Aastra administration portal, from where the AMC+ will download
the configuration (including license), Feature file and LCR file.
11.8.5 Default IM Host
If you would like to use the IM and Presence service of the AMC+, the host URI of the desired Default
IM Host in your network has to be entered here. Contact your administrator for further information.
As soon as the Default IM Host has been set correctly the presence status line becomes available in the
Home screen. Normally this will be your corporate domain.
11.8.6 IM/Presence enabled
Set this to on to enable the use of instant messaging (IM) and presence. Check the IM and Presence
chapter 10 to learn more about this functionality.
The Default IM Host setting will not be lost even if this option is disabled!
11.8.7 Anonymous Call Prefix
If your PBX supports outbound anonymous calls (no caller ID shown) enter the necessary feature code
here. The option Anonymous Call will become available whenever you enter or select a phone number
and open the options menu.
43
AMC+ 2.0 User Guide
11 Settings
This has to be configured as a PBX Access Code on the AMCC!
11.8.8 Automatic Start
If Automatic Start is enabled, the AMC+ will be started automatically whenever the phone is switched
on.
11.8.9 Call Reverse Enabled
If this option is enabled inbound calls will be rejected and an automatic call back to the party in concern
is initiated. Refer to 11.2.5 for a description of Call Reverse.
11.8.10 Show ’Close’ in menu
Checking this box simply adds the option Close to the AMC+’s menu.
11.8.11 LCR enabled
This option will make the AMC+ adhere to least-cost-routing (LCR) rules if a rule set has been deployed along with the AMC+ configuration.
11.8.12 Operator Supported Dialing (OSD)
Some operators can call your configured PBX Dialing-in number automatically. Please note that this
will only work with the SIM card for which your AMC+ was activated. If your provider supports OSD
and if you would like to use it, set this setting to On.
This will only be applied when you are not in a roaming state.
44
AMC+ 2.0 User Guide
12 Factory Reset of the AMC+
12 Factory Reset of the AMC+
It is possible to do a quick, but complete factory reset. Open the Settings and click on the Optionskey
for a context-sensitive menu. It will give you the option to execute a factory reset which will delete all
configurations made.
A new configuration deployment might be desirable (refer to page 34).
45
AMC+ 2.0 User Guide
13 Manual download from the Aastra portal
13 Manual download from the Aastra portal
On top of the automatic download of information from the Aastra portal that the AMC+ initiates it is
also possible for you as a user to manually request download of information.
The options in the AMC+ menu are:
• Download configuration
• Download Feature file
• Download mobile LCR file
Download configuration downloads all the settings for the AMC+ and also the license for the application when it is created in the portal.
Download Feature file downloads the Feature file that is assigned for the user. There can be several
Feature files on the portal but only one will be assigned to a specific user. The feature file provides the
in- and out-call features that will be accessible from the AMC+.
Download LCR downloads the LCR file. There can be several LCR files on the portal but only one will
be assigned to a specific user. The LCR file provides information on how calls shall be routed for this
user.
46
AMC+ 2.0 User Guide
14 For Administrators and Technicians
14 For Administrators and Technicians
This chapter contains information directed at administrators and/or technicians. Please note
that administrative information is also provided throughout this manual.
14.1 Access to Hidden Screen
There are further settings that may be altered and used for debugging and the like by the experienced
administrator.
To access these settings on the Blackberry platform:
• Open the Settings menu
• Then type in: *#398 in the Enterprise Settings screen while holding the SHIFT key.
The following only describes the settings that can be used by the administrator for testing. Everything
that is not explained is either meant for development testing purposes only, or should not be altered
without contacting our support engineers.
14.2 Advanced Settings
The check box options can be used for error diagnosis:
• Enable File Logging
A log file with error messages will be saved on the device. This log file is only accessible via the
Blackberry Media Manager (home/user/mcclient/debug_log.txt).
• Enable Debug Popups
Checking this box has the effect that debug messages will pop up while the AMC+ is running
and in use.
• Enable Debug Screens
With this option you can enable debugging for: Activation, VoIP, Misc, WiFi and GRPS (options
will be displayed in the main menu of the AMC+ after Enable Debug Screens has been enabled).
The following applies to data connections:
• TCP tunneling enabled
This has to be checked if voice over 3G is to be used (Settings/Cellular Data/Allow Voice over
3G).
47
AMC+ 2.0 User Guide
14 For Administrators and Technicians
• Connect via BES
All connections will be handled over the Blackberry Enterprise Server (BES); no APNs have to
be set if this is enabled.
• Further Options
All further options should not be altered without prior consultation of our support engineers.
14.3 Recording and Retrieving Traces
If traces have to be recorded for assistance of our support team, please activate the option "Enable File
Logging" in the Hidden Settings, refer to 14.1.This log file can be copied (and consequently sent to
the support team via e-mail) using the Blackberry Media Manager. You can find it in the following
directory:
(Device Memory/home/user/mcclient/debug_log.txt)
Support
Tracing should be performed after consulting one of our support engineers. He will tell you which trace
nodes (see below) to activate in your specific case.
Copyright
c Copyright Aastra Technologies Limited 2010. All rights reserved.
Disclaimer
No part of this document may be reproduced in any form without the written permission of the copyright
owner. The contents of this document are subject to revision without notice due to continued progress
in methodology, design and manufacturing. Aastra shall have no liability for any error or damage of
any kind resulting from the use of this document.
48