1
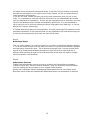
GPS Project 2007
Trekker Lessons
Sponsored by PRCVI and SET-BC
1
GPS Project
Sponsored by PRCVI and SET- BC
GPS
PRCVI
SET-BC
- Global Positioning Satellite
- Provincial Resource Centre for the Visually Impaired
- Special Education Technology – British Columbia
Introduction
About the project
This project was initiated to examine the impact of GPS technology on the orientation and
mobility of secondary students with visual impairments in British Columbia. The goal of
the project is to explore the Trekker GPS system, currently available for students with
visual impairments, and assess its usefulness to support Orientation and Mobility
capabilities.
Project organizers and participants wish to thank Dave Rathwell, teacher of the visually
impaired, orientation and mobility instructor, and assistive technology consultant, for his
dedication and expertise in developing this set of Trekker lessons.
About Trekker
Trekker, a GPS system for the Blind and visually impaired, uses GPS and digital maps to
help blind persons find their way in urban and rural areas. Trekker users can pinpoint
where they are, learn about area attractions, and find out how to get to specific
destinations.
Fitting in the palm of the hand, this personal digital assistant (PDA) technology offers the
visually impaired user greater freedom, raising their confidence in their ability to travel.
Trekker helps guide the visually impaired through their environment. It complements
existing aids (white canes and guide dogs). It does not replace them. Sleek and discreet,
Trekker provides information in the most natural way possible and allows users to record
both vocal and written notes.
Important Caution
The Trekker system is designed as an ORIENTATION AID only, and must not, at any time, be used as
the only aid while traveling. A conventional mobility aid should be used in conjunction with the GPs
unit as TREKKER IS NOT A MOBILITY DEVICE. It is the user's responsibility to use this device with
caution. Furthermore, always take extra precautions when traveling on foot on roads designed for
motorized transportation.
About the student lessons
Much of the information contained in this lesson plan document is drawn from the Trekker
3.0 User Manual prepared by HumanWare. Permission to use it, directly or indirectly, has
been granted by the authors of the Trekker 3.0 User Manual.
2
This document is intended to be a companion document to the Trekker 3.0 Manual and is
not meant to replace the Trekker 3.0 User Manual. A great deal of valuable information
and detail can only be found in the Trekker 3 User Manual found on HumanWare’s website
(http://www.humanware.ca/web/Guides/maestro202_trekker30_user_guide.htm)
Please refer to pertinent section numbers in the Trekker User Manual when using these
lesson plans.
3
Table of Contents
GPS Project ..........................................................................................................2
Sponsored by PRCVI and SET- BC ............................................................................2
Introduction .......................................................................................................2
Table of Contents...................................................................................................4
Lesson 1 Preparing to Travel...................................................................................5
Activity 1: Unpacking the box ...............................................................................6
Activity 2: Exploring the PDA................................................................................6
Lesson 2 Understanding Menus and Dialogue Boxes ................................................. 12
Activity 1: Understanding Menu and Dialogue Box Navigation.................................. 12
Activity 2: Exploring the System menu ................................................................ 15
Activity 3: Exploring the Trekker Application Menu Options ..................................... 17
Lesson 3 Using Pedestrian Mode............................................................................ 19
Activity 1: Starting Trekker ................................................................................ 20
Activity 2: General Information about Pedestrian Mode .......................................... 20
Activity 3: Points of Interest (POI’s) in Pedestrian Mode ......................................... 21
Activity 4 Routes in Pedestrian Mode .................................................................. 23
Lesson 4 Free Mode.............................................................................................. 26
Activity 1: General Information about Free Mode................................................... 26
Lesson 5 Exploring the Browsing Mode .................................................................. 30
Activity 1: General Information about Browsing .................................................... 30
Lesson 6 Exploring Motorized Mode........................................................................ 32
Activity 1: General Information........................................................................... 32
Activity 2: POI’s in Motorized Mode ..................................................................... 32
Activity 3: Routes in Motorized Mode ................................................................... 32
Appendix 1 Braille Letters and Numbers for Data Input.............................................. 34
Braille Letters and Numbers for Data Input in Dialogue Box Editfields ....................... 34
Appendix 2 Telephone Keypad .............................................................................. 35
Appendix 3 Quick Reference Chart ........................................................................ 36
Data Entry:...................................................................................................... 36
Navigation : ..................................................................................................... 36
Function:......................................................................................................... 37
Appendix 4 Settings (copied directly from the Trekker 3 manual)................................... 38
1.1
Settings ................................................................................................ 38
Appendix 5 Map Manager (copied directly from the Trekker 3 manual)............................ 42
1.2
Trekker Map manager ............................................................................. 42
4
Lesson 1 Preparing to Travel
Objectives:
1. The student will be able to identify the various components that make up the
Trekker GPS System (PDA, GPS receiver, external speaker, desktop cradle, power
splitter, carrying case)
2. The student will be able to connect and charge the components.
3. The student will be able to identify the keys on the tactile keyboard and PDA
4. The student will understand the functions associated with the keys on the tactile
keyboard and the PDA
5. The student will be able to perform a soft reset
Brief Review of Prerequisite Skills:
1. Proficiency with all mobility skills related to street travel
2. Proficiency with a Windows and a screen reading program if Trekker related
programs are to be installed independently
3. Ability to discriminate PDA buttons that have different shapes and sizes
4. Manual dexterity sufficient to perform a soft reset
5. Ability to categorize
6. Ability to understand synthesized speech
Challenges and Tips
1. Prior to using Trekker it is necessary to read Section 3 (Setting Up) of the Trekker
manual. It contains very important information. The complete Trekker User
Manual can be located at
http://www.humanware.ca/web/Guides/maestro202_trekker30_user_guide.htm.
Section 3 (Setting Up) is linked from the Table of Contents or can be found directly
at
http://www.humanware.ca/web/Guides/maestro202_trekker30_user_guide.htm#_
Toc147639598
2. Prior to using Trekker, The Map Manager program contained on the Trekker CD,
will need to be installed on your PC. Refer to the Section 3 (Setting Up) link above
for more information about installing the Map Manager. See Appendix 5 for details
on using the Map Manager. It assumes that you will have a screen reader running.
3. Prior to using Trekker it will be necessary to install Active Sync on your computer.
It is contained on the Trekker CD. Refer to the Section 3 (Setting Up) link above
for more information about installing Active Sync.
Features:
Trekker is HumanWare's revolutionary orientation aid. It uses the Global Positioning
System (GPS), and digital maps to help blind and visually impaired people find their way
in urban and rural areas. Trekker users can pinpoint exactly where they are, and be made
aware of points of interest in the area. It complements existing mobility aids (white
canes and guide dogs). It does not replace them.
Sleek and discreet, Trekker provides information in the most natural way possible and
allows users to record both vocal and written notes. A wide variety of maps covering North
American and European countries are available. For a list of available coverage, please
5
consult the HumanWare website (www.humanware.com). Maps can be bought from
HumanWare's website. They will be delivered on CD or online. User-friendly Trekker
employs off-the-shelf hardware for GPS input. You can purchase Trekker as a standalone
system (Trekker solo) or add it as an option to the Maestro suite of applications.
Activity 1: Unpacking the box
Step 1 Locate and identify the components of the system
Contents of the Package
Basic components:
HP iPAQ 4150 or Dell Axim X51 PDA
Tactile Keyboard
Desktop Cradle and USB Connector Cable
Power Supply Adapter
Carrying Case
Keyboard stylus (for sighted users)
Tactile description of the PDA
Standard PDA software and documentation package containing print documents and
Companion CD
Trekker components:
GPS Receiver RoyalTek RBT 1000 or 2001 & Clip-on case
External Speaker with audio cable
Power Splitter (used to charge the GPS receiver, External Speaker or PDA at the same
time)
Strap
Travel Bag
A GPS map on CD and a storage card
Trekker Getting Started Guide (Print and Braille)
Step 2
Insert the PDA into the desk cradle. Locate the 3 ended power supply adaptor. Connect it
to the desk cradle, GPS receiver and the external speaker. Connect the other end of the
power adaptor to a wall socket. Charge all units.
Activity 2: Exploring the PDA
Step 1
Note the location of the Power Button. Be aware of the indicator lights for troubleshooting
using sighted assistance
Top Front
Power button: Located at the top on the front of the PDA. Use this button to turn the unit
On. To turn the unit Off, press and hold the System Bar key, located at the bottom right
side of the PDA.
The Dell Axim X51 Power button is also the Power Indicator. When connected to external
power and the main battery is fully charged, the Power button lights up green. When the
main battery charge is low, the Power button flashes amber. When the battery is being
charged, the Power button turns amber.
The HP4150 Power Indicator: Located immediately to the right of the Power button. An
amber flash indicates that the unit is charging. A steady amber light indicates that the unit
is fully charged.
6
Active Bluetooth/Wireless LAN Indicator: On the Dell Axim X51, it is located on the right
side of the top front panel. On the HP iPAQ 4150, it is located immediately to the left of
the Power button.
Microphone: On the Dell Axim X51, it is located on the left side of the top front panel. On
the HP iPAQ 4150, it is located just to the left of the SDIO Expansion Slot. Use the
microphone to record your voice or other sounds.
Step 2
Turn on the Key describer mode by pressing and holding the F1 key. Use this mode to
explore the Tactile keyboard, noting that it is divided into 3 zones (Data Entry, Navigation,
and Function)
Up, Down, Left
and Right
Arrow keys,
with the Enter
key in the
Step 3
Using the Key Describer mode, explore the Data Entry keys, learning their location and
their function.
7
Data Entry Keys
The upper half of the Tactile Keyboard is the data entry zone. It includes the following
keys:
Backspace: Located at the top left corner of the Tactile Keyboard. Used in Dialogue boxes
to delete the character that precedes the cursor.
Delete: Located at the top right corner of the Tactile Keyboard. Used in Dialogue boxes to
delete the character that follows the cursor.
Validate: Larger keys located on either side of the Braille/Telephone keyboard. Pressing a
Validate key sends the entered character to the edit field. If no keys have been pressed, a
space will be entered.
Spell: Located below the Left Validate key. Spells the current word.
Tell: Located below the Right Validate key. Reads the current line.
Braille/Telephone Keypad: Located in the middle upper half of the Tactile Keyboard, it
consists of twelve buttons arranged as three columns of four rows. By default, the Braille
keypad is activated and represents a Braille cell. You can configure any two out of three
columns to represent a Braille keypad. Enter one Braille dot at a time and press Validate
to accept the character (see Appendix 1). When used as a telephone keypad, the keys are
mapped with numbers and letters as any telephone keypad (see Appendix 2).
Step 4
Using the Key Describer mode, explore the Navigation keys, learning their location and
their function.
Navigation Keys
Cursor Cross
keys: Up,
Down, Left,
Right Arrow
keys. Enter
in the middle
En
Shift
Tab
The navigation keys include the cursor cross, located in the middle of the lower half of the
tactile keyboard, and the keys aligned along the right side of the lower half of the
keyboard, next to the cursor cross.
The Cursor cross keys are the following:
Up Arrow: Move up in a line, menu item, combobox item, or listbox item.
Down Arrow: Move down a line, menu item, combobox item, or listbox item..
Left Arrow: Move to previous character, or close a submenu
Right Arrow: Move to next character, or open a submenu
Enter: Located in the middle of the Arrow keys. Activates the current control
8
Tab: Located below and to the right of the cursor cross. Moves to the next control in a
Dialogue box.
Shift Tab: Located below and to the left of the cursor cross. Moves to the previous control
in a Dialogue box.
The navigation keys aligned on the right side of the bottom half of the keyboard are as
follows:
Home: Located at the top of the column. Move to beginning of line, Where Am I function,
press and hold to toggle between Pedestrian and Motorized Modes, press Control+Home
to get next instruction when traveling a route.
Page up: Located second from the top of the column. Press to access route information,
press and hold to toggle between Free Mode and Pedestrian Mode.
Page down: Located third from the top of the column. Press to open the Route Selection
dialogue box, press and hold to create a Quick Route. This key will also immediately
deactivate an active route.
End: Located at the bottom of the column. Move to end of line, get a list of POI’s on
segment, access POI’s around when in Free Mode, press and hold to toggle Browsing on
and off
Step 5
Use the Key Describer mode to explore the Function keys. Learn their location and their
function
Function Keys
The function keys are aligned along the left side of the lower half of the tactile keyboard,
next to the cursor cross, as follows:
F1: Located at the top of the column. Says the title of the active window. Press and Hold
F1: to toggle the key describer On and Off.
F2: Located second from the top of the column. Trekker will announce information about
the connection and the number of satellites in view.
F3: Located third from the top of the column. Activates the Contextual menu.
F4: Located at the bottom of the column. Opens the Trekker Application menu.
Press and hold F4 to toggle between the Braille and Telephone keypads.
Bottom Front
9
Escape: Located at the bottom left side of the front of the unit. Cancels operations and
closes dialogue boxes. Closes the Trekker program,
Control: Located between the Escape key and the Navigation button in the middle.
Control+F4
starts the Trekker program, Control+Right Arrow announces POI related information,
Control+
Left Arrow announces the selected POI’s telephone number, when focused in a route
selection
list box it announces route information,
Navigation button: Located in the middle of the bottom set of buttons. It is not used.
Recording button: Located in the center of the Navigation button. Press this button to
create Points of Interest by saying a short audio message describing the P.O.I.
Shift: Located to the right of the Navigation button. Shift+F3 Announces the current
Navigation Mode, Shift+F2 resets your position if Trekker loses your location, Shift+Page
Down reroutes to your destination if you stray from your route and/or get lost,
System Bar: Located at the bottom right side of the front of the unit. Activates the system
menu to start the Trekker program, press and hold to turn off the PDA.
Step 6
Explore the edges to become familiar with the location of the various ports and buttons.
The Edges
Top Edge
Stereo Headphone Jack: Located at the leftmost edge of the top of the unit. Connect your
headphone, headset, or earpiece.
Secure Digital I/O (SDIO) Expansion Slot: Located at the centre of the top edge, supports
Secure Digital (SD) storage cards. The Dell Axim X51 has a Compact Flash card slot,
located on the back of the SD card slot.
Infrared: On the Dell Axim X51, it is located on top of the card slot. On the HP iPAQ 4150,
it is located on the bottom edge, to the left of the Charging/Communications Port.
Stylus: Located at the rightmost edge of the top of the unit. Pull up with fingernail to
remove, push down to lock.
Left Edge
Lanyard hook on the Dell Axim X51: Located near the top of the left edge.
Lock button on the Dell Axim X51: Located below the lanyard hook, and allows you to lock
the device so that it does not respond to inadvertent pressing of keys. To lock the unit,
slide the lock button upward. To unlock it, slide the button downward.
Wi-Fi/Bluetooth On/Off button on the Dell Axim X51: Located below the Lock button.
Standard Record button: On the Dell Axim X51, it is located below the Wi-Fi/Bluetooth
On/Off button. On the HP iPAQ 4150, it is located near the top of the left edge, below the
Headphone jack. It is disabled.
Reset Button: On the HP iPAQ 4150, it is located below the Record button. On the Dell
Axim X51, it is located on the back panel, to the upper right of the battery cover. You will
need to remove the Tactile Keyboard to find these buttons. To perform a soft reset, insert
the stylus point in the hole until the system resets.
Right Edge
Battery Cover Release Latch on the HP iPAQ 4150: Located below the Stylus near the top
of the right edge. Slide up to remove the battery cover.
Battery Cover: On the HP iPAQ 4150, it is located just below the Battery Cover Release
Latch. To remove and install rechargeable battery, pull away with fingernail the battery
cover. On the Dell Axim X51, it is located below the Reset button.
10
Battery lock of the Dell Axim X51: Located on the bottom center of the back panel. Use
this switch to release and remove the main battery. To unlock, slide the button to the left
and remove the battery cover. To lock, put the battery cover in place and slide the button
to the right.
Bottom Edge
Charging/Communications Port: Located in the middle of the bottom edge. Connect to
universal cradle or charging adapter.
Step 7
Learn the location of the stylus and the reset button. Should Trekker freeze or become
unresponsive it may be necessary to perform a soft reset. This will not erase data.
Perform a soft reset. To do this remove the stylus, locate the indented reset button on
the back right side of the PDA just under the elastic strap. Push the end of the stylus into
the reset button and hold there briefly. Remove the stylus. The device will reset and
normal operation will be resumed
11
Lesson 2 Understanding Menus and Dialogue
Boxes
Objectives:
1. Students will learn Windows keyboard commands to open, navigate, and close
menus
2. Students will learn Windows keyboard commands to navigate and use dialogue
boxes.
3. Students will learn how to input text in an editfield
Brief Review of Prerequisite Skills:
1. Students are familiar with synthesized speech
2. Students have a basic understanding of Windows concepts
Challenges and Tips
1. Trekker’s spoken route, POI and connection information takes verbal precedent
over menu and dialogue box information when both occur at the same time. This
may initially confuse the user as to where the focus of the device actually is. In
fact even though Trekker GPS related info is spoken, open menu’s and dialogue
boxes are still open and active.
2. The words “dot, dot, dot” are not spoken to indicate that a dialogue box will open.
Features:
1. Underlined letters will immediately open the corresponding menu
2. The speech package follows Windows conventions for menu and dialogue box
navigation.
3. Single key navigation is available in listboxes and comboboxes.
Activity 1: Understanding Menu and Dialogue Box Navigation
In order to use Trekker it is necessary to understand how to navigate menus and dialogue
boxes using the tactile keyboard. Also when in a dialogue box edit field (e.g. search field)
it is necessary to know how to input text. What follows is Windows from the keyboard
information necessary to use Trekker
Step 1
Using the information below students will open, navigate, and close menus and submenus.
12
Navigating menus
Menus are lists of items. When a menu is opened Trekker announces the item that has
focus, the number of items in the list, and the underlined letter of the item. Typically
menus drop down from a menu bar, although in the case of Trekker they simply appear
when you press the appropriate key. Menus are navigated with the up and down arrows
and Trekker speaks each menu item as it gets focus. A menu item (without a submenu) is
opened by pressing the Enter button when it is spoken (i.e. has focus). All menu items
have underlined letters which are spoken. You can open any menu item immediately by
inputting the underlined letter and pressing the Validate key (see section on data input).
Some menu items have a submenu, indicated by a right pointing arrowhead. Trekker
announces “submenu” when they are present. Submenus are opened with a right arrow.
The items in a submenu are then navigated with the up and down arrow keys and chosen
with the Enter key. Submenus also have underlined letters and may contain further
submenus. To move forward in this cascading menu system press the Right arrow key. To
move back one level press the Escape key. Continuing to press Escape will eventually
close the menu altogether (Trekker will announce “closing menu”)
Step 2
Using the information below students will open, navigate and close dialogue boxes
13
Navigating Dialogue Boxes
Editfiel
Combobox
Checkbox
Buttons
Dialogue boxes will open from a menu when Trekker requires information from the user in
order to proceed. Trekker dialogue boxes contain a maximum of 5 controls although
some will contain fewer controls. To move from control to control press the Tab key. To
reverse the direction, press the Shift Tab key. The controls are:
1. Editfield - Trekker announces the editfield label and then says “edit” (e.g. “Name
edit”). You need to input data when Trekker says “edit”. Move to the next control
by pressing the Tab key.
2. Combobox - Trekker announces the combobox label, then says “combobox” and
then says the number of items in the combobox. The list of items contained in the
combobox is opened with a Down arrow. Continue pressing the Down arrow to
scroll through the choices. Press Enter to accept the choice. Move to the next
control by pressing the Tab key
3. Listbox (not shown) – Trekker announces Listbox and then announces the item
that has focus. A listbox is very similar in appearance to a combobox. Whereas a
combobox is used to make disparate choices, a listbox is used to make choices
from within a category. Use the Up and Down arrow keys to navigate a listbox.
4. Checkbox – Checkboxes are used to give extra significance (depending on the
dialogues box). Trekker announces the label of the checkbox and its state (i.e.
“checked” or “not checked”). To add or remove the checkmark from this box press
the Validate key. Press Tab to move to the next control.
5. Buttons – Typical buttons will be OK, Search, Close, Edit, More and Cancel,
depending on the dialogue box that is open. Trekker will announce the name of the
Button. Activate the button by pressing the Enter key. This may take you to a
new dialogue box , however, the controls will be the same.
Depending on the dialogue box that is open, it will be closed by pressing one of the
Buttons that are present (OK, Cancel, etc). While this will close the Dialogue box that you
are in, it may cause another dialogue box to open. In which case proceed through the
controls. When an OK button is present, pressing it will accept all dialogue box choices
and any data that has been inputted and close the dialogue box. Alternatively, any
dialogue box can be closed at any time by pressing the Escape key. This will cancel the
changes that have been made. This will also close the menu that started it.
14
Step 3
Using the information below, students will learn to input text, as required, in dialogue box
editfelds
Inputting Text
When you are in a dialogue box and Trekker says “edit”, text will need to be entered. This
is done from the data entry portion of the tactile keyboard as noted in the Data Entry
section.
The Braille/Telephone Keypad is located in the middle upper half of the Tactile Keyboard.
It consists of twelve buttons arranged as three columns of four rows. By default, the
Braille keypad is activated and represents a Braille cell. You can configure any two out of
three columns to represent a Braille keypad. Enter one Braille dot at a time and press
Validate to accept the character. The Validate key also acts as the Space key when no
other key is pressed. When used as a telephone keypad, the keys are mapped with
numbers and letters as any telephone keypad. Press and hold the F4 key to toggle
between the Braille and Telephone keyboards. See Appendix 1 for a corresponding list of
Braille letters. See Appendix 2 for the corresponding telephone keypad.
Activity 2: Exploring the System menu
Step 1
Turn on the PDA. You will be prompted to “press the Up and Down (arrow) keys to open
the system menu”. Doing so opens the System Menu (displayed below)
15
At this point you are not in the Trekker program. You are in a general menu PDA system
menu. Note that the menu item that has focus (Trekker) is spoken first, followed by the
number of items in the menu (5) followed by the underlined letter (r). This convention is
used whenever a menu is opened. To move through the menus press the up and down
arrow keys. If you want to start Trekker press Enter when it is announced.
Step 2
Following Trekker in the system menu is Configuration. When opened, the Configuration
Panel (displayed below) contains general configuration settings for the entire PDA. The
only one that may be necessary to open is Bluetooth, since the connection between the
GPS receiver and the PDA is a Bluetooth connection
It is only necessary to open the Bluetooth dialogue box:
• To initially tell the PDA which GPS receiver is being connected
• To reconnect the GPS receiver after a hard reset
• To turn Bluetooth off if you need to install a Trekker upgrade
Should you need to open the Bluetooth dialogue box you will be presented with the
following:
16
Use the Tab key on the Trekker to move through the controls in the dialogue box. When
you get to the Bluetooth Device Type combobox, use the down arrow key to scroll through
the list. When Trekker announces the GPS receiver that you are using, Tab out of the
listbox to the Enable Bluetooth device button and press Enter. Tab to OK and press Enter
to return to the Configuration Panel. Press Escape to exit the Configuration Panel and
return to the System Bar where you will be prompted to press the up and down (arrow)
keys to open the System menu. From here you can launch Trekker by arrowing to it and
pressing the Enter button.
Activity 3: Exploring the Trekker Application Menu Options
Step 1
Launch the Trekker program. When it is launched it has an application (program) menu
that provides items for operation and settings. To open the Trekker Application Menu
press F4.
17
The following menu opens:
Application Menu
Application Submenu
Step 2
Move through the menus by pressing the up and down arrow keys. For each menu item
(except Exit) there is a submenu, as indicated by the arrowhead. As previously
mentioned, submenus are opened with a right arrow, scrolled with a down and up arrow,
and closed with a left arrow. Alternatively, they can be opened by inputting the underlined
letter and pressing Validate. To close the Trekker Application menu press Escape.
**Note: It is critical to exit the Trekker application before turning off the PDA.
Failure to do this will cause an error message the next time you start Trekker
Step 3
Explore the submenus for each menu item.
The submenus for each menu item are as follows:
• Point of Interest: Search by distance, Search by address, Create, Edit, or Delete
• Info: Route, GPS, System, or Where Am I.
• Navigation Modes: Browsing Offline, Motorized Mode, or Free Mode.
• Route: Activate, Create, Deactivate, Browse, Delete, Edit, Reroute, or Reverse a
route.
• Settings: Set GPS On, Verbosity, General, Trekker Volume, Trekker Speech Rate,
Map Activation, and Dictionary.
• Help: Quick Reference, General Help.
• Exit: Close the Trekker application. Alternatively, the Escape Key can also be used
to close the Trekker application.
Application menu items and their submenus will be explored further as they relate to
specific lessons.
18
Lesson 3 Using Pedestrian Mode
Objectives:
1. Students will learn to interpret the information Trekker relays while traveling
2. Students will learn how to create, find and use points of interest (POI’s) in
Pedestrian Mode
3. Students will learn how to create, browse and travel routes in Pedestrian Mode
Brief Review of Prerequisite Skills:
1. Students understand that Trekker is an aid for orientation only. It is not to be used
without traditional mobility aids such as a long cane or a guide dog.
2. Students’ have proficient mobility skills for all aspects of street travel including
street crossings
Challenges and Tips
Trekker’s descriptions of intersections (e.g. “3-way intersection crossing First Street on
your right” may be confusing to students who do not have an accurate understanding of
their travel in relation to the streets they are approaching. See diagram below:
First Street
The arrow is the direction of travel on 2 possible sidewalks. Regardless of which side of
the street you are on Trekker will announce “3-way intersection crossing First Street on
your right”. However whether or not the student actually crosses First Street depends on
which side of the street they are traveling on. It cannot be overstated that Trekker is only
a general aid for orientation. Specific orientation knowledge and mobility skills are
essential for safe and successful travel.
Features:
1. Verbosity settings (see Appendix 4) allow the student to customize the amount of
detail that Trekker announces.
2. Students can access points of interest contained on the storage card map or create
their own
3. Students can create routes using a variety of origins and destinations
4. Maps and routes can be previewed prior to travel
19
Activity 1: Starting Trekker
Step 1
Before using Trekker, verify if the GPS Receiver, External Speaker, and PDA are properly
attached, powered On and their batteries are fully charged. The storage card containing
the map of your current area is properly inserted in the card slot of your PDA.
Step 2
Make sure that the external speaker is attached as close as possible to your ear.
Furthermore, ensure that the GPS receiver is attached on the back of your neck, or on top
of your shoulder. Because it is Bluetooth enabled, verify that the PDA Bluetooth Radio is
On. Note that a map will be activated by default if it is the only map present on the
Storage card. If more than one map is present on the card, you will need to activate one.
For additional information, please refer to the Map Activation section in the HumanWare
Trekker manual
(http://www.humanware.ca/web/Guides/maestro202_trekker30_user_guide.htm#_Toc14
7639676) .
Step 3
To start Trekker, first power on the PDA. Then press the System Bar button to activate the
System Menu. Select Trekker from this menu, and press Enter.
Go outdoors, or place the unit by a window, and power On the GPS receiver, and wait until
the GPS connection is established. This operation can take several minutes for the first
connection.
When Trekker establishes the connection, it will begin beeping to indicate that it is
detecting satellites and calculating your current position. Trekker will then announce the
name of the street you are currently on.
If Trekker continues to beep, but no street is detected, try moving up the street to ensure
that you get a good signal.
Activity 2: General Information about Pedestrian Mode
Pedestrian Mode is activated by default when Trekker is launched. The information Trekker
provides comes directly from the map that is loaded. As you walk Trekker announces:
• The name of the street you are on
• A description of the type of intersection that you will encounter next
• The name of the intersection cross street you are approaching
• Points of interest in your immediate area.
You can also obtain general GPS information by pressing from the Trekker application
menu by choosing Info / GPS, or by pressing the F2 key. Trekker will then announce the
following information:
• The number of satellite in view
• The strength of the GPS reception
• Estimated speed and altitude
Trekker has a “Where am I” feature (Home key) that will give you information on your
current location. This information includes:
• Route status if you are on a route that has been activated (see section on Routes)
• Your cardinal direction
20
•
•
•
•
The
The
The
The
current street name and estimated address
nearest POI (if any)
nearest intersection located in front of you
next instruction if you are on a route (see section on Routes)
Step 1
Travel in a familiar area with intersections to experience the orientation information that
Trekker provides.
Press the F2 key to find out about satellites and reception.
Use the Where Am I function (Home key) to get orientation information about your
immediate environment
Activity 3: Points of Interest (POI’s) in Pedestrian Mode
.
Step 1
What is a POI?
A POI is a landmark. There are 2 types of POI’s. They are ones that are contained on the
map when you purchase the Trekker system, and the personal ones that you create. POI’s
can be used as the origin or destination of a route. They can also be used as a starting
point to browse an area prior to your visit. POI’s can be edited with personal information
(e.g. add phone number) if desired.
Step 2
Searching for POI’s
Use the Trekker POI Search dialogue to find both mapped and personal POI’s. You have
two choices when searching for POI’s. They are Search by Distance and Search by
Address:
21
Search by Distance
Search by Address
Both dialogue boxes contain Source and Category comboboxes. The Source combobox
contains: All, Personal, All external or Activated maps.
• All considers P.O.Is from every source
• Personal considers all P.O.Is recorded by the user
• All external represents P.O.Is from all third party databases that have been
imported
• Activated maps considers all the P.O.Is contained on your map.
The default setting is All. Selecting one allows you to narrow your search, thereby
reducing the wait time.
The Category combobox contains over 50 categories for points of interest. Selecting one
allows you to narrow your search thereby reducing the wait time. The default is All
Both dialogue boxes also contain a Favourites checkbox. When this checkbox is checked
the POI will be available in a separate combobox when creating a route or browsing a map
(please see those sections for details).
Note that when inputting text to search for a POI, it is not necessary to enter the complete
name. Inputting a part of the name will cause Trekker to search everything containing
those letters. Also when looking for an item in a combobox the first letter of the item can
be inputted. This will open the combobox at the point of items starting with that letter.
Both of these will save time when inputting text.
Step 3
Create a Personal POI
To create a Personal POI press the Record button and say a short message describing it.
Each POI will also be assigned a sequential number (e.g. POI1, POI2, POI3, etc).
Alternatively you can open the POI menu and choose Create. The dialogue box that opens
allows you to add a recording. All Personal POI’s are automatically assigned Favourite
status.
22
Step 4
Edit a POI
If you want to edit the POI to give it a more descriptive text name or add personal
information you must first search for it. To do this open the Point of Interest menu, scroll
down to Edit and press Enter. The editing process involves 3 dialogue boxes. The process
is described in detail in the Free Mode section. Typically POI’s that are on the map do not
require editing as they already contain extensive information. Personal POI’s however,
will require editing as they are assigned a number. To edit a Personal POI please refer to
“Edit a POI” in the Free Mode section.
Step 5
Other
While not described in detail in this document, POI’s can also be deactivated and deleted
from the POI menu. The dialogue boxes that open (as with all POI related dialogue boxes)
require you to search for the POI before you can do anything with it.
The phone number of a POI can be obtained by pressing Control+Left Arrow
Detailed POI information can be obtained by pressing Control+Right Arrow (name,
category, civic address, and text notes if entered)
Activity 4 Routes in Pedestrian Mode
Step 1
The Route feature allows you to create a precise travel route by entering a starting point
and a destination point. You can then travel the route in real-time or virtually explore it
with the browsing feature. As you travel (or browse it), Trekker will announce streets and
intersections you come across and will provide turn by turn instructions to reach your
destination. Routes must first be created and then activated before they can be traveled.
Step 2
Create a Route
Routes must be created before they can be searched or browsed. Routes can be created in
two ways. The first is by opening the Route menu and choosing Create. The second is by
using the Quick Route feature.
Creating a Route using the Route Menu
Routes created this way require input in two main dialogue boxes. The first is the Route
Origin Selection dialogue box. Depending on the origin chosen in the Source combobox,
further dialogue boxes may open. For example if Points of Interest are chosen then a
search dialogue will open.
23
Route Origin Dialogue Box
Depending on the item
that is chosen in this
combobox , different
dialogue boxes will follow
The second main dialogue box that opens is the Route Destination dialogue box. Again,
further dialogue boxes may open before the destination can be set. Except for the title,
this dialogue box is identical to Route Origin dialogue box shown above.
Once all the required route information has been entered Trekker will begin computing
your route and will announce “Computing route… Saving route… Route created.” Trekker
will then announce the name of the route using the destination as the name.
Create a Quick Route
A Quick Route can be created by pressing the Page Down key. A route created this way
uses your location as the origin. You are immediately taken to the Route Destination
dialogue box. Input destination information as explained in the previous section. The route
is automatically activated and ready to travel.
Step 3
Activating a Route
After routes are created they must be activated before they can be traveled. To activate a
route (except for Quick Routes) choose the Activate submenu from the main Route menu.
Select Pedestrian or Motorized. The Route Selection dialogue box will open. Since all
routes are saved, it is necessary to select it from the list and then Tab to the Activate
button and press it. Routes can also be activated directly by pressing the Page down key.
This will open the Route Selection dialogue box without having to go through the menu
system. When you are in the Route Selection dialogue box you can find out the route
source, destination and length by pressing Control + Right Arrow. This may be useful as
routes are named by their destination and more information may be necessary before
selecting it.
Step 4
Traveling a Route
Once a route is selected and activated Trekker will begin instructing you on how to reach
your destination. It will begin by giving you the street name and cardinal direction to
travel. As you approach an intersection Trekker will describe it (e.g. 4 way), followed by
24
the name of the current and intersecting street. It will then tell you whether to proceed
through the intersection or turn right or left. Finally Trekker will tell you when the next
route instruction will be given.
If you are off route Trekker will warn you at the next intersection that it is not on the
route. It is important to note that off route information is not automatically announced
until you approach an intersection. If there are few intersections on a route then you may
travel a long distance before Trekker automatically notifies you. It is recommended to
verify that you are on route by pressing the Route Information key (Page Up), or use the
Where Am I function (Home key).
If Trekker determines that you are significantly off route (more than 200 metres from the
expected intersection) it will announce that you are significantly off route and prompt you
to reroute. Rerouting can be done from the main Route menu.
Step 5
Browsing a Route
This is a useful feature if you want to explore or preview a route before actually traveling
it. To do this select Browse from the main route menu. From the Route Selection Dialogue
box that opens choose the route. Tab to Browse and press Enter. Use the Up and Down
arrows to go forward and backward through the route instructions. Note that this is
different than browsing an area on the map where the arrow keys are used to virtually
travel the streets in all directions.
Step 6
Other Route Features
Trekker can automatically reverse a route by checking the Reverse Route checkbox.
Trekker will then say, “Route in reverse direction.” give you reversed route information.
You can uncheck the box to return to your original route direction.
Routes can be Deleted, Edited, Browsed and Deactivated from the main Route menu.
Note that active routes are automatically deactivated when your destination is reached.
25
Lesson 4 Free Mode
Objectives:
1. The student will learn to travel in unmapped areas
2. The student will learn how to create, edit and use points of interest for personal
landmarks in Free Mode
3. The student will learn how to use the automatic guidance feature to navigate to
points of interest in Free Mode
Brief Review of Prerequisite Skills
1. The student has an understanding of angles expressed in degrees as they relate to
their body and direction
2. The student has a general sense of distance in relation to their stride and traveling
speed
Challenges and Tips
1. The accuracy of the angle and distance to a POI’s varies with the number of
satellites, environment and time of day.
2. The distance to a POI in Free Mode tends to be least accurate the farther away you
are from it. The distance to a POI is always general. GPS accuracy is typically
within 10 – 20 meters.
3. When walking to a POI, angles less that 25 degrees should be ignored (i.e. keep
going straight). Alter your direction only on angles approaching 45 degrees.
4. Should the degrees announced exceed 160 you have walked past the POI and need
to turn around.
5. Navigating to POI’s assumes that you are moving as your distance and direction
are recalculated every 10 seconds. If you stop and wait you will notice that
Trekker will provide greatly differing information in terms of distance and direction
(even though you aren’t moving). This is because GPS information is degraded by
the US government for civilian use. GPS information is most accurate when you
keep moving.
Features:
1. Automatic guidance to a POI is activated by pressing Enter on the selected POI
2. Voice recordings can be added to POI’s to personalize them
3. The text number that is assigned to a POI can be edited to make searching for it
easier
Activity 1: General Information about Free Mode
Use Free Mode in unmapped areas such as parking lots, parks, campuses, or bodies of
water. Trekker automatically switches to Free Mode when you have penetrated a sufficient
distance (about 40 meters, or 130 feet) into an unmapped area. While in free mode, if
Trekker detects that you are coming back to the mapped street network, it will
automatically map you to the street, and switch you back to Pedestrian Mode. You can
also to switch to Free mode manually from the Trekker Application menu by selecting
Navigation Modes, then Free Mode. Alternatively, press and hold the Page Up button to
toggle it On or Off. In this case, Trekker will not automatically switch you back to
26
Pedestrian mode as you return to the street network. You must manually select the
Pedestrian Mode.
Step 1
“Where Am I” function in Free Mode
Use the Home key to access this information. Trekker will announce the direction you are
traveling, the name of the area (e.g. park name) if it is mapped, the nearest POI detected
(with angle and distance information), and information on the nearest street located in
front of you.
Step 2
POI’s in Free Mode
Traveling in Free Mode Free mode assumes that you will probably be creating POI’s as you
travel. This is the only way to navigate to and from specific points as you travel unmapped
in Free Mode.
To create a personal POI press the Record button on the PDA and say a short (4 second
max) audio message to describe it. Alternatively you can use the Trekker Application
menu (POI / Create) which will also allow you to create a voice recording by pressing the
Record button. In either case the POI will be automatically assigned a number (sequential
from the last personal POI (e.g. POI #2).
To locate a POI that you have created use the “POI Around” function (End button). The
following (sample) dialogue box will open. It lists all of the personal POI’s that you have
created:
Information is available with regard to your location relative to the selected POI. It is
given in terms of the angle to it and the distance between you and the P.O.I. Scroll
through the list (using the Up and Down arrows) to hear this information for each POI. To
navigate to a specific POI, select it and then press the Enter key. Trekker will announce
“start navigating to POI 4 (as per diagram example). As you walk Trekker will announce
the following (as an example). “85 degrees on your left, 15 metres”. This information will
27
be recalculated and re-announced every 10 seconds as you walk towards the selected
POI. Trekker will announce via a chime when you enter the POI detection zone
(approximately 10 metres) and the voice recording you created will be played.
It is important to note that civilian GPS signals are degraded by the US government for
security purposes. The information that Trekker announces is an estimate. While the
direction given is generally very accurate, the distance can vary significantly. It is
important to listen carefully to the distance. When it announces a distance close to the
POI (less than 3 metres), stop. Continuing to follow the announced changes in direction or
distance as it recalculates every 10 seconds may or may not be accurate. It is up to the
user to determine when they are as close to the POI as Trekker will get them. At that
point look for cane landmarks if the destination is familiar, or solicit aid if it is not.
Step 3
Editing a POI
As mentioned POI’s are given a sequential number. If a voice description as been assigned
then it will be announced as you travel. If you want to edit the POI to give it a descriptive
text name, to make searching for it easier, use the Edit submenu from the Point of
Interest menu. This will sequentially open the following dialogue boxes:
1. Search for POI
2. Locate POI
3. Edit POI
Note that even though you pressed Edit, the process will involve using 3 dialogue boxes.
1. The first dialogue box that opens requires you to search for the POI.. Also note
that personal POI’s are stored in the Source combobox under Personal. Input the
name of the POI (e.g. POI1) from the data entry portion of the tactile keyboard
pressing the Validate key after each letter (Braille or print) is inputted. Tab to
Source and either open the combobox or input “p” for Personal. Tab to the Search
button and press Enter to locate it.
2. Once Trekker finds it Tab to the Edit button and press Enter.
3. From here you can edit “POI1” (for example) and give it a more descriptive name.
28
POI’s created in Free Mode are specific to it. They are not available in Pedestrian mode.
POI’s created in Free mode are also more accurately located than those created in
Pedestrian Mode.
29
Lesson 5
Exploring the Browsing Mode
Objectives:
1. Students will learn to browse maps while online and offline
2. Students will learn to browse a route while offline
3. Student will access Where Am I and POI information while browsing
Brief Review of Prerequisite Skills:
1. Students are familiar with Pedestrian and Free Mode
2. Students understand cardinal directions and their relation to each other.
3. Students are familiar with all aspects of POI’s
Challenges and Tips
Browsing maps offline can be confusing. Virtual movement on the street is determined by
pressing the arrow keys. Once you have begun to travel it is important to press the
Where Am I key to determine whether you are traveling north, south, east or, west.
Simply wandering using the arrow keys is unlikely to provide any more than name
familiarity with the area being explored.
Features:
1. POI’s can be searched and routes to them can be created for previewing prior to
travel
2. Street name and number information is provided using the Where Am I feature
Activity 1: General Information about Browsing
Browsing allows you to virtually explore an area on a map using the Arrow key for
navigation. There are three specific uses for browsing.
1. To virtually explore a map area while you are online (i.e. outdoors with GPS
receiver turned on.
2. To virtually explore a map area while you are offline (i.e. indoors or outdoors with
no GPS connection)
3. To preview a route that has been created, before actually traveling it.
Step 1
To switch to Browsing mode select Navigation Modes from the main Trekker menu and
choose Browsing Offline. The Browsing feature may be immediately access by pressing
and holding the End key. Either way, the Browsing Origin dialogue box opens. It defaults
to your last browsing origin. Arrow through the combobox to select other choices. If you
are online and wish to browse a map choose Last GPS Position. This will allow you to
virtually explore your immediate area while online, without actually traveling it. Tab to the
OK button to begin browsing the area.
30
Browsing Offline
Browsing Online
Step 2
To travel virtually on the street use the arrow keys. Trekker will announce “can’t go that
way” until you press the arrow that lines you up on the street. At that point press the Up
and Down arrows to travel the street. Intersections will be announced as if you are
walking the street. Use the Right and Left arrows to turn at an intersection. Proceed using
the Up arrow.
Step 3
POI’s in Browsing Mode
When browsing a map you can use the Where Am I and POI functions as if you were
walking on the street. To access Where Am I information press the Home key. To access
POI information, open the Points of Interest main menu and proceed as if you were
actually traveling on the street.
Step 4
Routes in Browsing Mode
To preview a route prior to traveling it choose Browse from the main Route Dialogue box.
Choose Pedestrian or Motorized. Then choose a route from the listbox that opens. Tab to
the Browse button and Trekker will begin instructing you on the route. Cancel Browsing
by pressing the Escape key
31
Lesson 6 Exploring Motorized Mode
Objectives
1. Students will learn the names of the current and intersecting streets as they travel
in a vehicle
2. Students will learn to create a route for vehicle travel
Brief Review of Prerequisite Skills:
1. Students are familiar with all aspects of Pedestrian Mode
Challenges and Tips
2. Information is not as detailed as that given in Pedestrian Mode
3. The GPS receiver should be placed so that it is facing out a window (e.g. on the
front dash).
Features:
1. Where Am I information is available in Motorized Mode
2. Only routes marked as Favourites will be announced as you travel.
Activity 1: General Information
Use Motorized Mode to while traveling in a vehicle. To enter Motorized Mode choose it
from the main Navigation Modes menu. Alternatively you can toggle between Pedestrian
and Motorized Modes by pressing and holding the Home key. Trekker will announce the
current street name and intersecting street names as you approach them. It will not give
a description of the intersection as it would in Pedestrian Mode. Where Am I Information is
available. Trekker will announce the current street name and estimate address, the
nearest cross street in front of you, and the vehicle speed.
Activity 2: POI’s in Motorized Mode
Only POI’s marked as Favourites will be detected and announced.
Activity 3: Routes in Motorized Mode
Step 1
When creating a route you are prompted to create either a Pedestrian or Motorized route.
Likewise when selecting a route you will be asked to choose from either Pedestrian or
Motorized. Only routes created in their respective category will be available for selection
and activation.
Step 2
Once activated, the user is informed of the first intersection that will be encountered.
When this intersection is reached, Trekker will communicate the first set of instructions.
32
Subsequent instructions will be given in advance to help anticipate next action. Three
thresholds are available to better prepare you. They are 3 Km, 1 Km and 250 m (or 2
miles, 1 mile, and 820 feet). The instructions will provide information on actions that are
needed to follow the route. For Example: “In 3 kilometers: Take Exit-11” Followed by “In
1 kilometer: Take Exit-11”. The last threshold will warn you that the next action is near by
saying for example: “Get ready to take Exit-11” Upon reaching an intersection where you
need to turn, Trekker will provide instructions on actions that need to be taken, such as
“Turn right on Gilford Street”.
When more than one turn is located within a short distance, you will be warned in
advance, for example, “Get ready to turn right on Gilford then Turn left on Carter” or
“Turn right on Gilford then Turn left on Carter”.
33
Appendix 1 Braille Letters and Numbers for Data
Input
Braille Letters and Numbers for Data Input in Dialogue Box Editfields
After all dots for each letter or number have been entered, press the Validate key to have
the letter or number inserted in the editfield. Press the Validate by itself (i.e. no dots), to
enter a space. When entering a number do not precede it with the number sign.
Braille Letters
a
b
c
d
e
f
g
h
A b c d e f g h
i
j
k
l
m
n
o
p
I j k l m n o p
q
r
s
t
u
v
w
x
Q r s t u v w x
y
z
Y z
Braille Numbers
1
2
3
4
5
6
7
8
9
0
1234567890
34
Appendix 2 Telephone Keypad
For data input, the keypad acts as a regular telephone keypad when used for text entry.
Press
the Validate key to enter the appropriate character.
As keys are repeatedly pressed, they are mapped and announced as follows:
1
2
3
4
5
6
7
8
9
0
1 @ period * ? ! comma underline & colon quote (
semi colon,
2 a b c
3 d e f
4 g h i
5 j k l
6 m n o
7 p q rs
8 t u v
9 w x y z
0 space plus dash slash equals greater less
) apostrophe % $
The bottom left key is the Telephone Character Quick List. Use the Right Arrow key to
select the character and press the Validate key to insert it
The bottom right key is the number sign (#)
35
Appendix 3
Quick Reference Chart
Data Entry:
Backspace
Delete
Validate
Spell
Tell
Keypad
Deletes the character that precedes the cursor
Deletes the character that follows the cursor
Sends the entered character to the editfield in a dialogue box. If no
keys are pressed it sends a space
Spells the current word in a dialogue box editfield
Reads the current line in a dialogue box editfield
Press as necessary to choose characters for an editfield
Navigation :
Up Arrow
Down Arrow
Left Arrow
Right Arrow
Enter
Tab
Shift Tab
Home
Control + Home
Page Up
Move up in a menu item, combobox item, or listbox item
Move down in a menu item, combobox item, or listbox item
Move to a previous character
Close a submenu
Move to the next character
Activate the current control
Move to the next control in a dialogue box
Move to the previous control in a dialogue box
Move to the beginning of a line
Where Am I function
Press and hold to toggle between Pedestrian and Motorized modes
Press to get the next instruction when traveling a route
Press to get route information
Press and hold to toggle between Free Mode and Pedestrian Mode
36
Page Down
End
Press to open the Route Selection dialogue box
Press and hold to create a Quick Route
Immediately deactivates an active route
Move to end of line
Access POI’s when in Free mode
Get a list of POI’s on segment in Pedestrian Mode
Press and hold to toggle Browsing on and off
Function:
F1
F2
F3
F4
Escape
Control
Control + F4
Control + Right Arrow
Control + Left Arrow
Control + Home
Recording Button
Shift
Shift +F2
Shift + F3
Shift + Page Down
System Bar
Says title of the active window. Press and hold to toggle Key
Describer on and off
Announces the number of satellites in view and the reception
strength
Activates the contextual menu
Opens the Trekker Application menu
Press and hold to toggle between the Braille and telephone
keypads
Cancels operations
Closes dialogue boxes
Closes the Trekker program
Modifier key – it does nothing on its own
Starts the Trekker program (after PDA is turned on)
Announces POI information related to the selected POI
When focused in a route selection listbox, it announces route
information (route source, destination and length)
Announces the telephone number of the selected POI
Press to get the next instruction when travelling a route
Press to create a POI and say a short audio message describing it
Modifier key – it does nothing on its own
Resets your position if Trekker loses your location
Announces your current navigation Mode
Re-routes you to your destination if you stray from your route or
get lost
Activates the System Menu to start the Trekker program
Press and hold to turn off the PDA
37
Appendix 4 Settings (copied directly from the
Trekker 3 manual)
1.1
Settings
Use the Trekker Settings menu options to configure various settings for Trekker,
including: Set GPS On/Off, Verbosity, Distance Units, Volume Control, Speech Rate, Map
Activation, and Dictionary. To access the Trekker Settings menu, from the Trekker
Application menu, select Settings.
1.1.1 Set GPS On
In order to use the GPS Receiver, the Bluetooth radio has to be turned On beforehand in
the Configuration settings. If the Bluetooth keyboard is in use, the Set GPS On option will
disable the keyboard connection. From the Trekker Application menu, select Settings, then
Set GPS On (or press and hold F2) to turn ON the connection between the GPS Receiver
and the Trekker application.
NOTE: If the Bluetooth keyboard is not in use. Trekker will always set the GPS On upon
start up, and the GPS connection will be established automatically.
When powering Off the GPS receiver, its current connection with Trekker will be disabled.
If you turn it back On, you will need to go to the Trekker Application Menu – Settings - Set
GPS On (or press and hold F2) to reconnect.
This feature is useful if you experience errors with the GPS connection. In this case, you
may want to reset the connection by: toggling the GPS Off, waiting a few seconds, then
toggling the GPS back On. Also, when browsing offline, you may want to power off the
GPS receiver in order to save power. When browsing Offline, Trekker automatically sets
the GPS off. When you return to browsing online, GPS is set back to on.
NOTE: When exiting Trekker, the current connection between the GPS and Trekker will be
disabled, but remember, your GPS receiver is still powered on, do not forget to power it
off.
1.1.2 Trekker Verbosity Settings
Use the Trekker Verbosity Settings menu to configure verbosity settings for Where Am I,
P.O.I Pedestrian, P.O.I Motorized, and Browsing. To access the Trekker Verbosity Settings
menu, from the Trekker Application menu, select Settings, then Verbosity.
1.1.3 Geographical Where Am I Verbosity Settings
Use the Trekker Where Am I Verbosity Settings Dialog to select the Where am I verbosity
level. To open the Trekker Where Am I Verbosity Settings Dialog, from the Trekker
Application menu, select Settings, Verbosity, then Where Am I.
Please select your Where Am I verbosity preferences: Choose from one of four settings:
Location and P.O.I, or, Location and P.O.I and Intersection, or, Advanced Mode, or, Reset
to original. Selecting Advanced Mode brings you to the Trekker Where Am I Advanced
Settings Dialog. Default is Location, P.O.I, and Intersection.
1.1.3.1 Where Am I Advanced Settings
Use the Trekker Where Am I Advanced Settings Dialog to select advanced verbosity
settings while using the Where Am I function in Trekker. To open the Trekker Where Am I
Verbosity Settings Dialog, from the Trekker Application menu, select Settings, Verbosity,
38
then Where Am I. In Please select your Where Am I verbosity preferences select Advanced
Mode.
First Item: Choose from one of four settings: Blank, Current Location, Nearest Point of
Interest, or Nearest Intersection. Default is Current Location.
Second Item: Choose from one of four settings: Blank, Current Location, Nearest Point of
Interest, or Nearest Intersection. Default is Nearest Point of Interest.
Third Item: Choose from one of four settings: Blank, Current Location, Nearest Point of
Interest, or Nearest Intersection. Default is Nearest Intersection.
Reset to Default: Select to restore factory settings.
1.1.3.2 P.O.I Pedestrian Verbosity Settings
Use the Trekker P.O.I Pedestrian Verbosity Settings Dialog to select the Pedestrian P.O.I
verbosity level. To open the Trekker P.O.I Pedestrian Verbosity Settings Dialog, from the
Trekker Application menu, select Settings, Verbosity, then P.O.I Pedestrian.
Please select your pedestrian Point of Interest verbosity preference: Choose from one of
eight settings: Tone Mode, or, Name, or, Name, Direction, or, Name, Direction, Note, or,
Name, Note, Direction, or, Off, or, Advanced Mode, or, Reset to original. Selecting
Advanced Mode brings you to the Trekker P.O.I Advanced Settings Dialog for Pedestrian
Mode. Default is Name, Note, Direction.
1.1.3.3 P.O.I Advanced Settings for Pedestrian Mode
Use the Trekker P.O.I Advanced Settings Dialog for Pedestrian Mode to select advanced
verbosity settings in P.O.I Pedestrian mode when using Trekker. To open the Trekker
P.O.I Verbosity Settings Dialog: Pedestrian Mode, from the Trekker Application menu,
select Settings, Verbosity, then P.O.I Pedestrian. In Please select your pedestrian Point of
Interest verbosity preferences, select Advanced Mode.
First Item: Choose from one of five settings: Blank, P.O.I Name, P.O.I Direction, P.O.I
Category, or P.O.I User Note. Default is P.O.I Name.
Second Item: Choose from one of five settings: Blank, P.O.I Name, P.O.I Direction, P.O.I
Category, or P.O.I User Note. Default is P.O.I User Note.
Third Item: Choose from one of five settings: Blank, P.O.I Name, P.O.I Direction, P.O.I
Category, or P.O.I User Note. Default is P.O.I Direction.
Fourth Item: Choose from one of five settings: Blank, P.O.I Name, P.O.I Direction, P.O.I
Category, or P.O.I User Note. Default is Blank.
Reset to Default: Select to restore factory settings.
1.1.3.4 P.O.I Motorized Verbosity Settings
Use the Trekker P.O.I. Motorized Verbosity Settings Dialog to select the Motorized P.O.I.
verbosity level. To open the Trekker P.O.I Motorized Verbosity Settings Dialog, from the
Trekker Application menu, select Settings, Verbosity, then P.O.I Motorized.
Please select your motorized Point of Interest verbosity preference: Choose from one of
eight settings: Tone Mode, Name, Off, Advanced Mode, Reset to original. Selecting
Advanced Mode brings you to the Trekker P.O.I Advanced Settings Dialog for Motorized
Mode. Default is Name.
OK: Select this button or press Enter to accept your settings.
Cancel: Select this button or press Escape to discard your settings.
1.1.3.5 P.O.I Advanced Settings for Motorized Mode
Use the Trekker P.O.I Advanced Settings Dialog: Motorized Mode to select advanced
verbosity settings in P.O.I Motorized mode.
To open the Trekker P.O.I Verbosity Settings Dialog: Motorized Mode, from the Trekker
Application menu, select Settings, Verbosity, then P.O.I Motorized. In Please select your
motorized Point of Interest verbosity preference, select Advanced Mode.
39
First Item: Choose from one of four settings: Blank, P.O.I Name, P.O.I Category, or P.O.I
User Note. Default is P.O.I Name.
Second Item: Choose from one of four settings: Blank, P.O.I Name, P.O.I Category, or
P.O.I User Note. Default is Blank.
Third Item: Choose from one of four settings: Blank, P.O.I Name, P.O.I Category, or P.O.I
User Note. Default is Blank.
Reset to Default: Select to restore factory settings.
1.1.3.6 Browsing Offline Settings
Use the Trekker Browsing Offline Settings Dialog to select the verbosity level in Browsing
Offline mode when using Trekker.
To open the Trekker Browsing Offline Settings Dialog, from the Trekker Application menu,
select Settings, Verbosity, then Browsing Offline.
Please select guidance mode: Hand-side mode is the only available option. N/A for this
version.
Detailed intersection information: When this option is checked, Trekker will provide
detailed intersection information. Use the Validate buttons to toggle On or Off. Default is
Off.
Distance traveled so far: When this option is checked, Trekker will provide the distance
traveled so far. Use the Validate buttons to toggle On or Off. Default is Off.
1.1.4 Route Browsing Verbosity
Select the verbosity level when browsing a route.
Pedestrian: Select Detailed to browse from one intersection to another or Summary to get
the turn by turn description. The default setting for Pedestrian mode is Detailed.
Motorized: Select Detailed or Summary. The default setting for Motorized mode is
Summary.
1.1.5 General Settings
Use the Trekker General Settings menu to configure settings for Distance Unit, P.O.I
Creation, and to Reset Default Settings. To access the Trekker General Settings menu,
from the Trekker Application menu, select Settings, then General.
1.1.5.1 Distance Units Settings
Use the Trekker Distance Units Dialog to select the units of measure for describing
distance when using Trekker. To open the Trekker Distance Units Dialog, from the Trekker
Application menu, select Settings, General, then Distance Unit.
Please select your distance unit preferences: Choose between miles and feet, and
kilometers and meters. Default is miles and feet
1.1.5.2 P.O.I Creation Settings
To open the Trekker P.O.I Creation Settings Dialog, from the Trekker Application menu,
select Settings, General, then P.O.I Creation.
Vocal Note: Choose between Create P.O.I with vocal note, and Create P.O.I without vocal
note. Default is Create P.O.I with vocal note.
OK: Select this button or press Enter to accept your settings.
Cancel: Select this button or press Escape to discard your settings.
1.1.5.3 Trekker Reset Default Settings
Use the Trekker Reset Default Settings menu item to reset all Trekker general settings to
factory default values. To access Trekker Reset Default Settings menu item, from the
Trekker Application menu, select Settings, General, then Reset Default Settings.
40
1.1.5.4 Position Format
Use this option to set in which format positions will be described. From the Settings /
General submenu, select Position format. From there, select the coordinate units of your
choice. You have the choice of identifying positions in degrees/minutes/seconds or in
decimal degrees.
1.1.5.5 Trekker Volume Control
Use the Trekker Volume Control Dialog to adjust the volume level.
To open the Trekker Volume Control Dialog, from the Trekker Application menu, select
Settings, then Trekker Volume.
Use Trekker Volume: When this option is checked, you will be able to control Trekker’s
volume from this dialog, overriding the main PDA volume control. Use the Validate
buttons to toggle On or Off. Default is On.
Trekker Volume: Select the Trekker volume on a scale of 1 to 10. Default is 6.
Trekker Factory Default: Select to restore factory settings.
1.1.5.6 Trekker Speech Rate
Use the Trekker Speech Rate Dialog to adjust Trekker’s speech.
To open the Trekker Speech Rate Dialog, from the Trekker Application menu, select
Settings, then Trekker Speech Rate.
Use Trekker Speech Rate: When this option is checked, you will be able to control
Trekker’s speech rate from this dialog, overriding the main PDA speech rate. Use the
Validate buttons to toggle On or Off. Default is On.
Trekker Speech Rate: Select the Trekker speech rate on a scale of 1 to 10. Default is 4.
Trekker Factory Default: Select to restore factory settings.
1.1.5.7 Map Activation
Use the Map Activation dialog to activate maps that have been previously installed on your
storage card. From the Settings menu choose the Map Activation option. You can select up
to a maximum of 4 maps from the list.
1.1.5.8 Dictionary
Use the Dictionary dialog to select the desired dictionary language, which will be used to
substitute certain terms of the selected language. For example: The term “ST” will be
substituted by “Saint” if the French dictionary is selected and it would be “Street” if
English were selected. To open the Dictionary Dialog, from the Settings menu choose
the Dictionary option (or D).
Available dictionary languages list: Select a desired dictionary language from the list.
Default is the language used by Trekker.
41
Appendix 5 Map Manager (copied directly from the
Trekker 3 manual)
1.2
Trekker Map manager
Trekker Map Manager (TMM) is a PC application that allows you to manage the contents of
your storage cards. You can transfer maps and P.O.I files from the PC to the storage card
of your Trekker PDA or remove Maps and P.O.Is files from the PDA. You can manage
either the Personal P.O.I database which contains all the P.O.I 's created by the user or
the External database containing all P.O.I 's from external source. The application also
allows you to convert Personal P.O.I 's created using Trekker 2.7.3 or previous versions to
the new format. Please note that Navteq P.O.I 's are managed simultaneously with all the
Maps information.
1.1.6 System Requirements
Trekker Map Manager runs under the Windows 2000 and XP platforms and the minimum
requirement are:
Processor:
RAM:
Available hard disk space:
166 MHz
64 MB
300 MB
Trekker Map Manager is compatible with most screen reading applications.
1.1.7 Trekker Map Manager Components
Trekker Map Manager consists of 3 pages (tabs): Maps, Personal P.O.I 's, and External
P.O.I 's. Each of them lets you transfer the related databases from the PC to the PDA’s
storage card and/or delete the related information from the Storage card.
To remove, install or backup maps or P.O.I 's files you will need to have a storage card
inserted in the PDA’s card slot. An ActiveSync session should be running before starting
the Trekker Map Manager. If no storage card is inserted in the PDA card slots, Trekker
Map Manager will not show the transfer options and will run in Restricted Mode).
Note that Trekker maps are compressed files (.map). These files will be automatically
recognized and unpacked by the application. User should not attempt to unpack them
manually.
1.1.8 Managing maps
The Map Manager tab allows you to install and delete maps on your PDA.
NOTE: A map cannot be renamed; a renamed Map cannot be displayed in the Maps on PC
Section.
To transfer maps from the PC to PDA’s storage card, follow these steps:
1- Select the Location of the map files on your PC. Use the Alt+O keys (Path to maps
folder on PC) to specify the path to the desired PC maps location (folder) or use the
Browse PC button to change to another location. The last selected folder will become the
default maps folder. Note that Map Manager will only search for the available maps in the
selected folder and not in its subfolders.
2- In the Maps on PC list, select the maps you wish to install by pressing space bar. To
access the Map Information window, select the desired map and press Alt+Enter. Press
Tab to reach the following Information for the selected map: States included on the Map,
Map generated date, Application Version and Platform, Map Size, Number of P.O.I 's
available and Map Version. Select the OK button to close the Map Info Window.
42
NOTE: The Map Info Window is only available for maps stored on the PC (upper window),
but not for those installed on the PDA’s storage card (displayed in the lower window).
3- Select the storage card where the maps will be installed.
4- Check the memory space available before installation by pressing Tab.
5- Press Tab again to check the space that will remain on the storage card after the
installations indicated in the “maps on PC” and “Maps on PDA” windows.
The value of these two fields will be updated as soon as you select or unselect a map.
6- Press the Install/Remove Selected Map button. A dialog box will open and display the
estimated time needed for the operation. During installation, use screen reader commands
to read the progression state of the operation.
To delete maps found on your PDA’s storage card, follow these simple steps:
1- From the Maps on Storage card section, select the maps you wish to delete from the
storage card.
2- Press the Install/Remove Selected Map button.
Maps found in the PC and Storage card are identified by the following information: map
name, map status (selected to be installed, for removal or not selected), map version and
the map file size.
NOTE: To avoid corrupt files, make sure that the PDA is properly docked in the cradle and
connected to the power outlet when Installing & Removing Maps.
When introducing a new storage card or saving a new map into an existing one, you must
restart the Trekker application in order to properly consider the new information.
1.1.9 Managing Personal P.O.Is
The P.O.Is you have created represent valuable information. This section allows you to
create a backup copy of your P.O.Is on your computer and convert old P.O.Is. To access
the Personal P.O.Is page, press CTRL+TAB. The interface is divided into two main
sections: the Personal P.O.Is available on PC (Alt+P) and Personal P.O.Is from storage
card (Alt+S) sections. It is also in this section that you will find the Old Personal P.O.I
conversion button that will bring up the Conversion dialog. More information on this
subject can be found in the Older Personal P.O.Is conversion section.
1.1.9.1 Backup a Personal P.O.Is
To backup a Personal P.O.Is file from the storage card to the PC, first verify the path to
the folder in which the Personal P.O.Is file will be saved (Alt+O). If you want to change to
another folder, use the Browse button (Alt+W). The last selected folder will be the default
Personal P.O.Is files folder. To start backup select the Backup button (Alt+B).
1.1.9.2 Restoring a Personal P.O.Is file
You can only restore a Personal P.O.Is file, if it has been saved beforehand on the PC’s
selected folder. Once saved, this Personal P.O.Is file and its size will then be available and
be displayed in the Personal P.O.Is from Storage card section. To restore a Personal P.O.Is
file to the PDA, select the memory card in the PDA that will hold the Personal P.O.Is and
check the available space remaining after the installation. Press the Restore button
(Alt+E). Note that the restoring process will replace the existing Personal P.O.Is and its
associated audio files found in your storage card by the Personal P.O.Is files of the PC.
At any time you can press the Refresh Connection button (or F5) to update the data
currently displayed.
43
1.1.9.3 Older Personal P.O.Is Conversion
Trekker allows you to convert Personal P.O.Is created with Trekker versions 2.7.3 and
older. You can use the Conversion tool to convert or merge all your old Personal P.O.Is
files from several storage cards into a single file. The new file will have a csv format
(Comma separated Values).
The Conversion Dialog allows you to prepare a list of your old P.O.Is files (from different
storage cards) that you intend to convert. Insert one storage card at a time. To add P.O.I
files to the list, press the Add button, a message “Please insert an old map” will display.
Insert a memory card which contains the desired map and select the OK button. Personal
P.O.I files will be displayed in the list. Then, use the Conversion button. Trekker Map
Manager will create a single P.O.I file named “Personal.csv”. This file contains all P.O.Is. A
folder containing all the associated audio files will also be created.
To remove a P.O.I file that you don’t want to convert, select the desired file and press the
Remove button. This does not remove old P.O.Is from the storage card. Note that there
will be no message to confirm this operation.
NOTE: The audio file names are generated randomly, however when inserting several
storage cards, there is a slight risk that two or more audio files will have the same name.
If this occurs, only one of these files will be kept and will be associated with the
corresponding P.O.Is. Consequently, only one P.O.I will have the right Wav file.
1.1.10 Managing External P.O.Is
The External P.O.Is Manager allows you to transfer and delete external P.O.Is.
The interface is similar to the one found in the Map Manager. The two basic tasks of
transferring files to your PDA or deleting those already there can be done by way of the
two windows listing files to be transferred from the computer to the PDA and another one
listing files found on your PDA. Simply select the file you wish to install or delete from the
appropriate window and press the Install/Remove Selected External P.O.Is button. For
additional information, please follow same instructions found in the Managing Maps
section.
Please refer to the External Database Format Specifications Appendix for more information
about this exciting possibilities to import complementary data.
44