1
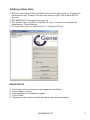
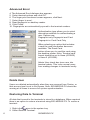
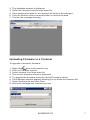
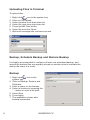
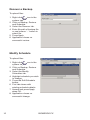
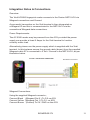
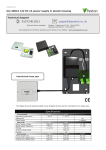
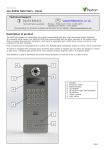
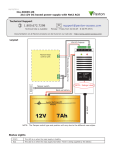
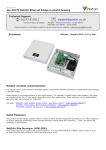
BIO-MERGE-PX Installation Requirements
Minimum PC Specification
Supported Operating Systems:
Windows 7, Windows Server 2008, Windows Server 2008 R2, Windows XP
SP3
Processor:
Pentium IV compatible processor with a minimum speed of 1 GHz
RAM:
Minimum 2GB
Graphics:
512 MB PCI2 x16
Network Requirements
The following network ports should be allowed
TCP/IP 9870 Virdi reader server
Prerequisites
Paxton Net2 version 4.27 or later
USB desktop reader drivers (on installation disk) BIO-MERGE-PX can
only be installed on Paxton Server, although in certain circumstances this
software will run successfully on a Paxton Client using PACS settings.
The Card Format should be set to Hexa 2 on all AC2500 terminals and to
Hexa on AC5000 terminals.
Software Installation
BIO-MERGE-PX should be installed on the Paxton server PC. Before
installing please check the minimum specifications and the prerequisites.
1. L
oad the BIO-MERGE-PX CD-ROM and install the desktop reader
drivers by clicking the “1. Install Desktop Reader Drivers” button on the
auto run menu.
2. Click “2. Install BIO-MERGE-PX for Paxton” button on the auto run
menu.
Depending on the software already installed the installer will firstly install all
the pre-requisites. All pre-requisites are on the installation CD-ROM. The
pre- requisites for BIO-MERGE-PX are:
Windows Installer 4.5
Net Framework 3.5 SP1
SQL 2008 R2 Express
2
BIOMERGE-PX
3. R
un through the installer which may prompt for several reboots
depending on the pre-requisites it installs.
4. On completion restart the PC.
NB
If the Windows 7 operating system is being used we recommend that User
account and Areo themes are disabled and a basic theme used. Also,
the software should only be used with an account having administrator
privileges.
First Time Using BIO-MERGE-PX
Once the PC is rebooted BIO-MERGE-PX starts automatically. BIOMERGE-PX can be found in Start --> All Programs --> Start up folder. On
first run the software requires to be licenced. The licence window will popup
advising a licence is required.
1.
2.
3.
4.
Contact your vendor and supply the site id, and company name.
Vendor will generate licence key.
Enter licence key and press Save Licence.
If licence key is valid the window disappears.
NB
Please ensure all respective Paxton ACU’s are connected to the Paxton
Server otherwise there may be naming issues as BIO-MERGE references
the readers by their ACU ID
BIOMERGE-PX
3
PACS Settings
On installation BIO-MERGE-PX is configured to connect to Paxton software
on the target machine using the “System engineer” account and the default
password of “net2”. The credentials can be changed providing the Paxton
user has system engineer rights. To change the credentials.
1.
2.
3.
4.
Right click
icon in the system tray.
Select PACS Settings.
The PACS Settings window appears.
Enter new details and click OK.
New Terminal Registration
Whenever a new terminal registers with BIO-MERGE-PX a Terminal
Registration window appears. Select or type a name for the terminal and
select Terminal Type.
Select send all users to terminal to send existing fingerprints to terminal.
4
BIOMERGE-PX
Adding a New User
1. Add the user using Paxton Software and select token type as “Fingerprint
verification card”. Ensure the user has access rights, No access will be
ignored.
2. BIO-MERGE-PX dialogue box pops up.
3. The Admin User check box enables the user to enter in to terminal administration. Check the box.
3. To enrol user click on “Quick Enrol” or “Advanced Enrol”.
Quick Enrol
4.
5.
6.
7.
8.
The finger print enrolment screen appears, click Next.
Select finger to enrol.
Read fingerprint on desktop reader.
Click Finish.
Fingerprints are automatically synced to the terminal readers.
BIOMERGE-PX
5
Advanced Enrol
4. The Advanced Enrol dialogue box appears.
5. Select desired options and click OK.
6. The finger print enrolment screen appears, click Next.
7. Select finger to enrol.
8. Read fingerprint on desktop reader.
9. Click Finish.
10. Fingerprints are automatically synced to the terminal readers.
Authentication type allows you to select
alternative methods for authenticating a
user. Options are:
Fingerprint only Fingerprint and Card
Fingerprint or Card Card Only
When selecting an option that includes
a card the card information becomes
available. The Read Card
button allows you to read the card using
the desktop reader. Note: Terminal card
format should be set to Hexa (AC5000)
or Hexa 2 (AC2500).
Admin User check box turns user into
terminal admin. This locks normal users
from making changes to terminals locally.
Delete User
Users are deleted automatically when they are removed from Paxton, or
their access level is set to No Access. Note: BIO-MERGE-PX should be
running at all times to ensure full system synchronisation.
Restoring Data to Terminal
All data that is send to the terminals is stored in a database. When required
there is an option to restore a terminal using BIO-MERGE-PX. To restore a
terminal:
1. Right click
icon in the system tray.
2. Select Restore Terminal.
6
BIOMERGE-PX
3.
4.
5.
6.
7.
The database window is displayed.
Select the terminal from the drop down list.
Once selected the data for the terminal will show in the data grid.
Click the Restore Data to terminal button to restore the data.
Confirm the message warning.
Uploading Firmware to a Terminal
To upgrade a terminal’s firmware:
1.
2.
3.
4.
5.
6.
7.
8.
Right click
icon in the system tray.
Click on Firmware Upload.
Select terminal from drop down list.
The current firmware version is displayed.
To upgrade the firmware press the Upload Firmware button.
A file dialogue window appears allowing you to locate the firmware file.
Select firmware file and click Open.
Wait until message box confirms success.
BIOMERGE-PX
7
Uploading Files to Terminal
To upload files:
1.
2.
3.
4.
5.
6.
7.
Right click
icon in the system tray.
Click on File Upload.
Select terminal from drop down list.
Select file type from drop down list.
Press Upload Files button.
Select file and click Open.
Wait until message box confirms success.
Backup, Schedule Backup and Restore Backup
It is highly recommended to configure at least one scheduled backup, and
ensure the backup files are regularly stored on another drive to maintain the
data in the event of a crash.
Backup
1. R
ight click
icon in the
system tray.
2. Click on Backup, Restore and
Schedule.
3. Enter a name for the backup.
4. Select a location by pressing the
‘...’ button or enter a file path.
5. Select Now.
6. Press Apply.
7. The application closes after
backup succeeded.
8
BIOMERGE-PX
Scheduled Backup
To upload files:
1. R
ight click
icon in the
system tray.
2. Click on Backup, Restore
and Schedule.
3. Select a location by
pressing the ‘...’ button or
enter a file path.
4. Select Schedule.
5. Enter first date and time.
6. Select Frequency Daily,
Weekly or Monthly.
7. Press OK.
8. Application closes when
schedule is applied
successfully.
Recover a Backup
To upload files:
1. R
ight click
icon in the
system tray.
2. Click on Backup, Restore
and Schedule.
3. Select the Recover tab.
4. Enter file path of backup file
or use browse ‘...’ button to
select file.
5. Press Apply.
6. Application closes on
successful restore.
BIOMERGE-PX
9
Recover a Backup
To upload files:
1. R
ight click
icon in the
system tray.
2. Click on Backup, Restore
and Schedule.
3. Select the Recover tab.
4. Enter file path of backup file
or use browse ‘...’ button to
select file.
5. Press Apply.
6. Application closes on
successful restore.
Modify Schedule
To upload files:
1. R
ight click
icon in the
system tray.
2. Click on Backup, Restore
and Schedule.
3. Select the Modify
Schedules tab.
4. Highlight schedule you wish
to change.
5. Press the Edit Schedule
button.
6. First tab shows with
existing schedule details.
7. Amend and press Apply
when OK.
8. Application closes on
successful change.
10
BIOMERGE-PX
Integration Notes & Connections
Overview:
The Virdi AC5000 fingerprint reader connects to the Paxton NET2 ACU via
Wiegand connections and Ground.
A successful transaction on the Virdi terminal is then interpreted as
a Wiegand ID and this is communicated to the NET2 ACU via the
conventional Wiegand data connections.
Power Requirements:
The AC 5000 reader may be powered from the ACU provided the power
supply can provide at least 2 Amps for the Virdi terminal to function
correctly under load.
Alternatively please use the power supply which is supplied with the Virdi
terminal. In this instance ensure the ground cable (brown) from the supplied
Wiegand cable 5P is connected to 0 Volt / Ground in the NET2 ACU; as per
illustration below.
Wiegand Connections:
Using the supplied Wiegand connector;
Connect Black (Wiegand Out 0 ) To D 0 on ACU
Connect Yellow (Wiegand Out 1) To D 1 on ACU
Connect Brown (Ground) To 0V / GND on the ACU
BIOMERGE-PX
11
TERMINAL SET UP – QUICK START GUIDE
There are two basic requirements to follow to get your system up and running.
1. Set up the terminal IP, Server IP and Terminal ID.
2. Set up Wiegand output format in the terminal.
The Virdi terminals communicate via TCP/IP to the allocated server where the
Biomerge software is installed. Please follow the steps below for configuration.
TCP/IP SET UP:
1. TERMINAL IP SET UP
•
Press and hold ENT to enter menu
•
Select option 2 (Network)
•
Select option 1 (IP Address)
•
Use F4 to delete characters and type in new IP address using keypad
•
Hold Down Enter for next step or to Exit
2. SERVER IP SET UP
•
Press and hold ENT to enter menu
•
Select option 2 (Network)
•
Select option 2 (Server IP)
•
Use F4 to delete characters and type in new IP address using keypad
•
Hold Down Enter for next step or to Exit
3. TERMINAL ID SET UP
•
Press and hold ENT to enter menu
•
Select option 2 (Network)
•
Select option 3 (Terminal ID)
•
Use F4 to delete characters and type in ID using keypad
•
Press enter and select option 4 (Terminal Only)
•
Hold Down Enter or to Exit
•
Press F4 twice until you see option to SAVE
•
Press 1 for YES (To Save) Followed by Enter
WIEGAND SET UP:
Please ensure Wiegand is enabled in the Virdi terminal by following these steps:
1.
Press and hold ENT to enter reader menu
2.
Select option 5 (Terminal)
3.
Select option 4 (Wiegand)
4.
Press ENT to select Wiegand out format.
5.
Press 3 to select 26 Bit.
6.
Select site code if applicable, or leave as 0
7.
Press and Hold ENT to exit
8.
Press F4 twice until you see option to SAVE
9.
Press 1 for YES (To Save) Followed by Enter
GENIE CCTV LTD.
CCTV House, City Park, Watchmead, Welwyn Garden City, Hertfordshire, AL7 ILT
Tel: +44 (0) 1707 330541 Fax: +44 (0) 1707 330543
www.geniecctv.com
Edition. GN-July 2013