1
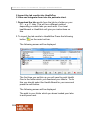
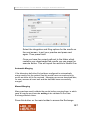
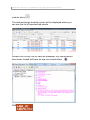
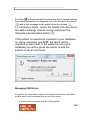
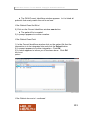
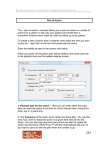
Health One Version 7.1 User Manual. Copyright 2011Helix Health Ltd Laboratory Data Messaging Laboratory results are recorded in the patient's file by: Manually entering the data Automatically receiving the data via the Data Exchange Module Manually Entering Laboratory Results 1) Create a new medical transaction. Leave the transaction Type as contact but change the Name to Lab. 2) Click on OK to create the transaction. 3) Insert the sequence haemoglobin or biochemistry as required and record the results. Automatically via the Data Exchange Module This is done in 3 phases 1. Download the lab results to a folder 185 Health One Version 7.1 User Manual. Copyright 2011Helix Health Ltd 2. Import the lab results into HealthOne 3. View and integrate them into the patients chart. 1. Download the lab results from the lab to a folder on your PC – e.g. C: labs. This will be a different method depending on which labs you work with. Your local healthboard or Healthlink will give you instructions on this. 2. To import the lab results to HealthOne Press the following button on the main tool bar. The following screen will be displayed The first time you set this up you will need to point Health One to the folder which you download your labs to. To do this you should select the Health Board for your area and press the edit button. The following screen will be displayed. The path to your folder which you down loaded your labs to and press next. 186 Health One Version 7.1 User Manual. Copyright 2011Helix Health Ltd Select the integration and filing options for the results on the next screen, to suit your practice and press next again. Then press finish. Once you have the correct path set to the folder which contains your downloaded lab results you can press the execute button. This will import the results to Health One. Automatic Merging If the laboratory definition file had been configured to automatically merge results into the patient files this would have occurred and only errors would be left to be resolved. Managing errors are described later, for now, assume all went well and the data has been successfully merged. Manual Merging Many practices would validate the results before merging them, in which case all results would now be waiting to be validated in the Data Exchange Module Inbox. Press this button on the main toolbar to access the Exchange 187 Health One Version 7.1 User Manual. Copyright 2011Helix Health Ltd module inbox The data exchange module screen will be displayed where you can see the list of imported lab results. Double click on any line to view the message. Any results which have been viewed will have an eye icon beside them 188 Health One Version 7.1 User Manual. Copyright 2011Helix Health Ltd Pressing will indicate that the result has been viewed and has been given permission to integrate. You can also print the result, send a text message to the patient from this screen. To integrate a result - select the results from the list on the data exchange module screen and press the integrate selected items button If the patient is matched to a patient in your database on name, surname, sex DOB, the result will be imported to their chart. If the patient is not in your database you will be given the option to add the patient or set as not found. Managing DXM Errors If a patient file cannot be located for an imported transaction the DXM module can be set to manage this in one of two ways: Automatically create a new file for the patient 189 Health One Version 7.1 User Manual. Copyright 2011Helix Health Ltd Set the transaction status to 'Not Found' and await user intervention to resolve the problem The choice of action is controlled via the lab Definition file. See Creating a Definition File later in this section. Note: If the definition file had been set to always validate transactions then all transactions, including the not found, are set to an initial status of waiting. Only when an attempt is made to integrate the transaction will a dialogue box appear requesting your choice of action: Automatically Create a New Patient File Initially this may seem the most sensible thing to do, however, labs do make mistakes, and the problem could be that the patient's name has simply been spelt incorrectly. Mark the Transaction as 'Not Found' With this setting the transaction will appear in the DXM INBOX as 'Not Found'. Now there are two possibilities: The patient genuinely does not exist The patient does exist but their name has been spelt in-correctly In all cases 1) Select the transaction and then click on the Correct DXM menu button 190 Health One Version 7.1 User Manual. Copyright 2011Helix Health Ltd The DXM Correct Identifiers window appears. In it is listed all patient's that nearly match the not found one: If the Patient Does Not Exist 2) Click on the Correct Identifiers window new button. The patient file is created. 3) A prompt appears to confirm creation. If the Patient Does Exist 1) In the Correct Identifiers window click on the patient file that the transaction is to be integrated into and click the Select button. 2) A prompt appears to confirm integration. Click OK 3) A notice appears to inform you it has been done. Click OK Not found patient. If the Patient does exist ..continued. 191 Health One Version 7.1 User Manual. Copyright 2011Helix Health Ltd 4) Two things now occur: The transaction is integrated into the selected patient's file. The name error is remembered for this lab and will be automatically corrected next time if set to do so in the definition file advanced options. (See HCR Identifiers below) 6) Click the Correct Identifiers window Cancel button. Window closes and DXM window back in view. 7) If you are ready to quit the DXM module click on the cross in the upper right hand corner of the DXM window. Tidying the INBOX All transactions imported into HEALTHone™ arrive in the DXM INBOX. From time to time it will be necessary to locate specific transactions and perform housekeeping on the INBOX. Locate Specific Transactions 1) Open the DXM module DXM window opens. 2) Use any of the techniques above to locate the transaction(s) required. Selecting Transactions 1) Once the transaction(s) required have been located they can be selected individually by clicking once on the transaction selector column to the left of the transaction. 2) Hold down Ctrl and Click the selector column to select multiple transactions. 192