1
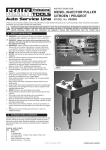
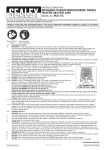
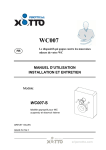
INSTRUCTIONS FOR: DIESEL INJECTOR NOZZLE TESTER MODEL NO: VS2058.V2 Thank you for purchasing a Sealey product. Manufactured to a high standard, this product will, if used according to these instructions, and properly maintained, give you years of trouble free performance. IMPORTANT: PLEASE READ THESE INSTRUCTIONS CAREFULLY. NOTE THE SAFE OPERATIONAL REQUIREMENTS, WARNINGS & CAUTIONS. USE THE PRODUCT CORRECTLY AND WITH CARE FOR THE PURPOSE FOR WHICH IT IS INTENDED. FAILURE TO DO SO MAY CAUSE DAMAGE AND/OR PERSONAL INJURY AND WILL INVALIDATE THE WARRANTY. KEEP THESE INSTRUCTIONS SAFE FOR FUTURE USE. 1. SAFETY WARNING! Always use caution when working around fuel systems. The fuel in the fuel rail may be pressurised even if the engine is not running. WARNING! Ensure Health and Safety, local authority and general workshop practice regulations are adhered to when using tools. IMPORTANT: These instructions are provided as a guide only. Always refer to the vehicle manufacturer’s service instructions, or a proprietary manual, to establish the current procedure and data, also any warnings or cautions. Wear suitable clothing to avoid snagging. DO NOT wear jewellery and tie back long hair. Wear approved eye protection. A full range of personal safety equipment is available from your Sealey dealer. Operate in a well ventilated area. DO NOT inhale fluid vapours. Keep yourself, tools, and test equipment away from all moving / hot engine parts. Ensure the vehicle is in Neutral (manual transmission) or Park (automatic transmission), and that the parking brake is firmly applied. Block the drive wheels. Always keep a fire extinguisher close by, that is suitable for fuel/electrical/chemical fires. Always turn vehicle's ignition to ‘OFF’ when connecting or disconnecting electrical components, unless otherwise instructed, and take extreme caution when touching electrical components. Use a rag to cover fuel line fittings, when connecting or disconnecting fuel lines. Avoid contact with fuel. Clean up all fuel spills immediately. Dispose of all soiled rags properly. Keep away from engine cooling fan. On some vehicles, the fan may start up unexpectedly. You must follow the vehicle's service manual cautions when working around the air bag system. If the cautions are not followed the air bag may deploy unexpectedly, resulting in personal injury. Note that the air bag can still deploy several minutes after the ignition is turned ‘OFF’ (or even if the battery is disconnected) because of a special energy reserve module. Always relieve fuel pressure before disconnecting fuel lines from injectors. Never lay tools on the vehicle's battery. This may short the terminals together, causing harm to yourself, the tools, or the battery. Never smoke or have open flames near vehicle. Vapours from fuel and charging batteries are highly flammable and explosive. DO NOT use tester if damaged. Maintain tester in good and clean condition for best and safest performance. After testing, ensure all connections on vehicle are restored. DO NOT place yourself or another person in line with the injector that is being pressurised, as there will be high pressures involved and the spray from the injector will be at high velocity and can potentially cause serious injury. 2. INTRODUCTION Enables the testing of injectors under pressure. Fitted with Ø90mm gauge with rubber bumper reading both psi and bar. Ideal for checking of atomisation pattern and opening pressure. Transparent reservoir fitted with fine filter and unit supplied with two injector connection pipes. 3. SPECIFICATION Model No: . . . . . . . . . . . . . . . . . . . . . . VS2058.V2 Gauge scale: . . . . . . . . . . . . . . . . . . . . . 0-600Bar/0-8700psi Connecting Pipework: . . . . . . . . . . . . . . M12/M14 © Jack Sealey Limited Original Language Version VS2058.V2 Issue: 1 - 03/09/14 4. TESTING PROCEDURE WARNING! Before using equipment ensure you have read, understood and apply Section 1 Safety Instructions. IMPORTANT: The information in this manual is not a substitute for the procedures outlined in the vehicle service manual. ALWAYS follow the manufacturer's instructions and safety precautions when working on fuel systems. This tester is designed to be bench mounted. Before using it, select an appropriate location on a bench or similar and affix the tester to it, using appropriately sized fixings. Ensure that the tester is securely fastened before proceeding with testing. 4.1. Pre-Test checks. 4.1.1. 4.1.2. 4.1.3. 4.1.4. Carry out a thorough visual and hands-on inspection of the engine and fuel system. Look for loose or cracked electrical wiring, battery cables, ignition wires, and fuel or vacuum lines. Perform diagnostic procedures as described in the vehicle's service manual to eliminate other possible causes of problems. Depressurise the vehicle's fuel system by following the procedure outlined in the vehicle's service manual. On most vehicles, this involves disconnecting or deactivating the electric fuel pump(s) and operating the engine until it stalls. Note: Some vehicles may have more than one fuel pump - deactivate all fuel pumps. Failure to do so can result in personal injury, vehicle damage, spilt fuel, fire or other hazardous conditions. Remove the fuel injectors to be tested, following the procedure in the vehicle's service manual. 4.2. Testing Injectors. 4.2.1. 4.2.2. 4.2.3. 4.2.4. 4.2.5. 4.2.6. 4.2.7. 4.2.8. 4.2.9. Fill the tester's reservoir with an approprate calibration fluid which complies with ISO 4113 (such as Shell S.9365), and replace lid. Connect tester to fuel injector, using one of the supplied connection pipes. Make sure all connections are securely fastened. As fuel will be sprayed from the injector, have some form of recepticle to place over/near the injector to capture the spray - also ensure that you do not place yourself or anyone else in line with the injector's nozzle. Commence pumping the lever on the tester, this will begin to build up the pressure to the injector. Once some pressure has built up, wait a short time to see if the pressure starts to drop. If it does there may be a leak between the pipe and injector and/or tester, tighten these up if necessary. If these are OK, the injector nozzle may be leaking. Check to see if this is OK. Continue to pump the lever and use the gauge to observe the pressure at which the injector nozzle opens and compare this to the manufacturer's specification. When the nozzle opens, observe for correct spray pattern/atomisation and compare this to the manufacturer's expected spray pattern. If necessary, disconnect and carry out any remedial work to the injector before re-connecting it and repeating the test. NOTE: When disconnecting the injector, care needs to be taken to de-pressurise if there is pressure still present in the tester. When finished testing, reconnect all injectors and parts to the vehicle. Keep tester clean by wiping over with a dampened cloth. Change fluid filter within the reservoir if it is suspected to have become clogged. 4.3. Testing Other Equipment. 4.3.1. This tester can also be used for pressure testing other equipment such as pipes, tanks, pump castings etc. where high pressure is required. Always follow the equipment manufacturer's safety instructions as well as the safety instructions contained within this manual before testing. Parts support is available for this product. To obtain a parts listing and/or diagram, please log on to www.sealey.co.uk, email [email protected] or phone 01284 757500. Environmental Protection Recycle unwanted materials instead of disposing of them as waste. All tools, accessories and packaging should be sorted, taken to a recycling centre and disposed of in a manner which is compatible with the environment. When the product becomes completely unserviceable and requires disposal, drain off any fluids (if applicable) into approved containers and dispose of the product and the fluids according to local regulations. NOTE: It is our policy to continually improve products and as such we reserve the right to alter data, specifications and component parts without prior notice. IMPORTANT: No liability is accepted for incorrect use of this product. WARRANTY: Guarantee is 12 months from purchase date, proof of which will be required for any claim. INFORMATION: For a copy of our latest catalogue and promotions call us on 01284 757525 and leave your full name and address, including postcode. Sole UK Distributor, Sealey Group, Kempson Way, Suffolk Business Park, Bury St. Edmunds, Suffolk, IP32 7AR © Jack Sealey Limited Original Language Version 01284 757500 www.sealey.co.uk 01284 703534 [email protected] VS2058.V2 Issue: 1 - 03/09/14