1
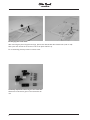
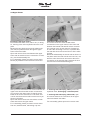
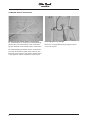
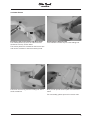
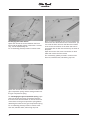
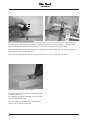
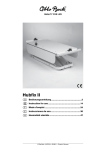
Hubfix II
Service Manual
Table of Contents
1 Preface ......................................................................................................................................................2
2 Safety ........................................................................................................................................................2
3 Maintenance Schedule and Required Tools ........................................................................................3 - 4
4 Settings / Retrofit / Exchange ..................................................................................................................5
Hubfix II (Model 5132) ........................................................................................................................5
4.1
4.2
4.3
4.4
4.5
Cover ........................................................................................................................5
Upper Frame .............................................................................................................7
Double Scissor Construction .....................................................................................8
Lower Frame .............................................................................................................9
Gas Spring with Release Mechanism .....................................................................11
1
1 Preface
Regular maintenance is important – it increases safety and service life of the product.
All rehab products should be checked and serviced once a year.
When using a product often, however, or when a product is being used by children or adolescents who are
still growing or by patients whose clinical picture changes, it is recommended to check, readjust and possibly
service the product at an interval of 6 months.
For all service and maintenance work use only original spare parts.
The service and maintenance work described in this manual should be performed by skilled specialist staff
only and not by the user of the product.
This service and maintenance manual refers to the respective spare parts catalogs and instructions for use
of the described products; therefore, please use all the documents together.
Please use the maintenance schedules (check list) for duplication. Keep the completed maintenance schedules and hand over a copy to the customer.
Instructions for Use
647G154
Hubfix II
Spare Parts Catalog
646K68
2 Safety
For all maintenance and repair work, there are a few points you should always observe:
Use suitable tools (refer to page 3 and the following pages).
Wear appropriate clothing as well as gloves and safety glasses, if necessary.
Secure the product to prevent it from tipping over or falling off the workbench, for example.
Study the service and maintenance instructions before beginning your work.
You should become familiar with the functions of the product first. If you do not know the product,
please first study the instructions for use before inspecting the product.
If no instructions for use are available to you, please order them from the manufacturer (refer to
the overview of all Otto Bock Branches „Otto Bock Worldwide“).
You can also download the document from our homepage under www.ottobock.de or
www.ottobock.com.
Clean / Disinfect the product before starting inspection. Please also refer to the instructions for
use regarding any care instructions or specific product inspection information.
Many of the screw fastenings use thread lock or nylock nuts. If you have to undo such screw
fastenings please replace the respective nut with a new thread and/or nylock nut. If new thread
lock or nylock nuts are not available, use a liquid thread lock substance with medium strength
(e.g. Loctite 241 or Euro Lock A24.20).
2
3 Maintenance Schedule and Required Tools
The following list shows you the tools and auxiliaries mentioned in the text.
Flex ratchet and
Socket wrench bits sizes 10 -17
Wrenches
Sizes 10 -17
Allen wrench hex keys
Size 2.5 – 6 mm
Screwdrivers
Blade width 2.5 mm
Water pump pliers DIN 8976
Handle width up to 32 mm
Plastic hammer
PVC tubing section
(e.g. HR11590005)
Disassembly aid:
Screw M8x60 ISO 4017
Washer 8,4 DIN 9021
Nut M8 DIN 934 (2x)
Liquid thread lock
„medium strength“
3
Maintenance Schedule
for Regular Service
Item
Range
SN.:
Customer:
Hubfix II
Inspection
1.)
Function / Setting
(refer to 647G154 instructions for use)
(check list)
2.)
Damages/ Deformations
3.)
Screw Connections
Hubfix II
4.1
4.2
Cover
Upper frame
- Movable panels
x
x
- Clamps
x
x
- Profile rollers
x
x
- Telescoping tube
4.3
Double scissor construction
- Folding mechanism
x
x
4.4
Lower frame
- Profile rollers
x
x
- Suction cup feet
x
x
4.5
Gas spring with release mechanism
- Folding mechanism
x
x
Do the settings of the bath lift comply
with the user‘s requirements?
The maintenance was carried out by:
4
on:
4 Settings / Retrofit / Exchange
4.1 Cover
B
A
B
C
The cover consists of a cover plate (A), two movable panels (B) and two wings (C).
The wings are connected to the cover plate by piano hinges.
Exchanging a wing:
Open and remove the four screw connections between the wing and the hing and detach the wing.
Exchanging a hinge: After you have disassembled the wing, open and remove the four screw connections
between the hinge and the cover plate and detach the hinge.
For re-assembly, please proceed in reverse order.
Attention: When mounting the plastic nuts,use a ring wrench or a socket wrench.
Follow the instructions for adjusting the movable
panels in the instructions for use.
Exchanging a movable panel
Open and remove the marked screws and completely remove the movable panel with the telescoping
tube on it.
Open and remove the screw connection between the
movable panel and the telescoping tube and detach
the movable panel.
For re-assembly, please proceed in reverse order.
5
Exchanging the Cover Plate
After removing the piano hinges and wings, please first disassemble the release knob (refer to 4.5).
Now open and remove the six screws in the cover plate and lift it up.
For re-assembly, please proceed in reverse order.
Assembly/Adjustment/Exchange of the Fasteners
Observe the information given in the instructions for
use.
6
4.2 Upper Frame
Exchanging the Upper Frame
First remove the entire cover (refer to 4.1). In doing
so, the wing must not be separated from the cover
plate.
Remove the two plastic nuts from the release unit
(see 4.5) and pull these back through the upper
frame toward the inside.
Open and remove the screws between the upper
frame and the double scissor construction. If necessary, use the disassembly aid.
For re-assembly, please proceed in reverse order.
Please pay attention to the instructions under 4.5
Inserting the Disassembly Aid
The screw connection of the double scissor
construction on the upper frame, lower frame and
between the internal and external scissor construction consists of two screws that are screwed into
an axle. After loosening a screw, it is possible that
the axle with the second screw will turn with it while
opening.
Screw the disassembly aid into the axle as shown in
the photo and fix the axle with the two lock nuts, one
after the other. Now loosen and remove the screw
connection on the opposite side. Unscrew the lock
nuts and remove the disassembling aid.
After you have removed the two screws between the
upper frame and the double scissor construction,
you can move the upper frame so that the screw
heads of the screw connections on the other side
can be unscrewed with an allen wrench hex key as
shown in the photo.
Open and remove the screw connections on both
sides and remove the upper frame.
For re-assembly, please proceed in reverse order.
Use new, stainless steel, self-locking cap nuts.
To exchange the telescoping tubes proceed as
explained under „Exchanging a movable panel.“
To exchange the telescoping tube holder, open
and remove both screw connections to the upper
frame and detach the holder.
For re-assembly, please proceed in reverse order.
7
4.3 Double Scissor Construction
Exchanging the Double Scissor Construction
For all information on mounting and disassembling,
please refer to the instructions of the component
groups attached to the double scissor construction.
For disassembling the double scissor construction,
you must dismantle the upper frame (refer to 4.2),
the lower frame (refer to 4.4) and the release head
of the hydraulic release mechanism (refer to 4.5)
8
Exchanging the Leg Springs
Be sure to re-assemble the leg springs as shown
here in the picture.
4.4 Lower Frame
Exchanging the Suction Plates with Bore Holes
The suction plates only serve as rubber feet and
should not have any suction effect.
The suction plates are screwed into the lower frame
and can be screwed on and unscrewed by hand.
Exchanging the Suction Plate
First remove the release clip from the holding bolt.
Then lever the lock ring from the holding bolt with a
small screwdriver.
Now you can pull the suction plate out of the lower
frame.
For re-assembly, please proceed in reverse order.
9
Exchanging the Lower Frame
Open and remove the screws between the lower
frame and the double scissor construction. If necessary, use the disassembly aid.
For re-assembly, please proceed in reverse order.
Open and remove the screw connection between the
gas compression spring and the storage location for
the gas compression spring.
For exchanging the gas compression spring, open
and remove both the screw connections between
the lower frame and the holder as well as the screw
connections for the gas compression spring before
detaching the holder for the gas compression spring.
For re-assembly, please proceed in reverse order.
Use new, stainless steel, self-locking cap nuts.
10
After you have removed the two screws between the
lower frame and the double scissor construction, you
can move the lower frame so that the screw heads
of the screw connections on the other side can be
unscrewed with an allen wrench hex key as shown in
the photo.
Open and remove the screw connections on both
sides and remove the lower frame.
For re-assembly, please proceed in reverse order.
Use new, stainless steel, self-locking cap nuts.
4.5 Gas Spring with Release Mechanism
Exchanging of the Hydraulic Release Mechanism
Remove the push button from the release unit.
Tighten the plastic nuts with a wrench and turn the
release knob away from the release unit. Pull the
release unit out of the cover plate and also unscrew
both plastic nuts from the release unit.
When assembling and reconstructing the position
of the release knob, please pay attention to the
information in the instructions for use.
Pull the hydraulic tube and the release unit through
the upper frame toward the inside and disassemble
the release head.
To exchange the gas compression spring, open
and remove the screw connections between the gas
compression spring and the holder. After loosening
the lock nuts, unscrew the piston of the gas compression spring from the still screwed in release
head. The release knob must not be dissassembled
for this.
When assembling, make sure you set the hydraulic
release devices correctly.
To disassemble the release head, first open the
lock nuts underneath the release head. Open and
remove the screw connection between the release
head and the double scissor construction. Then
unscrew the release head from the piston of the gas
compression spring.
For re-assembly, please proceed in reverse order.
When assembling, make sure you set the hydraulic
release devices correctly.
11
Setting the Hydraulic Release Device
After the release knob has been assembled with the release unit, and the release head with the gas compression spring, set the release mechanism so that the push button can move approx. 1 mm before the
piston in the release head touches the valve pin in the piston of the gas compression spring.
By screwing the piston of the gas compression spring into the release head, the space decreases; by unscrewing it, the space becomes larger.
Use a piece of PVC tubing or leather to turn the piston rod so as not to damage it with pliers.
Make a final inspection of the functions.
After pressing the release button, it must be possible
to let down the cover.
After letting go of the release button, the cover must
remain at the desired height.
Check to make sure that the tube of the hydraulic
release unit is not bent or clamped.
12
Hersteller/Manufacturer:
Otto Bock HealthCare GmbH
Max-Näder-Straße 15 · D-37115 Duderstadt, Germany
National: Tel. (0 55 27) 848 1461/1462/1463 · Fax (0 55 27) 848 14 60
International: Phone. +49-5527-848-1304/1562/1590/1594/3663 · Fax +49-5527-848-1676
e-mail: [email protected] · Internet: http://www.ottobock.com
Otto Bock HealthCare GmbH
Sälzerstraße 16 · D-56235 Ransbach-Baumbach, Germany
Otto Bock HealthCare GmbH has been certified by the German Society for the Certification of Quality Assurance Systems (DQS)
in accordance with DIN EN ISO 9001 standard, reg. no. 779 (management system)
© Otto Bock · 647G182=D – 11.03/1
Versandanschrift für Rücksendungen/Address for Returns