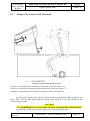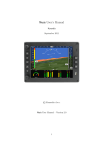
1
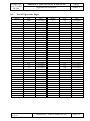
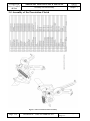
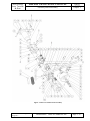
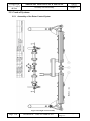
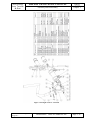
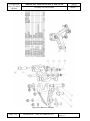
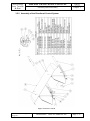
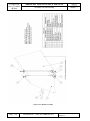
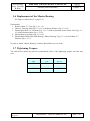
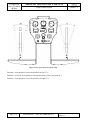
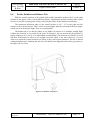
AVIATION ARTUR TRENDAK & SON AIRCRAFT MAINTENANCE MANUAL GYROCOPTER SERIAL NUMBER: REGISTRATION NUMBER: NUMBER ON FILE: THE MANUAL WAS APPROVED WITH A DECISION OF PRESIDENT OF THE CIVIL AVIATION AUTHORITY DATED …………………………………. NO. ……………………… “ULTRALIGHT” CATEGORY THIS GYROCOPTER CAN BE USED IN THE “ULTRALIGHT” CATEGORY FOR LEISURE, SPORTS AND DISPLAY PURPOSES AS WELL AS OTHERS, EXCLUDING AIR TRANSPORT. USING THIS GYROCOPTER FOR TRAINING AND PRACTICE TO OBTAIN A CERTIFICATE OF QUALIFICATIONS OF AN ULTRALIGHT GYROCOPTER PILOT AS WELL AS HAVE QUALIFICATIONS ENTERED IN THIS CERTIFICATE CAN BE DONE SOLELY IN A CERTIFIED TRAINING CENTRE. THE GYROCOPTER MUST BE USED ACCORDING TO THE RESTRICTIONS AND INFORMATION STATED IN THIS INSTRUCTION MANUAL. THIS MANUAL MUST ALWAYS BE AVAILABLE WHEN PERFORMING MAINTENANCE ACTIVITIES ON THE GYROCOPTER. Edition 1 Change no.: 21 Aug 2014 Document no.: TERCEL-AMM-001-EN The manual has been developed as per the requirements of the regulations in Annexe No. 5 “Ultralight Aircraft” - of the Decree of the Minister of Infrastructure dated 25 April 2005 on Excluding the Application of Some of the Laws of the Act on Air Law for Some Sorts of Aircraft as well as Defining the Conditions and Requirements concerning the Use of this Aircraft (Official Journal 107 section 904) with subsequent amendments. It is not allowed to make any entries and supplements in this “Aircraft Maintenance Manual” without the consent of the Civil Aviation Authority. In case this Manual is lost, you should notify the Civil Aviation Authority instantaneously, and when outside the border of your country - an equivalent institution. Any person to find this manual is requested to send it in instantaneously to Urząd Lotnictwa Cywilnego (Civil Aviation Authority), 02-247 Warszawa, ul. Marcina Flisa 2, Poland, and when outside the border of your country to an equivalent institution. Document no.: TERCEL-AMM-001-EN Edition 1 Change no.: 21 Aug 2014 AVIATION Artur Trendak & Son AIRCRAFT MAINTENANCE MANUAL Organizational Information Chapter 0 0.1 Chapter 0 Organizational Information Register of Changes If necessary AVIATION ARTUR TRENDAK will issue updates for this manual and will publish it in the form of bulletins on its website. Any changes of this manual must be instantaneously entered and written in the table below as well as be approved by the Civil Aviation Authority (CAA). A new or revised text in changed pages must be marked with a black vertical line on the margin and a change number. The number of the last change in a given page and its date must be placed in the page footer. Every time a change is entered, the pages listed in the table below must be mentioned. Change no. Edition 1 Change no.: Description of change 21 Aug 2014 Pages Affected Entry date Document no.: TERCEL-AMM -001-EN Signature Page 0-1 AVIATION Artur Trendak & Son Change no. Page 0-2 AIRCRAFT MAINTENANCE MANUAL Organizational Information Description of change Pages Affected Document no.: TERCEL-AMM-001-EN Chapter 0 Entry date Edition 1 Change no.: Signature 21 Aug 2014 AVIATION Artur Trendak & Son 0.2 AIRCRAFT MAINTENANCE MANUAL Organizational Information Chapter 0 List of Up-to-date Pages Chapter 0 1 2 3 Edition 1 Change no.: Page Title Reverse 0-1 0-2 0-3 0-4 1-1 1-2 1-3 1-4 2-1 2-2 2-3 2-4 2-5 2-6 2-7 2-8 2-9 2-10 2-11 2-12 3-1 3-2 3-3 3-4 3-5 3-6 3-7 3-8 3-9 3-10 3-11 3-12 3-13 3-14 21 Aug 2014 Date 14.11.2013 14.11.2013 14.11.2013 14.11.2013 14.11.2013 14.11.2013 14.11.2013 14.11.2013 14.11.2013 14.11.2013 14.11.2013 14.11.2013 14.11.2013 14.11.2013 14.11.2013 14.11.2013 14.11.2013 14.11.2013 14.11.2013 14.11.2013 14.11.2013 14.11.2013 14.11.2013 14.11.2013 14.11.2013 14.11.2013 14.11.2013 14.11.2013 14.11.2013 14.11.2013 14.11.2013 14.11.2013 14.11.2013 14.11.2013 14.11.2013 14.11.2013 Chapter 4 5 6 7 8 9 10 Page 4-1 4-2 4-3 4-4 4-5 4-6 5-1 5-2 5-3 5-4 5-5 5-6 5-7 5-8 6-1 6-2 6-3 6-4 7-1 7-2 8-1 8-2 8-3 8-4 8-5 8-6 8-7 8-8 9-1 9-2 10-1 10-2 Document no.: TERCEL-AMM -001-EN Date 14.11.2013 14.11.2013 14.11.2013 14.11.2013 14.11.2013 14.11.2013 14.11.2013 14.11.2013 14.11.2013 14.11.2013 14.11.2013 14.11.2013 14.11.2013 14.11.2013 14.11.2013 14.11.2013 14.11.2013 14.11.2013 14.11.2013 14.11.2013 14.11.2013 14.11.2013 14.11.2013 14.11.2013 14.11.2013 14.11.2013 14.11.2013 14.11.2013 14.11.2013 14.11.2013 14.11.2013 14.11.2013 Page 0-3 AVIATION Artur Trendak & Son 0.3 AIRCRAFT MAINTENANCE MANUAL Organizational Information Chapter 0 Table of Contents Chapter Title 0 Organizational Information 1 General Information 2 Description of the Gyrocopter and its Systems 3 Assembly and Disassembly 4 Maintenance Work, Operational Materials 5 Schedule of Inspections and Service Work 6 Weighing and Specifying the Position of the Centre of Gravity 7 Durability of Structural Components 8 Flight Control System 9 Other Maintenance Information 10 Supplements Page 0-4 Document no.: TERCEL-AMM-001-EN Edition 1 Change no.: 21 Aug 2014 AVIATION Artur Trendak & Son AIRCRAFT MAINTENANCE MANUAL General Information Chapter 1 Chapter 1 General Information 1. page 1.1 Introduction ................................................................................................ 1-2 1.2 Basis for Acknowledging Airworthiness .................................................... 1-2 1.3 Directives and Announcements of Airworthiness ...................................... 1-2 1.4 Responsibility ............................................................................................. 1-3 Edition 1 Change no.: 21 Aug 2014 Document no.: TERCEL-AMM-001-EN Page 1-1 AVIATION Artur Trendak & Son 1.1 MAINTENANCE MANUAL General Information Chapter 1 Introduction This manual has been written to provide pilots and engineers with information that is essential for correct operation and proper maintenance of the gyrocopter in order to ensure its airworthiness and safe and effective operation. The gyrocopter should be operated in accordance with this manual and the applicable regulations. The conformity with the manual and regulations is the owner/operator responsibility. The gyrocopter can be operated only when it is technically operative and has a valid authorization to perform flights. An authorization to perform flights is entered in the ultralight aircraft book, which is a document identifying an ultralight aircraft and its subassemblies as well as containing data on the record of usage. Any modifications to the gyrocopter, made without the consent of the manufacturer and the proper aviation authority, will render this manual invalid for the modified model. 1.2 Basis for Acknowledging Airworthiness gyrocopter meet BUT Requirements - German Requirements regarding construction of the ultralight gyrocopters. 1.3 Directives and Announcements of Airworthiness All applicable directives of airworthiness or other documents (notes, regulations) issued by civil aviation authorities must be observed. Compliance with the directives should be recorded in the Ultralight Aircraft Book (Gyrocopter Book) or approved in an equivalent manner. Page 1-2 Document no.: TERCEL-AMM-001-EN Edition 1 Change no.: 21 Aug 2014 AVIATION Artur Trendak & Son 1.4 AIRCRAFT MAINTENANCE MANUAL General Information Chapter 1 Responsibility The user is responsible for conducting overhauls and proper maintenance at the right time as described in this manual. The deadlines for inspection and maintenance actions should follow those recommended by Aviation Artur Trendak. The Civil Aviation Authority can order to change the deadlines by issuing bulletins or safety information notices. Persons that certify maintenance should use their engineering knowledge and skills to specify the extent of the necessary repairs and checks and other issues which can affect the airworthiness of the gyrocopter. The repairs and inspections of the gyrocopter should be registered (with a listing of all defects, shortages and additional maintenance resulting from the execution of the work schedule) in the form of reports and recorded in the Gyrocopter Book. Maintenance attestants are responsible for keeping these records. Every subsequent repair or inspection should be conducted after previous familiarization with the history of repairs and inpections. Maintenance information (bulletins, notices etc) published by Aviation Artur Trendak should be assessed and taken into consideration by the user/owner to ensure security and reliability during operation. Complying with the recommendations of maintenance information should be recorded in the Gyrocopter Book. Edition 1 Change no.: 21 Aug 2014 Document no.: TERCEL-AMM-001-EN Page 1-3 AVIATION Artur Trendak & Son MAINTENANCE MANUAL General Information Chapter 1 The page is left blank deliberately Page 1-4 Document no.: TERCEL-AMM-001-EN Edition 1 Change no.: 21 Aug 2014 AVIATION Artur Trendak & Son AIRCRAFT MAINTENANCE MANUAL Chapter 2 Description of the Gyrocopter and its Systems Description of the Gyrocopter and its Systems Chapter 2 Table of Contents 2.1 General Description................................................................................................................. 2 2.1.1 Technical Data ................................................................................................................. 2 2.2 Three side view ....................................................................................................................... 3 2.3 Control Systems ...................................................................................................................... 5 2.3.1 Schema of the Rotor Control System............................................................................... 5 2.3.2 Schema of the Directional Control System ...................................................................... 6 2.4 Fuel System (Diagram) ........................................................................................................... 8 2.5 Oil System (Diagram) ............................................................................................................. 9 2.6 Engine Cooling System (Diagram) ....................................................................................... 10 2.7 Electrical System (Diagram) ................................................................................................. 12 2.8 Prerotation System ................................................................................................................ 14 Edition 1 Change no.: 21 Aug 2014 Document no.: TERCEL-AMM-001-EN Page 2-1 AVIATION Artur Trendak & Son 2.1 AIRCRAFT MAINTENANCE MANUAL Description of the Gyrocopter and its Systems Chapter 2 General Description is a two-seat ultralight gyrocopter. The main structural component is the composite fuselage. The tail structure is attached to the two slender metal tail beams which are guided from the fuselage. The tail structure consist of two vertical stabilizers (with rudders) and horizontal stabilizer. The control surfaces are also composite. A metal mast, with rotor head and rotor blades on top, is attached to the fuselage structure. The blades, made from drawn aluminium, are entirely anodized and perfectly balanced. is powered with a CA 912 ULT engine. It is a Rotax 912 UL engine, modified by the AVIATION ARTUR TRENDAK Company by adding an Iveco turbocharger. It is equipped with a three-blade composite propeller of the KASPAR AERO, which has the capability to manually change pitch. The gyrocopter in equipped with fixed tricycle landing gear. The main legs are elastic and made of composite. The front leg is made of steel, is steerable from the cabin and amortized with a wheel pneumatic unit. The wheels diameter is 350mm. The spacious cabin with a width of 136 cm is accessible through a large door on the left hand and right hand sides. Extensive glazing ensures optimum visibility. Proper comfort is completed by two ergonomic and adjustable bucket seats, each equipped with adjustable four-point safety belts. 2.1.1 Technical Data Geometric data Rotor diameter 8.60 Rotor surface 60.82 Rotor blade chord 0.20 Overall length (w/o rotor) 5.04 Fuselage width 2.35 Track of wheels 2.20 Cockpit width 1.36 Overall width 2.35 Overall height 2.87 Wheel diameter 0.35 undercarriage: “ordinary” m m2 m m m m m m m m Weight data Maximum Take-Off weight Empty weight Load capacity Page 2-2 560 315 245 kg kg kg Document no.: TERCEL-AMM-001-EN Edition 1 Change no.: 21 Aug 2014 AVIATION Artur Trendak & Son AIRCRAFT MAINTENANCE MANUAL Description of the Gyrocopter and its Systems Chapter 2 Data of the power unit Engine type Engine Power Reducer ratio Propeller Propeller diameter Capacity of fuel tanks 2.2 CA 912 ULT 122 KM at 5800rpm 1 : 2.43 KASPAR AERO 2/3 LT 1.72m 120 litres Three side view Figure 2.2-1 Tercel Isometric View Edition 1 Change no.: 21 Aug 2014 Document no.: TERCEL-AMM-001-EN Page 2-3 AVIATION Artur Trendak & Son AIRCRAFT MAINTENANCE MANUAL Description of the Gyrocopter and its Systems Chapter 2 Figure 2.2-2 Tercel Three Side View Page 2-4 Document no.: TERCEL-AMM-001-EN Edition 1 Change no.: 21 Aug 2014 AVIATION Artur Trendak & Son AIRCRAFT MAINTENANCE MANUAL Description of the Gyrocopter and its Systems 2.3 Control Systems 2.3.1 Schema of the Rotor Control System Number 1 2 3 4 5 6 7 8 Chapter 2 Name Mast Control Stick Rotor Head Bowden Cable ------------------Holder Holder Figure 2.3-1 Rotor Control System Edition 1 Change no.: 21 Aug 2014 Document no.: TERCEL-AMM-001-EN Page 2-5 AVIATION Artur Trendak & Son 2.3.2 AIRCRAFT MAINTENANCE MANUAL Description of the Gyrocopter and its Systems Chapter 2 Schema of the Directional Control System Figure 2.3-2 Directional Control System - Pedals Page 2-6 Document no.: TERCEL-AMM-001-EN Edition 1 Change no.: 21 Aug 2014 AVIATION Artur Trendak & Son AIRCRAFT MAINTENANCE MANUAL Description of the Gyrocopter and its Systems Chapter 2 Figure 2.3-3 Directional Control System - Rudders Edition 1 Change no.: 21 Aug 2014 Document no.: TERCEL-AMM-001-EN Page 2-7 AVIATION Artur Trendak & Son 2.4 AIRCRAFT MAINTENANCE MANUAL Description of the Gyrocopter and its Systems Chapter 2 Fuel System (Diagram) Figure 2.4-1 Fuel System Page 2-8 Document no.: TERCEL-AMM-001-EN Edition 1 Change no.: 21 Aug 2014 AVIATION Artur Trendak & Son 2.5 AIRCRAFT MAINTENANCE MANUAL Description of the Gyrocopter and its Systems Chapter 2 Oil System (Diagram) Oil line 8mm Oil Tank Hose with Adaptor Hose Dia 12 Gasket Turbocompressor Oil Cooler Overflow Tank or Deaeration Conduit Turbine Oil Receptacle Bolts with Locking Washers Propeller Figure 2.55-1 Fuel System Edition 1 Change no.: 21 Aug 2014 Document no.: TERCEL-AMM-001-EN Page 2-9 AVIATION Artur Trendak & Son 2.6 AIRCRAFT MAINTENANCE MANUAL Description of the Gyrocopter and its Systems Chapter 2 Engine Cooling System (Diagram) PUMP RADIATOR TANK RADIATOR Figure 2.6-1 Engine Cooling System Page 2-10 Document no.: TERCEL-AMM-001-EN Edition 1 Change no.: 21 Aug 2014 AVIATION Artur Trendak & Son AIRCRAFT MAINTENANCE MANUAL Description of the Gyrocopter and its Systems Chapter 2 RADIATOR RADIATOR Figure 0-1 Engine Cooling System Edition 1 Change no.: 21 Aug 2014 Document no.: TERCEL-AMM-001-EN Page 2-11 AVIATION Artur Trendak & Son 2.7 AIRCRAFT MAINTENANCE MANUAL Description of the Gyrocopter and its Systems Chapter 2 Electrical System (Diagram) The main source of electrical energy of the gyrocopter is engine mounted DC generator (14V, 250W at 5800 rpm). The electrical system is two-lead system because of the composite structure of the cabin. The master switch is placed on the central console panel and is activated with a removable red key. The electrical system supply: the ignition system, engine start-up system, fuel pumps, instruments, sensors, radio equipment, electric trim system, cabin heating fan, cabin light, navigation lights, other appliances connected by sockets. On the side of the instrument board, there is a 12V socket (a typical socket for a car lighter) and USB(+5V) receptacle allowing for connecting additional devices. Individual circuits are enabled with appropriate marked switches and secured with circuit breakers. When the generator is idle (e.g. the engine is off, it is at a low speed or there is a failure), orange indicator light turns on (charging) on the instrument board, and the electric units are supplied from the battery (12V, 10Ah). Elucidation of denotations on the diagram of the electrical system: 1 2 3 4 5 6 7 8 9 10 11 12 13 14 15 16 17 18 19 20 BATTERY INTEGRATED GENERATOR ELECTRIC STARTER EXTERNAL REGULATOR STARTER RELAY STARTER SWITCH CAPACITOR CABIN LIGHT MASTER SWITCH-RED KEY OPTIONAL 1 4 WAY CIRCUIT BREAKER MAIN ELECTRIC FUEL PUMP AUX ELECTRIC FUEL PUMP MAGNETO SWITCH MAGNETO SWITCH ELECTRIC IGNITION MODULE “A” ELECTRIC IGNITION MODULE “B” CHARGING LAMP FUSEBOX TRANSCEIVER Page 2-12 21 22 23 TRANSPONDER TRIMM FAN OAT CHT EGT OT OP RRC ABT MAP FLS Document no.: TERCEL-AMM-001-EN Outside Air Temperature Cylinder Head Temperature Exhaust Gas Temperature Oil Temperature Oil Pressure Rotor Revolution Counter Air-Box Temperature Manifold Pressure Fuel Level Sensor Edition 1 Change no.: 21 Aug 2014 AVIATION Artur Trendak & Son AIRCRAFT MAINTENANCE MANUAL Description of the Gyrocopter and its Systems Chapter 2 Figure 2.7-1 Electrical System Edition 1 Change no.: 21 Aug 2014 Document no.: TERCEL-AMM-001-EN Page 2-13 AVIATION Artur Trendak & Son 2.8 AIRCRAFT MAINTENANCE MANUAL Description of the Gyrocopter and its Systems Chapter 2 Prerotation System Prerotation consist of Belt Clutch (transmission), Flexible Shaft and Bendix. Prerotation is engaged by the pilot from the cabin. Pulling the prerotation handle stretches belts in Belt Clutch and applies torque via Flexible Shaft to the Bendix. Bendix gear moves automatically and couples with rotor head gear. Figure 2.8-1 Prerotation System Page 2-14 Document no.: TERCEL-AMM-001-EN Edition 1 Change no.: 21 Aug 2014 AVIATION Artur Trendak & Son AIRCRAFT MAINTENANCE MANUAL Chapter 3 3.1. Assembly and Disassembly Chapter 3 Assembly and Disassembly Assembly and Disassembly of the Rotor ............................................................................ 3-2 3.1.1. Assembly of the Rotor Hub ......................................................................................... 3-2 3.1.2 Disassembly of the Rotor ............................................................................................. 3-4 3.1.3 Assembly and Blades Alignment (Chordwise balance) ............................................... 3-6 3.1.4 Installation of the Rotor on the Gyrocopter ................................................................. 3-7 3.2 Assembly of the Rotor Head ............................................................................................... 3-8 3.3 Assembly of the Mast ........................................................................................................ 3-11 3.4 Assembly of the Prerotation Clutch .................................................................................. 3-12 3.5 Control Systems ................................................................................................................ 3-14 3.5.1 Assembly of the Rotor Control System ..................................................................... 3-14 3.5.2 Assembly of the Directional Control System ............................................................ 3-17 3.6 Replacement of the Master Bearing .................................................................................. 3-19 3.7 Tightening Torques ........................................................................................................... 3-19 Edition 1 Change no.: 21 Aug 2014 Document no.: TERCEL-AMM-001-EN Page 3-1 AVIATION Artur Trendak & Son 3.1. AIRCRAFT MAINTENANCE MANUAL Assembly and Disassembly Chapter 3 Assembly and Disassembly of the Rotor 3.1.1. Assembly of the Rotor Hub Figure 3.1-1 Assembly of the rotor hub (Note: After assembly, the rotor hub cannot be disassembled) Page 3-2 Document no.: TERCEL-AMM-001-EN Edition 1 Change no.: 21 Aug 2014 AVIATION Artur Trendak & Son AIRCRAFT MAINTENANCE MANUAL Assembly and Disassembly Chapter 3 Figure 3.1-2 Rotor assembly Edition 1 Change no.: 21 Aug 2014 Document no.: TERCEL-AMM-001-EN Page 3-3 AVIATION Artur Trendak & Son AIRCRAFT MAINTENANCE MANUAL Assembly and Disassembly Chapter 3 Figure 3.1-3 Installation of the rotor on the rotor head 3.1.2 Disassembly of the Rotor The rotor must be detached from the gyrocopter to be carried by road transport. NOTE: During disassembly of the rotor, it is forbidden to stand in places other than assigned for this purpose! Make sure the wheel brakes are activated (position 1). Push the control stick in the extreme front position and secure it with a strap so the rotor head disc rests on the brake. Remove the cotter pin (5, Figure 3.1-23) and unscrew the nut (3, Figure 3.1-23) from for rotor hub suspension pin (4, Błąd! Nie można odnaleźć źródła odwołania.) (teeter bolt) in the hub. With the help of another person holding down the rotor, remove the pin (4, Błąd! Nie można odnaleźć źródła odwołania.3) (making sure the sleeves remain in their places) and remove the rotor from the head. Unscrew the nuts (5, Błąd! Nie można odnaleźć źródła odwołania.2), remove the M10 bolts (4, Błąd! Nie można odnaleźć źródła odwołania.2) and remove the blades (2, Błąd! Nie można odnaleźć źródła odwołania.2) from the sockets in the hub. Page 3-4 Document no.: TERCEL-AMM-001-EN Edition 1 Change no.: 21 Aug 2014 AVIATION Artur Trendak & Son AIRCRAFT MAINTENANCE MANUAL Assembly and Disassembly Chapter 3 Gather pieces together and assemble back the hub, sockets, M10 bolts (4, Błąd! Nie można odnaleźć źródła odwołania.2), washers (3, Błąd! Nie można odnaleźć źródła odwołania.2) and nuts (5, Błąd! Nie można odnaleźć źródła odwołania.2). Place the pin (4, Błąd! Nie można odnaleźć źródła odwołania.3) (teeter bolt) in the hub with sleeves, screw on a nut (3, Błąd! Nie można odnaleźć źródła odwołania.3) and pass through the cotter pin (5, Błąd! Nie można odnaleźć źródła odwołania.3). The removed blades, for storage or transport, must be appropriately fastened and protected against damage. Edition 1 Change no.: 21 Aug 2014 Document no.: TERCEL-AMM-001-EN Page 3-5 AVIATION Artur Trendak & Son AIRCRAFT MAINTENANCE MANUAL Assembly and Disassembly Chapter 3 3.1.3 Assembly and Blades Alignment (Chordwise balance) The blades and the rotor hub are supplied with the numbers specifying their orientation in the assembly kit. By matching the alphanumerical markings, insert the rotor blades into the sockets in the hub. For each blade fit two screws M10 (into extreme outer holes with washers on both sides). Next, screw nuts to the first contact. Next, place alignment string as shown on (Fig. 3.1 - 4). The string should pass through the center of rotation as shown on (Fig. 3.1 - 5). If not, blades attachment must be regulated. Fit subsequent pair of screws and check alignment. Repeat for the rest of the screws. If the rotor is not aligned properly, it will result in vibrations. The better the alignment of the rotor is, the greater the comfort of flight is, the smaller the vibrations are and the longer the life of the machine and its subassemblies is. When the string does not overlap the hub axis, two people are needed for help: hold down the blade tips, then push the hub in the right direction. After alignment, tighten the nuts with a torque spanner applying 24 Nm torque. The correctness of alignment must be checked in the first flight. Figure 3.1-4 Blades alignment Page 3-6 Document no.: TERCEL-AMM-001-EN Edition 1 Change no.: 21 Aug 2014 AVIATION Artur Trendak & Son AIRCRAFT MAINTENANCE MANUAL Assembly and Disassembly Chapter 3 Figure 3.1-5 Blades alignment 3.1.4 Installation of the Rotor on the Gyrocopter NOTE: During installation of the rotor, it is forbidden to stand in places other than assigned for this purpose! Make sure the wheel brakes are activated (position 1). Brake the control stick in the extreme front position so that the rotor head disc rests on the brake. Lubricate the pin (teeter bolt – 4, Figure 3.1) for rotor hub suspension on the head and the slip sleeves with a dedicated lubricant (WHS2002). With the help of another person (with a ladder), raise the rotor and place it on the head. Insert pin through the head and the hub (making sure the sleeves remain in their places) and press it down to the end. Tighten the nut, next unscrew it by 1/4 of a revolution and pass the safety cotter pin through the hole at the end of the pin. Check rotor movement range. s Edition 1 Change no.: 21 Aug 2014 Document no.: TERCEL-AMM-001-EN Page 3-7 AVIATION Artur Trendak & Son AIRCRAFT MAINTENANCE MANUAL Assembly and Disassembly Chapter 3 3.2 Assembly of the Rotor Head Figure 3.2-1 Rotor Head assembly Page 3-8 Document no.: TERCEL-AMM-001-EN Edition 1 Change no.: 21 Aug 2014 AVIATION Artur Trendak & Son AIRCRAFT MAINTENANCE MANUAL Assembly and Disassembly Chapter 3 Figure 3.2-2 Rotor head roll pin installation Edition 1 Change no.: 21 Aug 2014 Document no.: TERCEL-AMM-001-EN Page 3-9 AVIATION Artur Trendak & Son AIRCRAFT MAINTENANCE MANUAL Assembly and Disassembly Chapter 3 Figure 3.2-3 Rotor Head section Page 3-10 Document no.: TERCEL-AMM-001-EN Edition 1 Change no.: 21 Aug 2014 AVIATION Artur Trendak & Son AIRCRAFT MAINTENANCE MANUAL Assembly and Disassembly Chapter 3 3.3 Assembly of the Mast Figure 3.3-1 Mast assembly Edition 1 Change no.: 21 Aug 2014 Document no.: TERCEL-AMM-001-EN Page 3-11 AVIATION Artur Trendak & Son AIRCRAFT MAINTENANCE MANUAL Assembly and Disassembly Chapter 3 3.4 Assembly of the Prerotation Clutch Figure 3.4-0-1 Prerotation Clutch assembly Page 3-12 Document no.: TERCEL-AMM-001-EN Edition 1 Change no.: 21 Aug 2014 AVIATION Artur Trendak & Son AIRCRAFT MAINTENANCE MANUAL Assembly and Disassembly Chapter 3 Figure 3.4-0-2 Prerotation Clutch assembly Edition 1 Change no.: 21 Aug 2014 Document no.: TERCEL-AMM-001-EN Page 3-13 AVIATION Artur Trendak & Son AIRCRAFT MAINTENANCE MANUAL Assembly and Disassembly Chapter 3 3.5 Control Systems 3.5.1 Assembly of the Rotor Control System Figure 3.5-1 Flight Control assembly Page 3-14 Document no.: TERCEL-AMM-001-EN Edition 1 Change no.: 21 Aug 2014 AVIATION Artur Trendak & Son AIRCRAFT MAINTENANCE MANUAL Assembly and Disassembly Chapter 3 Figure 3.5-2 Flight Control – Left Side Edition 1 Change no.: 21 Aug 2014 Document no.: TERCEL-AMM-001-EN Page 3-15 AVIATION Artur Trendak & Son AIRCRAFT MAINTENANCE MANUAL Assembly and Disassembly Chapter 3 Figure 3.5-3 Roll Lever assembly Page 3-16 Document no.: TERCEL-AMM-001-EN Edition 1 Change no.: 21 Aug 2014 AVIATION Artur Trendak & Son AIRCRAFT MAINTENANCE MANUAL Assembly and Disassembly Chapter 3 3.5.2 Assembly of the Directional Control System Figure 3.5-4 Yaw Controls Edition 1 Change no.: 21 Aug 2014 Document no.: TERCEL-AMM-001-EN Page 3-17 AVIATION Artur Trendak & Son AIRCRAFT MAINTENANCE MANUAL Assembly and Disassembly Chapter 3 Figure 3.5-5 Rudder assembly Page 3-18 Document no.: TERCEL-AMM-001-EN Edition 1 Change no.: 21 Aug 2014 AVIATION Artur Trendak & Son AIRCRAFT MAINTENANCE MANUAL Assembly and Disassembly Chapter 3 3.6 Replacement of the Master Bearing See Figure in subsection 3.2 (page 3-8). Disassembly 1. Remove Main “U” Cap (Fig. 3.2-1, 13). 2. Unscrew Bearing Nuts (Fig. 3.2-1,11) with Safety Washer (Fig. 3.2-1,12). 3. Disassembly Main “U” Element (Fig. 3.2-1,7) with components from Central Axle (Fig. 3.21,1) and Prerotation Rim (Fig. 3.2-1,6). 4. Disassembly Seger Ring (Fig. 3.2-1,10). 5. Disassembly Double Row Ball Bearing “Master Bearing” (Fig. 3.2-1,8) from Main “U” Element (Fig. 3.2-1,7). In order to install “Master Bearing” on Rotor Head follow reverse order. 3.7 Tightening Torques The table below shows the general recommended values of the tightening torques for bolts and nuts. thread M5 M6 M8 M10 M12 Edition 1 Change no.: 21 Aug 2014 Nm 5-6 7-10 7-24 10-38 >12 in×lb 45-55 60-90 60-210 90-335 >105 Document no.: TERCEL-AMM-001-EN Page 3-19 AVIATION Artur Trendak & Son AIRCRAFT MAINTENANCE MANUAL Chapter 4 Maintenance Work, Operational Materials Chapter 4 Maintenance Work, Operational Materials 4. page 4.1 Introduction ................................................................................................ 4-2 4.2 Range of Service Work which can be Conducted by the Pilot .................. 4-2 4.3 Oil System ................................................................................................... 4-3 4.4 Engine Head Cooling System ..................................................................... 4-3 4.5 Brake Fluid .................................................................................................. 4-4 4.6 Air, Oil and Fuel Filters ............................................................................. 4-4 4.7 Lubrication Schedule ................................................................................. 4-4 Edition 1 Change no.: 21 Aug 2014 Document no.: TERCEL-AMM-001-EN Page 4-1 AVIATION Artur Trendak & Son 4.1 AIRCRAFT MAINTENANCE MANUAL Maintenance Work, Operational Materials Chapter 4 Introduction The owner/operator is responsible for conducting maintenance at the right time as described in this manual. 4.2 Range of Service Work which can be Performed by the Pilot Pilot, being the owner or operator of the gyrocopter, can perform the following service work. In this case he should write the maintenance work executed into the gyrocopter book and confirm it with his signature and the licence number held (the qualification certificate). 1. Removing the undercarriage wheels; replacing the wheels; replacing the tyres; cleaning and servicing the wheel bearings. Removing and fitting brakes components in scope required in removing the wheels; replacement of the brake shoes unless special tools are required. Replenishing the fluid in the braking system. Removing and fitting the tail wheels. 2. Replacing the damaged safety wires or cotter pins, except those belonging to the engine, drive transmission system, flight controls system and the rotor. 3. Repairing the upholstery and equipment of the cockpit interior. Repairs inside the cockpit do not require dismantling of any structural components or flight controls system, and also they do not collide with these systems or interfere with the gyrocopter structure. 4. Repairs that do not require welding, repairing the fairings and non-structural covers and shields. 5. Replacing the safety belts. 6. Replacing the seats and their parts. 7. Replacing the light bulbs, headlights, reflectors, lenses and lights. 8. Replacing all the shields not requiring removal of the propeller, disconnection of the engine or the flight controls system. 9. Replacing the spark plugs, cleaning, checking the slot. 10. Replacing and servicing the battery. 11. Assembling and disassembling rotor blades and the rotor hub, which design allow to perform this operation without necessity to use special tools. 12. Replacing the VHF equipment unless it is integrated with the navigation equipment. 13. Making and placing the required placards and descriptions in the cockpit. 14. Lubricating the gyrocopter components (along with a prior cleaning of the hinges). 15. Checking air filters (removing, cleaning, fitting, replacing). 16. Checking fuel filters (removing, cleaning, fitting, replacing). 17. Changing the engine oil; removing, cleaning, fitting, replacing the oil filter. Page 4-2 Document no.: TERCEL-AMM-001-EN Edition 1 Change no.: 21 Aug 2014 AVIATION Artur Trendak & Son 4.3 AIRCRAFT MAINTENANCE MANUAL Maintenance Work, Operational Materials Chapter 4 Oil System Recommended oil: AeroShell Oil Sport PLUS 4. Standard quantity of oil in the system: 3,5 dm3. All work related with oil system maintenance, including: checking the oil level and its exchange, deaerating the system, rinsing the system, replacing and checking the oil filter are described in the Rotax engines Service Manual. Oil exchange must be performed every 100 hours of engine work. 4.4 Engine Head Cooling System Shortage of the cooling fluid, casued by the usage, must be replenished with distilled water. The cooling fluid must be replaced completely every 2 years. To fill in the cooling system it is necessary to apply a mixture of glycol and water with the 50:50 ratio. The system capacity is 4.5dm3. All work related with the engine head cooling system maintenance, including: exchange of the fluid, and rinsing the system is described in the Service Manual of Rotax engines. 4.5 Brake Fluid The DOT 4 fluid is recommended for application with the wheel braking hydraulic system. The fluid must be replaced at least every 3 years. 0.5 dm3 of the fluid must be prepared for exchange. In order to exchange the brake fluid, unscrew completely deaerator at the brake pump mounted on the control stick. Next replace it with a special deaerator with a transparent tube, provided with the factory kit, then mount the applicator (syringe) in the tube filled with a new fluid. Unscrew the deaerator at the brake cylinder of one of the wheels. By moving the brake lever and forcing in the fluid with the applicator, it must be forced through the system, and the old fluid, flowing out through the deaerator at the wheel, must be gathered into container. Make sure the system is deaerated. Tighten the deaerator at the first wheel, unscrew one at the second and repeat the actions. Unscrew the special deaerator with the tube and change it to the original one. After deaeration, tighten all the deaerators. Check the system for leakage. NOTE: due to the chemical activity of the fluid, secure places of the deaerator at the brake pump mounted on the stick with paper or a cloth so it does not get onto other gyrocopter components. Look after to your own safety. Finally, clean all the surfaces. Edition 1 Change no.: 21 Aug 2014 Document no.: TERCEL-AMM-001-EN Page 4-3 AVIATION Artur Trendak & Son 4.6 AIRCRAFT MAINTENANCE MANUAL Maintenance Work, Operational Materials Chapter 4 Air, Oil and Fuel Filters All the work related with replacing and cleaning air, oil and fuel filters is described in the Rotax engines Service Manual. 4.7 Lubrication Schedule Before lubrication, the parts must be cleaned of dirt and the residue of the old lubricant. Lubrication after 50 and 100 hours must be performed during maintenance respectively: 50hour/half-year or 100-hour/yearly, depending on the mode of performing maintenances (see subsection 5.1). L.p. Lubricated parts 1 Bendix rack and prerotation gear rim. 2 3 4 5 6 *) Rotor head pitch and roll pin. Hub suspension bolt on the rotor head (teeter bolt) and slip sleeves. Door hinges. Rudder control pedals. Choke and prerotation levers axles. Lubrication frequency Before each flying day 50 hours 50 hours *) 100 hours 100 hours 100 hours Lubricant WHS2002 WHS2002 WHS2002 WD40 WHS2002 WHS2002 The pin for rotor hub suspension on the head (teeter bolt) and the slip sleeves work in a space filled with lubricant inside the rotor hub cube. Exchange of the lubricant should take place during replacement of the pin and the sleeve every 250 hours of flight. Moreover, the pin and the sleeves should be cleaned and covered with a layer of lubricant whenever the rotor is fitted on the head. Page 4-4 Document no.: TERCEL-AMM-001-EN Edition 1 Change no.: 21 Aug 2014 AVIATION Artur Trendak & Son AIRCRAFT MAINTENANCE MANUAL Chapter 6 Weighing and Specifying the Position of the Centre of Gravity Chapter 6 Weighing and Specifying the Position of the Centre of Gravity 6. page 6.1 Introduction ................................................................................................ 6-2 6.2 Position of the Centre of Gravity and a Datum Reference ......................... 6-2 6.3 Weighing and Specifying the CG Position by a Suspension Method ......... 6-3 6.4 Weighing and Specifying the CG Position by a Three-Scales Method ...... 6-4 Edition 1 Change no.: 21 Aug 2014 Document no.: TERCEL-AMM-001-EN Page 6-1 AVIATION Artur Trendak & Son 6.1 AIRCRAFT MAINTENANCE MANUAL Weighing and Specifying the Position of the Centre of Gravity Chapter 6 Introduction Check weighing and specifying the position of the centre of gravity of the empty gyrocopter must be performed at least every 4 years and also in every case in which a change of weight or weight distribution could occur, e.g. after doing repairs, painting, introducing structural changes, building in new or replacing fixed equipment with other. 6.2 Position of the Centre of Gravity and a Datum Reference The position of the centre of gravity of the gyrocopter (side view) is determined by the value of the angle which apex is located on the transverse axis of rotor head suspension on the mast, one arm is parallel to the vertical axis of the coordinate system related to the fuselage, and the other arm passes through the centre of gravity of the gyrocopter. The Cartesian coordinate system, based on the fixed fuselage surfaces, as on the figure below, is helpful in determining the position of the centre of gravity by a method of three-scales placed under the landing gear wheels. In practice, as a level datum of the gyrocopter, use the upper flat surface of the central tunnel inside the cockpit between the seats. z Area of admissible position of CG in flight configuration x Page 6-2 Document no.: TERCEL-AMM-001-EN Edition 1 Change no.: 21 Aug 2014 AVIATION Artur Trendak & Son 6.3 AIRCRAFT MAINTENANCE MANUAL Weighing and Specifying the Position of the Centre of Gravity Chapter 6 Weighing and Specifying the CG Position by a Suspension Method The suspension method is a basic weighing method and specifying the position of the centre of gravity practised by the manufacturer. It requires suspending the gyrocopter (without the rotor) on the hanging scale by the pin fixing hub to the rotor head. The gyrocopter weight is a sum of the (net) weight read from the scale on which it was suspended and the weight of the rotor which has to be weighed separately. The position of the centre of gravity is specified by means of an accurate level (accuracy 0.1º) put on the upper flat surface of the central tunnel inside the cockpit between the seats. It is important that the control stick is not blocked (there is the freedom of tilting the rotor head). The admissible range of the centre of gravity of the empty gyrocopter is: -0,6º ÷ +0,6º The actual weight and the position of the centre of gravity of the empty gyrocopter for a specific model is recorded in the up-to-date weighing report and is stated in subsection 6.4 of the Flight Manual. Admissible range of Centre of Gravity Edition 1 Change no.: 21 Aug 2014 Empty Gyrocopter -0,6 ÷ 0,6 [deg] 1 Person on board 4,5 ÷ 5,5 [deg] 2 Persons on board 7,5 ÷ 8,5 [deg] Document no.: TERCEL-AMM-001-EN Page 6-3 AVIATION Artur Trendak & Son 6.4 AIRCRAFT MAINTENANCE MANUAL Weighing and Specifying the Position of the Centre of Gravity Chapter 6 Weighing and Specifying the CG Position by a Three-Scales Method A method of three-scales put under the landing gear wheels is more intelligible for the most of the users. When put on scales, the gyrocopter must be levelled by means of an accurate level held on the upper flat surface of the tunnel inside the cockpit between the seats. The gyrocopter can be weighed both with the rotor fitted and without it. It is essential for the accurate specification of the position of the centre of gravity that the rotor head axis is set up exactly vertical. The gyrocopter weight is equal to a sum of (net) indications of all the three scales (plus the rotor weight provided it was detached when weighing the gyrocopter). W = WF + WRL + WRR (+ WR) The position of the centre of gravity along axis X is calculated from the following formula: xcg = WF × a + (WRL + WRR) × b WF + WRL + WRR where: W – gyrocopter weight WF – weight indication under the front wheel WRL – weight indication under the rear left wheel WRR – weight indication under the rear right wheel WR – rotor weight a = 1740 [mm] – axis coordinate of the front wheel b = 90 [mm] – axis coordinate of the rear wheels xcg [mm] – coordinate of the centre of gravity of the gyrocopter NOTE: The theoretical values of dimensions a and b are stated above. The values must be measured when weighing and inserted into the formula. The admissible range of the position of the centre of gravity of the empty gyrocopter is: 306 ÷ 386 mm Page 6-4 Document no.: TERCEL-AMM-001-EN Edition 1 Change no.: 21 Aug 2014 AVIATION Artur Trendak & Son AIRCRAFT MAINTENANCE MANUAL Chapter 7 Durability of the Structural Components Chapter 7 Durability of Structural Components 7. page 7.1 Introduction ................................................................................................ 7-2 7.2 Operation Time of the Units ...................................................................... 7-2 Edition 1 Change no.: 21 Aug 2014 Document no.: TERCEL-AMM-001-EN Page 7-1 AVIATION Artur Trendak & Son 7.1 AIRCRAFT MAINTENANCE MANUAL Durability of Structural Components Chapter 7 Introduction Observing the admissible operational time of the individual units and parts as well as replacing them or conducting a complete overhaul at the right time is a responsibility of the owner/user. Complete overhauls are executed by or through the agency of the gyrocopter manufacturer – AVIATION Artur Trendak. Replacement of the individual units or parts of the gyrocopter or complete overhaul should be recorded in the Gyrocopter Book. Replacing engine subassemblies, components and engine related systems should be performed in accordance with the CA 912 ULT Engine Maintenance Manual. 7.2 Operation Time of the Units The time is stated in flight hours or years from the date of being built in the gyrocopter, and in case of the engine - working hours or in years from the date of being built in. Structural Unit or Component Fuselage as a whole Rotor mast Rotor (blade, hub) Rotor head Pin for rotor hub suspension on the head (teeter bolt) and the slip sleeves Bolts fixing the rotor hub Bolts and nuts fixing the rotor blades Master bearing Propeller Propeller bolts Landing gear legs Rotor head control system pushers Bowden cables in the rudder system V-belts in the prerotation clutch Tensioner pulley master bearing (6209) in the prerotation clutch Engine Rubber sleeves (dampers) of the engine frame Fuel pump Fuel lines Oil lines Fuel tank ventilation line Page 7-2 Operation Time 6000 hours 2000 hours 2000 hours 500 hours 2000 hours 250 hours replacement replacement complete overhaul replacement replacement 500 hours 1000 hours 500 hours 600 hours 600 hours 2000 hours 2000 hours 500 hours 250 hours 500 hours replacement replacement replacement complete overhaul complete overhaul replacement replacement replacement replacement replacement 1500 hours or 15 years 1500 hours 1000 hours or 5 years 500 hours or 2 years 500 hours or 2 years 3 years complete overhaul replacement replacement replacement replacement replacement Document no.: TERCEL-AMM-001-EN Action Edition 1 Change no.: 21 Aug 2014 AVIATION Artur Trendak & Son AIRCRAFT MAINTENANCE MANUAL Flight Control System Chapter 8 Chapter 8 Flight Control System 8. page 8.1 Introduction ................................................................................................. 8-2 8.2 Angular Range of Rotor Head Movement .................................................. 8-2 8.3 Range of Control Stick Movement ............................................................ 8-3 8.4 Pedals, Rudders and Balance Tab ............................................................... 8-5 Edition 1 Change no.: 21 Aug 2014 Document no.: TERCEL-AMM-001-EN Page 8-1 AVIATION Artur Trendak & Son 8.1 AIRCRAFT MAINTENANCE MANUAL Flight Control System Chapter 8 Introduction Chapter 8 includes the design deflection values of the control components along with admissible tolerances. 8.2 Angular Range of Rotor Head Movements Head Deflection Figure 8.1-1 Rotor Head deflection range Parking position and braking the rotor: Position during horizontal flight: Rear position: -2 (+0,5°/-0,1°) extreme front 7 19 (+0,5°/-0°) extreme rear The maximum angle of head tilt to the left and right is 7 (+0,5°/-0°) The extreme values of the deflection and tilting angles of the rotor head are determined by the head structure and its suspension, and they are not adjustable. Page 8-2 Document no.: TERCEL-AMM-001-EN Edition 1 Change no.: 21 Aug 2014 AVIATION Artur Trendak & Son 8.3 AIRCRAFT MAINTENANCE MANUAL Flight Control System Chapter 8 Range of the Control Stick Movement 1 2 3 Figure 8.3-1 Control Stick movement range Position 1 corresponds to the extreme front position of the rotor head (-2°). Position 2 (vertical) corresponds to the neutral position of the rotor head (7°). Position 3 corresponds to the extreme rear position of the rotor head (19°). In order to lock control stick, push it in forward direction and hold in that position by one hand. Then, with the other hand, grab the locking strap, and pull so the stick remains in the extreme front position. CAUTION! IT IS FORBIDDEN TO LOCK THE CONTROL STICK DURING THE FLIGHT. To unlock the control stick, release clamp on the strap and pull the stick. Edition 1 Change no.: 21 Aug 2014 Document no.: TERCEL-AMM-001-EN Page 8-3 AVIATION Artur Trendak & Son 1 2 AIRCRAFT MAINTENANCE MANUAL Flight Control System Chapter 8 3 Figure 8.3-2 Control Stick movement range Position 1 corresponds to a rotor head tilt to the left (7°). Position 2 (vertical) corresponds to a neutral position of the rotor head (0°). Position 3 corresponds to a rotor head tilt to the right (7°). Page 8-4 Document no.: TERCEL-AMM-001-EN Edition 1 Change no.: 21 Aug 2014 AVIATION Artur Trendak & Son 8.4 AIRCRAFT MAINTENANCE MANUAL Flight Control System Chapter 8 Pedals, Rudders and Balance Tab With the neutral positions of the pedals, both rudders should be deflected by 2º to the right (relative to the planes of the vertical stabilizer chords). Adjusting the neutral position of the control surfaces is possible by appropriate fixing of the Bowden cables to the holders on tail beams. The maximum deflection angle of the control surfaces is 20º ÷ 25º to the right and left relative to the neutral position. These values are much higher than the maximum deflection angles which can occur during the flight. They are not adjustable. The balance tab is set after the phase of test flights. Its purpose is to facilitate straight flight without the necessity to use pedals by the pilot. If necessary, you can correct the tab position by gently bending it in or out (it is recommended to hold Balance Tab between two blocks of wood and then bend firmly in order to get straight bend line which is the most effective). It is not allowed to strain the control surfaces too firmly as they can become damaged. The tab is affixed with polyurethane glue. Bending the tab to the left deflects the flight direction of the gyrocopter to the right, and vice versa. Figure 8.4-1 Balance tab position Edition 1 Change no.: 21 Aug 2014 Document no.: TERCEL-AMM-001-EN Page 8-5 AVIATION Artur Trendak & Son AIRCRAFT MAINTENANCE MANUAL Chapter 9 Other Maintenance Information Chapter 9 Other Maintenance Information 9. page 9.1 Manoeuvring on the Ground, Road Transport ........................................... 9-2 9.2 Cleaning and Maintenance ......................................................................... 9-2 9.3 Repairs and Modifications ......................................................................... 9-2 Edition 1 Change no.: 21 Aug 2014 Document no.: TERCEL-AMM-001-EN Page 9-1 AVIATION Artur Trendak & Son 9.1 AIRCRAFT MAINTENANCE MANUAL Other Service Information Chapter 9 Manoeuvring on the Ground, Road Transport When transporting or moving the gyrocopter, the control stick should always be immobilized with a strap. For road transport (on a trailer, in a container), detach the rotor (see subsection 3.1.2) and fix the gyrocopter to the base by the landing gear legs. Moving the gyrocopter on the ground should be performed with great caution by using a forked drawbar, grappled by the front wheel axle or a rope grappled by the front leg. When parking with the rotor fitted, tie the rotor to the fuselage by means of straps with pockets fitted on the blade tips or by using two tapes. 9.2 Cleaning and Maintenance The outside surfaces of the fuselage, rotor and propeller must be washed with water with an addition of mild soap. Hard-to-wash stains of lubricant or oil can be removed by means of a lintfree cloth wetted with heavy aliphatic petrol. For seasoned painted surfaces, you can use any high-grade waxes or an abrasive compound of automotive type. Soft fabrics or suede must be used for polishing. The glazing is to be rinsed with clean water or a water solution with an addition of mild soap and next wiped up with clean soft fabric, sponge or suede. Exercise great caution with it to avoid scratches. NOTE: To clean the glazing do not apply agents containing alcohol! The cockpit interior, seats, rugs and upholstery should be cleaned with a vacuum cleaner. It is recommended to apply commercially available cleaning agents for car upholstery, however, the guidelines located on the wrapping must by strictly observed. Clean the engine in accordance with the Engine Maintenance Manual. 9.3 Repairs and Modifications All repairs and modifications in the structure can be conducted only by authorized personnel and in an agreement with the gyrocopter manufacturer. CAUTION: Before performing any modification of the gyrocopter, contact the aviation authority to make sure the planned modification will not undermine gyrocopter airworthiness. On performing a repair or modification, weigh the empty gyrocopter and specify the position of its centre of gravity as well as record the data in the table in subsection 6.4 of the Flight Manual. Page 9-2 Document no.: TERCEL-AMM-001-EN Edition 1 Change no.: 21 Aug 2014 AVIATION Artur Trendak & Son AIRCRAFT MAINTENANCE MANUAL Supplements Chapter 10 Chapter 10 Supplements page 10.1 Introduction ................................................................................................ 10-2 10.2 List of Introduced Supplements ................................................................. 10-2 Edition 1 Change no.: 21 Aug 2014 Document no.: TERCEL-AMM-001-EN Page 10-1 AVIATION Artur Trendak & Son 10.1 AIRCRAFT MAINTENANCE MANUAL Supplements Chapter 10 Introduction Chapter 10 includes appropriate supplements essential for the safe and efficient operation of the gyrocopter when it is equipped with various additional systems and equipment not applied in the standard variant. 10.2 List of Introduced Supplements Document no. Title of an attached supplement Notes In the “Notes” column, confirm manually the existence of additional equipment or systems in the gyrocopter model for which the following manual is intended. Page 10-2 Document no.: TERCEL-AMM-001-EN Edition 1 Change no.: 21 Aug 2014