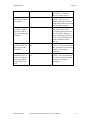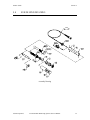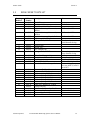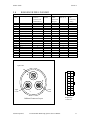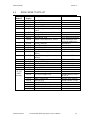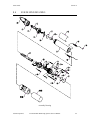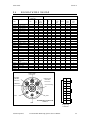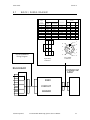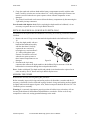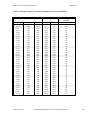
1
6-SERIES
ENVIRONMENTAL
MONITORING
SYSTEMS
Service
Manual
CONTENTS
SECTION 1 INTRODUCTION ................................................................................................. 1
1.1
1.2
1.3
1.4
HOW TO USE THIS MANUAL......................................................................................... 1
QUALIFICATIONS ............................................................................................................ 1
SERVICE PHILOSOPHY .......................................................................................................... 1
PC BOARD HANDLING ....................................................................................................... 2
SECTION 2 TROUBLESHOOTING ........................................................................................ 3
2.1
2.2
2.3
2.4
2.5
2.6
CALIBRATION ERRORS .................................................................................................. 3
PC6000 SOFTWARE PROBLEMS.................................................................................... 4
SONDE COMMUNICATION PROBLEMS ...................................................................... 5
SENSOR PERFORMANCE PROBLEMS.......................................................................... 6
610 DISPLAY/LOGGER PERFORMANCE ........................................................................... 9
6500 PERFORMANCE PROBLEMS ............................................................................... 11
SECTION 3 CARE, MAINTENANCE AND STORAGE ..................................................... 12
3.1
3.2
3.3
3.4
SONDE CARE AND MAINTENANCE............................................................................. 12
PROBE CARE AND MAINTENANCE ........................................................................... 13
SONDE STORAGE........................................................................................................... 17
PROBE STORAGE ........................................................................................................... 19
SECTION 4 600R SONDE........................................................................................................ 23
4.1
4.2
4.3
4.4
4.5
4.6
SONDE DISASSEMBLY/ASSEMBLY .............................................................................. 23
PC BOARD REPLACEMENT ......................................................................................... 24
TEST PROCEDURE .............................................................................................................. 24
SONDE EXPLODED VIEWS .................................................................................................. 26
REPLACEMENT PARTS LIST ................................................................................................ 28
BLOCK / WIRING DIAGRAM ............................................................................................... 29
SECTION 5 600XL SONDE .................................................................................................... 30
5.1
5.2
5.3
5.4
5.5
5.7
SONDE DISASSEMBLY/ASSEMBLY ........................................................................... 30
PC BOARD AND DEPTH MODULE REPLACEMENT ................................................ 32
TEST PROCEDURES....................................................................................................... 32
SONDE EXPLODED VIEWS .................................................................................................. 35
REPLACEMENT PARTS LIST ....................................................................................... 36
BLOCK / WIRING DIAGRAM ........................................................................................ 38
SECTION 6 600XLM SONDE ................................................................................................ 39
6.1
6.2
6.3
6.4
6.5
6.6
6.7
SONDE DISASSEMBLY/ASSEMBLY ........................................................................... 39
PC BOARD AND DEPTH MODULE REPLACEMENT ................................................ 41
TEST PROCEDURES....................................................................................................... 41
SONDE EXPLODED VIEWS .................................................................................................. 44
REPLACEMENT PARTS LIST ....................................................................................... 45
BULKHEAD WIRING DIAGRAM.................................................................................. 46
BLOCK / WIRING DIAGRAM ........................................................................................ 47
i
SECTION 7
7.1
7.2
7.3
7.4
7.5
7.6
7.7
6820 SONDE....................................................................................................... 48
SONDE DISASSEMBLY/ASSEMBLY .............................................................................. 48
PC BOARD AND DEPTH MODULE REPLACEMENT ................................................ 50
TEST PROCEDURE ......................................................................................................... 50
SONDE EXPLODED VIEWS .................................................................................................. 53
REPLACEMENT PARTS LIST ....................................................................................... 54
BULKHEAD WIRING DIAGRAM.................................................................................. 55
BLOCK / WIRING DIAGRAM ........................................................................................ 56
SECTION 8 6920 SONDE........................................................................................................ 57
8.1
8.2
8.3
8.4
8.5
8.6
8.7
SONDE DISASSEMBLY/ASSEMBLY....................................................................................... 57
PC BOARD AND DEPTH MODULE REPLACEMENT ................................................ 59
TEST PROCEDURE ......................................................................................................... 59
SONDE EXPLODED VIEWS .................................................................................................. 62
REPLACEMENT PARTS LIST ....................................................................................... 63
BULKHEAD WIRING DIAGRAM.................................................................................. 64
BLOCK / WIRING DIAGRAM ........................................................................................ 65
SECTION 9 6600 SONDE......................................................................................................... 66
9.1
9.2
9.3
9.4
9.5
9.6
9.7
SONDE DISASSEMBLY/ASSEMBLY ........................................................................... 66
PC BOARD AND DEPTH MODULE REPLACEMENT ................................................ 66
TEST PROCEDURES....................................................................................................... 70
SONDE EXPLODED VIEWS .................................................................................................. 73
REPLACEMENT PARTS LIST ....................................................................................... 74
BULKHEAD WIRING DIAGRAM.................................................................................. 75
BLOCK / WIRING DIAGRAM ........................................................................................ 76
SECTION 10 6500 PROCESS MONITOR............................................................................. 77
10.1
10.2
10.3
10.4
10.5
DISASSEMBLY/ASSEMBLY OF 6500 MONITOR .............................................................. 77
6500 MONITOR EXPLODED VIEW .................................................................................. 79
EXPLODED VIEW OF 6502 BREAKOUT BOX................................................................... 80
BLOCK DIAGRAM OF 6500 MONITOR ............................................................................ 81
BOARD ASSEMBLIES ...................................................................................................... 82
SECTION 11 610D/DM DISPLAY/LOGGERS ..................................................................... 84
11.1
11.2
11.3
SOFTWARE UPDATES............................................................................................... 84
LOADING NEW SOFTWARE..................................................................................... 84
REPLACEMENT PARTS LIST ................................................................................... 86
SECTION 12 WARRANTY AND SERVICE INFORMATION ......................................... 87
APPENDIX A HEALTH AND SAFETY................................................................................ 90
APPENDIX B REQUIRED NOTICE .................................................................................... 97
APPENDIX C ACCESSORIES AND CALIBRATION STANDARDS............................... 98
APPENDIX D SOLUBILITY AND PRESSURE/ALTITUDE TABLES .......................... 101
ii
SECTION 1 INTRODUCTION
1.1
HOW TO USE THIS MANUAL
The manual is organized to help you maintenance and service YSI 6-Series Environmental
Monitoring Systems products. For successful service, in addition to this Service Manual, an
understanding of the Principles of Operation, Calibration Techniques, and System Setup is
necessary. These sections are in the 6-Series Operations Manual, available from YSI Customer
Service.
All YSI 6-series products (600, 600XL, 600XLM, 6600, 6820, 6920, 6500, and the 610) are
covered in this manual. Each product has a separate section with exploded views, parts list, block
diagrams and test processes. Maintenance procedures, calibration errors and troubleshooting are
also covered in separate sections.
If you have any questions about this product or its application, please contact YSI Technical
Support, an authorized regional service center or your authorized YSI Dealer.
1.2
QUALIFICATIONS
The following service sections are intended for use by qualified service technicians that have been
authorized by YSI Incorporated. End users may find the illustrations and procedures in this
manual useful when ordering parts or testing, but should not attempt to disassemble and service
these products. Non-authorized service will void the manufacturer’s warranty.
1.3
SERVICE PHILOSOPHY
From years of experience servicing water quality instrumentation it has been found that most
service issues are the result of failed probes, sensors and/or cables. There are a number or
reasons for this condition, including exposure to harsh environments, limited life expectancy due
to design limitations, and maintenance requirements. For this reason, troubleshooting efforts
should be initially directed at determining the condition and functionality of the probes and
cables.
In the event that a service problem is isolated to the instrument itself, YSI recommends the
replacement of the entire defective sub-assembly rather than individual components. To lessen
down time, YSI and its Authorized Service Centers maintain an ample stock of replacement subassemblies.
The recommended method of determining a sub-assemblies condition is by substitution. For
example, to test for a defective probe assembly, substitute the assembly with a known good one,
or a decade resistance box of equivalent value. If, after testing, the PC board meets the
established specifications, the probe assembly will have to be serviced or replaced.
YSI Incorporated
Environmental Monitoring Systems Service Manual
1
1.4
PC BOARD HANDLING
YSI 6-series printed circuit boards utilize state-of-the-art SMT (surface mount technology)
components. WARNING: PC board assemblies contain static-sensitive components. Always
handle at a static-free (ESD) workstation.
YSI Incorporated
Environmental Monitoring Systems Service Manual
2
SECTION 2 TROUBLESHOOTING
This section contains troubleshooting tables that will help identify the causes of the most
common difficulties that may occur while operating the YSI 6-Series equipment. The Symptom
column describes the type of difficulty that you might experience. The Possible Cause column
describes the conditions that might cause the stated symptom. The Action column provides
simple steps that can be followed to correct for the “possible cause” and cure the “symptom”
being experienced. The column entitled Ref is the number of the reference section and
subsection in a corresponding YSI Operations Manual where you may find additional
information.
Troubleshooting problems have been categorized into six general areas.
•
•
•
•
•
•
Calibration Error Messages
PC6000 Software
Sonde Communication
Sensor Performance
6500 Environmental Process Monitor Performance
610 Display/Logger Performance
If you need assistance that this Troubleshooting section can not provide, please contact YSI
Technical Support, an authorized regional service center or your authorized YSI Dealer.
2.1
CALIBRATION ERRORS
There is only three Calibration Error messages that are possible. They are listed below instead of
in the troubleshooting table. Only two of the error messages are related to sensor performance.
High DO Charge: This message indicates a malfunction in the DO sensor that is generally due
to the roughness of the electrodes on the surface of the probe face. The charge associated with
the DO sensor must be in the range 25 to 75 or the error message will appear when calibration is
attempted. If this error message is encountered, remove the DO probe from the sonde and
resurface it according to the instructions in the 6-Series Operations Manual. After resurfacing
the probe, activate the DO charge parameter in the Report setup section of the sonde software
and confirm that the value is within the acceptable range. After resurfacing, allow the sensor to
pulse in the Run mode for at least 5 minutes, during which time the DO charge may be expected
to drop in value if the sensor is still functional. If resurfacing according to the instructions in the
6-Series Operations Manual does not result in a lowering of the charge, contact YSI Technical
Support for additional help.
Out of Range: This message indicates that the output of the sensor being calibrated does not
conform to the normal range for this parameter. This problem could be due to either a
malfunctioning sensor or to a calibration solution that is out of specification. If this error
message is encountered, first insure that your standards for pH, ORP, ammonium, nitrate,
chloride, conductivity, and turbidity have not been contaminated and that your DO sensor is in
air (DO % Cal) or in a solution of known dissolved oxygen concentration (DO mg/L). Also be
certain that you have entered the correct value for the calibration solution. If the calibration error
YSI Incorporated
Environmental Monitoring Systems Service Manual
3
Troubleshooting
Section 2
message continues to occur, contact YSI Technical Support to determine whether the sensor in
question needs to be factory-serviced or replaced.
Illegal Entry: This message simply indicates that your keyboard input does not conform to the
accepted format for this parameter. For example, you may have entered the “letter O” instead of
“zero” for a calibration value. Return to the desired parameter in the Calibrate menu and repeat
the calibration entry, being certain to enter only numbers.
The following troubleshooting tables can help you if you encounter problems with software,
communication protocol, or sensor malfunctions other than calibration errors.
2.2
PC6000 SOFTWARE PROBLEMS
For more information about PC6000 software, please reference the PC6000 Operations Manual,
item # 6125. To obtain this manual, please contact YSI Customer Service.
SYMPTOMS
PC6000 software
operates but no data
are captured to disk.
POSSIBLE CAUSE
Data capture not set up
PC6000 displays data,
no files found.
Will not auto configure.
After auto configure, no data
arrives
Data directory path not
recognized
Expected parameters
are not displayed on
reports or plots
Unable to print
reports or plots
Data files not readable
Parameters not added to Yaxis list
Sensor disabled
Printer port improperly
configured
Video screen of PC is
not readable
When selecting
“sonde” from PC6000
top line, sonde menu
not shown
YSI Incorporated
Printer port improperly set
Printer type improperly
selected
Print cable improperly
connected
Incorrect menu color option
has been selected
Incorrect graphic mode
Prompt # appears in place of
menu
Communication problem
ACTIONS
Move cursor to data capture
setup and make proper
selections.
Enter parser, site name , ID
Return to sonde menu and start
sonde
Move cursor to PC6000
Advanced setup and establish a
directory
Export file as PRN, CDF, SDF
Add parameter
Check sensor setup instructions
Try a screen print out to the
printer (print screen)
Check setup
Check setup
Check connections at both ends
Select appropriate menu
parameter
Select compatible graphic mode
Type “menu” and press (enter)
Make certain Com port
selection is correct.
Environmental Monitoring Systems Service Manual
4
Troubleshooting
2.3
Section 2
SONDE COMMUNICATION PROBLEMS
For more information about PC6000 software, please reference the 6-Series Environmental
Monitoring Systems Operations Manual, item # 069301. To obtain this manual, please contact
YSI Customer Service.
SYMPTOM
Screen is locked at
“connecting, please
wait”.
Cannot communicate
with sonde
POSSIBLE CAUSE
Com port selected is assigned
to anther device, i.e. Modem
or mouse
Sonde not powered
Cable connection is loose
Damaged connectors
Com port not selected
Scrambled data
Make sure that the connectors
are clean and dry
Check battery contacts for
corrosion or oxidation
Confirm battery voltage,
minimum 5 volts for the
600XLM sonde, minimum 9
volts for the 6600, 6920, 6600
sondes
Unmatched baud rate between
host and sonde
Host is too slow
Interface cable failure
Internal failure
YSI Incorporated
ACTION
Select another com port
Check 12 vdc source
Check both ends of cable;
secure connectors
Check pins at both ends, insure
they are straight, dry and clean.
Change to other Com port,
other peripheral on the same
port (Internal mouse). Try other
PC, 610 hand held terminal or
dumb terminal
Clean if necessary
Clean if necessary or replace
batteries if they are damaged
Match the baud rate
Use faster computer
Check cable for damage. If
necessary, return for service
Return sonde for service
Environmental Monitoring Systems Service Manual
5
Troubleshooting
2.4
Section 2
SENSOR PERFORMANCE PROBLEMS
For more information about PC6000 software, please reference the 6-Series Environmental
Monitoring Systems Operations Manual, item # 069301. To obtain this manual, please contact
YSI Customer Service.
SYMPTOMS
ISE’s unstable:
Dissolved Oxygen
reading unstable or
inaccurate
POSSIBLE CAUSE
pH probe not in calibrator
solution
ISE sensor has been exposed to
pH buffers
ISE sensor was exposed to
water with a conductivity >2
mS/cm
Probe not properly calibrated
Membrane not properly
installed or may be punctured
DO probe electrodes require
cleaning
Water in probe connector
Algae or other contaminant
clinging to DO probe
Barometric pressure entry is
incorrect
Cal at extreme temperature
DO Charge too high ( >75)
610 Anodes polarized
(tarnished)
2. Probe left on continuously
DO Charge too low (<25)
Insufficient electrolyte.
Poor probe performance
DO gain range outside of 0.7 to
1.7 or the DO charge range is
outside 25 to 75.
YSI Incorporated
ACTION
Put pH probe in calibrator
solution with ISE sensor
Soak in 100 mg/L standard for
a few hours overnight
Soak in 100 mg/L standard for
a few hours overnight
Follow DO cal procedures
Follow 6562 setup procedure
Follow DO cleaning
procedure. Use 6035 maint.
Kit
Dry connector; reinstall probe
Rinse DO probe with clean
water
Repeat DO cal procedure
Recal at (or near) sample
temperature
Enable DO charge parameter
in the Sonde report menu. Run
6920, if charge is over 75,
recondition probe with 6035
Maintenance Kit. Follow DO
cleaning procedure.
Replace electrolyte and
membrane.
Probe output must start at a
high DO value and go lower at
initial power up. If DO output
starts low and climbs, or a
negative number appears, the
probe is defective.
If the ranges are outside these
numbers, the probe needs
reconditioned.
Environmental Monitoring Systems Service Manual
6
Troubleshooting
Dissolved Oxygen
reading unstable or
inaccurate
pH, ORP, chloride,
ammonium, or nitrate
readings are unstable
or inaccurate. Error
messages appear
during calibration.
Section 2
When DO sensor is removed
(on units that this is possible) –
the output is NOT 0 to 1.2
DO probe has been damaged
Internal failure
Probe requires cleaning,
Probe requires calibration
Sensor and milli volt output for
known pH buffers is incorrect.
PH probe reference junction
has dried out from improper
storage.
Water in probe connector
Probe has been damaged
Calibration solutions out of
spec or contaminated with
other solution
ORP fails Zobell check
Depth unstable or
inaccurate
YSI Incorporated
Internal failure
Depth sensor has not been
zeroed
Depth sensor access hole is
obstructed
Depth sensor has been damaged
Internal failure
If the output is outside this
range, the connections are
contaminated and need to be
cleaned. Rinse both the probe
and bulkhead connectors in
warm water and let soak for 15
min. Then rinse with DI water
and allow drying overnight
with the parts disassembled.
Replace 6562 probe
Return sonde for service
Follow probe cleaning
procedure
Follow cal procedures
Buffer 4= +170-185 MV + 40
MV
Buffer 7= 0 MV + 40 MV
Buffer 10 = -170-185 MV +
40 MV
The span between the 4 and 7
and the 7 and 10 buffers must
be 170-185 MV. If the pH
probe is not working correctly,
a Cal error will appear on the
screen.
Soak probe in tap water or
buffer until readings become
stable
Dry connector; reinstall probe
Replace probe
Use new calibration solutions
Take into account temperature
dependence of Zobell solution
readings
Return sonde for service
Follow depth zero procedure
Follow depth cleaning
procedure
Return sonde for service
Return sonde for service
Environmental Monitoring Systems Service Manual
7
Troubleshooting
Conductivity unstable
or inaccurate. Error
messages appear
during calibration.
Installed probe has no
reading
Temperature,
unstable or inaccurate
Turbidity probe
unstable or
inaccurate. Error
messages appear
during calibration
YSI Incorporated
Section 2
Conductivity improperly
calibrated.
Follow cal procedure
Conductivity probe requires
Follow cleaning procedure
cleaning
Conductivity probe damaged
Replace probe
Calibration solution out of spec Use new calibration solution
or contaminated
Internal failure
Return sonde for service
Calibration solution or sample
Immerse sensor fully.
does not cover entire sensor.
The sensor has been disabled
Enable sensor
Water in probe connector
Dry connector; reinstall probe
Probe has been damaged
Replace the 6560 probe
Report output improperly set up Set up report output
Internal failure
Return sonde for service.
Water in connector
Dry connector; reinstall probe
Probe has been damaged
Replace the 6560 probe
Probe requires cleaning.
Follow probe cleaning
procedure
Probe requires calibration
Follow cal procedures
Probe has been damaged
Replace probe
Water in probe connector
Dry connector; reinstall probe
Calibration solutions out of
Use new calibration solutions
spec
Wiper is not turning or is not
Activate wiper. Assure
synchronized.
rotation. Make sure setscrew
is tight.
Wiper is fouled or damaged.
Clean or replace wiper.
Internal failure.
Return probe for service.
Environmental Monitoring Systems Service Manual
8
Troubleshooting
2.5
Section 2
610 DISPLAY/LOGGER PERFORMANCE
For more information about PC6000 software, please reference the 6-Series Environmental
Monitoring Systems Operations Manual, item # 069301. To obtain this manual, please contact
YSI Customer Service.
SYMPTOMS
610 does not
communicate with
sonde.
POSSIBLE CAUSE
ACTION
Sonde power not turned on for
Go into Setup 610 and turn on
610.
Sonde power.
Baud rate does not match sonde. Try different baud rates on 610.
Sonde is configured to “power up Try communicating with sonde
to run” and/or “power up to
through “Terminal” in the 610
menu” in Sonde software
communications menu. If
successful, disable both settings
in Advanced|Setup menu.
610 appears to try to go “Wait for DO” and/or “Wait for Communicate with sonde via
into Run mode, but
Filter” is active in Sonde
Smart Terminal in the 610
then gives “Comm time software
communications menu.
out error”.
Deactivate “Wait for DO” in the
Advanced|Sensor menu.
Deactivate “Wait for Filter” in
the Advanced|Data Filter menu.
The
parameters
active
in
the
new
Create a new file for the new
While trying to log data
study. Alternatively view the
to an existing file while study are not IDENTICAL to
parameters active when the file data from the existing file and
in the Run mode or
set up the sonde parameters to
setting up the 610 for was created.
match those in the existing file.
logging using an
existing file name, the
error “file parameters
differ” appears.
The 610 software does not allow Do not attempt to mix “Add”
When trying to
the addition of data to “Capture” and “Capture” files.
“Capture” data to an
file using the “Add” function and
existing file or to
vice versa, even if the parameters
“Add” data to an
existing file, the error match.
“Wrong type of file”
appears.
The date/time setting and/or
Make sure the values of date
When using a 610 to
format on the 610 does not match and time (e.g., 1/10/99;
put a 6600 into
12:10:00) and the format (e.g.,
Unattended mode, the the date/time setting and/or
format on the 6600.
1/10/99 and not 10/1/99) are the
error “Bad sonde
same on both 610 and 6600.
response” appears.
When putting 610 into The “Radix mark” is not set the Make sure that the radix
Run mode, the error
same in 610 as in the sonde.
selection (“.” Or “,”) is the same
message “Data format
in the 610 Setup menu and in
error” appears.
the sonde Advanced|Setup
menus. For the sonde, if the
YSI Incorporated
Environmental Monitoring Systems Service Manual
9
Troubleshooting
610 locks up in the Run
mode with no response
from keypad.
610 will not power up
showing no response
from keypad and no
response when charger
is installed.
610 displays RUN only
in left hand corner of
display and will not
power down.
610 displays
“Checksum” error, or
“Syntax” error during
power-up procedure
and may not power
down.
YSI Incorporated
Section 2
comma selection is active, the
radix will be “,” and when
inactive, the radix will be “.”.
Microprocessor has locked up.
Remove charge block from 610
backside. The 610 screen
should become blank. Reinstall
charge block and the 610 should
return to normal operation.
Microprocessor has locked up.
Disassemble 610 and remove
battery from circuit board.
Leave battery disconnected for
about 30 minutes. Reattach
battery and attempt to power up
the 610. Note that charge block
must be installed to achieve
power-up.
The 610 software setup has been Remove charge block from 610
lost.
backside. 610 screen should go
blank. Reinstall block and then
re-initialize 610 software
according to
The 610 software setup has been Remove charge block from 610
lost.
backside. 610 screen should go
blank. Reinstall block and then
re-initialize 610 software
according to
Environmental Monitoring Systems Service Manual
10
Troubleshooting
2.6
Section 2
6500 PERFORMANCE PROBLEMS
For more information about PC6000 software, please reference the 6500 Environmental Process
Monitor Operations Manual, item # 065902. To obtain this manual, please contact YSI Customer
Service.
SYMPTOM
6500 will not
communicate with
sonde.
POSSIBLE CAUSE
ACTION
“Autobaud” may be disabled in Connect sonde to a terminal
sonde. RS232. Full SDI-12 may device and make certain that
be enabled in sonde.
“Autobaud” is enabled in the
System|Comm menu. Then
make certain that “Full SDI-12
is disabled in the
Advanced|Setup menu.
Using sonde with old software
Must have Software Ver. 1.04 or
later for 600R, 600XL, and 6820
sondes. Must have version 1.03
or later software for 600XLM,
6920, and 6600 sondes.
An improper SDI-12 address is
selected in the sonde.
All parameters
displayed on 6500 are
missing the decimal
point.
6500 appears to be
attempting to
communicate with
sonde, but actual
readings take several
seconds to appear.
YSI Incorporated
Comma Radix designation is
active in the sonde.
“Wait for DO” and/or “Wait for
Filter” are enabled in the sonde.
Connect sonde to a terminal
device and make certain a
proper SDI-12 address (0-9) is
selected in the System menu.
Connect sonde to a terminal
device and deactivate the
Comma radix selection in the
Advanced|Setup menu.
Connect sonde to a terminal
device and deactivate “Wait for
DO” in the Advanced|Sensor
menu and “Wait for Filter” in
the Advanced|Data Filter menu.
Environmental Monitoring Systems Service Manual
11
SECTION 3 CARE, MAINTENANCE AND STORAGE
This section describes the proper procedure for storage of the sensors that will maximize their
lifetime and minimize the time required to get the sonde ready for a new application. This section
will describe interim or short-term storage between applications where the sonde is being used at
a regular interval (daily, weekly, biweekly, etc.) and long term storage (e.g., over-the-winter)
when the sonde will not be used on a regular basis for several months.
In the descriptions and instructions below, it is assumed that the user has retained the vessels
(bottles, boots, etc.) in which the individual sensors were stored on initial delivery. If these
specific items have been misplaced or lost, they can be replaced by contacting YSI Customer
Service. Alternatively, the user may have similar (and equally acceptable) storage equipment on
hand even though it was not part of the original YSI package. Common sense should be the
guide on substitution of storage vessels.
3.1
SONDE CARE AND MAINTENANCE
The Model 6570 Maintenance Kit is available for use with your sonde. The kit includes several
items that will be helpful or necessary to perform the proper routine maintenance on your sonde.
The 6570 Maintenance Kit includes two types of O-rings (for probes and cable connector),
probe/installation/replacement tools, 2 cleaning brushes for the conductivity sensor, O-ring
lubricant, and a syringe for cleaning the depth sensor port.
The 6570 Maintenance Kit can be ordered from any authorized YSI dealer, or directly from YSI.
When caring for your sonde, remember that the sonde is sealed at the factory, and there is never
a need to gain access to the interior circuitry of the sonde. In fact if you attempt to disassemble
the sonde, you would void the manufacturer's warranty.
SONDE PROBE PORTS
Whenever you install, remove or replace a probe, it is extremely important that the entire sonde
and all probes be thoroughly dried prior to the removal of a probe or a probe port plug. This will
prevent water from entering the port. Once you remove a probe or plug, examine the connector
inside the sonde probe port. If any moisture is present, use compressed air to completely dry the
connector. Check to see if the connector is corroded. When you reinstall a probe or port plug,
lightly grease the O-ring with lubricant supplied in the 6570 Maintenance Kit.
YSI Incorporated
Environmental Monitoring Systems Service Manual
12
Care, Maintenance and Storage
Section 3
CABLE CONNECTOR PORT
The cable connector port at the top of the sonde should be covered at all times. While
communicating with the sonde, a cable should be installed and tightened in place. This will
assure that a proper connection is being made and prevent moisture and contaminants from
entering.
When a communications cable is not connected to the cable connector port, the pressure cap
supplied with the instrument should be securely tightened in place.
If moisture has entered the connector, dry the connector completely using compressed air, a clean
cloth, or paper towel. Apply a very thin coat of lubricant from the 6570 Maintenance Kit to the
O-ring inside the connector cap before each installation.
3.2
PROBE CARE AND MAINTENANCE
Once the probes have been properly installed, remember that periodic cleaning and DO
membrane changes are required.
6562 DO PROBES
For best results, we recommend that the KCl solution and the Teflon membrane at the tip of the
6562 probe be changed prior to each sonde deployment and at least once every 30 days during
the use of the sonde in sampling studies. In addition, the KCl solution and membrane should be
changed if (a) bubbles are visible under the membrane; (b) significant deposits of dried
electrolyte are visible on the membrane or the O-ring; and (c) if the probe shows unstable
readings or other probe-related symptoms. See the 6-Series Operations Manual that came with
your sonde for instructions on changing the DO membrane.
After removing the used membrane from the tip of the 6562 probe, examine the electrodes at the
tip of the probe. If either or both of the silver electrodes are black in color, the probe should be
resurfaced using the fine sanding disks which are provided in the 6035 reconditioning kit.
Figure 1
To resurface the probe using the fine sanding disk, follow the
instructions below. See Figure 1.
First dry the probe tip completely with lens cleaning tissue.
Next, hold the probe in a vertical position, place one of the
sanding disks under your thumb, and stroke the probe face in a
direction parallel to the gold electrode (located between the
two silver electrodes). The motion is similar to that used in
striking a match. Usually 10-15 strokes of the sanding disk are
sufficient to remove black deposits on the silver electrodes.
However, in extreme cases, more sanding may be required to
regenerate the original silver surface.
YSI Incorporated
Environmental Monitoring Systems Service Manual
13
Care, Maintenance and Storage
Section 3
After completing the sanding procedure, repeatedly rinse the probe face with clean water and
wipe with lens cleaning tissue to remove any grit left by the sanding disk. After cleaning,
thoroughly rinse the entire tip of the probe with distilled or deionized water and install a new
membrane.
IMPORTANT: Be sure to: (1) Use only the fine sanding disks provided in the 6035 maintenance
kit in the resurfacing operation and (2) Sand in a direction parallel to the gold electrode. Not
adhering to either of these instructions can seriously damage the electrodes.
NOTE: If this procedure is unsuccessful, as indicated by improper probe performance, it may be
necessary to return the probe to an authorized service center.
6560 CONDUCTIVITY/TEMPERATURE PROBES
The openings that allow fluid access to the conductivity electrodes must also be cleaned
regularly. The small cleaning brush included in the 6570 Maintenance Kit is ideal for this
purpose. Dip the brush in clean water and insert it into each hole 15-20 times. In the event that
deposits have formed on the electrodes, it may be necessary to use a mild detergent with the
brush. After cleaning, check the response and accuracy of the conductivity cell with a calibration
standard.
The temperature portion of the probe requires no maintenance.
6561 pH AND 6565 COMBINATION pH-ORP PROBES
Cleaning is required whenever deposits or contaminants appear on the glass and/or platinum
surfaces of these probes or when the response of the probe becomes slow.
Remove the probe from the sonde. Initially, simply use clean water and a soft clean cloth, lens
cleaning tissue, or cotton swab to remove all foreign material from the glass bulb (6561 and
6565) and platinum button (6561). Then use a moistened cotton swab to carefully remove any
material that may be blocking the reference electrode junction of the sensor.
CAUTION: When using a cotton swab with the 6561 or 6565, be careful NOT to wedge the
swab tip between the guard and the glass sensor. If necessary, remove cotton from the swab tip,
so that the cotton can reach all parts of the sensor tip without stress.
If good pH and/or ORP response is not restored by the above procedure, perform the following
additional procedure:
1. Soak the probe for 10-15 minutes in clean water containing a few drops of commercial
dishwashing liquid.
2. GENTLY clean the glass bulb and platinum button by rubbing with a cotton swab soaked in
the cleaning solution.
3. Rinse the probe in clean water, wipe with a cotton swab saturated with clean water, and then
rerinse with clean water.
YSI Incorporated
Environmental Monitoring Systems Service Manual
14
Care, Maintenance and Storage
Section 3
If good pH and/or ORP response is still not restored by the above procedure, perform the
following additional procedure:
1. Soak the probe for 30-60 minutes in one molar (1 M) hydrochloric acid (HCl). This reagent
can be purchased from most distributors. Be sure to follow the safety instructions included
with the acid.
2. GENTLY clean the glass bulb and platinum button by rubbing with a cotton swab soaked in
the acid.
3. Rinse the probe in clean water, wipe with a cotton swab saturated with clean water, and then
rerinse with clean water. To be certain that all traces of the acid are removed from the probe
crevices, soak the probe in clean water for about an hour with occasional stirring.
If biological contamination of the reference junction is suspected or if good response is not
restored by the above procedures, perform the following additional cleaning step:
1. Soak the probe for approximately 1 hour in a 1 to 1 dilution of commercially available
chlorine bleach.
2. Rinse the probe with clean water and then soak for at least 1 hour in clean water with
occasional stirring to remove residual bleach from the junction. (If possible, soak the probe
for period of time longer than 1 hour in order to be certain that all traces of chlorine bleach
are removed.) Then rerinse the probe with clean water and retest.
Dry the sonde port and probe connector with compressed air and apply a very thin coat of O-ring
lubricant to all O-rings before re-installation.
DEPTH SENSOR
The depth sensor modules are factory installed options that are located between the bulkhead and
the sonde tube. For 600XL and 600XLM sondes, there is a circular protective cap with two
small holes. The cap cannot be removed, but a syringe is supplied in the maintenance kit to aid
in cleaning the pressure port. Fill the syringe with clean water, place the tip of the syringe into
one of the holes and gently force water through the pressure port. Ensure that the water comes
out of the other hole. Continue flushing the pressure port until the water comes out clean.
CAUTION: Never try to remove the circular pressure port cap.
For 6920, 6820 and the 6600 sondes, the depth sensor is exposed to the water by either a circular
access port on the side of the sonde or a though-hole on a module just above the sonde bulkhead.
A syringe is supplied in the maintenance kit to aid cleaning the pressure port. Fill the syringe
with clean water, place the tip of the syringe into one of the holes and gently force water through
the access port. Ensure that the water comes out of the other hole. Continue flushing the
pressure port until the water comes out clean.
CAUTION: Do not attempt to remove the depth module from the sonde body.
YSI Incorporated
Environmental Monitoring Systems Service Manual
15
Care, Maintenance and Storage
Section 3
LEVEL SENSOR
For level sensors follow all the maintenance procedures given for depth sensors. In addition,
ensure that the desiccant always remains active. Active desiccant is a distinctive blue color.
When it can absorb no more moisture, it is a rose red or pink color. For either the cartridge or
the canister, the end that is vented to atmosphere will begin to change color first. As long as the
desiccant closest to the sonde is blue, no maintenance is required. Local conditions will dictate
how long the desiccant will last. In humid environments, the desiccant may need to be changed
or regenerated well before it is completely exhausted to ensure that it lasts the entire deployment.
You may regenerate the desiccant, replace the desiccant in the cartridge or canister, or replace
the entire cartridge or canister. See the 6-Series Operations Manual for more information.
To regenerate the desiccant, remove it from the unit and spread it evenly, one granule deep, on a
suitable tray. Heat for about one hour at about 200 ° C (about 400 ° F). The desiccant should
then be cooled in a suitable, tight container before refilling the unit. The color of the desiccant
will return to blue if the regeneration cycle has been successful. The felt filters should also be
dried at about 100 ° C (about 200 ° F) for about 30 minutes before assembly.
Desiccant material is sold separately. Both the cartridge and canister can easily be opened,
emptied, and refilled.
CAUTION: It is important to keep the tube in vented sondes and cables dry. They are supplied
with caps for closing the volume when not in use. Keep the caps on until just before calibration
and deployment. For storage, replace the caps.
6882 CHLORIDE, 6883 NITRATE AND 6884 AMMONIUM SENSORS
You should clean these probes whenever deposits or contaminants appear on the ion selective
membranes located on the tips of these sensor modules.
Figure 2
If possible, the module should be cleaned while
PLIERS (SLIP-JAW)
installed in the sonde bulkhead. Use clean water and a
moist piece of lens cleaning tissue to gently wipe the
sensor membranes until no more contaminants are
removed. However, under some conditions, it may be
necessary to remove the module from the sonde
bulkhead for cleaning and/or storage. To remove the
module, follow the diagram at the side. Remove the
module with finger pressure only, if possible.
However, it is acceptable to use small pliers if
AMMONIUM OR
necessary to loosen the module for final removal by
NITRATE PROBE
hand. Be very careful not to squeeze the module
any more than is necessary for a firm grip. Use slipjaw pliers to minimize the chance of
applying too much pressure on the module. While the module is removed from the sonde, be
sure to dry the sonde port and probe connector with compressed air and apply a very thin coat of
lubricant to the O-ring before re-installation.
YSI Incorporated
Environmental Monitoring Systems Service Manual
16
Care, Maintenance and Storage
Section 3
NOTE: The ion selective membranes are fragile. Be certain to: (1) Use only moist, high quality
lens cleaning tissue for the cleaning procedure (not paper towels or other coarse materials); and
(2) Stroke the probe face very gently with the tissue during the procedure. If you do not adhere to
these instructions, you can seriously damage the sensors.
6025, 6026 AND 6036 CHLOROPHYLL AND TURBIDITY PROBES
The 6026 and 6036 turbidity probes require only minimal maintenance. After each deployment,
the optical surface on the tip of the turbidity probe should be inspected for fouling and cleaned if
necessary by gently wiping the probe face with moist lens
Figure 3
cleaning paper. In addition, for the 6026 probe, it is
recommended that the wiper be replaced periodically. The
frequency of this replacement depends on the quality of
water under examination. A replacement wiper is
supplied with the 6026 sensor, along with the small hex
driver required for its removal and reinstallation. Follow
the instructions supplied with the turbidity sensor to insure
proper installation of the new wiper assembly. Additional
wipers are available from YSI.
3.3
WIPING
TURBIDITY PROBE
WIPER
ASSEMBLY
NON-WIPING
TURBIDITY PROBE
SONDE STORAGE
INTERIM SONDE STORAGE
Since the introduction of the YSI 6-Series Environmental Monitoring Systems product line
several years ago, YSI has learned a great deal about storage protocols which will maximize the
lifetime of your sensors. This knowledge has come from our own extensive in-house testing
programs as well as from feedback from a large number of customers and sales representatives.
Proper storage of the your sonde between periods of usage will not only extend the life of the
sensors, but will also ensure that the unit will be ready to use as quickly as possible in your next
application.
The recommended short term or interim storage procedure is simple and identical for all sondes,
models 600R, 600XL, 600XLM, 6820, 6600 and 6920.
No matter what sensors are installed in the instrument, it is important to keep them moist without
actually immersing them in liquid, which could cause some of them to drift or result in a shorter
lifetime. For example, the reference junction of a pH sensor must be kept moist to minimize its
response time during usage, but continued immersion in pure water may compromise the
function of the glass sensor and/or result in long term leaching of the reference junction.
YSI recommends that short term storage of all multi parameter instruments be done by placing
approximately 0.5 inch of water in the calibration and/or calibration cup, that was supplied
YSI Incorporated
Environmental Monitoring Systems Service Manual
17
Care, Maintenance and Storage
Section 3
with the instrument, and by placing the sonde with all of the probes in place into the cup.
The use of a moist sponge instead of a half-inch of water is also acceptable, as long as its
presence does not compromise the attachment of the calibration cup to the sonde. The
calibration cup should be sealed to prevent evaporation.
The key for interim storage is to use a minimal amount of water so that the air in chamber
remains at 100 percent humidity. The water level has to be low enough so that none of the
sensors are actually immersed. Any type of water can be used in this protocol: Distilled,
deionized, or tap water. If the storage water is inadvertently lost during field sampling studies,
environmental water can be used to provide the humidity.
Sondes with level sensors have a tube that vents the pressure transducer to the atmosphere. It is
important that the air in the tube remains dry at all times. Sondes with integral cables
should be stored with the desiccant in place and the vented end of the desiccant system sealed.
Sondes with connectors should be stored with the connector cap firmly in place. When
disconnecting the cable, put the cap on immediately. Vented cables should be stored in a bag
containing desiccant, with their caps in place.
Ø Interim multi parameter storage is easy. Simply remember the following key points:
Ø Use enough water to provide humidity, but not enough to cover the probe surfaces.
Ø Make sure the storage vessel is sealed to minimize evaporation.
Ø Check the vessel periodically to make certain that water is still present.
Ø For sondes with level sensors, keep the tube sealed and dry.
GENERAL RECOMMENDATIONS FOR LONG-TERM SONDE STORAGE
The following are long term storage recommendations listed by instrument type. They will be
applicable for sondes with typical sensor configurations.
600XL, 600XLM -- Remove the pH or pH/ORP probe from the sonde and store it according to
the instructions found in the following section on individual sensors. Cover the empty port with
the provided plug. Leave the conductivity/temperature and the dissolved oxygen probes in the
sonde with a membrane and electrolyte on the DO sensor. Place enough of deionized, distilled,
or tap water in the calibration cup to cover the sensors, insert the sonde into the vessel, and seal
with the cap/O-ring to minimize evaporation.
6820, 6920, and 6600 -- Leave the conductivity/temperature and the dissolved oxygen probes in
the sonde with a membrane and electrolyte on the DO sensor. Remove all other probes from the
sonde and store according to the instructions found in the following section on individual
sensors. Cover the empty ports with the provided plugs. Place approximately 300 mL of
deionized, distilled, or tap water in the calibration cup, insert the sonde into the vessel, and
tighten the threaded cup to attain a good seal and minimize evaporation.
600R (with Replaceable Reference Electrode Module) -- Instruments of this design were
generally sold after January 1996 and can be identified by the presence of 4 probes (temperature,
YSI Incorporated
Environmental Monitoring Systems Service Manual
18
Care, Maintenance and Storage
Section 3
dissolved oxygen, pH reference, and pH glass) in the bulkhead. Remove the reference module,
store it as described below, and plug the open port with the insert that was provided. Make
certain that the dissolved oxygen sensor has an undamaged membrane and electrolyte in place.
Place approximately 300 mL of tap water in the storage vessel, insert the sonde, and seal the
vessel with the cap and O-ring. Do not use deionized or distilled water in this case, as it may
damage the pH glass sensor that must remain in the sonde.
600 (with Combination pH Sensor) -- Instruments of this design were generally sold prior to
January, 1996 and can be identified by the presence of only 3 probes (temperature, dissolved
oxygen, pH) in the bulkhead. Be certain that the dissolved oxygen sensor has an undamaged
membrane and electrolyte in place. Fill the provided storage vessel with a solution that is 2
molar (2 M) in potassium chloride (KCl) to a level that completely covers the dissolved oxygen
and pH probes. See the following section for instructions on preparation of the KCl storage
solution. Seal the vessel with the cap and O-ring.
3.4
PROBE STORAGE
LONG-TERM STORAGE OF PROBES
The following sections provide additional details on the storage of individual sensors associated
with instruments in the 6-series product line from YSI.
TEMPERATURE
No special precautions are required. Sensors can be stored dry or wet, as long as solutions in
contact with the thermistor probe are not corrosive (for example, chlorine bleach).
CONDUCTIVITY
No special precautions are required. Sensors can be stored dry or wet, as long as solutions in
contact with thermistor probe and conductivity electrodes are not corrosive (for example,
chlorine bleach). However, it is recommended that the sensor be cleaned with the provided
brush prior to long term storage.
DISSOLVED OXYGEN
Rapid Pulse dissolved oxygen sensors should always be stored with a membrane and electrolyte
in place and in such a way that the drying out of the electrolyte on the probe face is minimized.
For long-term storage, the medium should be water rather than the moist air used in interim
storage. The long-term storage protocol is also dependent on the instrument under consideration.
For the 600XL, 600XLM, 6820, 6600 and 6920, two long-term storage methods are equally
acceptable.
1.
Remove all probes other than dissolved oxygen, conductivity, and temperature from the
sonde and seal the vacant ports with the provided port plugs. Leave the electrolyte and
membrane in place on the dissolved oxygen sensor. Fill the calibration cup with water
YSI Incorporated
Environmental Monitoring Systems Service Manual
19
Care, Maintenance and Storage
Section 3
(tap, deionized, or distilled are equally acceptable) and insert the sonde. Make certain
the water level is high enough to completely cover the DO sensor. Seal the vessel to
prevent evaporation of the water. At the end of the storage time, remove the existing
membrane and re-membrane the probe using new electrolyte.
2.
Remove the dissolved oxygen sensor from the sonde leaving the electrolyte and
membrane in place. Store the probes in water (tap, deionized, or distilled are equally
acceptable) in a beaker, flask, or other vessel of the user’s choice. Be sure not to
damage the membrane or the probe tip when placing the probe on the bottom of
the vessel. If possible cover the vessel with parafilm or plastic wrap to minimize
evaporation of the water during long-term storage. Monitor the water level in the storage
vessel periodically and replenish if loss due to evaporation occurs. At the end of the
storage time, remove the existing membrane and re-membrane the probe using new
electrolyte.
Because the user cannot remove the Model 600R’s dissolved oxygen probe from the sonde, a
slightly different long-term storage protocol is required:
For 600 systems equipped with a replaceable reference electrode module, remove the reference
module, store it as described below and plug the open port with the port plug that was provided.
Make certain that the dissolved oxygen sensor has an undamaged membrane and electrolyte in
place. Fill the provided storage vessel with a solution which is 2 molar (2 M) in potassium
chloride (KCl), insert the sonde and seal the vessel with the cap and O-ring. This solution can
be prepared by dissolving 74.6 g of KCl in 500 mL (approximately 1 pint) of water or 37.3 g of
KCl in 250 mL (approximately 0.5 pint) of water. The water should be distilled or deionized. If
KCl solution is unavailable, it is acceptable to store the dissolved oxygen and pH glass sensors in
tap water. Do not use deionized or distilled water in this case, as it may damage the pH glass
sensor, which must remain in the sonde. At the end of the storage time, remove the existing
membrane and re-membrane the probe using new electrolyte.
•
For 600 systems equipped with a combination pH probe (purchased prior to 1996), none of
the probes are user-replaceable and a different storage technique is required. Make certain
that the dissolved oxygen sensor has an undamaged membrane and electrolyte in place. Fill
the provided storage vessel with a solution, which is 2 molar (2 M) in potassium chloride
(KCl), to a level that completely covers the dissolved oxygen and pH probes. Seal the vessel
with the cap and O-ring. At the end of the storage time, remove the existing membrane and
re-membrane the probe using new electrolyte.
YSI Incorporated
Environmental Monitoring Systems Service Manual
20
Care, Maintenance and Storage
Section 3
pH
The key to pH probe storage, short or long-term, is to make certain that the reference electrode
junction does not dry out. Junctions which have been allowed to dry out due to improper
storage procedures can usually be rehydrated by soaking the sensor for several hours (overnight
is recommended) in a solution which is 2 molar in potassium chloride (see dissolved oxygen
section above for preparation of this solution). If potassium chloride solution is not available,
soaking the sensor in tap water or commercial pH buffers may restore probe function. However
in some cases the sensor may have been irreparably damaged by the dehydration and will require
replacement. It is also important to remember not to store the pH sensor in distilled or deionized
water as the glass sensor may be damaged by exposure to this medium.
The long-term storage protocol is dependent on the instrument.
For Model 600XL, 6820, 6600 and 6920 systems, the recommended long-term storage protocol
is identical. Remove the probe from the sonde and seal the vacant port with the provided plug.
Place the probe in the storage vessel (plastic boot or bottle) which was in place on delivery. The
vessel should contain a solution which is 2 molar in potassium chloride. Make certain that the
vessel is sealed to prevent evaporation of the storage solution. Electrical tape can be used to
provide a removable seal between the boot and the module body.
For Model 600 systems equipped with a replaceable reference electrode module, remove the
reference module and plug the open port with the provided insert. Place the module in the
storage vessel boot, which was in place on delivery, and seal the vessel with electrical tape. The
vessel should contain a solution which is 2 molar in potassium chloride and should be sealed to
prevent evaporation of the storage solution. Make certain that the dissolved oxygen sensor has an
undamaged membrane and electrolyte in place. Fill the provided sonde storage vessel with tap
water, insert the sonde, and seal the vessel with the cap and O-ring. Do not use deionized or
distilled water in this case, as it may damage the pH glass sensor that must remain in the
sonde.
For Model 600 systems equipped with a combination pH probe (purchased prior to 1996), a
different storage technique is required. Make certain that the dissolved oxygen sensor has an
undamaged membrane and electrolyte in place. Fill the provided storage vessel with a solution
which is 2 molar in potassium chloride (KCl) to a level which completely covers the dissolved
oxygen and pH probes, insert the sonde, and seal the vessel with the cap and O-ring.
ORP
Long Term Storage: ORP is not available on the Model 600R. For the Model 6600, 600XL,
6820 and 6920 systems, the recommended long-term storage protocol is identical. Remove the
probe from the sonde and seal the vacant port with the provided plug. Place the probe in the
storage vessel (plastic boot or bottle) which was in place on delivery. The vessel should contain
a solution which is 2 molar in potassium chloride. Make certain that the vessel is sealed to
prevent evaporation of the storage solution.
YSI Incorporated
Environmental Monitoring Systems Service Manual
21
Care, Maintenance and Storage
Section 3
AMMONIUM, NITRATE AND CHLORIDE
The active element in these ion selective electrode sensors is a polyvinyl chloride (PVC)
membrane that is impregnated with the reagent that provides specificity for either ammonium or
nitrate. The useful life of this sensor can be reduced if the membrane is stored immersed in
water. Thus, storage in dry air is recommended for long term storage. While dry air is slightly
preferable for general storage, the short-term storage of these sensors in the sonde, with the entire
sensor array in moist air, will have no significant detrimental effect on the life of the membrane.
Remove the sensor module (6820, 6920, and 6600) from the sonde and cover the vacant port with
the provided plug. Place the sensor back in the storage boot that was provided, and set aside in
room air.
TURBIDITY AND CHLOROPHYLL
No special precautions are necessary for either the short or long-term storage of the turbidity and
chlorophyll sensors for the Models 6600, 6820 and 6920. However, for long-term storage, the
user may wish to remove the sensor from the sonde and store it dry in air to minimize any
cosmetic degradation of the probe body and to maximize the life of the wiper on the 6025 and
6026.
DEPTH AND LEVEL
No special precautions are required for the sensor itself, but see instructions above with regard to
maintaining a dry atmosphere in the vent tube. Sensors can be stored dry or wet, as long as
solutions in contact with the strain gauge sensor port are not corrosive (for example, chlorine
bleach).
Recommendations are identical for short-term and long-term storage.
YSI Incorporated
Environmental Monitoring Systems Service Manual
22
SECTION 4 600R SONDE
4.1
SONDE DISASSEMBLY/ASSEMBLY
Probes and interface cables can be serviced after disassembly of the sonde. It may be necessary to
disassemble the sonde and troubleshoot from within the sonde. Use this chapter to assist in disassembly of
the sonde, diagnosis, and selecting the replacement part required for repair. If you are unsure of any of these
procedures, or if you uncover a problem not discussed in this manual, contact YSI Technical Support, an
authorized regional service center or your authorized dealer.
WARNINGS
Opening of the sonde by non-authorized service personnel will void the warranty.
The 600R’s internal Printed Circuit Board contains static-sensitive devices. Disassemble the
sonde at a static-safe workstation, or permanent damage may occur.
Do not use a screwdriver or other device to pry apart the assembly or permanent damage may
occur.
DISASSEMBLY PROCEDURE
Follow the procedure outlined below to disassemble the sonde. Refer to the exploded views in section 9.2
to understand the assembly.
1. Thoroughly dry the outside of the sonde using an absorbent cloth.
2. With the probe guard attached, remove the two bulkhead mounting screws located just above the probe
guard mounting screws.
NOTE: The bulkhead has a cable and connector attached to the PC cable assembly.
3. GENTLY pull the bulkhead away from the sonde tube, being careful to avoid breaking the attached
wires.
NOTE: The O-ring is covered with silicon grease, which prolongs their life.
4. Unplug the connector. Carefully grasp the bundle of wires and GRADUALLY AND EVENLY pull
the entire bundle of wires until the connector is unplugged. Set the bulkhead and probe guard assembly
aside.
5. Gently but firmly pull the cable assembly from the sonde tube. The O-ring can make this operation
difficult.
NOTE: The PC board will still be connected to the bulkhead. To make troubleshooting easier, the bulkhead
can be powered without the sonde tube. Be certain to disconnect any power source before attempting to
remove the PC board.
YSI Incorporated
Environmental Monitoring Systems Service Manual
23
600R Sonde
Section 4
ASSEMBLY PROCEDURE
Reference the Assembly Drawing during this procedure.
Inspect all O-rings and sealing surfaces for blemishes, scratches and dirt. If necessary, clean with
a lint free cloth and isopropyl alcohol. Before assembly, O-rings and sealing surfaces should be
lightly lubricated with stopcock grease. Also, the desiccant pack should be dried at 120 oF for 30
minutes.
Warning: It is extremely important to properly position all cables/wires so that they will not
become pinched between the bulkhead, depth module or sonde tube. Failure to do so may
compromise a main seal, causing permanent damage to the sonde.
If the depth module was separated from the bulkhead as part of the disassembly procedure, see
Depth Module Installation before assembly.
1. Carefully, plug the bulkhead’s 20-pin Amp connector into the printed circuit board assembly.
2. With shock mounts properly positioned on printed circuit board, carefully, install the printed
circuit board into sonde tube. Install the desiccant pack into sonde tube.
4.2
PC BOARD REPLACEMENT
The Model 600R printed circuit board utilizes state-of-the-art SMT (surface mount technology)
components. In the unlikely event of a failure, YSI recommends that the entire PC board be
replaced, not repaired.
Warning: The 600R’s PC board assembly contains static-sensitive devices, so always handle it
at a static-free (ESD) workstation.
4.3
TEST PROCEDURE
The following procedures verify the functionality and accuracy of each of the Model 600R’s
measurement parameters.
Equipment required: Model 610 display/logger or a PC with EcoWatch for Windows or
PC6000 software, 10 mS/cm conductivity calibrator solution, pH buffer 4, stirred temperature
standard with 0.1oC accuracy, 100% argon/nitrogen gas or a sodium sulfite Na2SO3 solution, and
a tape measure.
PRE-TEST
•
•
•
•
If necessary, make repairs to the system. Perform all routine probe and sonde maintenance
before testing. Maintenance procedures are described in Section 3.
Calibrate the Model 600’s DO, and pH parameters using procedures described in the 6-Series
Operations Manual. During pH calibration verify that the mV reading are within acceptable
range.
Do not calibrate conductivity unless necessary. Under normal circumstances, cleaning the
conductivity sensor will restore the system normal operation.
It is not necessary to remove the sonde guard to perform the tests described below. To
prevent carryover between tests, rinse the sonde thoroughly in water, shake the excess off
and out of the sonde. Dry the sonde’s outside surfaces.
YSI Incorporated
Environmental Monitoring Systems Service Manual
24
600R Sonde
Section 4
pH TEST
1. Put the Model 600 in RUN mode.
2. Place the Model 600 in pH 4 buffer and allow to stabilize.
3. The readings must be between 3.9 - 4.1 pH units within 2 minutes.
CONDUCTIVITY TEST
1. Place the Model 600 in 10 ms/cm. Move the Model 600 up and down in the solution to
remove trapped bubbles. Moving the sonde until the readings stabilize.
2. The reading must be within 2%. Errors could be the result of bubbles in the cell, low solution
level or the need for cell cleaning.
TEMPERATURE TEST
1. Place the Model 600 in a well-stirred bath of a known temperature.
2. The Model 600 must read within ± .25 oC of the standard.
OXYGEN TEST
1. Test the oxygen response and probe background current by placing the DO sensor in a zero
oxygen environment. To establish zero oxygen, surround the DO sensor with argon gas,
nitrogen gas or sodium sulfite solution.
2. The dissolved oxygen reading must read <2% in 3 - 5 minutes.
YSI Incorporated
Environmental Monitoring Systems Service Manual
25
600R Sonde
4.4
Bubble #
1
1
1
2
3
4
5
6
6
Section 4
SONDE EXPLODED VIEWS
Part #
063018
063019
063020
063012
063632
069236
116744
063130
063131
YSI Incorporated
Assembly Drawing
Description
Bubble #
Weight, 6 oz
6
Weight, 24 oz
6
Weight, 51 oz
7
Probe Guard
8
Bulkhead Assy
9
Shock Mount
10
Circuit Board Assy
11
(25’) Non-vented, CE
12
(50’) Non-vented, CE
13
Part #
063132
063133
063090
001513
063021
063051
063640
059862
062307
Environmental Monitoring Systems Service Manual
Description
(100’) Non-vented, CE
(200’) Non- vented, CE
Non-vented
Screw, 6-32, .250
Overlay, 600R
Tube
Cable Assy, pH Reference
O-ring, 1.239,.070 D
O-ring, 1.237,.100 D
26
600R Sonde
Section 4
BULKHEAD ASSEMBLY
1
2
3
4
5
6
10
7
8
9
6
Bubble #
1
2
3
3
4
5
Part #
063636
063632
059862
062307
001710
063023
YSI Incorporated
Description
Port Plug, pH
Bulkhead Assy
O-ring, 1.239,.070 D
O-ring, 1.237,.100 D
Screw
Port Plug, DO
Bubble #
6
7
8
9
10
Part #
062768
063640
006581
063040
006580
Environmental Monitoring Systems Service Manual
Description
O-ring, .239, .070 D
Cable Assy, pH Reference
Probe, pH Glass
DO Probe
pH Reference
27
600R Sonde
4.5
Section 4
REPLACEMENT PARTS LIST
Item Number
Description
Comments
063636
063023
Plug, pH
Plug, DO
pH Reference and Glass Ports
006580
pH Reference Electrode
006581
pH Glass Electrode
063632
Bulkhead
063640
pH Cable Assy
063051
Tube, 600
063021
Overlay, 600
065597
Desiccant, 3 Gram
006583
P. M. Kit
063012
Guard, Probe, 600
119444
Board Assy, 6-Series
063018
Weight, 6 ounce, 1 inch
063019
Weight, 24 ounce, 3 inch
063020
Weight, 51 ounce, 6 inch
063054
Cup, Transport
059862
O-ring, EPR, 1.239
Sonde Tube
001513
Screw, Cap, 6-32, .25, SS
Retain Sonde Tube (Hex Head)
059851
Screw, Cap, 4.40, .375, SS
Retain PCB to Standoff
063090
Connector, End Cap
063130
Cable Assy, Integral, 25’
Includes Sonde End Cap
063131
Cable Assy, Integral, 50’
Includes Sonde End Cap
063132
Cable Assy, Integral, 100’
Includes Sonde End Cap
063133
Cable Assy, Integral, 200’
Includes Sonde End Cap
CONTENTS OF 6583 PM KIT
Item Number
Description
Includes Conductivity / Temperature
Also Need 063021
O-rings, Lubricant, Cleaning Brush
Comments
063636
062768
Plug, pH
O-ring, EPR, .239
pH Reference and Glass Ports
pH and DO ports
063241
O-ring, Silicone, 1.299
Transport Cup
038154
Lubricant, O-ring
038213
Brush, Tube Cleaner
YSI Incorporated
Environmental Monitoring Systems Service Manual
28
600R Sonde
4.6
Section 4
BLOCK / WIRING DIAGRAM
Probe
Oxygen
pH Electrode
pH Reference
Conductivity
Temperature
Wire
Color
Yellow
White
White
Black
Green
Gray
Orange
Brown
Blue
Red
Red
20 Pin
Amp
Connector
1
3
5
19
20
2
4
6
8
10
12
1
2
3
4
5
6
7
8
9
10
11
12
13
14
15
16
17
18
19
20
Main Cable
Wire Color
Yellow
Orange
Green
Gray
Blue
Red
Black
Purple
Bare
Pin Description
RS232 TX
RS232 RX
Alarm
RTS
CTS
+ 12V DC
GND
SDI-12
Shield
DB-9
2
3
------9
5
-----
MS-4
----------A
C
B
MS-8
C
D
E
G
H
A
B
F
B
Wire Side 20 pin
Amp Connector
BULKHEAD
CONNECTOR
CABLE
CONNECTOR
COND
600R
TEMP
CIRCUIT
D.O.
ISE
YSI Incorporated
BOARD
Environmental Monitoring Systems Service Manual
29
SECTION 5 600XL SONDE
5.1
SONDE DISASSEMBLY/ASSEMBLY
When used for its intended purposes and maintained according to YSI’s recommendations, the
600XL sonde assembly will rarely need internal servicing. However, if service is required and
the sonde must be opened, the instructions provided below should be followed or permanent
damage to the sonde may occur.
WARNINGS:
Ø Opening of the sonde by non-authorized service personnel will void the warranty.
Ø The 600XL’s internal Printed Circuit Board (PCB) contains static-sensitive devices.
Disassemble the sonde at a static-safe workstation, or permanent damage may occur.
Ø Do not use a screwdriver or other device to pry apart the assembly or permanent damage may
occur.
Tools required: 7/64” hex wrench, small standard screwdriver, lint free cloth, and stopcock
grease.
DISASSEMBLY PROCEDURE
Reference the Assembly Drawing, during this procedure.
1. Thoroughly dry the outside of the sonde using an absorbent cloth. Install the sensor guard to
protect probes.
2. Remove the two 7/64” hex screws located at the end of the sonde tube closest to the end cap
(cable connector).
3. Grasp the sonde tube with one hand and the end cap with the other hand. Carefully, twist the
two sections about 5 - 10° while pulling them apart. Extreme care must be exercised when
the two parts separate so that the internal components are not damaged.
4. Disconnect the 8-pin Amp connectors from the printed circuit board. On sondes with vented
level, the pressure tube will keep the end cap attached to the bulkhead.
5. Remove the two 7/64” hex screws that attach the sonde tube to the bulkhead or
bulkhead/depth module assembly. If a depth module is present, it should remain attached to
the bulkhead.
6. Grasp the sonde tube with one hand and the bulkhead assembly with the other hand.
Carefully, twist the two sections about 5 - 10° while pulling them apart. Extreme care must
be exercised when the two parts separate so that the internal components are not damaged.
7. For sondes with vented depth, use a small screwdriver to pry the pressure tube off of the
depth module nipple. Remove the battery compartment and sonde tube.
8. Disconnect the 20-pin Amp connector from the printed circuit board. Note position of the
shock mounts for the assembly process.
Note for units with depth or level: Unless replacing the depth module or bulkhead, it is not
necessary to separate the two. See the next section, Depth Module Removal.
YSI Incorporated
Environmental Monitoring Systems Service Manual
30
600XL Sonde
Section 5
DEPTH MODULE REMOVAL (SONDES WITH DEPTH ONLY)
If separation of the depth module and bulkhead is necessary, the following instructions must be
followed. Wires from the bulkhead are fed through the depth module making this a tedious
procedure.
1. On the back of the depth module, locate bulkhead wires from the 3, 4 and 6 pin Lemo
connectors. Reference the Depth Module, figure 4, drawing below. Carefully, remove these
wires from the body of the 20-pin Amp connector by lightly pushing the tab on the side of
connector in, while pulling on the wire.
Bulkhead wires
Nipple Fitting
Reference the Bulkhead Wiring Diagram in
from 3 & 6 pin
or plug
Section 5.4, Sonde Exploded Views.
Lemos
2. Wires in connector positions 1, 2, 3, 4, 5, 6, 8,
10, 12, 15, 16, 19 and 20 must be removed
from the connector body. Wires from the
depth module in positions 7, 9, 11 and 13 can
remain attached to the 20-pin connector.
3. Remove the two 7/64” hex screws that attach
the depth module to the bulkhead.
4 ea. depth
module
wires
Bulkhead
wires from
4-pin Lemo
4. Grasp the depth module with one hand and
the bulkhead assembly with the other hand.
Depth Module
Carefully, separate the two sections while
Figure 4
guiding the bulkhead wires through the two
depth module holes. Extreme care must be
exercised when the two parts separate so that the internal components are not damaged.
Note: The depth module and printed circuit board must be replaced as an entire assembly. See
Section 5.2, PC Board and Depth Module Replacement.
ASSEMBLY PROCEDURE
Reference the Assembly Drawing during this procedure.
Inspect all O-rings and sealing surfaces for blemishes, scratches and dirt. If necessary, clean with
a lint free cloth and isopropyl alcohol. Before assembly, O-rings and sealing surfaces should be
lightly lubricated with stopcock grease. Also, the desiccant pack should be dried at 120 oF for 30
minutes.
Warning: It is extremely important to properly position all cables/wires so that they will not
become pinched between the bulkhead, depth module or sonde tube. Failure to do so may
compromise a main seal, causing permanent damage to the sonde.
If the depth module was separated from the bulkhead as part of the disassembly procedure, see
the next section, Depth Module Installation before assembly.
1. Carefully, plug the bulkhead’s 20-pin Amp connector into the printed circuit board assembly.
2. With shock mounts properly positioned on printed circuit board, carefully, install the printed
circuit board into sonde tube. Install the desiccant pack into sonde tube.
Sondes with vented level: Inspect the end of the pressure tube for holes or breaks. Before
the printed circuit board is installed in the sonde tube, pull the vent tube (from battery
compartment) through the sonde tube. While holding the vent tube, install the printed circuit
YSI Incorporated
Environmental Monitoring Systems Service Manual
31
600XL Sonde
Section 5
board into the sonde tube. Carefully, press the pressure tube onto the depth module nipple.
Check for tight fit.
3. Carefully, press the sonde tube on to the bulkhead assembly. Install the two 7/64” hex
screws.
4. Plug the 8-pin Amp connector into the printed circuit board (cable end of board).
5. Carefully, press the sonde tube on to the battery compartment assembly. Be careful not to
kink the pressure tube on vented level sondes. Install the two 7/64” hex retaining screws.
DEPTH MODULE INSTALLATION (SONDES WITH DEPTH ONLY)
If the depth module was separated from the bulkhead as part of the disassembly procedure follow
the procedure below to re-assemble.
1. Route the bulkhead wires from the 3, 4 and 6 pin Lemo connectors through the designated
depth module holes. Reference the Depth Module drawing, figure 4, for hole positions.
2. Carefully, press wires into the proper position in the 20-pin Amp connector. Reference the
Bulkhead Wiring Diagram Section 5.4, Sonde Exploded Views.
3. Attach the depth module to the bulkhead using two 7/64” hex screws.
5.2
PC BOARD AND DEPTH MODULE REPLACEMENT
The Model 600XL printed circuit board utilizes state-of-the-art SMT (surface mount
technology). In the unlikely event of a component failure, YSI recommends that the entire PC
board be replaced, not repaired.
Notice for sondes with depth: Model 600XLs with depth require replacement of both the
printed circuit board and depth module if either fail because they are specially characterized as a
pair at the factory. For disassembly procedures, Sonde Disassembly / Assembly, Section 5.1.
Warning: The 600XL PC board assembly contains static-sensitive components, so always
handle it at a static-free (ESD) workstation.
5.3
TEST PROCEDURES
The following procedures verify the functionality and accuracy of each of the Model 600XL’s
measurement parameters.
Equipment required: Model 610 display/logger or a PC with EcoWatch for Windows or
PC6000 software, 10 mS/cm conductivity calibrator solution, pH buffers 4, 7 and 10, stirred
temperature standard with 0.1oC accuracy, 100% argon/nitrogen gas or a sodium sulfite Na2SO3
solution, Zobell solution and a tape measure.
PRE-TEST
•
•
•
If necessary, make repairs to the system. Perform all routine probe and sonde maintenance
before testing. See Troubleshooting and Maintenance, Sections 2 and 3.
Calibrate the Model 600XL DO, pH, and depth parameters using procedures described in the
Calibration Section of the 6-Series Operation Manual.
Do not calibrate conductivity unless necessary. Under normal circumstances, cleaning the
conductivity sensor will restore the system to normal operation.
YSI Incorporated
Environmental Monitoring Systems Service Manual
32
600XL Sonde
•
•
•
Section 5
It is not necessary to remove the sonde guard to perform the tests described below. To
prevent carryover between tests, rinse the sonde thoroughly in water, shake the excess off
and out of the sonde. Dry the sonde’s outside surfaces.
The pH probe is also the reference for the other ORP sensor. Thus, the pH probe must be
within specifications or the ORP readings may be affected.
Under “Report Setup” in the 600XL main menu, turn on the millivolt reading for the ISEs
(pH and/or ORP) being tested.
pH TEST
1.
2.
3.
4.
5.
6.
7.
Put the 600XL in Run mode with pH millivolt Report setting activated.
Place the 600XL in pH 4 buffer and allow to stabilize.
Within 2 minutes the readings should be between 3.9 - 4.1 pH units and 150 to 210 mV.
Rinse thoroughly and place the 600XL in pH 10 buffer. Allow time for readings to stabilize.
Within 2 minutes the readings should be between 9.9 - 10.1 pH units and -150 to -210 mV.
Rinse thoroughly and place the 600XL in pH 7 buffer. Allow time for readings to stabilize.
Within 2 minutes the readings should be between 6.9 - 7.1 pH units and -30 to 30 mV.
CONDUCTIVITY TEST
1. Place the 600XL in 10 mS/cm conductivity calibrator solution. Move the 600XL up and
down in the solution to remove trapped bubbles. Continue to move the sonde until the
readings stabilize.
2. The reading should be within 5% of the standard value. Errors could be the result of bubbles
in the cell, low solution level or the need for cell cleaning. See Troubleshooting Section 2.
TEMPERATURE TEST
1. Place the 600XL in a well-stirred bath of a known temperature, preferably between 20oC and
30oC.
2. The 600XL must read within ± .25oC of the standard.
OXYGEN TEST
1. Test the oxygen response time and zero oxygen offset by placing the DO sensor in a zero
oxygen environment after being calibrated/run in a 100% saturated environment. To establish
zero oxygen, surround the DO sensor with argon gas, nitrogen gas or sodium sulfite solution.
2. The dissolved oxygen reading should read < 2% in 3 - 5 minutes.
3. Rinse the sonde.
ORP TEST
1.
2.
3.
4.
Go to the ORP calibrate mode.
Type “uncal”.
Place the 600XL ORP electrode in Zobell solution and note the temperature.
The millivolt reading should be within ±50 mV of the value in the Millivolt versus
Temperature Chart for Zobell solution.
5. Re-calibrate if required.
6. Rinse the sonde.
DEPTH
1. Stretch out the 600XL cable.
YSI Incorporated
Environmental Monitoring Systems Service Manual
33
600XL Sonde
Section 5
2. Hold the end of a tape measure to the top hole in the depth plug. The depth plug is located on
the side of the depth module.
3. Stretch the tape measure along the cable.
4. For sondes with shallow depth capability, place a piece of waterproof tape at 15 feet. For
medium depth capability, place a piece of waterproof tape at 50 feet.
5. Lower the 600XL into still water until the tapeline on the cable reaches the water’s surface.
Check the readings. Shallow sensors should read 15 ± .06 feet. Medium depth sensors should
read 50 ± .4 feet.
YSI Incorporated
Environmental Monitoring Systems Service Manual
34
600XL Sonde
5.4
Section 5
SONDE EXPLODED VIEWS
20-25
Assembly Drawing
YSI Incorporated
Environmental Monitoring Systems Service Manual
35
600XL Sonde
5.5
Section 5
REPLACEMENT PARTS LIST
Drawing
Bubble #
1
2
3
4
YSI Item
Number
063051
065821
001513
065832
5
065872
6
7
8
065873
001513
059862
Sonde Tube
Overlay, 600XL
Cap Screw, 6-32, .250, SS
Depth Module Assy, Non-vented,
Shallow
Depth Module Assy, Non-vented,
Medium
Depth Module Assy, Vented, Shallow
Cap Screw, 6-32, .250, SS
O-ring, .070 D, 1.239 ID
9
10
11
12
065819
063018
069583
062307
Guard, Sensor
Weight, SS, 1”
Lid, Transport cup
O-ring, .100 D, 1.237 ID
13
14
15
16
17
069584
069236
065839
116737
169444
Tube, Clear Transport Cup
Shock Mount, PCB
Port Plug Assy
Bulkhead Kit, 600XL
Printed Circuit Board Assy, 6-Series
18
19
20
21
22
23
24
25
063090
063990
063130
063131
063132
063133
063137
063138
065807
069582
062763
063089
065597
Connector, End Cap, Non-vented
Connector, End Cap, Vented
Cable Assy, Integral 25’, Non-vented
Cable Assy, Integral 50’, Non-vented
Cable Assy, Integral 100’, Non-vented
Cable Assy, Integral 200’, Non-vented
Cable Assy, Integral 25’, Vented
Cable Assy, Integral 50’, Vented
O-ring, Port Plug
Calibration Transport Cup Kit, Clear
Connector, 20-pin, Amp
Pressure Cap Assembly
Desiccant Pack
YSI Incorporated
Description
Environmental Monitoring Systems Service Manual
Comments
Self adhesive
Calibrated w/PCB
Calibrated w/PCB
Calibrated w/PCB
Used in early units with
small diameter O-ring.
Newer design units with
large diameter O-ring
2 ea., Retain circuit board
Includes 065807 O-ring
With or W/O depth
Units with depth, must
use item 065872, 065832
or 065873
Used on Bulkhead
36
600XL Sonde
5.6
Section 5
BULKHEAD WIRING DIAGRAM
Bulkhead Probe Ports
Wire
Color
Description
Red
Orange
White
Brown
Black
Purple
Yellow
Yellow
Black
Blue
Orange
Gray
Gray
DO Cathode
Conductivity R Sense
DO Anode
Conductivity R Drive
DO Reference
Conductivity L Drive
Depth VSW
Conductivity L Sense
Depth (-) Input
Temperature 1
Depth (+) Input
Temperature 2
Depth (-) Input
Purple
Orange
ISE 1
ISE 1
White
Green
ISE 2
ISE 2, Reference
20-pin Amp
Connector
(Connects PCB
to bulkhead assy)
1
2
3
4
5
6
7
8
9
10
11
12
13
14
15
16
17
18
19
20
Depth
Module
3-pin
Lemo
(Dissolved
Oxygen)
1
4-pin Lemo
(ISE 1 & 2)
6 Pin Lemo
Cond.
(Conductivity
& Temp)
2
3
4
2
3
1
1
2
5
3
6
4
2
1
4
3
3-pin Lemo
4-pin
Lemo
6 Pin
Lemo
Bulkhead Connector Layout
YSI Incorporated
Environmental Monitoring Systems Service Manual
1
2
3
4
5
6
7
8
9
10
11
12
13
14
15
16
17
18
19
20
20-pin Amp
Connector
37
600XL Sonde
5.7
Section 5
BLOCK / WIRING DIAGRAM
Internal
8-pin
Amp
Connector
1
8
7
2
6
3
5
4
Ext. Sonde
Wire
Color
Yellow
Orange
Green
Red
Black
Purple
Bare
Pin
Description
RS232 TX
RS232 RX
Alarm
Not used
Not used
+ 12V DC
GND
SDI-12
Shield
Connector
Pin 3
Pin 7
Pin 5
Pin 8
Pin 6
Pin 2
8
1
7
2
9
6
3
7
5
4
External Cable
Pinouts
DB-9
MS-4 MS
-8
2
--C
3
--D
----E
--------9
A
A
5
C
B
--B
F
--B
1
8
2
3
4
6
See Bulkhead Wiring
Diagram.
5
Ext. Sonde
Connector
BULKHEAD
CONN/CAP
ASSY
600XL
CIRCUIT
BOARD
YSI Incorporated
Environmental Monitoring Systems Service Manual
38
SECTION 6 600XLM SONDE
6.1
SONDE DISASSEMBLY/ASSEMBLY
When used for its intended purposes and maintained according to YSI’s recommendations, the
600XLM sonde assembly will rarely need internal servicing. However, if service is required and
the sonde must be opened, the instructions provided below should be followed or permanent
damage to the sonde may occur.
Warnings
Opening of the sonde by non-authorized service personnel will void the warranty.
The 600XLM’s internal Printed Circuit Board contains static-sensitive devices. Disassemble the
sonde at a static-safe workstation, or permanent damage may occur.
Do not use a screwdriver or other device to pry apart the assembly or permanent damage may
occur.
Tools required: 7/64” hex wrench, small standard screwdriver, lint free cloth, and stopcock
grease
DISASSEMBLY PROCEDURE
Reference the Assembly Drawing during this procedure.
1. Thoroughly dry the outside of the sonde using an absorbent cloth. Install the sensor guard to
protect probes.
2. Unscrew the battery cover and remove the batteries. Re-install the battery cover.
3. Remove the two 7/64” hex screws located at the end of the sonde tube closest to the battery
compartment.
4. Grasp the sonde tube with one hand and the battery compartment with the other hand.
Carefully, twist the two sections about 5 - 10° while pulling them apart. Extreme care must
be exercised when the two parts separate so those internal components are not damaged.
5. Disconnect the 8-pin and 3-pin Amp connectors from the printed circuit board. On sondes
with vented level, do not attempt to completely remove the battery compartment, the pressure
tube will keep the battery compartment attached to the bulkhead.
6. Remove the two 7/64” hex screws that attach the sonde tube to the bulkhead or
bulkhead/depth module assembly. If a depth module is present, it should remain attached to
the bulkhead.
7. Grasp the sonde tube with one hand and the bulkhead assembly with the other hand.
Carefully, twist the two sections about 5 - 10° while pulling them apart. Extreme care must
be exercised when the two parts separate so those internal components are not damaged.
8. For sondes with vented depth, use a small screwdriver to pry the pressure tube off of the
depth module nipple. Remove the battery compartment and sonde tube.
9. Disconnect the 20-pin Amp connector from the printed circuit board. Note position of the
shock mounts for the assembly process.
Note for units with depth or level: Unless replacing the depth module or bulkhead, it is not
necessary to separate the two. See the next section for Depth Module Removal.
YSI Incorporated
Environmental Monitoring Systems Service Manual
39
600XLM Sonde
Section 6
DEPTH MODULE REMOVAL (SONDES WITH DEPTH ONLY)
If separation of the depth module and bulkhead is necessary, the following instructions must be
followed. Wires from the bulkhead are fed through the depth module making this a tedious
procedure.
5. On the back of the depth module, locate bulkhead wires from the 3, 4 and 6 pin Lemo
connectors. Reference the Depth Module drawing below. Carefully remove these wires from
the body of the 20-pin Amp connector by
Bulkhead wires
Nipple Fitting
lightly pushing the tab on side of connector
from 3 & 6 pin
or plug
Lemos
inward, while pulling on the wire. Reference
the Bulkhead Wiring Diagram, Section 6.6.
Wires in connector positions 1, 2, 3, 4, 5, 6, 8, 10,
12, 15, 16, 19 and 20 must be removed from the
connector body. Wires from the depth module in
positions 7, 9, 11 and 13 can remain attached to
the 20-pin connector.
6. Remove the two 7/64” hex screws that attach
the depth module to the bulkhead.
4 ea. depth
module
wires
Bulkhead
wires from
4-pin Lemo
7. Grasp the depth module with one hand and
Depth Module
the bulkhead assembly with the other hand.
Figure 5
Carefully, separate the two sections while
guiding the bulkhead wires through the two depth module holes. Extreme care must be
exercised when the two parts separate so those internal components are not damaged.
Note: The depth module and printed circuit board must be replaced as an entire assembly. See
PC Board and Depth Module Replacement, Section 6.2.
ASSEMBLY PROCEDURE
Reference the Assembly Drawing during this procedure.
Inspect all O-rings and sealing surfaces for blemishes, scratches and dirt. If necessary, clean with
a lint free cloth and isopropyl alcohol. Before assembly, O-rings and sealing surfaces should be
lightly lubricated with stopcock grease. Also, the desiccant pack should be dried at 120 oF for 30
minutes.
Warning: It is extremely important to properly position all cables/wires so that they will not
become pinched between the bulkhead, depth module or sonde tube. Failure to do so may
compromise a main seal, causing permanent damage to the sonde.
If the depth module was separated from the bulkhead as part of the disassembly procedure, see
Depth Module Installation in the next section before assembly.
3. Carefully, plug the bulkhead’s 20-pin Amp connector into the printed circuit board assembly.
4. With shock mounts properly positioned on printed circuit board, carefully, install the printed
circuit board into sonde tube. Install the desiccant pack into sonde tube.
Sondes with vented level: Inspect the end of the pressure tube for holes or breaks. Before the
printed circuit board is installed in the sonde tube, pull the vent tube (from battery
compartment) through the sonde tube. While holding the vent tube, install the printed circuit
board into the sonde tube. Carefully, press the pressure tube on to the depth module nipple.
Check for tight fit.
YSI Incorporated
Environmental Monitoring Systems Service Manual
40
600XLM Sonde
Section 6
5. Carefully, press the sonde tube on to the bulkhead assembly. Install the two 7/64” hex
screws.
6. Plug the 3-pin and 8-pin battery compartment connectors into the printed circuit board.
7. Carefully, press the sonde tube on to the battery compartment assembly. Be careful not to
kink the pressure tube on vented level sondes. Install the two 7/64” hex retaining screws.
DEPTH MODULE INSTALLATION (SONDES WITH DEPTH ONLY)
If the depth module was separated from the bulkhead as part of the disassembly procedure follow
the procedure below to re-assemble.
4. Route the bulkhead wires from the 3, 4 and 6 pin Lemo connectors through the designated
depth module holes. Reference the Depth Module, figure 5, drawing for hole positions.
5. Carefully, press wires into the proper position in the 20-pin Amp connector. Reference the
Bulkhead Wiring Diagram, Section 6.6.
6. Attach the depth module to the bulkhead using two 7/64” hex screws.
6.2
PC BOARD AND DEPTH MODULE REPLACEMENT
The Model 600XLM printed circuit board utilizes state-of-the-art SMT (surface mount
technology) components. In the unlikely event of a failure, YSI recommends that the entire PC
board be replaced, not repaired.
Notice for sondes with depth: Model 600XLMs with depth require replacement of both the
printed circuit board and depth module if either fail because they are specially characterized as a
pair at the factory. For disassembly procedures, see Section 6.1 Sonde Disassembly / Assembly.
Warning: The 600XLM PC board assembly contains static-sensitive devices, so always handle it
at a static-free (ESD) workstation.
6.3
TEST PROCEDURES
The following procedures verify the functionality and accuracy of each of the Model 600XLM’s
measurement parameters.
Equipment required: Model 610 display/logger or a PC with EcoWatch for Windows or
PC6000 software, 10 mS/cm conductivity calibrator solution, pH buffers 4, 7 and 10, stirred
temperature standard with 0.1oC accuracy, 100% argon/nitrogen gas or a sodium sulfite Na2SO3
solution, Zobell solution and a tape measure.
PRE-TEST
•
•
•
If necessary, make repairs to the system. Perform all routine probe and sonde maintenance
before testing. See Troubleshooting and Maintenance, Sections 2 and 3.
Calibrate the Model 600XLM DO, pH, and depth parameters using procedures described in
the Calibration Section of the 6-Series Operations Manual.
Do not calibrate conductivity unless necessary. Under normal circumstances, cleaning the
conductivity sensor will restore the system to normal operation.
YSI Incorporated
Environmental Monitoring Systems Service Manual
41
600XLM Sonde
•
•
•
Section 6
It is not necessary to remove the sonde guard to perform the tests described below. To
prevent carryover between tests, rinse the sonde thoroughly in water, shake the excess off
and out of the sonde. Dry the sonde’s outside surfaces.
The pH probe is also the reference for the other ORP sensor. Thus, the pH probe must be
within specifications or the ORP readings may be affected.
Under Report setup in the 600XLM Main Menu, turn on the millivolt reading for the ISEs
(pH and/or ORP) being tested.
pH TEST
1.
2.
3.
4.
Put the 600XLM in Run mode with pH millivolt Report setting activated.
Place the 600XLM in pH 4 buffer and allow to stabilize.
Within 2 minutes the readings should be between 3.9 - 4.1 pH units and 150 to 210 mV.
Rinse thoroughly and place the 600XLM in pH 10 buffer. Allow time for readings to
stabilize.
5. Within 2 minutes the readings should be between 9.9 - 10.1 pH units and -150 to -210 mV.
6. Rinse thoroughly and place the 600XLM in pH 7 buffer. Allow time for readings to stabilize.
7. Within 2 minutes the readings should be between 6.9 - 7.1 pH units and -30 to 30 mV.
CONDUCTIVITY TEST
1. Place the 600XLM in 10 mS/cm conductivity calibrator solution. Move the 600XLM up and
down in the solution to remove trapped bubbles. Continue to move the sonde until the
readings stabilize.
2. The reading should be within 5 % of the standard value. Errors could be the result of bubbles
in the cell, low solution level or the need for cell cleaning. See Troubleshooting, Section 2.
TEMPERATURE TEST
1. Place the 600XLM in a well-stirred bath of a known temperature, preferably between 20 oC
and 30 oC.
2. The 600XLM must read within ± .25 oC of the standard.
OXYGEN TEST
1. Test the oxygen response time and zero oxygen offset by placing the DO sensor in a zero
oxygen environment after being calibrated/run in a 100% saturated environment. To establish
zero oxygen, surround the DO sensor with argon gas, nitrogen gas or sodium sulfite solution.
2. The dissolved oxygen reading should read < 2% in 3 - 5 minutes.
3. Rinse the sonde.
ORP TEST
1.
2.
3.
4.
Go to the ORP calibrate mode.
Type “uncal”.
Place the 600XLM ORP electrode in Zobell solution and note the temperature.
The millivolt reading should be within ±50 mV of the value in chart for Zobell solution
(millivolts versus temperature).
5. Re-calibrate if required.
6. Rinse the sonde.
YSI Incorporated
Environmental Monitoring Systems Service Manual
42
600XLM Sonde
Section 6
DEPTH
1. Stretch out the 600XLM cable.
2. Hold the end of a tape measure to the top hole in the depth plug. The depth plug is located on
the side of the depth module.
3. Stretch the tape measure along the cable.
4. For sondes with shallow depth capability, place a piece of waterproof tape at 15 feet. For
medium depth capability, place a piece of waterproof tape at 50 feet.
5. Lower the 600XLM into still water until the tape line on the cable reaches the water’s
surface. Check the readings. Shallow sensors should read 15 ± .06 feet. Medium depth
sensors should read 50 ± .4 feet.
YSI Incorporated
Environmental Monitoring Systems Service Manual
43
600XLM Sonde
6.4
Section 6
SONDE EXPLODED VIEWS
Assembly Drawing
YSI Incorporated
Environmental Monitoring Systems Service Manual
44
600XLM Sonde
6.5
Section 6
REPLACEMENT PARTS LIST
Drawing
Bubble #
1
2
3
4
5
YSI Item
Number
067003
067005
063089
062687
116706
5
6
7
8
116707
067010
069236
169444
9
10
10
11
12
067002
063051
067007
059862
065832
12
065872
12
13 & 17
14
15
16
Refer to
the YSI
600XL
drawing
065873
062307
116738
065819
063018
069584
069583
069582
Overlay, 600XLM
Sonde Tube, 9’5”
Sonde Tube, 10’5”
O-ring, 1.239 ID
Depth Module Assy, Non-vented,
Shallow
Depth Module Assy, Non-vented,
Medium
Depth Module Assy, Vented, Shallow
O-ring, 1.237 ID
Bulkhead Kit, 600XLM
Guard, Sensor
Weight, SS, 1”
Tube, Clear Transport Cup
Lid, Clear Transport Cup
Kit, Clear Transport Cup
116735
065839
065807
063234
062763
065597
Battery Terminal Kit
Port Plug Assy
O-ring, Port Plug
Calibration Transport Cup
Connector, 20-pin, Amp
Desiccant Pack
YSI Incorporated
Description
Bail, 600XLM
Cover, Battery
Pressure Cap Assembly
O-ring, .862 ID
Battery Compartment Assy, Nonvented
Battery Compartment Assy, Vented
O-ring
Shock Mount, PCB
Printed Circuit Board Assy, 6-Series
Environmental Monitoring Systems Service Manual
Comments
Battery cover end seal
2 ea., Retain circuit board
Units with depth, must
use Depth module assy.
Self adhesive
Short version
Long version
Depth mod. to tube seal
Calibrated w/PCB
Calibrated w/PCB
Calibrated w/PCB
Main sonde seal
With or W/O depth
Includes 069584, 069583
& 062307
Replace worn terminals
Includes 065807 O-ring
Used on Bulkhead
45
600XLM Sonde
6.6
Section 6
BULKHEAD WIRING DIAGRAM
Bulkhead Probe Ports
Wire
Color
Description
Red
Orange
White
Brown
Black
Purple
Yellow
Yellow
Black
Blue
Orange
Gray
Gray
DO Cathode
Conductivity R Sense
DO Anode
Conductivity R Drive
DO Reference
Conductivity L Drive
Depth VSW
Conductivity L Sense
Depth (-) Input
Temperature 1
Depth (+) Input
Temperature 2
Depth (-) Input
Purple
Orange
ISE 1
ISE 1
White
Green
ISE 2
ISE 2, Reference
20-pin Amp
Connector
(Connects PCB
to bulkhead assy)
1
2
3
4
5
6
7
8
9
10
11
12
13
14
15
16
17
18
19
20
Depth
Module
3-pin
Lemo
(Dissolved
Oxygen)
1
4-pin Lemo
(ISE 1 & 2)
6 Pin Lemo
Cond.
(Conductivity
& Temp)
2
3
4
2
3
1
1
2
5
3
6
4
2
1
4
3
3-pin Lemo
4-pin
Lemo
6 Pin
Lemo
1
2
3
4
5
6
7
8
9
10
11
12
13
14
15
16
17
18
19
20
20-pin Amp
Connector
Bulkhead Connector Layout
YSI Incorporated
Environmental Monitoring Systems Service Manual
46
600XLM Sonde
6.7
Section 6
BLOCK / WIRING DIAGRAM
Internal
8-pin
Amp
Connector
1
8
7
2
6
3
5
4
Ext. Sonde
Wire
Color
Yellow
Orange
Green
Red
Black
Purple
Bare
Pin
Description
RS232 TX
RS232 RX
Alarm
Not used
Not used
+ 12V DC
GND
SDI-12
Shield
8
Connector
Pin 3
Pin 7
Pin 5
Pin 8
Pin 6
Pin 2
External Cable
Pinouts
DB-9
MS-4 MS
-8
2
--C
3
--D
----E
--------9
A
A
5
C
B
--B
F
--B
1
1
8
7
1
2
9
3
6
3
3
7
3-pin Amp Battery
Power Connector
See Bulkhead Wiring
Diagram.
2
2
5
4
4
(Wire Side)
Pin 1 Blk - Batt. Negative
Pin 3 Red - Batt. Positive
6
8-pin Amp
Connector
5
Ext. Sonde
Connector
(Wire Side)
BULKHEAD
CONN/CAP
ASSY
600XLM
CIRCUIT
BOARD
YSI Incorporated
Environmental Monitoring Systems Service Manual
47
SECTION 7 6820 SONDE
This section is intended for use by a qualified service technician that has been authorized by YSI.
End users of the Model 6820 may find the illustrations and procedures in this chapter helpful in
understanding and caring for the Model 6820. However, disassembly of the sonde by a
non-authorized service technician will void the manufacturer's warranty.
If you need service or service support, please contact the dealer from whom you purchased the
product or the YSI Technical Support Group.
7.1
SONDE DISASSEMBLY/ASSEMBLY
When used for its intended purposes and maintained according to YSI’s recommendations, the
6820 sonde assembly will rarely need to be opened for internal servicing. However, if service is
required and the sonde must be opened, the instructions provided below must be followed or
permanent damage to the sonde assembly may result.
WARNING
Opening of the sonde by non-authorized service personnel will void the warranty.
The 6820’s internal Printed Circuit Board contains static-sensitive devices. Disassemble the
sonde at a static-safe workstation, or permanent damage may occur.
Do not use a screwdriver or other device to pry apart the assembly or permanent damage may
result.
Tools required: Phillips screwdriver, 3/8” or larger nut driver, prying block 1/2” X 3/4” X 3”
(see Figure 2), O-ring lubricant, and large pliers.
SONDE DISASSEMBLY
Cond/Temp
(6 Pin Lemo)
pH/ORP, ISE 1/ISE2
(4 Pin Lemo)
1. Remove the probe guard or storage cup.
Thoroughly dry the outside of the sonde
and probes using an absorbent cloth.
Remove all of the probes.
Dissolved Oxygen
(3 Pin Lemo)
Screw Port
Plug
Screw Port
Plug
⊗
2. Locate the Bulkhead Screw Port Plugs. See
Figure 6. At the center of each plug is a
tightened Phillips screw. Loosen one of the
screws approximately 1/4”.
⊗
ISE 3
WARNING: Loosening the screw too far
may cause damage to the plug’s threads
during the next step.
ISE 5
Turbidity
8 Pin Lemo
ISE 4
Figure 6
3. Steady the sonde body in a vise or, while
sitting, between your legs. It will take a
significant amount of force to remove the Bulkhead Screw Port Plugs, so be sure that the
sonde is firmly held during this procedure.
YSI Incorporated
Environmental Monitoring Systems Service Manual
48
6820 Sonde
Section 7
4. Position a 1/2” thick prying block and nut driver as shown in Figure 7.
5. With the nut driver opening attached under the lip of the loosened screw, “pop” the plug
from the bulkhead by apply downward pressure on the handle of the nut driver.
6. Repeat steps 2 through 5 for the second Bulkhead Port Plug.
7. Once the plugs have been fully removed, remove both O-ring Screws from the bulkhead
assembly with a Phillips screwdriver.
8. Grasp the bulkhead with one hand and the sonde body with
the other hand and carefully pull the bulkhead away from
the sonde body. While pulling, a slight twisting motion,
about 5 °, may assist the disassembly. Please note that
considerable force may be required to separate the two
parts. WARNING: The bulkhead is connected to the
internal PC board via wires.
9. To remove the PCB, grasp the board on either side of the
20-pin connector and pull until the 8-pin connector at the
top pulls free. When removing the bulkhead from the PCB,
take note of the Turbidity connector, and pull the connector
from the PCB so that the pins remain on the wiring
harness.
Prying Block
Figure 7
10. Using the large pliers or vise, loosen the cable and remove it, being careful not to scratch or
damage the PVC piece. For BCR connectors, place the PVC base into a vise or use the pliers
and turn entire sonde, being careful not to damage or markup the PVC piece. NOTE: Do not
use a wrench on the Stainless Steel Connector flats.
SONDE ASSEMBLY
1. Before assembly, inspect the sealing O-rings and sealing surfaces for blemishes, scratches
and dirt.
2. Clean and lightly lubricate the O-rings and sealing surfaces.
3. Dry the desiccant pack in a 120O F oven for 30 minutes. Re-install desiccant pack into sonde.
4. Plug the bulkhead wires onto the PCB. Push the PCB into the sonde body. Install the cable’s
8-pin connector onto the PCB. Put Loctite 242 or equivalent onto the threads. Allowing the
PCB and bulkhead to rotate, carefully tighten the cable 1/8 of a turn after it just touches the
sonde body. Push the bulkhead fully into sonde body.
WARNING: It is extremely important to properly position the bulkhead wires so they will
not become pinched between the bulkhead and the sonde body. Failure to do so may damage
the main seal, causing permanent damage to the sonde.
5. Re-install the O-ring screws (068248) until the O-ring just touches the bulkhead. Seat the Oring by turning the screw an additional 11/4 turn.
WARNING: Once these screws are tightened, the bulkhead should not twist when the sonde
guard or storage cup are installed or removed. If it does turn, apply more torque to the
screws.
6. Screw in the screws from the port plugs and tap both plugs into the bulkhead. Note: Make
sure the screws are all the way in so the threads are not damaged.
7. Inspect and lubricate probe O-rings and sealing surfaces. Re-install probes.
YSI Incorporated
Environmental Monitoring Systems Service Manual
49
6820 Sonde
7.2
Section 7
PC BOARD AND DEPTH MODULE REPLACEMENT
The Model 6820 PC board utilizes a state-of-the-art SMT (surface mount technology) PC board.
In the unlikely event of a PC board failure, YSI recommends that the entire PC board be
replaced, not repaired.
NOTICE FOR UNITS WITH DEPTH: Model 6820s with depth require replacement of both
the board and depth sensor if either fail because they are specially characterized as a pair at the
factory. See the Replacement Parts List.
WARNING: The 6820 PC board assembly contains static-sensitive devices, so always handle it
at a static-safe workstation.
7.3
TEST PROCEDURE
The following procedures verify the functionality and accuracy of each of the Model 6820’s
measurement parameters.
Equipment required: Model 610 display/logger, or a PC with EcoWatch for Windows or
PC6000 software, 10 mS/cm conductivity calibrator solution, pH buffers 4, 7 and 10, stirred
temperature standard with 0.1oC accuracy, 100% argon/nitrogen gas or a sodium sulfite Na2SO3
solution, Zobell solution, ammonium 100 mg/L standard, nitrate 100 mg/L standard, turbidity 10
NTU standard, acridine orange, and a tape measure.
PRE-TEST
•
•
•
•
•
•
If necessary, make repairs to the system. Perform all routine probe and sonde maintenance
before testing. See Troubleshooting and Maintenance, Sections 2 and 3.
Calibrate the Model 6820 DO, pH, depth, turbidity, chlorophyll, chloride, ammonium and
nitrate parameters using procedures described in the Calibration Section of the 6-Series
Operations Manual.
Do not calibrate conductivity unless necessary. Under normal circumstances, cleaning the
conductivity sensor will restore the system to normal operation.
It is not necessary to remove the sonde guard to perform the tests described below. To
prevent carryover between tests, rinse the sonde thoroughly in water, shake the excess off
and out of the sonde. Dry the sonde’s outside surfaces.
The pH probe is also the reference for the ISEs reference. Thus, the pH probe must be
within specifications or the readings from the other ISEs will be affected.
Under Report setup in the 6820 Main Menu, turn on the millivolt reading for the ISEs being
tested.
pH TEST
1.
2.
3.
4.
5.
6.
7.
Put the 6820 in Run mode with pH millivolt Report setting activated.
Place the 6820 in pH 4 buffer and allow to stabilize.
Within 2 minutes the readings should be between 3.9 - 4.1 pH units and 150 to 210 mV.
Rinse thoroughly and place the 6820 in pH 10 buffer. Allow time for readings to stabilize.
Within 2 minutes the readings should be between 9.9 - 10.1 pH units and -150 to -210 mV.
Rinse thoroughly and place the 6820 in pH 7 buffer. Allow time for readings to stabilize.
Within 2 minutes the readings should be between 6.9 - 7.1 pH units and -30 to 30 mV.
YSI Incorporated
Environmental Monitoring Systems Service Manual
50
6820 Sonde
Section 7
CONDUCTIVITY TEST
1. Place the 6820 in 10 mS/cm conductivity calibrator solution. Move the 6820 up and down in
the solution to remove trapped bubbles. Continue to move the sonde until the readings
stabilize.
2. The reading should be within 5 % of the standard value. Errors could be the result of bubbles
in the cell, low solution level or the need for cell cleaning. See Troubleshooting, Section 2.
TEMPERATURE TEST
1. Place the 6820 in a well-stirred bath of a known temperature, preferably between 20 oC and
30 oC.
The 6820 must read within ± .25 oC of the standard.
OXYGEN TEST
1. Test the oxygen response time and zero oxygen offset by placing the DO sensor in a zero
oxygen environment after being calibrated/run in a 100% saturated environment. To establish
zero oxygen, surround the DO sensor with argon gas, nitrogen gas or sodium sulfite solution.
The dissolved oxygen reading should read < 2% in 3 - 5 minutes.
2. Rinse the sonde.
ORP TEST
1. Go to the ORP calibrate mode. Type “uncal”.
2. Place the 6820 ORP electrode in Zobell solution and note the temperature. The millivolt
reading should be within ±50 mV of the value in chart for Zobell solution (millivolts versus
temperature).
3. Recalibrate if required.
4. Rinse the sonde.
NITRATE TEST
1. Place the 6820 in 100 mg/L Nitrate standard. The reading should be 100 ± 10 mg/L with a 40
±25 mV indication.
2. Rinse the sonde.
AMMONIUM TEST
1. Place the 6820 in 100 mg/L Ammonia standard. The reading should be 100 ± 10 mg/L with a
110 ±50 mV indication.
2. Rinse the sonde.
TURBIDITY
1. Place the 6820 in 10 NTU Turbidity standard. The reading should be 8 to 12 NTU.
2. Rinse the sonde.
3. Rotate the wiper. It should park 150 to 210 degrees from the optics.
DEPTH
1. Stretch out the 6820 cable.
2. Hold the end of a tape measure to the top hole in the depth sensor plug. The depth plug is
located on the side of the sonde body.
YSI Incorporated
Environmental Monitoring Systems Service Manual
51
6820 Sonde
Section 7
3. Stretch the tape measure along the cable. For shallow depth sensors, place a piece of
waterproof tape at 15 feet. For medium depth sensors, place a piece of waterproof tape at 50
feet.
4. Lower the 6820 into still water until the tapeline on the cable reaches the water’s surface.
Check the readings. Shallow sensors should read 15 ±.06 feet. Medium depth sensors should
read 50 ± .4 feet.
CHLOROPHYLL
1. Calibrate according to the calibration procedures in the YSI 6-Series Operations Manual. If
no error messages appear, the probe should be assumed to be linear.
2. Make sure the wiper rotates and parks between 150 and 210 degrees from the optics.
YSI Incorporated
Environmental Monitoring Systems Service Manual
52
6820 Sonde
7.4
Section 7
SONDE EXPLODED VIEWS
Assembly Drawing
YSI Incorporated
Environmental Monitoring Systems Service Manual
53
6820 Sonde
7.5
Section 7
REPLACEMENT PARTS LIST
Drawing
Bubble #
1
YSI Item
Number
068259-01
Description
Comments
Sonde Body Assy, Shallow
2
068259-02
Sonde Body Assy, Medium
Characterized Assy W/PCB &
Depth Sensor
Characterized Assy W/PCB &
Depth Sensor
2
3
4
5
6
7
8
9
069258-3
068283
068284
068285
068296
118223
068251
169444
Depth Module Assy, Shallow-vented
Cable Assy, Integral, 5M
Cable Assy, Integral, 10M
Cable Assy, Integral, 25M
Sonde Body Connector Assy
Sonde Body Assy, W/O Depth
Overlay
Board Assy, 6820
10
11
12
12 & 13
14
15
14 & 15
16
17
18
19
20
21
068246
068255
068245
068248
065807
065840
065839
062768
063636
068249
061673
068267
068247
O-ring, AS 141
Bulkhead Assy
O-ring
Screws, O-ring
O-ring
Plug, Port
Plug Assy, Port
O-ring
Plug, ISE Port
Plug, Bulkhead Screw Port
Screw, SS, 8-32
Gasket, Transport Cup
O-ring, AS-229
22
23
24
25
24 & 25
062749
062646
069288
069287
069268
O-ring
Plug, Turbidity Port
Tube, Clear, Transport Cup
Lib, Transport Cup
Kit, Clear Transport Cup
26
27
068230
068233
068275
068238
069301
Probe Guard Assy
Probe Guard Assy
Header, 8-pin connector
Bottle, Calibration
6-Series Operations Manual,
Instruction
Connector, 20-pin, Amp
Connector, 4-pin, Single Row
O-ring
Desiccant Pack
062763
062212
059862
065597
YSI Incorporated
If depth unit, must use 068259-01
or 068259-02
Bulkhead to sonde body
Use with 068248 screw
Screw with O-ring
Use with 065840 & 068249
W/O O-ring
Includes 065840 & 065807
Use with 063636, 1 per
Use with 062768
2ea on units w/clear transport cup.
Bulkhead to transport cup. Used
with grey transport cup only.
Use with 062646
W/O O-ring
Part of 069268
Part of 069268
Use with wiped/unwiped Turb.,
Includes 068267 gasket
Use with unwiped Turbidity
Use with wiped Turbidity
Connects Depth Assy to PCB
Used on Bulkhead
Used on Bulkhead
Seals Integral Cable to sonde
Environmental Monitoring Systems Service Manual
54
6820 Sonde
7.6
Section 7
BULKHEAD WIRING DIAGRAM
Wire
Color
Description
Red
Orange
White
Brown
Black
Purple
Yellow
Yellow
Black
Blue
Orange
Gray
Gray
DO Cathode
Cond. R Sense
DO Anode
Cond. R Drive
DO Excitor
Cond. L Drive
Depth VSW
Cond. L Sense
Depth (-) Input
Thermistor
Depth (+) Input
Thermistor (-)
Depth (-) Input
Solution
ISE-2
ISE-3
ISE-4
ISE-5
ISE-1
ISE Reference
Turb. LED
Turb. Motor (1)
Turb. Motor (2)
Turb. Temp.
Comp.
Turb. VCCSW +5
Turb. VEE -5
Turb. GND
Turb. Input
Purple
Yellow
Yellow
Yellow
White
Green
Gray
Red
Black
Orange
Purple
Blue
White
Brown
Orange
Amp
Connectors
20-pin
8-pin
Conn
Conn
Turb.
1
2
3
4
5
6
7
8
9
10
11
12
13
14
15
16
17
18
19
20
1
2
3
4
Bulkhead Connectors
8-pin
Conn
Depth
ISE
3
ISE
4
ISE
5
3-pin
Lemo
DO
1
4-pin
Lemo
6 Pin
Lemo
Cond.
8-pin
Lemo
Turb.
2
3
4
2
3
1
1
2
5
3
6
4
2
1
1
1
4
3
5
1
2
6
5
6
7
8
8
4
3
7
8
1
COND/TEMP
6 Pin Lemo
ISE1/ISE2
pH/ORP
4 Pin Lemo
DISSOLVED
OXYGEN
3 Pin Lemo
TURBIDITY/
Chlorophyll
8 Pin Lemo
1
2
3
4
5
6
7
8
9
10
11
12
13
14
15
16
17
18
19
20
Screw Port Plug
3
5
ISE3
4
ISE5
ISE4
BULKHEAD CONNECTOR
lAYOUT
20-pin Amp
Connector
YSI Incorporated
Environmental Monitoring Systems Service Manual
55
6820 Sonde
7.7
Section 7
BLOCK / WIRING DIAGRAM
Internal
8-pin
Amp
Connector
1
8
7
2
6
3
5
4
See 6820 Bulkhead
Wiring Diagram.
.
Wire
Color
Yellow
Orange
Green
Gray
Blue
Red
Black
Purple
Bare
Pin
Description
RS232 TX
RS232 RX
Alarm
RTS
CTS
+ 12V DC
GND
SDI-12
Shield
8-pin Amp
Connector
BULKHEAD
External Cable
Pin-outs
DB-9
MS-4 MS-8
2
3
------9
5
-----
8
1
7
2
6
3
5
4
----------A
C
B
C
D
E
G
H
A
B
F
B
CONN/CAP
ASSY
6920
CIRCUIT
BOARD
YSI Incorporated
Environmental Monitoring Systems Service Manual
56
SECTION 8 6920 SONDE
8.1
SONDE DISASSEMBLY/ASSEMBLY
When used for its intended purposes and maintained according to YSI’s recommendations, the
6920 sonde assembly will rarely need internal servicing. However, if service is required and the
sonde must be opened, the instructions provided below should be followed or permanent damage
to the sonde may occur.
WARNINGS
Opening the sonde by non-authorized service personnel will void the warranty.
The 6920’s internal printed circuit board contains static-sensitive devices. Disassemble the
sonde at a static-safe workstation, or permanent damage may occur.
Do not use a screwdriver or other device to pry apart the assembly. Permanent damage may
occur.
Tools Required: Phillips screwdriver, nut driver (3/8” or larger), prying block (1/2” x 3/4” x 3”),
O-ring lubricant and pliers.
SONDE DISASSEMBLY
Reference the Assembly Drawing during this
procedure.
1. Thoroughly dry the outside of the sonde using
an absorbent cloth. Unscrew the sonde cap
assembly and remove the batteries.
2. Remove the 4 screws than retain the connector
cap assembly to the sonde tube and unplug the
assembly’s 8-pin connector from the board.
Cond/Temp
(6 Pin Lemo)
Dissolved Oxygen
(3 Pin Lemo)
pH/ORP, ISE 1/ISE2
(4 Pin Lemo)
Screw Port
Plug
Screw Port
Plug
⊗
⊗
3. Set aside the connector cap assembly.
4. Remove the probe guard or storage cup.
Thoroughly dry the outside of the sonde and
probes using an absorbent cloth. Remove all of
the probes.
ISE 3
ISE 5
Turbidity/
Chlorophyll
8 Pin Lemo
5. Locate the Bulkhead Screw Port Plugs. See
Figure 8. At the center of each plug is a
tightened Phillips screw. Loosen one of the
screws approximately 1/4”.
ISE 4
Figure 8
WARNING: Loosening the screw too far may cause damage to the plug’s threads during the
next step.
6. Steady the sonde tube in a vise or, while sitting, between your legs. It will take a significant
amount of force to remove the bulkhead screw port plugs, so be sure that the sonde is firmly
secured.
YSI Incorporated
Environmental Monitoring Systems Service Manual
57
6920 Sonde
Section 8
7. Position a 1/2” thick prying block and nut driver as shown in Figure 9. With the nut driver
opening attached under the lip of the loosened screw,
“pop” the plug from the bulkhead by applying
Prying Block
downward pressure on the handle of the nut driver.
8. Repeat steps 5 through 7 for the second bulkhead port
plug.
9. Remove both O-ring screws from the bulkhead
assembly with a Phillips screwdriver.
10. Grasp the bulkhead with one hand and the sonde tube
with the other hand and carefully pull the bulkhead
away from the sonde tube. While pulling, a slight
twisting motion of about 5 ° may assist the disassembly.
Please note that considerable force may be required to
separate the two parts.
Figure 9
WARNING: Be careful, the bulkhead and depth modules are connected to the internal circuit
board via wires.
11. 11 To remove the circuit board from sondes with no depth module, carefully pull the board
out of the sonde tube and disconnect the 20-pin connector. Note the position of the shock
mounts for the re-assembly process. Take note to the Turbidity connector located at the 8pin connector. Remove this connector from the PCB with the pins staying in the wiring
harness. NOTE: The 3-pin power connector will be disconnected when the PCB is out of
the Sonde Tube.
12. To remove the circuit board from sondes with a depth module, carefully lay aside the
bulkhead and remove the two machine screws that retain the depth module to the sonde tube.
Grasp the depth module with one hand and the sonde tube with the other hand and carefully
pull the depth module away from the sonde tube. Again, a slight twisting motion may assist
with the disassembly. Please note that considerable force may be required to separate the
two parts. Next, carefully, pull the circuit board from the sonde tube and disconnect the 20pin connector. Note the position of the shock mounts for the re-assembly process. Take note
to the Turbidity connector located at the 8-pin connector. Remove this connector from the
PCB with the pins staying in the wiring harness. NOTE: The 3-pin power connector will be
disconnected when the PCB is out of the Sonde Tube.
NOTE: Unless replacing the depth module, it is not necessary to pull the wires through the holes
in the depth module. Also, see PC Board and Depth Module Replacement.
SONDE ASSEMBLY
1. Before assembly, inspect all O-rings and sealing surfaces for blemishes, scratches and dirt.
Clean and lightly lubricate the O-rings and sealing surfaces.
2. Dry the desiccant pack in a 120O F oven for 30 minutes. Re-install desiccant pack into sonde.
3. Plug the 3-pin power connector into board assembly. Plug the bulkhead wires and Turbidity
wires into the board assembly. Carefully install the circuit board into the sonde tube, making
sure that the shock mounts are properly positioned. If the sonde has a depth module, install
the depth module assembly. While sliding board assembly into sonde tube, take care not to
damage or bind the power connector and wires. NOTE: Confirm the location of the Red and
Black wire on sonde tube, this will have to be noted for installation of connector cap.
YSI Incorporated
Environmental Monitoring Systems Service Manual
58
6920 Sonde
Section 8
Note for sondes with depth: If cables were removed from the depth module as part of the
disassembly procedure, reassemble by routing the turbidity cable and the 20-pin bulkhead
connector cable through holes on opposite sides of the module. Reinstall depth module.
4. Reinstall the bulkhead to the sonde tube.
WARNING: It is extremely important to properly position all of the cables so that they will
not become pinched between the bulkhead, depth module or sonde tube. Failure to do so
may damage the main seal, causing permanent damage to the sonde.
5. Plug in the 8-pin connector cap connector to the board. NOTE: Newer sondes have polarity
markings on the connector cap. These markings have to be in line with the proper polarity
from the power lines located where the bulkhead was installed (Red +, Black -). Older
sondes don’t have polarity markings on connector cap; therefore, don’t be concerned how the
connector is installed. Install the 4 screws that attach the connector cap assembly to the
sonde tube. Install the cap assembly.
6. Install the O-ring screws (068248) until the O-ring just touches the bulkhead. Seat the Oring by turning the screw an additional 11/4 turn.
WARNING: Once these screws are tightened, the bulkhead should not twist when the sonde
guard or storage cup are installed or removed. If it does turn, apply more torque to the
screws.
7. Clean, inspect and grease the port plug O-rings. Screw the screws from each of the port
plugs, then tap both plugs into the bulkhead. NOTE: Make sure the screws are all the way in
so the threads are not damaged.
8. Inspect and lubricate probe O-rings and sealing surfaces. Re-install probes.
8.2
PC BOARD AND DEPTH MODULE REPLACEMENT
The Model 6920 printed circuit board utilizes state-of-the-art SMT (surface mount technology)
components. In the unlikely event of a component failure, YSI recommends that the entire PC
board be replaced, not repaired.
NOTICE FOR SONDES WITH DEPTH: Model 6920s with depth require replacement of
both the printed circuit board and depth module if either fail because they are specially
characterized as a pair at the factory. See Replacement Parts List, Section 8.5.
WARNING: The 6920 PC board assembly contains static-sensitive devices, so always handle it
at a static-free (ESD) workstation.
8.3
TEST PROCEDURE
The following procedures verify the functionality and accuracy of each of the Model 6920’s
measurement parameters.
EQUIPMENT REQUIRED: Model 610 display/logger or a PC with EcoWatch for Windows or
PC6000 software, 10 mS/cm conductivity calibrator solution, pH buffers 4, 7 and 10, stirred
temperature bath with 0.1oC accuracy, 100% argon/nitrogen gas or a sodium sulfite Na2SO3
solution, Zobell solution, ammonium 100 mg/L standard, nitrate 100 mg/L standard, turbidity 10
NTU standard, 1000 mg/L chloride standard, acridine orange, and a tape measure.
YSI Incorporated
Environmental Monitoring Systems Service Manual
59
6920 Sonde
Section 8
PRE-TEST
Ø If necessary, make repairs to the system. Perform all routine probe and sonde maintenance
before testing. See Troubleshooting and Maintenance, Sections 2 and 3.
Ø Calibrate the Model 6920 DO, pH, depth, turbidity, chlorophyll, ammonium, chloride and
nitrate parameters using procedures described in the Calibration Section of the 6-Series
Operations Manual.
Ø Do not calibrate conductivity unless necessary. Under normal circumstances, cleaning the
conductivity sensor will restore the system to normal operation.
Ø You need not remove the sonde guard to perform the tests described below unless you use
the sonde transport cup to hold standard solutions. To prevent carryover between tests, rinse
the sonde thoroughly in water, shake the excess off and out of the sonde. Dry the sonde’s
outside surfaces.
Ø The pH probe is also the reference for the other ISE probes. Thus, the pH probe must be
within specifications or the readings from the other ISEs will be affected.
Ø Under Report setup in the 6920 Main Menu, turn on the millivolt reading for the ISEs being
tested.
pH TEST
1.
2.
3.
4.
5.
6.
7.
Put the 6920 in Run mode with pH millivolt Report setting activated.
Place the 6920 in pH 4 buffer and allow to stabilize.
Within 2 minutes the readings should be between 3.9 - 4.1 pH units and 150 to 210 mV.
Rinse thoroughly and place the 6920 in pH 10 buffer. Allow time for readings to stabilize.
Within 2 minutes the readings should be between 9.9 - 10.1 pH units and -150 to -210 mV.
Rinse thoroughly and place the 6920 in pH 7 buffer. Allow time for readings to stabilize.
Within 2 minutes the readings should be between 6.9 - 7.1 pH units and -30 to 30 mV.
CONDUCTIVITY TEST
1. Place the 6920 in 10 mS/cm conductivity calibrator solution. Move the 6920 up and down in
the solution to remove trapped bubbles. Continue to move the sonde until the readings
stabilize.
2. The reading should be within 5 % of the standard value. Errors could be the result of
bubbles in the cell, low solution level or the need for cell cleaning. See Troubleshooting,
Section 2.
TEMPERATURE TEST
1. Place the 6920 in a well-stirred bath of a known temperature, preferably between 20 oC and
30 oC.
The 6920 should read within ± 0.25 oC of the standard.
OXYGEN TEST
1. Test the oxygen response time and zero oxygen offset by placing the DO sensor in a zero
oxygen environment after being calibrated/run in a 100% saturated environment. To
establish zero oxygen, surround the DO sensor with argon gas, nitrogen gas or sodium sulfite
solution.
2. The dissolved oxygen reading should read < 2% in 3 - 5 minutes.
3. Rinse the sonde.
YSI Incorporated
Environmental Monitoring Systems Service Manual
60
6920 Sonde
Section 8
ORP TEST
1.
2.
3.
4.
Go to the ORP calibrate mode.
Type “uncal”.
Place the 6920 ORP electrode in Zobell solution and note the temperature.
The millivolt reading should be within ±50 mV of the value in chart for Zobell solution
(millivolts versus temperature).
5. Re-calibrate if required.
6. Rinse the sonde.
NITRATE TEST
1. Place the 6920 in 100 mg/L Nitrate standard. The reading should be 100 ± 10 mg/L with a
40 ± 25 mV indication.
2. Rinse the sonde.
AMMONIUM TEST
1. Place the 6920 in 100 mg/L Ammonium standard. The reading should be 100 ± 10 mg/L
with a 110 ± 50 mV indication.
2. Rinse the sonde.
CHLORIDE
1. Place the 6920 in 1000 mg/L chloride standard. The reading should be 1000 ± 150 mg/L
with a 100 ± 50 mV indication.
2. Rinse the sonde.
TURBIDITY
1. Place the 6920 in 10 NTU Turbidity standard. The reading should be 8 to 12 NTU.
2. Rinse the sonde.
3. Rotate wiper. It should park 150 to 210 degrees from the optics.
DEPTH
1. Stretch out the 6920 cable.
2. Hold the end of a tape measure to the top hole in the depth module plug. The depth plug is
located on the side of the sonde tube.
3. Stretch the tape measure along the cable.
4. For sondes with shallow depth capability, place a piece of waterproof tape at 15 feet. For
medium depth capability, place a piece of waterproof tape at 50 feet.
5. Lower the 6920 into still water until the tapeline on the cable reaches the water’s surface.
Check the readings. Shallow sensors should read 15 ± .06 feet. Medium depth sensors
should read 50 ± .4 feet.
CHLOROPHYLL
1. Calibrate according to the calibration procedures in the YSI 6-Series Operations Manual. If
no error messages appear, the probe should be assumed to be linear.
2. Make sure the wiper rotates and parks between 150 and 210 degrees from the optics.
YSI Incorporated
Environmental Monitoring Systems Service Manual
61
6920 Sonde
8.4
Section 8
SONDE EXPLODED VIEWS
Assembly Drawing
YSI Incorporated
Environmental Monitoring Systems Service Manual
62
6920 Sonde
8.5
Section 8
REPLACEMENT PARTS LIST
Drawing
Bubble #
YSI Item
Number
Description
Comments
1
2
3
4
5
5
6
7
8
9
10
11
12
13
14
062647
119256
063089
062687
119277
119254
069239
068247
069236
069214
069230
119252
119253
061732
169444
Bail
Cap Assy, Sonde
Pressure Cap Assembly
O-ring
Connector, Cap Assembly, Vented
Connector Cap Assembly
O-ring
O-ring
Shock Mount
Overlay, 6920
Sonde Tube
Battery Terminal, Red
Battery Terminal, Black
Connector, Plug, 3 Cond.
Circuit Board Assy
Eye screws separate, 062688
Includes bail
15
15
15
16
069258-1
069258-2
069258-3
068246/
068244
069264
068255
062768
063636
068248
062749
062646
065839
068249
061673
065807
068267
068247
068230
068233
069268
069288
069287
062212
062763
065597
068238
068245
069301
Depth Module Assy, Shallow
Depth Module Assy, Medium
Depth Module Assy, Shallow, Vented
O-ring, If no depth module, use 068244
17
18
19
20
21
22
23
24
25
26
27 & 28
29
30
31
32
33 & 34
33
34
YSI Incorporated
Screw, Mach, 10-24, TRS
Bulkhead Assy
O-ring
Plug, ISE Port
Screw, O-ring
O-ring
Plug, Turbidity Port
Plug Assy, Port
Plug, Bulkhead Screw Port
Screw, SS, 8-32
O-ring
Gasket
O-ring, AS-229
Probe Guard Assy, Short
Probe Guard Assy, Long, Std
Kit, Clear Transport/Cal Cup
Tube, Clear Transport Cup
Lid, Clear Transport Cup
Connector, 4-pin, Single Row
Connector, 20-pin, Amp
Desiccant Pack
Bottle, Calibration
O-ring
6-Series Operations Manual
Retain circuit board
Self adhesive
If replaced in a unit with depth, must
use item 069258-1, 2 or 3.
Characterized with circuit board
Characterized with circuit board.
Characterized with circuit board.
Use with 063636, 1 per
Use with 062768
Screw with O-ring
Use with 062646
Without O-ring
Includes 065807 O-ring
Use with 065839 & 068249
Bulkhead to transport cup
Use with unwiped Turbidity
Use with wiped Turbidity
With 069288, 069287 & 068267
Use with wiped or unwiped Turb.
Use with wiped or unwiped Turb.
Used on Bulkhead
Used on Bulkhead
Use with 068248 screw
Environmental Monitoring Systems Service Manual
63
6920 Sonde
8.6
Section 8
BULKHEAD WIRING DIAGRAM
Wire
Color
Description
Red
Orange
White
Brown
Black
Purple
Yellow
Yellow
Black
Blue
Orange
Gray
Gray
DO Cathode
Cond. R Sense
DO Anode
Cond. R Drive
DO Excitor
Cond. L Drive
Depth VSW
Cond. L Sense
Depth (-) Input
Thermistor
Depth (+) Input
Thermistor (-)
Depth (-) Input
Solution
ISE-2
ISE-3
ISE-4
ISE-5
ISE-1
ISE Reference
Turb. LED
Turb. Motor (1)
Turb. Motor (2)
Turb. Temp.
Comp.
Turb. VCCSW +5
Turb. VEE -5
Turb. GND
Turb. Input
Purple
Yellow
Yellow
Yellow
White
Green
Gray
Red
Black
Orange
Purple
Blue
White
Brown
Orange
Amp
Connectors
20-pin
8-pin
Conn
Conn
Turb.
1
2
3
4
5
6
7
8
9
10
11
12
13
14
15
16
17
18
19
20
1
2
3
4
Bulkhead Connectors
4-pin
Conn
Depth
ISE
3
ISE
4
ISE
5
3-pin
Lemo
DO
1
4-pin
Lemo
6 Pin
Lemo
Cond.
8-pin
Lemo
Turb.
2
3
4
2
3
1
1
2
5
3
6
4
2
1
1
1
4
3
5
1
2
6
5
6
7
8
8
4
3
7
1
COND/TEMP
6 Pin Lemo
ISE1/ISE2
pH/ORP
4 Pin Lemo
DISSOLVED
OXYGEN
3 Pin Lemo
TURBIDITY
8 Pin Lemo
2
3
4
5
6
7
8
9
10
11
12
13
14
15
16
17
18
19
20
Screw Port Plug
3
5
4
ISE3
1
ISE4
ISE5
BULKHEAD CONNECTOR
lAYOUT
20-pin Amp
Connector
YSI Incorporated
Environmental Monitoring Systems Service Manual
64
6920 Sonde
8.7
Section 8
BLOCK / WIRING DIAGRAM
Internal
8-pin
Amp
Connector
1
8
7
2
6
3
5
4
Ext. Sonde
Wire
Color
Yellow
Orange
Green
Gray
Blue
Red
Black
Purple
Bare
8
Pin
Description
RS232 TX
RS232 RX
Alarm
RTS
CTS
+ 12V DC
GND
SDI-12
Shield
Connector
Pin 3
Pin 7
Pin 5
Pin 8
Pin 6
Pin 2
External Cable
Pinouts
DB-9
MS-4 MS
-8
2
--C
3
--D
----E
----G
----H
9
A
A
5
C
B
--B
F
--B
1
7
2
6
3
5
4
1
8
2
9
3
7
See 6920 Bulkhead
Wiring Diagram.
4
6
8-pin Amp
Connector
BULKHEAD
5
Ext. Sonde
Connector
CONN/CAP
ASSY
6920
CIRCUIT
BOARD
YSI Incorporated
Environmental Monitoring Systems Service Manual
65
SECTION 9 6600 SONDE
9.1
SONDE DISASSEMBLY/ASSEMBLY
When used for its intended purposes and maintained according to YSI’s recommendations, the
6600 sonde assembly will rarely need internal servicing. However, if service is required and the
sonde must be opened, the instructions provided below should be followed or permanent damage
to the sonde may occur.
WARNING
Opening of the sonde by non-authorized service personnel will void the warranty.
The 6600’s internal Printed Circuit Board contains static-sensitive devices. Disassemble the
sonde at a static-safe workstation, or permanent damage may occur.
Do not use a screwdriver or other device to pry apart the assembly or permanent damage may
occur.
Tools required: 9/64” hex wrench, small standard screwdriver, lint free cloth, and stopcock
grease
9.2
PC BOARD AND DEPTH MODULE REPLACEMENT
The Model 6600 printed circuit board utilizes state-of-the-art SMT (surface mount technology).
In the unlikely event of a component failure, YSI recommends that the entire PC board be
replaced, not repaired.
Notice for sondes with depth: Model 6600s with depth require replacement of both the printed
circuit board and depth module if either fail because they are specially characterized as a pair at
the factory. For disassembly procedures see Section 9.2, Sonde Disassembly /Assembly.
Warning: The 6600 PC board assembly contains static-sensitive components, so always handle
it at a static-free (ESD) workstation.
DISASSEMBLY PROCEDURE
Reference the Assembly Drawing during this procedure.
1. Thoroughly dry the outside of the sonde using an absorbent cloth. Install the sensor guard to
protect probes.
2. With a 9/64” hex wrench, remove the two 8-32 cap screws located at the end of the sonde
tube closest to the bulkhead. If the sonde has a depth module, these screws will allow the
depth module to separate from the sonde tube.
3. Grasp the sonde tube with one hand and the bulkhead with the other hand. Carefully, twist
the two sections about 5 - 10 ° while pulling them apart. Extreme care must be exercised
when the two parts separate so those internal components are not damaged.
4. Disconnect the 20-pin and 8-pin Amp connectors from the printed circuit board. For sondes
with vented level, use a small screwdriver to pry the pressure tube off of the depth module
nipple. The bulkhead assembly is now detached from the rest of the assembly. If a depth
module is present, it can remain attached to the bulkhead. See the next section, Depth
Module Removal.
5. Remove the two 8-32 cap screws that attach the sonde tube to battery compartment assembly.
YSI Incorporated
Environmental Monitoring Systems Service Manual
66
6600 Sonde
Section 9
6. Grasp the sonde tube with one hand and the battery compartment assembly with the other
hand. Carefully, twist the two sections about 5-10 ° while pulling them apart. Extreme care
must be exercised when the two parts separate so those internal components are not
damaged.
7. The printed circuit board can be removed from the battery compartment by disconnecting the
3-pin and 8-pin Amp connectors.
Note for units with depth or level: Unless replacing the depth module or bulkhead, it is not
necessary to separate the two. See Depth Module Removal.
DEPTH MODULE REMOVAL (SONDES WITH DEPTH ONLY)
If separation of the depth module and bulkhead is necessary, the following instructions should be
followed.
1. Remove the two 8-32 cap screws that attach the depth module to the bulkhead. See Figure
10.
2. Grasp the depth module with one
hand and the bulkhead assembly
with the other hand. Carefully,
separate the two sections by
twisting the two sections about 510 ° while pulling them apart.
Extreme care must be exercised
when the two parts separate so
those internal components are not
damaged.
Figure 10
3. Disconnect the 4-pin Amp
connector that connects the depth module to the bulkhead 20-pin connector. Guide the
bulkhead wires/connectors through the two depth module holes.
Note: Sondes with depth. The depth module and printed circuit board must be replaced as an
entire assembly. See PC Board and Depth Module Replacement.
ASSEMBLY PROCEDURE
Reference the Assembly Drawing during this procedure.
Before assembly, inspect all O-rings and sealing surfaces for blemishes, scratches and dirt. If
necessary, clean with a lint free cloth and isopropyl alcohol. O-rings and sealing surfaces should
be lightly lubricated with stopcock grease. Also, the desiccant pack should be dried at 120 oF for
30 minutes prior to assembly.
Warning: It is extremely important to properly position all cables/wires so that they will not
become pinched between the bulkhead, depth module or sonde tube. Failure to do so may
compromise a main seal, causing permanent damage to the sonde.
YSI Incorporated
Environmental Monitoring Systems Service Manual
67
6600 Sonde
Section 9
PC BOARD INSTALLATION
1. Carefully, install a shock mount onto the board by slipping it over the end of the board and
sliding it into location between the PCB’s 3-pin connector and the PCB’s battery. See Figure
11
2. Plug the 8-pin connector from the battery compartment and the 3-pin Amp connector from
the battery terminal leads into their proper locations on the top of the board.
3. Position the PCB w/ shock mount on the battery compartment as shown figure 11.
3-Pin & 8-Pin
Connectors
Shock
Mount
Figure 11
4. Lightly lubricate the installed O-rings on the battery compartment.
5. Insert the battery compartment with connected board and shock mount into the sonde tube;
do so in the end of the tube that is labeled with the battery label.
WARNINGS: When assembling a VENTED battery compartment, be sure the vent tube is not
damaged or pinched.
When inserting the battery compartment, be sure that the side of the compartment where batteries
are installed lines up directly with the battery label on the sonde tube.
6. Secure the battery compartment to the sonde tube with two 8-32 Cap Screws (062690).
DEPTH MODULE INSTALLATION: (SONDES WITH DEPTH ONLY)
If the depth module was separated from the bulkhead as part of the disassembly procedure follow
the procedure below to re-assemble.
1. Lightly lubricate the outer O-rings of both the depth module and the
bulkhead.
2. Pass the Amp connectors through the oval slots in the depth module in
the following order:
Pass the 8-pin chlorophyll connector of the bulkhead through one of
the oval slots.
Pass the 4-pin depth connector of the bulkhead through the same slot.
Figure 12
YSI Incorporated
Environmental Monitoring Systems Service Manual
68
6600 Sonde
Section 9
Pass the 20-pin connector through the same slot as the depth connector. The 20-pin must be
passed through length-wise, so rotate it 90 °. See figure 12.
Pass the 8-pin turbidity connector of the bulkhead through the other slot.
3. Insert the bulkhead into the depth module while slowly rotating the bulkhead 5-10 ° until it is
both fully seated and the bulkhead’s threaded inserts align with the holes in the module. See
figure 10.
4. Secure the bulkhead to the depth module with two 8-32 Cap Screws (062690).
BULKHEAD/DEPTH MODULE ASSEMBLY TO SONDE TUBE
1. Reach into the sonde tube and grab the PCB by the edges. Pull the board toward the bottom of
the sonde tube. Allow the board to protrude ONLY 1” out from the end of the sonde tube.
Warning: DO NOT unplug the board from the battery compartment
2. Install a shock mount onto the board by slipping it over the end of the board and sliding it
into location just beyond the 8-pin turbidity connector so that the connector is visible.
3. Plug the 8-pin turbidity connector from the bulkhead onto the PCB, at the proper location,
with the two nubs facing away from the board. Do not install the chlorophyll connector.
Note: The turbidity connector has white and black wires.
4. Plug the 20-pin connector from the bulkhead into the PCB at the proper location. Be sure it
is fully seated.
5. Skip to step #7 if sonde does not have depth. Plug the 4-pin Amp connector from the
bulkhead onto the 4-pin header coming from the depth module. Make sure the wires match
colors (Yellow to Yellow, Black to Black, Etc.). Tuck the 4-pin depth connectors into the
sonde tube.
6. If your unit is NOT a vented depth unit then skip to step (7). If the depth module is vented,
then push the vent tube of the battery compartment onto the fitting of the depth module. Be
sure the vent tube is fully seated against the flange of the fitting and that no holes are present.
7. Position the shock mount (the last one installed), so that it will be sandwiched between the
battery compartment and the sonde tube, similar to the first shock mount. It is shaped to fit
this area.
8. Slide the PCB completely into the sonde tube and gather the wires from the bulkhead so they
will not be pinched. Be sure to tuck the 8-Pin Chlorophyll cable assembly into the sonde
tube.
Warning: When attaching the depth module to the sonde tube, be sure the vent tube is not being
pinched.
9. Insert the depth module (with bulkhead) or bulkhead into the sonde while slowly rotating
them 5-10 ° until they are both fully seated and the module’s threaded inserts align with the
holes in the sonde tube.
10. Secure the depth module or bulkhead to the sonde tube with two 8-32 Cap Screws (062690).
YSI Incorporated
Environmental Monitoring Systems Service Manual
69
6600 Sonde
Section 9
BATTERY COMPARTMENT CLOSING
1. Lightly lubricate the O-ring on the outside of the battery cover. DO NOT lubricate the
internal O-ring (066273). See figure 13.
2. Secure the battery cover to the battery compartment using two Cap Screws. Be sure to
tighten down completely, but do not over-tighten. The cover should be slightly below the top
of the battery compartment.
Figure 13
9.3
TEST PROCEDURES
The following procedures verify the functionality and accuracy of each of the Model 6600’s
measurement parameters.
EQUIPMENT REQUIRED: Model 610 display/logger or a PC with EcoWatch for Windows or
PC6000 software, 10 mS/cm conductivity calibrator solution, pH buffers 4, 7 and 10, stirred
temperature bath with 0.1oC accuracy, 100% argon/nitrogen gas or a sodium sulfite Na2SO3
solution, Zobell solution, ammonium 100 mg/L standard, nitrate 100 mg/L standard, turbidity 10
NTU standard, 1000 mg/L chloride standard, acridine orange, and a tape measure.
PRE-TEST
•
•
•
•
•
•
If necessary, make repairs to the system. Perform all routine probe and sonde maintenance
before testing. See Troubleshooting and Maintenance, Sections 2 and 3.
Calibrate the Model 6600 DO, pH, turbidity, chlorophyll, chloride, nitrate, and depth
parameters using procedures described in the Calibration Section of the 6-Series Operations
Manual.
Do not calibrate conductivity unless necessary. Under normal circumstances, cleaning the
conductivity sensor will restore the system to normal operation.
It is not necessary to remove the sonde guard to perform the tests described below. To
prevent carryover between tests, rinse the sonde thoroughly in water, shake the excess off
and out of the sonde. Dry the sonde’s outside surfaces.
The pH probe is also the reference for the other ORP sensor. Thus, the pH probe must be
within specifications or the ORP readings may be affected.
Under “Report Setup” in the 6600 main menu, turn on the millivolt reading for the ISEs (pH
and/or ORP) being tested.
YSI Incorporated
Environmental Monitoring Systems Service Manual
70
6600 Sonde
Section 9
pH TEST
1.
2.
3.
4.
5.
6.
7.
Put the 6600 in Run mode with pH millivolt Report setting activated.
Place the 6600 in pH 4 buffer and allow to stabilize.
Within 2 minutes the readings should be between 3.9 - 4.1 pH units and 150 to 210 mV.
Rinse thoroughly and place the 6600 in pH 10 buffer. Allow time for readings to stabilize.
Within 2 minutes the readings should be between 9.9 - 10.1 pH units and -150 to -210 mV.
Rinse thoroughly and place the 6600 in pH 7 buffer. Allow time for readings to stabilize.
Within 2 minutes the readings should be between 6.9 - 7.1 pH units and -30 to 30 mV.
CONDUCTIVITY TEST
1. Place the 6600 in 10 mS/cm conductivity calibrator solution. Move the 6600 up and down in
the solution to remove trapped bubbles. Continue to move the sonde until the readings
stabilize.
2. The reading should be within 5% of the standard value. Errors could be the result of bubbles
in the cell, low solution level or the need for cell cleaning. See Troubleshooting, Section 2.
TEMPERATURE TEST
1. Place the 6600 in a well-stirred bath of a known temperature, preferably between 20oC and
30oC.
2. The 6600 must read within ± .25oC of the standard.
OXYGEN TEST
1. Test the oxygen response time and zero oxygen offset by placing the DO sensor in a zero
oxygen environment after being calibrated/run in a 100% saturated environment. To establish
zero oxygen, surround the DO sensor with argon gas, nitrogen gas or sodium sulfite solution.
2. The dissolved oxygen reading should read < 2% in 3 - 5 minutes.
3. Rinse the sonde.
NITRATE TEST
3. Place the 6920 in 100 mg/L Nitrate standard. The reading should be 100 ± 10 mg/L with a
40 ± 25 mV indication.
4. Rinse the sonde.
AMMONIUM TEST
3. Place the 6920 in 100 mg/L Ammonium standard. The reading should be 100 ± 10 mg/L
with a 110 ± 50 mV indication.
4. Rinse the sonde.
CHLORIDE
3. Place the 6920 in 1000 mg/L chloride standard. The reading should be 1000 ± 150 mg/L
with a 100 ± 50 mV indication.
4. Rinse the sonde.
TURBIDITY
4. Place the 6920 in 10 NTU Turbidity standard. The reading should be 8 to 12 NTU.
5. Rinse the sonde.
YSI Incorporated
Environmental Monitoring Systems Service Manual
71
6600 Sonde
Section 9
6. Rotate wiper. It should park 150 to 210 degrees from the optics.
ORP TEST
1.
2.
3.
4.
Go to the ORP calibrate mode.
Type “uncal”.
Place the 6600 ORP electrode in Zobell solution and note the temperature.
The millivolt reading should be within ±50 mV of the value in the Millivolt versus
Temperature Chart for Zobell solution.
5. Re-calibrate if required.
6. Rinse the sonde.
DEPTH
1. Stretch out the 6600 cable.
2. Hold the end of a tape measure to the top hole in the depth plug. The depth plug is located on
the side of the depth module.
3. Stretch the tape measure along the cable.
4. For sondes with shallow depth capability, place a piece of waterproof tape at 15 feet. For
medium depth capability, place a piece of waterproof tape at 50 feet.
5. Lower the 6600 into still water until the tapeline on the cable reaches the water’s surface.
Check the readings. Shallow sensors should read 15 ± .06 feet. Medium depth sensors should
read 50 ± .4 feet.
CHLOROPHYLL
3. Calibrate according to the calibration procedures in the YSI 6-Series Operations Manual. If
no error messages appear, the probe should be assumed to be linear.
4. Make sure the wiper rotates and parks between 150 and 210 degrees from the optics.
YSI Incorporated
Environmental Monitoring Systems Service Manual
72
6600 Sonde
9.4
Section 9
SONDE EXPLODED VIEWS
Assembly Drawing
YSI Incorporated
Environmental Monitoring Systems Service Manual
73
6600 Sonde
9.5
Section 9
REPLACEMENT PARTS LIST
Drawing
Bubble #
1
2
3
4
5
6
7
8
9
10
11
12
14
15
16
17
18
20
26
27
YSI Item
Number
116003
116273
066273
001740
062697
062635
002670
062651
066264
066263
062644
062647
062690
062678
062688
062698
063089
065597
066279
066267
28
29
30
33
34
35
36
066272
066266
066265
065839
063636
062768
116269
Cap, Transport Cup
Gasket, Bulkhead
Shock Mount, PCB
Port Plug Assy
Port Plug
O-ring
Battery Compartment, Non-vented
36
116270
Battery Compartment, Vented
37
169444
Printed Circuit Board Assy, 6600
39
116242
39
116243
39
39
116244
116245
006570
116274
Depth Module Assy, Non-vented,
Shallow
Depth Module Assy, Non-vented,
Medium
Depth Module Assy, Non-vented, Deep
Depth Module Assy, Vented, Shallow
Maintenance Kit
Cal Cup Kit
YSI Incorporated
Description
Comments
Battery Cover Assy
Power Cable Assy
O-ring, Battery Compartment, Square
Screw, 6-32
Label, Battery
Battery Terminal
Washer, Lock, #6
O-ring, 2.862D
Overlay, 6600
Guard, Sensor
Sonde Tube
Bail
Cap Screw, 8-32
End Plate, Sensor Guard
Eye Screw, Modified
Port Plug Assy, Turbidity, Chlor, Turb.
Pressure Cap
Desiccant Pack
Bulkhead Assy, 6600
Tube, Clear Transport Cup
With 062630 O-ring
Environmental Monitoring Systems Service Manual
Sonde tube seal
With or w/o depth
2 ea., Retain circuit board
With 065807 O-ring
Use with 062768 O-ring
With 116273 power cable
and 062635 terminals
With 116273 power cable
and 062635 terminals
Units with depth, must
use Depth Module Assy
Calibrated w/PCB
Calibrated w/PCB
Calibrated w/PCB
Calibrated w/PCB
Includes 066267, 066272
& 066266
74
6600 Sonde
9.6
Section 9
BULKHEAD WIRING DIAGRAM
Wire
Color
Description
Red
Orange
White
Brown
Black
Purple
Yellow
Yellow
Black
Blue
Orange
Gray
Gray
DO Cathode
Cond. R Sense
DO Anode
Cond. R Drive
DO Excitor
Cond. L Drive
Depth VSW
Cond. L Sense
Depth (-) Input
Thermistor
Depth (+) Input
Thermistor (-)
Depth (-) Input
Solution
ISE-2
ISE-3
ISE-4
ISE-5
ISE-1
ISE Reference
Turb. LED
Turb. Motor (1)
Turb. Motor (2)
Turb. Temp.
Comp.
Turb. VCCSW
+5
Turb. VEE -5
Turb. GND
Turb. Input
Purple
Yellow
Yellow
Yellow
White
Green
Gray
Red
Black
Orange
Purple
Blue
White
Brown
Orange
Green
Brown
Red
Blue
Gray
Yellow
Orange
Purple
Amp Connectors
20-pin
8-pin
Conn
Conn
Turb.
1
2
3
4
5
6
7
8
9
10
11
12
13
14
15
16
17
18
19
20
1
2
3
4
8-pin
Conn
Chlor
4-pin
Conn
Depth
ISE
3
Bulkhead Connectors
ISE
ISE
3-pin
4-pin
4
5
Lemo
Lemo
DO
1
6 Pin
Lemo
Cond.
8-pin
Lemo
Turb.
8-pin
Lemo
Chlor.
2
3
4
2
3
1
1
2
5
3
6
4
2
1
1
1
4
3
5
1
2
6
5
8
6
7
8
4
3
7
1
Chlorophyll
Chlorophyll
Chlorophyll
Chlorophyll
Chlorophyll
Chlorophyll
Chlorophyll
Chlorophyll
1
2
3
4
5
6
7
8
Dissolved Oxygen
ISE’s
Turbidity
YSI Incorporated
PH/ORP
ISE’s
1
2
3
4
5
6
7
8
9
10
11
12
13
14
15
16
17
18
19
20
ISE’s
Chlorophyll
Cond./Temp.
5
1
2
6
8
4
3
7
Environmental Monitoring Systems Service Manual
20-Pin Amp
Connector
75
6600 Sonde
9.7
Section 9
BLOCK / WIRING DIAGRAM
Internal
8-pin
Amp
Connector
1
8
7
2
6
3
5
4
Ext. Sonde
Wire
Color
Yellow
Orange
Green
Red
Black
Purple
Bare
Pin
Description
RS232 TX
RS232 RX
Alarm
Not used
Not used
+ 12V DC
GND
SDI-12
Shield
Connector
Pin 3
Pin 7
Pin 5
Pin 8
Pin 6
Pin 2
8
1
7
2
9
Wire Side
6
3
7
Power Connector
5
4
External Cable
Pinouts
DB-9
MS-4 MS
-8
2
--C
3
--D
----E
--------9
A
A
5
C
B
--B
F
--B
1
8
2
3
4
6
See Bulkhead Wiring
Diagram.
Wire Side
8-pin Amp
Connector
BULKHEAD
5
Ext. Sonde
Connector
CONN/CAP
ASSY
6600
CIRCUIT
BOARD
YSI Incorporated
Environmental Monitoring Systems Service Manual
76
SECTION 10 6500 PROCESS MONITOR
10.1
DISASSEMBLY/ASSEMBLY OF 6500 MONITOR
When used for its intended purposes and maintained according to YSI’s recommendations, the
6500 will rarely require service. However, if service is required or the instrument must be
opened, the instructions provided below, used in conjunction with the Assembly Drawing, should
be used during this procedure.
WARNINGS!
Opening the 6500 by non-authorized service personnel may void the warranty. The 6500’s
internal printed circuit board contains static-sensitive devices.
Disassemble following ESD (Electro-Static Discharge) safe guidelines, or permanent damage
may occur.
Do not use a screwdriver or other device to pry apart the assembly or permanent damage may
occur.
Tools required: Slotted screwdriver and 5/32” hex key.
Front Panel and Display Board Removal
1.
2.
3.
4.
Shut off AC power to the 6500 Monitor.
If wet, thoroughly dry the outside of the 6500 using an absorbent cloth.
Loosen the four slotted screws positioned at the corners of the Front Panel Assembly.
Carefully, remove the Front Panel Assembly. Do not use a prying tool, bare hands
should be sufficient.
The Display I/O Cable is long enough to allow the Display PCB Assembly to be moved aside
while work is performed, or can be unplugged from the Display PCB Assembly for easy board
removal or replacement.
Ø The Display PCB Assembly can be separated from the Front Panel Assembly by removing
the 4 slotted screws located on the back corner of the Display PCB Assembly.
Ø The Display Module Assembly can be removed from the display PCB Assembly by
removing the 4 slotted screws located on the back corner of the Display Module Assembly.
I/O Plate, I/O and Power Supply Board Removal
1. Unplug, pull forward and move out of the way all cables that are attached to Pluggable
Socket Connectors.
2. Remove the 4 hex screws than retain the I/O Plate to the enclosure.
WARNING:
1.
When removing the I/O Plate, care must be taken not to damage the Sonde Interface
Cable. This cable will have to be unplugged from the I/O Board before the I/O Plate
can be completely removed.
2.
When removing the I/O Plate, both the I/O and Power Supply Boards will be removed.
YSI Incorporated
Environmental Monitoring Systems Service Manual
77
6500 Environmental Process Monitor
3.
Section 10
Carefully, pull the I/O Plate far enough out of the enclosure to access the Sonde Interface
Cable. Unplug the Sonde Interface Cable from the I/O Board Assembly. The I/O Plate,
I/O Board and Power Supply Board can now be removed from the enclosure for
servicing.
Ø To remove the Power Supply Board from the I/O Board Assembly, disconnect the AC and
DC Cables and disconnect the 4 mounting tabs/snaps.
Ø Removal of the I/O Board Assembly from the I/O Plate can be accomplished by removing the
7 slotted mounting screws.
ASSEMBLY
1. Inspect all gaskets and sealing surfaces for blemishes, scratches and dirt. As necessary, clean
or replace affected parts. Case gasket replacement is recommended if the existing case gasket
has been in place for more than one year and the case is opened.
2. Remove old desiccant packs from the enclosure. Place two new desiccant packs inside the
6500. The YSI 6506 contains 6 packs of desiccant.
To assemble, simply reverse disassembly steps.
NOTE: Be certain that the Mylar sheet (2.5 x 3.5 inches) has been reinstalled between the I/O
board and the power supply board.
YSI Incorporated
Environmental Monitoring Systems Service Manual
78
6500 Environmental Process Monitor
10.2
Bubble
Number
1
2
3
4
5
6
7
8
9
10
11
12
Section 10
6500 MONITOR EXPLODED VIEW
Part
Number
115953
065949
065943
065911
065914
065930
065903
065912
065929
065926
065936
065974
YSI Incorporated
Description
Panel Assy, Front
Spacer, LCD
Conn, Pluggable, 8
Cable, Display, I/O
Cable, DC
Gasket, MS-8
Enclosure, NEMA4
Cable, Sonde Inter.
Screw, Sealing
Fitting, Conduit
Cap, Dust, MS-8
Gasket, Case
Bubble
Number
13
14
15
16
17
18
19
20
21
22
23
Part
Number
115952
115905
065915
065942
065944
115906
065907
065913
065917
065928
065918
065910
Environmental Monitoring Systems Service Manual
Description
Display Mod. Assy
Display, PCB Assy
Plate, I/O
Conn, Pluggable, 3
Conn, Pluggable, 12
Board Assy, I/O
Board Assy, Power
Cable, AC
Standoff, I/O Plate
Nutplate
Plate, Support
Key Extender
79
6500 Environmental Process Monitor
10.3
Section 10
EXPLODED VIEW OF 6502 BREAKOUT BOX
11
Bubble
Number
1
2
3
4
5
6
7
8
9
10
11
YSI Incorporated
Part
Number
065912
065932
065940
065928
065929
065930
065936
065926
065950
065958
115981
Description
Cable, Sonde Interface
Enclosure, NEMA4X, W/Front
Board Assy, Breakout Box
Nutplate
Screw, Sealing
Gasket, MS-8
Cap, Dust, MS-8
Fitting, Conduit
Washer, Lkin, #10
Screw, Cap, 10-32
Cover Assy, Front, W/Gasket
Environmental Monitoring Systems Service Manual
80
6500 Environmental Process Monitor
10.4
Neutral
Line
Ground
Section 10
BLOCK DIAGRAM OF 6500 MONITOR
AC Cable
P/S
I/O
I/O
J2
J6
J9
Pin # Pin # Pin #
1
3
2
2
1
1
NC
DC Cable
P/S
I/O
J1
J8
pin # pin #
+12
1
1
VDC
+5
2
2
VDC
+5
3
3
VDC
COM
4
4
COM
5
5
-12V
6
6
VDC
MS-8 Sonde
Cable
I/O
MS-8
J10
Pin #
Pin #
1
A
+12
VDC
COM
SDI-12
2
3
B
C
AC Power
Input
90 - 240 VAC
J6
J2
AC Cable
MS-8
Power
Supply
Board
I/O
Board
Assembly
J1
YSI Incorporated
J10
J9
DC Cable
J8
Display
Board
Assembly
J7
J2
Display I/O
Cable
Environmental Monitoring Systems Service Manual
81
6500 Environmental Process Monitor
10.5
Section 10
BOARD ASSEMBLIES
1
6
J1
1
2
J2
Power Supply
J5
J1
1
J6
1
12
1
1
D1
FL1
D2
J9
6
J8
K1
K2
K4
K3
1
1
2
D3
D4
J2
10
D19
20
D5
J7
D6
D7
D8
D20
1
30
C1
1
U1
8
1
J3
8
J10
J4
MS-8 Sonde
Connector
I/O Board Assembly
YSI Incorporated
Environmental Monitoring Systems Service Manual
82
6500 Environmental Process Monitor
2
1
Section 10
Display
10
20
oooooooooo
30
J2
Display Board Assembly
YSI Incorporated
Environmental Monitoring Systems Service Manual
83
SECTION 11 610D/DM DISPLAY/LOGGERS
11.1
SOFTWARE UPDATES
YSI 610 software may be updated from time to time. This is simple since the 610 uses nonvolatile FLASH memory to hold the software. New 610 software can be installed by using a PC.
To update software all you need is download it from YSI’s website at www.ysi.com, or you can
request a copy of the YSI 610 software update diskette from YSI Customer Service. Everything
else you need comes with the standard YSI 610 kit.
The 610 software update diskette contains two files used for update, and may contain other files.
The two files are AOUT.A03 that contains the new 610 software, and LOAD4.EXE, which is a
PC program you run to send the new 610 software to the 610.
When loading new 610 software, the entire keyboard will appear to work incorrectly. This is
normal. Follow the instructions below carefully. If you type a wrong character, hit the Skip key
(which is a backspace).
11.2
LOADING NEW SOFTWARE
To load new YSI software into the 610, proceed carefully as follows:
1.
Connect the 610 to an (MS-DOS) Personal Computer, using the Null Modem cable
(provided). This forms a 5-wire RS-232 connection. You must use the COM1 RS-232 port
of the PC.
2. Make sure there is no mouse on COM1 or COM3.
3. Set the PC to run from the floppy drive which holds the YSI programs (type A: or B: on the
PC, and press Enter on the PC).
4. Disconnect the wall charger from the 610 if it is connected.
5. Turn off the 610 by pressing Power, or by pressing Esc then Power. Reset the 610 by tapping
the Esc and Skip keys simultaneously, and then releasing them immediately. If you did this
correctly the message RESET DONE or MASTER RESET will appear in the 610 display. If
you do not get either message, go back to step 5.
6.
Type the following 5 keys on the 610: D C ? Del Bksp. Verify you see PMODE on the
610 screen. If you make a typo, press Skip to backspace over the typo and retype it. Once
you see PMODE press the Z key. The 610 screen displays PROGRAMMING MODE
!!LOADING!!
7.
On the PC at the DOS prompt, type the command "LOAD4 -ROM -F128" and press Enter
(also on the PC). This runs the transfer program. Loading begins at once and takes about 5
minutes. Loading is complete when the DOS prompt returns to the PC screen, and you hear
a chirp from the 610.
YSI Incorporated
Environmental Monitoring Systems Service Manual
84
610D/DM Display/Loggers
Section 11
8.
Verify the message ALL ROM BANKS SENT is on the PC screen, and the word
COMPLETE has appeared on the 610 screen. If either message is not shown, go back to
step 1.
9.
If the 610 has never been loaded with YSI software before, you need to do items A-E
below. These items are shown here for completeness. Otherwise proceed to step 11.
10. (A) Type the 5 keys: ' Bksp _ G D. Verify you see SETUP on the 610 screen. Press the
Z key.
(B) Press Q until baud rate is 9600, then press "
(C) Press Q until word format is 8D+1 STOP then press "
(D) If bank number is not 0, press Q Y Z then press "
(E) If prog addr is not 16384, press Q S P U J N Z then press "
11. Type the following 3 keys on the 610: F G ". Verify you see RUN on the 610 screen. If
you make a typo, press Skip to backspace over the typo and retype it. Once you see RUN
press the Z key. The 610 displays YSI SOFTWARE INITIALIZED for 3 seconds, then
shuts itself off.
12.
The 610 is now ready for use.
YSI Incorporated
Environmental Monitoring Systems Service Manual
85
610D/DM Display/Loggers
11.3
Section 11
REPLACEMENT PARTS LIST
Item #
116100
Description
Overlay, Front, 610D
116101
Overlay, Front, 610DM
116102
I/O, Module Board Assembly
116103
Display Assembly
116104
Display Gasket
116105
Connector Gasket
116106
Body Gasket
116107
Screw Casing
116108
Keyboard Backplate
116109
EEPROM (Latest software revision. Re-programmable)
063511
Battery Pack, Kit
116117
Keypad Assembly
116110
Board Assembly, 610D
116111
Board Assembly, 610DM, 126K Memory
116112
Board Assembly, 610DM, 512K Memory
YSI Incorporated
Comments
Main case seal
Environmental Monitoring Systems Service Manual
86
SECTION 12 WARRANTY AND SERVICE INFORMATION
YSI EPG instruments are warranted for two years against defects in workmanship and materials
when used for its intended purposes and maintained according to instructions. All cables are
warranted for one year. The depth, dissolved oxygen, temperature/conductivity, pH, and
pH/ORP combination probes are warranted for one year. Damage due to accidents, misuse,
tampering, or failure to perform prescribed maintenance is not covered. The warranty period for
chemicals and reagents is determined by the expiration date printed on their labels. Within the
warranty period, YSI will repair or replace, at its sole discretion, free of charge, any product that
YSI determines to be covered by this warranty.
To exercise this warranty, write or call your local YSI representative, or contact YSI Customer
Service in Yellow Springs, Ohio. Send the product and proof of purchase, transportation prepaid,
to the Authorized Service Center selected by YSI. Repair or replacement will be made and the
product returned, transportation prepaid. Repaired or replaced products are warranted for the
balance of the original warranty period, or at least 90 days from date of repair or replacement.
LIMITATION OF WARRANTY
This Warranty does not apply to any YSI product damage or failure caused by (i) failure to
install, operate or use the product in accordance with YSI’s written instructions, (ii) abuse or
misuse of the product, (iii) failure to maintain the product in accordance with YSI’s written
instructions or standard industry procedure, (iv) any improper repairs to the product, (v) use by
you of defective or improper components or parts in servicing or repairing the product, or (vi)
modification of the product in any way not expressly authorized by YSI.
THIS WARRANTY IS IN LIEU OF ALL OTHER WARRANTIES, EXPRESSED OR
IMPLIED, INCLUDING ANY WARRANTY OF MERCHANTABILITY OR FITNESS FOR A
PARTICULAR PURPOSE. YSI’s LIABILITY UNDER THIS WARRANTY IS LIMITED TO
REPAIR OR REPLACEMENT OF THE PRODUCT, AND THIS SHALL BE YOUR SOLE
AND EXCLUSIVE REMEDY FOR ANY DEFECTIVE PRODUCT COVERED BY THIS
WARRANTY. IN NO EVENT SHALL YSI BE LIABLE FOR ANY SPECIAL, INDIRECT,
INCIDENTAL OR CONSEQUENTIAL DAMAGES RESULTING FROM ANY DEFECTIVE
PRODUCT COVERED BY THIS WARRANTY.
YSI Incorporated
Environmental Monitoring Systems Service Manual
87
Warranty and Service Information
Section 12
AUTHORIZED U.S. SERVICE CENTERS
North Region
YSI Incorporated • Repair Center • 1725 Brannum Lane • Yellow Springs, Ohio • 45387 •
Phone: (800) 765-4974 • (937) 767-7241• E-Mail: [email protected]
South Region
C.C. Lynch & Associates • 212 E. 2nd Street • Suite 203 • Pass Christian, Mississippi • 39571
• Phone: (800) 333-2252 • (228) 452-4612 • Fax: (228) 452-2563
West Region
EQUIPCO Sales and Service • 1110 Burnett Avenue, Suite D • Concord, CA • 94520 • Phone:
(800)550-5875 • Fax: (510)674-8655
North
North Dakota
Montana
Washington
Minnesota
Vermont
Maine
Wisconsin
South Dakota
Oregon
Idaho
Michigan
Wyoming
New York
Iowa
Nebraska
Ohio
Illinois Indiana
Nevada
Utah
Colorado
Kansas
Pennsylvania
West
Virginia
Missouri
Kentucky
West
California
Tennessee
Oklahoma
Arizona
Arkansas
New Mexico
Mississippi
Alabama
Texas
Virginia
New Hampshire
Massachusetts
Rhode Island
Connecticut
New Jersey
Delaware
Maryland
North
Carolina
South
Carolina
Georgia
Louisiana
Florida
South
Alaska
Hawaii
West
West
YSI Incorporated
Environmental Monitoring Systems Service Manual
88
Warranty and Service Information
Section 12
INTERNATIONAL SERVICE CENTERS
YSI Incorporated
YSI Incorporated • Repair Center • 1725 Brannum Lane • Yellow Springs, Ohio • 45387 •
Phone: (937) 767-7241• E-Mail: [email protected]
Hydrodata Services Ltd.
Alexander Road • London, Colney • AL2 1JB • Phone: 011-44-2737-827-837 • Fax: 0114401727-827-838
YSI Japan Ltd.
Sakura – Building 6-5-6-13 • Shinjuku, Shinjuku-ku, Tokyo • 160 • Phone: (81-3) 5360-3561 •
Fax: (81-3) 5360-3565
YSI Incorporated
Environmental Monitoring Systems Service Manual
89
APPENDIX A HEALTH AND SAFETY
YSI Conductivity solutions: 3161, 3163, 3165, 3167, 3168, 3169
INGREDIENTS:
❑ Iodine
❑ Potassium Chloride
❑ Water
WARNING: INHALATION MAY BE FATAL.
CAUTION: AVOID INHALATION, SKIN CONTACT, EYE CONTACT OR INGESTION.
MAY EVOLVE TOXIC FUMES IN FIRE.
Harmful if ingested or inhaled. Skin or eye contact may cause irritation. Has a corrosive effect on
the gastro-intestinal tract, causing abdominal pain, vomiting, and diarrhea. Hyper-sensitivity may
cause conjunctivitis, bronchitis, skin rashes etc. Evidence of reproductive effects.
FIRST AID:
INHALATION: Remove victim from exposure area. Keep victim warm and at rest. In severe cases
seek medical attention.
SKIN CONTACT: Remove contaminated clothing immediately. Wash affected area thoroughly
with large amounts of water. In severe cases seek medical attention.
EYE CONTACT: Wash eyes immediately with large amounts of water, (approx. 10 minutes). Seek
medical attention immediately.
INGESTION: Wash out mouth thoroughly with large amounts of water and give plenty of water to
drink. Seek medical attention immediately.
Health and Safety Information
Appendix A
YSI pH 4.00, 7.00, and 10.00 Buffer Solutions: 3821, 3822, 3823
pH 4 INGREDIENTS:
❑ Potassium Hydrogen Phthalate
❑ Formaldehyde
❑ Water
pH 7 INGREDIENTS:
❑ Sodium Phosphate, Dibasic
❑ Potassium Phosphate, Monobasic
❑ Water
pH 10 INGREDIENTS:
❑ Potassium Borate, Tetra
❑ Potassium Carbonate
❑ Potassium Hydroxide
❑ Sodium (di) Ethylenediamine Tetraacetate
❑ Water
CAUTION - AVOID INHALATION, SKIN CONTACT, EYE CONTACT OR INGESTION.
MAY AFFECT MUCOUS MEMBRANES.
Inhalation may cause severe irritation and be harmful. Skin contact may cause irritation; prolonged
or repeated exposure may cause Dermatitis. Eye contact may cause irritation or conjunctivitis.
Ingestion may cause nausea, vomiting and diarrhea.
FIRST AID:
INHALATION - Remove victim from exposure area to fresh air immediately. If breathing has
stopped, give artificial respiration. Keep victim warm and at rest. Seek medical attention
immediately.
SKIN CONTACT - Remove contaminated clothing immediately. Wash affected area with soap or
mild detergent and large amounts of water (approx. 15-20 minutes). Seek medical attention
immediately.
EYE CONTACT - Wash eyes immediately with large amounts of water (approx. 15-20 minutes),
occasionally lifting upper and lower lids. Seek medical attention immediately.
INGESTION - If victim is conscious, immediately give 2 to 4 glasses of water and induce vomiting
by touching finger to back of throat. Seek medical attention immediately.
YSI Incorporated
Environmental Monitoring Systems Service Manual
91
Health and Safety Information
Appendix A
YSI Zobell Solution: 3682
INGREDIENTS:
❑ Potassium Chloride
❑ Potassium Ferrocyanide Trihydrate
❑ Potassium Ferricyanide
CAUTION - AVOID INHALATION, SKIN CONTACT, EYE CONTACT OR INGESTION.
MAY AFFECT MUCOUS MEMBRANES.
May be harmful by inhalation, ingestion, or skin absorption. Causes eye and skin irritation.
Material is irritating to mucous membranes and upper respiratory tract. The chemical, physical, and
toxicological properties have not been thoroughly investigated.
Ingestion of large quantities can cause weakness, gastrointestinal irritation and circulatory
disturbances.
FIRST AID:
INHALATION - Remove victim from exposure area to fresh air immediately. If breathing has
stopped, give artificial respiration. Keep victim warm and at rest. Seek medical attention
immediately.
SKIN CONTACT - Remove contaminated clothing immediately. Wash affected area with soap or
mild detergent and large amounts of water (approx. 15-20 minutes). Seek medical attention
immediately.
EYE CONTACT - Wash eyes immediately with large amounts of water (approx. 15-20 minutes),
occasionally lifting upper and lower lids. Seek medical attention immediately.
INGESTION - If victim is conscious, immediately give 2 to 4 glasses of water and induce vomiting
by touching finger to back of throat. Seek medical attention immediately.
YSI Incorporated
Environmental Monitoring Systems Service Manual
92
Health and Safety Information
Appendix A
YSI Ammonium Standard Solutions: 3841, 3842, and 3843
INGREDIENTS:
❑ Ammonium Chloride
❑ Lithium Acetate Dihydrate
❑ Sodium Azide (trace)
❑ Hydrochloric acid
CAUTION - AVOID INHALATION, SKIN CONTACT, EYE CONTACT OR INGESTION.
MAY AFFECT MUCOUS MEMBRANES.
May be harmful by ingestion or skin absorption. May cause eye and skin irritation. The chemical,
physical, and toxicological properties have not been thoroughly investigated.
Ingestion of large quantities of lithium salts can affect the central nervous system producing
symptoms ranging from dizziness to collapse. It may also cause kidney damage, nausea, and
anorexia. Note that the ingestion of harmful quantities form the solutions is considered unlikely
given the low concentration of lithium and the volumes likely to be handled.
FIRST AID:
INHALATION - Remove to fresh air. If not breathing, give artificial respiration. If breathing is
difficult, give oxygen. Call a physician.
SKIN CONTACT - Remove contaminated clothing immediately. Wash affected area with soap or
mild detergent and large amounts of water (approx. 15-20 minutes).
EYE CONTACT - Wash eyes immediately with large amounts of water (approx. 15-20 minutes),
occasionally lifting upper and lower lids. Seek medical attention immediately.
INGESTION - Immediately rinse out mouth with large quantities of water. If reagent was
swallowed, give 2 glasses of water and seek medical attention immediately.
YSI Incorporated
Environmental Monitoring Systems Service Manual
93
Health and Safety Information
Appendix A
YSI Nitrate Standard Solutions: 3885, 3886, and 3887
INGREDIENTS
❑ Potassium Nitrate
❑ Magnesium Sulfate
❑ Gentamycin Sulfate (Trace)
CAUTION - AVOID INHALATION, SKIN CONTACT, EYE CONTACT OR INGESTION.
May be harmful by ingestion or skin absorption. May cause eye and skin irritation. The chemical,
physical, and toxicological properties have not been thoroughly investigated.
FIRST AID:
INHALATION - Remove to fresh air. If not breathing, give artificial respiration. If breathing is
difficult, give oxygen. Call a physician.
SKIN CONTACT - Remove contaminated clothing immediately. Wash affected area with soap or
mild detergent and large amounts of water (approx. 15-20 minutes).
EYE CONTACT - Wash eyes immediately with large amounts of water (approx. 15-20 minutes),
occasionally lifting upper and lower lids. Seek medical attention immediately.
INGESTION - Immediately rinse out mouth with large quantities of water. If irritation occurs or
reagent was swallowed, seek medical attention immediately.
YSI Incorporated
Environmental Monitoring Systems Service Manual
94
Health and Safety Information
Appendix A
YSI Turbidity Standards: 3845, 3846, 3487, 6072, and 6073
INGREDIENTS
❑ Styrene divinylbenzene copolymer spheres
The material is not volatile and has no known ill effects on skin, eyes, or on ingestion. Therefore,
no special precautions are required when using the standards. General precautions should be
adopted as required with all materials to minimize unnecessary contact. Note, however, that the
chemical, physical, and toxicological properties have not been thoroughly investigated.
FIRST AID:
SKIN CONTACT - Remove contaminated clothing. Wash affected area with soap or mild
detergent and water.
EYE CONTACT - Wash eyes immediately with large amounts of water (approx. 15-20 minutes),
occasionally lifting upper and lower lids. If irritation occurs, seek medical attention immediately.
INGESTION - Rinse out mouth with large quantities of water. If irritation occurs or reagent was
swallowed, seek medical attention as a precaution.
YSI Incorporated
Environmental Monitoring Systems Service Manual
95
Health and Safety Information
Appendix A
YSI Replacement Desiccant 065802
INGREDIENTS
❑ Calcium Sulfate and Calcium Chloride
CAUTION - AVOID INHALATION, SKIN CONTACT, EYE CONTACT OR INGESTION.
MAY AFFECT MUCOUS MEMBRANES.
FIRST AID:
SKIN CONTACT - Flush with water.
EYE CONTACT - . Flush with water. If irritation continues, obtain medical attention.
INGESTION - If patient is conscious, induce vomiting. Obtain medical attention.
YSI Incorporated
Environmental Monitoring Systems Service Manual
96
APPENDIX B
REQUIRED NOTICE
The Federal Communications Commission defines this product as a computing device and requires
the following notice.
This equipment generates and uses radio frequency energy and if not installed and used properly,
may cause interference to radio and television reception. It has been type tested and found to
comply with the limits for a Class A or Class B computing device in accordance with the
specification in Subpart J of Part 15 of FCC Rules, which are designed to provide reasonable
protection against such interference in a residential installation. However, there is no guarantee that
interference will not occur in a particular installation. If this equipment does cause interference to
radio or television reception, which can be determined by turning the equipment off and on, the user
is encouraged to try to correct the interference by one or more of the following measures:
❑ Reorient the receiving antenna
❑ Relocate the computer with respect to the receiver
❑ Move the computer away from the receiver
❑ Plug the computer into a different outlet so that the computer and receiver are on different
branch circuits.
If necessary, the user should consult the dealer or an experienced radio/television technician for
additional suggestions. The user may find the following booklet, prepared by the Federal
Communications Commission, helpful: "How to Identify and Resolve Radio-TV Interference
Problems". This booklet is available from the U.S. Government Printing Office, Washington, D.C.
20402, Stock No.0004-000-00345-4.
APPENDIX C ACCESSORIES AND CALIBRATION
STANDARDS
STANDARD EQUIPMENT WITH YSI SONDES
❑
❑
❑
❑
❑
❑
600R, 600XL, 600XLM, 6820, 6600 or 6920 Sonde with Calibration Cup
EcoWatch for Windows Software
Operations Manual
Guard for Probe Compartment
6570 Maintenance Kit
6560 Conductivity/Temperature Probe ( not supplied with the 600R)
PROBES FOR THE SONDES
❑
❑
❑
❑
❑
❑
❑
❑
❑
6560 Conductivity/Temperature Probe
6561 pH Probe
6562 Rapid Pulse DO Probe
6565 Combination pH/ORP Probe
6026 Turbidity Probe, wiped
6036 Turbidity Probe, unwiped
6882 Chloride Probe
6883 Ammonium Probe
6884 Nitrate Probe
OPTIONAL ACCESSORIES FOR THE SONDES
❑
❑
❑
❑
❑
❑
❑
❑
❑
❑
❑
❑
❑
❑
❑
❑
❑
062781 PC6000 Software (Available at no cost)
6027 Turbidity Wiper Kit
6035 Probe Reconditioning Kit for 6562 Dissolved Oxygen Probe
062655 Carrying case
6038 12 VDC Power Supply with 110 VAC input
6037 12 VDC Power Supply with 220 VAC input
6100 External Power Connector, attaches to 6095B Field Cable
6570 Maintenance Kit
068230 Short Probe Compartment Guard, for 6036 turbidity probe (non-wiping) for 6820 & 6920
5775 Membrane Kit
6108 Desiccant Cartridge Kit
6109 Desiccant Canister Kit
065802 Replacement Desiccant
6120 6-Series Operations Manual, Spanish
6121 6-Series Operations Manual, German
6089 Non-Vented CE Cable Kit
6194 Vented CE Cable Kit
Accessories and Calibration Standards
Appendix C
CABLES FOR THE SONDES
Ø
Ø
Ø
Ø
Ø
Ø
Ø
Ø
Ø
Ø
Ø
Ø
Ø
Ø
Ø
Ø
6093 Field Cable, 100 ft (30 m)
6092 Field Cable, 50 ft (15 m)
6091 Field Cable, 25 ft (7.5 m)
6090 Field Cable, 8 ft (2.4 m)
6191 Field Cable, Vented, 25 ft (7.5 m)
6192 Field Cable, Vented, 50 ft (15 m)
6067B Low Cost Calibration Cable, Dry use only; 10 ft (3m)
6077B CE Calibration Cable, 10 ft. (3m)
SP6093-L Special field cables available in 25 ft (7.6 m) increments; Maximum 1000 ft (305 m)
6098B Field Cable to 610-D/610-DM adapter
6096 Field Cable to Flying Lead (wire) adapter, 15 ft (5m)
6095B Field Cable to Female DB-9 (PC Serial with Power Connector)
6099: 610 to Female DB-9 (PC Serial)
6100 External Power Connector, attaches to 6095B Field Cable (6ft)
6102: 610 to Portable Power Pack Adapter
6103 MS-8 Dust Cover (caps connector when not in use)
CONDUCTIVITY REAGENTS
Ø
Ø
Ø
Ø
Ø
Ø
3161 Calibrator Solution, 1,000 uS/cm (quart)
3163 Calibrator Solution, 10,000 uS/cm (quart)
3165 Calibrator Solution, 100,000 uS/cm (quart)
3167 Calibrator Solution, 1,000 uS/cm (box of 8 pints)
3168 Calibrator Solution, 10,000 uS/cm (box of 8 pints)
3169 Calibrator Solution, 100,000 uS/cm (box of 8 pints)
pH REAGENTS
Ø 3821 pH 4 Buffer (box of 6 pints)
Ø 3822 pH 7 Buffer (box of 6 pints)
Ø 3823 pH 10 Buffer (box of 6 pints)
ORP REAGENTS
Ø 3682 Zobell Solution (125 ml)
AMMONIUM REAGENTS
Ø 3841 1 mg/L ammonium-nitrogen standard solution
Ø 3842 10 mg/L ammonium-nitrogen standard solution
Ø 3843 100 mg/L ammonium-nitrogen standard solution
NITRATE REAGENTS
Ø 3885 1 mg/L nitrate-nitrogen standard solution
Ø 3886 10 mg/L nitrate-nitrogen standard solution
Ø 3887 100 mg/L nitrate-nitrogen standard solution
YSI Incorporated
Environmental Monitoring Systems Operations Manual
99
Accessories and Calibration Standards
Appendix C
TURBIDITY REAGENTS
Ø
Ø
Ø
Ø
3845 0 NTU standard
6073 100 NTU standard suspension
3846 200 NTU standard suspension
3847 800 NTU standard suspension
DISPLAYS, LOGGERS, AND ACCESSORIES
Ø
Ø
Ø
Ø
Ø
Ø
Ø
Ø
Ø
Ø
Ø
Ø
610-D Handheld Field Display with Accessories
610-DM: 610-D with 128K of memory
610-DM: 610-D with 512K of memory
614 Ultraclamp, C-clamp Mount for 610
615 Leather Carrying Case for 610
616 Cigarette lighter adapter (powers and charges 610s)
617 Replacement Battery Pack for 610
6099: 610 to Female DB-9 (PC serial)
6097 Blank port plug for 610
6104 Replacement Charger Jack for 610
6042 Battery Charger for 610
6101 Portable Power Pack for 610 or sondes
LOGGER/TELEMETRY
Ø 1240: SDI-12 Logger for interfacing as many as 10 6-Series devices. Can also serve as RF
telemetry platform (RF radio, battery, interface cable, junction box not included)
Ø 1240B1: 7 amp hour, lead acid 12 VDC rechargeable battery
Ø 1240B2: 20 amp hour, alkaline 6 VDC battery (2 required)
Ø 1240AC: 110 VAC charger/transformer assembly, charges 1240B1
Ø 1240SO: 1240 Solar Panel Assembly, includes panel, mount, cable
Ø 1240SE: 1240 Serial data interface cable, connects 1240 to PC
Ø 1240JU: 1240/6 series Junction Box, provides input of multiple SDI-12 devices (standard
configuration is for 5 devices)
Note: For RF radio frequency telemetry system applications, contact YSI Massachusetts Customer
Support @ 1-800-363-3269 (USA) or 508-748-0366 or fax 508-748-2543.
SOFTWARE
Ø
Ø
Ø
Ø
Ø
PC6000: MS-DOS compatible communication, upload, plotting
610SOFT: Software upgrade for Model 610 D/DM
6920SOFT: Software upgrade for Model 6920
EW-DOS EcoWatch for MS-DOS Applications
EW-WIN EcoWatch for Windows (Use EW-WIN for 6-Series Applications)
YSI Incorporated
Environmental Monitoring Systems Operations Manual
100
APPENDIX D SOLUBILITY AND PRESSURE/ALTITUDE TABLES
Table 1: Solubility of Oxygen (mg/L) in Water Exposed to Water-Saturated Air at 760 mm Hg
Pressure.
Salinity = Measure of quantity of dissolved salts in water.
Chlorinity = Measure of chloride content, by mass, of water.
S(0/00) = 1.80655 x Chlorinity (0/00) )
Chlorinity 0
Salinity: 0
5.0 ppt
9.0 ppt
10.0 ppt
18.1 ppt
15.0 ppt
27.1 ppt
20.0 ppt
36.1 ppt
25.0 ppt
45.2 ppt
0.0
14.62
13.73
12.89
12.10
11.36
10.66
1.0
14.22
13.36
12.55
11.78
11.07
10.39
2.0
13.83
13.00
12.22
11.48
10.79
10.14
3.0
13.46
12.66
11.91
11.20
10.53
9.90
4.0
13.11
12.34
11.61
10.92
10.27
9.66
5.0
12.77
12.02
11.32
10.66
10.03
9.44
6.0
12.45
11.73
11.05
10.40
9.80
9.23
7.0
12.14
11.44
10.78
10.16
9.58
9.02
8.0
11.84
11.17
10.53
9.93
9.36
8.83
9.0
11.56
10.91
10.29
9.71
9.16
8.64
10.0
11.29
10.66
10.06
9.49
8.96
8.45
11.0
11.03
10.42
9.84
9.29
8.77
8.28
12.0
10.78
10.18
9.62
9.09
8.59
8.11
13.0
10.54
9.96
9.42
8.90
8.41
7.95
14.0
10.31
9.75
9.22
8.72
8.24
7.79
15.0
10.08
9.54
9.03
8.54
8.08
7.64
16.0
9.87
9.34
8.84
8.37
7.92
7.50
17.0
9.67
9.15
8.67
8.21
7.77
7.36
18.0
9.47
8.97
8.50
8.05
7.62
7.22
Temp
o
C
▼
▼
Solubility and Pressure/Altitude Tables
Appendix D
▼
▼
19.0
9.28
8.79
8.33
7.90
7.48
7.09
20.0
9.09
8.62
8.17
7.75
7.35
6.96
21.0
8.92
8.46
8.02
7.61
7.21
6.84
22.0
8.74
8.30
7.87
7.47
7.09
6.72
23.0
8.58
8.14
7.73
7.34
6.96
6.61
24.0
8.42
7.99
7.59
7.21
6.84
6.50
25.0
8.26
7.85
7.46
7.08
6.72
6.39
26.0
8.11
7.71
7.33
6.96
6.62
6.28
27.0
7.97
7.58
7.20
6.85
6.51
6.18
28.0
7.83
7.44
7.08
6.73
6.40
6.09
29.0
7.69
7.32
6.96
6.62
6.30
5.99
30.0
7.56
7.19
6.85
6.51
6.20
5.90
31.0
7.43
7.07
6.73
6.41
6.10
5.81
32.0
7.31
6.96
6.62
6.31
6.01
5.72
33.0
7.18
6.84
6.52
6.21
5.91
5.63
34.0
7.07
6.73
6.42
6.11
5.82
5.55
35.0
6.95
6.62
6.31
6.02
5.73
5.46
36.0
6.84
3.52
6.22
5.93
5.65
5.38
37.0
6.73
6.42
6.12
5.84
5.56
5.31
38.0
6.62
6.32
6.03
5.75
5.48
5.23
39.0
6.52
6.22
5.98
5.66
5.40
5.15
40.0
6.41
6.12
5.84
5.58
5.32
5.08
41.0
6.31
6.03
5.75
5.49
5.24
5.01
42.0
6.21
5.93
5.67
5.41
5.17
4.93
43.0
6.12
5.84
5.58
5.33
5.09
4.86
44.0
6.02
5.75
5.50
5.25
5.02
4.79
45.0
5.93
5.67
5.41
5.17
4.94
4.72
YSI Incorporated
Environmental Monitoring Systems Operations Manual
102
Solubility and Pressure/Altitude Tables
Appendix D
Table 2: Calibration Values for Various Atmospheric Pressures and Altitudes
PRESSURE
Inches Hg
30.23
29.92
29.61
29.33
29.02
28.74
28.43
28.11
27.83
27.52
27.24
26.93
26.61
26.34
26.02
25.75
25.43
25.12
24.84
24.53
24.25
23.94
23.62
23.35
23.03
22.76
22.44
22.13
21.85
21.54
21.26
20.94
20.63
20.35
20.04
19.76
YSI Incorporated
mm Hg
768
760
752
745
737
730
722
714
707
699
692
684
676
669
661
654
646
638
631
623
616
608
600
593
585
578
570
562
555
547
540
532
524
517
509
502
ALTITUDE
Millibars
1023
1013
1003
993
983
973
963
952
942
932
922
912
902
892
882
871
861
851
841
831
821
811
800
790
780
770
760
750
740
730
719
709
699
689
679
669
Feet
-276
0
278
558
841
1126
1413
1703
1995
2290
2587
2887
3190
3496
3804
4115
4430
4747
5067
5391
5717
6047
6381
6717
7058
7401
7749
8100
8455
8815
9178
9545
9917
10293
10673
11058
Meters
-84
0
85
170
256
343
431
519
608
698
789
880
972
1066
1160
1254
1350
1447
1544
1643
1743
1843
1945
2047
2151
2256
2362
2469
2577
2687
2797
2909
3023
3137
3253
3371
CALIBRATION
VALUE
Percent Saturation
101
100
99
98
97
96
95
94
93
92
91
90
89
88
87
86
85
84
83
82
81
80
79
78
77
76
75
74
73
72
71
70
69
68
67
66
Environmental Monitoring Systems Operations Manual
103
Solubility and Pressure/Altitude Tables
Appendix D
Table 3. Conversion Factors for Feet/Meters, Celsius/Fahrenheit, mg/L/ppm
TO CONVERT FROM
TO
EQUATION
Feet
Meters
Multiply by 0.305
Meters
Feet
Multiply by 3.28
Degrees Celsius
Degrees Fahrenheit
5/9×(oF-32)
Degrees Fahrenheit
Degrees Celsius
9/5×(oC)+32
Milligrams per liter (mg/L)
Parts per million (ppm)
Multiply by 1
Table 4. Conversion Factors for Common Units of Pressure
kilo Pascals
mm Hg
millibars
inches H20
PSI
inches Hg
1 atm
101.325
760.000
1013.25
406.795
14.6960
29.921
1 kiloPascal
1.00000
7.50062
10.0000
4.01475
0.145038
0.2953
1 mmHg
0.133322
1.00000
1.33322
0.535257
0.0193368
0.03937
1 millibar
0.100000
0.750062
1.00000
0.401475
0.0145038
0.02953
1 inch H20
0.249081
1.86826
2.49081
1.00000
.0361
0.07355
1 PSI
6.89473
51.7148
68.9473
27.6807
1.00000
2.0360
1 inch Hg
3.38642
25.4002
33.8642
13.5956
0.49116
1.00000
1 hectoPascal
0.100000
0.75006
1.00000
0.401475
0.0145038
0.02953
1 cm H20
0.09806
0.7355
9.8 x 10⁻⁷
0.3937
0.014223
0.02896
YSI Incorporated
Environmental Monitoring Systems Operations Manual
104
1700/1725 Brannum Lane
Yellow Springs, Ohio 45387 USA
(800) 765-4974 (937) 767-7241
FAX: (937) 767-9320
Website: http://www.ysi.com
E-mail: [email protected]
Item #069304B
Drawing #A69304
November 1999