1
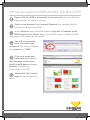
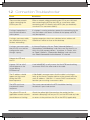
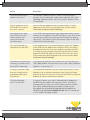
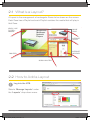
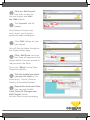
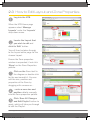
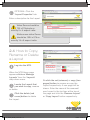
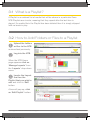
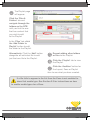
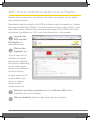
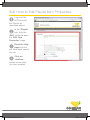
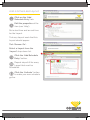
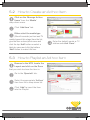
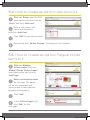
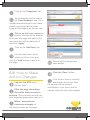
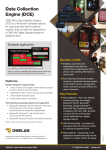
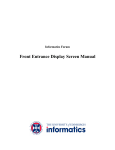
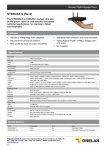
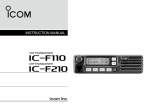
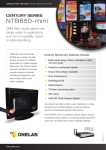
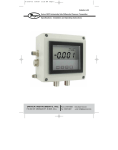
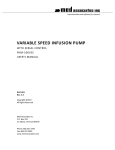
ONELAN Digital Signage:
Quick-start User Guide
Digital Signage Solutions
V7_USER_GUIDE_v09a.indd 1
12/3/09 16:54:06
contents
Getting Connected
1
How to Log into a ONELAN Net-Top-Box (NTB)
1.1
Connection Troubleshooter
1.2
How it works
1.3
How to Restore Default Settings
1.4
How to Upload Files to the NTB
1.4
Layouts
2
What is a Layout?
2.1
How to Add a Layout
2.2
How to Edit Layout Properties
2.3
How to Copy, Rename or Delete a Layout
2.4
Playlists
3
What is a Playlist?
3.1
How to Add Folders or Files to a Playlist
3.1
How to Add Special Items to a Playlist
3.2
How to Edit Playlist Item Properties
3.3
Schedules
4
How the Schedule Works
4.1
How to Schedule Layouts
4.2
Ad hoc
5
What is Ad hoc?
5.1
How to Create an Ad hoc Item
5.2
How to Playlist an Ad hoc Item
5.3
How to Create an Ad hoc User Account
5.4
How to Create an Ad hoc Page and Add Items to it
5.5
How to Make Ad hoc Changes
5.6
Click ‘Help’ on any NTB web page for a more comprehensive version of
this guide or see the ONELAN website for the most up-to-date version.
V7_USER_GUIDE_v09a.indd 2
12/3/09 16:54:06
1.1How to Log into a ONELAN Net-Top-Box (NTB)
Ensure that the NTB is connected to the network. Ask your Network
Administrator for advice if unsure.
Open a web-browser (e.g. Internet Explorer) in a computer that is
also connected to the network.
In the ‘Address’ bar of the web-browser, type the IP address of the
NTB and press the ‘Enter’ key. If you do not know it, restart the NTB
and wait for it to appear on the screen.
You will be prompted
for a user name and
password. The factory defaults
are ‘remote’ and ‘9999’.
If the user name and
password are correct
then the page shown here
(right) should appear in your
browser. You are now
connected to the NTB.
‘Bookmark’ the current
page for easy retrieval in
future.
VIDEO / LIVE
TV FEED /
IMAGES
RSS FEED
DIGITAL SIGNAGE SOLUTIONS
V7_USER_GUIDE_v09a.indd 3
SCROLLING TEXT
12/3/09 16:54:07
1.2 Connection Troubleshooter
Check
Resolution
There must be network
cables connecting the
NTB to your PC.
Either a network cable connecting your PC to your LAN and
one connecting the NTB to the LAN, or a crossover cable
connecting your PC directly to the NTB. (Are you absolutely
sure that it is a crossover cable?).
If using a laptop then it
must be connected to
mains power.
If a laptop is running on battery power, the networking circuits
may have been shut down. A reboot of the laptop and NTB
may be required.
If using a crossover cable,
you should turn off any
wireless networking.
Laptop computers often have a button to turn wireless off.
Otherwise it will be an icon on the desktop.
If using a crossover cable
then the PC must not be
configured to work
through a proxy.
In Internet Explorer, click on ‘Tools | Internet Options |
Connections | LAN Settings’ and make sure that there is no
tick in the ‘Use a proxy server...’ checkbox. In Firefox, click
on ‘Tools | Options.. | Connection Settings’ and make sure
that ‘Direct connection to the Internet’ is selected.
Reboot the NTB and
the PC.
A green ‘OK’ for ‘eth0’
should appear on the
screen during
NTB boot-up.
A red ‘eth0 [Fail]’ usually means that the NTB found nothing
to connect with at the other end of the cable.
The IP address should
appear on the screen
during the NTB
boot sequence.
A ‘No Cable’ message means that the cable is missing or
faulty or that there is another device on the network with the
same IP address. ‘189.254.1.1’ means DHCP could not be
found or you are using a crossover cable.
The NTB must have
completed it’s boot
sequence.
The screen connected to the NTB should be showing
the default Layout and content.
The yellow LEDs on all
applicable network sockets
should be on or flashing.
Check the yellow light (if present) on the socket that the
network cable plugs into on your PC, on the NTB and any hubs
or routers in the path from the PC to the NTB (if applicable).
Email: [email protected] www.onelan.com/support
V7_USER_GUIDE_v09a.indd 4
12/3/09 16:54:07
Check
Resolution
You should know the IP
address of your PC.
To find the IP address of the PC: open a DOS command
prompt, click on Start | Run, type ‘cmd’ and click ‘OK’, type
‘ipconfig’ and press Enter. You will see the IP address of the
PC displayed.
The IP addresses of the
NTB and PC must be in
the same ‘sub-net’.
Ask your System Administrator for further advice. If the IP
addresses of the NTB is unreachable then see the section
titled ‘How to Restore Default Settings’.
You should try to ‘ping’
The NTB from the PC.
Note, however, that
some networks do
not allow pings.
In the DOS command prompt type: ‘ping’ followed by a space
and then the IP address of the NTB and press enter. After a few
seconds you should see a message that includes the phrase
‘(0% loss)’. The yellow LED on the network socket of the NTB
should flash during the ping.
You should be able to
web-browse to the NTB.
In the web-browser, e.g. Internet Explorer, type the IP address
of the NTB into the address bar and press Enter. You will be
prompted to enter the user name and password for the NTB.
If a valid user name and password were given then the home
page of the NTB will appear in the browser. If the user name
or password have been forgotten then see the section ‘How
to Restore Default Settings’.
The browser should not be
showing a cached version
of the NTB’s web page.
If using Internet Explorer then remove any tick from the menu
‘File | Work offline’ and clear the history under ‘Tools | Internet
Options’. Try pressing ‘F5’.
If using a crossover cable
then you should not be
prompted to dial up to
the Internet.
If using Internet Explorer and you cannot prevent the PC from
dialing out for an Internet connection then install the Firefox
browser on your PC and use it to access the NTB. Use Internet
Explorer to access the Internet as before.
You should be able
to FTP to the NTB.
In Internet Explorer, type ‘ftp://’ followed the IP address of
the NTB into the address bar and press Enter. You will be
prompted for the same user name and password. In Firefox,
type ‘ftp://’ followed by the user name, a colon (:), the
password, the at symbol (@) and then the IP address of
the NTB. e.g. ftp//remote:[email protected]. You should see
a list of folders including ‘media’.
DIGITAL SIGNAGE SOLUTIONS
V7_USER_GUIDE_v09a.indd 5
12/3/09 16:54:07
1.3 How it works
The NTB controls a screen (e.g. Plasma, LCD panel or projector) and you
control the NTB through a web-browser.
File-based content (e.g video) is uploaded from your PC onto the hard-drive
in the NTB. Under most applications there is NO STREAMING involved.
Once files have been stored on the NTB, they can be put into a Playlist
via the web-browser.
SCREEN
USER PC
WITH BROWSER
LAN
NETWORK
NTB
CONTENT
Content that has been put into a Playlist on the NTB will be
shown on the screen, not the web-browser on your PC monitor.
Email: [email protected] www.onelan.com/support
V7_USER_GUIDE_v09a.indd 6
12/3/09 16:54:10
1.4 How to Restore Default Settings
It is possible to configure the
NTB into a state where it simply
cannot be contacted:
zz An incorrect static IP address
has been set.
zz Passwords have been forgotten.
zz The NTB’s firewall has been
set incorrectly.
To restore the NTB to factory
default settings:
Attach a keyboard to the purple
jack and press Ctrl-Alt-F1.
Type the NTB user name:
‘maint’, and press ‘Enter’.
Type the NTB password:
‘maint’, and press ‘Enter’.
Type the number of the
relevant menu option to reset
factory settings.
Type ‘yes’ to agree to this
change.
Type ‘0’ to exit from the
maintenance menu.
Type ‘yes’ to allow the system
to reboot.
Once the system has rebooted it
should be accessible again. (This
procedure will not delete any content).
DIGITAL SIGNAGE SOLUTIONS
V7_USER_GUIDE_v09a.indd 7
12/3/09 16:54:11
1.5 How to Upload Files to the NTB
Open Windows Explorer
and, in the Address Bar,
type ‘ftp://’ followed by the
IP address of the NTB.
You will be prompted
to enter the user name
and password to access the
NTB using FTP.
You will see a page that
allows you to create,
rename and delete folders
on the NTB.
Work only in the ‘media’ folder.
Create a suitable file structure
by adding new folders under the
media folder. It is recommended
that each Layout has it’s own
folder and each Zone/Playlist
has it’s own sub-folder.
VIDEO / LIVE
TV FEED /
IMAGES
Some networks do not allow FTP, use the ‘Files & Folders’ web
RSS FEED
page on the NTB to upload files.
VIDEO / LIVE
TV FEED /
IMAGES
Email: [email protected] www.onelan.com/support
V7_USER_GUIDE_v09a.indd 8
12/3/09 16:54:11
Open another Windows
Explorer on your PC and
browse to a folder containing
content that you wish to upload.
NTB
Drag and drop or copy
and paste folders and/or
files from your PC to the media
sub-folders on the NTB.
Rename and delete files
on the NTB if you wish.
To download files from
the NTB, just drag and
drop in the reverse direction.
PC
The FTP page does not refresh itself automatically. Sometimes a
file might appear twice or a file that you just uploaded may not
show in the list. Use the F5 key or the Refresh button on your browser
to redraw the page.
You cannot move files from one folder to another in FTP. Use the
cut and paste facility in the ‘Files & Folders’ web page on the NTB.
VIDEO / LIVE
TV FEED /
IMAGES
IMAGE
ZONE
INTERNET
CLOCK
V7_USER_GUIDE_v09a.indd 9
DIGITAL SIGNAGE SOLUTIONS
12/3/09 16:54:12
2.1 What is a Layout?
A Layout is the arrangement of rectangular Zones to be shown on the screen.
Each Zone has a Playlist and each Playlist contains the media that will play in
that Zone.
VIDEO / LIVE
TV FEED /
IMAGES
IMAGE
ZONE
INTERNET
CLOCK
INTERNET
WEATHER
RSS FEED
SCROLLING TEXT
2.2 How to Add a Layout
Log into the NTB.
Selects ‘Manage Layouts’ under
the ‘Layouts’ drop-down menu.
Email: [email protected] www.onelan.com/support
VIDEO / LIVE
TV FEED /
IMAGES
V7_USER_GUIDE_v09a.indd 10
12/3/09 16:54:13
Click on ‘Add Layout’
tab, enter a name for
the new Layout and click
the ‘Add’ button.
The ‘Layouts’ tab will
appear.
Scroll down to locate your
new Layout, new Layouts
appear as khaki rectangles.
Click ‘Edit’ button for your
new Layout.
VIDEO / LIVE
TV FEED /
IMAGES
VIDEO / LIVE
TV FEED /
IMAGES
IMAGE
ZONE
INTERNET
CLOCK
You will then be taken through to
the Layout editor page.
RSS FEED
INTERNET
WEATHER
RSS FEED
SCROLLING TEXT
SCROLLING TEXT
Click ‘Add Zone’ and your
first Zone will appear on the
Layout editor. Use your mouse to
drag or resize the Zone.
Then click ‘Show’ on the Zone
Properties pallette.
VIDEO / LIVE
TV FEED /
IMAGES
Tick the media types that
you want to show in this
Zone (only 1 ‘movie’ Zone on
Century & Decades Models).
VIDEO / LIVE
TV FEED /
IMAGES
Repeat for each new Zone
that you wish to add.
Click ‘Save All Changes and
Edit Playlist’ button
to finish Zone Layout arranging.
IMAGE
ZONE
INTERNET
CLOCK
INTERNET
WEATHER
RSS FEED
SCROLLING TEXT
IMAGE
ZONE
INTERNET
CLOCK
VIDEO / LIVE
TV FEED /
IMAGES
IMAGE
ZONE
INTERNET
CLOCK
INTERNET
WEATHER
RSS FEED
INTERNET
WEATHER
RSS FEED
SCROLLING TEXT
V7_USER_GUIDE_v09a.indd 11
SCROLLING TEXT
DIGITAL SIGNAGE SOLUTIONS
12/3/09 16:54:15
2.3 How to Edit Layout and Zone Properties
Log into the NTB.
When the NTB Home page
appears select ‘Manage
Layouts’ under the ‘Layouts’
drop-down menu.
Locate the Layout that
you wish to edit and
click its ‘Edit’ button.
VIDEO / LIVE
TV FEED /
IMAGES
You will then be taken through
to the Layout editor page for the
chosen Layout.
RSS FEED
Ensure the Zone properties
window is expanded, if not click
‘Show’ on the Zone Properties
pallette.
SCROLLING TEXT
Click on the Zone itself in
the diagram or double-click
for the one beneath it. You can
edit the size, position and
properties of the Zone by
dragging with a mouse or...
VIDEO / LIVE
TV FEED /
IMAGES
IMAGE
ZONE
INTERNET
CLOCK
INTERNET
WEATHER
RSS FEED
SCROLLING TEXT
...enter a new size and
position details manually
into the Zone properties palette.
Click ‘Save All Changes
and Edit Playlist’ button to
apply, which will take you through
to edit the Playlist.
VIDEO / LIVE
TV FEED /
IMAGES
IMAGE
ZONE
INTERNET
CLOCK
Email: [email protected] www.onelan.com/support
RSS FEED
VIDE
TV F
IMAG
IMAGE
ZONE
INTERNET
CLOCK
RSS
INTERNET
WEATHER
SCROLLING TEXT
INTERNET
WEATHER
V7_USER_GUIDE_v09a.indd 12
12/3/09 16:54:17
G TEXT
OPTIONAL: Click the
‘Layout Properties’ tab.
Enter a description for the Layout.
Video Zones should be
720 x 576 pixels or
exactly 5 x 4 aspect ratio.
Widescreen video Zones
should be 1024
x 576 or
IMAGE
ZONE
exactly 16 x 9 aspect
ratio.
VIDEO / LIVE
TV FEED /
IMAGES
IMA
ZO
INT
CLO
INTERNET
CLOCK
INT
WE
RSS FEED
SCROLLING TEXT
2.4 How to Copy,
Rename or Delete
a Layout
INTERNET
WEATHER
Log into the NTB.
When the NTB Home page
appears
click on ‘Manage
VIDEO / LIVE
TV FEED /
Layouts’
from the ‘Layouts’
IMAGES
drop-down menu.
IMAGE
ZONE
INTERNET
CLOCK
Locate the Layout that
you wish to copy, rename
or delete.
RSS FEED
Click the delete (red
cross) button
to delete
SCROLLING TEXT
the Layout.
INTERNET
WEATHER
Or click the cut (scissors) or copy (two
pages) button to rename or copy the
Layout respectively. A new page will be
drawn. Enter the name of the renamed/
new Layout in the text box at the top of
the page and click the ‘Rename Layout’
or ‘Copy Layout’ button respectively.
VIDEO / LIVE
TV FEED /
IMAGES
IMAGE
ZONE
INTERNET
CLOCK
INTERNET
WEATHER
RSS FEED
DIGITAL SIGNAGE SOLUTIONS
SCROLLING TEXT
V7_USER_GUIDE_v09a.indd 13
12/3/09 16:54:19
3.1 What is a Playlist?
A Playlist is an ordered list of media that will be shown in a particular Zone.
NTB Playlists are circular, meaning that they repeat after the last item is
played. If a media file in the Playlist has been deleted then it is simply skipped
with no break in play.
3.2 How to Add Folders or Files to a Playlist
Upload the folders
or files to the NTB
as described previously.
Log into the NTB.
When the NTB Home
page appears click on
‘Manage Layouts’ from
the ‘Layouts’ drop-down
menu.
Locate the Layout
that has the
Playlist that you wish to
edit and click its ‘Edit’
button.
VIDEO / LIVE
TV FEED /
IMAGES
A box will pop up, click
an ‘Edit Playlist’ button.
RSS FEED
SCROLLING TEXT
Email: [email protected] www.onelan.com/support
VIDEO / LIVE
TV FEED /
IMAGES
V7_USER_GUIDE_v09a.indd 14
IMAGE
ZONE
INTERNET
12/3/09 16:54:20
CLOCK
The Playlist page
will appear.
Click the ‘Files &
Folders’ tab and
navigate through the
folders on the NTB
until you find the one
that has content that
you wish to add
to the Playlist.
In the ‘Files’ tab, click
the ‘Add Folder to
Playlist’ button to add
the folder to the Playlist.
IMAGE
ZONE
INTERNET
CLOCK
INTERNET
WEATHER
Alternatively: Click the ‘Add’ button
alongside an individual file to add
just that one file to the Playlist.
VIDEO / LIVE
TV FEED /
IMAGES
Repeat adding other folders
or files to the Playlist.
RSS FEED
Click the ‘Playlist’ tab to view
the Playlist.
SCROLLING TEXT
Click the ‘Audition’ button for
the Layout, Zone or Playlist
item to see what you have created.
If a file fails to appear in the list then the Zone is not enabled to
show that media type. See Section 2.3 for instructions on how
to enable media types for a Zone.
DIGITAL SIGNAGE SOLUTIONS
V7_USER_GUIDE_v09a.indd 15
12/3/09 16:54:20
3.3 How to Add Special Items to a Playlist
Special items include text, newsfeeds, live video, web pages, clocks, tables
and control elements.
Newsfeeds must be added to the NTB and tables must be created on it before
they can be added to a Playlist. Visit the relevant sections under ‘Media’ in the
drop-down menu. Browse to any external web page that the NTB must show
and obtain the address, or URL, from the address bar in the browser.
Log onto the
NTB and edit
the Playlist as
described above.
Click on the
‘Specials’ tab.
You will see a list of
different item types
that can be added to
the Playlist, depending
on the media types
that you have allowed
the Zone to play.
In each case you will
need to either type
text in or make a
selection from
a drop-down list.
VIDEO / LIVE
TV FEED /
IMAGES
RSS FEED
SCR
Enter text or make a selection and then click the ‘Add’ button
to add the item to the Playlist.
Click an ‘Audition’ button to see what you have created.
Email: [email protected] www.onelan.com/support
V7_USER_GUIDE_v09a.indd 16
12/3/09 16:54:21
3.4 How to Edit Playlist Item Properties
Log onto the
NTB and edit
the Playlist as
described above.
In the ‘Playlist’
tab, click the
‘Edit’ button to open
the ‘Edit Item
Properties’ page.
Read the Help
pages to find
out what each control
can do.
Click an
‘Audition’
button to see what
you have created.
IMAGE
ZONE
INTERNET
CLOCK
DIGITAL SIGNAGE SOLUTIONS
V7_USER_GUIDE_v09a.indd 17
12/3/09 16:54:22
4.1 How the Schedule Works
The Schedule contains a
default Layout and may
contain other Layouts that
will appear at certain times
of day or days of week.
LAYOUT
C
B
A
Def.
The default Layout will
appear on the screen at all times
when no other Layout is Scheduled.
TIME
If a Layout is set to show when
another non-default Layout is being
shown then the Layout with the
most recent start time will be shown.
4.2 How to Schedule Layouts
Log into the NTB as
an administrator.
Click on ‘Manage Schedules’ from
the ‘Schedules’ drop-down menu.
Set the Default Layout:
Click ‘Edit’ for the Default
Schedule.
Click ‘Edit’ for the first (or
default) Layout.
VIDEO / LIVE
TV FEED /
IMAGES
For ‘Screen’ select ‘Off’ if you
want the screen to be shut down
by default (recommended).
Select a Layout from the
‘Show Layout’ drop-down list.
This will be the default Layout.
VIDEO / LIVE
TV FEED /
IMAGES
RSS FEED
SCROLLING TEXT
Email: [email protected] www.onelan.com/support
RSS FEED
SCROLLING TEXT
IMAGE
ZONE
INTERNET
CLOCK
Click ‘Save’.
VIDEO / LIVE
TV FEED /
IMAGES
IMAGE
ZONE
INTERNET
CLOCK
INTERNET
WEATHER
INTERNET
WEATHER
RSS FEED
SCROLLING TEXT
VIDEO / LIVE
TV FEED /
IMAGES
V7_USER_GUIDE_v09a.indd 18
12/3/09 16:54:24
Add a Scheduled Layout:
Click on the ‘Add
Schedule Entry’ tab.
Edit the properties of the
item (see ‘Help’).
Set a start time and an end time
for the Layout.
VIDEO / LIVE
TV FEED /
IMAGES
Tick any days of week that this
Layout should appear.
VIDEO / LIVE
TV FEED /
IMAGES
IMAGE
ZONE
RSS FEED
INTERNET
CLOCK
Tick ‘Screen: On’.
INTERNET
WEATHER
RSS FEED
Select a Layout from the
‘Layout’ drop-down list.
SCROLLING TEXT
Click the ‘Add Schedule
Entry’ button.
Repeat steps 6-8 for every
Layout that must be
Scheduled.
Click the ‘Activate’ button
to make your new schedule
go live.
VIDEO / LIVE
TV FEED /
IMAGES
RSS FEED
VIDEO / LIVE
TV FEED /
IMAGES
IMAGE
ZONE
SCROLLING
INTERNET
CLOCK
INTERNET
WEATHER
RSS FEED
SCROLLING TEXT
IMAGE
ZONE
INTERNET
CLOCK
VIDEO / LIVE
TV FEED /
IMAGES
RSS FEED
INTERNET
WEATHER
OLLING TEXT
DIGITAL SIGNAGE SOLUTIONS
V7_USER_GUIDE_v09a.indd 19
12/3/09 16:54:26
5.1 What is Ad hoc?
Ad hoc Items are place-holders that can be put into a Playlist, just like other
content, by an administrator but the contents of the Item can be updated by
a lower-level (Ad hoc) user.
Ad hoc Users only have access to a few Ad hoc Items and have, therefore,
very limited capacity to change the content on the display. A typical Ad hoc
use is to give a receptionist the ability to change a daily welcome message
or the TV station on the screen in the company foyer.
The administrator controls access
to the Ad hoc items by creating one
or more web pages, known as Ad
hoc Pages, for the Ad hoc User and
placing the Ad hoc Items on those
pages.
Content types that can be made
Ad hoc include:
zz Text.
zz TV station.
zz Tables.
No user can make Ad hoc
changes unless the Ad
hoc Item has been placed on a
Page and the user has
permission to access that page.
The 5-step process to
enable and make Ad hoc
changes (each step is
covered in more detail later):
Create an Ad hoc Item.
Add the Ad hoc Item
to a Playlist.
Create an Ad hoc user
account on the NTB.
Create an Ad hoc Page
for the new user and add
the Ad hoc Item to the page.
Make an ad-hoc change
as an Ad hoc user.
Email: [email protected] www.onelan.com/support
V7_USER_GUIDE_v09a.indd 20
12/3/09 16:54:26
5.2 How to Create an Ad hoc Item
Click on the ‘Manage Ad hoc
Items’ from the ‘Media’
drop-down menu.
Click ‘Add item’ tab
Either select the media type
(We will consider just text and TV
media types at this stage) from the list,
give the item a descriptive name and
click the top ‘Add’ button or select a
table by name and click the bottom
‘Add’ button to make it Ad hoc.
Enter the default words or TV
station and click ‘Save’.
VIDEO / LIVE
TV FEED /
IMAGES
RSS FEED
SCROLLING TEXT
5.3 How to Playlist an Ad hoc Item
Browse to the NTB, locate the
Layout and click on the Zone
that you wish to show the item in.
Go to the ‘Specials’ tab.
Select the appropriate ‘Ad hoc’
item from the a drop-down list.
Click ‘Add’ to insert the item
into the Playlist.
VIDEO / LIVE
TV FEED /
IMAGES
VIDEO / LIVE
TV FEED /
IMAGES
RSS FEED
SCROLLING TEXT
RSS FEED
SCRO
DIGITAL SIGNAGE SOLUTIONS
V7_USER_GUIDE_v09a.indd 21
12/3/09 16:54:27
5.4 How to Create an Ad hoc User Account
Click on ‘Setup’ from the NTB
drop-down menu and click on
‘Users’ and then ‘Add user’.
Enter a user name, real
name and password
and click ‘Add User’.
Click ‘Edit’ for the new account.
VIDEO / LIVE
TV FEED /
IMAGES
IMAGE
ZONE
Ensure that only ‘Ad hoc Access’ is ticked and click ‘Update’.
INTERNET
CLOCK
VIDEO / LIVE
TV FEED /
IMAGES
IMAGE
ZONE
INTERNET
CLOCK
INTERNET
WEATHER
RSS FEED
INTERNET
WEATHER
RSS FEED
SCROLLING TEXT
SCROLLING TEXT
5.5 How to Create an Ad hoc Page and Add
Items to it
Click on ‘Manage
Ad hoc pages’ from the
‘Media | Design Ad hoc Pages’
drop-down menu and click on
‘Add Page’.
Enter a descriptive name
for the page. The name
will be very important and
should make it clear what the
purpose of the page is.
VIDEO / LIVE
TV FEED /
IMAGES
Click ‘Add’.
RSS FEED
SCROLLING TEXT
In the ‘Ad hoc Pages’ tab,
click ‘Edit’ for the
new page.
VIDEO / LIVE
TV FEED /
Email: [email protected]
www.onelan.com/support
IMAGES
IMAGE
ZONE
VIDEO / LIVE
TV FEED /
IMAGES
INTERNET
CLOCK
VIDEO / LIVE
TV FEED /
IMAGES
IMAGE
ZONE
INTERNET
CLOCK
V7_USER_GUIDE_v09a.indd 22
RSS FEED
RSS FEED
12/3/09 16:54:29
INTERNET
SCROLLING TEXT
WEATHER
XT
Click on the ‘Properties’ tab.
Type instructions to the user in
the ‘User Guidance’ box. If it is
unclear what should go in here, leave
it blank and come back to it after
trying out the page as an Ad hoc user.
Tick or un-tick user names to
specify who should be allowed
to access this page and edit the Ad
hoc Items that will be placed on it
and click ‘Apply’.
IMAGE
ZONE
VIDEO / LIVE
TV FEED /
IMAGES
RSS FEED
SCROLLING TEXT
INTERNET
CLOCK
Click on the ‘Add Item’ tab.
INTERNET
WEATHER
Use the drop-down list to
select an Ad hoc Item and
click the ‘Add’ button to add it to
VIDEO / LIVE
IMAGE
the/ page.
TV FEED
ZONE
IMAGES
Repeat until all items have
been added.
INTERNET
CLOCK
5.6 How to Make
Ad hoc Changes
RSS FEED
Click the ‘Save’ button.
INTERNET
WEATHER
SCROLLING TEXT
Log into the NTB as an
Ad hoc user.
Click the page describing
the action that you wish to
perform. (This is where you will see
how important page name choice is).
If the Ad hoc item is currently
showing on the screen then
the change will be noticed
immediately. If not then it will be
noticed when the item does appear.
Make / overwrite the
necessary changes to
the item(s) shown on the page.
DIGITAL SIGNAGE SOLUTIONS
V7_USER_GUIDE_v09a.indd 23
12/3/09 16:54:31
ONELAN Limited
1st Floor Andersen House, Newtown Road
Henley-on-Thames, Oxon. RG9 1HG
United Kingdom
Digital Signage Solutions
V7_USER_GUIDE_v09a.indd 24
Tel: +44(0)1491 411 400 Fax: +44(0)1491 579254
Email: [email protected] www.onelan.com/support
12/3/09 16:54:33