1
SERIES~
6300
6350
LED TV
user manual
Warning! Important Safety Instructions
(Please read the appropriate section that corresponds to the marking on your
Samsung product before attempting to install the product.)
Thts symbol tndicates th at htgh voltage IS
present inside It IS dangerous to make any
ktnd of contact wtth any tnterna l part of thts
product
CAUTION : TO REDUCE THE RISK OF ELECTRIC SHOCK. DO
NOT REMOVE COVER (OR BACK) THERE ARE NO USER
SERVICEABLE PARTS INSIDE. REFER ALL SERVICING TO
QUALIFIED PERSONNEL.
Th ts symbol indicates that tmportant literature
concerning operation and maintenance has
been tncluded with thts product.
• The slots and opentngs in the cabinet and in the back or bottom are provided for necessary ventilation To
ensure reliable operation of this apparatus, and to protect it from overheating, these slots and openings
must never be blocked or covered
- Do not place this apparatus in a confined space, such as a bookcase, or built-in cabinet, unless proper
ventilation is provided
- Do not place this apparatus near or over a radiator or heat register, or where it is exposed to direct
sunlight
- Do not place vessels (vases etc.) containing water on this apparatus, as this can result in a fire or
electric shock .
Do not expose th is apparatus to rain or place it near water (near a bathtub, washbowl, kitchen sink, or
laundry tub, in a wet basement, or near a swimm ing pool etc.). If this apparatus accidentally gets wet,
unplug it and contact an authorized dealer immediately.
• This apparatus uses batteries. In your community, there might be environmental regulations that require
you to dispose of these batteries properly. Please contact your local authorities for disposal or recycling
information.
• Do not overload wall outlets, extension cords or adaptors beyond their capacity, since this can resu lt in fire
or electric shock.
• Power-supply cords should be placed so that they are not likely to be walked on or pinched by items
placed upon or against them. Pay particular attention to cords at the plug end, at wall outlets, and t he
point where they exit from the appliance.
• To protect this apparatus from a lightning storm, or when it is left unattended and unused for long
periods of time, unplug it from the wa ll outlet and disconnect the antenna or cable system This will
prevent damage to the set due to lightning and power line surges.
• Before connecting the AC power cord to the DC adaptor outlet, make sure the voltage designation of the
DC adaptor corresponds to the loca l electrical supply
• Never insert anything metallic into the open parts of this apparatus. Doing so may create a danger of
electric shock .
To avoid electric shock, never touch the inside of this apparatus. Only a qualified technician should open
this apparatus.
• Make su re to plug th e power cord 1n until 1t IS f1rmly seated. When unplugg1ng the power cord from a wall
outlet. always pull on the power cord's plug Never unplug by pulling on t he power cord Do not touch the
power cord w ith wet hands
If this apparatus does not operate normally- 1n particular. 1f there are any unusual sounds or smells coming
from it- unplug it 1m mediately and contact an authonzed dealer or serv1ce center.
• Be sure to pull the power plug out of the outlet 1f the TV IS to remai n unused or if you are to leave the
house for an extended penod of t1me (espeCial!y when children. elderly or disabled people will be left
alone in the house)
- Accumulated dust can cause an electnc shock, an electnc leakage or a f1re by ca us1ng the power cord
to generate sparks and heat or the insulation to deteriorate.
Be sure to conta ct an authorized service center for information if you intend to install your TV in a location
with heavy dust, high or low temperatures, high humidity, chem ical substances, or where it will operate
24 hours a day such in an airport, a train station, etc Failing to do so may lead to serious damage of your
TV.
Use only a properly grounded plug and wail outlet.
- An 1m proper ground may cause electnc shock or equipment da mage (Class I EqUipment only.)
To turn th is apparatus off com pletely, you must disconnect it from t he wal l outlet Consequently, the wa ll
outlet and power plug must be readily accessible at all t imes
• Do not allow children to hang onto the product.
Store the accessories (battery, etc.) in a location safely out of the reach of child ren.
• Do not install the product in an unstable location such as a shaky self, a slanted floor. or a location
exposed to Vibration.
Do not drop or apply any shock to the product. If the product
contact a service center
IS
damaged, disconnect the power cord and
• To clean this apparatus, unplug the power cord fro m the wall outlet and wipe the prod uct using a soft,
dry clot h Do not use any ch emicals such as wax. ben zene. alcohol, t hinners, insect 1c1de, air fresheners,
lubnca nts, or detergent. These chemica!s can damage the appearance of the TV or erase t he printing on
th e product
• Do not expose this apparatus to dripping or splashing
• Do not dispose of batteries in fi re
Do not short-cir·cuit , disassem ble, or overheat the batteries
There is danger of an explosion 1f you replace the bat tenes used in the remote w ith the w rong type of
battery. Rep lace only with the same or equ:vaient type
WARNING - TO PREVENT THE SPREAD OF FIRE, KEEP CAN DLES OR OTH ER ITEMS WITH OPEN FLAM ES
AWAY FROM TH IS PRODUCT AT All_ TIM ES.
• Th is produ ct contains chemicals know n to the State of California to ca use cancer and
reproductive tox icit y.
• Use ca re w hen touching the TV after it has been on for some t ime. Some parts can be
warm to the touch .
Internet Security
Samsung takes a number of steps to protect 1ts Internet-compatible Smart fVs agamst unauthorized incursions
and hacking fix exam ple, certa1n sens1t1ve commun:cat1ons between the TV and the Internet servers
are encrypted In addition, the lVs operating systern has adopted controls to prevent the insta llation of
unauthonzed appi1CCJt1ons
A.lthough we take steps to protect your SmartTV and 1nformat10r\ <lO Internet-connected device or
transm ission is completely secure We th erefore encourage you to take add itional steps to safeguard your TV.
secure your internet connection , an d rninim1ze the r:sk of unauthonzed access . These steps are ltsted bel ow·
When Samsung releases software updates to 1m prove t he security on your T\1. you should prornotly Jnstaii
these updates. To automat1cally rece1ve t hese updates. turn on ''Auto Update" m t he TV's menu (Support
>Software Update > Auto Update) When an update 1s available, a popup message appears on the TV
screen Accept the software down load and update by selecting YES when prompted Take steps to secure
your w ireless router and r.etwork. Yo ur router's manual should prov: de additional details about how to
implement the fo llow mg measures:
• Secure your w ireless router's management settings w ith a unique password to prevent unauthorized
changes to security related sett1ngs
• Implement standard encryption (e g , VVPA2 encryption) on your w ireless router to secure your
wireless network signa!
• Secure access to your w ireless netvvork w1th a hard-to-guess password
• Confirm your router's firewall setting
IS
enabled (if so equipped)
• fv1ake sure all your Internet connected devices are behind your network's fJrewa il
• If your router or modem has a st andby rnode button, use it to disconnect your horne network from the
Internet w hen it is not rn use.
• Use stron g passwords for all your Internet accounts (Netflix, Facebook, Skype, etc ) If your TV has a
camera, recess the camera into the TV's bezel when it is not in use. Recessing the camera makes it
inoperative.
If any unexpected messages appear on your TV screen requesting perm1ssion to i1 nk a device or enable a
remote session, do NOT accept
Do not visit suspicious w eb sites and do not instal l any suspicio us programs We recommend users install
only those authorized apps provided by Sarnsu ng through Samsung Smart Hub.
Figures and illustratrons in thrs User Manual are provided for reference only and may differ from the actual
product appearance Product desrgn and specifications may change without notice
Features of your new TV
SMART HUB
Your TV features Smart Hub, a multi-purpose entertainment and fami ly center. With Smart Hu b. you can surf
the web, download applications, and stay rn touch with family and friends through social networking services.
In addition, you can view or play photo, video, and music files stored on external storage devices.
Press the 0 button to launch Smart Hub. Choose a service using the icons displayed in the top part of the
screen.
Smart Hub services and functionality include:
GAMES: You can view all game apps provided by Sma rt Hub and download and play games you select.
SAMSUNG APPS: Samsung Apps offers an extensive collection of free and for-pay news, sports, weather,
and gaming content you can download directly to and enjoy on your TV
OnTV: View a listing of programs that are currently airing or are scheduled to air. Select a program to
watch .
MOVIES & TV SHOWS: Purchase and stream movies and series directly from the Internet.
MULTIMEDIA: Play back photo, video, and music files from an external storage device
Anynet+ (HDMI-CEC)
Lets you to control all connected Samsung devices that support Anynet+ with your Samsung TV's remote.
e-Manual
Provrdes a detailed, on-screen user's manual built into your TV (page 16).
SMART Interaction
Access and control menu option s and functions using motions. To use Smart Interaction, connect the SMART
TV camera (sold separately) to the TV
Device Manager
Use the TV features with a USB keyboard and mouse.
Screen Mirroring
Displays mobile devrce screens on the TV using a w ireless con nection .
Contents
01. Turning on the TV and
Cabling
05. Troubleshooting and
Maintenance
7
Turning on and Controlling the TV
18 Troubleshooting
7
Arrange the cables us1ng the Cab le
Holder
20 Network Troubleshooting
02. Using the Remote Control
8
Eco Sensor and Screen Brightness
24
Gettmg Remote Support
24
Caring for the TV
Using the Hemote Control
10 Using the Remote Control to Control
External Devices
10 Connecting the IR Extender Cable
11
23
Setting Up the Universal Remote
Control
06. Specifications. wall
mounting. and other
information
2 5 Specifications
27 Dimensions
28
Licenses
29
Mounting the TV on a Wall Using the
Wa ll Mount Kit (Optional)
30
Providing Proper Ventilation for Your
TV
16 Lau nching the e-fv'lanual
31
Securing t he TV to the Wa ll
16 Additional e-Manuai Features
32
Warranty Information
17 Updating thee-Manual to the Latest
Vers1on
33
SAMSUN G BRAND PRODUCTS
03. Smart Hub
04. Using the e-Manual
01 ~Turning on the TV and Cabling
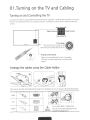
Turning on and Controlling the TV
You can turn on the TV using the Remote Control or the TV's Controller. a small joystick-like button on the back
of the TV in its lower-left corner. You can also use the TV's Controller to operate the TV without the Remote
Control.
Open Smart Hub.
Open the menu.
Select a source.
Turn off the TV.
.......
····~·
•••• •
I
. ......
Remote control receiver
When you use the Remote Control, the standby
LED does not light, except when you press the C)
button.
\
••• :
Arrange the cables using the Cable Holder
r
l.---~-_../
Make sure you have the correct cable before plugging it in. Illustrations of common plugs and ports are shown below.
Cable Plu s
Ports
HDM I
USB
Optical
&
Warning
Do not plug cables in upside down.
Be sure to check the orientation of the
plug before plugging it in.
02.Using the Remote Control
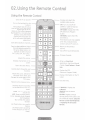
Using the Remote Control
Turns the TV on and off.
Turn on the backlight for the
buttons.
The backlight lasts for only a
few seconds. Turns the remote
control light on or off.
When on, the buttons become
illuminated for a moment when
pressed . (Using the remote
control with this button set
to On will reduce the battery
usage time.)
---~;...---r-...,-..,..---..,_.....---
Displays and selects the
available video sources.
--,:t--........,_\J:~---:::~=-::---o:~M:..,..__ STB: Turn on and off the
"'
satellite or cable set-top box
connected to the TV.
STB GUIDE: Displays the STB's
EPG (Electronic Program
Guide) .
STB MENU: Opens the STB's
OSD (Menu) .
These buttons are only available
when the universal remote
control is set and TV turns on.
Gives direct access to channels.
Press to select additional digital
channels being broadcast by
the same digital station . For
example, to select channel
'54-3', press '54', then press'-'
and '3'.
--..;,...,;o.~(==~~=~tz:=~LL--
Returns to the previous
channel.
Cuts off the sound temporarily.
Adjusts the volume . --...;-;--1
Displays channel lists on the ---P~====:Y~~~~~~~~~Hf--- Brings up Smart Hub
screen .
applications. See thee-Manual
chapter, Smart Features >Smart
Hub.
Displays the EPG
(Electronic Program Guide).
· · - - - Displays information on the TV
screen .
Use these buttons according
to the directions on the TV's
screen .
---1!~~~~~~~~~
P.SIZE: Lets you choose the
picture size.
MTS: Press to choose stereo,
mono, Separate Audio Program
(SAP broadcast) .
CC Controls the caption
decoder.
--~·tr.::=~~:=----:=-.:::~
Use these buttons in a specific
feature .
Use these buttons according
to the directions on the TV's
screen .
n~=---- E-MANUAL: Displays the
e-Manual.
SEARCH: Run the Search
function .
KEYPAD: Displays a virtual
remote panel on the screen. See
the e-Manual chapter, Using the
Remote Control and Peripherals
>Displaying the On-Screen
Remote.
-
...
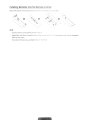
Installing Batteries into the Remote Control
Match the polanty of the battenes to the syr-nbois ;-:
co~noartrnent
NOTE
- Use the remote control within 23 feet of The TV
- Bright light may affect the performance of the remote cc~; t ;·o! A.vo: d using when near spec:a l fluorescent
lights or neon signs.
- The color and shape may vary depend ing on the modei
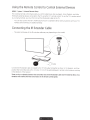
Using the Remote Control to Control External Devices
MENU > System > Universal Remote Setup
Th e universa l remote control featu re lets you cont ro l cab le boxes, Blu-ray players, home theate rs, and other
third-party external devices connected to the TV using t he TV 's remote cont roL To use t he TV's remote cont rol
as a universa l remote, you must f irst con nect the IR ext ender cable t o th e TV.
- You can also use t he Anynet + (HD MI -CEC) function to operat e externa l Samsung devices w ith your TV's
remote cont rol w it hout any add itional setu p.
Connecting the IR Extender Cable
- The color and design of t he IR extender cable may va ry depen ding on t he model.
...·········· ...
III•JIII
~
•'
.•
...........
···.
' •.
...
Connect the IR extender cable (included) to th e TV 's IR output connect or as shown in the diagram, and t hen
posit ion the transmitter end w ith in 4 inches (10 em) of the external device 's remote cont rol receiver, pointing
in the direction of the receiver.
There can be no obstacles between the transmitter end of the IR extender cable and the external device. Any
obstacles will interfere with the transmission of the remote control signals.
Setting Up the Universal Remote Control
- If you want to cont rol a set-top-box. you need to have your zip code and your cable prov1der's name and
location on hand before you begm If you want to comrol a B!u-ray player or home theater, you need the
manufacturer's nam e and model number
1.
Turn on the external device you want to cont ro l with the universal remote function
2. Press t he SOURCE button on your remote to bring up the Source screen .
3. Select the Universal Remote Setup icon.
- You ca n also start Universal Remote Setup t hrough the TV's menu Navigate to System
>Universal
remote control.
4. The TV checks if the !R extender cabie is connected . If it confirm s the conn ect ion. press the G button.
5.
Select the type of device you want to control - set-top-box. Biu-ray player, or home theater.
6. Follow the directions on the screen to complete the set up and register t he device. The directions will be
different depending on th e device you want to control.
Controlling a Device with the Remote Control
Setting up and registering an externa l device with the TV rem ote also registers the connector through which
the device connects to t he TV. You can control registered external devices with the TV remote control by
selecting the external device on t he Source screen No addit ional operations are required . See "Controlling
External Devices w ith the TV Remote -Using t he Universa l Remote" in thee-Manual for information on
addit ional f unctions.
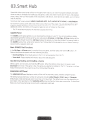
03~Smart Hub
Smart Hub is the control center of the TV Through Smart Hub you can v1ew TV program schedules and select
shows to watch, download and install apps and games. select and stream movies and TV shows, and playback
photo, video, and music files located on Blu-ray players. USB devices, smart phones and tablets, your computer,
and the Internet.
Smart Hub has five main panels: GAMES, SAMSUNG APPS, On TV. MOVIES & TV SHOWS, and MULTIMEDIA.
To move from panel to panel, select on e of the icons at the top of the screen You can also press left or right
button to display the previous or next panel Each panel gives you access to additional screens. To open the
additional screens, select items on the panel or select an icon or hotspot on the screen.
- The TV must be connected to the Internet to access Smart Hub.
GAMES Panel
The GAMES panel displays games you can download to and play on your TV. You can also update or delete
downloaded games. The Games panel has two sub-panels: All Games and My Page. All Games displays all the
games available through Smart Hub. My Page displays the games you have downloaded. Most games listed on
the GAMES panel are free, while some requ ire a fee . To download a for-pay game, you must have a Samsung
Account with a reg istered credit card .
Basic GAMES Panel Fu nctions
In the My Page or All Games panel, move the focus to a game, and then press and hold the G button . An
Options drop down list appears with the following functions.
• Download/ Remove: Downloads games to the TV or removes games from the TV
· View detail: Displays detailed information about the selected game
Quickly Downloading and Installing a Game
Select a game, and then press an d hold the G button . When the Options drop down list appears, select
Download from the list. If the game is free, the game you selected is installed on the TV !f the game is not free,
follow the directions on the screen to pay for and download the game.
SAMSUNG APPS Panel
The SAMSUNG APPS panel displays a variety of free and for pay news, sports, weather. and gam ing apps
The Samsung Apps panel has a number of sub-panels including Most Popular, What's new, and Categories
Default apps install automatically when Smart Hub is first launched. The default apps may differ depending on
your region. Most apps listed on the SAMSUNG APPS panel are free, but some apps require a fee . To download
these, you must have a Samsung Account with a reg istered credit card.
SAMSUNG APPS Panel Functions
Move the focus to an app, and then press and hold the G button An Options drop down list appears with
the fol lowing functions.
Move: Relocates an ap p on the screen
· Delete: Removes a selected app from your TV.
Multi Delete: Removes multiple ap ps from the TV
View Details: Displays detailed information about a selected app
Change View: Changes how the apps are sorted on the screen, by Custom view or Most Played
• Lock/ Unlock: Locks or unlocks apps. Locked apps cannot be accessed.
· Update Apps: Di splays a list of apps that have updates available You can select which apps to update.
The SAMSUNG APPS Panel functions are context-sensitive The fu nct ion s that appear may differ depending on
the app you select
Downloading and Installing an App
1.
On the SAMSUNG APPS panel, select Most Popular. What's new, or Categories.
2.
Move the focus to an app, and then press and hold the G button. When the Options drop down list
appears. select Download from the list If the app is free , the app you selected is installed on the TV. If the
app is not free, follow the directions on the screen to pay for and download the app _
OnTV Panel
OnTV displays you r current prog ram live 1n a small window, a list of recommended progra ms currently on other
channels, and a list of recommended programs that w ill air later. Use these lists to change the channel, view
more information about recommended programs runn ing later, including how much time is left until they air.
You can also set up a Schedule Viewing of a program that hasn't a1red yet.
To view a program recommended by OnTV. select t he image.
The OnTV panel has the fol low ing main subpane!s:
· Guide: Displays the program schedu le of each dig ital cha nnel. Yo u can check the program sched ule and
set up a Schedule Viewing.
· Timeline View: Displays program recommendations for different times of the day.
· Trending: Displays what is the most t rendy or po pular content on Twitter, You can set up a Schedule
Viewing to view
OnTV Panel Functions
Move the focus to a program, and the n press and hold the G button. An Options drop down list appears with
t he follow ing fu nctions
Detailed Information: Displays detailed information abou t t he selected program.
· Reserving: Sets up a Schedule Viewing for the selected program.
MOVIES & TV SHOWS Panel
Buy or rent mol!lf:s and TV shows online and stream them to your TV us1ng apps downloaded via Smart Hub.
Th;s !S called V; deo on Demand (VOD) The MOVIES & TV SHOWS screen d;sp iays recom mended mov1es and
TV shows and d;splays rnuit;ple VOD conten t sources so you can browse and watch all more easily.
The MOVIES & TV SHOWS pan el has th e foliow ;ng ma1n subpanels
Favorites: V1ew the movies and TV programs :eg;stered as Favorites.
Featured: V: evv movies or TV proQrams grouped accord1ng to various themes, such as mov1es with a
specif;c actor c r an actocw ho act ed m a TV senes, etc
Movies: View movies by release date, popularity, or genre
TV Shows: Search TV shows by a;r date, popularity, or genre
Trailers: V:ew movie trailers for upcorn;ng mov;es
Trending: V1ew movies and TV programs that are th e most trendy or popular on Twitter.
Basic MOVIES & TV SHOVVS Panel Functions
Move t he focus to a mov1e or TV program, and then press and hold the 13' button. An Opt ions drop down list
appears w ith th e following fun ctions
Play Content Now: D1splays the names of one or more content providers. Select a content provider to play
the selected movie or TV program 1mmed1ately. If the app for the content provider you selected is not
installed on the TV, a pop -up window appears _In the pop-up window, select eit her to display t he app's
informat 1on page or to install the app immediately. Note t hat you can also instal! the app f rom the app's
informat1on page
• Add to/Remove from Favorites: Add the selected content to or delete it from Favorites.
MULTIMEDIA
The MULTIMEDIA Panel lets you play media content saved on USB devices, smartphones, cameras, computers,
or in cloud services. The MULTIMEDIA Panel has three main subpanels: USB Drive, Network Device, and Cloud
Service. USB Dnve displays USB devices connected to t he TV. ~J etwo rk Device dispiays devices connected to
your TV through your home network (a computer, a sma rt phone, etc.). Cloud Service displays services such as
Dropbox and SkyDrive !inked via your Samsung account to the TV.
Allowing Connections with a Computer or Mobile Device
To play multimedia content located on a computer or mobile device on the TV, you need to:
1.
Establish the connection t o the computer or dev1ce
2.
Allow the connection with t he computer/mobile device on th e TV.
For information about establ1shing connections, see t he "Connecting to a Computer" and "Connecting to a
Mobile Device" sections of thee-Manual.
To al low a connect1on with a comp uter or mobile device, follow these steps:
0
1.
button, and then select Network Device in the MULTIMEDIA panel. The devices connected to
Press t he
the TV are listed.
2.
Select Options > Multimedia Device Settings The devices con nected t o t he TV are listed .
• Alt ernatively, select Multimedia Device Settings from the Network menu to see t he list of t he devices
connect ed to the TV.
3.
A llow t he connection w ith the device you want to connect to the TV.
Playing Content
1.
If you want to play content locat ed in a Cloud Service, navigate to t he Smart Hub ) Samsung Account
menu, and then select Log In to sign in to your Samsung account. If you want to play content located on a
device connected to the TV using Samsung Link, go to Step 2 below
2.
button, and then select Network Device or Cloud Service in the MULTIMEDIA panel The
Press the
devices or cloud services connected to the TV appear.
8
3. Select a dev1ce or cioud service. The folders and fi les shared by t he selected device or cloud service appear.
4. Select the media content you want t o play from the list.
04~Using
the e- anual
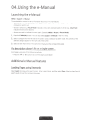
launching the e-Manual
MENU > Support > e-Manual
The embedded e-manual contains information about you r TV's key features .
- Alternatively, you can download a copy of thee-manual from Samsung's website, and rea d it on your
computer or print it out
- Words in yellow (e g_, Picture Mode) indicate a menu item and bold words in white (e.g , Smart Hub)
indicate remote control buttons
- Arrows are used to indicate the menu pat h. (Example: MENU> Picture> Picture Mode)
1. Press theE-MANUAL button . You can also select Support > e-Manual in the TV's menu .
2.
Select a category from the left side of the screen. Once a selection has been made, the contents of the
selected category appear on the nght side of the screen.
3. Select an item from the list This opens thee-manual on the corresponding page.
If a description doesn•t fit on a single screen ...
Scroll pages using one of the followi ng methods.
• Press the ~ or ~ buttons to scroll t he page up and down.
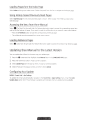
Additional eM>Manual Features
Loading Pages using Keywords
Select Search to bring up the search screen . Enter a search term, and then select Done. Select an item from the
search results to load the corresponding page _
Loading Pages from the Index Page
Select Index to bring up the index screen Select a keyword from t he list to navigate to the rel evant page.
Using History to Load Previously Read Pages
Select Opened page A list of previously read pages is shown Select a page Thee-Manua l JUm ps to the
selected page
Accessing the Menu from the e-Manual
Select $ (Try Now) from the right side of a f eatu re -description page to access the corresponding menu item
and try out the feature right away. If you want to read th ee-Manual entry on a specific screen menu feature :
• Press theE-MANUAL button to load the corresponding e-Ma nual page.
- Thee-Manua l cannot be accessed f rom some menu screens
Loading Reference Pages
Select. (Link) from the right side of a feature-description page to access the correspond ing reference page.
Updating thee-Manual to the Latest Version
You can update the e-Manua l in the same way yo u update apps.
G button, and then highlight thee-Manual item :n the SAMSUNG APPS screen .
1.
Press the
2.
Press and hold t he G butt on . A pop-up menu appears.
3.
Select Update Apps from the pop-u p menu . A pop·u p window appears.
4.
Select e-Manua l in the popup window, and then select Up date
Configuring Auto Update
MENU
>Smart Hub > Apps Settings
To update thee-manual auto matically, navigate to t he Smart Hub > Apps Settin gs menu and set the Auto
Update Apps opt ion to On. The e-ma nual ls updated automatica ily w hen an update becomes ava ilable.
OSeTroubleshooting and
aintenance
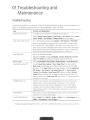
Troubleshooting
If the TV seems to have a problem, first review this list of possible problems and soiut:ons. ,'\lso, review the
Troubleshooting Section in th ee-Manual. If none of the troubleshooting tips apply, visit www.samsung.com/
support or ca ll Samsung Customer Service at 1-800-SAMSUNG (1-800-726-7 864).
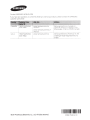
Issues
Solutions and Explanations
Flickering and Dimming
Try disabling some of the TV' s energy efficiency features
Disable Energy Saving (System > Eco Solution > Eco Sensor) and/or Energy
Saving (System > Eco Solution > Energy Saving) and check again
Screen Color is Not Correct
Run a Se!f Diagnosis Picture Test (Support> Self Diagnosis> Picture Test)
If the picture problem is caused by the TV. the problem should be visible
1n the Picture Test If the problem is not visible, next confirm that the lV s
video input ports are connected to the correct externa l video device output
ports and that none of the connections are loose . Finally, if possible, test
your external video devices by connect ing them to another TV
Screen Brig htness
Adjust the following settings:
Navigate to Picture and adjust Backlight, Contrast, Brightness, Sharpness.
Color, Tint (G/R) and other picture quality adjustment settings.
Blurred Images
Turn on Auto Motion Plus (Picture > Picture Options > Auto Motion Plus).
Unwanted Powering Off
Check if Sleep Timer (System> Time > Sleep Timer) has been enabled.
Sleep Timer automatically turns off the TV after an amount of t 1me that
you select If the Sleep Timer has not been enabled, see if No Signal Power
Off (System > Eco Solution > No Signal Power Off) or Auto Power Off
(System > Eco Solution > Auto Power Off) has been enabled. No Signal
Power Off turns off the rv if no signal has been received by the TV for a
specified period ti me. Auto Power Off turns off the TV if there has been no
user input in four hours.
Trouble Powering On
Confi rm that the power cord is connected and that the rem ote has live
batteries and is functioning correctly. If the power cord is connected
properly and the remote control is operating normally, there might be
a problem with the antenna cable connection or th e cable/satellite box
might not be turned on. Check the antenna con nection or turn on the
cable/satellite box.
Stand Assembly
If you have any trou ble assembling the stand, review the sta nd assembly
instruction in the Quick Start Guide.
Cannot Find a Channel
Re-run Setup (Go to MENU > System ) Setup) or run Auto Program (Ci o to
MENU > Broadcasting > Auto Program) .
- For detailed troubleshooting information, watch t he troubleshooting videos at wwwsa msung.com/spsn
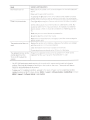
Issues
Solutions and Explanations
The TV won't turn on
Make sure the A.C power cord
the TV
-~-------
'5
secur·eiv pluggeci •n to the wall outlet an d
Make sure the wall outl et is workmg
Try pressing the C) button on the TV to make sure the problem is not the
remote. If the TV turns on, refer to ''Remote control does not work" below.
There
IS no
picture/video
Check the cable conn ecnons Remove and reconnect all cables con nected
to the TV and external dev1ces
Set the v1deo outputs of your external de'/iCes (Cable/Sat Box, DVD, B!uray etc) to match the TV's input connections. F-or example, 1f an external
device's output 1s HDMI, it should be connected to an HDMimput on the
TV
Make sure your connected dev:ces are powered on
Be sure to select the correct 1nput source.
Reboot the connected device by unplugging it, and then reconnecting the
device's power cab le.
The remote control does not
work.
Replace the remote control batteries Make su re tne battenes are instalied
with the!r poles(+/-) in the correct drrection
Clean the receiver's transmission Window on the remote .
Try pointing the remote drrectly at the TV from 5-6 feet away
The cable/set top box remote
control doesn't turn the
TV on or off or adjust the
volume.
Program the Cable/Set rem ote control to operate the TV Refer to the
Cable/Set-Top-Box user manual for the SAMS U ~JG TV code
- This TFT LED Panel uses a panel consrst1ng of sub prxels wh1ch requ ;r·e sophrsticated technology to
produce. There may be, however, a few bright or dark Pixels on the screen. These prxels will have no
impact on the performance of the product.
- To keep your TV in optimum cond ition, upgrade to the latest software. Use the Update Now or Auto
Update functions on the TV 's menu (Screen MENU > Support > Software Update > Update Now or Screen
MENU > Support > Software Update > Auto Update)
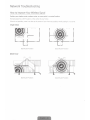
Network Troubleshooting
How to Improve Your Wireless Signal
Position your wireless router, modem router, or access point in a central location.
The best place for a Wi-Fi router is in the center of your home.
If that is not possible, move it as close to the center of your home as possible. Avoid putting it in a corner.
Single Story
Bad Router Position
Good Router Position
Bad Router Position
Good Router Position
Multi Story
Adding a wireless repeater
A wireless repeater is a device which extends your wireless network's range without requiring you to add any
wiring . All you need to do is place the repeater halfway between your wireless router and your TV, and you will
get an instant boost in your wireless signal strength .
Single Story
Multi Story
ooo
D
D
0
D
0
8
Wireless router
Wireless repeater
0
Do not locate the router on the floor and keep it away from walls and metal objects
Avoid placing the router near objects such as metal filing cabinets. Metal objects, walls, and floors will
interfere with your router's wireless signal. The closer your router is to these obstructions, the more severe the
interference, and the weaker the signal.
Reduce wireless interference
The most common wireless technology, 802 .11 g (wireless-G), operates at a frequency of 2.4GHz. Many
cordless phones, microwave ovens, baby monitors, garage doors, and other wireless devices also use this
frequency . Reduce interference by avoiding wireless devices that use the 2.4GHz frequency and use devices
that communicate via the 5.0 GHz frequency instead .
Replace your router's antenna
If you must place your router in the corner, consider replacing
your standard antenna with a Hi-Gain wireless antenna.
High gain antennas can be attached to most wireless routers.
They boost the signal strength and aim the signal in one
direction .
Intermittent Wi-Fi
• Check t he distance between the Modem/Router and the TV. The distance should not exceed 50ft (15.2
m) .
• Verify that there are no obstacles between yo ur TV and the Modem/Router.
(Appliances, cord less phones, stone walls/fire places, etc. decrease Wi-Fi strength.)
• Check the cable that connects the Modem to the Router (if you use a separate Modem and Router) to see
if it is in good condition. If it is not, replace the cable.
• Connect the TV to your Modem/Router using a CAT 7 cable, and then t ry to set up a w ired network
connect ion. (MENU> Network> Network Settings).
• Check Network Status (MENU> Network > Network Status) to see if the IP address is invalid, for example,
169.x.x.x. If it is, call your ISP to get a valid IP address, and then ask them to check the connection
between your Modem and Router and the connection between the Modem I Router and the Internet
• If you see a valid Mac address, call your ISP and ask them to reset your network circuit to re-register the
Mac addresses of your new Modem/Router and the TV.
Netflix problems
• Verify that your Modem/Router is no more than 50ft (15 .2 m) away from the TV.
• Change t he DNS to 8.8.8.8. Select MENU > Network> Network Status> DNS Server > Select Manually >
DNS >enter 8.8.8.8 >OK
• Verify that the ESN for Netflix is va lid . (Go to MENU > Support > Contact Samsung)
Reset Netflix by selecting MENU > Smart Hub > Smart Hub Reset.
Smart Hub Error Messages
• Verify that the distance between the TV and the Modem/Router does not exceed 50ft (15.2 m)
• Verify that the TV is connected to the network by checking the Network Status (MENU > Network >
Network Status).
• Reset Smart Hub by selecting the MENU > Smart Hub> Smart Hub Reset.
• Update the TV's software (MENU > Support > Software Update).
• Wait 2 to 3 days for the issue to resolve itself.
Eco Sensor and Screen Brightness
..
Eco Sensor measures the light in your room and optimizes the brightness of the TV automatically to reduce
power consumption. This causes the TV to brighten and dim automatically. If you want to turn this off, go to
MENU> System> Eco Solution> Eco Sensor.
Do not block the receiver with any object. It can decrease picture brightness.
Preventing burn-in.
Avoid keeping a still picture or a picture with static elements (black bars, black borders, logos, etc.) on your
TV for more than two hours at a time. If that is unavoidable, change the picture or change to another channel
for a minute or two every couple of hours. Reducing the brightness and contrast of the screen when it is
displaying static elements will also help.
Getting Remote Support
Samsung Remote Support sePJICe offe;s you or e-on- one support With a Samsung Techn:c1an who can
remotely:
• Diagnose you r TV
• Adjust the TV settings for you
• Perform a factory reset on your TV
• Install recommended firmware updates
How Does Remote Support Work?
Having a Samsung Tech remotely service your TV is easy
1. Call the Samsung
2. Open t he menu on
Contact Center
and ask for rem ote
support.
your TV and go to
the Support section
3.
Select Remote
Management.
and then read and
agree to the service
agreements_When
the PIN screen
appears. provide the
PiN number to the
agent_
4.
The agent will then
access your TV_
Th at' s it!
Caring for the T\1
- If a sticker was attached to the TV screen. some r.jebn s can rema in after you remove the st1cker. Please
clean the debr:s off before watch1ng TV
- The exterior and screen of the product can ge: scratched dunng clea ning Be sure to wipe the exterior and
screen carefully using a soft cloth to prevent scratches
Do not spray water or any liquid directly onto the TV
Any liquid that goes into the prod uct may cause a
failure, fire, or electr:c shock.
Turn off the TV, and then gently w1 pe away smudges
and f1ngerpnnts on the screen w ith a micro-fiber
cloth Cean the body of the TV with a soft cloth
dampened with a small amount of water. Do not
use flammable liq uids (benzene, th inners, etc) or a
clea ning agent For stu bborn smudges, spray a small
amount of screen cleaner on the cloth .
06~Specifications~ wall mounti ng af
and other informa tion
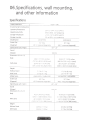
Specifications
Display Resolution
1920 X i 080
Environmental Considerations
Operating Temperature
50 ' >= to 1C4°F (10'C 10 40' C)
Operating Hu m1dity
Storage Temperature
10% to 80%. non-condensing
-4' F to 113' F (-20'( to 45 ' C)
Storage Humidity
5% to 95% . non-condensing
Model Name
UN3 2H6350
UN40H6350
Screen Size
32" C!ass
(Diagonal)
(3 1 5 . measured d1agcna!ly)
40 " Class
(4o .o·· measu red diagonally)
--------------------~--
-----~------------------------
Stand Swivel (Left I Right)
Sound
(Output)
10\JV X 2
Dimensions (W x H x D)
Body
28.4 X 17 0 X 2.4 rnches
(721 4 X 43 \ 8 X 62 9 (mm))
35 6 X 2 1.1 X 2.4 inches
(906.6 X 536.1 X 63 .1 (mm))
28 4 X 19 7 X 10 4 irches
\721.4 X 501.6 X 2648 (mm))
35 6 X 23 .8 X 10.4 inches
(906 6 .X 604. 9 X 264.8 (mm))
Without Stand
l 1 2 !bs (5 1 Kg)
With Stand
13.4 !bs (6 1 Kg)
"!7 6 lbs (8 0 Kg)
20 0 lbs (9 .1 Kg)
With stand
I
I
I
I
Weight
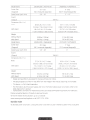
Model Name
UN48H6300 I
u ~,J4 8 H6350
UN50H6300 I UNSOH6350
Screen Size
48'. Class
50" Class
(D iagonal)
(47 6 measu red diagonally)
(49 5" measured diagonally)
Stand Swivel (Left I R1ght)
-20' - 20'
Sound
(Output)
10W X 2
Dimensions (W x H x D)
Body
With sta nd
Weight
Without Stand
With Stand
42.3 X 24 8 X 2 5 1nches
( 1075 1 X 630.9 X 63 5 (mm))
43 .9 X 25.7 X 2.5 inches
(1 116 8 X 654.4 X 63.7 (mm))
42 3 X 28 0 X 12 .0 inches
(1 075 .1 X 71 1.2 X 306 9 (mm))
43 .9 X 28.8 X 12.0 inches
(1116.8 X 733 .5 X 306.9 (mm))
24 9 ibs (11 3 Kg)
28 4 !bs (12 9 Kg'
28.2 lbs (12.8 Kg)
31 .7 lbs (1 4.4 Kg)
----------~-------------------------
-
Mode! Name
UN55H6300 I UN55H6350
Uf'-l60H6300 I UN60H6350
Screen S1ze
55" Class
(54 6 measured diagonally)
60" Class
(60 0" measured diagonally)
-20°- 20'
-15°- 15'
(Diagonal)
Stand Swivel (Left I Right)
Sound
(Output)
1OW X 2
-
Dimensions (VIJ x H x D)
Body
(1230.6 X 718.4 X 64 0 (mm))
53 7 X 31 J X 2.5 inches
(136 5 0 X 797.4 X 64.4 (mm))
48.4 X 31.4 X 12.0 inches
(1230 6 X 800.0 X 306.9 (mm))
(1365.0 X 874.4 X 306.9 (m m))
Without Stand
34.81bs (15.8 Kg)
51 .8 1bs (23.5 Kg)
With Stand
38.3lbs (17.4 Kg)
56.2 !bs (25 .5 Kg)
UN65H6300 I UN65H6350
UN75H6300/UN75H6350
Screen Size
65" Class
75" Class
(Diagonal)
(64 5 measu red diagonally)
(74.5 measured diagonally)
-20° ·- 20°
0'
48.4 X 28.2 X 2.5 1nches
W1th stand
53 .7 X 344 X 12.0 inches
We1ght
Model Name
Stand Swivel (Left I Right)
Sound
(Output)
10W X2
Dimensions (W x H x D)
Body
With stand
57.2 X 33.3 X 2.7 inches
(1454 5 X 846.3 X 70.9 (mm))
57.2 X 36 7 X 14.7 inches
65.9 X 38 .2 X 2 7 inches
(1676.2 X 970.4 X 70.9 (mm) )
65.9X41 OX 13 .7 inches
(1454.5 X 932 6 X 375 3 (rnm))
(1676.2 X 1042 .5 X 350.2 (mm))
56.2 lbs (25.5 Kg)
61.9 lbs (28.1 Kg)
68.7 !bs (31 2 Kg)
72 .7 lbs (33 0 Kg)
Weight
Without Stand
With Stand
- Design and specif ications are subject to change without prior notice.
- The actual appearance of the TV may differ from t he images 1n this manual, depending on t he modeL
- This device
iS
a Class B digita l apparatus
- For information about the power supply, and more information about power consumption, refe r to the
label attached to the product
- Typical power consumption is measured according to Energy Star Program requirements for Televisions.
Dispose unwanted electronics through an approved recycler
To find the nea rest recyc!ing location. go to our website
www.samsung com/recycllngdirect or call, (877) 278 - 0799
Standby mode
To decrease pow er consumption, unplug the power cord when you don't intend to use the TV for a long time.
Dimensions
Port panel detail I Rear view
- The displayed image may differ depending on the model.
(Unit: inches)
m
m
Model name
@)
@)
00
riD
®
UN32H6350
8.9
5.9
6.9
4.3
5.1
4.4
5.0
UN40H6350
11 .6
8.0
7.6
7.7
5.1
6.1
5.0
UN48H6300 I UN48H6350
12.3
10.4
10.3
8.7
5.1
6.9
5.0
UN50H6300 I UN50H6350
10.4
12 .8
11 .8
5.1
7.9
6.4
5.0
UN55H6300 I UN55H6350
14.6
10.4
13.2
9.3
5.1
8.9
5.0
UN60H6300 I UN60H6350
10.0
15.2
16.5
5.1
10.6
9.2
5.0
UN65H6300 I UN65H6350
16.9
9.9
18.2
9.3
5.2
12.4
5.1
UN75H6300 I UN75H6350
11 .6
22 .9
19.1
5.2
14.4
13.3
5.1
All drawings are not necessarily to scale. Some dimensions are subject to change without prior notice . Refer to
the dimensions before installing your TV. Not responsible for typographical or printed errors
© 2014 Samsung Electronics America, Inc
Licenses
[I] DOLBY.
DIGITAL PLUS
~db
Premium Sound 15.1
~db
Studio Sound
DIVX:.
HD
The terms HDMI and HDMI High-Definition Multimedia Interface, and the HDMI Logo are trademarks or
registered trademarks of HDMI Licensing LLC in the United States and other countries.
Still image warning
Avoid displaying still images (such as Jpeg picture files) , still image elements (such as TV cha nnel logos, stock or
news bars at the screen bottom etc) , or programs in panorama or 4:3 image format on the screen Constantly
displaying still pictu res can cause image burn-in on the LED screen, which will affect image quality. To red uce
risk of this effect, please follow the recommendations below:
Avoid displaying the same TV channe l for long periods.
• Always try to display any image in full screen. Use the TV set's picture format menu for the best possible
match.
• Reduce brightness and contrast to avoid the appearance of after-images.
• Use all TV features designed to reduce image retention and screen burn. Refer to the e-Manual for details.
Mounting the TV on a Wall Using the Walll\1ount Kit
(Optional)
Wall or Ceiling Mounting
if you mount th1s product on a wall, it should be mounted only as recommended by the
manufactur·er Unless ;t ;s co rr·ect!y :-nc unted, the oroduct may sl ide or fall, causing serious
!!:jury to a chdd o r
ana ser ~ ou s
to the orod uct
Installing the Wall Mount Kit
The wall mount k1t (sold Separately) lets you r:;ou :;t the 'Von the '/.:ali
For detailed information about msta ii1ng the vvail n1o u;: t . see the :1structions provided with the wall mount.
We recommend you contact a techn1c1an for ass:sta nce w hen Installi ng the wall mount bracket We do not
advise you to do 1t you rself Sam sung Electron<cs rs not re s ~;ons.bie for any damage to the product or injury to
yourself or others if you select to 1 r~ sta ll the wall rnount on your Ov'm.
To order the wa ll mount k:t, con tact Sarnsu ng Custcrr1e: Care ::;r ! -800-SAMSUNG (1-800-726-7864) .
VESA Wall Mount Kit Notes and Specifications
Install your wa ll mount on a sol1 d wall perpendicu lar w the floor Before attaching the wall mount to surfaces
other than plaster board, please contact yo ur nearest dealer for add1tional informat:on If you install the TV on
a ceiling or slanted \Nall, it may fall and resu!t :;, sev-ere person al ;njury,
TV s1ze ;n
1nches
Product
Family
VESA screw hole specs
(A * B) in rndlirneter:;
!
32 - 40
200 X 200
LED-TV
48- 75
Sta ndard
Screw
-
I
_J
400 X 400
Quant1ty
f'Vl 8
4
i;-
~
~~
..._____,
'---~
I
---~
;
,
I
------------J
Do not install your Wall Mount Kit wh iie your TV is turned on. It may result in personal injury from
electric shock.
- Standard d1rn ens:ons for wall mount k;t s are
s ho\vr·~
n the table
- Samsung wail mount k1ts contain a detalied ;nstai!at1o n manual. and all parts necessary for assembly are
provided
- Do not use scr·ews t hat do not comply w :th VES;\
:. t ~mdard
screvv spec:fica t, ons
- Do not use screws that are !anger than ti:e
length or do not comply w1th VESA standard screw
specifications Screws that are too iong may cause da::'age to th e tns1de of the TV set.
- For wa ll mounts that do not comp ly w ith the VESA standard screw specif ications , the length of the screws
may differ depending on the wall mount spec if ications
- Do not fasten the screws too firmly This may damage the product or cause the product to fa ll , lea di ng to
persona l injury Samsung is not liab le for these kinds of accidents.
- Samsung is not liab le for product damage or personal inJury when a non-VESA or non-specifie d wal l
mount is used or the co nsumer fails to follow the product insta llation Instructions.
- Do not mount the TV at more than a 15 degree t ilt
- A lways have two people mount the TV on to a wal l.
Providing Proper Ventilation for Your TV
When you install your TV, mai ntain a dista nce of at least 4 inches between the TV and other objects (walls,
cabinet sides, etc.) to ensure proper ventilation. Fail ing to maintai n proper ventilation may resu lt in a fire or a
problem with the product caused by an increase in its internal temperature .
If you use parts provided by another manufacturer, it may cause difficu lt ies with the product o r resu lt in injury
caused by the product falling .
- Whether yo u insta ll your TV using a stand or a wa ll -mount, we strongly recommend you use parts
prov1ded by Sam sung Electronics only.
Installation with a stand.
Installation with a wall-mount.
~-----------
4 inches ~
~
'
: 4 1nches
~
'
:
4inches ~
~
'
'
-r 4-inches---- -:
:
: 4lnches
v'
~------------ _!_ ~ ~~c_h_e_s----- ~
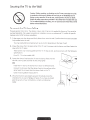
Securing the TV to the Wall
Caution: Pulling, pushing, or climbing on the TV may cause the TV to fall.
In particular. ensure your children do not hang on or destabilize the TV.
Doing so may cause the TV to tip over, causing serious injuries or death.
Follow all safety precautions provided in the Safety Flyer included with your
TV. For added stability and safety, you can purchase and install the anti-fall
device as described below.
To Prevent the TV from Falling
These are general instructions. The clamps, screws, and string are not supplied by Samsung. They must be
pu rchased separately. We suggest consulting an installation service or professional TV installer for specific
hardware and anti-fa ll hardware installation .
1. Put the screws into the clamps and firmly fasten them onto the wa ll. Confirm that the screws have been
firmly installed onto the wa ll.
- You may need add1tional material such as an anchor depending on the type of wa ll.
2.
Remove the screws from the back center of the TV. put the screws into the clamps, and then fasten the
screws onto the TV agam.
- These screws may not be supplied with the TV. If they are not, purchase screws with the following
specifications:
• For a 32 - 75 inches models: M8
3. Connect the clamps fixed onto the TV and the clamps fixed onto the
wall with a strong cable and then tie the string tightly.
NOTE
······ '
~}
.....··
• Install the TV near to t he wall so that it does not fall backwards.
• Connect the string so that the clamps fixed on the wal l are at the
same height to or lower than the clamps fixed on the TV.
• Untie the string before moving the TV.
4. Verify all connections are properly secured. Periodical ly check the
connections for any sign of fatigue or failu re. If you have any doubt
about the security of your connections, contact a professional
installer.
..············...
(~ )
·········
,•
Warranty Information
Federal Commu nication Comm ission
Interference Statement
This equ1pment has been tested and found to
comply with the limits for a Class B digital device,
pursuant to Part 15 of t he FCC Rules . These limits are
designed to prov1de reasonable protection against
harmful interference in a res1dent1al installation This
equipment generates, uses and can radia te radio
frequency energy and, if not installed and used in
accordance w ith the instruct ions. may cause harmful
interference to rad io communications However.
there is no guarantee that interference will not occur
in a particular installation If this equipm ent does
cause harmful interference to radio or television
reception, wh ich can be determined by turning the
equipment off and on, the user is encouraged to try
to correct the interference by one of the foliovving
measures:
• Reorient or relocate the receiving antenna
• Increase t he separation between t he equipment
and receiver.
• Connect the eq uipment into an out let on a
circuit different from that to wh ich the receiver is
connected.
FCC Caut1on: Any changes or modifications not
expressly approved by the party responsible for
comp liance could void the user's authority to operate
th is equipment
Th is dev1ce complies w ith Part 15 of the FCC Ru les.
Operation is subject to the fo llowing two conditions
( 1) This device may not cause harmful interference,
and (2) th is device must accept any interference
received, including interference that may cause
undesired operation .
For product availab le 1n the USA/Canada market. only
channel 1-11 can be operated . Selection of other
channels is not possible.
This device and its antenna(s) must not be co-located
or operation in conjunction with any other antenna
or transmitter.
FCC Radiation Exposure Statement:
Th is equipment complies w ith FCC radiation exposure
limits set fort h for an uncontrolled environment. This
equipment should be installed and operated w ith
minimum distan ce 20cm betwee n the radiator &
your body.
• Consult the dealer or an experienced rad1oi TV
technician for help.
IMPORTANT WARRANTY INFORMATION REGARDING TELEVISION FORMAT VIEWING
- See the warranty ca rd fo r more information on
warranty terms.
Wide screen format LED D1splays (with 16:9 aspect
ratios, the ratio of the screen width to height) are
primarily designed to view w ide screen format fu llmotion video . The Images displayed on them shou ld
primarily be in the wide screen, 16:9 rat io format,
or expanded to f ill the screen, it your model offers
this feature, with the images constantly in motion.
Displaying stationary graphics and images on the
screen, such as t he dark sidebars on non-expanded
standard format te levision video and programm ing,
should be lim1ted to no more t han 5% of the total
television viewing t ime per week.
Additionally, viewing other stationary images and
text such as stock market crawls, video game
displays. station logos, web sites or comp uter
graphics and patterns, should be limited as described
above for all televisions.
Displaying stationary images that exceed the above
guidelines can cause uneven aging of LED Displays
tha t leave subtle, but permanent burned-in ghost
images in the LED picture. To avoid this, vary the
programming and images, and pnmarily display full
screen moving images, not stationary pattern s or
dark bars. On LED models that offer picture sizing
features, use these controls to view different formats
as a fu li screen picture.
Be careful about the television formats you select and
the length of time you view them . Uneven LED aging
as a result of format select ion and use. as well as
burned in images. are not covered by your Samsung
limited warranty
The above described warranty repairs must be
performed by a SAMSUNG Authorized Service
Center Along w1th this Statement, the Original
Limited Warranty Statement and a dated Bill of
Sale as Proof of Purchase must be presented
to the Service Center. Transportation to and
from the Serv1ce Center is the responsibility of
the purchaser Conditions covered are limited
only to manu facturing defects in material or
workmanship, and only those encountered in
normal use of the product.
• SAMSUNG ELECTRONICS NORTH AMERICAN
LIMITED WARRANTY STATEMENT
Subject to the requirements, conditions,
exclusions and limitations of the original Limited
Warranty supp lied with Samsung Electronics
(SAMSUNG) products. and the requirements,
conditions, exclusions and limitations contained
herein, SAMSUNG will additionally provide
Warranty Repa ir Service in the United States on
SAMSUNG products purchased in Canada, and in
Canada on SAMSUNG products purchased m the
United States, for the warranty period originally
specified. an d to the Original Purchaser only
Excluded, but not limited to, are any originally
specified provisions for, in-home or on-site
services, minimum or maximum repair times,
exchanges or replacements, accessories, options,
upgrades, or consumables.
For the location of a SAMSUNG Authorized
Service Center, please call toll-free:
- In the United States: 1-800-SAMSUNG (1800-726-7864)
- In Canada: 1-800-SAMSUNG
SAMSUNG BRAN D PRODUCTS
LIMITED WARRANTY TO ORIGINAL
PURCHASER
This SAMSUNG brand product. as supplied and
distributed by SAM SUNG and delivered new, 1n the
original carton to the original consumer purchaser,
is warranted by SAM SUNG against manufacturing
defects in materials and workmanship for period of:
(90 Days Parts and Labor for Commercial Use)
Categories
LCD/LED
TV
Parts
1
Year
Labor
1
Year
Plasma
Display
1
Yea r
Year
3D Glasses
1
Year
1
Year
1
Size
Service
39" and
Larger
CarryIn or In
Home
37" and
Smaller
Carry-In
All
CarryIn or In
Home
-
Carry-In
or Pick
up
* * 180 Days after Purchasing and 600 Hours of Use
Lamp on Projector
This limited warranty begins on the original date of
purchase, and is valid only on products purchased
and used in th e United States. To receive warranty
service. the purchaser must contact SAMSUNG for
problem determination and service procedures.
Warranty service can only be performed by a
SAMSUNG authorized service center. The original
dated bill of sale must be presented upon request
as proof of purchase to SAMSUNG or SAMSUNG's
authorized service center.
SAM SU NG will repair or replace th is product, at our
option and at no charge as stipulated herein, with
new or reconditioned parts or products if found to be
defective during the limited warranty period specified
above Al l replaced parts and prod ucts become the
property of SAMSUNG and must be returned to
SAMSUNG. Replacement parts and products assume
the remaining original warranty, or ninety (90) days,
whichever is longer
Certain products are eligible for In-home service at
Samsung's discretion. To receive in-home service,
the product must be unobstructed and accessible to
service personnel. If during in-home service. repair
cannot not be completed, it may be necessary to
remove, repair and return the product. If in-home
service is unavailable, SAMSUNG may elect, at our
option, to provide for transportation of our choice
to and from a SAMSUNG authorized service center.
Otherwise, and for 37" and smaller LCD/LED TV,
transportation to and from the SAMSUNG authorized
service center is the responsibility of the purchaser.
This limited warranty covers manufacturing defects
in materials and workmanship encountered in
normal, and except to the extent otherwise expressly
provided for in this statement. noncommercial
use of this product. and shall not apply to the
following, including, but not limited to: damage
which occurs in shipment. delivery and installation;
applications and uses for which th is product was
not intended; altered product or serial numbers;
cosmetic damage or exterior finishes: accidents,
abuse, neglect, fire. water. lightning or other acts of
nature: use of products. equipment, systems, utilities.
services. parts. supplies. accessories, applications.
installations. repairs, external wiring or connectors
not supplied or authorized by SAM SUNG which
damage this product or result in service problems:
incorrect electrical line voltage, fluctuations and
surges: customer adjustments and failure to follow
operating instructions, cleaning, maintenance
and environmenta l instructions that are covered
and prescribed in the instruction book: reception
problems and distortion related to noise, echo.
interference or other signal transmission and delivery
problems: brightness related to normal aging, or
burned-in images. SAMSUNG does not warrant
uninterrupted or error-free operation of the product.
THERE ARE NO EXPRESS WARRANTIES OTHER
THAN THOSE LISTED AND DESCRIBED ABOVE,
AND NO WARRANTIES WHETHER EXPRESS OR
IMPLIED, INCLUD ING, BUT NOT LIMITED TO, ANY
IMPLIED WARRANTIES OF MERCHANTABILITY OR
FITNESS FOR A PARTICULAR PURPOSE, SHALL APPLY
AFTER THE EXPRESS WARRANTY PERIODS STATED
ABOVE, AND NO OTHER EXPRESS WARRANTY
OR GUARANTY GIVEN BY ANY PERSON, FIRM OR
CORPORATION WITH RESPECT TO THIS PRODUCT
SHALL BE BINDING ON SAMSUNG. SAMSUNG
SHALL NOT BE LIABLE FOR LOSS OF REVENUE OR
PROFITS, FAILURE TO REALIZE SAVINGS OR OTHER
BENEFITS, OR ANY OTHER SPECIAL, INCIDENTAL
OR CONSEQUENTIAL DAMAGES CAUSED BY THE
USE, MISUSE OR INABILITY TO USE THIS PRODUCT,
REGARDLESS OF THE LEGAL THEORY ON WHICH
THE CLAIM IS BASED, AND EVEN IF SAMSUNG
HAS BEEN ADVISED OF THE POSSIBILITY OF SUCH
DAMAGES. NOR SHALL RECOVERY OF ANY KIND
AGAINST SAMSUNG BE GREATER IN AMOUNT
THAN THE PURCHASE PRICE OF THE PRODUCT
SOLD BY SAMSUNG AND CAUSING THE ALLEGED
DAMAGE . WITHOUT LIMITING THE FOREGOING,
PURCHASER ASSUMES ALL RISK AND LIABILITY
FOR LOSS, DAMAGE OR INJURY TO PURCHASER
AND PURCHASER'S PROPERTY AND TO OTHERS
AND THEIR PROPERTY ARISING OUT OF THE USE ,
MISUSE OR INABILITY TO USE THIS PRODUCT
SOLD BY SAMSUNG NOT CAUSED DIRECTLY BY
THE NEGLIGENCE OF SAMSUNG . THIS LIMITED
WARRANTY SHALL NOT EXTEND TO ANYONE
OTHER THAN THE ORIGINAL PURC HASER OF TH IS
PRODUCT, IS NONTRANSFERABLE AND STATES
YOUR EXCLUSIVE REMEDY.
Some states do not allow limitations on how long an
implied warranty lasts. or the exclusion or lim itation
of incidental or consequentia l damages, so the above
limitations or exclusions may not apply to you. This
warranty gives you specific legal rights. and you may
also have other rights which vary from state to state.
To obtain warranty service, please contact SAM SUNG
at:
Samsung Electronics America, Inc.
85 Challenger Road
Ridgefield Park, NJ 07660-2112
1-800-SAMSUNG 726-7864- www.samsung.com
1-800-749-0260: Projectors only
The benefits of this Limited Warranty extend only
to the original purchaser of Samsung products
from an authorized Samsun g reseller. THIS LIMITED
WARRANTY SHALL NOT APPLY TO ANY SAMSUNG
PRODUCTS PURCHASED FROM UNAUTHORIZED
RESELLERS OR RETAILERS. EXCEPT IN STATES WHERE
SUC H RESTRICTION MAY BE PROHIBITED. For a list
of Samsung authorized retailers, please go to: http :;;
www.samsung.com/us/peaceofmind/authorized_
resellers.html.
Contact SAMSUNG WORLD WIDE
If you have any questions or comments relating to Samsung products, please contact the SAMSUNG
customer care center.
US.A
1-800-SAMSUNG
www.samsung .com/ca_fr
ren ch)
www samsung .com/us
(726-7864)
© 2014 Samsung Electronics Co., Ltd . All rights reserved.
Samsung Electronics Canada Inc,
Customer Service 55 Standish Court
Miss1ssauga, Ontano L5R 482 Canada
Samsung Electronics America, Inc. 85
Challenger Road Ridgefield Park, ~JJ
07660
lllllllllllllllllllllllllllllllllllllllllll
BN68-05942A-OO
I 1111111111111111111111
BN68-05943A-00
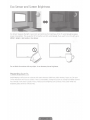
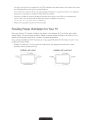
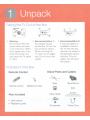
Taking the TV Out of the Box
~
,fiA
r
N::\ ...,_
' \.!!51""..._1
Warning:
Do not touch the TV's
screen when you take
it out of the box. Hold it
by its edges only. If you
touch the screen, you
can cause the TV panel
to crack.
-~/
Recommendation 1 :
Two people should
remove the TV from the
box as shown above.
When removing the
TV, hold it by its edges
only. Do not touch the
screen.
Recommendation 2:
If only one person is
available to remove
the TV from the box,
remove it as shown in
the illustration above.
Hold the TV by its
edges. Do not touch
the screen.
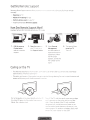
Included in the Box
Remote Control
Stand Parts and Cables
~
~ Base
Remote Control
Also included
User manual
Regulatory guide
Stand Mount
Batteries (2 AAA)
Cable Holder
Screws
32-38 inch models: 7 pieces
39 inch and above models: 8 pieces
·~
IR extender
Power Cord
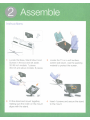
Instructions:
Locate the Base, Stand Mount and
Screws in the box and set aside.
32-38 inch models: 7 pieces
39 inch and above models: 8 pieces
2
Locate the TV on a soft surface,
screen side down. Use the packing
material to protect the screen.
3 Fit the stand and mount together,
making sure the notch on the mount
aligns with the stand.
4
Insert 4 screws and secure the stand
to the mount.
1
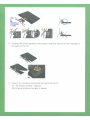
5
Holding the stand parallel to the screen , slide the stand into the notches on
the back of the TV.
6
Insert 3 or 4 screws and secure the stand to the TV.
32- 38 inches models: 3 pieces
39 inches and above models: 4 pieces
After you have connected all your external devices, plug the
1V's power cord into the back of the TV DO NOT plug it into a
wall outlet until you have reached Section 7, Initial Setup.
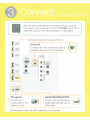
Connection panel on the back of the 1V
~~
~~
~~
1 Internet
Connect here with an Ethernet cable or
wirelessly later during the Initial Setup.
COMPONENT
/ AVIN
II~
(AUDIO OUT)
lr=J
I
Connect your
coaxial cable to the
Antenna In port.
Cable/Satellite/OVA
Connect your set-top box or
digital video recorder with an
HDMI cable.
- The displayed image may differ depending on the model.
Blu-ray/DVD/Home Theater
Connect your video player using an
HDMI cable.
OOJ~
OOJ~
OOJ~
I~
I~
,I ~
Game console
Connect your game console
or DVR using an HDMI cable.
COMPONEI'fT
/ AVIN
r HD~~N4
)
[-]
( IROOT )
[11
[11
( AUDIO Ol1T)
Audio
Connect a receiver/home theater
using an optical audio cable.
- The displayed image may differ depending on the model.
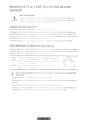
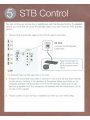
You can control your set-top-box or satellite box with the Remote Control. To establish
control, you must first set up theIR extender cable. If you don't have an STB, skip this
section.
1 Connect theIR extender cable to the TV's IR output connector.
ll ~
OOJ ~
lml ~
~ ~·
I~
I~
I
....
~
~----~-il
.u; . . ~. .
•
·-·-·
(J
~~=~
•
[I)
,.. ,_""
""""
------
I
I
I
~
I
IR Out
Connect theIR Extender
: Cable here.
Place the transmitter end
within 4 inches of the settop-box's remote control
sensor.
- The displayed image may differ depending on the model.
2 Position the transmitter end within 4 inches (1 0 em) of the set-top-box's remote
control sensor, pointing in the direction of the sensor. Make sure there are no
obstacles between the transmitter end of theIR extender cable and the settop-box or satellite box. Any obstacles will interfere with the transmission of the
remote control signals.
3 Finalize control of your set-top or satellite box when you run Initial Setup.
()' Initial Setup
When you turn on your 1V for the first time, it immediately starts the Initial Setup.
During Initial Setup, connects to your home network, implements Smart Hub
agreements, links to the source of your live 1V signal, and sets up control of your settop or satellite box.
Information You Need
Internet Access
Have the following information on hand
before you turn on your 1V for the first
time:
Your wireless network's password.
(Make sure your network is on .)
Your Postal or Zip code.
The name and location of your cable
or satellite provider (if you use one).
The 1V must be connected to the Internet
to use the Smart Features. If you have
a wireless network, confirm that your
network router is working before you
start the initial setup. If you have a wired
network, connect the 1V to the network
with an Ethernet cable before you begin
(CAT 7 cable preferred).
Running Initial Setup
1 Plug your 1V into a wall outlet.
~ Aim the Remote Control at the 1V.
3 Press the TV button on the Remote
Control to turn on the 1V, and then
follow the directions on the screen .
To learn more about operating your 1V and its Smart Features, see your 1V's user's
manual or launch the 1V's built in e-Manual. Congratulations on the purchase of your
new Smart 1V!
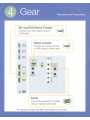
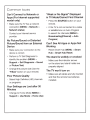
Common issues
Can't Connect to Network or
Apps {For Internet supported
model only)
ffi
Make sure the 1V has a network
connection (MENU> Network>
"Weak or No Signal" Displayed
in TV Mode/Cannot Find Channel
~;
Press the SOURCE button on your
remote.
~
It the 1V is not connected to a cable
or satellite box run Auto Program
to search for channels (MENU>
Network status)
Contact your Internet service
provider.
No Picture/Sound or Distorted
Picture/Sound from an External
Device
tlfo
·'~'
Broadcasting(Channel) > Auto
Program)
Can't See All Apps or Apps Not
Working
Reset Smart Hub (MENU > Smart
Make sure your connection to the
device is correct.
Perform a 1V Self Diagnosis to
identify the problem (MENU>
Hub > Smart Hub Reset)
The stand is wobbly or crooked
'
Support > Self Diagnosis > Sound
or Picture Test)
fi'
Change the picture size (Use the
"P.Size" button on your remote)
Poor Picture Quality
¥;'
Select High Definition (HD) channels
or programs.
Your Settings are Lost after 30
Minutes
Change to Home Mode (MENU >
Support > Use Mode > Home Use)
1
Make sure the indicator arrows
on the stand and stand holder are
properly aligned.
The TV won't turn on
• Make sure alf cables are fully inserted
and that the remote has batteries
installed.
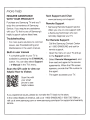
More help
REQUIRE ASSISTANCE
WITH YOUR PRODUCT?
Tech Support and Chat
Purchase any Samsung lV and you'll
enjoy the convenience of Samsung
Service. If you require any assistance
with your TV, first try any of Samsung's
helpful support options listed here.
Remote Support
Troubleshooting
For more quick solutions to common
issues, see Troubleshooting and
Maintenance in the user's manual.
Built-in user manual
··· A complete guide to your lV is
available by pressing the E-MANUAL
button. You can also select Support
> e-Manual in the lV's menu.
Scan the QR code to view our
helpful How-to Videos
·~
www.samsung.com/s upport
, Samsung Remote Support service
offers you one-on-one support with
a Samsung Technician who can
remotely diagnose your lV.
For Remote Support:
Call the Samsung Contact Center
at 1-800-SAMSUNG and ask for
remote support.
:
1
Open the menu on your lV and go
to the Support section.
Select Remote Management, and
then read and agree to the service
agreements. When the PIN screen
appears, provide the PIN number to
the agent.
The agent accesses your lV.
Scan this with
your smart
phone to see
helpful videos.
If you experience issues, please do not take the lV back to the store.
In the United States of America, call us at 1-800-SAMSUNG (1-800-726-7864) or
visit us at www.samsung.com or www.samsung.com/spsn for support and warranty
service.
IMPORTANT SAFETY PRECAUTIONS
• Placing the television on a platform, stand, cabinet, table or other surface which is:
-
recommended by Samsung or sold with the product;
-
secure and stable;
-
sufficiently wider in the base than the base measurement of the television;
-
strong and large enough to support the size and weight of the television.
• Positioning the television close to the wall to avoid the possibility of the television falling when pushed.
• Ensuring your television is installed by an authorized Samsung installer.
• Following the instructions for wall mounting in the installation manual and using the mounting equipment supplied by Samsung.
• Placing the television toward the back of the furniture or surface on which it is placed.
• Ensuring that the television does not hang over the edge of the furniture or surface on which it is placed.
• Not hanging anything from or on the television.
• Anchoring both the television and the furniture on which it is placed to a suitable support especially in the case of tall furniture, such as
cupboards or bookcases which exceed one metre in height. This can be done by using sturdy brackets, safety straps or mounts that
are made specifically for flat screen televisions.
• Not placing any material between the television and the furniture on which it is placed.
• If the furniture on which the television is placed has drawers, cabinets or shelves under the television , taking steps to prevent children
from climbing, such as installing safety latches so the doors cannot be opened .
• Keeping pets away from the television.
• Educating children about the dangers of climbing on furniture to reach the television or its control.
Failure to take these safety precautions may cause the television to fall from the stand or mounting equipment,
causing damage or serious injury.
Regulatory Compliance Statements
-
Federal Communications Commission (FCC) - USA
Industry Canada Equipment Standard for Digital Equipment (ICES-003) - Canada
Voluntary Control Council for Interference (VCCI) - Japan
Bureau of Standards Metrology and Inspection (BSMI) - Taiwan
Korea Communications Commission(KCC) - Republic of Korea
Italian Post Ministry (Homologation) - Italy
FCC Class A Notice
This device complies with part 15 of the FCC Rules. Operation is subject to the following two conditions:
1 . This device may not cause harmful interference, and
2. This device must accept any interference received, including interference that may cause undesired operation.
[E) This equipment has been tested and found to comply with the limit!t for a Class A digital device, pursuant to Part 15 of the FCC Rules.
These limits are designed to provide reasonable protection against harmful interference when the equipment is operated in a commercial
environment. This equipment generates, uses, and can radiate radio frequency energy and, if not installed and used in accordance with
the instruction manual, may cause harmful interference to radio communications. Operation of this equipment in a residential area is
likely to cause harmful interference in which case the user will be required to correct the interference at his own expense.
FCC Class 8 Notice
This device complies with part 15 of the FCC Rules. Operation is subject to the following two conditions:
1. This device may not cause harmful interference, and
2. This device must accept any interference received, including interference that may cause undesired operation.
[E) This equipment has been tested and found to comply with the limits for a Class B digital device, pursuant to Part i 5 of the FCC
Rules. These limits are designed to provide reasonable protection against harmful interference in a residential installation. This
equipment generates, uses and can radiate radio frequency energy and, if not installed and used in accordance with the instructions,
may cause harmful interference to radio communications. However, there is no guarantee that interference will not occur in a
particular installation . If this equipment does cause harmful interference to radio or television reception, which can be determined by
turning the equipment off and on, the user is encouraged to try to correct the interference by one or more of the following measures:
- Reorient or relocate the receiving antenna.
- Increase the separation between the equipment and receiver.
- Connect the equipment into an outlet on a circuit different from that to which the receiver is connected.
- Consult the dealer or an experienced radio/TV technician for help.
User Information
Changes or modifications not expressly approved by the party responsible for compliance could void the user's authority to operate the
equipment. If necessary, consult with your dealer or an experienced radio/television technician for additiona suggestions. You may find the
booklet called How to Identify and Resolve Radio/TV Interference Problems helpful. This booklet was prepared by the Federal Communications
Commission. It is available from the U.S. Government Printing Office. Washington, DC 20402, Stock Number 004-000-00345-4.
The party responsible for product compliance:
SAMSUNG ELECTRONICS CO., LTD.
America OA Lab of Samsung
3351 Michelson Drive
Suite #290, Irvine, CA92612 USA
Warning
User must use shielded signal interface cables to maintain FCC compliance for the product. Provided with this monitor is a detachable
power supply cord with IEC320 style terminations. It may be suitable for connection to any UL Listed personal computer with similar
configuration . Before making the connection, make sure the voltage rating of the computer convenience outlet is the same as the monitor
and that the ampere rating of the computer convenience outlet is equal or exceeds the monitor voltage rating. For 120 Volt applications,
use only UL Listed detachable power cord with NEMA configuration 5-15P type(parallel blades) plug cap. For 240 Volt applications use
only UL Listed detachable power supply cord with NEMA configuration 6- 15P type (tandem blades) plug cap. This television receiver
provides display of television closed captioning in accordance w ith Section 15. i 19 of the FCC rules. (TV broadcast receivers with picture
screens i 3 inches or larger in diameter models only)
lCES-003 Class A Notice -Avis NMB-003, Classe A
This Class A digital apparatus complies with Canadian ICES-003.
Cet appareil numerique de Ia classe A est conforme a Ia norme NMB-003 du Canada.
lCES-003 Class B Notice - Avis NMB-003, Classe B
This Class B digital apparatus complies with Canadian ICES-003.
Cet appareil numerique de Ia classe B est conforme Ia norme NMB-003 du Canada.
a
VCCl Class A Notice
~0)~~/;t, ? 7 :AA 1\HfHif,ij~~-c-t o
~O)~~~~~Jl:I:Ji-cilm-t ~ c11!i.ltM~~51 ~~~ T ~ c fJ{~ ~)a:: -to
~0)~-g.t::t;tilm~tJ(~t;JJt~~m~~-r ~J:? ~*~n~ ~ c n'~ ~J a::-t 0
VCCl Class B Notice
~O)~~(j:, ?7:AB f~l&ftf.lij~~""('9 o
~O)~fi:t;t, ~~!l:tJt-cilm9 ~ ~ c ~ 131¥-.1 c ~-ct. '*9tJ{, ~ O)~~tJ'? ~;.t-\!=>-T ~.-- t:~ 3 :,~i~mtt:::ilitt ~
n~c, :¥l:1~~~~51~~~9~ctJ'~~Ja::9o
ltlt&~B}l1fl::~ ?""C:iE ~I.. 'If~~) t&l..'~ ~ Tl' ~ l..' o
-c ilm ~
CCC Class A notice - China
~~A·~~ . ~~~~-~ . ~~~~-~~d~~~~tt .
~~Mffl~l' . ~- -~ m~~-~tt*UW~~ft~m• .
BSMl Class A Notice
The following statement is applicable to products shipped to Taiwan and marked as Class A on the product
compliance label.
Ji§f1!ffj:g:
~~ ~••m•~£· ~@tt=~ ~~m~· ~ ~-~~M~~-· ~~Mm~T ·
~m~•*~*~~~~~ ~ ~~~·
(€
BSMI Class A Notice
Products with the CE marking comply with the EMC Directive(2004/1 08/ EC) and the Low Voltage
Directive(2006/95/ EC) issued by the Commission of the European Community.
Compliance with these directives implies conformity to the following European Norms:
- EN55022: Radio Frequency Interference
- EN55024: Electromagnetic Immunity of Information Technology Equipment
- EN61 000-3-2: Power Line Harmonics
- EN61 000-3-3: Voltage Fluctuations
- EN55013: Radio disturbance characteristics of broadcast receivers and associated equipments
- EN55020: Electromagnetic immunity of broadcast receivers and associated equipm
European Class A Warning
(If the user manual declares the product as Class A, following statement applies.)
This is a class A product. In a domestic environment this product may cause radio interference in which case the user may be
required to take adequate measures.
A-G- 7/7/ (gj.Ej!-g.
Ol 7171:::
.A~~o~ :::
~ ¥~( A8) ~::x::~m~~7171£.Ai ~ DH::X::~
-3;! ~ ~~ o £. ~Liq.
8-G- 7/7/
Ol 717 1:::
<lL~Liq.
g~~t.!7/XfXH)
.9:.::: .A~~::x::~:::
Ol
~ ~ -9-2.l o~.AI71 I:J~2.~11j, 7~~ 2.12.1 ::X::IQ'l OU.Ai
(7f~g. g~~t.f7/XfXH)
7~~~(88) ~;x::~n~~~7171£Ai
-9-£
7f~Ol!Ai Af~of::: -3;!~ ~~ 0 £.
ofllj,
2.:::
::X::IQ'lOf!Ai
A~~ ~
4-
Mercury Statement (LCD Monitor, LCD TV, DLP Projection TV, Projector for USA only)
Contains Mercury, Dispose According to Local, State or Federal Laws
Wiring the Mains Power Supply Plug(UK Only)
IMPORTANT NOTICE
The mains lead on this equipment is supplied with a moulded plug incorporating a fuse. The value of the fuse is indicated on the pin face
of the plug and, if it requires replacing, a fuse approved to BSI1362 of the same rating must be used.
Never use the plug with the fuse cover omitted if the cover is detachable. If a replacement fuse cover is required, it must be of the same
colour as the pin face of the plug. Replacement covers are available from your dealer.
If the fitted plug is not suitable for the power points in your house or the cable is not long enough to reach a power point, you should
obtain a suitable safety approved extension lead or consult your dealer for assistance. However, if there is no alternative but to cut off the
plug, remove the fuse and then safely dispose of the plug.
Do NOT connect the plug to a mains socket as there is a risk of shock hazard from the bared flexible cord.
IMPORTANT
The wires in the mains lead are coloured in accordance with the following code:
BLUE- NEUTRAL BROWN- LIVE
As these colours may not correspond to the coloured markings identifying the terminals in your plug, proceed as follows:
The wire coloured BLUE must be connected to the terminal marked with the letter N or coloured BLUE or BLACK. The wire coloured
BROWN must be connected to the terminal marked with the letter L or coloured BROWN or RED.
WARNING:
DO NOT CONNECT EITHER WIRE TO THE EARTH TERMINAL, WHICH IS MARKED WITH THE LETTER E OR BY THE EARTH SYMBOL
, OR COLOURED GREEN OR GREEN AND YELLOW.
Italian Homologation Notice
Questo apparecchio e fabbricato in conformita al D.M.28.08.95 n.548
ed in particolare a quanto specificato nell Art.2, comma 1.
Questo apparecchio e fabbricato nella U.E. in conformita al D.M.28.08.95 n.548
Art.2, comma 1 ed al D.M.26.03.92 Art.1
- For products produced in countries except European Community
Questo apparecchio e fabbricato in conformita al D.M.28.08.95 n .548
ed in particolare a quanto specificato nell Art.2 , comma 1.
- For products produced in European Community
Questo apparecchio e fabbricato nella U.E. in conformita al D.M.28.08.95 n.548
Art.2, comma 1 ed al D.M.26.03.92 Art.1
[BRAZIL] Pilhas e baterias, ap6s seu uso, nao devem ser jogadas em lixo
comum. Para evitar riscos
a saude humana e ao meio ambiente, realize o descarte
ambientalmente adequado, em um Servic;o Autorizado Samsung.
Important Safety Instructions (UL Only)
1.
2.
3.
4.
5.
6.
7.
8.
9.
10.
11.
12.
13.
14.
•
Read these instructions.
Keep these instructions.
Heed all warnings.
Follow all instructions.
Do not use this apparatus near water.
Clean only with dry cloth.
Do not block any ventilation openings, Install in accordance with the manufacturer's instructions.
Do not install near any heat sources such as radiators, heat registers, stoves, or other apparatus (including amplifiers) that produce
heat.
Do not defeat the safety purpose of the polarized or grounding-type plug. A polarized plug has two blades with one wider than the
other. A grounding type plug has two blades and a third grounding prong. The wide blade or the third prong are provided for your
safety. If the provided plug does not fit into your outlet, consult an electrician for replacement of the obsolete outlet.
Protect the power cord from being walked on or pinched particularly at plugs, convenience receptacles, and the point where they exit
from the apparatus.
Only use attachments/accessories specified by the manufacturer.
Use only with cart, stand, tripod, bracket, or table specified by the manufacturer, or sold with the apparatus. When a cart is used, use
caution when moving the cart/apparatus combination to avoid injury from tip-over.
Unplug this apparatus during lightning storms or when unused for long periods of time.
Refer all servicing to qualified service personnel. Servicing is required when the apparatus has been damaged in any way, such as
power-supply cord or plug is damaged, liquid has been spilled or objects have fallen into the apparatus, the apparatus has been
exposed to rain or moisture, does not operate normally, or has been dropped.
Ventilation
Do not place the apparatus in a rack or bookcase. Ensure that there is adequate ventilation and that you 've followed that manufacturer' s
instructions for mount ing and installation.
MPR II Compliance (MPR II a~plied model only)
This monitor complies with SWEDAC(MPR II) recommendations for reduced electric and magnetic fields.
EU Eco-Label (EU Eco-Label applied model only)
Products which have model codes that end in XU are intended for the UK market. Samsung has not applied for Ecolabels for products with this
specific model code.
***
* c- *
* \: *
*
*
Eu)i;!
Better for the environment. ..
• High Energy Efficiency
• Reduced C0 2 emissions
• Designed to facilitate repair and recycling
Ecolabel
... better for you.
www.ecolabel.eu
[...__E_u_E_c_o_la_b_e_l:_H_u_Jo_2_2J_02__]
SAMSUNG Electronics makes an effort to develop environment-friendly product that minimizing an impact to environment through whole
process from getting raw materials, production, transportation, usage and end-of-life disposal by adding 'environment' on function, price,
quality, design that were the essence for product development.
These environmental characteristics are endorsed by the award of the European Eco-label (also known as the Euro Flower) issued by
the European Commission as approval of the product environmental status for energy saving, facilities for recycling and a host of other
features. The full list of criteria and more information on the ecolabel canbe found at the web-site address: http://www.ecolabel.eu
Recycling Information (Take-back offer)
For recycling information for our products, please contact the company corresponding to your region of residence.
For those who reside in other countries, please contact a nearest local Samsung dealer for recycling information for the products to be treated
in environmentally acceptable way.
The information of Regional Takeback Schemes can be found at Samsung's web-site.
http://www.samsung.com/recycling_compliance
CIS Only
®
u
®
u
CI1MBOn «He gnl'l n11Lllesol1 npOAYKLIHI1» np11MeHl'leTCl'l B coorsercrs11e c rexHH4eCKI1M pernaMeHTOM
TaMo)KeHHoro co103a «0 6e3onacHOCTI1 ynaKOBK11» 005/2011 11 yKa3biBaer Ha ro, 4TO ynaKOBKa gaHHoro
npogyKra He npegHa3Ha4eHa gnl'l nosropHoro Hcnonb30BaHI15l H nogne)KI1T yrl1nl138l.ll111. YnaKOBKY
gaHHOro npogyKra 3anpelllaercl'l 11cnonb30BaTb gnl'l xpaHeHI15l n11Lllesol1 npOAYKLIHI1.
CHMBon «nernl'l Me611yca» yKa3blsaer Ha B03MO)f{HOCTb yr11nvt3a1..11111 ynaKOBKI1. C11Mson MO)f{eT
6b1Tb ,QOnOilH8H 0603Ha48HI1eM M8T8pl1afla ynaKOBKI1 B B11A8 1..111cf:>pOBOIO 11/11Jlvt 6yKB8HHOIO
o6o3Ha4eHHl'l.
C11Mson KegeHgiK ogai\Tblf-\ 005/2011 rexHI1Kaflbll\ pernaMeHTiHe cai1Kec 1\0nAaHblnagbl )KaHe OCbl
eHiMHif-1 1\amaMaCbiH eKiHwi per nai1AanaHyra apHanMaraHbiH )KaHe )KOtOra )KaTaTbiHbiH KepcereAi.
0Cbl SHiMHif-( 1\anTaMaCbiH a3bii\-TYiliK SHiMgepiH Cai\Tay ywiH nali!AanaHyra TbiHbiM canbiH8Abl.
CvtMBOil 1\anTaMaHbl )1(010 MYMKiHAiriH Kepcere,Qi. C11Mson caHAbll\ KOA )K9He/HeMece apin
6enrinepi rypiHAeri 1\anTaMa MarepvtaflbiHblf-\ 6enriciMeH TOilbii\TblpbiilYbl MYMKiH.
1111111111111111111111111111111111111111111
BN68-04972A-03