1
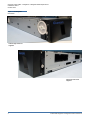
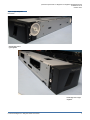
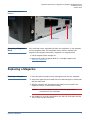
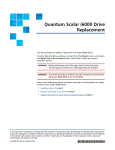
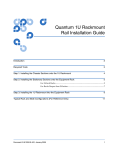
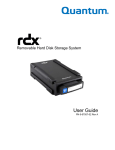
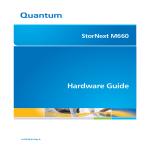
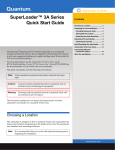
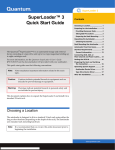
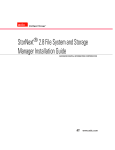
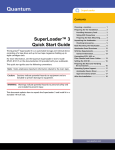
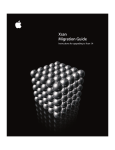
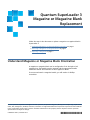
Quantum SuperLoader 3
Magazine or Magazine Blank
Replacement
Follow the steps in the document to replace a magazine or magazine blank in
SuperLoader 3:
• Understand Magazine or Magazine Blank Orientation on page 1
• Removing a Magazine or Magazine Blank on page 5
• Replacing a Magazine on page 7
Understand Magazine or Magazine Blank Orientation
A magazine or magazine blank can be configured to fit in the right or left
magazine bay. The handle must be removed and the appropriate handle
attached to match the orientation of the magazine or blank.
To remove and attach a magazine handle, you will need a #1 Phillips
screwdriver.
© 2013 Quantum Corporation. All rights reserved. Quantum, the Quantum logo, DLT, DLTtape, the DLTtape logo, SuperLoader,
Scalar, DXi, StorageCare, StorNext, GoProtect, and Vision are registered trademarks of Quantum Corporation and its affiliates
in the United States and/or other countries. All other trademarks are the property of their respective owners. Quantum
specifications are subject to change.
6-68059-01 Rev A, October 2013
*6-68059-01 A*
Quantum SuperLoader 3: Magazine or Magazine Blank Replacement
6-68059-01 Rev A
October 2013
Figure 1 Left Magazine
Orientation
Outside edge view of left
magazine
Inside edge view of left
magazine
2
Understand Magazine or Magazine Blank Orientation
Quantum SuperLoader 3: Magazine or Magazine Blank Replacement
6-68059-01 Rev A
October 2013
Figure 2 Right Magazine
Orientation
Outside edge view of
right magazine
Inside edge view of right
magazine
Understand Magazine or Magazine Blank Orientation
3
Quantum SuperLoader 3: Magazine or Magazine Blank Replacement
6-68059-01 Rev A
October 2013
Figure 3 Left and Right
Magazine Blank Orientation
Left magazine blank
Right magazine blank
Changing the
orientation of a
magazine
4
1 Remove the two screws that attach the handle to the front of the magazine.
Understand Magazine or Magazine Blank Orientation
Quantum SuperLoader 3: Magazine or Magazine Blank Replacement
6-68059-01 Rev A
October 2013
Figure 4 Removing the Screws
from the Handle
Screws
2 Unsnap the handle carefully, being careful not to break the hinge.
3 Rotate the magazine 180 degrees so that what was the front of the
magazine is now the back.
4 Attach the appropriate left or right handle to the front of the rotated
magazine.
5 Snap the handle back onto the front of the magazine.
6 Install the two screws to attach the handle securely to the magazine.
Changing the
orientation of a
magazine blank
1 Remove the two screws that attach the handle to the front of the magazine
blank.
2 Unsnap the handle carefully, being careful not to break the hinge.
3 Rotate the magazine blank 180 degrees so that what was the front of the
magazine is now the back.
4 Add the appropriate right or left handle to the front of the rotated
magazine blank.
5 Snap the handle back on the front of the magazine blank.
6 Install the two screws to attach the handle securely to the magazine blank.
Removing a Magazine or Magazine Blank
To replace a cartridge magazine or magazine blank, you need to remove the
current magazine or blank, and then install the new magazine or blank. If you
currently have a magazine blank and wish to change it to a cartridge magazine,
you must remove the blank first, and then insert a cartridge magazine. This
allows for up a maximum of 16 cartridges in the autoloader, plus one cartridge
in the drive.
Removing a Magazine or Magazine Blank
5
Quantum SuperLoader 3: Magazine or Magazine Blank Replacement
6-68059-01 Rev A
October 2013
Note: Handles are either right or left. They are not interchangeable between
the left and right sides of the autoloader.
Removing a Magazine
1 On the menu, scroll to Commands.
2 Press Enter.
3 On the Commands sub-menu, scroll to Eject, and then press Enter.
4 On the Eject sub-menu, scroll to Right Magazine or Left Magazine,
depending on which magazine you want to eject, and then press Enter.
The magazine pops forward so that the front of the magazine is no longer
flush with the front panel.
5 With one hand, grasp the magazine by the handle and slide it forward to
remove. Place your other hand under the magazine to support it and
prevent it from falling.
6 Remove any tapes, one at a time, from the magazine. Rotate the gear
handle (Figure 5) on the back of the magazine to align the tape(s) with
either of the two openings (Figure 6 on page 7) along the top half of the
magazine, removing each tape individually.
Figure 5 Magazine Gear
Handle
gear handle
6
Removing a Magazine or Magazine Blank
Quantum SuperLoader 3: Magazine or Magazine Blank Replacement
6-68059-01 Rev A
October 2013
Figure 6 Tape access on a
Magazine
tape access
Removing a Magazine
Blank
Your autoloader comes equipped with either two magazines, or one magazine
and one magazine blank. The autoloader will not function without both
magazine bays equipped with either a magazine or a magazine blank.
1 Pull the magazine blank straight out.
2 Replace with another magazine blank or a cartridge magazine (see
Replacing a Magazine).
Replacing a Magazine
Replacing a Magazine
1 Insert the tapes removed from the old magazine into the new magazine.
2 Grasp the magazine by the handle with one hand and support it underneath
with the other hand.
3 Slide the magazine into the magazine bay. Make sure you position the
magazine correctly; it should slide smoothly.
Caution: Insert the magazine slowly to avoid damaging internal
components or the autoloader.
4 The magazine is correctly installed when you feel it click into place and the
front is flush with the front panel.
Replacing a Magazine
7
Quantum SuperLoader 3: Magazine or Magazine Blank Replacement
6-68059-01 Rev A
October 2013
8
Replacing a Magazine