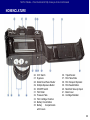
1
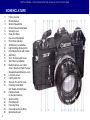
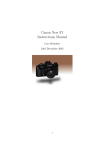
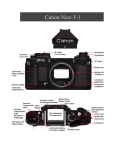
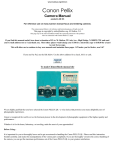
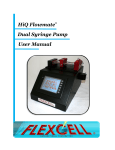
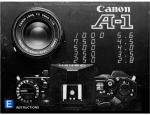
Not For Resale – Free Download at http://www.joe-chan.com/manuals
Not For Resale – Free Download at http://www.joe-chan.com/manuals
INTRODUCTION
Congratulations! You have purchased one of
the finest automatic 35mm SLR cameras
available today. The Canon EF is a complex
instrument having a multitude of advanced
features, yet it is incredibly simple to use. Just
select a shutter speed and the camera adjusts
its own diaphragm for you automatically
under all kinds of lighting situations, from
bright sunlight at the beach to dim candlelight. You are assured of perfect exposures
every time. Now you can concentrate on
picture taking and stop worrying about
mechanics. But before you actually load any
film into your new camera, familiarize yourself
thoroughly with the Canon EF and this
instruction manual. Handle the camera, practice focusing, and use the winding lever. And,
by all means, refer to the instructions often
during this orientation period. When used
correctly, the Canon EF will provide you with
perfectly exposed photographs for years to
come. We at Canon hope you receive as much
enjoyment in using the EF as we had in
designing it. And we hope your involvement in
photography continues to grow.
2
Not For Resale – Free Download at http://www.joe-chan.com/manuals
NOMENCLATURE
1.
2.
3.
4.
5.
6.
7.
8.
9.
10.
11.
12.
13.
14.
15.
16.
17.
18.
19.
20.
21.
22.
23.
24.
25.
3
Frame Counter
Shutter Button
Shutter Speed Dial
Shutter Speed Index Mark
Winding Lever
Flash Hot Shoe
Eye-Level Pentaprism
Film Plane Indicator
AE Memory Lock Button
Light Emitting Diode (LED)
Film Rewind Knob with Crank
ASA Ring
Sync Terminal with Cover
Self-Timer Lock Button
Multi-Purpose Lever (SelfTimer / Depth-of-Field Preview /
Stopped-down Metering Lever)
L–M Lock Lever
CAT System Pin
AE Lock Pin and 'A' mark
Focusing Index Mark
with Depth-of-Field Scale
Distance Scale
(in feet and meters)
Aperture Ring
Front Bayonet
Focusing Ring
Canon Breech-Lock Ring
Neckstrap Eyelet
Not For Resale – Free Download at http://www.joe-chan.com/manuals
Canon FD 50mm f/3.5 S.S.C.,
Macro, 1/1000 sec., AE, ASA 400
Not For Resale – Free Download at http://www.joe-chan.com/manuals
TABLE OF CONTENTS
I.
II.
III.
IV.
V.
VI.
PICTORIAL OUTLINE FOR USING
THE CAMERA ..................................... 6-7
MAIN FEATURES....................................8
VIEWFINDER INFORMATION.................9
TECHNICAL EXPLANATION
OF THE CAMERA ........................... 10-15
A. Electro-Mechanical Shutter........... 10-11
B. Variable Aperture AE Control
Method ......................................... 12-13
C. Silicon Photocell........................... 13-14
D. Central Emphasis Metering ................15
CAMERA HANDLING.......................16-18
A. Carrying the Camera ..........................16
B. Holding the Camera ......................16-17
C. Bracing Yourself and the Camera.......18
D. Releasing the Shutter .........................18
BASIC OPERATION.........................19-53
A. Loading the Mercury Batteries............19
B. Checking the Batteries ..................20-21
C. Turning the Camera On
and Advancing the Film ......................21
D. Loading the Film............................22-24
E. Setting the ASA..................................25
F. Setting the Aperture Ring
and the CAT Switch.......................26-27
VII.
VIII.
IX.
X.
G. Selecting a Shutter Speed .................. 27-29
H. Viewing and Focusing (including
notes on Infrared Photography) .......... 30-31
I. Locking-ln an Exposure Reading ........ 32-34
J. Releasing the Shutter ...............................35
K. Making Multiple Exposures ................. 36-38
L. Taking Pictures by Flash..................... 39-42
M. Changing Lenses................................ 43-44
N. Using the Self-Timer .................................45
O. Previewing Depth-of-Field................... 46-48
P. Taking a Stopped-Down Meter
Reading .............................................. 49-50
Q. Locking the Mirror Upward........................51
R. Rewinding the Film ...................................52
S. Turning the Camera Off ............................53
INTERCHANGEABLE LENSES ............. 54-57
ACCESSORIES ...................................... 58-61
SPECIFICATIONS .................................. 62-63
PROPER CARE OF THE CAMERA..............64
A. Cleaning the Camera ................................64
B. Storing the Camera...................................64
C. Using the Camera in Extremely
Cold Conditions ........................................64
D. Having the Camera Serviced ....................64
Fold out both front and back nomenclature pages for easy reference when reading the instructions.
5
Not For Resale – Free Download at http://www.joe-chan.com/manuals
I PICTORIAL OUTLINE FOR USING THE CAMERA
Load the batteries and
check their power level.
Turn the camera on.
Load the film and advance it
to the first frame.
Select a shutter speed.
Look into the viewfinder.
Compose, focus and check
the meter needle.
Press the shutter button gently.
Out of Focus
In Focus
6
Not For Resale – Free Download at http://www.joe-chan.com/manuals
Set the ASA film speed.
Advance the film
to the next frame.
Set the aperture ring of
the lens to the ‘A’ mark.
Rewind the film
after all frames are exposed.
Set the CAT switch
to “NORMAL”.
Turn the camera off.
7
Not For Resale – Free Download at http://www.joe-chan.com/manuals
II MAIN FEATURES
A
Variable Aperture AE (Automatic Exposure). Simply select a shutter speed and the
aperture is set for you automatically.
B
Automatic electronic flash. When using the
Canon Speedlite 133D and a Flash-Auto Ring, the
aperture is set automatically according to the
focused distance of the lens with synchronization at
1/125 sec.
Extremely wide range of shutter speeds
using an Electro-Mechanical Shutter. Accurate
electronic control from one second down to a full
30 seconds; foolproof mechanical control from onehalf second to 1/1000 second (including B) even if
the batteries fail.
AE memory lock for locking-in exposure
readings.
C
J
Incredible meter sensitivity and rapid response to changing light levels by using a Silicon
Photocell. At ASA 100, EV - 2 (8 sec. at f/1.4) to
EV 18 (1/1000 sec. at f/16)
D
Wide range of FD lenses from 15mm fullframe fish-eye to 300mm telephoto for AE
photography. Other Canon lenses available from
7.5mm circular fish-eye to 1200mm super-telephoto.
2000mm and 5200mm mirror lenses available by
special order.
E
Multiple exposures possible simply by pushing a button while operating the winding lever.
Exact registration is possible, and the frame counter
does not advance during the procedure.
F
Full-information viewfinder displaying large
scales for both shutter speeds and f/stops.
8
G
H
I
Wide film speed range from ASA 12 to
ASA 3200.
Fast-action winding lever with
120 throw and comfortable plastic tip.
K
L
a
short
Short-stroke, feather-touch shutter button.
Huge shutter speed dial overhangs the front
edge of the camera making a change of shutter
speeds quicker than ever.
M
Automatic blank shot mechanism. Advancing film to frame one is possible without using the
shutter button.
N
Cold weather performance assured down
to –20 degrees C. (–4 degrees F.)
O
Easy battery replacement using two readily
available, inexpensive 1.3 volt mercury batteries.
Not For Resale – Free Download at http://www.joe-chan.com/manuals
III VIEWFINDER INFORMATION
a.
b.
c.
d.
e.
Center Split-1 mage/Microprism Rangefinder
Ground Glass with Fresnel Screen
Shutter Speed Scale
Shutter Speed Indicator
Stopped-Down Metering Index Mark
f.
g.
h.
i.
Underexposure Warning Mark (maximum lens
aperture is automatically set)
Aperture Scale
Meter Needle
Overexposure Warning Mark
9
Not For Resale – Free Download at http://www.joe-chan.com/manuals
IV TECHNICAL EXPLANATION OF THE CAMERA
The Canon EF is a 35mm single-lens-reflex AE
(automatic exposure) camera which is designed for
fast handling and precise exposure control. Being
modularly constructed, it contains many advanced
electronic circuits to make picture-taking easier than
ever before.
A Electro-Mechanical Shutter
10
The vertically moving metal focal plane shutter in
the EF has speeds from 1/1000 sec. down to a full
30 seconds, plus a "B" (Bulb) setting for manual
time exposures. The shutter is electronically controlled in its slow range from 1–30 sec. in six discrete
steps (1, 2, 4, 8, 15, and 30). The red Light Emitting
Diode (LED), just to the left of the pentaprism,
blinks on and off to indicate when the shutter is
open. In the normal range in which most photography will be performed, the shutter is mechanically controlled from 1/2-1/1000 sec., plus B, in
ten steps (1/2, 1/4, 1/8, 1/15, 1/30, 1/60, 1/125,
1/500, 1/1000, and B). Electronic control of the
shutter in the slow range insures high accuracy for
long shutter speeds, whereas mechanical control in
the normal range permits manual operation of the
Not For Resale – Free Download at http://www.joe-chan.com/manuals
camera over a wide range of shutter speeds even if
the batteries fail. Another benefit of using mechanical control for the majority of speeds is that the
Canon EF uses only two inexpensive 1.3 volt mercury batteries which are available almost anywhere
in the world.
Canon FD 300mm f/5.6 S.C., 30 sec., AE, ASA400.
11
Not For Resale – Free Download at http://www.joe-chan.com/manuals
Not For Resale – Free Download at http://www.joe-chan.com/manuals
B
Variable Aperture AE Control Method
Commonly known as "shutter priority EE," the
Variable Aperture AE control method gives the
photographer absolute control over the shutter speed
to prevent camera shake. You select a shutter speed
appropriate to the action and/or the lens you are
using, and the camera automatically adjusts the
aperture of the lens to precisely the proper f/stop or
fraction thereof.
Silicon Photocell
The Silicon Photocell is a highly accurate and
extremely stable light measuring cell having a wider
range of sensitivity and much faster response to
rapidly changing light levels than the conventional
CdS cell. At ASA 100, the metering range of the
Silicon Photocell is from EV 18 (1/1000 sec. at f/16)
down to EV —2 (8 sec. at f/1.4), which is five f/stops
more sensitive than the normal CdS cell. At ASA 25,
the range is from 1/1000 sec. at f/8 down to 30 sec.
at f/1.4. This increased sensitivity range is made
possible by the development of a special logarithmic
amplifier to intensify the low amount of current
generated by the photocell in very dim light
conditions.
13
Not For Resale – Free Download at http://www.joe-chan.com/manuals
TECHNICAL EXPLANATION OF THE CAMERA
AE RANGE OF SILICON PHOTOCELL
AT VARIOUS ASAs
FD 50mm f1.4 S.C.C. LENS
ASA
12
:
25
:
50
:
100
:
200
:
400
:
800
:
1600
:
Shutter speed (sec)
3200
EV
RANGE
– 4 ~ 15
– 4 ~ 16
– 3 ~ 17
– 2 ~ 18
– 1 ~ 18
0 ~ 18
1 ~ 18
2 ~ 18
3 ~ 18
Not For Resale – Free Download at http://www.joe-chan.com/manuals
Central Emphasis Metering
After extensive experimentation, it was determined
that the Central Emphasis Metering method of
exposure measurement used in the Canon EF is the
most reliable way of obtaining proper exposures in
fast moving AE photography. The entire viewfinder
screen is read by the Silicon Photocell with more
emphasis given to the center portion, where the main
subject is likely to be located. In a typical landscape,
even a normal center-weighted system can produce
underexposure because of the influence of the bright
sky in the upper part of the picture area. The
following is a diagram of Canon EF's Central
Emphasis Metering method which also minimizes the
effect of skylight when the camera is used horizontally.
15
Not For Resale – Free Download at http://www.joe-chan.com/manuals
V CAMERA HANDLING
Proper handling of your Canon EF is a very
important technique in picture taking. Probably
more pictures are lost through poor handling than
for any other reason. To take full advantage of the
EF's fast operation, you must learn where each
control is instinctively. Before loading film into the
camera, practice focusing, releasing the shutter and
using the winding lever. A few minutes of practice
now will pay off later in fewer missed shots.
A Carrying the Camera
Attach the Canon EF's neckstrap and adjust it to a
length which feels "right" to you when the camera is
around your neck. To avoid dropping the camera
accidentally, you should always carry the camera by
its strap. Carry the EF around your neck, hang it
over your shoulder, or wrap the neckstrap around
your hand. For comfortable viewing and to keep
extraneous light from the viewfinder, the rubber
eyecup should be attached and kept on the eyepiece
permanently. Use a lens hood at all times to prevent
ghost images and flare. Also, you can protect the
front surface of the lens from dust or fingerprints by
attaching a UV (Ultraviolet) filter. When you are
taking pictures, it is a good idea to take the camera
16
Not For Resale – Free Download at http://www.joe-chan.com/manuals
out of its case, so that it will always be ready to use.
Between shooting sessions, the camera should be put
back into its case to protect it from dust.
B
Holding the Camera
The suggested procedure for holding the camera
horizontally is as follows: Place the camera across
your left palm and grasp the underside of the lens
focusing ring between your thumb and first one or
two fingers. Hold the right end of the camera firmly,
so that your right thumb is behind the tip of the
winding lever and your forefinger is on the shutter
17
Not For Resale – Free Download at http://www.joe-chan.com/manuals
CAMERA HANDLING
button. Press the camera to your forehead while
sighting with either your right or left eye. To hold
the camera vertically, rotate the camera 90° so that
the shutter button is near the top, place the left end
of the camera in your left palm and grasp the
focusing ring of the lens from the underside. Hold
the camera with your right hand in exactly the same
manner as in horizontal shooting. The advantage of
this method is that it permits rapid changing of
positions from horizontal to vertical with a
minimum of fumbling.
C Bracing Yourself and the Camera
To reduce camera shake, brace your elbows against
your body and stand flat on your feet. Spread them
apart with one foot a little bit in front of the other,
and bend your knees slightly. If there is a sturdy
support near by, such as a telephone pole, a tree, a
door jamb, or wall, lean against it. This is particularly necessary, when you are using shutter speeds of
1/30 sec. and below with the standard 50mm lens on
the camera. At shutter speeds of 1/15 sec. and
below, it is almost impossible to produce shots free
of camera movement without the use of a tripod or
some other camera supporting device. When you
18
change to a lens of different focal length, the above
suggestions are not necessarily valid. A good rule of
thumb in determining the slowest shutter speed you
can safely hand-hold the camera with a particular lens
is to make a fraction representing this "safe" shutter
speed by putting a "one" over the focal length of the
lens. For example, when a 135mm telephoto lens is
mounted on the camera, the slowest hand-holdable
shutter speed you can use to achieve sharp photographs is 1/135 sec. (135mm = 1/135 sec.). Set the
shutter speed dial at 1/125 sec., which is closest to
1/135 sec. This rule can be applied to all lenses, from
moderate wide-angle to super-telephoto.
D Releasing the Shutter
Squeeze the shutter button gently, instead of
punching it. Also, try to coordinate your breathing
with the release of the shutter. A good time is the
instant between exhaling and inhaling (or vice versa)
when your diaphragm is at rest. Of course, when
shooting fast action, this coordination is not always
possible or even desirable. It is more important to
concentrate on capturing the action rather than on
the position of your diaphragm.
Not For Resale – Free Download at http://www.joe-chan.com/manuals
V BASIC OPERATION
A Loading the Mercury Batteries
Since the Canon EF's Variable Aperture AE control
and the electronic control of slow shutter speeds
depend on battery power for their operation, two
1.3 volt mercury batteries (Mallory PX 625 or
Eveready EPX 625) must be loaded into the battery
compartments located in the bottom of the camera.
Turn the camera upside down and unscrew both
battery compartment covers with a coin. Load one
battery into each compartment making certain that
the "+" side of the battery is up. Then replace both
covers and screw them back on tightly.
• To insure good electrical contact, clean both
surfaces of each mercury battery with a clean dry
cloth and handle each by its edges only.
• Be careful to load the batteries properly.
Improper loading (with the "–" side up) might cause
damage to the camera's electrical circuits.
• If the camera will not be used for a long period of
time, the batteries should be taken out of the
battery compartments to prevent possible damage to
the terminals from battery corrosion.
• PX-13 type mercury batteries are not recommended because of their low temperature characteristics.
19
Not For Resale – Free Download at http://www.joe-chan.com/manuals
BASIC OPERATION
B
Checking the Batteries
After loading the batteries, you should check their
power level. This is a simple procedure on the EF.
Just hold the red battery check button on the
bottom of the camera in for two or three seconds.
Watch the LED on the top of the camera. If the LED
blinks on and off rapidly, then the power level of the
batteries is sufficient. If the LED blinks only once or
does not blink at all, then the power level is
insufficient. If this is the case, replace both batteries with two new ones of the same type.
• Since the Canon EF relies heavily on battery
power for its operation, check the batteries each
time you plan to use the camera and carry spare
batteries with you at all times in case of battery
failure. Attach the small battery case to the camera
strap and carry extra batteries in it.
• If the batteries do fail, the EF can still be used
manually from 1/2–1/1000 sec. The Variable Aperture AE control will not operate, but you can
manually adjust the aperture ring of the lens. A basic
exposure guide to follow for bright sunlight (with
distinct shadows) is to make a fraction representing
the shutter speed needed at f/16 by putting a "one"
over the film's ASA rating. With a film of ASA 100,
use 1/100 sec. at f/16. Choose the nearest click-stop
20
Not For Resale – Free Download at http://www.joe-chan.com/manuals
setting, in this case, 1/125 sec. For hazy sunlight
(with weak shadows), use f/11. In cloudy bright
conditions (with no shadows), try f/8. On heavily
overcast days or in open shade, f/5.6 is required.
C Turning
the Camera On and Advancing the Film
The ON/OFF switch, located on the back of the
camera just below the winding lever, controls the
operation of the Variable Aperture AE control, the
electronically controlled portion of the ElectroMechanical Shutter (from 1–30 sec.), the winding
lever, and shutter button. To turn the camera on,
push the switch up. This activates the camera's
electric circuit and makes the winding lever spring
out to its stand-off position 15° away from the
camera body. Now the winding lever can be operated
easily with the tip of your thumb. Advancing the
film and recocking the shutter for the next shot are
accomplished in a single, short 120° throw to the
right.
21
Not For Resale – Free Download at http://www.joe-chan.com/manuals
BASIC OPERATION
D Loading the Film
The Canon EF uses color or black and white film in
standard 35mm cartridges. To load a cartridge into
the camera, first open the camera's back cover. Fold
out the rewind crank, grasp it and pull the rewind
knob up sharply. The back cover will pop open. Put
the cartridge into the film cartridge chamber, push
down and rotate the rewind knob until it drops into
its fully-seated position. Pull the film leader across
the camera and push the tip into one slot of the
multi-slot take-up spool. Advance the film once,
making certain the sprocket holes of the film are
engaged in the teeth of the film transport sprocket.
Close the back cover until it snaps shut. Gently turn
the rewind crank clockwise to take up the slack in
the film and then fold the rewind crank back in.
Operate the winding lever two more times while
watching the rewind knob. If it rotates, the film is
loaded properly. If the knob fails to rotate, then open
the back cover and reload the film.
22
Not For Resale – Free Download at http://www.joe-chan.com/manuals
23
Not For Resale – Free Download at http://www.joe-chan.com/manuals
BASIC OPERATION
• The Canon EF has an Automatic Blank Shot
Mechanism which frees the photographer from using
the shutter button during film loading. The winding
lever works independently of the shutter button
until frame number one is reached.
• Avoid direct sunlight when loading or unloading
the film. If no other shade is available, then turn
your back on the sun and use the shadow of your
body to shield the camera while loading.
• Commercially available cartridges come in 12, 20
and 36 exposure rolls. One way to save money on
the cost of film is to bulk load your own cassettes.
Bulk film in 50 or 100-foot rolls, a bulk film loader
and some reloadable cassettes are all you need. A
darkroom is not necessary. For more information,
contact your local camera dealer.
24
Canon FD 17mm f/4 S.S.C., 1/500 sec., AE,
ASA 400
Not For Resale – Free Download at http://www.joe-chan.com/manuals
E
Setting the ASA
The ASA is a numerical rating of a film's sensitivity
to light. A higher ASA number indicates a faster film
which is more sensitive to a given amount of light; a
lower ASA number indicates a slower film which is
less sensitive to the same amount of light. The
relationship between ASA numbers is such that a
film of ASA 100 is twice as fast as one rated at ASA
50. The film manufacturer's recommended ASA
rating can be found in the data sheet packed with
the film or printed directly on the cartridge itself. To
set the ASA, lift up the ASA ring, located
underneath the rewind knob, and rotate it in either
direction until the proper number is aligned with the
white index mark. When the ring is released, it
automatically locks into position. The table below
indicates the ASA and their corresponding DIN
numbers.
shutter speed setting and the brightness of the scene)
which helps the Variable Aperture AE control
determine the proper exposure.
• When changing to a film of a different ASA, do
not forget to reset the ASA ring. Otherwise, your
film will be improperly exposed.
• Setting the correct ASA is essential to the proper
operation of the camera, since the ASA is one of the
three bits of information (the other two are the
25
Not For Resale – Free Download at http://www.joe-chan.com/manuals
BASIC OPERATION
F
Setting the Aperture Ring and the
CAT Switch
The amount of light that is allowed to strike the
film is determined by the lens diaphragm. This
amount of light is represented by "f" numbers or
f/stops engraved on the aperture ring which clicks
into place as it is rotated. The f/stop designations
indicate the opening formed by the diaphragm, and
this opening is called the aperture. On the standard
50mm lens, the engraved f/stops are 1.4, 2, 2.8, 4,
5.6, 8, 11, and 16. At f/1.4, the lens is at its
maximum aperture with the diaphragm wide open.
For this reason, f/1.4 is said to be a large f/stop even
though it is small in numerical value. And conversely, f/16 is the minimum aperture of the lens and
is a small f/stop. The relationship between successive
f/stops is arithmetic: as you close down the diaphragm, each f/stop indicates half as much light as
the proceeding one. When operating the aperture ring
manually, you may use any aperture setting. For
normal AE operation, the aperture ring must be set
at the green mark. Hold in the AE lock pin while
turning the aperture ring from f/16 (or f/22 on some
lenses) to the 'A' mark. At this special setting, the
aperture ring is disengaged, allowing the camera to
adjust the lens diaphragm automatically to any
f/stop setting. Also, to make sure that the camera
selects the proper f/stop, the CAT switch must be set
26
Not For Resale – Free Download at http://www.joe-chan.com/manuals
at the "NORMAL" position.
• If the proceeding discussion seems complex, keep
in mind the following definitions:
An f/stop is a number used to represent the amount
of light which is allowed to pass through the lens.
The diaphragm is the mechanical iris inside the lens
which is opened or closed according to the setting of
the aperture ring.
The aperture is the hole or opening formed by the
diaphragm blades.
• The camera and its FD lenses are designed for
automatic exposure with light measurement done at
the maximum aperture. Manual stopped-down
metering is not recommended with FD lenses. If you
wish to set the aperture manually, take the meter
reading before removing the aperture ring from the
'A' mark.
G Selecting a Shutter Speed
The amount of light striking the film is controlled by
the lens diaphragm, whereas the length of time that
light is allowed to strike the film is controlled by the
focal plane shutter. The shutter consists of two
opaque "curtains" which travel over the opening and
allow the light coming through the lens to reach the
film. The length of time the curtains remain open
determines the exposure time for your picture. On
the shutter speed dial, shutter speeds from 1/1000 –
1 sec., and B, are marked in white (with the
exception of the orange "125" for electronic flash
synchronization), while the speeds from 2 – 30
seconds are marked in yellow. To set the shutter
speed, rotate the dial in either direction until the
27
Not For Resale – Free Download at http://www.joe-chan.com/manuals
BASIC OPERATION
desired number clicks into place next to the white
index mark. An in-between setting should not be
used. When changing shutter speeds, there is no need
to remove your eye from the eyepiece, because the
selected shutter speed is automatically indicated on
the large scale in the viewfinder. With a total of 17
click-stop settings to choose from, the question you
might ask is: "How do I select the right shutter
speed?" First of all, you must select a shutter speed
which keeps the meter needle somewhere within the
white portion of the aperture scale. If you take a
picture when the needle is touching either of the red
warning marks (underexposure at the bottom of the
scale and overexposure at the top), then your
photograph will be improperly exposed. Depending
on the brightness of the scene, the film's ASA, and
your photographic intentions, you can use the
following general guidelines to help you select an
appropriate shutter speed when using the standard
50mm lens: When you are shooting outdoors in the
open or want to freeze action, choose fast shutter
speeds (1/125 – 1/1000 sec.). When photographing
in the shade or indoors without a flash, then select
slower speeds (1/30 or 1/60 sec.). To take pictures at
night (without a flash), use slow shutter speeds (30 –
1/15 sec.), with the camera mounted on a tripod.
28
• At the "B" setting, the shutter will remain open as
long as the shutter button is depressed. A cable
release is a handy device for holding the shutter
button in for long periods of time. Also, it allows the
shutter to be opened without the photographer
touching the camera or button directly, and therefore keeps camera shake to a minimum, thus insuring
a clear picture. At "B," the aperture ring must be set
manually.
• Intentional blur oftentimes can give your photographs a convincing feeling of action. Two types of
intentional blur are (1) subject blur and (2) background blur created by panning. Subject blur (1) is
created by keeping the camera still while the subject
moves across the field of view. The subject becomes
blurred while the background remains sharp. Background blur (2) can be created by panning, or
following the subject with the camera, keeping the
subject basically at the same position in the viewfinder. The subject remains relatively sharp while the
background blurs into a streaky effect. Experiment
by using slow shutter speeds of 1 – 1/60 sec. A
neutral density filter (ND4 or ND8) over the lens
will permit using slow shutter speeds even with fast
films.
Not For Resale – Free Download at http://www.joe-chan.com/manuals
Canon FD 100mm f/2.8 S.S.C., 1/16 sec, AE, ASA 400, ND-8 filter.
Not For Resale – Free Download at http://www.joe-chan.com/manuals
BASIC OPERATION
H Viewing and Focusing
The Canon EF is a single-lens-reflex (SLR) camera.
This means that you view the subject through the
same lens as is used to take the photograph.
Continuous viewing (except at the moment of
exposure) is made possible by the use of an
instant-return mirror located inside the body just
below the pentaprism. Since the picture you see in
the viewfinder is the same as the one recorded on the
film, parallax is completely eliminated. The viewfinder remains bright during AE operation, because
through-the-lens metering (TTL) is performed with
the lens at maximum aperture. Focusing is made
easier by a split-image/microprism rangefinder. You
rotate the focusing ring while looking through the
viewfinder until the point where the divided image
of the subject on the split-image focusing screen can
be seen correctly matched in the center of the
viewfinder. The subject snaps into sharp alignment at
proper focus. For a subject not having straight-line
forms or with indistinct outlines, you have the
choice of using the microprism ring around the
split-image focusing screen. The microprism shatters
out-of-focus images very well and snaps into sharpness at the precise point of focus. When using certain
lenses (such as macro or super-telephoto), the
30
ground glass with the fine-lined Fresnel screen
outside the microprism area will aid you in focusing.
Not For Resale – Free Download at http://www.joe-chan.com/manuals
• In fast-breaking situations, or in candid shooting,
you can prefocus the lens by using the distance scale
engraved on top of the lens barrel. Estimate the
distance between you and the subject. Then turn the
focusing ring until this distance (in feet or meters) is
aligned with the focusing index mark. This method is
especially useful when there is not enough time for
through-the-lens focusing, or when you do not want
to draw attention to yourself by lifting the camera
to eye level.
mark engraved on the
• Film Plane Indicator – the
camera just to the left of the pentaprism indicates
the exact position of the film plane. This is an aid
when actually measuring the film-to-subject distance
in macrophotography.
• Black and White Infrared Photography: Because
infrared light rays focus on a plane slightly behind
that of ordinary light rays, it is necessary to modify
slightly the normal method of focusing the lens.
First, focus on the main subject as usual. Next, take
note of the focused distance (in feet or meters)
which appears opposite the focusing index mark.
Then, turn the focusing ring slightly, so that the
focused distance is aligned with the tiny red dot
engraved on the lens barrel just to the right of the
focusing index mark. Use a red filter (R1) over the
lens and set the aperture ring manually hollowing the
film manufacture's suggestion for exposure settings.
• Color Infrared Photography: In color infrared
film, two of the film's layers are sensitive only to
visible light, while the third layer is sensitive only to
infrared. Therefore, it is not necessary to readjust
the focused distance. However, f/stops of f/5.6 – 16
are recommended to produce sharp pictures. Use
either a dark yellow (Y3) or orange (O1) filter and
set the aperture ring manually following the film
data sheet.
focused distance
infrared mark
31
Not For Resale – Free Download at http://www.joe-chan.com/manuals
BASIC OPERATION
I
Locking-ln an Exposure Reading
In the majority of cases. Canon EF's Central
Emphasis. Metering system will give correct exposure
readings in AE photography. However, occasionally
you will encounter picture-taking situations which
require a departure from normal AE operation. For
example:
(1) Your subject is strongly backlighted or contrasts sharply with the background and will not
appear in the center of the picture.
(2) The entire scene is either extremely light, such
as a light colored subject in snow; or it is very dark,
such as a dark colored subject in deep shade or
against a dark background.
In the above cases, it is necessary to modify the
automatic exposure reading which the camera normally sets by itself. The Canon EF provides a
convenient way to do this by incorporating an AE
memory lock button on the left side of the camera
between the pentaprism and the ASA ring. By
holding in this button, you can lock the meter
needle of the camera at a particular f/stop while you
change the position of the camera (and hence the
view in the viewfinder). To produce a good exposure
in the first situation (1) described above, focus on
your main subject and center it in the viewfinder. If
32
Not For Resale – Free Download at http://www.joe-chan.com/manuals
the subject appears small, move in closer until it
occupies about one-third of the total viewfinder
area. Push the AE memory lock button and hold it
in. Then you may step back and/or change the
position of the subject in the viewfinder to suit your
compositional taste, while the correct exposure
reading is locked into the camera's Variable Aperture
AE control. Releasing the shutter will produce a
properly exposed photograph.
In the second situation (2) above, the scene cannot
be metered directly. Most scenes are composed of
both light and dark areas which usually average out
to a medium gray. Because all TTL exposure meters
are calibrated to give proper exposure when reading
a neutral gray card (of 18% reflectance), they give
correct exposure for most scenes. In extreme cases in
which the scene is predominantly light or predominantly dark, the Variable Aperture AE control must
be fooled into providing the correct exposure. One
readily available alternate subject is the palm of your
own hand held out a foot or so in front of the lens
and placed in the same light as your original subject.
Focus on your subject normally. Then fill the
viewfinder with the out of focus image of your right
palm making absolutely sure that it is in exactly the
33
Not For Resale – Free Download at http://www.joe-chan.com/manuals
BASIC OPERATION
same light as your main subject. Push in and hold the
AE memory lock button with your left thumb.
Return your right hand to the camera body and
release the shutter. The exposure you locked in will
be close to the proper exposure needed for a very
light or very dark subject.
• In practical terms, the exposure latitude of both
black and white and color negative film (from which
prints are made) is inherently large enough to
overcome almost all AE maladjustments which occur
in day-to-day shooting. Therefore, it is not mandatory to use the AE memory lock button at all.
However, color transparency film has extremely
small exposure latitude and requires near perfect
exposure to produce good results. When taking color
slides, the use of the AE memory lock button in the
special situations previously described is strongly
recommended,
• A standard 18% reflectance gray card is a much
more accurate surface to meter than the palm of
your hand. It may be purchased very inexpensively
from your local camera dealer and carried with you
for situations requiring nothing less than perfect
exposure.
34
Not For Resale – Free Download at http://www.joe-chan.com/manuals
J
Releasing the Shutter
The Canon EF's shutter button is conveniently
located on the right side of the camera and is coaxial
with the winding lever and shutter speed dial. The
shutter button stroke is very light and short for a
Variable Aperture AE camera. As a built-in safety
feature, the shutter button is locked automatically
when the camera is turned off.
35
Not For Resale – Free Download at http://www.joe-chan.com/manuals
BASIC OPERATION
K Making Multiple Exposures
Exposing the same frame of film with two or more
images is an exciting technique used by many
photographers to create dream-like scenes, abstract
designs, motion studies, or humorous pictures. Your
imagination is the only limiting factor in this creative
process, because Canon has made multiple exposure
photography so easy to perform with the EF camera.
A multiple exposure button is located in the center
of, the ON/OFF switch. After making your first
exposure, hold in this button with your left thumb
while operating the winding lever in the normal way.
The movement of the film transport sprocket is
stopped, while the winding lever re-cocks the shutter.
Now you are ready for your next shot which will be
in perfect registration directly on top of the first
shot. This process may be repeated any number of
times, and the frame counter is stopped until the
film is actually advanced to the next frame.
• The multiple exposure button need not be depressed during the entire winding operation, but
only needs to be held in at the beginning of the
stroke.
• In multiple exposure photography, exposures on
the same frame of film are additive. In the AE mode
of operation, the Canon EF automatically deter36
mines the proper exposure needed for a single frame.
When making multiple exposures, less exposure must
be given to each shot. One simple way to do this is
to reset the ASA ring to a higher setting, which will
fool the camera into decreasing the exposure reading. Multiply the normal ASA of the film by 2 for a
double exposure, by 3 for a triple exposure, by 4 for
a quadruple exposure, and so forth. However, when
making multiple exposures of night lights or a
subject against a black background, do not reset the
ASA ring, because the black areas in the scene will
become overexposed.
Not For Resale – Free Download at http://www.joe-chan.com/manuals
• In shooting fireworks, the recommended way to
record multiple bursts on the same frame is not by
using the multiple exposure button, but by mounting the camera on a tripod, setting the shutter speed
dial at "B" and holding the shutter open with a cable
release. Set the aperture ring manually to the
appropriate f/stop, using the following table:
ASA
25
50
100
200
400
f/stop
5.6
8
11
16
22
• Interesting motion studies can be made by
mounting the camera on a tripod, using color film,
and making a triple exposure through a red, a green
and blue filter respectively. Select a scene having
both stationary and moving parts, such as a seascape
with rocks and surf, a crowded street with many
moving cars and people, or a tree whose leaves are
rustling in the breeze. Set the camera on a sturdy
tripod, focus and compose in the normal way.
Multiply the film's normal ASA by 3 and set this
higher rating on the camera's ASA ring. Put a red
filter (R1) over the lens and make the first exposure
in the AE mode of operation. Press the multiple
exposure button, and operate the winding lever.
Replace the red filter with a green filter (G1),
making certain not to move the camera at all. Make
the second exposure, and again operate the multiple
exposure button and winding lever. Replace the
green filter with a blue one (CCB12) and make the
third exposure. This sounds like an unduly complex
method of taking photographs, but the results are
well worth the extra effort. The stationary objects in
the scene remain motionless and are rendered in
their natural colors, whereas the moving objects
become a "rainbow" of separate red, green and blue
images. In the above method you might have to
experiment with manual exposures through the three
filters to get perfectly exposed slides. Use the filter
factor for each filter in your exposure calculations.
Consult your local camera dealer for additional
advice.
Notice:
If exact registration is required, multiple exposures
should not be made on the first few frames of a roll.
Film characteristics can cause slight mis-registration
(about 0.05mm).
37
Not For Resale – Free Download at http://www.joe-chan.com/manuals
Not For Resale – Free Download at http://www.joe-chan.com/manuals
L
Taking Pictures by Flash
Even though the Canon EF can take pictures by
candlelight, there are certain situations which require
using an external light source. In dim light, when
you want to stop fast action or take crystal clear
snapshots full of vivid colors and fine details, you
need flash. If you want to avoid harsh shadows when
shooting in bright sunlight, flash can be used as fill-in
light. At night, a nearby subject can be illuminated
with flash. Since the Canon EF uses a vertically
moving metal focal plane shutter, synchronization
with electronic flash is possible at all speeds up to
and including 1/125 sec. With a flash hot shoe built
into the top of the pentaprism, the EF can easily
accept any direct mounting electronic flash unit,
including the specially-designed Canon Speedlite
133D. This flash unit (with the Flash-Auto Ring A2
or 62 attached to the front bayonet of the lens)
employs the Canon Auto Tuning (CAT) System to
determine the proper exposure in flash photography.
The focused distance of the lens and the charging
level of the 133D are sent as electrical signals to the
camera's Variable Aperture AE control, which then
adjusts the diaphragm automatically to produce
Synchronization
Contact
CAT System Contacts
Left: Canon FD 35mm f/2 S.S.C., B at f/16, ASA 400.
Right: Canon FD 100—200mm f/5.6 S.C., Double Exposure, each shot at 1/30 sec., AE ASA 400.
39
Not For Resale – Free Download at http://www.joe-chan.com/manuals
BASIC OPERATION
CAT SYSTEM
well-exposed shots. Therefore, the CAT System of
electronic flash photography is as easy as normal AE
photography. For electronic flash units requiring the
use of an external PC cord, a sync terminal with a
spring-loaded plastic cover is provided on the left
end of the camera. When using flash bulbs, a
reflector-type holder, such as the folding Canon
Flash V3, can be mounted into the flash hot shoe.
M, MF, and FP flash bulbs synchronize at 1/15 sec.
and below.
40
Not For Resale – Free Download at http://www.joe-chan.com/manuals
• When using the CAT System with the EF camera,
the shutter speed dial must be set at" 125," the CAT
switch set to the " " position, and the aperture ring
set at the 'A' mark. With all other types of
flash, the switch may be left at its "NORMAL"
position, but the aperture ring has to be set
manually.
• At present, the CAT System may be used with
four Canon lenses: two standard 50mm lenses, the
f/1.4 and f/1.8 and two 35mm wide-angle lenses, the
f/2 and f/3.5.
• Normal AE photography may be performed at
any time when using the CAT System by returning
the CAT switch to the "NORMAL" position.
• Two electronic flash units, one direct-mounting
type inserted in the flash hot shoe and another using
a PC cord plugged into the sync terminal, cannot be
used simultaneously on the EF. When a PC cord is
plugged into the sync terminal, the flash hot shoe is
automatically disconnected.
• After using the CAT System for flash photography,
turn the camera off and return the CAT switch to
the "NORMAL" position. If you leave the switch
set to the
position and turn the camera back on,
the automatic exposure setting for your next flash
shots will be incorrect.
41
Not For Resale – Free Download at http://www.joe-chan.com/manuals
Not For Resale – Free Download at http://www.joe-chan.com/manuals
M Changing Lenses
One of the nice features of an SLR is its lens
interchangeability. An SLR is not really a SINGLE
LENS reflex at all, because it can use many lenses of
various focal lengths. In the design of an SLR, the
type of lens mount and its construction are very
important factors. The EF camera uses the Canon
Breech-Lock Mount first developed in 1959. This
unique mount combines the virtues of sturdiness,
rugged dependability and fast operation. The mount
holds the lens securely in place with absolutely no
wobble or play and insures that the lens is always
exactly the same distance from the film plane.
Changing lenses is a rapid procedure requiring a little
more than one-eight of a turn of the breech-lock ring
on the back of the lens. To remove the lens from the
camera, turn the breech-lock ring counter-clockwise
until it stops and pull the lens away from the camera
body. Mounting another lens on the camera body is
a simply procedure. Just align the red dot on the
breech-lock ring of the lens with the red dot located
under the name "Canon" engraved on the front of
the camera's pentaprism. Push the back of the lens
into the camera body and turn the breech-lock ring
clockwise until it is tight.
43
Not For Resale – Free Download at http://www.joe-chan.com/manuals
BASIC OPERATION
• When the camera body and lens are stored
separately, a rear lens cap attached to the back of
the lens and a body cap on the camera are
recommended.
• Avoid direct sunlight when changing lenses.
• On Canon FD lenses without an AE lock pin and
on all FL and R lenses, make sure the breech-lock
ring is turned to its full counter-clockwise position
(the red dot on the ring is opposite the focusing
index mark) before mounting the lens.
44
Canon FD 24mm f/2.8 S.S.C., 1/1000 sec., AE,
ASA 400.
Not For Resale – Free Download at http://www.joe-chan.com/manuals
N Using the Self-Timer
The self-timer on the EF provides a delay of
approximately 10 sec. from the time the shutter
button is pressed until the picture is actually taken.
The self-timer can be used in place of a cable release
to gently and smoothly release the shutter when
slow speeds are used. Also, it allows the photographer to include himself in his own pictures. Depress the self-timer lock button, located on the
front right side of the camera, while turning the
multi-purpose lever counter-clockwise to unlock it.
Cock the lever by continuing to turn it counterclockwise until it stops. Activate the self-timer by
pressing the shutter button.
• The camera is usually placed on a tripod or other
sturdy support when using the self-timer.
• When taking a self-portrait, the exposure is automatically determined at the instant the shutter
button is pressed and not when the picture is
actually taken. Therefore, do not stand directly in
front of the lens, as the Variable Aperture AE
control might be fooled into producing an improper
exposure. To prevent stray light from entering the
viewfinder from the rear and possibly affecting the
meter reading, it is a good idea to cover the eyepiece
with your hand just before pressing the shutter
button. Or you can take off the rubber eyecup and
close off the viewfinder completely by slipping the
plastic eyepiece/hot shoe cover over the eyepiece.
• After using the self-timer, the multi-purpose lever
should be reset to its vertical, locked position.
45
Not For Resale – Free Download at http://www.joe-chan.com/manuals
BASIC OPERATION
O Previewing Depth-of-Field
If you focus on a particular subject and take a
picture, some objects in front of and behind the main
subject will be "in focus" in the final photograph.
The distance between the nearest and farthest
objects, which appear sharp, is called "depth-offield." Three factors influence depth-of-field: the
f/stop at which the picture is taken, the focal length
of the lens, and the focused distance between the
camera and subject. Depth-of-field decreases as the
lens is opened-up. At f/1.4, the maximum aperture
of the standard 50mm lens, depth-of-field is very
shallow permitting quick and easy focusing on the
main subject. At the same f/stop and focused
distance, lenses with short focal length (wide-angle
lenses) have inherently greater depth-of-field than
long lenses in the telephoto range. Also, at very close
distances between the camera and subject, any lens
has shallow depth-of-field. To preview depth-of-field
in the viewfinder of the EF, follow this procedure:
First operate the winding lever to cock the shutter.
After you have focused and composed your picture
in the normal way, check the aperture scale in the
viewfinder and note the f/stop selected by the
camera. Unlock the aperture ring and manually set it
at this f/stop. Push the multi-purpose lever in toward
46
Not For Resale – Free Download at http://www.joe-chan.com/manuals
47
Not For Resale – Free Download at http://www.joe-chan.com/manuals
BASIC OPERATION
the lens until it stops. The viewfinder screen will
darken offering you a visual preview of the
depth-of-field. Another way of determining the
depth-of-field is to check the depth-of-field scale
engraved on the lens barrel. The f-numbers appear
at both sides of the focusing index mark indicating
the near and far limits of depth for any given
focused distance and lens opening. For example,
with the standard 50mm lens focused at 15ft. (5m),
depth-of-field at f/16 extends from 8ft. (2.5m) to
infinity (V). This method is particularly useful at
small f/stops, when a visual preview of the
depth-of-field becomes difficult, because the viewfinder screen gets too dark.
• Selective focus is a creative technique used by
many photographers to throw a distracting or
unimportant background (or foreground) out of
focus. Try using a slow film (ASA 100 or below) and
a normal or telephoto lens. Focus on a subject close
to the camera. Then choose a fast shutter speed
which will permit the camera's AE control to select a
large f/stop, such as f/1.4 – 4.
48
• For those shots which demand almost unlimited
depth-of-field, where every object in the photograph
appears sharp, use your standard 50mm lens (or
better yet, a wide-angle) and focus about half-way inbetween the nearest and farthest object. Adjust the
shutter speed dial until the meter needle in the
viewfinder points to f/16. If necessary, mount the
camera on a tripod when slow shutter speeds
are required.
Not For Resale – Free Download at http://www.joe-chan.com/manuals
P
Taking a
Reading
Stopped-Down
Meter
When you use Canon FL lenses or interpose bellows
units, extension tubes etc. between the lens (either
FL or FD lens) and the camera, it is necessary to
take a stopped-down meter reading. First, operate
the winding lever to cock the shutter. Unlock the
aperture ring from the 'A' mark and push the
multi-purpose lever in toward the lens until it stops.
The method then is not to check that the needle on
the right of the viewfinder screen is in the white part
of the scale, but to bring the needle, by operation of
the aperture and/or shutter speed control to the
center of the index mark in the viewfinder. Release
the multi-purpose lever and press the shutter button
to take a perfectly exposed photograph.
• During stopped-down metering at small apertures,
it is very difficult to focus properly, because
depth-of-field is very deep, and the viewfinder screen
is dark. Therefore, focus first before taking a
stopped-down reading.
• Stopped-down metering should not be used with
FD lenses (except in the case of interposing accessories such as bellows units between the lens and the
camera) since the Canon EF and its FD lenses are
designed for automatic exposure with light measurement done at the maximum aperture.
Stopped-down
metering index mark
The above photo shows the lever locked to stoppeddown position for your convenience.
49
Not For Resale – Free Download at http://www.joe-chan.com/manuals
BASIC OPERATION
• On manual lenses and accessories, it is not
necessary to push the multi-purpose lever in toward
the lens. Simply adjust the f/stop or shutter speed
until the meter needle is aligned with the stoppeddown metering index mark. When using manual
accessories between the camera body and an FD
lens, lock the automatic/manual aperture lever in the
manual position before installing the lens. On all FD
lens except one, this is accomplished simply by
pushing the largest lever on the back of the lens
counter-clockwise until it stops and locks into place.
On the FD 50mm f/1.8 S.C. lens, the lever must be
held in place by moving the manual lock lever to the
"L" position.
• You cannot make a meter reading with the 7.5mm
fish-eye lens mounted on the EF, because the
aperture scale is not visible. Use a hand-held meter
instead.
50
FD 50mm f/1.4 S.S.C. FD
Automatic/Manual
Aperture Lever
50mm f/1.8 S.C.
Automatic/Manual
Aperture Lever
Manual Lock Lever
Not For Resale – Free Download at http://www.joe-chan.com/manuals
Q Locking the Mirror Upward
Whenever it is imperative to completely eliminate
all camera movement, you can lock the mirror in the
"up" position before taking a picture. This is
particularly necessary when the EF is mounted on a
microscope or a bellows unit, where the slightest
vibration of the camera is magnified many times in
the final photograph. After you have focused, lock
the multi-purpose lever in its stopped-down position
and take a meter reading. Then, turn the L-M lock
lever to the orange "M" position, which will flip the
mirror up and lock it there. Take the shot by using a
cable release to trip the shutter.
51
Not For Resale – Free Download at http://www.joe-chan.com/manuals
BASIC OPERATION
R Rewinding the Film
The winding lever will stop suddenly before the end
of its stroke when you have reached the end of the
roll of film. Don't try to complete the stroke, as the
film sprocket holes may be torn. To rewind the film,
push in the rewind button located on the bottom of
the camera. Next, fold out the crank from the rewind
knob and turn it in the direction of the small arrow
until you feel the tension in the film lessen. This
indicates that the film has left the multi-slot take-up
spool. Turn the rewind crank one or two more revolutions to completely rewind the tip of the film
leader back into the cartridge. Then, pull up the
rewind knob to open the camera back and lift out
the cartridge.
• Avoid direct sunlight when unloading the film.
• Keep your exposed cartridges in a cool, dry and
shady place and have them processed as soon as
possible.
• Do not leave the same roll of film in your camera
for months on end, since black and white film may
become fogged, and color film may experience a
definite color-shift.
52
Not For Resale – Free Download at http://www.joe-chan.com/manuals
S
Turning the Camera Off
After you finish using the Canon EF, you should
turn off the battery current flowing to the camera's
electrical circuits. Move the ON/OFF switch to the
"OFF" position, and push the winding lever from its
stand-off position back in toward the body to its
locked position.
Reminder: To prevent unnecessary current drain
from the batteries, be sure to turn the camera off
after you are finished taking pictures.
53
Not For Resale – Free Download at http://www.joe-chan.com/manuals
VII INTERCHANGEABLE LENSES
Not For Resale – Free Download at http://www.joe-chan.com/manuals
Canon offers the widest selection of interchangeable
lenses for any Variable Aperture AE camera being
manufactured today. The FD series of lenses permit
full AE operation and range from an incredible
15mm full frame fish-eye which "sees" a full 180 to
a 300mm telephoto having only an 8 angle of view.
Included in this series is a 50mm macro lens focusing
down to 8.4" with a life-size adapter, a 17mm
super-wide-angle taking in 104 of view without
rectilinear distortion, a 55mm f/1.2 ASPHERICAL
lens employing an aspherical element to completely
eliminate flare, and three zoom lenses, one equipped
with macro focusing (the 35-70mm lens). The FL
and manual series, although not designed for AE
photography, can be used on the Canon EF in the
stopped-down metering mode. Lenses from a 7.5mm
circular fish-eye lens all the way up to a 1200mm
super-telephoto are available from Canon. Three
special FL telephoto lenses each use one or more
artificial flourite elements to help combat chromatic
aberration, a universal problem present in telephoto
lens designs. (Even a fantastic 5200mm f/14 mirror
lens is available from the factory by special order.)
All Canon lenses are world-famous for their incredible resolving power, high image contrast,
superior color balance, and lack of aberrations. Most
lenses are now multi-layer coated with Canon's
exclusive process, called "Super Spectra Coating."
S.S.C, indicates multi-layer coating, whereas S.C.
(Spectra Coating) indicates single-layer coating. Each
Canon FD lens has an easy to hold diamond-studded
rubber focusing grip and is supplied with a leather
carrying case. In addition, most lenses have either a
built-in or special bayonet-mounting lens hood. The
latter can be easily stored on the lens in the reversed
position. To produce pictures of the highest quality,
always use Canon interchangeable lenses with your
Canon EF.
55
Not For Resale – Free Download at http://www.joe-chan.com/manuals
INTERCHANGEABLE LENSES
FD SERIES (FOR AE OPERATION)
Closest Focusing
Distance
Filter Size
(m)
(mm)
(ft.)
Four Built.3
1
in
Angle of
View
Minimum
Aperture
Fish-Eye FD 15mm f/2.8 S.S.C.
180°
f/16
FD 17mm f/4 S.S.C.
104°
f/22
.25
.9
FD 20mm f/2.8 S.S.C.
Super WideAngle
FD 24mm f/1. 4 S.S.C.
ASPHERICAL
94°
f/22
.25
84°
f/16
FD 24mm f/2.8 S.S.C.
84°
FD 28mm f/2.8 S.C.
Type
Full-Frame
Fish-Eye
Lens
Hood
Length
(mm)
(ins.)
(g)
Weight
(Ibs.)
(ozs.)
Built-in
60.5
2-3/8
485
1
1-1/8
72
None
56
2-3/16
450
1
0
.9
72
None
58
2-1/4
345
.3
1
72
–
68
2-11/16
500
f/16
.3
1
55
+BW-55B
52.5
2-1/16
330
11-1/2
75°
f/22
.3
1
55
BPW-55B
49
1-15/16
280
10
FD 28mm f/3.5 S.C.
75°
f/16
.4
1.5
55
+BW-55B
43
1-11/16
250
9
*FD 35mm f/2 S.S.C,
64°
f/16
.3
1
55
+BW-55A
60
2-3/8
370
13
*FD 35mm f/3.5 S.C.
63°
f/22
.4
1.5
55
+BW-55A
49
1-15/16
236
8-1/3
*FD 50mm f/ I.4 S.S.C.
46°
f/16
.45
1.5
55
+BS-55
49
1-15/16
305
11
*FD 50mm f/1.8 S.C.
46°
f/16
.6
2
55
+BS-55
44.5
1-3/4
255
9
FD 55mm f/1.2 S.S.C.
43°
f/16
.6
2
58
+BS-58
52.5
2-1/16
510
1
2
43°
f/16
.6
2
58
+BS-58
56
2-3/16
575
1
4
46°
f/22
20.5
(cm)
8.4 (ins.)
55
None
Necessary
59.5
2-5/16
310
11
FD 85mm f/1.8 S.S.C.
29°
f/16
.9
3
55
+BT-55
57
2-1/4
430
15
FD 100mm 1/2.8 S.S.C.
24°
f/22
1
3.5
55
+BT-55
57
2-1/4
360
12-1/2
FD 135mm f/2.5 S.C.
18°
f/22
1.5
5
58
Built-in
91
3-9/16
630
1
6
FD 135mm f/3.5 S.C.
18°
f/22
1.5
5
55
+BT-55
83
3-1/4
465
1
0
FD 200mm f/2.8 S.S.C.
12°
f/22
1.8
6
72
Built-in
140.5
5-1/2
700
1
8
FD 200mm f/4 S.S.C.
12°
f/22
2.5
8
56
Built-in
133
5-1/4
675
1
7
FD 300mm f/5.6 S.C.
8°
f/22
4.
13
58
Built-in
173
6-13/16
1125
2
7-1/2
12
1
10
Wide-Angle
Standard
Macro
Short
Telephoto
Telephoto
56
FD 55mm f/1.2 S.S.C.
ASPHERICAL
FD 50mm f/3.5 S S.C. Macro with
Life Size Adapter
Not For Resale – Free Download at http://www.joe-chan.com/manuals
Zoom
FD 35–70mm f/2.8-3.5 S.S.C.
64°–35°
f/22
+++ 1
3.5
FD 85–300mm f/4.5 S.S.C.
29°–8°
f/22
2.5
8
FD 100–200mm f/5.6 S.C.
24°-12°
f/22
2.5
8
58
Exclusive
Series IX Built-in
55
Built-in
120
4-3/4
575
1
4
243.5
9-9/16
1695
3
7-1/2
173
6-13/16
765
1
11
FL AND MANUAL SERIES (FOR STOPPED-DOWN METERING)
Type
Minimum
Aperture
180°
f/22
64°/79°
f/22
.3
24°
f/22
Focusing By
Bellows
**FL 400mm f/5.6
6.2°
f/32
4.5
**FL 600mm f/5.6
4.1°
f/32
**FL 800mm f/8
3.1°
**FL 1200mm f/11 S.S.C.
*
**
X
+
++
+++
Weight
(ins.)
(g)
None
62
2-7/16
380
58
Exclusive
74.5
2-15/16
545
48
None
43
1-11/16
220
15
++48
Exclusive
338
10
35
++48
Built-in
448
f/32
18
60
++48
Built-in
508
2.1°
f/64
40
130
++48
Built-in
853
? FL 300mm f/2.8 S.S.C.
FLUORITE with Extender 2X
8°
f/32
3.5
12
Exclusive
Insertion Type
Built-in
231
FL 300mm f/5.6 FLUORITE
8°
f/22
4
13
58
Built-in
FL 500mm f/5.6 FLUORITE
5°
f/22
10
33
95
Built-in
TS 35mm f/2.8 S.S.C.
Tilt and Shift
Bellows
FLM 100mm f/4
Macro
Artificial
Fluorite
Telephoto
Length
Hood
(mm)
Circular FishFish-Eye 7.5rnm f/5.6 S.S.C.
Eye
Super
Telephoto
Closest Focusing
Filter Size
Distance
(mm)
(m)
(ft.)
Six
Fixed Focus
Built–in
Angle of
View
Lens
1
1'
1–15/16
1'
5–5/8
1'
8
2'
9–9/16
(lbs.)
(ozs.)
13-1/2
1
3
7-1/2
3,890
8
9
5,000
11
0
5,360
11
13
6,200
13
11
9-1/16
2,340
5
2
168
6-11/16
860
1
14
300
11-13/16
2,700
5
15
Equipped with a coupling pin for Canon Automatic Tuning System.
Front component interchangeable type. Focusing adapter (2 elements, 1 group, FL automatic diaphragm, with A-M ring).
Available by special order.
FD lens hoods are of bayonet mount.
Filter is of insertion type with holder.
Macro focusing capability to -3m (1ft.) from the film plane.
Subject to change without notice.
57
Not For Resale – Free Download at http://www.joe-chan.com/manuals
VIII ACCESSORIES
Practically anything you can conceive, your Canon
EF can photograph. With a comprehensive line of
accessories to choose from, you can take pictures of
crystal structures by attaching the camera directly to
a microscope via the Photomicro Unit F. Use the
Magnifier S (plus Adapter S) over the eyepiece to
enlarge the center microprism for critical focusing.
You can duplicate your favorite color slides by using
the Bellows FL, the FD 50mm f/3.5 S.S.C. Macro
lens, and the Slide Duplicator. Or you can easily
copy pages from books or magazines with the
camera securely mounted on either of Canon's two
copy stands — the larger Copy Stand 4, or the less
expensive Handy Stand F. The Angle Finder A2 or B
58
can be attached to the camera's eyepiece for
convenient viewing when the camera is not at eye
level. Close-up focusing may be accomplished in a
number of ways, either by using a macro lens, by
using Canon Close-up Lenses, by using the Extension
Tubes FL 15 or FL 25, by using the Bellows FL or
Bellows M, or by using the standard 50mm lens in
the reverse position with the aid of the Macrophoto
Coupler FL55. If you wear eyeglasses, there are four
strengths of Dioptric Adjustment Lenses for eyesight
correction. Canon also makes its own electronic flash
units, cable releases, scores of filters and two gadget
bags.
Not For Resale – Free Download at http://www.joe-chan.com/manuals
1.
2.
3.
4.
5.
6.
7.
Eyecup
Dioptric Adjustment Lens
Angle Finders A2 and B
Magnifier S
Magnifier Adapter S
Canon Speedlite 133D and Flash-Auto Ring
A2 or B2
Bellows FL
8.
9.
10.
11.
12.
13.
14.
Bellows M
Macrophoto Coupler FL 55 and FL 58
Slide Duplicator
Extension Tube M Set
Microphoto Hood
Photomicro Unit F
Canon Release 30 and 50
59
Not For Resale – Free Download at http://www.joe-chan.com/manuals
ACCESSORIES
15.
16.
17.
18.
19.
20.
21.
22.
60
58mm Close-up Lenses
55mm Close-up Lenses
55mm/58mm Filter
Lens Hood
Handy Stand F
Copy Stand 4
Camera Holder F2
Gadget Bag 4 and G-1
Not For Resale – Free Download at http://www.joe-chan.com/manuals
Not For Resale – Free Download at http://www.joe-chan.com/manuals
IX SPECIFICATIONS
Type: 35mm single-lens-reflex AE (Automatic
Exposure) camera with focal plane shutter.
Format: 24 x 36mm.
Standard Lens: Canon FD 50mm f/1.4 S.S.C.,
Canon FD 55mm f/1.2 S.S.C., or
Canon FD 50mm f/1.8 S.C.
Interchangeable Lenses: FD series for AE photography; FL series for stopped-down metering.
Viewfinder: Fixed eye-level pentaprism.
Viewfinder Information: Aperture scale with meter
needle, over and underexposure warning marks,
stopped-down metering index mark, shutter
speed scale and indicator.
Focusing Screen: Split-image/microprism surrounded
by ground glass with Fresnel screen.
Field of View: 92% vertical and 93% horizontal
coverage of actual picture area.
Magnification: 0.82X at infinity with the standard
50mm lens.
Eyepiece Accessories: Angle finders, magnifier, 4
strengths of eyesight correction lenses, and an
eye-cup can be attached.
Mirror: Instant-return type.
Electro-Mechanical Shutter: Vertically moving
metal focal plane shutter. 1/2 sec. -1/1000 sec.
and B in 11 steps (mechanically controlled); 30
–1 sec. in 6 steps (electronically controlled).
62
Shutter Speed Dial:
B, 1–1/1000 sec............................ white marking
1/125 sec. (X sync) ................... orange marking
30–2 sec. .................................... yellow-marking
Slow Shutter Speed Indicator: Light Emitting
Diode (LED) flashes when shutter speeds from
1–30 sec. are used.
Self-Timer: The built-in self-timer is activated by
the shutter button with a time lag of approximately 10 sec. A self-timer lock button prevents unintentional operation.
Exposure Adjustment: Variable Aperture AE with
FD series lenses. The aperture is adjusted automatically after shutter speed and ASA are set.
Central Emphasis Metering gives an average reading of the screen brightness with more emphasis
on the center portion utilizing a wide range
Silicon Photocell. Stopped-down metering is
possible with FL lenses.
Exposure Meter Coupling Range: EV –2 to EV 18
at ASA 100 with FD 50mm f/1.4 lens: 8 sec. at f/1.4
to 1/1,000 sec. at f/16. At ASA 25 : 30 sec. at
f/1.4 to 1/1000 sec. at f/8.
Film Speed Range: ASA 1 2 - ASA 3200.
Power Source: Two 1.3 volt mercury batteries
(Mallory PX625, Eveready EPX625).
Battery Check: LED flashes when battery check
Canon FD 20mm f/2.8 S.S.C., 1/125 sec., AE, ASA 400
Not For Resale – Free Download at http://www.joe-chan.com/manuals
button is depressed if power is sufficient.
AE Memory Lock: The f/stop set by the Variable
Aperture AE control may be locked-in by
pressing a button.
Flash Synchronization: X synchronization at 1/125
sec. and below; M, MF, and FP bulb synchronization at 1/15 sec. and below.
Flash: Built-in hot shoe has direct contacts (for
Canon Auto Tuning System). The sync terminal
with a built-in cover is on the left end of the
camera body.
Canon Auto Tuning (CAT) System: Possible by
combination of the Flash Auto-Ring A2 or B2
and the Speedlite 133D. According to the ASA
and focused distance, the aperture is adjusted
automatically with the selected f/stop indicated
in the viewfinder.
Multiple Exposures: Possible by depressing the
multiple exposure button while operating the
winding lever. Operation may be repeated any
number of times. The frame counter is stopped
during multiple exposures.
Lens Mount: Canon Breech Lock: FD, FL and R
lenses can be used.
Depth-of-Field Preview: Possible by pressing the
multi-purpose lever, after manually setting the
aperture ring and cocking the shutter.
Automatic Blank Shot Mechanism: Film may be
advanced to frame No. 1 simply by using the
winding lever. Use of the shutter button is not
needed when making blank shots.
Film Loading: Performed by pulling up the rewind
crank to open the back cover. Easy film loading
with multi-slot take-up spool.
Winding Lever: Single stroke 120° throw. 15°
stand-off. The lever moves to the stand-off
position when the camera is turned on.
Film Rewinding: Performed by the rewind button
and crank.
Frame Counter: S-1-38, automatically resets when
back cover is opened.
Dimensions: Body Only – 151 x 96 x 48mm.
(5-15/16" x 3-3/4" x 1-7/8").
With f/1.4 Lens–151 x 96 x 100mm.
(5-15/16" x 3-3/4" x 3-15/16").
Weight: Body Only-740gm (1 Ib., 10 ozs.).
With f/1.4 Lens- 1045gm (2 Ibs., 5 ozs.).
Subject to change without notice.
63
Not For Resale – Free Download at http://www.joe-chan.com/manuals
X PROPER CARE OF THE CAMERA
A Cleaning the Camera and Lens
Use a camel hair or blower brush to clean the film
cartridge chamber and the area around the multi-slot
take-up spool before loading film into the camera.
Also, use the brush to whisk away dirt and dust from
the eyepiece and the front and rear surfaces of the
lens. If salt water spray or fingerprints inadvertently
get on the lens, they should be cleaned off as soon as
possible using commercially-available cleaning tissue
and a good quality lens cleaning liquid. Put one or
two drops of cleaning liquid on the tissue, and
lightly wipe the lens in a circular motion from the
center toward the outer edges. Do not use a
handkerchief or other cloth, as the lens elements
may be permanently scratched. If you cannot
remove dust particles from the surface of the instantreturn mirror simply by brushing, you should not
attempt to clean the mirror yourself with tissue and
cleaning liquid. Only an authorized serviceman
should undertake this delicate task. Actually dirt on
the mirror has absolutely no effect on the quality of
your photographs.
64
B
Storing the Camera
If the camera will not be used for an extended length
of time, leave the shutter uncocked and remove the
mercury batteries. Take the camera out .of its
eveready case and wrap it up in a clean, soft towel
together with silica gel or some other desiccant to
keep it dry.
C Using
the Camera in Extremely
Cold Conditions
In severely cold weather (down to –20 C or –4°F),
you should keep the Canon EF inside your coat and
expose it to the outer air only when you are ready to
take a picture. This procedure is necessary primarily
to keep the mercury batteries warm. Since the film
gets brittle at low temperatures, perform film winding and rewinding as slowly as possible.
D Having the Camera Serviced
You should never attempt to disassemble or repair
the Canon EF yourself! If the camera ceases to
function properly, it should be serviced by an
authorized Canon repair facility. See your local
camera dealer for further details.
Not For Resale – Free Download at http://www.joe-chan.com/manuals
Fold out both front and back nomenclature pages for easy reference when reading the instructions.
Not For Resale – Free Download at http://www.joe-chan.com/manuals
NOMENCLATURE
26.
27.
28.
29.
30.
31.
32.
33.
34.
35.
CAT Switch
Eyepiece
Metal Focal Plane Shutter
Multiple Exposure Button
ON/OFF Switch
Film Roller
Pressure Plate
Film Cartridge Chamber
Battery Check Button
Battery
Compartments
with Covers
36.
37.
38.
39.
40.
41.
42.
Tripod Socket
Film Plane Rails
Film Transport Sprocket
Film Rewind Button
Multi-Slot Take-Up Spool
Back Cover
Cartridge Stabilizer
66
Not For Resale – Free Download at http://www.joe-chan.com/manuals
FILTERS
CANON FILTERS (Screw-in type)
Type
Factor
1X
Recommended especially for high
mountain areas and where ultra- violet
rays are strong.
Sky light
1X
1.5X
For landscapes and portraits with low
sun. Darkens the blue of the sea and
sky and brings out the whiteness of
the clouds.
CCA4
(Amber)
1.5X
**Y3
2X
For landscapes and still-life. This filter
is similar to the Y1, but the effects are
stronger.
CCA8
(Amber)
2X
G1
2X
For portraits against the sky. Natural
reproduction of foliage.
CCA12
(Amber)
2X
Type
*UV
Y1
**01
3X
***R1
6X
*ND-4
*ND-8
67
For Black and White Film
Use and Effect
Factor
*
**
***
4X
8X
For haze penetration, contrast in
marine scenes, distant landscapes,
aerial photography and sky/cloud
contrast.
For distant landscapes. Exaggerated
sky/cloud contrast with a very dark
sky. Gives dramatic and interesting
effects.
Neutral density filters are used only to
control exposure and have no effect
on colors.
Especially used with high speed black
and white film in bright daylight.
Also can be used with color film
For color infrared film
For black and white infrared film
For Color Film
Use and Effect
For distant snow or mountain scenes on
an overcast day and for open shade
photos under a clear sky to reduce excessive bluish results.
Used with daylight type film for shooting in cloudy, or rainy weather or in the
shade. Eliminates bluish tinge.
Used with daylight type film for shooting in cloudy or rainy weather or in the
shade. Used with tungsten type film for
shooting in the morning or evening.
Used with tungsten type film for shooting in sunlight to obtain normal color
tones.
CCB4
(Blue)
1.5X
Used with daylight type film for shoot-ing
in the morning or evening to elim- inate
reddish tinge.
CCB8
(Blue)
2X
Used with daylight type film for shoot ing
at night or indoors with clear flash bulbs.
CCB12
(Blue)
3X
Used with daylight type film for shooting under artificial lighting to obtain
normal color rendition.
Not For Resale – Free Download at http://www.joe-chan.com/manuals