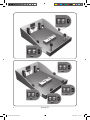
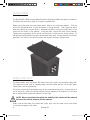
1
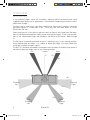
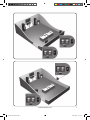
Bronze series
Bronze x1
Bronze x 2
Bronze x 5
x
Bronze 6
x
Bronze centre
Bronze BX-FX
Bronze BXW-10
Bx
o w n e r s
m a n u a l
B
B
B
m o n i t o r a u d i o . c o . u k
B
B
Bronze BX Manual.indd 1
10/03/2010 10:55:26
Bronze BX Manual.indd 2
10/03/2010 10:55:26
Contents Page
Introduction 3
Positioning 4
AV Positioning 4
2 Channel Positioning 7
Setting up the BX-FX 7
Plinth Fixing 8
Spikes and Feet 8
Grilles 9
Fixing the BX-FX to a Wall 9
Port Bungs 10
Specifications 11
Owner Information 12
monitoraudio.co.uk
Bronze BX Manual.indd 1
1
10/03/2010 10:55:26
2
Bronze BX Manual.indd 2
Bronze BX
10/03/2010 10:55:26
introduction
This is Bronze BX, Monitor Audio’s most affordable speaker range. Blending the best of
its award-winning predecessors with advanced technologies from our up-market RX and
flagship Platinum ranges, Bronze BX far exceeds the standards of performance and quality
you’d normally expect from an ‘entry level’ range.
By using ever more accurate computer simulations and introducing still more refined
materials and structures, we’ve fine-tuned our acclaimed Bronze Reference range to a new
industry high, developing its astonishingly precise and naturally dynamic sound to place
its successor, Bronze BX, on a level way beyond the capabilities of many more expensive
rivals.
In Bronze BX the benefits of our ceaseless search for audio purity are dedicated to your
enjoyment of music and film audio. And BX is engineered for stunning aesthetic results
as well. By harvesting greater accuracy and efficiency from comprehensive test and
measurement data, our in-house teams have created a beautiful union of breathtaking
fidelity and slender lifestyle design that represents the truest spirit of Monitor Audio.
Paradoxically for an entry level range, Bronze BX is a class apart.
Resplendent in a stunning Natural Oak, Rosemah, Walnut or black oak vinyl furniture finish
and built with the accuracy that exemplifies the Monitor Audio brand world-wide, the seven
slender Bronze BX models will look gorgeous in any room. Their understated elegance
hides a sophisticated ergonomic design, which includes multi-chamber cabinet structures
to optimise driver performance, high quality connections for ease-of-use and perfect signal
transfer and discreet precision-machined footings for excellent stability.
monitoraudio.co.uk
Bronze BX Manual.indd 3
3
10/03/2010 10:55:26
positioning
AV Positioning
In the following pages, there are illustrations showing optimal positioning and some
suggested room layouts for AV applications. For advice on configuring a 2 channel system,
please refer to page 7.
The front, and in some cases rear, floor standing and stand mount speakers should be
positioned approx 6 - 9 feet apart (1.8m - 2.5m) and start with them about 10 inches
(25cm) from the wall.
When playing music, if the sound is too bass heavy or there is bass boom from the room,
then try moving the loudspeakers slightly further away from the wall(s). If this is not possible,
then try the supplied port bungs (not included in the BX-FX or BX Centre). Refer to Page
10.
The BX Centre should be positioned so that it is pointing at you, in your viewing position,
and at approximate ear height. If it is below or above ear height, use some rubber feet
(small feet supplied) to angle it slightly.
The BX-FX’s should be positioned in accordance with the below illustrations and approx 2
feet (60cm) above ear height when in your listening position.
Left
Centre
Right
0°
22°
30°
90°
Surround
Left
Surround
Right
110°
135°
150°
Rear
Surround
Left
4
Bronze BX Manual.indd 4
Rear
Surround
Right
Bronze BX
10/03/2010 10:55:27
Bi-Pole
Di-Pole
RIGHT
Bi-Pole
Di-Pole
LEFT
Bi-Pole
Di-Pole
RIGHT
Bi-Pole
Di-Pole
LEFT
monitoraudio.co.uk
Bronze BX Manual.indd 5
5
10/03/2010 10:55:29
Bi-Pole
Di-Pole
RIGHT
Bi-Pole
Di-Pole
LEFT
Bi-Pole
Di-Pole
RIGHT
Bi-Pole
Di-Pole
Bi-Pole
LEFT
Di-Pole
Bi-Pole
LEFT
Di-Pole
RIGHT
6
Bronze BX Manual.indd 6
Bronze BX
10/03/2010 10:55:31
NOTE: When using 2 pairs of BX-FX in a 7.1 system, you need to use the RIGHT
hand speaker for the rear surround left and the LEFT hand speaker for the rear
surround right. This is because of the tweeter phasing.
2 Channel Positioning
For use in a 2 channel system, the listening position and the loudspeakers should form an
equilateral triangle. The speakers should be positioned approximately 6 - 10 feet (1.8 - 3m)
apart. They ideally need to be between 8 - 18 inches (20 - 45cm) away from the rear and
3 feet (1m) from the side walls.
Experimentation is strongly advised when initially setting up your speakers, as environments
and personal preference differ with each installation. If there is not enough bass, for
example, then try moving your speakers closer to a wall. The opposite, if there is too much
bass. Also see the information on page 10 refering to Port Bungs. If you are loosing stereo
imaging, try ‘toeing’ them in slightly. The sound should appear to originate from the centre
point between the speakers, not the actual speakers themselves.
Setting up the BX-FX
The Bronze BX-FX’s are paired, but specifically, right hand and left hand units. Of which
both can be configured to bi-pole (normal operation) or di-pole modes. The factory setting
is bi-pole.
In bi-pole mode, all speaker units (mid/bass unit and tweeters) are in phase. This feature is
designed for when the BX-FX is set up as a rear/surround speaker in a typical 5.1 channel
system, or alternatively in a 7.1 channel system without a second pair of BX-FX’s for rear/
surround duties.
In di-pole mode, the rear firing tweeters are out of phase with the other tweeter and mid/
bass unit. It is best to implement this configuration when using the two pairs BX-FX as part
of a 7.1 channel system, with the BX-FX’s taking up positions on the side and rear walls.
Please note that the BX-FX’s are left and right handed. This is not an issue when used in bipole mode. It is essential that they are positioned correctly if used in a 7.1 channel system.
Please refer to the positioning section on page 6.
NOTE: Before changing your BX-FX’s from bi-pole mode to di-pole mode,
please ensure that the speaker wires are disconnected from your loudspeakers.
This helps to protect your amplifier.
monitoraudio.co.uk
Bronze BX Manual.indd 7
7
10/03/2010 10:55:32
Plinth Fixing
(BX5 & BX6 only)
The Bronze BX5 & BX6’s are provided with plinths to improve stability and acoustic response.
The plinths are secured in place by using the supplied bolts.
Before you fit the plinth ensure the floor area is clear of any hard/sharp objects. To fit the
plinth turn the cabinet over so that the bottom is facing upwards. Then, place the plinth
onto the cabinet ensuring the plinth is orientated correctly, lining up the bolt holes in the
plinth with the inserts in the cabinet. Using the bolts, secure the plinth to the cabinet.
Tighten them up gradually at first and ensure the plinth is fitted securely to the cabinet. Fit
the feet to the plinth before turning the loudspeaker back over. (Please read the instructions
opposite). The spikes are used to improve sound quality and bass performance
Spikes and feet
The floorstanders from the Bronze BX Series come with spikes and separate rubber feet.
The spikes are to be used on carpeted floors and the rubber feet for use on hard floors
where spikes are not appropriate.
The spikes screw into the threaded inserts on the underside of the plinth. If you do not wish
to use the plinth, spikes can be fixed directly into the bottom of the cabinet. Ensure there
are no trailing cables where the speakers will be sited.
NOTE: When used without the plinth the stability of the cabinet will be reduced
because the cabinet footprint will be reduced.
When used on hard floor, the rubber feet simply push into the same inserts that would
usually be occupied by the spikes.
8
Bronze BX
Bronze BX Manual.indd 8
10/03/2010 10:55:34
Grilles
All of the Bronze BX speakers come with grilles covered in acoustically transparent cloth.
The grilles are held invisibly in place by magnets in both the grille and the cabinet (except
BX-FX). They are contained within the separate card packaging.
To fit them, firstly ensure they are the correct way up (badge at the bottom) and offer them
up to the cabinet. The magnets should them pull it into position.
The BX-FX comes with the grilles factory fitted. If you wish to remove them, carefully prize
them away from the cabinet with the tips of your fingers. There are three separate grilles
fitted to each BX-FX cabinet.
CAUTION: Do not lift or move the loudspeaker with the grilles fitted. If any movement
needs to be done, please remove the grilles first.
Fixing the BX-FX to a wall
CAUTION: You will need to determine where the BX-FX will be fixed and the structure
of the wall. For safety reasons, if you are unsure of your ability to provide a secure and
safe fixing, do not attempt to fix these speakers to your wall, please obtain the services
of a competent and qualified trades person.
CAUTION: Ensure that there are no water pipes or electricity cables running behind
where the wall brackets are going to be secured. Work from secure steps and avoid
trailing wires.
We do not supply wall fixing screws and plugs with the BX-FX. Please use suitable fixings
for the type of wall construction the BX-FX’s will be fixed to.
To fix your BX-FX’s to the wall, we would recommend using the wall fixing template enclosed
within the packaging carton.
monitoraudio.co.uk
Bronze BX Manual.indd 9
9
10/03/2010 10:55:34
Port bungs
WARNING: Care must be taken not to insert the port bungs too far into the port as
this may result in the foam bung being lost inside the cabinet.
If the loudspeaker is to be used in a small room, typically 9 sqM (80 sqFT) or a room
that is known to reproduce accentuated bass response, it may be desirable to fit the port
bungs. However, before this is done it is worth experimenting with the positioning of the
loudspeaker in the room. To reproduce the optimum performance from the loudspeaker it
is important to make sure the loudspeaker is not positioned too close to a wall (typically
150mm / 6” from the back of the cabinet) or near corners of a room (typically 1M / 3FT).
If the room is larger than detailed above and no problems are known, please read point 1.
If the positioning of the loudspeaker is predetermined by room aesthetics or layout, please
move on and read point 2 for the BX1/ BX2 and point 3 for the BX5/ BX6.
Port bungs might not be necessary on the BX2 even if placed close to a rear wall due
to the front firing port tube. Experimentation is still highly recommended though.
1. If you can adhere to the room characteristics detailed above we recommend that you
do not fit the port bungs to achieve the best performance. However you may feel that
by fitting the bungs even under these circumstances provides you with a degree of
fine-tuning to suite particular taste. Experimentation is highly recommended.
2. Where a bookshelf/ stand-mount speaker with a rear firing port tube (BX1) is to be
used in close proximity (2”, 50mm) to a rear wall such as on a bookshelf, positioned
in a cabinet or mounted on a wall, we recommend fitting the port bungs to the ports.
This will reduce the bass ‘boom’ sometimes termed as overhang, and assist the
loudspeaker to reproduce its best performance under the environmental constraints.
‘Boom’ is generally caused when bass energy from the loudspeaker ‘excites’ room
modes and causes an accentuation at a particular frequency, or number of frequencies.
3. Where a floor-standing loudspeaker (BX5 & BX6) is to be used in close proximity (closer
than 150mm 6”) to a rear wall, we recommend fitting the port bungs. This will reduce the
bass ‘boom’ sometimes termed as overhang and assist the loudspeaker to reproduce
its best performance under these environmental constraints. This is caused when bass
energy from the loudspeaker ‘excites’ room modes and causes an accentuation at a
particular frequency, or number of frequencies.
Where the loudspeaker has two ports per speaker, BX5 and BX6, a further degree
of fine-tuning is provided. In this case you have three options; to leave all the ports
open (point 1), fit the port bungs to the rear ports or to fit a port bung to the front
port. We recommend that you experiment with fitting the port bungs to the rear port
or the front port in succession as the results can vary dependant on room acoustics
and positioning. The overall bass extension will not be reduced, however the bass
energy/ output around the port tuning frequency will be reduced. This has the effect
of reducing bass ‘boom’ increasing bass clarity and apparent agility. Experimentation
is highly recommended.
10
Bronze BX Manual.indd 10
Bronze BX
10/03/2010 10:55:35
Bronze BX Manual.indd 11
10/03/2010 10:55:35
3.2kHz
1 x 6.5” C-CAM®
Bass/ Mid driver.
1 x 1” (25mm)
C-CAM® gold dome
tweeter
70W
15 - 70W
Bass reflex – rear
ported. HiVe® port
System
3.2kHz
1 x 5.5” C-CAM®
Bass/ Mid driver.
1 x 1” (25mm)
C-CAM® gold dome
tweeter
260 x 166 x 180
10 1/4 x 6 9/16 x
10 1/16
Power Handling (RMS)
Recommended Amp
Requirements
Bass Alignment
Crossover Frequency
Drive unit
Complement
External Dimension
H x W x D (mm)
Plinth Dimensions
H x W x D (inch)
3.86 (8.5)
Bass reflex – Front
ported. HiVe® port
System
8 Ohms
Nominal
Impedance
Weight (each)
Kg (lb)
30 - 100W
88dB
Sensitivity
(1w @ 1m)
2 Way
5.84 (12.8)
13 3/4 x 7 5/16 x
10 1/16
350 x 185 x 255
100W
8 Ohms
90dB
42Hz - 30kHz
2 Way
55Hz - 30kHz
System Format
BX2
BX1
Frequency Response
Model
LF: -6dB @ 600Hz
MF/HF: 3.4kHz
2 x 6.5” C-CAM®
Bass driver.
1 x 6.5” C-CAM®
Bass/ Mid driver.
1 x 1” (25mm)
C-CAM® gold dome
tweeter
985 x 186 x 315
(1003 x 253 x 350
Inc Plinth)
38 3/4 x 7 5/16 x
12 3/8
(39 3/4 x 9 1/4 x
13 3/4 Inc Plinth)
LF: -6dB @ 400Hz
MF/HF: 3.2kHz
1 x 5.5” C-CAM®
Bass driver.
1 x 5.5” C-CAM®
Bass/ Mid driver.
1 x 1” (25mm)
C-CAM® gold dome
tweeter
850 x 166 x 248
(868 x 215 x 282
Inc Plinth)
33 7/16 x 6 9/16 x
9 3/4
(34 3/16 x 8 7/16 x
11 1/8 Inc Plinth)
17.96 (39.5)
Dual Chamber, bass
reflex, front and rear
ported. Twin HiVe®
port System
Dual Chamber, bass
reflex, front and rear
ported. Twin HiVe®
port System
11.82 (26)
40 - 150W
150W
8 Ohms
90dB
34Hz - 30kHz
2 1/2 Way
BX6
30 - 120W
120W
8 Ohms
90dB
37Hz - 30kHz
2 1/2 Way
BX5
specifications
6.18 (13.6)
6 9/16 x 18 1/8 x
6 1/2
166 x 460 x 166
2 x 5.5” C-CAM®
Bass/ Mid driver.
1 x 1” (25mm)
C-CAM® gold dome
tweeter
3.2kHz
Sealed Cabinet
20 - 120W
120W
8 Ohms
90dB
60Hz - 30kHz
2 Way
BX-Centre
3.62 (8)
10 13/16 x 10 7/8 x
3 15/16
(4 5/8 deep Inc grille
and bracket)
274 x 276 x 100
(118 deep Inc grille
and bracket)
1 x 5.5” C-CAM®
Bass/ Mid driver.
2 x 1” (25mm)
C-CAM® gold dome
tweeters
2.2kHz
Sealed Cabinet
20 - 80W
80W
8 Ohms
88dB
65Hz - 30kHz
2 Way
BX-FX
Owner Information
Product Details
Model .................................................................
Product Serial No ................................................
Date of Purchase ................................................
Dealer Details
Dealer Name .....................................................................................................................
Address .............................................................................................................................
...........................................................................................................................................
e-mail address ...................................................................................................................
Telephone Number ............................................................................................................
Monitor Audio reserves the right to alter specifications without notice.
For the 5 years manufacturer’s warranty and to be entered into our monthly prize draw,
please visit the online registration form at: www.monitoraudio.co.uk
12
Bronze BX Manual.indd 12
Bronze BX
10/03/2010 10:55:35
Bronze BX Manual.indd 13
10/03/2010 10:55:35
m o n i t o r a u d i o . c o . u k
Monitor Audio Ltd.
24 Brook Road
Rayleigh, Essex
SS6 7XJ
England
Tel: +44 (0)1268 740580
Fax: +44 (0)1268 740589
Email: [email protected]
Web: www.monitoraudio.co.uk
Designed in the United Kingdom
© 2010. Version 1.1
Bronze BX Manual.indd 14
10/03/2010 10:55:36