1
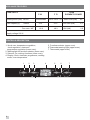
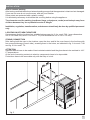
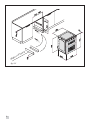
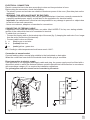
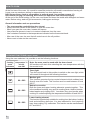
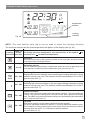
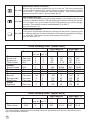
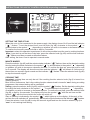
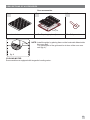
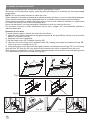
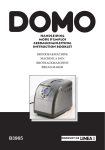
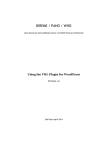
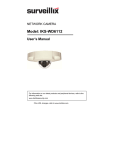
GB Built-in oven installation use maintenance INDEX pag. pag. General warnings 3 Oven cooking chart 10 Appliance features 4 Description and use of accessories 10 Installation 5 Cleaning and maintenance 14 How to cook 8 GENERAL WARNINGS The appliance has been designed and constructed following the under mentioned European rules: EN 60335 - 1 plus relevant amendment EN 60335 - 2 - 6 plus relevant amendment Furthermore the appliance is in conformity with the under mentioned European directives: CEE 2006/95 + 93/68 relevant to electric safety (BT) CEE 2004/108 relevant to electromagnetic compatibility (EMC) Oven features that can come into contact with food are made of materials suitable to those prescribed by CEE 89/109 directives and law by decree Nr. 108. The conformity of the appliance to the above mentioned norms is put in evidence by the CE symbol evident on the identifying nameplate. Read carefully all the instructions contained in this booklet. It provides you with important information regarding the safe installation, use and maintenance of the appliance as well as useful advice for getting the best out of your oven. Keep this booklet in a safe place for future reference. The manufacturer pays particular attention when printing its instruction manual however misprints may occur. If the texts are unclear, please contact the service centre for explanations. After removing the packing, check that the appliance is not damaged in any way. Be careful not to leave the packing materials (plastic sheeting, expanded polystyrene etc.) in reach of children, as they can be dangerous. IMPORTANT: do not use the oven door handle to move the appliance, such as when removing it from the packaging. IMPORTANT This appliance must be used exclusively for cooking food and for no other purpose. Any other use of the appliance (such as heating a room) is incorrect and therefore dangerous. The manufacturer can not be considered responsible for possible damages arising from a wrong installation or incorrect. This appliance is not intended for use by persons (including children) with reduced physical, sensory or mental capabilities, or lack of experience and knowledge, unless they have been given supervision or instruction concerning use of the appliance by a person responsible for their safety. Children should be supervised to ensure that they do not play with the appliance. - Installation and maintenance have to be done by qualified staff only. - The appliance should only be used for the cooking of food and not for any other use. - The safety of this appliance is assured only when it is correctly connected to a good system of previewed grounding, like from the norms. - When in use the appliance becomes very hot. Do not touch the heated elements inside the oven. - Do not touch the appliance with humid or wet hands or feet. - Do not use the appliance barefoot. - Do not pull the feeding cable in order to detach the plug from socket. - Do not leave the apparatus exposed to atmospheric agents (rain, sun and so on). - Do not allow the appliance to be used by children. CAUTION: The oven surfaces may get very hot when the grill is in use. Keep children well away. Keep from sitting and put heavy objects on the oven door when it is open. The manufacturer reserves the right to make modifications that may be necessary and useful, without prejudicing essential safety and working features. The manufacturer can not be considered responsible for possible damages arising from a wrong installation or incorrect use of the appliance. 3 APPLIANCE FEATURES OVEN CAVITY F 88 Working sizes (mm) LxPxH Oven capacity (l) Statico Fan oven / MF OVEN ELEMENTS POWER F 72 595x542x884 595 x 542 x 714 33 lt 33 lt Fan oven (kW) 2,1 48 lt Grill (kW) 2,9 60 lt Static oven (kW) 2,2 Supply voltage 230 V~ CONTROLS DESCRIPTION 5. Functions selector (upper oven). 6.Thermostat warning light (upper oven). 7. Thermostat (upper oven). 1. Knob oven temperature regulation, clock regulation, electronic programmer regulation (lower oven). 2. Warning light for functions selector (lower oven). 3. Selector for cooking functions (lower oven). 4. Display, Clock, electronic programmer, cooking mode, oven temperature. 1 4 2 3 4 5 6 7 INSTALLATION How to remove packing After having removed internal and external packing ensure that the apparatus is intact and not damaged. If you are not sure do not use the oven, and call your Retailer. Some points are protected with a plastic coating. It is absolutely necessary to eliminate this covering before using the appliance. The elements used for packing (cardboard, bags, polystyrene, cards) must be kept away from children because they are a potential source of danger. Installation, regulation, transformation, maintenance should only be done by qualified personnel only. LOCATING IN KITCHEN FURNITURE Its necessary that the furniture has suitable features see pict. 2 for mod. F 88 (oven dimensions 595 x 542 x 884 mm) and 2/1 for mod. F 72 (oven dimensions 595 x 542 x 714 mm). (FIXING) CONNECTION After having built the oven in the furniture, open the door and fix the oven frame in the furniture with four screws sideways (2 each side), screwing them in the holes, as indicated in fig. 2 for mod. F 88 and fig. 2/1 for mod F 72. ATTENTION: Adjacent boards have to be made of heat resistant material and the glues have to be resistant to 100° C. temperatures. At the end of mounting contacts to electrics components have to be impossible. Protections have to be removable only with the help of a tool. sc re sc w re w sc re sc w re w fig. 2 5 sc re sc w re sc re sc w re S r e d i fig. 2/1 6 u e nn rs w w ELECTRICAL CONNECTION Electric connection has to be done according to rules and law provisions in force. Before doing the connection, check the following: - The electric power and sockets are suitable to maximum power of the oven. (See data plate on the appliance). - WARNING: THIS APPLIANCE MUST BE EARTHED. The appliances electrical safety can only be guaranteed when it has been correctly connected to a properly earthed power supply, as laid down in the regulations for electrical safety. Important: the manufacturer cannot be held responsible for any damage to persons or objects due to the lack of an earth connection. - Never use reducers, adaptors or branches for connections. CONNECTING OF FEEDING CABLE If apparatus is not fitted with feeding cable, use cable Mod. H05RR-F 3x4 sq. mm. stating suitable section of the cable which has to be connected to terminal. To obtain that you have to: - Connect the supply cable to the terminal strip of the oven (fig. 3), keeping the earth wire 3 cm. longer than the active conductors (live/neutral) . - Connect cables wires as follows: L = (live) brown or red wire N = (neutral) blue wire = (earth) yellow - green wire. N.B. Feedings cable temperature should never reach 100°C. Connection to normal socket Connect feeding cable a normal plug suitable to the load stated on data plate. When the cooker has been built-in household check that the plug is accesible. Direct connection to electric supply If an appliance is not equipped with supply cable and plug, the power supply must be fitted with a disconnect switch in which the distance between contacts permits total disconnection in accordance with overvoltage category III, as required by installation regulations. The yellow/green earth wire should not be controlled by the switch.. L N fig. 3 7 HOW TO COOK At the first use of the oven, its normal to smeel the protective oils used in manufacture burning off. Leave oven on maximum setting for approximately one hour before use. N.B. Set any timer, clock or programmer to manual mode (see section on page 11) N.B. Before carryng out cleaning, disconnect the appliance from electrical supply. At the end of the initial heating, let the oven cool down and clean the inside with detergent and warm water. Before using, wash all grid accessories, baking-pan and trays. General information and use precautions - The oven must be used with the door closed. - Always hold the handle in the middle, to open the oven door. - When you open the oven door, beware hot vapour. - Use protective gloves to insert or to extract containers from the oven. - Use containers resistant to the temperatures indicated on the thermostat knob. - After use of the oven, be sure that all controls are in the off position.. - Never roast or bake on the oven base. COOKING FUNCTIONS (upper oven) Using the oven selectors it is possible to set the following functions. Cooking temperature °C mode min 60 indicators max 260 Note: the oven must be used with the door closed All functions will start after selecting the oven temperature with the thermostat knob. Oven light Turn the control knob to this position to switch on the oven light, which will remain lit throughout the following functions. 8 60 ÷ 200 Medium grill This function operates the top central element which radiates heat directly over the foods. This function must be used between 60 and 200°C. 60 ÷ 260 Natural convection Both the lower and upper heating elements operate together. This is the traditional cooking, very good for roasting joints, ideal for biscuits, baked apples and crisping food. You obtain very good results when cooking on a shelf adjusting the temperature between 60 and 260°C. 60 ÷ 260 Lower heating element This function is particularly suitable for cooking from the bottom, heating food and sterilizing glass jars. It is also indicated for food requiring long, slow cooking, e.g. casseroles. This function can be used between 60° and 260°C. COOKING FUNCTIONS (lower oven) temperature indicator Fig. 4A cooking indicator NOTE: The oven selector knob (fig.4) can be used to select the following functions. The functions selected and the oven temperature will appear on the display (see fig. 4A). Temp. °C Cooking min 40 . indicators max 260 Warning : the oven must be used with the door closed. To change the oven temperature, turn the selector to the symbol increase, or to to lower the temperature. to Oven light Turn the control knob to this position to switch on the oven light, which will remain lit throughout the following functions. 20 ÷ 60 Defrosting with fan The air at ambient temperature is distributed inside the oven for defrosting food more quickly and without proteins adulteration (pre-set value 40 °C). 50 ÷ 200 Medium grill Selecting this function switches on the central upper heating element for direct radiation of heat over food .This function must be used between 50 to 200°C (pre-set value 200 °C). 50 ÷ 200 Large grill Selecting this function switches on the two upper heating elements for direct radiation of heat over food. This function must be used between 50 to 200°C (pre-set value 200 °C). 50 ÷ 260 Natural convection Both the lower and upper heating elements operate together. This is the traditional cooking, very good for roasting joints, ideal for biscuits, baked apples and crisping food. You obtain very good results when cooking on a shelf adjusting the temperature 260 °C (pre-set value 180 °C). 50 ÷ 260 Fan oven Both the fan and the circular heating element operate together. The hot air adjustable between 50 and 260 °C is evenly distributed inside the oven. This is ideal for cooking several types of food (meat, fish) at the same time without affecting taste and smell. It is indicated for delicate pastries (pre-set value 170 °C). 9 50 ÷ 260 Fan-assisted natural convection Both the top and bottom elements are on, as is the fan. This is the conventional cooking method, excellent for a variety of foods. It produces good results for cooking on one level -- ideal for biscuits, cakes and canapés -- with the temperature adjustable from 50 to 260°C. (pre-set value 185 °C). 50 ÷ 200 Fan assisted total grill The air which is heated by the grill heating element is circulated by the fan and so helps to distribute the heat. The fan assisted grill replaces perfectly the turnspit. You can obtain very good results also with large quantities of poultry, sausage, red meat. This function must be used between 50 to 200°C (pre-set value 200 °C). 50 ÷ 260 Lower heating element This function is particularly indicated for cooking from the bottom, warming up food or sterilizing glass jars. It is also indicated for food requiring long and slow cookings, i.e. casserole. This function can be used between 50 and 260 °C (pre-set value 220 °C). Oven cooking chart (lower oven) Function Oven mod. 88 °C Minutes Oven mod. 72 °C Minutes 3 3 4 190 190 260 130 130 6+6 190 190 260 120 100 6+6 Level mod. 88 mod. 72 Meats Roast veal Roast pork Fillet of beef Poultry Roast chicken Scones Bread Pastres Biscuits Sponge cake Small cake Cakes Apple-pie Fan oven Fan oven Grill 4 4 5 Grill Fan oven Fan oven 2 3/5 4 2 1/3 3 200 190 180 85/90 20/22 25/30 200 180 180 85/90 20 25/30 Fan oven Fan oven Fan oven 3/5 4 4 1/3 3 3 200 150 160 15 50 25 200 150 150 14 45 35 Fan oven 4 3 190 45 170 43 Oven cooking chart (upper oven) Function Level Oven mod. 88 °C Minutes Oven mod. 72 °C Minutes 260 260 260 260 mod. 88 mod. 72 Toast Fillet of beef Grill Grill 2 2 2 2 3 6+6 3 6+6 The values shown (temperatures and cooking times) are approximate and may vary depending on the type of meat and its thickness. 10 INSTRUCTIONS FOR USE OF CONTROL DEVICES (depending on model) Minute minder Clock Start of cooking Cooking time End of cooking Defrosting Fig. 4B Key lock SETTING THE TIME OF DAY When the oven is first connected to the power supply, the display shows 00.00 and the led indicator flashes. To set the desired time, turn the knob (fig. 4B) clockwise to the symbol or anticlockwise to the symbol " " depending on whether you wish to increase or decrease the time. To confirm the time set, press the knob or wait for 5 seconds. Important: unless this operation is performed, it will not be possible to set the ovens cooking functions. Note: if you wish to set the time of day later, press the selector knob (fig. 4B) until the time indicator flashes and then proceed as described above. After setting, the timer is set to operate in manual mode. MINUTE MINDER Press the selector (fig.4B) until the minute minder indicator flashes, then set the desired cooking time by turning the knob clockwise to the symbol or anticlockwise to the symbol depending on whether you wish to increase or decrease the time. To confirm the time set, press the knob or wait for 5 seconds. The display will show the set time and the indicator will remain lit. At the end of the set time, an acoustic signal sounds and the indicator flashes. Press the selector knob (fig.4B) to stop the acoustic signal. COOKING TIME Important: cooking time can only be set if the cooking function selector knob (fig.4) is turned to a cooking position! Bear in mind, furthermore, that is the cooking function selector knob is turned to zero during a cooking programme, the entered setting will be cancelled! Setting: press the selector knob (fig.4B) until the symbol flashes. Set the desired cooking time by turning the knob clockwise to the symbol or anticlockwise to the symbol depending on whether you wish to increase or decrease the time. To confirm the set time, press the selector knob (fig.4B) or wait for five seconds. The display will show the symbol with the set time and the symbol with the time at which the oven will switch off. Start of cooking is indicated by the symbol , which lights up on the display. At the end of the set time the oven switches off automatically, an acoustic signal sounds and the indicator flashes. Press the selector knob (fig.4B) to stop the acoustic signal and turn the function selector (fig.4) to zero to exit cooking time setting. 11 COOKING END TIME Important: cooking end time can only be set if the cooking function selector knob (fig.4) is turned to a cooking position! Bear in mind, furthermore, that is the cooking function selector knob is turned to zero during a cooking programme, the entered setting will be cancelled! Setting: press the selector knob (fig.4B) until the symbol flashes. Set the cooking end time by turning the knob clockwise to the symbol or anticlockwise to the symbol depending on whether you wish to increase or decrease the time. To confirm the set time, press the selector knob (fig.4B) or wait for five seconds. The display will show the symbol with the set cooking end time and the symbol with the cooking time. Start of cooking is indicated by the symbol , which lights up on the display. At the end of the set time the oven switches off automatically, an acoustic signal sounds and the indicator flashes. Press the selector knob (fig.4B) to stop the acoustic signal and turn the function selector (fig.4) to zero to exit cooking end time setting. COOKING TIME AND COOKING END TIME Press the selector (fig.4B) until the symbol flashes. Set the desired cooking time as described at COOKING TIME. Press the selector knob (fig. 4B) until the symbol flashes. Set the desired cooking end time as described in the paragraph COOKING END TIME. The oven will begin cooking based on the calculation of cooking end time minus cooking time. For example, if cooking end time is set at 12.00 and a cooking time of 1.30h is set, the oven will begin cooking at 10.30 and will switch off at 12.00. Start of cooking is indicated by the symbol , which lights up on the display. At the end of the set time the oven switches off automatically, an acoustic signal sounds and the indicator flashes. Press the selector knob (fig.4B) to stop the acoustic signal and turn the function selector (fig.4) to zero to exit cooking time and cooking end time setting. CANCELLING PROGRAMMES Programmes can be cancelled at any time by re-selecting the previously selected functions and turning the selector knob (fig.4B) anticlockwise to the symbol zero , resetting the time to zero. SETTING THE KEY LOCK If you activate the key lock, the timer can no longer be used to set the time or programmes. Neither the time of day nor an elapsing minute minder nor an active cooking programme can be modified. However, the set functions will operate accurately. Proceed as follows to activate the key lock: Press the selector knob (fig.4B) until the symbol flashes. To confirm, turn the selector knob anticlockwise to the symbol for about 3 seconds. Only the acoustic signal emitted at the end of a cooking programme can be stopped, no other functions can be changed. To deactivate the key lock, turn the selector knob (fig. 4B) anticlockwise to the symbol for around 3 seconds. On the display, the indicator for the key lock function switches off. ADJUSTING THE DISPLAY BRIGHTNESS The brightness of the display can be adjusted between 4 different brightness settings by turning the selector knob (fig. 4B) anticlockwise to the symbol or clockwise to the symbol . Note: adjustment can be made only when the function selector (fig. 4) is set to zero. 12 DESCRIPTIONS OF ACCESSORIES Oven accessories A B C front part A = wire shelves B = Drip dray (optional) D = Grill pan set NOTE: Install the grids, by placing them on the horizontal slides inside the oven wall. The raised part of the grid must be in face of the oven rear wall (fig. 4). fig. 4 COOLING MOTOR Some models are equipped with tangential cooling motor. 13 CLEANING AND MAINTENANCE Wait until the appliance has cooled down before attempting to clean it. Disconnect it from the power supply, either by pulling the plug out or switching off the power supply at the mains. NOTE: Do not use steam cleaners to clean the oven. Clean enamelled, chromed or painted parts with warm water and soap, or non-corrosive liquid detergent. Clean stainless steel parts using methylated spirit of a suitable commercially produced solution. Clean aluminium panels or edges with cotton wool or with a cloth soaked in vaseline or a seed-based oil. Clean and then go over it with methylated spirit. Never use abrasives, corrosive detergents, bleaches or acids for cleaning the oven. Do not leave corrosive or acidic substances (lemon juice, vinegar, etc.) on enamelled, painted or stainless steel parts. Removal of oven door To make cleaning easier, remove the oven door as follows: 1) open the door halfway and remove the glass stoppers A, the profile B (as shown in fig. 8) and the glass C, as shown in fig. 8A. 2) open the oven door completely. 3 ) flip the hinge hooks "A" outwards (see fig. 8B). 4) shut the oven door slowly until it reaches hooks "A", making sure these are locked into slots "B" of the oven door, as shown in fig. 8C. 5) Using both hands, push the oven door lightly inwards, toenable the door hinges "C" to come away from the slots "D" (see fig. 8D) and pull the door towards you until it is released from the oven. After cleaning it, reposition it correctly following the abovesteps in the reverse order and flipping hooks "A" inwardsbefore you shut the oven door (fig. 8E). B A Fig 8 C Fig 8A A A B C A A D Fig. 8B 14 Fig. 8C Fig. 8D Fig. 8E CAUTION: Do not use rough or abrasive materials or sharp metal scrapers to clean the glass doors of the oven since they may scratch the surface and cause the glass to break. Oven light (fig. 9) The oven bulb is a special kind which is resistant to high temperatures. Replace it as follows: disconnect the oven from the power supply by removing the plug or switching off the power supply at the mains; remove the protective glass (A) and replace the burnt-out bulb with one of the same type. Replace the protective glass. Fig. 9 T300°C A Important: if the oven is no longer to be used, it should be made inoperable by cutting the power supply cable, after unplugging it from the power supply. Disused appliances can be a safety risk as children often play with them. For this reason it is advisable to make the oven safe. This appliance is marked according to the Europeandirective 2002/96/EC on Waste Electricaland Electronic Equipment (WEEE).By ensuring this product is disposed of correctly,you will help prevent potential negativeconsequences for the environment and humanhealth, which could otherwise be caused byinappropriate waste handling of this product. The symbol on the product, or on thedocuments accompanying the product, indicatesthat this appliance may not be treated ashousehold waste. Instead it shall be handedover to the applicable collection point for therecycling of electrical and electronic equipment.Disposal must be carried out in accordance withlocal environmental regulations for wastedisposal.For more detailed information about treatment,recovery and recycling of this product, pleasecontact your local city office, your householdwaste disposal service or the shop where youpurchased the product. 0051 Tipolitografia Montagnani - Modena (Italy) - Cod. 537863 1008