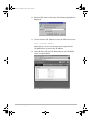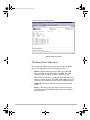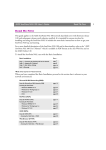
1
hp.book Page 1 Thursday, April 2, 1998 4:33 PM
hp.book Page 2 Thursday, April 2, 1998 4:33 PM
hp.book Page 5 Thursday, April 2, 1998 4:33 PM
HP CD-ROM Server
User’s Guide
hp.book Page 6 Thursday, April 2, 1998 4:33 PM
© Copyright 1997, 1998
Hewlett-Packard Company.
All rights reserved.
Reproduction, adaptation or translation
without prior written permission is prohibited,
except as allowed under the copyright laws.
Publication number
5967-2219
Second Edition,
February 1998
Applicable Products:
J3168A
J3169A
Hewlett-Packard shall not be liable for errors
contained herein or for incidental or
consequential damages in connection with the
furnishing, performance or use of this material.
A copy of the specific warranty terms applicable
to your HP product and replacement parts can
be obtained from your HP Sales and Service
Office or Authorized dealer.
For warranty service information, see appendix
E in this guide.
Safety Considerations
Prior to the installation and use of this product,
review all safety markings and instructions.
Trademark Credits
Microsoft®, MS-DOS®, Windows®, Microsoft
Windows NT™ are trademarks or U.S.
registered trademarks of Microsoft Corporation.
NetWare® and Novell® are registered
trademarks of Novell Corporation. IBM®, IBM
LAN Server®, Operating System/2® are
registered trademarks of International
Business Machines Corp. Ethernet is a
registered trademark of Xerox Corporation.
UNIX® is a registered trademark of UNIX
System Laboratories Inc. in the U.S.A. and
other countries, licensed exclusively through
X/Open Company Limited.
Warranty
The information contained in this document is
subject to change without notice.
HEWLETT-PACKARD COMPANY MAKES
NO WARRANTY OF ANY KIND WITH
REGARD TO THIS MATERIAL, INCLUDING,
BUT NOT LIMITED TO, THE IMPLIED
WARRANTIES OF MERCHANTABILITY AND
FITNESS FOR A PARTICULAR PURPOSE.
!
Instruction Manual Symbol. If
the product is marked with this
symbol, refer to the product
manuals to protect the product
from damage.
WARNING
Denotes a hazard that can
cause injury
CAUTION
Denotes a hazard that can
damage equipment or data.
Do not proceed beyond a WARNING or
CAUTION notice until you have understood
the hazard and have taken appropriate
precautions.
Grounding. This product provides a
protective earthing terminal. There must be an
uninterrupted safety earth ground from the
main power source to the product’s input wiring
terminals, power cord or supplied power cord
set. Whenever it is likely that the protection
has been impaired, disconnect the power cord
until the ground has been restored.
Hewlett-Packard Company
8000 Foothills Boulevard
Roseville, California
95747-6588
hp.book Page 7 Thursday, April 2, 1998 4:33 PM
Preface
Thank you for purchasing the HP CD-ROM Server!
The HP CD-ROM Server provides a simple and cost-effective
way to allow information stored on CD-ROMs to be shared by all
users on an Ethernet network.
The HP CD-ROM Server provides multi-protocol support for
most network operating systems. As additional support and new
features become available, it provides the ability to upgrade
firmware for future investment protection.
The HP CD-ROM Server for Ethernet networks is available as a
stand-alone or tower module.
About this Manual
This manual applies to both the HP CD-ROM Server
Stand-Alone and Tower modules with firmware version 4.11 or
later.
The manual consists of six chapters followed by appendices:
1. Introduction – Provides a brief description of the HP
CD-ROM Server: how it works, where to use it and key
benefits.
2. Basic Installation – Provides the steps to connect your
HP CD-ROM Server to the network and to your CD-ROM
drives.
3. Network Configuration – Provides the procedures to
integrate your HP CD-ROM Server into your network
environment.
4. Mounting or Mapping Network Drives – Provides the
steps to set up your system to access CD-ROMs.
5. CD-ROM Server Configuration – Describes how to
configure operation of the HP CD-ROM Server.
6. Security Management – Provides information on how to
manage and control user access to CD-ROMs.
The appendices provide supplemental information, such as
troubleshooting procedures, configuration parameters, firmware
upgrade procedures and technical specifications.
7
hp.book Page 8 Thursday, April 2, 1998 4:33 PM
HP Customer Support Numbers
If you need assistance, call one of the following numbers.
In the USA and Canada, call 208-323-2551
In Europe, call the following number for your country:
Austria
06.60.63.86
Netherlands
020.606.87.51
Belgium (Dutch)
02.626.88.06
Norway
22.11.62.99
Belgium (French)
02.626.88.07
Portugal
01.44.17.199
Denmark
39.29.40.99
Spain
90.23.21.123
Finland
02.03.47.288
Sweden
08.61.92.170
France
04.50.43.98.53
Switzerland
084.880.11.11
Germany
0180.52.58.143
United Kingdom
0171.512.5202
Italy
02.2.641.0350
Ireland
01.662.55.25
Europe (English
outside the UK)
+44.0171.512.5202
For all other countries, contact your reseller.
Electronic Support Services
Hewlett-Packard provides software utilities, firmware upgrades
and support information for the HP CD-ROM Server through
the World Wide Web and various bulletin board services.
World Wide Web
8
HP's Electronic Support Center:
http://www.hp.com/go/CDROM_Server
America Online
Download from the HP Forum.
CompuServe
Download from the HP Forum on CompuServe. To sign up for
CompuServe call (800) 848-8199 and ask for Representative
#51 (USA only).
HP BBS
Use 208 344-1691 for 24-hour access to the HP Bulletin Board
Service. The first time you use this service, you will be asked
to type your name and address to establish an account and
password for future use.
hp.book Page 5 Thursday, April 2, 1998 4:33 PM
Table of Contents
Preface
HP Customer Support Numbers . . . . . . . . . . . . . . . . . . . . . . . . . . . . . . . 8
Electronic Support Services . . . . . . . . . . . . . . . . . . . . . . . . . . . . . . . . . . . 8
Table of Contents
1. Introduction
HP CD-ROM Servers . . . . . . . . . . . . . . . . . . . . . . . . . . . . . . . . . . . . . .
How They Work. . . . . . . . . . . . . . . . . . . . . . . . . . . . . . . . . . . . . . . . . . .
Where to Use Them . . . . . . . . . . . . . . . . . . . . . . . . . . . . . . . . . . . . . . .
Features and Benefits. . . . . . . . . . . . . . . . . . . . . . . . . . . . . . . . . . . . . .
1-1
1-2
1-3
1-3
2. Basic Installation
Overview . . . . . . . . . . . . . . . . . . . . . . . . . . . . . . . . . . . . . . . . . . . . . . . .
Unpacking . . . . . . . . . . . . . . . . . . . . . . . . . . . . . . . . . . . . . . . . . . . . . . .
Accessories. . . . . . . . . . . . . . . . . . . . . . . . . . . . . . . . . . . . . . . . . . . . . . .
Connecting the Hardware . . . . . . . . . . . . . . . . . . . . . . . . . . . . . . . . . .
2-1
2-2
2-3
2-4
3. Network Configuration
Novell NetWare Networks . . . . . . . . . . . . . . . . . . . . . . . . . . . . . . . . . .
Microsoft and IBM Networks . . . . . . . . . . . . . . . . . . . . . . . . . . . . . . . .
TCP/IP Networks . . . . . . . . . . . . . . . . . . . . . . . . . . . . . . . . . . . . . . . . .
Time Synchronization . . . . . . . . . . . . . . . . . . . . . . . . . . . . . . . . . . . . . .
3-1
3-3
3-3
3-9
4. Mounting or Mapping Network Drives
The HP CD-ROM Server File System . . . . . . . . . . . . . . . . . . . . . . . . . 4-2
Access Points . . . . . . . . . . . . . . . . . . . . . . . . . . . . . . . . . . . . . . . . . . . . . 4-5
Novell NetWare (NCP) . . . . . . . . . . . . . . . . . . . . . . . . . . . . . . . . . . . . . 4-6
Microsoft and IBM Networks (SMB) . . . . . . . . . . . . . . . . . . . . . . . . . 4-12
UNIX (NFS). . . . . . . . . . . . . . . . . . . . . . . . . . . . . . . . . . . . . . . . . . . . . 4-21
Web Browsers (HTTP) . . . . . . . . . . . . . . . . . . . . . . . . . . . . . . . . . . . . 4-22
5. CD-ROM Server Configuration
Configuration Using a Web Browser . . . . . . . . . . . . . . . . . . . . . . . . . . 5-2
Configuration Using a Text Editor . . . . . . . . . . . . . . . . . . . . . . . . . . . 5-4
5
hp.book Page 6 Thursday, April 2, 1998 4:33 PM
6. Security Management
How to Setup Access Restrictions . . . . . . . . . . . . . . . . . . . . . . . . . . . .
HP CD-ROM Server Access Rights . . . . . . . . . . . . . . . . . . . . . . . . . . .
Security Management using a Web Browser . . . . . . . . . . . . . . . . . . .
Security Management using a Text Editor . . . . . . . . . . . . . . . . . . . . .
Security Management in Specific Network Environments . . . . . . . .
6-1
6-2
6-3
6-6
6-9
A. Troubleshooting
Diagnostic Test . . . . . . . . . . . . . . . . . . . . . . . . . . . . . . . . . . . . . . . . . . .
The Front Panel Indicators . . . . . . . . . . . . . . . . . . . . . . . . . . . . . . . . .
Errors When Accessing the CD-ROM Server . . . . . . . . . . . . . . . . . . .
Difficulty Locating the CD-ROM Server in NetWare . . . . . . . . . . . . .
NetWare NDS Installation Errors . . . . . . . . . . . . . . . . . . . . . . . . . . . .
Problems When Accessing Disc Changers . . . . . . . . . . . . . . . . . . . . . .
Restoring Factory Default Settings . . . . . . . . . . . . . . . . . . . . . . . . . . .
A-2
A-3
A-5
A-6
A-6
A-8
A-9
B. The Config.ini File
C. Updating the Firmware
Firmware Updates . . . . . . . . . . . . . . . . . . . . . . . . . . . . . . . . . . . . . . . . C-1
D. Technical Specifications
General . . . . . . . . . . . . . . . . . . . . . . . . . . . . . . . . . . . . . . . . . . . . . . . . .
Network and Drive Connectors . . . . . . . . . . . . . . . . . . . . . . . . . . . . . .
Electrical and Environmental . . . . . . . . . . . . . . . . . . . . . . . . . . . . . . .
Supported Network Systems . . . . . . . . . . . . . . . . . . . . . . . . . . . . . . . .
Supported Network Protocols. . . . . . . . . . . . . . . . . . . . . . . . . . . . . . . .
Security Features . . . . . . . . . . . . . . . . . . . . . . . . . . . . . . . . . . . . . . . . .
E. Warranty
F. Regulatory Statements
Index
6
D-1
D-2
D-2
D-3
D-4
D-4
hp.book Page 1 Thursday, April 2, 1998 4:33 PM
1
Introduction
HP CD-ROM Servers
HP CD-ROM Servers connect CD-ROM drives to Ethernet
networks. All users on the network can share the information on
any CD-ROM inserted into a connected CD-ROM drive.
HP CD-ROM Server
Stand-Alone Module
Stand-Alone Module
Tower Module
HP CD-ROM Server
Tower Module
The stand-alone module provides RJ-45 and BNC network
connectors. The RJ-45 connector connects to a 10Base-T
(twisted-pair cable) network. The BNC connects to a 10Base2
(thin coaxial cable) network. The 50-pin high-density SCSI-2
connector supports up to 7 CD-ROM drives. If CD-ROM disc
changers are used, up to 56 discs can be accessed.
The tower module provides RJ-45 and AUI (Attachment Unit
Interface) network connectors. The RJ-45 connector connects to
a 10Base-T (twisted-pair cable) network. If you use an
appropriate external transceiver module, the AUI connector
allows you to connect to a 10Base2 (thin coax), 10Base5 (thick
coax) or fiber-optic network.
Introduction 1-1
hp.book Page 2 Thursday, April 2, 1998 4:33 PM
The 50-pin SCSI-2 header (typically for SCSI ribbon cable)
supports up to 7 CD-ROM drives, or up to 56 discs if disc
changers are used. The CD-ROM tower module is designed for
installation into a CD-ROM tower.
How They Work
HP CD-ROM Servers connect as nodes on an Ethernet network.
An HP CD-ROM Server acts as a network file server. This
means that it is independent of other file servers—a network
client communicates directly with the CD-ROM server. This
results in high performance and reliability.
Installation and configuration is easy. In most environments,
the network connection is the only installation required prior to
using the HP CD-ROM Server. There is no software that must
be installed on clients or file servers. Your computer will see the
HP CD-ROM Server simply as another network file server, and
you access it through standard network operating system
commands.
The HP CD-ROM Server also supports the HTTP protocol.
Therefore, you can access and manage the CD-ROM server
through a standard Web browser, such as Netscape Navigator or
Microsoft Internet Explorer.
For Windows 95 or NT 4.0 systems, a software utility is
available for use in place of a Web browser. This utility (the HP
CD-ROM Server Utility) provides an easy-to-use graphical
interface to manage your HP CD-ROM Servers. You can
download this software from the HP Web site (see the Electronic
Support section in the front of this manual for the HP Web
address).
Note
1-2 Introduction
❏ At the HP Web site, you can also download technical support
information, and the latest versions of the CD-ROM server
firmware and software utilities. Check with your HP-authorized
dealer for additional assistance.
hp.book Page 3 Thursday, April 2, 1998 4:33 PM
Where to Use Them
HP CD-ROM Servers can be used in a variety of network
environments. It supports basic messaging and network
protocols, including:
• NCP (NetWare Control Protocol) over IPX
• SMB (Server Message Block) over NetBEUI (NetBIOS
Extended User Interface)
• SMB over NetBIOS/TCP/IP
• NFS (Network File System) over UDP/IP.
• HTTP (HyperText Transfer Protocol) over TCP/IP for
access from a Web browser
Network clients that use these networking protocols can access
the CD-ROM server. Refer to appendix D for more information.
NetWare Networks
HP CD-ROM Servers emulate Novell File Servers running
NetWare 3.x and 4.x. No NLM is required.
Microsoft and IBM
Networks
HP CD-ROM Servers are easily shared using the SMB protocol,
which is integrated with popular PC systems (such as Microsoft
Windows 95 and NT, and IBM OS/2 systems).
UNIX Networks
Internet/Intranet
Networks
HP CD-ROM Servers are mounted using NFS.
HP CD-ROM Servers are accessed from a Web browser in
environments that can use HTTP over TCP/IP.
Features and Benefits
File Server
Independence
The HP CD-ROM Server comes pre-installed with all the
network functionality required. It does not rely on intermediate
communications with a file server.
Ease-of-Use
The HP CD-ROM Server is designed to be easy to install and
use. Software on disks or tapes are not needed to install the
server. The server uses basic network protocols (NCP, SMB and
NFS), so there is no need to learn any special software to access
the server.
Introduction 1-3
hp.book Page 4 Thursday, April 2, 1998 4:33 PM
Flexibility
As a network node, the HP CD-ROM Server can be located
anywhere on the network, either close to users or in secured
areas. Since it is a multi-protocol device, it can simultaneously
support a variety of network operating environments, including
Novell NetWare, Microsoft and IBM Network Operating
systems, UNIX and Internet/intranets. HP CD-ROM Servers
also provides flexible connectivity to CD-ROM drives and
CD-ROM disc changers.
Web Server
Functionality
As a Web server, it can be accessed from a Web browser, such as
Netscape Navigator or Microsoft Internet Explorer. Web
browser access includes configuration and management.
Security
Speed
CD-ROM access can be restricted by setting up password
protection. It is also possible to limit the number of
simultaneous users of any CD-ROM to comply with license
agreements.
By using a 32-bit RISC processor and cache memory, there is
ample throughput for demanding CD-ROM applications.
Maintenance
New firmware can be easily downloaded to the HP CD-ROM
Server’s flash memory over the network.
Remote Management
The HP CD-ROM Server supports the Simple Network
Management Protocol, SNMP, for management applications
that use it. Management can also be done through a Web
browser.
1-4 Introduction
hp.book Page 1 Thursday, April 2, 1998 4:33 PM
2
Basic Installation
Overview
A typical Ethernet network using an HP CD-ROM Server
Stand-Alone Module is illustrated below. For a Tower Module,
the CD-ROM drives and tower module will normally be installed
inside a tower chassis.
Network Hub
CD-ROM Server
Module
Network cables
SCSI cables
CD-ROM drives
Basic Installation 2-1
hp.book Page 2 Thursday, April 2, 1998 4:33 PM
Unpacking
Unpack and inspect all parts for damage. Contact your dealer if
anything is missing. All packaging materials can be recycled.
Each HP CD-ROM Server product contains the following:
• CD-ROM server module
• HP CD-ROM Server User’s Guide (this manual).
• HP CD-ROM Server Quick Installation Guide
Included with the Stand-Alone Module only:
• One of the following power supply modules (19 Vdc):
Region
North America/USA
Europe
United Kingdom
CAUTION
HP Part Number
0950-3274
0950-3268
0950-3270
❏ Verify the part number of the power supply for your
country. Failure to comply may result in damage to the
power supply and other equipment. For specifications, see
appendix D.
Included with the HP CD-ROM Tower Module only:
• 4 mounting screws for the CD-ROM server.
• 2 screws and washers for the network connection board.
• Network connector board and ribbon cable assembly.
• A self-adhesive LAN hardware address label to attach to
the tower enclosure.
2-2 Basic Installation
hp.book Page 3 Thursday, April 2, 1998 4:33 PM
Accessories
You may need some additional hardware to complete your
installation. Available hardware from Hewlett-Packard are
listed below.
SCSI Cables
Note
For the Stand-Alone Module Only. HP provides the following
SCSI-2 cables and terminators. For other SCSI-2 cables or
terminators, consult with HP or your local cable vendor.
❏ Industry-standard SCSI-2 cables and terminators are available
in different lengths and with different connector types. You
must obtain the proper cables to match the connectors on your
CD-ROM drives. HP SCSI cables may, or may not, be suitable
for your drives..
HP Product (meters)
C2955A (0.5 m)
C2908A (1.0 m)
C2956A (1.5 m)
C2957A (2.0 m)
K2286 (1.0 m)
K2296 (1.0 m)
K2297(1.5 m)
92222A (0.5 m)
92222B (1.0 m)
92222C (2.0 m)
50-pin high-density (thumb screws),
male/male
50-pin low-density (bail lock) to high-density
(latch clip), male/male
50-pin low-density (bail lock) to high-density
(thumb screws), male/male
50-pin low-density (bail lock), male/male
(For drive-to-drive connections only)
Active Terminator, 50-pin low-density, (bail
lock)
Active Terminator, 50-pin high-density, (thumb
screws)
K2291
C2904A
Additional Power
Supplies
SCSI Connector Type
For the Stand-Alone Module only. HP provides the following
power supplies for other countries and regions:
Region
Japan
Australia
South Africa
Israel
HP Part Number
0950-3267
0950-3269
0950-3272
0950-3273
Basic Installation 2-3
hp.book Page 4 Thursday, April 2, 1998 4:33 PM
Transceivers
For the Tower Module only. HP provides the following AUI
transceivers:
HP Product
28641B
28683A
Towers and
SCSI Drives
AUI Transceiver
ThinLAN coaxial cable (BNC)
Fiber-optic cable (ST)
HP provides the following towers and SCSI drives:
HP Product
C2987A
C2988A
C2997A
Description
8-bay tower for HP CD-ROM Server Tower
Module. Provides SCSI backplane plug-in
connectors.
7-bay tower for HP CD-ROM Server StandAlone Module (requires a SCSI cable to the
first drive). Provides SCSI backplane plug-in
connectors.
HP 20X CD-ROM drive (includes SCSI plug-in
assembly)
Connecting the Hardware
Before You Begin
•
•
•
•
2-4 Basic Installation
Stand-alone version only: Make sure that the power supply
(19 Vdc) included with your product is marked with the
correct AC voltage and frequency for your country.
Verify that power is not connected to the CD-ROM server
or any of the CD-ROM drives when making changes to the
SCSI cables. The SCSI bus may be damaged if you connect or
disconnect any units when the power is on.
If you have not already done so, record the LAN hardware
(MAC) address of the CD-ROM server. You will need this
address during installation. The address is printed on the label
placed on the bottom of the server, in the form
00-60-B0-hh-hh-hh (where h is a hexadecimal number).
Verify with your Network Administrator that a network
connection is set up to connect the CD-ROM server and
configure it onto the network.
hp.book Page 5 Thursday, April 2, 1998 4:33 PM
Installing the
Tower Module in a
CD-ROM Tower
If you are installing a CD-ROM Stand-Alone Module, or if your
Tower Module has already been installed in a tower, you can skip
this section.
The HP CD-ROM Server Tower Module is intended to be
installed in standard CD-ROM towers. The dimensions of the
CD-ROM server are the same as for standard CD-ROM drives,
which is 5.25 inch half-height.
To install the CD-ROM server, follow the steps below:
WARNING
❏ To avoid the risk of electrical shock or other injury,
disconnect power from the tower before removing the
cover, chassis, or enclosure.
1. Prepare the CD-ROM tower for the installation, for example,
remove the chassis cover.
2. Record the LAN hardware (MAC) address of the CD-ROM
server. You will need this number during the network
configuration described in chapter 3. The address is found on
the label on the bottom of the server.
Note
❏ An additional label that identifies the same LAN hardware
address is included with the CD-ROM server tower module.
This label is intended to be attached to the outside of the tower
chassis (the CD-ROM server may not be accessible after it is
installed).
3. Refer to the tower installation instructions for additional
hardware to be assembled onto the CD-ROM server prior to
installation.
4. Slide the CD-ROM server into the tower.
Basic Installation 2-5
hp.book Page 6 Thursday, April 2, 1998 4:33 PM
5. If required, use the four screws supplied to fix the CD-ROM
server in place. Use the upper or lower holes depending on the
type of tower and its mounting requirements. See the figure
below.
CAUTION
❏ The length of the screws must not exceed 0.2 inch (5 mm). If
they do, the internal components of the CD-ROM server
may be damaged.
6. Attach the power cable to the CD-ROM server. The power
connector on the CD-ROM server is a standard PC 4-pin power
connector (12 and 5 Vdc), as shown in the picture below.
Power supply connector
7. Connect the external network connector board to the CD-ROM
server using the ribbon cable. The network connector board
includes network connectors and the Reset button.
The board is intended to be mounted on the back of the
CD-ROM tower. The mounting plate on the board fits into
standard parallel-connector cut-out holes available on most
towers.
2-6 Basic Installation
hp.book Page 7 Thursday, April 2, 1998 4:33 PM
.
External network connector board
Proceed to “Connecting CD-ROM Drives to the CD-ROM
Server”.
Connecting
CD-ROM Drives to
the CD-ROM
Server
Note
If your CD-ROM server tower module and drives have been
pre-installed in a tower, proceed directly to “Connecting the
CD-ROM Server to the Network”.
You can connect up to seven SCSI CD-ROM drives to a single
CD-ROM server. You must use the SCSI cables that are
appropriate for your drives. If the cables were not supplied with
your drives, they must be ordered separately.
❏ Be sure to follow the guidelines for connecting SCSI devices:
• Minimize the SCSI bus length, which is the total length
of cable between SCSI bus terminators. However, do not
use device-to-device cables that are less than 0.5 meters.
• Do not exceed the maximum SCSI bus length of 6 meters.
• To work properly, the SCSI bus must be electrically
terminated at both ends using SCSI terminators. The
CD-ROM server contains an internal terminator for one
end of the SCSI bus. You must provide an external
terminator for the other end of the bus.
• Each unit on the SCSI bus must have a unique SCSI
address, or “ID”. The CD-ROM server reserves SCSI
address 7. You can use values 0 through 6 for the CDROM drives.
Note
❏ IDE and EIDE CD-ROM drives are not supported.
Basic Installation 2-7
hp.book Page 8 Thursday, April 2, 1998 4:33 PM
1. Connect a SCSI cable to the SCSI connector on the CD-ROM
server and to the first CD-ROM drive.
Connect the SCSI cable to the first CD-ROM drive. If there
are more drives (up to 7), use additional SCSI cables to
connect the drives.
50-pin High-density
SCSI-2 connector
(Stand-Alone Module)
50-pin header
SCSI-2 connector
(Tower Module)
2. Connect a SCSI terminator to the last drive in the SCSI chain:
• If there is only one CD-ROM drive, then it is the “last”
drive in the chain and must be terminated.
• Do not terminate other CD-ROM drives placed between
the CD-ROM server and the last drive.
• The HP CD-ROM
Server contains builtin SCSI termination;
therefore, the server
must be physically
located at one end of
the chain.
3. Set the SCSI address of
the CD-ROM drive(s).
Each connected drive
must have a unique SCSI
address. SCSI addresses
0 through 6 may be used.
The SCSI address of the
HP CD-ROM Server is 7
and cannot be changed.
See the CD-ROM drive
documentation for
instructions on how to set
the address.
2-8 Basic Installation
1
2
External SCSI Terminator
hp.book Page 9 Thursday, April 2, 1998 4:33 PM
Note
❏ You should refer to the documentation provided with your
CD-ROM drive. Some SCSI drives may contain special
termination instructions.
4. If you are installing the CD-ROM server in a tower, connect the
power connector and replace the tower enclosure.
Connecting the
CD-ROM Server to
the Network
The HP CD-ROM Server Stand-Alone Module is equipped with
RJ-45 (twisted-pair cable) and and BNC (thin coaxial cable
connectors.
The Tower Module, on the other hand, provides RJ-45 and an
AUI (Attachment Unit Interface, 15d-pin ‘D’) connectors. The
AUI connector allows you to connect to a 10Base2 (thin coax),
10Base5 (thick coax) or fiber-optic cable network using an
appropriate external transceiver.
Power supply
connector
RJ-45
BNC
Network connectors
4-pin Power
connector
RJ-45
AUI
Network connectors
To connect the CD-ROM server to your network follow these
steps:
Note
❏ Verify that power to the CD-ROM server is off. (For the standalone module, simply disconnect the power connector.)
5. Connect the network cable to the appropriate connector. Use
only one of the network connectors (on the stand-alone module,
use either the RJ-45 or BNC connector)
Basic Installation 2-9
hp.book Page 10 Thursday, April 2, 1998 4:33 PM
.
5
6. Turn power on using the following instructions:
• Stand-alone version only: First connect power to all
CD-ROM drives and turn them on. Then connect the
external power supply to the HP CD-ROM Server.
• Tower module only: Simply switch the power on to the
entire CD-ROM tower assembly containing the drives
and HP CD-ROM Server.
7. Observe the CD-ROM server’s indicator lights. They will all
flash during power-on and self-test. When the STATUS
indicator (yellow) stops flashing and remains off, the CD-ROM
server is ready for use.
Depending on the number of drives in use, this may take from
a few seconds to several minutes.
8. Insert a CD-ROM disc into a drive and verify that the ‘CD’
indicator (green) on the CD-ROM server turns on. If it does not,
verify your SCSI cable connections and addresses, then power
cycle the CD-ROM server. (If it still does not turn on, refer to
appendix A.)
Hardware installation is now completed. Proceed to chapters 3,
4, 5 and 6 to setup your CD-ROM server for use.
2-10 Basic Installation
hp.book Page 1 Thursday, April 2, 1998 4:33 PM
3
Network Configuration
This section contains configuration information for the following
network environments:
Note
•
Novell NetWare . . . . . . . . . . . . . . . . . . . . . . . . . . . . . page 3-1
•
Microsoft & IBM Networks . . . . . . . . . . . . . . . . . . . . page 3-3
•
TCP/IP Networks . . . . . . . . . . . . . . . . . . . . . . . . . . . . page 3-3
❏ To use the CD-ROM server in the TCP/IP environment you
must first set its IP address. This can be done from within
the TCP/IP environment, as described on page 3-3.
Novell NetWare Networks
The HP CD-ROM Server emulates both a NetWare 3.x bindery
server and a NetWare 4.x NDS (Novell Directory Services)
server.
Installation as a
Bindery Server
If used as a Bindery server, no installation is required prior to
using and accessing the HP CD-ROM Server. To access your
CD-ROMs, refer to chapter 4.
Installation as an
NDS Server
If used as an NDS-compatible server, the HP CD-ROM Server
must first be installed in the NDS tree, which simply involves
setting the appropriate configuration parameters.
Note
❏ If this is the first CD-ROM server being installed in your
NDS tree, the CD-ROM Server will try to extend the NDS
Schema with a new attribute to the “NCP server” class. This
new attribute will not affect the operation of your NetWare
servers. This schema extension has been approved by
Novell.
❏ Adding the schema extension requires supervisor rights to
the [Root] of the NDS tree. This means that the user in the
NDSAdminName parameter must have supervisor access
rights.
Network Configuration 3-1
hp.book Page 2 Thursday, April 2, 1998 4:33 PM
Chapter 5 describes different methods that you can use to set
the NetWare configuration in the HP CD-ROM Server; the
required configuration settings are described below.
Parameter name
Value
Description
TimeZone
=
Must be set to the correct Time Zone
that the CD-ROM server is operating in.
TimeSyncSource
= None
Default is None. Set to NDS to enable
the HP CD-ROM Server to get its time
from the NetWare network.
NDSEnable
= yes
Must be set to yes to enable the NDS
login.
NDSTreeName
=
The name of the tree that you want to
install the server into.
NDSServerContext
=
The context in the NDS tree where you
want to install the server.
=
The distinguished name of a user or
administrator with Supervisor or Create
rights in the context where you want to
install the server.
NDSAdminPassword
=
The password of the administrator
entered in NDSAdminName shown
above. Once written, this password will
appear as ******.
NDSInstall
= no
Change this to yes when you are ready
to install the server.
NDSAdminName
The NDS server installation will begin 5 seconds after saving
the configuration settings to the CD-ROM server. The
installation should take about 20 seconds, after which users will
be able to access the CD-ROM server using NDS mode.
Refer to chapter 4 for instructions on accessing your CD-ROM
server.
After installation you will have to logout and then login again to
have all the necessary Rights on the HP CD-ROM Server object
and the associated volume. Using NetWare Administrator, you
will find a new server object and corresponding volume object in
the context you chose above.
If there are any problems with the installation you can check for
errors in the logfile.txt file in the CD-ROM Server’s config
directory. Refer to “NetWare NDS Installation Errors” in
appendix A if you need more information.
3-2 Network Configuration
hp.book Page 3 Thursday, April 2, 1998 4:33 PM
Microsoft and IBM Networks
The HP CD-ROM Server does not require any configuration
when using Microsoft and IBM networks that use SMB over
NetBEUI (such as Windows for Workgroups, Windows 95,
Windows NT or OS/2). For instructions on making a network
connection to your CD-ROM server, proceed to chapter 4.
Note
Microsoft and IBM networks that use SMB over TCP/IP require
TCP/IP configuration as described in “TCP/IP Networks” below.
TCP/IP Networks
To use the HP CD-ROM Server in the TCP/IP environment, you
must select an available Internet Protocol (IP) address. On some
systems, you may need a unique host name to associate with the
IP address. The IP address can be easily set from UNIX or
Windows NT systems.
Note
❏ To configure IP addressing on Windows 95 (and other
systems that support TCP/IP networks), and to configure
other TCP/IP parameters—such as a subnet mask, default
gateway address—you will need to edit and save the
CD-ROM servers config.ini file as described in chapter 5.
Before you begin
•
Obtain root privileges on your UNIX system or
administrator privileges on the Windows NT server.
•
Confirm with your Network Administrator that you may
proceed with network configuration.
Obtain an unused IP address, and a host name (if
necessary), from your Network Administrator.
•
Note
❏ Do not use the factory default IP address (192.36.253.80)
when installing your HP CD-ROM Server. Always consult
your Network Administrator before assigning an IP address.
•
Obtain the LAN hardware (MAC) address found on the label
on the bottom of the CD-ROM server (or attached to the
tower enclosure).
•
Verify that the CD-ROM server is powered up and connected
to the network.
Network Configuration 3-3
hp.book Page 4 Thursday, April 2, 1998 4:33 PM
Assigning an
IP Address and
Host Name
To establish communication with the TCP/IP network, an IP
address must be assigned to the CD-ROM server and, if
necessary, associated with a unique host name in your system
host table. The IP address must be sent to the CD-ROM server
to configure it.
If you are using host names, associate a host name with your IP
address using the appropriate procedures for your system
(consult your Network Administrator or refer to your system
manuals).
Sending the IP
Address to the
CD-ROM Server
The IP address can be sent to the CD-ROM server in several
ways, depending on your network operating system.
There are two manual methods:
•
Editing the config.ini file for the CD-ROM server. This
requires that you already have network access to the
CD-ROM server (see chapter 5.)
•
Using ARP – (Address Resolution Protocol). On supported
systems (Windows NT and UNIX), this the easiest method.
However, it requires that the IP address is sent to each new
device individually. The protocol is not routable, that is, the
workstation from which the configuration is made must be
located on the same network segment as the CD-ROM
server.
There are three automated methods: RARP, BOOTP and DHCP.
The main characteristics for each method are:
3-4 Network Configuration
•
RARP – (Reverse Address Resolution Protocol) downloads
the IP address to each device automatically. It requires a
RARP daemon on your system. RARP operates within a
single network segment only.
•
BOOTP – (Bootstrap Protocol) is similar to RARP, but
operates on the entire network. It requires a bootp daemon
on your system.
•
DHCP - (Dynamic Host Configuration Protocol) allows for
the automatic but temporary assignment of IP addresses
from a predefined pool of addresses. In the absence of either
an active RARP or BOOTP daemon running on the host,
DHCP will, when enabled, cause the selected host to
automatically allocate and download a free IP address,
Default Gateway (Router) address and subnet mask to the
requesting CD-ROM server. It also provides data that
defines how long the IP addresses will remain valid.
hp.book Page 5 Thursday, April 2, 1998 4:33 PM
Choose the method best suited to your needs. If necessary, the
RARP, BOOTP and DHCP methods can be enabled or disabled
by editing the RARPEnable, BOOTPEnable and DHCPEnable
parameters in the config.ini file as described in chapter 5
“CD-ROM Server Configuration”. See appendix B for default
values.
Note
❏ Only one of the RARP, BOOTP, DHCP methods for setting
the IP address should be enabled at the same time. If both a
BOOTP and a DHCP server on the network provides an IP
address, then the BOOTP address is used. If both a RARP
and a BOOTP or DHCP server provides an IP address at the
same time, the results are undefined.
In Windows NT,
Set the IP Address
Using ARP
In Windows NT, the IP address can be sent to the CD-ROM
server using an ARP command. Perform the following
commands from a DOS prompt to send the IP address to the
CD-ROM server and to verify that it was successfully
configured. Enter the LAN hardware address (specified on the
label attached to the bottom of the CD-ROM server). Each pair
of digits must be separated by a hyphen. See the example below:
arp -s <IP address> <LAN hardware address>
ping <IP address>
Example:
arp -s 192.124.138.80 00-60-b0-11-00-86
ping 192.124.138.80
The host will return ‘Reply from 192.124.138.80...’ or similar
message indicating that the address has been set and that
communications with the CD-ROM server is established.
Note
❏ When you execute the ping command for the first time, the
response time may be longer than usual. The ping command
is used to write the IP address to the CD-ROM server.
❏ Once the CD-ROM server has communicated using its IP
address, the arp and ping commands cannot be used to
change the IP address. This inhibits accidental or
unauthorized changes of the IP address. To enable the CDROM server to accept setting of the IP address using ARP,
you must restart it (cycle power).
Network Configuration 3-5
hp.book Page 6 Thursday, April 2, 1998 4:33 PM
In UNIX, Set the
IP Address Using
ARP
Perform the following commands to download the IP address
and verify the communication. The LAN hardware address is
located on the label attached underneath the HP CD-ROM
Server (or on the tower chassis). The LAN hardware address is
entered in pairs of digits separated by a colon. See the example
below:
arp -s <IP address> <LAN hardware address> temp
ping <IP address>
Example:
arp -s 192.124.138.80 00:60:b0:11:00:86 temp
ping 192.124.138.80
The host will return a message similar to ‘192.124.138.80 is
alive’ which indicates that the address has been set and that
communication is established.
Note
❏ The arp -s command may vary between different systems.
Some BSD-type systems expect the IP address (or host
name) and LAN hardware address in reverse order. IBM
AIX systems require the additional argument ether for
Ethernet networks, for example:
arp -s ether salesdept 00:60:b0:11:00:86 temp
❏ When you execute the ping command for the first time you
should expect a response time that is longer than usual. The
ping command is used to write the IP address to the
CD-ROM server.
❏ Once the CD-ROM server has established communications
using an IP address, the arp and ping commands cannot
be used to change the address. This prevents accidental
or unauthorized change of the IP address. To allow the
CD-ROM server to accept a new IP address using ARP, you
must restart (power cycle) the CD-ROM server.
3-6 Network Configuration
hp.book Page 7 Thursday, April 2, 1998 4:33 PM
In UNIX, Set the
IP Address Using
RARP
Follow these steps to download the Internet (IP) address using
the RARP method:
1. Append the following line to your LAN hardware (MAC)
address table (typically /etc/ethers):
<LAN Hardware Address>
<host name>
Example:
00:60:b0:11:00:86
cdserv
2. Make sure the host table and alias name databases are
updated as required by your systems.
3. Start the rarp daemon (if not already running), typically by the
command: rarpd -a
4. Restart (power cycle) the HP CD-ROM Server to download the
IP address.
In UNIX, Set the
IP Address Using
BOOTP
Follow these steps to download the IP address using BOOTP:
1. Append the following entry to your boot table (typically
/etc/bootptab):
<host name>:ht=<hardware type>:vm=<vendor magic>:\
:ha=<hardware address>:ip=<IP address>:\
:sm=<subnet mask>:gw=<gateway field>
Example:
cdserv:ht=ether:vm=rfc1048:\
:ha=0060b0110086:ip=192.124.138.80:\
:sm=255.255.255.0:gw=192.124.138.254
2. Make sure the host table and alias name data bases are
updated as described on page 3-4.
3. Start the bootp daemon (if not already running), typically by
the command: bootpd -a
4. Restart (power cycle) the HP CD-ROM Server to download the
IP address, default gateway (gw) address and subnet mask.
Network Configuration 3-7
hp.book Page 8 Thursday, April 2, 1998 4:33 PM
Note
❏ The ht and vm fields must be entered exactly as in the
example. For Ethernet, ht=ether.
❏ The ha and ip fields are the LAN hardware (MAC) address
and IP address respectively. Do not use the addresses in the
example above. Use the LAN hardware address specified on
the label on your HP CD-ROM Server, and use the IP
address that was assigned by the Network Administrator.
❏ The sm and gw fields correspond to the subnet mask and
default gateway (router) address parameters. See chapter 5
“CD-ROM Server Configuration”.
Set the IP Address
Using DHCP
Follow the step-by-step procedure below to use DHCP:
1. Edit or create a scope in the DHCP manager of the dhcp
daemon. The entries made in this scope should include the
following:
•
•
•
•
•
•
Subnet mask
Default router Internet address
NetBIOS over TCP/IP name server Internet address(es)
NetBIOS over TCP/IP node type*
NetBIOS over TCP/IP scope ID
Lease duration
*node type The CD-ROM server can act either as a B Node
(WINS disabled), or as an H Node (WINS enabled)
2. Activate the scope
3. Set the DHCPEnable parameter to yes in the config.ini file of the
CD-ROM server.
Using WINS with
the CD-ROM
Server
If you intend to use WINS, you must set the WINSEnable
parameter to yes in the config.ini file of the CD-ROM server.
You can also set the Primary and Secondary WINS server
address, and the Scope ID, as required, by using one of the
methods outlined in chapter 5 “CD-ROM Server Configuration”.
The CD-ROM server is now ready to be accessed using TCP/IP.
3-8 Network Configuration
hp.book Page 9 Thursday, April 2, 1998 4:33 PM
Time Synchronization
Setting the time on
the CD-ROM
Server
The CD-ROM server clock has a volatile memory, so the correct
time must be entered whenever it is restarted. By editing the
CD-ROM server’s config.ini file, the time may be set by
manually entering the Date and Time parameter values, or can
be configured to set automatically via the network operating
system
Parameter name
Value
Description
Date
= 97-06-28
yy-mm-dd, enter the date followed by !
to set manually.
Time
= 14:46:30
hh:mm:ss, enter the time followed by !
to set manually.
If you are using NetWare NDS you can set your CD-ROM server
for automatic time synchronization operation by setting the
TimeSyncSource parameter to NDS as shown below.
Parameter name
Time
Synchronization in
NetWare NDS
Value
Description
TimeZone
=
Must be set to the Time Zone that the
CD-ROM server is operating in. Refer
to “TimeZone parameter permissible
values” in appendix B.
TimeSyncSource
= NDS
Default is None. Set to NDS to enable
the CD-ROM server to get its time from
the NetWare network.
The CD-ROM server acts as a NetWare Secondary Time Server.
Time synchronization is normally obtained from a NetWare
Time Server using the SAP method. This method is set by the
CD-ROM server’s TimeSyncSources. The default for this
parameter is a value of SAP.
Parameter name
Value
TimeSyncSources = SAP
Description
The default is SAP for the network
agreed time. Alternatively enter the
server names to be contacted for time
synchronization.
Alternatively if you have a Time Provider Group on your system
you can choose to provide a list of servers for the CD-ROM server
to contact to obtain its time synchronization. The list can also
contain Secondary Time Servers. The list of servers is inserted
into the TimeSyncSources parameter as follows:
TimeSyncSources = server1,server2,server3,....
Network Configuration 3-9
hp.book Page 10 Thursday, April 2, 1998 4:33 PM
3-10 Network Configuration
hp.book Page 1 Thursday, April 2, 1998 4:33 PM
4
Mounting or Mapping Network Drives
If you are new to HP CD-ROM Servers, you should read the first
part of this chapter to learn about the file system and how to
access the CD-ROMs. Subsequently, proceed to the appropriate
section in this chapter depending on your operating environment
and client system:
•
Novell NetWare (NCP) . . . . . . . . . . . . . . . . . . . . . . . page 4-6
(Clients: Windows 95, Windows NT, Windows for
Workgroups and DOS)
•
Microsoft & IBM Networks (SMB). . . . . . . . . . . . . . page 4-12
(Clients: Windows 95, Windows NT, Windows for
Workgroups, OS/2 and DOS)
•
•
Note
UNIX (NFS) . . . . . . . . . . . . . . . . . . . . . . . . . . . . . . . page 4-21
Web Browsers (HTTP) . . . . . . . . . . . . . . . . . . . . . . page 4-22
❏ The appropriate network client and transport protocols must
be running on your computer. The following protocols are
supported:
• NCP (NetWare Control Protocol) over IPX
• SMB (Server Message Block) over NetBIOS/NetBEUI
• SMB over NetBIOS/TCP/IP
• NFS (Network File System) over UDP/IP.
• HTTP (HyperText Transfer Protocol) over TCP/IP for
access from a Web browser
❏ Refer to your Network Operating System manuals for
instructions.
Mounting or Mapping Network Drives 4-1
hp.book Page 2 Thursday, April 2, 1998 4:33 PM
The HP CD-ROM Server File System
The CD-ROM server will appear to your system as a file server.
Like any other file server it has a directory structure where files
are stored. The CD-ROM server directory structure is outlined
below:
These folders contain
each CD-ROM’s files
and data.
The index file is used
for Web browsing.
The config folder holds
configuration files used
by the CD-ROM
server.
These folders contain
the files that control
access rights.
The purpose of each folder is more fully explained on the
following pages.
The cd Folder
When you insert a CD-ROM into a connected drive, a folder for
that CD-ROM is created in the cd folder on the server. All the
files on that CD-ROM are accessed through this folder.
The name of the cd folder will comply with the following rules:
•
•
The volume name held on the CD-ROM will be used if alias
names have not been set (see below).
If the CD-ROM volume name is not detected (for example, it
is specified in upper-case letters), and there are no alias
names set, then the CD-ROM server will automatically
allocate a name of the form cd_nnnnn, where nnnnn is a
unique five digit number.
4-2 Mounting or Mapping Network Drives
hp.book Page 3 Thursday, April 2, 1998 4:33 PM
•
If the system administrator has set a CD-ROM alias name,
it will be used instead of the volume name.
Often, a volume name is not a good representation of the
CD-ROM contents. A CD-ROM alias name is a convenient
way of setting a more significant or recognizable name.
Note
❏ If you run an application from a CD-ROM, or look for its
associated files on the CD-ROM, you may not be able to use a
CD-ROM alias name because the application may not
recognize it.
•
If the system administrator has set a SCSI drive alias name
this will be used in place of any of the above names. The
drive alias name is also known as the SCSI alias name, or
SCSIAlias.
SCSI alias names are useful for the following reasons:
• When you set a SCSI alias, any CD-ROM inserted into
the drive will be seen as having this name. Thus you
could use the same drive for a series of CD-ROMs, such
as a monthly issue, and you will not have to enter a new
name each time you change the disc.
• When you enter a SCSI alias, the volume rights for any
disc inserted in the drive will be determined by the drive
access rights. This is convenient because the access
rights only have to be set once, and then the CD-ROM in
the drive can be changed without any need to enter
access rights each time.
How do I set alias names? Information about setting the
CD-ROM alias name and the SCSI alias name, along with their
access rights, can be found in chapter 6 “Security Management”.
The volumes folder
Note
The volumes folder contains all files used for controlling the
access of the CD-ROM server, the connected CD-ROM drives,
and the CD-ROMs inserted.
❏ Information on these files is necessary only if you intend to
use a text editor to set the names, passwords, configuration
and other parameters. If you use a Web browser, these files
are accessed differently.
Mounting or Mapping Network Drives 4-3
hp.book Page 4 Thursday, April 2, 1998 4:33 PM
Three different folders are found under the volumes folder:
•
server folder. The files in the server folder (cd.txt,
config.txt, root.txt and volumes.txt) control access to the file
system of the CD-ROM server itself. The file default.txt
contains the default settings to be used when either a new
CD-ROM is inserted, or a new CD-ROM drive is connected.
•
scsi folder. The scsi folder contains a file for each SCSI ID
named id<x>lun<y>.txt (where <x> is the SCSI address and
<y> the LUN address), and will be created automatically. If
the alias name in the file is configured, this file will control
access to the CD-ROM inserted in the drive.
cdrom folder. When inserting a CD-ROM, the cdrom
folder will contain a text file that is automatically created. It
will be identified through its volume name. This file controls
the user access to the CD-ROM. Settings for up to 56
CD-ROMs can be stored in the CD-ROM server at any time.
The settings will remain even if the CD-ROM is ejected.
When the limit is reached, the oldest settings are discarded
when a new CD-ROM is inserted.
•
For more information about controlling access to the CD-ROM
server see chapter 6 “Security Management”.
The config folder
The config folder contains various CD-ROM server configuration
files.
•
The html and public folders contain HTML files and images
used when accessing the CD-ROM server from Web
browsers.
•
•
The stat.txt file contains CD-ROM server statistics.
The config.ini file is used to set the CD-ROM server
parameters as outlined in chapter 5 “CD-ROM Server
Configuration”.
The scsi.txt contains a list of the attached CD-ROM drives as
described in chapter 6 “Security Management”.
•
•
The file index.htm is used when accessing the CD-ROM
server from a Web browser.
4-4 Mounting or Mapping Network Drives
hp.book Page 5 Thursday, April 2, 1998 4:33 PM
Access Points
The HP CD-ROM server is integrated into your network
operating system just like any other file server and you use the
same commands to access it. To be able to access CD-ROMs from
your applications, you need to make them available to your
system, that is you ‘mount’ the CD-ROM server on UNIX
systems or ‘map’ the server to a drive letter on PC systems.
There are several different mounting or mapping access points
that you can specify:
•
•
•
Note
root level access: The top level of the CD-ROM server
directory structure is used as the access point. The user of
the CD-ROM server can access all files on the server
including the config and volumes folders. This is useful for
Network Administrators, who have to be able to configure
and monitor the CD-ROM server.
cd folder access: The cd folder is used as the access point.
The user can access all CD-ROMs inserted into the drives
connected to the server. On PC systems, this makes it
possible to use only one drive letter to access all drives
connected to the CD-ROM server. This is the recommended
access point for normal users.
CD-ROM access: An inserted CD-ROM—or connected
CD-ROM drive if the SCSI ID has been given an alias
name—can be used as the access point. In other words, a
SCSIAlias is used as the access point and only the files on
that CD-ROM can be accessed. On PC systems this makes it
possible to map a drive letter to a single CD-ROM. This is
useful or even necessary with CD-ROM software that
expects to find its data at the root level.
❏ SCSIAlias The SCSI alias name is a useful feature when
administrating monthly updated CD-ROMs. This means
that the access restrictions can be defined only once, and
users do not have to re-mount the folder each time a new
CD-ROM is inserted.
Mounting or Mapping Network Drives 4-5
hp.book Page 6 Thursday, April 2, 1998 4:33 PM
Novell NetWare (NCP)
When accessing your CD-ROM server through NetWare, you use
the same procedures as accessing any other NetWare file server.
This section gives you examples of how to access the CD-ROM
server from Novell clients on Windows 95, Windows NT,
Windows for Workgroups and DOS.
The procedures are very similar if you are using Bindery or
NDS—the main difference is that for Bindery, you will be asked
to enter your user name and password when logging in to the
CD-ROM server.
Note
❏ The examples below assume that you have not changed the
NetWare server name on the CD-ROM server. The default
server name in the NetWare environment is HPhhhhhh_NW,
where hhhhhh are the last six digits of the CD-ROM server
LAN hardware address. If you have changed the server
name, simply replace the name in our examples with the
assigned name.
❏ Alternatively, login scripts can be used to automate and
distribute access to the CD-ROMs. To map the networked
CD-ROMs, the attach/map (in NetWare 3.x) or login/map
(in NetWare 4.x) commands are normally used.
❏ To enable the CD-ROM server to be seen by the NDS tree, it
is necessary to change the settings within the configuration
file (config.ini), as described in “Installation as an NDS
Server” in chapter 3 .
Windows 95 and
Windows NT 4.0
1. Start the Windows Explorer from the Start/Programs Menu.
2. Expand the Network Neighborhood icon. The available
resources are displayed.
4-6 Mounting or Mapping Network Drives
hp.book Page 7 Thursday, April 2, 1998 4:33 PM
3. Expand the Entire Network icon and open the NetWare
networking folder.
4. Double click the entry for your new CD-ROM server. The
default entry name is HPhhhhhh_NW, where hhhhhh are the last
six digits of the CD-ROM server LAN hardware (MAC)
address. The name can be changed during configuration as
described in chapter 5 “CD-ROM Server Configuration”.
5. If you are using Bindery mode you will be prompted to enter
your user name and password, unless you are already logged
in. Before the CD-ROM server has been set up, all users have
full access to it.
Mounting or Mapping Network Drives 4-7
hp.book Page 8 Thursday, April 2, 1998 4:33 PM
6. Once you are logged in to the CD-ROM server, expand the SYS
and cd folders to display all the resources:
7. If you wish to map the CD-ROM server to a drive letter, rightclick one of the following CD-ROM server resources:
• For root level access, right click SYS.
• For cd folder access, right click the cd folder.
• For CD-ROM access, right click the CD-ROM you want to
access.
If you do not wish to map the CD-ROM server to a drive
letter, just continue to explore the CD-ROM server until the
file you need is found.
8. From the pop-up menu, select Map Network Drive...
4-8 Mounting or Mapping Network Drives
hp.book Page 9 Thursday, April 2, 1998 4:33 PM
9. Select a drive letter for your CD-ROM server.
10. Check Reconnect at logon if you wish to use the CD-ROM
server under the same drive letter the next time you start your
computer.
11. Click the OK button. The CD-ROM server is ready for use.
Windows for
Workgroups
1. Start the File Manager.
2. From the Disk menu, select Connect Network Drive… The
following screen is displayed. If you also have Microsoft
Network installed, you may have to click the button labelled
‘NetWare…’ to display the screen.
3. Click the Select NetWare Connection button on the toolbar.
4. Select the entry for your new CD-ROM server. The default
name is HPhhhhhh_NW, where hhhhhh are the last six digits of
the CD-ROM server LAN hardware (MAC) address.
5. Click the Login button.
6. If you are using Bindery mode you will be prompted to enter
your user name and password, unless you are already logged
in. Before the CD-ROM server has been set up, all users have
full access to it.
Mounting or Mapping Network Drives 4-9
hp.book Page 10 Thursday, April 2, 1998 4:33 PM
7. Once you are logged in to the CD-ROM server, click the Drive
Connections button on the toolbar. The following screen is
displayed:
8. Double click HPhhhhhh_NW\SYS and then the CD folder to
display the following screen:
9. Select a drive letter in the Drives listing and then:
• For root level access, select HPhhhhhh_NW_SYS in the
Resources list.
• For cd folder access, select the CD folder in the Resources
list.
• For CD-ROM access, select the CD-ROM you want to
access in the Resources list.
4-10 Mounting or Mapping Network Drives
hp.book Page 11 Thursday, April 2, 1998 4:33 PM
10. Click Map to map the CD-ROM server to the selected drive
letter.
11. Click Permanent if you wish to use the CD-ROM server under
the same drive letter the next time you start you computer.
12. Click the Exit button on the toolbar. The CD-ROM server is
ready for use.
DOS
The CD-ROM server is mounted using the map command.
Use the map command to mount the CD-ROM server.
At the DOS prompt of a NetWare file server, type:
map root <drive letter>:=HPhhhhhh_NW/<path>:
where hhhhhh are the last six digits of your CD-ROM server LAN
hardware (MAC) address and <path> is the path to a CD-ROM
server folder, or a file on a CD-ROM.
Example (root level access):
To access the root level of your CD-ROM server with LAN
hardware address 0060b0cd000b under the drive letter E, type:
map root E:=HPcd000b_NW/SYS:
Example (cd folder access):
If your CD-ROM server LAN hardware address is
0060b0cd000b, and you want to be able to access all the
CD-ROMs under the drive letter F, type:
map root F:=HPcd000b_NW/SYS:/CD
Example (CD-ROM access):
If your CD-ROM server LAN hardware address is
0060b0cd000b, and you want to map a CD-ROM named
cd_18881 to drive G, type:
map root G:=HPcd000b_NW/SYS:/CD/cd_18881
13. To make the connections permanent, edit your autoexec.bat
file to include your map commands.
Mounting or Mapping Network Drives 4-11
hp.book Page 12 Thursday, April 2, 1998 4:33 PM
Microsoft and IBM Networks (SMB)
You access the HP CD-ROM Server just like any other
workstation or file server. Below you will find examples on how
to access the CD-ROM server using clients for Windows 95,
Windows NT, Windows for Workgroups, OS/2 and DOS.
SMB (Server Message Blocks) is a protocol that makes use of
NetBIOS. NetBIOS can be transported over several different
network protocols. The CD-ROM Server supports the following
transport methods automatically:
•
•
Note
SMB over NetBIOS/NetBEUI.
SMB over NetBIOS/TCP/IP (also designated NBT).
❏ The examples below assume that you have not changed the
SMB server name on the CD-ROM server. The default
server name in the SMB environment is HPhhhhhh, where
hhhhhh are the last six digits of the CD-ROM server LAN
hardware (MAC) address. If you have changed the server
name, then replace the default names in our examples with
the new name.
❏ The Network Administrator can set the configuration
parameter ShowPseudoShares so that the only files seen are
the CD-ROMs. If this is the case, the folders (such as, config
or root) will not be seen when accessing the CD-ROM
server. However they can still be accessed by manually
inserting the path to the folder (for example, the root folder)
when mapping the drive.
4-12 Mounting or Mapping Network Drives
hp.book Page 13 Thursday, April 2, 1998 4:33 PM
Windows 95 and
Windows NT 4.0
1. Start the Windows Explorer from the Start/Programs Menu.
2. Expand the Network Neighborhood icon. The available
resources are displayed:
3. Expand the Entire Network icon and then open the Workgroup
folder. If the Workgroup folder is not visible, refer to
“Alternative Method of Connection” later in this chapter.
4. Double click the entry for your new CD-ROM server. The
default name is HPhhhhhh, where hhhhhh are the last six digits
of the CD-ROM server LAN hardware address.
Notice that the individual CD-ROMs are shown as well as the
cd folder that contains them. This is not the normal
hierarchical appearance, but it is done this way to give you the
choice of either mounting individual CD-ROMs, or all of them
together. See the note below if you would like more
information.
Note
❏ If the configuration parameter ShowPseudoShares has been
set to no (see chapter 6), the only files you will see are the
CD-ROMs.
Mounting or Mapping Network Drives 4-13
hp.book Page 14 Thursday, April 2, 1998 4:33 PM
5. To map a resource to a drive letter, select one of the CD-ROM
server resources and use the right mouse button:
• To map to all folders and files, right click root.
• To map to all of the CD-ROMs, right click the cd folder.
• To map to an individual CD-ROM, right click its folder.
6. From the pop-up menu, select Map Network Drive.
7. Select a drive letter for your CD-ROM server or use the default
drive letter.
8. Check Reconnect at logon if you wish to use the CD-ROM
server resource under the same drive letter the next time you
start your computer.
9. Click the OK button. The CD-ROM server is ready for use.
4-14 Mounting or Mapping Network Drives
hp.book Page 15 Thursday, April 2, 1998 4:33 PM
Note
❏ In the Microsoft Network environment, network resources
are accessed by specifying a server and a resource on that
server using the \\server\resource syntax (UNC Universal Name Convention). The resource is not a file path
and it is not possible to replace the resource name with the
path to a file or folder on your CD-ROM. Therefore, if using
the file system as outlined on page 4-2, only cd folder access
(see “Access Points” earlier in this chapter) would be
possible. However, the CD-ROM server will also allow you to
map the following resources on SMB clients:
• root, which includes the complete file system of the
CD-ROM server. Map a network drive to root for rootlevel access.
• cd_nnnnn, a folder for each CD-ROM (or CD-ROM drive
if an alias name for the SCSI ID has been set). Map a
network drive letter to cd_nnnnn to mount an individual
CD-ROM.
Alternative
Method of
Connection
If you have removed the default workgroup named ‘Workgroup’,
the CD-ROM server will not be visible in the browser until an
existing workgroup has been specified in the CD-ROM server.
This is done by the parameter Domain/GroupName. To connect to
the CD-ROM server do the following:
1. Start the Windows Explorer from the Start menu.
2. Select Map Network Drive... from the Tools menu.
3. Select a drive letter.
4. In the path box, type \\HPhhhhhh\root, where hhhhhh are the
last six digits of the CD-ROM server’s LAN hardware address.
5. Check Reconnect at logon if you wish to use the CD-ROM
server under the same drive letter the next time you start your
computer.
6. Click the OK button. The CD-ROM server is ready for use.
You can edit your CD-ROM server configuration to make it
appear in any existing workgroup. See chapter 5 “CD-ROM
Server Configuration”.
Mounting or Mapping Network Drives 4-15
hp.book Page 16 Thursday, April 2, 1998 4:33 PM
Windows for
Workgroups
1. Start File Manager.
2. From the Disk menu, select Connect Network Drive. The
following dialog is displayed.
3. Select a drive letter or accept the default.
4. In the Path field, type an entry for your CD-ROM server, for
example:
\\HPhhhhhh\<path>
where hhhhhh are the last six digits of the CD-ROM server LAN
hardware address, and <path> identifies one of the following
resources:
• To map at the root level, type root.
• To map the CD-ROMs at the cd folder level, type cd.
• To map an individual CD-ROM, type the volume name.
5. Check Reconnect at Startup if you wish to use the same
mapping the next time you start your computer.
6. Click the OK button. The CD-ROM server is ready for use.
Note
❏ If you have removed the default workgroup named
‘Workgroup’, the HP CD-ROM Server will not be visible in
the browser until an existing workgroup has been specified
in the CD-ROM server configuration file.
4-16 Mounting or Mapping Network Drives
hp.book Page 17 Thursday, April 2, 1998 4:33 PM
Windows NT 3.51
1. Start the File Manager.
2. From the Disk menu, select Connect Network Drive.
3. Select a drive letter or accept the default.
4. In the Path field, type an entry for your CD-ROM server, for
example:
\\HPhhhhhh\<path>
where hhhhhh are the last six digits of the CD-ROM server LAN
hardware address, and <path> identifies one of the following
resources:
• To map at the root level, type root.
• To map the CD-ROMs at the cd folder level, type cd.
• To map an individual CD-ROM, type the volume name
(for example, cd_12345).
5. Check Reconnect at Startup if you wish to use the same
mapping the next time you start your computer.
6. If you wish to connect using a different user name, enter the
name in the Connect As box. Otherwise, leave the Connect As
box empty.
7. Click the OK button. The CD-ROM server is now ready for use.
Mounting or Mapping Network Drives 4-17
hp.book Page 18 Thursday, April 2, 1998 4:33 PM
IBM Peer for OS/2
Make sure you have IBM Peer for OS/2 installed. If not, see the
note below.
1. Double click the OS/2 Peer icon. The Peer window opens:
2. Double click the Sharing and Connecting icon to open the
following window:
Active connections will be listed in the window.
4-18 Mounting or Mapping Network Drives
hp.book Page 19 Thursday, April 2, 1998 4:33 PM
3. From the Connection menu, select Create. The following
dialog is shown:
4. In the Workstation field, enter HPhhhhhh, where hhhhhh are
the last six digits of your CD-ROM server’s LAN hardware
address.
5. In the Share/alias field, enter the name of the CD-ROM server
folder or an individual CD-ROM:
• To map at the root level, type root.
• To map the CD-ROMs at the cd folder level, type cd.
• To map an individual CD-ROM, type the volume name
(for example cd_12345).
6. In the Local device name field, select a drive letter to map to.
7. Click Create. The CD-ROM server is ready for use.
Note
❏ The CD-ROM server folders will not be visible on the
Desktop in OS/2 versions prior to OS/2 WARP Connect. If
you wish to use an earlier version of OS/2, we recommend
using third-party NFS software to connect to the CD-ROM
server.
Mounting or Mapping Network Drives 4-19
hp.book Page 20 Thursday, April 2, 1998 4:33 PM
If you do not have Peer for OS/2. If you do not have Peer for
OS/2, the CD-ROM server can be mapped to a drive letter using
the net use command. Do as follows:
1. Open an OS/2 window.
2. Use the net use command to map the CD-ROM server to a
drive letter. At the OS/2 prompt, type:
net use <drive letter>: \\HPhhhhhh\<folder>
where hhhhhh are the last six digits of your CD-ROM server’s
LAN hardware address, and <folder> is any CD-ROM server
folder.
3. To make the connections active each time you boot up, create
or edit your startup.cmd file to include your net use commands.
DOS
The CD-ROM server is mounted using the net use command,
provided that the appropriate network support is installed.
1. Use the net use command to map the CD-ROM server to a
drive letter. At the DOS prompt, type:
net use <drive letter>: \\HPhhhhhh\<folder>
where hhhhhh are the last six digits of your CD-ROM server
LAN hardware address and <folder> is any CD-ROM
server folder.
Example (root level access):
To map the root level of your CD-ROM server with LAN
hardware address 0060b0cd000b under the drive letter E, type:
net use E: \\HPcd000b\root
Example (cd folder access):
If your CD-ROM server LAN hardware address is
0060b0cd000b, and you want to be able to access all the
CD-ROMs under the drive letter F, type:
net use F: \\HPcd000b\cd
4-20 Mounting or Mapping Network Drives
hp.book Page 21 Thursday, April 2, 1998 4:33 PM
Example (CD-ROM access):
If your CD-ROM server LAN hardware address is
0060b0cd000b, and you want to map a CD-ROM named
cd_12345 to drive G, type:
net use G: \\HPcd000b\cd_12345
2. To make the connections permanent, edit your autoexec.bat
file to include your net use commands.
Notes:
❏ If you are using DOS within Windows 95 or Windows NT
4.0, and you wish to access files or directory names longer
than 8 characters, you will need to precede these long names
with a quote mark (“ ). For example, use the cd (change
directory) command to change to the directory called
Product Information:
G:\HPcd000b\CD\>cd “PRODUCT INFORMATION
❏ Windows NT gives the additional facility of using the *
wildcard. For example a quick way of changing to the
Product Information directory would be:
G:\HPcd000b\CD\>cd “PRODUCT*
UNIX (NFS)
Before you begin
You will need root privileges to mount the CD-ROM server.
On UNIX systems the CD-ROM server is accessed using NFS.
To access the server, you will have to do the following:
1. Create a directory for the CD-ROM server.
mkdir <directory>
Example:
mkdir /hpcd
Mounting or Mapping Network Drives 4-21
hp.book Page 22 Thursday, April 2, 1998 4:33 PM
2. Mount the CD-ROM server.
mount <IP address or host name>:/ <directory>
Example:
mount cdserv:/ /hpcd
Note
❏ The <IP address or host name> is the IP address or host
name assigned to the CD-ROM server during TCP/IP
configuration, see “TCP/IP Networks” in chapter 3 .
NFS for PC or
Apple Macintosh
The CD-ROM server can also be accessed through third-party
NFS software for PC or Apple Macintosh computers. If you run a
TCP/IP network, this provides an alternative to SMB. Please see
the NFS software documentation for instructions on how to
mount the CD-ROM server.
Web Browsers (HTTP)
The CD-ROM server supports HTTP over TCP/IP. This means
that the CD-ROM server works as a WWW server. To access the
CD-ROM server Home Page, it must be configured with an IP
address as described in “TCP/IP Networks” in chapter 3 .
If required, HTTP support can be switch on or off using the
parameter HTTPEnable (default setting is on) as described in
chapter 5 “CD-ROM Server Configuration”.
The CD-ROM server can be accessed from any standard Web
browser, for example, Netscape Navigator or Microsoft Internet
Explorer. The example below uses Internet Explorer.
Internet Explorer
1. Start Internet Explorer.
2. From the File menu, select Open Location... The following
dialog is displayed:
4-22 Mounting or Mapping Network Drives
hp.book Page 23 Thursday, April 2, 1998 4:33 PM
3. Enter the URL of the server, i.e. http://<IP address>.
Alternatively use the host name associated with the IP
address and assigned to the CD-ROM server.
4. Click OK. This will bring you to the Home Page of your
CD-ROM server, as shown below. From here, several links to
all the functionality of the CD-ROM server, as well as external
links, are available.
For Basic Setup,
Advanced
Configuration, or
Management:
username = root
password = pass
(factory defaults)
CD Access
On the Home Page, the tab CD Access is initially enabled. You
will see a list of the CD-ROMs that are available. You can then
click on the CD-ROMs to view their contents, also in the form of
a list. Thus you can browse the CD-ROMs as with any other file
manager utility.
Some CD-ROMs contain an index.htm, or index.html file, that
allows you to access the contents of the disc through a browser
page. If you click on such a CD-ROM, this page will appear
instead of a simple list. However you can replace the index page
with a simple listing by adding /. after the location address and
pressing the Return key.
Mounting or Mapping Network Drives 4-23
hp.book Page 24 Thursday, April 2, 1998 4:33 PM
Adding Bookmarks
in your Web
browser
For easy access to your CD-ROM server resources, Web pages
can be saved in the “Bookmarks” or “Favorites” list in your Web
browser.
1. Use the CD Access tab on the Home Page to list the
CD-ROMs. If you add a bookmark at this level, you will be
able to quickly return to the CD-ROM server to select one of
the discs from the list of CD-ROMs installed.
2. Alternatively, you may wish to select one of the CD-ROMs and
then add the bookmark. You will then be able to quickly return
to that specific CD-ROM. You can continue this process by
selecting any directory or file on a CD-ROM, and then adding
the bookmark.
3. For instructions on how to add a bookmark, refer to your
browser’s online help.
• For Netscape Navigator, select Add Bookmark from the
Bookmarks menu.
• For Microsoft Internet Explorer, select Add Favorites
from the Favorites menu.
4. At any time in the future you can select the bookmark you have
made by choosing it from the bookmarks menu. Most Web
browsers will allow you to customize the words used to
represent your bookmark items, so that they are more easily
recognized.
Note
❏ Web browsers usually save pages that you view, so that you
can return to them very quickly by retrieving them from
local cache memory. This can cause a problem if CD-ROMs
have been changed, because when you return to the Access
Disc page, you will not see the changes. All you need to do to
see the changes is to reload the page.
4-24 Mounting or Mapping Network Drives
hp.book Page 1 Thursday, April 2, 1998 4:33 PM
5
CD-ROM Server Configuration
This chapter shows how to configure the HP CD-ROM Server.
The configuration can be made in the following ways:
Note
•
Using a Web browser . . . . . . . . . . . . . . . . . . . . . . . page 5-2
This is the easiest way and is supported by on-line help
instructions. However,this method requires that the
CD-ROM server be configured with an Internet (IP) address
on a TCP/IP network.
•
Using a text editor . . . . . . . . . . . . . . . . . . . . . . . . . page 5-4
This tool can be used from any environment using your
favorite editor.
❏ For Windows 95 and NT 4.0 systems, you can also configure
the HP CD-ROM Server using a software utility available
from HP’s Web site. For more information, visit the HP Web
site (refer to the front of this manual).
Through configuration changes, you can customize CD-ROM
server operation. For example, you can:
•
•
•
•
Note
Set up the SMB server name.
Enable or disable CD-ROM server protocols, such as
NetWare, SMB on NetBIOS/NetBEUI, SMB on
NetBIOS/TCP/IP and NFS.
Set up Internet and SNMP parameters.
Set the JukeBoxLockTime parameter to prevent disc changer
flutter (see appendix A for more information).
❏ Disc changer flutter may occur when one user requests
access to a CD-ROM while another user is reading data from
a different CD-ROM. The changer attempts to service both
requests by alternately accessing both CD-ROMs and
transferring small amounts of data from each. Because of
the time needed to swap discs, the data-transfer rate for
both users will be very low.
CD-ROM Server Configuration 5-1
hp.book Page 2 Thursday, April 2, 1998 4:33 PM
Configuration Using a Web Browser
The configuration of the CD-ROM server can be performed from
a Web browser. To access the CD-ROM server’s Home Page, an
Internet (IP) address must be set on the CD-ROM server (see
“TCP/IP Networks” in chapter 3). Also, the HTTPEnable
parameter must be set to yes, which is the default setting.
Follow the steps below to enter the configuration from a Web
browser. The browser used in this example is Internet Explorer.
1. Start Internet Explorer.
2. From the File menu, select Open Location... The following
dialog is displayed:
3. Enter the URL of the server using the internet (IP) address:
http://<IP address>.
Alternatively, you can use the host name assigned to the
CD-ROM server in place of the IP address.
5-2 CD-ROM Server Configuration
hp.book Page 3 Thursday, April 2, 1998 4:33 PM
4. Click OK. This will open the Home Page of your HP CD-ROM
Server, as shown below.
Username: root
Password: pass
5. Click the Advanced Configuration tab. When entering for the
first time during a session you will be prompted to enter the
Username (default is root) and Password (default is pass).
The General Settings page will be displayed.
6. Enter the new settings. Click ‘Reset Server settings’ to return
to the values before you made changes. Click the ? button to
access the on-line help if more information is required.
CD-ROM Server Configuration 5-3
hp.book Page 4 Thursday, April 2, 1998 4:33 PM
7. Click Submit Server settings to download the new settings to
the CD-ROM server.
8. In the menu at the left side, click the name of the next
parameter group (Netware, NFS, etc.) that you wish to
configure. Repeat steps 6 and 7 for each parameter group.
9. Restart the CD-ROM server to make the new settings take
effect: Click the Management and Access Rights tab. In the
menu at the left side, click Restart Server. Click the Restart
Server button to confirm.
The indicators will flash during power-on and self-test. When
the yellow STATUS indicator stops flashing and remains off, the
new settings are ready for use.
Note
❏ On the CD-ROM server’s Home Page, a Quick Installation
button is also available. Quick Installation provides
configuration for a few basic parameters in the CD-ROM
server. These are required to use access rights, password
handling and user authentication. The settings are all
available under the Configuration button as well.
Configuration Using a Text Editor
If you can locate and open the CD-ROM server on your network,
you can configure the CD-ROM Server using your favorite text
editor in any environment. The basic procedure is to view the
CD-ROM server’s file structure and open the config.ini file in the
config folder. Then you make changes to the configuration and
save the file. This sends your configuration changes to the CDROM server. The file structure is described in “The HP CD-ROM
Server File System” in chapter 4.
Follow the steps below to configure the CD-ROM server using a
text editor. In the examples below the Windows Notepad editor
on a Windows 95 workstation is used.
1. Click Start, click Programs, and start the Windows
Explorer.
2. Locate the CD-ROM server that you want to configure. (Refer
to chapters 3 and 4 to access the CD-ROM server on the
network.)
5-4 CD-ROM Server Configuration
hp.book Page 5 Thursday, April 2, 1998 4:33 PM
3. In the config folder, locate the config.ini file. Open the file
using the Windows Notepad editor or any other editor. In a
standard Explorer setup, double clicking an ‘.ini’ file will
automatically open the file with the Notepad editor. An
example is shown below.
See appendix B for a list of the config.ini file’s contents.
Note
❏ The configuration file illustrated above is for version 4.11 of
the HP CD-ROM Server firmware. As firmware updates
become available, the configuration files may change. Refer
to appendix C for more information.
4. Enter new settings by editing each parameter in the file.
Further explanation of the parameters is available in
appendix B “The Config.ini File”.
5. To activate the new settings it will be necessary to restart the
CD-ROM server. This can be done by setting the Restart
parameter to yes. The CD-ROM server will restart when you
save the file.
6. Save the file. Saving the file sends the new settings to the
CD-ROM server. If you have set the Restart parameter to yes,
the server will restart and the indicators will flash during the
self-test. When the STATUS indicator stops flashing and
remains off, the server is ready for use with the new settings.
CAUTION
❏ When editing the file, be sure that there is a space between
the equal sign and the parameter value.
❏ Do not remove the [END] marker from the file.
CD-ROM Server Configuration 5-5
hp.book Page 6 Thursday, April 2, 1998 4:33 PM
5-6 CD-ROM Server Configuration
hp.book Page 1 Thursday, April 2, 1998 4:33 PM
6
Security Management
How to Setup Access Restrictions
1. Read the general information given in “HP CD-ROM Server
Access Rights” later in this chapter.
2. Choose the method you will use to set the security parameters
held in the CD-ROM server’s access files:
• Web Browser . . . . . . . . . . . . . . . . . . . . . . . . . . . . page 6-3
This is the easiest way and is supported by on-line help
instructions. However,this method requires that the
CD-ROM server be configured with an Internet (IP)
address for TCP/IP networks.
• Text Editor . . . . . . . . . . . . . . . . . . . . . . . . . . . . . . page 6-6
This method can be used from any environment through
your favorite text editor.
Note
❏ For Windows 95 and NT 4.0 systems, you can also configure
the HP CD-ROM Server using a software utility available
from HP’s Web site. Refer to the Electronic Services at the
front of this guide for more information).
3. Refer to the appropriate section in this chapter for information
on setting access restrictions for your particular network
environment:
• NetWare 3.x . . . . . . . . . . . . . . . . . . . . . . . . . . . . . page 6-9
(Includes access restrictions in NetWare Bindery with,
and without, authentication against the 3.x server.)
• NetWare 4.x . . . . . . . . . . . . . . . . . . . . . . . . . . . . page 6-11
This covers access restrictions in NetWare NDS.
• Microsoft and IBM Networks . . . . . . . . . . . . page 6-12
• UNIX (NFS) . . . . . . . . . . . . . . . . . . . . . . . . . . . . page 6-13
(Includes authentication of PCs in NFS environments.)
Security Management 6-1
hp.book Page 2 Thursday, April 2, 1998 4:33 PM
HP CD-ROM Server Access Rights
The HP CD-ROM Server can be configured to restrict user
access to CD-ROM drives, to individual CD-ROMs, and to the
CD-ROM server configuration files. You can limit the number of
users simultaneously accessing any CD-ROM to comply with
user-license restrictions.
Access restrictions are set individually for each protocol
(NetWare, SMB, NFS, HTTP) through separate settings in the
access files. The default settings in some protocols provide full
access rights to all users, so we recommend that you implement
at least two access restrictions:
The Access Control
Parameters
•
Restrict access to the config and volumes directories.
Note that when you install your CD-ROM server into
NetWare NDS, the default settings will restrict access to
both the config and volumes directories.
•
Disable all protocols not being used. If unused protocols
are not disabled, a user accessing the server through such a
protocol may be given full access rights, regardless of the
security configurations in other protocols. To disable unused
protocols, you must set the appropriate CD-ROM server
configuration parameters - refer to chapter 5.
There are separate access files for each CD-ROM drive, the
CD-ROMs inserted into the drives, and the CD-ROM server
configuration files. To change the access rights to any of these
volumes, you need to change the parameter values in the
corresponding access files stored in the CD-ROM server.
The following list describes the parameters stored in the access
files. Not all parameters are used in every access file.
Name is the volume name and cannot be changed. If a CD-ROM
disc has no volume name, it will be assigned a default name
cd_nnnnn, where nnnnn is a unique five digit number. CD-ROM
drive names will be id<x>lun<y>, where <x> is the SCSI address
and <y> the LUN (logical unit number) to identify mult-unit
drives.
Alias is the name displayed in the cd folder representing the
CD-ROM or CD-ROM drive. By editing this entry, you can select
a name that makes sense to the users of the CD-ROM. The name
must be a unique and valid volume name.
6-2 Security Management
hp.book Page 3 Thursday, April 2, 1998 4:33 PM
Comment is text that is displayed in Windows Explorer when the
user is selecting CD-ROMs.
• In SMB, the share level name must not exceed 12
characters. If this is insufficient for a meaningful name,
you can use the comment parameter to give more
information to users. The comment will also be displayed
in the Web browser.
• In NetWare, the comment is not available. However the
12-character naming limit does not exist, so you can
assign a longer name instead of a comment.
DriveName^ is the manufacturers name of the drive, and cannot
be changed.
InsertedVolume^ is the name of the CD-ROM that is inserted,
and cannot be changed.
LockEject^ will lock the eject button if set to yes.
Note
❏ Items above marked ^ only appear in the SCSI drive access
files, which are identified as id<x>lun<y>.
UserLimit is the maximum number of simultaneous users of a
CD-ROM disc. If it is set to 0, any number of users may access
the disc.
SessionTimeout specifies how many seconds a user is
considered to be active after the last access to the disc. When the
time has expired, another user may access the disc and perhaps
lock out the first user, depending on the UserLimit setting.
Note
❏ Items in the access control files which have a value of * have
no access restrictions, for example, SMBPassword = * means
that no password is required to access the volume when
using SMB.
Security Management using a Web Browser
Security management of the CD-ROM server’s access rights can
be performed from a Web browser. To access the CD-ROM
server’s Home Page, the Internet (IP) address must be set (see
“TCP/IP Networks” in chapter 3. Also the HTTPEnable
parameter must be set to yes - which is the default setting.
Follow the steps below to configure access control from a Web
browser. The browser used in the example is Internet Explorer.
1. Start the Web browser.
Security Management 6-3
hp.book Page 4 Thursday, April 2, 1998 4:33 PM
2. From the File menu, select Open. The following dialog box is
displayed:
3. Use the Internet (IP) address to enter the URL of the server:
http://<Internet address>
Alternatively, you can use the host name assigned to the
CD-ROM server in place of the IP address.
4. Click OK. This will open the Home Page of your CD-ROM
server, as shown below.
6-4 Security Management
hp.book Page 5 Thursday, April 2, 1998 4:33 PM
5. Click the Management and Access Rights tab. When entering
for the first time during a session you will be prompted to enter
the Username (default is root) and Password (default is
pass). The page below will be displayed.
If you need help, click the ? button to display the on-line help.
6. Management is grouped into four areas: General, CD-ROM
Rights, Drive Rights, and Server Rights. Click the Server
Rights tab for volume rights.
The following notes may help you when managing access rights:
• The identity of the drive will appear as: id<x>lun<y>
where <x> is the SCSI address and <y> the LUN
address.
• If the disc has no volume name, and an alias name has
not been assigned, the name of the disc will default to
cd_nnnnn, where nnnnn is an unique five digit number.
• The settings for a CD-ROM are stored even if the disc is
removed. The settings are immediately available if the
disc is re-inserted. Settings for typically 56 CD-ROMs
can be stored in the CD-ROM server at any time. If the
limit is reached, the oldest setting is discarded when a
new CD-ROM is inserted.
• The access settings for a CD-ROM drive will override the
CD-ROM disc settings for discs that are inserted in that
drive. But this only occurs when an alias name is entered
for the drive - if there is no alias, the drive access settings
are not used.
Security Management 6-5
hp.book Page 6 Thursday, April 2, 1998 4:33 PM
7. Having selected the volume, you can now enter the new
settings by editing the parameters shown on the browser page.
A general explanation of the parameters is available in “The
Access Control Parameters” later in this chapter. Specific
information concerning each network operating system starts
on page 6-9.
8. Click Submit settings to download the new setting to the
CD-ROM server. The new settings will immediately take
effect, and a page will appear to report the successful change
in settings.
9. Repeat the procedure for each volume as necessary.
CAUTION
❏ When editing the files be sure that the equal sign and
the parameter value is separated by a space.
❏ Do not remove the [END] marker from the files.
Security Management using a Text Editor
You can manage access rights from your favorite editor in any
network environment. Simply edit the appropriate text files
stored on the CD-ROM server (for information on the CD-ROM
server’s file system, refer to chapter 4.
The general format of the access control files is shown below.
The actual files vary depending on which access file (drive, disc,
or server file) you intend to change:
Name
Alias
Comment
DriveName
InsertedVolume
LockEject
UserLimit
SessionTimeout
SMBPassword
NetWareUser/Group
NFSIPAddress
NFSGroup
NFSUser
[END]
6-6 Security Management
=
=
=
=
=
=
=
=
=
=
=
=
=
cd_12345
cd_12345
no
0
0
*
*
*
*
*
;Cannot be changed
hp.book Page 7 Thursday, April 2, 1998 4:33 PM
To set the access control parameters using a text editor, follow
the steps below. In the examples provide, the Windows Notepad
editor on a Windows 95 workstation is used.
1. Start the Windows Explorer and locate the CD-ROM server.
2. In the config folder, locate the scsi.txt file. Open the file using
a text editor, such as Windows Notepad (on most systems,
Notepad will run if you select and double-click a .txt file). This
file will show you the type of drives that are connected and the
volume names of any inserted CD-ROMs. Close the file when
you have finished inspecting the contents.
3. The Volumes folder contains all the access control files, which
includes the three folders shown below.
4. Open the appropriate folder and file according to the table
below:
To set access rights to:
The CD-ROM server
The configuration files
The access-rights files
Select the following:
root.txt in the Server folder
config.txt in the Server folder
volumes.txt in the Server folder
All of the connected drives and
CD-ROMs
cd.txt in the Server folder
Any of the individual drives
the SCSI drive identity
(example: id2lun0.txt)
Any of the individual CD-ROMs
the CD-ROM name in the Cdrom
folder (example: music_1.txt)
Any new drives or CD-ROMs that
default in the Server folder
will be connected in the future
5. Enter new settings by editing the file. For parameter
information, refer to “The Access Control Parameters” earlier
in this chapter. For specific information on each network
operating system, refer to “Security Management in Specific
Network Environments” later in this chapter.
Security Management 6-7
hp.book Page 8 Thursday, April 2, 1998 4:33 PM
Note
❏ The following notes may help you when managing access
rights:
• The identity of a drive will appear as: id<x>lun<y>.txt,
where <x> is the SCSI address and <y> the LUN
address.
• The name of the CD-ROM file will default to
cd_nnnnn.txt (where nnnnn is an unique five digit
number) if the CD-ROM does not have a name or alias
name.
• The settings for a CD-ROM is stored even if the disc is
remove and will be immediately available if the disc is reinserted. Settings for up to 56 CD-ROMs can be stored in
the CD-ROM server at any time. If the limit is exceeded
when a new CD-ROM is inserted, the oldest settings is
discarded.
• The access settings for a CD-ROM drive will override the
CD-ROM disc settings for discs that are inserted in that
drive. However, this applies only when an alias name is
configured for the drive - if there is no alias the drive
access settings are not used.
6. Save the file. Saving the file sends the new settings to the
CD-ROM server and will take effect immediately.
7. Repeat the operation for each volume as necessary.
CAUTION
❏ When editing the file, be sure that there is a space
between the equal sign and the parameter value.
❏ Do not remove the [END] marker from the files.
6-8 Security Management
hp.book Page 9 Thursday, April 2, 1998 4:33 PM
Security Management in Specific Network
Environments
Access Restrictions
in NetWare
Bindery (no
Authentication)
When accessing the CD-ROM server, if user authentication is
not required, then NetWare server licenses are also not required
because the server does not log onto the file server. In this case,
you do not have to specify the parameter AuthenticationServer
stored in the CD-ROM server’s config.txt file. All users (except
‘supervisor’) will be given guest access rights.
To restrict access to the CD-ROM server’s configuration and
security files when no Authentication Server is used, follow
these steps:
1. Open the config access rights:
• If using a Web browser, step through the pages:
Management, Volume Rights, Server, Config.
• If using a text editor, open the file config.txt which is
located at: root\volumes\server\config.txt. Setting the
volume rights is described earlier in this chapter.
2. Find the NetWareUser/Group entry and replace * with the
word Supervisor. This will change the access rights from ‘no
restrictions’ to ‘supervisor only’.
3. Save and close the config access rights.
4. Repeat steps 1 to 3 for the volumes access rights (volumes in
the Web browser, or with a text editor open volumes.txt). This
will restrict access to the files that hold the access rights.
5. Open the CD-ROM server configuration parameters and
change the SupervisorPassword parameter from pass
(default password), to the password you wish to use. For
information on how to access and change parameters, refer to
chapter 5.
Access to the configuration files and the access rights files will
be now limited to the Supervisor, and will be password
protected. Users will not have access to those files, but will still
have guest access to CD-ROMs.
Security Management 6-9
hp.book Page 10 Thursday, April 2, 1998 4:33 PM
Access Restrictions
in NetWare
Bindery (with
Authentication)
If user access control is required, you must define an
AuthenticationServer. The CD-ROM server must log onto the
authentication server briefly to authenticate the user and
identify the groups the user belongs to. In this case, the
authentication server must have a standby license for the
CD-ROM server, but several CD-ROM servers can share this
license. If a license is not available, the user may still be
authenticated but group information cannot be read.
Authorized users have configurable rights to the volumes of the
CD-ROM servers. Authorization of users is done using an
existing NetWare server, referred to as the Authentication
Server in the configuration.
The authentication process reduces Network Administrator
overhead. The Administrator does not have to maintain a
separate user database for CD-ROM servers. If the user is
defined in the file server that the CD-ROM serveruses for
authentication, the Administrator will not have to do anything
to give the user access to the CD-ROM server.
Authentication in a
NetWare 3.x
Server
For access to the CD-ROM server connected to a NetWare 3.x
Server, authentication is validated through a user list in the
bindery of the NetWare server:
•
•
•
If on the list, a user’s password will be verified and the user
will be granted access.
If the password is incorrect, login will fail.
If not on the list, the user will not be granted access to the
CD-ROM server. However, the user could login as ‘guest’
and get access to volumes that are not protected.
The access is controlled by creating or editing
NetWareUser/Group entries in the access control files. The
following values can be used:
NetWareUser/Group
Description
*
Any user has access
<any user or group>
Users with this name or in this group are
access
<entry not present>
No access from NetWare
You may add as many NetWareUser/Group entries as you
require. See the following examples.
6-10 Security Management
hp.book Page 11 Thursday, April 2, 1998 4:33 PM
Example 1:
Grant all NetWare users access:
NetWareUser/Group = *
Example 2:
Grant access to all users in the group ‘salesdep’ and to the user
‘Daryl’ who is not a member of ‘salesdep’:
NetWareUser/Group = salesdep
NetWareUser/Group = Daryl
Note
❏ You can always access the CD-ROM server using the user
name ‘supervisor’ and the password specified by the
parameter SupervisorPassword. The factory default
password is pass.
Access Restrictions
in NetWare NDS
Access rights for users in bindery mode in NetWare is separate
from users accessing the CD-ROM server in NDS mode. For this
reason, we recommend that you disable bindery mode after you
have successfully installed the server in NDS, then allow users
to log on in NDS mode only.
To ensure that the CD-ROM server is visible to the NDS tree,
the configuration file should be modified as described in
“Installation as an NDS Server” in chapter 3.
Note
❏ If NDS mode is not functioning, you can always access the
CD-ROM in Bindery mode by logging in as supervisor. This
is true even if the parameter BinderyEnable is set to no.
Default settings in
NetWare NDS
After installation, the default security rights will protect all the
configuration files. Only the CD-ROMs will be displayed to
users. The user rights to the CD-ROM server and its files and
directories are set up as follows:
•
Supervisor rights to the SYS volume is inherited from the
Supervisor rights to the NDS Server object.
• Read and File Scan rights are inherited from the Browse
rights to the NDS Server object.
• By default, the config and volumes directories are setup with
an inherited-rights filter that filters all rights except the
Supervisor right. This protects all the configuration files.
Because the CD-ROM server acts as a normal NDS file server,
its NDS Security rights can be set using standard procedures.
Security Management 6-11
hp.book Page 12 Thursday, April 2, 1998 4:33 PM
The CD-ROM server’s file system security rights are set up by
the NetWare Administrator, as detailed below:
1. Login as Admin, and start the NetWare Administrator.
2. Browse the SYS: volume by double clicking it. You will see all
the directories available in the CD-ROM server.
3. Select the directory or file for which you wish to set the access
rights to, and right click it.
4. Choose Details, and make the required changes.
The NetWare NDS access rights for the CD-ROM server can be
set using Security Equivalence, Group, Container, Organization
role, and User Objects as with any other NDS file server. There
is no difference between how you use NetWare Administrator to
set these access rights for a CD-ROM server, and how you would
set the access rights on an NDS file server.
Access Restrictions
in Microsoft and
IBM Network
Operating Systems
The CD-ROM server implements share-level access control only
(user-level access is not supported). A password can be assigned
to any CD-ROM server folder or any CD-ROM inserted in a
connected drive. The user will automatically be prompted for the
password when trying to access the shared folder. Access will
then be granted to the folder and all subfolders.
The password is set using the SMBPassword entry in the access
control files in the Volumes folder. The following values are
valid:
SMBPassword
Description
*
No password required to access the folder using
Microsoft Network.
<password>
Any valid password (15 characters maximum)
<entry not present>
No access using Microsoft Network
To assign a password to a CD-ROM server folder or CD-ROM, or
to change an old password, proceed as follows:
Example 1:
Restrict access by prompting the user to enter a password
(for example, ‘pass’):
SMBPassword = PASS
6-12 Security Management
hp.book Page 13 Thursday, April 2, 1998 4:33 PM
Example 2:
Grant all Microsoft Networks users access:
SMBPassword = *
Access Restrictions
in UNIX (NFS)
When accessing the CD-ROM server using NFS, you may
restrict the access to users with a certain IP Address, Group ID
(GID) or User ID (UID).
Access is controlled by creating or editing NFSIPAddress,
NFSGroup and NFSUser entries in the access control files in the
Volumes folder on the CD-ROM server. The following values can
be used:
Note
NFSIPAddress
Description
*
Users with any IP address are granted access
<any IP address>
Only users with the specified IP addresses have
access
<entry not present>
IP address is not used to grant access
NFSGroup
Description
*
Users with any GID may access the folder or
CD-ROM
<Group ID>
Only users with the specified GID have access
<entry not present>
GID is not used to grant access
NFSUser
Description
*
Users with any UID may access the folder or
CD-ROM
<User ID>
Only users with the specified UID have access
<entry not present>
UID is not used to grant access
❏ There is an ‘or’ relation between the NFS access control
parameters. A user fulfilling any one of the NFS access
criteria you have specified will be granted access. If you set
an asterisk (*) to any of the parameters, all users will have
access regardless of the settings of the other parameters.
You may add as many NFSIPAddress, NFSGroup and NFSUser
parameters as you require. See the following examples:
Security Management 6-13
hp.book Page 14 Thursday, April 2, 1998 4:33 PM
Example 1:
Give access to users with UID 100 and 101 and to all users with
GID 4:
NFSUser = 100
NFSUser = 101
NFSGroup = 4
Example 2:
Give users with IP address 192.124.138.60 and 192.124.138.65
access:
NFSIPAddress = 192.124.138.60
NFSIPAddress = 192.124.138.65
Authentication of a
PC in an NFS
environment
PC workstations on a UNIX network can also be authenticated.
This requires an authentication server specified by the
parameter PCNFSDAuthentServer to be set (see appendix B).
The DefaultUid and PCNFSDAuthentServer parameters can be
combined in 4 different ways, to obtain the following behavior:
6-14 Security Management
Default PCNFSD
Uid
AuthentServer
Result for PCNFSD clients
-2
0.0.0.0
Clients with user id and group id = -2 can
be authenticated, but there is no
authentication server.
-2
192.124.138.99
(example only)
If clients are authenticated by the server,
they get their real user id and group id. If
not, they default to DefaultUid.
0
192.124.138.99
(example only)
If clients are authenticated by the server,
they get their real user id and group id. If
not, they fail.
0
0.0.0.0
All clients will fail.
hp.book Page 1 Thursday, April 2, 1998 4:33 PM
A
Troubleshooting
This appendix will help you to:
•
•
Run a diagnostic test . . . . . . . . . . . . . . . . . . . . . . . . .page A-2
Understand the meaning of the front panel
indicators. . . . . . . . . . . . . . . . . . . . . . . . . . . . . . . . . . .page A-3
The remainder of this appendix deals with the following
problems:
Before You Begin
•
Errors when accessing the CD-ROM server . . . . . . .page A-5
•
Problems when running CD-ROM software . . . . . . .page A-6
•
Difficulty in locating the CD-ROM server
in NetWare . . . . . . . . . . . . . . . . . . . . . . . . . . . . . . . . .page A-6
•
•
Errors during NetWare NDS Installation . . . . . . . .page A-6
Problems when accessing Disc Changers . . . . . . . . .page A-8
If you are having trouble with locating your CD-ROM server on
your network, note the following:
•
The CD-ROM server may not immediately appear because
your system and network protocols may require significant
time to locate the CD-ROM server. You should wait several
minutes and then try again.
•
In Windows networks, a “master browser” function
performed by one of the systems on your network may be
required. “Browse master” services are commonly performed
by file servers, but on peer-to-peer networks, the service may
be missing. Refer to your Windows system documentation
for information on adding file server services
Troubleshooting A-1
hp.book Page 2 Thursday, April 2, 1998 4:33 PM
Diagnostic Test
The diagnostic test will test the CD-ROM server’s memory and
the operation of the connected drives.
Before using the diagnostic test:
•
Users who are currently accessing the CD-ROM server will
be interrupted.
•
The diagnostic test is only available for the first hour after
you power on or restart the CD-ROM server. Also, you must
restart the CD-ROM server before you can repeat the
diagnostic test.
• To test the data transfer operation of a CD-ROM drive, the
drive must have a CD-ROM inserted with a file larger than
10 Mbytes on it.
Conduct the diagnostic test as follows:
1. If using a Web browser, start the browser and enter the URL
of the server’s diagnostic page:
http://<IP address>/config/html/diag.htm
2. Make sure that a suitable CD-ROM is inserted into each of the
drives whose operation is to be tested. To test the data transfer
operation of a CD-ROM drive, the drive must have a CD-ROM
inserted with a file larger than 10 Mbytes on it.
3. To start the diagnostic test, simply reload the diagnostic page
in the Web browser. The test may take several minutes. When
it is complete, you must again reload the diagnostic page to
display the results.
Note
❏ Any further reloading of the diagnostic page will simply
show the same test results. You must restart (power cycle)
the CD-ROM Server before you can repeat the diagnostic
test.
A-2 Troubleshooting
hp.book Page 3 Thursday, April 2, 1998 4:33 PM
http://<IP address>/config/html/diag.htm
Example Diagnostic Result
The Front Panel Indicators
The front panel indicators show the status of the CD-ROM
server. The indicators have the following functions:
•
Status – Flashes during start-up. When the CD-ROM
server is ready for use, this light turns OFF. The LED
should remain off, unless an error condition occurs.
•
CD – Will turn ON when a readable CD-ROM is inserted
into any connected drive. The LED will be either on or off,
unless an error condition occurs when the LED will flash.
•
Network – Flashes to indicate the presence of network
traffic.
Power – Will turn ON when power is connected to the
CD-ROM server. This LED should remain on to indicate
power is present.
•
Troubleshooting A-3
hp.book Page 4 Thursday, April 2, 1998 4:33 PM
Normal Conditions
The Power LED is controlled by hardware and is always on
when power is connected. See the following table to interpret the
state of other LEDs.
Event
Status
LED
CD
LED
Network
LED
Initial power to unit
ON
ON
ON
During power-up/Self-test.
Approx. 30 seconds.
Flash
OFF
OFF
After power-up/Self-test
OFF
OFF
Flash*
First disc inserted
OFF
ON
Flash*
Last disc removed
OFF
OFF
Flash*
Flash loading
1 Flash/sec
1 Flash/sec
1 Flash/sec
* The Network LED will flash when there is network traffic.
Error Conditions
The following table shows how the front panel indicators show
various error conditions:
CD
LED
Network
LED
Flash
Flash*
OFF
N/A
OFF
Flash
Flash
Flash
Flash
OFF
OFF
Flash
OFF
OFF
Flash
OFF
Flash
Flash
Flash
OFF
Flash
OFF
OFF
Error in DRAM/DIMM
configuration error
Flash
Flash
OFF
Software/Hardware
combination error
Flash
Flash***
Flash***
Event
Status
LED
CD-ROM has incorrect format or
OFF
SCSI bus not connected**
Faulty network connection
Illegal LAN hardware address.
Flash load failed
Error in EEPROM
Error in FLASH PROM
Error in SRAM
Error in DRAM/DIMM
* The Network LED will flash when there is network traffic.
** Check the stat.txt file in the server’s config folder for more information.
*** The CD LED and Network LED flash alternately in this condition.
A-4 Troubleshooting
hp.book Page 5 Thursday, April 2, 1998 4:33 PM
Status Indicator
Remains Lit
If the Status indicator remains on after start-up, this may
indicate an error. Most likely there is a problem with the SCSI
bus or a connected CD-ROM drive. Turn power off and check all
SCSI cable connections. Make sure all connected drives have
unique SCSI addresses and that only the last drive in the SCSI
chain is terminated. For the stand-alone module, restore power
to the drives and then to the CD-ROM server.
Try turning the CD-ROM server off, and then on again (power
cycle). If you have disc changers or multiple drives, wait several
minutes for the Status indicator to turn off.
CD Indicator Off
If the CD indicator remains off when inserting a CD-ROM into a
connected drive, check that the CD-ROM is in a supported
format (High Sierra, ISO 9660, Multisession or ISO 9660 with
Rock Ridge extensions).
For the stand-alone module, turn off power to the CD-ROM
server and drives, and check the SCSI bus connections. Then
restore power, first to the drives and then to the CD-ROM
server.
Errors When Accessing the CD-ROM Server
If you get error messages when accessing the CD-ROM server or
any CD-ROMs:
•
Check the SCSI chain. Ensure that all external CD-ROM
drives are switched on and that only the last unit is
terminated.
•
Make sure the drives are switched on prior to turning on the
CD-ROM server. For more information, see “Connecting
CD-ROM Drives to the CD-ROM Server”in chapter 2.
•
TCP/IP network. Verify that you have assigned a unique
Internet (IP) address to the CD-ROM server. See also,
“Assigning an IP Address and Host Name” in chapter 3.
•
Microsoft Windows Network. Verify that you have
enabled the SMB protocol.
•
Check the front panel indicators and consult the error table
above to help identify problems.
Troubleshooting A-5
hp.book Page 6 Thursday, April 2, 1998 4:33 PM
CD-ROM Software
will not run
•
If you have successfully inserted a CD-ROM, but software on
the CD-ROM fails to run or generates error messages, the
software may expect the CD-ROM data to be mapped at root
level. In the Microsoft and IBM network operating system
environments, you must then assign a drive letter to that
particular disc. See chapter 4, “Mounting or Mapping
Network Drives”.
•
Some applications look for information on the CD-ROM
using its true volume name - if you have set an alias name, it
may not recognize the disc and fail to run.
•
Some CD-ROMs may require the MSCDEX (Microsoft)
driver. You may need to contact Microsoft or your CD-ROM
vendor.
•
It may be necessary to restrict the number of users to one if
the CD-ROM is a single-user version.
Difficulty Locating the CD-ROM Server in
NetWare
Ethernet Frame
Types
There are four different frame types on Ethernet networks:
Ethernet II, IEEE 802.3, IEEE 802.2, and SNAP. All four frame
types are enabled by default and your HP CD-ROM Server will
automatically detect the frame type used on the network.
Ensure that your frame type is compatible with the servers on
your network.
NetWare File
Server
If you are unable to locate your CD-ROM server, a NetWare file
server may be required on your network.
NetWare NDS Installation Errors
If you experience problems when installing your CD-ROM server
in a NetWare NDS network, any errors that occur will be
written to a file named logfile.txt which is located in the config
folder of the CD-ROM server.
A-6 Troubleshooting
hp.book Page 7 Thursday, April 2, 1998 4:33 PM
A summary of the possible error messages is given below:
Error
Description
Installation failed: NDS tree not
found
The server could not find the NDS
tree. Please check the spelling.
Installation failed: Administrator
object missing
The server could not find the user object specified in the NDSAdminName
parameter. Please check the spelling.
Installation failed: Administrator
password is incorrect
The password supplied in the
NDSAdminPassword could not be
used to login as the user in the
NDSAdminName parameter. Please
check the spelling.
Installation failed: Server context
not found
The context specified in the
NDSServerContext parameter was
not found. Please verify that the
spelling is correct.
Installation failed: Insufficient
rights to create server object
The specified user in the
NDSAdminName parameter doesn’t
have sufficient rights to create the
server object in the specified context.
Installation failed: NDS Server ob- You have tried to install the server on
ject already exists
top of an existing server object.
Installation warning:
Could not extend NDS Schema
(class 1)
Installation warning:
Could not extend NDS Schema
(class 2)
Installation warning:
Could not extend NDS Schema
(attribute)
These errors are the result of
insufficient rights of the administrator
trying to install the server. The server
here tries to extend the NDS Schema
with an extra attribute to the ‘NCP
Server’ class in NDS. Extending the
NDS Schema requires SUPERVISOR
rights to the [Root] object. This is only
necessary for the first CD-ROM server
being installed in the tree. For all other
CD-ROM servers being installed into
the tree, the attribute will already be
defined and this step is not necessary.
Troubleshooting A-7
hp.book Page 8 Thursday, April 2, 1998 4:33 PM
Problems When Accessing Disc Changers
Note
❏ Disc changers, with up to 8 discs each, are supported. Up to
56 CD-ROM discs are supported through LUN (Logical Unit
Number) addressing.
The CD-ROM server has a parameter, JukeBoxLockTime, which
sets how long a user has exclusive access to a CD-ROM during a
data-read operation. This is to prevent disc-changer flutter in
order to optimize access speed when many users are accessing
different discs in the same changer.
Disc-changer flutter can occur if a user requests access to a
CD-ROM when another user is already reading data from a
different CD-ROM. The changer may then attempt to service
both requests by repeatedly changing between the two
CD-ROMs and transferring a small amount of data each time.
Because of the relatively long time needed to change CD-ROMs,
the data transfer rate to both users will become unacceptably
low.
The JukeBoxLockTime parameter will ensure that when there
are simultaneous requests for access to different CD-ROMs, a
sizable block of data is transferred to each user before the
CD-ROM access is changed.
•
•
If the JukeBoxLockTime parameter is set too low the data
transfer rate will be unacceptably low.
If the JukeBoxLockTime is set too high the CD-ROM drive
will time-out on a second user’s request before the first
user’s access is completed. This will result in users receiving
a ‘CD-ROM not available’ notice.
The default setting is 0 seconds which disables this function; you
can adjust this value by following the instructions given in
chapter 5.
A-8 Troubleshooting
hp.book Page 9 Thursday, April 2, 1998 4:33 PM
Restoring Factory Default Settings
The factory default settings can be restored if required (for
example, if you have accidently disabled all network protocols).
Restoring the settings can be done in three ways:
•
Using a Web browser on a TCP/IP network.
•
•
Using FTP on a TCP/IP network.
Using the config.ini file in a text editor
• Using the Push button.
Step by step instructions for each method are given below.
Note
❏ The LAN hardware (MAC) address specified in the
HardwareAddress parameter will remain unchanged, but all
other parameters are reset. This includes the Internet (IP)
address if one had been configured.
Using a Web
browser
Follow these steps to reset to the defaults settings using a
browser:
1. Start the Netscape Navigator or Internet Explorer and go to
the Management page as outlined under “Configuration
Using a Web Browser” in chapter 5.
2. On the Management page, click Factory default.
3. On the next page, confirm by clicking Set defaults. The factory
default setting will now be restored and the CD-ROM server
will then automatically restart.
Using FTP
Follow the steps below to restore the default settings:
1. Log in to the CD-ROM server with the command:
ftp <IP address or host name>
where <IP address or host name> is the IP address or host
name assigned to the CD-ROM server.
2. You will be prompted for user id and password. Use the user
id root, which has the default password pass (root is the user
id with the highest priority).
3. Issue the command get defaults to restore the default
settings. The unit will then automatically restart.
4. Log out using the command quit, bye or exit depending on
your FTP version.
Troubleshooting A-9
hp.book Page 10 Thursday, April 2, 1998 4:33 PM
Using a Text
Editor
Follow the steps below to restore the default settings:
1. Locate and open the CD-ROM server’s config.ini file using
a text editor (for example, Windows Notepad).
2. Change the FactoryDefaults parameter from no to yes.
3. Save the file.
This writes the contents of the file to the CD-ROM server and
will reset the server to factory defaults.
Using the Push
Button
Follow the steps below to restore the default settings:
1. Turn off the CD-ROM server (by removing power).
2. Press and hold the Push button while you power on the
CD-ROM server. Continue to press the Push button until the
Network indicator flashes at regular two second intervals.
Push button
(Tower Module)
Push button
(Stand-Alone Module)
3. Release the Push button and wait at least two seconds (one
flash of the Network indicator).
4. Press and hold the Push button again for at least five seconds
until the Network indicator remains constantly on.
The CD-ROM server is now reset to factory default settings and
should automatically restart. If it fails to restart, try power
cycling the CD-ROM server.
A-10 Troubleshooting
hp.book Page 1 Thursday, April 2, 1998 4:33 PM
B
The Config.ini File
Parameter name
Default Value
Description
HardwareAddress
= 00:60:b0:11:00:86
The CD-ROM server LAN hardware (MAC) address.
The value shown is an example only. You can also
set a Locally Administrated Address.
Date
= 95-01-01
yy-mm-dd, enter the date followed by ! to set
manually
Time
= 00:00:00
hh:mm:ss, enter the time followed by ! to set
manually
FactoryDefaults
= no
Set this parameter to yes and save the file to reset
to factory default settings.
Restart
= no
Set this parameter to yes and save the file to restart
the CD-ROM server.
TimeZone*
=
Must be set to the Time Zone that the CD-ROM
server is operating in. Refer to “TimeZone
parameter permissible values”.
TimeSyncSource*
= None
Default is None. Set to NDS to enable the CD-ROM
server to get its time from the NetWare network.
=0
Sets the maximum duration of a data read during
multiple access requests to prevent disc changer
fluttering. 0 to disable.
= 192.36.253.80
The CD-ROM server Internet (IP) address. The
value shown is an example only.
= 0.0.0.0
All traffic directed outside the local network
(according to the NetMask) is sent to the default
router. Any re-routing via other routers is done
automatically. The default 0.0.0.0 indicates that no
default router is set.
= 0.0.0.0
Subnet mask used to determine when the traffic
should be sent via a router. For example, the normal
class C mask is 255.255.255.0. The default 0.0.0.0
indicates that automatic router sensing is used.
[Server]
[SCSI]
JukeBoxLockTime
[IP]
InternetAddress
DefaultRouter
NetMask
The Config.ini File B-1
hp.book Page 2 Thursday, April 2, 1998 4:33 PM
Parameter name
Default Value
Description
BOOTPEnable
= yes
Enable or disable bootp IP address setup.
RARPEnable
= yes
Enable or disable rarp IP address setup.
DHCPEnable
= no
Enable or disable dhcp IP address setup.
EnableNetBEUI
= yes
Enable or disable SMB over NetBIOS/NetBEUI.
EnableNBT
= yes
Enable or disable SMB over NetBIOS/TCP/IP.
[SMB]
EnableWINS
= yes
Enable or disable WINS over NetBIOS/TCP/IP.
PrimaryWINSserver
=
Primary WINS server address.
SecondaryWINSserver
=
Secondary WINS server address, if required.
NBTscopeID
=
Always Enabled. Default: Empty String.
Domain/GroupName
= WORKGROUP
The name of the CD-ROM server workgroup.
ServerName
= HPhhhhh
The server name in the Microsoft Network
environment, where hhhhh are the last 6 digits of the
LAN hardware address.
NetBEUIFrameType
= auto
If auto is selected 802.2 or DIX will automatically be
selected by scanning the network. If required, the
frame type can also be set to either 802_2 or DIX.
ShowPseudoShares
= yes
Enable or disable whether the cd, config, root, and
volumes folders are visible.
NFSEnable
= yes
Enable or disable NFS.
DefaultUid
= -2
Default user id to be used when authenticating
PCNFSD clients. Disable by setting the parameter
to 0 (zero).
PCNFSDAuthentServer
= 0.0.0.0
The Internet address of the server used for
authentication of the PC users on the UNIX (NFS)
network. Disable by setting the parameter to 0.0.0.0.
Password
= pass
Password used when using HTTP or FTP to access
the server.
HTTPEnable
= yes
Enable or disable HTTP. Disabling the HTTP
protocol is also a way of restricting users from
accessing the CD-ROMs from Web browsers.
BaseURL
= www.hp.com/
Used for external links.
= public
Specifies the community that has read only access
to all supported SNMP objects except
writeCommunity, SupervisorPassword and
ftpPassword. It corresponds to the readCommunity
SNMP object.
[NFS]
[HTTP/FTP]
[SNMP]
GetCommunityName
B-2 The Config.ini File
hp.book Page 3 Thursday, April 2, 1998 4:33 PM
Parameter name
Default Value
Description
= pass
Specifies the community that has read-write access
to all supported SNMP objects except read only
objects. It corresponds to the writeCommunity
SNMP object.
TrapDestination
= 0.0.0.0
Specifies the Internet Address which SNMP traps
are sent to. It corresponds to the trapAddress SNMP
object. Default is 0.0.0.0, i.e. all SNMP traps are
disabled.
TrapCommunityName
= public
Specifies the community for all generated SNMP
traps. It corresponds to the trapCommunity SNMP
object.
SystemContact
=
Optional entry which should be in plain text and may
be used to show the name of the system contact
person.
SystemName
=
Optional entry which should be in plain text and may
be used to show the name of the location of the
system.
SystemLocation
=
Optional entry which should be in plain text and may
be used to show the name of the location of the
system.
AuthenticationTrap
= disabled
Enables or disables the SNMP authentication failure
traps. It corresponds to the
snmpenableAuthenTraps (MIB-II) SNMP object.
NWEnable
= yes
Enable or disable NetWare support.
Frame_802.2
= auto
Enable or disable the 802.2 frame type.
Frame_802.3
= auto
Enable or disable the 802.3 frame type
Frame_EthernetII
= auto
Enable/disable the Ethernet II frame type
Frame_SNAP
= auto
Enable or disable the SNAP frame type.
ServerName
= HPhhhhhh_NW
NetWare server name to be presented to the
NetWare clients, where hhhhhh are the last 6 digits
of the LAN hardware address.
InternalNetAddress
=xx-xx-xx-xx
Internal network address.
BurstMode
= on
Burst mode enable.
BinderyEnable
= Yes
Enables/Disables bindery mode login. Set to disable
to increasing system security when using NDS. The
supervisor will always be able to login in bindery
mode even if this parameter is set to no.
SupervisorPassword
= PASS
Supervisors Password.
SetCommunityName
[NetWare]
BindAuthentication
=
Server Name.
NDSEnable*
= Yes
Enable/Disable NDS
NDSTreeName*
=
Name of the Tree you wish to install the server into.
The Config.ini File B-3
hp.book Page 4 Thursday, April 2, 1998 4:33 PM
Parameter name
Default Value
Description
NDSServerContext*
=
Context in the NDS Tree where you wish to install
the server.
NDSAdminName*
=
Name of user or administrator with Supervisor or
Create rights in the context where you want to install
the server.
NDSAdminPassword*
=
Password for the administrator defined in
NDSAdminName. Once written into the
configuration file, the password will not be shown,
but replaced with *’s, representing each letter of the
Password.
NDSInstall*
= no
Change to ‘yes’ when you are ready to install the
server in NDS.
TimeSyncSources
= SAP
Default is SAP for the network agreed time.
Alternatively, enter the server names to be
contacted for time synchronization.
[END]
Note
❏ The parameter names marked with an asterisks (*) denote items
that must be configured to allow the HP CD-ROM Server to be
installed within the NDS tree.
❏ The parameter TimeZone has the permissible values shown in
the table on the following page.
B-4 The Config.ini File
hp.book Page 5 Thursday, April 2, 1998 4:33 PM
TimeZone
parameter
permissible values
The following table shows the time zone as the number of hours
+/-UTC (Universal Coordinated Time or Greenwich Mean Time)
•
If you use the parameter values shown on the left, there will
be no automatic adjustment for DST (DST = Daylight Saving
Time).
•
If you use the parameter values shown on the right, DST
adjustments are automatic.
TimeZone
parameter value
Hours
+/- UTC
TimeZone
parameter value
Hours
+/- UTC
UTC
0
GB_Eire
0
UTC+1_(No_DST)
1
Western_Europe
0
UTC+2_(No_DST)
2
Iceland
0
UTC+3_(No_DST)
3
Central_Europe
1
UTC+4_(No_DST)
4
Poland
1
UTC+5_(No_DST)
5
Eastern_Europe
2
UTC+6_(No_DST)
6
Turkey
3
UTC+7_(No_DST)
7
Western_Russia
3
UTC+8_(No_DST)
8
US_CAN_Eastern
-5
UTC+9_(No_DST)
9
US_CAN_Central
-6
UTC+10_(No_DST)
10
Saskatchewan
-6
UTC+11_(No_DST)
11
US_CAN_Mountain
-7
UTC+12_(No_DST)
12
US_Arizona
-7
UTC-1_(No_DST)
-1
US_CAN_Pacific
-8
UTC-2_(No_DST)
-2
US_Alaska
-9
UTC-3_(No_DST)
-3
US_Aleutian
-10
UTC-4_(No_DST)
-4
Cuba
-5
UTC-5_(No_DST)
-5
Egypt
2
UTC-6_(No_DST)
-6
Libya
1
UTC-7_(No_DST)
-7
Sudan
2
UTC-8_(No_DST)
-8
Tunisia
1
UTC-9_(No_DST)
-9
Brazil_Noronha
-2
UTC-10_(No_DST)
-10
Brazil_Sao_Paulo
-3
UTC-11_(No_DST)
-11
Brazil_Manaus
-4
UTC-12_(No_DST)
-12
Brazil_Rio_Branco
-5
The Config.ini File B-5
hp.book Page 6 Thursday, April 2, 1998 4:33 PM
TimeZone
parameter value
B-6 The Config.ini File
Hours
+/- UTC
TimeZone
parameter value
Hours
+/- UTC
Chile
-4
Chile_Easter_Isl
-7
Paraguay
-4
Aust_Adelaide
9h30m
Aust_Darwin
9h30m
Aust_Hobart
10
Aust_Perth
8
Aust_Sidney
10
New_Zealand
12
Afghanistan
4h30m
Armenia_Azer
4
Burma
6h30m
China_PRC
8
India
5h30m
Iran
3h30m
Iraq
3
Jordan
2
Kazak_Kirgi
6
Lebanon
2
Syria
2
hp.book Page 1 Thursday, April 2, 1998 4:33 PM
C
Updating the Firmware
Firmware Updates
The CD-ROM server firmware stored in Flash Memory* on the
server can easily be updated over the network. All firmware
updates are free of charge.
Note
❏ *Flash Memory The program (firmware) that runs your
CD-ROM server is stored in Flash Memory. This is a
memory chip that, like ordinary ROM memory, keeps its
contents even when the power is turned off. However, you
can erase its contents and write new data to it. When
firmware updates with new features are available for your
CD-ROM server, you can download them to the flash
memory without having to replace any parts.
Checking if a
Firmware Update
is available
Contact your HP authorized dealer for the most recent releases
of firmware. Your existing firmware version is identified in the
CD-ROM server’s config.ini file.
You can also use the HP Web site (refer to Electronic Support in
the front of this guide) or contact your nearest HP Customer
Support Center.
Updating the HP
CD-ROM Server
Flash Memory
You can carry out an update to your Flash Memory over the
network using FTP on a TCP/IP network.
To upgrade over the network you will need the following:
•
•
•
The file with the new CD-ROM server firmware. The name
of this file is of the form hpcd_version, e.g. hpcd_411.bin for
the firmware release 4.11 for the CD-ROM Server. Retrieve
the updated file from the HP Web site or your HP authorized
dealer.
A computer on the network with TCP/IP and FTP.
The CD-ROM server must also be installed on the network
with TCP/IP configuration as described chapter 3.
Updating the Firmware C-1
hp.book Page 2 Thursday, April 2, 1998 4:33 PM
Follow the steps below to install new CD-ROM server firmware:
1. Obtain a copy of the firmware update file from your
HP-authorized dealer or from HP’s Electronic Support
services.
2. Log in to the CD-ROM server with the command
ftp <IP address or host name>
where <IP address or host name> is the IP address or host
name assigned to your CD-ROM server.
3. You will be prompted for user id and password. The default
user id is root, and the default password is pass.
(root is the user id with the highest priority).
4. Issue the command bin to change to binary transfer mode.
5. Issue the command put <filename> flash where <filename>
is the name of the new CD-ROM server firmware, for example
hpcd_411.bin.
CAUTION
❏ Be careful not to interrupt the file transfer. If the
transfer is interrupted the CD-ROM server may
become inoperative and must be returned to HP.
6. Wait for the transfer to complete. This normally takes 1 to 4
minutes. The unit will then automatically restart with the new
CD-ROM server firmware.
7. Log out using the command quit, bye or exit depending on
your FTP version.
Instructions on how to install your CD-ROM server firmware are
also supplied with the firmware update.
C-2 Updating the Firmware
hp.book Page 1 Thursday, April 2, 1998 4:33 PM
D
Technical Specifications
All specifications are subject to change without prior notice.
General
• Height: 1.7 in (4.3 cm)
Dimensions
• Width: 5.9 in (14.9 cm)
• Depth: 8.8 in (22.4 cm)
Weight
• 1.5 lbs (0.7 kg)
• 32-bit RISC controller
Internal
Components
• 2 Mbytes RAM
• 2 Mbytes flash memory for firmware updates.
Firmware
Updates
(Flash memory allows you to download the latest
firmware to update your CD-ROM server operation.)
• Requires FTP (file transfer protocol) on a TCP/IP
network.
• Up to 7 SCSI CD-ROM drives.
Supported
CD-ROM
Drives
• Disc changers (up to 8 discs each) are supported.
Up to 56 CD-ROM discs are supported through
LUN (Logical Unit Number) addressing.
(CD-R writers are not supported)
File Systems
The following CD-ROM file systems are supported:
High Sierra (HSF), ISO 9660, Multisession and ISO
9660 with Rock Ridge extensions.
Technical Specifications D-1
hp.book Page 2 Thursday, April 2, 1998 4:33 PM
Network and Drive Connectors
Stand-Alone Module
Tower Module
• RJ-45 (10Base-T
twisted-pair cables)
• RJ-45 (10Base-T
twisted-pair cables)
Network
• BNC (10Base2 ThinLAN
coaxial cables)
• AUI (10Base2,
10Base5, or fiber-optic
transceiver)
CD-ROM
Drive
SCSI-2, 50-pin female,
high-density (micro-D).
SCSI-2, 50-pin header
(typically, for ribbon cable).
Electrical and Environmental
Input power
Environmental
HP J3168A
Stand-Alone Module
HP J3169A
Tower Module
19 Vdc,
15.2 W (max),
via external power
module (see input and
output ratings below).
12 Vdc (0.5 A nominal
when using the AUI
connector), and
5 Vdc (3 A),
through a 4-pin power
connector.
Temperature: 41-104°F (5-40°C)
Humidity: 20-80% RHG, noncondensing
Complies with:
• FCC Subpart B Class A.
Electromagnetic
• EN 55022 Class-B/1994, EN50082-1/1992.
• VCCI Level 1.
For more information, see appendix F.
Safety
D-2 Technical Specifications
Complies with EN 60950, UL1950. Power supply
approved for all countries.
hp.book Page 3 Thursday, April 2, 1998 4:33 PM
Power Module for the HP J3168A Stand-Alone Module
Region/Country
HP Part
Number
Input
Rating
Output
Rating
North America/USA
0950-3274
110-127Vac
60Hz
19Vdc
800ma
Europe
0950-3268
220-240Vac
50Hz
19Vdc
800ma
United Kingdom
0950-3270
220-240Vac
50Hz
19Vdc
800ma
Japan
0950-3267
100Vac
50/60Hz
19Vdc
800ma
Australia
0950-3269
230-240Vac
50Hz
19Vdc
800ma
South Africa
0950-3272
220-250Vac
50Hz
19Vdc
800ma
Israel
0950-3273
220-240Vac
50Hz
19Vdc
800ma
Supported Network Systems
Novell NetWare
NetWare 3.12, 4.10 and 4.11
Microsoft Windows
Windows for Workgroups 3.11
Windows 95
Windows NT 3.51, 4.0
Microsoft LAN
Manager
LAN Manager 1.3 and above
IBM LAN Server
LAN Server 1.3 and above
UNIX
Supports UNIX through NFS over UDP/IP on
TCP/IP networks.
WWW
Internet/intranet over HTTP 1.0 and HTML
2.0 compatible browsers.
Technical Specifications D-3
hp.book Page 4 Thursday, April 2, 1998 4:33 PM
Supported Network Protocols
Novell NetWare:
NCP over IPX
Microsoft Windows
and OS/2
SMB over NetBIOS/NetBEUI and
SMB over NetBIOS/TCP/IP
TCP/IP
NFS over UDP/IP, TCP, ARP, RARP,
BOOTP, DHCP, WINS/NBNS, SNMP, FTP
WWW
HTTP over TCP/IP
Network
Management
SNMP MIB-II and private enterprise MIB.
Platform-independent configuration and
management through standard Web
browser.
Security Features
D-4 Technical Specifications
Novell NetWare
Encrypted passwords. Authorization via file
server, including NDS.
Microsoft Windows
IBM OS/2
Share level access control.
UNIX
NFS version 2, PCNFSD authentication via
file server.
WWW
Password
hp.book Page 1 Thursday, April 2, 1998 4:33 PM
E
Warranty
Your Authorized
Dealer
If you encounter difficulty, begin by contacting your HP
Authorized Dealer who sold this product to you. Your HP
Authorized Dealer will be familiar with your requirements and
can provide assistance.
Customer Support
Hewlett-Packard has support services available to help you in
case of difficulties with your HP HP CD-ROM Server. For
postsales support, refer to the telephone numbers in the front of
this guide.
Warranty Period
The HP CD-ROM Server is warranted against defects in
materials and workmanship for a period of two years from the
date of receipt by the end user. During the warranty period, HP
will replace the unit at no charge provided the defective unit is
returned. You may return the unit to your HP Authorized
Dealer or your local HP Sales and Service Office representative.
Be sure to include a copy of your purchase receipt.
This warranty does not apply if the HP CD-ROM Server has
been damaged by accident or misuse, or as a result of service or
modification by other than an authorized Hewlett-Packard
Service Facility.
For warranty service on HP CD-ROM Server products (USA
only), call HP at (800) 366-8040 with the following information:
• HP product model number
• Serial number
• Description of the problem
Ask for information and instructions on returning the defective
product.
Warranty E-1
hp.book Page 2 Thursday, April 2, 1998 4:33 PM
Service Billing
(Out of Warranty)
When ordering a replacement unit for out-of-warranty service,
you may be charged a repair cost. See your HP Authorized
Dealer or your local HP Sales and Service Office representative.
Or, you can call HP at (800) 366-8040 (USA only).
Service Outside
the USA
Customers outside the USA should contact their HP Authorized
Dealer or HP Sales and Service Office to obtain information on
prices, exchange unit availability and instructions.
Servicio en Mexico
Para cualquier servicio requerido dentro de la República
Mexicana, favor de communicarse a:
Hewlett-Packard de Mexico, S.A. de C.V.
Monte Morelos No. 209
Loma BonitaGuadalajara, Jal. CP 45060
Telefono 669-95-00
E-2 Warranty
hp.book Page 1 Thursday, April 2, 1998 4:33 PM
F
Regulatory Statements
FCC Statements
General Information This device complies with Part 15 of the
FCC Rules. Operation is subject to the following two conditions:
(1) This device may not cause interference, and (2) this device
must accept any interference received, including interference
that may cause undesired operation.
Pursuant to Part 15.21 of the FCC Rules, any changes or
modifications to this equipment not expressly approved by the
Hewlett-Packard Company may cause interference and void the
FCC authorization to operate this equipment.
The Federal Communications Commission has prepared a
booklet titled Interference Handbook (1986), which may be
helpful to you. This booklet (stock number 004-000-004505-7)
may be purchased from the Superintendent of Documents, U.S.
Government Printing Office, Washington, D.C. 20402.
FCC Class A for HP J3168A/J3169A This equipment has
been tested and found to comply with the limits for a Class A
digital device, pursuant to Part 15 of the FCC Rules. These
limits are designed to provide reasonable protection against
interference in a commercial environment. This equipment
generates, uses and can radiate radio frequency energy and, if
not installed and used in accordance with the instructions, may
cause interference to radio communications.
However, there is no guarantee that interference will not occur
in a particular installation. If this equipment does cause
interference to radio or television reception, which can be
determined by turning the equipment off and on, the user is
encouraged to try to correct the interference by one or more of
the following measures:
•
Reorient or relocate the receiving antenna.
•
Increase the separation between the equipment and
receiver.
Regulatory Statements F-1
hp.book Page 2 Thursday, April 2, 1998 4:33 PM
•
•
Australia
Canada
Connect the equipment into an outlet on a circuit different
from that to which the receiver is connected.
Consult the dealer or an experienced radio/TV technician for
help.
This equipment complies with Australian EMC
requirements.
This equipment complies with Canadian EMC Class-A
requirements.
VCCI Class 1
(Japan)
European
Community
F-2 Regulatory Statements
Declaration of Conformity The following Declaration of
Conformity complies with ISO/IEC Guide 22 and EN45014. It
identifies the product, the manufacturer's name and address,
and the applicable specifications that are recognized in the
European community.
hp.book Page 3 Thursday, April 2, 1998 4:33 PM
Regulatory Statements F-3
hp.book Page 4 Thursday, April 2, 1998 4:33 PM
Chinese Safety
Statement
F-4 Regulatory Statements
hp.book Page 1 Thursday, April 2, 1998 4:33 PM
Index
!
C
10Base2 2-9, D-2
10Base5 2-9, D-2
10Base-T 2-9, D-2
Cables
SCSI 2-3
CD drive access 4-5
CD folder 4-2
CD LED indicator 2-10, A-3
CD-ROM
Access control 6-2
Accessing 4-5
Alias 6-2
Folder 4-4
Inserting 4-2
Map to drive letter 4-5
User limit 6-2, 6-3
CompuServe 8
Config folder 4-4, 5-4
Config.ini file 4-4, 5-4
A
Access control
Group ID 6-13
IP address 6-13
Microsoft and IBM Network operating systems 6-12
NetWare 6-11
NetWare Bindery 6-9, 6-10
Session timeout 6-3
Share-level 6-12
UNIX 6-13
User ID 6-13
User limit 6-3
Access control file 6-2, 6-6
Access Control Parameters 6-2
Access points 4-5
Accessories 2-3
AIX systems 3-6
Alias 4-3, 6-2
America Online 8
Apple Macintosh 4-22
Arp 3-4
UNIX 3-6
Windows 3-5
AUI 2-9, D-2
Authentication
NetWare 3.x 6-10
PCNFSD 6-14
B
bootp 3-4, 3-7
D
Default router address 3-8
DHCP 3-4, 3-8
Diagnostics A-2
Disk changer flutter 5-1, A-8
DOS 4-11, 4-20
E
Ethernet address. See LAN hardware
address
F
File system 4-2
Firmware updates C-1
Flash memory C-1
Folder
CD 4-2
Config 4-4, 5-4
Index 1
hp.book Page 2 Thursday, April 2, 1998 4:33 PM
G
N
GID 6-13
NBT 4-12
NCP 4-1, 4-6
Net mask 3-8
NetWare 4-6
Authentication Server 6-9
Loginscripts 4-6
Server name 4-6
Supervisor 6-11
Supervisor password 6-11
NetWare NDS 3-1, 6-11
NetWareUser/Group 6-10
Network connector board 2-6
Network indicator A-3
NFS 4-1, 4-21, 4-22, 6-13
NFSGroup 6-13
NFSIPAddress 6-13
NFSUser 6-13
NLM 1-3
Node address. See LAN hardware
address.
H
Hardware address 2-4
Hardware type 3-7
High Sierra (HSF) D-1
Host name 3-4
HTTP 1-2, 4-1
I
IBM Peer for OS/2 4-18
IDE 2-7
Index.htm file 4-4
Indicator
CD 2-10
Indicator LEDs, front panel A-3
IP address 3-3
UNIX 3-6
Windows NT 3-5
ISO 9660 D-1
J
JukeBoxLockTime 5-1, A-8
L
LAN hardware address 2-4, 3-5, 3-6, A-9
LEDs, front panel A-3
Long file names in DOS 4-21
LUN address 4-4, 6-8, A-8
M
Mapping or Mounting
Access points 4-5
MSCDEX A-6
Multisession D-1
2 Index
O
OS/2 4-18
P
PCNFSD 6-14
Power indicator A-3
Power supply D-2
HP part numbers 2-2
Q
Quick Installation 5-4
R
Rarp 3-4, 3-7
Reset
Factory defaults A-9
Rock Ridge D-1
hp.book Page 3 Thursday, April 2, 1998 4:33 PM
S
U
SCSI
Address 2-7, 4-4
Cables 2-3
Chain 2-8
Guidelines 2-7
Terminator 2-3, 2-8
SCSI folder 4-4
SCSI.txt file 4-4
SCSIAlias 4-3, 4-5
Security Management
Text Editor 6-6
Web Browser 6-3
Server folder 4-4
Server name
NetWare 4-6
SMB 4-12, 5-1
SessionTimeout 6-3
Share-level access control 6-12
SMB 4-1, 4-12
Over NetBIOS/NetBEUI 5-1
Over NetBIOS/TCP/IP 5-1
Server name 4-12
SMB server name 4-12, 5-1
SMBPassword 6-12
SNMP 5-1
Stat.txt file 4-4
Status indicator 2-10, A-3
Subnet mask 3-8
Supervisor 6-11
Supervisor rights
NetWare 6-11
SupervisorPassword 6-11
UID 6-13
UNC 4-15
UNIX 4-21
Updating your firmware C-1
UserLimit 6-3
V
Volume name 6-2
Volume rights 6-5
Volumes folder 4-3
W
Web browser 4-22
Access restrictions 6-1
Windows 95 4-6, 4-13
Windows for Workgroups 4-9, 4-16
Windows NT 4-17
WINS 3-8
World Wide Web address (Preface) 8
T
TCP/IP 3-3
Terminator 2-3
Testing the CD-ROM server A-2
Time Synchronization 3-9
TimeZone 3-9, B-1, B-5
Tower module installation 2-5
Index 3
hp.book Page 4 Thursday, April 2, 1998 4:33 PM
4 Index
hp.book Page 3 Thursday, April 2, 1998 4:33 PM
hp.book Page 4 Thursday, April 2, 1998 4:33 PM
Copyright © 1997, 1998
Hewlett-Packard Company
Manual Part Number
5967-2219
*5967-2219*