1
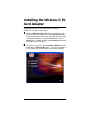
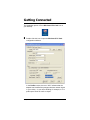
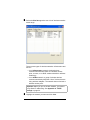
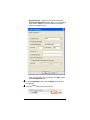
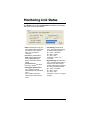
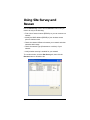
Wireless-G
PC Card
U
S
E
R ’ S
G
U
I
D
E
Contents
Overview ......................................................................... 3
Installation Instructions ................................................. 4
What’s in the Package................................................... 4
Before You Begin .......................................................... 4
Installing the Wireless-G PC Card Adapter.................... 5
Getting Connected ........................................................ 9
The Adapter LEDs........................................................12
Setting Security .............................................................13
Accessing the Security Screen.....................................14
WPA2-PSK (Pre-Shared Key) ......................................16
WPA-PSK (Pre-Shared Key) ........................................17
WEP (Wired Equivalent Privacy) ..................................18
WPA2-Enterprise .........................................................20
WPA.............................................................................23
Certificate (WPA2-Enterprise and WPA) ......................25
Changing your Security Setting ....................................26
Advanced Options.........................................................27
Creating Profiles...........................................................27
Monitoring Link Status..................................................30
Using Site Survey and Rescan.....................................31
Advanced Configuration ...............................................33
Appendix A. TCP/IP Settings ........................................34
Appendix B. Troubleshooting.......................................39
Appendix C. Zoom Technical Support Services..........41
Appendix D Regulatory Information.............................45
2
Wireless-G PC Card Adapter
Overview
The chapters in this User’s Guide describe how to:
•
Install the Zoom Wireless-G PC Card adapter on a Windows
PC
•
Connect to a wireless network
•
Enable security on the Wireless-G PC Card adapter
•
Use the advanced features of the Wireless-G PC Card
configuration software
Chapters 1 and 2 cover the basics – what you need to get
connected and to enable security.
If you are interested in the more advanced features of the
Wireless-G PC Card adapter, please see Chapter 3. This
chapter explains how to create profiles so you can switch your
connection from one network to another, monitor the strength of
your network connection, and scan a list of available networks.
Overview
3
1
Installation Instructions
This chapter provides simple instructions for installing the
Wireless-G PC Card software on a Windows PC. If you have
already installed the adapter on a computer (using the separate
Quick Start booklet), you can skip this chapter and begin with
Chapter 2: Setting Security.
What’s in the Package
The Wireless-G PC Card adapter package includes the
following:
•
Wireless-G PC Card
adapter
•
Quick Start manual
•
CD containing the
Installation Wizard and
documentation
Before You Begin
Before you install the Wireless-G PC Card adapter, check that
your computer has the following:
•
•
PCMCIA slot
Windows XP, 2000, Me,
or 98SE
•
•
CD drive
At least 6 MB of free hard
drive space
If you are using Windows 98SE: Your computer must have at
least 64MB RAM and a 300 MHz or faster CPU. Also, you may
need the Windows 98SE Installation CD during the setup
process.
4
Wireless-G PC Card Adapter
Installing the Wireless-G PC
Card Adapter
Important! Install the software BEFORE you insert the
Wireless-G PC Card into your laptop.
1
2
Insert the Wireless-G PC Card CD into the CD drive. The
CD should start automatically and the Language Selection
screen should appear. Select your language. (If the CD does
not start automatically, on the Windows desktop click the
Start button, click Run, and then type E:\setup.exe where E
is the letter of your CD drive.)
From the menu choices, select Installation Wizard then PC
Card. (Note to Windows Me users — If you are prompted to
do so, restart your computer after you complete this step.)
Chapter 1: Installation Instructions
5
3
4
5
6
The setup program opens:
Follow the prompts to complete the installation.
At the final setup screen, click Finish and then turn off your
computer.
Wireless-G PC Card Adapter
6
7
While your laptop is off, insert the Wireless-G PC Card into
the PCMCIA slot on your laptop, making sure that the LEDs
are facing up. You will hear the card click softly into place.
Turn the computer on. Windows will find your new hardware.
You may see a Found New Hardware box indicating the
progression of the installation. Typically no user action is
necessary. If you are using Windows XP, you may be
required to click Next.
8
9
Depending on your operating system, you may also see a
Hardware Installation box or a Digital Signature Not
Found box. You can safely ignore these messages and click
Yes or Continue Anyway. If prompted, click Finish and/or
Yes to restart your computer to finish setting up your new
hardware.
To verify that the adapter is working correctly, on your
Desktop, right-click My Computer and select Properties
from the pop-up menu.
Windows XP/Windows 2000: In the System Properties
window, select the Hardware tab and click the Device
Manager button.
Windows Me/Windows 98SE: In the System Properties
window, select the Device Manager tab.
Chapter 1: Installation Instructions
7
10
All operating systems: In the list of devices, double-click
Network Adapters and make sure there is no alert icon
next to the Zoom Wireless-G PC Card adapter.
(
This alert icon appears next to devices that are not
responding or that are not installed properly.)
Your Wireless-G PC Card adapter is successfully installed!
Continue with Getting Connected on the next page.
8
Wireless-G PC Card Adapter
Getting Connected
The installation places a Zoom Wireless-G PC Card icon on
your desktop:
1
Double-click this icon to open the Wireless-G PC Card
configuration software:
In the Profile text box, the term “ANY” indicates that the
adapter has identified the strongest wireless network signal
in your vicinity – in your office building, for example, or in a
public space such as a cafe or airport.
Chapter 1: Installation Instructions
9
2
Select the Site Survey tab to see a list of wireless networks
within range:
There are two types of wireless networks: Infrastructure and
Ad Hoc.
• In an Infrastructure network, wireless devices
communicate with each other via a wireless access
point, a router, or an ADSL modem with built-in wireless
technology.
• In an Ad Hoc network, a group of wireless devices
communicate directly with other “client” devices that are
using wireless adapters. The network does not include a
wireless access point.
Important: When you join an Ad Hoc network, you need to
set up Static IP addressing. See Appendix A: TCP/IP
Settings on page 34.
3
10
Highlight the network you want and click Join.
Wireless-G PC Card Adapter
If the network you select has security configured, you
must enable and configure security on your computer before
you can connect. See Chapter 2, Setting Security on page
13.
4
Your laptop should now be connected to the network, as
long as your security settings match those of the access
point and other network users. To check your connection,
open your Web browser and go to your favorite site.
If you have difficulty accessing the Internet, follow the
suggestions in your browser’s “Page cannot be displayed”
message. You may need to adjust your LAN settings.
As you work online, you can monitor your connection easily
using the Link Status icon that appears in the right corner of the
taskbar when you open the Wireless-G PC Card utility:
The icon’s color indicates the link status:
Blue indicates an excellent or good link.
Yellow indicates a usable but weak link.
Red indicates no link or a very poor link.
Chapter 1: Installation Instructions
11
The Adapter LEDs
The states of the LEDs on the Wireless-G PC Card adapter are
explained below.
LED
Status
Meaning
LINK
Flashing
Adapter is attempting to connect to a
wireless network.
Steady
Adapter is connected to a network.
Flashing
Adapter is transmitting or receiving
data.
ACT
(Activity)
12
Wireless-G PC Card Adapter
2
Setting Security
We strongly recommend security, although you do not need to
use it to get your wireless connection working.
Important! You must first enable security on the the wireless
access point. You then enable security on the adapter using the
same configuration that you used for the access point. For
example, if the wireless access point is configured for WPA2PSK, you must select WPA2-PSK security in the Wireless-G PC
Card configuration software and enter the same encryption key.
Select one of five ways to configure and implement security for
your wireless network:
•
•
WPA2-PSK (WiFi ® Protected Access 2 Pre-Shared Key) is
the recommended option if it is supported by the access
point and the devices in your network. WPA2-PSK protects
your communications with AES (Advanced Encryption
Standard). Some access points permit a “mixed mode”
network composed of both WPA and WPA2 wireless clients.
WPA2-PSK requires you to enter an encryption key shared
by the access point.
WPA PSK (WiFi ® Protected Access Pre-Shared Key)
If the devices in your network do not all support WPA2-PSK,
select WPA-PSK. WPA-PSK protects your communications
with TKIP (Temporal Key Integrity Protocol).
Chapter 2: Setting Security
13
This option requires you to enter an encryption key shared
by the access point.
•
WEP (Wired Equivalent Privacy)
If the devices in your network do not support WPA2-PSK or
WPA-PSK, select WEP data encryption.
This method requires you to enter an encryption key. The
keys can be 64 or 128 bits in length.
•
WPA2-Enterprise
If you are linking to a network that accesses a RADIUS
(Remote Authentication Dial-In User Service) authentication
server, and if the devices in the network support WPA2,
select WPA2-Enterprise. This option provides security with
AES (Advanced Encryption Standard). AES has a key size
of 128, 192, or 256-bits. In order for eavesdroppers to
decipher a message, they would have to try every possible
key.
•
WPA is an option for users who access a RADIUS (Remote
Authentication Dial-In User Service) authentication server
that does not support WPA2. WPA provides security with
TKIP (Temporal Key Integrity Protocol), which dynamically
changes keys as the system is used.
Accessing the Security Screen
1
14
On your desktop, double-click the Zoom Wireless-G PC
Card icon:
Wireless-G PC Card Adapter
2
3
4
The Zoom Wireless-G PC Card configuration software
opens to display the configuration parameters:
Make sure that the desired wireless network is displayed in
the Profile and SSID text boxes (the term <Infra>
designates an Infrastructure network) and that the Network
Type is correct. (For the differences between Infrastructure
and Ad Hoc networks, see page 10.)
Select the Enable Security check box to open the Security
Configuration window. For Step 5, consult the table below:
To configure
Go to page
WPA2-PSK
16
WPA-PSK
17
WEP
17
WPA2-Enterprise
20
WPA
23
Chapter 2: Setting Security
15
WPA2-PSK (Pre-Shared Key)
5
6
7
8
9
In the Security Configuration window, click the Encryption
Mode drop-down arrow and select WPA2-PSK.
In the Pre-shared key [WPA] area, enter the same network
key that is used on the wireless access point. We advise you
to enter a key with a minimum of 20 random characters.
Click OK to save your settings and return to the
Configuration tab.
On the Configuration tab, click Apply.
Click the Close box to exit the configuration software.
That’s it! You have configured WPA2-PSK security for your
wireless connection, and you’re ready to use the Internet.
16
Wireless-G PC Card Adapter
WPA-PSK (Pre-Shared Key)
If not all of the wireless devices in your network support the
recommended WPA2-PSK, select WPA-PSK.
5
6
7
8
9
In the Security Configuration window, click the Encryption
Mode drop-down arrow and select WPA-PSK.
In the Pre-shared key [WPA] area, enter the same network
key that is used on the wireless access point. We advise a
key with a minimum of 20 random characters.
Click OK to save your settings and return to the
Configuration tab.
On the Configuration tab, click Apply.
Click the Close box to exit the configuration software.
Chapter 2: Setting Security
17
That’s it! You have configured WPA-PSK security for your
wireless connection, and you’re ready to use the Internet.
WEP (Wired Equivalent
Privacy)
5
18
In the Security Configuration window, click the Encryption
Mode drop-down arrow and select WEP:
Wireless-G PC Card Adapter
6
In the Preconfigured key [WEP] area, do the following:
a In the Format for entering key drop-down list, select
• ASCII characters if your network uses all Zoom
wireless products
b
c
d
7
• Hexadecimal digits if an access point, router, or
some adapters are not Zoom products
In the Key Length drop-down list, select 128 bits or 64
bits.
Note: 128-bit WEP provides more security than 64-bit,
but 128-bit could diminish network performance.
In the Key Index drop-down list, if you are using a 64-bit
key, select which of four keys – 1, 2, 3, or 4 – will be
used to encrypt the data. The key you select must be the
same one that is selected on the access point. We
recommend that you use Key 1.
128-bit WEP uses just a single key.
In the Network Key text box, enter a key using the table
below as a guide.
The key must be the same for all the devices on your
network.
If you selected key
type…
Enter exactly…
Hexadecimal digits
– 128 bits
26 characters A–F, a–f and 0–9. For
example,
00112233445566778899AABBCC.
Hexadecimal digits
– 64 bits
10 characters. The characters can
be A-F, a-f, and 0-9. For example,
11AA22BB33.
ASCII – 128-bits
13 characters. The characters can
be any upper- or lower-case letters
and numbers. For example:
MyKey12345678.
ASCII – 64 bits
5 characters. The characters can be
any upper- or lower-case letters and
numbers. For example, MyKey.
Re-enter the key in the Confirm Network Key text box.
Chapter 2: Setting Security
19
8
Click OK to save your settings and return to the
Configuration tab.
9 On the Configuration tab, click Apply.
10 Click the Close box to exit the configuration software.
That’s it! You have configured WEP security for your wireless
connection, and you’re ready to use the Internet.
WPA2-Enterprise
Select WPA2-Enterprise if
•
you are linking to a corporate network that uses a RADIUS
(Remote Authentication Dial-In User Service) authentication
server
•
all of the devices in the network support WPA2, or your
access point offers both WPA2 and WPA.
20
Wireless-G PC Card Adapter
5
6
7
In the Security Configuration window, click the Encryption
Mode drop-down arrow and select WPA2-Enterprise.
In the IEEE 802.1X Authentication area, note that the
check box marked Enable IEEE 802.1X authentication for
this network is selected. With IEEE 802.1X authentication,
each wireless device (client) sends a signal to the wireless
access point, which in turn sends the signal to the RADIUS
server. The server determines whether or not the client is
allowed to join the network.
Click the EAP (Extensible Authentication Protocol) Type
drop-down list and select an authentication protocol:
•
PEAP (Protected Extensible Authentication Protocol –
the (default). With PEAP, you can select from three
authentication extensions:
MS-CHAPV2. Microsoft’s version of CHAP
(Challenge-Handshake Authentication Protocol
(default)
GTC
TLS/SmartCard
•
TLS (Transport Layer Security). There are no
authentication extension options with TLS.
Chapter 2: Setting Security
21
•
TTLS (Tunneled Transport Layer Security). With TTLS,
you can select from four authentication extensions:
PAP (Password Authentication Protocol)
CHAP (Challenge Handshake Authentication
Protocol)
MS-CHAP (Microsoft’s version of CHAP).
8
9
MS-CHAPV2 (the default).
Click the Certification tab and enter the required information
(see page 25).
Click OK to save your settings and return to the
Configuration tab.
10
11
On the Configuration tab, click Apply.
Click the Close box to exit the configuration software.
That’s it! You have configured WPA2-Enterprise security for your
wireless connection, and you’re ready to use the Internet.
22
Wireless-G PC Card Adapter
WPA
Select WPA if you are linking to a corporate network that uses a
RADIUS (Remote Authentication Dial-In User Service) server
that does not support WPA2.
5
6
In the Security Configuration window, click the Encryption
Mode drop-down arrow and select WPA.
In the IEEE 802.1X Authentication area, note that the
check box marked Enable IEEE 802.1X authentication for
this network is selected. With IEEE 802.1X authentication,
each wireless device (client) sends a signal to the wireless
access point, which in turn sends the signal to the RADIUS
server. The server determines whether or not the client is
allowed to join the network.
Chapter 2: Setting Security
23
7
Click the EAP (Extensible Authentication Protocol) Type
drop-down list and select an authentication protocol:
•
PEAP (Protected Extensible Authentication Protocol –
the default). With PEAP, you can select from three
authentication extensions:
MS-CHAPV2 (the default). This is Microsoft’s
version of CHAP (Challenge-Handshake
Authentication Protocol.
GTC
TLS/SmartCard
•
TLS (Transport Layer Security). There are no
authentication extension options with TLS.
•
TTLS (Tunneled Transport Layer Security). With TTLS,
you can select from four authentication extensions:
PAP (Password Authentication Protocol), the most
basic form of authentication.
CHAP (Challenge Handshake Authentication
Protocol)
MS-CHAP (Microsoft’s version of CHAP).
MS-CHAPV2
8
24
Click the Certification tab and enter the required information
(see page 25).
Wireless-G PC Card Adapter
9
Click OK to save your settings and return to the
Configuration tab.
10
11
On the Configuration tab, click Apply.
Click the Close box to exit the configuration software.
That’s it! You have configured WPA security for your wireless
connection, and you’re ready to use the Internet.
Certificate (WPA2-Enterprise
and WPA)
A certificate is issued to a wireless network user by a Certificate
Authority – often the corporate network administrator – to confirm
the user’s identity, thereby maintaining network security.
If you are linking to a corporate network that uses an
authentication server and you have configured WPA2 Enterprise
or WPA security, your MIS staff will assist you in completing the
Certification information.
Chapter 2: Setting Security
25
Changing your Security
Setting
If the type of security on your wireless network changes, you
need to modify your security settings.
On the Configuration tab, click the Configure Security button
to select a different security option and enter the required
information.
26
Wireless-G PC Card Adapter
3
Advanced Options
The Zoom Wireless-G PC Card utility provides options so you
can create profiles, monitor the signal strength of your network
connection, scan available networks, and specify advanced
settings. This chapter tells you when and how to use each of
these options.
Creating Profiles
A profile is a collection of settings needed for a particular
wireless connection. If you plan to use more than one network,
you can create a profile for each one and then switch to its
profile when you want to connect to that particular network.
For example, you may want to set up profiles for a work network
and a home network, each of which has different configuration
settings. By creating two profiles, you can store the settings for
each network and then switch quickly and easily from one
network to the other by selecting the appropriate profile.
1
On your desktop, double-click the Zoom Wireless-G PC
Card icon.
Appendix A: TCP/IP Settings
27
2
On the Configuration tab, in the Profile text box, enter a
name for the profile you want to create.
For example, let’s say you have a small home network to
which you want to be able to switch quickly when you arrive
home. Give the profile the name “Home”:
3
In the Configuration area, enter the following settings:
• SSID – Enter the network name. In the example above,
the SSID is Home.
• Network Type – From the drop-down list, select Ad
Hoc.
• Ad Hoc channel – From the drop-down list, select the
channel used by the other device(s) in the network. If
you are setting up the first computer in the network,
select a channel.
!
28
Also, to avoid interference, it is desirable to have a 5channel difference between your channel and the
channel being used by another network within range.
Click Site Survey, then Rescan to check the channel
settings of other networks within range.
If you are unsure of which channel to use, select the
default, Channel 6.
Transmit Rate – Select Auto to allow your device to
adjust automatically in the case of interference or a weak
connection. If you want to specify a fixed speed, choose
one from the drop-down list. Most people should select
Auto.
Wireless-G PC Card Adapter
• Enable Security – Select this check box to open the
Security Configuration window. Note: If you are setting
up an ad hoc network, as in this example, only WEP
security is available to you.
4
5
After you enter your security settings, click OK to return
to the Configuration tab.
In the Configuration area, click the Apply button to save
the settings.
Click the Save button to save the Profile.
Appendix A: TCP/IP Settings
29
Monitoring Link Status
The Status area on the Configuration tab displays information
about your wireless connection:
• State: (Infrastructure only) The
name and the MAC address of
the wireless access point to
which your computer is
connected.
• Current Tx (Transmission)
Rate: Highest transmission
speed in Megabytes per
second of the last received
packet.
• Current Channel: The Wi-Fi
frequency channel.
• Throughput (Packets/sec):
TX = number of packets
transmitted per second without
errors.
RX = number of packets
received per second without
errors.
30
• Link Quality (Infrastructure
only): The transmission quality
of the last received packet.
80 – 100% = Excellent
60 – 80% = Good
40 – 60% = Fair
Under 40% = Poor or no
connection
• Signal Strength (Infrastructure
only): The transmission signal
strength of the last received
packet, expressed as a percent
of maximum allowable power.
80 – 100% = Excellent
60 – 80% = Good
40 – 60% = Fair
Under 40% = Poor or no signal
strength
Wireless-G PC Card Adapter
Using Site Survey and
Rescan
Use the Site Survey window and the Rescan button when you
need to do any of the following:
• Find a list of network names (ESSIDs) so you can connect to a
network
• Identify the MAC address (BSSID) of your wireless access
point or wireless router
• Check the channel difference between your network and other
networks within range
• Check the network type (infrastructure or ad hoc) of your
network
• Verify whether security is enabled for your network
To use this window, click the Site Survey tab, then click the
Rescan button to refresh the list.
Appendix A: TCP/IP Settings
31
The information displayed on the Site Survey tab is as follows:
• ESSID (Extended Service Set
Identifier): An Extended Service Set
consists of two or more Basic
Service Sets (see below). An
ESSID, also known as an SSID or
Network Name, is chosen by the
person who sets up the network.
The ESSID is a code attached to all
packets sent over an infrastructure
wireless network. The code can
contain up to 32 alphanumeric
characters. All devices in the
network must share the same
ESSID.
• BSSID (Basic Service Set
Identifier): A Basic Service Set
consists of a wireless access point
connected to wired network and a
set of wireless devices. In an
infrastructure network, the BSSID is
the MAC address of the wireless
router or wireless access point. In
an ad hoc network, the BSSID is the
MAC address of the first computer in
the network to be powered up.
32
• Channel: The Wi-Fi frequency
channel.
• Network Type: Infrastructure or Ad
Hoc (see page 10).
• Security: The type of security
configured for the network.
• Signal: The strength and quality of
your transmissions.
• Supported rates (data transfer
speeds): In networks using older
(802.11b) equipment, the
maximum data rate is typically
11Mb/s, while in networks using
802.11g equipment the maximum
rate is 54Mb/s. In networks that
include both new and older
equipment, the maximum rate is
18. The rates depend on signal
strength and quality.
Wireless-G PC Card Adapter
Advanced Configuration
To access this window, click the Advanced button on the
Configuration tab.
• Power Save Enabled: When
you select this option, the
Wireless-G PC Card adapter
immediately signals the access
point that it is in Power Save
mode. The access point buffers
all packets until it is polled by
the adapter.
Note: The access point you use
must also support Power Save.
• Nitro XM: Selected by default.
This technology lets devices
communicate directly with each
other while they remain linked
to a Nitro XM-enabled access
point. Nitro XM enables data
compression and can
significantly enhance data
transfer speed.
• Nitro Mode: Selected by
default. Provides special
protocol enhancements to
improve the throughput of your
wireless connection.
Appendix A: TCP/IP Settings
• RTS (Request To Send)
Threshold: This is a
mechanism designed to ensure
that all devices in a network
can send data to the access
point. If some laptops are
having trouble communicating,
enter the maximum packet size
of data to be sent – 0 to 1500
is recommended. If the packet
size exceeds the value you set,
RTS will be activated. The
default is Disabled (2347).
• Frag (Data fragmentation)
Threshold: If your adapter
often transmits large files, you
can set a limit on packet size. If
the limit is exceeded, the
adapter will split the packet.
The default is Disabled (2346).
33
Appendix A
TCP/IP Settings
By default, Windows is set for dynamic addressing (DHCP).
Generally, this is the correct setting for an Infrastructure network,
but needs to be changed if you are using an Ad Hoc network.
(Note: Use our instructions as a basic guide. Advanced users will
know other ways to set up their networks.)
Please go to the section that corresponds to your Windows
operating system.
Windows XP
1 Follow these steps to open the Internet Protocol (TCP/IP)
Properties dialog box.
a From the desktop, click the Start button, select Control
Panel, and then click Network Connections.
b Right-click the Wireless Network Connection icon, and
select Properties.
c In the Wireless Network Connection Properties dialog
box, select Internet Protocol (TCP/IP) from the list, and
click the Properties button.
d If you have an ad hoc network, continue with step 2a. If
you have an infrastructure network, continue with step
3a. If you’re not sure what kind of network you have,
refer to page 10.
2 For Ad Hoc Networks: Complete the following to set static IP
addressing:
a Ensure that Obtain an IP address automatically is not
selected. Then select the buttons labeled: Use the
following IP address and Use the following DNS
server addresses.
34
Wireless-G PC Card Adapter
b If this is the first computer to be set up in the ad hoc
network, enter 10.0.0.5 for an IP address. If you are
adding it to an existing ad hoc network, increment the
last digit by one, for example, 10.0.0.6, 10.0.0.7
c Enter 255.255.255.0 for Subnet mask. The Subnet
mask should be the same for each computer in your ad
hoc network.
d Enter 10.0.0.5 for Default gateway and Preferred DNS
server. (This is the IP address of the first computer that
was set up in your ad hoc network.) The Default
Gateway and Preferred DNS server should be the
same for each computer in your ad hoc network.
e Click OK twice.
That’s it! You have set static IP addressing for a Windows XP
computer in an ad hoc network.
3
For Infrastructure Networks: To verify your DHCP settings,
complete the following:
a Ensure that Obtain an IP address automatically is
selected.
b Ensure that either Obtain a DNS server address
automatically or Enable DNS is selected. All text boxes
for static IP addressing should be blank.
c Click OK twice to exit.
That’s it! You have verified your DHCP settings for a Windows
XP computer in an infrastructure network.
Appendix A: TCP/IP Settings
35
Windows 2000
1 Follow these steps to open the Internet Protocol (TCP/IP)
Properties dialog box.
a From the desktop, click the Start button, point to
Settings, then click Network and Dial-up
Connections.
b Right-click the Local Area Connection icon, and select
Properties.
c In the Properties dialog box, in the Connect Using box,
make sure the Zoom Wireless-G PC Card adapter is
displayed.
From the Components list, select Internet Protocol
(TCP/IP) and click the Properties button.
d If you have an ad hoc network, continue with step 2. If
you have an infrastructure network, continue with step 3.
2 Complete the following steps to set static IP addressing:
a In the Internet Protocol (TCP/IP) Properties dialog
box, ensure that Obtain an IP address automatically is
not selected. Then make sure the buttons labeled Use
the following IP address and Use the following DNS
server addresses are selected.
b If this is the first computer to be set up in the ad hoc
network, enter 10.0.0.5 for IP address. If you are adding
it to an existing ad hoc network, increment the last digit
by one, for example, 10.0.0.6, 10.0.0.7
c Enter 255.255.255.0 for Subnet mask. The Subnet
mask remains the same for each computer in your ad
hoc network.
d Enter 10.0.0.5 for Default gateway and Preferred DNS
server. (This is the IP address of the first computer that
was set up in your ad hoc network.) The Default
Gateway and Preferred DNS server should be the
same for each computer in your ad hoc network.
36
Wireless-G PC Card Adapter
e Click OK twice.
That’s it! You have set static IP addressing for a Windows 2000
computer in an ad hoc network.
3
For Infrastructure Networks: To verify your DHCP settings,
complete the following:
a Ensure that Obtain an IP address automatically is
selected.
b Ensure that either Obtain a DNS server address
automatically or Enable DNS is selected. All text boxes
for static IP addressing should be blank.
c Click OK twice to exit.
That’s it! You have verified the DHCP settings for your Windows
2000 computer in an infrastructure network.
Windows 98SE/Me
1 Follow these steps to open the Internet Protocol (TCP/IP)
Properties dialog box:
a From the desktop, click the Start button, point to
Settings, then click Control Panel.
b In the Control Panel window, double-click the Network
icon.
c In the Network dialog box, select the Zoom Wireless-G
PC Card TCP/IP from the list, click the Properties
button and then click OK.
d If you have an ad hoc network, continue with step 2a. If
you have an infrastructure network, continue with step
3a.
2 Complete the following to set static IP addressing:
a Ensure that Obtain an IP address automatically is not
selected. Then click the Specify an IP Address button.
Appendix A: TCP/IP Settings
37
b If this is the first computer to be set up in the ad hoc
network, enter 10.0.0.5 for IP address. If you are adding
a computer to an existing ad hoc network, increment the
last digit by one, for example, 10.0.0.6, 10.0.0.7
c Enter 255.255.255.0 for Subnet mask. The Subnet
mask should be the same for each computer in your ad
hoc network.
d Click the Gateway tab and enter 10.0.0.5 for Default
Gateway. (This is the IP address of the first computer
that was set up in your ad hoc network.) The Default
Gateway should be the same for each computer in your
ad hoc network.
e Enter 10.0.0.5 for Preferred DNS server. (This is the IP
address of the first computer that was set up in your ad
hoc network.) Click the DNS Configuration tab then
click Enable DNS. Enter 10.0.0.5 for Preferred DNS
server. The Preferred DNS server should be the same
for each computer in your ad hoc network.
f
Click OK twice.
That’s it! You have set static IP addressing for a Windows
98SE/Me computer in an ad hoc network.
3
For Infrastructure Networks: To verify your DHCP settings,
complete the following:
a Ensure that Obtain an IP address automatically is
selected.
b Ensure that either Obtain a DNS server address
automatically or Enable DNS is selected. All text boxes
for static IP addressing should be blank.
c Click OK twice to exit.
That’s it! You have verified the DHCP settings for your Windows
98SE/Me computer in an infrastructure network.
38
Wireless-G PC Card Adapter
Appendix B
Troubleshooting
If your Zoom Wireless-G PC Card adapter is not working
properly, try each of the following steps until you get it to work.
1
2
3
4
5
6
Make sure the adapter is firmly inserted into the laptop’s PC
card slot.
Turn the laptop off, then on, and then check to see if the
adapter is working.
Make sure that the adapter is not physically damaged.
If possible, try installing the adapter on another laptop.
Run the Zoom Wireless-G PC Card utility. On the
Configuration tab, make sure that the SSID and Network
Type settings for the Wireless-G PC Card adapter are the
same as these settings for the other wireless devices in your
network.
Then click the Security tab and check the security settings
to make sure that the adapter has the same security settings
as the other wireless devices in your wireless network. Make
sure that your security key is the same – remember that the
keys are case-sensitive.
Check your TCP/IP settings as described in Appendix A on
page 34.
!
If you have an Infrastructure network, it’s highly likely
that you are using Dynamic Addressing (DHCP). In that
case, make sure that your Zoom Wireless-G PC Card
adapter’s TCP/IP setting is Obtain an IP Address
Automatically.
• If you have an ad hoc network, make sure that your
adapter’s TCP/IP settings specify an IP address that’s
on the same subnet as the other devices in your ad hoc
wireless network. For example, if the devices in your ad
hoc network have IP addresses such as 10.0.0.1
through 10.0.0.8, you could use the address 10.0.0.9.
Appendix B: Troubleshooting
39
7
8
40
If the adapter still does not work, uninstall the software and
then re-install it:
First, turn off your computer and unplug the adapter from the
PC Card port. Then select Start – All Programs – Zoom
Wireless-G PC Card – Uninstall Zoom Wireless-G PC
Card. Follow the prompts to uninstall, then re-install the
software (see page 5).
If the above solutions do not work, consult Technical
Support. Please see Appendix C: Zoom Technical
Support Services on page 41.
Wireless-G PC Card Adapter
Appendix C
Zoom Technical Support
Services
Zoom has a variety of technical support services available to our
customers. We strive to provide convenient, professional support
responsive to our customers’ needs and capabilities. If you find
yourself unable to get your Zoom product to operate, and you
have thoroughly reviewed your owner’s manual and all relevant
documentation, please feel free to contact us for help.
For your records, and to facilitate Technical Support from either
your equipment supplier or Zoom, please record the following
information when you receive your Zoom product.
Product Information
Product Name
__________________________________
Product Model Number
__________________________________
Product Serial Number
__________________________________
Date Installed
_______________________
The serial number is located on the bottom of the PC Card under
the barcode. Please be sure to write the number down. This will
greatly speed up your service and insure that the service
representative is addressing the proper Zoom product.
Calls to Zoom’s voice technical support staff are the most time
consuming, and at times you may find it difficult to get through.
We do not want you left on hold for long periods of time, so we
limit the queue length. We recommend that you take the time to
familiarize yourself with the other services described in this
section before calling. Many questions can be answered more
quickly using e-mail or our World Wide Web Home page.
Appendix C: Zoom Technical Support Services
41
World Wide Web
Zoom’s Web page lets you send email for assistance, register
on-line, access product reviews and descriptions, and do a
whole lot more. Visit the Zoom Technical Support area for the
latest Flash Files and Drivers for your Zoom Product. To access
Zoom’s Web page, please log onto your local Internet Service
Provider, then go to the Web browser and select:
www.zoom.com
From Zoom’s Homepage you can easily go to Technical Support
or many other useful areas.
Smart Facts™ Q&A Search Engine (English Only)
Smart Facts™ is an automated intelligent database of Frequently
Asked Questions (FAQ’s) about Zoom products. It allows you to
search for solutions to your Technical Support questions, by
product or via a powerful Keyword Search Engine. If you still
cannot find a solution to your question, SmartFacts lets you
access our Technicians via email for a personalized response.
SmartFacts provides you with a way to track the history of your
problem and to add or change the description without having to
enter any information that was previously sent. SmartFacts can
even contact you automatically if there is an update to your
hardware or software that helps to address the question you had.
You can access SmartFacts from www.zoom.com/techsupport
42
Wireless-G PC Card Adapter
Contact Zoom by Email
You can email Zoom with any tech support questions you might
have and one of our Technical Support Engineers will respond
by email within 2 business days. You may request personal
assistance via email at www.zoom.com/techmail. When emailing
Zoom, be sure to include the following:
•
Serial number of your adapter
•
Your full name and address
•
A detailed description of your problem
Contact Zoom by Phone
You can reach Technical Support by calling these numbers:
In the United States, call (561) 241-4371.
In the UK, call 0870 720 0090.
From continental Europe, call 44 (0) 1252 580624.
Appendix C: Zoom Technical Support Services
43
Return of Defective Units
Please contact your local distributor or reseller for Factory
Authorized Repair or Replacement of your In-Warranty
Defective Product. If you are unable to reach your distributor,
you can contact the Zoom Factory Customer Service by calling:
US: (561) 241-7712
UK: 0870 720 0090
From continental Europe: 44 (0) 1252 580624
Please note that the customer is responsible for any charges
(including brokerage or customs and duties) associated with
shipping the defective unit to Zoom for repair. During the first
year Zoom will pay return shipping to the customer by common
carrier. After the first year the customer may be required to pay a
shipping and handling fee. Any applicable customs, duties and
brokerage charges to import the product are the responsibility of
the customer. Zoom encourages all customers to return
defective units to their respective reseller whenever possible.
44
Wireless-G PC Card Adapter
Appendix D
Regulatory Information
U.S. FCC Part 15 Emissions Statement
This equipment has been tested and found to comply with the limits for a Class B
digital device, pursuant to part 15 of the FCC Rules. These limits are designed to
provide reasonable protection against harmful interference in a residential
installation. This equipment generates, uses and can radiate radio frequency
and, if not installed and used in accordance with the instructions, may cause
harmful interference to radio communications. However, there is no guarantee
that interference will not occur in a particular installation. If this equipment does
cause harmful interference to radio or television reception, which can be
determined by turning the equipment off and on, the user is encouraged to try to
correct the interference by one or more of the following measures:
•
Reorient or relocate the receiving antenna.
•
Increase the separation between the equipment and receiver.
•
Connect the equipment into an outlet on a circuit different from that to which
the receiver is connected.
•
Consult the dealer or an experienced radio/TV technician for help.
This device complies with Part 15 of the FCC Rules. Operation is subject to the
following two conditions: (1) This device may not cause harmful interference, and
(2) this device must accept any interference received, including interference that
may cause undesired operation.
FCC Caution: Any changes or modifications not expressly approved by the party
responsible for compliance could void the user's authority to operate this
equipment.
IMPORTANT NOTE:
IEEE 802.11b or 802.11g operation of this product in the U.S.A. is firmwarelimited to channels 1 through 11.
Industry Canada Emissions Statement
This Class B digital apparatus meets all requirements of the Canadian
Interference-Causing Equipment Regulations.
Cet appareil numérique de la classe B respecte toutes les exigences du
Règlement sur le matériel brouilleur du Canada.
Operation is subject to the following two conditions:
1) this device may not cause interference and
2) this device must accept any interference, including interference that may
cause undesired operation of the device.
Appendix D: Regulatory Information
45
Countries of Operation & Conditions of Use in the European Community
This device is intended to be operated in all countries of the European
Community.
Requirements for indoor vs. outdoor operation, license requirements and allowed
channels of operation apply in some countries as described below:
Note: The user must ensure that the channels of operation are in conformance
with the spectrum usage rules for European Community countries as described
below.
• This device will automatically limit the allowable channels, as determined by
the setup program during installation, by examining the operating system's
current country of operation. If the country of operation is not determined, the
device will default to US settings. Use of the incorrect country of operation
may result in operation not in accordance with local regulations, and may
cause harmful interference to other systems. The user is obligated to ensure
that the device is operating according to the channel limitations,
indoor/outdoor restrictions and license requirements for each European
Community country as described in this document. If configured incorrectly,
you can contact technical support for instructions on changing the device's
spectrum usage.
• This device may be operated indoors or outdoors in all countries of the
European Community using the 2.4 GHz band: Channels 1 - 13, except where
noted below.
− In Italy the end-user must apply for a license from the national spectrum
authority to operate this device outdoors.
− In Belgium outdoor operation is only permitted using the 2.46 - 2.4835 GHz
band: Channel 13.
− In France outdoor operation is only permitted using the 2.4 - 2.454 GHz
band: Channels 1 - 7.
Electrostatic Discharge Statement
The unit may require resetting after a severe electrostatic discharge event.
46
Wireless-G PC Card Adapter
Declaration of Conformity
Declaration of Conformity
Déclaration de conformité
Konformitätserklärung
Dichiarazione di conformità
Declaração de Conformidade
Konformitetsdeklaration
Overensstemmelseserklæring
Conformiteitsverklaring van de EU
Δήλωση Συμμόρφωσης
Deklaracja zgodności
Declaración de conformidad
Cam kết về sự tuân thủ ở Châu Âu
Manufacturer/Producent/Fabrikant/
Constructeur/Hersteller/Κατασκευαστής/
Fabbricante/ Fabricante/Tillverkare/
Nhà sản xuất
Zoom Technologies, Inc.
207 South Street
Boston, MA 02111 USA / 617-423-1072
www.zoom.com
Brand/Varemærke/Merk/Marque/Marke/
Μάρκα/Marchio/Marka/Marca/Thương hiệu
Zoom Wireless-G PC Card Adapter
Type/Typ/Μάρκα/Tipo/Kiểu mẫu
Model 4412A
The manufacturer declares under sole responsibility that this equipment is compliant to
Directive 1999/5/EC via the following. This product is CE marked.
Producenten erklærer under eneansvar, at dette udstyr er i overensstemmelse med
direktivet 1999/5/EC via følgende. Dette produkt er CE-mærket.
De fabrikant verklaart geheel onder eigen verantwoordelijkheid dat deze apparatuur voldoet
aan Richtlijn 1999/5/ EC op grond van het onderstaande. Dit product is voorzien van de CEmarkering.
Le constructeur déclare sous son entière responsabilité que ce matériel est conforme à la
Directive 1999/5/EC via les documents ci-dessous. Ce produit a reçu le marquage CE.
Hiermit erklärt Zoom die Übereinstimmung des Gerätes modem mit den grundlegenden
Anforderungen und den anderen relevanten Festlegungen der Richtlinie 1999/5/EC. Dieses
Produkt ist das gekennzeichnete CE.
Ο κατασκευαστής δηλώνει με αποκλειστική του ευθύνη ότι αυτό το προϊόν συμμορφώνεται
με την Οδηγία 1999/5/ΕC μέσω των παρακάτω. Αυτό το προϊόν φέρει τη Σήμανση CE.
Il fornitore dichiara sotto la sola responsabilità che questa apparecchiatura è compliant a
1999/5/EC direttivo via quanto segue. Questo prodotto è CE contrassegnato.
Producent stwierdza że to urządzenie zostało wyprodukowane zgodnie z Dyrektywą
1999/5/EC. Jest to potwierdzone poprzez umieszczenie znaku CE na urządzeniu.
O fabricante declara sob sua exclusiva responsabilidade que este equipamento está em
conformidade com a Directiva 1999/5/EC através do seguinte. Este produto possui
Marcação CE.
El fabricante declara bajo su exclusiva responsabilidad que este equipo satisface la Directiva
1999/5/EC por medio de lo siguiente. Este producto tiene marca CE.
Nhà sản xuất cam kết với trách nhiệm của mình là thiết bị này tuân theo Hướng dẫn
1999/5/EC thông qua các mục sau. Sản phẩm này được đánh dấu là CE.
73/23/EEC – LVD
89/336/EEC – EMC
1999/5/EC
EN 60950-1:2001
EN 301 489-1, v1.4.1: 2002-08
EN 301 489-17, v1.2.1: 2002-08
EN 300 328, v1.6.1: 2004
Andy Pollock
11 August, 2006
4412A/TF, Boston, MA, USA
Director, Hardware Engineering/Direktør, Hardware
Engineering/Director, Sustaining Engineering
/Directeur, Ingénierie de soutien/Direktør, Sustaining
Engineering /Διευθυντής, Μηχανικής Διατήρησης
/Direttore, Hardware Engineering /Dyrektor,
Inżynieria ciągła/Director, Engenharia de
Manutençã/Director, Ingeniería de apoyo/Giám Đốc
Kỹ thuật Phần cứng
Appendix D: Regulatory Information
47
NOTICE
This document contains proprietary information protected by
copyright, and this User’s Guide and all the accompanying
hardware, software, and documentation are copyrighted. No part of
this document may be photocopied or reproduced by mechanical,
electronic, or other means in any form.
The manufacturer does not warrant that the hardware will work
properly in all environments and applications, and makes no
warranty or representation, either expressed or implied, with respect
to the quality, performance, merchantability, or fitness for a
particular purpose of the software or documentation. The
manufacturer reserves the right to make changes to the hardware,
software, and documentation without obligation to notify any person
or organization of the revision or change.
All brand and product names are the trademarks of their respective
owners.
Wi-Fi® is a registered trademark of the Wi-Fi Alliance.
Microsoft® and Windows® are registered trademarks of Microsoft
Corporation.
© Copyright 2006
All rights reserved.
2236-A
27434
©2006