1
Owner'sManual
ManualDe/Propietafio
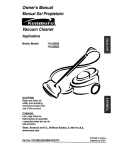
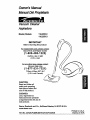
Vacuum Cleaner
Aspiradora
Model, Modelo
116.25512
116.25513
IMPORTANT
Before
returning
this product-
For replacement parts, please contact:
Sears Parts and Repair Center
(1-800-488-1222)
Anytime, day or night
(U.S.A. only)
For any other issue, please contact:
Vacuum Help Line
(1-877-531-732t)
7:30am-4:00pm EST, M-F
(U.S.A. and Canada)
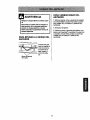
CAUTION:
Read and follow all
safety and operating
instructionsbefore first
use of this product.
CUIDADO:
Lea y siga todas las
instruccionesde operaci6n
y seguridadantes del use de
este producto.
Sears, Roebuck and Co., Hoffman Estates, IL 60179 U.S.A.
www.sears.com
Part No. C131ZCPJOOUOO-KCO1ZCPJZOUO
Printed in U.S.A.
Impresoen EUA
Canister Care ......................
Before Using Your New
Vacuum Cleaner
....................
2
Kenmore Vacuum CleanerWarranty
Important Safety Instructions
Parts and Features .................
... 2
.........
Assembly Instructions
.............
Power-Mate Jr. ®Storage ..............
13
Bag Changing .....................
Cleaning Exterior and Attachments .....
Motor Safety Filter Changing ..........
Exhaust Filter Changing ..............
3
4-5
6-7
7
Power-Mate"
Care
13
14
14
15
..................
16
Belt Changingand AgitatorCleaning.. 16-17
Light Bulb Changing .................
17
AgitatorServicing ...................
18
Operating Instructions
...............
8
How to Start ........................
8
VacuumingTips .....................
9
Suggested Pile Height Settings ........
10
Attachments .......................
10
Attachment Use Chart ...............
11
Performance Features .............
11-12
How YourVacuum Cleaner Works .......
13
Troubleshooting
Requesting
Or Service
....................
Assistance
..................
19
Back Cover
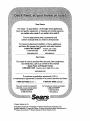
Please read this guide. It will help you assemble and operate your new Kenmore vacuum
cleaner in the safest and most effective way.
For more information about vacuum cleaner care and operation, call your nearest Sears store.
You will need the complete model and serial numbers when requesting information. Your vacuum cleaner's model and serial numbers are located on the Model and Serial Number Plate.
Use the space below to record the model number and serial number of your new Kenmore
vacuum cleaner.
Model No.
Serial No.
Date of Purchase
Keep this book and your sales check (receipt) in a safe place for future reference.
LIMITED
ONE YEAR WARRANTY
ON KENMORE
VACUUM
CLEANER
This warranty is for one year from the date of purchase, and includes only private household
vacuum cleaner use. During the warranty year, when this vacuum cleaner is operated and
maintained according to the owner's manual instructions, Sears will repair any defects in
material or workmanship free of charge.
This warranty excludes vacuum bags, belts, light bulbs, and filters, which are expendable parts
and become worn during normal use.
For warranty service, return this vacuum cleaner to the nearest Sears Service Center in
the United States.
This warranty applies only while this product is in use in the United States. This warranty gives
you specific legal rights, and you may also have other rights which vary from state to state.
Sears, Roebuck and Co., D/817 WA, Hoffman
Estates, IL 60179
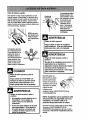
Your safety is important to us. To reduce the risk of fire, electrical shock,
injury to persons or damage when using your vacuum cleaner, follow basic
safety precautions including the following:
Read all instructionsin this manual before
assembling or using your vacuum cleaner.
Use your vacuum cleaner only as
described in this manual. Use only with
Sears recommended attachments.
Disconnect electrical supply before
servicing or cleaning out brush area.
Failure to do so could result in electrical
shook or brush suddenly starting.
Do not leave vacuum cleaner when
plugged in. Unplug from outlet when not in
use and before servicing.
To reduce the dsk of electrical shock - Do
not use outdoors or on wet surfaces.
Do not allow to be used as a toy. Close
attention is necessary when used by or
near children.
Do not use with damaged cord or plug. If
vacuum cleaner is not working as it should,
has been dropped, damaged, left outdoors,
or dropped into water, return it to a Sears
Service Center.
Do not pull or cam] by cord, use cord as a
handle, close door on cord, or pull cord
around sharp edges or comers. Do not run
vacuum cleaner over cord. Keep cord away
from heated surfaces.
Do not unplug by pulling on cord. To
unplug, grasp the plug, not the cord.
Do not handle plug or vacuum cleaner with
wet hands.
Do not put any objects into openings.
Do not use with any opening blocked; keep
free of dust, lint, hair and anything that may
reduce air flow.
Keep hair, loose clothing, fingers, and all
parts of body away from openings and
moving parts.
SAVE THESE
Turn off all controls before unplugging.
Use extra care when cleaning on stairs. Do
not put on chairs, tables, etc. Keep on
floor.
Do not use vacuum cleaner to pick up
flammable or combustible liquids (gasoline,
cleaning fluids, perfumes, etc.), or use in
areas where they may be present. The
fumes from these substances can create a
fire hazard or explosion.
Do not pick up anything that is buming or
smoking, such as cigarettes, matches, or
hot ashes.
Do not use vacuum cleaner without dust
bag and/or filters in place.
Always change the dust bag after
vacuuming carpet cleaners or freshener,
powders and fine dust. These productsclog
the bag, reduce airflow and can cause the
beg toburst. Failure to change bag could
cause permanent damage to the cleaner.
Do not use the vacuum cleaner to pick up
sharp hard objects, small toys, pins, paper
clips, etc. They may damage the cleaner or
dust bag.
Do not operate vacuum cleaner without the
exhaust filter or exhaust filter door in place
(if applicable).
The hose contains electrical wires. Do not
use when damaged, cut, or punctured.
Replace if cut or worn. Do not pick up
sharp objects.
Always turn off and unplug the vacuum
cleaner before connecting or disconnecting
either hose, Handi-Mate Jr.® (if applicable),
or nozzle.
Hold plug when rewinding onto cord reel.
Do not allow plug to whip when rewinding.
You are responsible for making sure that
your vacuum cleaner is not used by anyone
unable to operate it properly.
INSTRUCTIONS
Proper assembly and safe use of your vacuum cleaner are your responsibilities.
Your vacuum cleaner is intended for Household use. Read this Owner's Manual
carefully for important use and safety information. This guide contains safety
statements under warning and caution symbols.
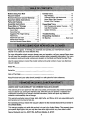
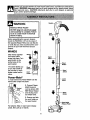
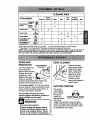
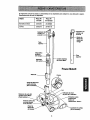
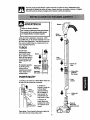
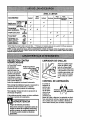
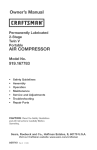
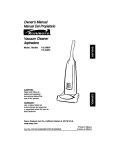
It is important to know your vacuum cleaner's parts and features to ensure its proper and safe
use. Review these before using your cleaner.
Item
Part No.
In U.S.
Part No.
In Canada
Headlight Bulb
20-5240
20-40600
Belt
20-5218
20-40118
Power-Mate®
Cord
Holder_
Cord and
_-- Cord and
Plug Holder
!
--
Handle Quick
Release
Upper
Wand --------_
Wand
Swivel __
--Upper
Cord Holder
Power Cord
Flange
Belt
Wand Quick
Release Pedal
(Not Shown)
"....
Pile Height Indicator
Pile
Height Pedal.
Protector
Reset Button
Handle
Release Pedal
Power.Mate B
Model/Serial Number
(On Bottom)
• Cleaner
(Not Shown)
Wand
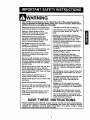
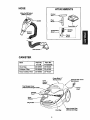
HOSE
ATTACHMENTS
3-Way On/Off Switch
Off/Floor/Carpet
Crevice
Handle
Tool --_
Floor
_7
_
Brush _
_
"_f*-
Power-Mate Jr.e
I
_
Combination
:i
Brush
_
p
!_Fabric
, _JJ
<---
Dusting
Brush
Brush
Hose Swivel
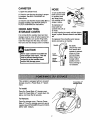
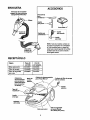
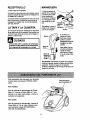
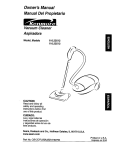
CANISTER
Item
Pan No.
Pan No.
In U.S.
In Canada
Dust Bag
20-50557
20-50404
Exhaust
20-86889
20-40324
20-86883
20-40321
Filter
Motor Safety Filter
Power-Mate Jr."
Storage cover
Cord
Rewind
Exhaust Filter Cover
Button ._
Tool Storage Cover
(Attachment Storage inside)
Cord
Can_ter
Hood
Bag HoideJ
Dust Bag
5
Motor Safety Filter
(Behind Dust Bag)
I_
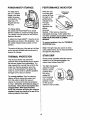
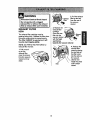
given. WARNING statements alert you to such dangers as fire, electric shock, burns
Please
pay special
attentionto
hazard alert
alert you
boxes,
and follow
any as
instructions
and
personal
injury.
CAUTIONthese
statements
to such
dangers
personalII
njury and/or property damage.
Electrical
J
Shock Hazard
DO NOT plug into electrical supply
until assembly is complete. Failure
to do so could result in electrical
Lock
i shock or injury,
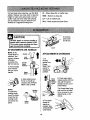
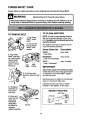
Before assemblingthe vacuum cleaner,
check the PACKING LIST on the cover of
the separate Repair Parts List. Use this list
to verify that you have received all the components of your new Kenmore vacuum
cleaner.
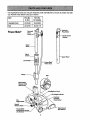
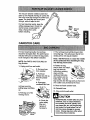
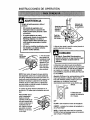
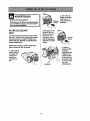
WANDS
Slide wands together
until wand button
snaps into place. Turn
wand buttonto the
slotted area of the
wand swivel.
Upper
Wand --
_
The swivel allows you
to turn the handle to
the left side to reach
farther under low furniture.
mm
m
Power-Mate ®
Button
Wand
Swivel
Lower
Wand
1. Insert wands into Power-Mate" until the
wand button snaps into place.
2. Connect PowerRaised
Area
Mate ®plug and
cord as shown. DO
NOT force. Raised
area of plug must
be toward hand.
Wand
Button
3. Secure cord into
the cord holder on
the wand swivel.
_Wand
Quick
To remove: Step on wand quickrelease
pedal, then pull up on wands.
elease Pedal
6
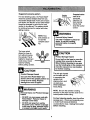
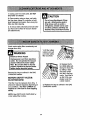
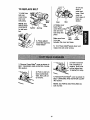
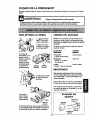
CANISTER
t. Open the canister hood.
2. Check to see that the dust bag is properly installed. See BAG CHANGING for
instructions.
3, Check to see that the motor safety filter is
properly installed. See MOTOR SAFETY
FILTER CHANGING for instructions.
HOSE
t. Line up the hose
latch tab and notch
in canister hood
and insert hose
into canister until it
snaps in place.
Latch
Tab
To remove: Lift
hose latch tab
Notch
HOOD AND TOOL
STORAGE COVER
upward and pull up
on hose.
2, Insert handle into wand until lock button
It is normal for the canister hood and tool
snaps in place, Be sure hose is not twisted.
storage cover to come off when opened further than needed. Line up the hinge slots,
insert the hinges into the slots, and close
the hood and tool storage cover to reinstall.
To remove: Press handle quick release
buttonand pull up on handle.
To store:
Disconnect hose
from wands and
CAUTION
Never open canister hood with the
tool storage cover open. This will
help to prevent damage from
occurring to the canister hood
andlor tool storage cover,
This canister is equipped with an on-board
storage area for a Power-Mate Jr.®attachment.
To lnstalh
Open the Power-Mate Jr.® storage cover.
Insert the Power-Mate Jr.', press down into
place, and close the lid securely.
To Remove:
Open the storage cover. Remove PowerMate Jr." from the storage area and use as
needed (see ATTACHMENTS and ATTACHMENT USE TABLE).
canister to prevent
stress on hose
Lock
_-HenCe
Qu_k
during storage.
Store hose in a
loosely coiled
position so the
hose covering is
not stressed.
Power-Mate Jr."
Storage Cover
/
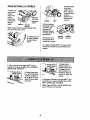
OPERATING INSTRUCTIONS
Personal
Hazard
Injury and Product
Pile
Height
Pedal-*
Damage
• DO NOT plug in if switch is in ON
position. Personal injury or
damage could result.
Indicator
Release
Pedal
• The cord moves rapidly when
rewinding. Keep children away
and provide a clear path when
rewinding the cord to prevent
personal injury,
3. Lower wand from uprightposition by
pressing on the handle release pedal.
• DO NOT use outlets above
counters. Damage from cord to
items in surrounding area
could occur.
CAUTION
DO NOT leave the Power-Mate '_
Cord
tof Pu,,
cord
canister
toout
_
The cord will
not rewind until
the cord rewind
esired islength.
button
running in one spot in the upright
position for any length of time.
Damage to carpet may occur.
4. Select a pile heightsetting by pressing
the small pedal on the rear of the PowerMate®. The pile height setting shows on the
indicator.See SUGGESTED PILE HEIGHT
SETTINGS.
pushed.
Attention:
Refer to your carpet manufacturer's cleaning recommendations. Some
more delicate carpets may require that they
be vacuumed with the Power-Mate ® agitator
turned off to prevent carpet damage.
NOTE: To reduce the risk of electric shock,
this vacuum cleaner has a polarized plug;
one blade is wider than the other. This plug
will fit in a polarized outlet only one way. If
the plug does not fit fully in the outlet,
reverse the plug. If it still does not fit, contact a qualified electrician to install the proper outlet. Do not change the plug in any
way.
L_OF
F
FLOOR
_=,,-'_
5. Select a switch
position on the
handle.
2. Plug the polarized power cord into a 120
Volt outlet located near the floor.
To rewind: Unplug
the vacuum cleaner.
OFF
Hold the plug while
rewinding to prevent
damage or injury
from the moving
cord. Push cord
rewind button.
FLOOR - turns on the canister motor only.
CARPET - turns on both the canister and
the Power-Mate ® motors.
NOTE - When this switch is in the FLOOR
position, the headlight DOES NOT function
since no electricity flows to the PowerMate ®.
8
Suggestedsweepingpattem.
Suc_on
Control
For best cleaning action, the Power-Mate"
should be pushed straight away from you
and pulled straight back. At the end of each
pull stroke, the direction of the Power-Mate ®
should be changed to point into the next
section to be cleaned. This pattern should
be continued across the carpet with slow,
gliding motions.
"_
Carpeted stairs
need to be
vacuumed
regularly. For
best cleaning
results, fully
close the suction
control.
NOTE: Fast,
jerky strokes do
not provide
complete cleaning.
The hose swivel
allows the hose to
turn without moving
the canister. This is
Product Damage Hazard
helpful for cleaning in
small areas. Check
Do not pull on the hose to move the
canister from one stair to the next.
hose for twisting
before pulling canister.
When finished cleaning in one area
use the handle grip on the canister to
move the vacuum to a new location
for further
cleaning.
The stair grip located
on the caster will aid
Product Damage Hazard
Use care if the Power-Mate ®and
in preventing the
canister from
wand is left in the upright position as
it may tip over easily. Property
damage can occur if tipped.
slipping when used
on stairs (see
PERFORMANCE
FEATURES).
! r.,L WARNING
NOTE: Be sure the canister is resting
securely on the stairs and the caster is in a
locked position before using.
Personal Injury and Product Damage
Hazard
• DO NOT run over power cord with
Power-Mate'.
Personal injury or
damage could result.
For best cleaning results, keep the airflow
passage open. Check each assembly area
in HOW YOUR VACUUM WORKS
• DO NOT pull plug from wall by
the power cord. If there is damage
to the cord or plug, personal injury
or property damage could result.
occasionally for clogs. Unplug from outlet
before checking.
9
For best deep down cleaning, use the XLO
setting. However, you may need to raise the
height to make some jobs easier, such as
scatter rugs and some deep pile carpets,
and to prevent the vacuum cleaner from
shutting off. Suggested settings are:
HI - Shag, deep pile, or scatter rugs.
MED - Medium to deep pile.
LO - Low to medium pile.
XLO - Most carpets and bare floors.
DwaOn
CAUTION
To remove,
press latch
and lift out.
\
NOT attach or remove handle or
ds while vacuum cleaner is ON,
J This could cause sparking and daml age the electrical
contacts.
La
ATTACHMENTS ON HANDLE
NOTE: If the
Power-Mate ®is
attached, turn
vacuum cleaner
off before
removing handie from wands,
1. Press handle
quick release
and pull up on
handle.
_,\
Handle ..-_\
"-,/
ATTACHMENTS ON WANDS
_ (
Lock
Button .-_-_-]
1.To
remove
wands from
PowerMate ®, lock
wands in
L_.J
Handle
Quick
straight-up
position.
Upper
2. Slide attachments
firmly on handle as
needed. See ATTACHMENT USE CHART•
NOTE:
2. Press wand quick
release pedal with foot
and pull the wands
straight up and out of
Power-Mate'.
The Power-Mate ° plug
and cord do not have
to be removed to use
attachments on the
wands.
Dusting
To assemble
insert the fabric
brush into the
dusting brush,
dusting brush
and press into
place.
m
Wand
Quick
Release
Pedal
Brush
__
Fabric
Brush
10
3. Put attach-
_-----_
merits on
wands as
needed• See
ATTACHMENT
USE TABLE.
-,,
CLEANING AREA
ATTACHMENT
Between
Furniture* Cushions*
Drapes*
Stairs
Bare
Floors
Carpeted
FloondRugs
v'
Combination 10msn
brush
Fabric
brush
pust!n.
Walls
l/
=/
i,'
Crevice tool
Floor brush
i/
I_
i/
i/
v'**
Power'Mate®
Handi-Mate Jr.e
(Some Models)*'*
Power-Mate Jr2
v'
_Some Models)***
v'
*Always dean attachmentsbefore usingon fabrics, ** 3-way OnlOff switchshouldbe in FLOOR position.
*** Handi-Mate Jr..° and Power-Mate Jr.° attachmentinstructionsare includedwith the products.
NOTE: When separating wands depress lock button completely before pullingwands apart. If
wand lock button is difficult to depress push the two wands more tightly together to line up
me ock button w th the he e. Depress lock button and then pu I wands apart.
OVERLOAD
PROTECTOR
The Power-Mate ®has
EDGE CLEANER
Overload Protector
Reset Button
Active brush edge
cleaners are on both
sides of the PowerMate". Guide either
side of the Power-
built-in protection
against motor and belt
damage should the
agitator jam. If the
agitator slows down or
stops, the overload
protector shuts off the Power-Mate*. The
canister motor will continue to run.
Mate ®along baseboards or next to
furniture to help
remove dirt trapped at
carpet edges.
To correct problem: Turn off and unplug
vacuum cleaner, remove obstruction, then
press overload protector reset button. A
ball point pen may be required
SUCTION CONTROL
The suction
control allows
you to change
the vacuum
suction for
different fabrics
If the problem persists, have the
vacuum cleaner serviced by a Sears or
other qualified service agent.
Suction
Suction
and carpet
weights, Opening the control decreases
suction for draperies and lightweight rugs,
while closing the control increases suction
for upholsteries and carpets.
WARNING
Personal Injury Hazard
Always unplug the vacuum cleaner
before cleaning the agitator area as
brush may suddenly restart. Failure
to do so can result in personal injury.
11
POWER-MATE ®STORAGE
PERFORMANCE
The lower wand
has a "U" shaped
flange in the area
where the power
cord attaches. The
base has a "U"
When the unit
is running with
normal air flow,
the light on the
performance
indicator is off.
=4_
'_"
shaped slot near
the front.
INDICATOR
Performance
Indicator
The light
comes on
whenever the
airflow
becomes
blocked. If that occurs, check the
disposable dust bag, motor safety filter
and other possible clog locations shown in
HOW YOUR VACUUM CLEANER
WORKS,
The flange allows
the wands and Power-Mate®to be stored
with the canister to conserve storage space.
The canister must be stored on end for this
feature to be used.
To attach the Power-Mate ®, it must be in the
fiat position as shown in the illustration. Use
the handle release pedal to place it in this
position.
To correct problem:
SHOOTING table.
See the TROUBLE-
Note: The light may also come on when
using attachments, due to reduced airflow
through the attachment.
The wand will slip out of the slot as it is lifted
up for use and will slide into the slot as it is
lowered for storage.
STAIR GRIP
THERMAL PROTECTOR
During normal operation while the vacuum
cleaner is in the horizontal position, the
caster wheel rotates freely 360 °.
This vacuum cleaner has a thermal
protector which automatically trips to protect
the vacuum cleaner from overheating. If a
clog prevents the normal flow of air to the
motor, the thermal protector turns the
motor off automatically. This allows the
motor to cool in order to prevent possible
damage to the vacuum cleaner.
The Stair Grip feature
allows the caster
wheel to lock in
position when
the unit is
rotated 25 °
from horizontal
into a vertical
To correct problem: Turn the vacuum
cleaner off and unplug the power cord
from the outlet to allow the vacuum
position in order
for the vacuum
cleaner to rest on stairs.
cleaner to cool and the thermal protector
to reset. Check for and remove clogs, if
necessary.
Also check and replace any
clogged filters. Wait approximately
thirty (30) minutes and plug the vacuum
cleaner in and turn back on to see if the
motor protector has reset.
t2
The vacuum cleaner creates suction that
picks up dirt. Rapidly moving air carries the /J
dirt to the dust bag through the airflow pas-/_/_
sages. The dust bag lets the air pass
/jr
through, while it traps the dirt.
/._
For best cleaning results, keep the .,_'7
airflow passage open. Check the /_y
starred areas occasionally for
_J/
clogs. Unplug from outlet
,,_ (
before checking
_'
/i
I_
_
\
Motor
Safety
Filter
Exhaust
%- -- :'kW)
_._
CANISTER CARE
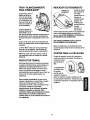
For best cleaning results, the dust bag
should be changed often. The performance
indicatorwill come on when the bag needs
to be changed or the airflowis blocked.
7. The red bag mount will flip forward after
removing bag. This will prevent the lid from
closing until a new bag is installed.
Note: DO NOT bend or crease the middle
of the cardboard when installing the bag
into the bag mount slots,
NOTE: See PARTS AND FEATURES for
Bag Number.
8. Rotate red bag
mount down and install -
1. Unplug cord from wall outlet.
2. Remove hose
from canister.
bag into slots per
instructions pushing
down until the
3. Pull hood
release out and up,
then liftcanister
hood.
cardboard tab locks
into position and the
holes align. Tuck the
\
bag securely into the bag cavity so that none
of it is able to be pinched by the hood.
4, Disengage
cardboardtab from
9. Close and latch canister hood.
red bag mount by
pulling away and lifting
up.
10. Reinstall hose.
11. Plug cord intowall outlet.
5. Pull bag out of the
red bag mount.
NEVER REUSE A DUST BAG.Very fine
materials, such as carpet freshener,
face powder, fine dust, plaster, soot,
new carpet lint, etc. can clog the bag
and cause It to burst before it is full
6. Check the
motor safety
filter and
replace, if
necessary.
and may cause damage to vacuum
motor. Change bag more often when
vacuuming these materials.
Mount
13
1. Unplug cord from wall outlet. DO NOT
drip water on cleaner.
2. Clean exterior using a clean, soft cloth
that has been dipped in a solution of mild
liquid detergent and water, then wrung dry.
Wipe dry after cleaning.
Do not use attachments if they
are wet. Attachments used in
dirty areas, such as under a
refrigerator, should not be used
on other surfaces until they are
washed.They could leave marks.
3. To reduce static electricity and dust buildup, wipe outer surface of vacuum cleaner
and attachments.
Check motor safety filter occasionallyand
change when dirty.
Electrical
1. Lift the rubber
retainer and pull
out motor safety
filter as shown.
Shock Hazard
Unplug power cord from electrical
outlet. Do not operate the vacuum
cleaner without the motor safety
filter, Be sure the filter is dry and
properly installed to prevent motor
failure and/or electrical shock.
Rubber
Retminer
//////
2. Replace the filter, white side out,
facing the dust bag,
by sliding it back
into place under
the ribs in the bag
cavity. Tuck filter in
so that it fits com-
Remove the bag as outlined in the BAG
CHANGING section.
MOTOR SAFETY FILTER
ELECTROSTATIC
pletely under the
rubber retainer.
This filter must be replaced when dirty. It
should be replaced regularly depending on
use conditions. The filter CANNOT be
3. Replace the bag as outlined in the BAG
CHANGING section.
washed as it will lose its dust trapping
ability.
NOTE: See PARTS AND FEATURES for
motor safety filter number.
14
WARNING
Fire andlor Electrical
2. Pull the exhaust
Shock Hazard
Filter
Do not operate with a clogged
exhaust filter or without the exhaust
filter or exhaust filter cover installed.
3. Replace the
exhaust filter
EXHAUST FILTER
HEPA
cartridge.
Place the new
filter into the
vacuum cleaner
with the foam
The exhaust filter cartridge must be
replaced when dirty. Replace the filter when
the entire surface area is covered evenly.
The filter CANNOT be washed as it will
lose its dust trapping
filter up and out
from the rear of
the vacuum
cleaner.
Filter
seal facing
towards the vacuum cleaner.
ability.
NOTE: See PARTS AND FEATURES for
exhaust filter number.
t. Pull out and
up on the
exhaust filter
cover to remove
from the vacuum
cleaner and lay
aside.
Tabs
15
4. Replace the
exhaust filter
cover by placing
the two tabs on
the filter cover
into the slots on
the vacuum
cleaner and
rotate into place
until it snaps
closed.
POWER-MATE® CARE
Always follow all safety precautions
! 'v, lWARNING
when cleaning
Electrical
and servicing
the Power-Mate".
Shock Or Personal Injury Hazard
Disconnect electrical supply before servicing or cleaning the unit. Failure to do so
could result in electrical shock or personal injury from cleaner suddenly starting,
TO CLEAN AGITATOR
TO REMOVE BELT
NOTE: In order to keep cleaning efficiency
high and to preventdamage to your vacuum, the agitator must be cleaned every_time
the belt is changed.
1. Turn PowerMate ® upside
down.
2. Unscrew the
The agitator must also be cleaned according to the following schedule:
two (2) PowerMate ® cover
screws.
3. Turn PowerMate e right side
up, Press handle
release pedal
and lower the
swivel. Lift rear
latches up.
Vac_uum ClQaner UsQ
Clean Agitator
HEAVY
every week
-
(used daily)
MODERATE
-
every month
(used 2-3 times/week)
LIGHT -
every2months
(used I time/week)
Side
Latch
Latches
IMPORTANT
Disconnect
cleaner from electrical outlet.
Check and remove hair, string and lint buildup frequently in the Power-Mate ® agitator
and end cap areas.
4. To remove cover,
grasp the sides and pull
out.
Remove any dirt or debris in the belt path
area or in the brush roller area.
Carefully remove any string or debris
located on the agitator, or end caps.
5. Lift agitator
assembly out
and remove
worn belt.
Agitator Assembly
Belt Pulley_
6. Check and
clean end cap
areas. See
AGITATOR
ASSEMBLY
for pictureof
complete
agitator assembly.
Brush Unit
End Cap
16
3. Line up
front of
cover and
base. Rest
cover on
TO REPLACE BELT
1. Install new
belt over
motor drive,
then over
belt pulley.
NOTE: See
PARTS AND
FEATURES
for belt number.
front edge of
base as
shown.
Motor
Drive
Cover
4. Rotate cover
back. Press
cover firmly until
side and rear
tabs snap into
place.
Pu//ey
Agitator
Base
End Cap
Make sure there
Side
Rear
is no gap
Latch
Latches
between the cover and base.
2. Place agitator
assembly back into
Power-Mate ®.
5. Turn Power-Mate®upside down and
replace two (2) cover screws.
Push In
And Turn
t. Remove Power-Mate ® cover as shown in
BELT CHANGING AND AGITATOR CLEANING section.
Push In
And Turn
3. Push in and turn
bulb clockwise, to
replace. Bulb must
not be higher than
15 Watts(130 Volts).
2. Push in and turn
bulb counterclockwise, then pull out
to remove.
4. Reinstall Power-Mate ® cover as shown in
BELT CHANGING AND AGITATOR CLEANING section.
NOTE: See PARTS AND FEATURES
bulb number.
17
for
TO REPLACE AGITATOR
ASSEMBLY
Electrical
Hazard
1. Remove Power-Mate ° cover, belt and
agitator assembly. See "To Remove Belt"
in BELT CHANGING AND AGITATOR
CLEANING.
Shock Or Personal Injury
Disconnect electdcal supply before
servicing or cleaning the unit.
Failure to do so could result in elec-
2. Replace Agitator.
trical shock or personal injury from
cleaner suddenly starting.
3. Replace belt, agitator assembly, PowerMate%over, lightbulb and lightcover.
See "To replace belt"in BELT CHANGING
AND AGITATOR CLEANING.
TO CHECK AGITATOR
ASSEMBLY
When brushes
level of the base
__r_T-_
Base Support Bars
support bars,
replace the
K---are wern to the
agitator
assembly.
18
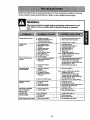
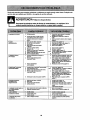
Review this table to find do-it-yourselfsolutionsfor minor performance problems.Any other
service needed, should be performed by a Sears or other qualifiedservice agent.
WARNING:
Disconnect
electrical supply before performing maintenance
to the
unit. Failure to do so could result in electrical shock or personal
injury.
Vacuumcleaner won=tstart.
1. Unpluggedat wall outlet.
2, TdppeddrcuitIxeaker/'dolmfuse
at householdservicepanel.
3, Loosehoseeiec_cel conneotinns.
Poorjob of dirt
pich-up.
1.
2.
3.
4.
5.
6,
Fullor cloggeddustbag.
C_agged
air_owpassages.
_
itlters.
Wrongpile heightsetgag.
S_-'tJoncootrotisopen.
Heiein hose.
7.
8,
g.
10,
Worn P_,_r-Motee agitator.
Wornor brd_enbell
Dirtyagitotoror end caps.
Canisterhoodopen.
Vacuum cleaner starts but
shuts off.
t. Rug in firmly,pushON/OFFswitchto ON.
2. Resetcircuitbreakeror replacefuse.
3, Reconnecthoseends,(page7).
t.
2.
3.
4.
5.
6.
7.
it & g.
Changebeg, (page13).
Cleat aidtowpassages.(page13).
Chaagefiltes, (page14-15).
AdjustsotHag,(page 10).
Adjustcon_ol,(page 11)
Replacehose.
Changeagitator,(page18).
See BELTCHANGINGAND AGITATOR
CLEANING,(pages16-17).
10. C_oseandlatchhood.
1, Hoseor hoodelectricalcomecbens.
2. Trippedovedoadprotectorin
Power-Mate*.
t. o_ _'n_n_ reo0rr__seen_(puge
7).
2, Removeany itemsthat maybe caught
or jammed,thenreset. If deane_clarts
andstopsagain,dean agitatorandend caps,
thenreset,(pages11, 16-17).
3.
Resetthennei protector(page12),
3. Trlppedthermalprotectm
in canister.
Power-Mute° will not
run when altached.
1. Pov_'-Mate° cennec_ons
unplugged.
2. Wornor brekenbell
3. Dirtyagitatoror endcabe.
4, Tripped_f_oed _oteotor in
Powar-Mate'.
1.
Plugin firmly,(page6-7),
5, Switchnotin CARPETpusi_on.
See BELTCHANGINGAND AGITATOR
CLEANING,(pages16-17).
4.
Rornoveamyitems that may be caught
or jammed,then reseL If deanerclarts
and clopsagain, dean agitatorandendcaps,
thenreset,(pages'il, 16-17).
5. Mo_es_tch to CARPETgedtie_, (pagee).
Pm/ornianceindicator
aotJvatos.
1.
2.
3.
4.
1.
2,
3.
4.
Cleanerpicks up moveable
rugs -or- Power-Mate*
bushostoo hard,
1. Wrongpileheightseffing,
2. SuclJontoosbong.
t. Ao]ustsetting,(page 10).
2. Open sucbenconb_ei,
(psge11).
Lkjht v_n't vmrk.
1. Burnedout lightbulb.
1. Dirty gewer ca_l.
2. ConJ_mmnd.
1. Changelightbulb,(page17).
Card _'t
nm_nd.
Cleanerleaves marks on ca_Nt.I
2&3.
Fuitor degged dustbeg.
Dirty filters.
Blockedairflowpassage.
Certainattachmenttools.
Changebag, (page 13).
Changefilters,(page t4-15).
Clearblod_agefromairflowpassage,(page 13).
Thisisnormei.Light _ou_d go nd
whentoei is removed.
1. Cleanthe gewer coed.
2. Pulloutcordandrewind.
1. Wrongvacuundngpottom.
J
19
I. SeeVACUUMINGTIPS. (page9).
Antes de usar su aspiradora nueva .....
1
Garantia de la aspiradora de Kenmore
Instrucciones importantes de
seguridad ............................
Piezas y caractedsticas ...............
Instrucciones
de
.. 1
ensamblamiento
5-6
.................
2
3-4
Almacenaje del Power-mate Jr.® .......
6
Instrucciones de operati6n ...........
7
Paracornenzar .......................
7
Sugerencias para aspirar ...............
8
Sugerenciassobre el ajustede nivel de
pelo de la alfombra ....................
8
Accesorios...........................
9
Uso de los accesodos.................
10
Caracterisf_casde rendimiento ........
10-11
Funcionamiento de su aspimdom .........
Cuidado del recept_culo ..............
Cambiode la balsa ...................
Limpiezadel exteriory de los accesorios...
Cambiodel filtro de seguridaddel motor ...
Cambiodel filtro de escape .............
12
12
13
13
14
Cuidado de la Power-Mate ® ............
15
Carnbiode la correay limpieza
del agitador.......................
Cambiode la bombilla .................
15.16
16
Cuidadodel agitador ..................
17
Reconocimiento de problemas .........
18
Informacibn de
assistancia o servicio ..... Poster;orCubierta
12
favor lea esta guia que le ayudaraa assemblary operarsu aspiradoranuevade Kenmore en una manera
m_s seguray effeclJva.
Paramas informaci6n acerca del cuidadoy operaci6nde esta aspirador,flamea su tiendaSearsmas cercana.
Cuandoprequnteporinformaci_nustednecisitar_el nt_merocompletode sede y modetode la aspiradoraque
est_ Iocadoen la placa de los n6merosde modeloy serie.
Use el espaciode abajo para registrarel nt_merode modeloy serie para su nueva aspiradorade Kenmoce.
Nt_merode Modelo_
Nt_memde Serie.
Fecha de Compra
m
Matengaeste libro y su reciboen u lugar seguropara referencias futuras.
GARAN'I1AUMITADA DE UN N;IO DE LA ASPIRADORA KENMORE
N
I
Esta garantia es pot un afio desdela fecha de compra,e incluyesolamenteel uso de la aspiradoraen hogares
pdvados.Duranteel a_o de garantia,cuandola aspiradoraes operaday mantenidade acuerdoal manualde
instruccionesdel due_o,Sears reparar_cualquierdefectoen materialeso fabdcacibn librede cargo.
Esta garantiaexcluyelas bo_sasde coiecci6n,correas,lampadllas, y filtros, las cualesson partesgastablesque
se detedoran con e! uso normal.
Para el servicio de garantia, rstome esta aspiradora al Centro de Servicio Sears m;ts cercano en los
Estados Unidos.
Esta garantia se aplicasolamentemienf_asest_ producto estd en uso en los EstadosUnidos.Esta gamntia le
da a ustedderechoslegales esperJficos,y ustedpuedetener tambidnotrosderechoslos cualesvadan de
estadoa estado.
Sears, Roebuck and Co., 1:)/8'17
WA, Hoffman Estates, IL 60179
Suseguridades muyimportanteparanosotros.Parareducirel riesgodeincendio,
choqueel_ctrico,lesi6ncorporalo dafiosal utilizarsu aspiradora,actdedeacuerdo
conprecaucionesb_sicasde seguHdad, entre elias:
Lea les instruccionesen este manual antes de
armar o usar su aspiradora.
Apague todoslos controles antes de
desenchufar.
Use su aspiradora t_nicamenteen la forma
descritaen este manual. Usa t_nicamentecon
accasoriosrecomendados porSears.
Desconecte el cord6n el_ctricoantes de
componero limpiarel drea del cepillo.De Io
contrario, el cepillopodrfaarrancar de form
imprevistao podria producirseun choque
electrico.
Tenga cuidado especial al utilizarla
aspiradora en escalones. No la coloque sobre
sillas, mesas, etc. Mant_ngelaen el piso.
No use Is aspiradorapars aspirarI(quidos
inflamableso combustibles(gasolina,I[quidos
para limpieza, perfumes, etc.) ni la use an
lugares donde dstos podrfanestar presentes.
Los vapores de estas sustanciespuedencrear
un peligrode incendioo explosi6n.
No abandone la aspiradora cuando estd
conectada. Descondctela cuando no la estd
usandoy antes de dade servicio.
No levante ninguna cosa qua se est_
qiuemando o emitiendohumo, como
garrillos,carillos o cenizas calientes.
Pars reducirel riesgo de choque el6ctrico,no
use su aspiradoraal aim Ubreni sobre
superficiesmojadas.
No use la aspiradora sin tener instaladala
bolsa para polvo y/o los flltros.
No permita qua sea utilizadacomojuguate.
Se requiere tener mayor cuidadocuando sea
ub]izadaen la proximidadde nifioso por
nines.
Cambia siempre la bolsapara polvo despuds
de aspirarlimpiadoresde alfombras o
desodorantes,talcosy polvosfinos. Estos
productosatescan la bolsa, reducen el flujo de
aire y pueden causar que dsta se rompa. Si
no cambia la bolsa podrfaocasionardafio
permanente a la aspiradora.
No use la aspiradorasi el cord6n o el enchufe
estd dar_ado.Si la aspiradorano estd
funcionando adecuadamente o si se ha
dejado caer, est_ dafiada, se ha dejado
expuesta a la intemperieo se ha dejado caer
en agua, devu61valaaun Centro de servicio
de Sears.
No use la aspiradorapara levantar objetos
agudos,juguetes peque_os, elfileres,
sujetapapeles,etc. Podrian dar_arla
aspiradorao la bolsa para polvo.
No hale ni transportela espiradora por el
cord6n;no use el cord6n como mango;no
cierrepuertas sobreel cord6n; no hale el
cord6nsobre rebordesagudos ni esquinas.
No pase la espiradora sobreel cord6n.
Mantenga el cord6n alejado de superficies
calientes.
No opera sin el flltrode escape ni la cubierta
del filtrode escape instalados.
No desconectela aspiradoratirando del
cord6n el6ctrico.Para desconectada,hale el
enchufe,no el cord6n.
Siempre apagu_ y desconectela aspiradora
antes de conectar o desconectarla manguera,
Handi-Mata Jr.@ (si aplicabla), o la boquilla.
Sujete el enchufecon la mano al enrollarel
cord6n eldctrico. Para desconectada,hale en
enchufe, no el cord6n.
La manguera contiene cables el6ctricos.No
la use cuando estd dafiada, cortada, o
perforada. Reemplace si est_ cortada o
desgestada. No levante objetosafilados.
No toque la aspiradorani el enchufe con las
manos mojadas.
No coloqueobjetos en las aberturas.
Usted es responsablede asegurar qua su
aspiradorano sea utilizada por ninguna
persona qua no pueda manejada
correctamente.
No utilice la aspiradora si alguna abertura
astdbloqueada; mantdngalafibrede polvo,
GUARDE
ESTAS INSTRUCClONES
El armado y uso seguro de su aspiradora son su responsabilidad. Esta aspiradora ha sido
disefiada exclusivamente para use domdstico. La aspiradora deberd almacenarse en un ugar
seco yen el interior. Lea este Manual del propietario detenidamente, pues contiene
informaci6n importante sobre se_]uddad y uso. Esta quia contiene informaci6n sobre
seguridad debajo de simbolos de aavertiencla cuidado.
2
Esimportante
conocer
laspiezas
y caracteds_cas
desuaspiradora
paraasegurar
suusoadecuado
yseguro,
Examfnelas
antesdeusarsuaspiradora.
Objeto
PiezaN°.
enEUA
PiezaN°.
en Canad&
Bombilla
defarol
Correa
20-5240
20-5218
20-40600
20-40118
_____ eSUje"ador del
cord6n y el
Suje_dordel
cord6n yel
nchuh)
Tubo
superior----D
Disposidvo
giratorlo
delmanga
Cord6n el_ctrico
de Power-Mate _
Sujetador
delcord6n--.._
Power-Mate®
Pedal de Ilberaci6n
r_pida del tubo
(No se muestra_._
N_meros de serie del
modelo Power-Mate m
de pelo de la alfombra
sobrecargas
BorOn de
restauraci6n
Pedal de selecci6n
de nivel de pelo
de la affombra
Pedal de
liberaci6n
"Reset"
' Limpiador de orillas
(No se muestra)
3
MANGUERA
ACCESORIOS
Interruptor de encendido/
apagado de tres posiciones
(Apagado/Plso/Alfombra)
Herramienta
Mango
_
Cepillo para
combinaci6n
<---
_
-_
_
para sacudir
_
_. __u
Cepillo
Cepillo
para telas
....
NOTA:Todoslos modeloscuentancon
unjuego de accesoriosen el receptdcuIo. Unosmodelos _enen un juego adicionalque se puede guardaren la bolsa
accesariapara el uso para la basurau
otroslugaressudos.
Disposltivo
glratoriode
RECEPTACULO
Objeto
Pieza N,.
en EUA
Part No.
en Canad_
Bolsa para polVo
20-50557
20-50404
Filtro de escape
20-86889
20-40324
Filtro de seguridad
del motor
20-88883
20-40321
Cubierta de
almacenamiento
para accesorios
(Almacenamiento
para accesorios
Cubierta de almacenamiento
i_ra Power-Mate Jr.e
Bot6n de
cord6n
eld,ctrico ..._
Cubierta del filtro de escape
.
Tapa del
receptdculo _..._
Pestlllo
de la tapa
de la bolsa
Bolsapa_po_o
4
Filtro de segurldad
del motor (Debts
de la bolsa para polvo)
informad6nle alertarddel peligrode fiJego,choqueselectricos,quemadasy lesianes. Cuidado:
Pot'favorpongaespecialatend6n
Este informad6nle alertarade peligmscomolesiones
a dstosrecuadroscon
y daSosde
alerta de propiedad.
desgo.Advertencia: Este
ADVERTENCIA
Peligrode choque eldctdco
No conecte la aspiradora hasta qua termine
de armada. De Io contrario podria causar
un choque al_ctdco o lesi6n corporal.
Bot6n
de cierre ---_
m
Antes de armar la aspiradora,chequeela LISTA
DE EMBALAJE en la cubiertaseparadade la Lista
de Partes para Reparaci6n. Use esta lista para verificar que ha recibidotodaslas companentesde su
nuevaaspiradoraKenmore.
m
TUBOS
Una los tubos
deslizdndoloshasta
que el bot6nquede
fijoen pesid6n. Gire el
bot6ndel tubohada la
zona ranuradadel dispositivogiratoriodel
tubo.
El disposilJvo
gimtorio
le permitegirar el
mangohada la
izquierdapara limpiar
mejordebajo de los
mueblesbajos.
B°t6n_---__
_
-- Botdn del
tubo
4k
SuJetad°r
_
m
m
l
giratorio
del mango
del cord6n "_
POWER-MATE®
1. Introduzcalos tubosen la Power-Mate"hastaque
el botdndel tuboquedefijo en posid6n.
elevada
hac_adentr°_
inferior
2. Conecteel
enchufey corddnde
la Power-Mate"
comose muestra,
NO LO fuerce. El
drea elevadadel
enchufefiene que
estarhacia la mano.
_!"
3, Assegureel
cordbndentro del
sujetadordel cord6n
en el giratoriode la
mango.
tubo
bPedal
de
Para retirar: Pise el pedal de liberad6n rdpidadel
tuboy lJredel tuboshacia arriba.arriba.
5
RECEPTACULO
1, Abra la tapa del recept_culo.
2. Examinela balsa para polvoeste instaladocorrectamante.Consultelas instruccionesde instaladdnen
la CAMBIO DE LA BOLSA.
3. Examineel filtrode seguddaddel motoreste instalado correctamante.Consultelas instrucdonesde
instalaci&'len CAMBIODEL FILTRODE SEGURIDAD DEL MOTOR.
LA TAPAY LA CUBIERTA
Es normalque la tapa del receptdculo se desprenda
al ser abiertamds de Io necesario.Pare colocarnuevamente la tapa, alineelas ranuresde la bisagra,insL'rtelasy cierrela tapa.
!
MANNGUERA
1. Alinee la pestafiade
sujed6n de la manguera
y la ranurede la cubierta del receptdculoe
introduzcala manguera
en el recept_culohasta
que quede fija en posiPestal_,
ci6n.
sujeci6n
Para retirar: Levanteel dela
manguera
pestillo de la manguere
Ranura
y tire de la manguera.
2. Introduzcael
mango en el tubo
hastaque el bot6n
quedeen posici6n.
AsegOresede que la
rnanguera no est6
torcida.
CUIDADO
Nunca dabe abrir la capucha del contenedor
estando la tapa abierta. As| se evitar6 da_os
a la capucha del contanador ylo a la tapa.
Bot6n de
m
Bot6n de
liberaci6n
r_pida del
Para retirar: Oprima
el botbnde liberadbn
rdpidadel mango
para liberarel mango
y tire del mangohacia
arfiba.
Pare Guardar: Para prevenirla preci_nde la mangua
mientresse guarda,desunaia manguadel tubode la
aspiradore. Guardela maguaan una posicibn
enrolladay flojamentede tal maneraque la tapa de la
mangua no se estire.
Estd aspiradora esta equipada con almacdn
a bordo para el accesorio POWER- MATE
JR.®.
Para instalar:
Abra la cubierta de almacenaje del PowerMate Jr.°. Inserte el Power-Mate Jr.", presi6nelo en su lugar hacia abajo, y cierre la
cubierta con seguridad.
Para quitar:
Abra la eubierta de almacenaje. Levante el
Power-Mate Jr." de su lugar utilicelo como
sea necesario (v6ase ACCESORIOS y
USO DE ACCESORIOS).
Almacenamiento
para Power-Mate Jr.=
INSTRUCClONES
DE OPERATION
/
Peligro de leai6n personal y da6o al
producto
Pedal de selecci6n_
Indicadorde
nivel depelo
• NO enchufe la aspiradora si el
interruptor est4 en la posici6n ON.
Podda causar lesi6n personal o daRo
al praducta.
• El cordbn el6ctrico se mueve
r_pidamente durante a] anrollamiento.
Mantenga alejados a los niRos y
asagure espacio libra suficiante para
evitar ]asiones personales al enmllar
el cord6n.
de nivel de
pelode la
de la alfombra
• NO use los anchufes Iocalizados sobre
los mueblae. Los objetos cercanos
podHan resuItar daRados,
Bot6n
del cord6n
1, Tire del cord6n
para sacado de]
receptdculohasta
tenorla Iongitud
deseada.El cord6n no se enroIlard hastaque
optimael bot6n
para enrollado.
NOTA:Para redudr el desgode choqueeldcf_ico,
esta aspiradoracuentacon una davija poladzada,
uno de los contactoses rodsanchoque el otto.La
clavijas61opuedeintrodudrsede una maneraen el
enchufe.Si la davija no cabe bienen el enchufe,
invi_rtala. Si at_nno cabe, Ilamea un eleclricista
para que instaleun enchufecorrecto.No alterela
davija de ningunamanera.
alrombra
_
Iiberaci6n
del mango-_--_
lllll"
"_ _]_
_
3. Baje el tubodesde la posidb'l verlJcalpisandoel
pedal de liberad6n del mango.
p cu,o oo
NO deje la Power-Mate° funcionando en
posici6n vertical en un lugar durante ningt_n
espacio de tiempo: se puede da6ar la
alfombra.
4. Seleccione una alturade pelode la alfombra
usandoel pedal pequeSo ubicadoen la parle posteriorde la Power-Mate'. El nivelde pelo la alfombra
se muestraen el indicador.ConsulteSUGERENCIAS SOBRE EL AJUSTE DE NIVEL DE PELO DE
LA ALFOMBRA.
Atenci6n: Refidrasealas recomendaciones
del labdcante para limpiar su alfombra,hJgunasalfombras m_s delicadas pueden requerirel uso de la
aspiradoracon el agitadorPower-Mate"
desconectadopara prevanirque la alfombrasea
I/OFF
FLOOR
ARPET
2. Conecte el cord6nel_ctricopoladzado en un
enchufede 120 voltJosque se encuenb'ecerca del
piso.
Para enrollar: desconecte la aspiradora.
Sujete el enchufe
mientrasenrollael cord6n para impedirda_o
o lesi6n corporalpot el
movimientodel cord_. Oprimael contrd
para botch el cord6n
el_c_ico con la mano
o con el pie,
HI I
_,_ _11r4_
r
da_ada.
U
5. Selecdone una
posid6n del interruptor
en el mango.
OFF
FLOOR - s61oendende el motorde{recept_culo.
CARPET - enciendelos motoresdel recept_culoy
de la Power-Mate'.
NOTA- Cuandoeste controlestden la posid6_'_
FLOOR, el farol no funciona porque no la electriddad no fluye al Power-Mate'.
Eetilodelimpieza
sugerido.
Paraobtener
la mejoracci_ de limpiezase recomiendaempujarla Power-Mate
® en direcci6ndirectamenteopuestaa ustedy jalarla en linearecta.AI
finalde cada pasada de regreso,cambiela direcci(_ de la Power-Mate®hacia la siguientesecci6na
limpiar.Contint_eas[ a travdsde toda la alfombrade
una manera lentay deslizante.
NOTA:las pasadas r_pidasy jalonadas no Iogran
una limpieza completa,
El disposi{_vo
giratorio
de la manguerapermite que dsta gire sin necesidadde mover el
recept_culo.Estoes
muy Otilpara limpiaren
dreas pequefias.Asegt_resede que la manguera no est_ torcida
antesde jalar el recept_culo.
Peligm de lesi6n personal y da6o al
producto
Tenga cuidado si el Power-Mat_®y la
manguera se dejan en posici6n vertical
pues peuden caerse f&cilmente.Si se
voltean peude haber da6o de propiedad.
Peligro de lesi6n personal y dar_oal
producto
• No atropelle el cord6n el_=ctricocon la
Power-Mate®. Hay un peligro de
leal6n corporal o unos da_os de
posesiones.
• No tire del cord6n el6ctrico de la pared
para desenchufado. Si hay danos en
el cordbn el6ctrico o el enchufe, hay
un peligro de lesi6n corporal o unos
da6os de posesiones.
Control de
aspiraci6n
Los escalones alfombrados requierenlimpieza peri6dica.Cierre
pot completoel con_el
de aspiraci6npara
Iogmr los mejores
resultadosde limpieza. Mantengael
paso de aire abierto
pare Iogrsr los
mejores resultados
de nmpieza.
ADVERTENCIA
Peligro de lesi6n personal
Tenga cuidado si coloca el recept_culo
sobrs escalones. Si se cae, podda causar
lesi6n personal o dai_oa la propiedad.
Peligro de lesi6n personal y da6o al
producto
No jale de la manguera para mover la
aspiradora de un escal6n al
siguiente. Cuando termine de limpiar
una _rea use la manija en la
aspiradora para moverla a otro lugar
para continuar la limpieza,
SOSTE_NPAPA LA
ESCALEPA El sost6n
para la escalera esta
situado en el cuerpo y
ayudar_ a evitar que la
aspiradorase deslice
cuando se est_
utilizadoen las
escaleres (vdase CARACTERISTICAS del
FUNCIONAMIENTO)
NOTA: Asegttrese que la aspiradora est_
descansando con seguridad sobre las
escaleras y el echador est_ en la
posicibn bloqueada antes de usarla,
Examine de vez en cuandocada una de las dreas
de uni6nen FUNCIONAMIENTODE SU
ASPIRADORApara asegurarse de que no estf_n
bloqueadas.Desconecte la aspirsdora antes de
reviser.
Useelajuste
XLO(bajo)psraobtaner
iamejorlimpieza a fondo.Por otra parte,quiz_sse requieraelevarel nivelpara facilitarelgunas tareas, comopot
ejemplocuandose trata de lapetes y algunaselfombras de pelo largo,y pars impedirque la aspiradora
se apague.Se sugierenlos siguientesajustes:
HI - Pelomuylargoy suelto,tapetes,alfombras
muy acojinadas.
MED - Pelo medianoa largo.
LO - Pelo cortoa mediano.
XLO - La mayorfa de las alfombrasy pisos
descubiertos.
CUIDADO
Para quitar,
_
pestillo y
levantarse.
resionar el
Pes_go
ACCESORIOS DEL MANGO
NOTA: Si tiene
instaladala
Power-Mate®,apague la aspiradora
antesde quitarel
mangode los
tubos,
1. Oprimael baton
de liberaci_ r_pida del mangopars
liberarel mangoy
tire del mango
hada arriba.
A
T
i
clerre
Bot6n de
liberaci6n
r_pide
del mango.-,_
ACCESORIOSDELTUBO
1. Parsretirarlos
tubosde la
Power-Mate
°,
cd&:luelosen la
posiddn ve_cal
de bloqueo.
m
Tubo
2. Pise el pedal de
liberacidnrdpidadel
Pedalde
liberaci6n tuboy _re del tubo
r_pldadel hada arribapara
desprenderlode la
Power-Mate®.
I
M
2. Desliceel accesoriodoseado canfirmeza sobre el
mango.Consultela USO DE
LOS ACCESORIOS
CepUlo
NOTA:
Para montar el
cepillo para sacudir
inserte el cepillo
para telas dentro de
la boquilla del
cepillo pars sacudir
presione en su
lugar.
No es necesario
retirarel enchufey
cord6neldclz'icode
la Power-Mate
®
pars usarlos
accesoriosdel tubo.
Cepillo
para telas
3. Coloqueel
accesoriodeseado sobreel
tubo.Consulte
la USO DE LOS
ACCESORIOS.
AREA A LIMPIAR
Entre
Meubles* cojines*
ACCESORIO
Cepillopara
Cepillopara sacudir
combinaci6n
Cepillo ,_
parateas
Herramienta
parahendiduras_
CorUnas*
Pisos
Pisos
EscalonesJescubiertos
aJfombrados/
Paredes
AJfombras
t/
=/
v'
=/
t/
Cepillo para pisos
Power'Mate®
v'**
_p
Handi-Mate Jr."
(AJgunos modelos)'*"
(AIgunos modelos)*'*
Power-MateJr."
iS
t,/
t/
l/
"Siempre limpielos accesormsantesde usarsobretelas. ** [] interruptor
de 3 posiciones
debeestarerl la posicidnFLOOR(pisodescubierto).
**' La HandI-MateJr., y la Power-MateJr."induyensuspropia6insbllcclonesparausode accesorio_
NO]'_,:C.uandosepare los tub_ oprim.acomp!etamenteel bot.6nde bl.oqueoantes.deseparadospor .com.
,plezo.bi sete ol_cutzaoprlmirel bol6n,junle rodslos ZUDOS
para adnearel oot6ncon et orincio, uprima el borony
despudssepare los lubos.
PROTECTOR CONTRA
SOBRECARGAS
LIMPIADOR DE ORILLAS
Active los cepUloslimpiadoresde orillas a cada
ladode la Power-Mate
®.
Pase la Power-Mate®junto
alas paredeso junto a los
mueblespara ayudara eliminarla lJerraacumulada
La Power-Mate®cuenta
Bot6n de protector
con protecci_
conb'asobrecargasf/'-'_
incorporadacontra
da5o del motory la
correaen caso de atascamientodel agitador.
Si el agitadorfunciona
m_s despacioo para,el
protectorde sobrecarga
para la Power-Mate®.El
motordel receptdculocontinuardfuncionando.
en las orillasde la alfombra.
CONTROL DE ASPIRACI(SN
El controlde
aspirad6nle
permitecambiar la poten-
Para corregir el problema:Apagudy desconectdla
aspiradora,limpiela obstrucci6n,y despuds
presioneel bot6ndel protectorde sobrecarga.
Para reajustar: Empujeel bot6nde pmtecci_ de
sobrecargadel agitador.
cia de aspiraaspiracl6n
aspiraci6n
cidnde la aspiradoradependiendodel
grosorde la tela o alfombra.La aspiraci6nse disminuye,para limpiarcortJnasy tapetesligeros,abriendo el control;para aspirarmueblesy alfombras,el
controldebe cerrarsepara aumentarla aspiraci6n.
Si el problemapersiste,busqueun t6cnicocaliflcado
que haga el servido de la aspiradora.
Peligro de lesiones personales
Desconecte siempre la aspiradora antes de
limpiar las &reas de la agitador pues datos
poddan arrancar de manera irnpreviata. El
ho hacerto, podria resultar en lesiones
personales.
10
TAPAYALMACENAMIENTO
PARAPOWER-MATE
®
INDICADOR DE RENDIMIENTO
Indicadorde
rendlmiento
El tubo inferiortiene un
rebordeen forma de
"U"en la zona de fijaci6n del cord6nelL_trico, La base Ueneuna
ranuraen forrnade "U"
cerca de la parte from
tamde]recep_culo.
Cuandola unidad
est_ fundonando
con elflujo
normalde aim, e]
indicadorde
rendimientoest_
apagado.Se
ene]endela luz
cuandoel flujo de
aire estd
obstrufdo. Si
esto sucede,
revisela bolsapara polvo,el filbo de la segufidaddel
motory ofroslugaresposiblespor residuos de
basura.Ve=_seCOMO ELIMINAR LOS RESlDUOS
DE BASURA EN LOS CONDUCTOS.
La ranurapermitealmacenar los tubosy la
Power-Mate
® con et
tubopara economizarel espae]orequeddopara su
elmacenamiento.Para usar esta caracter{sticaes
necesarioalmacenar el recep_culo en forma vertical.
Para corregir el problema: Verse el diagrama
RECONOCIMIENTODE PROBLEMAS.
El tubose sale de ta ranuraal ser levantado para
usarloy se deslizadentrode _sta al bajarlopara almacenarlo.
Nota: Es posible que la luz enciendaal usar los
aosesoriosporque el flujo de aire es reducidopor los
accesorios,
La Power-Mate
_ debe estar en la posicibnliana
comose ve en el diagrama. Use el mangodel
pedal de liberae]6npara moveda a esta posici_n.
SOST#N PARA LA ESCALERA
NOTA:Se puede usar menosespaciosi baja el
tubotelesc6picocomo se muestraen la secci6n
MONTAJE.
Durante la operaci6n normal de la aspiradora
mientrasque est&en la posici6nhorizontal,las
ruedas del cuerpo
PROTECTOR TERMAL
Esta aspiradora Uene un protector termal que
se ajusta automdUcamente para proteger a la
aspiradora del sobrecalentamiento. Si una
obstruccibn impide el flujo normal de aire al
motor, el protector termal apaga el motor
automdticamente para permitir que el motor se
enfde a fin de evitar posibles da_os a la
aspiradora.
La caracteristica
del
Sostdn
para _
360°.giren
libremente
la Escalera
permite que las
ruedas del cuerpo se
traben en posici6ncuando la unidad gira 25 °
de una posici6nhorizontala vertical para que
la aspiradora descanse con seguridad sobre las
escaleras.
Para corregir el problema: Si esto ocurre,
apague la aspiradora y desenchufe el cord6n
del tomacorriente para permitir que la
aspiradora se enfrfe y que el protector termal
se reajuste. Busque y saque las
obstrucciones, si es necesario. Examine
tambi6n y reemplace cualquier filtro
obatruido, Espere aproximadamente treinta
(30) minutos y enchufe la aspiradora y
volbtela para ver si el protector del motor se
ha reajustado.
tl
U
La aspiradoraorea succi6no aspirad6nque levanta
la tierra.La tierra es impulsadaa trav6sde lasvias
de flujo aire hastala bolsapot una rdpidacornente
de aire. La bolsapara polvopermiteel flujode aire,
pero ab-apala tierra.
/J
//./I_
//,/
///
'
/
Para Iograr los mejoresresultadosde limpieza,
_/
mantengaabiertaslasv{asde aire. Examine
,,_*.J
peribdicamentelas dreas indicadascon asteris-._._"
/
/i
Ii
Cos para asegurarse de qua no est_n b,o- _7
queadas. Desconectedel receptaculode /_5
revisarlo
Filtro de
seguHdad
del motor
Filtro de
'_
_*S
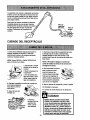
CUIDADO DEL RECEPTACULO
La bolsadebe cambiarseseguidopara Iograrlos
mejoresresultadosde limpieza.El indicador
electr_icode la bolsao de mangueraenciende
cuandose necesitacambiar.
7. Examiney limpieelfiltro de seguridaddel motor.
El montajerojode la bolsase indinar_hada
adelantedespu6sde que retirela bolsa. Esto
impedirdque la tapase ciorreantesde instalaruna
bolsanueva.
NOTA: Vdase PIEZAS y CARACTER[STICAS
para el n_mero de la bolsa.
NOTA: NO doble ni pliegue el centro del
cart6n al instalar la bolsa en las ranuras del
1. Desconecteel corddn
el6c_co de la clavijade
la pared.
montaje de la bolsa.
8. Gire haciaabajoel soporte
parala bolsarojay para
insertarla bolsaen las
2. Quite la manguerade
la aspiradora.
3. Tire del peslllo de la
tapa hacia fuera y hacia
arTiba;luegolevantela
tapa del recep_culo.
ranurasempujehacia abajo
hastaque las lengSetasde
cart_ encierranseguramente
en lasposicionesapropiadas
comose ve en el diagrama.
4. Destrabela pesta6a de cart6n del montajerojo
de la bolsa empujando
hacia afuera y trando
hada ardba.
9. Baje la cubiertadel receptdculoy cierreel pestillo.
10. Relnstalela manguem.
tl. Conecte el corddnel6ctdco
en la clavijade la
pared.
5. Saque la bolsadel
ITIOl_ltaja rojo.
Filtro de ._
seguHdad/
montage
rojo
NUNCA REUTILICE UNA BOLSA PARA
POLVO.Los materiales muy finos, tales
como desodorantes para alfombras,talco
facial, polvo fino, yeso, hollin, pelusa de
alfombras nuevas,etc., pueden atascar la
bolsa y causar que se rompa antes de que
est6 Ilena y puede da_ar el motor de la
aspiradora. Cambie la bolsa m=tsseguido
cuando aspire este tipo de materiales.
6. Revisey
cambieel filtrode
seguddaddet
motor,cuando
sea necesado.
12
1.Desconecta
elcordbn
eldcitico de la clavijade la
pared.NO choree agua sobre la aspiradora,
CUIDADO
2. Limpieel exteriorconun traposuavey limpio,que
hasido exprimidodespudsde remojarenuna soluci_nde agua y detergemteIiquidoligero.Seque el
exteriorcon un traposeco despu_sde limpiar.
No use los accesortos si est_n mojados.
Los accesoHos que se utilicen en _reas
sucias, debajo del refrigerador,no deben
usarse en otras superficies sin antes ser
lavados. PodHan dejar marcas.
3. Limpiela superfideexteriordel receptdculoy de
los accesofiospara redudrla electfiddad est_Ucay
la acumulaci6n de poivo.
Examine el flllrode seguridaddel motorde vez en
cuandoy cambiocuandoest_ sucio.
Peligro de choque ePtctrico
Disposltivo de
retencldn de goma
Desenchufe el cord6n de la corriente eldctrica. No opere la aspiradora sin el filtro de
seguridad del motor. Aseg6urese de que el
filtro estd seco e instalado adecuadamente
para impedir que el motor falle ylo que se
produzca un choque el_,ctrico.
2. Reemplaceel
filtroconla
superficieblancaen
sucampo de vista
p_"correrlodebajo
de las costillasen ta
cavidadde la bolsa.
Meta el filtropapa
que quepapot
completodebajodel
dispositivode
retenci6nde goma,
Para quitar la bolsa, siga 1asinstruccio_esen CAMBIO DE LA BOLSA.
FILTRO DE SEGURIDAD DEL
MOTOR
ELECTROSTATICO
Este flltro se Ueneque cambiarcuandoestdsudo.
Debe cambiarseped6dicamentesegfinlas condicionesde uso. El filtro no se puede lavar pues
perderl"asu capecidad para atrapar altrapar
polvo.
1. Levante el disposiUvo de retend6n de
goma y saque el filtro
de seguridadcomo se
ve en el diagrama.
Disposltivo de
retencldn de goma
3. V_ase CAMBIO DE LA BOLSApara cambiar
la bolsa.
NOTA:V_ase PIEZAS y CARACTERISTICAS
para el nDmem del filtro de seguridad del motor.
13
!
ADVERTENCIA
"
Peligro de choque el_ctrico
No opere con un filtro de escape bloqueado
o sin el filtro de escape o la cubierta del filtro de escape instalados,
escape
2. Jate el flltrode
escapehacia arribay
hada fuera de Is
parte posteriorde la
aspiradora.
i
FILTRO DE ESCAPE
HEPA
3. Reemplace el car~
tucho del fil_o del
escape. Coloque el
fillro nueva en la
aspiradora con el
lado de esponja an
diracci6n a la aspiradora.
Este cartuc,
ho del liltroescapetJeneque carnbiar
est6 sucio. Cambieel filtrocuandoel area superficialestd cubiertapot completo.El filtm no se
puede lavar pues perder|a su capacided para
atrapar altrapar polvo.
NOTA:V6ase PIEZAS y CARACTER[STICAS
para el nDmero del filtro de escape.
1. Jale y suba ta
cubiertadel filtro
de escape para
quitadade la
aspiradoray
col&:luelaa un
lack).
LengOe_s
t4
de
escape
4. Montela
cubiertadel filtm
de escape
oslocando las dos
lengOetasen la
cubierta del filtro
en las ranurasde
la aspiradory gire
en su lugarhssta
que derre
cornpletamente..
CUIDADODE LA POWER-MATE®
Siem_re deberdn seguirse todas las precauoiones de seguridad al limpiar y dar servido a la PowerMate .
!
ADVERTENCIA
,ti rodeohoque
ele coclesi6,
co ,ora
I De$conecte la unidad antes de limpiarla o darle servicio. De Io contrario podda producirse un
I choque eldctrico o causar lesi6n corporal si la aspiradora arranca de manera imprevista.
PARA RETIRAR LA CORREA
LIMPIEZA DEL AGITADOR
NOTA: Para mantener una alta eficiencia de
limpieza y evitar el daSo a la aspiradora, hay
aue limpiar el agitador cada vez aue se cambia
1. Col,oquela PowerMate® con la parte
infed_ hada arriba.
Ja_c,
ozr.e,a.
2. Quite los dos (2)
tomillosan la cubiecta
de la Power-Mate®.
Tambidn hay que limpiar el agitador seg0n el
siguiente her'ano:
El uso de la
3. ColoqueI_,
Power-Mate'="en la
posid6nvertical.
Aprieteel pedaldel
mango de libemd_ y baje la
articulaci6ngiratoria. Levantelos
pestillostraseros
Pestillos
laterales
as=dr._toj:a
agita_dJ_
Frecuente (usada dirariamente)
Moderado (usada 2 o 3 veces
por semana)
cada semana
cada mes
cada 2 meses
Ligero (usada 1 vez por semana)
Pestillos
traseros
IMPORTANTE
Desconecte la aspiradora. Examinefrecuentemente el cepilloy_as dreas de soportedel mismo
de la Power-Mate° y eliminetodocabello,hiloy
pelusaacumulada.
4, Para quitarla cubierta, agarrelos lados y
tire afuera.
[]
Retire todo indicio de basura o suciedad de I
la zona de la corTea y del rodillo del cepillo.
Con cuidado quite las tapas y quite el hilo o
los restos ubicados en el agitador, o en los
aoportes del cepillo.
Ensamble del
agitador
5, Levante la
unidaddel agitadory quitela
correagastada.
Polea para
Tapa del
ccflea -_p_
6. Examiney limpielas dreas de tapa del extremo.
En la ENSEMBLE DEL AGITADORse propordona
una ilusb'aci6nde todo el ensambledel agitador.
agitador
15
I
PARA RETIRAR LA CORREA
3. Alinee la I:_rte
frontalde la
cubiertacon la
base. Coloque
_acubiertasobre
el borde
delanterode la
base comese
muesfra.
t. Instaleuna
CQ(Tea nueva
sobreel
impulsordel
motory
It.ego sobre
la rueda dentada del
cepillo.
del motor
Cubierta
Base
corrl_8
Agitador
5. Rote la cubierta
hada ab'_s.Apriete
con pocafuer7_a
hastaque los
lengOetaslater'alas
y fraseras encierren
seguramente.
Tapa del
extremo
NOTA:Vdase PIEZAS y CARACTER{STICAS
para el nt_merode la correa.
2. Coloqueob'avez
ta unidaddel agitadoren la PowerMate® .
Cerci_rese que no
hay espacio entre
la cubierta y la base.
Pestillos
laterales
Pestillos
traseros
5. Coloquela Power-Matee con la parte inferior
hacia arriba y insertelos dos (2) tornillosen la
cubierta.
|
Empuje hacla
adentro y gire
1, Quite la cubiertade la Power-Matee como se
describeen la secci6nCAMBIO DE LA CORREAY
LIMPIEZA DEL AGITADOR.
2. Empujehacia adenfro y gire la bombillaen
el sentidosontrarioel
de las agujasdel reloj,
luegotire hada afuera
para sacar.
3. Empujehada
adentroy gireen el
sentidoconb'afioal de
las agujasdel reloj
para reemplacer.La
bornbillano debe set
m_s de 15 vatios( 130
v
osO.
4. Reinstalela cubiertade la Power-Mate
® como
se describeen la secci6nCAMBIO DE LA CORREA Y LIMPIEZA DEL AGITADOR.
NOTA: Vdase PIEZAS y CARACTERISTICAS
para el n'3merode la bombilla.
16
PARA CAMBIAR MAZO DEL
AGITADOR
1. Retirela cubierta,correay ensambledel agitador
de la P_ver-Mate®Consulte"Pararetirarla correa"
bajo CAMBIO DE LA CORREA Y LIMPIEZA DEL
AGITADOR.
Peligro de choque el6ctdco o lesi6n corporal
Desconecte la unidad antes de limpiarla o
darle servicio. De Io contrario podrla producirse un choque el6ctrico o causar
lesi6n corporal si la aspiradora arranca de
manera imprevista,
2. Reemplaceel agitador.
3. Cambiela correa,el ensamblede_agitador,la cubiertade la Power-Mate®,la bombillay la cubiertade
la bombilla.Consulte"Paracambiarla correa"bajo
CAMBIODE LA CORREAY LIMPIEZA DEL
AGITADOR.
PARA REVISAR LA UNIDAD DEL
AGITADOR
tadoslos cepillosal
nive!de las barras
de sopode en la
base, cambiela
Cuandoestdn gasunidaddel agitador.
__
Barra de soporte
de la base
17
Revise
esterecuadro para encontrarsoludonesa problemasque puede corregirusted mismo.Cualquier otro
serviciodebe serrealizado porSEARS u otto agentede serviciocalificado.
Le upiradom noarranc_
t.
3.
t.
23.
4,
NO Ilsplrll
satlsfactodamente.
S.
6.
7.
8.
0.
10.
Lo ospl_doro ilrrl_Cll,
peru se apaga.
ESLlides_nectade.
Cortacircuitosb_tade o _usilde quem_lo
on el tablem de servi_ de la residencia.
Co_e:_onesell_bicas de Is manguera
SLII_t
as .
Boisa pare Ix)No lens o atescade.
Vias de flujode eire _des.
FiRms suoos.
Ajuste incormctode nivelde pelode
la alfombra.
Control de aspirac_ abiert_
Manguem rata.
Agitader de la Foyer-Mate° desgastado_
Correa desgasta_ o mrs.
Agitader o tapas del extremo de _ste sucios.
Tapa del mcepl_cu4oabierta.
1. Cone_donesel_ctdcssde Is manguem o
de _ tapa.
2. Protectorco_ra sobrecargasde Is
Power-Mate®botade.
3.
La Power-mate* no funclona
cuande es_i inetalodL
1.
2.
3.
4.
Protectortermalbotade
enel mce_lo.
Cowes
de la Power-Mate® desconontadas.
Cowea desgastadeo rata.
Agitader o tapas del extremosde 6ste sucios.
Protectorconlmsdarecarges de la
Fower-Mate° b_tado.
5. El intenuptorno est_ en b posici_ CARPET.
[] Indlcado_ e_ect_nlce
de Is bols_ y de la
manguera fundoM
Le asplrodora I_
t_p_s
--o- es d_.ll empuJar •
Power=matee.
4.
3.
3.
4.
--o-
Boisa pare pol',,olena o stascade.
Filtms suci_
Vlas de flujode aire 9tosc_des,
Ciertos accesori_s.
1. Conectebien, (]prima selectorde mcendJdc/
apagadoa la posici_ ON.
3. Rest_
el cortacir_
o camb_eel
fusibl_
3. Vuelva e c_lectar los extrenm_de la manguel'a,
(l_gina 6).
1.
2.
3.
4.
Cambiela balsa, (p_gina t2).
Limpie _s vfas de flujode aire, (p_gina 12).
Cambieel tilting,(p_gin_ 13-14).
NusZea r_d, _gina _).
S.
6,
7.
0.&6`
Ajusied contrd, (p_ina 10).
CombieI_ msnguera.
_an_e Is agitador,(p,_gnm17).
Co.suite CAMBIO DE LA CORREAY LIMPIF-ZA
DEL AGITADOR, (p_inas 15-16).
10. Ciem_bien la tal_.
1, Examinelas conexmnesel_J_zs, welva a conectar los extremosde la manguera, (p;_gina6).
3. Re,re cuaiquie_objeto atoradeo mscad_
kJegorest_tdez_, Si _ aspimderam
dem
se ,_elve e apagar, limpieel _gdeder y los
tapas del extremosde _te, luego restaUez_a.
(p_ginas 10, 15-16).
3. Restabiezcaprotectorretinal, (pagina 11).
1. C_necte bien, (pdgins5_).
2&3.
ConsulteCAMB}O DE LA CORREAY LIMPIEZA
DEL AGtTADO_ (l_girms 15-16),
2- ReSre cualquie_objetoatoradoo mscad_
luego resteUezca. Sila espiradera errancadem
se vue_e e opaga', limpie el agitader y los
tapas del e_trerr_ de _ste, iuego i_e_e,z_,
(p_gms 10, 15-16).
Ponga el intermptora la posid_ CARPET,
(pdgina7).
1.
3.
3.
4.
Cambie la bolsa, (p_gin_ 12).
Cambie el lil_os, (p_gi_a 13-14)
_esUoquee tas vfas de flujode aire, (p_na 12).
Esto esnormal. [] indicadorde_ s_xnomml
cuande
la he_amienta est_ quitada.
'l. Ajuste inc_'_cto de rd_ de pelode la alfombra.
3. Aspirack_ de_asiade poterde.
t. Ajuste el n_, (p_gina9).
3. ._bra el conbd de aspiracide,(p_gina 10).
La luz no fundona.
1. _nbHla
1, Cambie la I_rnbifla, (p_ina 16).
[] cordd_ no so mroll&
1. Co_
el_ctricosudo.
3. Cordde etascado.
1, Limpie el cord_ ek_trico.
2- Tire del cor_ )' despu_s enr_llelo.
La nplradora dejamarcu
etl la dfombm.
1. Estilode limpk_8 incon_¢_.
t,
lundide.
18
Cortsu_eSU GERENCIAS PARA ASPIRAR,
(p_gina8),
19
20
Your Home
For repair - in your home - of all major brand appliances,
lawn and garden equipment, or heating and cooling systems,
no matter who made it, no matter who sold itl
For the replacement parts, accessories and
owner's manuals that you need to do-it-yourself.
For Searsmprofessional installationof home appliances
and items like garage door openers and water heaters.
1-800-4-MY-HOME ® Anytime, day or night
(1-800-469-.4663)
(U.S.A. and Canada)
www.seam.com
www.sears.ca
Our Home
For repair of carry-in products like vacuums, lawn equipment,
and electronics, call or go on-line for the nearest
Sears Parts and Repair Canter.
1-800-488-1222
Anytime,dayornight(U.S.A.only)
www.sears.com
To purchase a protection agreement (U.S.A.)
or maintenance agreement (Canada) on a product serviced by Seam:
1-800-827-6655
(U.S.A.)
Para pedir servicio de reparad6n
a domicilio,y para ordenar piezas:
t-888.SU-HOGAR s_
1-800-361-6665
(Canada)
Au Canada pour service en francis:
1.800-LE-FOYER ac
(1-888-784-6427)
,, Lzars
© Sears, Roebuck and Co.
® Registered Trademark I "r_Trademark / sa Service Mark of Seam, Roebuck and Co.
® Marce Reglstrada I'rM Mama de F=ZbrlcaI su Mama de SewIdo de Sears, Roebuck and Co.
tic Marque de commerce I MOMarque d&pos6e de Seam, Roebuck and Co.