1
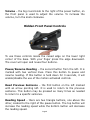
Eye-Pal Reader
User Manual
Eye-Pal Reader Version 1.0
Table of Content
Items Enclosed in the Box ..........................................3
Assembly .................................................................4
Quick Start for Eye-Pal READER ..................................5
How to Read with Eye-Pal READER ..............................5
Operating Instructions ...............................................6
Central Front Panel Controls .......................................6
Hidden Front Panel Controls........................................7
Motion Activated Controls...........................................8
Keypad Controls........................................................8
Advanced Features .................................................. 10
Book Mode ............................................................. 10
Headphone Instructions ........................................... 11
Traveling with Eye-Pal READER.................................. 12
Tips for Best Performance ........................................ 13
Troubleshooting ...................................................... 13
Important Notes ..................................................... 14
Warranty................................................................ 14
Congratulations and Thank You….
For selecting Eye-Pal READER, a state-of-the-art reader that
scans books, newspapers, letters and other printed material to
read them aloud for you. We hope you enjoy using Eye-Pal
READER as much as we enjoyed designing it.
Page 2
Items Enclosed in the Box
• Folded Eye-Pal Reader device
• Power Supply
• Power Cord
• Quick Reference Guide
• Warranty Card
• Manual
• Keypad (optional)
Page 3
Assembly
Step 1- Place Eye-Pal READER on a flat surface with the front
panel facing toward you.
Step 2- Unfold the camera. Pull the camera arm up until it locks
into place. You will hear a clicking sound indicating that the arm is
in place. Then swivel/pull the camera head up until it also locks
into place. Again you will hear a clicking sound indicating that the
camera head is in place.
Step 3- Connect the power supply to the power cord. Turn EyePal READER around so the front panel is facing away from you.
Plug the power supply into the back of the Base on the left side.
Then plug the other end into a power outlet.
Your Eye-Pal READER is now ready to be used.
Note- There is a headphone port on the right side of Eye-Pal
READER for private listening. A headset is NOT included.
Page 4
Quick Start
Step 1- Clear the platform of any objects. Turn on Eye-Pal
READER by holding in the small round power button located in the
center of the front panel.
Step 2- Turn the volume knob, located to the right of the power
button, on the front panel, clockwise. A tune will play while the
device starts up.
Step 3- Once Eye-Pal READER is done loading, you will hear
“Please place your document.” You are now ready to read.
Note: Keep the platform clear of any documents until you hear
“Please place your document.”
Step 4 – To turn off the device hold in the power button. Do not
unplug the device until it is turned off.
How to Read with Eye-Pal READER
(With or without the keypad)
To start reading, place a document on the base of Eye-Pal
READER. Orientation does not matter. As soon as the document is
still, you will hear a “shutter” sound. Eye-Pal READER will begin to
read aloud in just a few seconds.
To read fine print on a medicine bottle or any other small object
place it in the middle of the platform. You will hear the device say,
“Reading fine print.”
If you remove the document, you will hear, “Please place your
Page 5
document”. You may either replace the document or resume
reading, by pressing the Pause/Resume button on the front panel
(see below) or the Pause/Resume button on the Keypad.
Note: Eye-Pal READER can only read text that is within the
borders of the base platform. Any text outside of the borders will
not be read. Be sure not to obstruct the camera’s view with your
hands.
Operating Instructions
The following instructions will provide a detailed description on
how to use Eye-Pal READER with each of these 4 methods of
operation:
1. Central Front Panel Controls
2. Hidden Front Panel Controls
3. Motion Activated Controls, no buttons!
4.Keypad Controls
Central Front Panel Controls
Power – the small round button in the center of the front panel is
used to turn Eye-Pal READER on and off.
Page 6
Volume – the big round knob to the right of the power button, on
the front panel is used to adjust the volume. To increase the
volume, turn the knob clockwise.
Hidden Front Panel Controls
To use these controls locate the raised edge on the lower right
corner of the base. With your finger press the edge downward.
The cover will open and reveal four buttons.
Pause/Resume Reading – the second button from the left. It is
marked with two vertical lines. Press this button to pause and
resume reading. If this button is held down for 3 seconds, it will
enable/disable the use of the motion activated controls.
Read Previous Sentence – the first button on the left marked
with an arrow pointing left. It is used to return to the previous
sentence. This button may be pressed as many times as needed
to return to a specific sentence.
Reading Speed – there are two triangle buttons, one above the
other, located to the right of the pause button. The top button will
increase the reading speed while the bottom button will decrease
the reading speed.
Page 7
Restarting – to restart Eye-Pal READER for any reason, press the
first button in the hidden control panel on the left side for 5
seconds. You will hear “Restarting.”
Motion Activated Controls
To enable the motion-activated controls, press and hold the pause
button in the hidden front panel for 3 seconds. You will hear
“Gesture Commands Enabled.”
Pause/Stop Reading – move your hand slowly above the printed
material from left to right.
Resume Reading – move your hand slowly above the printed
material from left to right
Read Previous Sentence – move your hand slowly from right to
left above the printed material. Move your hand as many times as
it takes to reach any sentence.
Keypad Controls Method
(Optional Accessory)
Page 8
Help Button –located in the middle of the keypad, above the Up
Arrow, it is a white round button. Hold down the Help button and
any other button on the keypad at the same time. You will hear a
description of that button and its function.
Pause/Resume Button – located in the center of the arrow
keys, it is a white square, marked with a raised black circle. In
Reading Mode, this button will pause and resume reading.
Left Arrow – located to the left of the Pause/Resume button, it is
a white square, marked with a raised black Left Arrow. In Reading
Mode, press this button to hear the previous word.
Right Arrow – located to the right of the Pause/Resume button,
it is a white square, marked with a raised black Right Arrow. In
Reading Mode, press this button to hear the next word.
Up Arrow – located above the Pause/Resume button, it is a white
square, marked with a raised black Up Arrow. In Reading Mode,
press this button to hear the previous sentence.
Page 9
Down Arrow – located below the Pause/Resume button, it is a
white square, marked with a raised black Down Arrow. In Reading
Mode, press this button to hear the next sentence.
Save Button – located on the upper left side of the keypad, it is a
white square, marked with a raised black vertical line. Hold down
the Save button and one of the Arrow buttons at the same time.
You will hear, “Image saved.” Up to four pages can be saved; one
page designated to each Arrow Button.
Recall Button – located on the upper right side of the keypad, it
is a white square, marked with a raised black horizontal line. Hold
down the Recall button and press one of the Arrow Buttons to
read a previously saved page. You will hear “Reading image.”
Advanced Features
Reading Columns – when the Left Arrow and Right Arrow
buttons are pressed at the same time, Eye-Pal READER will read
through columns.
Describing Page Layout – when the Up Arrow and Down Arrow
buttons on the keypad are pressed at the same time, Eye-Pal
READER will describe the layout of the page.
Changing Languages – when the Recall and Save buttons on the
keypad are pressed at the same time, Eye-Pal READER will switch
languages and/or voices.
Turning Light off – when the Up Arrow, Down Arrow and Pause
buttons on the keypad are pressed at the same time, the light will
turn off.
Book Saving Mode
Page 10
Book Mode allows you to save multipage documents to a USB
flash drive.
How to start scanning in Book Mode:
1. Turn on the device
2. Wait for the music to stop playing, and then plug the USB
flash drive into the USB port located on the right side of
Eye-Pal READER. You will hear, “External memory device is
detected. Entering Book scan mode.”
3. Place a document or a book on the platform.
4. Wait for the camera shutter sound; this indicates that the
page has been scanned.
5. Wait two seconds in between scanning pages. Once the
scanned page is removed you can place another one on the
platform.
6. Repeat until you've scanned all pages.
To convert a saved Book to text and MP3 (audio file)
1. When you're done scanning, press the Pause/Resume button
to convert scanned pages into a text and audio file.
2. When the process is complete, you will hear, ”Conversion
complete, you can now disconnect external memory device”.
Please note that conversion process takes time depending on
the quality and complexity of the scanned image(s).
3. Take out the flash drive when instructed.
Now you can use the flash drive on your computer to view, read
and listen to the saved text.
When a Book is saved, three folders are created on the USB flash
drive: $EyePal Audio, $EyePal Images and $EyePalText
Eye-Pal READER converts the scanned images into a text and MP3
Page 11
file at the same time. Users will be able to find the MP3 files in the
Eye-Pal Audio folder and Text files in the Eye-Pal Text folder.
If scanned images are not converted, they can be found in the
Eye-Pal Images folder.
We suggest renaming the MP3 and text files to make them
meaningful to you (name of the document, book).
Headphones (or External Speakers) Instructions
1. Headphones with a pin audio jack are recommended.
Headphones with a USB connector are not compatible with
Eye-Pal READER.
2. With the device on, plug the headphones or speakers into
Eye-Pal READER. The headphone jack is located on the right
side of the device.
Note: Always stop reading before plugging or unplugging the
headphones or external speakers. If you add or remove the
headphones or speakers while Eye-Pal READER is reading and a
problem occurs, restart the device and follow the instructions.
Traveling with Eye-Pal READER
To collapse Eye-Pal READER, locate the button at the joint of the
camera head and long vertical arm. Press this button and swivel
the camera head down and away from you.
Page 12
Then locate the button on the joint that is towards the back on the
right side of the platform. While holding the arm of the camera
press the button and slowly lower the arm it until it lays flat on
the platform.
Tips for Best Performance
• Give Eye-Pal READER time to work. Eye-Pal READER should
process only one command at a time.
• When Eye-Pal READER is starting up, ensure that the ABiSee
logo is not covered.
• When placing a document, keep the text flat and ensure there
are no obstructions blocking the camera’s view of the text
(including your hands).
• Make sure that a document is moved completely off Eye-Pal
READER before placing another document onto it.
Page 13
Troubleshooting
Eye-Pal READER is trouble free most of the time due to its simple,
yet effective design. However, if you encounter a problem, here
are some tips:
1. If Eye-Pal READER freezes up, stops responding to your
commands or is acting abnormally, please hold the triangle
button in the hidden front panel for several seconds. You will
hear “Restarting”. This process does not restart the device
itself, just the software.
2. If this doesn’t solve the problem, turn off the device and then
power it back on by pressing the power button on the front
panel.
3. If the problem persists, please call your local distributor or
ABiSee, Inc. Customer Service Professionals.
Important Notes
Eye-Pal READER is programmed to correct itself and will restart on
its own, if necessary. If this occurs, wait a moment before using it
again.
ABiSee, Inc. WARRANTY
2 YEAR WARRANTY ON ALL ABiSee, Inc. PRODUCTS:
ABiSee, Inc. warrants to the original purchaser that its products
are free from defects in materials and workmanship for two years
from the date of purchase. This warranty does not cover
Page 14
accidental damage, misuse, improper care or alteration, acts of
God – such as floods and earthquakes, any products whose
mechanical serial number or electronic serial number has been
removed, altered or defaced, or damage from exposure to
moisture,
humidity,
excessive
temperatures
or
extreme
environmental conditions. Coverage terminates if the original
purchaser sells or otherwise transfers the product.
To report a warranty defect, please contact your local distributor
or ABiSee, Inc. Please include your email and telephone number
so that we may contact you. If, after inspection, we find that the
product is defective in materials or workmanship, we shall, at no
charge to you, repair or replace the product at our discretion, and
return the product to you. You are responsible for shipping costs
to ABiSee, Inc. but there is no charge for the inspection or the
return postage.
This warranty excludes claims for incidental or consequential
damages in connection with the warranty problem. Some
jurisdictions do not allow the exclusion or limitation of incidental
or consequential damages so the above limitation or exclusion
may not apply to you. This warranty gives you specific legal
rights, and you may also have other rights, which vary from state
to state.
To obtain warranty service, a warranty card must have been filled
out and mailed back to ABiSee, Inc. ABiSee, Inc. sells only
through authorized distributors. Online auction confirmations are
not accepted for warranty verification and ABiSee, Inc. will not
replace missing components from any package purchased through
an online auction or any other authorized source. ABiSee, Inc.
retains the exclusive right to either repair or replace the unit with
a refurbished unit or new unit at its sole discretion. The same
policy shall apply to software. 5
Page 15
Thank You for Choosing Eye-Pal READER
Your Local Distributor is:
Page 16