1
Safety • Assembly • Operation • Tips & Techniques • Maintenance • Troubleshooting • Parts Lists • Warranty
A
O
A
AL
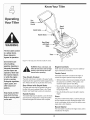
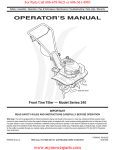
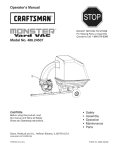
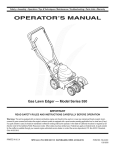
Model241shown
Front Tine Tiller -- Model Series 240
IMPORTANT
READ SAFETY
RULES AND INSTRUCTIONS
CAREFULLY
BEFORE
OPERATION
Warning: This unit isequippedwith an internalcombustionengineand shouldnot be usedon or nearany unimprovedforest-covered,brushcoveredor grass-coveredland unlesstheengine'sexhaustsystemis equippedwith a sparkarrestermeetingapplicablelocalor statelaws(if any).
If a sparkarresterisused,it shouldbe maintainedineffectiveworkingorder by the operator.In theState of Californiathe aboveisrequiredbylaw
(Section4442 of the CaliforniaPublicResourcesCode). Otherstatesmay havesimilarlaws.Federallaws applyon federallands.A sparkarrester
for the muffleris availablethroughyour nearestengineauthorizedservicedealeror contactthe servicedepartment,RO. Box361131Cleveland,
Ohio 44136-0019.
PRINTEDIN U.S.A.
MTD LLC, P.O. BOX 361131 CLEVELAND, OHIO 44136-0019
FORMNO. 769-02153
12/20/2005
This Operator's Manual is an important part of your new tiller, it will help you assemble,
prepare, and maintain the unit for best performance.
Please read and understand what it says.
Table of Contents
Safety Labels ......................................................
Safety ...................................................................
Assembly .............................................................
Operation .............................................................
Adjustments ......................................................
Maintenance
3
4
6
8
12
......................................................
Troubleshooting ................................................
Off-Season Storage ..........................................
Parts List ...........................................................
Warranty ............................................
13
14
15
16
Back Cover
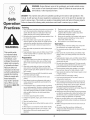
Finding and Recording Model Number
BEFOREYOU ASSEMBLINGYOUR NEW EQUIPMENT,
please locate the model plate on the equipment and copy the
information to the sample model plate provided to the right.
You can locate the model plate by looking at the rear of the
tine shield. This information is important for use when visiting
the manufacturer'sweb site, obtaining assistance from the
Customer Support Department, or when communicating with
an authorizedservice dealer.
f
Model Number
Serial Number
MTD LLC
P.O. BOX
361131
CLEVELAND, OH 44136
330=220=4683
800-800-731
0
www.mtdproducts.com
Customer Support
Please do IVOTretum
purchased,
without
the unit to the retailer from which it was
first contacting
Customer
Support.
If you have difficulty assembling this product or have any questions regardingthe controls, operation,or maintenanceof this
unit, you can seek help from the experts. Choose from the options below:
• Visit www.mtdproducts.com.
Click on the Service & Support menu option.
• Phone a Customer Support Representative at 1-800-800-7310.
• The engine manufacturer is responsiblefor all engine-related issues with regards to performance, power-rating,specifications, warranty and service. Please refer to the engine manufacturer'sOwner's/Operator's Manual, packed separatelywith
your unit, for more information.
MTD _er_afio_a_
Aw®_8 Wi_m ir_@_r®d_cf_
O¢_rCompa_y
Coa_ad__J_
S,'.::hr_,ice S ,::_
Jpp,._rt
Produd:
Registration
Product Menu
2
?riwcy Porky
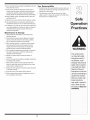
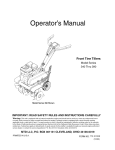
Safety Labels Found On Your Tiller
i_ii_
_i i _iI i_
_ii_
TO AVOID SERIOUS iNJURY
1. READTHE OPERATOR'S
MANUAL.
2. KNOWLOCATIONAND FUNCTIONSOF ALL
CONTROLS.
3. KEEPALLSAFETYDEVICESANDSHIELDS
iN PLACEANDWORKING.
4. NEVERALLOWCHILDRENOR
UNINSTRUCTEDADULTSTO OPERATE
TILLER.
Labels
5. SHUT OFF ENGINE BEFORE UNCLOGGING
TINES OR MAKING REPAIRS.
6. KEEP BYSTANDERSAWAYFROMMACHINE.
7,KEEP AWAY FROM ROTATING PARTS.
8.USE EXTREME CAUTION WHEN
REVERSING OR PULLING THE MACHINE
TOWARDS YOU.
WARNING
S32147
DO NOT remove safety
(or any) labels from
tiller for any reason.
3
WARNING: Engine Exhaust, some of its constituents, and certain vehicle components contain or emit chemicals known to State of Californiato cause cancer and
birth defects or other reproductiveharm.
Operat on
DANGER: This machine was built to be operated according to the rules for safe operation in this
manual. As with any type of power equipment, carelessness or error on the part of the operator can
result in serious injury. This machine is capable of amputating hands and feet and throwing objects.
Failureto observe the following safety instructions could result in serious injury or death.
Training
1. Read,understand,andfollow all instructionson the machine
and in the manual(s)beforeattemptingto assembleand
operate.Keepthis manualina safe place forfuture and
regularreferenceand for orderingreplacementparts.
WARNING
This symbol points
out important safety
instructions which, if
not followed, could
endangerthe personal
safety and/or property
of yourself and others.
Read and follow all
instructions in this manual before attempting to
operate this machine.
Failureto comply with
these instructions
may result in personal
injury. When you see
i this symbol, HEED ITS
WARNING!
13.
Replacegasolinecap andtighten securely.
14.
Ifgasoline is spilled, wipeit off the engineand
equipment.Movemachineto another area.Wait 5
minutes beforestartingthe engine.
Neverstorethe machineor fuel containerinside near an
open flame,spark or pilotlight (e.g. furnace,wateror
space heater,clothesdryer,etc.).
2. Befamiliar withall controlsand their properoperation.Know 15.
howto stop the machine.
3. Neverallowchildren under14 yearsold to operatethis
machine.Children14 yearsold and overshouldread and
16. Allow machineto cool 5 minutesbeforestoring.
understandthe operationinstructionsand safetyrules in
Operation
this manualandshould be trainedand supervisedby a
1. Do not put handsor feetnear rotatingparts.Contactwith
parent.
the rotatingparts can amputatehands andfeet.
4. Neverallowadultsto operatethis machinewithoutproper
2. Do not operate machinewhileunderthe influenceof alcohol
instruction.
or drugs.
5. Keepbystanders,helpers,pets andchildren at least 75 feet
3. Neveroperatethis machinewithoutgood visibility or light.
from the machinewhile it is in operation.Stop machineif
Alwaysbe sureof yourfooting and keepafirm hold on the
anyoneentersthe area.
handles.
Preparation
4. Keep bystanders,helpers,pets,and childrenat least 75 feet
from the machinewhile it is inoperation.Stopthe machineif
anyoneentersthe area.
1. Thoroughlyinspectthe areawhere the equipmentis to be
used.Removeall stones,sticks,wire, and otherforeign
objects whichcould be trippedover andcausepersonal
injury.
5. Be careful when tillingin hard ground. Thetines maycatch
in the groundand propelthe tiller forward. Ifthis occurs, let
2 Wear sturdy, rough-soledwork shoesand closefitting
go of the handlebars anddo not restrainthe machine.
slacksand shirt. Loosefitting clothesor jewelrycan be
6. Exerciseextremecaution whenoperatingon or crossing
caught in movableparts. Neveroperatethis machinein bare
gravelsurfaces.Stay alert for hiddenhazardsor traffic.
feet or sandals.
7. Neveroperatethe machineat hightransport speedson hard
3. Disengageclutchleversand shift (if provided)into neutral
or slipperysurfaces.
("N") beforestartingthe engine.
8. Exercisecautionto avoidslipping orfalling.
4. Neverleave this machineunattendedwiththe engine
9. Lookdown and behindand use care when in reverseor
running.
pulling machinetowardsyou.
5. Neverattemptto makeany adjustmentswhile engineis
10.Start the engineaccordingto the instructionsfound in this
running,exceptwherespecificallyrecommendedinthe
manualandkeepfeet well awayfrom the tines at all times.
operator'smanual.
11.After strikinga foreignobject, stop the engine,disconnect
6. Toavoid personalinjury or propertydamageuse extreme
the sparkplug wire and groundagainstthe engine
care in handlinggasoline. Gasolineis extremelyflammable
Thoroughlyinspectthe machinefor any damage. Repairthe
and the vapors are explosive.Serious personalinjury can
damagebeforestarting andoperating.
occur when gasolineis spilled on yourself or your clothes
12.Disengageall clutch levers(if fitted) and stop engine before
which can ignite.Washyourskin andchangeclothes
you leave the operatingposition(behindthe handles).Wait
immediately.
until the tines come to a completestop before unclogging
7. Useonly an approvedgasolinecontainer.
the tines, makingany adjustments,or inspections.
8. Extinguishall cigarettes,cigars,pipes and othersourcesof
13.Neverrun an engine indoorsor ina poorly ventilatedarea.
ignition.
Engineexhaustcontainscarbonmonoxide,an odorlessand
9. Neverfuel machineindoors.
deadlygas.
10. Neverremovegas cap or addfuel whilethe engine is hot or
14.Mufflerand engine becomehot andcan causea burn.Do
running.
not touch.
11.Allow engine to cool at leasttwo minutesbefore refueling
15.Use cautionwhentilling near fences,buildingsand
12. Neveroverfill fuel tank. Filltank to no morethan Y2inch
undergroundutilities. Rotatingtines can cause property
belowbottomof filler neck to providespacefor fuel
damageor personalinjury.
expansion.
4
16.Do not overloadmachinecapacityby attemptingto till soil to
deep at too fast of a rate.
Your Responsibility
1. Restrictthe use of this power machineto personswho read,
understand,andfollowthe warningsand instructionsinthis
manualand on the machine.
17. Ifthe machineshould start makingan unusualnoise or
vibration,stop the engine,disconnectthe spark plug wire
and groundit againstthe engine.Inspectthoroughlyfor
damage. Repairany damage beforestartingandoperating.
18.Keep all shields, guards,andsafetydevices in place and
operatingproperly.
2. The safetylabels on the tiller are shown inthe "Safety
Labels"section.Toensuresafe operationof the tiller,follow
the instructionson all labelsclosely.
19.Neverpick up or carry machinewhilethe engine is running.
20. Use onlyattachmentsand accessoriesapprovedbythe
manufacturer.Failureto do so can resultin personalinjury.
21. Ifsituationsoccur whichare not coveredinthis manual,use
care andgood judgment.Contactyour dealeror telephone
1-800-800-7310for assistanceandthe name of your
nearestservicingdealer.
Maintenance
ces
& Storage
1. Nevertamperwith safetydevices.Checktheir proper
operationregularly.
2. Check boltsand screwsfor proper tightnessat frequent
intervalsto keepthe machineinsafe workingcondition.
Also, visuallyinspectmachinefor any damage.
3. Beforecleaning, repairing,or inspecting,stop the engine
and makecertainthe tines and all movingparts have
stopped.Disconnectthe spark plug wire andground it
againstthe engineto preventunintendedstarting.
4. Do not changethe enginegovernorsettings or over-speed
the engine.The governorcontrolsthe maximumsafe
operatingspeedof the engine.
WARNING
This symbol points
out important safety
instructions which, if
not followed, could
5. Maintainor replacesafetyand instructionlabels, as
necessary.
6. Followthis manualfor safe loading, unloading,transporting,
and storageof this machine.
7. Neverstore the machineor fuel container insidewhere
endangerthe personal
safety and/or property
of yourself and others.
Read and follow all
instructions in this man-
there is an open flame,spark or pilot light such as a water
heater,furnace,clothesdryer,etc.
8. Alwaysreferto the operator'smanualfor properinstructions
on off-seasonstorage.
9. Ifthe fuel tank hasto be drained,do this outdoors.
10.Observeproperdisposallaws and regulationsfor gas, oil,
etc. to protectthe environment.
ual before attempting to
operate this machine.
Failureto comply with
these instructions
may result in personal
njury. When you see
this symbol, HEED ITS
WARNING!
5
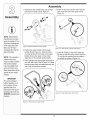
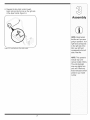
Assembly
4. Insert left end of tine clutch control into the
hole on the left side of the upper handle,
Figure 3-3.
1. Removethe star handle knobs and carriage
boltsfrom the lower handle, Figure 3-1.
f
NOTE: Stand behind
the tiller as if you were
going to operate it. Your
right hand corresponds
to the right side of the
tiller; your left hand
correspondsto the left
side of the tiller.
NOTE: This operator's
manual may cover
various models of tillers.
The units illustrated
may vary slightly from
your unit. Follow only
those instructions which
\
J
J
Figure3-1: Removehardwarefrom lowerhandle.
Figure3-3: Installleft side ofthe tine clutchcontrol.
2. Position the upper handle onto the lower
handle, Step A Figure 3-2. Align the holes
on lower handle with the holes on the upper
handle (choose the upper or lower holes
depending on the desired handle height).
5. Insert the Z-fitting on the clutch cable into
the hole on the tine clutch control. Hook the
"Z" end into the opening from the inside to
the outside as shown in Figure3-4.
3. Insertcarriage bolts through the holes and secure with star knobs, Step B Figure 3-2. Make
certain carriage bolts are seated securely into
one of the two positions provided.
f
pertain to your model
number.
iMPORTANT
::Thisunit is shipped
without gasoline or oi
i in the engine. Fill up
i gasoline and oil as
instructed in the accom.......
panying engine manual
i BEFORE operating your
machine.
Figure3-4: Hookcable into tine clutchcontrol.
'_
Figure3-2:Attachandsecureupperhandle.
_j
6
\
J
6. Squeeze
thetineclutchcontrolinward.
Insertrightendintotheholeontherightside
oftheupperhandle,Figure3-5.
f
NOTE: Stand behind
,,_
Figure3-5: Installrightend of tine clutchcontrol.
the tiller as if you were
going to operate it. Your
ight hand corresponds
to the right side of the
tiller; your left hand
corresponds to the left
side of the tiller.
.y
NOTE: This operator's
manual may cover
various models of tillers.
The units illustrated
mayvary slightlyfrom
our unit. Follow only
those instructions which
)ertain to your mode[
number.
7
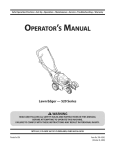
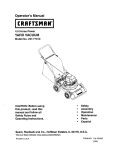
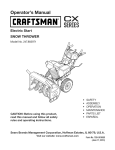
You r Tiller
Rec0il
Starter
Clutch Cable
Rear Wheel
with Depth
Stake
WARNING
The tine clutch control
isa safetydevice.
Never attempt to
bypass its operation.
Use extreme care
when handling
gasoline. Gasoline is
extremely flammable
and the vapors are
explosive. Never fuel
the machine indoors
i or while the engine
is hot or running.
Extinguishcigarettes,
cigars, pipes, and
other sources of
ignition.
Keep hands and feet
away from the tines.
Referto warning label
on the unit.
Figure4-1:The majorparts of the tiller (model241 shown).
Engine
_
follow ail instructionsand warnings
ARNING:Read,understand,
and
postedon
the machine and in this
manual before operating.
Tine Clutch
Throttle Control
Thethrottlecontrolleveris locatedon the engine,it
controlsthe engine'sspeedand stopstheengine.
Control
Theclutchcontrol leveris locatedon the upperhandle.
Squeezingthe leveragainstthe handleengagesthefine
drive.Releasethe leverto stopthe tines from turning.
* With the throttlecontrol movedcompletelyto the left,
the carburetorisin STARTor FASTposition.Use
maximumenginespeedfor deep tilling.
Rear Wheel with Depth Stake
* Movethe throttlecontrolleverto the rightto reduce
enginespeed.Throttlecontrolshouldbe at IDLEfor
transportingthe tiller.
Thedepthstakeand wheelare locatedat the rearof
the tiller.Bothmay be adjusted.Referto the "Wheel
Position"and "DepthStake"sectionsfor instructions.
Handle
Controls
NOTE:See theseparateenginemanualfor additional
engineinformationand functions.
Movethe throttleall the way to the rightto stop the
engine.
Knobs
Thehandle heightmaybe adjusted.Loosenthe knobs
and removethe carriageboltsto changethe position.
Reinstalland tightenthe hardwarewhencomplete.
Primer
Theprimer,locatedon the engine,is usedto pumpgas
intothe carburetorand aid instartingthe engine.Use it
to starta cold engine,but do notuse it to restarta warm
engineafter a short shutdown.
Recoil
Starter
The recoilstarteris locatedon the engineand is usedto
manuallystart the engine.
8
_
manyotheruseful laborsavingtasks in the garden.After
engineis runningand appropriatespeedset on throttle,
squeezefine clutchcontrol(see Figure4-1)against
upper handleto engagethe fine drive. Releasethe lever
to stop the tinesfrom turning.
follow all instructionsand warnings
ARNING:Read,understand, and
postedon the machine and in this
manual before operating.
Before Starting
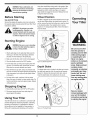
Wheel Position
Gas And Oil Fill-Up
Thetiller isshippedwith the wheeladjustedsuchthat the
unit sitslevel. Beforetilling, thewheelmust be raised.To
do this, removethe clevisand cotterpins, raisethe wheel
to the desiredposition,then reattachpinsto secure,
Figure4-2. Fortransportingthe tiller, reversethe stepsto
lowerthewheel.
Servicethe enginewith gasolineand oil as instructed
in
the separateenginemanualpackedwith yourtiller. Read
instructionscarefully.
_._|1_
Your Tiller
handlinggasoline. Gasolineis exARNING:Useextremecarewhen
tremely
flammable and the vaporsare
explosive.Never fuel machine indoors
or while the engineis hot or running.
Starting
Engine
WARNING
_
in front of the
theisengineis
WARNING:
Betiller
surewhile
no one
standing
runningor being started.
Besore
nooneother
than the operator :is
standing near the tiller
while starting engine
1. Attachsparkplug wireto sparkplug. Makesurethe
metalcap on the end of the spark plug is fastened
securelyoverthe metaltip on the sparkplug.
2. Makesurethat the fine clutchcontrolisdisengaged.
3. Placethe throttlecontrol in the FASTposition.
Figure4-2:WheelAdjustment
4. Forfirst time start-up,firmly pressengineprimerfive
(5) times. Forall futurestarts, pressthree(3) times.
Waitabouttwo secondsbetweeneach press.
Depth Stake
5. Placeleft hand on gas tank.Grasprecoilstarterand
pull rope out slowlyuntil enginereachesthe beginning
of its compressioncycle(rope willpull slightlyharder
at this point).
Thedepth stakeacts as a brakefor the tillerand controls
the depthand speedat whichthe machinewill operate,
Figure4-3. Removethe clevisand cotterpins, raiseor
lowerthedepth stake,thenreattachpins to secure.
fromanymo. ng
parts
6. Pull ropewith a rapid,continuous,full armstroke.
Keepa firm grip on handle.Let rope rewindslowly.Do
not let recoilstartersnapbackagainstengine.Repeat
untilengine starts.
Stopping
or operating the unit.
Never run engine
indoors or in enclosed,
poorly ventilated
areas. Engine exhaust
contains carbon
monoxide, an odorless
and deadly
hands, feet, hair and
loose clothing away
Engine
1. Movethrottlecontrolleverto STOPor OFF position.
See your engine
manual packaged with
your unit for detailed
instructions pertaining
to starting the engine,
2. Disconnectspark plugwire from sparkplug and
groundagainsttheengine.
Using Your Tiller
Yourtiller (alsoknownas a cultivator)is a precisionbuilt
machinedesignedfor seedbed preparation,cultivating,
furrowing,and mulching.It isengineeredto minimize
the hardestwork inthe vegetableor flowergarden,to
till thesoil for plantingand cultivating,and to perform
Figure4-3:The DepthStake
_ii_i_;i/;I_I:_I_I_I_I_I_I_I_I_I_I_I_I
!!il
9
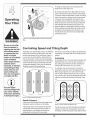
Fortilling, thedepth stakemustbe loweredand the
wheelmustbe raised,Figure4-4.
i
By increasingthedepthof thedepth stake,theforward
speedof the machineis reducedand the workingdepth
is increased.Whenthe depthstakeis raised,the working
depthof the machineis reducedand the forwardspeed
is increased.The workingdepthof the machinemay
be predeterminedby settingthedepthstakeso that the
wheelsare aboutfourinches fromthe groundwhenthe
tines and depthstakeare restingon the ground.This
settingwill permita workingdepthof about fourinches.
Whenpresettingthe workingdepth,the handlesshould
be adjustedso the handgrips area little abovewaist.
Thetiller will be lowerwhenthe tinesand depthstake
penetratethe ground.
¸
Figure4-4:Lowerthe depth stakeand raisethe wheelwhen
tilling.
Controlling Speed and Tilling Depth
Whentilling,leaveapproximately8 inchesof untilledsoil
betweenthe first and secondtillingpaths,thenmake
the thirdpath betweenthe firstand second,Figure4-5.
In some soils,the desireddepthis obtainedthe first
time overthe garden.In othersoils,the desireddepth
is obtainedby goingoverthe gardentwo or threetimes.
Passesshouldbe madeacrossthe lengthand width
of the gardenalternately.Rockswhich are turnedup
shouldbe removedfrom the gardenarea.
Thetype of soiland workingconditionswill determinethe
actualsettingof the depthstakeand the handlepressure
required.
Cultivating
Forcultivating,a two to threeinchdepth isdesirable.The
throttleshouldbe set to controlforwardmovementto a
slow walkingspeed.With the outertines installed,the
workingwidthof the machineis22 or 24 inches.
Forcultivation,this may be reducedto 13 inchesby
removingthe outertines,referto the AdjustmentSection.
Whenlayingout plant rows,be sureto allowenough
widthto permitcultivationbetweenthe rows.Ingrowing
cornor similarcrops,check-rowplantingwill permitcross
cultivationand practicallyeliminatehandhoeing,Figure
4-6.
J
Figure4-5:Recommended
tillerpaths.
Handle Pressure
Furthercontrolof tillingdepthand travel speedcan be
obtainedby variationof pressureon the handles.
A downwardpressureon the handleswill reducethe
workingdepthand increasethe forwardspeed.An
upwardpressureon the handleswill increasethe
workingdepthand reducethe forwardspeed.
Figure4-6:Allow enougharea betweenrows.
Thetiller has manyusesotherthan tillingand cultivating
a garden.One of these is the preparationof lawnarea
for seeding.The tillerwill preparea deep seed bed which
10
will be free of hard untilledspots,allowinga betterstand of grassto grow.The tiller is very usefulfor looseninghard
soil for excavationwith a shovel;Notedious handworkwill be necessary.Yourtiller maybe usedfor mixingcompost
in the pile or for mixingit with the soil in yourgarden.This shouldbe doneafter the soil has beenbrokento thefull
workingdepth.The compostshouldbe workedin to a depthof six to seveninches.This may be done by workingthe
lengthof the gardenand then by makingseparatepassesacrossits width.Theadditionof decayedorganicmatterwill
substantiallyincreasethefertility of yourgarden.For properdecayingaction,fertilizershouldbe appliedand workedin
with the mulch materials.Breakingup leavesand strawand mixingit with severalinchesof soilallowsproper aeration
of the plant rootsystemand retardsthe growthof weeds.
Transporting
and Storing
Totransportthetiller, lowerthewheeland movethe
depthstaketo the highestposition,Figure4-7.
the Tiller
You r Tiller
Tostorethe tiller, lowerthe wheeland orientthe depth
stakeso bothare touchingthe ground,Figure4-8.
Besurenooneother
J
Figure4-7: Fortransport,lowerwheel andraisedepth stake.
_
Figure4-8: Forstorage,lowerwheel anddepthstake.
J
than the operator is
standing near the tiller
while starting engine
or operating the unit;
Never
engine
indoors Or in enclosed,
poorly ventilated
areas. Engine exhaust
contains carbo
monoxide, anodorless
and deadly
gas:Keep
hands, feet, hair and
loose clothingaway
from any moving parts
See your engine
manual packaged with
your unit for detailed
instructions pertaining
to starting the enginei
11
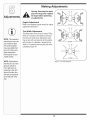
Making Adjustments
f
Warning: Disconnect the spark
plug wire and ground it against
the engine before performing
any adjustments.
Engine Adjustment
Refer to the separate engine manual for engine
adjustment instructions.
i¸
:
/
i:!
NOTEi This operator,s
manual may coverVari_
ous models of tillerS:
The unts illuStrated
may Varyslightly from
your unit. Follow on!y
those instructions
,€
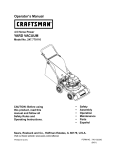
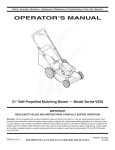
Tine Width Adjustment
The tilling width of the unit is 22 inches. Tilling
width can increase to 24 inches by removing
the clevis and cotter pins, sliding each outer
tine out one inch, and securing in this position
with the pins. Forcultivation, reduce the tine
width to 13inches by removingthe outer tines
completely, Figure 5-1.
24-inch
2-inch
•
Whichpertain to your
model numberl ...........
J
NOTE: Stand behind
Figure5-1:Tinewidthadjustment.
the tiller as if you were
going to operate it.
Your right hand correspondsto the right
side of the tiller; your
left hand corresponds
:othe left side of the
:iller.
12
nect spark plug, and groundagainst
Yourtillerhas beenengineeredwith a belt madeof
specialmaterialfor longerlifeand betterperformance.
It shouldnotbe replacedwith an off-the-shelfbelt. See
the retailerfrom whichyou purchasedyourtiller,an
authorizedMTDServiceDealer,or call 1-800-800-7310
for information
regardingpriceand availability.
performingany maintenance on your
machine.
Engine
Referto the separateenginemanualfor enginemaintenanceinstructions.
•
Maintainengineoil as instructed
in theseparate
engine manualpackedwith yourunit. Readand follow
instructions
carefully.
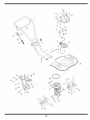
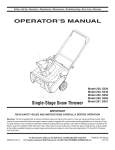
1. Removethe frame and engineby removingthe six
screwsand lock nuts holdingtheengine and frameto
the shield,Figure6-1.
• Serviceair cleanerevery ten hoursundernormal
conditions.Cleanevery hourunder extremelydusty
conditions.Poorengineperformanceand flooding
usually indicatesthat the air cleanershouldbe
serviced.Toservicethe air cleaner,referto the
separateenginemanualpackedwith yourunit.
'_,'_)
MPORTANT:Never runyour enginewithout
air cleanercompletely assembled.
• The spark plugshouldbe cleanedand thegap reset
every 25 hoursof engineoperation.Sparkplug
replacementis recommendedat the startof eachtiller
season;checkenginemanualfor correctplug type
and gap specification.
• Cleanthe engineregularlywith a cloth or brush.
Keepthecoolingsystem(blowerhousingarea)clean
to permitproperair circulationwhich isessentialto
engine performanceand life. Be certainto removeall
dirt and combustibledebrisfrom mufflerarea.
Alwaysstop engine,
disconnect
spark
plugland ground
ga nst
engine
before
Figure6-1:Remove
engineandframeto gainaccessto thebelt.
(Model241shown)
cleaningl lubricatmgor performing
maintenance on your
machine:
2. Loosenthe lock nut shownin StepA Figure6-2.
Lubrication
3. Unloopthe belt from thepulleys,StepB Figure6-2.
Transmission
5. Reattachframe and engineusingthe hardware
removedearlier.
The transmissionis pre-lubricatedand sealedat the factory. It requiresno checking.Seean authorizedservice
dealer forany serviceissues.
4. Reassemblethe newbelt and tightenthe lock nut.
IMPORTANT: Never
Removewheelassemblyand lubricatethe axleshaft at
leastoncea season.
use a pressure washer
to clean your tiller.
Water can penetrate
tight areas of the tiller
causing serious damage
to the unit.
Cleaning Tine Area
IMPORTANT: Never run
Cleanthe undersideof the fineshieldafter each use.
The dirt washesoff thetines easierif rinsedoff immediatelyinsteadof after itdries. Alwaystoweldry the
tiller afterwardsand applya lightcoat of oil or siliconeto
preventrustingor water damage.
your engine without the
aircleaner completely
assembled.
Tine Shafts
Removetine assembliesand lubricatethe tine shaftsat
leastoncea season.
Wheel Shaft
(]_,_j) IMPORTANT:Never
use acan
"pressure
washer"
to clean your tiller. Water
penetratetight
areas of the tiller causing serious damage.
Figure6-2:Loosen
thenutto remove
thebelt.
13
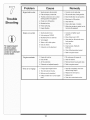
Problem
Cause
Engine fa! s tO start
Remedy
wi!e d
! connect wire to spa[k
I 2 Fue tankemptyorstaefue
3. Throttle control!evernot in correct
4,
2 F tankwthcean freshgaso ne
3, Movethrottle leverto start position.
sta_ingPosition(i! equipped)position
Chokenot n ON post on.
I
5: clean fuel line.
&Blocked fue!
Fau!tysPa[k
7, Engnefood ng.
6 C!ean:adjust gaR Or[epiace:
.
1. Sparkplugwire loose.
Engineruns erratic
2. Unit runningon CHOKE.
1. Connectand tightenspark
plug wire.
3. Blockedfuel line or stalefuel.
2. Movechoke leverto OFE
4. Ventplugged.
3. Cleanfuel line;fill tank with clean,
fresh gasoline.
5. Wateror dirt in fuel system.
4. Clearvent.
6. Dirtyair cleaner.
For repairs beyond
the minor adjust.
merits listed here,
contact an authorized
service dealer.
wait a few rninutes to restartlbut do
not pr me (f equ pped)
5. Drainfuel tank. Refillwith
fresh fuel.
7. Carburetorout of adjustment.
6. Cleanfollowingengine manual.
7. Referto enginemanual.
I
Engine overheats
!;
Engineoi! !eve!low:
2 Di!tYa[fi!ter:
4.
Tines do no engage
Ai[f!ow iest[ cte&
Carburetornot adjustedproperly.
1. Foreignobject lodgedin tines.
1; E!! crankcasew th ProPeroi!:
2 c!e an ai[C!eaiei:
Removeblowerhousingand c!eanr
4. Referto enginemanual.
2. Tineclevispin(s) missing.
1. Stop tillercompletely,checkand
discardforeignobject.
3. Beltwornand/or stretched.
2. Replacefineclevis pin(s).
4. Pulleyand idler not in correctadjustment.
3. Replacebelt.
14
4. Takeunit to authorizedservice
Off-Season
Storage
Referto the enginemanualfor correctenginestorage
instructions.
if the tillerwill not be usedfor a period longerthan30
days,the followingstepsshouldbe taken to preparethe
tiller for storage.
Wipetines with oiled ragto preventrust.
Storetiller in a clean, dry area.Do not storenext to
corrosivematerials,such as fertilizer.
Cleanthe exteriorof engineand the entiretiller
thoroughly.Lubricatethetiller as describedin the
lubricationinstructions.
When storingany type of powerequipmentin an
unventilatedor metalstorageshed,care shouldbe
taken to rustproofthe equipment.Usinga light oil
or silicone,coat the equipmentand especiallyany
springs,bearings,and cables.
We do not recommendthe useof pressurewashersto
cleanyour unit.They may causedamageto spindles,
pulleys,bearings,or the engine.The use of pressure
washerswill resultin shortenedlifeand reduce
serviceability.
NOTE: When storing
anytype of power
equipment in an unventilated or metal storage
shed. care should be
taken to rustproofthe
equipment. Using a
I ght oil or silicone, coat
the equipment and
especially any springs,
bearings, and cables.
15
16
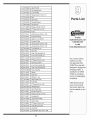
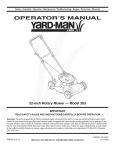
1
749-04282
UpperHandle
2
720-04072
StarHandle Knob
3
749-04281
LowerHandle
4
710-04398
FlangeScrew5/16-18x 7.5
5
754-04123
Belt
6
756-04163
idler Pulley
7
748-04125
ShoulderSpacer
8
686-04080
IdlerBracket
9
712-04065
FlangeLock Nut:3/8-16
Parts List
10 710-0654A TT Screw3/8-16x 1.00
11 786-04303
Frame
12 710-0514
HH CapScrew3/8-16x 1.00
13 732-0418
ExtensionSpring
14 738-04139
Stud 33 x 1.5x 3/8-16
15 756-04217
FlywheelPulley
16 710-0591
HH CapScrew3/8-24x 1.00
or visit
17 710-0520
HH CapScrew3/8-16x 1.50
www.mtdproducts.com
18 786-04256
Tine Shield61 cm
19 711-0415
ClevisPin
20 642-0005
OuterTine AssemblyLH
21 642-0003
InnerTine AssemblyLH
22 714-0149B
internalCotterPin
23 710-0809
TT Screw 1/4-20x 1.25
24 GW-9727
PipePlug 3/8 NPT
25 642-0002
InnerTine AssemblyRH
26 642-0004
OuterTine AssemblyRH
27 618-04276A Case Assembly
28 721-04157
Gasket
29 726-0299
PushCap
30 734-0973
Wheel5 x 1.38
31 749-04265
DepthStakeTube
32 711-04520
Axle Shaft
33 710-1007
TT Screw3/8-16x 1.50
34 786-04296
WheelBracket
35 749-04266
RearWheelTube
36 714-3020
internalCotterPin
37 712-04063
FlangeLock Nut:5/16-18
38 710-0487
CarriageBolt
39 731-05385
ClutchCableFitting
40 746-04247
ClutchCable
41 710-0599
TT Screw 1/4-20x.50
42 786-04307
Cable MountBracket
43 747-04508
Clutch Bail
44 736-0300
FiatWasher.406x .875x .059
17
_FACTORY
PARTS
To order
replacement parts, call
1-800-800-7310
Fora proper working
machine, use Factory Approved Parts.
V-BELTSare specially
designed to engage and
disengage safely. A
substitute (nomOEM)
V-Belt can be dangerous by not disengaging
completely.
Tiller features/components vary by model.
Some parts listed may
not be available on your
unit.
Notes
_
ii_
_ i_ill
i_ii
Use this page to take notes.
i_iii_
_ I_
Use this page to take notes.
19
Notes
MANUFACTURER'S
LiMiTED WARRANTY
The limitedwarrantyset forth belowisgivenby MTDLLCwith respect
to newmerchandisepurchasedand usedin the UnitedStates,its
possessionsand territories.
"MTD"warrantsthis productagainstdefectsin materialand workmanshipfor a periodof two (2) years commencingon the date of original
purchaseand will, at its option,repairor replace,freeof charge,any
part foundto be defectiveinmaterialsor workmanship.This limitedwarranty shallonlyapply if this product hasbeen operatedand maintained
inaccordancewith the Operator'sManualfurnishedwith the product,
and has notbeen subjectto misuse,abuse,commercialuse, neglect,
accident,impropermaintenance,alteration,vandalism,theft, fire, water,
or damagebecauseof otherperil or naturaldisaster.Damageresulting
fromthe installationor useof any part, accessoryor attachmentnot
approvedby MTDfor use with the product(s)coveredbythis manual
willvoid yourwarrantyas to any resultingdamage.
Normalwearparts are warrantedto be free fromdefects in materialand
workmanshipfor a periodof thirty (30) days fromthe dateof purchase.
Normalwearparts include,butare notlimitedto itemssuch as: batteries,belts,blades,blade adapters,grass bags, riderdeck wheels,seats,
snowthrowerskid shoes,shaveplates,auger spiralrubberand tires.
NOW TO OBTAIN SERVICE: Warranty service is available, WITH
PROOF OF PURCHASE, through your local authorized service
dealer. To locate the dealer in your area, check your Yellow Pages,
or contact MTD LLC at RO. Box 361131,Cleveland, Ohio 441360019, or call 1-800-800-7310 or 1-330-220-4683 or log on to our
Web site at www.mtdproducts.com.
This limitedwarrantydoesnot providecoverageinthe followingcases:
a. Theengineor componentparts thereof.These itemsmaycarry a
separatemanufacturer'swarranty.Referto applicablemanufacturer's
warrantyfor termsand conditions.
b. Log splitterpumps,valves,and cylindershavea separateone year
warranty.
c. Routinemaintenanceitemssuch as lubricants,filters, blade
sharpening,tune-ups,brakeadjustments,clutchadjustments,deck
adjustments,and normaldeteriorationof the exteriorfinish due to
useor exposure.
FOR
e. MTDdoesnot extendanywarrantyfor productssoldor exported
outsideof the UnitedStates,its possessionsand territories,except
those soldthroughMTD'sauthorizedchannelsof export distribution.
f. Replacementparts that are notgenuine MTDparts.
g. Transportationchargesand servicecalls.
No impliedwarranty,includingany impliedwarrantyof merchantabilityof fitness for a particular purpose,applies after the
applicable periodof express written warranty above as to the
parts as identified.No otherexpresswarranty, whetherwritten or
oral, except as mentioned above, givenby any personor entity,
includinga dealeror retailer, with respect to any product,shall
bind MTD.Duringthe periodof the warranty,the exclusiveremedy
is repairor replacementof the productas set forth above.
The provisionsas set forth in this warrantyprovidethe sole and
exclusiveremedy arising from the sale. MTDshallnot be liable
for incidentalor consequentialloss or damage including,without
limitation, expensesincurredfor substituteor replacementlawn
careservicesor for rentalexpensesto temporarily replacea
warranted product.
Somestatesdo notallowthe exclusionor limitationof incidentalor
consequentialdamages,or limitations
on howlong an impliedwarranty
lasts,sothe aboveexclusionsor limitations
maynot applyto you.
In no event shallrecoveryof any kindbe greaterthanthe amountof the
purchasepriceof the productsold.Alterationof safety features of
the product shallvoid this warranty. Youassumethe riskand liability
for loss,damage,or injuryto you and yourpropertyand/orto others and
theirpropertyarisingout of the misuseor inabilityto usethe product.
This limitedwarrantyshallnot extendto anyoneotherthan theoriginal
purchaseror to the personfor whomitwas purchasedas a gift.
HOWSTATELAWRELATESTOTHIS WARRANTY: This limited
warrantygivesyou specificlegal rights,and youmay alsohaveother
rightswhich vary from stateto state.
IMPORTANT:OwnermustpresentOriginal Proofof Purchaseto obtain
warrantycoverage.
d. Servicecompletedby someoneotherthanan authorizedservice
dealer.
MTD LLC, P.O. BOX 361131 CLEVELAND,
OHIO 44136=0019; Phone: 1=800=800=7310, 1=330=220=4683