1
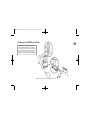
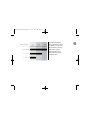
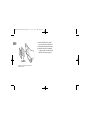
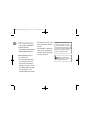
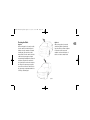
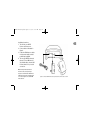
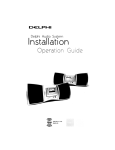
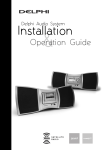
SKYFi2 install guide layout
6/20/06
4:47 PM
Page 2
SKYFi2™
Installation
Guide
H o m e a n d Ve h i c l e K i t s
Contents:
SKYFi2 Vehicle Adapter Kit Setup · · · · · · · · · · · · 2
SKYFi2 Installation · · · · · · · · · · · · · · · · · · · · · · · · · 7
XM Antenna Setup · · · · · · · · · · · · · · · · · · · · · · · · 12
SKYFi2 Home Adapter Kit Setup· · · · · · · · · · · · · 14
Warranty · · · · · · · · · · · · · · · · · · · · · · · · · · · · · · · · · 17
Warning: This manual and the SKYFi2
Satellite Radio Receiver User Guide contain
important safety and operating information.
Please read and follow the instructions in
these manuals. Failure to do so could result
in personal injury, death, and/or damage to
your SKYFi2 Receiver, accessories, and/or to
your vehicle or other property.
SKYFi2 install guide layout
2
6/20/06
Important: See page 19 for import a n t
FCC inform a t i o n .
4:47 PM
Page 3
SKYFi2 Vehicle Adapter Kit (SA10102) Setup
Your Delphi XM® SKYFi2™ Vehicle Adapter Kit contains the following components:
Your kit also includes:
• Extra adhesive pad
SKYFi2 Cradle
Vehicle swivel mount
XM Vehicle Antenna
• Surface preparation
cleaning kit
• Alcohol prep pad
• Cable wrap
• Adhesive-backed
Velcro® pads
Cassette audio
adapter
Nokia®-style button
mount converter
Figure 1. SKYFi2 Vehicle Adapter Kit components.
12V power adapter
SKYFi2 install guide layout
6/20/06
4:47 PM
Page 4
Hooking up Your SKYFi2 Receiver Cradle
Caution: Connect only appropriate input devices
to the SKYFi2 Vehicle Adapter Kit. Connecting any
incorrect input devices may damage the system and/
or the external electronic device. It is recommended
that you use only the 12V to 6V conversion power
adapter that came with your SKYFi2 Vehicle Adapter Kit.
Figure 2. Connect accessories to your SKYFi2 Cradle as shown.
3
SKYFi2 install guide layout
4
6/20/06
4:47 PM
After connecting the power and
antenna jacks into the car cradle, the
included organizer can be used to
improve the appearance of the installation. See figure 3.
The cable twist ties that were provided with the power adapter and car
antenna cables can be reused to
gather, bundle, twist tie, and secure
any excess cable. Excess cable can be
gathered under the dash, between the
seat or console, or under the mat so it
is not in the way.
Page 5
When using the wireless FM modulator, securing and tie-wrapping the
excess cable reduces background
hissing noise.
Check movement of doors and trunks
as well as seats so they do not damage excess cable.
Figure 3.
SKYFi2 install guide layout
6/20/06
4:47 PM
Page 6
The SKYFi2 Vehicle Adapter Kit
offers you many ways of connecting
your SKYFi2 to your vehicle’s radio.
All options provide excellent sound
quality and stereo separation.
Review and consider your own
unique situation when choosing
from the three options.
5
SKYFi2 install guide layout
6
6/20/06
4:47 PM
Cassette Adapter
For vehicles with a built-in cassette
player. Due to its superior audio quality,
this configuration is recommended
over the wired or wireless FM
modulator configurations if a
cassette slot is available in the vehicle.
Page 7
Direct Connect
The Delphi FM Direct Adapter
(SA10112) (sold separately) can provide
audio input through the vehicle’s
antenna lead. (Some vehicles may
re q u i re special antenna lead adapters.)
Wireless FM Modulator
For the ultimate ease of installation,
SKYFi2 has a built-in wireless FM
modulator that allows you to hear XM
programming through your vehicle’s
FM radio. The factory default setting
for the FM modulator is turned off.
See the SKYFi2 Satellite Radio
Receiver User Guide for more details.
SKYFi2 install guide layout
6/20/06
4:47 PM
SKYFi2 Installation
Because every vehicle is different,
these instructions are provided as a
general guideline only. If you need
help, consult a professional installer.
1. Decide which method (cassette
adapter, wireless FM modulator, or
direct connect) is most appropriate
for your vehicle and where you live.
2. Verify the system is working by
completing a test. Before installing
the system, connect the XM Antenna,
12V power adapter, and audio
connector or cassette adapter (if
used) to the SKYFi2 Vehicle Adapter
cradle with the SKYFi2 Receiver
Page 8
inserted. Plug the 12V power
adapter into the cigarette lighter
and place the XM Antenna on the
roof of your vehicle. Make sure you
are outdoors and not surrounded
by tall buildings or trees. Turn on
both your vehicle’s radio and
SKYFi2 Receiver. Tune the SKYFi2
Receiver to XM channel 1. You
should be able to hear the XM
Preview channel. If not, check all
connections.
Note: If using the wireless FM modulator or
the Delphi FM Direct Adapter, set the SKYFi2
Receiver and the vehicle’s FM radio to the same
frequency. See the SKYFi2 User Guide section
on “Listening to XM Using Any FM Radio.”
Warning: Do not install the mount where it
or SKYFi2 could block your vision or usage of
controls, or interfere with any safety devices
such as airbags. Failure to correctly place
SKYFi2 could result in injury to you or others if
the unit becomes detached during an accident
and/or obstructs the deployment of an airbag.
7
SKYFi2 install guide layout
8
6/20/06
4:47 PM
3. Turn off the radio and SKYFi2
Receiver. Disconnect all cables.
4. Find a place where you can mount
your SKYFi2 Vehicle Adapter
where it is most convenient for
you to use. It should be mounted
to a hard, flat surface below the
top of the dash within easy reach.
Choosing a lower location makes
it easier to manage the cables. A
lower location also ensures
SKYFi2 will not cause interference
with other FM radios outside the
vehicle. See figure 4.
5. The SKYFi2 Vehicle Adapter Kit
has two mounting options: flat
mount or swivel mount.
Page 9
a. Flat mount: Use the included Velcro pads or extra adhesive pad, attaching them to the back of the SKYFi2 vehicle
cradle and then to a flat surface in your vehicle. Do not
install the mount on a leather surface.
Figure 4.
SKYFi2 install guide layout
6/20/06
4:47 PM
b. Swivel mount: This mount allows
you to adjust the angle of your
SKYFi2 Vehicle Adapter after it is
installed. This mount uses a
strong adhesive that is not easily
repositioned when installed, so use
care when choosing the location of
and placing the mount. Do not
install this mount on a leather surface. Install the mount only if the
temperature is at least 60°F.
– Clean the mounting surface with
the enclosed surface pre p a r a t i o n
cleaning kit. Wipe the towelette
Page 10
in one direction only. Do not
wipe the surface in a circular
motion or back and forth. Dry the
area with a clean, dry cloth.
Repeat the cleaning process.
Allow to air dry thoroughly.
– Clean the same surface with the
enclosed alcohol prep pad. Wipe
in one direction only. Dry the
area with a clean, dry cloth.
Allow to air dry thoroughly.
– Warm the vehicle mount adhesive
pad by using a hair dryer or by
placing the vehicle mount on top
of the vehicle’s defrost outlet for
several minutes with the heater
on. Remove the liner from the
adhesive pad and adhere to the
vehicle’s surface. Make sure you
accurately place the pad on the
first try since in many cases it will
bond almost immediately. For
best results, do not touch or apply
pressure to the vehicle mount for
72 hours.
9
SKYFi2 install guide layout
6/20/06
4:47 PM
Page 11
6. Clip the SKYFi2 vehicle cradle
onto the swivel mount (figure 5).
7. Reassemble the system as in step 2.
8. Attach the antenna as explained
on page 12 and route the antenna
cable as described on page 13.
10
To vehicle
dashboard
Figure 5. Attach vehicle mount to back of
SKYFi2 as shown.
SKYFi2 install guide layout
6/20/06
4:47 PM
Removing swivel mount
from your dashboard
You can remove the swivel mount
from your dashboard by following
these steps:
1. Lift one edge of the adhesive pad
gently with fingers or the rounded
edge of a spoon. Once enough of
the edge is loosened to grip with
your fingers, pull the pad gently
from the mounting surface at a
90-degree angle. Do not use
sharp tools that could damage
the vehicle’s interior.
Page 12
2. If the pad fails to loosen, warm it
with a hair dryer for 2 to 3 minutes
to soften the adhesive. Be careful
not to apply too much heat, which
could damage the mounting
surface. Repeat step 1.
3. If any adhesive remains on the
dashboard surface, the adhesive
can easily be removed by rubbing
your thumb or finger across it.
4. As necessary, use a mild household
cleaner to clean the dashboard
surface.
Caution: Never use a commercial heat gun or
a paint-stripping gun. This can damage the
unit or your vehicle.
11
SKYFi2 install guide layout
12
6/20/06
4:47 PM
XM Antenna Setup
For best reception, the XM Antenna
should be placed either:
– In front of the rear window (option1)
– Behind the windshield (option 2)
When deciding which location to
choose, keep in mind:
– The antenna will perform best if it
has an unobstructed view of the
open sky and is surrounded by a
minimum of 3 to 6 inches of metal.
– For best FM modulator perf o rmance,
locate the antenna as close to
the vehicle’s FM antenna as possible.
Page 13
– If the vehicle has roof racks or skid
ribs, the antenna can be mounted
off-center.
– Trunk mounting is an alternative for
hard- or soft-top convertibles with
nonmetallic rooftops, though reception may not be as good.
Important: Do not install antenna inside the
vehicle passenger compartment. An antenna
mounted on the dashboard or on the rear window
deck area of the vehicle will likely experience signal
interruption issues and must be avoided. Mounting
the antenna on a nonmetallic surface will also
result in severe degradation in reception.
Warning: Failure to properly install the
antenna may result in injury to you or others if it
becomes detached during an accident.
SKYFi2 install guide layout
6/20/06
4:47 PM
Page 14
Routing the Cable
Option 2
When using option 2, route the
cable along the door jamb and
into the vehicle as shown in figure
6. Route the cable across the
weather seal near the bottom of
the door to reduce water leaks.
Option 1
When using option 1, route the cable
into the trunk as shown in figure 6.
Always cross the weather seal at the
lowest part of the trunk to reduce
water leaks. From the trunk, route the
cable into the passenger compartment through available wire channels
and then along the floor under the
door jamb trim or under the carpet to
the front of the passenger compartment. Do not leave the cable loose in
the passenger compartment where it
is likely to be damaged.
Figure 6.
13
SKYFi2 install guide layout
14
6/20/06
4:47 PM
Page 15
SKYFi2 Home
Adapter Kit (SA10103) Setup
Your Delphi XM SKYFi2 Home Adapter
Kit contains the following components:
Hooking up Your
SKYFi2 Receiver Home Stand
Note: See SKYFi2 User Guide for important
user information.
SKYFi2 Home Stand
6V AC power
adapter
XM High-gain
Indoor/Outdoor
Home Antenna
with 25 ft. cable
Audio cable
Figure 7. SKYFi2 Home Adapter Kit components.
Caution: Connect only the appropriate input
devices to the SKYFi2 Home Adapter Kit jacks.
Connecting any incorrect input device may
damage the system and/or the external electronic device. It is recommended that you use
only the AC power adapter that came with
your SKYFi2 Home Adapter Kit. If you need to
use a different adapter, it must be a 6V, 1000
mA DC adapter and must contain a unified
polarity-type jack, identified by the
symbol.
SKYFi2 install guide layout
6/20/06
4:47 PM
Page 16
Installation instructions:
1. Turn off both your SKYFi2
Receiver and home stereo.
2. Connect cables as illustrated in
figure 8.
3. Position the XM Antenna so that it
is facing south. Ideally, it should
point through a window.
4. Turn on your SKYFi2 Receiver and
the stereo. Tune to XM channel 1.
You should be able to hear the XM
Preview channel. If not, check all
connections.
Note: The Delphi SA10006 Antenna
Extension Cable (sold separately) is
designed to work with the SKYFi2 Home
Adapter Kit and provides an additional 50
feet of cable length to the standard XM
Home Antenna.
15
Figure 8. Connect the SKYFi2 Home Stand to power, antenna, and home stereo as shown.
SKYFi2 install guide layout
16
6/20/06
4:47 PM
Aiming the XM Home Antenna
For best reception, aim the home
antenna by following these
instructions:
1. Press the “menu” button on the
SKYFi2 Receiver.
2. Use the scroll wheel to select the
“Antenna Aiming” option. Press
the “XM” button to confirm selection.
3. This display will remain on until
you press the “menu” button
again, so you have plenty of time
to aim the antenna. Slowly turn
and tilt the antenna. The “satellite”
and “terrestrial” signal bars will
Page 17
change. Find the position that gives
the strongest signal strength (at
least two bars) on e i t h e r “satellite”
or “terrestrial.”
4. Once you are convinced you have
determined the proper position to
receive the best possible signal,
press the “menu” button to return
to normal operation.
Figure 9. Signal strength indicator.
SKYFi2 install guide layout
6/20/06
4:47 PM
Delphi Limited Consumer Warranty
Delphi Product and Service Solutions
(“Delphi”) warrants all Portable XM
Satellite Radio Accessory Products sold by
Delphi (each “Product”) to be free of
defects in material and workmanship,
subject to the following conditions:
The duration of Delphi’s warranty with
respect to each product is limited to one
(1) year from the date of sale to the original
consumer purchaser.
No other express warranties are made with
respect to any Product. All implied warranties,
including warranties of merchantability and
fitness for a particular purpose are limited
to the warranty period set forth above. This
warranty is not transferable and applies
only to the original consumer purchaser of
the Product.
Page 18
Delphi will, as its sole obligation under this
warranty, replace or repair, at its option,
any Product that does not conform to this
warranty. Products may be repaired or
replaced with new or with refurbished
items. This limited warranty does not cover
defects in appearance, cosmetic or decorative items, including any non-operative
parts. Under no circumstances will Delphi
be liable for any incidental or consequential
damages under this warranty or any
implied warranties. These remedies are the
customer’s exclusive remedies for breach
of warranty. This limited warranty only
extends to customers who purchase the
Products in the United States.
Delphi will not be responsible for damage
resulting from any (i) deviation from
Delphi’s operating instructions as printed in
Delphi’s catalog or on any packaging,
labels, or other literature provided with a
Product, (ii) installation of a Product in a
manner which is inconsistent with Delphi’s
written instructions, (iii) alteration or
modification of a Product, (iv) misuse,
(v) neglect, (vi) abuse, (vii) accident, (viii)
normal wear and tear, (ix) commercial use,
(x) improper storage, (xi) environmental
conditions, including excessive temperature
or humidity, (xii) service by anyone other
than a Delphi authorized repair facility,
(xiii) other improper application, installation
or operation of the Product, or (xiv) defects
or malfunctions of which Delphi is not
advised within ten (10) days of the expiration
of the limited warranty period.
17
SKYFi2 install guide layout
18
6/20/06
4:47 PM
How you (the Customer) can get service:
To obtain warranty service, you must return
the defective Product with the original
receipt to the original place of purchase. If
f u rther clarification or additional information
is required from Delphi, you may call Delphi
at: 1.877.GO DELPHI (1.877.463.3574). If
w a rranty service is needed at any time during
the warranty period, the purchaser will be
required to furnish a sales receipt/proof of
purchase indicating the date of purchase,
amount paid and place of purchase.
Customers who fail to provide such proof
of purchase will be charged for the
repair/replacement of any Product.
Page 19
How state law relates to the warranty:
Some states do not allow limitations on the
duration of implied warranties, or the
exclusion or the limitation of incidental or
consequential damages. So the above limitations or exclusions may not apply to you.
This warranty gives you specific legal
rights. You may also have other rights that
may vary from state to state. NO PERSON
IS AUTHORIZED BY DELPHI TO MODIFY
OR ADD TO THIS LIMITED WARRANTY.
SKYFi2 install guide layout
6/20/06
4:47 PM
FCC Statement
Please note that the cables and antenna wire
that have been supplied with your device are
supplied with permanently attached ferr i t e
beads. It is the responsibility of the user to
use the cable and antenna wire with the
ferrite beads.
The user is cautioned that changes or modifications not expressly approved by XM
Satellite Radio, Inc. can void the user’s
authority to operate this device.
This device complies with Part 15 of the FCC
rules. Operation is subject to the following
two conditions: (1) This device may not cause
harmful interf e rence, and (2) this device must
accept any interference received, including
interference that may cause undesire d
operation.
Page 20
This equipment has been tested and found to
comply with the limits for a Class B digital
device, pursuant to Part 15 of the FCC Rules.
These limits are designed to provide re a s o nable protection against harmful interference
in a residential installation.
This equipment generates, uses, and can
radiate radio frequency energy and, if not
installed and used in accordance with the
instructions, may cause harmful interf e rence
to radio communications. However, there is
no guarantee that interference will not occur
in a particular installation. If this equipment
does cause harmful interf e rence to radio or
television reception, which can be determined by turning the equipment off and on,
the user is encouraged to try to correct the
interference by one or more of the following
measures:
- Reorient or relocate the receiving antenna.
- Increase the separation between the
equipment and the receiver.
- Connect the equipment into an outlet on a
circuit different from that to which the
receiver is connected.
- Consult the dealer or an experienced
radio/TV technician for help.
Important: The FCC and FAA have not cert ified the Delphi XM SKYFi2 Satellite Radio
Receiver for use in any aircraft (neither
portable nor permanent installation).
T h e re f o re, Delphi cannot support this type
of application or installation.
19
SKYFi2 install guide layout
6/20/06
4:47 PM
Page 1
Delphi Corporation
1441 West Long Lake Road
Troy, Michigan 48098-5090
U.S.A.
Customer Service: [1] 877.GO DELPHI
www.delphi.com
Printed on Recycled Paper
©2006 Delphi Corporation. All rights reserved.
DPSS-06-E-061
The SKYFi2 name, XM name, and related logos
are trademarks of XM Satellite Radio Inc. All
other trademarks are the property of their
respective owners.