1
FCC Compliance
User’s Guide
®
AT8400 AllTouch
Remote Control
This device complies with Part 15 of the FCC
Rules. Operation is subject to the following
two conditions: (1) This device may not cause
harmful interference, and (2) this device must
accept any interference received, including
interference that may cause undesired
operation.
Note
This equipment has been tested and found to
comply with the limits for a class B digital
device, pursuant to Part 15 of the FCC Rules.
These limits are designed to provide reasonable protection against harmful interference in
a residential installation. This equipment
generates, uses, and can radiate radio
frequency energy and, if not installed and
used in accordance with the instructions, may
cause harmful interference to radio communication. However, there is no guarantee that
interference will not occur in a particular
installation. If this equipment does cause
harmful interference to radio or television
reception, which can be determined by turning
the equipment off and on, the user is encouraged to try to correct the interference by one or
more of the following measures:
• Reorient or relocate the receiving antenna.
• Increase the separation between the
equipment and the receiver.
• Connect the equipment into an outlet on a
circuit different from that to which the
receiver is connected.
• Consult the dealer or an experienced radio/
TV technician for help.
Any changes or modifications not expressly
approved by Scientific-Atlanta could void the
user’s authority to operate this equipment.
United States: Scientific-Atlanta, Inc., 5030 Sugarloaf Parkway,
Box 465447, Lawrenceville, GA 30042
Europe: Scientific-Atlanta Europe GmbH, Westerbachstrasse 28-32,
61476 Kronberg, Germany
Asia-Pacific: Scientific-Atlanta (Singapore) Pte. Ltd.,
1 Claymore Drive, #08-11 Orchard Towers, Singapore 229594
Latin America: Scientific-Atlanta Argentina S.A.,
Carlos Pelligrini 1149, Piso 11o, Capital Federal 1011,
Buenos Aires, Argentina
© 2002 Scientific-Atlanta, Inc. All rights reserved.
Printed in USA
www.scientificatlanta.com
Part Number 749219 Rev A
March 2002
CBL Setup Codes
AUX Setup Codes
About Cable Codes
Enter all 4 digits to program the AUX
mode key.
Your cable service provider may
have “locked” a valid cable code
into your remote to keep you from
changing the cable code unintentionally.
If you need to program the remote to
operate a different device, use the
following steps to unlock the remote.
1. Press and hold the SELECT key
and the CBL key until the LED
blinks twice.
2. Press 9 9 6.
Note:As you press each digit,
the mode key should blink.
3. Press CH- to unlock the remote.
Result: You can now set up your
CBL key with a different cable code.
Enter all 4 digits to program the
CBL mode key.
Cable Codes
Receiver Codes
Brand–Code
Onkyo–3007, 3068
Optimus–3012, 3027
Panasonic–3003,
3010, 3025
Philips–3000
Pioneer–3001, 3012,
3067
Quasar–3003
RCA–3012, 3054
Sansui–3000
Sherwood–3011
Sony–3008, 3014,
3017, 3020, 3055,
3056
Technics–3003, 3010,
3021, 3022
Victor–3004
Wards–3000, 3001,
3008
Yamaha–3009, 3057,
3069, 3058
AADC–3012
Aiwa–3000, 3006,
3008, 3015, 3024,
3047, 3048, 3050,
3049, 3061, 3051,
3059, 3060, 3062
Capetronic–3012
Carver–3000, 3019
Denon–3016, 3018,
3063, 3064
Harman Kardon–
3000, 3065, 3005
JBL–3005
JVC–3004, 3052,
3066
Kenwood–3002,
3013, 3023, 3026,
3053
Linn–3000
Magnavox–3000,
3012
Marantz–3000, 3003,
3070
MCS–3003
Brand–Code
ABC–0004
Contec–0008
General Instruments–0011, 0012
Gold Star–0010
Jerrold–0007, 0011, 0012, 0015
Memorex–0006
Panasonic–0006, 0009
Paragon–0006
Pioneer–0010, 0014
Pulsar–0006
Quasar–0006
Runco–0006
Scientific-Atlanta–0000, 0001, 0002,
0003, 0004, 0005, 0016
Samsung–0010
Starcom–0011
Tocom–0007
Toshiba–0006
Zenith–0006, 0013
Amplifier Codes
Brand–Code
Aiwa–3207
Carver–3202
Curtis Mathes–3203
Denon–3201
JVC–3205
Linn–3202
Magnavox–3202
Marantz–3203
Panasonic–3202,
3204
Philips–3202
Pioneer–3200, 3203
Sony–3208
Technics–3202, 3204
Victor–3205
Wards–3200
Yahama–3206
Home Automation Codes
Brand–Code
GE–3601
Radio Shack–3601
X10–3600
Satellite Codes
Additional Audio Codes
Brand–Code
These codes allow you to program your
remote to control cable radio set-top
devices.
Echostar–0021
Hughes–0017, 0020
Mitsubishi–0020
RCA–0018
Sony–0019
Brand–Code
Jerrold–3400, 3402
Scientific-Atlanta–3401
Starcom–3400
7
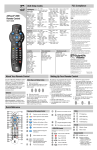
About Your Remote Setting Up Your Remote
Your new AT8400 AllTouch® Remote
Control ("remote") functions as four
remote controls in one to operate your
TV, VCR, cable set-top device (CBL),
and an additional device (AUX), such
as a stereo receiver or an amplifier.
In addition, the remote provides
advanced features such as Personal
Video Recorder (PVR) controls for
certain cable set-top devices and the
Picture-In-Picture (PIP) feature.
Note: If you have questions or
concerns about the operation of this
remote, contact your cable service
provider.
Batteries
The remote requires two alkaline AA
batteries. A diagram inside the battery
compartment of the remote indicates
proper placement of the batteries.
Mode Keys and Setup Codes
Q: What are mode keys?
A: The mode keys switch the remote
to operate a particular device.
Q: What are setup codes?
A: Setup codes are numeric codes
that identify your brand of
equipment so that the remote can
operate that equipment.
CAUTION: The AT8400
AllTouch Remote Control is
not a toy. It should be kept out
of the reach of children under
the age of 6 years.
This symbol is intended to alert
you of the presence of important
operating and maintenance
(servicing) instructions in the
literature accompanying this
product.
The mode keys are programmed with most of
the popular brands of electronic devices.
Therefore, before you perform these
procedures, you should test each mode key to
see if it is already programmed.
To test the mode key, turn on your device,
press the mode key for that device, and then
press POWER on the remote control to verify
that the power to the device turns off.
If none of the codes listed for your device work,
you can search through the code library for a valid
code. The remote automatically selects the proper
code.
1. Turn on the device.
2. Press and hold the SELECT key and the
appropriate mode key (AUX, VCR, TV, or
CBL) until the mode keys blink twice. For
example, to search for a TV code, press and
To Set Up a Mode Key
hold SELECT and TV.
Follow these steps to set up a mode key:
3.
Using the remote control keypad, press 9 9 1.
1. Find the code(s) for your brand of device
The mode keys blink twice.
in one of the setup code lists in this guide.
Note:Be careful not to press these keys too
2. Turn on your device.
quickly. As you press each digit, the mode
3. Press and hold the SELECT key and the
key should blink.
appropriate mode key for that device until 4. Point the remote toward the device, and press
all the mode keys blink twice. For
.
example, to set up the VCR key, press
The
remote
automatically tests each code in
and hold SELECT and VCR.
its
library,
beginning
with the most common
4. Enter the setup code for the device. The
codes. The mode key blinks once each time
mode keys blink twice to indicate that the
the remote transmits a new code.
code was accepted.
Note: Each of the code libraries contains
Notes:
fewer than 100 codes. The mode key blinks
• The setup codes for each mode key
twice when it reaches the last code in the
appear on both the front and the back
library.
of this guide.
5. As soon as the device powers down, press
• As you press each digit in the setup
the SELECT key.
code, the mode key should blink. If the
mode key does not blink, the remote
6. Verify that the new code is correct by
did not accept the digit. Enter that digit
pressing the Power key.
again.
7. Did the device power on again?
5. Point the remote control toward the
• If no, go back and repeat step 4.
, or
device and press POWER,
• If yes, press SELECT to lock the code.
CH+ to test the device.
6. Did the device operate correctly?
To Identify Programmed Codes
• If yes, go to step 7.
You can find out which code you used to program
your device by following this procedure.
• If no, repeat steps 3 through 5 using a
different setup code.
1. Press and hold the SELECT key and the
appropriate mode key (AUX, VCR, TV, or
Note: If all of the codes listed for your
CBL) until the mode keys blink twice.
brand of device fail to operate your device
properly, go to the To Search for Codes 2. Using the remote control keypad, press 9 9 0.
section of this guide for instructions.
The mode keys blink twice.
7. Repeat steps 1 through 5 for each mode
Note:Be careful not to press these keys too
key you want to set up.
quickly. As you press each digit, the mode
key should blink.
8. Write your codes here for future reference:
3. Press 1; then, count the number of times the
mode key blinks. That number indicates the
first digit in the code. For example, 4 blinks
TV:
VCR:
indicates the first digit in the code is 4. If the
mode key does not blink, the digit is 0.
AUX:
1
To Search for Codes
CBL:
4. Press 2; then, count the number of
blinks. That number indicates the second
digit in the code.
5. Press 3; then, count the number of
blinks. That number indicates the third
digit in the code.
6. Press 4; then, count the number of
blinks. That number indicates the fourth
digit in the code.
7. Write your codes for future reference in
the space provided in this guide.
To Program for Volume Control
You can program the remote to control the
volume and mute functions through any of
the devices that it controls. The default is to
control volume through your TV.
Note: For Explorer Digital Home Communication Terminals (DHCTs), use the SETTINGS button to go to the General Settings
menu on-screen, and make sure that the
Audio: Volume Control setting is set to
“Variable.”
1. Turn on the device.
2. Press and hold the SELECT key and the
CBL key until the mode keys blink
twice.
3. Using the remote control keypad, press
9 9 3. The mode keys blink twice.
Note:Do not press these keys too
quickly. As you press each digit, the
mode key should blink.
4. Press the mode key for the device you
want to control the volume.
5. Point the remote toward the device and
adjust the volume to confirm that the
Volume and Mute keys function as
expected.
To Join The Explorer eClub
The Explorer eClub is an online club that
provides news and information about the
Explorer DHCT and offers you a chance to
win prizes and other premium items.
To join the Explorer eClub, you must enter
the serial number of your DHCT. The
number is located on a label either on the
back panel or on the bottom of your DHCT
and begins with S/N. Write the serial number
here:_________________
You can access the Explorer eClub on the
Internet at the following Internet site:
www.scientificatlanta.com/explorerclub
2
VCR Setup Codes
TV Setup Codes
Enter all 4 digits to program the TV mode key.
Brand–Code
Admiral–1013, 1028
Aiko–1012
Akai–1005
Alaron–1022
American Action–
1023
Anam–1023
AOC–1003, 1005
Audiovox–1012,
1023, 1027, 1029
Baysonic–1023
Belcor–1003
Bell & Howell–1016
Bradford–1023
Brocksonic–1024,
1028
Brockwood–1003
Candle–1005, 1009
Carnivale–1005
Carver–1000
Celebrity–1001
Cineral–1012, 1027
Citizen–1005, 1009,
1010, 1012
Concerto–1009
Contec–1023
Craig–1023
Crosley–1000
Crown–1023
Curtis Mathes–1000,
1005, 1006, 1007,
1009, 1010, 1013,
1014, 1016, 1019,
1027, 1034, 1036
CXC–1023
Daewoo–1003, 1012,
1027, 1029, 1030
Daytron–1003
Denon–1014
Dumont–1002, 1003
Electroband–1001
Emerson–1003,
1016, 1021, 1022,
1023, 1024, 1026,
1028, 1029, 1030,
1005
Fisher–1016
Fujitsu–1022, 1032
Funai–1020, 1022,
1023
Futuretech–1023
GE–1004, 1006,
1007, 1013, 1021,
1026, 1027, 1034,
1036
Gibralter–1002,
1003, 1005
GoldStar–1003, 1005,
1009, 1021
Gradiente–1008,
1009
Grunpy–1022, 1023
Hallmark–1021
Harvard–1023
Harley Davison–1022
Harmon/Kardon–
1000
Hitachi–1009, 1014
Infinity–1000
Inteq–1002
JBL–1000
JCB–1001
JVC–1008, 1043
KEC–1023
Kenwood–1003,
1005
KTV–1005, 1023
LG–1009
Luxman–1009
LXI–1000, 1006,
1016, 1017, 1021
Magnavox–1000,
1005, 1022
Marantz–1000, 1005
Matsushita–1025
Megatron–1014,
1021
Memorex–1009,
1015, 1016, 1021,
1025, 1028
MGA–1003, 1005,
1015, 1021
Midland–1002, 1006,
1007
Minutz–1004
Mitsubishi–1003,
1013, 1015, 1021
Motorola–1013
MTC–1003, 1005,
1009, 1010
Multitech–1019,
1023
NAD–1017, 1021
NEC–1003, 1005,
1009
Nikko–1005, 1012,
1021
NTC–1012
Onwa–1023
Optimus–1016, 1019,
1025
Optonica–1013,
1018
Orion–1022, 1024,
1028
Panasonic–1007,
1025
Penney–1003, 1004,
1005, 1006, 1007,
1009, 1010, 1017,
1021, 1036
Philco–1000, 1003,
1005, 1014, 1028
Philips–1000
Pilot–1003, 1005
Pioneer–1019, 1031
Portland–1003, 1012
Prism–1007
Proscan–1006
Proton–1021
Pulsar–1002, 1003
Quasar–1007, 1018,
1025
Radio Shack–1003,
1005, 1006, 1009,
1016, 1018, 1021,
1023
RCA–1003, 1006,
1007, 1011, 1013,
1033, 1034, 1035,
1036, 1037, 1038
Realistic–1003, 1005,
1009, 1016, 1018,
1021, 1023
Runco–1002, 1005
Sampo–1005
Samsung–1003, 1005,
1009, 1010, 1021
Sansei–1027
Sansui–1028
Sanyo–1016
Scimitsu–1003
Scotch–1021
Scott–1003, 1021,
1022, 1023, 1024
Sears–1000, 1006,
1009, 1016, 1017,
1020, 1021, 1022
Semivox–1023
Semp–1017
Sharp–1013, 1018,
1031
Shogun–1003
Sony–1001, 1042
Sounddesign–1021,
1022, 1023
Squareview–1020
SSS–1003, 1023
Starlite–1023
Supreme–1001
Sylvania–1000, 1005
Symphonic–1020
Tandy–1013
Technics–1007, 1025
Technol Ace–1022
Techwood–1007,
1009
Teknika–1000, 1003,
1009, 1010, 1012,
1015, 1022, 1023
Telefunken–1009
Thomson DTC100–
1039
TMK–1009, 1021
Toshiba–1010, 1016,
1017, 1040, 1041
Vector Research–
1005
Victor–1008
Vidikron–1000
Vidtech–1003, 1021
Wards–1000, 1003,
1004, 1005, 1009,
1018, 1021, 1022
White-Westinghouse–
1028, 1029, 1030
Yamaha–1003, 1005
Zenith–1002, 1012,
1028
Enter all 4 digits to program the VCR mode key.
See Other VCR Codes if you want to program your VCR mode key to control another
device.
Brand–Code
Admiral–2013
Adventura–2001
Aiko–2026
Aiwa–2001, 2006,
2027
American High–2005
Asha–2024
Audiovox–2006
Beaumark–2024
Bell & Howell–2017
Brocksonic–2002,
2018, 2020, 2022,
2029
Calix–2006
Canon–2005
Carver–2000
CCE–2016, 2026
Cineral–2026
Citizen–2006, 2026
Colt–2016
Craig–2006, 2012,
2016, 2024, 2025
Curtis Mathes–2005,
2014, 2019
Cybernex–2024
Daewoo–2011, 2026
Denon–2009
Dynatech–2001
Electrohome–2006
Electrophonic–2006
Emerex–2004
Emerson–2001,
2002, 2006, 2010,
2018, 2020, 2021,
2022, 2026, 2029
Fisher–2012
Fuji–2005
Funai–2001
Garrard–2001
GE–2005, 2013,
2014, 2024
Go Video–2028, 2030
Gold Star–2007, 2006
Gradiente–2001,
2003
Harley Davison–2001
Harman Kardon–
2000, 2007
Harwood–2016
HI-Q–2012
Hitachi–2001, 2009
JVC–2003, 2015
KEC–2006, 2026
Kenwood–2007,
2015
KLH–2016
Kodak–2005, 2006
Lloyd’s–2001, 2021
Logik–2016
LXI–2006
Magnasonic–2026
Magnavox–2000,
2001, 2005, 2008
Magnin–2024
Marantz–2000, 2005
Marta–2006
Matsushita–2005,
2019
MEI–2005
Memorex–2001,
2005, 2006, 2008,
2011, 2012, 2013,
2017, 2019, 2024,
2027, 2033, 2036,
2037
MGA–2010, 2024
MGN-Tech–2024
Minolta–2009
Mitsubishi–2010,
2013, 2015
Motorola–2005,
2013
MTC–2001, 2024
Multitech–2001,
2016
NEC–2007, 2015,
2017
Nikko–2006
Noblex–2024
Olympus–2005
Optimus–2006, 2013,
2017, 2019, 2028,
2034, 2035
Orion–2002, 2020,
2029
Panasonic–2005,
2019, 2023, 2031
Penney–2005, 2006,
2007, 2009, 2024
Pentax–2009
Philco–2005, 2022,
2029
Philips–2000, 2005,
2032
Pilot–2006
Pioneer–2015
Profitronic–2024
Proscan–2014
Protec–2016
Pulsar–2008
Quarter–2011
Quartz–2011
Quasar–2005, 2019
Radio Shack–2001
Radix–2006
Randex–2006
RCA–2005, 2009,
2013, 2014, 2024
Realistic–2001, 2005,
2006, 2011, 2012,
2013, 2017
Runco–2008
Samsung–2011, 2024
Sanky–2008, 2013
Sansui–2001, 2025,
2029
Sanyo–2011, 2012,
2017, 2024
Scott–2010, 2011,
2018, 2020
Sears–2001, 2005,
2006, 2009, 2011,
2012, 2017
Semp–2011
Sharp–2013
Shintom–2016
Shogun–2024
Singer–2016
Sony–2001, 2004,
2005
STS–2009
Sylvania–2000, 2001,
2005, 2010
Symphonic–2001
Teac–2001
Technics–2005,
2006, 2019
Teknika–2001, 2005
Thomas–2001
Thomson CRK76–
2038
TMK–2021, 2024
Toshiba–2010, 2011
Totevision–2006
Unitech–2024
Vector Research–
2007
Victor–2011
Video Concepts–2011
Videosonic–2016,
2024
Wards–2000, 2001,
2005, 2012, 2013,
2024
White-Westinghouse–
2026
XR-1000–2001,
2005, 2016
Yamaha–2007
Zenith–2001, 2008
Setup codes for the
AUX and CBL mode
keys are located on
page 7 of this guide.
3
Other VCR Codes
Quick Reference
You can program your VCR mode key to
control a CD player, DVD, or PVR
device. Enter all 4 digits to program the
VCR mode key.
CD Codes
Brand–Code
Aiwa–2411
Burmeister–2419
California Audio
Lab–2403
Carver–2411, 2413
Denon–2401, 2426
DKK–2400
Emerson–2418
Fisher–2413
Garrard–2419
Genexxa–2404,
2418
Harman Kardon–
2411, 2412
Hitachi–2404
JVC–2408
Kenwood–2402,
2406, 2416,
2422, 2423
Krell–2411
Linn–2411
LXI–2418
Magnavox–2411,
2418
Marantz–2403,
2411, 2414
MCS–2403
Mission–2411
MTC–2419
Onkyo–2409, 2425
Optimus–2400,
2404, 2406,
2410, 2413,
2418, 2419, 2420
Panasonic–2403,
2417
Parasound–2419
Philips–2411
Pioneer–2404,
2418, 2420
Proton–2411
QED–2411
Quasar–2403
RCA–2407, 2413,
2418
Realistic–2413,
2414, 2419
Rotel–2411, 2419
SAE–2411
Sansui–2411, 2418
Sanyo–2413
Scott–2418
4
36
35
34
33
Sears–2418
Sharp–2406, 2414,
2424
Sherwood–2414
Sony–2400, 2421
Soundesign–2410
Tascam–2419
Teac–2414, 2419
Technics–2403
Victor–2408
Wards–2407, 2411
Yamaha–2405,
2415
31
29
PVR Codes
Brand–Code
5
4
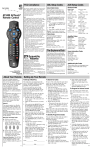
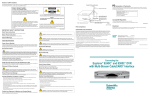
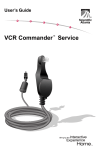
34
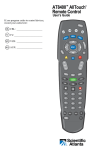
Displays the Applications
Menu
10
Displays a list of programs
that you have recorded,
allowing you to select one for
viewing
11
Displays live television
programming
22
4
Displays channel and
program information
5
Navigates through settings or
the program guide
32
Moves through selections
21
15
16
20
19
18
17
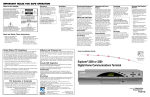
VCR/VOD Control
7
Selects and deselects
screen item
31
Displays the General
Settings or Quick settings
menus
13
Plays VCR/VOD
12
Fast forwards VCR/VOD
Exits settings, menus, and
guides
24
Stops VCR/VOD
23
Pauses VCR/VOD
Records program
6
Note: In VCR mode, these keys control
your VCR.
25
Rewinds VCR/VOD
30
Selects options in menus
and the program guide
14
Device Control
8
Selects channel, up or down
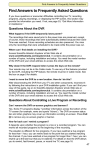
PIP Control
1
Powers on or off
28
Views favorite channels
35
AUX Mode Key
9
36
VCR Mode Key
Returns to last channel
viewed
2
TV Mode Key
22
3
Cable Mode Key
Enters channel numbers
(also enters your parental
control PIN)
T9857
Sound
27
Echostar–2040
Philips–2039
Replays the previous few
seconds of a program
9
10
11
12
13
14
24
23
29
26
8
28
27
26
25
Aiwa–2218
Harman Kardon–
2211
Hitachi–2217
JVC–2208, 2213,
2219
Kenwood–2206
Konka–2220, 2221
Magnavox–2201
Mitsubishi–2202
Onkyo–2201, 2214
Optimus–2204
Panasonic–2200,
2216, 2222
Philips–2201, 2228,
2230
Pioneer–2204, 2209
Proscan–2203
RCA–2203, 2232
Samsung–2210
Sany–2223
Sharp–2215
Shinco–2233
Sony–2205, 2224,
2225
Technics–2200
Toshiba–2201,
2229, 2226
Yamaha–2200,
2207
Zenith–2201, 2212,
2227
Displays the program guide
6
7
30
Brand–Code
PVR Control
33
5
32
DVD Codes
Viewing and Browsing Control
1
2
3
21
Reserved for future use
15
Reserved for future use
Adjusts volume
20
Opens or closes the PIP
window
19
Swaps the contents of the PIP
window and the main viewing
screen so that the PIP
window displays on the main
screen
16
Moves the PIP window to
another location on the
screen
17
Selects the channels in the
PIP window, up or down
18
Selects the video source
Mutes sound
6