1
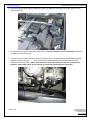
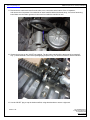
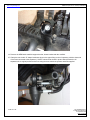
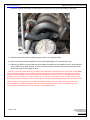
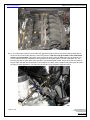
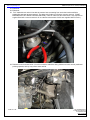
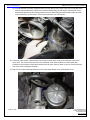
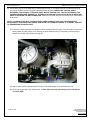
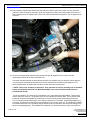
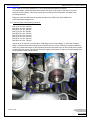
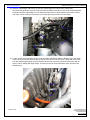
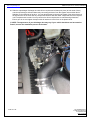
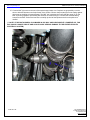
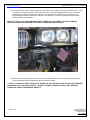
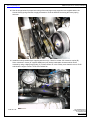
BMW E36 (‘96-’98 incl. ‘99 M3) US MODELS www.vf-engineering.com SUPERCHARGER (V3) INSTALLATION GUIDE FOR BMW E36 (‘96-’98 M52) (INCLUDING M3 ’99 S52) (VFK28-01, VFK38-01,VFK40-01) NOT CARB APPROVED NOT LEGAL FOR USE ON PUBLIC HIGHWAYS IN STATE OF CALIFORNIA. WARNING: DO NOT BEGIN INSTALLATION PRIOR TO READING THE PRE INSTALL NOTES ON PAGES 2-4 VF ENGINEERING www.vf-engineering.com M-F 9:00AM – 5:30PM (PST) 1365 N. Dynamics St. #E, Anaheim CA 92806 Phone: (714) 528-0066 Fax: (714) 528-0067 PAGE 1 of 28 P/N: VFM28/38/40-01 © 2006 VF Engineering All rights reserved Rev 1.10.25.06 www.vf-engineering.com BMW E36 (‘96-’98 incl. ‘99 M3) US MODELS IMPORTANT PRE-INSTALL NOTES: - SPECIAL INSTALL NOTES ***This installation guide serves as an outline of the steps needed to install your supercharger system and is not intended to guide a novice through the installation. If you do not have the proper tools, knowledge and experience to carry out the installation, please seek help from a professional. It is not VF-Engineering or its resellers’ responsibility to ensure that the installer successfully installs this kit or that the subject car runs optimally. It is the installers’ responsibility to install the product effectively and ensure its proper function and trouble shoot where necessary. Older model vehicles may require trouble shooting by the installer (not responsibility of VF-Engineering) of OEM vehicle ignition/mechanical components to ensure proper function. **VF-Engineering strongly recommends Bentley Publishers® service manual #B398 for this install** 1) THE INSTALLATION OF THIS KIT REQUIRES REPROGRAMMING (“FLASHING”) OF YOUR VEHICLES ECU BY VF-ENGINEERING. THIS REQUIRES THE ENGINE’S ECU TO BE SHIPPED TO VFENGINEERING. YOUR CAR WILL BE INOPERABLE WHILE THE ECU IS OUT OF THE VEHICLE. THIS FLASHING PROCESS USUALLY TAKES 2-3 BUSINESS DAYS PLUS TIME FOR RETURN SHIPPING. 2) INSTALLATION OF THIS KIT GREATLY INCREASES THE POWER OUTPUT OF YOUR STOCK VEHICLE. IT IS IMPERATIVE THAT THE CONDITION OF THE RECIPIENT VEHICLE BE THOROUGHLY INSPECTED PRIOR TO INSTALLATION, AND THAT BRAKES, TIRES, CLUTCH, ENGINE MOUNTS, AND SUSPENSION ARE UPGRADED TO HANDLE THE RATED POWER INCREASE. FAILURE TO DO SO MAY RESULT IN DAMAGE TO YOUR VEHICLE AND MAY LEAD TO INJURY AND POSSIBLE DEATH. THE USER AND INSTALLER ASSUME ALL RISKS ARISING FROM THE USE OF THIS PRODUCT. VF-ENGINEERING OR ITS EMPLOYEES ARE NOT RESPONSIBLE FOR ANY CONSEQUENTIAL LOSSES. THIS SUPERCHARGER SYSTEM IS INTENDED FOR USE ON HEALTHY, WELL MAINTAINED ENGINES. INSTALLATION ON WORN OUT OR DAMGAGED ENGINES IS NOT RECOMMENDED AND MAY RESULT IN DAMAGE TO THE ENGINE AND SUPERCHARGER. VF ENGINEERING IS NOT RESPONSIBLE FOR ENGINE DAMAGE. 3) INSTALLATION OF THIS PRODUCT INVOLVES REPLACING FUEL INJECTORS AND/OR THEIR ASSOCIATED ELECTRICAL CONNECTORS WITH NEW INJECTORS AND CONNECTORS SUPPLIED. BEFORE COMMENCING INSTALLATION ENSURE YOU HAVE TECHNICAL INFORMATION ON REPLACEMENT PROCESSES OR SEEK SKILLED / PROFESSIONAL ASSISTANCE. ***Installing high flow rate fuel injectors causes the dashboard instrument cluster fuel consumption and remaining mileage (TRIP) calculations to be incorrect. 4) PLEASE SEE ADDITIONAL PRE-INSTALL NOTES ON NEXT PAGE PAGE 2 of 28 P/N: VFM28/38/40-01 © 2006 VF Engineering All rights reserved Rev 1.10.25.06 www.vf-engineering.com BMW E36 (‘96-’98 incl. ‘99 M3) US MODELS ECU MODIFICATION REQUIRED **Please print out the ECU return form (see next page) and include in the package along with your ECU! This kit requires ECU modification known as “flashing” which is electronic overwriting of the original engine management software with new software designed for to work in conjunction with your system, and has been included in the price of your supercharger upgrade. This requires the ECU to be shipped directly to VF-Engineering for a serial flash of the VF supercharger software. The ECU modification can usually be turned around in 2-3 working days in most cases plus transit time. Any delay does not constitute grounds for product return. ECUs sent in without the “ECU Return Form” will not be processed. If you have a performance chip pre-installed you should return it to stock by having the ECU re-flashed at your BMW dealership prior to sending the ECU. If you do not do this, VF-Engineering flash the ECU to stock for a charge (1 unit of labor) – there is a risk of locking the ECU when performing this stock “bench” flash because the ECU is not connected to the car. VF-Engineering is not responsible for losses or costs incurred when ECU’s are locked. VF Engineering is not responsible for engine or ECU damage due to an improperly installed or mishandled ECU DEALER SERVICE / RETURN TO STOCK At some point you may take your supercharged car to your dealership for service. The supercharger software does not interfere with the OBD1/2 engine diagnostics system and remains fully serviceable. If you wish to return your vehicle back to stock, simply reinstall your OEM EPROM into your DME (for OBD1). OBD2 ECUs can be returned to stock condition by flashing them at the dealership or using certain aftermarket tools or contact VF-Engineering who can flash most ECUs to stock. or full performance and continued reliability, please heed the following recommendations: Use only premium grade fuel rated at 91 octane or higher (R+M/2) The compression ratio of the vehicle must be unaltered prior to the installation of this kit If your engine has been modified in any way, please contact VF Engineering prior to the installation of this product Upon completion of installation of product verify and or seek professional verification of safe engine operation eg AFR mixture at full throttle, ignition correction, belt alignment, engine cooling etc. Always listen for detonation (pinging) and discontinue hard use (full throttle) until problem is resolved Perform an oil filter and change upon completion of this installation and prior to the initial test drive. All subsequent oil changes should be at no later than 3,000 miles and high quality synthetic motor oil used. DO NOT ATTEMPT TO EXTEND THE OIL CHANGE INTERVAL REGARDLESS OF OIL MANUFACTURERS CLAIMS AS DAMGE TO THE SUPERCHAGRER MAY OCCUR Before beginning installation, replace all spark plugs that are older than 1 year or 10,000 miles with original heat range plugs as specified by the manufacturer and make sure stock timing settings are set. DO NOT USE PLATINUM SPARK PLUGS UNLESS THEY ARE ORIGINAL EQUIPMENT ON YOUR VEHICLE. CHANGE SPARK PLUGS EVERY 15,000-MILES AND SPARK PLUG WIRES AT LEAST EVERY 50,000-MILES. PAGE 3 of 28 P/N: VFM28/38/40-01 © 2006 VF Engineering All rights reserved Rev 1.10.25.06 BMW E36 (‘96-’98 incl. ‘99 M3) US MODELS www.vf-engineering.com ECU RETURN FORM <ECU_return_form_2012.xls> ** THIS FORM MUST BE COMPLETED BY THE VEHICLE OWNER ** This form should always be used when sending your ECU to VF-Engineering for software programming. ECUs sent to VF without this completed form will experience processing delays. VF does not cover the cost of ECU shipping or damage resulting from shipping. Please complete payment info below or call to provide payment for return shipping. ECUs may not be shipped if without payment info. Incomplete information on this form may result in delays. VF-Engineering ECU Software is for off road use only and is NOT approved for use on public highways in the State of California. ECU must be stock unless approved by VF tech dept. Contact [email protected] VF-Engineering supercharger kit invoice # Pre-owned product? (y/n) IMPORTANT NOTES: Date Ensure the ECU you are sending in, is a fully functioning ECU Customer full name from your car. Spare ECU's are not functional. Customer address Customer Phone Number Email Address If your ECU contains a physical replacement chip or flash from a 3rd party tuner, delays may occur. ECU's containing 3rd party soldered chips cannot be certain to function or communicate. Vehicle Make Vehicle Model Transmission (auto/Man) Ensure you do not send your transmission control (TCU) unit instead of the engine control unit (ECU). All ECU's should have Vehicle Year your name clearly written on it with a marker pen/sticker/ FULL VIN # business card. All ECUs should be adequately packaged to Supercharger serial # avoid damage in transit. ECU's should be insured for a Stage minimum of $120) for their replacement value. ECU is stock (y/n) If not please attach auth from VF Tech Dept. Card # initial here X initial here X initial here X initial here X initial here X Security code # Exp date I agree to VF-Engineering charging my credit card for payment of ECU return shipping I understand and acknowledge that the supercharger system and ECU software are not CARB approved I understand that there is no product warranty on used supercharger systems and purchasing software for a used product does not constitute or form a warranty contract and there is no implied hardware support for used product. I have read, understood and agree to the VF-Engineering, Supercharger Terms & Conditions and Product Warranty on the VF website or copy of, which is attached to this form in the Installation Manual provided with the Supercharger Kit prior to installation. I understand the pros and cons of modifying my vehicle and assume all risks and consequential costs. Signature I, the above signed agree to all the above terms and conditions. PAGE 4 of 28 Printed name & Date P/N: VFM28/38/40-01 © 2006 VF Engineering All rights reserved Rev 1.10.25.06 www.vf-engineering.com BMW E36 (‘96-’98 incl. ‘99 M3) US MODELS Preparation for the installation: During the installation process you will be handling some of the following items you may wish to replace while you are working on the vehicle, and therefore purchase before commencing the installation: Engine oil and oil filter Spark Plugs (VF-Engineering recommends the use of NGK Part# BKR7E on M3 models) Suggested gap 0.031” Engine Coolant You may wish to replace Engine Coolant Temp sensor – low cost. Air Conditioning belt Pre-cat Oxygen sensor(s) THIS MANUAL PROVIDES INFORMATION ON THE INSTALLATION, MAINTENCE, AND SERVICE OF THE VF ENGINEERING SUPERCHARGER KIT SPECIFICALLY DESIGNED FOR THE U.S. SPECIFICATION E36 BMW MODELS. THIS DOCUMENT MUST BE GIVEN TO THE END USER BY THE INSTALLER AND THE REGISTRATION FORM (LAST PAGE) MUST BE COMPLETED. PLEASE CONTACT VF ENGINEERING OR YOUR AUTHORIZED VF ENGINEERING DEALER FOR ANY ADDITIONAL INFORMATION REGARDING THE INSTALLATION OF THIS KIT. AN UNDERSTANDING OF THE INFORMATION CONTAINED IN THIS MANUAL WILL HELP NOVICES AS WELL AS EXPERIENCED TECHNICIANS. IF YOU BEGIN INSTALLING THIS PRODUCT, IT IS ASSUMED THAT YOU HAVE READ THE ACCOMPANYING TERMS AND CONDITIONS OF USE DOCUMENT AND PRODUCT WARRANTY DOCUMENT. ALL INFORMATION, ILLUSTRATIONS AND SPECIFICATIONS CONTAINED HERIN ARE BASED ON THE LATEST INFORMATION AVAILBALE AT THE TIME OF THIS PUBLICATION. ALL RIGHTS RESERVED TO MAKE CHANGES AT ANY TIME WITHOUT NOTICE. PAGE 5 of 28 P/N: VFM28/38/40-01 © 2006 VF Engineering All rights reserved Rev 1.10.25.06 www.vf-engineering.com BMW E36 (‘96-’98 incl. ‘99 M3) US MODELS INSTALLATION INSTRUCTIONS 1. Disconnect the ground terminal from the battery which is located in the trunk. 2. Locate and remove the Engine Control Unit (also known as the DME) from the vehicle by unscrewing the black cover (A) to reveal the DME itself. Disconnect the main harness connector by prying out the metal clip and gently lift the connector off the DME. (NOTE: Handle the harness with care, as on older cars, the wiring becomes hard and brittle and is a weak point). Then slide the DME outwards by hand. 3. Ship ECU to VF-Engineering for re-programming TOGETHER with the “ECU Return Form” found herein. Make sure ECU is securely packed when shipping. VF is not responsible for damage during shipping. ECU programming will be delayed if the ECU is returned without the ECU return form. Once the flash has been completed, ECU will be returned promptly if you have provided return shipping payment info. 4. Remove he coolant expansion tank cap and the raise car. Remove the under tray and drain engine coolant from drain plug at bottom corner of main radiator. PAGE 6 of 28 P/N: VFM28/38/40-01 © 2006 VF Engineering All rights reserved Rev 1.10.25.06 www.vf-engineering.com BMW E36 (‘96-’98 incl. ‘99 M3) US MODELS 5. Remove complete intake system: throttle body coupler (A), Mass Air Flow (MAF) sensor (B), airbox (C) and alternator duct (D). 6. Unscrew the fan coupler from the water pump pulley. (***Note the coupler is reverse threaded!) Remove the fan blade and store for later use. 7. Remove the upper radiator hose from engine (C). Remove the AC serpentine belt by de-tensioning its spring loaded tensioner at point (A). Next, remove the accessory serpentine belt by depressing its spring loaded tensioner at point (B). (**Note: Some tensioners have a hex which you can turn to depress the tensioner, others may require you to depress by torqing the bolt through the actual idler.) PAGE 7 of 28 P/N: VFM28/38/40-01 © 2006 VF Engineering All rights reserved Rev 1.10.25.06 www.vf-engineering.com BMW E36 (‘96-’98 incl. ‘99 M3) US MODELS 8. Remove front bumper by unscrewing 2 torx bolts through front lower grill. Remove all screws from the wheel well liners on the sides of the bumper. Disconnect the horns and fog lights (if applicable). Working at the front of wheel wells, remove the left and right inner panel fasteners. Slide bumper forward to remove. If equipped with headlight washers or parking distance control (PDC), disconnect their connections to the bumper in prior. Remove the air duct from front core support to airbox. 9. Step 9 removed as kit was updated from V2 (oil fed) supercharger to V3 (self-lubricated unit) 10. Disconnect fuel injector electrical connections. Disconnect intake temp sensor found between intake runner #3 and #4. Unhook both O2 sensor electrical connector blocks and remove their clips from the fuel rail. Unclip each of the 6 fuel injector electrical connections from the wiring harness housing rail and set the wiring harness rail to the side. WARNING: USE APPROPRIATE SAFETY PRECAUTIONS: Bleed any remaining fuel pressure using the Schrader Valve on the front of the fuel rail. Unbolt the fuel rail and set aside for later instruction. (***NOTE: Wear eye protection and work in a well ventilated area when working with fuel equipment!) PAGE 8 of 28 P/N: VFM28/38/40-01 © 2006 VF Engineering All rights reserved Rev 1.10.25.06 www.vf-engineering.com BMW E36 (‘96-’98 incl. ‘99 M3) US MODELS 11. Disconnect the crankcase hoses from the valve cover, connection at the bottom of the oil separator, and remove the oil separator from underside of intake manifold behind the throttle body, via its three anchoring bolts. Make sure the rubber grommet is removed from inside the manifold as well. 12. Grease the grooves on the 3/8 NPT tap supplied. Tap the intake manifold till the tap thread is just past half way. (**Note: Manifold is removed for photography purposes only) You should not need to remove manifold. 13. Use the 3/8 NPT plug to cap the intake manifold, using thread sealant to ensure a tight seal. PAGE 9 of 28 P/N: VFM28/38/40-01 © 2006 VF Engineering All rights reserved Rev 1.10.25.06 www.vf-engineering.com BMW E36 (‘96-’98 incl. ‘99 M3) US MODELS 14. Remove the OEM intake manifold support bracket, located underneath the manifold. 15. Clamp the new double ‘S’ shaped crankcase hose to the upper fitting on the oil separator, with the short side of the hose connected to the separator.(***NOTE: shorter hose shown in picture below) Return the oil separator unit to original position and secure using the three aluminum spacers and bolts supplied. PAGE 10 of 28 P/N: VFM28/38/40-01 © 2006 VF Engineering All rights reserved Rev 1.10.25.06 www.vf-engineering.com BMW E36 (‘96-’98 incl. ‘99 M3) US MODELS 16. Clamp the original crankcase vent hose back onto the lower connection of the oil separator. The upper crankcase (S) hose will continue on and connect to a port on the side of the supercharger intake pipe. 17. Install the replacement intake manifold support bracket in the original location. 18. Step 18 removed as kit was updated from V2 (oil fed) supercharger to V3 (self-lubricated unit) 19. Replace your OEM fuel injectors with the direct replacement high flow units supplied in the kit. (See important notes in RED below). When finished, be sure to refit all electrical connections fully and accurately and reuse the anchoring points for any plugs or wires. ***NOTE If you are uncertain about this procedure seek professional assistance and do not proceed. Follow BMW factory workshop guidelines or use official workshop technical manual for instructions on changing fuel injectors. Always ensure the battery is disconnected, proper air ventilation is provided and you are not working near naked ignition sources. Fuel vapor can cause nausea, loss of consciousness and lead to injury or death. Fuels and oils and coolant contain carcinogens (cancer causing agents). Always handle with proper equipment and clean up after. When working on fuel systems you must follow all health and safety rules and laws set out by the relevant or equivalent Bureau of Automotive Repair and Government Legislation in your country. VF-Engineering is not responsible for incorrectly fitted fuel components or consequential losses. PAGE 11 of 28 P/N: VFM28/38/40-01 © 2006 VF Engineering All rights reserved Rev 1.10.25.06 www.vf-engineering.com BMW E36 (‘96-’98 incl. ‘99 M3) US MODELS 20. Fit ¼” barbed check valve (A) in-line with EVAP (B) solenoid valve vacuum line. Ensure that the white side of the check valve is facing the direction of the EVAP solenoid. This valve may be located on the d/side frame rail area on some models. This check valve is a back up valve in case the OEM valve fails. Its purpose is to prevent manifold pressure travelling the wrong direction in the EVAP system (fuel tank ventilation). You can blow into the valve to verify which way it operates. You should be able to blow into the white side only which is why the black side will face the direction of the manifold. Our check valve is supplied with silicon hose to assist for fitting on other applications. You may need to remove it for your specific application (S52). PAGE 12 of 28 P/N: VFM28/38/40-01 © 2006 VF Engineering All rights reserved Rev 1.10.25.06 www.vf-engineering.com BMW E36 (‘96-’98 incl. ‘99 M3) US MODELS 21 Edited out. 22 Edited out. 23 Fit ⅛” barbed check valve in line with the vacuum hose connecting from under the intake manifold to exhaust flap actuator vacuum reservoir. The white side of valve is to face the vacuum reservoir. SOME ENGINES WILL NOT HAVE THIS VACUUM LINE.(***NOTE: Fitment of this check valve is only required on engines fitted with a vacuum reservoir for an exhaust valve actuator. All kits are supplied with this valve.) 24 Relocate horns as shown below. You will not need to extend the wiring. Make sure horns are not positioned pointing upwards, as they may collect water and fail. PAGE 13 of 28 P/N: VFM28/38/40-01 © 2006 VF Engineering All rights reserved Rev 1.10.25.06 www.vf-engineering.com BMW E36 (‘96-’98 incl. ‘99 M3) US MODELS 25 A small diameter crankcase ventilation hose runs from the top of the valve cover to the underside of the traction control throttle body. Disconnect it from the throttle body (A) and cap the exposed port on the throttle body with the cap and clamp provided in the kit. When fitting the supercharger intake duct later in the instructions, you will need to cut this crankcase hose vent a bit shorter. 26 Take note of the location of the vacuum line running from the same outlet as the crankcase vent on the valve cover. This vacuum line connects to the underside of the intake manifold. Cut the line half way between its two connection points and insert the second check valve provided in your kit. Ensure the black side of the valve is facing the manifold. 27 Step 27 removed as kit was updated from V2 (oil fed) supercharger to V3 (self-lubricated unit) PAGE 14 of 28 P/N: VFM28/38/40-01 © 2006 VF Engineering All rights reserved Rev 1.10.25.06 www.vf-engineering.com BMW E36 (‘96-’98 incl. ‘99 M3) US MODELS 25 Cut the MAF plug off of the OEM wiring, leaving approximately 3” of original wiring left connected to the plug, and extend the MAF harness using the extension harness provided. MAKE SURE YOU ARE SIMPLY EXTENDING THE HARNESS. IF COLORS DON’T MATCH, ENSURE THAT YOU ARE EXTENDING THE CORRESPONDING WIRE CORRECTLY. THE RESISTOR SHOULD BE INSTALLED INLINE IN WIRE THAT GOES TO PIN #2 ON THE MAF CONNECTOR. Make sure the other wires have consistent color combinations at each end. NOTE: IT IS IMPERATIVE THAT THIS RESISTOR IS USED CORRECTLY OR ELSE THE ENGINE WILL EXPERIENCE A LEAN CONDITION AND BE SUBJECTED TO POSSIBLE DAMAGE. IF IN DOUBT, CONTACT VF-ENGINEERING TECHNICAL DEPT. 28 Remove the upper alternator bolt (A) along with the attached idler pulley (B). This bolt is later reused in the same position, the idler pulley is not. Remove the lower alternator bolt (C) completely. Remove bolt (D) attached to the side of the oil filter housing (E). 29 Step 31 removed as kit was updated from V2 (oil fed) supercharger to V3 (self-lubricated unit) 30 Verify that support brace (C) rotates freely.. (**Note: bolts securing supercharger unit to bracket are only hand tight) PAGE 15 of 28 P/N: VFM28/38/40-01 © 2006 VF Engineering All rights reserved Rev 1.10.25.06 www.vf-engineering.com BMW E36 (‘96-’98 incl. ‘99 M3) US MODELS 31 Hold complete supercharger and bracket assembly and carefully lower into position over the alternator pulley (A). While lowering the assembly, guide the support brace (B) to the vacated bolting hole in the oil filter housing and secure together with a few turns of the new M8x120 bolt supplied. (Do not tighten down any bolts 32 Re-use the original upper alternator bolt (A) with new idler (B) supplied in the kit and mount the supercharger bracket to the upper alternator hole. Use either new M10x160 bolt or M10x180 bolt and M10 nut supplied (see note below to choose which to use), through the supercharger bracket into the lower alternator hole simultaneously fitting the 0.710” spacer between back of bracket and front face of lower alternator mounting hole. (**NOTE: There are 2 variations in alternators. If the alternator rear lower mounting hole is threaded simply use M10x160, otherwise use M10x180 and M10 nut to secure. Both hardware sizes are provided with all kits.) V3 service schedule. The Vortech V3 supercharger unit is a self-lubricated supercharger. This means it has an internal oil reservoir. The purpose of the oil is to lubricate the internal gears. The oil used a blend created by Vortech and available for purchase from Vortech directly at www.vortechengineering.com The V3 unit has several brass fittings, one of which is intended for a “breather” (brass fitting supplied in a clear bag). This fitting is to replace the brass “shipping” plug at the top of the unit. The shipping plug MUST be removed before the unit is operated (engine turned on) as it is intended to prevent the oil leaking out of the unit during shipping only. The breather which replaces it, is intended to allow oil vapor and residue to PAGE 16 of 28 P/N: VFM28/38/40-01 © 2006 VF Engineering All rights reserved Rev 1.10.25.06 www.vf-engineering.com BMW E36 (‘96-’98 incl. ‘99 M3) US MODELS escape from the unit when it gets hot. The brass fitting next this, is a dipstick and when unscrewed you will find a “hatched” level stick attached to it. The oil level should be within the hatching. The supercharger unit has a braided steel oil drain line which is only used to drain the oil out at the following service intervals. This oil line should zip tied aside free from obstruction at all other times. Oil change intervals. Replace oil after first 2500 miles of operation and then every 7500 miles. Oil available from www.vortechsuperchargers.com 33 Torque the bolts in the following sequence: Bolt (C) to 32 ft. lbs. (42 Nm). Bolt (A) to 32 ft. lbs. (42 Nm). Bolt (D) to 18 ft. lbs. (24 Nm). Bolt (L) to 15 ft. lbs. (20 Nm) Bolt (E) to 25 ft. lbs. (33 Nm). Bolt (F) to 25 ft. lbs. (33 Nm). Bolt (G) to 25 ft. lbs. (33 Nm). Bolt (H) to 18 ft. lbs. (24 Nm). Bolt (K) to 25 ft. lbs. (33 Nm) Attach end of oil feed line (J) to 90 degree -4 AN fitting on top of supercharger. (***Note: the 90 degree fitting is screwed into the supercharger brass oil feed nozzle. Do not use Teflon tape or paste sealants as these may contaminate engine oil and eventually work there way back to the oil feed nozzle which contains a metal mesh filter screen. If this screen becomes clogged it can restrict oil supply to the supercharger and cause premature supercharger failure.) PAGE 17 of 28 P/N: VFM28/38/40-01 © 2006 VF Engineering All rights reserved Rev 1.10.25.06 www.vf-engineering.com BMW E36 (‘96-’98 incl. ‘99 M3) US MODELS 34 Slide the supercharger intake duct (A) onto the supercharger inlet and leave the clamp loose. Simultaneously guide the long end of the hose from the bypass valve (B), as well as the complete bypass assembly under the supercharger and up-toward the open spout on the underside of the intake duct (A) and clamp. Guide crankcase vent hose (C) onto open spout (D) on intake duct and clamp. 35 Locate vacuum line (A) which runs from under the intake manifold beneath the throttle body to the nipple on the end of the fuel rail closest to the fire wall. Cut the vacuum line and insert T fitting with vacuum line from the supercharger bypass valve (B). Ensure vacuum line is securely connected to the valve with no kinks or risk of chaffing with sharp edges. This vacuum line can be zip-tied aside. Kinks will cause part throttle issues. PAGE 18 of 28 P/N: VFM28/38/40-01 © 2006 VF Engineering All rights reserved Rev 1.10.25.06 www.vf-engineering.com BMW E36 (‘96-’98 incl. ‘99 M3) US MODELS 36 Slide the supercharger discharge duct with silicon couplers and all clamps in place (at both ends of duct) onto the supercharger while simultaneously connecting the hoses from the bypass valve and the Idle Air Stabilizer to the underside of the duct. You can adjust fitment by trimming the length of the rubber hoses on the bypass valve in the even that any components interfere with each other. Adjust and secure all couplers until a complete seal is made. You may need to trim silicon couplers due to manufacturing tolerances. Ensure you do not over tighten clamps or this will assert too much force on the plastic ducts. (***NOTE: The appearance of your discharge duct may vary if your vehicle does/does not have traction control, however the installation process is the same. PAGE 19 of 28 P/N: VFM28/38/40-01 © 2006 VF Engineering All rights reserved Rev 1.10.25.06 www.vf-engineering.com BMW E36 (‘96-’98 incl. ‘99 M3) US MODELS 37 Connect MAF (A) sensor to the end of the supercharger intake duct. Couplers are purposefully cut to be short to aid with clearances and help fitment of the air filter. Ensure clamp heads (B) are not resting against other parts as chaffing will cause damage. The MAF unit is directional so verify that the arrow (C) on the MAF is pointing upwards, representing the direction air travels through it. Connect the extended wiring harness to the MAF. Ensure the harness is carefully zip-tied to fixed points and will not be pinched or chaffed. (***NOTE: IF THE MAF HARNESS IS DAMAGED IN ANY WAY AND SUBESQUENTLY POWERED UP, THIS MAY CAUSE A SHORT CIRCUIT AND COULD CAUSE SERIOUS DAMAGE TO THE ENTIRE VEHICLES ELECTRICAL SYSTEM.) PAGE 20 of 28 P/N: VFM28/38/40-01 © 2006 VF Engineering All rights reserved Rev 1.10.25.06 www.vf-engineering.com BMW E36 (‘96-’98 incl. ‘99 M3) US MODELS 38 Use the 45 degree silicon elbow fitting to join the air filter to the coupler on the end of the MAF sensor. Your kit contains a cylindrical airbox for the air filter, but due to variations in BMW production, the air box may need trimming to allow for variations in fog lights. The airbox can be removed for dry climates, but VFEngineering recommends utilizing the airbox in most conditions. The brake cooler ducts may also need trimming to allow air to the filter NOTE: IT IS VITAL THAT THE AIRBOX BE USED IF THERE IS ANY POSSIBILTY OF THE CAR BEING DRIVEN IN OR NEAR WATER (RAIN OR FLOOD) OR EXCESSIVE DIRT OR SAND. 39 Some bumpers have a grill plate you will need to trim allowing fresh air to enter through the front bumper into the otherwise sealed compartment where the air filter resides. (***NOTE: IT IS CRUCIAL THAT THIS DUCT IS OPENED UP AND THE FRONT VENT IN THE FRONT BUMPER IS REMOVED TO ALLOW AIR TO ENTER. FAILURE TO OPEN UP THESE AIR PATHS WILL RESTRICT POWER AND THROTTLE RESPONSE GREATLY. PAGE 21 of 28 P/N: VFM28/38/40-01 © 2006 VF Engineering All rights reserved Rev 1.10.25.06 www.vf-engineering.com BMW E36 (‘96-’98 incl. ‘99 M3) US MODELS 40 See the image below for proper belt routing of the new longer main serpentine belt supplied with the kit. Use the factory spring tensioner to apply belt tension. Re-fit the OEM AC belt using the factory spring tensioner. 41 Install the new top radiator hose supplied with the kit (A). Check for at least 3/8” clearance at point (B). Some variations in hoses (VF supplies OEM hose) may lead to inadequate clearance which can be resolved by using a slightly large pulley (C). Please contact VF in the unlikely event that this occurs. Re-fill and bleed the engine coolant. Re-fit main radiator fan. PAGE 22 of 28 P/N: VFM28/38/40-01 © 2006 VF Engineering All rights reserved Rev 1.10.25.06 www.vf-engineering.com BMW E36 (‘96-’98 incl. ‘99 M3) US MODELS 42 Check over your installation and follow instructions from the beginning to check for thoroughness. Reconnect battery and start the car. Verify there are no fuel leaks from the injectors and check all oil line connections at both ends. Check under car and verify all work. Once certain all systems are verified you can re-install the front bumper, and engine cover,. VF suggests you inspect the installation and check that no parts are chaffing after 10-20 miles. PAGE 23 of 28 P/N: VFM28/38/40-01 © 2006 VF Engineering All rights reserved Rev 1.10.25.06 www.vf-engineering.com BMW E36 (‘96-’98 incl. ‘99 M3) US MODELS PREVENTITIVE MEASURES Change spark plugs to 1 range cooler for extreme driving and hot climates. Supercharger oil must be replaced at 2500 miles from install and then every 7500 miles. You can purchase the oil from www.vortechengineering.com Change engine coolant temp senor whilst installing the supercharger kit (often a cause of fuelling issues on cars of any age). When disconnecting OEM electrical connectors, label them to avoid potential confusion when re-assembling. TROUBLE SHOOTING & MAINTENANCE TIPS AFTER INSTALLING SUPERCHARGER KITS Injector wiring on older cars can be brittle –check for proper connection Contact pins inside injector electrical connectors can bend back if the connector is ever mis-fitted and lead to intermittent connection and cylinder misfire. Loose crankcase vent tube is considered a vacuum leak and will cause poor fuel trimming. Loose crankcase vent tube to oil separator is a common cause of vacuum leak. Vacuum leak at hoses around silicon couplers may not be visible but is a simple mistake. Weak OEM crankcase vent tube (Melts with age) will cause vacuum leak. Clean crankcase vent tube and inside of supercharger intake duct every 20K miles and inspect for leaks and kinks and possibly replace. SYMPTOMS AND POSSIBLE CAUSES Hunting idle – major vacuum leak – check silicon couplers especially on throttle body and idle stabilizer. Smell of fuel – incorrectly fitted fuel injectors. Misfiring – bad electrical connections to fuel injectors or spark plugs Overheating – air lock in coolant system Very erratic idle – verify Mass Air Flow sensor may be fitted oriented in incorrect direction MAF signal CEL – check wiring harness extension and electrical continuity in extension harness ***Please read VF product warranty and maintenance/terms of use documents before using this product.*** PAGE 24 of 28 P/N: VFM28/38/40-01 © 2006 VF Engineering All rights reserved Rev 1.10.25.06 www.vf-engineering.com BMW E36 (‘96-’98 incl. ‘99 M3) US MODELS VF-ENGINEERING SUPERCHARGER KIT LIMITED WARRANTY Subject to all the terms, conditions and exclusions set forth in this document, Zurich Engineering, Inc. (“VF-Engineering”) provides the following warranties to the original purchaser of certain VFEngineering products. For reference purposes, “you” and “your” mean only the original purchaser of the warranted VF-Engineering product. YOU MUST ALSO READ OWNERS MANUAL. 1. 2. i. ii. iii. iv. v. vi. vii. viii. ix. x. xi. xii. xiii. xiv. xv. xvi. xvii. xviii. xix. xx. xxi. xxii. xxiii. xxiv. xxv. The supercharger unit refers to the Vortech Supercharger V-Series unit manufactured by Vortech Engineering Inc. If you complete and return the Warranty Registration Form along with a copy of Your original receipt within thirty days of Your purchase of a VF-Engineering supercharger kit, VF-Engineering warrants to you that the V-1, V-2, V-3, V-5 and V-9 supercharger in the kit will be free from defects in materials and/or workmanship in accordance with the Vortech Engineering, Inc. Warranties Program effective March 1, 2000. The balance of the kit will be free from defects in materials and/or workmanship for one-year/90 days as specified in sections (4), (5) from the date of your purchase of the kit. If you do not return the Warranty Registration Form and proof of purchase within thirty days then VF-Engineering warrants that the supercharger in the kit will be free from defects in materials and/or workmanship for a maximum of one year from the date of purchase of your kit. 3. REQUIREMENTS AND EXCLUSIONS: You must be the original purchaser. The supercharger must NOT be modified, disassembled, tampered in any way. The supercharger drive pulley must not be changed and the original pulley seal must remain intact. The original Vortech serial number tag must not be removed, altered or replaced. You must change the engine oil and oil filter at least every 3000 miles using a SH rated oil or synthetic lubricant, regardless of the vehicle, filter or oil manufacturers recommendations of oil change intervals. You must remove, inspect, and clean the oil inlet fitting (oil feed nozzle) to the supercharger every 3000 miles. The conversion must be allowed to ‘break in’ for a period of 300 miles and inspected as per maintenance instructions. The main serpentine belt must not be excessively tensioned see belt tensioning instructions. The Supercharger Kit must be maintained according to the minimum service requirements as listed under the maintenance schedule. Acts of God, normal wear and tear, rust damage, damage to vehicle or engine caused by backfire, engine failure, accident, or collision. Improper installation, not following installation instructions provided, or installation by an unskilled person. Over-speeding the supercharger by any method including under-drive accessory pulleys or larger crank pulley. Damage resulting from entry of foreign particles. If the supercharged car is driven after an uncorrected fault has been detected. Any faults/irregularities are not advised to your vendor. 4. ONE YEAR LIMITED WARRANTY ON VF-ENGINEERING SUPERCHARGER KIT ANCILLARIES AS BELOW: Mounting brackets and hardware Supercharger drive pullies and components. Idler pullies. Air inlet and discharge systems. Air valves GIAC software 5. NINETY DAY LIMITED WARRANTY ON VF-ENGINEERING SUPERCHARGER KIT CONSUMABLES AS BELOW: Air filters. Oil feed and oil drain components. Serpentine belts. Injectors, regulators and fuel components WARRANTY COVERAGE FOR THE SUPERCHARGER KIT IS EXCLUDED BUT NOT LIMITED TO THE FOLLOWING CONDITIONS: 6. VF-Engineering does not provide any warranty to You for damages to and/or failure of any non-VF-Engineering component or equipment on a vehicle, including but not limited to the engine, electrical systems, transmission and differentials; 7. The warranties do not protect You from Acts of God, normal wear and tear, or damage to a vehicle or engine caused by backfire, collision and or engine failure; 8. These warranties do not cover any costs incurred for towing or downtime of the vehicle, any labor costs to diagnose problems, to remove or replace the VF-Engineering products, or any damage caused by the use of another company's fittings or pullies. 9. The following non-VF-Engineering occurrences, uses and modifications are considered misuse of the VF-Engineering product and invalidate all Your VF-Engineering Warranties, including but not limited to: xxvi. Any disassembly or attempted disassembly of any VF-Engineering assembled parts; xxvii. Any disassembly or attempted disassembly of the supercharger, volute, gearcase or other components; xxviii. Damage resulting from ingestion of debris by the supercharger; xxix. Improper supercharger installation. xxx. Improper drive pulley/belt combination on supercharger; xxxi. Excess belt tension on the supercharger belt drive; xxxii. Over-speeding the supercharger by any method including under-drive accessory pulleys or larger crank pulley. xxxiii. Restricted or blocked supercharger air intake resulting in excessive negative pressure at the air inlet; xxxiv. Free revving of the engine with the drive belt driving the supercharger in place; xxxv. Incomplete fitment of all the parts supplied in the VF-Engineering kit. xxxvi. Restricted or lack of oil supply to the supercharger (V2 units); xxxvii. Improper installation of, or blocked or restricted oil drain line (V2 unit); xxxviii. Excessive engine crankcase pressures; xxxix. Dirty or contaminated engine oil; PAGE 25 of 28 P/N: VFM28/38/40-01 © 2006 VF Engineering All rights reserved Rev 1.10.25.06 www.vf-engineering.com BMW E36 (‘96-’98 incl. ‘99 M3) US MODELS xl. Removing or defacing the original Vortech serial number tag; xli. Improper installation, not following installation instructions provided, or installation by an unskilled person; xlii. If the supercharged car is driven after an uncorrected fault has been detected; or xliii. Any faults/irregular noises are not advised to your vendor. 10. Power increases with Zurich Engineering, Inc. Supercharger Kits are based on unmodified engines and quoted from results obtained from dynamometer tests using the Dynojet 248C & 224XLC and no guarantee is given that every car will achieve the same results as pre-existing conditions may affect results. EXTENT OF WARRANTY- ADDITIONAL EXCLUSIONS AND LIMITATIONS 11. The duration of any and all warranties is limited to the duration of this express warranty. All incidental and consequential damages are hereby excluded. Some US states do not allow limitations on how long an implied warranty lasts, or exclusion or limitations of incidental or consequential damages, so the above limitations or exclusions may not apply to you. This warranty gives you specific legal rights, and you may have other rights that vary from state to state (USA) only. 12. No warranties of merchantability of fitness for particular purpose, or affirmation of fact, of the warranty, expressed or implied, other than any available manufacturer’s warranties are extended or granted by VF-Engineering. DISCLAIMER 13. Motor racing is extremely hazardous, and death may occur. VF-Engineering products have no warranty or representations made with ability to protect against injury or death. Motor racing, aggressive driving, including driving for any period of time at full throttle, and car modifications of any kind that facilitate aggressive driving may reduce the useful life of the car and or any of its wearable parts. Improving the performance of an engine by altering the engine’s computer software may cause the engine to “work harder” and could result in damage to the car. The user assumes these risks. REMEDIES 14. Your sole remedy for the above warranties is the repair or replacement of the defective product only, at VF-Engineering’s discretion. xliv. xlv. xlvi. xlvii. xlviii. xlix. l. li. lii. liii. liv. lv. lvi. lvii. lviii. 15. WARRANTY CLAIM PROCEDURE If a VF-Engineering product is within the warranty period and You wish to make a claim, please follow the procedure as follows: Contact VF-Engineering on (+1)714-528-0066 asking for the service department and have the following information available: Supercharger serial number Copy of original invoice on which the product was purchased (must be dated and show retail store name); Year, make, model, vehicle mileage, and engine specifications of the vehicle; Number of miles on the VF-Engineering product; and Perceived problem 16. VF-Engineering will then offer suggestions to help you in troubleshooting or will issue a return authorization (R.A.) number to return the product for warranty evaluation; 17. If you have been issued an R.A. number, you must “safety package” each product, which means You must place the product(s) within a shipping box strong enough to hold the weight of the product(s) and to maintain its shape during shipping with adequate packing material so that the product(s) will not hit other product(s), component(s), or the side of the box during shipping. You want to use a professional company. Clearly mark the R.A. number in large (approximately 2”) alphanumeric characters in two locations on the outside of the box with a bold marker. Returned items in transit remain the responsibility until signed for by a member of VFEngineering shipping dept. 18. INCLUDE IN THE SHIPPING BOX THE FOLLOWING ITEMS: Serial number if applicable; Copy of original invoice on which the product was purchased (must be dated and show retail store name); Year, make, model, vehicle mileage, and engine specifications of the vehicle; Number of miles on the VF-Engineering product; and Perceived problem A copy of the original Three Year Warranty Registration, if applicable; Return authorization number; and Address to which the product is to be shipped after inspection. 19. Ship the properly safety packaged and marked box via UPS or other carrier, prepaid and insured for the retail value of the product being returned to: VF-Engineering Service department 1365 North Dynamics Street, Suite E. Anaheim, CA 92806 USA R.A. number____________ 20. If a VF-Engineering warranty applies, Your product will be repaired or replaced at VF-Engineering’s option and returned to you, freight prepaid excluding any international shipping, taxes, tariffs, customs and/or duties, etc which must be paid by You), via UPS/Fedex/DHL ground service. If a VF-Engineering Limited Warranty does not apply, we will advise you of the specific reason for denial and explain to you the costs involved in repair or replacement of your product. After relaying this information we will, at your option, either proceed with the repairs as quoted or return your products(s) to you in the condition it/they are in at the time of inspection of the warranty evaluation by VF-Engineering. Timing is not of the essence in delivery or turn around. If the warranty does not apply and you do not want VF-Engineering to repair or replace your product, you will be charged the disassembly and inspection charges for the product and return shipping with insurance by means of UPS COD. 21. This warranty cannot be amended orally or in writing by any VF-Engineering employee, representative or agent, and any promises inconsistent with this warranty are void and unenforceable against VF-Engineering. PAGE 26 of 28 P/N: VFM28/38/40-01 © 2006 VF Engineering All rights reserved Rev 1.10.25.06 www.vf-engineering.com BMW E36 (‘96-’98 incl. ‘99 M3) US MODELS VF-ENGINEERING SUPERCHARGER KIT OWNERS MANUAL The following information and recommendations are designed to promote years of trouble free service for your supercharger. Care recommendations have also been outlined for your vehicle and maintenance of your supercharger kit. MAINTENANCE INSTRUCTIONS FOR THE SUPERCHARGER KIT and SUPERCHARGER UNIT Caring for your kit (mandatory procedures) 1. After fitting, the new supercharger kit should be allowed to bed in for a run-in period of 300 miles during which the engine should not be driven over 4500 rpm. 2. The supercharger kit should be routinely inspected and maintained as below: ii. Air filters – Use the air filter system provided in your VF-Engineering system. iii. Air Intake / Air Discharge – Must be in good condition and properly secured. If equipped with flex hose, this must be Free of damage / leaks. iv. Belt Tension – Excessive belt tension can lead to supercharger or crankshaft bearing failure. Do not use a non-slipping or cog-type belt on a supercharger designed to be driven with a serpentine belt. Replacement belts for your application, are available from VF-Engineering. v. Air Assist – The air assist system on certain Vortech superchargers must be kept free from kinks and leaks. Spare parts are available from VF-Engineering. 3. Computer Chips – Use the computer chip or serial flash provided by VF-Engineering for this supercharger system. The use of an aftermarket chip is not recommended as they would not be calibrated for use with a supercharger and can cause detonation. VF Engineering supplies a computer chip or serial flash with each kit that is specifically developed and calibrated to maximize performance. 4. Crankcase Ventilation System – You must use the system provided in your VF-Engineering kit to prevent excessive crank case pressures and possible engine damage. We recommend you clean or replace this every 6000 miles. 5. Pullies – If your supercharger drive belt comes off it may be due to misalignment of the supercharger pulley cause by installation issues or movement of the mounting plate. Misalignment can also be caused by over-tightening (and failure) of the supercharger belt. For years of trouble free operation when used for street applications, we recommend the drive ratios not be changed from the standard specification. 6. In case of recurring miss-firing or detonation / pinging you should contact your vendor. By following these procedures you will ensure long term durability and reliability from your conversion. 7. The Supercharger oil must be replaced at 2500 miles and then at every 7500 mile intervals. The oil can be purchased from www.vortechengineering.com 8. Do not use engine oil additives as they may contain solid particulates which can clog the supercharger feed line. i. ii. iii. iv. v. vi. MAINTENANCE OF YOUR SUPERCHARGED VEHICLE 9. Before supercharging your vehicle we recommend you service and inspect your vehicle. Ideally the fault codes should be reset. This would highlight any existing conditions that may need attention. The condition of consumables, such as oil, filters, spark plugs, HT (plug wires) leads, ignition coil, and air mass sensor should be inspected and replaced where needed. 10. Never operate your engine at full throttle when the engine is cold. When starting the engine each day, always allow plenty of time for the oil to reach full operating temperature before running above 2500 RPM. Full operating temperature is generally achieved only after the engine water temperature has reached the ‘normal’ indicated operating range for 2-3 minutes. 11. Always utilize the highest octane super (premium) unleaded fuel available in your area. Where possible try to use the same brand of fuel. Where possible do not use fuels sold at low cost service stations and preferably use national brands whenever possible. 12. After filling up with fuel from a source other than the one you use regularly, carefully listen for engine detonation. If any detonation is audible, you may have a fuel problem. Cease utilizing heavy-throttle and drive with greater care until the fuel is consumed. If detonation is still evident, inspect for other causes such as: Faulty fuel pump(s). Check fuel pressure when detonation is occurring. Dirty injector(s), clogged fuel filter or pinched fuel line. Faulty spark plug(s) or spark plug wires with too much resistance. Consult your factory vehicle service manual. Most wires should not exceed 10 Ohms of resistance. Faulty ignition coil / distributor. Ask VF-Engineering for diagnostic info specific to your vehicle. Cooling system not functioning properly. Check for a faulty thermostat, faulty or improper calibration of the thermostatic fan switch, water pump belt slippage, a plugged radiator or bad fan clutch. Dirty air filter / cleaner. 13. Ensure the spark plug gap is correct for a supercharged application. 14. We recommend using manufacturer recommended service components or taking the advice from our dealers specializing in the different makes of cars. 15. Spark Plugs need to be changed at intervals of 8-10,000 miles or sooner. 16. Spark plug leads (wires) must be checked for condition. When reaching the end of their life, they become hard and must be replaced as a complete set. Check the condition of your coil pack and test for resistance according to OE spec. Check the condition of the distributor cap (where applicable) and replace if worn or heavily corroded. Replace rotor every 15,000 miles and cap every 50,000 or as condition warrant. 17. Engine oil should be changed every 3-5,000 miles. We recommend OE oil. Do not mix different grades of oil qualities. PAGE 27 of 28 P/N: VFM28/38/40-01 © 2006 VF Engineering All rights reserved Rev 1.10.25.06 BMW E36 (‘96-’98 incl. ‘99 M3) US MODELS www.vf-engineering.com PRODUCT REGISTRATION FOR WARRANTY. ***THIS DOCUMENT MUST BE RETURNED COMPLETED TO VALIDATE WARRANTY. Please retain a copy for your records. ( ) 1 YEAR WARRANTY Complete and mail form to: VF-ENGINEERING 1365 N DYNAMICS STREET, SUITE (E), ANAHEIM, CA 92806 USA. www.vf-engineering.com SUPERCHARGER SERIAL# (see blue tag on supercharger unit): PRODUCT PURCHASE DATE (also warranty start date): CUSTOMER NAME : CUSTOMER ADDRESS : CUSTOMER TEL# : Name of dealer / outlet where you purchased your VF-Eng product : Did you install the supercharger system yourself? Yes / No VEHICLE KIT FITTED TO : MAKE / MODEL / YEAR MILEAGE OF VEHICLE : CUSTOMER COMMENTS : VF-Engineering 1365 North Dynamics Street, Suite E, Anaheim, CA 92806 USA Tel (714)585-0066 Fax 714-528-0067 Website: www.vf-engineering.com Hours: M-F 9AM-5PM (PST) © Zurich Engineering, Inc. Terms may change without notice. without notice. PAGE 28 of 28 P/N: VFM28/38/40-01 © 2006 VF Engineering All rights reserved Rev 1.10.25.06