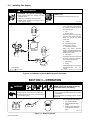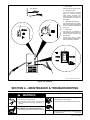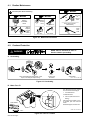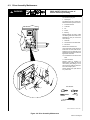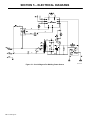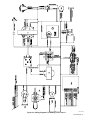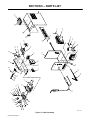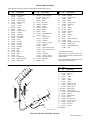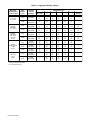
1
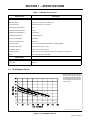
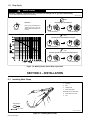
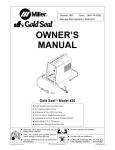
March 1995 Form: OM-174 470 Effective With Serial No. KF842218 OWNER’S MANUAL Gold Seal Model 420 CV/DC Welding Power Source/Wire Feeder For FCAW And GMAW Welding 90 Amperes, 18 Volts At 20% Duty Cycle Uses 115 Volts AC, Single-Phase Input Power Overheating, Short-Circuit, And Motor Overload Protection Usable Range Of 30 To 130 Amperes Includes Gun, Welding Wire, And Gas Valve Read and follow these instructions and all safety blocks carefully. cover 7/93 – ST-801 114 Give this manual to the operator. Have only trained and qualified persons install, operate, or service this unit. For help, call your distributor Call your distributor if you do not understand the directions. or: MILLER ELECTRIC Mfg. Co., P.O. Box 1079, Appleton, WI 54912 414-734-9821 1995 MILLER Electric Mfg. Co. PRINTED IN USA ARC WELDING SAFETY PRECAUTIONS WARNING ARC WELDING can be hazardous. PROTECT YOURSELF AND OTHERS FROM POSSIBLE SERIOUS INJURY OR DEATH. KEEP CHILDREN AWAY. PACEMAKER WEARERS KEEP AWAY UNTIL CONSULTING YOUR DOCTOR. In welding, as in most jobs, exposure to certain hazards occurs. Welding is safe when precautions are taken. The safety information given below is only a summary of the more complete safety information that will be found in the Safety Standards listed on the next page. Read and follow all Safety Standards. HAVE ALL INSTALLATION, OPERATION, MAINTENANCE, AND REPAIR WORK PERFORMED ONLY BY QUALIFIED PEOPLE. in disconnect box or that cord plug is connected to a properly grounded receptacle outlet. ELECTRIC SHOCK can kill. Touching live electrical parts can cause fatal shocks or severe burns. The electrode and work circuit is electrically live whenever the output is on. The input power circuit and machine internal circuits are also live when power is on. In semiautomatic or automatic wire welding, the wire, wire reel, drive roll housing, and all metal parts touching the welding wire are electrically live. Incorrectly installed or improperly grounded equipment is a hazard. 1. Do not touch live electrical parts. 2. Wear dry, hole-free insulating gloves and body protection. 3. Insulate yourself from work and ground using dry insulating mats or covers big enough to prevent any physical contact with the work or ground. 4. Disconnect input power or stop engine before installing or servicing this equipment. Lockout/tagout input power according to OSHA 29 CFR 1910.147 (see Safety Standards). 5. Properly install and ground this equipment according to its Owner’s Manual and national, state, and local codes. 6. Always verify the supply ground – check and be sure that input power cord ground wire is properly connected to ground terminal ARC RAYS can burn eyes and skin; NOISE can damage hearing; FLYING SLAG OR SPARKS can injure eyes. Arc rays from the welding process produce intense visible and invisible (ultraviolet and infrared) rays that can burn eyes and skin. Noise from some processes can damage hearing. Chipping, grinding, and welds cooling throw off pieces of metal or slag. NOISE 1. Use approved ear plugs or ear muffs if noise level is high. FUMES AND GASES can be hazardous to your health. Welding produces fumes and gases. Breathing these fumes and gases can be hazardous to your health. 1. Keep your head out of the fumes. Do not breathe the fumes. 2. If inside, ventilate the area and/or use exhaust at the arc to remove welding fumes and gases. 3. If ventilation is poor, use an approved air-supplied respirator. 4. Read the Material Safety Data Sheets (MSDSs) and the manufacturer’s instruction for metals, consumables, coatings, cleaners, and degreasers. CYLINDERS can explode if damaged. Shielding gas cylinders contain gas under high pressure. If damaged, a cylinder can explode. Since gas cylinders are normally part of the welding process, be sure to treat them carefully. 1. Protect compressed gas cylinders from excessive heat, mechanical shocks, slag, open flames, sparks, and arcs. 2. Install cylinders in an upright position by securing to a stationary support or cylinder rack to prevent falling or tipping. 3. Keep cylinders away from any welding or other electrical circuits. 7. When making input connections, attach proper grounding conductor first – double-check connections. 8. Frequently inspect input power cord for damage or bare wiring – replace cord immediately if damaged – bare wiring can kill. 9. Turn off all equipment when not in use. 10. Do not use worn, damaged, undersized, or poorly spliced cables. 11. Do not drape cables over your body. 12. If earth grounding of the workpiece is required, ground it directly with a separate cable – do not use work clamp or work cable. 13. Do not touch electrode if you are in contact with the work, ground, or another electrode from a different machine. 14. Use only well-maintained equipment. Repair or replace damaged parts at once. Maintain unit according to manual. 15. Wear a safety harness if working above floor level. 16. Keep all panels and covers securely in place. 17. Clamp work cable with good metal-to-metal contact to workpiece or worktable as near the weld as practical. ARC RAYS 2. Wear a welding helmet fitted with a proper shade of filter to protect your face and eyes when welding or watching (see ANSI Z49.1 and Z87.1 listed in Safety Standards). 3. Wear approved safety glasses with side shields. 4. Use protective screens or barriers to protect others from flash and glare; warn others not to watch the arc. 5. Wear protective clothing made from durable, flame-resistant material (wool and leather) and foot protection. 5. Work in a confined space only if it is well ventilated, or while wearing an air-supplied respirator. Always have a trained watchperson nearby. Welding fumes and gases can displace air and lower the oxygen level causing injury or death. Be sure the breathing air is safe. 6. Do not weld in locations near degreasing, cleaning, or spraying operations. The heat and rays of the arc can react with vapors to form highly toxic and irritating gases. 7. Do not weld on coated metals, such as galvanized, lead, or cadmium plated steel, unless the coating is removed from the weld area, the area is well ventilated, and if necessary, while wearing an air-supplied respirator. The coatings and any metals containing these elements can give off toxic fumes if welded. 4. 5. 6. 7. Never drape a welding torch over a gas cylinder. Never allow a welding electrode to touch any cylinder. Never weld on a pressurized cylinder – explosion will result. Use only correct shielding gas cylinders, regulators, hoses, and fittings designed for the specific application; maintain them and associated parts in good condition. 8. Turn face away from valve outlet when opening cylinder valve. 9. Keep protective cap in place over valve except when cylinder is in use or connected for use. 10. Read and follow instructions on compressed gas cylinders, associated equipment, and CGA publication P-1 listed in Safety Standards. sr1.1.1 2/94 WELDING can cause fire or explosion. Welding on closed containers, such as tanks, drums, or pipes, can cause them to blow up. Sparks can fly off from the welding arc. The flying sparks, hot workpiece, and hot equipment can cause fires and burns. Accidental contact of electrode to metal objects can cause sparks, explosion, overheating, or fire. Check and be sure the area is safe before doing any welding. 1. Protect yourself and others from flying sparks and hot metal. 2. Do not weld where flying sparks can strike flammable material. 3. Remove all flammables within 35 ft (10.7 m) of the welding arc. If this is not possible, tightly cover them with approved covers. 4. Be alert that welding sparks and hot materials from welding can easily go through small cracks and openings to adjacent areas. 5. Watch for fire, and keep a fire extinguisher nearby. WARNING 6. Be aware that welding on a ceiling, floor, bulkhead, or partition can cause fire on the hidden side. 7. Do not weld on closed containers such as tanks, drums, or pipes, unless they are properly prepared according to AWS F4.1 (see Safety Standards). 8. Connect work cable to the work as close to the welding area as practical to prevent welding current from traveling long, possibly unknown paths and causing electric shock and fire hazards. 9. Do not use welder to thaw frozen pipes. 10. Remove stick electrode from holder or cut off welding wire at contact tip when not in use. 11. Wear oil-free protective garments such as leather gloves, heavy shirt, cuffless trousers, high shoes, and a cap. 12. Remove any combustibles, such as a butane lighter or matches, from your person before doing any welding. ENGINES can be hazardous. ENGINE EXHAUST GASES can kill. 1. Use equipment outside in open, well-ventilated areas. Engines produce harmful exhaust gases. 2. If used in a closed area, vent engine exhaust outside and away from any building air intakes. ENGINE FUEL can cause fire or explosion. 3. Do not overfill tank – allow room for fuel to expand. 4. Do not spill fuel. If fuel is spilled, clean up before starting engine. Engine fuel is highly flammable. 1. Stop engine and let it cool off before checking or adding fuel. 2. Do not add fuel while smoking or if unit is near any sparks or open flames. MOVING PARTS can cause injury. Moving parts, such as fans, rotors, and belts can cut fingers and hands and catch loose clothing. 1. Keep all doors, panels, covers, and guards closed and securely in place. 2. Stop engine before installing or connecting unit. SPARKS can cause BATTERY GASES TO EXPLODE; BATTERY ACID can burn eyes and skin. Batteries contain acid and generate explosive gases. STEAM AND PRESSURIZED HOT COOLANT can burn face, eyes, and skin. It is best to check coolant level when engine is cold to avoid scalding. 3. Have only qualified people remove guards or covers for maintenance and troubleshooting as necessary. 4. To prevent accidental starting during servicing, disconnect negative (–) battery cable from battery. 5. Keep hands, hair, loose clothing, and tools away from moving parts. 6. Reinstall panels or guards and close doors when servicing is finished and before starting engine. 1. Always wear a face shield when working on a battery. 2. Stop engine before disconnecting or connecting battery cables. 3. Do not allow tools to cause sparks when working on a battery. 4. Do not use welder to charge batteries or jump start vehicles. 5. Observe correct polarity (+ and –) on batteries. 1. If the engine is warm and checking is needed, follow steps 2 and 3. 2. Wear safety glasses and gloves and put a rag over cap. 3. Turn cap slightly and let pressure escape slowly before completely removing cap. PRINCIPAL SAFETY STANDARDS Safety in Welding and Cutting, ANSI Standard Z49.1, from American Welding Society, 550 N.W. LeJeune Rd, Miami FL 33126 Safety and Health Standards, OSHA 29 CFR 1910, from Superintendent of Documents, U.S. Government Printing Office, Washington, D.C. 20402. Recommended Safe Practices for the Preparation for Welding and Cutting of Containers That Have Held Hazardous Substances, American Welding Society Standard AWS F4.1, from American Welding Society, 550 N.W. LeJeune Rd, Miami, FL 33126 National Electrical Code, NFPA Standard 70, from National Fire Protection Association, Batterymarch Park, Quincy, MA 02269. sr1.1.1 2/94 Safe Handling of Compressed Gases in Cylinders, CGA Pamphlet P-1, from Compressed Gas Association, 1235 Jefferson Davis Highway, Suite 501, Arlington, VA 22202. Code for Safety in Welding and Cutting, CSA Standard W117.2, from Canadian Standards Association, Standards Sales, 178 Rexdale Boulevard, Rexdale, Ontario, Canada M9W 1R3. Safe Practices For Occupation And Educational Eye And Face Protection, ANSI Standard Z87.1, from American National Standards Institute, 1430 Broadway, New York, NY 10018. Cutting And Welding Processes, NFPA Standard 51B, from National Fire Protection Association, Batterymarch Park, Quincy, MA 02269. EMF INFORMATION NOTE Considerations About Welding And The Effects Of Low Frequency Electric And Magnetic Fields The following is a quotation from the General Conclusions Section of the U.S. Congress, Office of Technology Assessment, Biological Effects of Power Frequency Electric & Magnetic Fields – Background Paper, OTA-BP-E-53 (Washington, DC: U.S. Government Printing Office, May 1989): “. . . there is now a very large volume of scientific findings based on experiments at the cellular level and from studies with animals and people which clearly establish that low frequency magnetic fields can interact with, and produce changes in, biological systems. While most of this work is of very high quality, the results are complex. Current scientific understanding does not yet allow us to interpret the evidence in a single coherent framework. Even more frustrating, it does not yet allow us to draw definite conclusions about questions of possible risk or to offer clear science-based advice on strategies to minimize or avoid potential risks.” To reduce magnetic fields in the workplace, use the following procedures: 1. Keep cables close together by twisting or taping them. 2. Arrange cables to one side and away from the operator. 3. Do not coil or drape cables around the body. 4. Keep welding power source and cables as far away as practical. 5. Connect work clamp to workpiece as close to the weld as possible. About Pacemakers: The above procedures are among those also normally recommended for pacemaker wearers. Consult your doctor for complete information. mod10.1 4/93 TABLE OF CONTENTS SECTION 1 – SPECIFICATIONS . . . . . . . . . . . . . . . . . . . . . . . . . . . . . . . . . . . . . . . . . . . . . . . . . . . . . . . . . . 1-1. 1-2. 1 Volt-Ampere Curves . . . . . . . . . . . . . . . . . . . . . . . . . . . . . . . . . . . . . . . . . . . . . . . . . . . . . . . . . . . . Duty Cycle . . . . . . . . . . . . . . . . . . . . . . . . . . . . . . . . . . . . . . . . . . . . . . . . . . . . . . . . . . . . . . . . . . . . 1 2 SECTION 2 – INSTALLATION . . . . . . . . . . . . . . . . . . . . . . . . . . . . . . . . . . . . . . . . . . . . . . . . . . . . . . . . . . . . 2 2-1. 2-2. 2-3. 2-4. 2-5. 2-6. Installing Work Clamp . . . . . . . . . . . . . . . . . . . . . . . . . . . . . . . . . . . . . . . . . . . . . . . . . . . . . . . . . . Gun Polarity For Wire Type . . . . . . . . . . . . . . . . . . . . . . . . . . . . . . . . . . . . . . . . . . . . . . . . . . . . . Installing Welding Gun . . . . . . . . . . . . . . . . . . . . . . . . . . . . . . . . . . . . . . . . . . . . . . . . . . . . . . . . . . Connecting Input Power . . . . . . . . . . . . . . . . . . . . . . . . . . . . . . . . . . . . . . . . . . . . . . . . . . . . . . . . Threading And Feeding Welding Wire . . . . . . . . . . . . . . . . . . . . . . . . . . . . . . . . . . . . . . . . . . . . Installing Gas Supply . . . . . . . . . . . . . . . . . . . . . . . . . . . . . . . . . . . . . . . . . . . . . . . . . . . . . . . . . . . 2 3 3 4 4 6 SECTION 3 – OPERATION . . . . . . . . . . . . . . . . . . . . . . . . . . . . . . . . . . . . . . . . . . . . . . . . . . . . . . . . . . . . . . . 6 SECTION 4 – MAINTENANCE & TROUBLESHOOTING . . . . . . . . . . . . . . . . . . . . . . . . . . . . . . . . . . . . . 7 4-1. 4-2. 4-3. 4-4. 4-5. Routine Maintenance . . . . . . . . . . . . . . . . . . . . . . . . . . . . . . . . . . . . . . . . . . . . . . . . . . . . . . . . . . . Overload Protection . . . . . . . . . . . . . . . . . . . . . . . . . . . . . . . . . . . . . . . . . . . . . . . . . . . . . . . . . . . . Drive Assembly Maintenance . . . . . . . . . . . . . . . . . . . . . . . . . . . . . . . . . . . . . . . . . . . . . . . . . . . . Gun Maintenance . . . . . . . . . . . . . . . . . . . . . . . . . . . . . . . . . . . . . . . . . . . . . . . . . . . . . . . . . . . . . . Troubleshooting . . . . . . . . . . . . . . . . . . . . . . . . . . . . . . . . . . . . . . . . . . . . . . . . . . . . . . . . . . . . . . . 8 8 9 10 11 SECTION 5 – ELECTRICAL DIAGRAMS . . . . . . . . . . . . . . . . . . . . . . . . . . . . . . . . . . . . . . . . . . . . . . . . . . . 12 SECTION 6 – PARTS LIST . . . . . . . . . . . . . . . . . . . . . . . . . . . . . . . . . . . . . . . . . . . . . . . . . . . . . . . . . . . . . . . Figure 6-1. Main Assembly . . . . . . . . . . . . . . . . . . . . . . . . . . . . . . . . . . . . . . . . . . . . . . . . . . . . . . . . . . . . Figure 6-2. GA-16C1 Gun . . . . . . . . . . . . . . . . . . . . . . . . . . . . . . . . . . . . . . . . . . . . . . . . . . . . . . . . . . . . . Table 6-1. Suggested Welding Settings . . . . . . . . . . . . . . . . . . . . . . . . . . . . . . . . . . . . . . . . . . . . . . . . . . 14 14 15 16 OM-174 470 – 3/95 SECTION 1 – SPECIFICATIONS Table 1-1. Welding Power Source Specifications Description Type Of Output Constant Voltage/Direct Current (CV/DC) Rated Weld Output 90 Amperes, 18 Volts DC, 20% Duty Cycle Type Of Input Power Single-Phase; 60 Hz; At 115 Volts AC Input Amperes At Rated Output 15 A Input Amperes Used While Idling 0.592 A KVA/KW Used At Rated Output 2.2 kVA/2 kW KVA/KW Used While Idling 0.062 kVA/0.035 kW Max. Open-Circuit Voltage 29 Volts DC Control Circuit Voltage At Gun 24 Volts AC Welding Processes Flux Cored Arc (FCAW) And Gas Metal Arc Welding (GMAW) Speed Range At No Load 220 To 750 ipm (5.6 To 19.1 mpm) Wire Diameter Range .023 To .035 in (0.58 To 0.89 mm) Overall Dimensions Length: 16-1/2 in (419 mm); Width: 9-1/2 in (241 mm); Height: 17 in (432 mm) Weight Net: 73 lb (33 kg); Ship: 80 lb (36 kg) Welding Gun Rated Output (Air Cooled) 160 Amperes At 60% Duty Cycle Using CO2 Shielding Gas Cable Length 10 ft (3 m) 1-1. Volt-Ampere Curves The volt-ampere curves show the minimum and maximum voltage and amperage output capabilities of the welding power source. Curves of other settings fall between the curves shown. ssb1.1 10/91 / sb1.3 10/91 - ST-173 767 Figure 1-1. Volt-Ampere Curves OM-174 470 Page 1 1-2. Duty Cycle CAUTION WELDING LONGER THAN RATED DUTY CYCLE can damage unit or gun and void warranty. • Do not weld at rated load longer than shown below. wfwarn8.2 8/93 UNIT Definition 0 10 Minutes 20% Duty Cycle At 90 Amperes Duty Cycle is percentage of 10 minutes that unit or gun can weld at rated load without overheating. 2 Minutes Welding Chart 8 Minutes Resting GUN 60% Duty Cycle At 170 Amperes Using CO2 6 Minutes Welding 4 Minutes Resting GUN 30% Duty Cycle At 170 Amperes Using Mixed Gases 3 Minutes Welding sb1.3 8/93 – SB-124 655-A 7 Minutes Resting Figure 1-2. Welding Power Source Duty Cycle Chart SECTION 2 – INSTALLATION 2-1. Installing Work Clamp 1 Insulator 2 Bolt 3 Smaller Hole 4 Work Clamp Tabs Bend tabs around work cable. 1 6 5 5 Work Cable From Unit 6 Nut 2 3 Tools Needed: 4 3/8, 7/16 in Ref. ST-025 190-C Figure 2-1. Installing Work Clamp OM-174 470 Page 2 2-2. Gun Polarity For Wire Type WARNING ELECTRIC SHOCK can kill. • • Do not touch live electrical parts. Turn Off welding power source, and disconnect input power before inspecting or installing. swarn1.1 2/93 1 STRAIGHT POLARITY REVERSE POLARITY DCEN DCEP For Flux Cored Wires (FCAW Process) 1 Polarity Changeover Label 2 Polarity Jumper Links Always read and follow welding wire manufacturer’s recommended polarity. For Solid Steel Or Aluminum Wires (GMAW) Process) Close door. GUN POLARITY CHANGEOVER 2 S-116 599-C Tools Needed: 3/8 in Ref. ST-159 619-A Figure 2-2. Gun Polarity Connections 2-3. Installing Welding Gun 1 Gun Securing Nut 2 Drive Assembly 3 Gun End Loosen securing nut. Insert gun end through front panel opening until it bottoms against drive assembly. Tighten nut. 4 Gun Trigger Leads Insert leads, one at a time, through grommet on front panel. Connect leads to matching leads in unit. 4 Close door. 3 1 2 4 Tools Needed: 5/16 in Ref. ST-159 619-A Figure 2-3. Gun Connections OM-174 470 Page 3 2-4. Connecting Input Power Connect unit to a properly grounded 115 VAC receptacle of a 20 ampere individual branch circuit protected by time-delay fuses or circuit breakers. Select an extension cord of 12 AWG for up to 75 ft (23 m) or 10 AWG for up to 140 ft (46 m). 2-5. Threading And Feeding Welding Wire WARNING ELECTRIC SHOCK can kill. • Do not touch live electrical parts. The welding wire, drive rolls, drive assembly, and all metal parts touching the welding wire are electrically live when welding or feeding wire using gun trigger. WELDING WIRE can cause puncture wounds. • • Do not press gun trigger until instructed to do so. Do not point gun toward any part of the body, other people, or any metal when threading welding wire. HOT SURFACES can burn skin. • Allow gun to cool before touching. CYLINDERS can explode if damaged. • • • Keep cylinders away from welding and other electrical circuits. Never touch cylinder with welding electrode. Always secure cylinder to running gear, wall, or other stationary support. swarn5.1 10/91 / swarn2.1 9/91 OM-174 470 Page 4 1 Wire Spool 2 Hub Tension Nut Grasp spool. Turn while using wrench to adjust nut. When a slight force is needed to turn spool, tension is set. 4 5 8 2 1 3 Tools Needed: 3 Welding Wire 4 Inlet Wire Guide 5 Pressure Adjustment Knob 6 Drive Roll 7 Outlet Wire Guide 8 Gun Conduit Cable Lay gun cable out straight. 4 6 7 9/16 in Hold wire tightly to keep it from unraveling. 6 in (150 mm) Open pressure assembly. 4 in (102 mm) Pull and hold wire; cut off end. Push wire thru guides into gun; continue to hold wire. Tighten Set switch. Close and tighten pressure assembly, and let go of wire. Remove gun nozzle and contact tube. WOOD Press gun trigger until wire comes out of gun. Reinstall contact tube and nozzle. Feed wire to check drive roll pressure. Tighten knob enough to prevent slipping. Cut off wire. Close and latch door. Ref. ST-161 157 / Ref. ST-159 615-A / Ref. ST-174 544 / S-0627-A Figure 2-4. Feeding Welding Wire OM-174 470 Page 5 2-6. Installing Gas Supply WARNING CYLINDERS can explode if damaged. • • • BUILDUP OF SHIELDING GAS can harm health or kill. Keep cylinders away from welding and other electrical circuits. Never touch cylinder with welding electrode. • Shut off shielding gas supply when not in use. Always secure cylinder to running gear, wall, or other stationary support. warn4.1 9/91 Obtain gas cylinder and chain to running gear, wall, or other stationary support so cylinder cannot fall and break off valve. 1 4 1 Cap 2 Cylinder Valve 2 Remove cap, stand to side of valve, and open valve slightly. Gas flow blows dust and dirt from valve. Close valve. 3 3 Cylinder 4 Regulator/Flowmeter Install so face is vertical. 5 OR 1 Argon Gas Or Mixed Gases 2 5 Gas Hose Connection Fitting has 5/8-18 right-hand threads. Obtain and install gas hose between regulator/flowmeter and welding power source. 6 6 Flow Adjust Typical flow rate is 20 cfh (cubic feet per hour). Check wire manufacturer’s recommended flow rate. 3 7 8 CO2 Adapter 8 O-Ring Install adapter with O-ring between regulator/flowmeter and CO2 cylinder. CO2 Gas Tools Needed: 7 5/8, 1-1/8 in ssb3.1* 12/92 – ST-158 697-A / Ref. ST-149 827-B Figure 2-5. Installation Of Deluxe Model Regulator/Flowmeter SECTION 3 – OPERATION READ SAFETY BLOCKS at beginning of manual before proceeding. WARNING MOVING PARTS can cause injury. • • Keep away from pinch points such as drive rolls. Keep all doors, panels, covers, and guards closed and securely in place. 1 2 ARCING can damage switch. • Do not change Thickness/Voltage switch position while welding. Arcing inside switch can damage contacts, causing switch to fail. 3 Wear the following while welding: 1 Dry, Insulating Gloves 2 Safety Glasses With Side Shields 3 Welding Helmet With Correct Shade Of Filter (See ANSI Z49.1) sb3.1 1/94 Figure 3-1. Safety Equipment OM-174 470 Page 6 1 Tools Needed: Power Switch Use switch to turn unit On and Off. 2 Wire Speed Control Use control to select a wire feed speed. As Thickness (voltage) switch setting increases, wire speed range also increases. Turn control clockwise to increase wire feed speed. 3 2 1 Thickness (Voltage) Switch Use switch to select an arc voltage. Use Thin to weld thin material,and Thick to weld thicker material (see rear cover). 4 Work Clamp Use wire brush or sandpaper to clean metal at weld joint area. Use chipping hammer to remove slag after welding. Connect work clamp to clean, paint-free location on workpiece, as close as possible to weld area. 3 4 Ref. ST-159 617 / Ref. ST-174 544 Figure 3-2. Controls SECTION 4 – MAINTENANCE & TROUBLESHOOTING WARNING ELECTRIC SHOCK can kill. • • Do not touch live electrical parts. Turn Off welding power source, and disconnect input power before inspecting, maintaining, or servicing. MOVING PARTS can cause injury. • • Keep away from moving parts. Keep away from pinch points such as drive rolls. HOT PARTS can cause severe burns. • Allow cooling period before maintaining or servicing. Maintenance and troubleshooting to be performed only by qualified persons. swarn8.2* 2/93 OM-174 470 Page 7 4-1. Routine Maintenance 6 Months Turn Off all power before maintaining. 3 Months 3 Months Replace Unreadable Labels Replace Cracked Parts During Heavy Service, Clean Monthly Trigger Cord Tape Or Replace Cracked Weld Cable Blow Out Or Vacuum Inside OR Clean Drive Rolls Gas Hose Gun Cable Figure 4-1. Maintenance Schedule 4-2. Overload Protection READ SAFETY BLOCKS at start of Section 4 before proceeding. WARNING A. Overheating 0 15 minutes When overheated, thermostat opens, output stops, and cooling fan keeps running. Let fan run for 15 minutes. Start welding. ssb10.1 1/94 – ST-801 114 Figure 4-2. Overheating B. Motor Fuse F1 Turn Off and unplug unit. Unlatch door and remove door/wrapper. 1 2 1 Circuit Board PC1 Located behind fan. 2 Fuse F1 (See Parts List For Rating) Pull fuse from fuse holder on PC1. To reinstall, push fuse into fuse holder. Tools Needed: Reinstall wrapper, and latch door. 3/8 in ST-801 126 / ST-149 327 Figure 4-3. Fuse F1 Location OM-174 470 Page 8 4-3. Drive Assembly Maintenance READ SAFETY BLOCKS at start of Section 4 before proceeding. WARNING Turn Off and unplug unit. 1 Wire Spool Cut welding wire off at contact tip. Retract wire onto spool and secure. 1 2 Pressure Roll Arm 3 Cotter Pin 4 Pin 5 Screw 6 Bearing Remove bearing as shown. Install new bearing and secure with screw. Reinstall arm onto pin and secure with cotter pin. 7 Setscrew 8 Smooth Groove For Hard Wire 9 Drive Roll Remove drive roll as shown. Use a wire brush to clean drive roll. Push drive roll onto shaft with desired groove in. Turn drive roll so one setscrew faces flat side of shaft, and tighten both setscrews. 10 Knurled Groove For Flux-Cored Wire 11 Wire Inlet Guide 4 Remove guide by pressing on barbed area or cutting off one end near housing and pulling it out of hole. Push new guide into hole from rear until it snaps in place. 2 5 Thread welding wire (see Section 2-5). Close door. 6 3 7 8 Tools Needed: 9 10 11 7 5/64 in Ref. ST-159 615-A / ST-154 199 Figure 4-4. Drive Assembly Maintenance OM-174 470 Page 9 4-4. Gun Maintenance READ SAFETY BLOCKS at start of Section 4 before proceeding. WARNING FLYING METAL CHIPS AND DIRT can cause injury and damage equipment. • Point gun away from people and in a safe direction when blowing out with compressed air. swarn10.1 10/91 Turn Off and unplug unit. 1 Wire Spool Cut welding wire off at contact tip. Retract wire onto spool and secure. 2 Gun Securing Nut Disconnect trigger leads. Loosen nut and remove gun and trigger leads. 3 Nozzle 4 Contact Tip 5 Head Tube 6 Liner Collet Disassemble gun as shown. 7 Liner Pull liner from this end. Blow gun casing out with compressed air. 1 Insert new liner into gun casing until even with end of head tube. 2 Install collet onto liner. Install contact tip and nozzle. Insert gun into feeder and mark where liner touches drive roll. Remove gun and cut liner off. Reinstall gun so that liner is as close as possible to drive rolls without touching. 3 4 Thread welding wire (see Section 2-5). Close door. 5 6 6 7 7 Tools Needed: 3/8, 5/16 in Ref. ST-159 619-A / Ref. ST-155 509 Figure 4-5. Gun Maintenance OM-174 470 Page 10 4-5. Troubleshooting READ SAFETY BLOCKS at start of Section 4 before proceeding. WARNING Table 4-1. Welding Trouble Welding Trouble No weld output; wire does not feed. Remedy Secure power cord plug in receptacle. Check and replace motor fuse F1, if necessary. Section 2-4 4-2B Replace building line fuse or reset circuit breaker if open. –– Secure gun trigger leads or repair leads, or replace trigger switch. 2-3 No weld output; wire does not feed; fan motor continues to run, and pilot light turns off. Thermostat TP1 open (overheating). Allow fan to run; the thermostat will close when the unit has cooled. 4-2A No weld output; wire feeds. Connect work clamp to get good metal-to-metal contact. Low weld output. Figure 3-2 Check and replace contact tip, if necessary. 4-4 Connect unit to proper input voltage or check for low line voltage. 2-4 Table 4-2. Wire Drive/Gun Trouble Wire Drive/Gun Trouble Electrode wire feeding stops during welding. Remedy Section Straighten gun cable and/or replace damaged parts. 4-4 Adjust drive roll pressure. 2-5 Readjust hub tension. 2-5 Check and replace contact tip, if necessary. 4-4 Clean or replace wire inlet guide or liner if dirty or plugged. 4-3, 4-4 Replace drive roll or pressure bearing if worn or slipping. 4-3 Secure gun trigger leads or repair leads, or replace trigger switch. 2-3 Check and replace motor fuse F1, if necessary. Check and clear any restrictions at drive assembly and liner. Have nearest Factory Authorized Service Station check drive motor. 4-2B 4-3, 4-4 –– OM-174 470 Page 11 SECTION 5 – ELECTRICAL DIAGRAMS SB-174 468 Figure 5-1. Circuit Diagram For Welding Power Source OM-174 470 Page 12 SC-174 465 Figure 5-2. Wiring Diagram For Welding Power Source OM-1309 Page 13 OM-174 470 Page 14 12 13 3 2 4 14 1 5 15 6 51 7 8 9 10 16 11 17 22 21 20 50 18 19 Figure 6-1. Main Assembly 49 34 23 48 33 32 24 35 31 47 25 30 27 26 46 28 45 36 29 44 43 37 38 42 41 39 40 SECTION 6 – PARTS LIST ST-801 138 Parts For Main Assembly NOTE: All items indented by a dot(s) are included with the item listed directly above. Item Part No. No. 1 2 3 4 5 6 7 8 9 10 11 12 13 14 15 16 17 18 19 20 21 22 23 24 25 126 838 090 416 124 817 151 828 112 031 090 443 111 622 092 237 090 415 085 244 085 242 010 224 058 549 149 332 147 635 119 028 602 169 129 893 124 506 174 538 111 929 010 910 073 355 010 909 111 998 134 201 119 539 Item Part No. No. Description Drive Assembly · Hinge Pin · Drive Housing · Cotter Hair Pin · Pressure Lever · Bearing · · Spacer · Knob · Spring · Cupped Washer · Fastener · Spring Pin · Wire Guide Hose Clamp Hose Drive Roll Set Screw Insulator Drive Motor Baffle Hub Washer Spring Nut Cotter Hair Pin Stand-Off Support Circuit Card 26 27 28 29 30 31 32 33 34 *073 426 118 936 079 747 006 393 172 994 005 656 120 675 129 696 119 264 010 047 122 385 038 618 35 36 37 170 970 147 545 111 443 000 101 097 922 111 997 157 305 174 535 174 544 111 644 025 338 157 187 089 899 Description · Fuse, slo-blo 5A Housing, 10 pin Terminal Relay Fan Motor Fan Blade Bracket Contactor Rectifier Tubing Terminal Assembly · Link Case w/Cmpts · Gas Valve · Cord Set · Bushing, cord set · Rheostat · Knob · Rocker Switch, SPST · Rocker Switch, DPDT · Case · Nameplate · Bushing, .875mtg · Bushing, .625mtg Side Panel Latch 9 8 Item Part No. No. 38 39 40 41 42 43 44 45 46 47 48 49 50 51 174 536 134 327 126 415 126 416 125 552 174 553 174 513 117 116 087 156 109 039 108 105 118 457 019 663 600 325 010 368 119 697 026 843 173 374 174 869 Description Wrapper · Warning Label Clamp Handle Thermostat, NC Transformer · Coil Resistor Varistor Capacitor Clamp Stabilizer Foot Cable, (order by ft) Clamp GA-16C1 Gun, (Fig 6-2) Insulator, vinyl Regulator/Flowmeter Hose *Recommended Spare Parts. +When ordering a component originally displaying a precautionary label, the label should also be ordered. Be sure to provide Model and Serial Number when ordering replacement parts. Item Part No. No. Description 1 2 3 4 5 6 7 8 8 9 9 9 10 11 12 13 14 15 16 17 18 Handle Assembly Head Tube · Nut · Jacket · Stop · Adapter · Spring Contact Tip, .030 Contact Tip, .035 Nozzle, 1/2 orf Nozzle, 3/8 orf Nozzle, flat spot Trigger Switch Assembly Terminal Cable/Conduit Sleeve Liner, .023-.035 · Collet, .023-.035 O-Ring, .500 Connector Terminal 7 6 2 5 4 3 10 1 1 15 14 11 1 13 16 17 3 12 110 793 110 795 110 780 110 779 110 781 128 878 110 782 110 786 110 787 110 789 ♦112 420 ♦110 790 110 794 080 565 110 792 110 797 167 440 110 784 079 974 110 796 047 994 ♦OPTIONAL 18 Ref. ST-110 832-D Figure 6-2. GA-16C1 Gun (Fig 6-1 Item 51) OM-174 470 Page 15 Table 6-1. Suggested Welding Settings Wire Type, Shielding Gas, And Flow Rate E-71T-GS Flux Core ER70S-6, Mild Steel, CO2, 20 cfh+ ER70S-6, Mild Steel, 75% Argon 25% CO2, 20 cfh+ ER 308, Stainless Steel, Tri-Mix, 20 cfh+ Aluminum, Argon, 30 cfh+ Metal Thickness Wire Diameter (inch) Operator Control Settings* 1/8 in. (3.2 mm) 12 ga. 14 ga. 16 ga. 0.030 Voltage Wire Speed 4 30 3 30 3 20 1 25 0.035 Voltage Wire Speed 4 30 3 25 2 25 0.023 Voltage Wire Speed 4 50 4 50 0.030 Voltage Wire Speed 4 40 0.023 Voltage Wire Speed 0.030 20 ga. 22 ga. And Thinner 1 20 1 20 – – 1 25 1 25 1 20 – – 3 50 2 45 2 40 1 30 1 30 4 40 3 40 3 40 2 40 1 40 1 35 4 60 4 55 3 50 2 45 2 40 1 35 1 35 Voltage Wire Speed 4 50 4 50 3 50 3 50 2 45 1 45 1 40 0.023 Voltage Wire Speed 4 40 4 35 4 35 3 30 3 30 2 20 – – 0.030 Voltage Wire Speed 4 30 4 30 4 30 3 25 3 20 2 15 – – 0.035 Voltage Wire Speed 4 15 4 15 4 15 3 15 2 15 – – – – 0.030 Voltage Wire Speed – – 4 85 3 80 2 75 1 70 – – – – 0.035 Voltage Wire Speed – – 4 55 4 60 2 60 2 55 – – – – 18 ga. *Do not change VOLTAGE switch position while welding. WIRE SPEED value in table is a starting value only, and WIRE SPEED control setting can be fine tuned during welding. +cfh = cubic feet per hour OM-174 470 Page 16