1
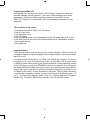
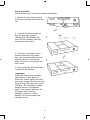
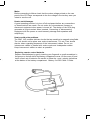
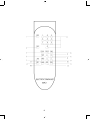
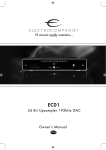
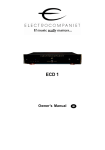
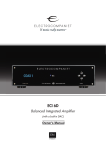
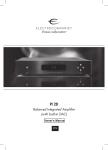
EMC 1UP
Ref
er
enceCD Pl
ayer
Owner
’
sManual
ENG
Unpacking the EMC 1UP
Immediately upon receipt of the EMC 1UP CD player, inspect the carton for
possible damage during shipment. The carton and packaging have been
designed to provide the safest possible protection for transport of your
EMC 1UP. Unpack the unit carefully. Save all packaging materials for future
shipment.
The contents of the carton
1 pcs Electrocompaniet: EMC 1UP CD player.
1 pcs AC main cord.
1 pcs inspection card.
1 pcs CD clamp.
1 pcs self-adhesive felt ring for placement of the CD clamp when not in use.
2 pcs Allen keys for securing of the Electro Mechanical Cancellation System.
1 pcs remote control
2 pcs batteries.
Important Notice
The transport screw must be removed for proper operation. When moving the
CD player. Always re-insert and tighten the transport screw to avoid severe damage to the unit!
For optimal sonic performance, the EMC 1UP should be burned in for a minimum time of 72 hours. The easiest way to burn in your EMC 1UP is to put a disc
in REPEAT mode with the rest of your system turned off. In daily operation, switch
off the CD player by using the STANDBY button on the remote. If the CD player
has been switched off, allow two hours of warm-up to optimize sonic performance.
Due to high class A operation in all Electrocompaniet designs, it is normal for the
CD player to feel warm. Proper ventilation is important. The CD player should by
no means be completely covered. A good rule of thumb is to allow at least 3 - 5
cm (1 - 2 inches) of air sidewise, and 5 - 8 cm (2 - 3 inches) above the CD player.
Please refer to Owner's Manual for removal of the CD transport screw.
3
Set up procedure
How to remove and UN secure transport necessities.
1. Remove the two wing bolts and
the wing nut located underneath the
unit.
2. Unscrew the Allen screws holding the gold sign marked
«Mechanical Cancellation System» with the smallest Allen key
and remove the bracket.
3. To loosen the transport screw
located underneath the golden
sign, use the largest Allen key and
unscrew counter clockwise for
about 10 turns. Do not remove this
allen screw.
4. Put the gold sign back and fasten
it whith the Allen screws.
! Important!
Keep Allen keys and all transport
necessities in a safe place for
future use. Always tighten the transport screw ontopp first, then the wing
nut and wing bolts when moving the
CDPlayer. The cancellation system
weights close to six kilograms
alone. If not securely fastened, the
CD player will be severely
damaged, resulting in void of
warranty. Do not over-tighten the
transport screw.
4
Mains
Before connecting to Mains check that the mains voltage printed on the rear
panel of the CD Player corresponds to the line voltage in the territory were you
intend to use the unit.
How to avoid damages
A good operating practice is to turn off all equipment before any connections
or disconnections are made. Do not under any circumstances connect or
disconnect equipment when power is turned on. The design of the RCA plug
generates a huge transient when inserted. Connecting or disconnecting
equipment with the power on could severely damage both speakers and
amplifier(s).
How to avoid noise problems
The EMC 1UP contains delicate circuits that are sensitive to magnetic strayfields.
The unit should not be place near mains transformers, TVs etc. Care should
also be taken regarding placement of the interconnect cables. Do not run
interconnect cables in parallel with mains cords and loudspeaker cables.
Keep interconnect cables as short as possible.
Replacing remote control batteries
Replace used batteries by gently inserting your fingernail or small screwdriver in
the groove on the left side of the battery compartment cover. Lift the cover off, and
insert a fresh set of batteries. Be careful to follow the + and - polarity indications
at the bottom of the battery compartment. Battery: 2 x LR03 / AAA: 1.5Volts.
5
Connecting the audio components
6
Balanced
Single ended
7
8
Remote control
1.
2.
3.
4.
5.
6.
7.
8.
9.
10.
11.
12.
13.
14.
15.
16.
17.
Single ended
STANDBY
DISC – No function.
SCAN – Play 10 seconds of each track.
PROG
a. Set the CD player in STOP MODE.
b. Select tracks with the numeric buttons (9), or step to the number using buttons
no. 14 or 15.
c. Press the PROG (4) button – the track is programmed.
Repeat b and c until all the tracks you wish to program is done.
After each track is programmed, the total playtime will be shown in the display.
If a track with number higher than 13 is programmed, the total playtime will not be
shown.
You can browse through the tracks with the buttons 14 and 15. On the tracks that
already are programmed, you will see a “P” shown in the display.
If you wish to remove a track from your program, choose the track number and
press PROG (4).
To monitor what is being programmed. Go back to STOP MODE.
Press PROG (4) – The display will now show the programmed tracks in the new
order.
The tracks are now stored in the order you programmed them and not in the
original numeric order.
If you press STOP (17) two times your program sequence will be erased.
FAST – press this button before you use the search buttons (6 or 13). The search
will go faster.
SEARCH BACKWARDS
A/B – Repeat a segment of the disc/track. Press the button once to mark the start
of the portion to be repeated. Press it again at the end of the desired sequence.
The selected area will play continuously until the STOP (17) button is pressed.
SHUF - The tracks will be played in a random order.
REP – Press this button once and all the tracks on the disc will be repeated.
The display will show “REPEAT”.
Press the button again, and it will only repeat the current track.
The display will show “REPEAT 1”
PAUSE – Pause on/off.
NUMERIC CONTROLS – Press these buttons to select a specific track on the disc.
For tracks 10 and above, the second digit of the number must be pressed within
one second.
TIME – Press once - shows total played time.
Press once more - shows total remaning time of disc.
Press once more - back to normal. (shows played time of single track)
SEARCH FORWARD
NEXT TRACK
PREVIOUS TRACK
PLAY
STOP
9
Front Panel Controls
The power on/off button is localised in the center of the front panel.
Generally, we
recommend
that you use the Standby button located on the Multi
Connecting
the
audio components
remote control.
The display will go dark. The e- sign on top of the unit will still be lit, indicating Standby
mode.
When not using the EMC 1UP for a long period, turn the main switch off and
disconnect the unit from the mains outlet.
The four buttons on the right front panel have the following functions:
Top button
= start/play
Right button = next
Left button
= previous
Lower button = stop
How to power up your system
You should always power up your system the following way: Signal sources (CD
player, tuner etc.) first. Allow a 30 seconds warm-up before you turn on the
amplifier(s). When switching off your system: Start with the amplifier(s), then the
signal sources.
Loading a Disc
1. Load the disc by gently pushing the drawer marked: ELECTROCOMPANIET
towards the rear of the unit. «Open» is shown on the display.
2. Place the disc on the spindle. Then place the CD-clamp on the spindle. The
clamp now securely fastens the disc.
3. Pull the cover all the way home. The CD player must first read and load vital
information from the disc. This process, indicated by a flashing display, takes
approximately three seconds. Tracks and total time are displayed.
4. Press start/play and the first track starts to play.
5. When changing a disc, press the stop button on the front panel or on the
remote control before opening the drawer.
6. If the drawer is opened during playback, it will take the disc a few seconds to
spin down.
7. Do not touch the disc until it has come to a complete standstill.
Warning:
The laser pick-up is located behind the spindle.
NEVER look directly into the laserbeam!!!
Under normal circumstances the laser needs no cleaning.
Do not use any kind of “cleaning CDs”!
10
Technical Specifications EMC 1UP
The following technical data were measured on randomized test objects and are
typical data. All measurements are made at 120V / 240V // 50Hz / 60 Hz.
Analog stage
Measurements
Parameters
Single ended
Balanced
Output level
Gain
Maximum output
THD
Channel separation
Equivalent input noise
(RMS)
1.6 V
1.6 X (4 dB)
>7V
< 0.002 %
> 90 dB
4 uV
3.2 V
3.2 X (10 dB)
>14V
Digital stage
Dynamic range
Signal to noise
THD
Frequency response
Output
Power consumption
(RMS)
(1 V out, 1 kHz)
(1 V out, 1 kHz)
(20 - 20 kHz)
23 W
The EMC 1UP has DC coupled analog output
Dimensions
Width
Depth
Height
Weight
483 mm
450 mm
120 mm
20 kg
-
19 inch
17.7 inch
4.7 inch
44 lbs
Specifications subject to change without notice.
11
100 dB
100 dB
-100 dB
0 dB
S/PDIF
If Service is needed
Your dealer will have all relevant information regarding the service centre in
your area, and will ensure that your unit is serviced with minimum delay. It is
our general policy to have your unit returned to you within five working days.
This is an average time, and can vary locally, depending on the workload at that
particular service station. If, for some reason, there are no service facilities
available in your country, please ship the unit to the following address:
Electrocompaniet as,
Breivikveien 7,
N-4210 Tau,
Norway
E-mail: [email protected]
Web: www.electrocompaniet.no
The end user is responsible for all shipping charges, insurance, re-importation
and duty charges. When shipping a product to the factory for service, always
include the following:
1. A sales slip or other proof of purchase if repair is claimed under warranty.
2. A proforma invoice with value of goods, stating that the amplifier is returned to Norway for repair.
3. An accompanying letter describing faults, symptoms, or problems with the unit.
4. Always ship the unit in its original carton and packaging material to
prevent damage in transit.
Electrocompaniet will not cover damages incurred in transit. If you require
further information concerning the operation of the unit, or if you have any
questions related to service, please do not hesitate to contact your dealer or
your national distributor.
PLEASE REMEMBER TO FASTEN THE TRANSPORT SCREWS!
12
Madei
nNor
way
W W W .ELECTRO CO M PANIET.NO