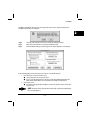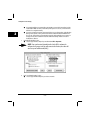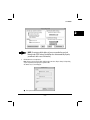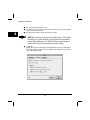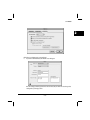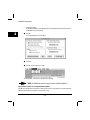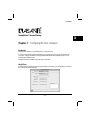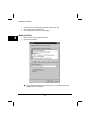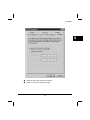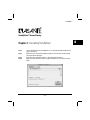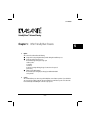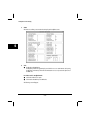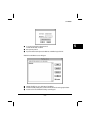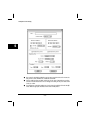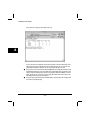
1
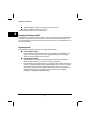
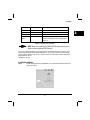
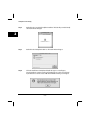
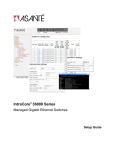
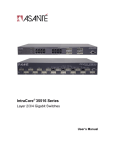
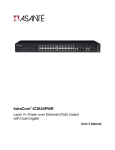
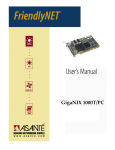
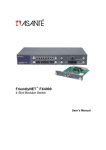
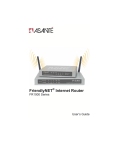
FriendlyShare
Visit Asanté at www.asante.com
Visit the Asanté Store at www.buyasante.com
•
•
•
Main Corporate Telephone Numbers
800-662-9686 Home/Office Solutions
800-303-9121 Enterprise Solutions
408-435-8388
Technical Support – Worldwide
801-566-8991
Technical Support Fax
801-566-3787
™
•
•
•
User’s Manual
Technical Support Bulletin Board System
408-432-1416
Asanté’s Online Store – United States callers only
888-491-4067
•
•
•
FriendlyShare
Internet Sharing
Copyright © 1999 Asanté Technologies,Inc. All rights reserved. Asanté,the Asanté logo,FriendlyNET,
FriendlyShare,and AsantéCare are trademarks or registered trademarks of Asanté Technologies. All other brand
names and products are trademarks or registered trademarks of their respective holders.
All features and specifications subject to change without prior notice.
06-00542-00 Rev.B 11/99
User’s Manual
FriendlyShare™
User’s Manual
Asanté Technologies, Inc
821 Fox Lane
San Jose, CA 95131
www.asante.com
November 1999
06-00542-00 Rev. B
–I–
FriendlyShare Internet Sharing
FriendlyShare Quick Start Guide
Follow these easy steps to start using FriendlyShare right now!
1)
Choose your server Macintosh, following the guidelines on the package: Minimum 120MHz PCI PowerMac, Mac
OS 8.1 or better, 32MB RAM.
2)
Verify that all of your computers are connected by Ethernet and that the Ethernet is working. Configure your client computers to get their IP addresses via DHCP.
3)
Insert the FriendlyShare CD-ROM and run the installer.
4)
Restart the server Mac.
5)
Locate the FriendlyShare folder on your hard drive and start the FriendlyShare Manager.
6)
Configure the following settings:
a) How do you connect to the Internet.
b) Which port is used for your ADSL or Cable Modem connection (if any).
c) Which port connects to your local LAN.
7)
Click "Key" and enter the software license key on the yellow sticker found on the CD envelope.
8)
Click "Save".
9)
Select "Start" from the "Service" menu.
10) You're ready to connect to the Internet from your client machines!
– II –
User’s Manual
Asanté Software License and Limited Warranty Agreement
SOFTWARE LICENSE AGREEMENT This is a legal agreement between you (either an individual or a single entity) and Asanté Technologies, Inc. By opening the package(s)
containing the SOFTWARE you are agreeing to be bound by the terms of this agreement. If you do not agree to the terms of this agreement, promptly return the unopened
SOFTWARE package(s) and the accompanying items including written materials and binders or other container(s) to the place you obtained them for a full refund.
1. GRANT OF LICENSE. Asanté Technologies grants to you the right to use one copy of the enclosed Asanté Technologies SOFTWARE program per serial number (the
"SOFTWARE" is in "use" on a computer when it is loaded into temporary memory (i.e., RAM) or installed into permanent memory (e.g., hard disk, CD-ROM, or other storage device) of that computer. Installation on a network server for the sole purpose of distribution to one or more other computer(s) shall constitute "use" for which a separate license/serial number is required.
2. COPYRIGHT. The SOFTWARE is owned by Asanté Technologies or its suppliers and is protected by United States copyright laws and international treaty provisions.
Therefore, you must treat the SOFTWARE like any other copyrighted material (e.g., a book or musical recording) except that you may either (a) make one copy of the SOFTWARE solely for backup or archival purposes, or (b) transfer the SOFTWARE to a single hard disk provided you keep the original solely for backup or archival purposes. You
may not copy the written materials accompanying the software.
3. OTHER RESTRICTIONS. You may not rent or lease the SOFTWARE, but you may transfer the SOFTWARE and accompanying written materials on a permanent basis provided you retain no copies and the recipient agrees to the terms of this Agreement. You may not reverse engineer, decompile, or disassemble the SOFTWARE, except and
only to the extent that such activity is expressly permitted by applicable law notwithstanding this limitation. The SOFTWARE is licensed as a single product. Its component
parts may not be separated for use in more than one computer. If the SOFTWARE is an update or has been updated, any transfer must include the most recent update and
all prior versions.
4. SOFTWARE SUPPORT. If product support for the SOFTWARE is not provided by Asanté, support will be provided by the manufacturer of the SOFTWARE. Please refer to
the manufacturer’s support number provided in the documentation for the hardware. Should you have any questions concerning this agreement, or if you desire to contact the Manufacturer for any other reason, please refer to the address provided in the documentation for the Hardware.
LIMITED WARRANTY – Asanté warrants that its SOFTWARE will perform in substantial conformance to the program specifications, therefore for a period of six (6)
months from the date of purchase from Asanté Technologies or its Authorized Reseller. Asanté Technologies warrants the media containing SOFTWARE against failure during the warranty period. No updates are provided. Asanté Technologies sole obligation with respect to this express warranty shall be (at Asanté’s discretion) to refund purchase price paid by Customer for any defective software products, or to replace any defective media with SOFTWARE which substantially conforms to Asanté’s applicable
published specifications. Customer assumes responsibility for the selection of the appropriate applications program and associated reference materials. Asanté makes no
warranty or representation that its SOFTWARE will work in combination with any hardware or applications SOFTWARE provided by third parties, that the operation of the
SOFTWARE will be uninterrupted or error free, or that all defects in the SOFTWARE will be corrected. For any third party products listed in the Asanté SOFTWARE documentation or specifications as being compatible, Asanté will make reasonable efforts to provide compatibility, except where the non-compatibility is caused by a "bug" or
defect in the third party’s product.
CUSTOMER REMEDIES - Asanté Technologies, and its suppliers’ entire liability, and your exclusive remedy shall be, at Asanté Technologies’ option, either (a) return of the
price paid, or (b) repair or replacement of the SOFTWARE that does not meet Asanté Technologies’ Limited Warranty and which is returned to Asanté Technologies with a
copy of your receipt. This Limited Warranty is void if failure of the SOFTWARE has resulted from accident, abuse, or misapplication. Any replacement SOFTWARE will be
warranted for the remainder of the original warranty period. Outside the United States, these remedies are not available without proof of purchase from an authorized
non-U.S. source.
WARRANTIES EXCLUSIVE - Asanté shall not be liable under this warranty if its testing and examination disclose that the alleged defect in the product does not exist or
was caused by customer’s or any third person’s misuse, neglect, improper installation or testing, unauthorized attempts to repair or modify, or any other cause beyond the
range of the intended use, or by accident, fire, lightning, or other hazard.
NO OTHER WARRANTIES - Asanté Technologies and its suppliers disclaim all other warranties, either expressed or implied, including, but not limited to, implied warranties of merchantability and fitness for a particular purpose, with regard to the SOFTWARE, the accompanying written materials, and any accompanying hardware. This limited warranty gives you specific legal rights. You may have other legal rights, which vary from state to state, or country to country.
NO LIABILITY FOR CONSEQUENTIAL DAMAGES - Asanté Technologies expressly disclaims all liability for any indirect or consequential damages whatsoever (including,
without limitation, damages for loss of business profits, business interrupted, loss of business information, or any other pecuniary loss) arising out of the use of, or inability
to use, this Asanté Technologies product, even if Asanté Technologies has been advised of the possibility of such damages. Any suit or legal action relating to this Agreement or Licensed Programs must be brought within one (1) year of the date the programs are purchased by the original licensee. Because some states/countries do not
allow the exclusion or limitation of liability for consequential or incidental damages, the above limitation may not apply to you.
LIMITATION OF LIABILITY The liability of Asanté Technologies arising from this warranty and sale shall be limited to a refund of the purchase price. In no event shall
Asanté Technologies, Inc. be liable for costs of procurement of substitute products or services, or for any lost profits, or for any consequential, incidental, direct or indirect
damages, however caused and on any theory of liability, arising from this warranty and sale.
U.S. GOVERNMENT Restricted Rights - The SOFTWARE and documentation are provided with RESTRICTED RIGHTS. Use, duplication, or disclosure by the Government is
subject to restrictions as set forth in subparagraph (c) (1)(ii) of The Rights in Technical Data and Computer SOFTWARE clause at DFARS 52.227-7013 or subparagraphs (c)
(1)and (2) of the Commercial Computer Software—Restricted Rights at 48 CFR 52.227-19, as applicable. Manufacturer is Asanté Technologies, Inc., 821 Fox Lane, San
Jose, California 95131. If you acquired this product in the United States, this Agreement is governed by the laws of the State of California. Should you have any questions
concerning this Agreement, or if you desire to contact Asanté Technologies for any reason, please contact your local Asanté Technologies subsidiary or sales office, or write:
Asanté Technologies, In., 821 Fox Lane, San Jose, California 95131.
WARRANTY DISCLAIMERS Asanté Technologies makes no other warranties, express, implied, or otherwise, regarding its software, and specifically disclaims any warranty for merchantability or fitness for a particular purpose. The exclusion of implied warranties is not permitted in some states and the exclusions specified herein may
not apply to you. This warranty provides you with specific legal rights. There may be other rights that you have which vary from state to state.
– III –
FriendlyShare Internet Sharing
About This Manual
This section provides an overview of the FriendlyShare Software Installation Manual. It describes chapter contents,
document and intended audience.
Chapter Contents
Chapter 1:
Describes the concept of creating a Local Area Network.
Chapter 2:
Describes the purpose and installation of FriendlyShare, a product designed to allow local area
networks to share Internet access through a single network computer acting as a "server" or
"gateway" to the Internet.
Chapter 3:
Describes how to troubleshoot your FriendlyShare installation, and how to obtain Technical
Support.
Chapter 4:
Describes how to uninstall FriendlyShare.
Chapter 5:
Describes other FriendlyShare features.
Chapter 6:
Describes troubleshooting and support.
Document Conventions
The following conventions are used for instructions and information.
Commands:
Commands are indicated in boldface font.
[NOTE: A heavy black arrow is used to call attention to important
information.]
Audience
This manual is intended for home users with little or no technical expertise in constructing Local Area Networks (LANs).
It assumes a basic working knowledge of the Macintosh operating system.
– IV –
User’s Manual
Table of Contents
Chapter 1
Introduction to Home Networking . . . . . . . . . . . . . . . . . . . . . . . . . 1
Chapter 2
Installing FriendlyShare on the
Macintosh PowerPC Computer . . . . . . . . . . . . . . . . . . . . . . . . . . . . 7
Chapter 3
Configuring the Client Computers . . . . . . . . . . . . . . . . . . . . . . . . . 17
Chapter 4
Uninstalling FriendlyShare . . . . . . . . . . . . . . . . . . . . . . . . . . . . . . . 21
Chapter 5
Other FriendlyShare Features . . . . . . . . . . . . . . . . . . . . . . . . . . . . . 23
Chapter 6
Troubleshooting and Support . . . . . . . . . . . . . . . . . . . . . . . . . . . . 27
List of Figures and Tables
Figure 1
A basic two-station network using a crossover cable . . . . . . . . . . 3
Figure 2
A typical 10BaseT Ethernet network . . . . . . . . . . . . . . . . . . . . . . . . 4
Table 1
TCP/IP Configuration . . . . . . . . . . . . . . . . . . . . . . . . . . . . . . . . . . . . . 9
–V–
FriendlyShare Internet Sharing
Notes
Use this section to record important information helpful when configuring FriendlyShare internet Sharing.
– VI –
User’s Manual
1
FriendlyShare™ Internet Sharing
Chapter 1: Introduction to Home Networking
Features, Benefits, and Requirements
Welcome to the world of home computer networking. Asanté Technologies offers the home computer owner the
means to simply and inexpensively link home computers into a Local Area Network (LAN), enabling the home user to
take advantage of the potential offered by shared resources. This potential has, until recently, been available only to
the business community due to factors of cost and required technical knowledge. Now Asanté Technologies provides
solutions to both of these issues and gives the home computer owner low cost and simple access to these benefits.
There is one very important reason for connecting separate home computers to establish an in-home network: shared
resources. An in-home network allows multiple computers to exchange information and share resources (printers, disk
drives, Internet connection, etc.). Each of these network implementations has its own unique set of features as well as
minimum system requirements.
In the past, Local Area Networks were confined to the business world. The cost of the hardware and software and the
complexity of their setup made home LANs difficult for the average home computer user to create. Advances in
technology brings the functionality of a corporate LAN into the home without the traditional concerns of the past.
Internet Access
With all of its advantages, a local area network has one drawback. It’s local. You are cut off from
the rest of the world. Without some connection to the outside, you can only communicate with computers that are part
of the local network. It would be nice if you could somehow “link” your home network to the Internet.
Inside the Asanté's FriendlyShare package is a powerful software program that allows an entire network to access the
Internet through a single connection. With a modem, ISDN, xDSL or a cable modem connection, an ISP (Internet
Service Provider) account, and the FriendlyShare software, you can have one computer act as the “gateway” to the
Internet for the other computers in the home. Every computer can have simultaneous access to the Internet, with no
complicated network IP addresses to assign or obscure protocols to learn. Just install the software and answer a few
–1–
FriendlyShare Internet Sharing
1
simple questions. Your Internet “gateway” can be up and running in minutes. Internet Connectivity for a network has
never been so easy in the past.
[NOTE: the hardware and software allow the same ISP account to be shared by
multiple users. please check with your ISP for proper usage].
System Requirements
To provide Internet access for your home network you will need a computer with the following to act as a server:
1.
2.
3.
4.
5.
6.
Macintosh CPU (PPC required - Will not run on Performa or Nubus PPC systems).
32MB RAM installed.
Built-in Ethernet OR free slot for an Ethernet card.
A modem, ADSL, ISDN, or cable modem connection.
An ISP account.
The FriendlyShare software installed and properly configured.
Building a FriendlyNet Network
The FriendlyShare software allows multiple clients in a LAN to share the same Internet account. There are several
options available for building a LAN.
Network Options For Your Home Network:
Option 1: 2-Station LAN
Many home networks will consist of 2 computers. To build a 2 station network you will need:
● One Macintosh computer (see above for system requirements) to act as the
FriendlyShare Server.
● A client computer with built-in Ethernet OR a free slot for an Ethernet NIC.
● Crossover cable (supplied with FriendlyShare Software.
The Asanté FriendlyShare software package allows both computers to share the same internet connection.
–2–
User’s Manual
1
FriendlyShare Ethernet
Crossover Cable
Workstation
Server
Modem
Figure 1: A basic two-station network using a crossover cable
Option 2: Multiple Station LAN
The most common network configuration is the traditional 10BaseT Ethernet LAN with multiple workstations
connected through a network hub.
–3–
FriendlyShare Internet Sharing
1
Server
Workstation
Modem
Network Hub
Workstation
Workstation
Printer
Laptop Computer
Workstation
Figure 2. A typical 10BaseT Ethernet network
To build a multiple station network you will need:
1. One computer (see above for system requirements) to act as the FriendlyShare Server.
2. Either built-in Ethernet OR a free slot for an Ethernet NIC (Network Interface Card) for each additional
computer connected to the LAN.
3. Hub or other Ethernet device with enough free ports to connect all of the workstations together.
–4–
User’s Manual
4.
One Ethernet NIC for each workstation to be connected to the LAN.
[NOTE:Some networks also use network peripherals such as printers or other
devices. Contact your local Asanté Technologies dealer for more information on
how to connect these devices to your LAN.]
Things to Remember
●
●
●
●
●
●
●
Before going to the next section, please make a note of the following:
You must have a Macintosh computer with Mac OS 8.1 or better, 32MB of RAM, an installed Asanté Ethernet
card and the capability to connect to the Internet. This computer with FriendlyShare enables a single
Internet connection to service the entire network.
You should also disable the sleep mode on the server. This can be found in the Energy Saver setting of the
Control Panel. You will see a setting that says,“Put the system to sleep after it has been idle for”. Change the
setting by moving the sliding bar to “Never”. Also, while still in Energy Saver, you will want to change the
settings under Preferences/Server Settings. Click both the “Restart automatically after a power failure” and
the “Never put the hard drive to sleep” buttons. Having the server computer in sleep mode will prevent any
clients from accessing the Internet.
You must have an active Internet account.
For a network to function, there must be two or more computers connected to the network and these
systems must be turned on. If one computer is turned on and the other unit(s) are not, there will be no
communication between them.
Each computer in the network requires an Ethernet card. This card must be configured and the device
driver installed before it will operate.
Follow the installation guidelines in this manual carefully. Each step of the process and the order in which it
is presented has been carefully chosen to help you perform a smooth, trouble-free installation.
–5–
1
FriendlyShare Internet Sharing
–6–
User’s Manual
2
FriendlyShare™ Internet Sharing
Chapter 2: Installing FriendlyShare on Your Macintosh
Introduction
About FriendlyShare
FriendlyShare, from Asanté Technologies, Inc. is a software product that allows multiple users on a local network to
share a connection to the Internet through a single machine that acts as the gateway. With FriendlyShare, users on a
small network can conveniently share simultaneous Internet access inexpensively. FriendlyShare supports many kinds
of Internet connections, including Dial-up Networking (OT/PPP) over a standard analog modem, ISDN, cable modem,
or ADSL.
Key Components
FriendlyShare consists of two core applications, FriendlyShare (server) and FriendlyShare Manager (for configuration
settings). FriendlyShare is installed on a computer that has access to the Internet via analog modem, ISDN, cable
modem, or ADSL. FriendlyShare handles tasks in the background and its operation is transparent to users. The FriendlyShare software manages all aspects of connecting from workstations on the local network to the Internet via an ISP.
FriendlyShare Manager allows the user to configure FriendlyShare to match the particular needs and parameters of his/
her individual system.
Installation
This section provides instructions for installing FriendlyShare on your network.
To install FriendlyShare, you must complete the following tasks:
● Verify the system requirements for the computer on which you will install the FriendlyShare software.
1. PowerPC CPU with built-in Ethernet or slot for Ethernet NIC
2. Mac OS 8.1 or later.
3. 32 MB RAM built in.
4. Working connection to the Internet.
–7–
FriendlyShare Internet Sharing
● Install the FriendlyShare software on the computer that will act as the server.
● Verify your installation(s) and resolve any open issues.
The rest of this chapter describes how to carry out these tasks.
2
Setting Up Cable Modems and ADSL:
For FriendlyShare Server workstations that are connected via a cable or ADSL modem, you need two Network Interface
Cards (NICs): one for the Internet connection and another to connect to the local network. Using two NICs creates a
secure separation between your local network and the Internet and also ensures that local network traffic won’t create
extra load on the backbone.
Preparing to Install
Before you install the FriendlyShare software, be sure to complete the following tasks:
●
●
Create Troubleshooting Tool
In order to troubleshoot your LAN and Internet connection, you will need to have the “WhatRoute” ping
program on each client computer. You can do this by copying the “WhatRoute” program to a floppy
diskette, or directly to the hard drive of the client system.
Configuring Your Installation
During installation, the Setup program assigns TCP/IP settings automatically for each FriendlyShare
Manager installation. In most cases, you do not need to change your configuration.
For the FriendlyShare server machine, the IP address is assigned by your ISP. For the Client workstations, the
IP address is assigned dynamically by the built-in FriendlyShare DHCP server. You do not need to manually
change TCP/IP settings unless automatic configuration failed during installation or if you have client
systems running on other platforms (such as Windows, Windows NT, Solaris, or Linux). To manually reconfigure TCP/IP settings, use the settings in the table below. For more information on FriendlyShare
configuration, see Configuring the FriendlyShare Manager.
–8–
User’s Manual
Setting
IP Address
Subnet Mask
DNS
Gateway IP
Address
Server Workstation
192.168. 0. 1
255.255.255.0
(Do not change.)
None
Client Workstation
automatic
automatic
automatic
(Same address as the local IP address of the workstation
on which the FriendlyShare Server is running. Default is
192.168.0.1.)
Table 1: FriendlyShare TCP/IP Configuration
[NOTE: We do not recommend using different TCP/IP settings unless you have
experience with configuring TCP/IP networks.]
If you elect to statically assign addresses to your client machines, in FriendlyShare manager in the “Options” section,
you must uncheck the box labeled “Enable built-in DHCP server.” Then, in each client machine you must manually
assign an IP address within the range 192.168.0.2 through 192.168.0.254. Each machine must have a different and
unique IP address in order for
FriendlyShare to function.
Installing FriendlyShare
Step 1:
Insert the FriendlyShare CD into the CD ROM drive. An icon entitled “FriendlyShare Installation” will
appear on the Desktop.
–9–
2
FriendlyShare Internet Sharing
Step 2:
Double Click on the icon entitled “FriendlyShare Installation.” The folder will open and the FriendlyShare Installer window will appear.
Step 3:
Double Click on the FriendlyShare Installer icon. The installer window will appear.
Step 4:
Click on the “Install” button. FriendlyShare will install and a progress screen will appear.
Once the installation is complete you will see the “Installation was successful” screen. Click “Quit”.
If your Macintosh does not have at least 32 MB of built-in RAM the following screen will appear.
2
– 10 –
User’s Manual
FriendlyShare will install but will not run. If you do not upgrade the memory in your computer and attempt to run
FriendlyShare the following screen will appear.
2
Step 5:
Step 6:
Step 7:
Click on the “Quit” button. Reboot the server to activate the FriendlyShare software.
Double-click on your hard drive icon, and open the FriendlyShare Folder.
Click on FriendlyShare Manager to open the program. The “Setup Configuration” screen will appear.
In the Setup Configuration, you must enter preferences or values in each of the following areas:
1. In the “How do you connect to the Internet” section,
● Select the appropriate connection for your system.
● If you are connecting through a dial up connection select the “Through Dial-up Networking” radio
button and then click the “Remote Access Setup” button and configure as described below.
2. In the “Options” section,
● If you want to automatically enable FriendlyShare each time the computer is started check the “Auto
start Service” box.
[NOTE: This feature cannot be used with America Online (AOL). AOL must be manually launched
before using FriendlyShare.]
– 11 –
FriendlyShare Internet Sharing
●
2
3.
If you want FriendlyShare to automatically assign IP numbers to your LAN client machine check the
“Enable built-in DHCP Server box (recommended). If this option is not chosen, each client machine
will have to be configured manually.
● If you elect to manually assign static (permanent) addresses to your client machines, in FriendlyShare
Manager in the “Options” section, you must uncheck the box labeled “Enable built-in DHCP server.”
Then, in each client machine you must manually assign an IP address within the range 192.168.0.2
through 192.168.0.254. Each machine must have a different and unique IP address in order for
FriendlyShare to function.
In the Cable Modem/ADSL section,
● Select the proper Ethernet adapter for your Cable Modem. This is important.
[NOTE: Since you have two Network Interface Cards (NICs) each must be
configured to its proper task. One will connect to the Internet; the other will
connect to your Local Network (LAN).]
4.
In the “Local Network Settings” section,
● Select the proper Ethernet Adapter for your local area network.
– 12 –
User’s Manual
2
[NOTE: Do not try to add the address of your server machine for your Local
Network in the TCP/IP settings. FriendlyShare does this automatically. If you do,
you will not be able to access the Internet. ]
5.
Click the Remote Access Setup button.
Note: This step is not necessary for ADSL or Cable modem connections. They are always “on”. Depending
on your setup however, this step may be required for ISDN.
The “Remote Access” screen will appear:
●
Enter your username in the “Name” section.
– 13 –
FriendlyShare Internet Sharing
●
●
2
●
Enter your password in the “Password” section.
If you want to store your password so that you will not have to enter it every time you start FriendlyShare, check the “Save Password” box.
Enter the telephone number of your Dial-up ISP exactly as you dial it.
[NOTE: Make sure that you enter any necessary prefixes, such as “*70” to disable
call waiting, or “9” to get an outside line. Also, you may need to add a comma (,)
to pause during dialing, such as “9,,18005551212”.This ensures that the phone
system has time to react to the commands the modem is sending.]
●
Click “Options…”
Configure PPP to connect automatically when starting TCP applications. The options dialog will look
like one of the following. In either one, make sure that PPP is selected and that you have checked the
“Connect automatically” checkbox.
– 14 –
User’s Manual
2
Click “OK” to close the Remote Access Control Panel.
6. If you click on the TCP/IP button, the “TCP/IP” screen will appear.
Enter the settings provided by your Internet Service Provider (ISP). You will not need to change these
settings unless you change your ISP.
– 15 –
FriendlyShare Internet Sharing
2
7.
Click the “Key” button.
The “Verify Serial Number” screen will appear. Enter the serial number (found on the yellow sticker on
the CD-ROM envelope) and click “OK”.
●
Click “OK”.
The Setup Configuration screen will appear.
●
Click “Save”.
●
From the “Services” menu, choose “Start”.
Your settings will be saved and your server will be up and running.
[NOTE: A Serial Number must be entered in order to install FriendlyShare.]
Congratulations, you have successfully installed FriendlyShare.
Note: When you make the first connection from a client, you may receive a message that the connection has timed out.
This delay is normal and if you try again the connection will succeed.
– 16 –
User’s Manual
FriendlyShare™ Internet Sharing
3
Chapter 3: Configuring the Client Computers
Introduction
Each of the other computers on your LAN will operate as a client of the server.
To connect to the Internet through the FriendlyShare server, each computer needs to be assigned an IP address. The
easiest way to configure an IP address is by using the built-in DHCP (Dynamic Host Configuration Protocol) server
provided by the FriendlyShare server.
Configuration for MacOS and Windows95 and 98 clients is shown below.
MacOS Clients
To configure a Macintosh running Open Transport Networking (most recent Macs), go to the Apple Menu, select Control
Panels, and open the TCP/IP control panel.
– 17 –
FriendlyShare Internet Sharing
1.
2.
3.
3
Under “Connect via:” select the Ethernet port that connects the Mac to the LAN.
Under “Configure” select “Using DHCP Server”
Close the Control Panel and select “Save” when prompted.
Windows 95/98 Clients
1.
2.
Click the Start menu, and select Settings, Control Panel.
Double-click the Network Icon.
●
Locate the TCP/IP line that is linked to the network card you use to communicate with the server.
Highlight that line and click Properties.
– 18 –
User’s Manual
3
●
●
Click the radio button “Obtain an IP address automatically”.
Click “OK” and restart your computer when prompted.
– 19 –
FriendlyShare Internet Sharing
– 20 –
User’s Manual
FriendlyShare™ Internet Sharing
Chapter 4: Uninstalling FriendlyShare
Step 1:
Step 2:
Step 3:
Step 4:
Insert the FriendlyShare CD into the CD ROM drive. An icon entitled “FriendlyShare Installation” will
appear on the Desktop.
Double Click on the icon entitled “FriendlyShare Installation.” The folder will open and the FriendlyShare Installer window will appear.
Double Click on the FriendlyShare Installer icon. The installer window will appear.
Change The Install to Uninstall, check the box marked “FriendlyShare v1.1”, and click the “Uninstall”
button.
– 21 –
4
FriendlyShare Internet Sharing
Step 5:
FriendlyShare will uninstall and the “UnInstalling” screen will appear. The installer will notify you that
uninstallation is complete. Click “Quit”.
If you attempt to remove FriendlyShare while the program is running, a screen will appear telling you
that “Some items to be moved or replaced by this installer could not be deleted because they were
locked or busy.”
Click “OK”. Rebooting the computer will finish removing the FriendlyShare files.
4
– 22 –
User’s Manual
FriendlyShare™ Internet Sharing
Chapter 5: Other FriendlyShare Features
1.
Option
This section of the toolbar allows the following:
● changes in the setup configuration that you made during the installation process.
● changes in your dial-up service access.
These will be changed only if you change your
1. Dial-up service.
2. Username.
3. Password.
4. Options concerning redialing, the type of connection or the protocol
you are using.
● Changes in your TCP/IP settings.
These would only be changed if you changed your Cable Modem/ADSL
service provider.
2.
Service
This command allows you to Start or Stop the FriendlyShare server software operation. If you checked the
auto-start service box during setup the only option available to you will be to stop the service after it has
been automatically started during the server’s boot up sequence.
– 23 –
5
FriendlyShare Internet Sharing
3.
Status
The Status screen allows you to monitor the activity of your FriendlyShare server.
4.
Tools
● The Black List & The White List.
FriendlyShare provides the opportunity for you to block the access to certain Internet sites by using
the Black list, or alternately to allow the client workstations to access only certain sites by means of
the White list.
5
Use of these tools is straightforward.
● Click on the Toolbar “Tools” option.
● Click on either the Black List, or the White List.
The following screen will appear:
– 24 –
User’s Manual
●
●
●
To set your password, click on Change Password.
Leave the “Old Password” area blank.
Enter your new password.
If you don’t want to Password protect the Black List or the White List, just click “OK”.
The Black List or the White List screen will appear:
●
●
●
Check the “Enable” box to access this feature of FriendlyShare.
To Add items, Modify existing items, or Delete items from the list click on the appropriate button.
To add a site to the list click Add. The following screen will appear:
– 25 –
5
FriendlyShare Internet Sharing
5
●
●
●
Enter a name for the Blacklist or Whitelist entry. You must enter the IP address of the internet site
that you wish to add to the White List or the Black List. Click “Add”.
To Delete a Web Page from your White or Black List, select the name of the Web Page you wish to
delete then click the “Delete” button. A screen will appear describing the entry to be deleted. Click
“Delete” to confirm.
To modify an item on the Black or White List, select the item to be modified. Click on the “Modify”
button. Make the appropriate modifications and click the “Modify” button.
– 26 –
User’s Manual
FriendlyShare™ Internet Sharing
Chapter 6: Troubleshooting Your Installation
& How To Get Support
6
If you encounter problems during/after installation:
●
●
●
●
●
●
Verify that the Server is able to dial up and access the ISP.
If the Server is unable to access the ISP, the problem is not with the FriendlyShare software. Troubleshoot the Server/ISP connection before continuing.
Verify that all hardware and cabling have been installed correctly.
Verify that there is a link on all Ethernet connections.
If a card or port (if using a hub or switch) does not have a link LED lit, the following could be the problem:
1.The port is defective,
2. Ethernet cable is not the correct type or is defective,
3. The card or built-in Ethernet is defective or,
4. The driver is not correctly installed.
Verify that you successfully completed all installation steps on the server and any client machines.
If you manually configured TCP/IP, verify that you successfully completed all configuration steps on
the server and any client machines.
Test the connection from a client to the Server by launching WhatRoute (included on the installation
CD ROM) and entering the IP address of the FriendlyShare Server (192.168.0.1).
[NOTE: Be sure that WhatRoute is in the “Ping” mode, and not its default “Trace”
mode.]
– 27 –
FriendlyShare Internet Sharing
You should receive a reply (not a timeout) from the server.
6
●
●
If you receive a timeout, verify that the cable, hardware and jacks are functional between the client
and the Server. If you are in a LAN involving a hub or switch, you may use the crossover cable supplied with the FriendlyShare software to connect a client machine directly to the server.
Test the ISP connection to the Internet by launching WhatRoute and entering the web address of the
Asanté Website (www.asante.com). You should hear the modem dialing and/or you should receive a
reply (not a timeout). If (www.asante.com) times out, ping the IP address of the Website as an alternative (205.267.167.10). If you receive a response using the IP address, but not the name, you may
have a DNS problem. Contact your ISP for support.
If all of the above steps fail, there may be a hardware failure. Contact Asanté Technical Support with
the results of your troubleshooting.
– 28 –
User’s Manual
Getting Support
Before contacting Asanté Technical Support, make sure you have followed the steps in Troubleshooting Your Installation. Technical Support is available from Asanté in the following ways:
World Wide Web:
http://www.asante.com
Telephone:
(801) 566-8991
Fax:
(801) 566-3787
Internet mail:
[email protected]
Bulletin Board Service:
(408) 432-1416
FTP Archive:
ftp.asante.com
Technical Support Hours:
6:00 A.M. to 5:00 P.M. Mountain Standard Time, Monday - Friday
– 29 –
6
FriendlyShare Internet Sharing
– 30 –
FriendlyShare
Visit Asanté at www.asante.com
Visit the Asanté Store at www.buyasante.com
•
•
•
Main Corporate Telephone Numbers
800-662-9686 Home/Office Solutions
800-303-9121 Enterprise Solutions
408-435-8388
Technical Support – Worldwide
801-566-8991
Technical Support Fax
801-566-3787
™
•
•
•
User’s Manual
Technical Support Bulletin Board System
408-432-1416
Asanté’s Online Store – United States callers only
888-491-4067
•
•
•
FriendlyShare
Internet Sharing
Copyright © 1999 Asanté Technologies,Inc. All rights reserved. Asanté,the Asanté logo,FriendlyNET,
FriendlyShare,and AsantéCare are trademarks or registered trademarks of Asanté Technologies. All other brand
names and products are trademarks or registered trademarks of their respective holders.
All features and specifications subject to change without prior notice.
06-00542-00 Rev.B 11/99