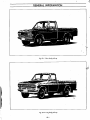
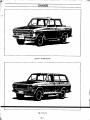
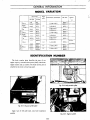
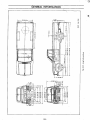
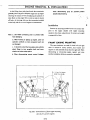
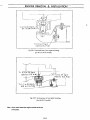
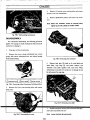
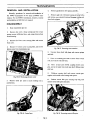
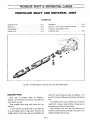
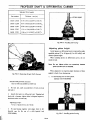
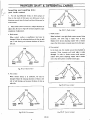
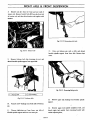
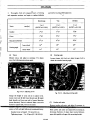
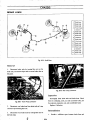
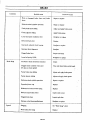
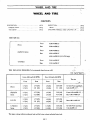
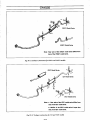
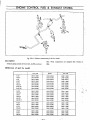
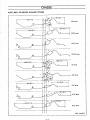
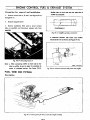
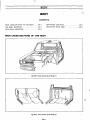
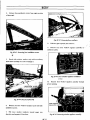
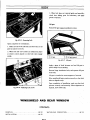
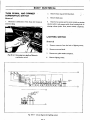
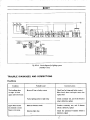
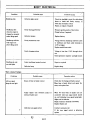
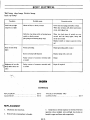
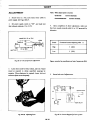
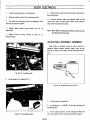
1
J
DAT5U N PICK UP
4
MODEL 521 SERIES
r
CHASSIS AND B ODY
i
r
I
NISSAN
I
f
J
J
NISSAN MOT
TOKYO
r
ev
JJN
20023
99999
R CO
JAPAN
LTD
t
f
L
R
v
I
41
0
OE
Jljl
QUI0J
OA1 SUN
UP
p CK
SERVICE
t ttU
MOOE
ES
521 SER
l lSStS
1001
i
j
il
1
1
1
It
It
11
l
t
I
po
to
N
N SS
tAQ10tlJAPAN
tOKYO
10
IV
1
r
FOREWORD
This seroice manual has been
of
our
prepared for
distributors and dealers in
providing effective
seroice
and
maintenance
proper
customers this manual should be read
for effective
1
utilization
Explanations
PleaJe
refer
se1
0e
g seroice personnels
and maintenance
of
are
The
carefully
essential
absolutely
following
satisfying
our
matters should be noted
of this manuaL
in this manual
hand drive but will
2
of aJsisti
series
DA TSUN PICK PU model 521
Since
the purpose
easily
to both
be
thi
are
mainly concerning
referred
and 13
also to the
left
the model
G N 521 U
right
hand drive models
15 ENGINE SERVICE MANUAL
or
LI3
for PL52 1 series for complete details
information concerning the chaJsis and
L16 and L20 ENGINE SERVICE MANUAL
of
the
car
because this manual describes
body only
3 All
part
names
in this manual
and
only the genuine
for replacements
4 All
on
seroice
conform
parts listed
information illustrations and
the latest product information
the contents
according
6
contained in this manual
available
at the time
use
are
based
ofpublication approval
this manual
are
responsible for revising
the SER VICE JOURNAL and SER VICE DAT4 AND
SPEClflCA 1IONS issued by the
servicing
DATSUN 521 PARTS CATALOG
A LOG must be used
in this PAR TS CA l
atispeci
onsfi
5 It should be emphasized that those who
to
to the
faclory
which carry the Intest
approved
factor
methods
Rights for alteration of specifications
and methods
at any time are
reserved
i
NISSAN
MOTOR
CO
JAPAN
TOKYO
LTD
v
SECTI ON GI
GENERAL
INFORMATION
DATSUN PICK UP
MODEL 521
SERIES
CHASSIS
BODY
I NISSAN I
MODEL VARIATION
GI
3
IDENTIFICATION NUMBER
GI
3
GENERAL VIEWS
GI
4
GENERAL SPECIFICATIONS
GI
a
FINAL
TRANSMISSION AND
SPHDOMETER RATIO
GI l0
RECOMMENDED LUBRICANTS AND
PERIOD ICAL MAINTENANCE
GI l0
I
JACKING UP AND TOWING THE CAR
GI la
t
NISSAN MOTOR CO
TOKYO
LTD
JAPAN
J
r
l
ll
GENERAL INFORMATION
I
t
O
Fig
Gl l
Short
body pick
up
ft
Fig
1
GI 2
Long body
GI 1
pick up
r
CHASSIS
I
I
f
Fig
Gl 3 Double
Fig
GI 4
GI 2
pick
Van
up
GENERAL INFORMATION
MODEL VARIATION
Vehicle
Engine
model
Pick up
R H drive
LH
521U
LS2I
L
4
R4W63
2
I
2 204 6
5
400
2
3
102
5000
300 6614
OtXl
4
F4W63
LS21T
Plck up
n
0
Pick up
US2JU
ULS21
VS21U
VLS21
N521U
NU21
JI3
5
881
8
4
R4W63
4
R4W63
4
R4W63
2
000 2
1
204 6
NU2lT
5
Rem ITkl
drive
Double
V
TIM speed
Seating 3Plcity payload kg lb
model
F4W63
4
R4W63
4
R4W63
4
Double
UNLS21
JlS
5
400
8
881
2
SOO
1
5
300
6614
Pick up
VN521U
V
102
3
NU21
PL521TU
ick
J
for
L16
up
454
2
1
000
for CANADA
PL52ITN
LG521
GS21U
0
GNS21U
GNLS21
S
The
number
body
engine
the
plate identifies
number and car number The
attached to the
113
2
000 2 204
1
JIS
2
000 2
1
6
4
F4W63
4
R4W63
204 6
4
F4W63
GNLS21T
maximum hose power
engine capacity
4
R4W63
LGS11T
Pick up
center of
cowl top
SAE
body
type uf
car
wheel base
number
plate
is
panel
Fig
Fig
GI 5 Chassis number
Upper face of left side
frame
US A
4
F4W63
GI 6
Body number plate
plate
near
front suspension
member
Fig
GI 3
GI
Engine number
Ill
J
IU
U
I U
I
en
G 1 Z 1a
o
in
mm
MDe
models
71
40
01
5012
81
I
1
I
1850172
IT
Jb 6PR
14
0Q
1035
1
6
91
3
PL521TN
PL521TU
Indicates
I
61
Unit
II II II
I
I
II
J
t
f
13
gM
253019 4290168 4325170
j
T
1
I
1
if
Mark
up
pick
body
Short
Ii
B
0
710 28
iio
In In
Gl
Fill
jj
r
M ci
r
Z oa
or
0M
0
1
o
in
o
II
71
I
mm
Unit
185146
2
I
I
oz
I
I
Q m Z ma
88
I
I
II
N
I
I
I
I
I
2 40
IIII
up
0M
pick
I
I
I
I
i
I
1
I
body
Long
ii
9
GI
Fig
Cl U
r
CHASSIS
Ir
T
1
c
E
E
1
c
o
J
0
o
I
I
1
S
o
9lE I
M
L
1
B B
ii
ai
C
M
0
M
O Z9 OZE l
N
1
I
n
r
OJ
oi
0
IB lS OVEl
I
I
o
11
Q
m
o
o
IT
q
iaio
I
00
t
o
O
00
r
iXlOr
O
N
ON
NN
J
1
11 ll
GI 6
m Zm a
r
ZT1 o a
oz
r
in
N
o
mm
Unit
J1
0
I
1r
e1
f
I
ON C
bN OL
N
00
I
Oo
tN
e
tC
1
rf
I
co
I
I
I
N
I
o
1111
Van
l1
GI
Fig
in
oN
N
Gl
L
CHASSIS
GENERAL SPECIFICATIONS
113
ENG lNE
52lU
L521
Item
L521T
U52lU
V52lU
UL521
VL521
345
4
Ovralllenglh
mrn
in
4
Overall widlh
mm
in
1 575
62 0
1 570
Overall height
mrn
in
1 545
60 8
1 530 60 2
Wheel base
mrn
in
2 530 99 6
2 530 99 6
mrn
in
1 850 72 8
325
3
170
1
171
618
1
c
c
g
E
5
Length
830
32
7
65 0
is
40 9
1
0
0
Width
c
mrn
1430
in
1
3
56
320
52 0
Height
mrn
in
0
Front
mrn
in
I 250 49
o
f
Rear
mrn
in
1
mrn
in
Minimum road clearance
400
1 240
49 0
48 8
16 5
2
200
7 87
2
kg Ib
960
Pay load
kg Ib
1 000
900 35 4
2
1 250 49
267 49 9
Vehicle weight
Maximum speed
420
15 7
1
2
1 245
u
u
2
040
1
1 650
267 49 9
187
36
7
1
1 035
4
116
22818
km h MPH
2
125
204 6
400
881 8
soo
J
102
1
125
1
78
055
2325 9
300
4
661
78 1
1
E
Maximum grade ability
sin
8
308
0
0 221
362
0
Minimum turning radius
m
5 2
52 17 1
ft
2
382
0
g
380
0
I
17
1
2
Seating capacity
Engine model
V
AH
12
Clutch type
5
J13
12
40
Dry single disc Diaphragm spring
Model
2
2
JI3
Battery volt capacity
0
5
R4W63
40
Dry single disc Diaphragm spring
F4W63
R4W63
c
El Synchro type
Hypoid
Hypoid
Re circulating ball
Re circulating ball
Final gear type
Steering gear type
oS
Warner
Warner
Front
Uni
Rear
Duo
Servo
Uni
Servo
Duo
Servo
Service
Servo
u
I
Parking
ii
Front
Rear
Rear
operated
Independent
Suspension
I
Mchanically
Semi
I
on rear
wheels
Mechanically operated
torsion bar
mmR
GI B
wheels
Independent torsion bar
elliptic leaf spring
rK
on rear
Semi
LT
elliptic
leaf spring
5
LI
1
3lb
102
1
loaded 500 kg
2
loaded 300 kg 661 41b
GENERAL INFORMATION
115
ENGINE
L16 ENGINE
N521U
NL521
NL521T
UNL521
3
170
4 325
1
545
2
530 99 6
VNL52 I
4 345
1 575 62 0
60 8
1
618
530 60 2
2 530 99 6
1 850 728
830
32 7
3
56
400
1
157
320
52 0
420
1 650
1 040
65 0
40 9
GNL52 I
LG521T
4
715 185 6
62 8
1
575
1 545 60 8
1
545 60 8
2 530 99 6
2
770
1 850 72 8
2 240 88 2
1 430
3
56
1 430
3
56
400
15 7
400
15 7
1 240
49 0
48 8
900 354
62 0
109 1
1
250 492
1
250 49 2
1250 49 2
I
250 492
1
267 49 9
1
267 49 9
1267 49 9
I
267 49 9
187
200 7 87
960
2
4
116
1
36
7
035
1
000 2 204 6
0 296
5
17
2
00
1023
1
140
253
0
5
1
2
368
0
366
0
2
1
lI5
12
Dry single disc
Diaphragm spring
R4W63
2
Hypoid
Re ciecula ting ball
Uni
Servo
Duo
Mechanically
operated
wheels
Independent torsion bar
elliptic leaf spring
6 00
12
6 PR LT
14
Hypoid
6 00 14 8 PR LT
Duo
115
40
F4W63
R4W63
F4W63
Re
circulating ball
Uni
Servo
Duo
Servo
Servo
Mechanically
on rear
wheels
operated
on rear
Independent torsion bar
Independent
Semi
Semi
50
5
4
18
Hypoid
Servo
Uni
Servo
0 247
Warner
Re circulating ball
elliptic
0 289
Dry single disc Diaphragm spring
R4W63
Hypoid
50
0 215
12
Dry single disc
Diaphragm spring
Servo
84 4
135
60
Re circulating ball
5
78 1
5 6
112
40
Warner
operated
2 204 6
113
Warner
Mechanically
on rear
1 000
2
F4W63
Duo
2 226 6
2
R4W63
Uni
Servo
40
Diaphragm spging
Warner
010
17 1
L16
Dry single disc
F4W63
125
301
0
2
7 87
5
115
40
5
87
351
0
5
200
1
454 1 000
1
17
5
2 1274
140
2
12
300
MIA
5
87
348
0
1
2
965
2 325 9
400
8818
4
84
135
200 7 87
1 055
2 281 8
GNL52 IT
2
1 245
5
16
GN521
G521
ENGINE
U
2
1
I 430
PL521lN
290 168 9
1 595
1 525 60 0
115
G521U
PL521TU
4
1
171
1 570
1
Semi
113 ENGINE
VN521U
leaf spring
wheels
torsion
bar
elliptic leaf spring
Mechanically operated
on rear
Independent torsion bar
Semi
elliptic leaf spring
6 PR LT
14
6 00 14 6 PR LT
6 00 14 6 PR LT
14 6 PR LT
6 00 14 6 PR LT
6 00 14 8 PR LT
GI 9
wheels
jt
r
CHASSIS
FINAL
TRANSMISSION AND
SPEEDOMETER RATIO
L521T
NL521T
PL521TU
LG521T
GNL521T
PL52ITN
N52lU
52lU
NL521
UNL521
L521
UL521
GN52lU
VN52lU
G521U
V52lU
GNL521
UNL521
LG521
VL521
Item
4 875
Final gear ratio
4 625
Control system
f
4 875
375
4
R4W63
F4W63
Type
S
4 625
375
4
4 625
R4W63
Column shift
Column shift
Floor shift
U521
1st
3 657
4 243
5 000
2nd
2 177
2 558
3 014
3rd
1 419
589
1
1 685
4th
1 000
1000
1000
Reverse
3 638
u
Speedometer
gear ratio
19 5
367
4
18 5
17 5
5 146
18 5
19 5
17 5
RECOMMENDED LUBRICANTS AND
PERIODICAL MAINTENANCE
RECOMMENDED SAE VISCOSITY NUMBER
ENGINE
OIL
Multi
viscosity
5W 20
oil
I
IOW 30
40
10W
20W 40
Single viscosity oil
20W
L
20
30
lOW
GEAR
OQ
01 L
SAE BO
SAE 90
30
20
10
0
10
20
30
40
22
4
14
32
50
6B
B6
104
Temperature range anticipated
GI 10
IOe
OF
18 5
CmZm a
rJ1
1oo s s 1 ZC1 C rc CD rJ o
3D
SHEL
SheUXIO
MOBILE
3D
Oil
lOW
Enco
ES O
20
Supc
MobilO
BPSuperVl5Coda
BP
shclpuD
20
ex
HD
lOW 20W
Lube
80 80 90
Lube
Mobile
Er
Eocol
u
E
30 40 SO
3D
MotrOiJ
40
20W
30 40 SO
ES O
HOEP
140
lOW 20W
30 40 SO
Enco
80
90
u
Oil
E
90
140
RetinlA
1X
Don
Shel
Shel
IlD
80
90
140
MobilegrascP
140
GP
E
Mobile Bukcl
5W
l
Hydr
Mulu
80
90
140
ex
HD40
H
Enco
greas
Esso
purpo
AtluJPcrmaGd
Enco FlUid
c
oIHD
Buke
Essu
lOW 20W
BPEne
lOW lOW
30 40 SO
IJPGcuOil
HypogcarOil
1I0Er 90EI 140EP
IlrakeFIl
lkl
I OEP 90EP
140EP
UP
BP
Ill
GTX20W
IOW
20
ulw D
Canroli1 Cutrol Cunol
SW
lOW 20W
30 40 SO
CntrolHyp
Hypoy
Cntrol
90
HI
Brake
B
40
XL2QW
frost
Anu
Energ a
SO
CASTROL
Mobile
L2
20 3D SO
3Q
Frc
l
lull
l ic
Gear
Enco
so
v
Super
Oil
Gear
20
80
Mobile
Oil
Eoca
lOW
80Er 90EP
SheUSpu
Mol r
Extra
40
IOW
or
lOW lOW
40
IOW
Oil
5
shclzon
Il
ShelXIOQ
Slo
I
oz
z uI
20W
MobiJe Mobile
tNeO Uni o
z oa
O
lOW
Special
r
CadwlGirg
LM
90
Castwl
FlUid
fCareezt
5troIAnti
v
lteh
Cll
Crl n
C
purpo
MolrOi
FivcSI
u
CALTEX
30
Cunom MotalOn
40
20W
10W
20
lOW 20W
Star
Five
30 40
UmveualThbn
80
MultproeThban
90
80
140
E
AIPurpow
Mufaklti Marflk
Coflirmecl
FludHD
Brake
Anti
marked
u
CHEVRON
RPMSupromctI
30
MOlor
40
20W
IOW
RPMSpcla
Oil
Oil
ITXACO
Mot r
VICl
20
lOW 20W
Gc
Lubn
RPMMulli
ScI
30
40
Umvers
al
80
90
140
RPM
Geu
Oil
20W
O
Mol r
lOW
Havoline
90
140
lOW 20W
Havolin
30 40
UmvcnalGer
Lubn EPI O EP90
u
80 90
Ge
Multi
Multi
Extu
Grease
purosc Purposc
Lubm
20
HD
RPM
Jnt
Oil
3D
Lubneat
80
motive
EP
140
AtluPcIl laGl
lard
HUldoiO
and
Atlas BTake
Anti
oils
fren
to
superHD
ColanFtre z
MurakUi MarfkAl BukeFlJ
Anti
Colan
permisble
it
avilabe
not
oils
MANUFCTRE
gradc 21048
L
MulL
MIL
l1048
L
APIMS
MS
Recu1ar MIL API
L210S APIGL
210SB
MIL
MIL
L
10924
GLS
API
Q
6
Z3z
a
l
G
Clutch
G
MIL
puroseG
Mul i
lkc
BT
2108
Q
70R3
COLANT
EFijZE
G
MIL
ANTI
brand
above
the
case
In
l
I
s
1
Zt1
1Z
INTERVAL
I
II I
ct
36
72
24
48
X
R
33
69
22 46
X
X
X
X
30
66
20
44
X
X
X
X
27
63
18
42
X
X
X
X
24
60
16
40
X
X
X
X
21
57
14
38
X
X
X
X
18
54
gO
12
36
60
X
X
15
51
87
10
34
58
X
X
X
X
12
48
84
8
32
56
X
X
X
X
9
45
81
6
30 54
X
X
X
X
6
42
78
4
28 52
X
X
X
X
39
75
50
X
X
X
X
X
X
X
MAINTEC
26
2
3
X
X
X
X
X
X
X
X
X
X
X
X
X
X
X
X
X
X
X
X
X
X
X
X
X
X
X
X
X
X
X
X
X
X
X
X
X
X
X
6
X
1
0
Replacmnt
R
R
kilometrs
of
PL521TN
PL521TU
except
els
Allm
top
miles
level
of
oil
POINTS thousand thousand
LUBRICATNG
of
of
Number
Number
jOints
necsary
gear
ball
except
if
diferntal
oil
e
eng
up
heel
earn
transmio
eck
res voir
y
luid
water suthaofrt
9
bushings
top
parts
linkage
linkage pedal linkage box ball control supenio grease joint spline
oelrato peratd brake gear linkage is ion pIes bearing slhIaerft slIheraft
level
joints
oil
of
t
g
9
I
f
or
Change Change
nec s
brak
cae dist
if
Refil
Change Grease
up
Cl
Lubricate Lubricate
han ste ste
tra
all
wt
pro pro
Grease Check Grease Grease Grease Repack Grease Grease
z o0
mz
F
X
r
R
24 48
36 72
X
r
33 69
X
20 44
30 66
38
14
57
36 60
12
JAI
R
E
34 58
10
87
51
15
X
R
54 90
18
40
16
24 60
21
42
18
63
27
46
22
IN
32 56
8
12 48 134
NANnECE
45 81
9
42 78
I IAI
llace
Re
28 52
4
6
ent
30 54
6
26 SO
39 75
R
X
X
X
2
3
6
0
1
leak
lor
eteilors
l
etc
iles
I
nuts
oi
oi
con ection
d
TS
N
l
I
Jsand
too
PO
lOusand
t
oi
oi
CE
J
SER
ber
Nu
ber
Nu
Wpe
er
oos
distrbutor cartidge
Jgs
l1
ele
NE
ENG
eJtcept
odels
I
p
larl
s
cleane
llace
re
air
llace
Re
replace
or
or
Checl
coed
IiIter cartr
oil
llace
Re
Replace
a
g
and
Wpe Mad
ldge
iW
ater
ling
li
ti
Olt
luel
leak
io9
and
tralner
breal Wpe
li
ent
PL5
ani1o
pointS
Iinder
c
igniton tension
clear nce
e
al
Reti9hen
t
Adju
adiust
Ioses
idling line
oil
lor
lecillc
s
bat e
luel engine
e
n
g
i
n
e
and
CMck Checl
Ch
e
c
l
A
d
j
u
s
t
CMc
l
Checl
belt
ian
J
v
MAINTEC
X
24
48
33
69
22
46
X
30 66
20
44
X
63
18
42
24 60
16
40
X
21
57
14
38
X
18
54
90
12
36 60
15
51
87
10
34 58
X
12
48
84
8
32 56
X
g
45
81
6
30
54
6
42
78
4
28
52
X
26
50
X
27
INTERVAL
X
36 72
39 75
X
X
X
2
3
JJ Vi
X
X
X
X
X
X
X
X
X
X
X
PL521TN
PL521TU
except
els
Al m
X
0
POINTS kilometrs
miles
of
of
thousand
thousand
SERVICE
of
X
X
X
X
X
BODY Number
AS IS
C
Number
X
wear
cylinders defcts
X
X
X
X
X
X
X
X
X
X
X
X
X
X
X
X
X
X
X
X
X
X
X
bolts
positon angle fjloaninget
brake
and
hand
lin gs
parts
box
gear
whe l
load
rotae
pre
supenio stering bearing damge
and
turni g
and
universal
alignmet shaft aiming mountigs cracks
cylinder ulic atighsn etighten whe l discs balnce whe l ropel r light ody
ake
Check coneti Check Check Overhaul Check Check Check Adjust Check Check Check Retigher Check Relighte Check Road
clu clu
Check
for
or
brake brake
11
X
nd
o
p
e
r
a
t
i
o
n
pedal sy tem leaks liners as embly absor e
Iree
X
linkage
hoses
play
X
X
X
pi ngs
of
X
X
6
1
X
X
X
X
X
for
etc
100 bra
shock
for
for
e
I
t
hy an
an
Ir
I
wt
wt
fre
he
Ir
tes
I
m ZmQ
60
30
INTERVAL
MAINTEC
R
X
X
X
X
R
X
X
X
X
X
52
24
48
X
X
21
45
X
X
18
42
X
X
15
39
X
X
12
36
X
X
g
33
X
X
6
X
X
3
X
X
X
R
54
Z r1 o Q
X
27
57
r
oz
X
X
X
X
X
X
X
r
X
X
X
X
X
X
X
X
X
X
X
X
X
X
X
X
X
X
X
X
X
X
X
X
X
X
X
X
X
X
X
X
X
X
Replacmnt
X
X
6
0
necsary
whicevr
jf
top
miles
level
POINTS thousand
of
PL521TN
PL521TU
For
LUBRICATNG
oil
diferntal
months
Number
necsary
gear
or
of
A
first
comes
oil
transmio
if
brake
drum
res voir
fluid
c
h
e
c
k
engine
brake
or
Change Change
Refil
up
C
L
L
heel
eam
water water shaft
bushings
linkage
distrbuo acelrto
co ling co ling
Change Change Grease
U1
pedal
operatd
foot
Lubricate Lubricate
top
linkage
brake
hand
level
joints
oil
ball
box
gear
linkage
parts
supenio
of
ste ring ste ring nip les
all
grease
joint
bearing
shaft
whe l
proel r
Grease Check Grease Grease Repack Grease
r
60
30
27
51
57
X
24 48
INTERVAL
MAINTEC
R
R
X
X
X
X
X
X
X
X
X
X
R
R
X
X
X
X
X
X
X
X
X
X
X
X
X
X
X
X
21
45
18
42
15
39
X
X
12
36
R
R
g
33
X
X
6
X
X
X
3
X
X
X
54
I C
I
IC
C
X
X
X
X
X
X
X
X
X
X
X
X
X
X
X
X
X
X
X
X
X
X
X
X
X
X
X
X
X
X
X
X
X
X
X
X
X
X
X
X
X
X
X
X
X
X
X
X
X
X
X
X
X
X
X
X
X
X
X
X
X
X
X
X
X
X
X
X
X
X
Replacmnt
X
X
X
6
X
0
X
X
X
X
X
X
whicevr
POINTS
SERVIC
PL521TN ENGIE
521TU
I
sy tem
I
leaks
of
for
thousand
nuts
months
first
comes
P
A
conetis leaks
air
hoses
spark
distrbuo
type head
filter ridge I nder
clearn
igntion cables tension
djust tension
val
an
buret r
Replace Check Check Replace Replace Retigh n Adjust
lace lace
0
or
or
c
elt
hig fan
e
up ine
en
tu
fue
oil
for
e
en
tion
lo se
of
es
oper 5wit
for
for
pi ngs andwater gravity tension
idling
emison
S
I
elment break r strainer mandanifold
cleaner plugs fuel bolts timing
c
For
C
etc
points
or
Number
control
V
miles
of
R
conelis operation vcoanlvterosl elctrial
of
specif belmpt pi ng
ry
ba
air
for
mp ion
peratio
em
fa
ho air
Check Check Check AdjuSl Engine Check Check Check Check Check Check Check Check
5z
Z n o0
r
Cm Z m 10
I
X
57
48
21
45
X
X
X
X
X
24
X
X
X
X
X
X
X
X
X
51
X
X
X
X
30
27
X
X
X
X
60
X
X
X
X
X
X
X
X
X
X
X
X
X
X
X
X
X
INTERVAL
MAINTE C
X
18
42
15
39
12
9
X
X
X
54
X
X
X
X
X
X
36
X
X
X
X
X
X
X
X
X
X
X
X
X
33
X
X
X
X
X
6
X
X
X
X
X
3
6
X
X
X
X
X
X
X
0
etc
whicevr
POINTS
8
For
thousand
of
CHAS I
wear
hoses
or
BODY months
first
Number comes
bolts
pi ngs
of
SERVICE
PL521TN
PL521TU
coneti s
miles
play
iree
pedal
for
cylinders operation
sy tem
brake brake
brake
def cts
clutch clutch leaks
Check Check for
or
drums
liners
and
caliper
positon
linkage
asembly
parts
sbore
sshock upenio
whe l
and
load
boX pre
ste ring bearing damge
for
c
y
l
i
n
d
e
r
s
lin gs brake retighen retighen whe l discs
hydraulic front whe l
foot brake
Check Check Overhaul Check Check Check Adjust Check
hand
and and
e
ooJ
angle flange
rotate
turni g
joint
and
universal
alignmet shaft mountigs
bal nce whe l
aimng
whe l front
head
and
Check Check
propel r
body light
Retigh n Retigh n
test
Check Road
CHASSIS
LUBRICANTS CAPACITY
sA
U
Liter
41
Fuel tank
l
I
ai
Imp
measure
measure
gallon
gallon
10 8
9 0
Without heater
6 0
58
1
32
1
With heater
6 6
74
1
45
1
5
MOO
c
Ul
Coolant
Without heater
c
4
6
1 69
141
6 8
1 80
50
1
3 0
0 79
0 66
1 06
0 88
60
c
lUl
With heater
113
115
Engine
Oil pan
Ll6 Engine
4 0
113
0 63
0 17
0 14
0 7
0 19
0 15
20
53
0
0 44
115 Engine
Oil filter
Ll6 Engine
Transmission
case
33
0
Steering gear box
Differential
0 83
case
0 087
0 073
0 22
0 18
JACKING UP AND TOWING THE CAR
JACK UP
Screw
When
jack
jacking
up Ihe front side
apply
screw
jack
10
screw
jack
to the
the
front jacking point beneath lower link
When
rear
jacking
up the
rear
jacking point beneath
In
no
event should
side
rear
screw
apply
spring
jack be applied
to
other
points
Fig
GI 18
CI 12 FTont jacking
point
GENERAL INFORMATION
Supportable point
The front supportable points
are
two
places
in frame
side member
The
spring
Fig
CI 13 Rear
rear
supportable points
are
in front of the leaf
of frame side member
jacking point
Garage jack
Note
When
carrying
out
operations with the
car
jacked
up be sure to support the car with stands
When jacking up the front side
front
cross
member
or
center
apply
garage
jack
to
of suspension
portion
member
When jacking up the
rear
side
apply
the
jack
to rear
axle housing
Fig
GI t4 Front jacking
Fig
CI t6 Front
Fig
CI t7 Rear
supporl4bk point
point
supportable point
TOWING
When towing forward
apply
a
rope
to
tension
rod
bracket
When towing rearward
apply
a
rope
to leaf
spring
shackle
Fig
CI H
Rear
jacking point
Note
GI 19
When towing be careful
not
to
apply
load
rapidly
or
CHASSIS
Fig
GI I8 Front
towing point
Fig
GI I9
towing point
4T
R
SERVICE JOURNAL OR BULLETIN REFERENCE
JOURNAL
DATE
BULLETIN
t
or
No
PAGE No
SUBJECT
GI 20
SEen ON ER
GI
ENGINE REMOVAL
INSTAllATION
DATSUN PICK UP
MODEL 521
SERIES
CHASSIS
BODY
I NISSAN I
NISSAN MOTOR CO
TOKYO
JAPAN
LTD
ENGINE REMOVAL AND
INSTALLATION
ER
1
lGIl
El
lE
EtlG1tlE
REMOi
ll
lSl
Il
l g
tlOtl
LLA
ItlSfA
At10
IlEfAOL
II
ER 3
CON1EN15
ENGINE
REAR ENGINE
RON
ER
HI
RemoVal
nstaHattOn
l
110l
2
3
ING
MOUN
ING
MOUN
ER
H
it
I
I
J
6
fig EJI
2
Engin
tment
comp
EA 1
or
th
L16
ngin
4
CHASSIS
Removal
12
Disconnect
speedometer
cable
Disconnect flat attaching plug
Scribe alignment marks
on
hood around hinges and
from
connector
reverse
lamp switch
remove hood from hinges
2
drain coolant
Completely
engine
and transmission
13
lubricant
Disconnect
remove
3
Remove blow by hose
from
cross
shift rod and
select
rod
shaft assembly by removing
and
then
cross
shaft
bracket from side member
rocker cover and air
cleaner
14
4
Remove radiator
5
Disconnect battery cable and
grille
Disconnect
front
exhaust
from
tube
exhaust
manifold
remove
battery offthe
car
15
6
Take off both upper and lower radiator hoses
loosen
fIxing
bolts
of
radiator
and
take
it
companion flange
Then
out
Disconnect
propeller
shaft
by disconnecting
it from
of gear carrier
in
sequence
16
7
Disconnect fuel tube from fuel pump
8
If equipped with heater
Jack up transmission
engine mounting
cross
a
little and then
member
its hoses at
engine
rear
by removing fixing bolts
of engine mounting insulator mounting
remove
remove
cross
member and
hand brake cable clamp
attachment
9
Disconnect
accelerator control
linkage and choke
17
wire at the carburetor side
Remove
sulators to
10
coil
Disconnect
wirings
for starter
alternator
bolts securing front engine mounting in
cross
member
ignition
oil pressure switch and thermal transmitter
18
II
Remove
clutch operating cylinder
and its
Hook with cable
are installed on
relurn
the other
spring
at
Fig
Fig
ER J
Removing clutch operating cylinder
ER 2
or
chain to
stringers
engine cylinder head
one
hooks
at the front and
the rear
4
ER
which
Lifting engine for the J 1 J and
J15 engine
ENGINE
At this lifting lower jack
gradually
REMOVAL
INSTAllATION
placed under the transmission
check
draw offjack at adequate stage
hoist up engine
observing the tension of wire and adjusting the position of
chain block
so
that
engine tilts in order
off body At this stage take
on
the
care
disconnecting parts
for
before
positions
actually disconnecting
to make it cleared
that accessories installed
body side do not touch engine and transmission
Installation
Reverse the removal
to
parts
the
engine
insulators have been
Note
8
Use fender
from
b
protecting
cover
to
protect
body
is
supported by
procedure
steadily
replaced
but do not connect any
until
engine
mounting
since the power unit
weight
them
damaging
When
hoisting
or
operation carefully
jacking
up
engine
carry out
that component parts
so
are
FRONT ENGINE MOUNTING
not damaged
The
c
It should be noted that
adopt flange
to
long body
join propeller shaft and
mission and others adopt
spline
d
remote
When
series vehicles
disconnecting
1 1
to
1 6
kg
m
linkages
IT
I
I
8 0 116
1I lb
or
1 1 to
1 6
I
1 1 to 1 6
0 11 6 It Ib
Crank
2 S
g m
to 20 2 It Ib
Fig
kg
center
m
line
I
ER 5 Sectional view
116 6
to
20 2
I
offront engine mounting
for theJ13 andJlS engines
ER 3
kg
S O 11 6 II Ib
I
8
however
remounting engine
J
j
T
noted
used for both left and right
member installation bolts are removed
I
T
be
are
that bracket and
support for left side differ from those for right side When
dismounting
control
insulators
It should
sides
trans
same
m
support
or
and
reinstalled
cross
CHASSIS
T
T
2 6 to 3 2 kg
2 5 to 3 Okg m
181 to 21 7 ft Ib
I
m
1
O
jj
l
l
Fig
ER 6 Sectional view
for
offront engine mounting
the L t6 engine
REAR ENGINE MOUNTING
One type of
with
long
rear
extension
T
engine mounting
is used for
engine
two
For engines with short extension
types of
rear
engine mounting for
and L series engines
are
33 to 3 8 kg m
123 9 to 27 5 ft Ib
r
T
lIto 1 6 kg m
8 0 10 11 6 ft Ib
Fig
ER 7 Sectional view
for
of rear engine mounting
the GN52t model
4
ER
used
the J series
engines
v
ENGINE REMOVAL
INSTALLATION
i
to
kg
m
n
4 3 to 5 0
T
31 1 to 36 2 ft Ib
I
I
i
T
5 to 2 1
1
10 8
Fig
kg
m
of rear engine mounting
the U V N521 models
I
3 3 to 3 8
kg
15 2 ft Ibl
ER 8 Sectional view
for
T
to
lu
iLn
m
23 9 to 27 5 ft Ib
d
T
j1
5 to 3 1
10 8
T
1
1
to 3 6
kg
to
J
m
8 0 to 11 6 ft Ib
Fig
ER 9 Sectional view
for
Note
Arrow marks means that
engine
kg
of rear engine mounting
the PL521 model
removal carries out
at this place
ER 5
m
15 2 ft Ib
CHASSIS
t1
lU rF
JOURNAL
DATE
H
ll l
liR
1
REF
or
PAGE
BULLETIN
PH RW
No
SUBJECT
No
ER 6
rF
REl
SECTION CL
CLUTCH
CD
J
DATSUN PICK UP
MODEL 521
SERIES
CHASSIS
BODY
I NISSAN I
NISSAN MOTOR CO
TOKYO
JAPAN
LTD
CLUTCH
CL
1
CLUTCH CONTROL
CL
5
SERVICE DATA AND
SPECIFICATIONS
CL10
TROUBLE DIAGNOSES
AND CORRECTIONS
CL 11
CLUTCH
L
CLUTCH
I
CONTENTS
DESCRIPTION
CL 1
Disc assembly
CL 4
REMOVAL
CL 2
Release bearing and sleeve
CL 4
DISASSEMBLY
CL 2
INSPECTION AND ADJUSTMENT
CL 2
REASSEMBL Y
4
CL
REINSTALLATION
CL 3
Clutch assembly
CL 4
Release mechanism
CL 5
DESCRIPTION
The clutch is of
type
a
single dry disc diaphragm spring
The major components
plate diaphragm spring and
provided
with riveted
springs arranged
plales
are
wire
on
clutch
cover
engagement
rings The clutch disc
is
to
both surfaces and coil
in a link The coil
and withdrawal lever
Release bearing sleeve
pressure
control clutch
Each part
Therefore
springs absorb shock
clutch
while engaging the clutch softening and smoothing clutch
used
engagement and disengagement
of the clutch
when
assembly
are
a
assembly
is secured with rivets
trouble is uncorrectable
with
a
new
replace
assembly
o
44
44
732
1
732
1
dia
o
M
e
Xl
240 9 45 dia
g
255
10 04
dia
e
CX1
Fig
CLot Construction
CL 1
Unit
of clutch
mm
in
the
CHASSIS
REMOVAL
The clutch
same
2
ass
manner as
mounting
mbly
is dimlounted
the engine assembly
the clutch
assembly efer
primarily
Thus
in the
I
release mechanism
Remove dust cover from clutch
housing
Remove
bearing
when dis
2
the Section TM
to
Removing
separate
Transmission and other relative sections
3
return
Remove release
front
from
spring
the withdrawal lever from
cover
and
bearing
remove
sleeve
and
bearing sleeve
and
bearing
sleeve from
withdrawal lever from withdrawal
lever ball pin
Fig
CL 2 Clutch
arsembly
DISASSEMBLY
When
loosen
remove
Withdrawal lever ball pin
3
Return spring
2
Withdrawal lever
4
Release
Fig
separating clutch assembly from flywheel
and
1
installation
bolts diagonally
and
3
CL 4
Removing release bearing and withdrdwallever
Withdraw release
use
of a
bearing
bearing
from bearing sleeve by Ihe
bearing puller
gradually
CD
Fig
CL J
Removing
clutch
Release bearing
assembly
Fig
Note
When
CL 5
pport clutch cover
bolts
sufficiendy
gradually
diaphragm spring tension
is
and
and loosen in
carefully
always applied
because
release
bearing
D IU
AfJ
separating clutch assemly from flyWheel
stallation
Withdrawing
Thoroughly
clean all disassembled parlo except for the
disc assembly and release bearing
wear
I
and check them for
crack and other defective conditions
CLUTCH
Clutch
3
assembly
Press the master gauge plate down exactly 7 8
307
0
1
etc
Check clutch
for excessive
occurs on
2
cover
diaphragm spring
presswe plate
crack and damage When noise
wear
clutch assembly replace
Measuring and adjusting height of diaphragm spring
in
this
first
on
Line up distance piece
clutch assembly base plate
special
tool
the height
gauge
plate
is
plate contacting
clutch
cover
end with
cover
H
from 7 8 nun
The result indicates the distance by which
in
plate
is
to measure
flywheel To do
from
to pressure
pressed against flywheel
is
mounted
diaphragm spring
is
That
is indicated
360 kg 793 71b
the
by
a
when
clutch
initial pressure
of
gauge when pressure
that distance with
depressed by
the pressure gauge is attached
T2005S001
H
on
Then subtract the value
cover
20051000
81
mounting face
installed
fully loosened
307
0
special tool 8T2oo58001
cover
cover
mounting face
pressure
1
from clutch
pressure with clutch
mm
a
press to which
If the pressure is less than
replace clutch
cover
as an
assembly
H
7
8
0
307
H
Stroke to be pressed
7 8
0 307
Clutch
Tfil
facing thickness
Fig
2
CL 6 Base
plate and distance piece
Place clutch assembly
clutch assembly
on
Measure the
surface ofbase
Height
distance piece
base plate stationarity
condition distance piece is
3
on
placed
Under this
beneath pressure plate
diaphragm spring height from
plate with vernier caliper depth
of diaphragm spring end
to 1 772 in at diameter 44 mm
and set
gauge
43 to 45 mm
I 733
Fig
the upper
CL B
4
Measuring
Adjust height
diaphragm spring
1 693
in
ST20500000
of
pressure
of diaphragm spring
diaphragm spring by
adjusting
wrench
the
special
if required
43 to 45 91693 to 1
772
BASE
PLATE
Unit
Fig
CL 7
Measuring
mm
lin
height of diaphragm spirng
Fig G L9 Adjusting
CL 3
diaphragm spring height
use
of
tool
CHASSIS
Disc
If facing is soiled with gIease
I
kerosene and dress
facing with
Jf
a
I
clean off with
oil
Replace
wire brush
facing if required
2
Check disc for deflection and repair
2
or
deflection at the outer circumference of
replace if the
facing
withdrawal lever and hearing sleeve contact
When
point
is worn in step
When
occurs
on
and sleeve
bearing
Release
assembly
grease
replace sleeve
bearing
leaks from release
or
noise
release bearing replace release bearing
exceeds
the following value
Upper limit of the deflection
05
85
rom
rom
0 0197 in at
346
3
in radius
Fig
CL 12
Fitting rekase bearing
REASSEMBLY
Release mechanism
1
Fig
CL10
Checking
disc fur deflection
Tightly
sleeve
as
Replace
disc assembly if facing is
extent that the
mm
facing height above
0 0118 in
facing
is worn
worn
unevenly
rivets are
turn
bearing with
Apply multi purpose
loose
Bearing sleeve inside
a
finger and make
grease to the
CLot 1
Checking clutch facing for
bearing
sure
that
wear
Fig
CL 4
following places
groove
Pack this
Fig
on
3
0
2
or
place
bearing operates smoothly
to such an
rivet is less than
to the
bearing
shown in Figure CL 12 When bearing is installed
completely
3
fit release
CL 13 Lubricated position
on
recess
the
bearing
sleeve
CLUTCH
REINSTALLATION
Withdrawal lever and bearing sleeve contact point
lever
Withdrawal
ball
pin and withdrawal lever
Clean clutch pilot bushing
contact surface
and
f1 it with multi
purpose grease
2
Install disc assembly and clutch assembly
by
the
of
use
a
clutch
aligning bar
on
flywheel
special
tool
00
ST20630
1
Withdrawal lever ball pin
3
Return
5pring
2
Withdrawal lever
4
Release
bearing
Fig
CL 14 Position
grease is
3
When grease is
withdrawal lever
on
applied to
install dust
on
Apply
the necessary
release bearing
connect
Note
clutch
grease
to
which
applied
clutch housing
cover
the withdrawal lever
and
places
bearing
install
sleeve
them with return spring
on
and
housing
compounded
with
molybdem
Fig
desulfide to lubricate main drive shaft splines
CL J 5
Installing
disc and clutch
assembly
CLUTCH CONTROL
CONTENTS
DESCRIPTION
CL 5
Reassembly
CL 8
CLUTCH PEDAL
CL 6
Reinstallation
CL 8
CL 8
Removal
CL 6
Inspection
CL 6
Removal
CL 8
Reinstallation
CL 6
Disassembly
CL 8
Adjustment
CL 6
Inspection
CL 8
CL7
Reassembly
CLog
CLUTCH MASTER CYLI NDER
OPERATING CYLINDER
Removal
CL 8
Disassembly
CL 8
ADJUSTING
Reinstallation
CLog
J nspection
CL 8
BLEEDING CLUTCH SYSTEM
CLog
WITHDRAWAL LEVER
CLog
DESCRIPTION
The 521
series vehicles adopt hydraulic type clutch
pendent
control system
clutch pedal master
and withdrawal lever
The hydraulic type clutch control system consists of a
fulcrum type
Cl 5
cylinder operating cylinder
The withdrawal lever is of
an
inner
CHASSIS
t
I
I
I
I
I
I
Fig
CL 16 Clutch control
CLUTCH PEDAL
Removal
1
Adjustment
Remove return spring
Adjust pedal pad height
RH drive
Loosen lock
2
nut of master
cylinder push rod and
selecting
disconnect push rod end
and
applying shim
Be sure to use shims
s
545 in
138 5 mm
to
adjustment
without stopper The
is made
for
by
having adequate thickness
having
same
thickness for both
upper and lower
3
Remove lock nut
remove
pedal
and washer of pedal shaft and
153
2
Inspection
disassembled
and carefully check them for
other abnormal conditions
new ones
1
2
Repair
or
parts indicated
wear
damage
replace
secure
the
is
5
135
33
5
mm
position with lock
and
150 mm
5 91 in
in
so
that the pedal
for R H
drive
and
nut
for L H drive
them with
if required
Note
Pedal head rubber
Return spring
C t
A
L
a
Make sure that chassis grease has been applied
to
the
it
3 Pedal lever bush
A
adjust pedal stopper properly
Next
pad height
Thoroughly clean all
below
6 02 in for L H drive
rom
lever
MG
marked
portions
two
required
noL JLr
W PI
U
I
ll J
Do not saew in it more than 3
because
pedal
Grease
t
Reinstallation
Reinstall clutch
places
in reverse sequence of removal
cylinder
CL 6
it
may
clog
the
return
mm
j
0 1181 inl
port of master
CLUTCH
Adjusting
Part number
30611
shim
Thickness
27260
16
0 0630
30612 27260
0 8
0 0315
30613 27260
0 5
0 0197
Item
model
R H
drive
L H drive
8
Fig
CL 17 Pedal
height adjustment
CL18 Sectional view
of clutch
CL 7
master
mm
in
126 4 96
117
4
61
Multi purpose grease
CLUTCH MASTER CYLINDER
Fig
2
1
Applied
cylinder
in
mm
mm
in
33
s 5
13S
150 0
5 91
r
CHASSIS
Removal
Reinstallation
Disconnect
2
Disconnect clutch line from master cylinder
pum
rod from clutch
Reinstall
1
pedal
the
master
cylinder assembly
sequence of removal and adjust
follo
Adjust pedal height by changing push
Remove securing bolts and
2
remove
rod
length
Bleed air out of the hydraulic system
cylinder
master
reverse
and
drain fluid
3
s
in
assembly from vehicle
OPERATING CYLINDER
Removal
Disassembly
Remove return spring
1
Remove riller cap and drain fluid
2
Pull back dust cover and remove snap
and return spring
cup
pusluod piston assembly primary
assembly
can
2
Di
3
Disconnect push rod from withdrawaHever
4
Release two bolts used to mount
nect clutch line from
ring Stopper
operating cylinder
be removed
to clutch
operating cylinder
housing
Inspection
Thoroughly clean all
parts
with brake fluid before
Disassembly
inspection
Remove dust
1
Check
cylinder and piston for
uneven
wear
cover
or
2
damage Replace if required
Remove
snsp
ring
All other parts
can
be
dis
assembled
2
Replace
cylinder
wear or
3
piston
primarily
cup
is disassembled
It must also be
deformation due to
Check dust
line for damage
cover
or
found replace with
whenever
fatigue
or
oil reservoir
master
replaced
when
damage is found
r
fIller cap and clutch
deformation If abnormal condition is
new one
It
Reassembly
Reassemble
the
ma5ter
sequence of disassembly
1
cylinder assembly
noting the following
@t
in reverse
matters
The piston cup should be soaked in brake fluid
before reassembly Install piston cup carefully
so
Fig
r
2
Apply brake fluid
iIlW
sufficiently
to
CL 19
Operating cyUnderdisassembled
that it is
cylinder and piston
J
Check all par
and assemble them
worn or
CL 8
damaged
especially piston
cup
and
replace
if
CLUTCH
Reassembly
Reassemble operating cylinder in
reverse
sequence
of
disassem
ly noting the following matters
Soak piston cup in fluid before reassembly
1
piston
cup
carefully
so
that it is faced
Apply brake fluid sufficiently
2
to
Install
correctly
cylinder
and
piston
and assemble them
Reinstallation
Reinstall the operating cylinder in
reverse
sequence of
removal
I
Bleed air out of the hydraulic system
2
Adjust push
2 0 to 3 0
the
following
rod so that withdrawal lever end
0 0787 to
mm
1181
0
in
play
is
in accordance wilh
instructions
Unit
1
Lock nut
2
Adjusting
3
Withdrawal
Fig
CL 20
nut
Adjusting
mm
4
Release
5
Diaphragm spring
in
bearing
withdrawal lever
play
WITHDRAWAL LEVER
JUSTING
AD
Correct adjustment of the clutch withdrawal lever is
essential
Insufficient free
bearing and
to
slip
ment
the
between
diaphragm spring fingers
the
causes
BLEEDING CLUTCH SYSTEM
release
the clutch
bleed
Remove
while excessive free travel affects full disengage
dust
screw
from
cap
operating
cylinder
of the clutch
The
clearance between the
diaphragm spring fingers
drawallever end
I
travel
as
can
release bearing and the
be
adjusted
at
2
the with
turn
follows
Loosen lock nut
Open bleed
Attach
a
screw
tube
approximately
immersing
container which contains
tighten adjusting
nut and eliminate
3
clearance between the top of withdrawal lever and release
Fill
master
a
three
quarters of
a
the open end into a clean
small
amount
cylinder reservoir
of brake fluid
with recommended
fluid
bearing
4
2
Return
and set
adjusting
adjusting
When
nut
adjusting
nut I 3 4 turns from that
stationarily with lock
position
Depress clutch pedal quickly while keeping
retighten
nut
bleed
and
screw
to
return
action until the fluid
Repeat this pumping
nut is returned I 3 4 turns withdrawal
allow it
it down
slowly
entering the
container is free from air bubbles
lever end is returned to 2 0 to 3 0 mm 0 0787 to 0 1181
in
and clearance between release bearing and
spring fingers
is 1 2 to 1 5 mm
5
diaphragm
0 0472 to 0 0591 in
Screw up bleed
screw
remove bleed tube and
CLog
on
replace
a
down stroke of
dust cap
pedal
CHASSIS
SERVICE DATA AND SPECIFICATIONS
All 521 series
Clutch cover type
Diaphragm MF200K
Clu tch release lever
Withdrawal lever end play
mm
in
2 0 to 3 0 0 0787 to O 1l81
Diaphragm spring to flywheel height
mm
in
43 to 45
1 693 to U72
Clutch disc
Single dry disc 20OCBL
Type
Facing
size
Outer dia
x
Inside dia
x
Thickness
cm2
Total friction area
in
200
sq in
362
mm
130
x
x
3 5
7 87
3386
0
to
x
5 12
56 I
Thickness of disc assembly
Free
in
mm
Compressed
6
8
in
mm
to
9 0
7 6 to 8 0 0 2992 to
Numbe of torsion spring
3543
0
3 ISO
0
6
Allowable minimum deplh of rivet
head from fscing surface
mm
in
3
0
O OI18
Allowable facing
mm
in
0 5
O 0I97
mm
in
4
0
0 01 57
run
lOt
Allowable free play of spline
at
mdius 85
Clutch pedal
Pedal height when
not
depressed
in
mm
Free travel of pedal head
Pressing strength at
Master cylinder
in
mm
full stroke
for RH drive
for LH drive
910 14
kg lb
3543
0
to 0 5512
13 2
29 I for RH drive
14 1
31 I
for LH drive
Clutch
Master cylinder diameter
Capacity
33
5
5 91
5
135
150 0
of clutch reservoir
Operating cylinder
mm
cc
in
15 87
Imp pts US pts
25
5 8
44 O 52 8
clutch
Operating cylinder diameter
mm
in
19 05 0 750
Tightening torque
Clutch assembly securing bolt
kg
m
ft lb
1 5 to 2 2
CL 10
10
8
to
15 9
346
3
x
O 1378
CLUTCH
TROUBLE DIAGNOSES AND CORRECTIONS
Probable
Condition
damaged
Noises audible on
Excessively
pedal depression
cated release bearing
worn
Corrective action
cause
or
lubri
poorly
be
cannot
bearing and diaphragm spring
Seized release
the
Replace
out
Insufficient
pedal
or
broken clutch
return and control
springs
Weakened broken
or
drawal lever return
Excessive
drive shaft
pedal
Set
contact
unhooked clutch with
in
springs
weakened
faces with felt
polishers
or
the
Replace
position
them
replace
or
if
snapped
spring or hook
it up as
required
spring
between clutch disc hub and
play
diaphragm
Readjust pedal free travel correctly
free travel
unhooked
Weakened
bearing
Clean
bearing
with metal brush and smooth
spring fingers
fingers
cased
being
greased inside
the release
Replace
which
bearing
the
Replace
clearance
spline
drive
clutch
disc and
between hub of
shaft is within 0 50
endwise
and 0 20
rom
ensure
that
new
clutch and
rom
0 0197 in
0 0079 in
crosswise
When clearances exceed above limits
replace
the drive shaft also
Noises audible
pedal release
on
of
Misalignment
causes
slight
clutch disc to
movement
of disc
flywheel
hub
in
idling
or
Broken
especially
at low
audible with
place
on
drive
shaft
engine
it
set
under
run
ut
slight
using
a
scriber
speed
weakened clutch
or
level of clutch disc with clutch disc in
rotation and check for no
respect of facing
This noise is
Set
disc cushion
Replace
the clu Ich disc
springs
Insufficient
pedal
Weakened unhooked
trol and
pedal
Set
free travel
return
Weakened broken
or
broken clutch
con
Check the springs for correct position and
replace
springs
or
pedal free travel correctly
unhooked clutch with
them
if necessary
Replace the spring or hook
it up as
required
drawallever return spring
Distorted
or
worn
Replace
drive shaft
the
drive shaft and clutch disc if
necessary
Excessive
play of release bearing
on
sleeve
CL 11
slip
Replace the
worn
parts
CHASSIS
Condition
C lu1ch
drags
Probable
Corrective action
cause
Insufficient push rod length
Excessive
Adjust the push
free travel
pedal
Adjust
Warped clutch disc
Set level of clutch disc if possible
Roughened linings
Repolish
loose
broken
or
lining
diaphragm
to
spring
with
linings
Replace
linings
clenched
with
damaging
bearing
5
0
run out
a
0 0197 in
mm
metal
brush
or
them if necessary
replace
Incorrect release
length correctly
free travel correctly
Maximum plate
Improperly filled
rod
Lining
rivets
pressure
be
should
to
protrusion
plate and flywheel
no
avoid
Adjust correctly
finger clearance
Clutch disc hub forcing
on
drive shaft
Locate
cause
of trouble and
remove
it
if
possible otherwise replace the clutch disc
Damaged drive shaft splines prevent the
Replace the drive shaft also
clutch disc from sliding
if required
Oil or grease on
linings
cLcate the
mrrect
Clean
Warped
or
damaged
pressure
plate
or
clutch
it
or
as
cause
of oil
the clutch disc
or grea se
leakage and
required
replace linings
defective parts
Replace
cover
Air
in the
pockets
hydraulic system
not
Bleed out
completely
bled correctly
Dirt or
master
Air
foreign
matter
on
sealing faces of
pockets
in master
Clean
replace piston
cup
if damaged
and
bleed the system
cylinder piston cup
cylinder due
to loose
Replace piston
cup and bleed the system
piston
Fluid leakage from cylinder
Replace piston
cup
if damaged
bleed the
system
Low fluid level in reseIVoir
Top
up
with brake
fluid and bleed the
system if necessary
Clogged
vent hole in reservoir cap promotes
infiltrate past the seal
CL 12
Clean reservoir cap unclog the vent hole and
CLUTCH
Condition
Abnormal
lining
Probable
Corrective action
cause
Insufficient pedal free travel
Adjust clutch pedal free travel correctly
wear
Driver
steps unnecessarily
lining
causes
wear
on
pedal
and damage
to
this
release
bearing
Advise driver to discontinue wrong practice
and step
clutch pedal only when
on
ne
cessary
Weakened
or
snapped
Check pressure springs for tension
pressure springs
fied
and replace springs
if they
as
speci
are
un
serviceable
Incorrectly installed linings
with new
Replace linings
them
ones
and install
Check clutch disc for center
correctly
alignment
Clutch drags
Oil
or
grease
on
flywheel
plate
pressure
and
linings
Remove
cause
of
plate
pressure
leakage clean flywheel and
and
thoroughly
replace
linings
Loose disc
linings due
to poor rivet
tightness
If
linings
rivets
rivets
disc hub does
Clutch
drive shaft
not
slide
freely
on
not
Otherwise
replace defective
worn
replace linings and clutch
securely
Remove any
shaft
from
spline
are
foreign
matter or dirt
When
splines
deposits
trouble is still
present replace damaged parts
Warped
or
cracked pressure plate
Replace
Locate
Misalignment
pressure
plate
the defective
adjust alignment
or
point and if possible
replace distorted parts
J
Check
Stiffened hydraulic control mechanism
down
Worn out lining
Insufficient clutch pedal return travel
to
the control and pedal return springs being
weak
or
linings
cIu tch disc
pressure
or
If necessary
take
components
and make sure that the
plate and flywheel
are
damaged
Locate cause of failure and
replace defective
springs
misadjusted
Weakened
Oil
due
pedal
tension
and lubricate
Install new
not
Clutch slips
spring
or
grease
broken diaphragm spring
on
Overhaul clu tch and
Remove
linings
cause
replace springs
of leakage and
ifcleaning is ineffective
CL 13
replace linings
CHASSIS
a
Probable
Condition
Worn
ij
or
Corrective action
cause
Replace linings
burned disc linings
Overloaded
master
cylinder
d
to a
stricted transfer port
re
Overhaul
piston
the master
cup if swollen
cylinder replace the
or
damaged and clean
the transfer port bleed the system
SERVICE JOURNAL OR
BULLETIN REFERENCE
I
JOURNAL
or
PAGE No
DATE
BULLETIN
iO
SUBJECT
No
1
I
J
f
I
i
1
I
l
I
1
CL 14
I
SECTION TM
t
TRANSMISSION
em
l
DATSUN PICK UP
MODEL 521 SERIES
CHASSIS
I
BODY
NlsSAN I
NISSAN MOTOR CO
TOKYO JAPAN
LTD
1
TRANSMISSION
TM
TYPE F4W63 TRANSMISSION
TM 12
TRANSMISSION GEAR
CONTROL COLUMN
SHIFT CONTROL SYSTEM
TM 15
SERVICE DATA AND
SPE CIFICATlONS
TM 18
TROUBLE DIAGNOSES AND
CORRECTIO N S
TM 21
lr
r
TRANSMISSION
TRANSMISSION
CONTENTS
DESCRIPTION
TM
l
Gear and shaft
TM
8
SPECIFICATIONS
TM
l
Balk
TM
8
REMOVAL
TM
3
Shifting
TM
8
DISASSEMBl Y
TM
4
Oil seal
TM
9
INSPECTION
TM
7
Rear
TM
9
9
ring
insert
engine mounting
insulator
Transmission case and rear extension
TM
7
REASSEMBLY AND ADJUSTMENT
TM
Bearing
TM
7
REINSTAllATION
TM 12
DESCRIPTION
521
Datsun
forward
F4W63
Both
series
vehicles
adopt type
column
shift
I reverse
4 forward I reverse
the
type
R4W63
consist of transmission
gear
assembly The
housing
are
R4W63
transmission
floor shift
rear extension
housing and
unit
and
transmission
and type F4W63
case
4
transmission
case
case
With this construction
cover
transmission
housing
The
transmission
are
is
combined
provided with
to
a
single
bottom
a
maintenance service
can
be
made easily
and
This chapter mainly describes about the type R4W63
transmission case and rear extension
transmission
made of aluminum alloy metal The clutch
SPECIFICATIONS
L521T
NL52 IT
PL521TU
N521U
GN521U
LG521 T
GNL52 IT
PL52ITN
NL521
GNL52 I
Final gear ratio
G521U
UL521
L521
LG521
V521U
4 875
4 625
375
4
4 625
375
4
VL521
4 875
4 625
Type
F4W63
R4W63
R4W63
Control system
Floor shift
Column shift
Column shift
1st
3 657
4 243
5 000
2nd
2 177
2 558
3 014
3rd
1 419
1589
1685
4th
1 000
1 000
1 000
Reverse
3 638
s
6
s
os
E
Speedometer gear
ratio
19 5
a
b
See
18 5
367
4
18 5
17 5
17 L
Oil capacity
Note
VN521U
U521U
521U
VNL52 I
Item
os
UNL521
Figure
2 0
TM l
17 L 3 6 US pts 3 0 Imp pts
2 0 L 4 2 US pts
5
3
Imp pts
TM 1
5 146
17 5
17 L
2 0L
19 5
2 0L
18 5
17 L
2
t
0
CHASSIS
l
J
1
2
J
3
Extension
Applied
housing type
short
model
GN521U GN521 G521U LG521
N521U NL521 UNL52l VN521U VNL521
2 long
3 short
521U L521
52IU VL521
L521T
Fig
TM j
LG521T NL521T GNL521T PL521TU PL52lTN
R4lV56 and F4lV56 transmissions
TM 2
U521U UL521
TRANSMISSION
REMOVAL
For transmission dismounting
applies Refer to Section
ER
the
following procedure
Engine
Removal
of this
Manual
I
Disconnect battery cable from terminal
2
Remove
du tch
starting
housing
to
motor
and bolts used
to
attach
engine
Jack up vehicle and support it with four stands
3
Recommend
a
hydraulic hoist
or
open
pit be utilized
Fig
if
available
4
Disconnect
6
Disconnect front
lamp
exhaust tube from exhaust mani
fold
1M 3
7
Detaching propeller shaft
speedometer
drive
cable and back up
switch cable from transmission extension housing
Remove cotter
and disconnect shift rods from
pin
Remove
shift levers
shaft assembly from transmis
cross
sion case
8
Remove clutch
hous
operating cylinder from clutch
ing
9
Apply
oil pan and support
jack beneath
a
engine
careful not to apply jack to oil pan drain plug
applying jack apply
jack
a
wooden block between oil pan and
to protect oil pan from
10
Remove
rear
Be
When
engine
damaging
from transmission and
mount
cross member
rw
o
hT
0
I
V
r@
co
Q
S
I
Cross shaft
2
Back up
J
Speedometer
Fig
5
switch cable
lamp
drive
Exhaust manifold
5
Propeller
I
shaft
11
TM 2 Bottom view
extensi9n housing
prevent oil
Pull
TM 4
out
Removing
mounting bolts
rear
transmission
on
Rear engine
cross
to
engine
rear
mount
once
place
rear
member and pull it down
toward fron t
rear
Note
leakage
I
portion of extension
of vehicle
propeller shaft Seal the end of
to
extension
mounting bolts
Fig
cable
Remove four bolts from companion flange of gear
carrier and detach
with
4
Rear
except equipped
When dismounting transmission be careful
damage
flr
r shift vehicle
TM 3
clutch
diaphragm spring
hub spline
not to
CHASSIS
4
Remove 14 bottom cover
bottom
5
cover
Remove
securing bolts and remove
from transmission
speedometer pinion
and remove rear exten
sion
Note When
rear
extension cannot
lightly tap it with
Fig
TM 5
Dismounting
a
plastic
be
removed easily
or wooden mallet
transmission
DISASSEMBLY
For transmission
applies The casings
careful
not to
disassembly the following procedure
are
damage
made of aluminum alloy metal Be
it
1
Drain gear oil from transmission
2
Remove dust cover
spring and
remove
release withdrawal
lever return
withdrawal lever and release bearing
from clutch housing
Fig
6
Removing
TNr eXtension
CD used to fix crosS shaft
rings @ and thrust washers
Remove lock pins
select link
withdraw
snap
cross
withdrawing
lip with
shaft together
cross
with outer
and
and
lever When
shaft be careful not to damage oil seal
groove for snap
ring
Removing release bearing and withdrawal lever
Fig
TM 6
3
Remove five front cover
front
TM 8
securing
bolts and remove
cover
Fig
7
TM
Removing
cross
Double intermesh counter gear and
and loosen main shaft lock nut
Fig
TM 7
Remo11ing front
Note
co
4
TM
sluft
Loosen interlock
plug previously
reverse
idler gear
I
I
I
i
I
I
I
I
I
I
I
I
I I
I I
I
I
I
J
I
I
I
I
I
TRANSMISSION
p
with
a
drift
using
a
fork rod pin punch
Removing
ear
fork
pull
ST23510 0
tool
special
out rod
I
I
I
I
I
fnt
I
I
I
I
I
i
r
I
I
I
I
I
II
i
I
I
I
J
I
I
I
I
I
I
I
Fig
I
I
12
I
TM 12
Driving out retaining pin
Remove main shaft assembly from
rear
side and
main drive gear from front side
Note
I
When main
cannot
I
shaft assembly and
be removed easily
case with
or
main drive gear
lightly tap
transmission
asticor wood mallet
I
Fig
9
Remove front
reverse
10
TM l0
Remol1ingcountergear
and
rear
snap
rings
and
withdraw
idler gear and shaft
Remove
plug from interlock hole
and take out
spring and ball
Note Be careful not 10 lose
spring and
GM
check ball
0
ain drive gear
Fig
TM 13
Removing
Main shaft
shaft assembly
main
lvl
i l
l
@ O
c
ili
Fig
II
TM l1
RemoVing
interlock hok
assembly
V
V
plug
Drive out retaining pin used to fIx fork and rod by
Fig
TM 5
TM 14 Main
shaft gear
disassembled
CHASSIS
13
and
@
14
Remove snap ring
4th
3rd
remove
See
Figure
from main shaft front side
@
synchro assembly
Remove main shaft lock nut
viously
and
and 3rd gear
@
TM 14 for part identification numbers
remove reverse
@
loosened
pre
gear and sleeve
Fig
Fig
IS
TM 15
Removing
map
When removing main shaft gear
of 1st gear to
bearing puller special
and withdraw bearing retainer
washer
@
j
Removing bushing
ring
apply the
front end
tool ST22130000
j and
1st gear
simultaneously by using
TM 17
a
press
See
thrust
Figure
TM IS
f@
@
1
3
8
Snap ring
2
4th
3rd
synchronizer
special
j
rIng
Mu
and with draw
synchroassembly
together by using
a
bearing
together
with ht gear
Support
this cnd and with
4
1st gear bearing bushing
5
Thrust washer and ball
6
Main shaft
iog
7
Main shaft bearing
nizcr assembly and 2nd gear
TM 18
9
draw 1st gear
Cross sectional view
bearing bush
totethcr with
synchro
of main shaft gear
pm
f 2nd gear
@
main
Removing bearing
Ir
the front end
shaft forward
depress
synchronizer
with
ST22130000
ht 2nd
Fig
TM 16
this end
toot
asscmbly
assembly
Fig
Support
@
2nd gear
and withdraw 1st 2nd
@
and
bushing @
17
all
To
disassemble
spread springs
press
TM 6
synchronizer
from both ends
assembly
remove
TRANSMISSION
Push out counter shaft from
8
or
rear to
front with
a
drift
using
a
fork rod pin punch
Removing fork pull
other proper tool and take out counter gear
Fig
12
jJ
special tool ST235IOOOO
out rod
1M 12
Dril1ingoutretainingpin
Remove main shaft
assembly from
rear
side
and
main drive gear from front side
Note
When main shaft assembly and or main drive gear
cannot
case
Fig
9
front
Remove
e
rever
10
TM l0
be removed easily
lightly tap transmission
with asticor wood mallet
Removingcountergear
and
rear
snap
rings
and
withdraw
idler gear and shaft
Remove
plug
from
interlock hole
and take out
spring and ball
NOlE
Be careful notlD lose
spring and
G
check ball
Main drive gear
Fig
lM 13
0
Removing
i
Main
main
shaft assembly
shaft assembly
l
c
@
d1
I
Fig
II
lM 11
RemoVing interlcck hok pL g
Drive out retaining pin used
to
fix fOlk and rod by
Fig
TM 5
lM 14 Main
shaft gear
disassembled
r
CHASSIS
13
and
@
14
from main shaft fron t side
Remove soap ring
remove
See
Figure
and
and 3rd gear
@
TM 14 for part identification numbe
Remove
viously
synchroassembly
4th
3rd
main
shaft lock nut
remove reverse
@
loosened
pre
gear and sleeve
Fig
Fig
15
TM 15
Removing
map
When removing main shaft gear
of 1st gear to
and withdraw
washer
@
bearing puller special
bearing
retainer
@i
Removing bushing
ring
apply
the front end
tool ST22130000
1st gear
simultaneously by using
TM 17
a
ill and
press
See
thrust
Figure
TM IB
I
Snap ring
2
4th
3rd
8
synchronizer
pecial
assembly
3
1st
ST22 I 30000
2nd synchronizer
and with draw
together
bearing
with I st gear
4
1st gear
5
Thrust washer and
6
Main shaft
iog
7
Main shaft bearing
nizer assembly and 2nd gear
Fig
TM 16
this end with
tool
depress main shaff forward
assembly
Fig
Support
bearing bushing
TM 18
9
ball
Support this end
draw 1 st gear
Cross sectional view
and with
bearing
totether with
bush
synchrcr
of main shaft gear
Removing bearing
ppot
the
front
end of 2nd gear
assembly
synchro
together by using
@
a
@
2nd gear
and withdraw 1st 2nd
@
and bushing
@
all
17
To
disassemble
synchronizer
spread springs from both ends
press
TM 6
assembly
remove
TRANSMISSION
INSPECTION
Thoroughly
cJ
and check
clean all disassembled parts with solvent
them for
and other defective
damage
wear
conditions
@
Transmission
o
18
9
1
Coupling
2
Shifting insert
Fig
sleeve
TM J 9
cr
case
and
extension
rear
Clean them with solvent thoroughly
crack which may
cause oil
leaking
and check for
and other defective
conditions
3
Synchro hub
4
Spread spring
When bur
joint repair
Synchronizer disassembled
To disassemble main drive gear
remove
snap
Remove adhesive from
3
Repair
or
other
damage
exists
on
replace
2
ben t or
ring
or
pitting and or
replace
installing surface completely
dowel
pin
knock
pin if damaged
warped
from front side by using snap ring pliers
4
Replace
rear
extension
if interior is worn
bushing
unevenly
Bearing
I
compressed
2
When ball bearing inner
crack
or
out
are
worn
race
19
Removing
snap
ring
Remove main drive gear bearing with bearing puller
special tool ST30030000 and press
and
cen
ter
3
Replace
needle
4
Replace
rear
bearing if worn
extension
or
bushing
if
worn
ir
main drive gear
Fig
bearing
TM 7
TM 22
wear or
damaged
t
Removing
ball
a new one
ii t
rig
race
unsmooth due to
unevenly
V
t
TM 21
dust with
of round of ball is excessive due to
rough surface replace bearing with
TM 20
remove
air
sliding surfaces
Fig
and
Thoroughly clean bearing dry
Inspecting baIl
bearing
or
cracked
CHASSIS
Gear and shaft
End
5
plays
of I st 2nd
range from 005 to 0 15
I
Check gear
replace
2
as
for
damage and
wear
crack
or
and
shaft
soap
for
crack
wear
and
worn
0 0020 to 0 0059 in
the end play is deviated from this range
required
Check
and 3rd gears should be in
mm
When
select proper
ring again
spline
Replace if required
3
Check main shaft for straightness
Replace
main shaft with
new
one
0 15
mm
0 0059 in
end exceeds maximum l
Maximum
out
run
if
a
out
run
at rear
t
Fig
Balk
TM 25
Measuring ge
IT end pl4y
ring
Check balk rings for
Replace
Fig
4
TM 23 C
cking
s
1in
m
ft fOT straightness
Measure backlash of each gear When gear is
excessively beyond
driven gears
are
limit
replaced as
recommend
a
both drive
as
2
Place balk ring in position
ring
to
16
pitting chip
on cone
of each gear Push
gear and check gap between balk
worn
0 031 in
replace
balk
and
ring end face
This gap should be within 1 2 to
0 047 to 0 063 in
mm
and or bur
required
clutch tooth front face
and
wear
When gap is less than 0 8
ring with
a new one
mm
It is worn
excessively
set
Standard all gears
0 05 to 0 10
Wear limit all g
0 20 mm 0 0079 in
mm
0 0020 to 0 0039 in
ars
Fig
TM 26 Balk
ring tcrcone installing dimension
i
Shifting
insert
Replace if worn excessively or unevenly deformed
Fig
TM 24
Measuring gear backlash
damaged
8
TM
or
TRANSMISSION
Oil seal
Replace
snap
ring
Rear
is
if lip is deformed
dropped
worn or
cracked
or
when
off
engine mounting insulator
Replace
if weakened deteriorated
or
cracked
REASSEMBLY ADJUSTMENT
Reassemble
When
assembly
transmission
in reverse sequence
reassembling
note the
following
of dis
3
Main shaft and gear
When
drift
to
Note
1
Snap ring
4
1st gear
2
4th
3rd
5
Thrust washer and ball
assembly
6
Main shaft
Ist 2nd synchronizer
7
Main
3
synchronizer
1M 28
Fig
matters
fitting
main shaft ball
transmission
depress bearing
Be
to
sure
Driving bearing bushing
bearing
adapter special
inner
race
use
a
hollow
tool ST23800000
firmly
install thrust
and ball
wash
bearing bushing
shaft bearing
assembly
Fig
TM 27 Main
shaft assembly
Fig
4
1
For both I st 2nd and
blies
4th
3rd
synchronize
install synchronizer hubs toward correct
assem
For
proper
1M 29
4th
3rd
snap
Fitting main shaft bearing
synchronizer hub
ring from
snap
lifec
synchronizer hub end play is
shaft
Part number
select
ring
those listed below
so
minimum
tion
2
When fitting I st gear needle bearing collar
use a
Note
a
to
brass drift
If end of collar is
deviated
damaged
Recommend
a
piece
1st gear end
play
is
32263 14600
40
1
to
32263 14601
45
1
to 1 50
45
1
32263 14602
1 50 to 1
55
32263 14603
55
1
32263 14604
1 60 to 1 65
mm
in
0 0551 to 0 0571
0 0571 to 0 0591
0 0591 to 0 0610
of mild metal be
applied while tapping
b
Thickness
Do not use wooden mallet
TM 9
to
1 60 0 0610 to 0 0630
0 0630 to 0 0650
that
JfIl
CHASSIS
5
disassembly
To lock main shaft install main shaft in transmis
sion
double
case
with the rated
to 79 5
lb
ft
intermesh gears
tightening torque 8 0
tighten lock
to 11 0 kg
m
For
shown in the
nut
proper thrust
57 8
0 05
and fIrmly bend lock washer
side tluust washer five types
available
are
Select
washer so that counter gear end
0 15
to
rear
following table
mm
0 0020
0 0059
to
in
play
as
a
is
when
assembled
Note
Install thrust washer 132225 A0900
Part number
G
o
Lock washer
TM 30
Fig
Thickness
in front side
mm
in
32225 A0900
35
2
to
40
2
0 0925 to 0 0945
32225 A090 I
40
2
to
45
2
0 0945 to 0 0965
32225 A0902
45
2
to
2 50
0 0965 to 0 0984
55
2
0 0984 to 0 1004
32225 A0903
2 50 to
32225 A0904
2 55 to 2 60 0 I004to 0 1024
Lock nut
Tightening
lock
nut
6 Main drive gear
drive
Reassemble
main
disassembly
For
those
below
listed
snap
so
in
gear
ring
that
reverse
sequence
select proper
one
of
Reverse idler gear
from
Reverse idler gear is reassembled in reverse sequence of
drive gear end play is
disassembly
minimum
For snap ring five types
following table
Select
play
Part number
Thickness
mm
149 to 1
55
0 0587 to 0 0610
32204 08001
156 to 1 62
0 0614 to 0 0638
32204 08002
1 62 to 1 68
1 0638 to 0 0661
32204 08003
1 68 to 1
74
0 0661
32204 08004
74
1
0 0685 to 0 0709
32204 16500
1 80 to 1 86 0 0709 to 0 0732
32204 16501
1 86 to 1 92
to 1 80
to
are
available
proper snap ring
is 0 05
shown in the
so
that reverse idler gear end
0 0020 to 0 0059 in
to 0 15 mm
when
assembled
in
32204 08000
a
as
Note
Install snap ring
32285 14600
in front side
0 0685
Part number
0 0732 to 0 0756
Thickness
mm
in
32285 14600
1 15 to 1
25
0 0453 to 0 0492
32285 14601
35
1
0 0531 to 0 0571
to
45
1
o
7
32285 14603
I 45to 1
55
0 0571 to 0 0610
22285 14604
1 05 to 1 15
0 0413 to 0 0453
Counter gear
Counter gear
is reassembled
in reverse sequence of
TM 10
TRANSMISSION
Shift fork and
operating
lever
i
l
Rear view
o
3
J
Forward
1
c
1
@
Operating
lever
ass
3
y
Reverse shift fork
41st
Reverse check
Fig
TM 31
shift rod
2nd shift fork
5
shift rod
6
3rd
4th shift
Operating
Layout ofshift fork and operating
fork
ver ass
shift rod
y
lever
Install each fork rod and shift fork
Note
shift fork
8
Pay attention
b
Be sure that there is
to
no
installing
direction
gap between fork rod
and shift fork
2
Install each fork rod together with check ball plug
check ball check ball spring and interlock plunger by
using
a
fork rod guide special tool ST23620000
Fig
Note
a
I nstall
fork rod in
a
position
In standard
3
When
position upper surface of plug is
installing plug
be
sure to
apply
Set
Insert
flush with upper surface of adapter
c
Layout of check ball
where fork rod
check ball groove is coincided with ball
b
TM 32
thread
up
operating
cross
lever
shaft into
case
to
the
correct direction
Assemble thrust washer
lever in case and set
snap
ring and operating
lever
stationarily with lock pin See Figure TM 3 I
Lock pin tightening torque
3
0
to
0 2 to
locking agent
TM 11
4
0
operating
cm
kg
3 in lb
0
I
f
I
f
0
CHASSiS
REINSTALLATION
Remount
transmission
in
reverse
sequence
ofdis
mounting
Q JwaSherl 2JCross slirlt
Fig
TM 33
Installing
fLockPin
cross
shaft
TYPE F4W63 TRANSMISSI ON
CONTENTS
DESCRIPTION
TM 12
INSPECTION
REMOVAL
TM 13
ASSEMBLY
TM 14
TM 13
Shift fork
TM 14
AND INSTALLATION
DISASSEMBLY
DESCRIPTION
The
tion is the
type F4W63 transmission is used especially for
Thus
floor shift type vehicle Generally however the construe
same as
in this
TM 34
yp
T
REPAIR
F4W63
TM 12
transmission
TM 14
that of the type R4W63 tran
chapter
description
control system and relative matters
t
Fig
AND
is made
ssion
only for the
TRANSMISSION
REMOVAL AND INSTALLATION
Remove
speedometer
pinion assembly
drive
procedures for removal and installation of
Primarily
the F4W63 transmission
mission
6
are
7
the same as R4W63 trans
For the F4W63 transmission however removal
and
Remove eight
rear
extension
remove rear extension
housing securing
housing Disengage
s
bolts
iking
rod
from fork rod gates
and installation of shift lever are required
DISASSEMBLY
Drain transmission gear oil
Remove dust cover
2
spring
remove
release withdrawal lever
withdrawal lever
and release
return
bearing from
clutch housing
Remove five front
3
front
4
cover
securing bolts
and
remove
cover
Remove 14 bottom cover
bottom
cover
securing bolts and remove
TM 37
Fig
from transmission case
8
Removing
rear
extension
Unscrew three check ball plugs and
remove
springs
and balls
9
Drive out
rods and
10
gear
Move
and
retaining pins used
remove
at
to secure forks to fork
rods and forks
Ist 2nd
and
the same time
4th
3rd
coupling
sleeves into
lock main shaft Release main
shaft nul
11
Withdraw counter shaft and
together with needle roller bearings
Fig
TM 35
Removing bottom
Remove
clevis
pin
used
to
secure
striking
Release
reverse
rod to
remove reverse
control lever
Fig
counter gear
and spacers
cover
12
5
remove
1M 36 Control arm
Fig
TM 13
idler gear
secu
ing
snap
idler gears and shaft
TM 38
Removing
reverse
idler gear
ring and
I
CH ASSIS
13
Remove
bearing
four
bolts
used
to
secure
main
shaft
retainer to transmiSsion case
Fig
15
TM 40
Drawing
out main
slraft assembly
Draw out main drive shaft
INSPECTION AND REPAIR
Fig
1M 39
RemovingmainslraftbNring
retiD
For detailed procedure for inspection and repair refer
to
the section
Service
covering the type R4W63
data
and
specifications
transmission
are
shown in page
TM 18
14
Draw out main
shaft assembly from transmission
ASSEMBLY
case
The transmission is assembled in reverse sequence to
disassembly
in the section
Refer to the instructions and notes described
covering the type
Shift fork
h
f
t
1
f
l
21st
Fig
2nd shift fork
TM 41
shift rod
Layout ofshift fork and operating lever
TM 14
R4W63 transmission
l
TRANSMISSION
I
Install shift forks
1st 2nd and
4th
3rd
on
sleeves and apply 1st 2nd fork rod
2
Place
4th
3rd
interlock
plunger
in
Place interlock
3
coupling
reverse
the
position
and
fit
plunger
in the
position and assemble
shift fork and fork rod
Secure each fork to fork rod with retaininjfpin
rp
4
fork rod
r
TRANSMISSION GEAR CONTROL COLUMN SHIFT
CONTROL SYSTEM
CONTENTS
REMOVAL
TM 16
ADJUSTMENT
TM 17
INSPECTION AND REPAIR
TM 17
Shift linkage
TM 17
INSTALLATION
TM 17
Select
TM 17
linkage
31 To be
lSE
1
Control rod
4
Shift lever
1
Select rod
2
Lower
5
Select lever boss
8
Shift lod
3
Cross shaft
6
Select lever
bracket and knock
Fig
TM 42 Control
system
4
forward speed
TM 15
transmission
greased
When disassembled
r
CHASSIS
REMOVAL
Remove
steering wheel assembly
o Snap ring 0
Fig
4J
TM
Fig
2
Remove
Removing sleering
steering column shell
w
cover
I
TM 46
Withdrawing
C washer
hand lever
Remove C washel
4
turn
l
Controllcver pivot pin
signal and
lighling switch
Fig
44
TM
Removing sleering column slrea
I
Lock
2
Select lever and select rod
3
Lower bracket
pin
and lock wire
co
47
7M
Fig
4
Shift lever and shift rod
5
Select lever boss
Separating
ever
and rod
lever from shift rod
5
Separate shift
6
Separate
7
Remove lock
8
Withdraw select lever
select lever from select rod
pin and select
lever
boss
pivot bolt
select lever
and shift
lever
9
Loosen
positioning
Fig
3
45
TM
Removing
Remove snap
turn
signa and lighting
ring and control
lever
switc
pivot pin
and
lower
knock
TM 16
an
extent
that
pin can be removed
10
Depress control
upper
support
turn
control rod and
withdraw hand lever
bracket up to such
rod downward
remove
it
from
lower bracket to change direction of
remove
it toward driver
s
compartment
TRANSMISSION
The individual
Note
joints
use
small washers and snap
When
rings Before removing check them for reinstalling
apply chassis
installing
grease
to
the
following
parts
sequence and direction
I
Select lever pivot bolt bushing
2
Select lever boss select lever guide unit
3
Reverse check unit
4
Insert and change lever units in upper portion of
INSPECTION AND REPAIR
Check all sliding parts and other components for
and
defective
other
conditions
Replace
as
wear
required
control shaft
INSTALLATION
Install control system in
reverse
sequence of removal
Cross shaft both frame and transmission sides
5
ADJUSTMENT
J
Figure A
CD
mm
nli
10 94
Steering
100
C
24
n
J
line
oc
Control rod
line
center
77
CID
center
3 03 in
M
nnl l
@
Ef
Figure
mm
II
B
II
1
Shift
2
Select
5
Reverse check
6
Trunion
3
Select rod
7
Shift rod
4
Control rod
8
Outer lever shift
lever
lever
Fig
Shift
ou
9
t
TM 48 Transmission control
Control rod
11
Beneath
steering
wheel
linkage assembly
return
linkage
Outer lever select
10
spring
seat
on
lower bracket comes into contact
with control rod ring
1
Set transmission outer lever to
neutral
position
Note
2
arrives
Select
1
trunion nut
Adjust
A
In this arrangement
change lever is in
B
posi
tion
and tighten it when change lever
position
linkage
Arrange
component
parts
so
that
reverse
2
Set transmission outer lever to
3
Tighten
able force is
check
TM 17
trunion nut at
applied
to
a
neutral
position
select rod
where
position
no unreason
CH ASSIS
SERVICE DATA AND SPECIFICATIONS
CONTENTS
General specifications
TM 18
Specifications
TM 18
General
TIGHTENING
TORQUE
TM 20
specifications
Type
Con trol system
Synchromesh type
F4W63
R4W63
R4W63
Floor shift
Column shift
Column shift
Warner
Warner
Warner
Gear ratio
1st
3 657
4 243
5 000
2nd
2 177
558
2
3 014
3rd
1419
1 587
1 685
4th
000
1
1 000
1 000
Rev
Speedometer gear
3 638
ratio
19 5
Final gear ratio
Extension
18 5
4 875
4 625
housing
Oil capaci ty
Note
a
b
See page TM 2
17 5
375
4
5 146
18 5
17 5
19 5
4 625
4 375
4 875
short
long
long
short
long
7L
I
2 0L
7L
I
2 0L
2 0L
71
1
2 0L
3 6 US pis 3 0
Imp pts
2 0 L
4 2 US
Imp pts
Specifications
Model
F4W63
R4W63
Item
Each gear backlash
For all gears
Standard backlash
0 05
in
mm
to 0 10
0 0020 to 0 0039
Replacement standard
4 625
long
Extension housing
3 5
18 5
short
I 7 L
pts
367
4
mm
0 20
in
0 0079
TM IS
TRANSMISSION
Model
F4W63
R4W63
Item
Each gear standard end play
For aU gears
mm
0 05 to 0 15
in
0 0020 to 0 0059
Balk
ring cone clearance
StMdard clearance
mm
2 to 1 6
1
in
0 0472 to 0 0630
Replacement
4th
3rd
standard
0 8
mm
in
0 0315
adjusting shim
Part number
32263 14600
Main drive gear
adjusting
Reverse idler gear
40
1
shim
in
0 0551 to 0 0571
32263 1460 I
1 45 to 1
50
0 0571 to 0 0591
32263 14602
1 50 to 1
55
0 0591 to 0 0610
32263 14603
55
1
0 0610 to 0 0630
32263 14604
1 60 to 165 0 0630 to 0 0650
to
to 1 60
Thickness
mm
in
32204 08000
1 49 to 1
55
32204 08001
56
1
to 1 62
0 0614 to 0 0638
32204 08002
1 62 to 1 68
0 0638 to 0 0661
32204 08003
1 68 to 1 74
0 0661 to 0 0685
32204 08004
I74 to 1 80 0 0685
32204 16500
1 80 to 186
0 0709 to 0 0 32
32204 16501
1 86 to 1 92
0 0732 to 0 0756
Part number
0 0587 to 0 0610
Thickness
mm
to
00709
in
32285 14600
1 15 to 1 25
0 0453 to 0 0492
32285 14601
35 to
1
45
1
0 0531 to 0 0571
32285 14602
25
1
to
35
1
0 0492 to 0 0531
32285 14603
45
1
to
1 55
0 0571 to 0 0610
22285 14604
TM 19
mm
45
1
Part number
shim
adjusting
Thickness
1 05 to 1
15
0 0413 to 00453
1
i
CHASSIS
Model
R4W63
F4W63
Item
Counter gear thrust washer
Thickness
Part number
in
mm
32225 A0900
2 35 to
40
2
0 0925 to 0 0945
32225 A090 I
2 40 to
45
2
0 0945
to
0 0965
32225 A0902
45
2
to 2 50
0 0965
to
0 0984
32225 A0903
50
2
to
2 55
0 0984
to
0 1004
2 55 to 2 60
0 1004
to
0 1024
32225 A0904
Tightening torque
kg
Transmission proper
Engine
Front
2 4 to 2 8
transmission installation bolt
cover
08
transmission installation bolt
tightening
nut
Companion flange tightening
to
10
4 to 1 8
1
Rear extension transmission installation bolt
Main shaft
m
nut
174
to 20 2
5 8 to
10 1
7 2
to
13 0
8
to II
57 8 to
5
79
10
to
14
723 to
2
1Ol
3 3 to 3 8
Rear engine mount installation bolt
ft lb
1 to
3
25
2 0 to 3 0
14 5 to
7
21
Back up lamp switch
2 0 to 3 0
5
14
to
21 7
Bottom
0 8 to 1 0
5 8 to
7 2
2 2 to
2 9
to
15 2
2 2 to
2 9
Filler
plug
Drain
plug
5
2
cover
installation bolt
Speedometer pinion
Interlock
Operating
to
3 to
0
installation bolt
5
3
23 9 to 27 5
4
0
18
7 to 2 1
1
plug
3
0
lever for both shift and select
to
4
0
Reverse check
2 0 to 3 0
Transmission outer lever
0 8 to 1 0
Trunion nut for both shift and select
2 0 to 2 8
TM
20
3
12
5 t021 7
14
5 8 to
14
7 2
5 to 20 2
TRANSMISSION
Select lever pivot bolt
0 5 to 0 8
3 6 to
5 8
Lower support bracket
0 6 to 1 0
3 to
4
7 2
Steering
wheel
tightening
Transmission gear control
nut
7 0 to
5
7
50 6 to 54 2
floor shift
Control lever installation bolt
1 9 to 2 2
13
7 to 15 9
TROUBLE DIAGNOSES AND CORRECTIONS
Condition
Probable
Corrective action
cause
Difficult to
Causes for difficult gear shifting
intermesh gears
and transmission
are
classified to troubles concerning the control system
When the gear shift lever is heavy and it is difficult to shift gears
clutch disengagement
may also be unsmooth
First make
sure
that the clutch operates correctly and inspect the transmission
Worn gears shaft and
or
bearing
Insufficient operating stroke due
or
I ips out
of mesh
to worn
Repair
or
or
damaged synchronizer
Replace
In the most case this trouble occurs when the interlock
is
replace
loose sliding part
Defective
Gear
Replace
worn or
In this
weakened
case
shooting
the trouble cannot be corrected by replacing gears
must be carried out
It should also be
weakened front and
check
A
rear
engine
mounts
Replace
or
weakened
or
Replace
broken spring
Worn fork rod ball groove
Replace
Worn damaged bearing
Replace
Worn
or
damaged
spring
and therefore trouble
noted that gear slips out of mesh due to vibration
ball and
or
carefully
Worn interlock plunger
Worn
plunger check ball and
when the control system is defective
or
Replace
gear
TM 21
generated by
fI
CHASSIS
Probable
Condition
Noise
When noise
occurs
noise occurs while
Insufficient
or
Corrective action
cause
under engine idling and stops while the clutch is
shifting
gears
it may be
judged
Add oil or
improper lubricant
Oil leaking due to defective oil seal and
disengaged
Clean
or
at a
Replace
Damaged bearing Cyclic knocking sound
Replace
occurs
replace
high speed
occun
also at
a
low speed
Worn each spline
Replace
Worn each bushing
Replace
SERVICE JOURNAL OR
JOURNAL
DATE
BULLETIN
BULLETIN REFERENCE
or
No
PAGE No
SUBJECT
TM 22
when
replace with designated oil
gasket clogged breather etc
Worn bearing High humming
or
that the noise is from the transmission
SECTION PD
PROPELLER SHAFT
DIFFERENTIAL
CARRIER
CI
DATSUN PICK UP
MODEL 521
SERIES
CHASSIS
BODY
I NISSAN I
NISSAN MOTOR CO
TOKYO
JAPAN
LTD
PROPELLER SHAFT AND
UNIVERSAL JOINT
PD
1
DIFFERENTIAL CARRIER
PD
5
7
1
C
PROPELLER SHAFT
DIFFERENTIAL CARRIER
PROPELLER SHAFT AND UNIVERSAL JOINT
CONTENTS
DESCRIPTION
PO
ASSEMBL Y
REMOVAL
PD 3
SERVICE
PO 4
DISASSEMBL Y
PD 3
TROUBLE
INSPECTION
PD 3
CORRECTIONS
PD 4
AND SPECIFICATIONS
DATA
DIAGNOSES
AND
PD 5
@
@
Fig
PO I
Propella shaft for
UV N 521 and except Floor Shift vehicles
DESCRIPTION
Three
GN
521
types
and 52 IT
series vehicles
These
of
are
vehicle are counter balanced within
propeller
shafts
for
UV N 52l
cm
gr
The
used
tapped
con
for
a
propeller
good riding comfort
at
occurs
36 000 kill
high speed Therefore the
ones
unbalance of IS
an
factory
with the best
9 000 km
assembled in the
PD
may be unbalanced if
with a hammer while
servicing
or
erroneously
flying
rocks
or
during off road driving
Check propeller
shaft is very important
propeller shafts in service parts and
at 4 000 rpm at the
propeller shaft
bottoming
struction
A correct balance of
lz
in
care
Floor shift vehicles except GN52IT
propeller shafts adopt solid tubular steel
0 2
shaft
joint and
24 000 miles and
center
bearing
every
propeller shaft spline every
6 000 miles for grease
CHASSIS
f
rA
6
u
Fig
PD 2
Fig
Propeller shaft for
PD3
G
NJ521
series vehicles
Propeller shafr for Floor shift vehicles
PD 2
DIFFERENTIAL CARRIER
PROPELLER SHAFT
REMOVAL
N
UV
S21
Remove
except
propeller
transmission side
Floor shifl vehicles
shaft
carefully
spline and
rear oil
G N S21 and Floor shift vehicles
Remove
so
differential gear
not to
damage
seal
3 joint
mounting bolts from both
and remove
case
as
transmission and
bearing mounting
brackets
DISASSEMBLY
Primarily
is balanced
are
required
do not disassemble
as
an
When
assembly
however
the
propeller shaft because
and
disassembly
it
Fig
repair
following procedures apply
S
1
With
journal
movement
installed
on
When journal
does
not
Lightly
Note
match
propeller shaft
can
3
marks
on
and other
be reassembled to the
Remove snap
ring
sleeve
parts
as
yoke
required
of yoke
with
a
hammer
and
race
smoothly
move
When removing
to
Put
base
tap
withdraw bearing
check it for
propeller shaft
disassemble
2
Removing bearing
PD5
journal
from yoke be careful not
damage jau mal
flange yoke
so
that
they
original condition
with an
ordinary
screw
driver
CD
@
ClO
A
Fig
PD 6
Exploded
view
INSPECTION
Check each part and repair
When
Fig
PD4
Removing
snap
replacing journal
unit
or
replace
replace if defective
as an
assembly
ring
2
When
journal pin exterior
A
yoke hole C
or
is
pitted
or
cruised
replace
4
Remove bearing
3
PD 3
When
is worn
damaged replace
1
CHASSIS
is
CD
4
When snap ring
5
When bearing oil seal ring
damaged
deformed replace
or
Propeller shaft installation bolt
2 5 to 3 0
is
@
6
damaged
or
When sleeve
damaged
18 5 to 22
m
Jb
ft
yoke and main shaft splined portions
replace sleeve yoke and
I
are
main shaft
is
propeller shaft tube surface
dented
Direction slackness
or
replace
cracked
When center
8
kg
and or needle roIler
replace
worn
or worn
When
7
@
bearing
is worn or
damaged replace
ASSEMBLY
Assemble propeller shaft in
sequence
reverse
to dis
assembly
Grease is sealed in joint
Fill
joint
with wheel
so
bearing
grease whenever
a
proper snap ring
0 0008 in
so
that
a
shim to
side
joint
less than 10
ring
ring having the
Install and assemble
mm
is selected be
same
Snap ring
gap Select
over
size
Selection of snap ring
0 to
Color
sure
Thickness
Part number
mm
in
identification
thickness for
components correctly
under bending friction resistance of
moves
kg cm
adjust
that slackness is 0 to 0 02
so
Moreover when a snap
to select another soap
opposite
as
PD 7
propeller
shaft is overhauled
Snap ring functions also
Fig
that no greasing is required
37146
14600
2 00 0 0788
White
37147
14600
2 02 0 0795
Yellow
37148
14600
2 04 0 0803
Red
37149
14600
2 06
0 0811
Green
37150
14600
2 08
0 0819
Blue
37151
14600
2 10
0 0827
Brown
37152
14600
2 12
0 0834
No paint
56Ib in
Tightening torque
Companion flange
center
G521 and GN521
bearing
unit installation nut
10 to 15 kg
m
74 to III ft Ib
Bearing mounting bracket installation bolt
G521 and GN521
4 to 2 7
2
m18
kg
to 20
Jb
ft
SERVICE DATA AND SPECIFICATIONS
Vehicle
52IT
Floor shift
U V N521
Except
Distance between
joints
mm
in
1 233
68 9
Spline model
Permissible unbalance
x
5
48
16
Involute spline
gr cm rpm
15 4 000
PD4
GN521
GN52 IT
1st
615
24 2
2nd
743
3
29
5
63
x
16
Involute spline
15 4 000
1st
615 24 2
2nd
983 38 7
5
63
x
16
Involute spline
15 4 000
PROPELLER SHAFT
DIFFERENTIAL CARRIER
TROUBLE DIAGNOSES AND CORRECTIONS
Condition
Vibration
tion
Probable
Vibra
occurs
Worn
haft
at
medium
during
or
the
Unbalance due to bent
and
high speed
vibration
transmitted
needle
damaged universal joint
Replace
bearing
on
propeller
or
Corrective action
cause
or
dented propeller
Repair
or
replace
shaft
i
Loose propeller shaft installation
to
Retighten
l
body
I
Worn transmission
rear extension
t
r
Damaged
Knocking
sound
during starting
noise
Worn or
on
bearing
Replace
damaged universal joint
Replace
center
or
during
coasting
Replace
bushing
Worn sleeve
yoke and
main shaft
spline
Replace
pro
peller haft
Loose propeller shaft installation
Retighten
Loose joint installation
Adjust snap ring
Damaged
Replace
center
bearing
DIFFERENTIAL CARRIER
CONTENTS
DESCRIPTION
PD
5
Adjusting
REMOVAL
PD
6
Adjusting side bearing
DI ASSSEMBL Y
PD
7
I
PD
7
gear tooth contact
INSPECTION AND REPAIR
PD
8
ASSEMBL Y AND ADJUSTMENT
PD
8
SERVICE DATA
PD
8
TROUBLE
PD
9
CORRECTIONS
I nspection before
disassembly
Assembling differential
gear case
Adjusting pinion height
nspecting
drive pinion preload
and
shim
repairing
PD lO
PD ll
drive
PD 13
INSTALLATION
PD14
AND SPECIFICATIONS
PD 14
DIAGNOSES AND
PD 15
DESCRIPTION
The differential gear carrier is made of light and strong
aluminum
alloy
and
uses
Shims and washers
contact
hypoid bevel
are
Differential gear oil should be replaced at initial I 000
gear
km
used for adjustments of tooth
and
preload and backlash of the gear
PD 5
600 miles
checked every 3 000 km
replaced every
36 000 km
24 000 miles
2 000 miles
CHASSIS
ID
@
1
j
I
j
I
@
j
@
Qt @
I
Companion nange
2
Front
3
Spacer
4
Pinion
bearing
height adjust
shim
8
Side bearing
IS
Drive gear
9
Bearing
16
Lock
17
Adjust shim
18
Thrust block
19
Side gear
20
Pinion mate shaft
cap
10
Differential
1
Oil
case
81
5
Pinion mate gear
12
6
Pinion mate gear
13
Drive pinion
7
Side gear thruit washer
14
Rear
bearing
8 Cross secaonal view
P
Fig
Adjust
washer
pin
of differential carrier
REMOVAL
When
removing gear
carrier
pinion companion flange
remove
two rear
to
axle shafts
assembly disconnect drive
flange yoke
Refer to
connection
and
REAR AXLE
for
removal of rear axle
1
Jack up
rear
axle support it with
a
stand
and drain
gear oil
2
Remove
3
Remove companion
rear axle
stallation bolts
remove
CD
shaft
flange
and
propeller
and housing installation
nuts
shan in
@
and
differential gear carrier assembly
Fig
PD 6
PD9
Removing differenti4 gear
carrier
PROPElLER SHAFT
DIFFERENTIAL CARRIER
DISASSEMBLY
Note
Be
sure
to
segregate left
lright
anc
side
bearings
together with shims
Inspectio before
1
In order to obtain the
oil
assembly for
disassembly
cause
leakage
of trouble
and measure
tooth
pinion
When tooth contact and backlash are incorrect
measure
backlash
and
torque
Unbend
diagonal
drive gear and
pinion
contact
4
correctly check
lock
washer
loosen installation
bolts in
and separate drive gear
sequence
of drive
S
Pull out lock pin and turn and
shaft pinion
drive gear hack tiIting also
mate
gear
side gear
remove
pinion
mate
block and thrust
lst
thl
washer
1
Secure differential gear carrier assembly
special
tool
tightening
t
2
ST07320000
nut and side
bearing
Remove differential
and right side
bearing
case
and
remove
on
side
a
stand
bearing
Note
Segregate left and right gean and thrust washers
cap
assembly
and segregate
6
eft
Hold
companion flange
tool SB1530000
outer races
j
and
remove
Note
J
remove
with a
pinion
flange wrench special
nut
withdraw
flange
drive pinion
Be careful not to lose
preload adjusting
shim
I
I
I
j
i
1
Fig
3
Withdraw
PDl0
side
Removing differentidl
bearing
with
puller
case
special
tool
Fig
P
12
Removing pinion
nut
SB3010000
7
Remove
represser
rear
bearing
inner
race
by
the use
special tool SB0030000
t
I
I
I
Fig
PDl1 R
moving side bearing
Fig
PD 7
PD 13
Removing bearing
inner
race
of
a
f
CHASSIS
Be sure to replace it with
Note
new
one
when rein
Apply
bearing
seized damaged
are
adapter
an
to
race
s
side surface and withdraw
O
Put removed pinion height
adjust
oil
seal
P
marily replace
6
Gear carrier
Differential
replace
mate gear thrust washers
excessively replace
weakened
is
damaged
or
replace
oil seal whenever disassembled
worn or
cracked replace
worn or
cracked
case
When sliding part is
8
pinion
or worn
When sliding part is
7
noise occurs
seal
When
outer race
shims in order
or
When side gear and
4
stalling
9
rotation
drags during
Remove oil seal from differential gear carrier
8
replace
Flange
When oil seal lip contact surface is damaged replace
ASSEMBLY AND
JUSTMENT
AD
Assemble differential carrier in
disassembly by noting
Fig
PD 14
AND REPAIR
Drive gear and drive
1
or
and
repair
or
pinion
positions
2
Clean shim washer and bearing contact surfaces
3
When installing bearing
bearing
When installing oil seal
4
adjusted correctly replace
2
When
tooth
seized replace
2
or
gears
surface is
tooth
as a
contact cannot
be
carefully
cracked
or
damaged
thrust washer
replace Repair
not to
damage
oil seal
with
lip
with
an
surface is
oil stone when
worn
or
wear or
Install pinion mate gear
1
damaged replace
seized
differential
pin hole
case
on case
thrust
Coincide pinion
case
block and side gear
mate
shaft with lock
and install it
seizure is
U
When
Bearing
When bearing is seized
differential gear
Assembling
UHUU
3
as
lips
and install
or
on
When
so
fIll space between
gears as a set
When tooth surface is cracked or
2
filling part
set
Side gear and pinion mate gear
1
When fitting
C 21 08 or G I 0924
MIL
multi purpose grease
When wear is excessive
put gear oil
however clean off oil from
check them for
and adjust correctly at the time of reassembly
cause
on
defective
When tooth contact is incorrect
I
to
matters
Put shims and washers in order and install them
the correct
Thoroughly clean all disassembled parts
replace if worn damaged
following
sequence
rrace
outl
Removing
1
INSPECTION
the
reverse
thrust
exfoliated
worn
rusted
value
or
8
PD
adjustment
is
required
washer so that clearance
select
a
proper side gear
is within
the standard
PROPELLER SHAFT
DIFFERENTIAL CARRIER
Side gear thrust washer
Thickness
Part number
mm
in
ST3321 0000
38424 25660
0 76 to 0 81
0 0299 to 0 0319
38424 32200
0 81 to 0 86 0 0319 to 0 0339
38424 32201
0 86 to 0 91
0 0339
to
0 0358
38424 32202
101 to 1 06 0 0398 to 0 0417
38424 32203
1 06 to l
ll
0 0417 to 0 0437
Fig
PD 16
Installing
side
bearing
Adjusting pinion height
Install
pinion
on
specified preload
measure
differentia1
7 to 10
carrier temporarily
apply
1 to 8 9 in lb
6
and
m
kg
pinion heigh t
When
installing pinion
on
differential carrier do not
install oil seal
Note
Do not
tighten
spacer and shim
When
PD15
Fig
Measuring sjd
applied
gear back clearance
adjustment
to
pmlon
are
is
nut
excessively
oot installed
required adjust thickness
back of rear bearing cup
Fit rear bearing
1ltool
Speci
cone
to drive
pinion
ST30030000
Standard side gear back clearance
002
3
to
0 08
Fit lock pin
0 0008 to 0 0031 in
mm
caulk circumference of lock
pin hole
and lock it
4
Install drive gear
head with
a
hammer
on
differential
tighten
case
bolts in
Tapping
bolt
diagonal sequence
bend lock washer to lock bolts
Tightening torque
4 8 to 5 5
5
kg
m
35 6
to
40 7 ft Ib
Fit side bearing together with
ferential
case
by
ihe
use
of
a
adjust
shim
drift
special
to
dif
tool
ST332 10000
r
Fig
PD 9
PD 17
because
Installing pinion bearing
of shim
CHASSIS
2
drive
Apply
bearing
pinion
carrier
to
and
install front
Remove drive
6
install shim
cone
pinion
the
on
from
back of
differential carrier and
bearing
rear
cup
When
adjusting preload check pinion height again
3
and tighten
companion flange
Install
7 to 10
specified preload
nut
so
6 2 to 8 9 in Ib
kgem
that
can
be
obtained
drive
Adjusting
4
Install
gauge
ferential carrier and
and drive
tool
measure
clearance between gauge end
pinion end surface
ST31100000
dif
special
with
a
on
thickness gauge
I
Spacer and
rear
bearing
pinion preload
washer to be
cones
are
applied between front and
used for adjustment of preload
When adjusting oil seal is not installed
2
ST31100000
adjust washer front bearing
Install spacer
flange
on
pinion and tighten pinion
nut with
cone
and
prescribed
tightening torque
Note
Turn
pinion by
hand so that nut is not tightened
and
excessively
in
thickness of spacer and
washer when pinion does not rotate
3
Measure
preload of
spacer and washer
to
drive
pinion
and select proper
obtain the prescribed
preload
Special tool ST3120OO00
Fig
5
PD 18
Measuring clearance
Thickness of drive pinion height adjust shim
can
be
obtained by the following equation
T
N
Where
H
0 01
x
0 2
T
Thickness of shim
N
Value measured by thickness gauge
H
Number on drive
pinion
head
Calculation example
When N is
T
0 5
5 and H is
0
2
x
0 01
Pinion
Part number
2
0 2
0 28
heigh t adjust
Fig
shim
Thickness
mm
1D 19
Measuring preload
in
Bearing
38153
10601
0 050
0 0020
38154
10601
0 075
0 0030
Length
Part number
n
38156
10601
38157
10601
0 250 0 0098
500
0
0 0197
spacer
mm
o
2 6673
38166 3 2202
6775
38167 3
68 00 2 6772
202
PD lO
i
in
PROPELLER SHAFT
DIFFERENTIAL CARRIER
i
Pinion bearing adjust washer
Thickness
38135 09400
2 43
00957
38136 09400
2 41
0 0949
0 1004
38137 09400
2 39
0 0941
53
2
0 0996
38139 09400
37
2
0 0933
51
2
0 0988
38140 09400
35
2
0 0925
2 49 0 0980
38140 09400
2 33
0 0917
38141 09400
31
2
0 0909
Thickness
38127 09400
59
2
38128 09400
57
2
38129 09400
55
2
38130 09400
09400
38131
38132 09400
4
Part number
Part number
mm
0 1020
1012
0
38133 09400
47
2
0 0972
38134 09400
45
2
0 0965
Remove
and install oil seal
flange
oil seal with
a
new
in
Be sure to
E F
replace
width
whenever differential carrier is
one
Tolerance of left
against
0 7874 in
disassembled
and om
Install flange and washer and tighten pinion nut with
5
cm
torque 14 to 17 kg
prescribed tightening
is
mm
or
in
mm
right side assembled
standard
expressed
size
20 rriIi1
in unit of 0 01
0 0004 in is
expressed as
one
104 to 129
lb
in
6
Turn
preload
side
Adjusting
I
to let
flange
make sure that
of pinion
bearing
Use the same shim
bearing and
or
pinion bearing breaking
again
is correct
again
shim
unless differential case side
replaced
carrier is
in and
or
preload
of bearing is
abnormal
2
When
side bearing
replacing
approximately
2 5 kg
before installing
new
5 5 Ib
and
use
weight block of
measure
bearing width
bearing
20 00 mm 0 7874 in
Standard width
Fig
Left side shim thickness
Tl
Right
A
C
D
F
x
om
0 175
Where
Adjusting
side
shim
bearing
mm
side shim thickness
3
T2
PD 20
B
D
F
x
0 01
A B
Mark
on
C D
Mark
on
0 150
mm
Apply selected shim
bearing
gear carrier
4
differential
mallet and install it
case
PD ll
e
to differential case
and fit side
cone
Tap
differential
case
on
assembly lightly
gear carrier
with
a
rubber
F
O
3
T
1
I
CHASSIS
When the width is insufficient
8
Side bearing shim
Part number
Thickness
38453 61200
0 05
mm
in
9
add shim
Measure drive gear and drive pinion backlash When
backlash is less than standard value
it from left to
move
0 0020
right
Move from
right
to
left when excessive
Q7 0 0028
0
38454 61200
38455 61200
0 12
0 0047
38456 61200
0 25
0 0098
38457 61200
50
0
0 0197
Standard backlash
0 13 to 0 18 mm
0 0051 to 0 0071 in
5
Coincide marks
on
and install bearing cap
bearing
on
cap and
bearing housing
bearing housing
Fig
Fig
PD21
Installing bearing
cap
10
PD23 M
When fluctuation
of backlash is excessive
drive gear back deflection A
6
Tighten
bolts in
tightening torque 4
diagnal
2 to 4 8
kg
sequence
m
31
to
with
prescribed
between drive gear and differential case
Deflection limit
Measure dimension between left and right bearing
cap
edges by
use
of
a
cap
measure
foreign material may be bit
35 ft Ib
7
the
h
bacU
ring
gauge
special
0 05
mm
0 002 in
tool
00
ST32110
Standard dimension
198 40 to 198 55
mm
7 811 to 7 817 in
II
Fig
PD22
When
dirve
gear
deflection
backlash fluctuation is excessive
Measuring width
PD 12
is
replace
satisfactory but
gears
3S a
set
DIFFERENTIAL CARRIER
PROPELLER SHAFT
Inspecting
and
repairing
drive
TOE
tooth contact
gear
l
I
Put
red lead
Minium
evenly
three to four teeth of drive gear
on
both surfaces of
turn drive gear to both
directions several times by hand and check drive gear for
tooth contact
2
When tooth contact is incorrect
shim
adjust
Be sure to
wipe
completion of adjustment
a
readjust
off red lead
HEEL
SIDE
thickness of
completely
upon
Fig
c
Heel contact
When
surface is insufficient
contact
damaged Adjust by reducing thickness
side
DRIVE
heel
may
of shim in
Flank
increases
right
one so
left side
d
and
drive
Replace
of side bearing and increase thickness of shim in
PD 27 Flank contact
contact
When backlash is
be
HEEL COAST
SIDE
too
tight
tooth
edge
flank contact occurs Noise
is
pinion adjusting
that drive
pinion
easily
in step
worn
washer with
a
thinner
is moved away from drive gear
Face contact
TOE
In the most
excessive
damaged
replace
one so
HEEL DRIVE
SIDE
Fig
b
case
Noise
In
this trouble occurs when backlasH is
increases
and
tooth
edge
is
easily
order to obtain correct tooth contact
drive
pinion adjusting
that drive
pinion
washer with
a
thicker
is moved to drive gear
HEEL COAST
SIDE
TOE
PD 25 Heel contact
Toe contact
When
contact
surface is in sufficient
toe
may
damaged Adjust by reducing thickness of shim
be
HEEL
SIDE
HEEL DRIVE
SIDE
in left
COAST
side of side bearing and increase thickness of shim in
right
side
Fig
PD 28 Face contact
TOE
HEEL
SIDE
DRIVE
Fig
PD 26
TOE
HEEL COAST
SIDE
HEEL DRIVE
SIDE
Fig
Toe contact
HEEL COAST
SIDE
PD29 Correct contact
r
PD 13
r
CHASSIS
e
Correct contact
shim is accompanied by change in backlash Check
When proper tooth contact is obtained
lead from ilear face
A correct contact pattern
that it lies in the range of 2 3
when no load is
wipe off
to
3 4 from
it when
red
installing
gear
means
INSTALLATION
tip of tooth
applied
Install
differential
in
carrier
reverse
removal Lubricate gears with gear oil upon
Note
Change
in the
thickness of
adjusting
washer
sequence
completion of
installation
or
SERVICE DATA AND SPECIFI CATIONS
Final gear type
Hypoid
Final gear ratio number of teeth
521
7
36
5 143
V52 I
37 8
4 625
G521
N521 GN512
39 8
4 875
VN521 UN521
35 8
375
4
PL521
35 8
375
4
50 6 to
3
72
Drive pinion
Preload when using
new
bearings
without oil seal
kg
m
ft Ib
7 to 10
Standard distance between drive gear center
and top face of drive pinion
Thickness of drive pinion
mm
in
mm
in
61
2 402
adjusting
washers
31
2
to 2 59
Spacing
Length of drive pinion bearing
0 0909 to 0 1020
02 0 0079
0
mm
in
67 56 to 68 00 2 6598 to 2 6772
Backlash between drive gear and pinion
mm
in
0 13 to 0 18 0 0051
Runout of rear side of drive gear
mm
in
Less than 0 05 0 0020
mm
in
0 76
mm
in
0 02 to 0 08 0 0008
spacer
Drive gear
to
0 0071
Side gear and pinion mate
Thickness of side gear thrust washers
to
11
1
0 0299 to 0 0437
Clearance between side gear and thrust
washer
Side
to
0 0031
bearing
Standard width
mm
in
20 00 0 7874
0 12 0 0047
0 50 0 0197
PD 14
0 25
to
0 0098
PROPELLER SHAFT
DIFFERENTIAL CARRIER
Tightening torque
122 9
Drive pinion nut
kg
m
ft lb
14 to 17
Drive gear bolts
kg
m
ft Ib
4 8 to
5
34 7 to 39 8
Side bearing cap bolts
kg
m
ft Ib
4 2 to 4 8
4 to 34 7
30
kg m
ft Ib
kg m
ft Ib
2
101
to
Differential carrier to axle housing
fIx nuts
Companion flange
to
propeller
on
drive
11 6 to 174
5 to 3 0 18 1 to
2
7
21
DIAGNOSES AND CORRECTIONS
Condition
Noise
4
2
shaft
ftx nuts
mOUBLE
16 to
Probable
Shortage
C aerective action
cause
of oil
Incorrect tooth contact between drive gear
and drive
Supply
gear oil
Adjust
tooth contact
pinion
side
differential
Damaged
bearing
or
Replace
or
adjust
improper adjustment
Damaged
Noise
on
coast
Replace defective parts
gear
Incorrect backlash between drive gear and
Adjust
backlash
drive pinion
Incorrect adjustment of drive pinion bearing
Noise on drive
Worn or
damaged
drive
pinion bearings
Adjust correctly
Rebuild differential and
replace
as
required
and coast
Incorrect tooth contact pattern
Damaged side
gear drive gear
Adjust backlash
drive pinion
Replace
as
or
replace hypoid
required
teeth surface
Seized drive gear and drive pinion
Replace hypoid
Pinion bearing under inadequate preload
Adjust preload
Seized
damaged
or
broken pinion bearing
Replace bearing
Seized
damaged
or
broken side bearing
Replace
side bearing
Replace
differential
Swinging defferential
case
PO 15
gear set
case
gear set
n
7
J
CHASSIS
Noise on rom
Corrective action
Probable cause
Condition
Loosen clamp bolts and nuts holding drive
Retighten
gear side
torque
bearing
etc
Side gear jammed in differential
Pinion gears
Worn
or
too
Replace
side gear thrust washer
damaged
designated tightening
Replace defective parts
case
their shaft
tigh t on
them to the
as
required
Replace
and pinion thrust washer
backlash bwtween drive gear and
Excessive
Incorrect
backlash
drive pinion
Replace
Worn differential gear or case
Breakage of
Shortage of oil
differential
Severe selVice due
use
or
to
excessive
worn
parts
Rebuild differential and replace
of improper oil
an
Adjust backlash
loading
After
adjusting preload
as
required
of bearings backlash
and engaging condition of gears fasten parts
Incorrect
adjustment
of drive gear and drive
and
apply specified volume of genuine
oil
pinion
Avoid abusing of the
Excessive
backlash
to
due
car
defacement of
side gear and thrust washer
Loosened bolts and
nuts
such
as
drive gear
bolts
SERV
JOURNAL
DATE
BULLETIN
uLri
OllAt
nl
Un
tilULLt
tE
i h i l
or
PAGE
No
SUBJECT
No
PD 16
gear
SECTION FA
FRONT AXLE
FRONT
SUSPENSION
DATSUN PICK UP
MODEL 521
SERIES
CHASSIS
BODY
I NISSAN I
NISSAN MOTOR CO
TOKYO
JAPAN
LTD
FRONT AXlE
FA
FRONT SUSPENSION
fA 9
SERVICE DATA SPECIFICATION S
FA 19
TROUBLE DIAGNOSES
AND CORRECTIONS
FA 21
1
r
lit
FRONT AXLE
FRONT SUSPENSION
FRONT AXLE
CONTENTS
Inspection
FA 3
FA 2
Reinstallation
FA 7
FA 2
Wheel
DESCRIPTION
FA
FRONT AXLE
Removal
8
FA
bearing adjustment
DESCRIPTION
Fig
The knuckle
spindle
FA l Cross sectional view
is installed on the knuckle
spindle
parts
support through the king pin The king pin bushing is
placed between
the knuckle
spindle
and
of ront
king pin sliding
arm
FA l
Knuckle spindle
Inner wheel
3
Outer wheel bearing
4
Oil
5
Wheel hub
6
Washer
7
Spindle
nut
8
Bearing
cap
9
Brake drum
bearing
seal
10
Wheel nut
11
Knuckle spindle support
12
King pin
13
Thrust bearing
14
Fulcrum bolt
15
Fulcrum pin
16
Spindle shim
17
King pin lock bolt or nu t
t8
Collar
19
Knuckle arm
20
King pin bushing
axle
and the
knuckle
1
2
thrust bearing is inserted between the
spindle and knuckle spindle support
is set
stationariIy
on
the knuckle
The knuckle
spindle
and when
CHASSIS
knuckle
the
operated
the knuckle
secured
on
supported
is
with
two
is
lightly
wheel bearings
spindle and brake drum and wheel
are
With this
the wheel hub with hub bolts
construction
spindle
spindle
the knuckle
round king pin axis
wneel hub
The
on
arm moves
wheels lightly rotate round the knuckle
axis
FRONT AXLE
Removal
I
Jack up vehicle and support it with stands
2
Remove hub nuts and wheeL
Fig
11
Remove brake hose from wheel
hole
cylinder
5
6
Remove brake drum
5
Remove hub cap
6
Remove cotter
mean
Plug
nut
M8
screwing
a
rod
or
by drilling a
plug threading hole
may be removed
0 256 in dia
mm
with a tap
4
Removing lting pin lock
Remove plug from the top of king pin with
other proper
3
FA 3
a
on
upper
bolt into threaded hole and by
pulling boll
pin and spindle
nut from knuckle
spindle
7
Remove wheel hub wheel
from knuckle
8
Remove
knuckle
9
bearings
oil seal and collar
spindle
brake disc assembly from
the
flange of
spindle
Remove knuckle arm from knuckle
spindle
Fig
12
king
Fig
10
FA 2
Removing knuckk
Apply
FA 4
Removing
king pin plug
drift to the top of king pin
and drive out
pin together with lower plug
ann
Remove king pin lock bolt
Fig
FA 2
FA 5
Removing king pin
FRONT AXLE
Tap spindle lightly with
13
a
copper
FRONT SUSPENSION
Clearance limit 0 15
lead hammer
or
0 0059 in
mm
and detach it from knuckle spindle support Be careful
not to
i
Standard dimensions
drop thrust bearing
King pin
r
outer
diameter
19 979 to 20 000 mm
inner diameter
Bushing
0 7866 to 0 7874 in
when filled
20 010 to 20 035 mm
0 7878 to 0 7888 in
if
ldf
2
1
tI
Fig
Lightly tap
14
by applying
race
a
FA 6
brass bar
circumference with
and
remove
from wheel hub When tapping
a
When
2
worn or
cracked replace
hammer
wheel bearing outer
outer race
3
circumfer
tap evenly
ence
When grease leakage is detected during disassembly
replace
Removing spindle support
outer race
Oil seal
Wheel
bearing
Remove grease from wheel
check bearing
ness
for condition
operating
Visual
indicated
as
serviceability
with solvent
and
Check it for
sound and appearance
be checked with bearing
hub
bearing
outer
race
rotating smooth
Rolling surface ca
installed
standard for wheel
on
wheel
bearing
are
follows
Standard dimensions
Outer bearing
Fig
FA 7
Exploded
view
of bushing
Inspection
Replace
worn
damaged
19 990
diameter
0 7870 to 0 7874
mm
in
to
52 000
Outer
51987
diameter
2 0467 to 2 04 72
mm
in
to
bearing
31988 to 32 000
2594
1
to 1
2598
64 987 to 65 000
2 5585
to
2 5591
f
King pin and bushing
when
20 000
Inner
Inner
l
seized
rusted
or
excessively
and clearance between king pin and bushing toward
diameter direction exceeds limit listed below
FA 3
CHASSIS
Visual Serviceability Standard for Wheel Bearing
INNER
RACE SUR FACE
OUTER RACE FITTED
SURFACE
COLLAR SURFACE
OUTER RACE
SURFACE
INNER RACE FITTED
SURFACE
ROLLER ROLLING
SURFACE
INNER RACE
SMALL COLLAR
LARGE COLLAR
ROLLER
SUPPORTER
OUTER RACE
Unserviceable
x
when minor
May be used
Judgement
0 emery paper
Rust should be removed with
Race and roller
Cause
s
t
O
O
atU
8
Flaking
l
l
15o
l
l
ii
Service life due to rolling fatigue
x
before the service life The
However this
following
causes
are
symptom
occurs
considered
Abnormal load overload
Improper handling
Crack
x
x
x
improper installation
or
Excessive tightening
Gap
is excessive and
a
considerable shock is received from the
outside
Rapid
heat
generation
on
the
race
due to creep
Abnormal thrust load
Tapped
FA 4
with
a
hammer while removing
FRONT AXLE
FRONT SUSPENSION
I
Race and roller
i
1
l
g
o
Cause
l
a
0
0
0
0
0
Seizure
l
l
ro
00
l
u
x
x
In
x
the
most
discoloring
Scratch
6
6
or wear
6
6
foreign
removal
of
result
other handling
or
Recess made
6
6
by
Poor lubricant
6
bit
foreign
grown
scar
due
to
quality
matter
deteriorated lubricant
or
Intrusion of dust Fitted surface is
Wear due to excessive
preliminary pressure
6
6
6
Excessive preliminary pressure
Fretting
6
6
6
The fitted part is discolored to brown
Fretting
on
6
6
6
corrosion
remarkably
worn
Biting
Rust
the
as
striking
striking
Wear
occurs
matter
Careless installation
6
made by pressing
or
seizure
cases
flaking
Shock is given carelessly during installation
6
Bit
Recess
or
rust
on
or
lubrication
faulty
or
fitted part
black
fine relative slip
means
metal contact surface
increased
Temperature
bearing
becoming
stops
during operation
moisture
inside
the
lowers
bearing
is
when
the
condensed
fine drips and the grease is moistened
The bearing has been placed in
a
highly
moistened
place for
a
long period of time
Intrusion
of moisture
chemicals
touched with bare hand and
no
etc
the
or
rustproof
bearing
is
action has been
taken
Discoloring
The
wheel
bearing
is
Slight discoloring
may become like oxidized oil stain due to
serviceable if discolor
grease
ing
with
can
be
solvent
removed
by
or
In the most
high
polishing
l
FA 5
cases
this
Occurs
when
preliminary
pressure is too
17
CHASSIS
Inner
RoUer
race
Recess
Cracked roller
bit
flaking
Cracked inner
inner race made
on
Recess
by
foreign matter
race
on auter race
made
by
bit foreign matter
III
Recess
bit
4
on
foreign
roller made by
matter
Spindle
Check
5
spindle for
exploration
or
dyeing test
When bearing inner
spindle with
a
crack
new one
by
means
of
a
race
slips against spindle
When thread is
Check front hub for crack by
magnetic
and replace if cracked
Fr nt hub
exploration
or
dyeing
test
and
means
of
a
magnetic
replace if cracked
replace
damaged repair
or
Standard dimensions
replace
Outer bearing
Inner
bearing
Standard dimensions
Wheel hub bore
Outer bearing
Inner bearing
mm in
51 955
to
51 974
2 0455 to 2 0462
64 955 to 64 974
2 5573 to
5580
2
A
19 9721019 985
Spindle
diameter
mm
in
0 7863 to 0 7868
31967 to 31983
2585
1
to
6
2592
1
Thrust bearing
Check thrust bearmg
FA 6
and replace If damaged rusted
FRONT AXLE
or
it does not rotate
smootWy
or
noise occurs
FRONT SUSPENSION
U
Spindle nut
when thread is
Repair or replace
as
side
utilize upper side as reaming
reaming guide
and
upper
side
center
damaged
both
When reaming upper side
bushings
7
from
Perform reaming
lower
utilize lower
when reaming lower
and
guide
to
align the
line correctly
Bushing inner
when fitted
diameter
20 010 to 20 035
0 7878 to 0 7888 in
mm
Reinstallation
2
Reinstall front axle in
noting the following
reverse
matters
to removal
sequence
Moreover
I
I
install thrust
by
3
G2108
MIL
10924 to sliding parts
When
so
use
support be
to face covered side
Jack
bottom
up the
clearance by means of
Install bushing carefully by the
spindle
sure
to
upward
Selecting spindle shim
I
replacing king pin and bushing
ST35380000
bearing
on
when installing
front axle lightly apply multi purpose grease
or
When installing spindle
spindle
of spindle slightly
filler gauge
measure
and select proper
shims to obtain the correct clearance
Standard clearance
of a special tool
a
0 04 mm
0 0016 in or less
that grease groove toward circumferen
tial direction is in upper side
and bushing joint is faced
rearward
Spindle shim
Grease groove
Upper
Part number
Thickness
40032 25660
0 075
0 0030
40033 25660
0 25
0 0098
40034 25660
0 75
0 0295
in
mm
side
Lower side
2
Fig
FA 8
King pin bushing
When
smoothly
readjust
king pin
When
shim
is
turning
filled
make
sure
to
operate
resistance exceeds standard value
and check bushing and king pin if
neces
sary
2
Remove
grease
bushing through
diameter
nipple
and
threaded grease
Approximately
hole is drilled thoroughly
drill grease hole
nipple
hole
3 mm 0 1181 in
remove
on
King pin turning
Drilling
resistance
5
1
cm
kg
3 in Ib
1
When grease
metal particles and bur
4
Install
plug
after applying seal
n its
circumference
and caulk three positions around spindle by punch
3
use
Ream the inside of bushing to standard value by the
of
king
pin
bushing
reamer
special
tool
HT56802000
5
FA
Install bearing outer
race
CHASSIS
6
Fill wheel hub and hub cap with
MIL
G2108
Figure
10924
or
up
to
1lurpose
multi
grease
J
Wheel
bearing adjustment
the described level See
I
FA 9
Tighten spindle
nut
to
the
specified tightening
torque
Tightening torque
2 to 3 4
3
kg m
1 to 24 6 ft b
23
Fig
7
FA 9
Filling space
between
heel
Fill space between wheel bearing rolle
seal lip pocket with multi purpose grease
bearing
and grease
MIL
G2108
Fig
or
FA 11
heel
Tightening
bearing
lock
nut
10924 completely
2
Turn wheel hub
a
few turns toward both clockwise
and counterclockwise to settle down bearing
tighten spindle
3
nut to the same
Turn wheel hub
a
and counterclockwise
and
measure
starting
tightening torque
bearing
torque is
on
spindle
few turns toward both clockwise
again
to allow
rotation
bearing breakingin
starting torque If measured
deviated
from
Measuring
heel
the specified value
readjust
Fig
FiHing
FA 10
space between
heel
bearing
rollers with grease
8
shaft
Apply
grease mentioned to spindle
1lurpose
multi
threaded portion
bearing
wheel bearing washer and wheel
lock nut exterior
Note In order to
bearing
carefullV
on
lightly
piiivide bearing
with
grease seal
washer
that
dust and
5
no
a
proper pressure
collar and lock nut
foreign
material stick
Fig
grease applied to them
FA 12
starting torque
FA 8
re
Return spindle nut in range from 400 to 700 and
cnincide it with cotter pin hole
4
and
bearing
rotation
FRONT SUSPENSION
FRONT AXLE
Note
Wheel bearing rotation starting torque
New bearing and seal
15
Used bearing and seal
7
Spring balance indication
New
bearing and seal
Used bearing and seal
Correctly
measure
tiar direction
starting
against hub
force toward tangen
bolt
13 0 in Ib orless
em
kg
1 in Ib
6
em
kg
or
b
less
No slackness should
exist toward
axial direc
tion
at hub bolt
2 1 kg 4 6 Ib
1 0 kg
8
or
less
5
2 2Ib or less
Apply
cotter
pin
spindle
to secure
nut
and install
hub cap
FRONT SUSPENSION
CONTENTS
FA
DESCRIPTION
FRONT SUSPENSION
9
Reinstallation
FA 14
FA 17
ADJUSTMENT
FA lO
Removal
FA 10
Vehicle posture
FA 17
Inspection
FA 12
Wheel
FA 17
alignment
DESCRIPTION
@
ijI
Ql
@
@
1
Upper
2
Lower link
link
3
Tension rod
4
Knuckle spindle support
5
Upper
link
spindle
6
Lower link
spindle
7
Fulcrum
8
Fulcrum bolt
9
Cotter
pin
pin
10
Shock absorber
t1
Frame
12
Adjusting shim
13
Lower
14
Upper bump
15
Bracket
bumper rubber
r
rubber
f
Fig
FA J 3 Cross sectional view
FA 9
offront suspension
1
CHASSIS
The
front suspension is
double wishbone type in
a
which uses torsion bar
dependent suspension
Both the upper and lower links
bracket secured on
the
upper and lower links
frame by
are
means
swing through
spring
installed
on
the
of welding The
screw
bushing and
rubber bushing respectively
Top and bottom of
installed respectively
link and
screw
the knuckle
through
bushing
on
spindle support
rubber
bushing
on
are
upper
lower link
The tension rod is installed
tension rod receives a force
on
applied
the lower link The
to the front and rear
directions
The front end of the torsion bar
the
torque
is installed
the
arm
on
on
is installed on
the lower link The rear end is connected to
anchor
spring
stationarily
by
spring
means of serration and the torque arm
by
means
the anchor
arm
The shock absorber is of
of serration
and is
Spring anchor
set
3
Anchor bolt
Torsion bar spring
member
a
Fig
hydraulic double acting
Removing anchor bolt
FA 14
type The shock absorber installed between the lower link
and the bracket to absorb vertical vibration In addition
two
bamper
rubbers
are
installed
on
the frame through
6
Spring anchor
torsion bar
spring and stabilizer
the bracket limiting link operating ranges
In relation to the above
stabilizer is also available
as an
described standard parts
a
I
Jack down slowly
torsion bar
optional part
2
spring toward
and
remove
spring anchor
and
rear
When stabilizer is used
lizer bracket to frame Then
remove
remove
bolt securing stabi
stabilizer from lower
link
7
FRONT SUSPENSION
Detach shock absorber by removing upper and lower
nuts
Removal
I
Jack up vehicle and support it with stands
2
Remove hub nuts and wheel
3
Remove front axle See Section FA Front Axle
5
nuts
Remove anchor bolt after
loosening
lock and adjust
using jack under spring anchor
a
Fig
FA 10
FA 15 Shock absorber
FRONT AXLE
8
RemOve nuts
tension rod
D
from the front and
rear
FRONT SUSPENSION
ends of
Remove bracket bolts @ from the front end
of tension rod and then detach tension rod
together
with
bracket
Fig
Fig
FA 16 Tension rod
12
FA 18
Removingcotterpin
Drive out fulcrum
pin
with a drift
and detach
knuckle spindle support from lower link Remove dust
cover
Remove fulcrum bolt after
9
detach knuckle
loosening
spindle support from
its
nut
and
upper link
Fig
J
Fulcrum bolt
Fig
2
Screw
FA 19
Removing fulcrum pin
bushing
FA 17 Fulcrum bolt
13
Remove
upper link bushing from knuckle spindle
support
10
Remove
screw
bushings
from both sides offulcrum
pin
14
I
Remove tightening nut from
lower
rear
side of
knuckle spindle support and drive out cotter pin
Remove upper link
detach upper link
camber
FA 11
adjusting
spindle
shim
spindle installation bolt
and
from mounting bracket with
CHASSIS
Remove lower link
17
arm
CD
bolt and separate torque
torque
arm
arm
@
and torque
link
from lower
f
Fig
15
Twist and
spindle
FA 20
separate
upper link
and remove dust cover
separated
upper link
on a
I
Upper link spindk
from upper link
and dust seal
vise and remove screw
Secure
bushings
FA 23 Lower link and torque
Fig
ann
r
18
t
Using
bushing
special
a
tap it with
bushing from
a
tool
to lower link
ST36070000
hammer
and drive
out
lower link
bracket
r
J
t
I
I
Fig
16
Removing
Loosen lower link
link spindle
on
FA 21
spindle
screw
nut
Remove lower link with
bushing
and
remove
torque
arm
lower
installed
lower link from lower link mounting bracket
Fig
FA 24
Removing lower link bushing
Inspection
I
or
Shock absorber
noise ocems
replace shock absorber with
a new one
Check upper and lower rubber bushings for condition
Fig
FA 22
and
Removing lower link
FA 12
replace if necessary
FRONT SUSPENSION
FRONT AXLE
replace if necessary
Specifications for Shock Absorber
Check dust seal for wear and
Max
Min
12 4
315
mm
length
205
mm
8 1 in
110
mm
3 in
4
Stroke
and replace
damage
as
in
length
required
Check threaded part of upper link spindle fulcrum pin
and screw
bushing and repair
or
replace
if necessary
force
Damping
Rebound
110
Compression
55
kg
kg
5 Ib
242
3
3lb
I21
Lower link
bushing upper link bushing
I
O 3m
Check rubber
0 98 ft sec
sec
bushing for condition
and replace
as
necessary
2
Upper link spindle
Apply
pin and
screw
bushing
end
measure
When end
upper link
fulcrum pin and
to
play toward
play exceeds
spindle
upper link
or
0 35
screw
bushing
4
spindle and fulcrum
Check torsion bar for distortion and weakness Whim
axial direction
0 0138 in
mm
fulcrum pin together
posture of vehicle is adjusted and
replace
cannot be obtained
wIth screw
See
bushing
Check
Torsion bar
dust
Specifications
cover
for
weakness
and
damage
Adjustment
vehicle height
new one
of vehicle posture
and
for Torsion Bar Spring
Diameter
Part number L R
54009 10
Short
mm
15200
14900
Long
54009 10
Van
54009 10 15200
54009 10 15200
10
54009
Option
damaged repair
or
deg
ft lb
x
830
2 99
x
32 7
216
219 x 830
3 74
0 862 x 32 7
27 0
20 7
x
830
2 99
0 815
x
32 7
21 6
x
830
2 99
0 815
x
32 7
21 6
219
x
830
3 74
x
32 7
27 0
Bumper
deg
rubber
Replace when weakened
threaded part is
m
20 7
0 862
6
or
kg
in
14900
Tension rod
When tension rod is distorted and
Torsional regidity
length
x
0 815
20 7
Double cabin
5
replace
specified
torsion bar with a
or
damaged
replace
When cushion rubber is weakened
or
7
damaged replace
Upper link and
When distorted
damaged repair
FA 13
or
lower link
cracked
replace
or
damaged
or
when thread is
1
CHASSIS
1
I
Lower link bushing
which lower link
bushing
mounting bracket
is inserted and
bushing
5 kg
9
m
615 to 68 7Ib ft
Upper link
3
When collar interior of lower link
along
5 to
8
Tightening torque
Reinstallation
Tighten
I
seal and dust
bushing
screw
on
upper link Install grease
cover
exterior are rusted remove rust with emery paper
24 to 25 kg
Tightening torque
2
Apply
disassembly
hammer
tool
special
a
to lower link
and
fit
lower
ST36070000
bushing
link
tap
bushing
it
used for
evenly with
lower
to
5 to 180 8Ib ft
173
a
2
MIL G2108
r
indicated by asterisk
bushing
10924
or
Apply
in
Fig
thread
grease to
interior and thread on upper link
bushing
r
on
spindle suffici
ently
6
Ie
I
screw
fitted to upper link with multipurpose grease
FA 27
0
u
Fill
link
mounting braclwt
r
m
r
i
t
r
v
62 5
2 4611
I
j
I
l
Fig
2
I
FA 25
Fitting IoweT link bushing
Lower link
44 6
Install torque arm on lower link
Fig
T I ghterung torque
2
3
Arm head
2 5 to 3 1
kg
Serration boss
0 8 to 12
kg m
InStall lower link
on
1 to 22 4 Ib ft
18
m
5 8 to 8 7Ib ft
Screw front and
1 756
length
in
lower link mounting bracket
4
so
rear links
Unk
plug
mm
dimension
inl
spindle
link
against upper
that opening width
standard
recommend fIller
and tighten lower link spindle nut at the position oflower
link shown in
Upper link and up
FA 2
in the same
Unit
U561
A
spindle
is 44 6
When
mm
screwing
be removed
Upon installation make
sure
to operate upper link
spindle smoothly
Fig FA 26
Operating
5
resistance
Remove filler
Less than
5 kg
0
install grease
plug
m
3 6
nipple
grease until grease comes out from dust cover
lb
ft
and inject
Reinstall
filler plug
6
Install upper link
bracket Be
used before
I
sure
di
Apply
pin imd thread
Fig
FA 26
Installing
10
link
to
use
same
on
upper link
mounting
camber shims which were
embly
iurpose grease
multi
on screw
Grease screw bushing
FA 14
spindle
the
bushing
sufficiently
to thread on fulcrum
interior
sufficiently
FRONT SUSPENSION
FRONT AXLE
2
Install dust seal
knuckle
on
5
spindle support
Remove f1ller
grease until
3
Coincide
of notch
direction
for cotter
pin
on
plug
install grease
and
nipple
inject
grease comes out from dust cover Reinstall
f1l1er plug
fulcrum pin with direction of pin hole of knuckle spindle
fulcrum
and drive
support
support with
into hole
into knuckle
pin
spindle
copper or lead hammer Insert cotter
a
tighten lock
6
pin
Upon
installation
make
sure
that
fulcrum pin
operates smoothly
nut
Less than 0 5
Operating resistance
0 4 to 0 6 kg
Tightening torque
kg
3 6 ft Ib
m
m
2 9 to 43 ft Ib
7
Install
knuckle
upper link
bushing
on
the
upper end of
spindle support
Install the upper end of knuckle spindle
8
upper link
arrange
support
them to condition shown in
on
Figure
FA 30 and tighten fulcrum bolt
Tightening torque
4 7 to 5 2
kg
m
34 0 to 37 6 ft Ib
4r
t
Fig
Be
sure
to
install fulcrum bolt from
side of
vehicle
a
Installing fulcrum pin
FA Z8
rear
l
Screw bushings in both sides manually and tempora
4
rily
that knuckle
so
spindle
lower link and retighten
Make
torque
angle
is
support
be
Note
sure
76 50
support is in the center of
them to the
that knuckle
Make
sure
specified tightening
and lower link
spindle
again that knuckle spindle
is in the center of lower link TIlls
operation
can
@
j
4
performed easily by removing f1ller plug
Tightening torque 24
to 25
kg
I73
m
5
to
180 8 ft Ib
54 5 mm
2 146 in
Fig
FA 30 Assembled posture
of knuckle spindle
and upper link
Tension rod
5
I
Unit
9 05 to 11 05
0 3563 to 0
4350
Fig
FA Z9
5
1 437
36
Installing
mm
inl
an
nut on the rear end of tension rod to obtain
extent that rubber
mm
9 05 to 1105
4350
0 3563 to 0
screw
Tighten
3IS
1
in
as
bushings
shown
n
are
compressed
Figure FA
1
3
into
and tighten lock
f
nut
2
bushing
fA
15
4
33
Install tension rod bracket on frame bracket
r
or
r
CHASSIS
3
Make the distance of rubber bushings to be 36 6
1441 in
mm
nut on the front eod of
by tightening
tension rod
When
adjust
rubber
bushings are compressed unequally
position of adjusting nut
the
I
Lock nut
tightening torque
5 to 2 1 kg
1
m
10 8 to 15 2 ft Ib
Bracket bolt
tightening torque
1 5 to 2 1
10
8
to
kg
E
m
E
15 2 ft Ib
Fig
Bracket bolt
1 5 to 2 1
4 mm
33
FA 32 Stabilizer instJJUation
tightening torque
kg m 10 8 to 15
8
Torsion bar spring
Grease serrations
I
sufficiently
Note
Be
and install it
careful
to
both ends
on
on
torque
select
left
springs correctly They
Right
36 6mm
2 ft Ib
1315 in
2
1441 in
and
L
Left
Position lower link
so
can
of torsion
bar
torsion
bar
arm
and
right
be identified with
R
marked on the end surface
that no clearance is between
lower link and bumper rubber and install spring anchor
Fig
6
FA 31
Tension rod installation
on
Figure
Shock absorber
Turn nut
fully against
torsion
bar
to
obtain
A
dimension shown
FA 33
the threaded upper end ofshock
absorber and tighten lock nut with
specified tightening
torque
Note
Be sure to position suspension as shown in
F
Figure
30
A
Upper lock nut tightening torque
1 5 to 2 1
kg
m
10 8 to 15 2
Lower bolt tightening torque
3 6 to
26 0 to
7
3
4
lb
ft
kg m
1
31
lb
ft
Stabilizer
Tighten
nut to arrange the
and stabilizer
as
shown in
height between lower link
Figure
FA 32
Fig
FA 16
FA 33 Anchor
ann
instal1Jtion
in
FRONT AXLE
FRONT SUSPENSIO
t
3
Jack up
applied
spring
tighten
Figure FA 33
nut
anchor
which anchor bolt is
dimension
that
so
meets the standard dimension
Jack up vehi
and support it with stands
e
shown in
and secure
lock nut
A
68 5
dimension
mm
2 697 in
A
dimension
Short body
98 3 86
Long body
92 3 62
Van
75
2 95
Double cabin
75
2 95
Option
90 3 54
mm
in
P
@1
t@
fii
4to 5
kg
m
28 9 to 36 2 ft Ib
2
Check vehicle for posture and adjust if necessary
4
See
Adjustment
of Vehicle Posture
as
near
See
other defective condition
apply when adjustment is
dimension
mm
following
ins true
4
dimension with anchor bolt adjust nut
dimension changes approximately
Figure
FA 34
When
H
nut is turned
5
3
one
mm
complete
dimension is in the
following
posture of vehicle is correct
required
ShortfLong
Without load
Van Double cabin
Option
79 to 84
73 to 77
76 t081
3 11 to 3
31
2 87 to 3 03
2 99 to 3 19
54 5
5
54
54 5
2 15
2 15
2 15
With standard load
Standard load indicates the following condition
lShorongt
body
3 passengers and 1 000
Van
3 passengers and 300
Double cabin
2 passengers in front
kg
2 204 6Ib
kg 661 4Ib
I passenger in
rear
and 250 kg
551 2 Ib
Wheel alignment
1
Carry
out whee
alignment
on a
so as
3 in
25
turn
due to weakened
The
in
anchor bolt of spring anchor
spring force
vertically when adjust
Vehicle posture may be incorrect
H
H
Adjust
H
Vehicle posture
tions
part
a
outlined below
3
or
Jack up
to release nuts from
ADJUSTMENT
spring
FA 34 Dimmension for standard vehicl posture
Fig
Lock nut tightening torque
flat surface with tire
FA 17
air pressure
adjusted
to
the normal pressure
range
CHASSIS
Thoroughly check all
2
componenV parts
and repair
and suspension systems
of steering
replace defective
OT
Short
Toein
1
r
mm
parts before starting wheel alignment
v
D Cabin
Van
Long
2 t03
2 t03
2t03
0 0787 to 0 1181
0 0787 to 0 1181
0 0787 to 0 1181
in
CambeT
1015
lOIS
1020
Caster
1050
2015
1055
King pin inclination
6015
6015
6010
Inner wheel
360
360
360
Outer wheel
310
310
310
Steering angle
Toe in
I
f
Measure
ment the
2
in
toe
and adjust
as
F OT
necessary
adjust
Loosen stopper bolt lock nut
following instructions apply
ISc
Steering angle
adjust stopper bolt
to
obtain the standard steering angle
0
U
c
Ji
r
i
1
I
r
I
1
IIl
l
t
l
r
r
0
t
L
3
r
7
I
e wr
so
7
1
t
Jj
1
FA J5
Fig
Adjusting
1IIIIIIII
toein
Fig
Change the length of
Loosen lock nuts
hand thread
arrow
@
CTOSS
rod
CD
and turn
cross
adjust
ID
toein
right
When
cross rod
is
turned to opposite side toe in is increased
I
m
iQ
Standard
3
CambeT and CasteT
Measure camber and caster and
I
centers of left and
lLmrL
right ball joints
cross rod
Tightening torque
length
Adjusting steering ang
rod to forward direction
in is reduced
Toe
direction
to
left hand thread and
FA J6
516
9 to 12
kg
is indicated below
mm
m
UIU
Both camber and caster
lLlflLIn
are
adjust if
ot
necessary in
adjusted by increasing
or
decreasing thickness of adjust shim inserted between
3 in
20
upper link
65 186 8 ft lb
FA 18
spindle
and upper link mounting bracket
FRONT AXLE
Adj osting shim
FRONT SUSPENSION
1
J
I
Thi kness
Part number
5454204101
1
I li
11
mm
in
I
IAJ t
i
rr
1
r
o
1
rro
I
J
0 0394
t
V
5454304101
2
0 0787
J
Standard thickness
J
1
54544 04101
0 1575
4
r
t
r
t
j
1
1
J
II
To
adjust
caster make
a
difference
of front shim and that of
thickne
increases
approximately
33
rear
caster
per
I
between thickness
shim
When front shim
reduces
mm
t
Caster changes
0 0394
in
of shim
Fig
FA 37
Adjusting
camber and caster
thickness
Note
a
Caster
adjusted
To
adjust
same
valve
reduces
camber
change front and
rear
changes when
shims in the
When thickness of shim increases
b
camber
Camber changes approximately 13 per I
does
0 0394 in of shim thickness
caster
camber
is adjusted
and
rear
shim
thicknesses
beyond 2
mm
0 0787 in
SERVICE DATA AND SPECIFICATIONS
King pin
Oearance limit between the
Bushing
king pin and bushing
in
mm
inner diameter when fitted
in
mm
15
0
0 0059
20 010 to 20 035
0 7878 to 0 7888
Oearance between the knuckle
spindle
support and spindle
King pin turning resistance
kg CJJi in
lb
mm
in
0 04
0 0016
15
3
1
Wheel bearing
Tightening torque
Spindle
nut
ft lb
kg m
3 2 to
40 to
returning angle
4 23 1 to 24 6
3
700
r
Wheel bearing rotation starting torque
When both
bearing
and seal
are new
kg
cm
in
lb
FA 19
is
however that camber
Do not adjust caster with difference between
front
mm
change although
not
It should be noted
less than
13
15
0
r
CHASSIS
When
at
readjusted
in Ib
cm
kg
r
6 1
7
less than
the hub bolt
When both bearing and seal
When
are new
readjusted
than 2 1
4 6
less than
10
2 2
1b
kg
less
Ib
kg
resistance
kg
m
ft lb
less than
5
0
3 6
sliding resistance
kg
m
ft Ib
less than
5
0
3 6
Brake hose connecting nut
kg
m
ft Ib
Wheel bearing lock nut
kg
m
ft Ib
3 2 to 3 4 23 1 to 24 6
Brake disc
kg m ft Ib
4 0 to 5 4 28 9 to 39 0
Upper link sliding
Lower link
Tightening torque
fixing
bolt
7
to
2 0
3
12
1 2 to 13 2
8
to 14 5
0 to 95 4
kg
m
ft Ib
kg
m
ft lb
2 1 to
Arm end
kg
m
ft Ib
2 5 to 3 1
Serration boss
kg
m
ft Ib
0 8
nu t
kg
m
ft Ib
8 5 to 9 5
bushing
kg
m
ft lb
24 to 25
kg
m
ft lb
Cotler pin lock nut
kg
m
ft lb
0 4 to 0 6
Lower link screw
kg
m
ft Ib
24 to 25
173 5 to 180 8
kg
m
ft Ib
4 7 to 5 2
34 0 to 37 6
Lock nut
kg
m
ft Ib
5 to 2 1
10
8 to 15 2
Bracket bolt
kg
m
ft Ib
5 to 2 1
10
8 to 15 2
kg
m
ft Ib
1 5 to 2 1
m
ft Ib
3 6 to
3
4
kg m
ft Ib
5 to
1
2
Lock nut of the anchor bolt
kg
m
ft Ib
4 to 5
Bumper rubber bolt
kg
m
ft Ib
1 to
Knuckle arm
King pin
fixing
bolt
lock bolt
5
2
15
2 to
1
18
Torque arm
w
Lower link
spindle
Upper
link
screw
Upper
link
spindle bolt fixing
to bracket
bushing
Falcrum bolt
to
18 1
4
22
to
2 5 7 to 8 7
1
5 to 68 7
61
173 5 to 180 8
5 to 6 2 39 8 to 44 8
2 9 to
3
4
Tension rod
Shock absorber
Lock nut of the upper end
Lower end
kg
10 8 to 15 2
1
31
26 0 to
Stabilizer
Bracket bolt
FA 20
10
8 to 15 2
28 9 to 36 2
6 8 0
tol
6
I
r
FRONT AXLE
FRONT SUSPENSION
1
I
TROUBLE
DIAGNOSES AND CORRECTIONS
V
v
Condition
Probable
Corrective action
cause
shock and shimmying of steer
Vibration
ing wheel
Vibration
ing
Too much backlash of steer
abrasion of each part of linkage
gear
vibration
and
of front
wheels
wheel This is very much noticeable when
travelling
over
air pressure of tire
Unbalance
ar
d
Adjust
deformation of
road
in
are
transmitted to the steering
many cases
Improper
bad roads and at higher
wheel
Correct the unbalance
or
Unevenly
tire or insufficient
worn
tight
replace
Replace
or
tighten
ening
speeds
Improperly adjusted
or
worn
front wheel
Adjust
or
replace
bearing
When the front wheels are travel
Shock
ling
steering
the
bumpy roads
over
is
linkage
steering wheel This
play
of the
wheel
Worn
or
alignment
loose
Adjust
suspension
link
screw
Replace
bushing
the
transmitted
to
is
notice
especially
Faulty
Demaged
able when travelling rough road
idler arm
Insufficiently
Replace
steering
tightened
gear
Tighten
housing
Shimmying
front
Abnormal vibrations of the
suspension group
and the
which
steering linkage
occur
whole
when
Worn
Replace
steering linkage
ball joint
a
specific speed is attained
Improper steering
adjustment
gear
in
Adjust
sufficient backlash
Defective shock absorber
or
loose installa
Replace
or
tighten
tion
Unbalanced vehicle posture
Vehicle
pulls
to
right or left
When driving with hands off the steering
Improper
wheel
ent
on
swerves
Note
to
a
flat road
right
Adjust
the vehicle gently
air pressure of tire
tightening ofwheel
or
insuffici
Adjust
or
tighten
nuts
left
or
Difference in height of right and left tire
A defective
rear
suspension
may
Replace
tires
treads
also be the cause of this trouble and
therefore see also the
with the rear
chapter dealing
spension
Incorrect adjustment
or
abrasion of front
Adjust
or
wheel bearing
su
Weakened front torsion spring
tion from standard
FA 21
specification
or
devia
Replace
replace
I
v
CHASSIS
Probable
Condition
9frective
cause
action
L
Worn
loose
or
suspension
link
screw
Replace
bushing
of
Deforrned
steering
and
linkage
suspension
Correct the unbalance
Unbalanced vehicle level
Instability of vehicle
Improper
Worn
Replace
link
Adjust
air pressure of tire
loose
or
suspension link
screw
Replace
bushing
Adjust
Incorrect wheel alignment
Worn
or
deforrned steering linkage and
Replace
suspension link
Incorrect
adjustment
of steering gear
Adjust
Correct or replace
Deforrned unbalanced wheel
Stiff s1llering wheel
checking
up
procedure
Jack up front wheels detach the steering
wheel and
gear and operate the steering
If it is light check steering linkage and
suspension
If it
is
Improper
air pressure of tire
Adjust
lubricants
Insufficient
impurities
in
excessively
worn
or
steering
mixing
linkage
or
groups
heavy check steering
steering coluOUl groups
gear
and
Insufficient
Replenish
place
grease
or
the part
steering linkage
in
lubricant
gear
box or
Add
or
or
Replace
wheel
Replace
Worn damaged steering gear and bearing
Replace
Incorrectly adjusted steering
Adjust
Unsmooth king pin
replace
gear
oil
contaminated lubricant
damaged part
insufficient lubrication
Worn
or
incorrectly
adjusted
or
adjust
bearing
gear
Deformed steering linkage
Replace
Incorrect wheel alignment
Adjust
Interference of steering column with turn
Adjust
r
signal switch
FA 22
I
FRONT AXLE
Cfdi
e
o
FRONT SUSPENSION
tIOn
Excessive steering wheel play
Probable
Corrective action
cause
I
7
v
Incorrectly adjusted steering
Worn
steering linkage
idler
gear
housing
Worn
or
loose
wheel
Retighten
bearing
suspension
I
Replace
arm
Improperly fitted of gear box
Incorrectly adjusted
Adjust
link
Adjust
screw
Replace
bushing
Noise
Improper
air pressure of tire
Adjust
Insufficient lubricating oil and grease for
Replenish lubricating
suspension ball joint and steering linkage
oil
or
their breakage
Loose
steering
and
replace
gear
bolts
linkage and
Retigh ten
suspension groups
Defective shock absorber
Replace
Defective wheel
Replace
bearing
Worn steering linkage and steering gear
Replace
Worn
Replace
of loose
suspension link
screw
bushing
Grating
tire noise
Improper
air pressure of tire
Adjust
Incorrect wheel alignment
Adjust
Deformed knuckle spindle and suspension
Replace
linkage
Jumping
of disc wheel
Improper
air pressure of tire
Adjust
Unbalanced wheels
Adjust
Defective shock absorber
Replace
Defective tire
Replace
Deformed wheel rim
Replace
r
FA 23
grease
or
1
CHASSIS
Probable
Condition
Excessively
or
partially
Corrective action
cause
worn tire
Improper
Adjust
air pressure of tire
Incorrect wheel
Adjust
alignment
Defective wheel bearing
Replace
Incorrect brake adjustment
Adjust
Improper
tire
shifting
Adjust
rotation
Rough and improper driving manner
Drive more
SERVICE JOURNAL OR BULLETIN REFERENCE
JOURNAL
or
DATE
BULLETIN
No
PAGE
No
SUBJECT
FA 24
gently
SECTION RA
1
REAR AXLE
REAR
SUSPENSION
DATSUN PICK UP
MODEL 521
SERIES
CHASSIS
BODY
I NISSAN I
NI55AN
MOTOR CO
TOKYO
JAPAN
LTD
REAR AXLE
RA
1
REAR SUSPENSION
RA
4
REAR
AXLE
J
V
1
J
REAR AXLE
t
CONTENTS
DESCRIPTION
RA l
INSPECTION
R 2
REMOVAL
RA l
INSTALLATION
RA 3
J
@
1
12
Axle shaft
3
Wheel bearing
4
Plain washer
5
Lock washer
6
Lock nut
7
Oil sea1
8
Bearing
9
Shim
10
Fig
RA l Cross sectionallliew
3
DESCRIPTION
The
housing
in
rear
is
a
axle is
pressed
weight and
is
any torsional and
The
rear
of
a
steel
semi
cage
Grease seal
11
Bnkedrum
12
Wheel nut
ax
Remove brake shoe and disconnect hand brake wire
floating type The axle
Banjo
sufficiently
of rear
Ax1ccase
2
type housing It is
light
strong to withstand against
bending loads
wheel
bearings
With those bearings the
withstands against
are
rear axle
severe use
The
tapered
roller
bearings
supports heavy load and
rear axle
receives thrust
force through thrust block in the differential
housing
REMOVAL
1
Jack up vehicle and support it with stands
2
Remove road wheel and brake drum
Fig
RA l
RA 2
Removing bralee
CHASSIS
4
Remove four nuts used to install brake end to axle
and disconnect brake line
Fig
RA J
8
p
RemoPing
A
lQck
Remove
RARemoPing loci nut
Withdraw axle shaft
9
Note Be careful notto damage oil seal in axle case side
6
Use axle stand
axle
on vise
special
tool ST07630000
and
Withdraw axle bearing together with brake disc and
bearing cage by using
RA 7
Remove oil Seal
Fig
RA 4
seal again because
Secwring axle in
cup from
Unbend lock washer with
a screw
a
tool
puRer special
0
ST371400
secure
Fig
7
tool
special
1e
rNr
Fig
5
wrench
by
nut
ST38020000
driver Do not
use
tap it
bearing
evenly
with
as
lip
required
is
cage
a
Remcwing
Do not use removed oil
damaged
remove
bearing
When removing bearing
seal
apply
rass
bar and
hammer
unbent lock washer again
INSPECTION
I
When axle is cracked
replace Repair
or
replace
when
bent
Bending limit
10
0 039 in
mm
indicator
is
placed
supported
on
reading
of
in center when axle
at
both
end center
holes
2
Repair
or
replace
when seal surface and
or
thrust
block side end surface is roughened
Fig
RA 5
Unbending loci
wruher
3
RA 2
Replace when bearing
is defective
Rough rolling
REAR AXLE
t
i
surface rust
on
roUer
or
4
other defective condition
Coincide washer
tightening
4
Be
to
sure
removed oil seal and lock washer
replace
lip
with nut groove
nutand bend washer carefully
so
correctly by
lip
that
is not
maged
with new ones
Note
When no
Fit bearing cup and grease seal
with
a
grease
2
MIL
G2108
or
rubber
evenly while fitting
brass hammer
cone
with
a
to cage
Fill
Tap
5
lip with
on
axle
Fit oil seal to tube end
MIL G2108
and fit
or
a set
a
brass
Multi purpose grease
GI0924
Be careful not to deform seal
Note
as
evenly by applying
bar When fitted apply grease to lip
G 10924 after fitting seal
Install brake disc and bearing cage
bearing
washer is used beneath lock washer
replace lock washer by adding plain washer
INSTALLATION
1
plain
or
I
damage lip
special tool ST38220000
Fill bearing with grease
6
Note Cone may be fitted
by
using a brass
bar
G2108
7
or
GI0924 completely
Install left
or
and
right shaft
adjust
direction by applying shim
axial
MIL
greas
Multi purpose
i
clearance toward
cated
by
arrow
mark
Clearance toward axial direction
3 to 0 9
0
mm
0 012 to 0 035 in
Standard shim thickness
5 mm 0 059 in
I
Fi
3
Tighten lock
RA 8
nstaUing bearing
nut with
a
Be careful to
place the faced
that washer is
not
special tool ST38020000
side of nut to washer side so
damaged
Tightening torque
15 to 20 kg
108
to
m
145 ft Ib
Fig
8
RA tO
Adjust shim
opposite side and adjust
direction by applying shim
Install shaft in
toward axial
clearance
Clearance toward axial direction
F
6 02 to
0 15 mm 0 0008 to 00059 in
Tightel torque
ing
Fig
RA 9
Tightening
lock
3 6 to 4 7 kg
nut
RA 3
m
26 0 to 34 0 ft Ib
CHASSIS
Install other parts in
1
Fig
RA ll
reverse
sequence to removal
MClJSUring clearance toward tDCW direction
I
REAR SUSPENSION
CONTENTS
DESCRIPTION
RA 5
SUSPENSION ASSEMBLY
RA 5
Removal
SPRING
Removal
AXLE
CASE
RA 5
Removal
RA 5
RA 5
INSPECTION
RA 5
ASSEMBL Y
RA 6
RA 5
SPEC I FICA TIONS
RA 6
AND REPAIR
RA 6
U
YO
i
c
@
Ofr
ff
l
4
1
2
3
4
5
Spring helper rubber
Qiprcar spring
Pin rear spring front
Pad rear spring lower R H L U
Assy shackle rear spring outer
6
7
8
9
Leaf rear spring
Kit shock absorber rcar
Padrear spring upper
Shackle rear spring inner
Fig
RA 12
Rear
4
RA
suspension
10
11
12
13
Assy bush rear spring rear
Assy bumper
Reinforcement rear axle
Bush robber shock absorber mounting
REAR AXLE
DESCRIPTION
The
which
and
rear
parallel
a
Banjo
is a
suspension
rear
uses
ends of the spring
type
rigid suspension
leaf spring Both front
elliptic
semi
are
secured
on
the frame with
rubber bushings and the shock absorber is installed
cross
the
member from the spring lower pad The suspension
is an under
type
on
slung type
SUSPENSION
ASSEMBLY
Removal
Fig
I
RA H
Removing suspension assembly
Jack up vehicle and support it with stands Remove
road wheel
SPRING
2
Disconnect hand brake
separate bracket
3
4
Support
remove
Note
unit
axle
not
r
and
Removal
shock absorber
V
@
Jack up vehicle
and
case
ID
with
a
jack
at
the
and shackle assembly
necessary
to
remove
center
and
spring
seat
axle case with
Support
3
Remove V bolts and separate
remove
jack slowly and
remove
or
stand
spring from
axle
case
seat
from
from
Note
It is
not
necessary
shock absorber
Lower
jack
2
@
shock absorber unless otherwise required
5
support it with stands and
road wheel
@
spring pin
It is
equalizer
a
CD
Remove brake tube
propeller shaft
wire
to
remove
nless otherwise
spring
uired
suspension assembly
4
Remove
manner
and
and shackle
spring pin
assembly
in the
identical with removal of suspension assembly
remove
leaf spring
AXLE CASE
Removal
1
Jack up vehicle
support it with stands and
remove
road wheel
2
and
Remove hand brake wire brake tube shock absorber
propeller
shaft
Remove U bolts and
separate axle case from spring
r
3
Fig
RA lJ
Removing
re4r
Pass axle
case
out to the side
suspension
RA 5
through
space above
spring and take
it
1
I
CHASSIS
rubber and bushings
4
replace
Shock absorber
If
repl
leaking
noise or reduced
damping
force is detected
ce
ASSEMBLY
Rear suspension assembling is carried
sequence to
I
out
disassembly by noting the following
When installing rubber
bushings
in reverse
items
coat soap water on
them slightly
RA 15
Pig
Removing
Ie case
2
following
Shackle pin
Spring
When
the
is
spring
cracked
broken
or
rubber
bushing
under
no
weakened
I 1 5 to 13
Spring pin
5 to 13
11
m
83 2 to 94 0 ft Ib
kg m
83 2 to 94 0 ft Ib
kg
ex
cessively replace
Tightening torque
Note When
spring
sprinilJn
2
in
one
side is replaced
recommend
U bolt
securing
5 to
61
when threaded part is
bruised cracked
or
broken
lb
ft
wear
3
4
4 to 1 6
1
kg
m 26 0 to 31 1
kg
lb
ft
10 1 to 11 6
lb
ft
m
damaged replace
Propeller
crac
3 6 to
Lower
or
Rubber and bushings
When
m
kg
3
72
Shock absorber installing nut
V bolt
Vpper
3
5 to 10 0
8
nut
the other side be also replaced
When V bolt is bent
shaft
5 to 3 0 kg m
2
Securing bolt
damage
or
deterioration exists in
Securing bolt
2 3 to 2 8
kg
m
18 1 to 21 7 ft Ib
16 6 to 20 2 ft Ib
SPECIFICATIONS
N 521 PL521
Rearspril18
UrlJth
x
55020 20400
width
No of leaves
nun
G521
N
60
On
62
0
2 36
x
60
47 2x 2 36
0 4724 1
0
27562
0
2362 1
0 47242
l
f
61
6
RA
U
N 52t
U
N 521 Option
55020 20801
55020 20800
63
1 200
60x
12 2
2756 2
02362 2
N 521
7 2
1 200
12 1
47 2
V
55020 20500
72
thickness
1 200
load
conditions after jacked down
INSPECTioN AND REPAIR
I
Tighten
51
63
200
1
x
60
12 1
0 2362 3
47 2
x
2 36
x
0 1969 1
0 4724 1
5 1
12 2
0 2362 3
47 2
2 36
0
1969 1
0 4724 2
REAR AXLE
N 521 PL52
3 04
Spririg constant
kg
mm
bfin
lb
kg
170
0 to 20
1
N
G
5 2
0
44
292
20
195 0 to 430 1
0 to
J
V
144
257
to
521
95
9 9 544
than 5 8 1142
U N 521
112
95
to
2
209 to 430
4 5 252
than
mo
mo
U 521
N
Option
N 52t
277 6
I
more
1
112
0
100 to 200 220 to 441 J
5 3 297
than 500
1102
th
mo
1
500
1102
Camber
Free
mm
Loaded
in
127
5 00
143
5 63
170
in
35
38
1
11
43
0
33
30
650
1433
500
102
70 6
6 69
69
with specified load
mm
lb
kg
698 5
540
5
27
500
108
1102
Spring eye diameter
Front
11
Shock
in
mm
41
161
4
16
4
161
41
161
in
mm
33
30
1
33
30
1
3
22
1
31
1 22
absorber
Stroke
x max
GN52
length
mm
in
t90
PL521
475
U V N 521
7 48
x
18
7
195
x
485
7 68
U V N 521
x
t9
1
195
x
485
Option
7 68
19
r
I
11
Damping force at 0 3 mls
Rebound
lb
k8
97
213
72
158
72
Compression
lb
kg
29
63 9
21
46 3
21
158
46
3
90
198
28
617
r
SERVICE JOURNAL OR BULLETIN REFERENCE
DATE
JOURNAL
BULLETIN
or
PAGE
No
SUBJECT
No
T
RA 7
CHASSIS
t
E JOURNAL UR
RViJ
JOURNAL
DATE
BULLETIN
6UL ETli
l
lRECFEEHEi
or
No
PAGE
No
SUBJECT
f
fi
1
B
RA
SECTION BR
BRAKE
j
i
DATSUN PICK UP
MODEL 521
SERIES
BODY
CHASSIS
r
I NIS
J
NI
l
ArJf
NISSAN MOTOR CO
TOKYO
LTD
BR
BRAKE
JAPAN
w
1
1
VA
tf
BRAKE
BRAKE
CONTENTS
DESCRIPTION
BR
Inspection
BRAKE
BR
Reassembly
Removal
BR
REAR BRAKE
BR
8
Inspection
BR
Removal and
BR
9
Reinstallation
BR
1
BR
9
BR
2
Reassembly
Removal
BR
2
HAND BRAKE
Disassembly
BR
3
I
nspecti on
BR
3
Inspection
Reassembly
BR
3
Installation
Reinstallation
BR
3
BR
4
Bra k
BR
4
Brake shoe clearance
BR
4
Hand brake
BR
4
BR
5
SERVICE
BR
6
TROUBLE
MASTER
BRAKE
PEDAL
CYLINDER
LINES
Removal
Inspection
Reinstallati
FRONT
m
BRAKE
Removal and disassembly
BR
6
BR
8
t
and reinstallation
disassembly
Inspection
and reinstallation
BR l1
BR 12
1
Removal
BR 12
BR 13
iBR
1
ADJUSTMENT
3
l
BR 13
pedal leight
BR 13
i
i
I
BR 14
BR 14
Bleeding hydraulic system
BR 15
7
DATA
AND SPECIFICATIONS
DIAGNOS AND CORR
BR 15
CTIO
BR 17
r
DESCRIPTION
Removal
The Datsun 521 series vehicles
The front brake is of a
a
servo
uni
adopt
type
a
hydraulic
brake
I
Unhook return spring
2
Remove spring pin and clevis pin
and rear brake is of
duoservo type The master cylinder is of
The hand brake is of a mechanical type
a
single type
which operates
push rod from
pedal
CD
@
arid separate
arm
the rear wheels
3
Remove fulcrum pin
@
and remove brake
pedal
arm
BRAKE PEDAL
F
Inspection
Check
for
sliding parts
wear
and return
pring for
weakness
2
Check brake
3
Check other parts for condition
pedal
for bending warping and crack
Reinstallation
Reinstall brake pedal in
2
Slightly and evenly
G2108
Fig
BR l
Bra1ee pedal
right hand
or
sequence of removal
coat multi purpose grease
MIL
GI0924 to sliding parts of fulcrum pin and
clevis pin and hook
P9rtion
1
BR l
reverse
of return spring
ii
CHASSIS
3
Tightening torque
steering wheels
Fulcrum pin
For vehicles
with
both
left
3 5 to 4 0 kg m
and right hand
MASTER CYLINDER
1
Valve cap
2
Valve cap
3
Check valve
4
Check valve
5
Oil reservoir cap
6
gasket
spring
Reservoir
7
Reservoir
band
8
Packing
9
Stopper
15
bolt
Primary piston cup
16
Secondary piston cup
17
Stopper ring
10
Piston return
tt
Spring
18
Snap ring
12
Spring
19
Rubber boot
13
Valve
20
Push rod
14
Piston
spring
scat
Fig
BR 2 Master
cylinder
Removal
I
2
nect brake
Disc
pedal
Remove clevis pin
master
cylinder push
rod
Disconnect brake tube
4
Remove
assembly
master
to
front
spring
and separate brake pedal from
3
two
return
bolts
CD
@
from master
retaining
dash panel
and
cylinder
master
remove
cylinder
shims and
cylinder assembly
Fig
4r
BR 2
HR 3 Master
cylinder
3 to 28 9 ft lb
25
BRAKE
Disassembly
In
I
Drain brake fluid
2
Remove stopper bolt
3
Remove rubber boot
remove
4
principle replace piston cup gasket and valves with
whenever master cylinder is disasSembled
new
ones
5
Check piston return springs for damage
other defective conditions and replace
snap ring and stopper ring and
6
Replace
others
if deformed
out
piston
and
other related
wear
and
necessary
damaged
push rod
Take
as
oLdefective
from
parts
cylinder
5
Remove valve cap
and then
remove
gasket check
Reassembly
valve and check valve spring
I
Note
Disassemble master cylinder
sliding
so
that the
surfaces of piston and piston cup
damaged
Do
absolutely
piston
carefully
not remove
necessary
fluid
Moreover
are
reservoir
Assemble
cylinder
master
in reverse sequence
to
disassembly
not
unle
2
do not remove
Apply rubber
grease to
piston
cup and other rubber
parts slightly Apply brake fluid to other component
partS
j
cup unless piston is replaced
and carry
out
parts
not
are
the operations carefully
damaged
materials enter
3
cylinder
or
no
that component
o
dust and
oiher foreign
and brake fluid reseivoir
Tightening torque
Valve cap
6 to 9
kg
43 4 to
m
1 ft Ib
65
Inspection
I
or
Thoroughly wash
all disassembled parts in brake fluid
J
0
alcohoL
Note
Do not wash rubber parts with mineral oil
they
are
When
Reinstallation
since
deteriorated
alcohol
is
used
rubber parts in alcohol
After parts
are
however
Reinstall
do not immerse
2
Fill reservoir with brake fluid
and
Check cylinder and piston for damage and
wear
the
on
conditions
3
Replace
than 0 15
mm
as
if the cylinder and piston clearance is
Note
3
more
19 05 mm
weakened
or
cylinder which
Make
sure
that
no
to
is
located nearest
master
brake fluid leaks
Do not use brake fluid other than specified
cup
For pedal height adjustment
refer to the paragraph
in
4
worn
sequence
Bleed master cylinder
covering pedal adjustment
0 0059 in
Replace piston
reverse
required
Master cylinder inner diameter
4
wheel
cylinder
uneven
sliding surface and for other defective
Replace
in
dry them with compressed
air
2
cylinder
removal
longer than 30 seconds
cleaned
master
packing
Tightening torque
Master cylinder
and valves if damaged
2 1
15
expanded
BR 3
to
5 kg
2
m
2 to 18 1 ft b
CHASSIS
BRAKE LINES
I
Brake
2
Brake tube
3
Brake
4
Front 4 way
hose
tube
connector
5
Brake tube
6
Brake tube
7
Brake hose
8
Connector
9
Brake tube
10
Vinyl
11
Brake tube
12
Brake hose
13
Rear 3 way
cover
connector
Fig
BR4 BTaJe
14
Brake tube
15
Brake tube
lines
Removal
1
Disconnect brake tube
both ends and
remove
by turning flare
nuts on the
clips used to secure brake tube
on
the panel
Fig
BR 6 Rear J WdY ConnectoT
Inspection
Thoroughly clean brake
Fig
2
Disconnect
connector
BR 5
FTont 4
them for
connector
collapsing
crack scar and rust
for weakness expansion
ear
Replace
brake hose from brake tube at 3 way
tube and brake hose
scar
Check
brake tube
and
and crack brake hose
if defective
by loosening flare nut
Reinstallation
3
Disconnect front brake hose
by turning flare nuts
on
1
the both erids
1l
4
BR
Provide
a
sufficient space between brake lines and
BRAKE
other
parts
parts
so
that brake lines do not interfere with other
4 way connector to
1 7 to 2
brake tube
during driving
due to vibrati on
Connector to brake tube
2
Apply
brake fluid to threaded part of brake tube
12
0
3 to 14 5
17 to 2 0
3
12
17 to 2 0
3 to 14 5
12
to
5
14
Wheel cylinder to
flare nut correctly engage threads and tighten flare nul
brake hose
Wheel cylinder to
3
Install brake
hose
Install front brake hose
being
sure
not
to twist
particularly carefully so
hose
load and wheel is set to straight driving position
steering wheel from lock
and
hose
In addition
wheels
are
be
sure
copper packing with
3 to
12
5
14
Brake hose to brake tube
io
5
14
3 to
12
5
14
12
17 to 2 0
that hose is not twisted when
When brake hose is disconnected from 3 way
housing
a new
17 to 2 0
brake tube
not interfere with brake
completely unloaded
nector on rear axle
3 to 14 5
2
3 way connector to
6
4
17 to 2 0
brake hose
Turn
to lock and make sure that tires
suspension components do
1
3way connector to
twisted when vehicle is in posture with standard
is not
7 to 2 0
1
brake tube
that hose
once
be
sure
to
Fill master cylinder reservoir with brake fluid and
perform
con
replace
7
air
bleeding completely
air
Upon completion of
one
brake
make
bleeding
sure
that
I
operates correctly and
no
brake fluid leaks from
brake tube and hose connectors
5
Tightening torque
Fully depress brake pedal
kg m
ft Ib
pedal
4 way connector
10 to 1 5
7 2 to 10 9
3 way connector
10 to 1
5
7 2 to 10 9
If fluid leaks from connector
leakage
or
Master cylinder
continue to
depress brake
and check brake line for fluid
for several seconds
tigh
connector
replace if necessaiy
to
brake tube
17 to 2 0
3
12
to
5
14
Note
Do not use brake fluid
1l1an
otlll
specified
FRONT BRAKE
1
Brake di
2
Front brake shoe
Fore
assembly
3
Front
brake shoe
assembly After
4
Upper
return
lower return
@@
Fig
HR 7 Front brake
BR 5
spring
spring
5
After shoe return spring
6
Wheel cylinder assembly
7
Adjuster assembly
8
Adjuster housing
9
Adjuster
wheel
10
Adjuster
screw
11
Adjuste
12
Shim
head
13
Lock spring
14
Spring plate
15
Lock plate
16
Shim
17
Rubber boot
CHASSIS
r
Removal and
disassembly
round
lf
Out
Jack up vehicle and support it with stands
I
254 mm
Inner diameter
10 00 in
Less than 0 02 mm
0 0008 in
2
Remove wheel and brake druOL When brake drum
cannot be removed
3
In order to
return brake
easily
operation
ease
Umit ofrebored drum JD
remove
hub assembly
2
brake shoe
When
seated
Unhook upper lower and after shoe return springs
sive
and then remove brake shoe assemblies
unevenly
heating
linings
10 04 in
Disconnect brake hose from wheel
cracked
are
incompletely
and or deteriorated due
worn
soiled with grease repair
or
thickness of brake shoe lining
in
5
mm
Brake shoe lining
from front spindle
4
255
adjuster
6
Loosen securing nut and remove wheel cylinder
7
Remove rubber boot
replace
If oil
a
clean
or
grease is found on brake shoe
thoroughly
spring plate
lock plate and
adjuster assembly from
lining face
shoe
brake disc
linings
with solvent
grind
b When brake shoe lining is installed
remove
When
is less than 1 0 mm 0 0394
cylinder
Note
shim and then
to exces
replace
or
to
diameter
equal
to
brake
that of brake
drum
Lining dimension
Width
45
Inspection
I
x
Thickness
5
4
x
x
Total friction
Brake drum
244
area
x
Length
mm
18
x
02
440 cm2
x
9 6 in
68 2 sq in
Thoroughly clean and inspect brake drum Replace if
cracked
or
is
or
excessively damaged When brake drum
excessively
excessive
polish with
worn
by
correct
or
scratched
means
or
of rebating
of
out
in teri
3
Check
adjuster
for smooth operation
round is
When minor
4
fine emery cloth
Return springs
Ifthey
are
considerably
weakened
them
tce
re
Return spring dimension
Upper return spring
Wire diameter
x
free length
mm
mm
in
in
20 x 136 5
0 079
x
Lower return spring
37
5 37
3
2
x
0 091
37
134 5
x
35
5 30
35
After shoe return spring
I 4
x
0 055
83 2
x
27 5
3 28
27 5
turns
Load kg
x
Ib
length mm
15
in
x
0 591
22
159 5
x
0 866
6 28
6
BR
5
159
x
x
6 28
4 5
0 177
x
x
99
3 90
i
BRAKE
1 1
12
4488 dla
810 5039 die
u
11 4
11
1111
II
IU
ENGTH
FR
136
r
r
515 371
F
Unit
Fig
BR 8
mm
H
134
515 301
Unit
in
Upper return spring
BR 9 Lower return
Fig
5
Check brake disc for distortion
6
Wheel cylinder
mm
in
spring
f
fl
@
@
1
Wheel cylinder housing
2
Piston
3
Piston cup
4
Dust
5
Snap ring
6
Connector
7
Packing
8
Connector bolt
9
Bleeder
BR I0 Front wheel
cylinder
I
1
Wheel
cylinder
can
following procedure
be disassembled simply by the
Remove snap ring and dust
from wheel
cylinder
Chec
the
cover
Thoroughly
Be careful not to damage sliding part
they
O Qo
Wheel
t
Sup
X
cr ck
are
min1 oil since
rubber parts in alcohol
After parIS
are
cleaned
r
r
c6rroSign
be
and piston exceeds 0 15
pla c
ithem
if1il
i tde
Cy
must
piston eiJp
diameter
64
20
mm
replaced if deformed
and
or
replaced
aging
even
13
due
16 in
to
damage
It is recommended that
if they
are
apparently
in
satisfactory condition
dotsriorated
When alcohol is used
JA
i
mm
wash all disassembled parts in brake fluid
Do not wash rubber parIS with
Qf wheel cylinder for scratches and
beiew n cylinder
Ifclelirimc
alcohol
Note
it
t
and take out piston
of piston and piston cup
or
ore
J
corrosion
described below
screw
Bleeder cap
10
Fig
cover
however
longer
dry
Assemble wheel cylinder in
do not immerse
than 30 seconds
tham with
sembly Carry
comprassed
parts
air
are
not
out
sequence to disas
operations carefully so that component
damaged
materials enter cylinder
BR 7
reverse
or
no
dust and other
foreign
CHASSIS
Apply rubber
grease to
piston cup and other rubber
parts slightly and brake lIuid
Reassembly
Reassemble
sequence to
to
piston and cylinder
bore
and reinstallation
and
reinstall
brake
front
in
Note the
disassembly and removal
reverse
following
matters
I
When
to
grease
adjuster
assembling adjuster
adjuster housing
assembly
bore
adjuster
apply
brake
wheel and
screw
When installing adjuster assembly to brake disc
Fig
apply
BR l1
Greasing points on ront brake
brake grease to disc
surfaces to slide
adjuster and spring plate sliding
adjuster smoothly
Measure adjuster
when
sIding resistance
sliding
resistance
Adjust by
3
Tightening
shim
Whee
is incorrect
torque
17 to 2 0
bolt
Connector
kg I 10 to 26 5Ib
12
Before
installing
grease to wheel
brake shoe assemblies
cylinder and adjuster brake shoe installing
grooves and brake disc and brake shoe
faces
stick
two
on
apply brake
places
assembly
contact
4
Be careful not to allow brake grease to
brake shoe surface
rn
kg
3 to
4 0 to
Brake disc
2
rn
kg
30 4 to 37 6 ft Ib
Adjuster sliding resistance
5 to 12
4 2 to 5 2
cylinder
5
4
4
5
lb
ft
rn
kg
28 9 to 39 0
lb
ft
Adjust brake shoe clearance and bleed brake system
Upon completion
of the above
that brake operates
correctly and no brake fluid leaks
adjustments make
REAR BRAKE
1f1
1
Brake disc
11
Adjuster
2
Rear brake shoe
12
Shim
assemblies
3
4
5
6
8
BR
Lock spring
After
14
Spring plate
Upper
return
15
Lock
spring
t6
Shim
Lower return
17
Rubber boot
spring
18
AntiI1lttle
After shoe
19
Spring
return
20
Anti rattle
spring
plate
pin
seat
spring
Wheel cylindet
21
Retainer
7
Adjuster assemblY
22
Extension link
8
Adjuster housing
23
Toggle
Adjuster wheel
24
Retumspring
9
BR 12 Rear brake
13
Fore
assembly
10
Fig
head
Adjuster
screw
lever
sure
k
BRAKE
if
8
disassembly
Remov al and
Disconnect brake tube at wheel
cylinder by loosening
flare nut
J
Jack up vehicle and support with stands
2
Remove wheel and brake drum
9
Remove wheel
cylinder
from brake disc
by loosening
installation nuts
10
spring plate lock plate and
from brake disc
assembly
adjuster
Remove rubber boot
shim and remove
1
Inspection
For the rear brake
inspection refer
to the instructions
for front brake
I
Fig
BR tJ Rear b ake
Brake drum
Refer to the
paragraph covering
brake drum of front
brake
3
4
Remove anti rattle
Open brake
shoe
spring and remove
5
pin
assemblies outward against return
extension link
Remove return
Remove brake shoe assemblies
shoe assembly
254
Out of round
0 02 mm 0
Limit of rebored drum LD
255
mm
mm
00 in
0008 in
10 04 in
springs
2
6
10
Inner diameter
must be
separated
Note that after brake
from
toggle
Refer
lever When
7
Lining
paragraph covering
the
to
front
brake shoe
lining
separating after brake shoe assembly from toggle lever
I
withdraw clevis pin
7
Disconnect toggle lever from hand brake
rear cable
lining dimension
Width
45
x
x
Thickness
4 5
x
Total friction
Tpgg
e
lever
rJ
BR 14
Removing toggk leve
adjuster
area
Length
mm
18
440
for smooth
x
02
em
x
9 6 in
68 2 sq in
operation
r
4
r
Fig
Check
3
I
244
x
Return
Ifthey
r
9
BA
springs
are
considerably weakened replace
them
CHASSIS
1
J
Upper
Wire diameter
x
free length
in
mm
mm
2 0
in
return
x
0 079
175
x
spring
2 3
32 5
6 89
spring
Lower return
0 091
32 5
6 22
x
14 x 83 2
30
158
x
After shoe return spring
0 055
30
5
27
3 28
x
27 5
turns
12
Load kg lb
x
length
mm
x
473
0
in
FREE LENGTH
19
184
x
0 748
7 24
x
LENGTH
1010
L
3941dia
Unit
mm
99
x
0 188
6 93
FREE
1U
BR 15
5
4
176
17516 69
ll 1
Fig
x
x
3 90
56
I
111
12
610 504
Unit
in
Upper return spring
Fig
BR 16 Lower return
5
Check brake disc for distortion
6
Wheel cylinder
mm
in
spring
1
@
@J
@
CD
@
I
Wheel
2
Piston
3
Piston cup
4
Piston head
5
Dust
6
Connector
7
Connector
6
Packing
9
10
r
Fig
BR 17 Rear wheel
BR l0
cylinder
cylinder housing
caver
Bleeder
bolt
screw
Bleeder cap
i
1
c
v
d
Wheel cylinder
64
20
3
ifUler diameter
mm
13116
cover
For
piston assembly
Wheel
cylinder
and pull
piston
out
head and
inspection and reassembly refer
apply
Before installing brake shoe assemblies
grease to the following
in
1
Remove dust
t
BRAKE
brake
places
Brake shoe installing grooves of adjuster and wheel
cylinder
to
2
Extension link installing grooves
3
Lower surface of spring seat
4
Contact surfaces between brake disc and brake shoe
offront brake
assembly Six places
Reassembly
At this time
and reinstallation
surface of brake
Reassemble and reinstall
rear
sure
not to coat brake grease to the
brake in reverse sequence
disassembly and removal noting
of
be
shoe
the
following
1
mailers
Refer to the notes for front brake
Rear adjuster assembly is the
1
the
same as
front Refer to
ng front adjuster assembly
covel
paragraph
Adjuster sliding resistance
5 to 12 kg
2
When
assembly
brake shoe
a
n o to 26 5Ib
assembling toggle lever and after brake shoe
adjust clearance between toggle lever and after
assembly
to 0 to
properly selected toggle pin
3 mm 0 to
0
Ql18
0
in with
washer
Fig
Part No
Thickness
44034 32200
2 0
44034
14800
3
2
44034
14801
2 6
0 102
44034 14802
2 9
0 114
44034 14803
3 2
0 126
mm
in
4
BR 18
Tightening
Greasing points
Connector bolt
0 091
Brake disc
5
brake
torque
Wheel cylinder
0 079
on rear
1 5 to 18
kg
m
12
m
17 to 2 0 kg
4 0 to
4
5
kg
IO 8to 13 0 ft Ib
m
3to 14 5 ft Ib
28 9 to 39 0 ft Ib
Adjust brake shoe clearance and bleed brake system
Upon completion of the above adjustments
make
that brake operates correctly and
Itaks
no
r
BR ll
l
brake fluid
sure
r
I
CHASSIS
HAND BRAKE
@
I
Control bracket
6
Set spring
11
Inner lever
15
Equalizer
2
Control lever
7
Front lever
12
Arm
spring
16
Rear cable
Lock plate
Cable spring
3
Control stem
8
Front cable
13
Center link rod
17
4
Control guide
9
Outer lever
14
Equalizer link
18
5
Control yoke
10
Center cable
Fig
BR 19
Hand brake construction
Front cable center cable
Removal
Completely loosen hand
Control stem
2
1
Completely
2
Remove
loosen hand brake
clevis
pins
D
and
@
and
brake
Remove clevis pin and separate cable from lever
separate
control steOL
Fig
BR 20 Control stem
Fig
BR 12
BR 21 Cable and lever
1
BRAKE
Rear cable
2
Replace if ratchet pawl
ly or unusually
I
Completely
2
Remove clevis pin and disconnect equalizer from
loosen hand brake
3
or
and teeth
are
worn
excessive
damaged
Check springs for weakness
and
replace if required
link
equalizer
Installation
3
Remove lock plate
CD and cable spring @
Reinstall hand brake in reverse sequence of removal
Grease
G2108
or
sliding
parts with multi purpose grease
MIL
GI0924
JUSTMENT
AD
Brake
pedal height
Loosen stopper up to such
separated from pedal
Fig
HR 22 Lock
Fig
4
5
extent that stopper is
arm
and cable spring
HR 23 Rear cable
Remove both side
rear cable
p
an
rear
Unit
brake drums and disconnect
from toggle lever
mm
On
@
Separate cable connecting flange
@
Fig
from brake
BR 24 Brake
pedal adjustment
disc
2
With
Inspection
pedal
I
Check cable for
master
cylinder push
adjust thickness of adjusting shim
damage
other defective conditions and
elongation
replace if required
ices ive
e
head is 138 5 mm
45
5
rod
so
fully pulled
that
height of brake
in from dash
panel
and
Standard shim thickness
BR 13
1 6 mm
out
0 0630 in
r
CHASSIS
i
Rear drum brake
Part No
Thickness
mm
in
With hand brake fully released
For
clearance
3061 I 27260
16
00630
30612 27260
0 8
0 0315
30613 27260
5
0
0 0197
Note
When
having the
Screw in
5
135
mm
sure
to
refer
rear
brake
brake shoe
Front drum
upper and
shim
lower
installation bolts
stopper so that height of brake pedal head
5 33 in
procedure
rear
to
brake
adjusting
use
for
thickn
same
cylinder
m
3
be
adjusting
the
adjust
is
and tighten lock
from dash panel
nut
Brake shoe clearance
Front drum brake
Fig
Jack up vehicle to lift up wheel
Remove rubber boot from brake disc
3
tightly tap adjuster housing and rrtove
brake
adjuster wheel with
shoes
on
and spread
when
a
adjust
in
rear
screw
cable stretched
A
portion
so
adjust equalizer link
L
that
dimension
with
shown
Figure BR 27 is standard dimension Lock adjust
screw
with lock nut
brake drum
For both left and right brakes
when adjuster wheel i
4
screwdriver
With
it forward
Stop turning adjuster wheel
considerable drag is felt
Note
a
Adjusting
Hand brake
2
Turn
BR 26
brake shoes
Equalizer link
spread
L dimension
5
29
turned downward
161
1
mm
in
Return adjuster wheel 12 ratches to obtain correct
clearance between brake drum and brake shoes
Turn brake drum and make
without dragging
brake drum
5
when
sure
brake
that brake drum turns
shoes
interfere with
readjust clearance
Install rubber boot
e
f
I
Fig
BR 27 Hand brake
adjustment
F
Adjust front cable adjust
Fig
BR 25
Adjusting front
Inake
screw
control stem stroke is 80 to 100
BR 14
B
mm
portion
so
that
3 15 to 3 94 in
BRAKE
when control
stem is
44 1 to 66 llb
pulled
Lock
with
adjust
force of 20 to 30 kg
a
screw
other end of hose in
container
a
containing
some
brake
fluid
with lock nut
Normal stroke
80 to 100
3
3 15 to 3 94 in
mm
Limited stroke
Less than 144
Note
mm
5 67 in
4
H nd
brake must operate smoothly
pulled
and released
noise
Depress brake pedal
Make
dragging twisting
sure
that
while being
or
With brake pedal
screw
5
when stroke exceed
7
Bleeding hydraulic system
essential factor for
matter
of fact
regular
during
operation
the brake service
8
air is
the
Allow brake pedal
brake pedal is
on
down
to
return
slowly
with bleeder
closed
Repeat
these
Conduct air
same
Note
operations
until no air bubbles
emerge
bleeding
on
remaining wheel cylinders
in
manner
Check l
1lS8IVoir
b
reservoir cap
and top up reseIVoir with the recommended
Thoroughly clean
materials
that
the
any mud
outlet ho1e
then attach
a
vinyl
Fluid
c
Ordinarily
Rear
is
free
pl ced
foreign
the
When
master
conduct
which i located
again
the
for
bleeding
Rear left
d
Dip
ir
sequence
dust from bleeder
hose to bleeder
during
following
or
from
drained
should not be used
brake fluid
so
for fluid level during bleeding
operation
Clean any dirt around master cylinder reseIVoir and
screw
as
to creep into the circuit with the result that the
the travel end
2
quickly
screw
much attention as
service brake
fluid action is altered and brake pedal becomes spongy at
1
open the bleeder
in hose
Bleeding hydraulic system deserves
likely
fully depressed
to exhaust air
Close bleed
screw
a
and keep
limit
6
As
three times
stroke
Readiust
an
or
abnorm 1
no
othf ulty condition
occurs
it is
two
pedal fully depressed
right
i
performed
Front left
bleeding
most near
option
refilling
cylinder i
air
bleeding
Front right
diSassembled
to master
cylinder
Specifications
Brake type
servo
Uni
Rear
servo
Duo
Hand brake
Mechanical operating
Brake drum
Front
Rear
mm
in
in
mm
BR 15
254
10 00
254
10 00
or re
on wheel cylinder
SERVICE DATA AND SPECIFICATIONS
Front
in the
on rear
wheels
CHASSIS
Brake lining
Dimension
width
x
front
thickness
Total friction
rear
x
length
4 5
x
x
244
18
x
0 2
440 68 2
sq in
em
area
45
in
rom
Wheel cylinder
Front
rom
in
20 64
13 16
Rear
rom
in
20 64
13 16
Master
cylinder
diameter
rom
19 05 3 4
in
Service data
Master
Cylinder push
At brake
rod
pedal height
rom
in
rom
in
138 5
545
Brake pedal
Brake
pedal height
5
135
33
5
Wheel cylinder
Allowable maximum clearance between
cylinder and piston
Master
rom
in
0 15
0 0059
0 15
0 0059
cylinder
Allowable maximum clearance between
cylinder and piston
rom
in
Brake drum
Allowable maximum
fround
out
rom
0 02 0 0008
in
Allowable maximum inner diameter of
rebored drum
Brake
rom
in
255
10 04
rom
in
10
0 0394
rom
in
lining
Allowable minimum thickness
Hand brake
Equalizer link
L dimension
29 5
161
1
Normal stroke
rom
in
80 to 100 3 15
Allowable maximum stroke
rom
in
144
BA 16
5 67
to
3 94
x
9 6
BRAKE
Tightening torque
Fulcrum pin
kg
m
lb
ft
5 to 4 0
3
Master cylinder
kg
m
lb
ft
2 1 to 2 5
m
kg
lb
ft
6t09
Master cylinder valve cap
3 to 28 9
25
15
2 to 18 1
4 to 65 1
43
4 way connector
kg
m
ftIb
10 to 15
7 23 to 10 85
3way connector
kg
m
ft lb
10 to 15
7 23 to 10 85
Front brake
Wheel cylinder
kg m
lb
ft
4 2 to 5 2
Connector bolt
kg m
lb
ft
1 7 to 2 0
Brake disc
kgm
lb
ft
4 0 to 5 4
kg
lb
ft
5 to 18
1
10
1 7 to 2 0
123
30 4 to 37 6
3
12
5
14
to
28 9 to 39 0
Rear brake
Wheel
cylinder
m
Connector bolt
kg m ft Ib
Brake disc
8 to 13 0
5
14
to
kg
m
ftIb
4 0 to
Master cylinder to brake tubO
kg
m
ft Ib
7 to 2 0
I
3 to
12
5
14
4way connector to brake tube
kg
m
lb
ft
Ito 2 0
7
12 3 to
5
14
Connector to brake tube
kg
m
ft lb
17 to 2 0
3
12
Wheel cylinder to brake hose
kg
m
ft Ib
7 to 2 0
1
Wheel cylinder tolbrake tube
kgm ft Ib
1 7 to 2 0
12 3 to 14 5
3way connector
kg
m
ft Ib
17 to 2 0
3 to 14 5
12
Brake hose to brake tube
kg
m
lb
ft
17 to 2 0
3 to 14 5
12
3 way connector to brake tube
kg
m
ft Ib
Ito 2 0
7
3
12
4
5
28 9 to 39 0
Brake lines
to
brake hose
12
to 14 5
3 to 14 5
to
14 5
TROUBLE DIAGNOSES AND CORRECTIONS
Condition
Probable
cause
Corrective action
Lack of braking power
Excessive
pressure
pedal
required
Grease
mud
or
water on brake shoe
linings
Remove drums
Clean and
dry
brake shoe linings
or
replace
poor brakes
Full
area
of linings does not contact
Scored brake drums
Replace brake shoes
Reface drums and install
linings
BA 17
new
brake shoe
CHASSIS
Condition
Spongy pedal
Probable
Deteriorated brake shoe lining face
Replace
Worn brake shoe lining
Replace
Oogged brake line
Inspect and clean
Air in brake lines
Bleed
Swollen hose due
to
deterioration
use
of
Replace hose and bleed system
Use prescribed brake fluid
Use of a brake fluid boiling poin t of which is
Change
too low
bleed system
reservoir filler cap vent hole
This promotes
a
vacuum
that sucks in air through
slight
or
thoroughly
poor quality brake fluid
Oogged
Pedal yields under
Corrective action
cause
in master
rear
with
prescribed
brake
fluid
and
Clean reservoir filler cap and bleed system
cylinder
seal
Deteriorated check valve
Fit
External leaks
Check master cylinder
a
new
check valve and bleed system
pressure
piping and wheel
cylinder for leaks and make necessary repair
Leakage from
master
cylinder through pri
Overhaul master cylinder
mary cap
Unbalanced brakes
Insufficient brake fluid level
Check and add
Tires
Inflate tires
improperly
Improper
Water
Mud
or
or
brake
oil
sand
on
on
inflated
adjustment
brake shoe
to correct
pressure
Readjust
linings
brake drum
Oean
or
replace
Clean
Deteriorated brake shoe lining face
Repair by
means
of polishing
Improper
brake shoe lining contact
Repair by
means
of polishing
Improper
brake shoe
Rearrange
or
lining angle
Worn brake shoe linings
Replace
Deformed brake shoe
Replace
BA IB
replace
or
replace
BRAKE
Condition
Probable
Worn or
damaged
Corrective action
cause
rust
other than
brake
Repair
or
replace
Repair
or
replace
Adjust
and
Apply
brake grease
drum
Defective wheel
Faulty
cylinder operation
brake shoe sliding
Faulty adjuster sliding
plate installation bolt
Loose back
Deformed back plate
Replace
Improperly adjusted wheel bearing
Readjust
wheel
Improper
Brake drags
or
replace
Readjust
alignment
Inspect and clean
Loose leaf spring U oolt
Retighten
Insufficient brake shoe drum clearance
Adjust
No
cylinder
brake pedal
master
play
on
Faulty brake
shoe
return
port
or
replace
Clean and adjust brake pedal height
Adjust and apply brake
cylinder operation
Repair
or
replace
broken return spring
Replace
Defective hand brake return
Inspect and correct
Oogged brake
Inspect and clean
Improper
grease
Replace
Expanded piston cap
Weakened
or
Adjust and apply brake grease
sliding
Faulty adjuster sliding
Defective wheel
grease
replace
or
Clogged brake lines
Clogged
Squeak
Retighten
apply brake
lines
wheel bearing adjustment
Readjust
replace
Brake drags
Dragging
See
Worn brake shoe lining
Replace
Bfl 19
or
above
CHASSIS
Condition
Squeal
Probable
Corrective action
cause
Deteriorated brake shoe lining face
Correct by
means
of polishing
or
replace
Deteriorated brake shoe lining face
Correct by
means
of polishing
or
replace
Worn brake shoe lining
Replace
Improper brake shoe and lining contact
Replace
Excessive friction between brake shoe and
Oean and apply brake grease
brake disc
Foreign
brake drum
sliding
sur
Oean
deflection of drum
sliding
sur
Rebore or replace
matter
on
face
Damaged
or
face
Chatter
Deformed or improperly installed brake shoe
Correct or
Loose back
Retighten
plate installation
bolt
replace
Worn anchor contact part
Replace
Improper brake shoe lining contact
Correct
or
replace
Roughened brake drum sliding surface
Rebore
or
replace
Rebore or
replace
Correct by
means
Excessively
distorted
or
deviated drum out
of round
Roughened
Excessive pedal
brake shoe
Improperly adjusted
lining
surface
brake
of polishing
or
Readjust
travel
Air intrusion into
Brake fluid
hydraulic system
leakage
Bleed system
from hydraulic system
or
Check repair
insufficient lluid level
Worn brake shoe
Tilted brake shoe
lining
or
faulty
Replace
return
RR
Correct
O
or
add brake fluid
replace
BRAKE
SERVICE JOURNAL OR BULLETIN REFERENCE
JOURNAL
DATE
BULLETIN
or
No
PAGE
No
SUBJECT
BA 21
CHASSIS
E JOURI l
SERVi
JOURNAL
DATE
OR
ET j
k3UU
I
EFEI1E Il E
or
PAGE
BULLETIN
L
No
SUBJECT
No
BA 22
SECTION WT
WHEEL AND TIRE
DATSUN PICK UP
MODEL 521
SERIES
CHASSIS
BODY
I NISSAN I
1
Jc
NI SSANMOTOR CO
TOKYO
JAPAN
LTD
WHEEL AND TIRE
WIl
TROUBLE DIAGNOSES AND
CORRECTIONS
WT 5
WHEEl AND TIRE
WHEEL AND TIRE
CONTENTS
DESCRIPTION
WT 2
Tire rotation
WT2
TIRE SIZE
INSPECTION
WT2
I nflation of tires
WT 2
Wheel
WT 2
CHECKING WHEELS AND JACKING
UP
WT3
in
Front
6 00
Rear
6 00 146PR LT
Front
6 00 146PR L T
Rear
6 00 14
8PR
6PR
14
LT
PL52l
G N 521 Series
LT
6 00 146PR LT L521 TU Only
U
N
V
Front
50
5
Rear
50
5
t
146PR LT
521
TIRE INFLATION PRESSURE
To be measured when tires
are
6PR
14
LT
cold
Unit
Under 100 km h 60 MPH
Over 100 km h
kg
lb
cm2
in
60 MPH
Tire size
Front
Series
21
75
1
25
1 8 26
21
3 0
42
18
26
15
21
2 75
39
18
26
15
21
4 25
60
18
26
15
21
N 52I
V
Series
Rear
2 05 29
3
46
3 05 43
55
4
64
1 75 25
1 8 26
5 21
1
3 0
42
18
26
3
46
15
21
1 75
25
18
26
2 05
29
15
21
3 25
46
18
26
3 55 50
L52lTU
U
Front
15
15
PL52 I
G N 52I
Rear
The upper column indicates moderate load and the lower column indicates
WTl
for both Front and
Rear
6 0014 6PR LT
Front 6 00
Rear 6 00
6PR
14
8PR
14
LT
LT
2 05 29
heavy
load
Rear 6 00 146PR LT
for both Front and Rear
5 50146PR LT
CflASSIS
Tighten
DESCRIPTION
wheel nuts to a torque of
5 to 10 0 kg
8
m
61 5 to 72 3 ft Ib
Inflation of tires
Tire rotation
improve riding comfort and
Tires with proper pressure
the
steering stability reduce driving sound and extend
To equalize the
service life
in the
checked for proper pressure
The tires should be
monthly bassis
conditions
5
0
rises
pressure
frequently depending
or more
while the tires
7 Ib
kg cm
in2
tires should be rotated
as
shown
diagram
on
driving
on
Ordinarily
cold
are
wear
PL521
tire
G
of that when tire is
U
10 000 km 6 000 miles
5 500 miles
N
52I
9 000km
N
V
52I
9 000 km 5 500 miles
cold during continuous driving under a constant speed due
to the tire
rise When
temperature
When tire valve caps
are
removed be
sure
to
or
r
cold
AIGHT FAONT
install
AIGHT
AEAA
the valves with out fail The valve caps assist in
on
air in the tire in case of
keeping
tire pressure
first find out whether the tire is hot
accurately
them
measuring
a
valve leak
and
keep
When
is
inflation pressure
too
high
tit
tl
dust and water out of the valves
the following
SPAAE
troubles will result
Hard ride
2
LEFT FAONT
Bruised tire
or
damaged
carcass
LEFT AEAA
iromeadiately inside
the tread
Fig
3
Poor traction at
4
Rapid tread wear at
in flation
When
rear
wheel resulting in
uneven
WT
Tire rotation
GN
521
v N 521
U
wear
center of tire
is
pressure
too
low
AIGHT FAONT
the following
AIGHT
AEAA
troubles will result
I Ti
2
s
squeal on
turns
SPAAE
Q
Hard steering
J
l
3
Rapid and uneven
wear on
tire tread
edges
LEFT
4
Bruised tire rim and various type of rupture
5
Tie cord
6
Tramp
fatigue
and
or
FAONT
Fig
breakage
LEFT AEAA
WT 2 Tire rotation
PL521U
shimmy troubles
INSPECTION
7
Unusual tire temperature rise
8
Car roll while turning
Wheel
swerve
a
corner or
making
a
sharp
in traffic
I
WT 2
When
wheel
deflections toward
vertical
and hor
WHEEL AND TIRE
izontal
axes
Figure
WT 3
the
at
15
are
the
points indicated by
mm
0 06 in
or more
asterisk in
replace
wheel
Fig
2
Fig
WT 3
Wheel rim
run
out
Jacking
WT 4
Place jack under rear spring
added
car is
jacked
up
damage
tear
condition
of
flange
of
rim
welded
deformed
and
for deformation
unit
and
damaged
other
Front
seat
Rear
apply parking brakes and as
precaution against moving place
block under the front
Check the
spare tire
up
Place jack under lower link
check points
Before
2
Removing
an rear of
l
one
a
large
wheel
crack
defective
rim will
cause
air
leakage
3
Thoroughly
and other
remove
foreign
rubber particles mud sand
flange of rim
a
4
Remove small
foreign
pieces of gravel glass nail and other
matters from tire tread
Fig
When the tire side wall is cracked
wear
if any
wire brush emery paper and for cloth
with
5
rust
matters from the
indicator is
exposed replace the
noticeably
tire with
a
or
WT 5
Jacking up front
side
tread
new one
CHECKING WHEELS AND
JACKING UP
Remove the sp
Insert
jack
re
rod
tire
to
guide
and
then
turn
it
counterclockwise
When
installing tighten
a
little strong after
lifting
up
and lock
Fig
WT3
WT 6
Jacking up
rear
side
stone
an
or
CHASSIS
3
5
Remove wheel cap
Change
when
Fig
4
WT 7
Removing wheel
6
Loosen wheel nuts
When loosening
turn nuts counterclockwise
WT B
Loos
ing wheel
Remove
sure to
WT 9
jack
wheel
by wheel
a
4
WT
temporarily
nuts
follow the order shown in figure
ing
Tighl
order
of wheel
and tightening wheel
following the above mentioned order
nut wrench
Fig
tighling be
Fig
cap
and tighten
tire
nul
nut
properly
WHEEL AND TIRE
TROUBLE DIAGNOSES AND CORRECTIONS
Possible
Condition
Wheel wobbles
Corrective actions
causes
Improper
tire pressure
Measure and
Damaged
tire
Repair
or
distorted wheel rim
or
Unbalanced wheel
Balance
Loosen wheel n ills
Retighten
or damaged wheel bearing
cessive play of wheel bearing
Worn
or
ex
Improper front wheel alignment
Worn or
link
damaged steering
ball
Correct
adjust correctly
replace
correctly
play
or
replace
Adjust
joint and
Replace
bushing
Excessive steering linkage
play
or
worn
Adjust
or
replace
steering linkage
Loosen
steering linkage
connection
nuts with the rated
Retighten
torque
or
Broken suspension spring
Replace
Defective shock absorber
Replace
replace
worn
tightening
parts if any
i
Unevenly exces
sively worn tire
Improper
tire rotation
Conduct tire rotation periodically in stan
dard every 10 000 km 6 000 miles
Unbalanced wheel
Improperly adjusted
Balance
brake
or
replace
Readjust correctly
Improper wheel alignment
Excessively distorted
or
Realign
improperly
in
Repair correctly
stalled suspension link
reinstall
High speed
Reduce speed
Sudden
to
on curves
start
and improper speeding due
rapid acceleration
or
J
improper brake
application
WT 5
Follow
manner
or
replace
if necessary
or
correctly
correct
and
proper
driving
I
CHASSIS
Condition
Tire
Possible
squeals
Improper
tire pressure
Improper front
wheel
Distorted knuckle
C
DATE
or
Measure and adjust correctly
alignment
y
BULLETIN
Realign correctly
suspension
pnV
CE JOURN AL
yn
JOURNAL
Corrective actions
causes
link
Repair
01 UU
1
J
lE
P
J
or
replace if nesessary
n
i
n
t
RI lr
t
or
PAGE
No
No
SUBJECT
WT 6
SECTION ST
STEERING
DATSUN PICK UP
MODEL 521 SERIES
CHASSIS
BODY
I NISSAN I
NISSAN MOTOR CO
TOKYO
JAPAN
I
LTD
STEERING
ST
STEERING LINKAGE
ST
6
SERVICE DATA AND
SPECIfiCATION
ST
8
TROUBLE DIAGNOSES
AND CORRECTIONS
ST
9
I
STEERING
STEERING
CONTENTS
DESCAIPTION
ST 1
INSPECTION AND REPAI A
REMOVAL
ST 2
ASSEMBLY AND ADJUSTMENT
DISASSEMBL Y
ST 3
INSTALLATION
4
ST
4
ST
ST 6
fr
DESCRIPTION
1
J
Steering column
7
Cross rod
Steering column jacket
8
Cross rod socket
3
Steering wheel
9
Idler arm assembly
4
Column clamp
10
5
Post grommet
11
6
Steering gear
1
2
Side rod
Steering gear assembly
ann
P g ST l
Structural view
CT 1
of steering
r1Jechanism
v
CHASSIS
The steering gear is of
gear ratio is 19 8
IThe
rod
tie rods
one
on
link
as
the
front
recirculating ball type
a
steering linkage
each side of the
wishbone type These side rods
pitman
the
and idler
arm
left
and
wheel
Steering
motion
in
arm
side At the
same
through
is
remove
steering post
control
is attached
to
steering
colunan jacket
even
gear
I
Detach gear lever
2
Disconnect shift lever from shift rod and select lever
and
from select rod at the steering column base
arm
the gear ratio by the steering
motion
operates the side rod
same time
the cross rod
and
gear arm
vertically
converted to
When transmission
8
connected through ball
moves
bolts
fixing
grommet
independent
arms
Unscrew
drag
be safely maintained
can
to
an
rod
With this construction
rotation
proportion
The gear
arm
of
cross
steering
right wheel
or
independently steering
gear
are
to both the knuckle arms
joints
if
is
suspension
7
and
has two side
the idler
arm
on
the
is moved
and the opposite side rod is also
moved
REMOVAL
I
Remove
horn
ring by depressing
and turning it
counterclockwise
2
Remove
steering wheel
3
Remove
steering wheel
4
Remove
steering column shell
5
Remove turn signal and dimmer combination switch
nut
Fig
9
assembly
Remove nut
Unscrew two
fIxing bolts
and
remove
column
ST 2 Column
arm
secure
by
gear arm to sector shaft
the use of
a
gear arm
puller
tool ST2714oo00
clamp
Note
Fig
Transmission control
used to
and withdraw gear
special
6
ST J
cLunp
Marl gear arm
Fig
ST
2
ST4
installing position before
Removing gear
arm
removal
if
STEERING
Remove
10
steering
12
housing installation bolts
gear
Detach transmission
control
parts from
steering
column jacket
11
Remove steering gear
assembly
toward engine
com
partment
DISASSEMBLY
JID
@
I
@
6
D
1
3
1
Sector shaft
2
Filler
3
Sector shaft
4
Sector shaft adjusting
Gear housing
5
adjusting
screw
plug
cover
screw
shim
Fig
6
Sector
11
Column jacket
7
Oil seal
12
Steering
column
8
Gear housing bushing
13
Column
jacket bushing
9
Worm
14
10
Worm
0 ring
Worm bearing
shaft
assembly ball nut assembly
bearing adjusting shim
ST 5 Cross sectional view
15
of steering gear
b
I
Drain steering gear oil
2
Loosen lock nut and turn sector shaft adjusting
screw
a
Jew turns counterclockwise Remove sector shaft
Cover
fIXing bolts
I
it
Fi
ST3
ST 6 Sector
raft
s
cOlleT
CHASSIS
Pull sector shaft
3
from gear
screw
with sector shaft
together
cover
sector shaft
housing Disassemble
Remove column
7
jacket bushing
adjusting
INSPECTION AND REPAIR
and shims from the cover
Wash
all
in
parts
solvent
clean
and
dry
them
thoroughly
I
Sector shaft
Check sector shaft tooth surface for pitting exfoliation
or
c
other damage and replace
sector shaft and or
necessary
contact surface is
gear housing bushing
Yhen
replace
as
bushing
as
damaged
Check
necessary
sector shaft and sector shaft bushing for bushing and shaft
fitting Replace
It
outsector
Remove fixing bolts used to
4
gear
and
housing
pull
secure
out column
shaft
smoothly
on
assembly vertically
column jacket to
column
worn
by
steering
worm
its own
weight condition
is
if ball nut is turned until it
In this test
the end of
reaches
Raise
worm
when it
nut
and observe ball nut When ball nut
rotates and comes down
satisfactory
jacket
excessively
when
disassemble ball
to
is not necessary
rotates
Pulling
ST 7
together
Steering worm assembly
2
Fig
them
worm
ball guide may be
thread
damaged
Do not allow ball nut to turn down to the end
of
thread
worm
When steering
live
be sure to
3
Worm bearing
1
Check
and
replace
worm
replace
as
as an
worm
assembly
is defec
other
damage
assembly
bearing for pitting
wear
or
necessary
r
ASSEMBLY AND ADJUSTMENT
3
Worm
bearing
Worm bearing adjusting shim
4
SY
8
Fig
Apply genuine
gear oil
MP 90
parts
Removing column jacket
Fit column jacket bushing
5
Remove steering
and detach wonn
worm
bearings
assembly
wonn
from gear
all disassembled
to
housing
bearing adjusting
Note
shims
When
fitting apply
to
column jacket
adhesive
to
bushing exterior
and grease to interior
and Oring
2
Note
Be careful not to allow ball nut to
worm
end
worm end
If
ball
nut rotates
ends of ball
guides
rundown
suddenly
may be
to
to
the
Fill space between sector shaft oil
grease and fit it to gear
6
Pry
discard it
sector shaft oil seal from
lips
with
housing
the
damaged
3
Place steering
housing together
out
seal
gear housing and
jacket
on
gear
and Oring
worm
assembly
with worm
in the
position
in gear
bearings and install column
housing together with
worm
bearing shims
STEERING
1 6 to 18
Tightening torque
116
Standard
Install sector haft adjusitng
5
kg m
and selected shim
in the slot of sector shaft
to 13 0 ft Ib
bearing shim thickness
worm
lj
Measure end clearance
1 5 mm 0 0591 in
adjusting
mm
Worm bearing
adjusting
Part No
4
screw
mm
48029 71200
0 762
0 0300
48030 71200
0 254
0 0100
48031 71200
0 127
0 0050
48032 71200
0 050 0 0020
of worm t
shim
so
a
proper sector shaft
that end clearance is 0 01
to
0 03
0 0004 to 0 0012 in
shim
Thickness
Adjust preload
screw
and select
in
lecting
aring by
worm
bearing shims to obtain steering colUJ nn initial turning
torque of 4 0
6 0
to
kg
m
28 9 to 434 ft lb
Fig
ST J 0
Measuring end deamce
Initial turning torque of steering column
New worm
bearing
4 0 to 6 0
Used
worm
4 to
2
kg
m
Sector shaft
bearing
4
kg
m
adjusting
screw
shim
3 5 to 5 2 in Ib
Thickness
Part No
2 1 to 3 8
lb
in
At steering wheel
New
0 2 to
Used
0 12 to 0 22
3 kg
0
nrn in
48213 BOIOO
1 575
0 0620
48214 BOIOO
1 550
0 0610
0 4 to O 7lb
525
1
48215 BOlOO
kg
3 to
0
0 0600
5 lb
0
6
I
48216 BOIOO
1 500 0 0591
48217 BOIOO
1475
48218 80100
1450 0 0571
a
0 0580
Install sector shaft in gear housing
Turn
steering column by hand until ball nut
travel center
so
is in its
that sector shaft center tooth enters baU
nut center looth space
2
Install
adjusting
side
1
so
sector
screw
shaft
cover
and
turn
sector
shaft
to raise sector shaft to sector shaft cover
that 2 t03
mm
0
0787 toO 1181
in lash is made
r
between sector shaft teeth and ball nut
II
ball nut
Fig
ST 9
Measuring initidl turning torque
sure
and sector shaft intermeshing position
deviated from center
ST 5
Make
is
that
not
CHASSIS
Sector shaft cover
9
tightening torque
m 116 to 13 0
kg
1 6 to 1 8
adjusting
lb
ft
lock
Note Be
sure to
use
preventing agent
surface of
surface of
3
on
steering
gasket and apply oil
the sector shaft cover
gear
housing
and
nut
and
leak
nut
sector shaft
tighten
when
temporarily
slowly
shaft
Connect gear
several times
8
to ensure
Set gear
arm
to sector shaft
it turns
to neutral
move
Pour gear oil
position and with ball
measure
nut
Approximately
liter 0 70 US pts 0 58 UK pts
Installation may be
backlash
mm
0 to 0 004 in
prescribed
assembly upto level
into gear
INSTALLATION
0 1
screw
m
sector shaft
When backlash is deviated from
adjusting
MP 90
Volume of oil
into
arm
sector shaft
kg
with
comes
at the end of gear
range of 0 to
and tighten
of nner plug hole and install filler plug
lower
to
smoothly
and sector shaft intermeshed at center
3 2 to 3 7
tightening torque
33
0
arm
turn
shaft
231 t026 8ft lb
contact with ball nut
7
full
one
sector
the upper
adjusting screw
sector
retighten
finally
Lock nut
10
screw
1 8 to 1 6 of
screw
installing
gasket
Turn sector shaft adjusting
sector shaft
lock
new
gear arm several times
Operate
further
in reverse sequence
accomplished
of removal Pay attention to the following matters
Tightening torque
tighten
and adjust backlash to the
Steering gear housing
value
3 2 to 3 7
kg
m
1 to 26 8 ft lb
23
Gear
arm
14
Steering wheel
2
With
make
sure
kg
7 to
front wheels
to
2 ft lb
101
m
5 kg
7
m
directed
punch mark
on
50 6 to 54 2
lb
ft
correctly
forward
to
the top end of steering
column
3
When
installing steering
wheel
apply
grease to
sliding
part lightly
Check steering wheel for smooth operation
4
Fig
ST 11
Metuuring backl4sh
STEERING LINKAGE
CONTENTS
AEMOVAl
AND DISASSEMBLY
INSPECTION AND AEPAIA
ASSEMBLY AND INSTAllATION
ST 7
Idler arm
ST 7
ST 6
assembly
l
ST 7
8
ST
STEERING
REMOVAL AND DISASSEMBLY
I
Jack up the front
7
of vehicle and support it with
pins and
Remove cotter
ends of
cross
and idler
arm
rod
nuts from ball studs in both
and separate
cross
rod from gear
arm
stands
2
pins and
Remove cotter
ball studs from knuckle
nuts
and detach side rod
INSPECTION
AND REPAIR
in both sides
arms
I
Side rod ball joint and
When
ball
cross rod
stud is wo n and
direction is excesSive replace
with
Fig
3
Remove
shaft
and
used
nut
remove
puller special
4
ST tZ Side rod and gear
to
secure
gear arm
by
When dust
a new one
joint
0 1 to 0 5
mm
clea
r
cross
is
cover
Clearance toward ball
sock
t
ce
toward axi
rod socket
or
side rod
damaged replace
axial direction
0 004 to 0 020 in
arm
gear
arm
the use of
a
on
sector
gear
arm
tool ST27140000
Remove idler arm
assembly from frame
i
ST 14 Cross sectional view
Fig
afball joint
1
2
Idler
arm
Remove
old
assembly for
3
replace
Remove side rod
them
gear arm as an
r
od idl
r
m
arm
ly
an
arm
for
bending
arm
damage
steering linkage
in
disassembly by noting the following
and crack
and
reverse
of
sequence
matters
assembly
I
6
and check idler
ASSEMBLY AND INSTALLATION
ST 13 Idler arm
cross
dirt
deformation and damage
if necessary
Assemble
S
grease and
wear
Cross rod side rod and gear
Check
Fig
assernbly
Tightening torque
Remove cotter pin and nut from side rod ball stud
and separate side rod from gear arm or idler
Cross rod ball stud
arm
ST 7
6 to 7
kg m
4 to 50 6
43
lb
ft
CHASSIS
Side rod ball stud
Knuckle
Gear
arm
arm or
6 to 7
side
idler
kg
6 to 7 kg
side
arm
4 to 50 6
43
m
lb
ft
m
o
434 to 50 6 ft Ib
@
Idler
assembly
arm
3 2 to 3 7
kg
I
m
1 to 26 8 ft b
23
A
Cross rod lock nut
9 to 12
kg
m
1 to 86 8 ft lb
65
ST 15 Cross sectional view
Fig
When
2
adjust
cross
cross
rod socket
an
cross
ro
are
rod length correctly
I
multi purpose grease
Apply
to threaded
Standard
cross
rod length
516
mm
20 3 in
Adjust
toe in and
2
outlined in
section
Steering 3
lgle
arm
Install
bushing tightening
torque is
12
When idler arm
nipple
0 0787 to 0 1181 in
Inner wheel
360
Outer wheel
310
grease
on
grease filler
arm
removal by noting the
kg m
MIL
G2108
assembly is installed install grease
plug hole and inject multi purpose
10924 until grease comes out from
or
lower end dust seal lip Remove grease nipple and reinstall
filler plug
When idler
arm
assembly
the standard dimension
A
Standard dimension
A
is
is installed make sure that
adjusted correctly
assembly
idler
assembly
following
in
reverse
sequence
of
137 8 to 139 8 mm 5 425 to
matters
1
SERVICE DATA AND SPECIFICATIONS
SPECIFICATIONS
Gear type
Recirculating ball type
Gear ratio
19 8
Steering
10924
FRONT AXLE AND SUS
4
Idler
or
arm
Threaded
3
2 to 3 ffim
G210S
86 8 ft Ib
PENSION
Toe in
bushing
MIL
interior plain bushing interior dust
steering angle
The procedure of toe in and steering angle adjustments
are
arm a
ssembly
seal inside and threaded part and bushing sliding surface
of idler
3
of idler
parated
se
wheel diameter
mm
in
400
8
ST
I
157
504
5
in
STEERING
SERVICE DATA
Standard thickness of
Worm
shims
bearing adjusting
in
mm
15
0 059
t
Initial turning torque of steering column
New worm
bearing
kgm
Used
bearing
kgm in Ib
worm
in Ib
4 0 to 6 0
3 5 to 5 2
2 4 to
2 1 to 3 8
4
End clearance of sector shaft
adjusting
screw
Backlash
at
the gear
arm
top end
Oil capacity
ann
mm
in
0 01 to 0 03
o to 0 1
mm
in
mm
in
mm
in
33
0
0 0004 to 0 0012
0 to 0 004
0 70 0 58
0 1 to
5
0
0 004 to 0 020
dimension
A
8
ST
Refer to page
Standard
in
L US pts UK pis
Ball joint axial end play
Idler
mm
cross rod
length
Toe in
8 to 139 8 5 425 to
137
516
in
mm
504
5
3
20
2 to 3
mm
0 0787 to 0 1181 in
Steering angle
Inner wheel
360
Outer wheel
310
Tightening torque
Steering
column
jacket
to
housing
m
ft Ib
16 to 1 8
116 to 13 0
kg
m
ft Ib
1 6 to 1 8
11 6
Sector shaft lock nut
kg
m
ft Ib
3 2 to 3 7
23 I to 26 8
Gear housing
kg
m
ft Ib
3 2 to 3 7
23 1 to 26 8
Gear
arm
kg
m
ft Ib
14
Steering wheel
kg
m
ft lb
7 to 7 5
Ball studs of cross rod
kg
m
ft Ib
6 to 7
gear
Sector shaft
kg
0
cover
to 3
l
0
1012
50 6 to 54 2
4 to 50 6
43
Ball stud of side rod
Knuckle
Gear
or
arm
idler
side
arm
side
kg
m
ft Ib
6 to 7 43 4 to 50 6
kg
m
ft Ib
6 to 7
4 to 50 6
43
f
TROUBLE DIAGNOSES AND CORRECTIONS
In regard of this matter refer to the
same
subject
described in the section
ST 9
FRONT AXLE AND SUSPENSION
CHASSIS
SERViCE JOURNAL OR BUllETIN REFERENCE
JOURNAL
DATE
BULLETIN
or
No
PAGE
No
SUBJECT
r
J
ST 10
SECTION FE
ENGINE CONTROL
FUEL
EXHAUST
SYSTEM
DATSUN PICK UP
MODEL 521
SERIES
BODY
CHASSIS
I NISSAN I
GI
t
i
t
NISSAN MOTOR CO
TOKYO
JAPAN
LTD
ENGINE CONTROL SYSTEM
FE
1
FUEL AND EXHAUST PIPINGS
FE
5
EN GINE CONTROL
FUEL
EXHAUST SYSTEM
ENGINE CONTROL SYSTEM
1
CONTENTS
DESCRIPTION
FE 3
Play of accelerator wire
ADJUSTMENT
FE 3
Pedal stopper
FE 3
4
FE
height
f
L1
I
Open
Angle
Operating
I
Close
Hitach 81
Nikki
82
C
A
Nut
B
Adjust
C
Lock nut
B
A
nut
Unit
Fig
FE 1 Accelerator contTol syst
fE
for
RH
drive
mm
in
CHASSIS
GP
l
Clearance 0
to
1
0 to 0 0394
Unit
Fig
FE 2 Accelerator control system
for
LH drive
rnm
in
mm
in
except model PL521
it
E3
Unit
Fig
FE 3 Accelerator control system
FE 2
for LH
drive PL521 model
ENGINE CONTROL
EXHAUST SYSTEM
FUEL
half turns
DESCRIPTION
so
to 0 08 in
The accelerator
is
system
light The
constructed
so
and the
smootWy
is
linkage
is
system
Tighten
accelerator control
the
that
in part
linkage
A
nut
C
B
to lock nut
mm
Nut
0 04
B
is
of carburetor side outer case
operates
affected by engine
not
that accelerator wire play is I to 2
Throttle Valve
Operating Angle
vibration
0
AD
USTMENT
RH drive
I
I
FE I Fully screw nut
bracket and
adjust
can
A
830 Nikki
LH
be turned
I
Close
lock nut
C
is
With
nut
adjust
wire
provided
B
clockwise
with sufficient slackness
and
play
extent that throttle lever is about to move
I
I
turn
it up to such
tighten
Operating angle
ABC
loose
2
PL521
wire
turn Make sure that
freely and
except PL52I
shown in
as
against accelerator
complete
unscrew one
B
nut
RH
790 Hitachi
Assemble accelerator control system
Figure
Nikki
830
of accelerator wire
Play
MODEL
Open
2
an
is zero at
Hitachi 81
Nikki
83
T
5
3 0 1181
this time
A
3
B
Unscrew adjust nut
Play will
tighten
be I
nuts
to
A
2 mm
and
one
to two
0 04 to 0 08 in
e
complete
Now
turns
securing
bracket
completely
8
to secure nut
Accelerator wire
B
Nut
C
Lock nut
Fig
FE 5
Unit
Adjusting play of accele
fo
3
ato
mm
in
wire
LH drive
PL521U vehicles mounted with L16 engine
Adjusting method
Note
that
throttle
is the
valve
exactly
same as
for LH drive
completely closed position
differs
C
8
A
A
Nut
B
Adjust
C
Lock nut
nut
200
Fig
FE 4
Adjusting play of accele
fo
ato
wire
RH drive
18
2
709
0
LH drive
Install accelerator wire
throttle valve to
sufficiently
such
an
as
completely
shown in
Figure
FE 2
slackened tighten nut
8
in
part
A
extent that throttle lever is about to move
is zero at this time
Set
Unit
mm
closed position and with wire
Unscrew nut
8
one
Fig
up to
Play
to IDe and
a
FE 3
FE 6
Adjusting play of accele
ato
wi
e
fo
PL521 vehicles mounted with
L6
engine
in
CHASSIS
Pedal
stopper height
RH drive
wire
Upon completion of accelerator
accelerator pedal and adjust stopper plate
between
ance
pedal
I mm
proximately
arm
and
0 04 in
stopper
play
so
depress
that clear
is
plate
when throttle valve is
opened Secure stopper plate with
a
lock
ap
fully
screw
Unit
Fig
18St
FE 8
Adjusting ped41
hight for LH drive
PL521U
method is the
Adjusting
ever
Unit
FE 7
in
83
3
Fig
stopper
mm
mm
same
as
for lR drive How
pedal stroke differs
in
Adjusting ped
J stopper height
for RH drive
Unit
2
LH drive
accelerator
pedal
that clearance
T
Depress
height
so
Fig
bolt head is 0 to I
is
fully opened
mm
and
adjust
between
pedal
stopper bolt
and
pad
bolt with a lock nut
Pedal free
play
Pedal stroke
Pedal
depressing
force when
fully
mm
in
rom
in
kg Qb
alignment
should be less than
center of stopper bolt
RH drive
LH drive
10 to 2 0
1 0 to 2 0
0 0394 to 0 0787
0 0394 to 0 0787
46 1 811
50
3 7 8 2
1969
3 7 82
open
4
FE
in
Adjusting ped41 stopper sheight
for PL521U
Note Deviation in center
stopper
0 to 004 in when throttle valve
Secure stopper
FE 9
mm
of accelerator pedal
2 mm
LH drive
0 08 in
against
only
PL521
10 to 2 0
0 0394 to 0 0787
48 1 890
3 7
8 2
ENGINE CONTROL
FUEl
EXHAUST SYSTEM
FUEL AND EXHAUST PIPINGS
CONTENTS
EXHAUST PIPE AND MUFFLEA
FE
5
FUEL TANK
Description
FE
7
Difference of part by model
FE
7
Precautions for removal and installation
FE
9
AND PIPINGS
FE
9
Description
FE
9
Removal
FE 11
I nspection and repair
FE 11
EXHAUST PIPE AND MUFFER
N521 Model Series
l
GN521 Model Series
t
Note
Front and
are
Fig
FE tO Exhaust construction
rear
tubes of the GN521
model series
longer than those of the N521 model series
for N52t andGN52t
models
FE 5
1
i
u
I
I
CHASSIS
VN521 Model Series
UN521 Model Series
Note
Aear tube of the UN521 model series diffen from
that of the VN521 model
Fig
ies
FE l1 Exhaust constructi01l for VN521 and UN521 models
G521 Model Series
521 Model Series
Note
L
Rear tube of the V521 model series diffen from
that of the 521 model
b
ies
of the G521 model
Muffl
that of the 521 model series
Fig
FE 12 Exhaust construction
FE 6
for 521 a11d
V521 models
ies is
than
long
ENGINE CONTROL
FUEL
EXHAUST SYSTEM
e
i
1
i
l11l
I
Fig
FE 13
Exhaust constTUction
Description
fOT
tube
Exhaust piping consists of front tube muffler and
Difference of part
by
PL521 model
These components
are
clamped
clips
rear
model
Front tube
Muffler
Rear tube
52tU
20010 14800
20100 00100
2040t
N52tU
20010 83000
20100 B2000
20401 B2000
521
1
20010 20600
20100 00 100
2040t 00301
52 IT
1
20010 t 4800
20100 BOIOO
20401
NL521
20010 B3600
20100 B2000
20401 B2000
52IT
N1
20010 B3000
20tOO B2000
20401 82000
20010
B2OO9
20100 B2000
2040 I B2000
200 10 B2000
20100 B200D
20401 B2000
G521U
20010 14800
20100 B0200
2040 t
GN521U
20010 B3200
20100 B200D
2040 t B3200
LG52t
20010
20600
20100 00200
20401
t4800
LG52tT
20010
t4800
20100 B0200
20401
t4800
PL52ITU
52ITN
P1
with U bolts or
14800
14800
c
14800
521
GN1
20010 B3700
20100 B2000
20401 83200
GNL52IT
20010 B3200
20tOO B2000
20401 B3200
V521U
200 10
t4800
20100 BOtOO
20401
t5200
VN521
20010 14800
20 t 00 B3000
20401
t5200
VL521
20010 20600
20tOO BOtOO
20401
15200
20010 20600
20100 B3llOO
20401
15200
U52tU
20010 t4800
20tOo
2040 t 28300
UL521
20010 20600
20too BOtOO
2040t
20010
20100 B3llOO
20401 28300
521
VN1
521
UN1
20600
A
FE
BOtOO
f
V
28300
CH ASSIS
PL521
N521 521 SERISE
EXHAUST PIPINGS
1887 74 3
N521 serise
CD
1193147 01
A
2127183 71
0
@
b
GN521 serise
N L521
serise
@
A
A
A
5
@
b
GNL521 serise
A
B
3
1638 5 164 51
206147
3
JiS
3P
c
@
511
521
serise
G521 serise
@
37tI54 0
1653165 11
@
c
A
A
@
15e21
1
59
L521 serise
9
1
GL521 serise
1973 3 77 71
PL521 serise
D
Unit
FE S
mm
in
FUEL
ENGINE CONTROL
EXHAUST SYSTEM
Precaution for removal and installation
I
Remove mount bolts A B and C See
through
muffler are embossed
FE1O
FEB
2
Remove
3
Remove installation
tube
FigUres
Muffler side of front tube and rear tube side of
on
clamps
manifold
L E J J
B and D
bolts used
to
secure
and disconnect exhaust
exhaust
tube from
EMBOSSMENT
manifold
Fig
b
FE 15
Clearance
should be 55
FE 14
Fig
NOlll
a
When
connecting
tube to muffler
cenlllr
Removing
of
Muffler and
between
mm
side
2 165 in
frame
See
and
Figure
muffler
FE 16
mount A
muffler to front tube or rear
Front
Unit
be sure to apply it complelllly to
embossed portion
See
Figure FE 15
Fig
FE 16 Clearance between side rame and
FUEL TANK AND PIPINGS
Description
Fig
tube connection
FE 17 Fuel system
for
the J13 and J15
Engine models
fE
9
mm
in
muffler
C
CHASSIS
Three types of fuel tank fuel tank for the 521 G521
N521 and GN521
UN521
fuel tank for the V521
and fuel tank for the PL521 U
are
Tank capacity is 41 liters
VN521 and
all fuel tanks
available
e
Fig
Fig
FE 18
F
l tank
FE 19 Fuel tank
for
VN521
for 521
FE 19
r
V521 and UN521
G521 G521 and GN521
10 8 US
gal
9 0
Imp gal for
ENGINE CONTROL
FUEL
EXHAUST SYSTEM
rY
To CAANK CASE
V
A
i
Fig
FE 20 F
1 tank
FE ll
rfoT PL521
U
CFlASSIS
Removal
I
521 and GN521 models
I
Remove drain
2
Loosen hand brake
3
Remove
plug
and drain fuel
hole
inspection
completely
cover
from
body
rear
Through inspection hole disconnect unit gauge wiring and
disconnect outlet tube and breather tube
4
Loosen filler hose
5
Remove front and
and then
2
remove
clips
clip
rear
tank
support
bracket
bolts
fuel tank
UVN521model
Procedures for the 521
However
and GN521
that breather tube position and
note
Fig
models
apply
support
Vapor liquid separator
FE 22
er
COI
bracket differ
3
PL521 model
Fuel
tank
is
installed along
with the
liquid
vapor
and
Inspection
repair
separator
A cover has been
provided just
wheel to protect vapor
view
fuel tank and piping for leakage and other
damages Repair
liquid separator against damage
Photograph below shows an exploded
Inspect
I
in front of left rear
or
replace
as
required Check rubber
hose
and fuel line joint particularly carefully for crack and
lofiqvaporuid
leakage
separator
Note
a
When
soldering
make sure that
no
gasoline
is
remained
b
When
cleaning
inside of tank
use
gasoline
Do
not use water
2
Unit gauge
and therefore it
Fig
21
FE
Vapor
liquid separator
a screw
FE 12
driver
adopts bayonet
can
system for installation
be removed and installed simply with
ENGINE CONTROL
FUEL
EXHAUST SYSTEM
SERVICE JOURNAL OR BUllETIN REFERENCE
JOURNAL
DATE
BULLETIN
or
No
PAGE
No
SUBJECT
y
11
3
CHASSIS
SERVICE JOURNAL OR BULLETIN REFERENCE
JOURNAL
or
DATE
BULLETIN
No
PAGE No
SUBJECT
CJ
FE 14
SECTION BF
BODY
DATSUN PICK UP
MODEL 521
SEPIES
CHASSIS
BODY
I NISSAN I
NISSAN MOTOR CO
TOKYO
JAPAN
LTD
FRAME
BF
1
BODY
BF
3
HOOD
BF
1
FRONT END AND
FRONT FENDER
BF
8
DOOR
BF 13
DOUBLE PICK UP
AND VAN
BF 18
WINDSHIELD AND
REAR WINDOW
BF 21
INSTRUMENT PANEL
BF 23
SEAT
BF 25
ROOM TRIM
BF 26
a
BODY
fRAME
DESCRIPTioN
The ladder
shape frame
members and six
cross
consists of left and
members
right
the frame as
side
This frame with in
condition
long
as
the vehicle is used under the standard
When the vehicle
comes
into a hard collision or
creased bending stress and torsional strength sufficiently
is driven with an excessive load on
withstands against heavy load and
high speed
however
broken and
or
The engine
springs
are
cab
mounted
body
on
rear
severe use
body
shock absorbers and
the frame may be bent
frame for
REPAIR
partially
The frame is rigid and normally
no
trouble occurs
damage
or
a
cracked
twisted
When the vehicle is driven
this frame
rough road under
a
hard thoroughly inspect the
and damaged parts Remove the frame
entirely depending
on
the
condition
of
damage and repair
on
5
n
tll
lI
tJ
OI
IDI
hila
10
I
I
E
E
U ClI
1011
I
i
l
i
5
B
O
i
ii
J
C
llI
aOl
9
2
oS
1
0
5
II
aj
i
cu
l
Cl
1
n
ta
iS
II
d
fi
0
i
1
IJC llne
01
tU
1II
d
BF l
r
a
p
BODY
5
ts
stlOIOI
6
h
E
E
lOS
IlII
os
I
n
Uh
c
I
iJ
c
J
m
Q
r
I
Q
Tg
Ig
COVlill
l
EO
It all
o
j
Il
II
m
t
o
uml
r
u
E llOtoS
rtl I
c
3
u
21
10
iE9
Q
o
I
E
ij
r
E
l
I
s
20
IO
ill
E
tLlSl
IE
l1
2
Q
it
u
l
b
ijo
f
1M
t
alii
BF
2
a
BODY
BODY
CONTENTS
MAIN
CAB
CAOSS SECTIONS
BODY
AEAA
OF CAB
BODY
MOUNTING
BODY MOUNTING
BF 3
DETACHING
BFA
DETACHING
CAB BODY
AEAA
BODY
BF 5
BF 6
BFA
MAIN CROSS SECTIONS OF CAB BODY
Fig
BF J
Crosssecticm
of cab body
1
li
Fig
4 Cross secticm
BF
BF 3
of cab body
2
I
10
BODY
CAB
BODY MOUNTING
Jute
0
LA
S
O
C
c
lif
S
C
0
Body mounting jute
Body
mounting bracket
Aubber washe
Body mountmg b 0 I t
3rd b
Plain washer
y
mountmg rubber
r
A bber
washu
et
o
Washe
is
1st body
mounting
Body mounting bolt
J
Plain washer
rubber
Special
I
washer
Body mounting
bottom rubber
ock nut
Plain washer
Mounting bolt
Unless otherwi
details
are
MCtion
Crosssection A A
Cross section B B
Fig
BF 5 Cab
the
specially notBd
same as
those in
8J
B
Cross section CC
body mounting
REAR BODY MOUNTING
I
I
Center of body
E
r
c
0
0
F
I
L
E
LO
S1
Co
a
l
0
lit
F
E
3l
I nstallation bolt
Plain washer
Installation bolt
Shim
Shim
Plain washe
lock
Cross
section O
D
nut
Cross section E E
Fig
BF 6 Rear
body mounting
4
BF
Shim
Plain W3lher
lock
Cross section F F
nut
the
aosa
BODY
DETACHING CAB BODY
I
Disconnect battery terminal from battery
2
Disconnect speedometer cable
3
Remove steering mechanism
steering wheel steering
post assembly and remote control system
BF 9 Disconnect brake tube
Fig
5
6
Disconnect hand brake
partment
linkage
harness
body and engine
Fig
4
BF 7
7
Removing steering post clamp bolts
front lever and cable joint
engine controls
Disconnect
accelerator
at
such
choke wire
as
heater hose
etc
rear
engine
com
instrument harness and others between
or
chassis
Remove six cab
body mounting bolts
Disconnect front brake tube at hose and brake tube
joint and
rear brake
tube at 4 way connector
Fig
8
Apply
rope wire
body by the
Fig BF 8 Disconnect brake tube
cab body
front
RJ
BF 10 Cab
use
or
body mounting
hanger
of a hoist
or
to cab
body
lift up cab
chain block and dismount
BODY
Fig
4
Apply
Fig
BF ll
up cab
Taking
kg
body
since
radiator
radiator grille before
core
or
to
rear
body lift
chain block
up rear
and dismount
support
or
lifting
not to scar or
body
while
scratch cab
lifting
and be
body Slightly
body weight
long body
Approximately
140
309lb
cab
portion
near
rear
rear body rearward while lifting
Aear
to detach
hqist
Carefully baiance
pull
sure
hanger
body Lifting
careful
Be
body mounting
body
Note
9
wire or
rope
the use of a
body by
rear
BF 12 Rear
is
suspended
Note
Carefully
balance
dismount
carefully
or
cab
so
body
while
lifting
and
that cab body is not scarred
scratched
Cab
body weight standanl
200 kg
model
Approximately
441Ib
Fig
DETACHING REAR BODY
Note
a
BF 13
Rear
Lifting
rear
body Taking
body mountings
No
1
up
through
5
use
shims Be careful to select conect shim
Disconnect
battery terminal from battery
b
2
Disconnect
rear
combination
15
lamp wiring
Clearance between rear
to
30
mm
toward the left
3
Remove
rear
0 591
or
body
to
RF fl
in
body
is
Deviation
right should be within 5
0 1969 in at the center line
body mounting bolts
and cab
1 181
n1m
BODY
HOOD
CONTENTS
Adjusting
SF 7
ADJUSTMENT
Centering hood lock
Adjusting hood lock control lever
operating force
hood
tightness
AEMOVAl AND
SF 7
SF S
SF S
INSTAllATION
SF S
Removal
SF S
Installation
SF S
ADJUSTMENT
CD
2
9
I
r
0
0
t
1
@
f
I
1
Fig
@
in
5
Dove
4
Safety catch
2
Dove tail bolt retaining nut
5
Female
3
Spring
6
Spring
tail bolt
Fig
Adjusting
The female hood lock is
4
I
BF 15
adjusting
stroke toward
mal hood locks
with
provided
the front
or
a
3 mm 0 118
rear
side of the
vehicle
lever
lever
BF 14 Male and female hood locks
Centering hood
lock
The male hood lock is
provided
toward
the left
adjusting stroke
with
or
a
3 mm
0 118 in
right side of the
vehicle
Fig
BF 7
BP 16
Adjusting female
hood locks
I
i
BODY
Loosen installation bolts and align the
correctly
center
Disconnect windshield washer hose at nozzle
3
Cover
hood lock control lever
Adjusting
operating
force
to
When the hood Jock control lever cannot be operated
lightly
2
loosen dove tail bolt
retaining
nut
protect
cowl area with cloth or other proper material
them from dama
ng
increase dove
tail bolt installation length and reduce securing force of
spring
hood
Adjusting
tightness
When the hood is closed and is slack
reduce installation
tightly
and increase
Note
securing
When
length of
force of the
inspecting
cannot
be closed
the dove tail bolt
spring
the hood lock note the
following
matters
a
Safety
catdllever
Check caulked portion of the
wear
and the
spring
b
catch lever for
for weakness and breakdown
Fig
If the spring is broken
and rapidly open
safety
the
aid of a
operation
down
female
lever for
smooth
move
Installation
smoothly
Position hood
engaging stroke with the dove tail bolt will be
Removal
Open hood
and prop it in the open
to
hood
hinges and
install
attaching
screws
and it may disengage
REMOVAL AND INSTALLATION
I
helper upward
and correct
and the spring for weakness and break
If the female lever does not
reduced
Coveringcowlarea
Remove hinge bolts and detach it from hinges with
4
during driving
Female lever
Check
BF 17
the hood may be unlocked
2
Adjust hood position and tighten attaching
3
Install hood latch striker
on
screws
hood and adjust hood
latch
position
FRONT END AND FRONT FENDER
Q
CONTENTS
BF
BUMPER
Removal
BF
Installation
BF 10
RADIATDA GRILLE
AND HEADLAMP
Removal
FRONT APRON
9
Removal
9
FRONT
GRILLE SURROUNDINGS
RIM
BF 10
BF 10
Ri
A
FENDEAS
BF 11
BF 11
BF 11
Removal
BF 11
Installation
BF 12
BODY
BUMPER
@
Fig SF
1
Front bumper
2
Bumper day
18 Front
3
Front member
bumper
Removal
I
2
Remove installation bolts from both ends of bumper
Front bumper
Fig
BF 19
bumper stays
Bumper stays
both ends of front apron
G
Detach
G
Front
are
installed
at
on
engine compartment side
frame with four bolts
apron
Removing bumper bolt
Fig
BF 9
BF 20
Removing bumper bolt
BODY
3
Pull
forward
and
remove
bumper together
Installation
with
bumper stays
4
Install front
Remove four installation bolts
When installing
and separate bumper
that
stays from bumper
GRItE GRILLE SURROUNDINGS
L
are
Radiator grille
and
headlamp
sequence
of removal
so
and clearance between bumper and
AND HEADLAMP RIM
@
BF 2J
reverse
uniform
1
Fig
in
align position carefully and correctly
bumper height
front apron
RADIATOR
bumper
Upper radiator grille surrounding
2
Radiator grille
3
Headlamp rim
4
Side radiator grille mrroundings
5
Lower radiator grille surrounding
grille surroundings
im
Removal
I
Unscrew upper
screws
and
remove
four
and front
two
First
2
installation
radiator grille toward front
next
detach lower radiator grille surroundings and
remove
Note
both side radiator grille
surroundings
Both ends of lower surroundings are overlapped on
side
and
surroundings
the above de
therefore
scribed removing sequence must be
regarded
of five lower surrounding installation
screw s
three side left
or
rightl
installation screws
either
roundings
3
Fig
BF 22
Removing radiator griu
one
BF 10
left
one
or
In other words out of
radiator grille
surrounding
in the bottom is used
right
end
of
lower
to
sur
also
Unscrew three self tapping screws
in front
two
in both ends are used to secure both side
surrounding bottoms also
secure
screws
Out
and detach head
lamp
rim
two on top and
BODY
FRONT APRON
1
3
Fig
Front
3
Front apron
bumper
BF 23 Front apron
Removal
Detach front
Bumper stay
2
Removal
bumper
See
Figure BF 18
Remove apron to fender attaching bolts and
I
remove
Clean fender attaching
removing
screws
bolts and nuts
by
dirt from them
apron downward
2
Disconnect
side marker
FRONT FENDERS
3
lamp
wirings for headlamp and
lamp
at their
Remove radiator
BF 24 Front fender
assemblies from the vehicle
Fig
BF l1
flasher
grille grille surroundings and head
III
Fig
side
connecting terminals
BF 25
Headlamp assembly
t
ODY
8
front side attaching bolts from headlamp
Remove
4
Remove front fender
7
rear side
attaching bolts
installing parL
Pig
BF26
lt
7
Pr
ft
j
4
Jchf rg
att
boJts
Pig
5
Remove apron
to
BP 29 Fender
rear
side
attaching bolts
fender attaching bolts from both
sides
8
Remove
attaching bolt from
bottom of front
rear
fender
9
Pull left
or
right
front fender toward front left
right direction and detach
Pig
6
BF 27
Apron
to
fender attaching
or
it
bolt
Remove front fender top attaching bolts
Fig
BP 30
Detaching front fender
Installation
Install front fender in
Note
Fig
BF 28 Pender top
Aeplace
reverse
lender
rubber
with a new one when
attaching bolts
BF 12
sequence of removal
used in
rear
reinstalling
side of fender
fender
BODY
DOOR
CONTENTS
ADJUSTMENT
SF 13
DOOR
LOCK MECHANISM
Door lock striker
SF 13
Removal
Door
SF 14
Installation
hinge
REMOVAL
SF 14
Fig
DOOR
SF 15
SF 15
SF
GLASS AND AEGULATOA
1
Door
2
Door window ventilator
3
Door window
4
Glass run
5
Door window weather
6
Door ou tside handle
7
Door lock
8
Door lock and remote control Ass
y
9
Door
panel
assem
bly
strip
key cylinder
window regulator
I nside
11
Regulator
12
Door
13
Scaling screen
14
Sealing
screen
15
Sealing
screen
16
Support cushion
handle
handle
finish
BF 31 Door construction
ADJUSTMENT
Door lock striker
Door lock striker
direction
as
can
be
adjusted freely
toward any
required
Fig
BF 13
BF 32
Adjusting
assembly
glass
10
16
SF 16
door striker
I
BODY
2
Align door position correctly before adjusting door
by adjusting
Loosen
gently
3
to
align striker against
Open
Door
attaching
striker
door and
door
and apply
a
jack
or
rigid rack
door striker
Note
2
open
beneath door to support it
striker It should be noted however that door sag cannot
be corrected
Fully
and close
screws
When applying
jack
or
cloth between door and
door
latch mechanism
tighten striker attaching
a
rigid rack apply piece of
jaek
or
rack to protect
door from scratching
screws
hinge
Door hinges
are
adjusted
top bottom front
place door in the position
right and
l
Visually inspect door from outside and make
or
left
toward
rear
that accent stripe is
to
positioned straight
I
sure
with front fender
and door exterior is flush with body exte ior
When door is not placed in the position correctly
2
detach dash side trim
3
front
When adjusting door position toward top
bottom
and when
adjusting
or rear
adjust body side hinge
door position toward
eft
or
Fig
sure
Supporting door
right adjust door side hinge
3
4
BF 34
When door position is adjusted
that door can be closed and
at
hinge
side
Remove upper and lower
hinges
at
the
body
side
and
separate door from body
make
opened smoothly and
that door lock operates correctly
REMOVAL
I
Remove
package tray and
remove
dash side trim
Fig
Note
When
BF 35
Separating door from body
reinstalling
clearance
door
position
it
correctly
Fig
BF 3J
Removing d4sh
Adjust
striker side
trim
BF 14
that
between door and body is even Adjust
door position with hinge installation bolts
side
so
body
door lock engagement at door lock
BODY
DOOR
LOCK MECHANISM
Door lock is
provided with
a
lock knob and is of
door is open
an
unlock type in which lock knob does not lower while
6
D
@
o
l
@
@
Fig
I
2
Detach inside handle and regulator handle
an
ordinary
Be careful
not to scar
or
remove
screw
scratch panel and
Detach
damaged
driver
Lock
3
Bell crank
4
Door lock remote control
5
Door lock
6
Outside handle lever
7
Inside lock knob installation bolt
installation bolt
installation bolt
assembly
assembly
sealing
remove
screen
carefully
so
that
it
is
crank installation bolts and inside lock knob installation
sealing
screen
w
I
Lock
installation bolts
4
Knob lock
2
Inside lock knob installation
5
Glass
3
13
Door f1nish
Fig
BF 37
Bell crank
Fig
Cloth
3
Detaching door finish
BF 15
run
instaiIation
bolts
CD
not
lock installation bolts lock knob bell
bolts and remove lock knob
and separate door fmish from door
Note
Lock knob
BF 36 Door lock mechanism
Removal
door finish installation clips with
1
2
installation bolts
BF J 8
Removing lock assembly
Separate key cylipder
and lock
joint
bolts
BODY
4
Remove
door
lock
with remote control
together
DOOR
GLASS AND REGULATOR
assembly through work opening
Detach door lock assembly
door finish
and
sealing
screen
I
2
Remove installation bults
and
remove
door window
support cushion
I
a
1
I
I
Do
i
I
r
Fig
BF J9
b
Removing door lock
1
c
Installa tion
1
Install door lock mechanism in
reverse
Fig
sequence of
BF 41
Sealing
screen
and bolts
removal
2
Upon completion of installation make
A
sure
between outside handle lever and lock side
lever end
is I to 3 mm
3
that play
roller
Remove
on
end of regulator
locking
Recommend
that glass be suspended with
of string beforehand
L
so
1
11
Q
I
I
I
71
c
40
BF
Fig
3
J
When play
A
Adjusting
door lock
is insufficient
adjust
outside handle
installing position
When door panel is deformed
e
g
hollow
etc
repair
panel
Fig
BF 16
42
BF
a
piece
that glass can be taken out
easily
I
t
from glass
0 0394 to 0 1181 in
Note
I
arm
channel and lower window glass to the bottom
Take out glass
BODY
4
Remove four installation screws from upper
portion
of door sash
Fig
Fig
5
Removing fouT installation
Detach side window weather
screw
driver carefully
so as
not to
strip
with
Removing door ventilator
8
Pull door glass upward and
9
Remove four door window regulator assembly in
stallation
BF 43
BF 45
remove
it
screws
SCTewS
an
ordinary
damage it
Fig
BF 46 Door window
regulator
instaLtion
screws
10
Remove
service
Fig
6
opening
weatherstrip
Remove two door window ventilator center side sash
instaJlation
7
BF 44 Del4ch
door window regulator assembly through
Pull
screws
door
window ventilator
toward
upper
rear
direction and separate it from door
Fig
BF 17
47
BF
Removing window egulatoT flSsembly
BODY
DOUBLE PICK UP AND VAN
CONTENTS
BF18
SIDE WINDOW
TAIL GATE AND
Double pick up
BF 18
Double pick up
Van
BF 18
Van
SIDE
BF 19
LIFT GATE
BF 19
BF 20
WINDOW
Double
pick
up
CROSS SECTION A A
Fig
When
installing be
sure
to
BF 48 Side window
double
pick up
apply sealing agent between
body panel and weather strip
Van
Fig
BF lB
BF 49 Side window
van
BODY
Remove
set
weather strip
remove
screws
toward
side
window sash
detach
luggage compartment side
and
side window assembly toward outside
When installing be
weather
from
sure
to
apply sealing
agen t between
strip and panel
G
Roof
Side window sash
Fig
BF 50
Removing side
window
TAIL GATE AND LIFT GATE
Double
pick
up
Tail gate lock
r
ll
1
Side lock T
G RH assembly
4
Clip
2
Side lock T G LH assembly
5
Thrust
3
Remote control assembly
Fig
and
Remove tail gate inside
cover
lock installation
from both sides
screws
BF 51
remove
screw
Tailgate
cross
headed
lock doubk
tail gate side
2
tail
gate
lock
assembly
through
Spring
7
Striker
washer
up
correctly
Remove tail gate remote control installation bolts
Remove
pick
6
When strokes of claws in both sides
adjust at remote control
service
adjuster
locks are balanced
opening
Upon completion of reinstallation
I
Make
sure
3
that both left and right locks operate
Bf
19
Apply
grease to
slinding parts
so
are
unbalanced
that both
side
I
I
J
B
Van
Tail gate lock
@
II
1
Tail gate lock body assembly
2
Shaft
3
Lock lever
4
8
j
Fig
Detach tail gate inside
cover
and
remove
right tail gate side lock installation
BF 52 Tail gate lock
both left and
screws
CD
r
Strike
spring
assembly
5
Lift gate side lock assembly
7
Push lever
8
Lock lever
9
Stopper
A
10
Pull lever
11
Keylcrer
12
Tail gate
13
Lift gate lock
ide lock assembly
14
Striker assembly
15
Clip
16
Key cylinder
17
Outside
18
Pull handle lever
handle
van
Disconnect key cylinder and lock joint
key cylinder
jl
rod
through
@
1
Sld c
I
k iri t
tion
screws
2
Lift gakdock
installation
Fig
3
jen Ob inst btion
4
Lock
screw
body installation
Fig
BF 54
Removing key cylind
rod
screws
screws
BF 53
Remove
Removing tailgate installation bolts
lock installation
screws
assembly from service opening
RF 7n
and
remove
lock
BODY
3
When lock does not operate
check
grease
lightly
and smoothly
lever sliding parts for lubrication
as
and apply
required
Uft gate
Remove lift gate support installation
Fig
BF 55
screws
Removing lock
Upon completion of reinstallation
I Make sure that both side locks and two locks on tail
gate top operate correctly
2
When both side claw strokes are unbalanced
at remote control
adjuster
so
adjust
that both claws engage
evenly
Fig
Apply
a
piece
BF 57
Lift gate
of cloth between roof and lift gate to
protect body from scratching
Remove
hinge
installation bolts and separate lift gate
from body
Lift gate is installed in
When
sides
l
Fig
BF 56
Adjusting
lock stroke
installing
3re
reverse
lift gate
sequence of removal
position ocrrectly
that both
aligned evenly
Upon completion of installation
make
operates correctly and smoothly
When
required
so
move
sure
that lock
adjustment
is
striker side
WINDSHIELD AND REAR WINDOW
CONTENTS
AEMOVAl
BF 22
INSTAllATION
BF 22
BF 21
WATEAlEAK COARECTION
BF 23
BODY
windshield
REMOVAL
Place
protective
a
panel
instrument
cover over
and front
front fenders
hood
The
glass
method which
below
procedure
may be used
to
check
ou
the
tlines
the windshield
opening
seat
I
Check
2
Remove rear view mirror support
ularities
3
Remove windshield wiper
2
t
On inside of body loosen the lip of rubber channel
arm
assembly
channel
rubber
windshield
for
Cle n off old sealer around windshield
anyirreg
and
opening
check entire b dy opening flange for any irregularities
from
spot welded flange
windshield
opening
pressure to
glass
putty knif
or
near
edge
other
rubber channel over
5
With
s
along
the
the
palm
top
and sides
of the hand
3
apply
a
blunt
and carefully
tQol
assist
At the same time
itable
of
With
l1entgl31
spot welded flange
Note
ith ail of helper
ca
fully lift
assembly from body opening and place
it on a
Care should be exercised to make certain
strike body
chips
windshield
helper Carefully position replace
a
nAshi I
t openip g
on
not
After windshield rubber channel is free from spotI
welded flange
the aid of
can
glass
during installation
metal
does
Edge
lead to future breaks
protected
bench
6
glass and
Clean
either is to be
or
weatherstrip of all old sealer
if
used
re
With
4
ndshield
glass supported
body opening check relationship of glass
peririleier
around entire
Inside
I
and
to
centered in
body opening
of glass
surface of glass should completely
contact
spot welded flange
2
Curvature
of glass should be uniform
that of
to
body opening
Mark any sections of body
5
glass
Fig
Note
BF 58
The windshield
Removing windshield
chrome
moldings
are
6
the rubber channel and shoo Id be removed
removing rubber channel from the
prior
important that
as
Remove
required
Clean
out
old
sealer in
glass cavity of windshield
rubber channel and around base of rubber channel
to
glass
INSTALLATION
It is
opening
be reformed
Install windshield
I
installed in
and reform
to
2
Install rubber channel to
3
Insert
a
glass
strong cord in the groove of rubber channel
where spot welded flange fits
the
Tie ends of cord and tape to inside surface of glass at
body windshield opening be
checked thoroughly before installation of the replacement
upper center of g
at
ss
BCJDY
r
t
CD
Weather
With
the
aid of
center windshield
Note
Do
Glass
BF 59 Draw cord installed
Fig
4
2
strip
a
assembly
notposition
helper
in
Fig
carefully position
and
7
body opening
glass by tapping
or
BF 60 Sectional view
of rubber
channel
Reinstall all previously removed parts and
remove
protective coverings
hammering
any time
t
l
f
WATERLEAK CORRECTION
at
H11
iH
t
l
In
many
instances
minor
waterleaks
around
windshield may be corrected by performing the
the
following
operations
5
When
glass and channel are properly positioned in
opening slowly pull ends of cord starting at upper center
of windshield
to
seat
lip
of rubber channel
welded flange Cord should be pulled first
wIndshield
then
upj e
ch
side
and
over
Using
spot
tip
top of
across
finally across
outer
Using
a
lips of
weatherstrip
completely
pressure
rubber
adhesive
type
channel
as
applicator
to
glass
sJ r irt
with
er
apply
pressure
an
cor
of
Leak between rubber
2
Use
indicated in Figure BF 60 Seal
a
pressure
from outside of
around rubber channel
apply
J
with
a
lt
9J
j
e
fSojw
black
qf gla
body
cli i i iel
and
applicator
bbdy
a na
glass
j
ed
wit
ng gun
weatherstrip adhesive
approved
a
i
b
narrow
q
tip Working
sealer under outer
iip
of
rubber channel around entire perimeter of
body opening
INSTRUMENT PAN EL
CONTENTS
REMOVAL
applicator
completely around perimeter
ana
ri appio
a
between glass and rubber chann l ofjthe
wind
shield bottom
6
Leak between rubber channel and glass
1
BF24
RF
3
BODY
Fig
BF 61
Removing
instrument
panel
REMOVAL
I
Disconnect
battery terminal
2
Disconnect
heater control
strun1mtharnessfengine
wirings for
3
jwishienld
BF 62
wire
from
compartment harness
wP
Remove steering pOst
Fig
4
lever
screws
from the top of instrument
panel and two from both sides
in
connector
5
panel
instrument
PulJ
rearward and separate it from
body toward left
rietc
clamp
Remove four set
insiallation bolts
Removing steerifJg post clamp bolts
Fig
RF
4
BF 63
Remolling
instrurTlent
panel
BODY
SEAT
square
shape
pipe frame and Sshape and
and vinyl leather are used for
and
urethane
springs
Rear seat
Seat uses steel
van
seat
cover
REMOVAL
Front seat
and
pick
up
double
pick
up
van
J@
a
Fig
Fig
Remove four
riser Seat can be
Rear seat
BF 64 Front seat
installation
nuts
Remove
screwed
against
seat
double pick
front side hinge installation
remove rear seat as
Seat cushion
Fig
G
screws
separate
an
assembly
up
SEAT BELT
Q
an
seat back from brackets in both side wheel housing units
and
separated
BF 66 Rear seat
OPTION
Seat back
BF 65 Rear seat double
pick
Fig
up
BF 25
8F 67 Seat belt
Jling
inst
positions
BODY
ROOM TRIM
OVERHEAD LINING
Removal
o
Insert
a
spatula
and withdraw
o
between roof
panel
and roof rail
end of overhead lining
one
Peel off overhead lining from roof panel from the
t
withdrawn end to the other end
eAi
e
j
Installa tion
o
Thoroughly
remove
lining remained
foreign matter
o
Adhere overhead
apply adhesive
is
and
to roof
other
panel
front side to rear side
completely
Providing circumference
with
a
OVERHEAD LINING
stretched
sufficient space
so
folded into roof rail cut off unnecessary
that it i
extra
dust
panel
lining from
carefully so that it
o
roof
on
and
pieces of overhead
old adhesive
space with
a
knife
fold circumference in
or
o roof
other proper tool and
SERVICE
JOURNAL
DATE
Fig
rail
or
Al OR
JpURi
PAGE
BF 68 overhedd
lining
BUllETIN REFERENCE
No
SUBJECT
BULLETIN No
I
Bf 26
SECTION BE
BODY ELECTRICAL
DATSUN PICK UP
MODEL 521
SERIES
BODY
CHASSIS
INI
NI
NISSAN MOTOR CO
TOKYO
JAPAN
LTD
WIRING
BE
1
FUSE
BE
7
LIGHTING SYSTEM
BE
8
HORN
BE 15
METER AND GAUGES
BE l B
WINDSHIELD WIPER
AND WASHER
BE 26
IGNITION SWITCH AND
STEERING LOCK
BE 3D
RADIO
BE 32
CLOCK
BE 35
HEATER
BE 36
a
BODY ELECTRICAL
WIRING
CONTENTS
WIRING
Engine
HAANESS
BE 1
compartment harness
BE 1
WIRING
BE 2
INSPECTION
Instrument harness
Body harness
DIAGRAM
BE 2
BE 4
BE 7
WIRING HARNESS
Engine compartment
harness
t
Fig
BE 1
E
gi
compartment harness
BE 1
BODY
Instrument harness
Body
harness
Fig
BE 2 Instrument hamess
Fig BE
3
B09Y
BE 2
ham
s
521
600
BodY
l
EtECJR C
t
n
J
4
t
I
1
JN
harness
C
bt
j
S
DC
C
f
L
t
1
j
i
r
1
4
BE
fi
codY
rness
lO
V521
h
f
f
t
lt
l
rne55
Fg
BE
5
Bod
BE 3
0521
BODY
WIRING DIAGRAM
w
g
r
c
s
c
a
ta
m
CI
i
c
m
o
0
a
J
OCO
t
lI
I
i
I
8
i
cO
03
g
i
eT
if
f
n
J
r
r
I
I
01
4
o
o
o
g
0
o
g
a
i
c
IIl
8
8
l
I
l
I
l
J 3
3
1
r
eve
Fig
I
6 Wiring
BE
dillgram
BE 4
common
countms
3i
J
C1
BODY
ELECTRICAL
w
c
o0
U
OE
a
o
6m
J
lQOII
J
t3S
lJi
i
0
i
j
io a
H
i
II
u
lRi
Jj
Q
LJ
w
G
O
0j
I
1
Ji
J
i
f
l1
a
5d
a
j
d
diagram
Fig BE 7 Wiring
BE 5
U S A
Canada
8
lP
o
l
ct
Q3 a
a
l
c
J
BOPY
w
9
a
r
CD
c
og I
CD
iL
M
i
5
V
Ii
t
C
I
1
CD
U
J
n
i
c
J
Ii
1
i
i
t
J
Q
J
i
6
i
Ifi
I
i
i
ii
Iil
I
1
j
I
I
I
8
11
1
1
E
t
1t
ii
l
l
2
gf
t
I
f
tit
Fig
8 Wiring diagram
BE
6
BE
Van Double
cabin
Q
12
tl
CI
Ca
a
o
I
i
lP
0
IJ
CC
J
O
BOOYELE TRICAL
INSPECTION
Cables
6
should be
into contact with
Referring
to
wiring diagram check wiring harness for
connection with electrical
connection
and
harness note the
Connected
equipment and
installation
following
When
f i
connector
checking
wiring
matters
unit should
not
be
loose
rusted
ed
or
cover
should not be
tion bolts
pletely
so
are
bolts should be
or
that
Cables
7
continuity
is
body
should
be
at
sections
of unit
where vibration
which current
Note
When
8
IToneous
connection should
be
with
fan
1
optumim
an
on body
due
occurs
to
at
or
extra
sections
engine operation and
inspecting
other main
performing
or
tenance service without power
when
or
it
is
pply from battery
s
anticipated that
part
a
may
be
disconnect battery I I terminal
flows
b
In
no
directly
No
as
com
should not come into contact with othermetal parts
5
positions
such
others
provided jn between body
through
in
rotating parts
irily
station
circuited
short
Terminals
securely clamped
from
and bolts
4
not come
part temperature of
or
Cables should be provided
length
crack
grounded through installa
in contact with
corner
they do
pulley fan belt etc
insulating material should not be deteriorated
For those parts which
3
damaged
that
so
wplFh rises highly
8
Cable insulator
sharp
sufficiently spearated
contaminated
2
clamped
present
test
event
should
an
unloaded
connected with ground
lamp or circuit
Be
circuit be
to use
sure
a
tester
r
c
1
FUSE
j
DESCRiPtiON
l ov
When
to
a
rcurrent
circuit the
interrupted
and
fuse
t
us
INSPECTION
exceeding the rated amperage flows
is heated and melted
s bles and
protected from damage due
to
electric
tequipment
burning
In
the circuit is
or
most
cases
fuse
can
be
checked visually
when it is difficult to check visually
However
a
l
tester may be used
are
damage
the
circuit
u
is
limited to the minimtim
Note
o
a
When fuse is blown off be sUre to correct the
cause
before
Be
sure
i
installing
new
fuse
I
b
to
use
fuse
having
the
specified
C
Do not use fuse having larger
capaeity
e
7
Q
ie
r
i
j
c
When the contact surface is dirty or rusts or the
eontact is loose
fuses
ment
and
BE 9
Fuse box
BE
voltage drops resulting in heated
abnormally operated
Remove dust
paper to
Fig
capacity
20A 30A etc
improve
or
polish
the contact
electrical
with
a
equip
fine emery
I
BODY
LIGHTING SYSTEM
CONTENTS
SIGNAL
AND DIMMEA
BE
8
TUAN
Sealed beam unit replacement
BE
8
COMBINATION SWITCH
Headlamp adjustment
BE
8
HEADLAMP
SIGNAL
AEAA
SIDE
BE
COMBINATION LAMPS
LICENSE
PLATE
LAMPS
MAAKEA
9
BE 11
SWITCH
LIGHTING
LAMP
FLASHEA
BE 11
Removal
PAAKING AND TUAN
FAONT
BE 11
Removal
DIAGNOSES AND
BE 10
TROUBLE
BE 10
COAAECTIONS
BE 12
BE 12
Headlamp
ILLUMINATION
LAMP
BE 10
BULB SPECIFICATIONS
BE 10
Turn
BE 13
signal lamps
Tail lamp stop lamp
license lamp
BE 15
backup lamp
HEADLAMP
Sealed beam unit
replacement
I Remove wiring socket from the back of sealed beam
unit
2
Remove head
3
Remove retaining ring by unscrewing three screws
Note
lamp fmisher
Do not disturb two
aiming adjusting
screws
5
10
Fig
Remove sealed beam unit
4
Reinstafl sealed beam unit in
reverse
Remooing head Lmtp finUher
sequence to
removal
Headlamp adjustment
For correct aiming adjustment
floor correct pressures of all tires
such
as
luggages
equipment
and passengers
place
and
vehicle to level
remove
except
all loads
for standard
spare lire and tools
Adjust vertical and horizontaI directions of head lamp
respectively
with
adjusting
screws
and side portions of headlight
moun
located
at
the upper
ting ring
Fig
BE B
BE 11
BE II
Removing head Lmtp
BODY ELECTRICAL
When adjusting low beam adjust aiming of low beam
head lamps at the outside
adjusting high
beam
cover
at the outside with cover and then
beam head lamps
High
adjust aiming of high
at the inside
Vertical adjusting
1
low beam head lamps
1
screw
Horizontal adjusting
screw
Fig
Aiming head lamp
BE 12
Low beam
beam
t
f I
r
r
c
i
J
1
n
When
t
10m
32 lIftl
i
J
r
I
f
in
Hmm
521
N521
741
G521 GN521
738
U521 UN521
715
V521
720
VN521
M
132
I
Gfll
h
mm
llftl
f
in
h mm
29 2
50
145
571
1040
291
1
29
50
145
5 71
1040
291 115
10
175 6 89
1050
320
12 6
1010
204 8 03
20
349
13 7
28
1
3
28
Fig
BE 13 Head
lamp aiming adjustment
data
FRONT PARKING AND TURN
SIGNAL LAMP
I
When
removing bulb with
lens removed
push
bulb
toward socket turn bulb counterclockwise and withdraw
bulb
When removing lamp
2
I
Remove mud cover
in
housing
used to
cover
lamp from
the
inside of wheel house
Fig
BE 9
BE 14 Mud coveT
11 5
BODY
2
Remove connector from wire harness
3
Remove
lamp housing installation
REAR COMBINATION LAMP
nuts and remove
When
removing bulb
toward socket
lamp assembly
turn
with lens removed
push bulb
bulb counterclockwise and withdraw
bulb
When
2
removing lamp housing
I
Remove connector from wire harness
2
Loosen
lamp
installation
nuts
and
remove
lamp
assembly
1
SIDE FLASHER MARKER
Remove
if
i
1
i
side flasher lamp installation nut from the
inside of fender
Of
and
and lamp housing
Fig
BE 15 Front p
Dking and tvm
signal lamp
LAMP
can
rem
ve lens
be
separated
packing and
bulb Lens
from body
LICENSE PLATE ILLUMINATION
LAMP
When
removing bulb
remove
lens and then
remove
bulb
BULB
SPECIFICATIONS
All countries except
For U S A and Canada
for U S A and Canada
Item
Wattage
Candela
power
High beam
Lowbeam unit
Front
parking
turn
j
rr
License
number
37 5 50
4002
5 50
37
4002
23
32 cp
1073
8
4 cp
67
6
5 cp
4
7 5
6 cp
1034
lamp
32 33 cp
tail
89
7 5
6cp
23 8
23 8
Stop
Rear combination
23 8
8 4 cp
illumination lamp
number
4001
signal lamp
r
power
trade
5
37
lamp
plate
Candela
SAE
4001
Side flasher lamp
Side maker
trade
Wattage
5
37
unit
Head lamp
SAE
6 67
89
1034
1034
32 33 cp
32 33 cp
Turn signal
23
32 cp
1073
23
32 cp
1073
Back up
23 32 cp
1073
23 32 cp
1073
Passenger compartment
6
Engine compartment lamp
6
BE lO
4 5 cp
5 cp
4
6
4
5 cp
6 4 5 cp
BODY ELECTRICAL
TURN SIGNAL AND DIMMER
ring and steering wheel
2
Remove horn
3
Remove shell cover
4
Unscrew two screws used to secure switch on
COMBINATION SWITCH
Removal
Disconnect combination switch from wire harness at
connector
column
plug
steering
jucket
and
column
remOve
jacket
steering
switch from locating hole
Now
remove
switch
on
completely
LIGHTING SWITCH
Removal
Fig
BE 16
Removing
turn
I
Remove connector from the back of lighting switch
2
Remove
3
Remove nut
4
Remove lighting switch
screw
and knob
plain
washer and spacer
sigMl and diameter
combination switch
A
CLOCKIL
M
SW
8
TO FUSE
FLA
Fig
tER
3l
F
UNIT
BE 17 Circuit
diagram forlighting system
BE ll
v
BODY
T
LIGHT
TCH
CUXK
IL
iz
It
I
TO
USf
r
TO rUSE
H
Fig
BE iS
Circuit diagram for
lighting system
CtUUJdU S A
TROUBLE DIAGNOSES AND CORRECTIONS
Headlamp
Condition
The
not
headlamp does
light
Probable
Blown off fuse
or
Corrective action
cause
faulty contact
for both
Check fuse for
When fused
Faulty lighting switch
or
light relay
or
vice versa
is defective
Conduct
Defective dimmer switch
cause
then
or
replace
continuity
switch is defective
be switched to lower
beam
detect and repair
Check continuity test and if the switch
relay
cannot
and faulty contact
replace fuse
upper and lower beams
Upper beam
fusing
test
and if dimmer
replace
Check the operation if dimmer switch is
Defective light relay
defective replace
ne
BODY ELECTRICAL
Condition
Headlamps dim
Probable
Corrective action
cause
Defective light circuit
Check the headlight circuit for cable being
about
to
break
and
faulty
contact
or
check fuse for faulty contact
Repair
Headlamps dim
Partly discharged battery
or
with engine
Charge battery
if required
operated
under idling speed
Headlamps
replace if required
Measure specific gravity of electrolyte
when the engine is
stopped
or
still dim
Defective battery
Replace battery
beam unit
Faulty sealed
Voltage between headlamp red white cable
and black cable terminals is
or
black
red
run
above idling speed
12 8V or
higher
Replace sealed beam units
Faulty charging system
Voltage
is less than 12 8V
through above
test
Check generator regulator and light circuit
Headlamp ip only
one
Faulty headlamp
terminal contact
Repair
as
required
side lights
Defective lamp
Turn
signal lamps
Condition
All turn signal
lamps
Replace lamp
Probable
Blown offfuse
or
Corrective action
cause
faulty
Check fuse for fusing and
contact
do not ligh t
Faulty flasher
unit
terminal
contact
defective flasher unit
or
When
fuse is fused
cause
and replace fuse
faulty contact
detect and repair the
When two lead wires of flasher unit
are
connected with turn signal switch turned
on
and individual turn signal lamps light
her unit is defective
fla
Repair connector terminal if necessary
Replace flasher unit
Defective turn
signal
Conduct continuity test
switch
If the
replace
tF
BE 13
turn
signal
switch is
defective
BODY
Condition
All
turn
Probable
Corrective actions
causes
Defective flasher unit
signal
Replace the flasher
unit
lainps do not go out
Flashing cycle
is
A
to low
lamp having wattage
specified wattage
more
than
the
flashing cycle
Faulty contact
one
is used
Defective flasher unit
Turn signal lamp
Replace with the specified
Replace flasher
in circuit
Repair
as
unit
necessary
is too
A
high
lamp having wattage less than the
spe
Replace with the specified
one
cified wattage is used
Defective flasher unit
There is
Flashing cycle
or
right side
ofteft
turn
a
Burnt out
Replace flasher
lamp which does
not flash
lamp bulb fIlament
right
Replace
Check all
lamps
for operation
Check lamp which does not light for burnt
signal
lamp differs from that of
or
unit
out fIlament and defective socket
left side turn
Replace if necessary
signal lamp
Only left
or
right side turn
Faulty
Check both side lamps for difference in
connector contact
brightness
signal operates
Repair
A
When windshield wiper
lamp other than specified
is used
is
necessary
Replace with
Measure
Partly discharged battery
which uses ignition for
power supply
as
the
specified
specific gravity
one
of electrolyte
Charge battery if necessary
operated
flashing cycle and
brigh tness change
Faulty
contact of power
supply
circuit
BE 14
Improper
contact of power
supply
circuit
ELECTRICAL
BODY
Tail
license
lamp stop lamp
back up lamp
lamp
Condition
Probable
Both left and right
lamps do
not
Blown offfuse
or
Corrective action
cause
faulty
Check fuse for fusing and faulty contact
contact
When fuse is blown off detect and correct
light
cause
Defective stop lamp switch or backup lamp
switch
or
faulty
Stop lamps
and
and replace fuse
When two lead wires of switch are
contact
neeted
and the
backup lamp only
circuit are normal
Replace switch
or
lamp lights
repair
con
lamp and
connector termi
nal
Only
one
side
lamp
Faulty grounding
Repair grounding cable contact
Burnt out lamp bulb filament
Replace lamp
lights
Faulty
or
Brigh tness of one side
lamp differs from
the
a new one
Repair
socket
Faulty
or
contact of connector terminal and
with
contact of connector terminal and
Repair if required
socket
other
tI
HORN
CONTENTS
AEPLACEMENT
BE 15
TROUBLE
DIAGNOSES AND
ADJUSTMENT
BE 16
CORAECTIONS
BElT
REPLACEMENT
1
Disconnect wire from horn
2
Remove bolts retaining horn to bracket
3
Install horn in reverse sequence to removal Test horn
operation when installed
Low and
located in upper and lower sides
BE 15
high
tone horns are
respectively
BODY
JUSTMENT
AD
Note
When
adjust screw
Clockwise
I
Secure horn in
power
2
a
vise
and connect horn cables to
is turned
Current decreases
Counterclockwise
Current increases
supply See Figure BE 19
Set power
supply
switch to
and make
ON
sure
4
that voltmeter indicates 12 to 12 5V
Upon completion of above adjustment
make
sure
that horn sounds correctly with 14 to 15V generated by
alternator
AMMETER
110
to
15Al
HORN
Sound
VOLTAGE METER
115 to 20VI
Fig
3
for hum adjustment
BE 19 Circuit
Consumed current adjusting value
High
5
440
Low
5
350
Figure
encircled in
parenthesis
are
basic
A
frequencies Hz
Listen horn sound for level volume and tone Adjust
sound
as
ammeter
required
to
obtain
When adjustment is
and turn adjust
screw
sepecified
required
amperage by
loosen lock nut
5
adequately
Secure lock nut of adjust
screw
HOR N BUTTON
IHI
III
Fig
BE 20
Adjusting hum
Fig
BE 16
HE ll Circuit diagram
for
horn system
BODY ELECTRICAL
TROUBLE DIAGNOSES AND CORRECTIONS
Probable cause
Condition
Horn does not
Excessively discharged battery
operate
Corrective action
Measure specific gravity of
Charge
Blown off fuse
if
required
Check fuse for fusing and improper contact
Replace
Improper
electrolyte
horn button contact
or
repair if required
In this case the horn sounds
relay terminal S
is
though horn
grounded
Check and repair horn button
Defective horn relay
Horn
sounds though the horn relay termi
nals B and
Replace
Defective horn
Horn
B
horn
terminal
Replace
Defective horn relay
circuited
short
relay
and
H
still does
are
not
circuited
short
sound
directly
horn
Horn does not stop though horn relay
continuously
Short ircuited horn button and horn relay
When
terminal S
nection
relay
horn
horn
stops through above discon
check horn
button unit particu
larly carefully
Repair horn relay
Replace
tone
S
terminal is disconnected
Replace
Reduced volume and
though
terminal is connected to horn
battery
Horn sound
are
does not sound though horn relay
terminals
and
H
horn
or
Improper fuse
wire contact
terminal S
horn button
Correct
quality
Broken cable
Improper horn button
Repair or replace
contact
BE 17
Repair
if
required
I
BODY
METERS AND GAUGES
CONTENTS
COMBINATION
METEA
BE lB
OIL PAESSUAE WAANING
Description
BE 1B
IGNHlON WARNING LAMP
BE 21
Replacement
BE 19
BULB SPECIFICATION
BE 21
BE 19
TAOUBLE
BE 19
COAAECTIONS
SPEEDOMETEA
Replacement
FUEL
METEA AND THERMOMETEA
LAMP
BE 21
DIAGNOSES AND
BE 22
BE 19
Speedometer
BE 22
Description
BE 19
Thermometer and fuel meter
BE 23
Replacement
BE 20
Oil pressure and ignition
BE 25
warning lamps
COMBINATION METER
Description
The
combination
fuel
speedometer
indicator
lamps
meter
oil
consists
meter
and
of three meters
thermometer
and
five
indicator
lamp ignition
warning lamp head lamp high beam pilot lamp and turn
signal pilot lamps left and right For illumination of the
pressure
combination meter four
meter
uses
meter for
a
wiring
meter can be
the 12
printed
pole
lamps
are
used The combination
circuit board located
behind the
With this construction the combination
simply connected
connector See
1
Speedometer
2
Meter illumination
to power
supply through
Figure BE22
6
Oil pressure warning
lamp
lamp
7
Ignition warning lamp
3
Fuel meter
8
Head lamp upper beam
4
Thermometer
5
Tum
lamp
signal pilot
pilot tamp
9
to
Regulator
12 pole connector
Fig
BE lB
BE 22 Combination
met
1
BODY ELECTRICAL
The illumination
board with
clips
lamp sockets
they
can
are
secured
on
the back
be removed and reinstallation
4
Loosen
speedometer cable
cable from
speedometer
union nut and remove
speedometer head
easily
The fuel meter and thermometer
The
regulator
use
meter
regulator
minimize indication error due to
fluctuation and therefore the meters
are
voltage
Install combination meter in
s
reverse
sequence
to
removal
very reliable
SPEEDOMETER
Replacement
I
Replacement
Disconnect negative
battery
cable
I
With combination meter removed
screws
2
Unscrew two set
screws
from lower part of combi
2
Loosen two screws
combination
nation meter
loosen attaching
and separate combination meter from meter
meter
used to
secure
cover
speedometer on
and detach speedometer
housing
from combination meter
3
Install
speedometer
Fig
Fig
BE 23
Removing combination
meter
BE 24
in reverse sequence to removal
Removing speedometer
FUEL METER AND THERMOMETER
Description
The fuel meter consists of
a
tank unit located in the
fuel tank and fuel meter The tank unit detects fuel level
with its float converts fuel level variation to
3
Pull out 12 pole connector from the back of combi
of slide resistor installed
nation meter
controls current
BE 19
flowing
on
the float
to the fuel meter
base
a
resistance
and thus
J
BODY
The
consists
thermometer
thermaltransmitter
of
in
located
thermometer and
a
the
thermaltransmitter is equipped with
engine
a
block The
current
bimetal
arm
ON
the
provided
current flows to the heat coil
pointer connected
the
to
with
tolerance may
occur
on
are
ann
and
arm
on
a
voltage fluctuation
supply
a
constant
If both
Consequently
defective
the thermometer of fuel
applied
the
at
trouble in the
the
a
to the
time
coil
the contact closes The
a
pulsating voltage
temperature and fuel gauges
thermometer
same
by the
current to the coil is
repetition of this operation produces
is
voltage
that the
heater coil When the ignition switch is
As the bimetal cools
of8Y which is
so
meter
the bimetal arm is heated and bent
interrupted
same
The
voltage
operate correctly
part of the regulator consists of
opening the contact
and the heat
bimetal
is used to
operating
bimetal
the bimetal ann is bent and
operated The characteristics ofboth meters
A
controls
and healer coil When the ignition switch is
coil is heated With this heat
thus
The
a
turned
are
source
thermometer and fuel
thermometer
flowing to the
fuel meter and thermometer
The
set to
thermaltransmitler
the
and thus
due to
regulator
thermistor element
which converts cooling water temperature variation to
resistance
meter
and
fuel
meter
become
this may be attributable to
voltage regulator
r
AEGULATOA
FUSE
M
TEMPE
AATUAE
IGNITION
GAUGE
SWITCH
GAUGE TANK UNIT
T
I
FUEL TANK
THEAMAL TAANSMITTEA
Fig
di4gram for fuel meter
temperature meter and voltage regulator
BE 25 Circuit
Replacement
1
With
screws
combination meter removed
used to
secure
combination meter
fuel meter
housing
and
or
remove
two set
thermometer
remove
fuel meter
2
Install fuel meter or thermometer in reverse sequence
to removal
on
or
thermometer from combination meter
BE 20
BODY ElECTRICAL
When the ignition switch is
circuit is closed
warning
ignition switch
through
the
generator
current
to
ON
the ignition
the warning lamp bulb and
to
ground
regulator When the engine is started and the
comes
opposes
in
lamp
set
and current flows from the
into
effect it
the generator output
operation
flowing from the warning
the current
breaks
the
warning circuit ground
connection and the lamp goes out
Ignition switch
r
Fig
BE 26
8
Removing thermometer
c
0
5
co
Pilot
OIL PRESSURE WARNING LAMP
The engine
lubricating system incorporates
an
relay
oil
stationary
the
the
light glows with
When the engine
is
kg
Alternator
Regulator
5 7 to 8 5
em
when the
Under normal operation
Ib sq in
on
to 0 6
em
1
I
a
L
pressure waming lamp which glows whenever engine oil
pressure falls below OA kg
a
3
Ql
te
lD
J
2
engine
is
ignition switch turned
Fig
BE 28 Circuit of ignition
warning system
running and oil pressure reaches
the above range the circuit opens and the light goes out
u
I
i
c
o
Warning light
BULB SPECIFICATIONS
Fuse
0
Wattage
Switch
en
Item
Candela
T
I
power
J
without
with
pressure
pressure
Meter illumination
signal
lamp
BE 27 Circuit of oil pressure
34 2cp
158
7 1 cp
1
161
17
lcp
161
17
lcp
161
I 7
I cp
161
indicator
lamp
warning system
High beam indicator
lamp
Ignition warning lamp
IGNITION WARNING LAMP
Ignition warning lamp glows
is set to
ON
generator fails
trade
number
J
Turn
Fig
SAE
and the engine
to
charge
when the
is not
with the
ignition switch
operated
or
Oil pressure warning
when the
lamp
engine operated
BE 21
rr
BODY
mOUBLE DIAGNOSES AND CORRECTIONS
Speedometer
Condition
Probable
Corrective action
cause
Speedometer pointer and
Improperly tightened speedometer
odometer do not operate
union nut
cable
Broken speedometer cable
union nut
correctly
Replace
Damaged speedometer drive pinion
Speedometer pointer
Retighten
gear
Replace
Defective speedometer
Replace
Rapidly bent speedometer cable
Correct
drive
or
pinion
gear
replace
deflects widely
Damaged speedometer drive pinion
gear
Defective speedometer
Improperly tightened speedometer
pointer
union nut
occurs
in response to increase
cable
Retighten
Defective speedometer cable
Replace
Defective speedometer
Replace
Excessively
Replace
bent
cable inner wire
or
or
gear
Replace
Unstable speedometer
Unusual sound
Replace pinion
twisted speedometer
union nut
cable
meter cable
lack of lubrication
of driving speed
Defective speedometer
Replace
Defective speedometer
Replace
Inaccurate odometer
Improperly
Replace speedometer
operation
worm
Inaccurate speedometer
indication
meshed second and third gear
gears
Faulty feeding
due to deformed odometer
and pinion carrier
BE 22
correctly
Replace speedometer
or lubricate
BODY ElECTRICAL
Thermometer and fuel meter
Probable
Condition
Both
thermometer
and
Blown off fuse
or
Corrective action
cause
improper connection
Check fuse for fusing and improper contact
fuel meter do not
Replace after correcting
operate
Correct contact
Defective
fused
or
voltage
regulator
Damaged
cause
if fused
Replace
open contact
Both thentlometer and
Defective voltage
fuel meter indicate
wire
inaccurately
grounding
seized
regulator
contact
and
Broken heat
or
improper
In this
case
meter
operates excessively
Replace
In this case meter operates
Improper cable contact
for
Check cable
repair
if
slightly
improper
contact
and
required
ThennometeJ
Thermometer does
not
Defective thermal transmitter
thermal transmitter
Replace
white cable is
Defective thermometer
Replace
deflect
Pointer indicates
Defective thermal transmitter
Pointer
when
does not
pointer
thermaltransmitter yellow
grounded
moves
to low limit when
ignition
switch is turned off
temperature
Pointer
Defective thermometer
even
indicates
replace
Thermometer
40 n resistance
accurately
transmitter
grounded
thermometer
is
applied
when
a
thermal
cable is
and thermometer indicates ap
800C
If thermometer
Replace
to
wihite cable
I760F
is
normal
above inspection
BE 23
temperature
seIViceable
is
yellow
proximately
Defective thermal transmitter
maximum
after ignition switch is turned off
In this case
Defective thermometer
thermaltransmitter
replace
In this case
Thermometer does
grounded
thermometer if
white cable is
not operate
pointer
deflects when thermaltransmitter yellow
operate
maximum
if
thermaltransmitter
through the
v
BODY
Condition
Probable
Improper cable
Corrective action
cause
If thermometer indicates
contact
a
temperature
slightly lower than the actual temperature
check cable from thermometer
transmitter for cable
poor contact
and
to
thermal
being about to break
faulty grounding
and
repair if necessary
Fud meter
Fuel meter does not
Defective tank unit
Replace tank
yellow
tank unit
operate
Defective fuel meter
unit if
Replace fuel
pointer does
pointer deflects when
cable is grounded
with a new
meter
not deflect
one
if
through the above
inspection
Pointer indicates
F
Defective tank unit
Replace tank
unit if
empty limit when
position
pointer lowers
below
ignition switch is turned
off
Defective fuel meter
F
Fuel meter functions
fuel meter if pointer still indicates
position through the above inspection
Replace
Defective tank unit
Replace tank
level when
improperly
tank unit
unit if pointer indicates a half
35 n resistance is applied to
a
yellow cable and then cable
is
grounded
Defective fuel meter
Replace fuel
indicate
a
meter if
pointer does
half level through the
not
above
inspection
Improper cable contact
If fuel meter indicates
than actual level
a
level slightly lower
check cable from
meter to tank unit for cable
break
poor contact and
and repair
BE 24
as
necessary
being
fuel
about to
faulty grounding
BODY ElECTRICAL
Oil pressure and
ignition warning lamps
Condition
Probable
Corrective action
cause
Oil pressure warning
lamp
Lamp does
light
not
Blown offfuse
or
faulty
Check fuse for
contact
fusing
and faulty contact
when ignition switch
Replace after correcting
is set to
necessary
ON
Broken
lamp bulb filament
or
faulty
cable
contact
cause or
repair
as
If oil pressure switch yellow black cable is
grounded and warning lamp does
not
light
check bulb for burnt out fIlament and
replace
Defective oil pressure switch
as
necessary
If warning lamp ligh Is through the above
inspection replace oil
Lamp does
not go out
while engine is
pressure switch
Lack of engine oil
Check oil level and add oil
Oil pressure is too low
Inspect engine oil
Defective oil pressure switch
Continuity
as
required
being
operated
pressure system
exists
on
oil pressure switch
men engine is being operated
Replace
oil pressure swi tch
Ignition warning lamp
Lamp does
not
light
Blown off fuse
or
faulty
contact
Check fuse for fusing and
when ignition switch is
set to
Repair
or
faulty
contact
replace if necessary
ON
Bumt
out
lamp bulb ftlament
or
cable contact
faulty
Pilot lamp does not light when voltage
regulator
connector is disconnected white
red cable is grounded and ignition switch is
set to
NO
Check bulb for burnt out fIlament and
replace if necessary
Lamp does
out when
not go
engine
Faulty charging system
Inspect charging system
is
started
BE 25
rl
BODY
WINDSHIELD WIPER AND WASHER
CONTENTS
DESCRIPTION
AEMOVAl AND INSTAllATION
Wiper
motor
Wiper
motor
linkage
BE 26
Wiper switch
BE 27
Washer nozzle
BE 27
BE 27
Caution for windshield washer
BE 27
Specifications
BE 28
adjustment
operation
BE 28
BE 28
DESCRIPTION
The windshield
mechanism wiper
wiper
arms
consists
of wiper motor
and blades The wiper motor unit
consists of a motor and auto stop mechanism
motor is of a
The
the
2
wiper
engine
electrically operated windshield washer consists of
washing fluid tank pump washer nozzles and vinyl tube
The
link
used to connect those components
The wiper
The
ed type
motor unit is located on the cowl
compartment
and the
link
dash in
windshield washer switch is combined with the
windshield wiper switch to
a
single
the washer twist the switch knob
mechanism is
located behind the instrument panel
BATTERY
IGNITION SWITCH
WASHER MOTOR
FUSE
W
LR
IBL
L
WIPER SWITCH
1
llAI
OFF
IVI
lVl
ILl
ILl
IBI
IBI
lLWI
ILW
j
BE 29 Circuit diagram
for windshield wiper
system
BE 26
2
lWlST
X
lBll
Fig
1
JSher
UJ
Z
I
unit When
operating
BODY ELECTRICAL
REMOVAL AND INSTALLATION
Wiper
motor
linkage
Removing wiper
I
arm
from pivot shaft
Raise wiper blade from windshield glass
of wiper
2
ann
and
remove
Separate wiper
wiper
motor
ann
raise the base
from pivot shaft
drive shaft
arm
from
con
25mm
0 984 in
necting rod
Fig
Wiper
BE J 1
Wiper arm installation
motor
Disconnect connector from wire harness
2
Separate wiper
drive shaft
motor
arm
from
con
necting rod
Fig
BE 30
Wiper motor linkage
Fig
3
and
4
Loosen set
remove
screws
used to secure both
sequence of removal
linkage in
noting the following matter
reverse
3
Loosen three bolts and
4
Reinstall wiper motor in
Wiper
Install windshield
wiper
arm
for
correct
remove
reverse
motor
sequence of removal
switch
I
Disconnect connector from the back of wiper switch
2
Loosen switch knob set
in correct installation
angle to obtain correct sweeping angle See Figure
31
BE
Wiper motor
pivot shaft connecting rod assembly
Reinstall windshield wiper motor
Note
BE 32
pivot shafts
installing dimensions
knob
BE 27
screw
and
remove
switch
J
BODY
Caution for windshield washer
3
Remove installation nut
4
Remove wiper switch from the back of instrument
plain
washer and spacer
operation
panel
Do not operate windshield washer continuously
Washer nozzle
than 30 seconds
adjustment
often
When washer nozzle is installed
not
is
sprayed properly adjust
sprayed
or
when washer fluid is
without
improper
windshield
Norrnally
nozzle direction so that fluid
in proper range See
causes
or
applying
windshield
more
washer fluid This
washer
washer should
be
operation
operated
10
seconds or less at one time
Figure BE33
Specifications
Type
Interlocked
Angle
87 to 930 Driver side
parallel type
96 to 1020 Assistant side
100mm
3 94 in
Fig
Operating speed
BE 33 Washer nozzle
High
59 to 73 rpm
Low
41
to
51 rpm
adjustment
TROUBLE DIAGNOSES AND CORRECTIONS
Condition
Windshield wiper
does not operate
Probable
Motor
Corrective action
cause
No current flows to motor due to
Broken armature
Replace
motor
Worn motor brush
Replace
motor brush
Replace
motor
Motor
is
minutes are
overheated
when
elapsed due
4
to
or
armature
5
to
Seized motor shaft
Windshield wiper circuit fuse
15A
is
easily fused due to
circuit
Short
rare
circuit
short
burning of motor inside component
BE 2B
or
Replace
part
motor or
repair
circuited
short
BODY ElECTRICAL
Probable
Condition
Corrective action
cause
Power supply
Blown off fuse due to trouble of other
Check
and cable
part in windshield wiper circuit
correct trouble
Loose open
Check wiring
or
broken wiring
for
other part
near
operation and
motor and terminal
for connection
connector
I
Correct if necessary
Erroneous wiring
Check each
connecting cord for cord
color and correct
Switch
Improper grounding
Correct
Improper switch
Connect
L Blue
B Black
and
contact
motor
Link
Wire harness of other part is hooked
on
as
uy
necess
LW Blue white
or
to
if motor operates If
switch
replace
operates
see
Correct
link
Windshield wiper
Motor
Disconnected link rod
Correct
Seized
Lubricate
With
or
rusted
arm
arm
raised
shaft
or
replace
arm
shaft
still excessive current
flows 3 to 5A due to
operating speed
is too slow
Rare
of motor armature
circuit
short
Windshield wiper stops only by
holding with hand due
arm
motor armature
lightly
to
Worn motor brush
With
Replace
Replace brush
still excessive current
raised
flows 3 to 5A due to
Seized motor shaft
Replace
motor
or
lubricate
earing
I
with
engine oil
Power sup
ply
Dropped source voltage
and
parts for operation
cable
Link
Measure voltage check other electrical
action for power
Hununing
occurs on
and take corrective
supply
if necessary
motor in arm op
erating cycle due to
Seized a9 shaft
Switch
Improper switch
Lubricate grease
contact
replace
Conduct continuity test and
necessary
BE 29
or
replace
if
5
r
BODY
Condition
Probable
Corrective action
causes
Windshield
Windshield wiper blade sticks
wiper blade
shield
on
wind
Raise
arm
without
glass
and
operate
applying
windshield
wiper
load
Oean windshield glass and
or
replace
wiper blade
Windshield wiper
speed
Motor
Low
high
speed
differs from I
cannot be
considerably
ratio
14
Windshield wiper is operated under the
changed correctly
same
or
speed
at both low and
high speeds
windshield wiper does not operate at
either low
or
high speed due to
Motor brush for either low
speed is
Motor
high
improper
relay
stop
auto
contact
due
contact
foreign
to
brush
Remove
au
clean
device
stop
to
carefully
contact
cover
so
as
not
and
to
deform relay plate
matter
0
Replace
worn
Contaminated
or
or
connection
Cable and
Improper
switch
2nd switch steps
between 1st and
Remove switch and make
and 2nd steps
0
are
sure
that 1st
not connected at OFF
position
i
If connected replace switch
i
0
ii
0
0
Motor
E
Contaminated autostop relay contact
0
or
0
matter
0
Incomplete
Cl
improper
Contact is not
con tact
due to
foreign
Remove
clean
autostop
contact
deform relay
operation
stop
auto
interrupted
Remove
correct
device
carefully
so
cover
as
not
and
to
plate
au to
stop
device
relay plate bending
cover
and
J
IGNITION SWITCH AND STEERING LOCK
CONTENTS
BE 31
IGNITION SWITCH WITH STEEAING
Description
BE 31
LOCK
Removal
BE 31
IGNITION
SWITCH
BE 30
BE 31
Description
BE 31
Steering lock replacement
BE 31
BODY ELECTRICAL
Removal
IGNITION SWITCH
Remove ring nut from ignition switch
I
Description
plain
The ignition switch controls the engine ignition system
and most of electrical
The terminal
2
Terminal
equipment
is for power
I
to
ON
is connected to
3
magnetic switch
on
switch is set to
START
switch
supply
power
The terminal
S
terminal of the
by
STEERING LOCK
the stater motor When the ignition
current flows to the
pass line so
resistor of
is for radio
magnetic
5
only
Description
The steering lock is built in the ignition switch When
is
lS used for vehicle equipped with
with resistor In order to increase
while
connector
IGNITION SWITCH WITH
the key is
4
ignition switch from the back of instrument
is
and the magnetic switch operates to start the
The terminal
voltage
Remove
When
starter motor
ignition coil
washer and spacer
panel and disconnect
prepared for electrical equipment and ignition circuit
The terminal
remove
supply from the battery
is connected upto the fuse block
the ignition switch is set
2
and
cranking engine
this
ignition
terminal forms
a
that current does not flow through the
set
Lock
and removed the steering system
locked automatically
stalled
The
locking mechanism
jacket
is in
tube When the key
and removed the steering lock spindle is
Lock
inserted in
on the
The
the steering column
on
is set to
ignition coil
to
notch in the collar which is stationarily set
a
steering column
ignition
cylinder with
to lock the
attaching
a
steering wheel
switch is installed
screw
the
on
back of
key
and interchangeable
Key position
Lock
Terminal
Ace
Garage
On
Start
B
On
Off
Start
II
IG
S
1
2
A
R
3
IGNITION SWITCH
I
on
Ace
Off
On
Steering
Start
Terminal
lock
replacement
For the purpose of tamper
t
screws
2
3
4
I
r
are
installed
so
used
that
removed easily
are
the self shear
type
sheared off when
the steering lock system cannot
Replace
the
be
steerfug lock proper in
accordance with the followiitg instructions when required
0
5
I
Loosen two attaching
two self shear
IGNITION SWITCH
proof
and their heads
II
tool
BE 31
type
screws
screws
and break remaining
with
drill
a
or
other proper
r
BODY
2
Now
remove
steering lock
proper
from
sleering
jackel tube
3
When
tighten
installing
a
new
lwo new self
ear
steering lock
type
screws
be sure to
proper
10 shear off their
heads
I
Ignition
2
5
Lock spindle
Key cylinder part
6
S leering
3
Steering jactet tube
7
Self shear type
4
Lock collar
8
Attaching
switch
put
rb
haft
screw
SCJeW
Fig
BE 34
Steering lock
RADIO
CONTENTS
INSTAllATION
BE 32
ADJUSTING
BE 33
ANTENNA TRIMMER
Noise
prevention
INSTALLATION
Fig
BE 35
Instolling
BE 32
ado
chart
BE 34
l
BODY ELECTRICAL
L
InslaII mounting brackel
on
InslaII anlenna
7
radio proper
and lead anlenna cable to Ihe back of
instrument panel
2
Remove mask for radio from instrument
3
Fit radio inlo inslrument panel by applying il from
panel
8
the back of inslrumenl
4
panel
Tighten plain washer
Connect anlenna cable and speaker cable 10 lead
cables from radio Connecl radio power
source
cable 10
blue cable of inslrumenl harness
spring washer and
nul
on
adjusl shaft
Note
Blue cable of instrument harness is used not only
for radio but also for clock
5
Tighlen
strumenl
screw
securing brackel
of radio
10
in
panel
JUSTING
AD
ANTENNA TRIMMER
When
radio is installed newly
replaced
anlenna trimmer
adjusl
or
when
adjusI
antenna is
screw on
the
bottom of radio in accordance with the following inslruc
tion
Fig
6
C
EI
1400 kc
BE 36 Ins tolling radio
InslaII speaker See Figure BE37
Fig
BE 38
Adjusting
antenna timmer
L
Exlend antenna complelely
2
Sel
frequency
10 I 400 KC
Noise may be
generaled
bul disregard it
t
3
Fig
BE 37
Installing speaker
Turn anlenna trimmer 10 left and righl slowly and
sel il al a
BE 33
position where receiving sensitivily
is
highest
f
BODY
Noise
prevention
chart
Run engine raise antenna set volume to maximum and
sel
dial al
medium point withoul catching
a
Condition
casting
wave
broad
Probable
Corrective action
cause
Ignition system
Noise occurs when
is
engine
High tension code
tension
High
operaled
code
may
be disregarded
because noise suppressor is used
coil
Ignitio
wire from
Apart choke
as
ignilion coil
as
far
possible
Install
5 fJ F capacilor in primary side
0
a
lerminal of ignition coil
Note
Be careful not to install capacitor in
secondary
primary
or
breaker side
otherwise engine becomes improper
Connecl wire belween engine and ignition
coil locating
Secure
area
of body with adhesive
ground of ignition coil
Secure contact of carbon electric
Dislributor
poIe and
rotor
Elirninale excessive tip
on
pole by scrubbing with
a
Check slagger belween
rotor
rolor
pole
or
cap
screwdriver
and slator
Charging system
Sound of allemating
current
AIlemalor
Inslall
presents
Note
If
depressed
or
F
Do not use
capacity
tor
When acceleralor pedal is
5fJ
O
a
capacitor
on
charging
lerminal A
Regulator
Inslall
released
capacitor excessively
is used
excessively
altema
coil will be broken
a
0 5 fJ F capacitor
on
A
lerminal
ofvoItage regulalor
noise preseo ts
Supplement equipmenl
When engine slarts
Operative
noise
gauge
presents
noise
of thermomeler and fuel
and ground wire
Noise still presents
even
inslaII 0 1 fJ F capacitor between lerminal
Note
after stopping
If
a
capacity
engine
is used
be deviated
BE 34
capacitor
having
excessive
indication of meter will
BODY ElECTRICAL
Condition
Probable
Noise presenls when
Corrective action
cause
Horn
Noise presents when turn
signallarnps
a
0
terminal
or
Inslall
horn is blown
Flasher unit
InslaII
lF capacilor
5
5 pF
0
a
on
horn relay
horn switch
capacitor
are
operated
Note
a
Be sure to locate
capacitor
most near
position
completely
of noise source and connect in parallel
b
Cut lead wire as short as possible
c
Ground
wire should
be
placed
d
e
on
the
body
Make installation and connection securely
Carefully
IN
identify
or
OUT
marks
CLOCK
Installation
I
I
Apply rubber
seal and sland 10 inslalIation screw of
clock and instaII them inlo located hole al the center of
inslrumenl
panel
v
insta1Ialion
Tighten
3
Connect lead cables of clock 10 inslrumenl harness
with nut
K
Black
cable
is
for
illumination lamp
j
9
i@
p
grounding
red blue
cable
is
for
it
and blue cable is for clock power
supply
Note
Fil
o
J
i
i
Blue cable of instrument harness is used not
po
only
for clock but also for radio
Fig
BE 35
BE 39
Instolling clock
I
I
II
2
screw
1
JLIJllttlll
41
111lIl
rr
BODY
HEATER
@
CD
J
@
Fig
I
Inlet hose
2
Outlet
3
Air duct
4
Defroster hose
hose
5
Hose connector
6
Defroster
7
Heater control lever
8
Air control
9
Clamp
nozzle
lever
10
Room healer unit
11
Heater control cable
BE 40 Heatl T unit
Installation
I
Remove instrumenl panel
2
Install heater unil proper
on
dash panel Connecl
to blue cable
wire harness of
blue cable
from molor
healer unil
Secure black cable on heater unil with
10
screw
ground
Fil heater hoses 10 hol waler inlet and outIel of
3
healer unil and secure them with
clamps
Connect the other ends of healer hose
Yfhen
connecting
use
connector as
10 engine side
required
t
Inlet hose
3
Connector
2
Outlet hose
4
Connector
Fig
BE J6
41
BE
Installing heater hose
BODY ELECTRICAL
4
Install air intake duct
G
Air intake duct
Fig
5
42
BE
on
dash
G
Installing
InslaII defroster nozzle
on
panei
and heater unit
1
Defroster nozzle
2
Heater control lever
Heater unit
Fig
BE 43
3
Defroster
Air
control lever
nozzle and heater
and air control levers
heater unit
9
the back of inslrumenl
Connecl healer conlrol cable 10 healer conlrollever
panel
6
InslaII healer switch on inslrumenl panel
7
Install heater conlrol lever and air control lever
on
10
Install rod of air conlroI lever
adjusl
lever
on
air intake ducl
II
Connecl defroster hoses
12
Connecl heater swilch to instrument harness
inslrumenl panel
8
and
heater unit to instrument harness
ReinslaII inslrumenl panel
Motor speed
L
B
L
ill
High
Resistor
DMediUmw
YR
II
YB
Body
Low
11 J
i21
YG
earth
t
Fig
BE 44
Circuit diagram
BE 37
for
heater
JI
BODY
TROUBLE DIAGNOSES AND CORRECTIONS
Condition
Probable
Corrective
cause
actiQp
Hol air does nol
come
out
Molor does nol
Open
or
shorl circuil of feed harness
Check and repair wiring harness
operate
Defective swilch
Conducl continuity tesl and replace switch
if necessary
Defective motor
Fan cannol be rotaled
smoothly by
Replace
Molor journal is out oflubricant
or
hand
Hot air does Dol
come
stick
motor
Lubricatejoumal
Replace
motor
Slow rolation offan
Replace
molor
Loose fan installation
Repair
Defective water pump
Repair
waler pump
Benl or clogged of connecting hose
Repair
or
Defective hol waler cock
Repair
Air is left in hose
Purge
Defective thermoslal
Replace thermostat
Defective water hose
Replace
Loose
Retighten clip
JIll nevertheless fan
is rotating
Air
temperature
is low
Hol waler does nol
circulate
Water temperature is
clean piping
air oul of hose
100 low
Water
leakage from
waler hose
heater
clipping of waler hose
Improper soldering of healer
Defective defrosler
Vibrating
noise
core
Solder leaking position
Disconnecled defroster hose
Correct connection
Benl
Correct
or
broken defroster hose
or
replace
Loose heater supporl
Tighlen completely
Loose
Retighlen
fixing
screw
BE 38
SECTION SE
SERVICE EQUIPMENT
DATSUN PICK UP
MODEL 521 SERIES
BODY
CHASSIS
INI
NI
NISSAN MOTOR CO
TOKYO
JAPAN
LTD
SPECIAL SERVICE TOOL
SE
18
SERVICE EQUIPMENT
SPECIAL SERVICE TOOL
Tool number
Tool
M reference
S
Figure
name
mm
Applied
Description
in
model
page
See Fig
No
Clutch tool
For centering lhe c1ulch disc
ST20630000
521
Fig
CIA 5
130
Clulch
aligning
PA30
bar
G
l
J
S30
j
ST20051000
Clutch
base
For measuring the diaphragm
521
spring height
130
Use with the distance
assembly
@
plale
piece
Sf20058001
Fig CL6
C30
S30
510
41
C24
C80
For measuring the
ST20058001
q
diaphragm
521
Fig
CL6
130
spring height
Clutch assembly
Use with the base
distance piece
S20051000
pIale
C30
S30
510
Q
BHO
ST2050000
For
adjusting
spring height
the diaphragm
521
Page
130
CL3
Diaphragm adjusI
C30
wrench
S30
510
BHO
SE 1
r
CHASSfS
M reference
S
Applied
Figure
Tool number
Description
Toolnarne
mm
in
page
model
See
Fig
No
Transmission tool
For
ST23620000
supporting the
inter lock
ball when inslalling Ihe fork
Fork rod
page
TM II
rod
guide
ST23510000
Fork rod
All
For removing Ibe fork rod
521
Page
relaining pins
CIO
TM 5
510
pin punch
C30
n
I
ST22 I 30000
For removing the main shaft
521
bearing
780
For removing the drive shaft
521
bearing
C30
Fig
TM 16
Bearing replacer
0
ST30030000
Bearing puller
II
S30
@
SE 2
Fig TM
21
2 E EQUIPMENL
SERVI
jl 1
j
L j
Tool number
tl
Applied
Tl
r9 Lnarrie
mm
Description
page
model
in
See
No
Fig
H
r
S M reference
1
Figure
1
ST23g00000
I
l
Ie
l
n
For inslalling the main shaft
521
bearing
130
1
Transmission
If
q
0
r1
d
Uifferen tial
carrier tool
3tl
1
t
l
Setting Iool of Ihe
ST07320000
I
gear carrier
521
s 4L
PD IO
J
stand
e
J
lfl
nj
1r
jn
in
lJtbs rlgf Hi
tt li1
ST33010000
Fig
130
Differential carrier
dl Cl
1
ijL
adapter
J
Fig iM 29
JUJJ
t
For removing the differenlial
nIt
Lm
bearing puller
1
I
side
Differential side
2
I
vn t
n
AIl
lbearing
r
k
r
Fig
PD n
1
i
r
1
I
L
@
t
1I
I
ST3fs30000
I
i
q
1HIU
J
f
i1nwn
J
1
t
r
l
t
l1q
ll
Drive pinion flange
V
For removing Ihe drive pinion
521
nul
130
A30
t
ll
wrench
C30
1
7
S30
lo
CIO
510
i
I
i
SE 3
VV
Fig
1 11 111
i
Ir
PD 12
3
l
2U
ll
CHASSIS
S M reference
Figure
Tool number
Tool
Descriplion
mm
name
For removing the drive pinion
rear
pinion
model
in
ST3003000ll
Drive
Applied
bearing
Fig
PD 16
PO I7
S30
inner race
C30
rear
bearing inner
521
page
See Fig No
CIO
II
race
replacer
510
@
ST33210000
For assembling the side
521
bearing
CIO
PD 16
Fig
PO 18
V510
Differential side
bearing drift
Fig
V
For
ST31IOOOO
heighl adjustmenl of the
drive
521
130
pinion
V510
Drive pinion
arrangemenl gauge
For measuring the drive
ST3 I 200000
preload
Drive pinion
preload
gauge
SE 4
pinion
All
Fig
PD 19
SERVICE EQUIPMENT
S M reference
Tool number
Tool
Figure
name
Applied
Description
mm
See
For measuring the distance
ST321 10000
belween side
bearing
caps
Front axle and
521
Fig
No
Fig PD 22
130
V510
DifferenliaI side
bearing cap gauge
page
model
in
n
suspension
tool
For removing the
ST35380000
king pin
bush
New
Page
521
FA 7
King pin bush drift
r
For correcling the king pin
HT56802000
521
Page
FA 7
bush
King pin bush
reamer
ST36070000
Lower link bush
drift
SE 5
For removing Ihe lower link
New
bush
521
Fig
FA 24
f
e
CHASSIS
Tool number
M referenc
S
Figure
Tool
name
mm
Description
in
Applied
model
page
See Fig No
Rear axle and
suspension
tool
ST38020000
Rear axle
For
loosening
the
rear axle
and
tighlening
bearing
521
Fig
6
RA
lock nul
bearing
lock nul wrench
ST07630000
Fig RA4
For removing the rear axle
sbafl
Rear axle stand
Use
with
sliding hammer
ST36230000
C
r
II
ST3623WQO
Use
as
hammer by
sliding
the weighl
Sliding
All
Fig
4
RA
hammer
I
f
ST37 I 40000
For removing the
shaft bearing
Rear axle shaft
bearing puller
SE 6
rear axle
521
130
Fig
RA 7
n
SERVICr EtlJJPMENT
S M reference
Figure
Tool number
Tool
name
mm
Appjied
Descriplion
in
IfV
10
1
page
model
I
v
See Fig
i
1
J
l
Il
I
I
No
I
u
I
ST38220000
for inslalling the
521
raft bearing and collar
u
Jl ear axle
axle
rear
i
Fig
RA 8
I
130
shaft
bearing collar
insert
l
f
1
I
u
1
to
I
I
Steering
I
tool
t
ST27140000
r
gear
Steering gear
521
For removing the sleering
arm
130
arm
510
I
l
p
L Fig
T4
i
i
BIIO
1
J
k
o
L
f
I
r
r
q
I
J
I
u
i
r
I
SERVICEJOURNALOR BULLETlN REEERENCE
I
1
I
JOURNAL
DATE
r
or
BUltETIWNo
I
PAGE
No
1
SUBJECT
1
I
I
I
I
1
i
r
r
r
o
t
1
t
1
n
u
i
r
J
i
i
I
I
T
n
0
1
r
I
4
7
SE
r
V
CHASSIS
SERVICE JOURNAL OR BULLETIN REFERENCE
JOURNAL
DATE
or
BULLETIN No
SUBJECT
PAGE No
E R
INISSANl
Issuro Date
25th
August
1970
U105501
Publication No
10E
s
0521GO