1
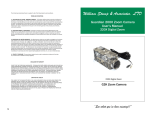
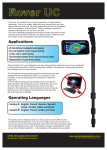
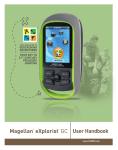
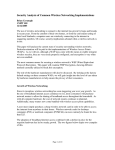
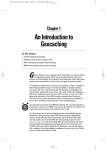
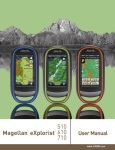
A Beginner’s Step by Step Guide to Geocaching
Geocaching is a great motivator to get outside and do some exploring, get some exercise and
learn about areas you might otherwise never visit. You can think of geocaching as a high-tech
treasure hunt where your job is to find a geocache – deviously hidden by another player – using a
GPS to guide you to the geocache’s location using coordinates that you obtain from a geocaching
website. Once you get to the geocache’s location (you won’t get right to it because GPS
receivers always have some error in their calculated locations) you then have to rely on your
senses to search for and find the geocache which is always hidden and sometimes well
camouflaged.
To help you get started, here are some basic steps to follow. After you have found a few
geocaches, these steps will become easy.
First Steps:
1. Know your GPR: Become familiar with the operation of your GPS receiver and learn
how to use it. You need to know how to manually enter or download latitude and
longitude coordinates of the geocaches you want to find and you need to know how to
use your GPS to navigate to these coordinate locations. Before trying to find a geocache,
spend some time reading your GPS User’s Manual, learn how your particular GPS
receiver works and practice using it to navigate. Geocaching is a lot more fun when you
don’t have to spend time trying to figure out basic GPS functions.
2. Create an online geocaching account: You need to set up a user account on a
geocaching website. A good site to use is http://www.geocaching.com. At this site you
can create a free account and select your own user name and password. Once you have
an account, you can search for geocaches, log your finds, activate travel bugs, hide and
publish your own geocaches and perform lots of other tasks.
Getting Information about a Geocache:
4. Logon to your account on http://www.geocaching.com.
5. Click HIDE & SEEK A
CACHE
6. Enter your ZIP Code and
a search radius and click
the Go button. (Note:
you also can search based
on other criteria such as
street address, county,
etc.)
7. A list of geocaches, sorted by distance from the Zip Code will be
displayed. The easiest way to view the location of these geocaches
is to display them in Google Maps. To do this, click on the MAP IT
icon located near the top right corner of the page.
7. Geocaches will be displayed on the map along with roads, state parks, water features, etc.
To view general information about a geocache, move the mouse over its icon and click on
it. A popup window like the one below will appear. It gives the geocache name (Four
Seasons), waypoint id (GC17FX4), difficulty, cache size, and links to other options.
While in the map view you also can zoom in and out and pan the view to explore
geocaches in other locations and you can change the base map to a USGS topographic
map or a satellite image which are useful because they provide information about the
specific landscape where a geocache is hidden.
8. Once you have decided upon a geocache that you want to find, click on its name (Four
Seasons in the above example) in the popup window. This will open a page that contains
detailed information about the geocache.
9. Enter the latitude and longitude coordinates of the geocache into your GPS receiver. Use
your GPS Owner’s Manual to figure out how to manually enter the coordinates. (Note:
you can click on the other conversions link to open a page that lists the geocaches
coordinates in a variety of formats such as degree, minutes, seconds or decimal degrees
which may be useful if your GPS receiver is configured for coordinates other than
decimal minutes.) Also be sure to read about the geocache and check out the additional
hints at the bottom of the page.
Finding a Geocache:
10. Now you are ready to find the geocache. Using the
mode of transportation of your choice, get as close to
the geocache as possible. Turn on your GPS and allow
it time to establish communications with the GPS
satellites to establish its location. If you are going to be
hiking into an unfamiliar area, especially if you have to
go a significant distance from your starting point, it’s a
good idea to Mark a waypoint (see your GPS User’s
Manual) just in case you get “lost” and need help
getting back to your starting point.
11. You then need to set the GPS to find or go to a
particular geocache. In the screen capture to the right,
the GPS is being set up to Go To the geocache named
GC17FX4 - the geocache that’s displayed in the
previous screen captures. If you multiple geocaches
(waypoints) stored on the GPS receiver, you will need
to select the one you want to find. Refer to your GPS
User’s Manual on how to select/find a waypoint.
12. After selecting Go To, the GPS receiver will go into
navigation mode. The easiest way to find your way to the
geocache is to use the Pointer/compass (the red arrow in the
screen capture) which will point in the direction you need to
travel to get to the geocache. Remember, the pointer just
points in the right direction but can not take into account
obstacles that may be between you and the geocache –
streams, highways, cliffs, private property, etc. It’s always a
good idea to have a good sense of the lay of the land before
you start your search and to have a plan for how to get from
your starting point to where the geocache is located. As you
approach the geocache, your GPS will display the distance
you still have to go. When the distance is zero, you are as
close as the GPS can get you. Remember, GPS accuracy can
vary from a few feet to tens of meters so even though the GPS reports you are at the
geocache location, it could be some distance – in any direction – away from where you
are. Now it’s up to you to find the hidden geocache. One trick is to inspect the
immediate area and look for obvious hiding places such as a hollow in a tree, a rotted tree
stump, a pile of rocks, etc. If it’s in an urban area look for fence posts, metal signs (a lot
of urban geocaches are in magnetic containers attached to posts, signs, etc.), benches and
other “obvious” hiding places.
13. Once you find the geocache, be sure to sign the log and to replace it exactly as you found
it. If there are people around, you may need to be discreet so as not to alert them to what
you are doing. In geocaching speak, non-geocachers are called muggles (from Harry
Potter stories) and they are to be avoided so they don’t find and take geocaches. Many
geocaches contain trackable items – geocoins or other objects with tracking codes on a
dog-tag attached to them. You can take these but only on two conditions 1) you must log
the fact that you took the trackable item from the geocache and 2) you must put the
trackable item in another geocache within a week or two so that it keeps moving from
location to location.
Logging Your Finds:
14. Lastly, after finding a geocache (or not) you need to logon to http://www.geocaching.com
and log your find and trackable items if you took any. Once you are logged on, search
for the geocache to get to its
page. The easiest way is to
click HIDE & SEEK A
CACHE, scroll down the page
to the section titled Other
Search Options: and then
enter the geocache id in the box
titled by Waypoint: Then
click the Go button.
15. Back on the geocache’s page, click on log
your visit which is located in the Navigation
box in the top right corner of the page. This
will take you to a page where you can select
the type of log you are entering (Found it,
Didn’t find it, etc.), enter the date and then
write a log entry in the Comments: section.
When done, click the Submit log entry button
at the bottom of the page.
16. If you took a trackable item, you will have to log it separately. Click on the
TRACKABLE ITEMS link on the left side of the page and enter the geocoin or travel
bug tracking number in the box so labeled and then click the Track button. (Note: The
tracking number will be stamped on a geocoin or will be on a “dog tag” attached to a
traveler a.k.a. hitch hiker.)
On the trackable item’s page, click on Found it? Log it! in the Trackable Item Options
box in the top right corner of the page. This will open a page, like the one on which you
logged your geocache find, where you can indicate that you took the trackable item and
where you can write comments that will be recorded in the trackable item’s log.
Ok – now it’s up to you to start geocaching. As you begin to find more and more geocaches you
can monitor your progress by clicking on the MY ACCOUNT link on the left side of any
geocaching.com web page to see a list of all the caches and trackable items that you have found.
So get out there and have fun.