1
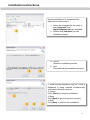
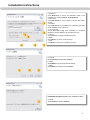
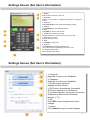
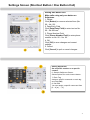
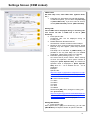
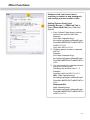
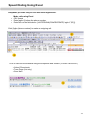
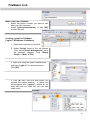
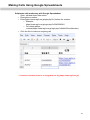
Agile Softphone Operation Introduction Settings Page (Setting User’s Information) This manual explains application software [Agile Softphone ver1.3.2]. Operation Check This application requires: [Operation] OS: Windows XP 32bit and 64bit Windows Vista 32bit and 64bit Windows 7 32bit and 64bit [Operation] Browser: Fast Help Link: Internet Explorer Ver7.0 or higher Other links: Internet Explorer Ver7.0 or higher Fire Fox 3.X or higher Google Chrome 4.X or higher Table of Contents • Settings Introduction (Operation Check / Operation Browser) Installation Instructions Settings Screen (Set User’s Information) Settings Screen (Sound Settings) Settings Screen (Shortcuts): Setting One Button Call / Shortcut Button CRM Linked Phonebook Phonebook Help Other Functions Fast Help 2 3–4 5 6 7 8 9 10 11 12 • Applications Cybozu Dezie, Web Browser’s Click to Call Web’s Click to Call / Excel’s click to Call FileMaker Link Google Spreadsheets Link 13 14 15 16 2 Installation Instructions Download Softphone’s compressed file. Select the file and unzip it. 1. Select the unzipped file and verify if both [setup.exe] and [AgileSoftphone.msi] are available. 2. Double click [setup/exe] to load installation wizard. a. Cancel Stops the installation process. b. Next Proceeds with the installation process. 1. Install Internet Explorer’s plug-ins. Check if Softphone is being installed simultaneously with Internet Explorer plug-ins. 2. Cancel Click [Cancel] to suspend installation. 3. Back Click [Back] to go to the previous activity. 4. Next Click [Next] to continue the installation. 3 Installation Instructions 1. Reference Click [Reference] to choose the destination folder of the software to be installed. Default: C:/program files. 2. Disk space Click [Disk Space] to verify if there is enough disk space / storage. 3. All Users Check [All Users]. Once installation is completed, application will be installed on PC of all users. 4. This User Only Check [This User only]. Once installation is completed, application will be installed to the specified user only. 5. Cancel Click [Cancel] to suspend installation process. 6. Back Click [Back] to go to the previous activity. 7. Next Click[Next] to continue the installation process. a. Cancel Click [Cancel] to suspend installation. b. Back Click [Back] to go to the previous activity. c. Next Click [Next] to continue the installation. Installation Progress displays the installation status. d. Close Click [Close] to finish installation. 4 Settings Screen (Set User’s Information) 1. Display Shows various screens, menu, etc. 2. Status Bar Displays current status of softphone indicated by changes in colors. 3. Unique ID Click [Unique ID] to open Unique Management Page. 4. Settings Click [Settings] to open Settings Screen. 5. Web Click [Web] to open a new window. 6. Headphone / Earphone Volume Adjusts headphone / earphone volume during a call. 7. Microphone Volume. Adjusts own MIC volume. 8. Mute Click [Mute] to mute voice. 9. Speaker Click [Speaker] to activate speakerphone. *You cannot activate speakerphone during a call. 10. Outgoing Call History Shows outgoing call history. Settings Screen (Set User’s Information) 1234567890 1234567890 1. Unique ID Required in order to use Softphone. 2. Password Required in order to use Softphone. 3. Display Name (Optional) Appears on Main Screen. 4. SIP Server (Automatically Generated) SIP Proxy required to use Softphone. 5. Extension Number (Automatically Generated) Displayed on Main screen (Extension Number: [****]). 6. OK Click [OK] to save changes and current settings. 7. Cancel Click [Cancel] to quit or cancel changes. 5 Settings Screen (Sound Settings) Headset Device Sound Settings To set Headset’s Sound Device: 1. Speaker Select the sound device (headset speaker) you want to adjust. Default: [Specified Device]. 2. MIC Select the sound device 8headset MIC) you want to adjust. Default: [Specified Device]. To set Speaker’s Sound Device: 3. Usage Check [Speaker] if you want to use the speaker. Also, you can use MIC Sound Device when speaker is activated. 4. Speaker Choose Speaker Sound Device when using the speaker. Default: [Specified Device]. 5. MIC Choose MIC Sound Device when using the speaker. Default: [Specified Device]. Ring Device Settings To set the Audio Device during an Incoming Call: 6. Ring Device Settings Choose [Play Audio Device] during an incoming call. Default: [Specified Device]. Incoming Call Ringing Tone To set the Incoming Call Ringing Tone: 7. Reference Click [Reference] to open the file dialog box. Select WAV file. Default: [ring.wav]. * Only WAV files are displayed on the dialog box. MP3 and other formats will not be displayed. 6 Settings Screen (Shortcut Button / One Button Call) Setting One Button Call Make calls using only one button on Softphone. 1. Delete Click [Button] to remove selected lines (No. 00 – No. 02). 2. Data Entry Field Click [Data Entry Field] to enter text on No. 00 – No.02 lines. 3. Phone Number Field Click [Phone Number Field] to enter phone number on No. 00 – No. 02. 4. OK Click [OK] to save changes and current settings. 5. Cancel Click [Cancel] to quit or cancel changes. Setting Speed Dial Set a specific number on a specific contact. 6. Sample Softphone Screen Shows options for each shortcut button. 7. Each Tag Assign a specific command on each tag and click [OK]. 8. Dial Pad You can assign a specific command from [0 – 9] or [ * , # ]. 7 Settings Screen (CRM Linked) CRM Linked Set Fast Help Link, other Web links (Cybozu Dezie, etc.). 1. Fast Help Link, other Web Link and Web Unlinked. In CRM Link options, you can either set [Fast Help] or [Other Web Link]. If you don’t want to set this, choose [Web Unlinked]. Default: [Web Unlinked]. Setting URL The set URL will be displayed during an incoming call. You cannot set this if CRM Link is set to [Web Unlinked]. 2. Enter Specific URL Configured URL will be displayed during an incoming call. 3. Disable Extension Number POP-UP Set extension number included in linked subject. 4. Response Time, During Call Disconnection, linked POP-UP may also appear. (Fast Help Exclusive Feature) Fast Help Link is activated. In [CRM Linked], it is possible to set only Fast Help Link. For detailed explanation, please refer to page 12, Fast Help. 5. Parameter (Value) Settings (%s, %1 - %5) S% stores source phone number. When entering %s and %s expansion, source phone number is displayed in [Enter Specific URL]. The entered or specified value is displayed in [Enter Specific URL] when %1 - %5 is entered and %1 - %5 is expanding. Example: Specific URL http://www.agile.ne.jp/paramS=%s¶m1=%1&p aram2=%2¶m3=%3¶m4=%4¶m5=% 5 %s: Source Phone Number %1: ABC1 %2: DEF2 %3: GHI3 %4: JKL4 %5: MNO5 Set and click [OK]. Then, during an incoming call from [0345906300], http://wwwagile.ne.jp/paramS=0345906300¶m 1=ABC1¶m2=DEF2¶m3=GHI3¶m4= JKL4¶m5=MNO5 will be displayed. Setting Web Button 6. Enter Specific URL Enter specific URL; if [OK] is not functioning, you can click [Web Button] in Softphone Screen to open the set URL. 8 Settings Phonebook Phonebook Stores a maximum of 10000 contacts. Stores phone numbers, contact names, company names, address and remarks. 1. Data Entry Field Click [OK] after entering contact name, phone number, company name, address and remarks. 2. CSV Import Import CSV files. CSV data format is not changed during import. 3. CSV Export Export CSV files. Select the data to be export from the dialog box. Successfully exported data is in [phonebook.csv] format. 4. Delete Select lines (No. 00 – No 9999) and click [Delete] to erase contact(s). 5. Delete All When deleting all entries, you will be prompted to another window confirming your command. Click [Yes] to delete all entries in your phonebook. Click [No] to cancel. 6. Call Select line(s) from No. 00 – No. 9999 then, click [Call] to make an outgoing call. 7. OK Click [OK] to save changes and current settings. 8. Cancel Click [Cancel] to quit or cancel changes. 9 Settings Screen (Help) Version Information 1. Verify your Softphone’s current version. Browser Plug-ins 2. Install preferred browser. • Internet Explorer • Mozilla FireFox • Google Chrome Help 3. Click the displayed Help URL for troubleshooting. You may also refer to our help page. 4. OK Click [OK] to save changes and current settings. 5. Cancel Click [Cancel] to quit or cancel changes. Softphone’s Main Screen displays the following phonebook information: 1. 2. 3. 4. 5. Phone Number Contact Name Company Name Address Remarks 10 Other Functions Softphone link can be used when searching a number in web phonebook, and sending a phone number to URL. Setting [Cybozu Dezie] Link [Settings Screen] à [CRM Link Tab] à Select [Other Web Link] from CRM Link Options. 1. Copy Cybozu Dezie phone number found on the specific URL field. Example: Link: https://sampleurl/cgibin/cyb/ag.cgi?page=AddressSimple Search&i=&aGID=&CP=al&SP=&Tex t=09011111111 Copy this: 09011111111 2. Outgoing phone number is replaced with %s. Example: Link: https://sampleurl/cgibin/cyb/ag.cgi?page=AddressSimple Search&i=&aGID=&CP=al&SP=&Tex t=%s 3. You can search the outgoing number during an incoming call. Following the direction from 1 – 3. Example: Incoming call from 09011111111 URL: https://sampleurl/cgibin/cyb/ag.cgi?page=AddressSimple Search&i=&aGID=&CP=al&SP=&Tex t=%s Displayed URL: https://sampleurl/cgibin/cyb/ag.cgi?page=AddressSimple Search&i=&aGID=&CP=al&SP=&Tex t=09011111111 11 Fast Help Setting Fast Help Link 1. 2. [Settings Screen] à [CRM Link Tab] à Select [Fast Help Link]. 3. 4. 1. Enter this on the [Specific URL Field]: https:// www.fasthelpsaas.jp/ Example: ServerName/ctiAspPopup?Event-offerd&ANIOutgoingPhoneNumber&Channel=IncomingNumber 5. 2. Enter outgoing number on the %s field. Example: UserName/ctiAspPopup?Event=offerd&ANI=%s&Ch annel=IncomingNumber 6. 3. Enter the registered incoming number on Fast Help. Enter Parameter Value [%1 - %5] or Group Incoming Number on the [Enter Specific URL]. If incoming number is configured to %1, group number will be displayed and URL message will be sent. Example: If you enter the group incoming phone number as [1%}, ServerName/ctiAspPopup?Event=offerd&ANI=%s&C hannel=%1 7. 4. Enter Event Response URL. Enter received data on the Response Time field. Use the displayed incoming number and group incoming number. Example: If incoming number is configured to [%1], ServerName/ctiAspPopup?Event=accepted&ANI=% s&Channel=%1. 8. 5. Enter Event Disconnection URL. Enter received data on the Disconnection field. Use the displayed incoming number and group incoming number. Example: If incoming number is configured to [%1], ServerName/ctiAspPopup?Event=completed&ANI= %s&Channel=%1. 9. 6. If you select [Event Response, Event Disconnection links (Fast Help exclusive features)], Response Time and Disconnection Time URL can be sent. 12 Speed Dialing Using Softphone Phonebook Make calls using your softphone with just a click. 1. Agile Softphone Agile://phone number 2. Zoiper Callto://phone number • Zoiper corresponds with CRM Link. 3. X-Lite Sip://phone number • Zoiper and X-Lite can be used by MAC users. • You cannot connect Cybozu with X-Lite free version. But, this is possible with Zoiper. 13 Speed Dialing Using Excel Softphone provides easy access with excel application. • • • Make calls using Excel CSV format Enter [agile://] before the phone number. Enter this on the field above: [=HYPERLINK(CONCENTRATE(“agile://”,$F))]. Click [Agile://phone number] to make an outgoing call. Click to call can be accessed using the softphone web contact. (Current: 04/05/2011) • Yahoo! Phonebook • Town Page (List only) • Guru Navi 14 FileMaker Link Make a call from FileMaker • Select the phone number you want to call from your list of contacts. • Script: [agile://phonenumber] à click [OK] to make the call. Creating a script for FileMaker [“agile://”&FileName::FieldName] 1. Enter phone number on the field. 2. Select [Script] found at the top toolbar. Then, select [Script Management]. Once the filename appears, Click [Empty Script] à [New] à [File]. 3. Open URL using the newly created script and enter [“agile://”] on the blank space. Click [OK]. 4. Click [&] then, click the field where you entered the phone number. A dialog box would appear with [“agile://”] written on the entry field and ccc. With this, you can now make a call. 15 Making Calls Using Google Spreadsheets Softphone calls made easy with Google Spreadsheet Save, edit and share data online. • Enter phone number. • Enter [https://www.agile.ne.jp/agto.php?t=] before the number. o Example: https://www.agile.ne.jp/agto.php?t=0345906060 o For mobile phone: =concat(https://www.agile.ne.jp/agto.php?=MobilePhoneNumber) • Click the link to make an outgoing call. * Customer’s browser must be a recognized site by [https://www.agile.ne.jp]. 16