1
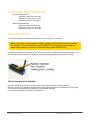
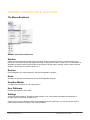
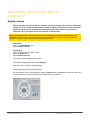
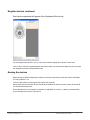
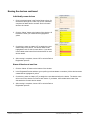
activote
Quick Start Guide-US
© 2007 Promethean, Inc.
Activote Quick Start Guide
1
TP1667EN Activote Quick Start Guide
Copyright © 2007 Promethean Limited. All rights reserved.
All information contained in this document is subject to change without notice.
Any use of the contents of this User Manual other than for the purpose intended
requires express written permission of Promethean Ltd.
All trademarks noted with the © mark are the properties of their respective companies.
NOTE: All utility and driver software provided to operate Activ products is the property
of Promethean. Use of this software is granted for the purpose of installation, set up
and operation of Activ products and the standard feature set outlined in this guide.
Promethean does not encourage or authorize any other use.
Additional application software is provided from time to time as a service to our
customers. This software is licensed to the end user by the supplier. Use, possession
and upgrades are the responsibility of that supplier. Registered owners of
Promethean product should contact those suppliers directly for support.
© 2007 Promethean, Inc.
Activote Quick Start Guide
2
Contents
Welcome to Activote..............................................................................................4
Compliance ...........................................................................................................4
Software Requirements.........................................................................................5
The Activhub .........................................................................................................5
Getting started with Activotes................................................................................6
Activote Voting Options.........................................................................................7
Windows Users
Naming and Registering Devices ...............................................................8
Voting with User names............................................................................11
Vote with prepared questions ...................................................................15
Macintosh Users
Naming and Registering Devices .............................................................16
Voting with user names ............................................................................19
Vote with prepared questions ...................................................................21
More Information .................................................................................................22
© 2007 Promethean, Inc.
Activote Quick Start Guide
3
welcome to activote
Activote is Promethean’s integrated personal response system that is designed to encourage student participation
and enhance learning.
This could be as straightforward as determining whether pupils are following a lesson, or it could be the basis for
planned discussion. And it's all done by asking students to make a choice and press a button. Capturing student
responses when they are questioned can be a powerful tool in influencing the direction of a lesson or the planning
of future work. Activote allows the answers of each pupil to be saved for retrieval later - individually or as a class.
Results can also be exported to Excel for record keeping and further analysis where appropriate.
Flexibility is key in any learning environment, which is why Activote can be used in several ways. Integrated into
Promethean’s software, it can be used ad-hoc, allowing teachers to ask unplanned questions as they occur.
However, it also works effortlessly over any application or website. Similarly, teachers can choose between using
the supplied pre-prepared content and easily making their own with the aid of the built-in Question Master Wizard.
What is this Manual?
This quick start guide takes you through the process of setting up and using the Activote devices and its
associated programs.
Compliance Statements for the Activote and
Activhub (United States of America, Canada and
Europe):
United States of America
This device complies with Part 15 of the FCC rules.
Operation is subject to the following two conditions:
1.This device may not cause harmful interference.
2. This device must accept any interference received,
including interference that may cause undesired
operation.
Changes or modifications to this equipment not
expressly approved by Promethean may void the
user’s authority to operate this equipment. For nonintentional radio parts, this equipment has been
tested and found to comply with the limits for a Class
B digital device, pursuant to part 15 of the FCC rules.
These limits are designed to provide reasonable
protection against harmful interference in a residential
installation. This equipment generates, uses and can
radiate radio frequency energy and, if not installed
and used in accordance with the instructions, may
cause harmful interference to radio communications.
However, there is no guarantee that interference will
not occur in a particular installation. If this equipment
does cause harmful interference to radio or television,
which can be determined by turning the equipment off
and on, the user is encouraged to try to correct the
interference by one or more of the following
measures:
Reorient or relocate the receiving antenna.
Increase the separation between the equipment and
receiver. Connect the equipment into an outlet on a
circuit different from that to which the receiver is
connected.
© 2007 Promethean, Inc.
Canada
This device complies with RSS-210 of Industry
Canada and is subject to the following two
conditions:
1. This device may not cause harmful
interference.
2. This device must accept any interference
received, including interference that may cause
undesired operation.
Changes or modifications to this equipment not
expressly approved by Promethean may void the
user’s authority to operate this equipment.
This Class B digital apparatus complies with
Canadian ICES-003.
Europe
The radio interface on this product is intended
for use with other Promethean radio devices for
operation in the following countries:Austria,
Belgium, Bulgaria, Cyprus, Czech Republic,
Denmark, Estonia, Finland, France, Germany,
Greece, Hungary, Iceland, Ireland, Italy, Latvia,
Lithuania, Luxembourg, Malta, Netherlands,
Norway, Poland, Portugal, Romania, Slovak
Republic, Slovenia, Spain, Sweden, Switzerland,
United Kingdom
Declaration of Conformity statement
A copy of the Declaration of Conformity is
available on the software application CD. Should
this not be available, please contact Promethean
for a copy.
Activote Quick Start Guide
4
software requirements
Windows Requirements
Activstudio version 3.0.110 or later
Activprimary version 3.0.71 or later
Activdriver version 4.1.10 or later
Macintosh Requirements
Activstudio version 3.0.96 or later
Activprimary version 3.0.96 or later
Activdriver version 2.3.110 or later
the activhub
The Activhub is needed for the Activote devices to communicate with your computer.
Note: It you have a Promethean Activslate, register and activate it before connecting
the Activhub. Your new Activotes (model PRM-AV3-01) cannot be used during the
same voting session as version 2 of the Activotes (model PRM-AV2-01).
Insert the Activhub into a USB socket on your computer. Use the 6 ft. USB extension cable if necessary. The
function indicator light is red when it has power. The light flashes green when the Activhub is working.
Tips for best use of the Activhub
Connect the USB Activhub to the 6 ft. cable, place in the holder and mount as high as possible.
Mount the Activhub side toward the Activote device users. Raise the antenna to 90 degrees from the ground.
The Activhub and Activote devices should be no more than 98 feet apart.
Keep the Activote devices in clear view of the Activhub.
© 2007 Promethean, Inc.
Activote Quick Start Guide
5
Getting started with activote
The Menus Explained
Example: Activstudio for Macintosh
Session
Opens the Activote Session window where you specify whether you want to perform a named, anonymous or
demo vote. The session window will appear before each voting session. Note in version 3.0.110 of Activstudio for
Windows, the Session window goes behind an open flipchart. Simply select “Desktop” mode to see the Session
window. This has been corrected in version 3.5.x.
Devices
Used to Register your Activote devices in the Device Registration program.
Users
Allocate your devices to individual users in the User Registration program.
Question Master
Compile a set of questions for your voting session.
User Database
Prepare and organize a list of users.
Settings
Access the Activote settings. Examples include whether or not voting results are displayed automatically or
whether users can alter their answers or not.
These menus are in the Windows version of Activstudio as well as Activprimary. You can also access most of
these functions under the Configure Tab of the Dashboard.
© 2007 Promethean, Inc.
Activote Quick Start Guide
6
Activote Voting Options
Option 1
Register and name each device. Labels are provided which can be inserted in each device for this
purpose. For each session, teachers use the anonymous mode for voting but could assign a device name
to a student name manually for evaluation purposes. During a voting session, the device names would
appear. For example if the devices are named as A1, A2, A3, ….. A32, the teacher can write in a notebook
or grade book which device is assigned to which student (i.e., Device A1 belongs to John Smith). When
voting takes place, the A1, A2, A3 names appear in the software.
Option 2
Register and name each device. Going one step further then Option 1, the User Database and User
menus are used to associate a student’s name with a device. In this option, while Named voting is taking
place, the students’ names will appear instead of the device names. Teachers do have options to display
or not display names during voting sessions even if Named voting is being used. With this option, teachers
can choose between anonymous and named voting for any particular session.
© 2007 Promethean, Inc.
Activote Quick Start Guide
7
registering and naming devices
Windows™
Register devices
Before voting devices can be used, the computer needs to know they exist. In this section we will
explain how to use the Device Registration program to register voting devices. Once devices are
registered and named, the Activhub and associated Activote devices can be used with any
computer running required versions of Activstudio or Activprimary.
Note: Ensure Activstudio or Activprimary is not running before you insert the Activhub into your
computer. The first time you launch the software, you will be asked to input your information and serial
number. The serial number is located on your installation CD case.
Activstudio:
Click on the Main Menu button.
Select Activote>Devices.
Activprimary:
Click on the Teacher Tools Menu button.
Select the Menu button.
Select Activote>Devices.
This opens the Device Registration window.
In the Device Registration window, select Register.
Enter the number of devices to be registered.
A three-letter PIN code appears (see below).
On each Activote device to be registered, press the Register button (labeled with a flame) until the green
and red lights turn on. Enter the pin code using the buttons on the device.
© 2007 Promethean, Inc.
Activote Quick Start Guide
8
Register devices continued
Each device registered will appear in the Registered Devices list.
You can register each device in turn, or have class members register them all at the same time.
If the number of devices registered equals the same number you entered at the beginning of the process,
the registration process will automatically stop.
Naming the devices
Before exiting the Device Registration window you need to electronically name each device individually
for Voting Options 1 or 2.
There are two options for Naming Devices: Name and Name All
Name allows you to name each device individually and Name All allows for all the votes to be named at
one time with the same prefix
Device Names can be 4 characters (combination of alphabetic or numeric). Labels are provided which
can be inserted at the base of each device.
© 2007 Promethean, Inc.
Activote Quick Start Guide
9
Naming the devices continued
Individually name devices
1. Click in the blank space in the Device Name column for
each device and type in a code of up to four characters,
comprised of letters and/or numbers. Do this for each
device to be named.
2. Click the “Name” button at the bottom of the window. All
the device names you created will be highlighted in
yellow.
3. On a device, press on a letter (A-F) to assign the name
electronically to the device. The device name will be
highlighted in red. Do this for each device. If you desire,
insert a label at the base of the Activote device for each
device named.
4. After naming is complete, choose “OK” to exit the Device
Registration process.
Name all devices at one time
1. Click the “Name All” button at the bottom of the window.
2. In the Registered Devices window, type a prefix (up to three letters or numbers). All the device names
created will be highlighted in yellow.
3. On a device, press on a letter (A-F) to assign the name electronically to the device. The device name
will turn red in the window. Do this for each device. If you desire, insert a label at the base of the
Activote device for each device named.
4. After naming is complete, choose “OK” to exit the Device
Registration process.
© 2007 Promethean, Inc.
Activote Quick Start Guide
10
voting with user names
Windows™
Add names to the User Database
Activstudio:
Click on the Main Menu button.
Select Activote>User Database.
Activprimary:
Click on the Teacher Tools Menu button.
Select the Menu button.
Select Activote>User Database.
In the Activote User Database window, select User>Add.
List your users in the Add Users window.
Choose OK after you are finished.
®
Note: Lists of names can also be imported using a .csv file, created in Excel . See the help
files for more details.
Allocating user names to registered devices
After the names have been added to the User Database, there are two options to allocate user names to
devices:
Option 1: Users select any device and assign (allocate) their name to the device.
Option 2: Users are assigned (allocated) specific named devices in advance.
© 2007 Promethean, Inc.
Activote Quick Start Guide
11
Allocating user names to registered devices continued
Option 1: Users select any device
Activstudio:
Click on the Main Menu button.
Select Activote>Users.
Activprimary:
Click on the Teacher Tools Menu button. Select the Menu button.
Select Activote>Users.
1. Select the option “Allocate devices by requiring all users to
enter a three-letter registration code.”
2. In the Folder drop-down menu, make sure All Users is
selected. In this way, you will see any users you added to
the User Database (there are other names included).
3. Select each name and click on the Add button to add the
name to a device.
Add
Button
After adding all names, choose “Allocate Devices”. The
users’ names appear, each of them highlighted in red and
followed by a three-letter code.
4. Each user should enter his or her three-letter code. The user
name will be highlighted green when the device is correctly
allocated.
5. Choose the Back option when finished.
6. Choose Exit.
© 2007 Promethean, Inc.
Activote Quick Start Guide
12
Allocating user names to registered devices continued
Option 2: Users are assigned a specific device
Activstudio:
Choose on Activstudio’s Main Menu button.
Select Activote>Users.
Activprimary:
Click on the Teacher Tools Menu button. Select the Menu button.
Select Activote>Users.
Select the option “Allocate named devices to users.”
1. In the Folder drop-down menu, make sure All Users is
selected. In this way, you will see any users you added to
the User Database (there are names included).
2. Select each name and click on the Add button to add the
name to a device.
3. Click on the Exit button when you have finished.
© 2007 Promethean, Inc.
Add
Button
Activote Quick Start Guide
13
Perform the named vote
Activstudio:
Click on the Main Menu button.
Select Activote>Session and select the Named Mode.
Click OK.
Activprimary
Click on the Teacher Tools Menu button.
Select the Menu button.
Select Activote>Session.
Select Named Mode.
Click OK.
1. On the Main toolbar, click on the Activote icon to perform the
vote.
2. Click on the Activote icon again when all users have voted.
The results appear.
© 2007 Promethean, Inc.
Activote Quick Start Guide
14
voting with prepared questions
Windows™
The Question Master program has been created to help generate voting flipcharts.
To open the Question Master program:
Activstudio:
Click on the Main Menu button. Select Activote>Question Master.
Activprimary:
Click on the Teacher Tools Menu button. Select the Menu button. Select Activote>Question Master.
The Question Master program opens.
Explore the options here to create your first voting flipchart.
See the help files for more details on how the Question Master works
.
© 2007 Promethean, Inc.
Activote Quick Start Guide
15
registering and naming devices
Macintosh™
Register devices
Before voting devices can be used, the computer needs to know they exist. In this section we will
explain how to use the Device Registration program to register voting devices. Once devices are
registered and named, the Activhub and associated Activote devices can be used with any
computer running correct versions of Activstudio or Activprimary.
Note: Ensure Activstudio or Activprimary is not running before you insert the Activhub into your
computer. The first time you launch the software, you will be asked to input your information and serial
number. The serial number is located on your installation CD case.
Activstudio:
Click on the Main Menu button. Select Activote>Devices.
Activprimary:
Click on the Teacher Tools Menu button. Select the Menu button.
Select Activote>Devices.
This opens the Activboard System preference
window.
Select Register.
Enter a custom PIN code and replace the default
ABC. You can only type upper case A – F
characters or use the buttons in the window to
create the code.
Enter the total number of devices to be
registered by replacing the default of 10. You
can register up to 500 devices.
A three-letter PIN code appears.
On each Activote device to be registered,
press the Register button (labeled with a flame)
until the green and red lights turn on.
Press the corresponding letters on the device
which match the PIN code.
© 2007 Promethean, Inc.
Activote Quick Start Guide
16
Register devices continued
Each device registered will appear in the Device ID column.
You can register each device in turn, or
have class members register them all at the same time.
Choose the Done option or wait for the process to stop.
Naming the devices
Before exiting the Activboard System Preference you need to electronically name each device individually
for Voting Options 1 or 2.
Choose the Rename option.
Individually name devices
1. Click in the blank space in the New Name
column for each device and type in a code of up
to four characters, comprised of letters and/or
numbers. Do this for each device to be named.
2. Choose the Synchronize button.
3. On a device, press on a letter (A-F) to assign the
name electronically to the device. The new
name for each device will move to the left under
the Name column. Do this for each device. If you
desire, insert a label at the base of the Activote
device for each device named.
4. After naming is complete, choose “Close.”
Name all devices with the same prefix
1. In the Activote Rename window, type a prefix
(up to three letters or numbers) in the box for
Name Prefix.
2. Choose Set to All.
3. Choose the Synchronize button.
4. On a device, press a letter (A-F) to assign the
© 2007 Promethean, Inc.
Activote Quick Start Guide
17
Naming the devices continued
name electronically to the device. The new
name for each device will move to the left
under the Name column. Do this for each
device. If you desire, insert a label at the base
of the Activote device for each device named.
5. After naming is complete, choose “Close.”
6. Quit System Preferences.
© 2007 Promethean, Inc.
Activote Quick Start Guide
18
voting with user names
macintosh™
Add names to the User Database
Activstudio:
Click on the Main Menu button.
Select Activote>User Database.
Activprimary:
Click on the Teacher Tools Menu button. Select the Menu button.
Select Activote>User Database.
Choose “Add” from the User menu.
There are existing user names in the database.
Type your users in the Add Users window.
Choose “New User for each user you add.
Choose the Add option after you are finished.
Quit the User Database and Save.
Allocating user names to registered devices
Activstudio:
Click on the Main Menu button.
Select Activote>Users.
Activprimary:
Click on the Teacher Tools Menu button. Select the Menu button.
Select Activote>Users.
© 2007 Promethean, Inc.
Activote Quick Start Guide
19
Allocating user names to registered
continued
1. In the Folder drop-down menu, make sure All Users is
selected. In this way, you will see any users you added to
the User Database (there are other names included).
2. Select each name you added (these will be at the bottom of
the list) and click on the Add button to add the name to a
device. You can multiple select all names added.
After adding all names, choose “Allocate Devices”. The
users’ names appear, each of them highlighted in red and
followed by a three-letter code.
4. Each user should enter his or her three-letter code. The user
name will be highlighted green when the device is correctly
allocated.
5. Choose the Back option when finished.
6. Quit and Save.
Perform the named vote
Activstudio:
Click on the Main Menu button.
Select Activote>Session
Click OK.
Activprimary:
Click on the Teacher Tools Menu button.
Select the Menu button.
Select Activote>Session
From the Session drop down menu, choose Named.
Click OK.
© 2007 Promethean, Inc.
Activote Quick Start Guide
20
Perform the named vote continued
1. On the Main toolbar, click on the Activote icon to perform the
vote.
2. Click on the Activote icon again when all users have voted.
The results appear.
voting with prepared questions
Macintosh™
The Question Master program has been created to help generate voting
flipcharts.
To open the Question Master program:
Activstudio:
Click on the Main Menu button. Select Activote>Question Master.
Activprimary:
Click on the Teacher Tools Menu button. Select the Menu button. Select Activote>Question Master.
The Question Master program opens.
Explore the options here to create your first voting flipchart.
See the help files for more details on how the Question Master works.
© 2007 Promethean, Inc.
Activote Quick Start Guide
21
more information
Further help
For complete information about using the Activote and its associated programs, refer to the help files and the
User Guide. To access the help files, right-click on the Activote icon on Activstudio’s Main toolbox. The User
Guide is on your installation CD-ROM.
Note: The Help information for registering and naming the Activote devices in the referenced software versions is
currently not accurate. All other information is accurate. Future updates will include updates to the Help files.
Technical Support: web/e-mail
http://prometheankb.com
From within your region, select the appropriate language.
For e-mail queries, click on Contact Technical Support at the top of the page and complete the online form.
Technical Support: telephone
Americas and Canada: +1-888-652-2848
Latin America: +1-678-336-8100
Europe/Middle East/Africa: +44 (0)870 165 2210
Asia and Pacific: +86 (0)755 298 32826
Promethean Planet forum
Join Promethean Planet for news, tips, resources and user forums:
www.prometheanplanet.com
Updates
Please visit the Promethean website frequently to check for updated drivers, software, user guides and flipchart
resources.
http://www.prometheanworld.com
You can also check for and update your Activstudio or Activprimary software from the Support Tab on the
Dashboard.
© 2007 Promethean, Inc.
Activote Quick Start Guide
22